
Glow-reactive ink reads differently from regular tattoo color, so the smartest glow pieces are planned with contrast and placement in mind. Many blacklight designs look best when the fluorescent element is a supporting layer, not the only thing someone relies on for form. These ideas pair readable linework with UV highlights, plus session and styling notes so the glow still looks intentional after healing.
1. Micro Constellation on the Inner Forearm

A micro constellation on the inner forearm reads as delicate everyday ink and then blooms under a blacklight. Recommend slightly heavier single-needle weight than a standard micro script so the connecting lines keep their shape at two and five years. Common mistake is packing stars too close together, which causes the dots to merge as skin shifts. For the session, plan one 60 to 90 minute pass for linework, then a brief second pass to glaze tiny UV dots if you want them brighter. For showing off, roll sleeves up and pair with a loose linen long-sleeve shirt that lets the forearm catch club lighting without looking like a costume.
2. Hidden Floral Accent on the Ribcage

Ribcage placements get rubbed by clothing and move with breath, so the safe play is a bold silhouette with UV specks for texture. Pain level tends to be higher here, typically a 7 out of 10, so expect multiple short passes rather than one long marathon. The mistake is asking for feather-thin twig detail that will soften into a blur after a couple of years. Suggest a heavier outline and open negative space between leaves, and plan a touch-up at the one-year mark. For the session, wear a fitted sports bra so the artist has clear access without fabric being moved. Sensitive placement note: sternum and ribs need someone who specializes in torso work because depth and spacing matter more here than on flat skin.
3. Fine Script Hidden on the Collarbone

Tiny collarbone scripts are popular, but they split artists into two camps. One camp says ultra-fine single-needle scripts at the collarbone blur within two years because the skin there moves and the lines are too close. The other camp says careful depth and slightly wider spacing keeps the script legible for many years, and they point to healed photos to back that claim. If you prefer fine script, bring two scale references so spacing decisions are concrete. Expect a 45 to 90 minute session. For showing off, a wide V-neck top frames the piece, and the styling works well with a simple delicate chain necklace that does not sit directly on the letters.
4. Neon Geometric Band Around the Wrist

Wrist bands face constant washing and friction, so a mixed approach of black linework plus UV inlay keeps the design visible every day and dramatic under blacklight. The common mistake is requesting ultra-precise dot work with no outline, which eats into clarity after the first year. Recommend a heavier outline and UV as an accent color only, then plan a quick touch-up at six to twelve months. Session time is usually 45 minutes to an hour. For the appointment wear a short sleeve or a loose cuff so the artist can work without fabric moving, and show it off with rolled cuff shirts that stop above the band.
5. UV Lace Underbust Accent

Underbust lace reads like jewelry and glows selectively under blacklight. This area is sensitive, expect a higher pain rating and multiple short sessions for complex shading. The frequent error is over-detailing the lace pattern too small, which fills in as it heals. Ask for slightly bolder anchor points in the pattern so the lace still reads at arm's length. Session wear advice is to bring a fitted bandeau or sports bra so the artist has continuous access without fabric moving. Sensitive placement note: work on and around the breastline is best with an artist experienced in torso symmetry and anatomy.
6. Glow-Outline Minimalist Mountain on the Back of the Neck
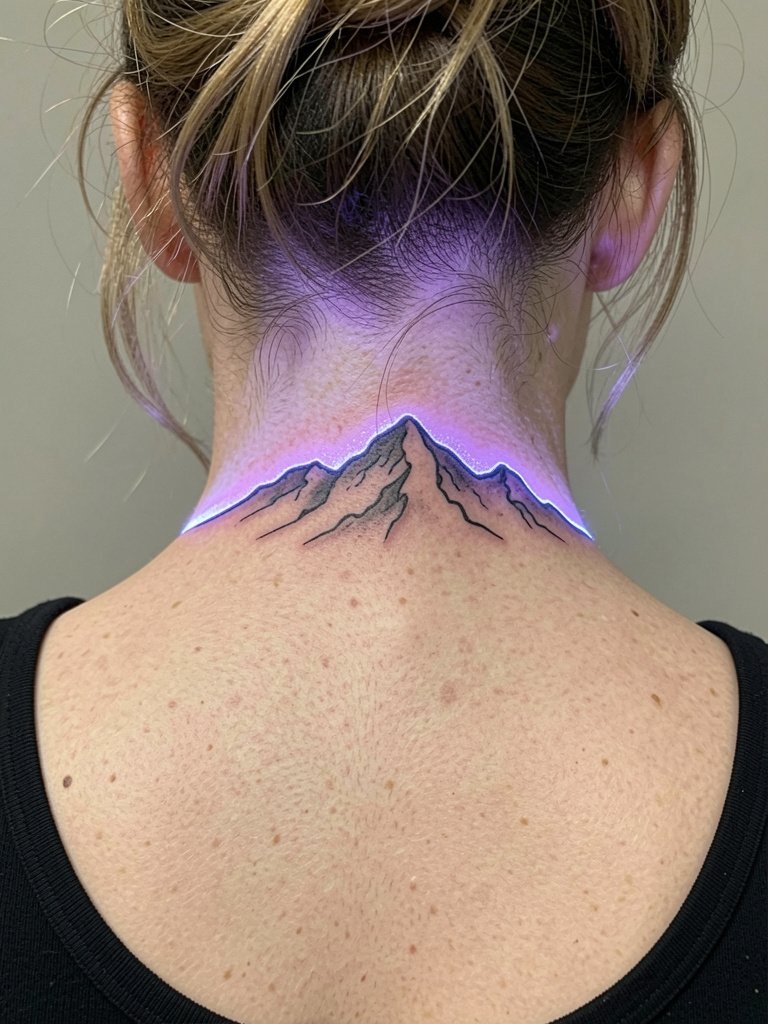
A thin mountain silhouette on the nape is subtle by day and dramatic under UV. Neck skin moves and has thin tissue, so ask for the main contour lines to be slightly heavier than a typical single-needle outline so they last. The session is short, usually 30 to 60 minutes, and touch-ups are common between year one and year three. For showing off wear hair up with a natural bun or ponytail and layer with a wide-neck tee that keeps the back exposed without fuss. Sensitive placement note: side and nape neck work should be done by artists used to small, high-movement areas.
Session Day Picks
The wrist, ribs, and nape pieces above need small tools that make the appointment smoother and the first week less fussy.
-
Thermal transfer stencil paper kit. Lets the artist preview and adjust fine constellation and script placement before committing, which matters on the inner forearm and collarbone pieces.
-
Breathable adhesive protective film roll. Helps wrist and hand pieces stay clean during daily tasks without trapping moisture.
-
Fragrance-free gentle body wash. Good for early showers after ribcage and underbust sessions, cleans without irritating the new ink.
-
Thin sterile transfer pencil set. Handy for small adjustments on-site for collarbone script and nape outlines.
-
Aquaphor Healing Ointment. A mainstream go-to for the first few days on small UV-accented pieces, applied sparingly to lock in moisture without clogging.
7. UV-Glow Jellyfish on the Calf
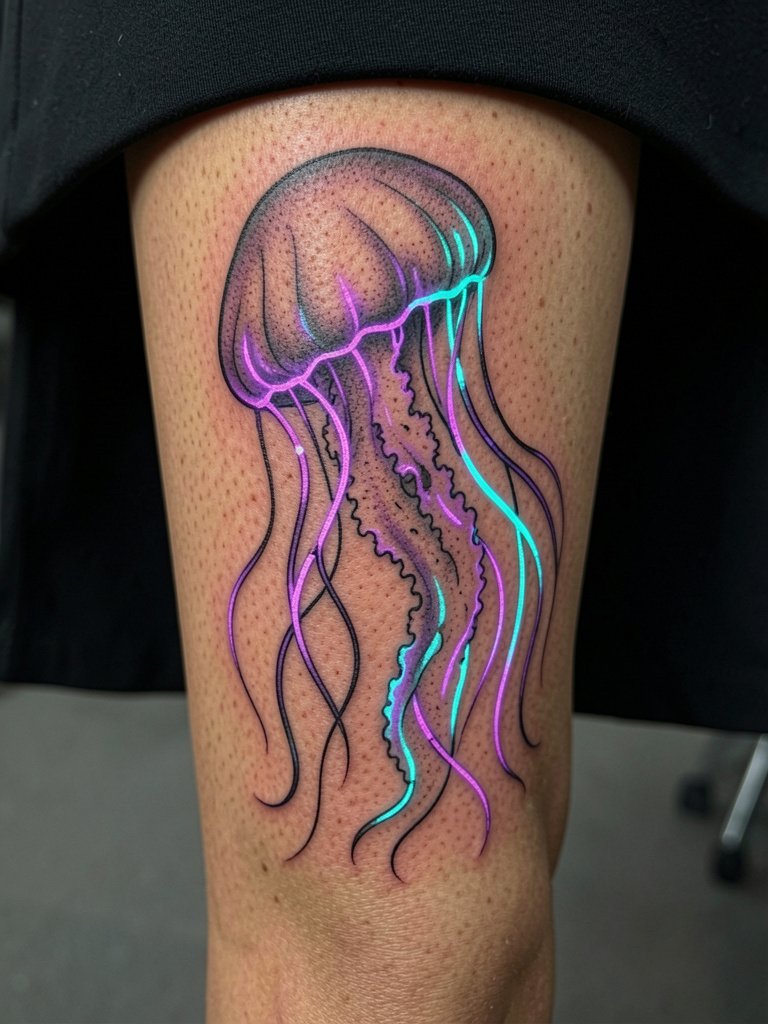
Calf placements give space for movement and long vertical compositions like jellyfish tentacles. The calf tolerates longer sessions, so expect one to two hours for an intricate glow outline and shading. A typical error is overloading tiny stipple shading without strong contrast, which reads muddy under UV. Ask the artist to lay heavier anchors where the tentacles begin, then fade to UV-only accents toward the tips. For session comfort, wear or bring loose drawstring pants that can be rolled without pressure on the calf, and for showing off pair it with midi skirts so the piece is visible under club lights.
8. Invisible Coordinates Behind the Ear

Behind-the-ear spots are discreet and age like small piercings when done right. Use bold enough micro-lettering so the characters do not blur together after a few years. The usual session is brief, 20 to 40 minutes, and touch-ups are common because of the thin skin and constant movement. The common mistake is requesting lines narrower than half a millimeter, which the skin cannot hold. For the session, pull hair up in a natural updo so the artist can work without fabric or hands shifting the area. Sensitive placement note: behind-ear work should be done by someone experienced with small script on thin skin.
9. Modern Tribal with UV Threading

Contemporary tribal patterns with UV threading are visually strong, but the approach raises a clear debate among practitioners. One camp warns against reusing culturally specific motifs without clear context, stressing that tribal imagery can be appropriative if not credited or adapted respectfully. The other camp argues that a modern, original take that nods to heritage while avoiding sacred symbols can be a legitimate personal expression. If choosing a pattern with cultural roots, explicitly discuss motifs and intended meaning with the artist, and consider a custom design that references origin respectfully. For placement, the outer upper arm tolerates bold blackwork, so add UV thread lines sparingly to maintain long-term clarity.
10. Glow-Flecked Botanical Sleeve Accent

Add UV flecks into a botanical sleeve to make details pop in nightlife settings without relying on glow ink for the form. For sleeve work plan layered sessions; the outer forearm section here takes 90 to 150 minutes depending on shading. Mistakes happen when fluorescent pigment is used as the primary contrast instead of an accent, which accelerates perceived fading. Discuss saturation levels and placement-specific spacing, and expect staggered touch-ups across the sleeve over several years. For showing off, three-quarter sleeves and rolled cuffs frame the color, and pairing the look with open-back midi dresses can highlight the arm work without looking costume-like.
11. UV Barcode on the Inner Wrist

Inner wrist barcodes are graphic and unexpected under blacklight. The wrist sees heavy washing and friction, so ask for the black bars to be slightly thicker than they appear in your reference. A common mistake is leaving the negative space too narrow, which leads to merging between bars as the skin settles. Session times are short, often thirty to forty-five minutes, and plan a touch-up within the first year. For the appointment wear a loose short sleeve or a cuff that can be rolled without rubbing the fresh ink, and for nightlife a slim bracelet that sits beside rather than across the barcode frames it well, try a minimal leather cuff.
12. Layered Mandala with UV Outer Ring
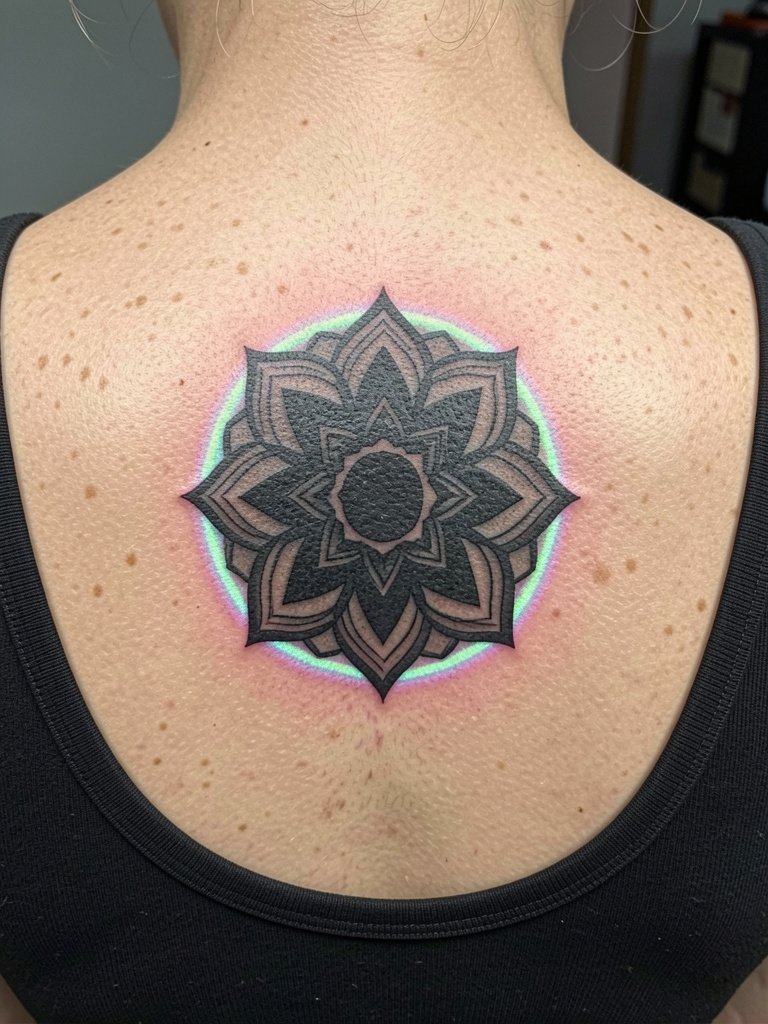
Mandala pieces feel delicate, but UV highlights should not carry the structural weight. There is a two-sided conversation among artists about UV use in sacred or culturally significant patterns. One perspective stresses preserving original meaning and avoiding sacred geometry that belongs to a specific community. Another perspective allows for contemporary interpretations if the design is clearly original and not a direct reproduction of culturally sacred motifs. If you choose mandala work, ask for a custom composition that references geometric rules while avoiding direct cultural replication, and plan for a one to two hour session for the upper back piece with a likely touch-up after the first year.
13. Glow-Flecked Neo-Traditional Animal Portrait on the Thigh
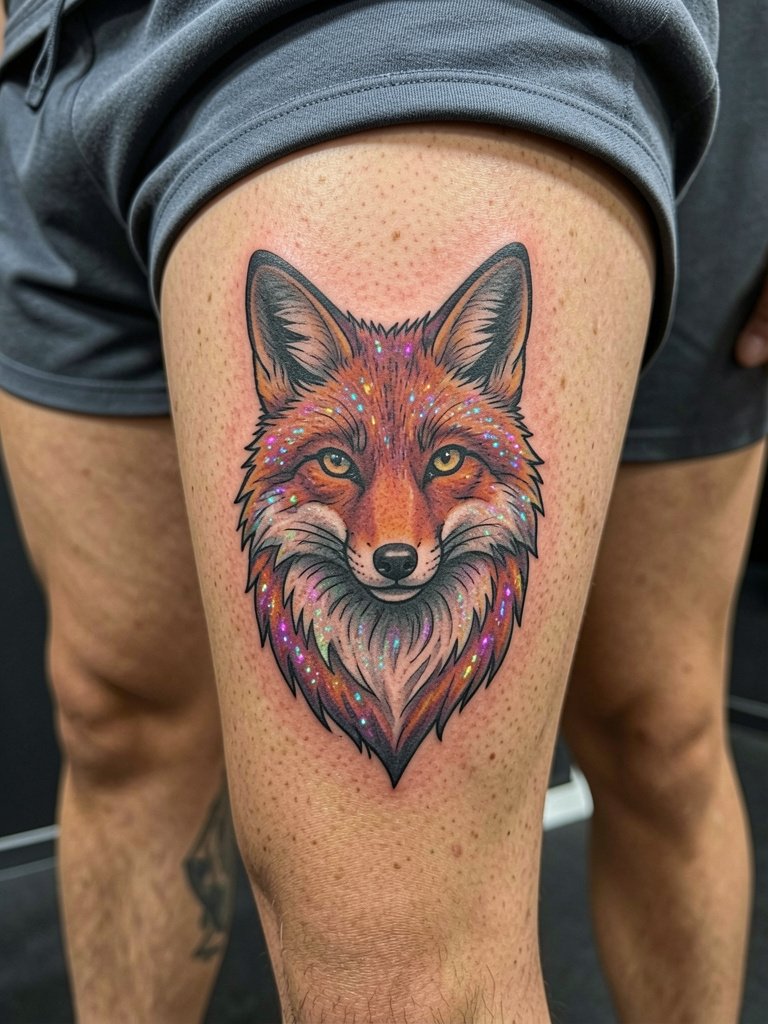
Upper thigh pieces let artists work bigger and with richer saturation, which suits neo-traditional animal portraits with UV accents. Thigh skin tolerates longer sessions, so plan two to three hours for complex color and glow layering. A mistake is shrinking the portrait too small and then expecting the same impact; scale matters here. For the appointment bring loose shorts that can be rolled up without pressure on the area. This placement is great for showing off in summer with high-waist swimwear, which reveals the sculpted thigh piece while keeping the design private when needed.
14. Fluorescent Freckle Cluster Across the Nose Bridge
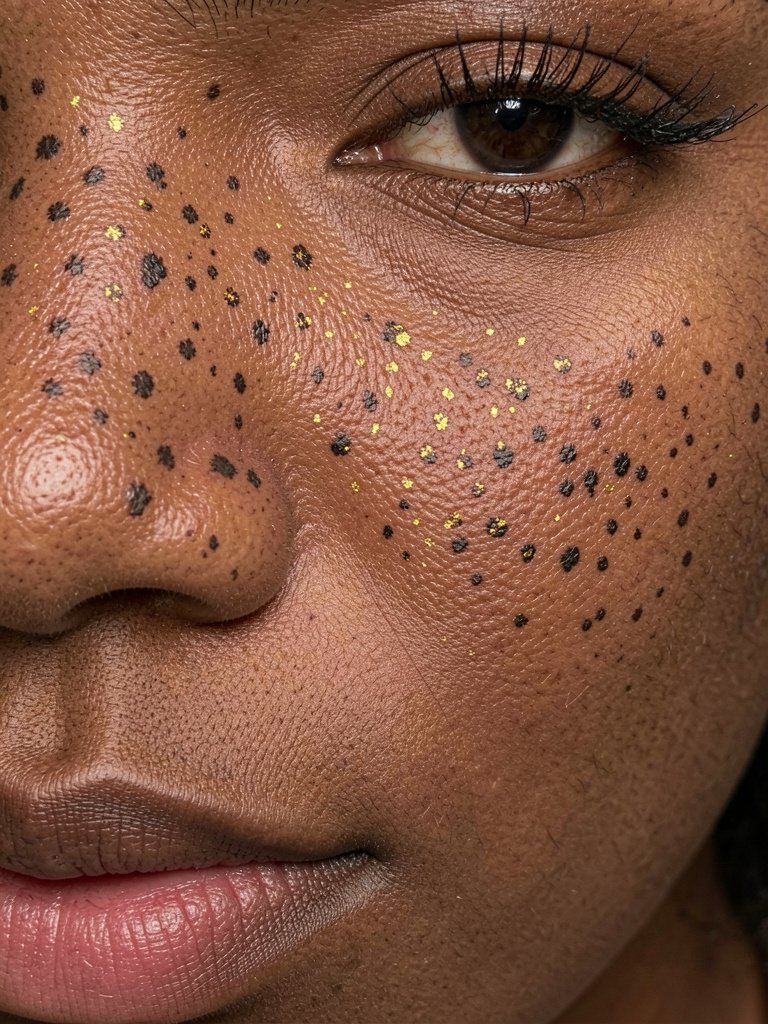
Micro freckle clusters across the nose bridge are playful and low-commitment, but face-adjacent placements need careful pigment choice. Many artists caution that UV pigment near facial skin can increase the chance of reaction and uneven fading, while other artists report consistent results with tested inks and conservative saturation. Name both sides of that conversation when you consult so you can weigh trade-offs. Expect a short session, twenty to forty minutes, and ask for tiny test dots if you have sensitive skin. For showing off, makeup-free looks or minimal sheer bronzer let the flecks catch UV without appearing costume-like.
15. Glow-Trace Cityline on the Collar of the Foot

Ankle and foot placements take more wear from shoes and socks, so keep linework bold and avoid ultra-fine negative spacing. The common error is underestimating friction from footwear, which causes faster fading. Plan for a 60 minute session and a touch-up at the six to twelve month mark. For the appointment wear shoes that slip on and off without pressure on the fresh tattoo, and for nightlife exposure cuff jeans or try a pair of ankle-length sandals that show the skyline without rubbing it.
Frequently Asked Questions
Q: Are UV-reactive inks safe for all skin tones and types?
A: Safety depends on the ink formulation and on individual skin sensitivity. Some artists use clinically tested fluorescent pigments and will patch-test small areas first, while others avoid certain UV colors on sensitive clients. If you have a history of allergic reactions, request a test dot or seek an artist who documents the inks they use and shows healed photos across skin tones.
Q: How long do blacklight details stay visible compared to normal ink?
A: In my experience blacklight highlights tend to fade faster than bold black outlines, because fluorescent pigments sit on a different dye base. That means the outline keeps the form while the glow can soften over one to five years depending on sun exposure and touch-ups. Plan touch-ups for glow accents at the one- to two-year mark if you want sustained intensity.
Q: Where can I find portfolios and healed photos of UV work without naming artists directly?
A: Search platform tags and keyword combinations that focus on healed examples and location, for example hashtag searches on social platforms with terms like "UV tattoo healed" plus your city filter. Look for portfolio galleries labeled "healed blacklight" or "healed UV" and request healed shots in multiple skin tones from any shop you contact. Reddit tattoo communities and portfolio aggregators can also point to artists who post healed progressions.
Q: What should I wear to the appointment for rib, thigh, and ankle placements?
A: Wear fitted pieces that expose the exact area without needing to be shifted during the session. For ribs bring a fitted sports bra or bandeau, for thigh bring loose shorts that roll up comfortably, and for ankle wear slip-on shoes. A helpful item to bring is a spare pair of comfortable loose pants to change into after a session. You can find practical session wear like loose linen drawstring pants that work for multiple placements.
Q: Do UV tattoos require special aftercare compared with regular color work?
A: Aftercare routines are similar, focusing on gentle cleansing, light moisture, and sun protection once healed, but avoid prolonged sun during the first weeks because UV pigments can be more photo-reactive while settling. Follow the artist's instructions for bandaging and washing, and schedule a check-in touch-up if small fluorescent patches appear uneven as the piece heals.
