
The feeds are full of soft pastel washes and tiny single-line waves, yet what stays crisp on skin is often simpler than the most liked posts. I see the same pattern at studios: delicate washes look dreamy at first and then soften, while compact black linework and stipple keep shape. Read on for 29 minimalist wave ideas, placement notes, realistic aging expectations, and clothing tips that actually help the tattoo last.
1. Minimalist Single-Line Wave, Inner Forearm
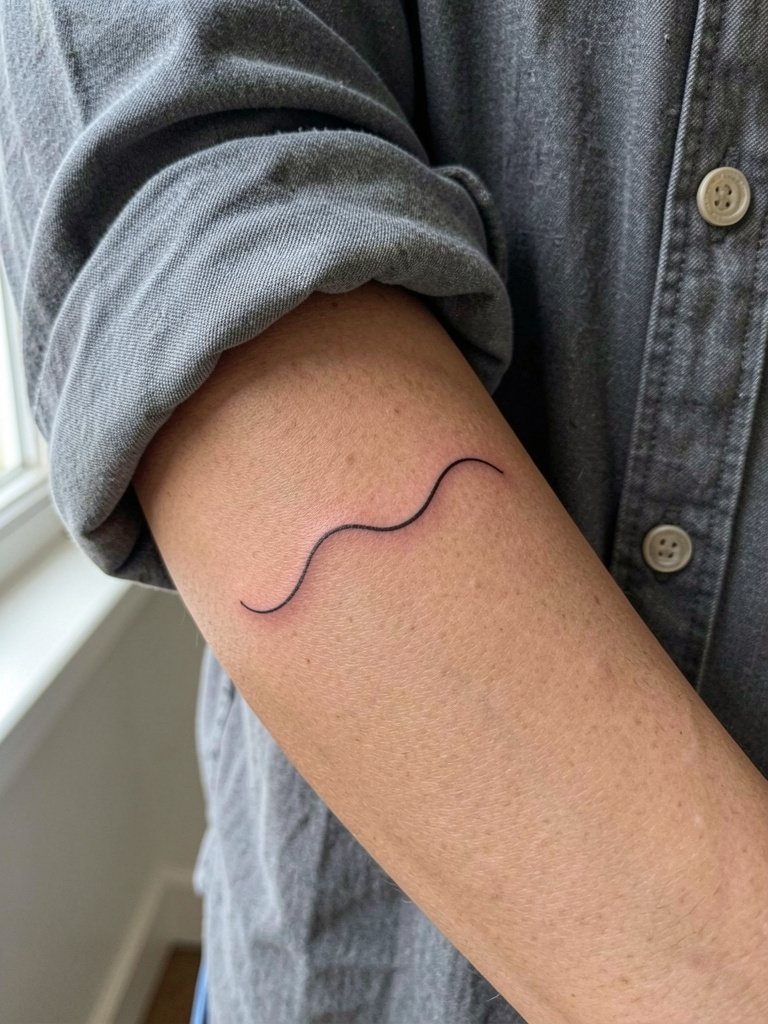
A single continuous line reads clean and quiet on the inner forearm, and the surface there holds fine linework better than many other spots. Ask for a line weight slightly heavier than ultra-micro so the contour survives two years of wear. Common mistakes are going too small or too thin, which leads to softening and partial blowout. Expect one brief session and a touch-up possible at 12 to 18 months. For showing off, roll sleeves and try a linen button-down in cream or olive, the neutral fabric puts the focus on the linework.
2. Wavy Line Abstract, Inner Wrist

A wrist wave reads intimate and discreet, but that same placement is prone to friction and fading from watches and washing. Request slightly bolder linework and avoid placing it on the bone. The session is short and the pain is moderate. A frequent mistake is crowding the design with bracelets on the same wrist. For session day, leave bracelets at home and wear a short sleeve. To highlight the piece after healing, pair it with a thin chain bracelet on the opposite wrist.
3. Wave and Moon, Lateral Hip Bone
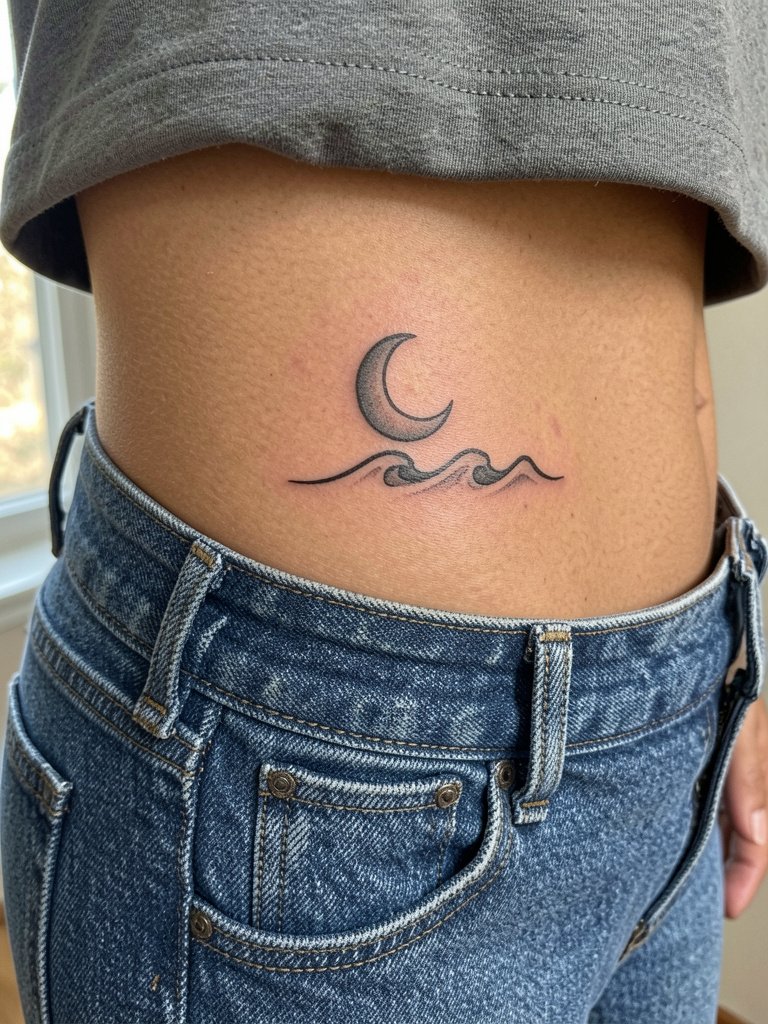
Pairing a small moon with a wave gives a compact narrative without extra clutter. Hip skin moves less than ribs, but tight waistbands can rub during healing. Wear loose drawstring shorts for sessions and the first week. A common aging hiccup is using grey wash on darker skin tones, which can disappear in photos. Bring references that show the exact moon size and spacing so the moon does not sit too close to the crest. When you want to reveal it, high-waisted linen shorts frame the hip. Try a gold hip chain for a styled look.
4. Wave and Sun, Upper Chest Below Clavicle

The upper chest is visible without being exposed. Expect a moderate pain level and plan a single session. The biggest mistake is centering the design too close to the clavicle where shifting clothing rubs during healing. Ask for compact spacing so the sun sits comfortably above the crest. For showing off, a V-neck or thin pendant opposite the tattoo balances the area. Consider a thin pendant necklace to frame the composition.
5. Geometric Linework Wave, Inner Upper Arm
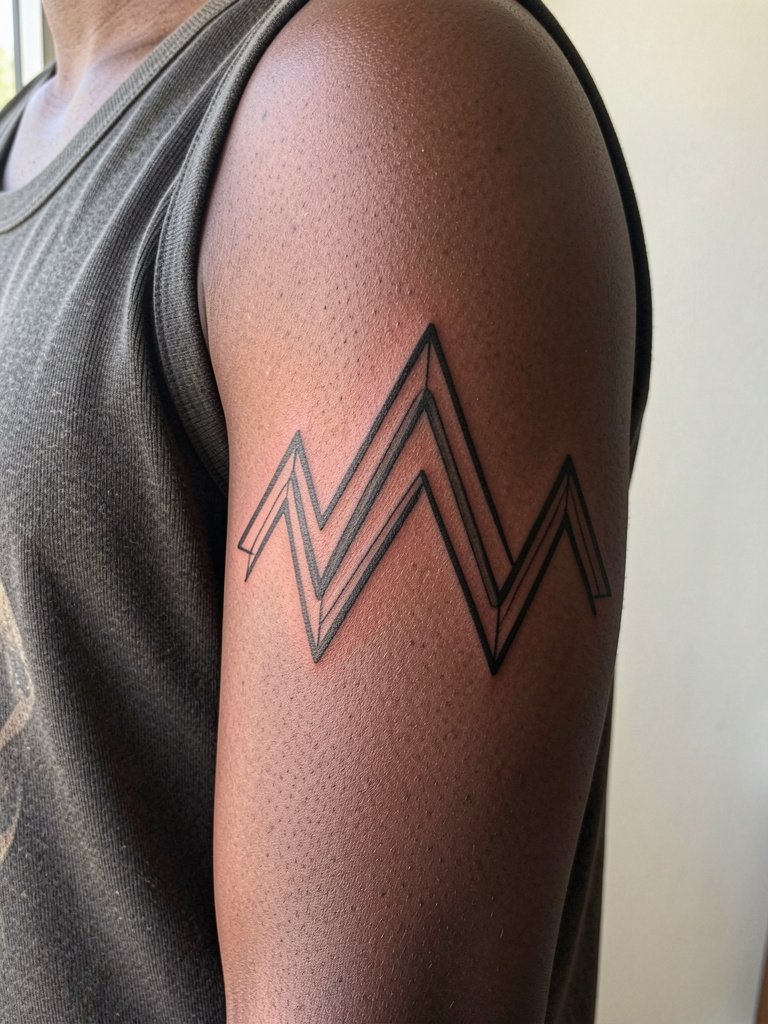
Angular waves suit the inner upper arm because the flat surface highlights clean geometry. This placement is lower on the pain scale and holds saturation well. Common mistakes include scaling the angles too small so edges blur together with time. In consultation, ask the artist to keep line spacing generous so each angle breathes. For session wear, choose a sleeveless top that gives clear access without tight sleeves rubbing the fresh ink. A sleeveless tank top is practical and keeps the area accessible.
6. Dotted Stipple Wave, Smooth Inner Upper Arm
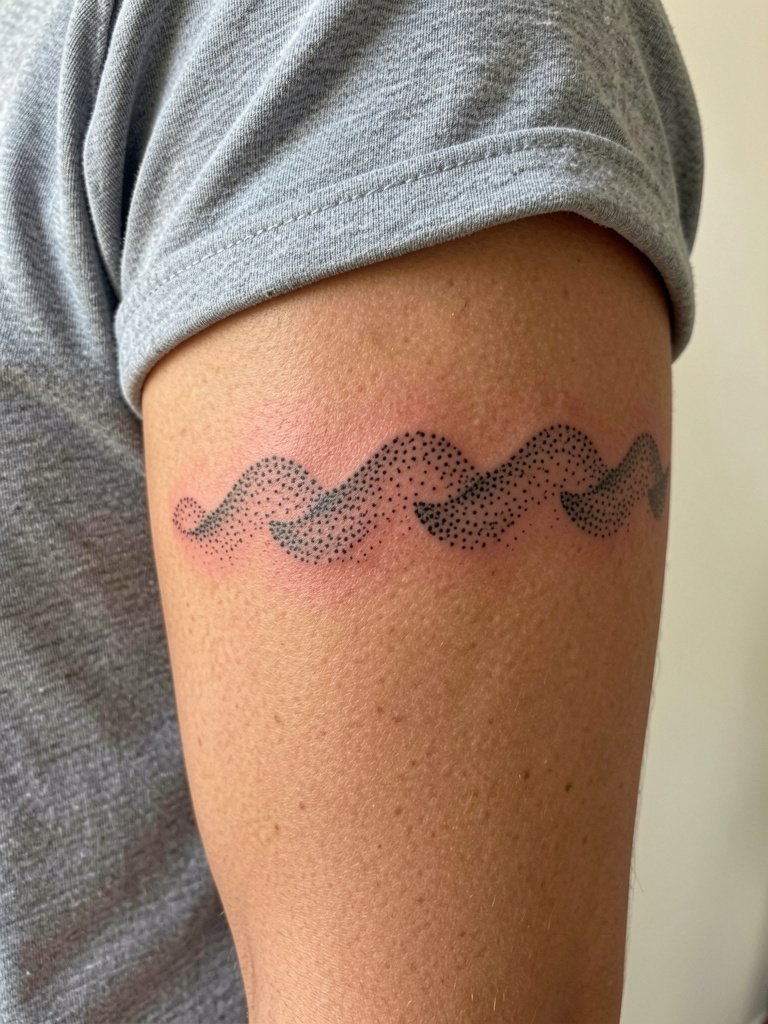
A stipple wave gives texture without heavy saturation, and the inner upper arm is a forgiving canvas for dots. The session can take a bit longer than a single line because dot work is time intensive. A mistake is requesting micro-dot density too tight, which can fuse into a soft patch as it heals. Ask the artist about dot spacing and contrast to preserve the texture at two and five years. For showing off, sleeveless tops keep the arm visible and pair well with soft neutral fabrics. Try a soft neutral tank top for styling.
Session Day Picks
The small forearm and wrist pieces above need simple session and aftercare basics that do not suffocate fine linework.
-
Inkosa Aftercare Balm. Thin viscosity recommended for fine line pieces in ideas 1 and 2 because it moisturizes without filling tiny channels and smudging stipple textures.
-
Japanese Tattoo Balsam. Less greasy options help the shallow single-needle work on the forearm and wrist breathe during healing.
-
Mad Rabbit Tattoo Lotion Mini. A travel size is handy for ankle and hip pieces in ideas 3 and 12 when you want a small amount that stays clean.
-
Eucerin Daily Lotion. A non-tattoo specific, fragrance-free lotion for long-term maintenance on areas like the inner arm or chest without adding heavy residue.
-
Aquaphor Healing Ointment. Thin layers in the first days protect tiny linework while avoiding clogged pores that can obscure fine detail.
7. Watercolor Wave Soft Edge, Outer Forearm
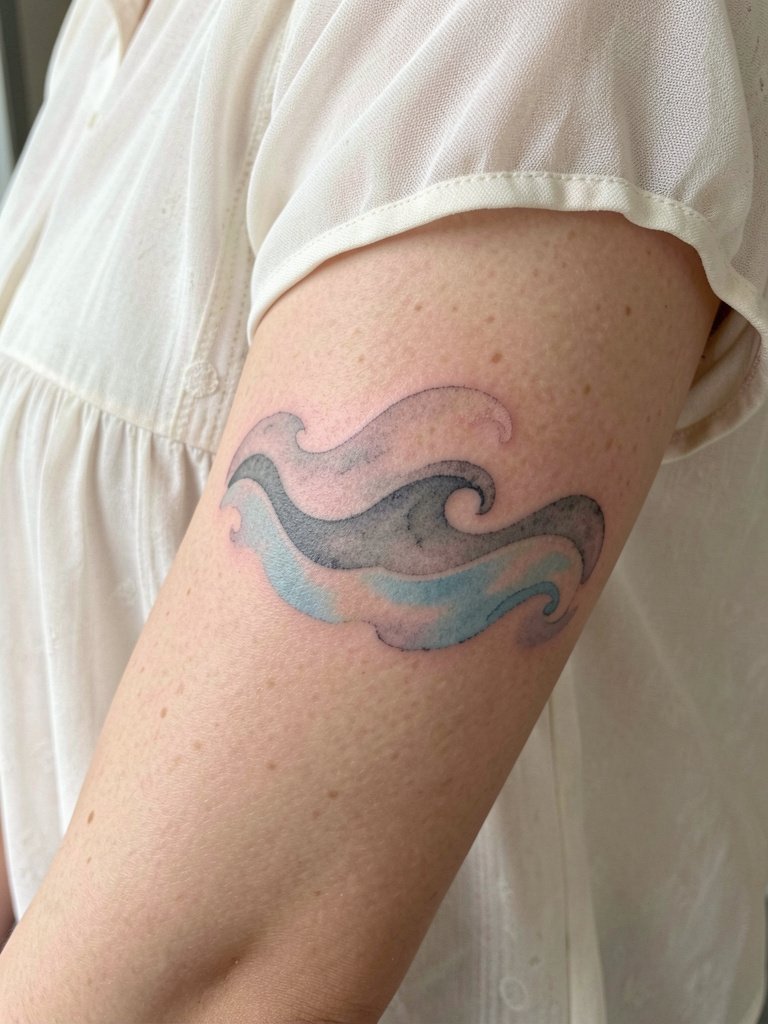
Watercolor washes look airbrushed at first but age differently than black linework. One camp argues watercolor fades quickly and loses the dreamy quality within a year. The other camp accepts gradual lightening as part of the aesthetic and says regular touch-ups keep it looking intentional. If you want the look but worry about longevity, ask for a small amount of anchoring linework around the crest. Outer forearm sessions are low pain, and showing off is easy with short sleeves. Try a chiffon short sleeve top that lets the soft color read well.
8. Ocean Mini-Detailed Curl, Calf
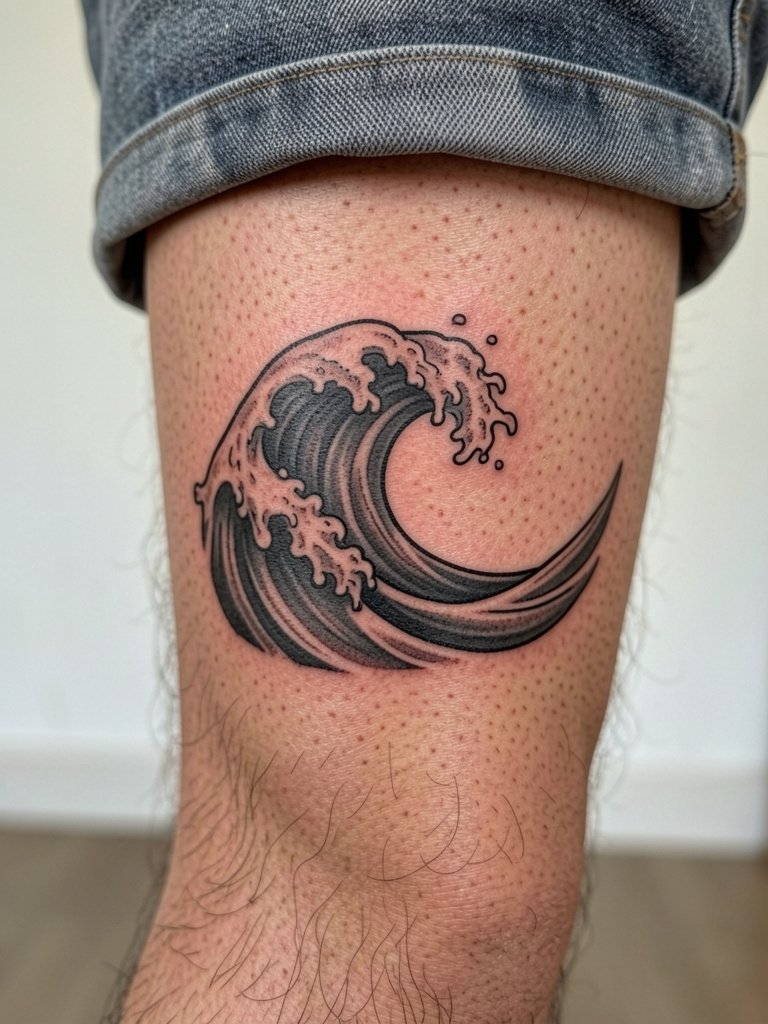
A slightly more detailed curl on the calf gives movement without a large footprint. Calf skin holds shading and contrast well, so stipple and soft grey will age better here than on bony areas. The session feels like moderate vibration and is comfortable for most people. Mistakes include cramming too much detail into a two-inch space, which blurs over time. For warm-weather reveal, pair the piece with shorts and a thin ankle bracelet on the opposite foot to balance the lower-leg focus. Try cotton shorts.
9. Single-Stroke Hand-Drawn Wave, Nape
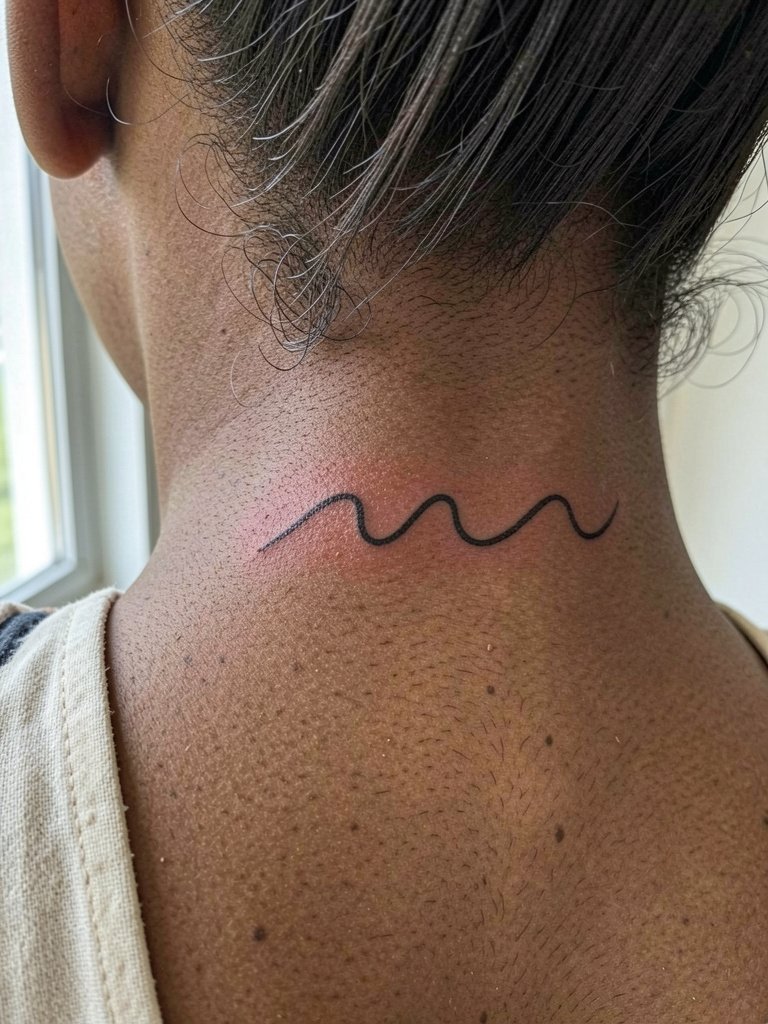
A single-stroke wave at the nape reads intimate and artful. The nape tolerates fine line well if you avoid the immediate hairline. A common mistake is placing the stroke so low that hair growth obscures the shape. Expect a short session and plan for the stylistic reveal by wearing tops with lower backs or open necks. Bring references that show the exact hand-drawn imperfection you want so the artist matches your stroke weight and rhythm. A lightweight open-back dress pairs nicely for evenings out.
10. Vertical Wave, Side Torso Ribcage
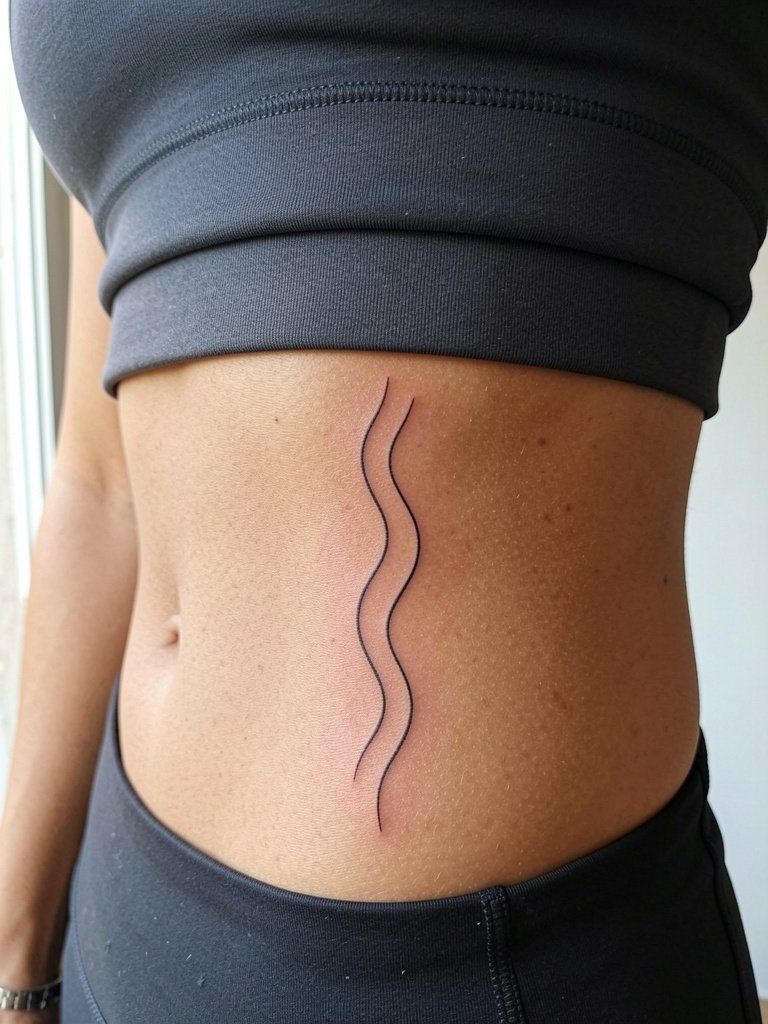
Vertical waves look unique on the ribcage but the placement sparks debate. One camp says fine line here blurs quickly because the skin stretches with breathing and movement. The opposing camp counters that with slightly wider spacing and careful depth, fine line can settle and remain readable for several years. If you prefer ribs, ask for a line spacing strategy and expect higher pain. Avoid ultra-micro lines on the ribs. For sessions, bring a side-tie or cropped top so the artist can access the area without you pulling clothing.
11. Double Parallel Waves, Inner Forearm
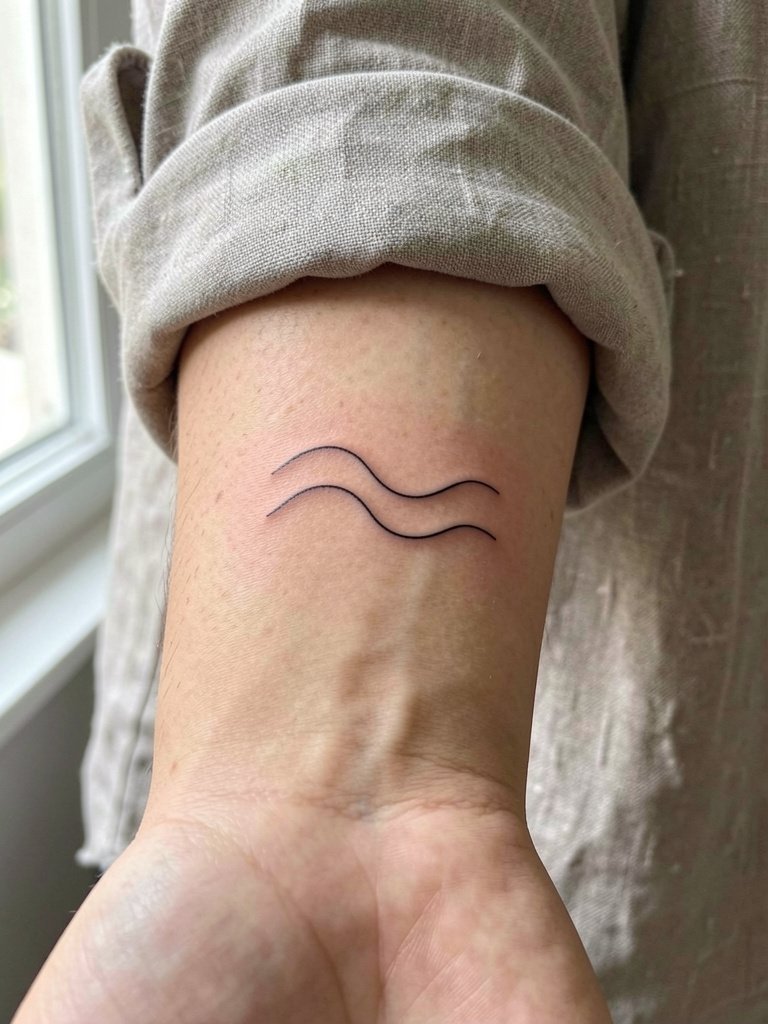
Parallel lines give depth without size. The inner forearm keeps separation long term when spacing is generous. Mistakes include making the two lines too close, which causes them to merge as the ink settles. Ask the artist to show a scale mockup of two lines at the exact spacing you want. Sessions are short and pain is low. Style-wise, rolled-up linen shirts frame the forearm and complement fine line work. A rolled cuff linen shirt reads editorial and effortless with this placement.
12. Wave with Tiny Sailboat, Ankle Inner Side
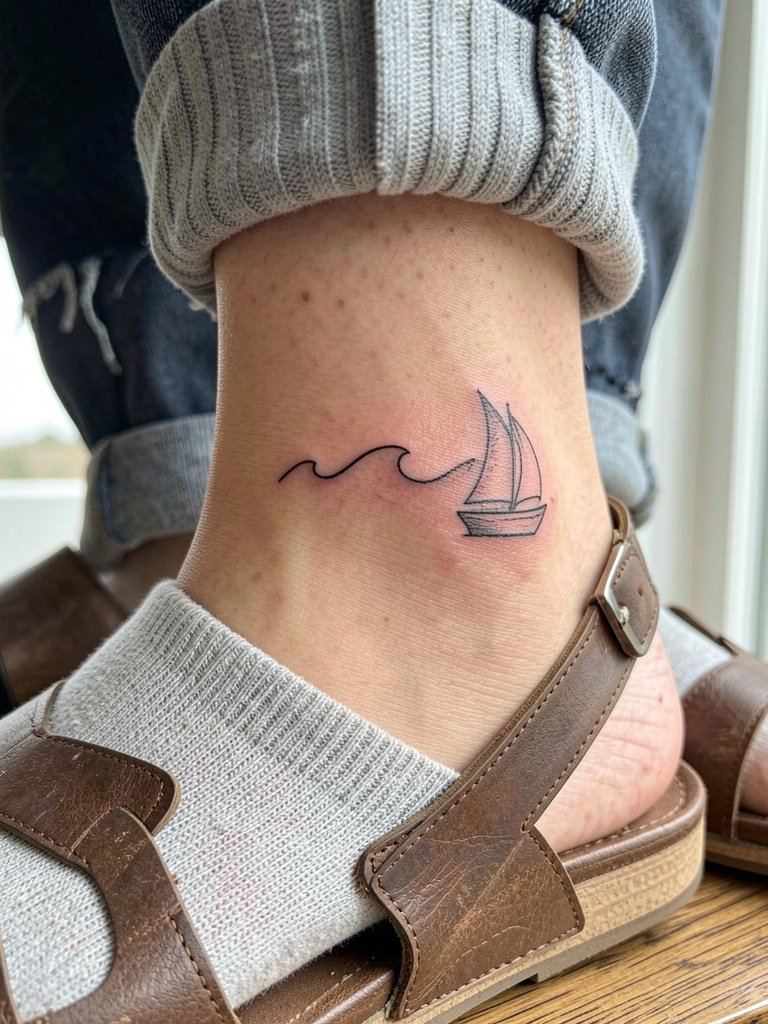
Ankle placements are charming but get distorted by movement and footwear. Place the design on the inner side above the bone to avoid rubbing and distortion while walking. Small sailboat details can be lost if the design is too tiny, so keep the boat simple and bold. The ankle session yields moderate discomfort. For reveal, open sandals make the inner ankle visible while a thin anklet on the opposite foot balances the look. Consider open sandals as part of your warm-weather wardrobe.
13. Wave with Anchor, Wrist Inner Side
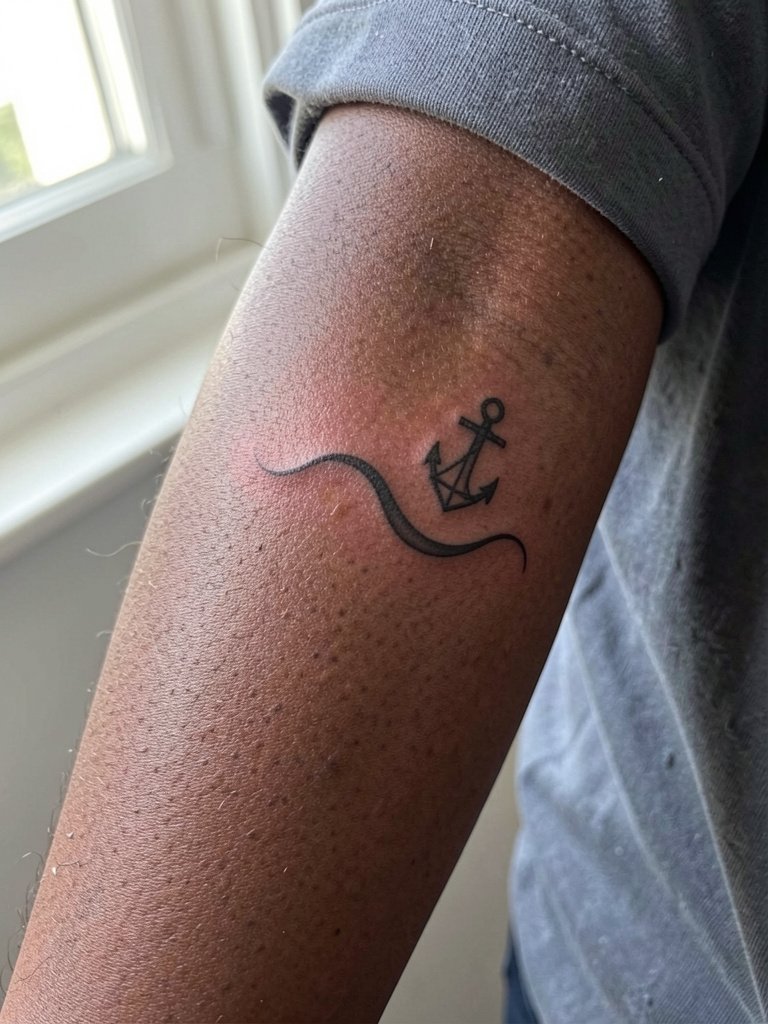
Combining an anchor with a wave condenses meaning into a tiny symbol. The inner wrist shows detail well for a year or two but can soften if the line weight is too thin. Ask for slightly bolder anchor proportions so the silhouette remains legible. A common mistake is adding too many tiny elements inside the anchor. Session time is short and aftercare in the first week must avoid bracelet friction. A minimalist watch on the opposite wrist complements the design and keeps attention balanced. Try a minimalist watch.
14. Negative Space Wave Inside Circle, Mastoid Area
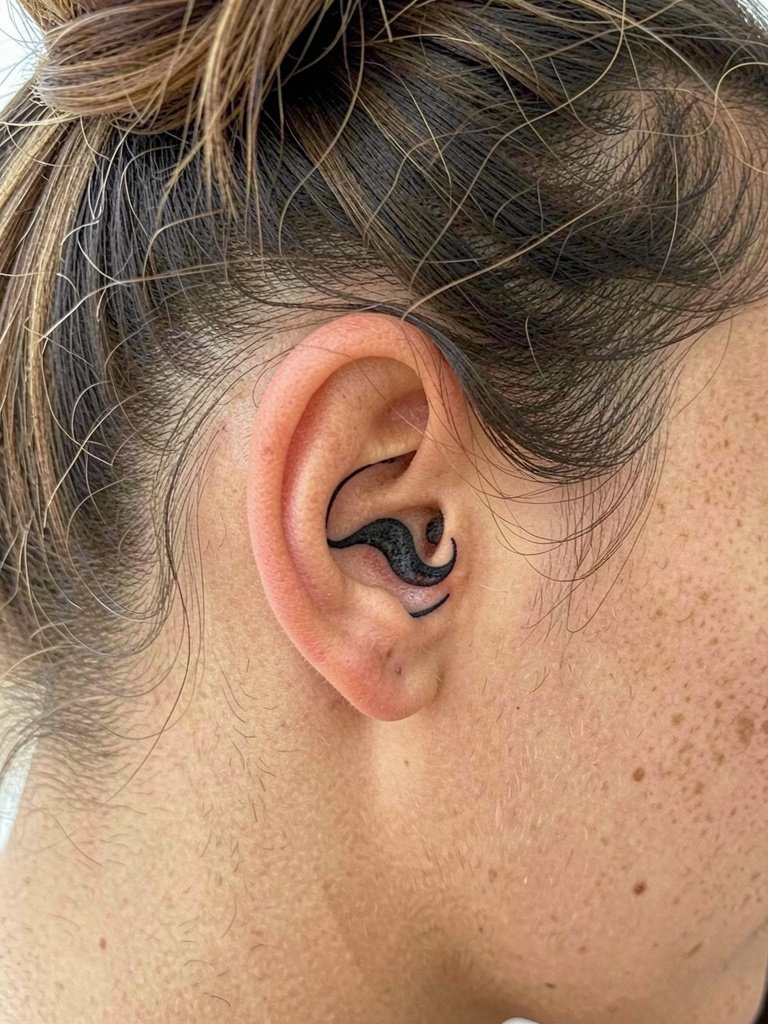
Negative space tricks the eye and uses your skin as part of the design. Behind the ear the mastoid area heals quickly but needs precise line placement so the circle does not spread and erase the inner wave. The mistake to avoid is a circle that is too small for the negative shape inside. If you like earring-based styling, pull hair into an updo for reveal and consider a delicate ear cuff opposite the tattoo. A hair up clip set helps when you want the mastoid area on display.
15. Silhouette Blackwork Wave, Inner Thigh

Filled black silhouettes read on darker tones and survive tiny shifts in line. Inner thigh is intimate and the skin there is forgiving, but friction from clothing can irritate early healing. Session pain is moderate and the first week benefits from loose shorts. Avoid overly intricate cutouts in a silhouette because small negative shapes can fill in over time. High-waisted shorts or skirts reveal the tattoo when you want it visible. Pair with high waist shorts for a summer look.
16. Minimalist Horizon Band, Wrist Wrap
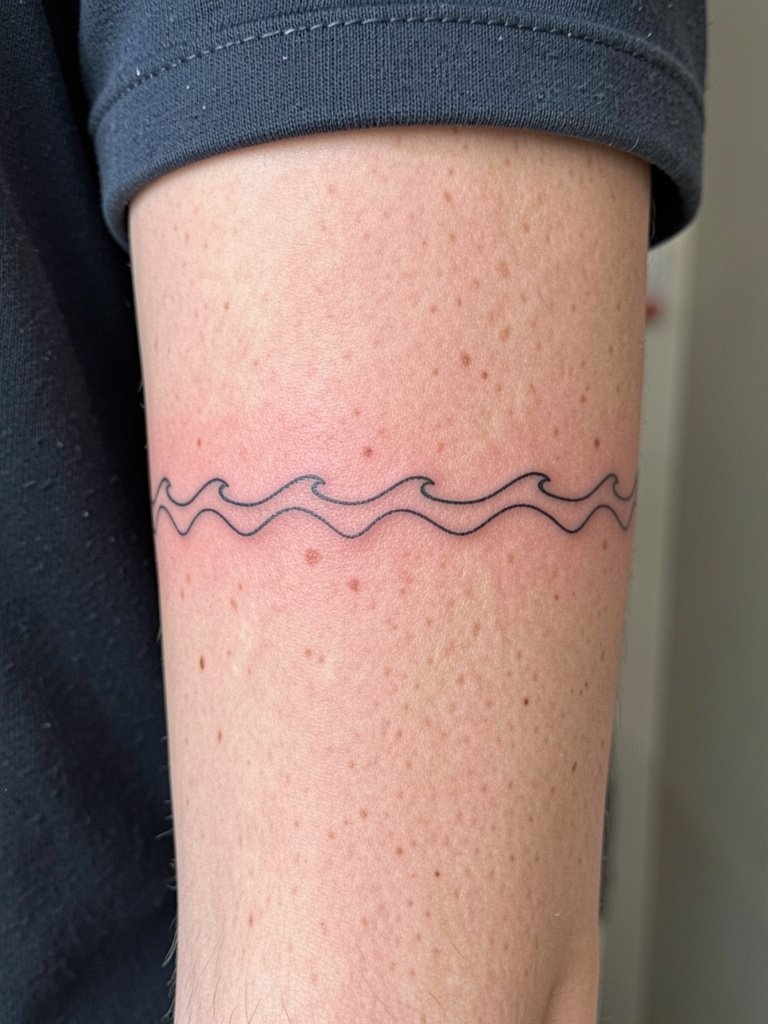
A wrapped horizon band reads like jewelry and is a good alternative to bracelets. The wrist is high-movement territory so line spacing and slightly bolder strokes help keep the band distinct. A common session error is underestimating how the band will sit when the wrist moves. Plan for a touch-up after a year if you want the wrap to stay crisp. For styling, swap metal bracelets to the opposite wrist so the tattoo is the focal piece. A thin anklet-like bracelet on the other wrist balances the look.
17. Micro Wave Tattoo, Finger Edge
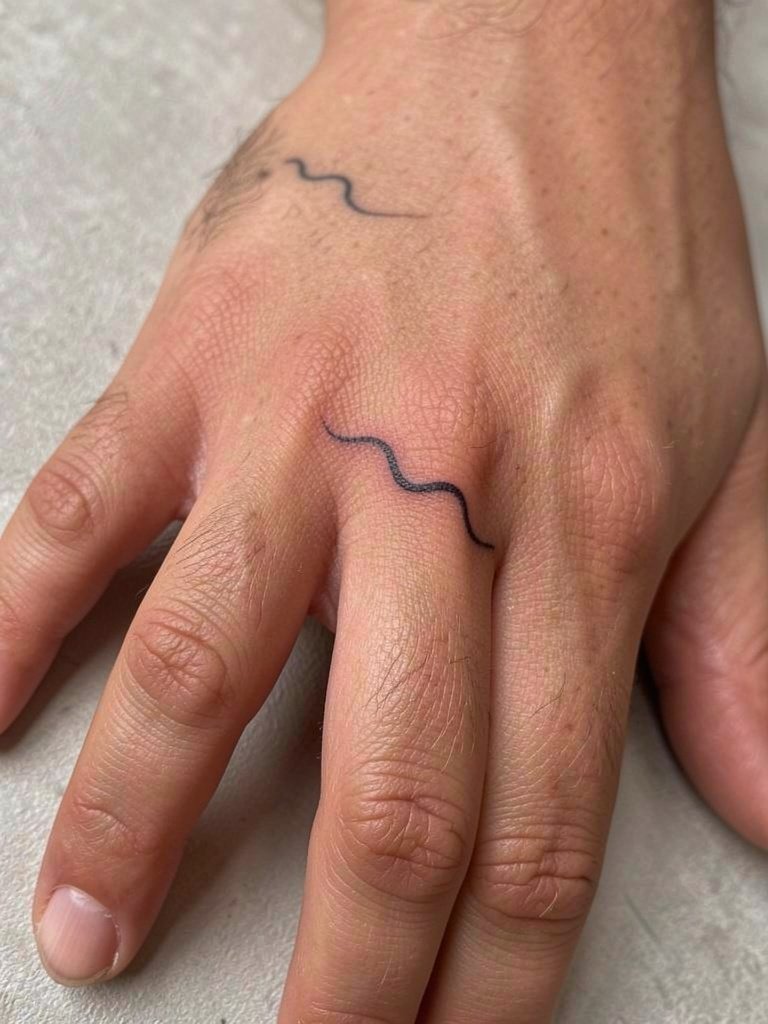
Finger tattoos are fashionable but face heavy washing and friction. If you want a finger wave, keep the shape simple and accept touch-ups may be needed within a year. Artists often recommend slightly thicker lineweight and avoiding interior detail. The session is quick and the pain is sharp but brief. A real mistake is expecting a finger design to behave like forearm work. For longevity, reserve finger pieces for symbolic marks rather than intricate imagery.
18. Wave with Tiny Sailboat Variant, Ankle Band
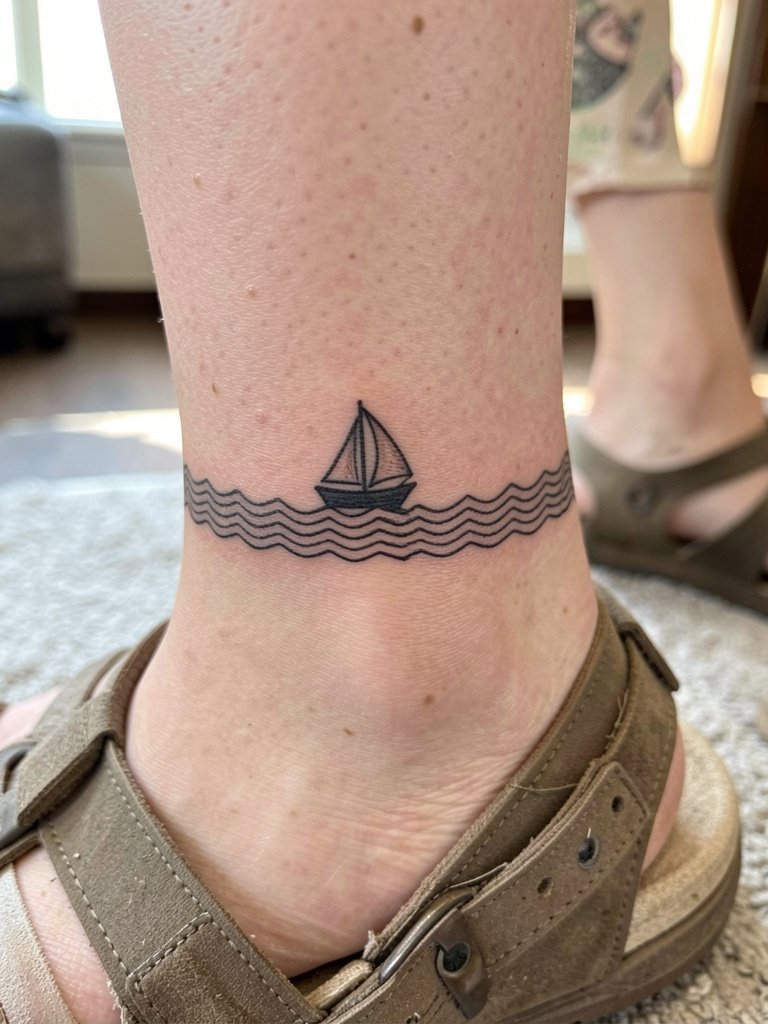
A banded ankle design with a sailboat feels narrative while staying compact. Avoid tight spacing between band elements to prevent blending under wear. For the session, sandals and rolled socks help access and keep pressure off fresh ink. The ankle will need protection from shoes in the first week. Balance the look with a thin anklet on the opposite foot. A simple thin anklet set complements the motif.
19. Negative Space Crescent Wave, Behind Ear Mastoid
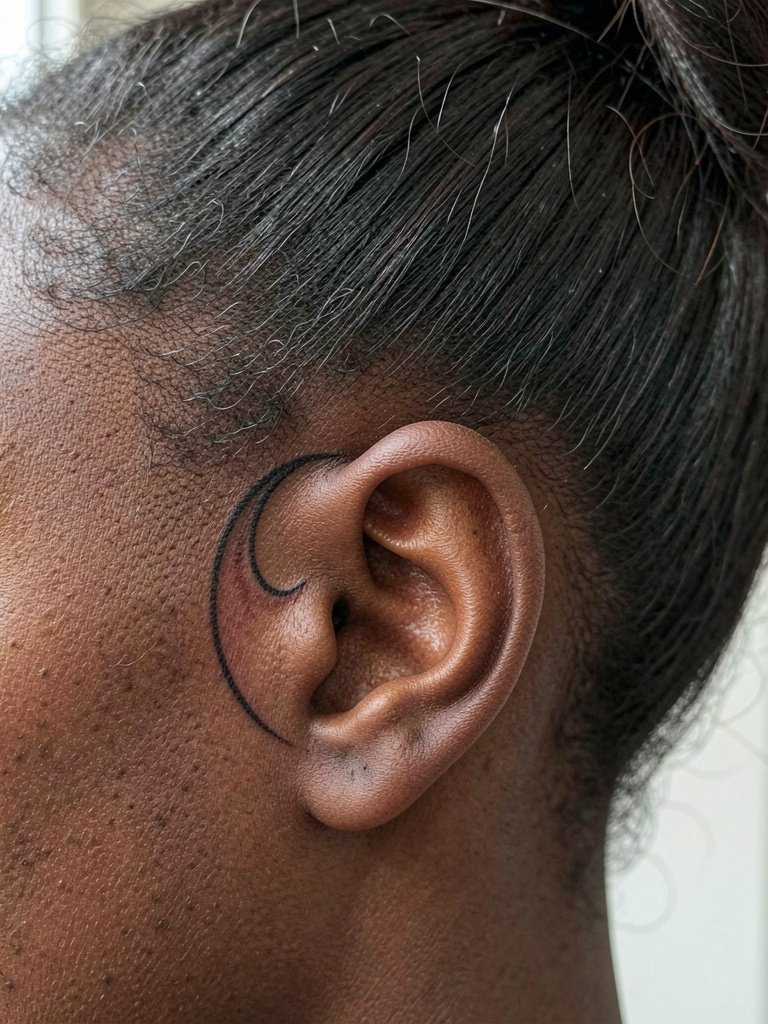
Behind-the-ear work is discreet and great for tiny negative shapes. The area heals fast but needs precise line placement. A common mistake is choosing a shape too delicate for the small canvas. For session-day comfort, wear hair up and bring a small clip to hold hair away. A delicate ear cuff across the opposite ear can create visual balance. Try a delicate ear cuff when styling.
20. Wave and Tiny Sailboat, Ankle Outer Side
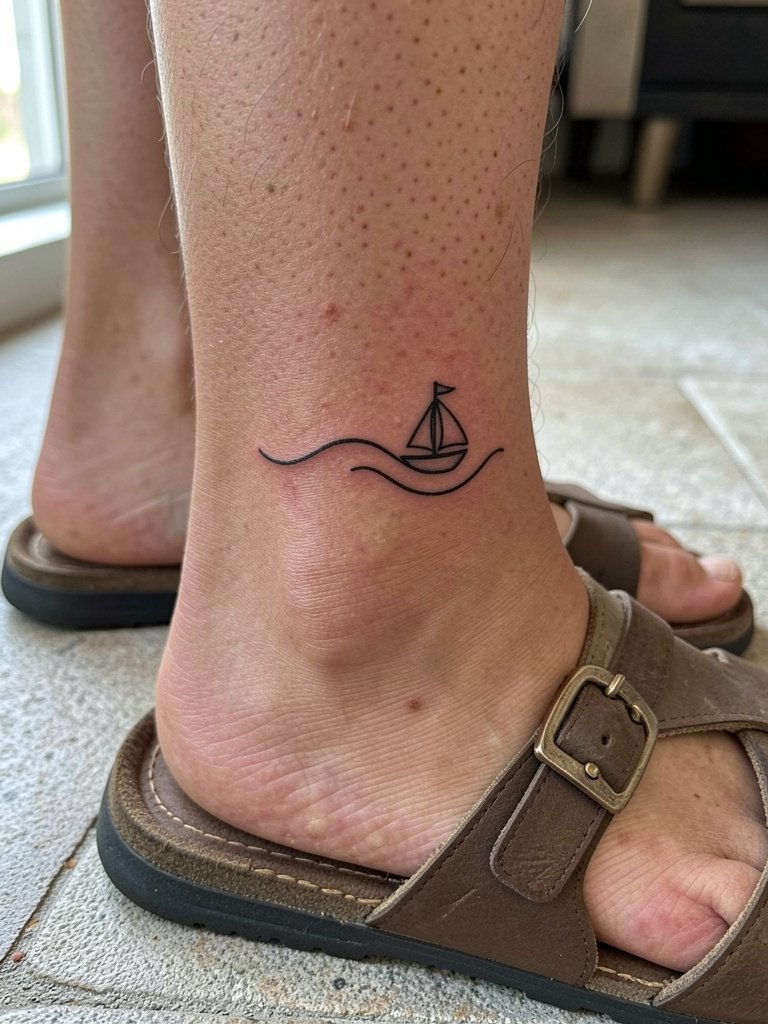
Outer ankle placements catch more friction from shoes and socks, which increases the chance of distortion. If you like the outer side, place the sailboat slightly above the bone and be ready to protect the area during the first week. Mistakes include putting too much tiny detail in the boat. For sessions, wear open shoes or bring soft slippers to avoid pressure. Styling with sandals helps the piece read for photos. A thin anklet can accent the reveal.
21. Horizontal Crest with Tiny Star, Collarbone
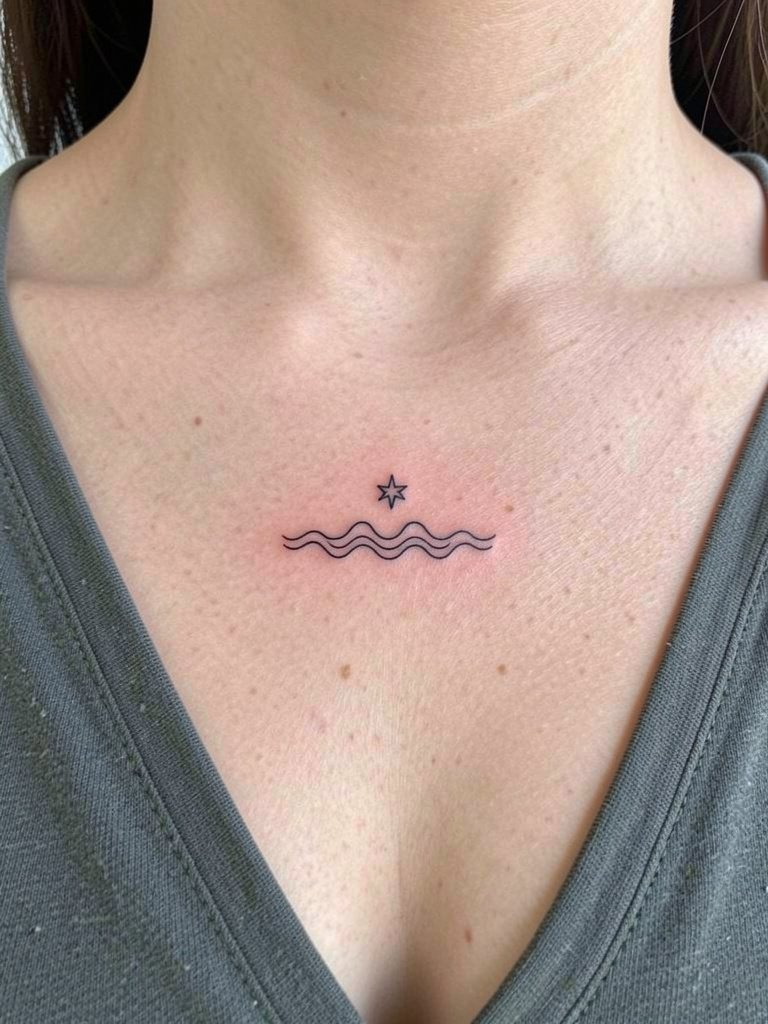
A tiny star adds punctuation to a collarbone wave. The area tolerates small work but avoid placing the design over the clavicle ridge. Request a compact layout with slightly bolder features so photos show the contrast. Session time is short and pain is moderate. A thin pendant necklace on the opposite side helps balance asymmetry. Try a thin pendant necklace for styling.
22. Vertical Mini Wave, Spine Edge
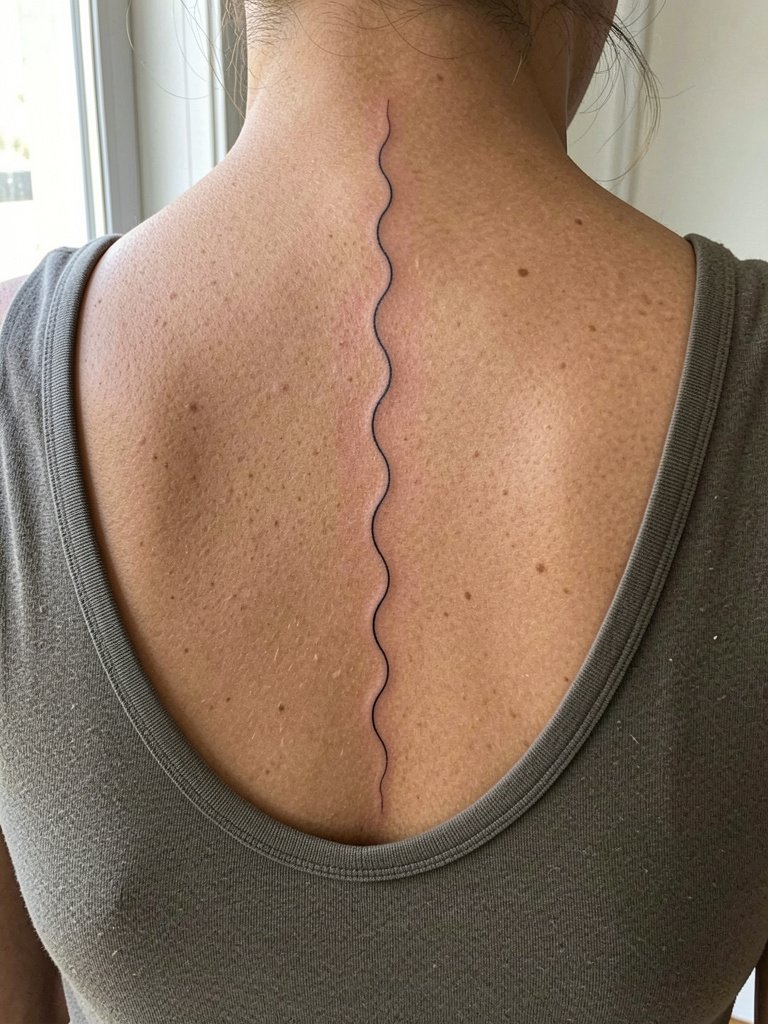
Vertical waves on the back or spine edge read as elongating design elements. The key mistake is making lines too thin for the thin skin near the spine, which can blur. A slightly warmer needle depth and modest spacing help retention. Sessions near the spine can feel sharp during needle passes. For reveal, wear tops with lower backs or wide necklines that allow the vertical piece to show. A low neck top provides easy exposure.
23. Crescent Wave Trio, Small Chest Cluster
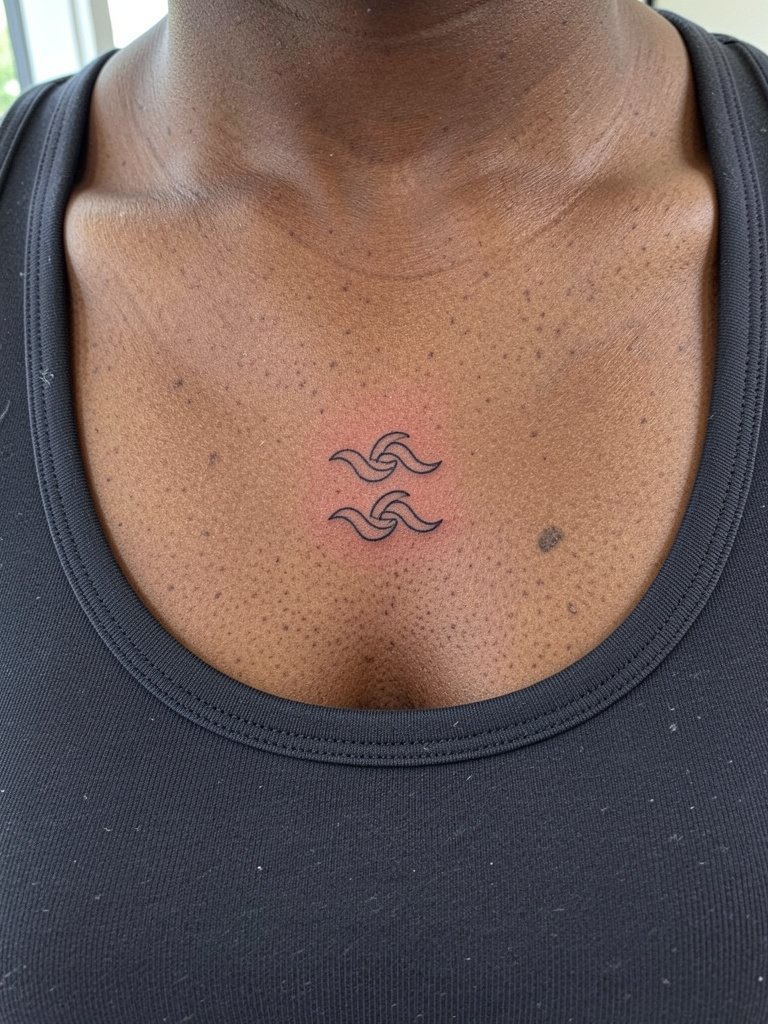
Small clustered crescents create a motif without being literal. The chest can handle compact groupings when spacing is respected. A mistake is adding too many tiny marks that merge during healing. Ask the artist to map the cluster at actual scale so you can see how it reads at arm’s length. Sessions are comfortable if you avoid the sternum midline. For styling, scoop-neck tanks reveal the cluster while keeping it tasteful. A scoop neck tank works well.
24. Geometric Wave Fragment, Inner Wrist Band
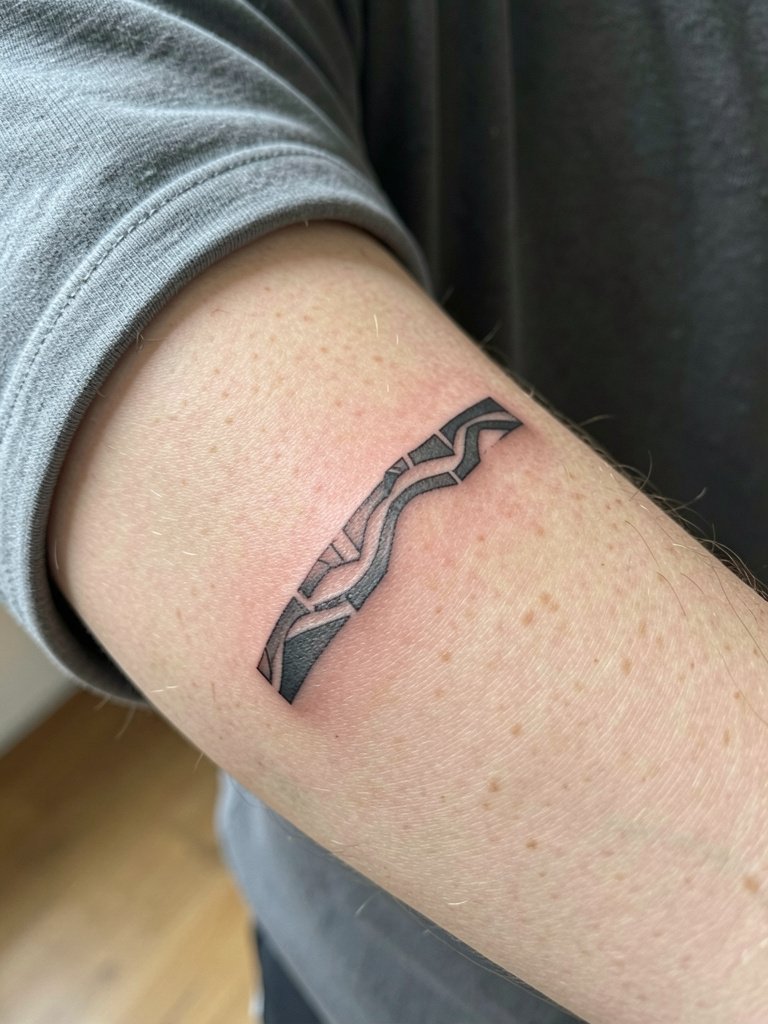
Geometric fragments translate well into bracelet-like tattoos. Wrist movement can soften intersecting angles, so allow space between segments. A frequent mistake is creating too many tight intersections. The session is brief. For showing off, a minimalist watch on the opposite wrist keeps the look balanced and prevents rubbing on the tattooed wrist. Try a minimalist watch.
25. Dot Work Wave, Thigh Outer Side
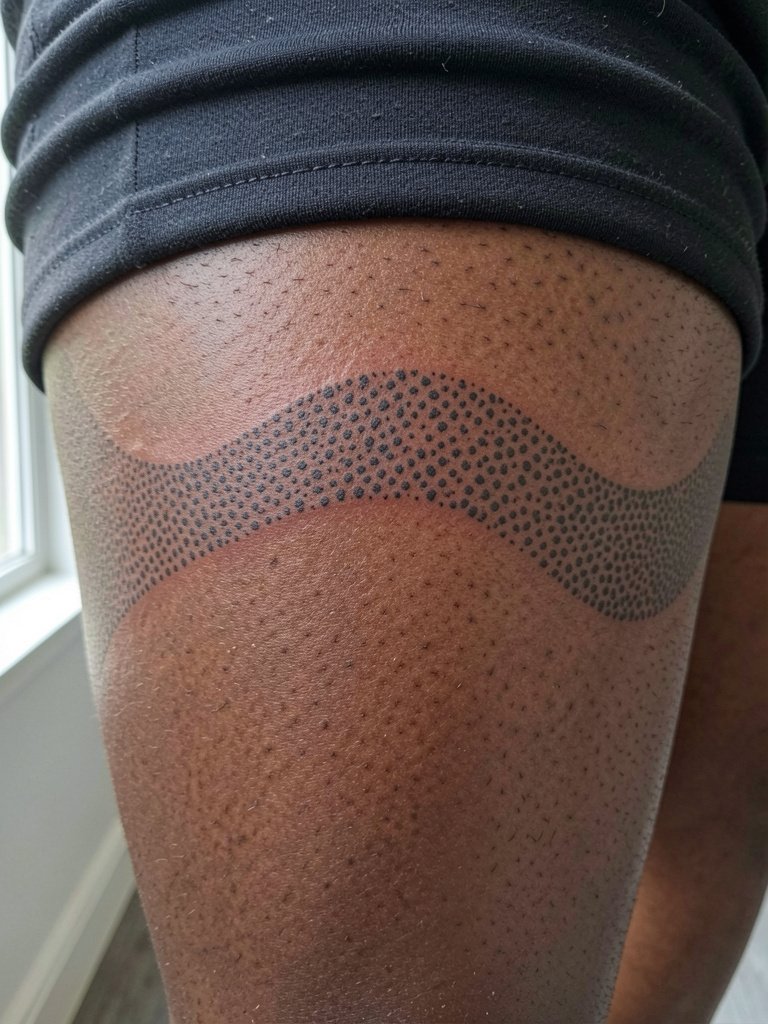
Dense dot work on the outer thigh reads as texture rather than stark line, and thigh flesh keeps dots distinct. Mistakes include making dots too close so they settle into blotches. Ask the artist for a healed sample of similar density on comparable skin tone. The session takes longer than a simple line, but pain is moderate. For reveal, shorts or cropped tops frame the thigh. Consider loose roll up pants for session comfort.
26. Horizon Negative Space, Lower Ribcage
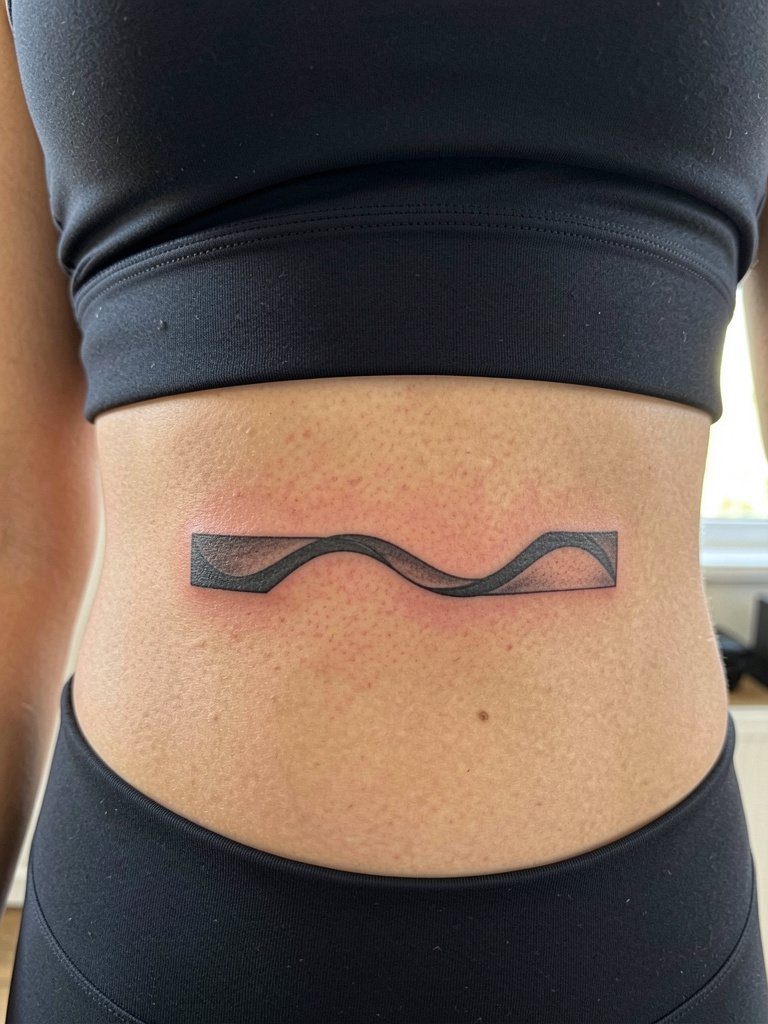
Negative space bars on the ribs are striking but require expert spacing because the skin stretches. A risk is loss of crisp edges as the bar settles. If you want this area, ask for slightly wider margins so the negative wave remains open. The ribs are a higher-pain placement and often need more breaks. Protect the area during healing and avoid tight waistbands for two weeks. A fitted cropped athletic top on session day gives the artist access without you moving fabric.
27. Tiny Wave Trio, Behind Collarbone Symmetry
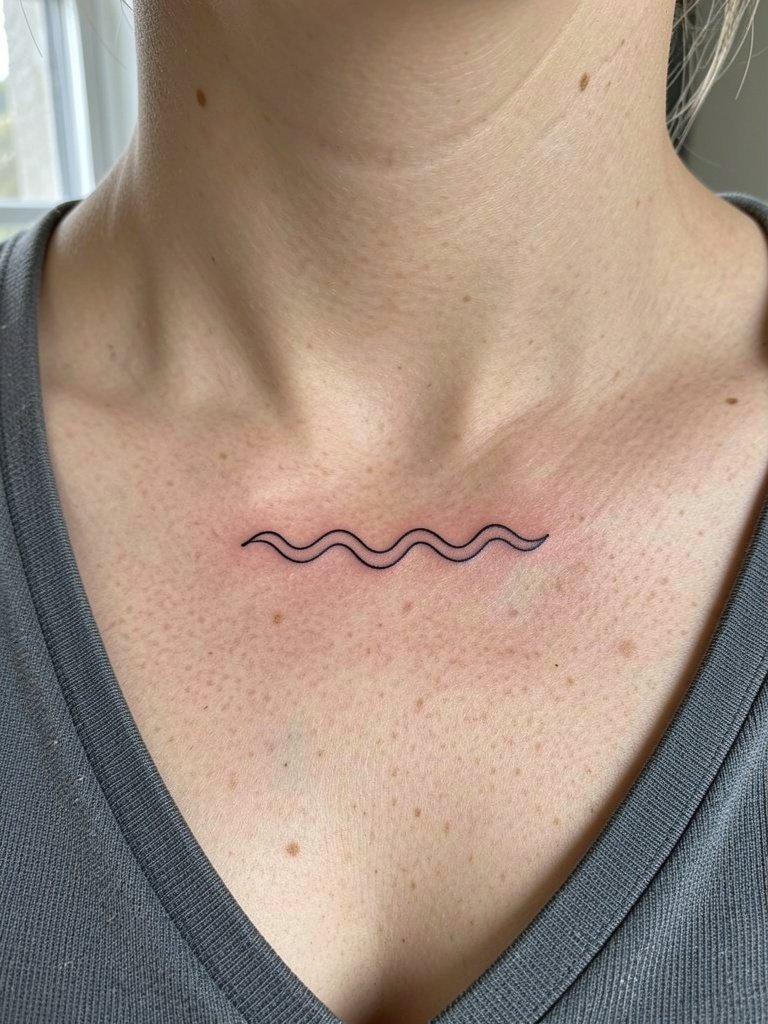
A trio of tiny waves on the collarbone creates symmetry for those who want multiple marks without scale. Watch for clavicle ridges when positioning because bone can distort the line appearance. The session is quick and the reveal pairs well with V-neck styles. For long-term clarity, keep the waves at least five millimeters apart. A V-neck linen top shows the placement off tastefully.
28. Simplified Crest with Sun and Moon, Lower Forearm
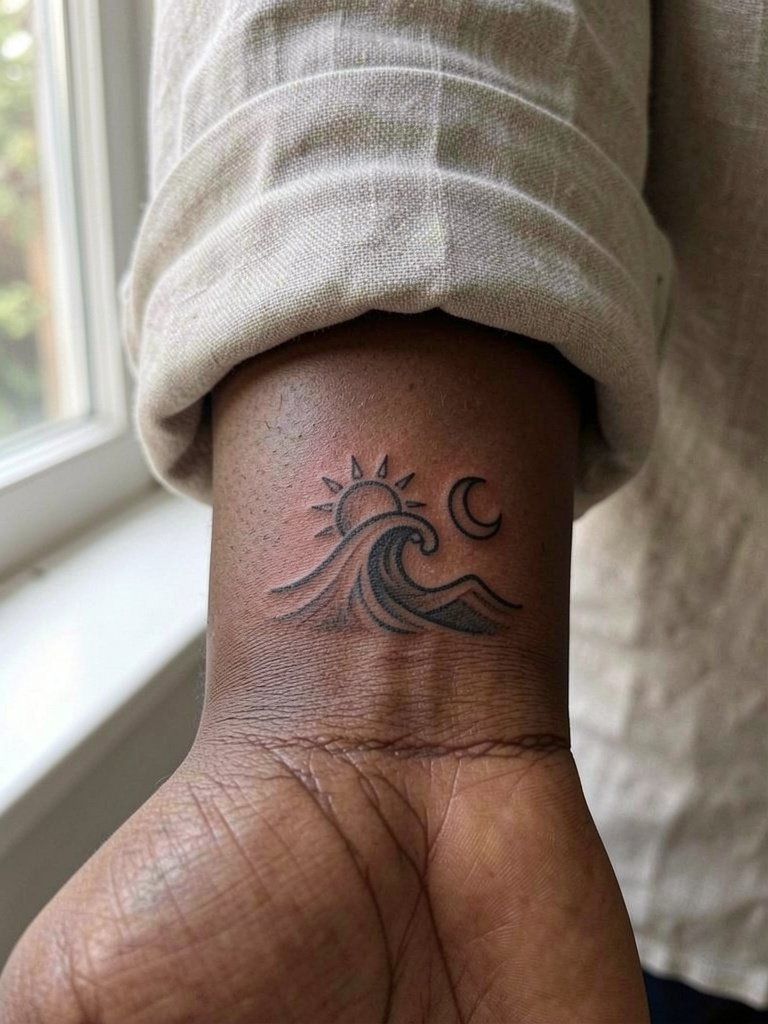
Combining sun and moon with a crest covers more symbolism in a compact band. The lower forearm holds small combos well, but too many tiny icons can vanish in a single image. A useful consultation point is to show the artist the exact icon scale you want and confirm visibility at photographing distance. Sessions are moderate and the area tolerates touch-ups easily. A rolled cuff linen shirt frames the forearm and keeps the piece visible. Try rolled cuff linen shirts for casual styling.
29. Wave Band with Negative Space, Inner Thigh Wrap
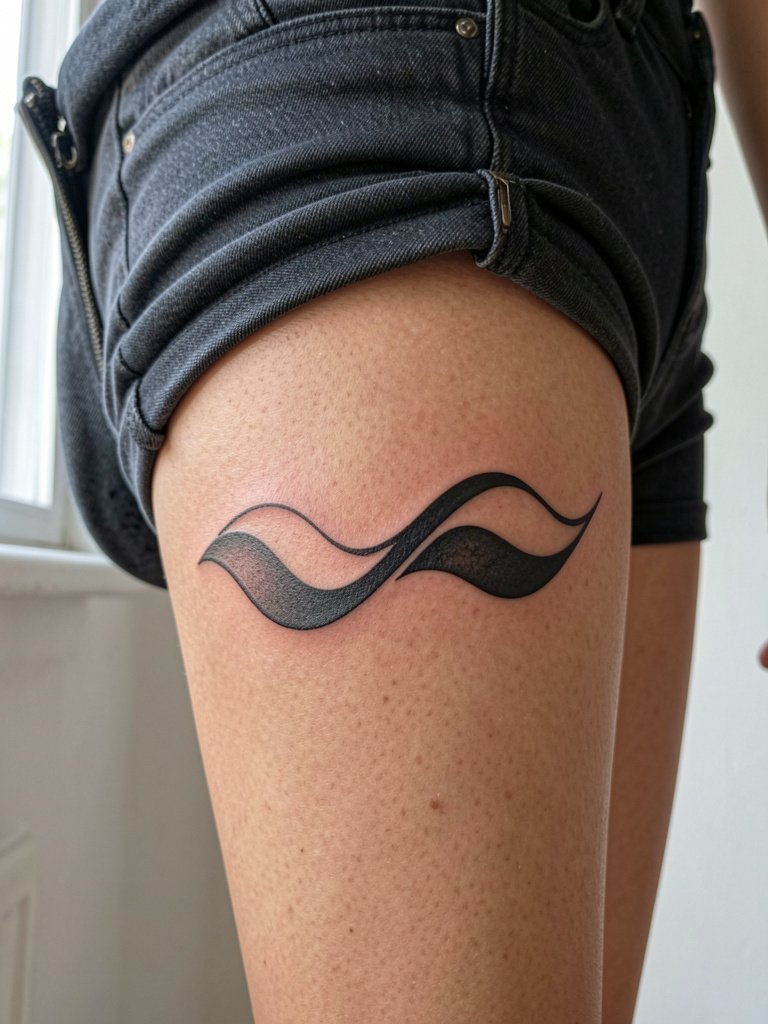
Alternating fill and voids create rhythm without adding bulk. Inner thigh wraps are private and resist blowout when placed away from the groin crease. The session is tolerable and healing needs loose clothing. A typical mistake is making the band too tight at the edges so it looks pinched when you move. For sessions, bring loose shorts you can wear afterward. High-waisted shorts or skirts show off the thigh designs when you want them visible. Consider high waist dark shorts.
Frequently Asked Questions
Q: How much will a small minimalist wave cost?
A: Prices vary by region and studio, but small pieces often fall under standard shop minimums. Expect a short session with a modest hourly minimum and the possibility of a touch-up fee later. Think about minimum shop fees as part of the cost for small work rather than haggling to a lower number.
Q: Where can I find minimalist wave portfolios and healed examples near me?
A: Search hashtags like #minimalistwave, #singlelinewave, and #finelinetattoo on Instagram and TikTok and use location filters to narrow results. Tattoo directories let you search by keywords such as "single line wave black" to view portfolios. Reddit threads in tattoo communities also surface healed examples and peer recommendations.
Q: Will a single-line wave fade to a grey smudge?
A: It can if the line is ultra-micro and placed on high-stretch or high-friction skin. One camp reports that 0.25mm single-needle waves blur within one to two years. The other camp argues that a slightly thicker line and careful placement lets fine work hold for five years or more. If longevity matters, specify a slightly heavier single-needle or give the artist reference photos showing healed work at scale.
Q: Is watercolor a bad choice for a wave if I want it to last?
A: Watercolor styles tend to lighten faster than black or stipple work, especially on darker skin tones. Some people accept this and plan regular touch-ups. If you want the watercolor palette but also some staying power, ask for small anchor lines or a grey wash underlay to keep the shape readable as color softens.
Q: What should I wear to my appointment for a ribcage or hip wave session?
A: For ribcage work, wear a side-tie top or cropped top so the artist can access the side torso without you adjusting fabric. For hip placements, choose loose drawstring shorts that sit below the waist so nothing presses on the fresh ink. A loose drawstring linen pant or high-waisted shorts are practical choices for session day.
Q: How often do minimalist wave tattoos need touch-ups?
A: Expect a possible touch-up around 12 to 24 months, especially for ultra-fine work or placements with friction. Bold black silhouettes and well-spaced stipple tend to need fewer touch-ups than micro single-needle pieces. Keeping the area moisturized and out of direct sun helps extend the interval between touch-ups.
Q: Are there placements I should avoid for a first fine line wave?
A: High-stretch or high-friction sites like the ribs and outer ankle are riskier for ultra-fine lines. If this is your first fine line piece, the inner forearm and inner upper arm are safer places for a crisp result that lasts longer.
