
A friend of mine waited months to commit to a phoenix piece because they could not tell which versions would still look good after a few years. I have visited five shops across Brooklyn and seen the same worry in other clients. These small, dark phoenix designs keep popping up in portfolios and on feeds, but the trick is picking a style and placement that ages cleanly and fits your life. Below are ten compact phoenix ideas that strike that balance and what to tell your artist to get them right.
1. Fine Line Phoenix on Inner Forearm

Someone I know first saw this on a friend and booked the same placement because inner forearm photos read well on camera. Expect a 3 to 4 out of 10 on pain, and most sessions take under an hour. Ask your artist for slightly heavier lineweight at the base of the wings so the contours do not blur at year two. A common mistake is asking for feather-fine lines all the way through, because those tend to soften and need touch-ups sooner. At six months the contrast will look crisp, at two years you will notice a softening of the finest lines, and a touch-up around year three often restores the original contour.
2. Blackwork Mini Phoenix at the Ankle

Fair warning: the ankle is thin and bony, so the session can feel sharp but short. Blackwork holds up well there because saturation resists fading, and an experienced artist will leave breathing room around thick fills to reduce blowout risk. Tell your artist you want solid saturation with crisp outer edges and ask them to avoid putting tiny details in areas that stretch when you walk. That placement normally takes 30 to 60 minutes. Expect the darkest look at six months, and predictable softening at two to five years that can be managed with a single touch-up.
3. Stipple-Shaded Phoenix Over the Ribcage

Artists are split on fine dot work on ribs. One camp says the skin stretch there blurs stippling within a year. The other camp argues that with deliberate spacing and proper needle depth stipple shading can last several years. Ask your artist where they stand and request a mockup scaled to the rib curvature. Expect a 7 out of 10 on pain and a session that can run one to two hours. Common mistakes include requesting ultra-tight dot clusters that end up muddy as they settle. If you want a version that ages better ask for slightly larger dot spacing and stronger primary lines.
4. Micro-Realism Phoenix Behind the Ear

There is a real visual payoff for this discreet spot because the area is low on stretch and shows detail well. The session is brief and the pain is mild to moderate. Tell the artist you want simplified features rather than micro-hyperrealism, because tiny shading can look like a gray smudge on some skin types. A common error is trying to cram too much texture into a coin-sized space. At six months the piece should read clear, and you might need a small touch-up at year two if any fine shading fades.
5. Bold Traditional-Style Phoenix on the Upper Arm

There is something satisfying about classic bold outlines for small phoenixes because they age predictably. Upper arm sessions are usually low pain and quick. During consultation, specify you want strong contrast between the outline and fill and avoid tiny internal filigree that will not survive touch-up-free aging. People often ask for too many small elements inside a traditional silhouette and later regret it. With good saturation this style will look robust at two and five years and rarely needs frequent touch-ups.
6. Watercolor-Style Dark Phoenix on the Collarbone

Watercolor on collarbones is fashionable but divides opinion. One camp says watercolor techniques fade into pale bruising too quickly on high-movement areas. The other camp says controlled edgework and dark anchors make watercolor approaches hold longer. Be explicit in your consultation about wanting dark anchors around the wings so the washes have structure. Expect a moderate pain level and a session of about one hour. Common mistakes are asking for indistinct washes without anchors. If you want longevity ask for a hybrid: watercolor fills with precise black linework framing the key shapes.
7. Geometric Phoenix on the Side of the Wrist

When geometry meets phoenix iconography you get a compact design that photographs well. The wrist is a medium pain area, and a piece like this usually takes 45 to 75 minutes. Tell your artist you want space between parallel lines to avoid early blurring. A typical mistake is squeezing micro-geometry into a tiny wrist patch, which becomes a muddled mass as it heals. At six months the shapes will be distinct, and you should plan for a touch-up around year two if you want crisp redefinition of the sharp angles.
8. Minimal Silhouette Phoenix on the Rib Arch

Pain here leans toward high but the silhouette approach pays off because it reduces blowout risk while keeping impact. The session time is usually under an hour. During your consultation ask for a test stencil placed on the arch to verify how the silhouette flows with breathing. People sometimes pick a silhouette that is too thin top to bottom, and that can fragment as skin moves. This version looks strong at six months, and solid silhouettes like this often need less frequent touch-ups than micro-detail pieces in the same area.
9. Tiny Phoenix on the Side of a Finger

Hand and finger placements are visible and they fade faster than other spots because of washing and friction. Think of this as a high-maintenance piece that may need touch-ups every year or two. The session is quick but can feel sharp. Ask your artist for slightly thicker strokes than you might want initially, because ultra-thin lines on fingers often disappear. If your career or everyday look is a concern consider the long-term upkeep. Many people accept the trade-off for a hand piece, but go in knowing it will not age the same as an upper arm design.
10. Black-Gray Micro Phoenix at the Nape of the Neck
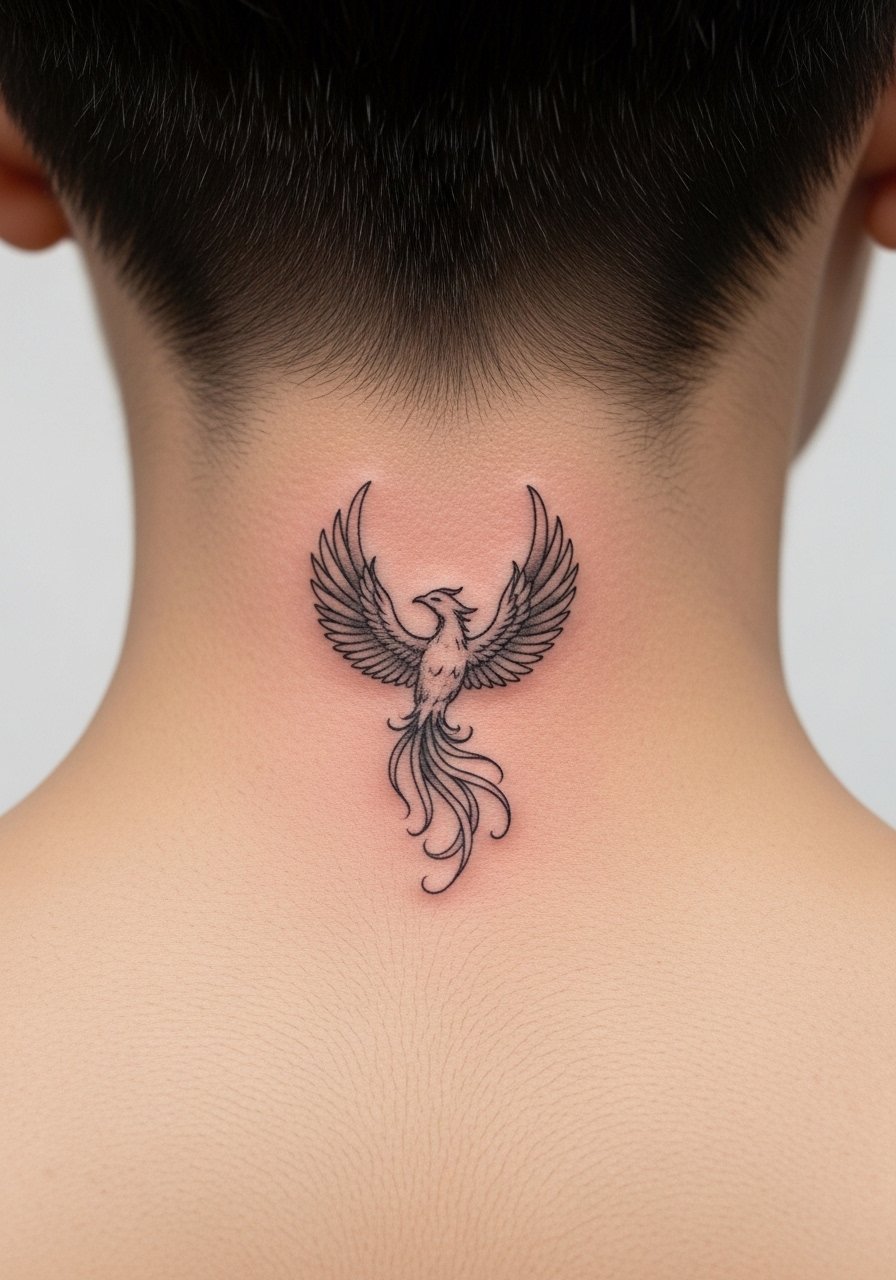
When placed at the nape this compact micro phoenix reads both intimate and classic. Pain is moderate and the session usually runs 30 to 60 minutes. Ask for whip shading that follows the hairline so the piece blends naturally into the area as you move. A common mistake is asking for hairlike wisps without a solid anchor, because those vanish with wash and time. At two years expect a gentle softening, and plan a single touch-up around year three if you want the darker contrasts restored.
Tattoo Prep and Aftercare Essentials

Below are practical supplies to help a small dark phoenix heal cleanly. I have used these types of items with clients and seen what works in real wardrobes and routines. Use the search links to find versions that match your skin sensitivity and preferences.
Fragrance-free gentle foaming cleanser for tattooed skin. Use for the first week to remove excess plasma without stripping moisture. Clean twice a day with gentle hands.
Lightweight fragrance-free balm formulated for tattoos. Apply a thin layer after cleansing to prevent scabbing and maintain saturation.
Medical-grade second skin bandage, single-use sheets. Useful for the first 24 to 48 hours if your artist recommends occlusion.
Silicone scar sheet, small strips for fine areas. For raised or textured healing areas, silicone can reduce hypertrophic scarring.
Breathable tattoo-friendly ointment in small jar. Choose a non-comedogenic formula and use sparingly to avoid clogged pores.
Aquaphor Healing Ointment, small tube. This is the one mainstream product I mention. Use it only as your artist suggests because some prefer thinner balms.
Mineral sunscreen SPF 50 stick for healed tattoos. Long-term UV protection preserves saturation.
Soft breathable wrap or travel pillow to shield sleeping areas. Helpful if your placement rubs on bedding while healing.
Every tattoo is different. Always follow your artist's specific aftercare instructions. Consult a dermatologist if you have skin concerns or unusual healing issues.
Frequently Asked Questions
Q: Will a fine line phoenix on the inner forearm blur faster than a blackwork version?
A: In my experience fine line softens more quickly than solid blackwork because thin strokes spread under the skin as you age. If you want the fine look but longer wear, ask for slightly heavier anchor lines and plan for a touch-up at two to three years.
Q: Do watercolor-style phoenixes need different aftercare than black-gray pieces on collarbones?
A: The basic aftercare is the same, but watercolor fills rely on lighter saturation so sun protection matters even more. After the initial healing, use a mineral sunscreen when exposed and consider more frequent touch-ups if the washes fade.
Q: Are finger phoenix tattoos worth it if I work with my hands?
A: Finger tattoos fade faster because of constant washing and friction. If your job involves heavy hand use plan for yearly maintenance. You can still get a finger phoenix, but expect a higher upkeep schedule.
Q: How should I tell an artist I want a version that ages well but still looks detailed?
A: Bring photos of healed tattoos you like and ask the artist to scale details for longevity. Say you want stronger primary lines, slightly increased spacing for dot work, and defined anchors around any fades. Those specifics give real guidance.
Q: Which of the aftercare products helps most with scabbing and itch during the first two weeks?
A: A lightweight fragrance-free balm used sparingly helps control scabbing and reduces itch. If scabs feel raised or unusually thick, a silicone strip from the list can be useful after initial healing to even out texture.
