
A small collarbone tattoo reads as a quiet choice in the chair. The skin there is thin and moves with breath, so line weight, spacing, and the way the stencil follows the clavicle curve determine whether a design still reads years from now. These ideas favor clarity and placement that flatters necklaces and necklines while minimizing blowout risk, starting with tiny scripts and moving into ornament, geometry, and micro-realism.
1. Fine Script Word Along the Clavicle
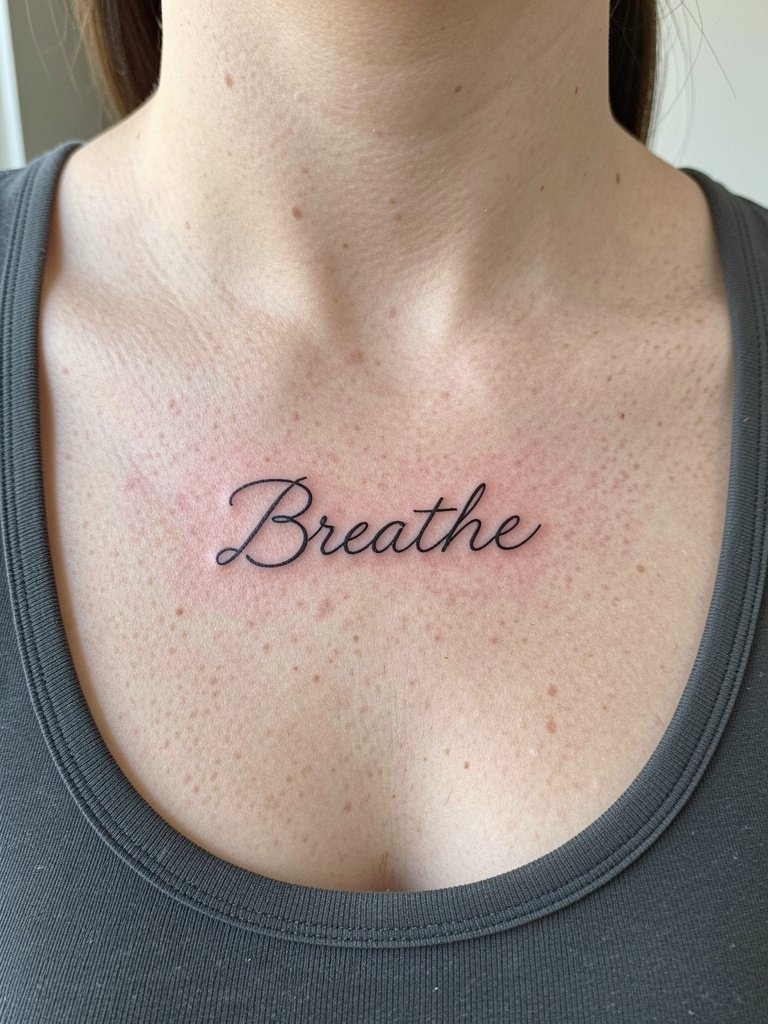
A single-word script that follows the clavicle curve is a classic first-collarbone pick. I recommend keeping the word at least three inches long so each letter can breathe and resist softening. During consultation specify the exact script size and ask the artist to show the stencil at life scale across your chest so you can check letter spacing. The inner collarbone area thins with age and sun exposure so touch-ups are common after two to five years. For show-off outfits, pair this with a v-neck slip dress that leaves the collarbone visible without competing with the lettering.
2. Micro Floral Cluster Nestled Over the Clavicle
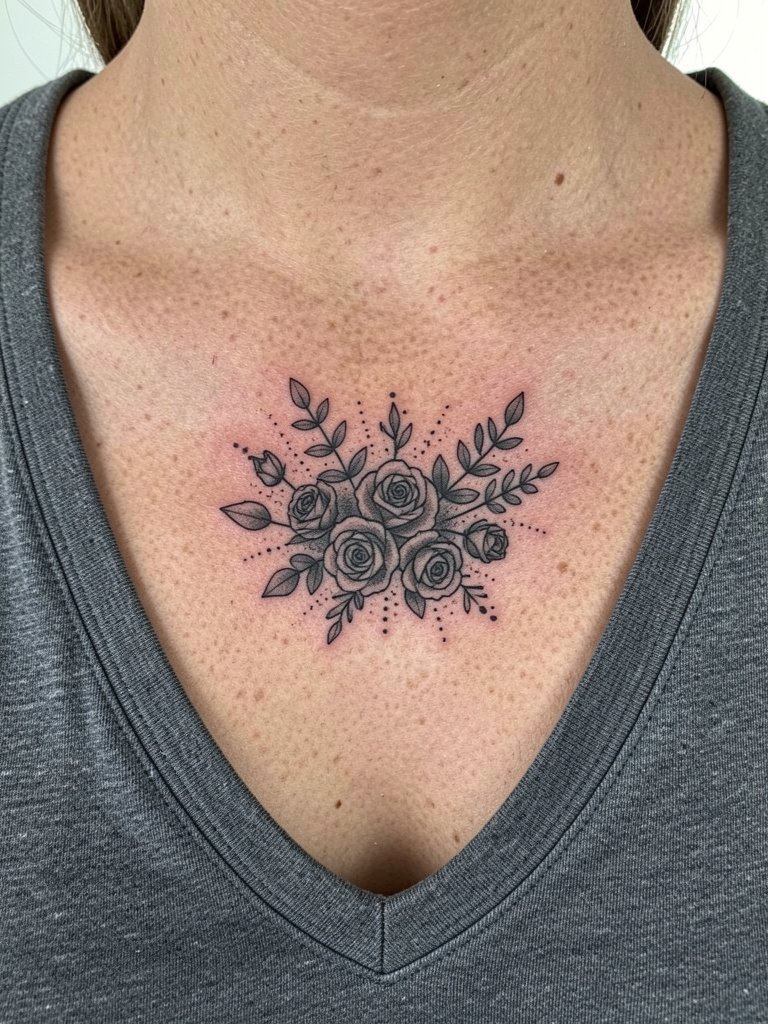
Tiny botanical clusters work because they break up the clavicle line without needing heavy saturation. A common mistake is packing too many tiny petals too close together. Request slightly wider spacing and stipple shading rather than solid fills to keep petals readable at one and three years healed. Session time is usually under an hour and pain rates moderate because the skin sits over bone. Style it with an open-back midi dress to showcase the cluster from an angle during evenings out.
3. Minimal Geometric Bar That Follows the Bone
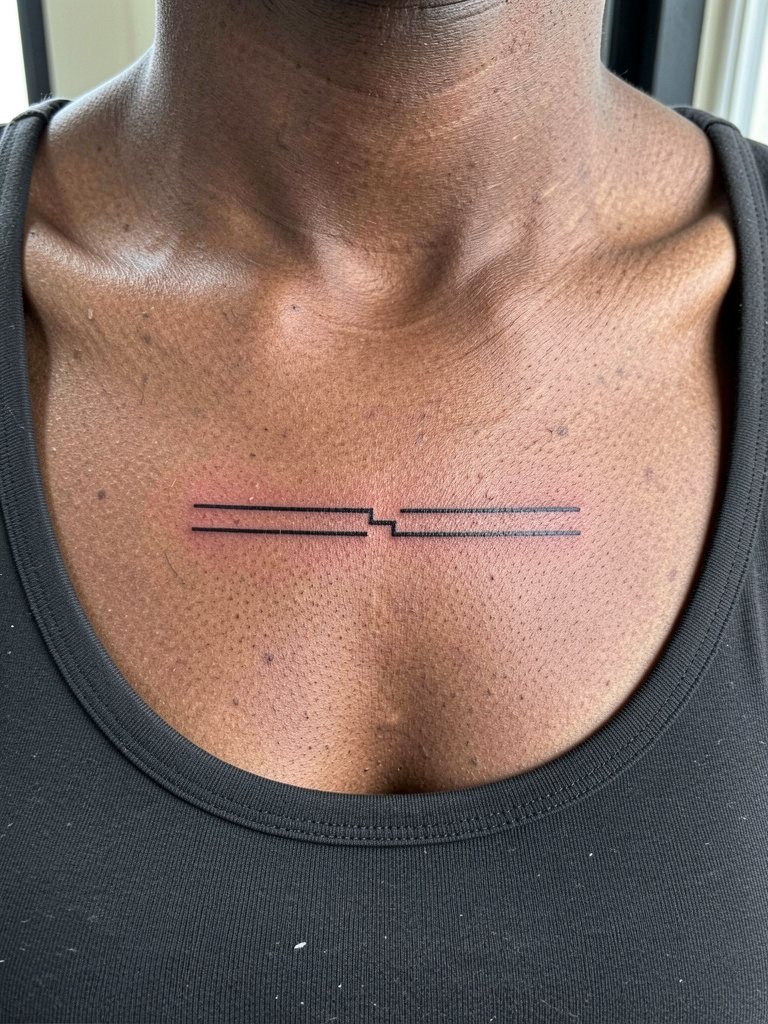
A clean geometric bar reads modern because it plays with negative space along the bone. The risk is underweight lines that fade into a soft blur. Ask the artist to use slightly heavier single-needle linework rather than a hairline to prevent early loss of definition. Expect a short session and low bleeding; the pain is sharper when the needle crosses the bone. For outfits, a square-neck crop top frames the negative space without overwhelming the minimalism.
4. Tiny Anchor or Symbol Off-Center
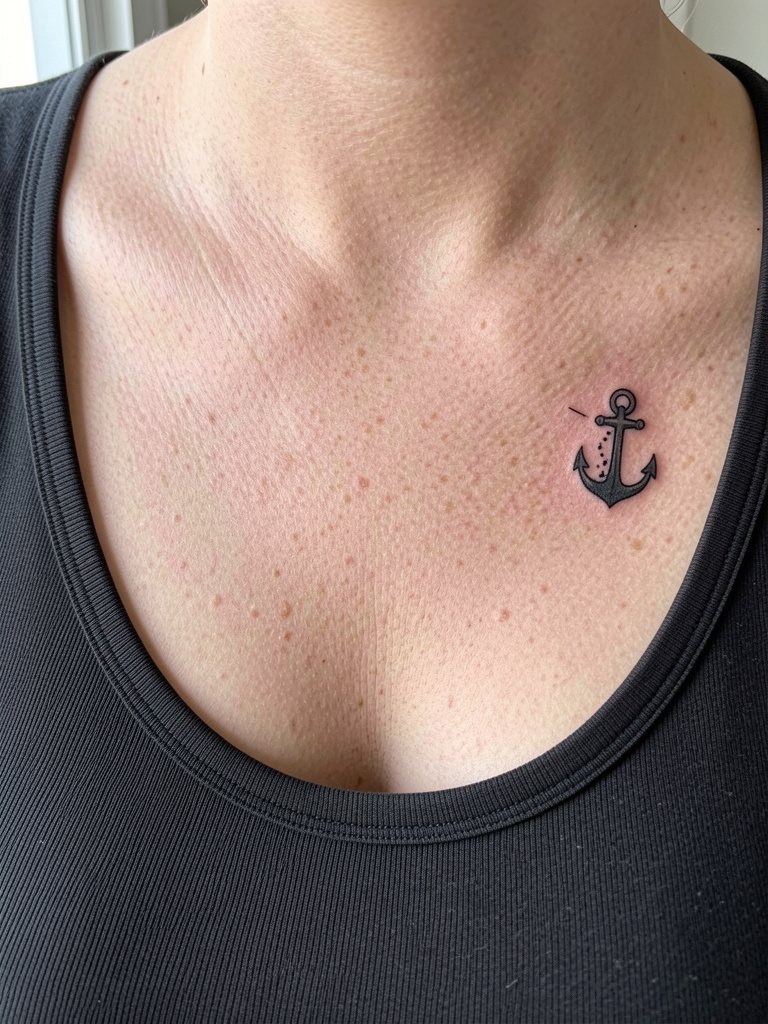
Small pictograms read best when given breathing room. The frequent mistake is anchoring these symbols too close to the bone intersection where contour makes lines compress. Place them slightly lateral so the symbol sits on flatter skin. If you want longevity, avoid ultra-thin single strokes for the main outline. The session is quick but the area can be sensitive when the needle passes over the projection of the clavicle. Pair an off-center symbol with layered thin chain necklaces, and consider a delicate chain choker to let the small motif peek through.
5. Micro-Realism Motif That Sits Between Bones
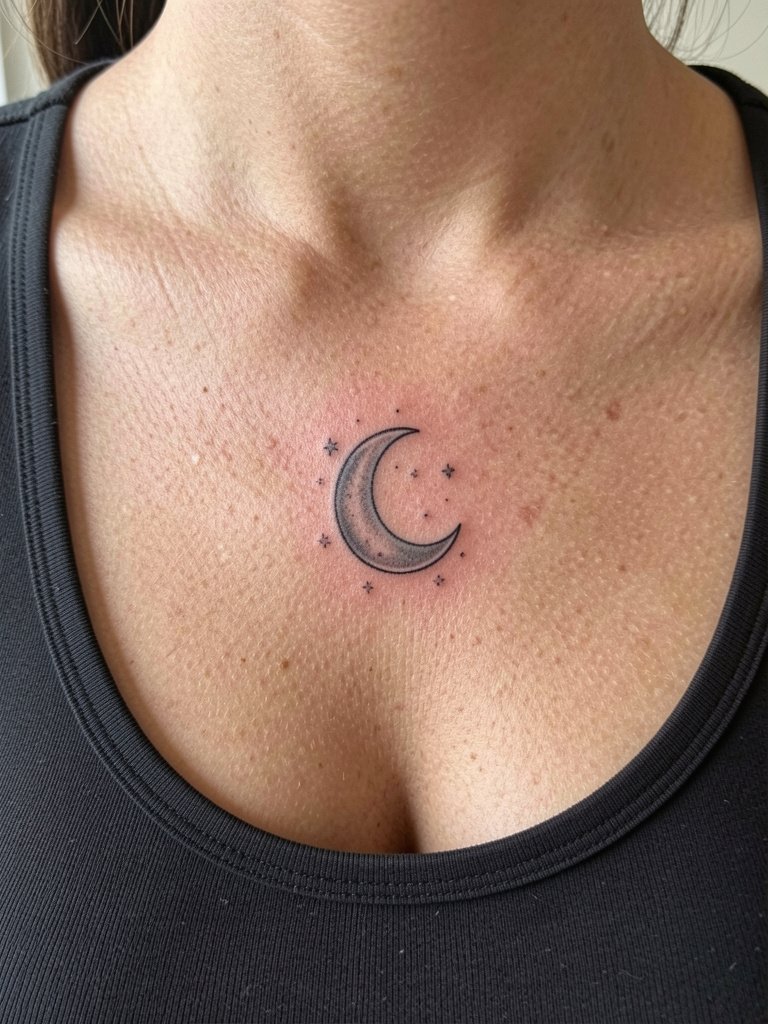
Micro-realism can be striking if the piece sits in the suprasternal notch where the skin is flatter. The mistake is over-detailing a tiny area. Ask the artist for simplified contrast and soft stipple shading instead of minute lines that will blur. Expect a slightly longer session than a single-line script and plan a light, breathable top for aftercare. For showing off the piece, a low scoop bodysuit keeps the notch visible and stable against gravity.
6. Delicate Chain-Link Necklace Tattoo
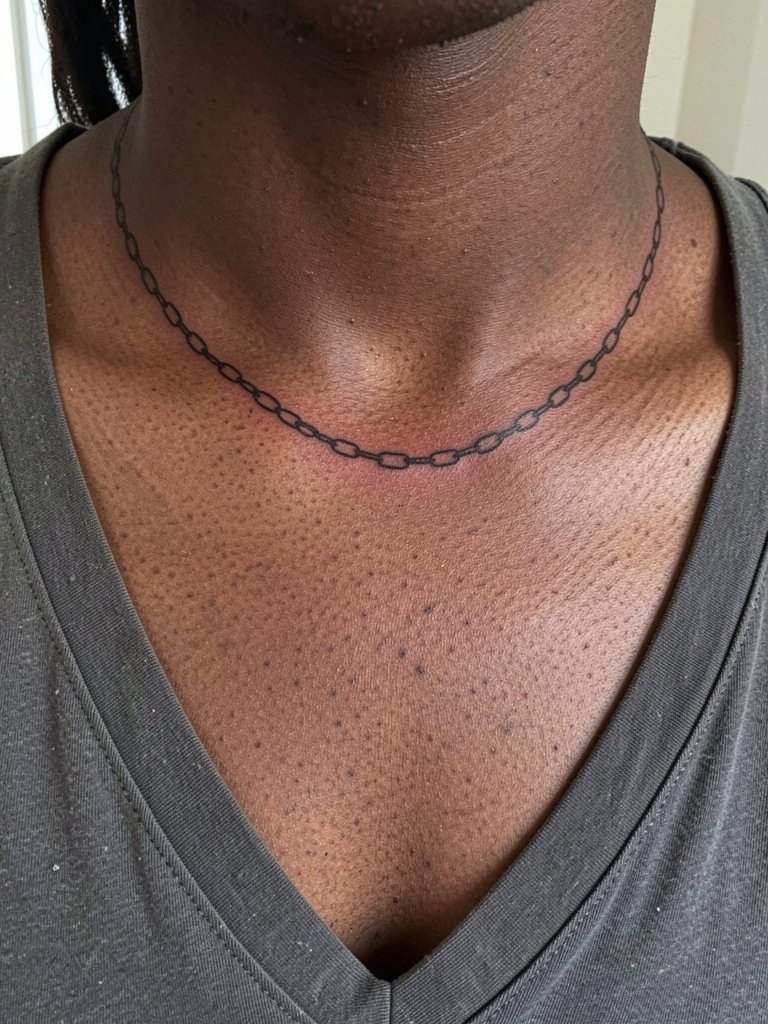
A chain tattoo mimics jewelry but should not be drawn so faint that link breaks fill in over time. The common aging problem is adjacent lines blurring into each other. Specify link size that reads at three years and ask to preview the life-scale stencil. Pain is moderate because the needle crosses the clavicle curve repeatedly. Style this with real layered chains or a slim pendant necklace rather than bulky jewelry that disguises the tattoo.
Pre-Session Essentials
Small collarbone pieces have specific stencil and healing needs. The five items below smooth the session and the first week for scripts, florals, and chain-link designs covered above.
-
Stencil transfer paper kit. Lets you preview how a curved script or chain-link will sit along the clavicle before the needle hits skin.
-
Topical numbing patches. Discreet patches applied 30 to 45 minutes before reduce the sharp sensation when the needle crosses the bone projection.
-
Thin protective film roll. Breathable film keeps collarbone tattoos clean overnight while avoiding friction from collars or necklaces.
-
Fragrance-free gentle body wash. Cleans the area during showers without stripping the delicate ink channels.
-
Aquaphor healing ointment. Thin application for the first three days helps maintain moisture without clogging the tiny needle channels.
7. Single Tiny Star Cluster Tracing the Clavicle
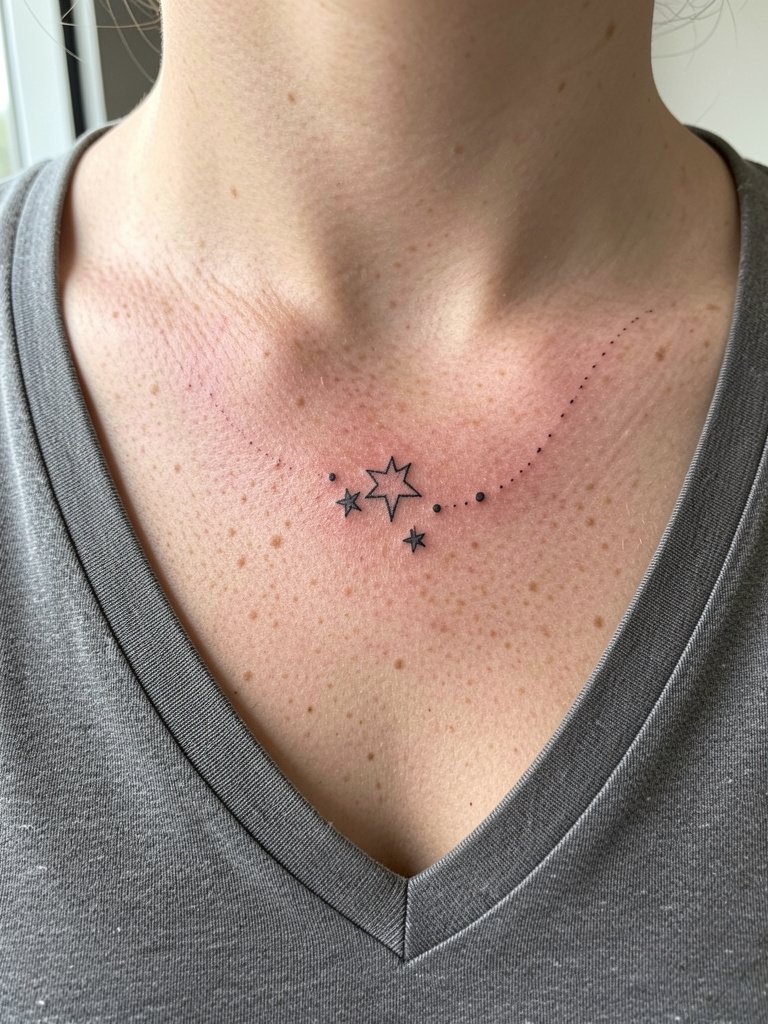
Tiny star clusters are playful but suffer when placed too close to the bone ridge. I recommend a slight offset to land on flatter skin so the star points hold. Common mistake is trying to include tiny shading inside each star; stick to solid black silhouettes or minimal stippling. The session is brief and pain peaks when crossing the clavicle. Wear a crew-neck linen shirt to the appointment so the artist can access the area without fabric shifting.
8. Mirrored Coordinates Following the Curve
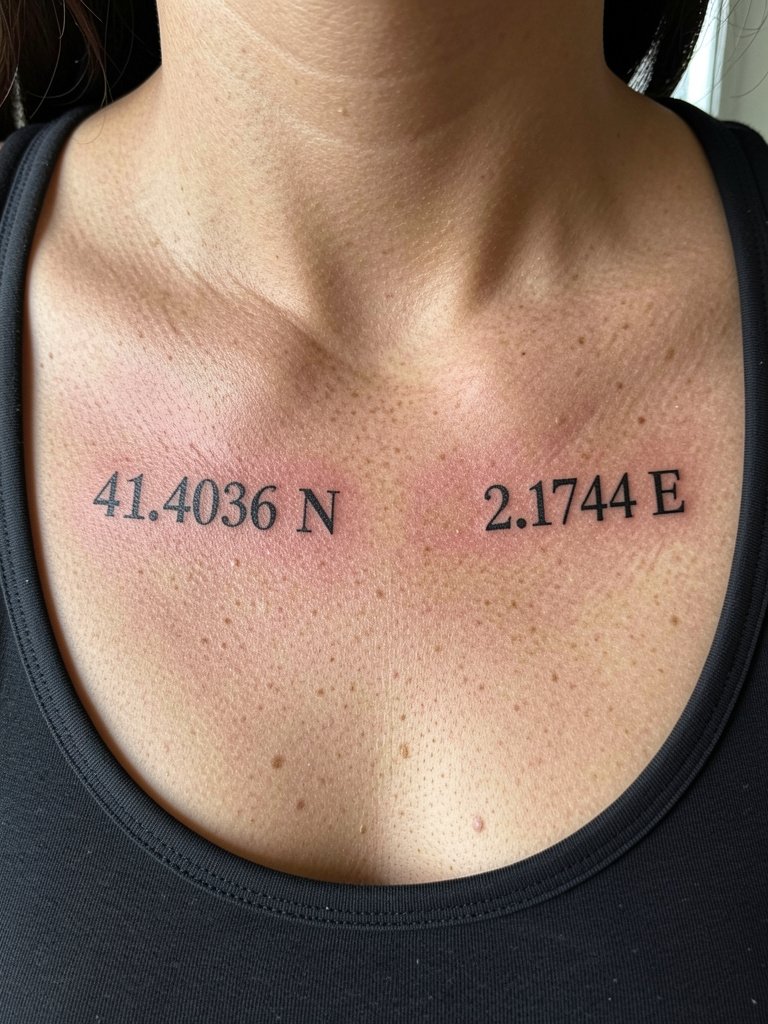
Coordinates work well across the clavicle for symmetry, but spacing matters. Demand a life-scale stencil to confirm how numerals read at arm's length. A frequent mistake is crowding numerals inside a small band which blurs into a string of marks. These typically take under an hour but may need a touch-up to keep numerals crisp after a year or two. Pair the look with a button-front blouse left one button open so the symmetry is visible without drawing attention away.
9. Negative-Space Crescent Echoing a Necklace
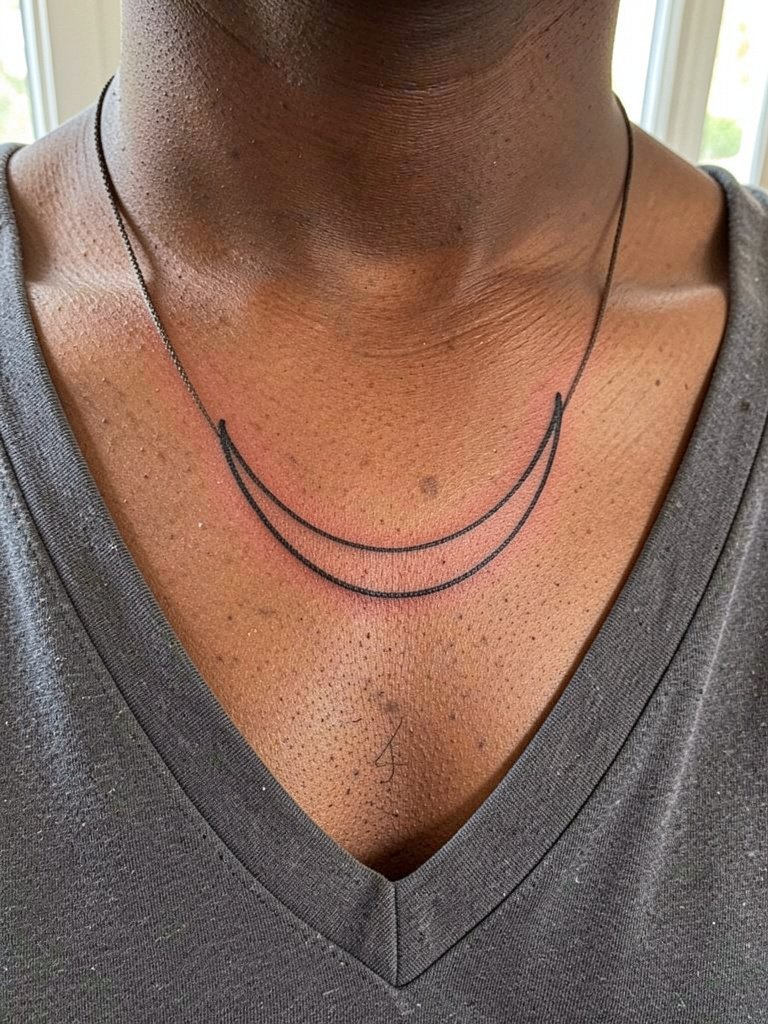
Negative-space designs benefit from deliberate spacing so the skin tone inside the shape reads clearly. The design ages best when outlines are slightly bolder than you might choose at first. Tell the artist to match the arc to a necklace curve you already wear for a natural interplay. Expect mild sharpness over the bone and schedule light activity for 24 hours after. For show-off outfits, choose an open-back dress that exposes the arc at an angle.
10. Single Fine Dot Accent at the Clavicle Notch
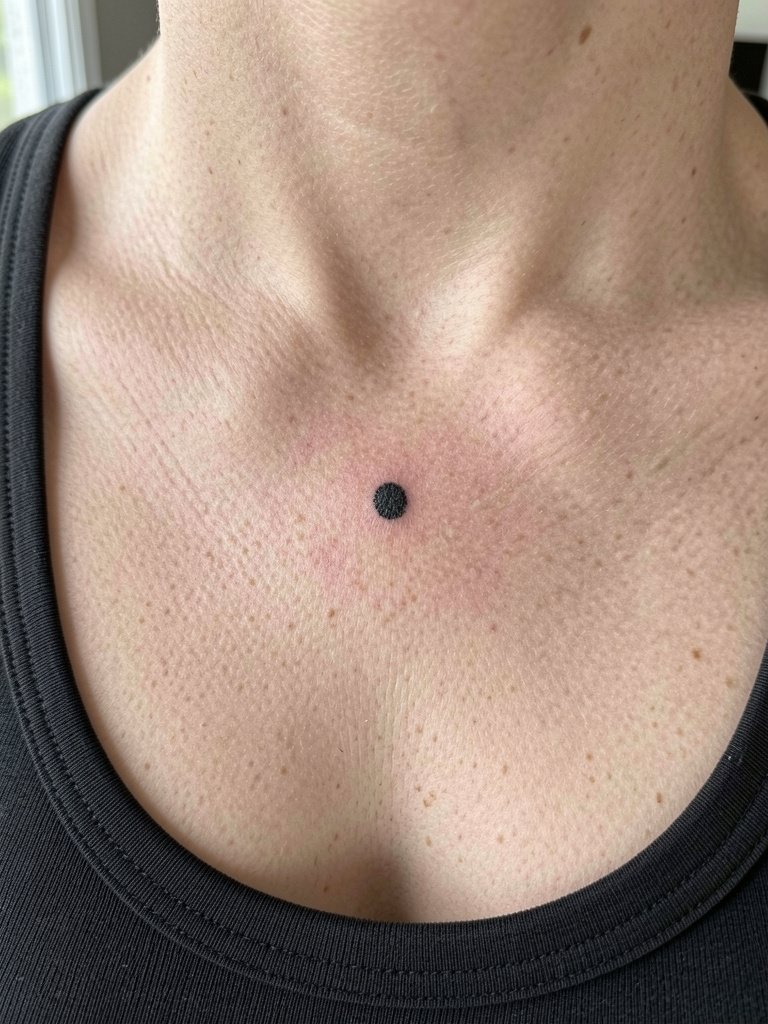
A single dot is deceptively simple. The largest mistake is making the dot too small in pigment volume so it fades into a freckle within a year. Request a slightly denser solid spot that still reads small at arm's length. The needle sensation at the notch is sharp because the skin is thin. This piece pairs well with a deep V-neck tee that keeps the area exposed for necklaces.
11. Tiny Script with Hidden Meaning Beneath a Necklace
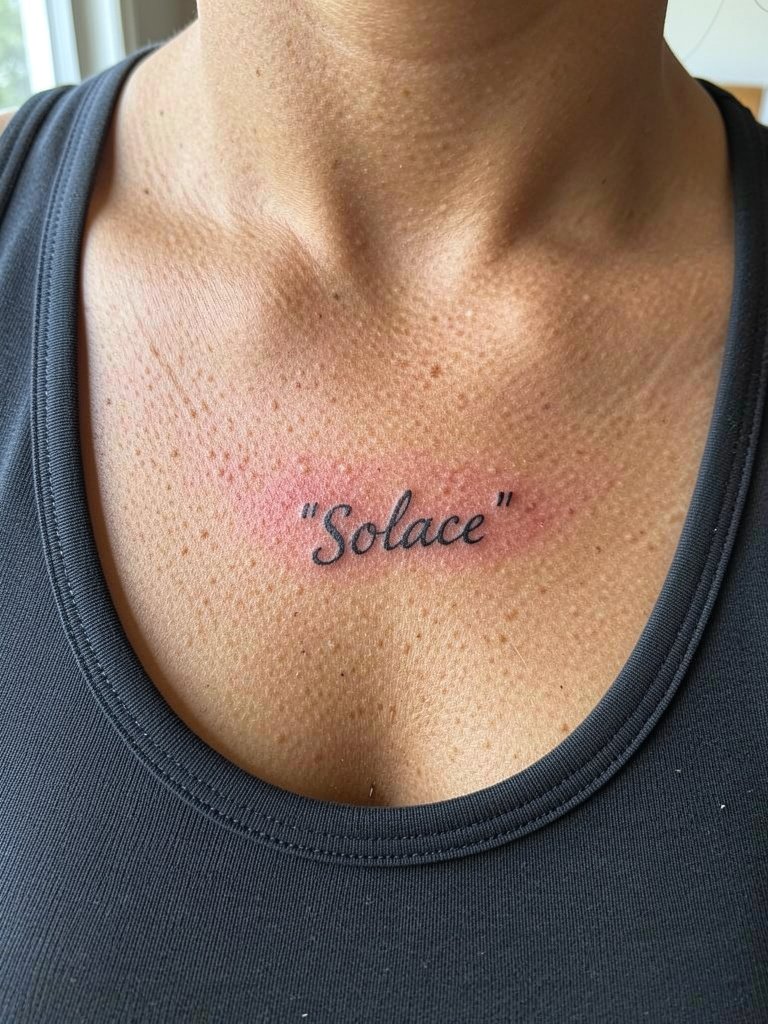
Concealed scripts work when placement anticipates jewelry overlap. The practical error is picking a font that needs open counters to read. Use a clean sans-serif that remains legible when partly covered. Ask the artist to show the stencil with a pendant layered so you can see the overlap. Expect a quick session and moderate sensitivity. Wear a thin pendant necklace post-session that will not rub the fresh ink.
12. Small Botanical Stem That Extends Toward the Shoulder
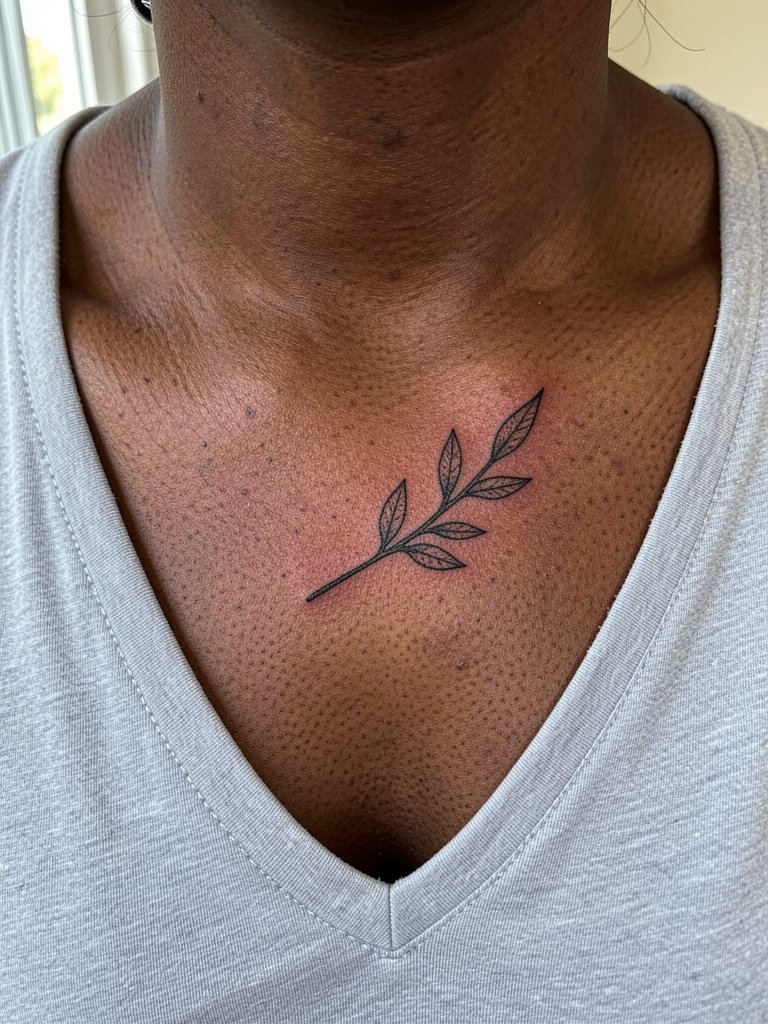
A stem that moves toward the shoulder plays nicely with strap lines. The risk is pushing too much detail into a moving zone where the arm's motion stretches the ink. Ask the artist to reduce internal linework and rely on outline plus stipple shading to keep leaves readable. The session is short, with increased sensitivity as the needle approaches the shoulder joint. For style, a tank with thin straps shows the extension cleanly.
13. Crescent Moon with Tiny Stars Cluster
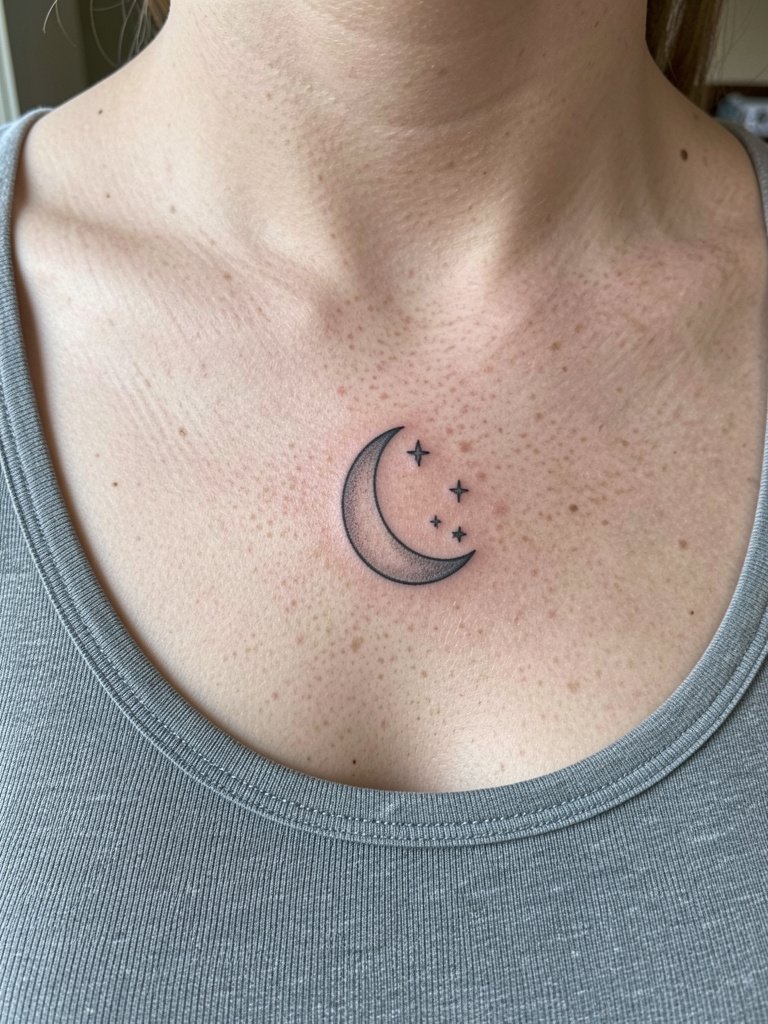
Classic celestial motifs age well when outlines have enough negative space to avoid bleeding. The typical mistake is adding tiny linework inside the crescent that will blur. Prefer soft grey shading and dot accents to keep the shape legible. Sessions are brief and the pain is variable across the ridge. For evenings out, pair with a plunge neckline dress so the motif sits in the natural focal plane.
14. Micro-Lock and Key Pair Straddling the Clavicle
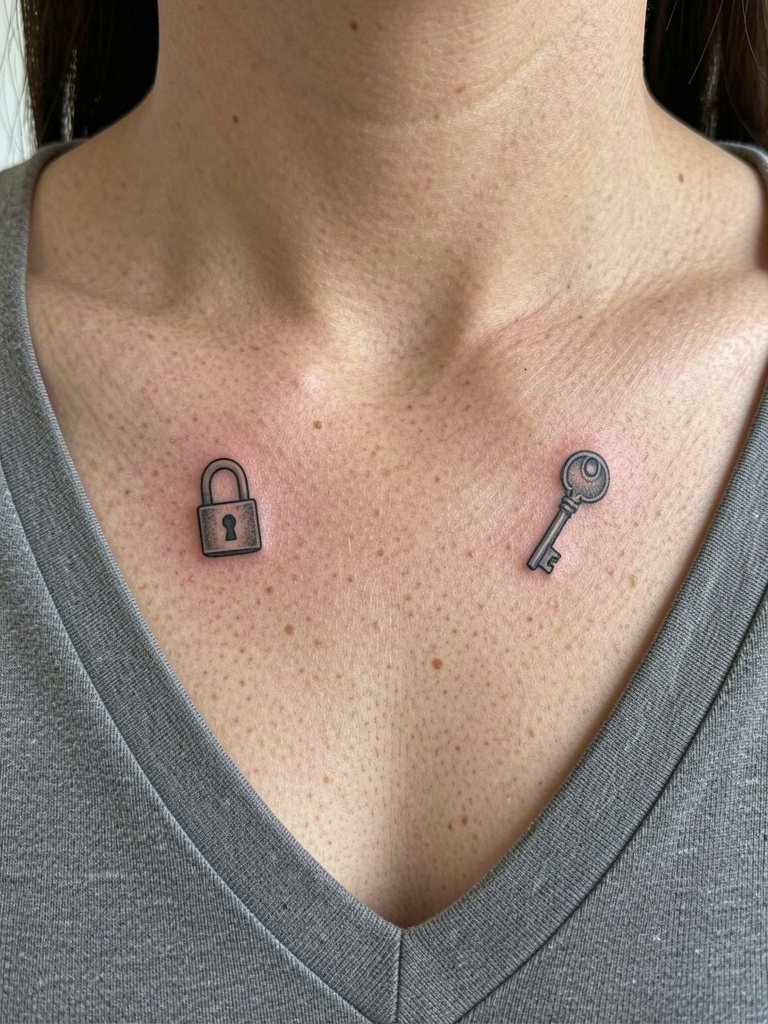
Paired micro motifs should be matched in scale to avoid one reading heavier. A common mistake is giving the lock thick outlines and the key thin ones, which unbalances the composition. Ask the artist to present scaled stencils for both sides simultaneously so symmetry is exact. Expect two brief passes instead of a single run. For styling, choose a soft v-neck sweater that lets both elements peek through.
15. Thin Wave Line That Tracks the Bone
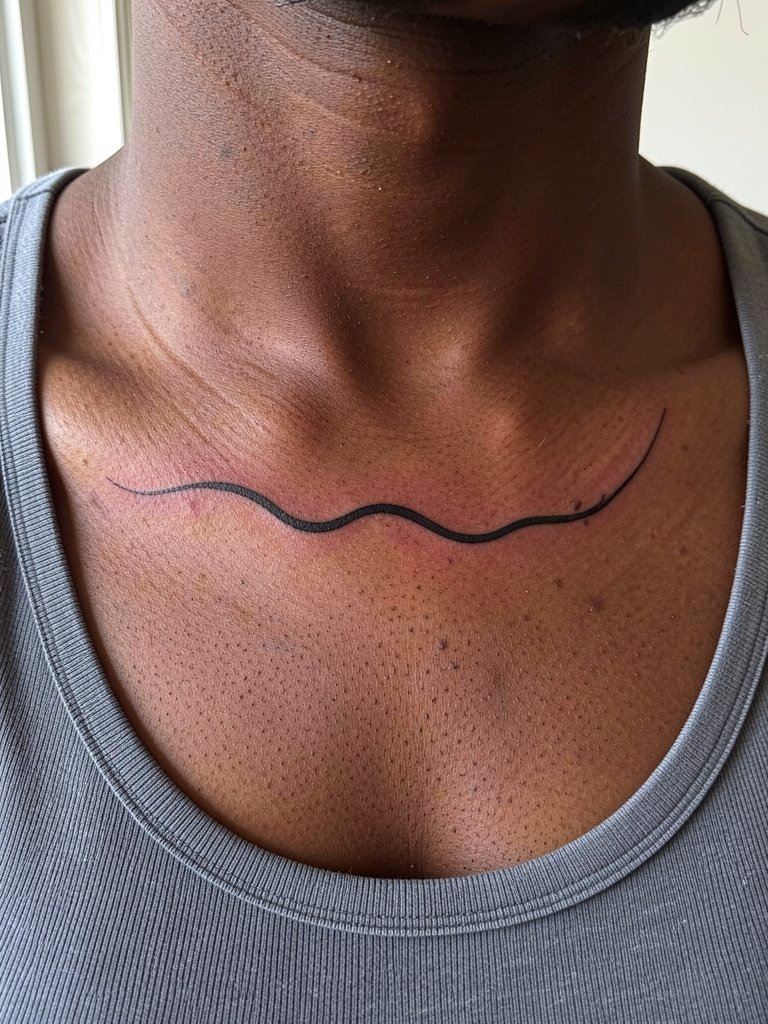
A wavy line can feel organic but needs consistent spacing from the bone so it does not warp with movement. The mistake is letting the wave sit directly on the high point of the clavicle where breathing and posture make it distort. Request the artist map the curve while you breathe naturally to find the most flattering line. This piece takes under an hour and pairs well with a scoop-neck camisole to keep the curve visible.
16. Tiny Botanical Wreath Centered Over the Notch
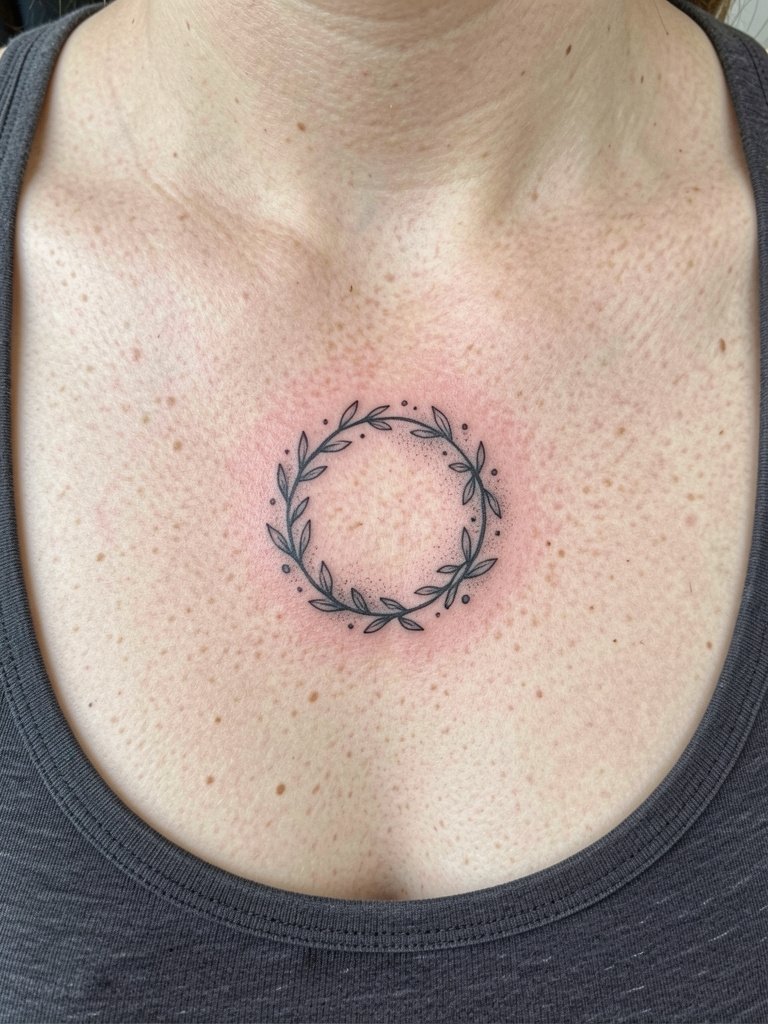
A centered wreath reads like a pendant but requires careful scale. The error is cramming too many leaf details into a small circle. Ask the artist to simplify elements into silhouette shapes and stipple for depth. Because the area is thin, the sensation can be sharp and the artist should work in short passes. Wear a low-cut bodysuit afterward so the neckline does not tug at the fresh piece.
17. Micro Icon with Color Accent
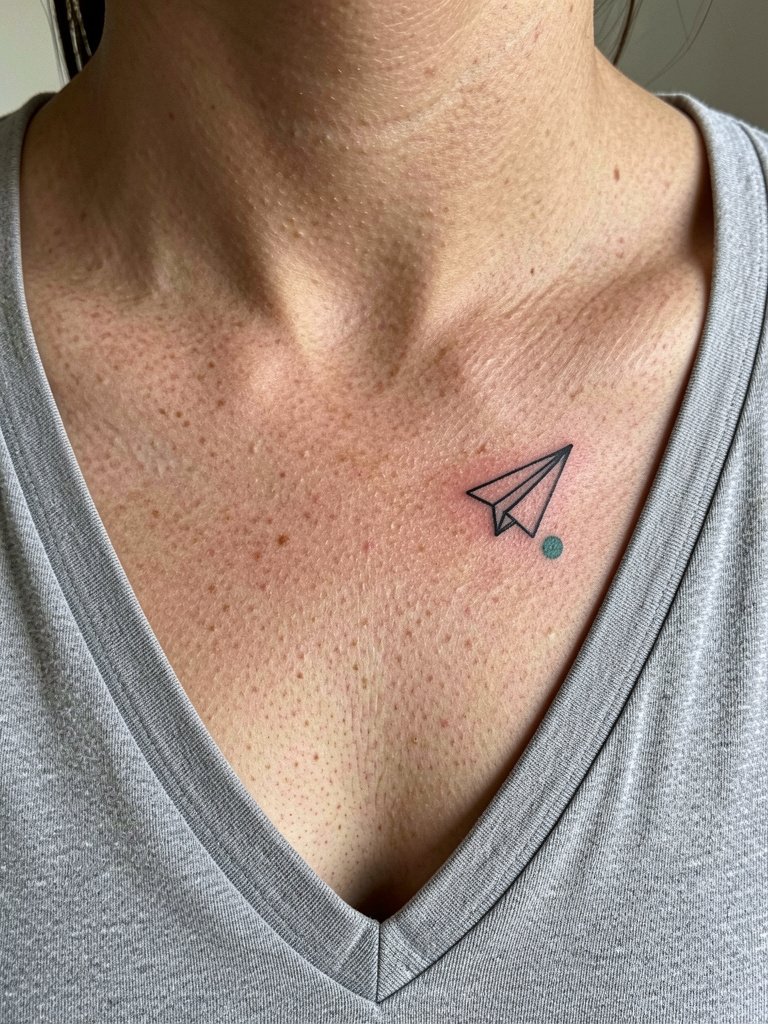
A tiny color accent can make a micro-icon pop but adds a variable: pigment saturation on different skin tones. The split camp debate among artists is clear about colored microwork. One group warns that small color dots tend to fade or migrate and recommend black-only accents. Another group says carefully saturated micro color holds if the pigment is placed with correct depth and touch-ups are planned. Name which color you want and ask for the artist's healed photos of similar tones. For wear, a v-neck tee lets the color flash when you move.
18. Stippled Crescent with Micro Dot Trail
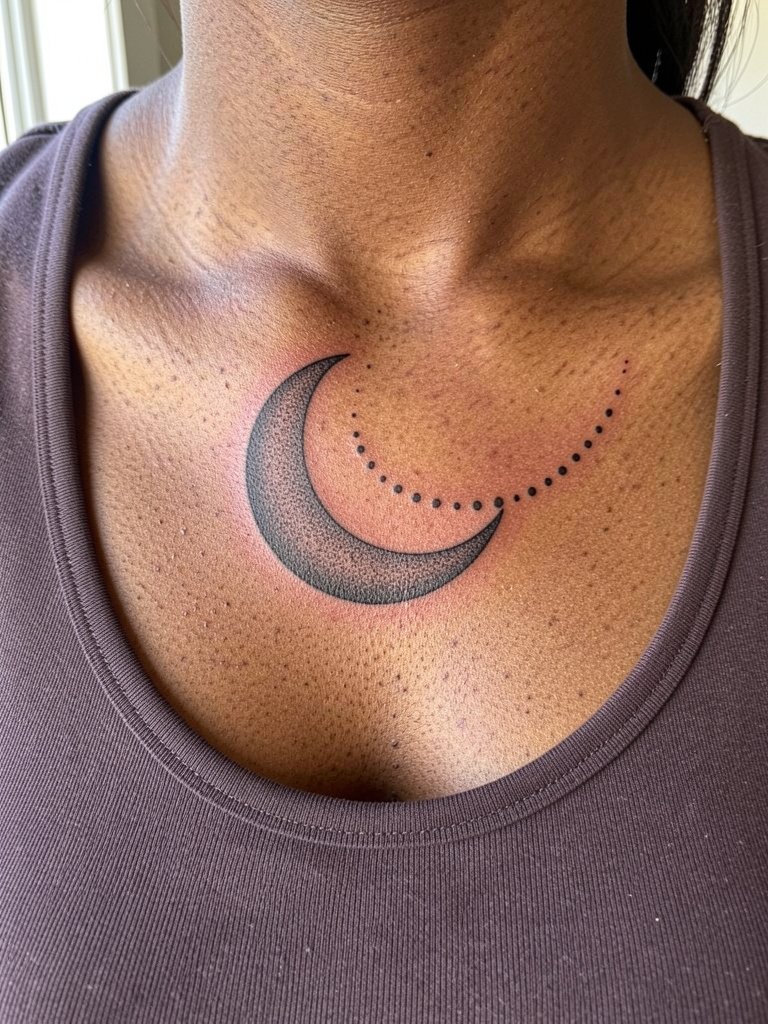
Dot-work shading reads beautifully on the collarbone if spacing is planned for future spread. The common error is putting dots too close, which merge into a grey patch with time. Ask the artist to space dots to predict a subtle softening at year three without losing form. Sessions can be longer due to stippling technique. For outfits, a boiled wool cardigan left open provides a neutral backdrop.
19. Micro Blackwork Triangle Accent
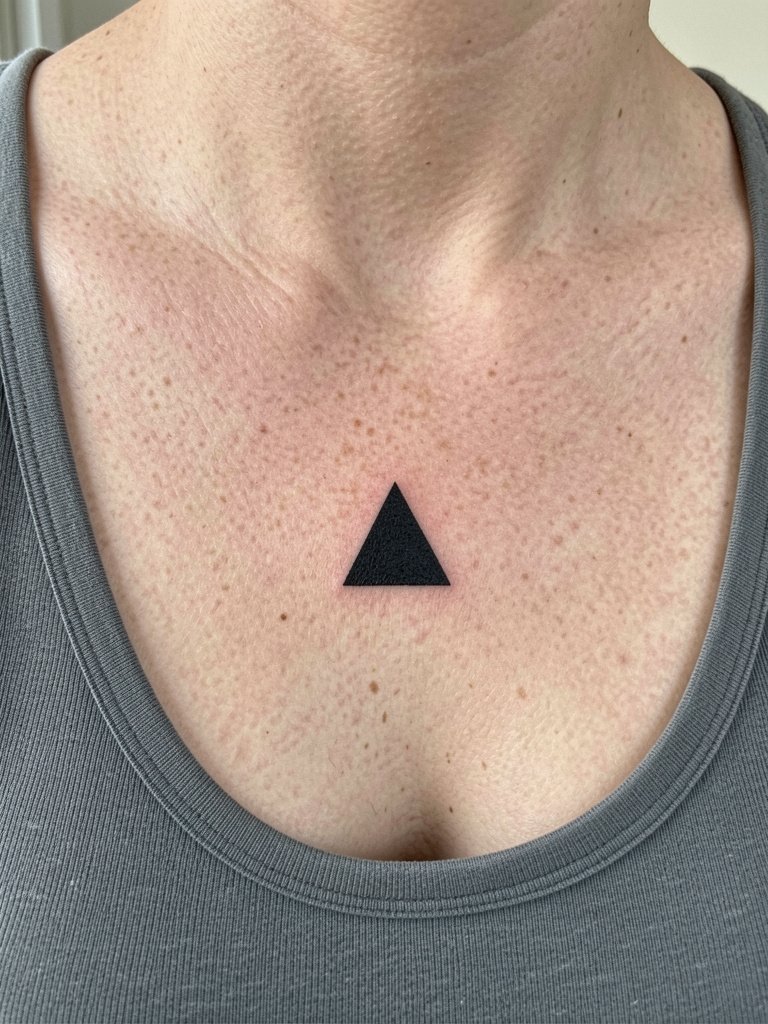
Solid black shapes can last if saturation is handled carefully. The frequent mistake is overfilling tiny solids which creates a raised scar-like area. Discuss desired density and let the artist plan for slightly flatter packing that still reads solid. Pain is noticeable where the triangle crosses the bone. Pair this bold minimalism with a structured blazer for a contrast between hard lines and skin.
20. Micro Botanical Sprig That Wraps Slightly
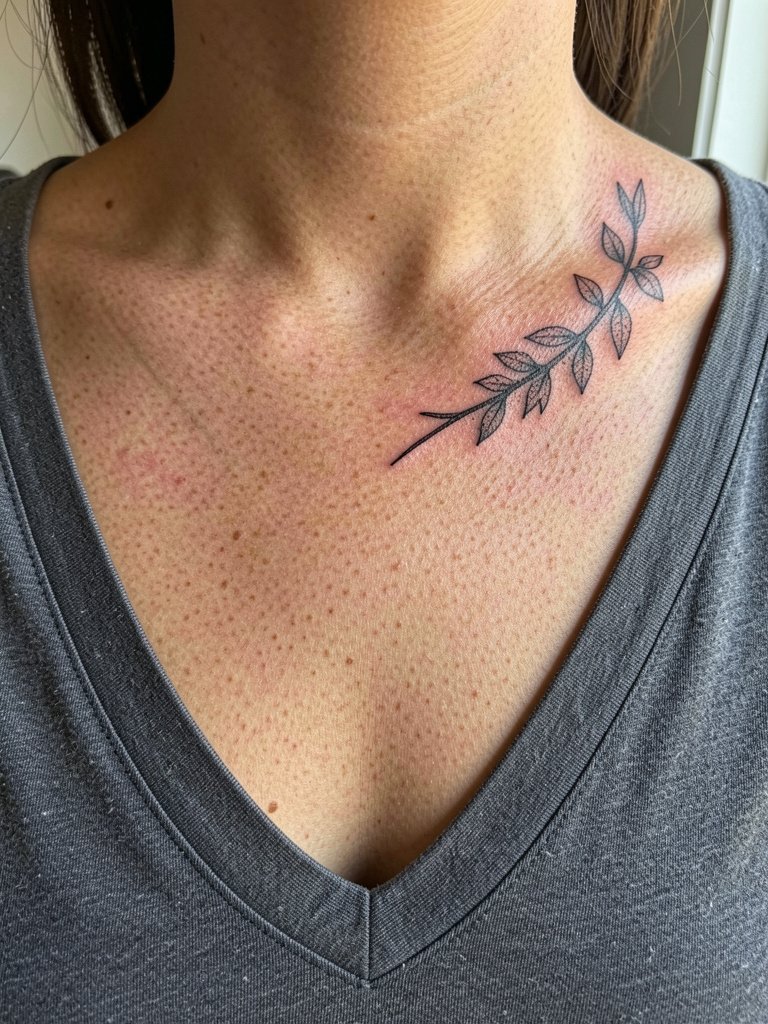
A sprig that wraps requires conversation about how movement affects reading. Avoid placing high-contrast detail where the shoulder joint creates folding. The real-life check is to watch the stencil while moving your arm to see how the sprig flows. Sessions are under an hour and aftercare calls for loose straps to prevent rubbing. Style with a one-shoulder top so the extension remains visible.
21. Tiny Constellation Placed at the Edge
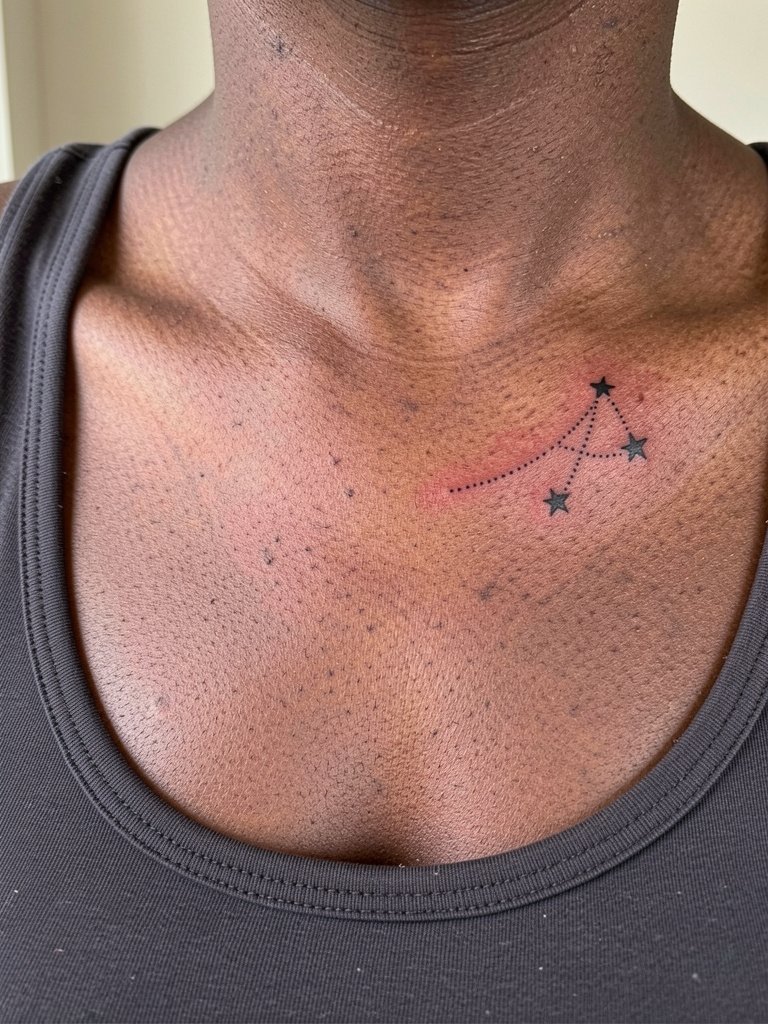
Constellations work as tiny groupings but the connecting lines are prone to softening. Request slightly heavier dot connectors and avoid continuous ultra-thin lines between stars. The area near the shoulder can be tugged by straps, so wear a strap style that avoids rubbing during healing. A sleeveless summer dress keeps the edge visible without friction.
22. Micro Quote Curving With the Bone
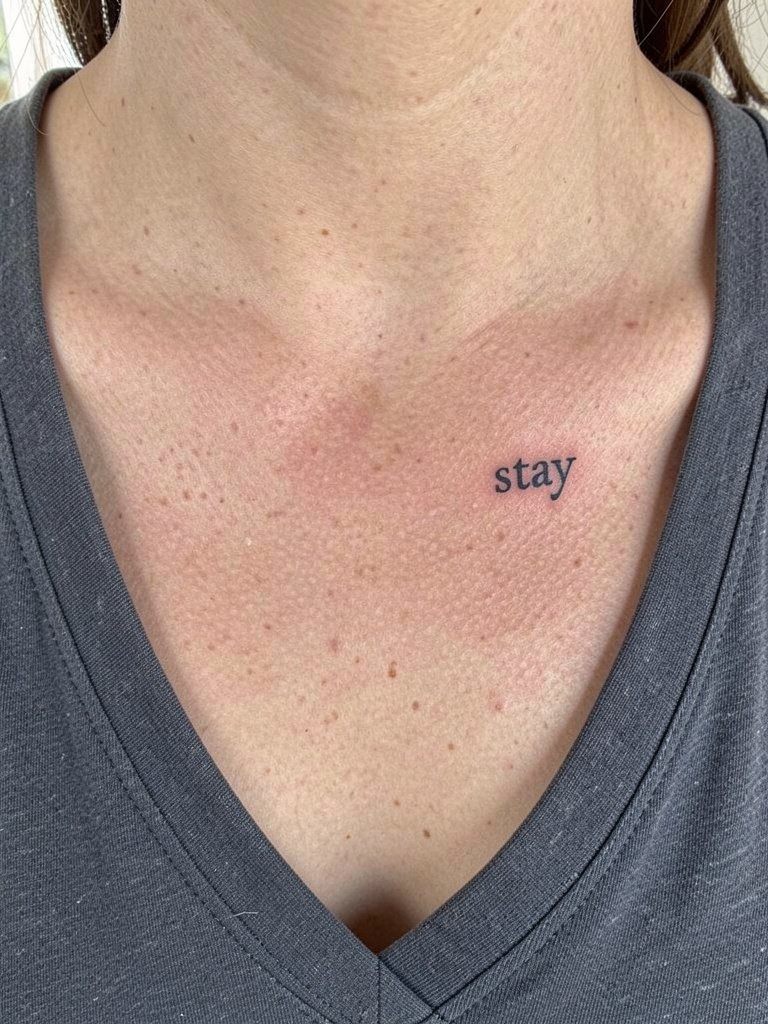
A micro quote that curves with the bone reads intimate but requires readable letter spacing. The common misstep is choosing too narrow a font or compressing characters to fit. Bring two font samples at actual size and ask the artist to show how kerning adapts to the clavicle arc. Touch-ups are common to keep letters crisp after the first year. For styling, a low scoop tank keeps the quote visible.
23. Tiny Compass Pointing Along the Collarbone
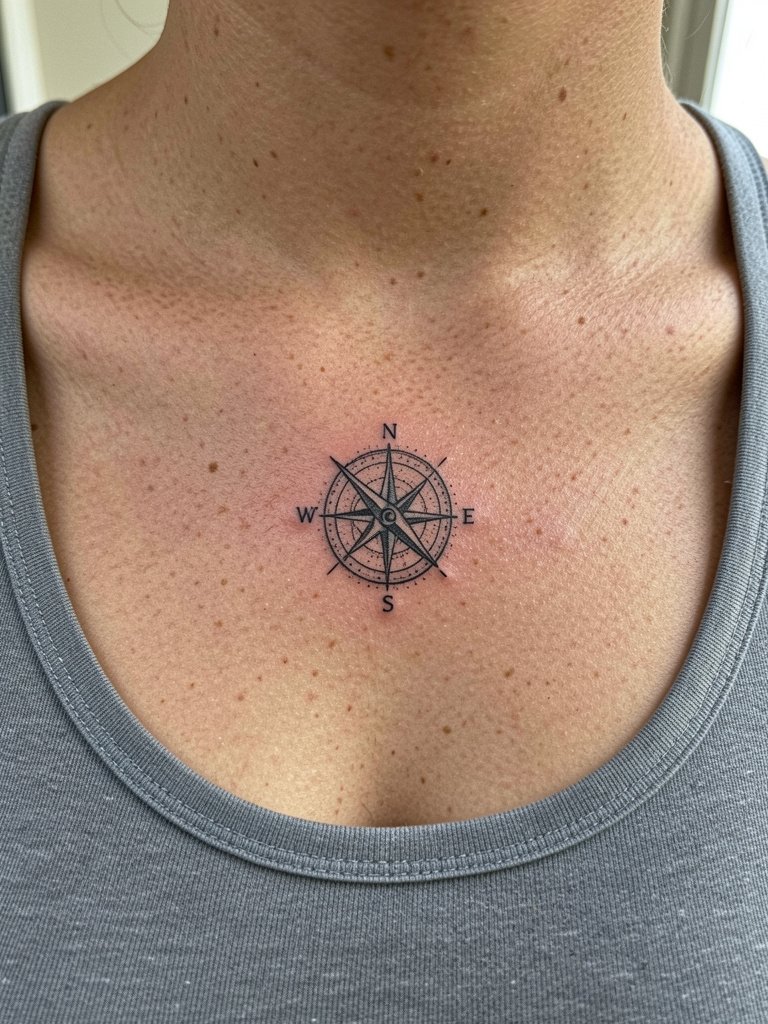
Compasses need clarity for tiny directional points. The frequent mistake is adding too many degree marks that blur together. Ask the artist to simplify to primary points and a small bold north pointer. The session is short and pain varies as the needle crosses thin skin. Pair with a button-down shirt left slightly open for a rugged contrast.
24. Tiny Wave with Color Accent Toward the Shoulder
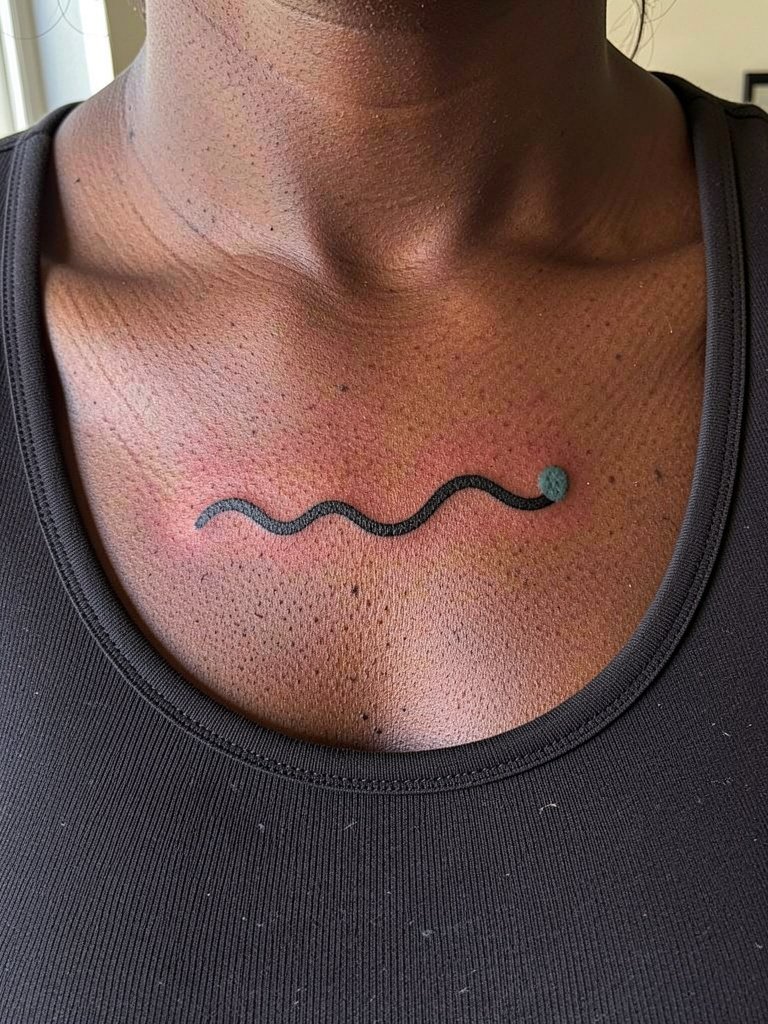
Small color accents on moving curves demand pigment choices that show on your skin tone. One camp argues micro-color is unreliable and prefers black-only work. The other camp points to successful healed photos where micro color reads clean after touch-ups. Ask to see healed examples on similar skin and plan a follow-up touch-up at the one-year mark if needed. For showcasing, a halter neck top keeps the shoulder area framed.
25. Minimal Arrow Tip Pointing Outward
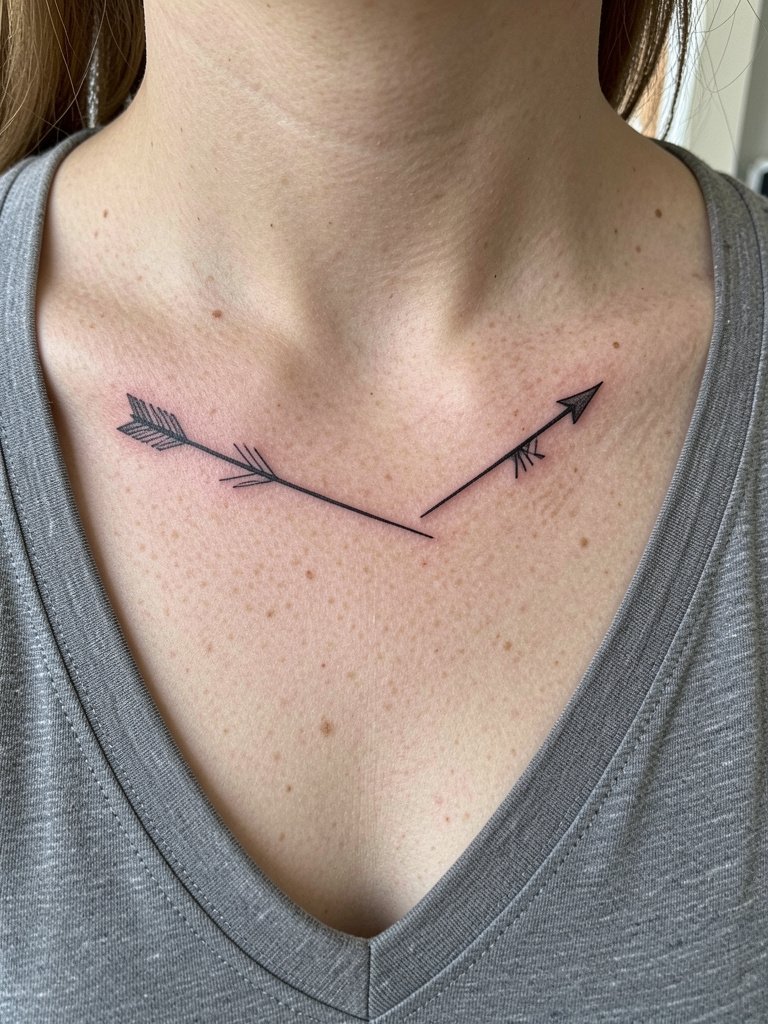
Arrow tips are directional and look best when the point follows the shoulder line. The common error is thin fletchings that disappear with time. Request slightly bolder fletch lines and simplified detail. Pain is focused where the tip crosses the clavicle prominence. Style this with a boat neck top to balance the directional emphasis.
26. Micro Knot Symbol Hidden Near the Shoulder
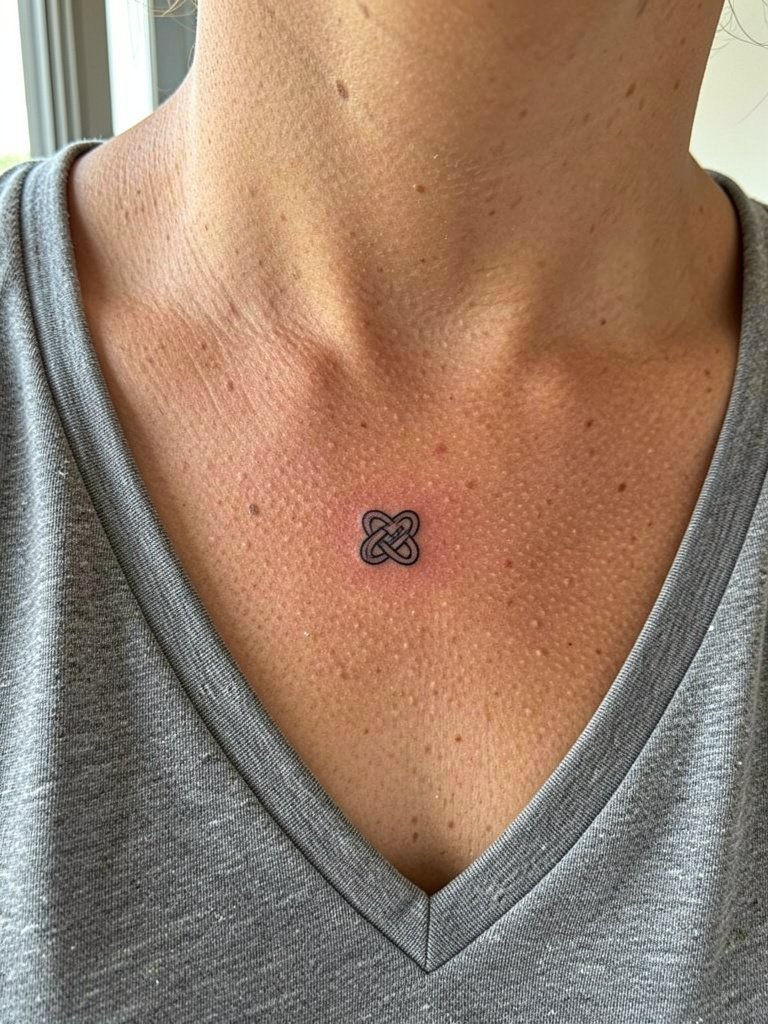
Knots can be decorative but need room between crossover lines or the interlace will soften. The practical mistake is crowding intersections in a tiny area. Ask the artist to enlarge crossover distances slightly to anticipate future softening. Sessions are brief and the lateral position sees less bone-related sharpness. For outfit pairing, a cap-sleeve tee keeps the knot discreet.
27. Micro Monogram Placed Subtly Under the Bone
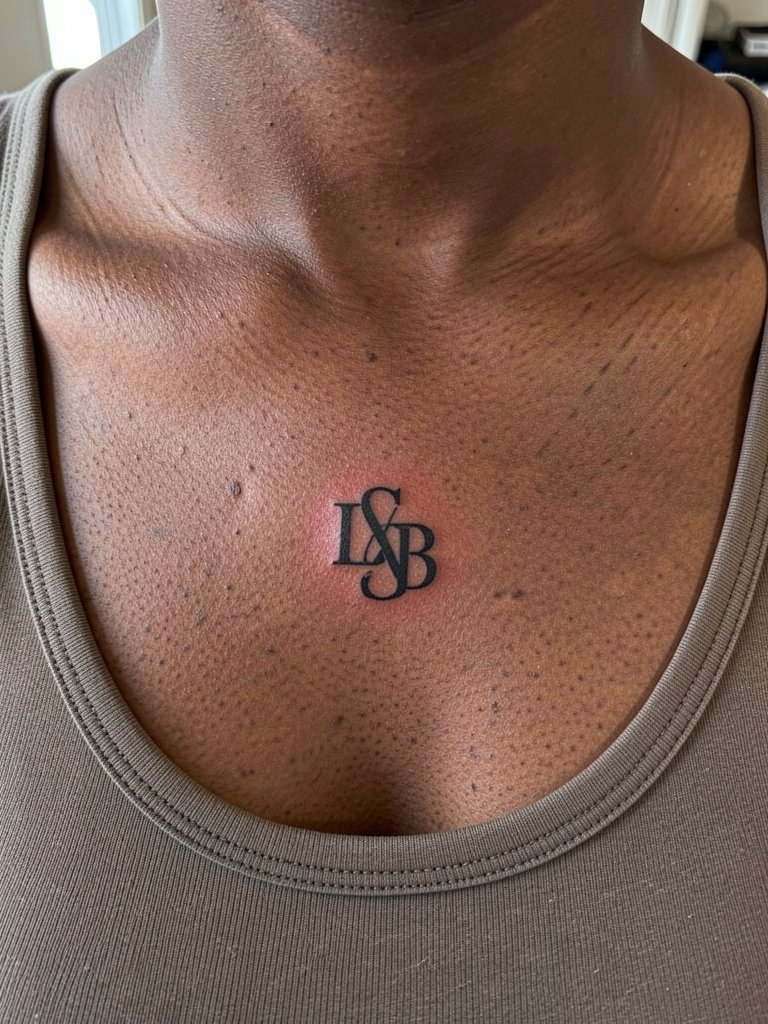
Monograms read best when simplified into bold counters and minimal flourishes. The common mistake is over-stylizing initials so they become unreadable at micro scale. Bring two font variations and ask the artist to create a badge that holds at three inches. Expect a short session and plan to avoid heavy necklaces during the first week. A delicate pendant necklace complements this placement without rubbing.
Frequently Asked Questions
Q: How painful is a collarbone tattoo compared with a forearm or shoulder?
A: Collarbone tattoos hit thin skin over bone so the sensation is sharper than an outer forearm and often a touch more intense than the shoulder. Pain tolerance varies, but most people find small collarbone pieces tolerable if the artist works in short passes and you use a numbing patch applied 30 to 45 minutes beforehand.
Q: How do I find healed collarbone portfolios and examples across skin tones?
A: Search platform filters and specific hashtags on social media for healed examples, use location filters on TikTok and Instagram, and browse portfolio sites for keywords like "collarbone healed" or "suprasternal healed." Reddit threads and community tag searches will surface multiple healed shots on different skin tones so you can compare how linework and color aged.
Q: Will fine line script hold up on the collarbone or should I pick a heavier outline?
A: Artists disagree on this and you should hear both sides. One camp says ultra-fine single-needle scripts here are vulnerable to blur because the skin is thin and moves with respiration. The other camp says carefully executed single-needle work with slightly wider spacing and proper depth can settle nicely and look delicate for years. Ask to see healed examples from your chosen artist and plan a follow-up touch-up if you want the finest possible script.
Q: What should I wear to the appointment and during the first week of healing?
A: For the appointment, wear a fitted scoop-neck or wide V-neck top that gives clear access to the collarbone without needing to tug or adjust fabric. For the first week, choose tops with soft seams and no heavy necklaces. A lightweight v-neck tee in breathable fabric reduces friction while the tattoo forms a scab and starts to settle.
Q: How often do small collarbone tattoos need touch-ups?
A: Many small collarbone pieces benefit from a touch-up between one and three years depending on line weight, sun exposure, and how well you follow aftercare. Expect that scripts and micro details are the most likely to need a minor refresh to restore crisp edges.
Q: Are there cultural or professional considerations for collarbone motifs like mandalas or tribal elements?
A: Yes. When a design borrows from a cultural or religious tradition, acknowledge its origin and consider a respectful adaptation rather than copying sacred imagery. Many artists will advise on culturally informed variations that honor the source while fitting your personal story.
Q: Can I wear necklaces after getting a collarbone tattoo?
A: Wait until the tattoo is fully healed and the scab has fallen away, typically two to four weeks. In the early days avoid necklaces that sit directly on the fresh ink to prevent irritation and accidental lifting of fragile healing skin.
