
Bold black stripes hold up better than whisper-thin whiskers, and traditional Japanese shading gives the tiger a presence that still reads after five years. I have seen both approaches in shops and the ones that age best start with confident spacing and saturated fills. Expect sessions that range from a focused two hours to multi-visit back work, and bring clear references that show exact scale so the artist knows how much room the stripes need.
1. Fierce Irezumi-Style Tiger on the Upper Arm
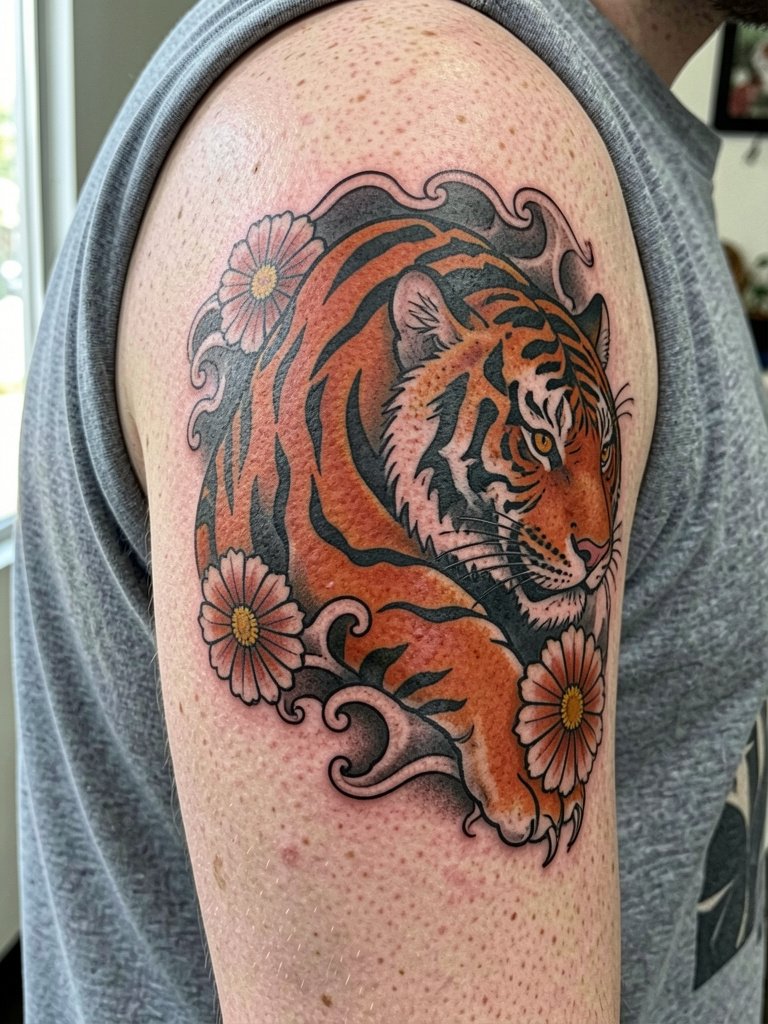
This placement favors strong linework and saturated color because the outer arm sees less stretch and fewer abrasions than the forearm. Expect a two to four hour session for a medium-sized panel, and plan a touch-up around year two to restore saturation if you want it vivid. A common mistake is asking for tiny facial detail on the tiger at too small a scale, which blurs as the skin settles. Tell the artist the exact finished diameter you want, and bring photos showing bold fill instead of micro detail. For show-off outfits try a sleeveless linen shirt that keeps the shoulder visible and breathes during healing.
2. Minimalist Single-Needle Tiger Stripe on the Inner Wrist
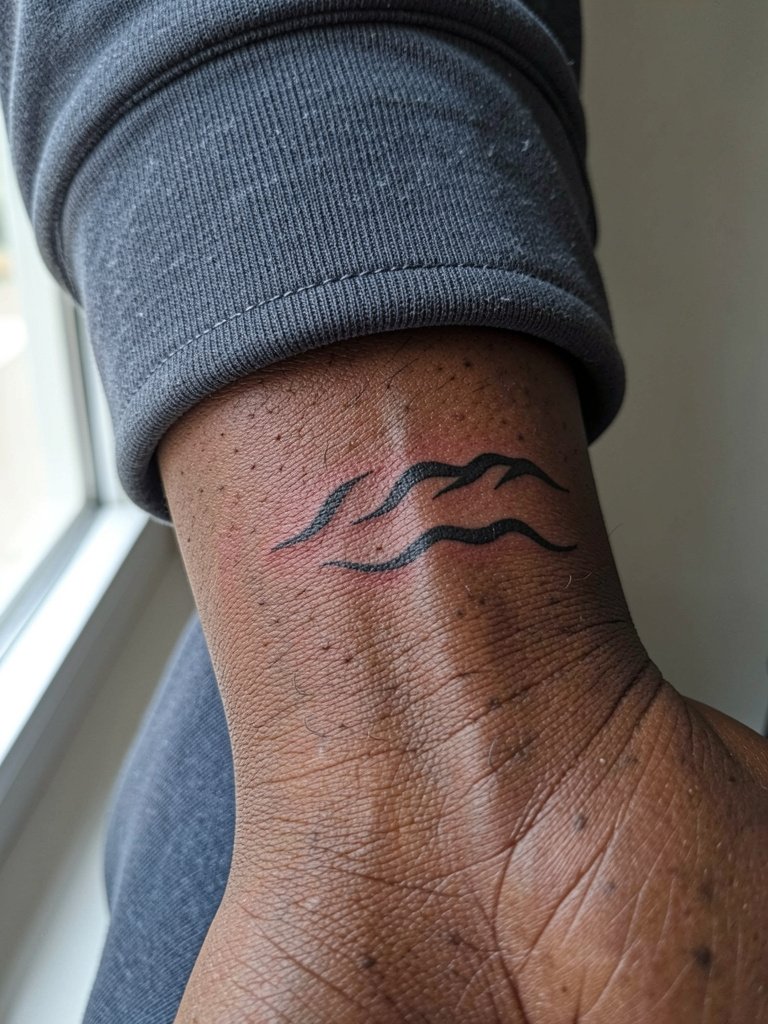
Wrist stripes read delicate at first but the inner wrist is high-motion and thin detail can spread. For longevity, widen the line weight a hair compared with a purely single-needle reference. Session time is short, thirty to forty-five minutes, but it hurts more than the outer arm. The usual mistake is underestimating friction from watches and bracelets. Ask for slightly bolder linework and plan a six-month check for touch-up if the edges soften. For wearing the piece out, a slim bracelet stack in mixed metals frames the stripes without rubbing the ink.
3. Dynamic Half-Sleeve Tiger with Waves and Clouds
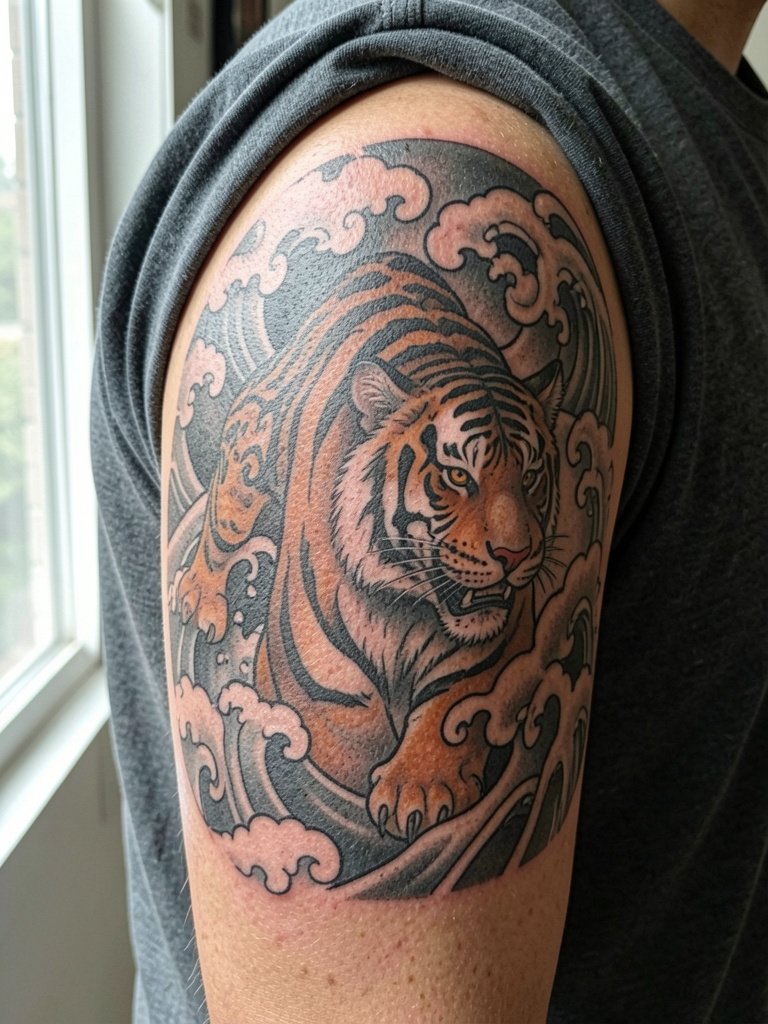
A half-sleeve gives room for the tiger to breathe so the stripes avoid crowding and the shading can be layered with stipple and whip techniques. Expect a multi-hour session or two sessions totaling four to six hours. Discuss composition lines with the artist and request mockups at different scales so the face stays legible at arm curvature. If the background gets too dense, the tiger can lose contrast over time, so keep negative space around key facial features. For post-session coverage bring a soft oversized cotton tee for comfort that does not rub the new ink.
4. Small Geometric Tiger Eye on the Collarbone
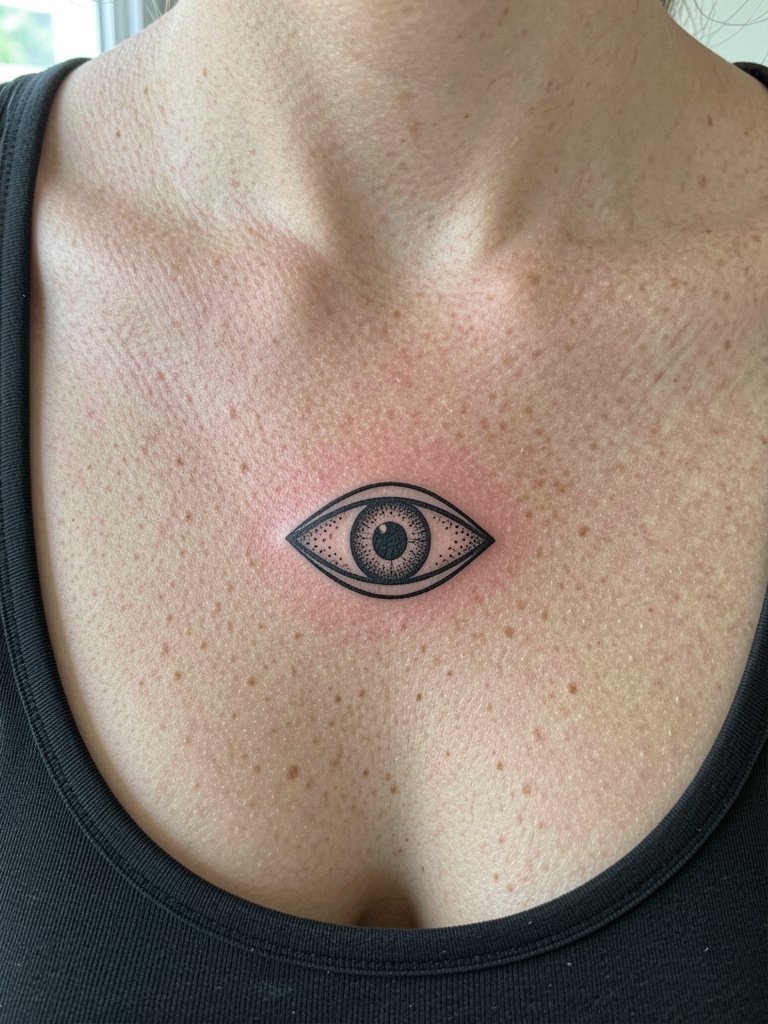
Collarbone skin moves and the area is thin, so a slightly bolder outline around the eye keeps the shape crisp as it heals. Sessions are quick, forty-five minutes to an hour, but pain can be higher than the arm because of bone proximity. A common error is choosing a very thin, intricate lattice in this spot, which softens within a year. Specify the exact outer ring thickness you want so the artist can map needle depth and spacing. For show-off looks pick open-neck blouses that reveal the collarbone and let the eye sit in frame.
5. Forearm Wrap Tiger with Bamboo Accents
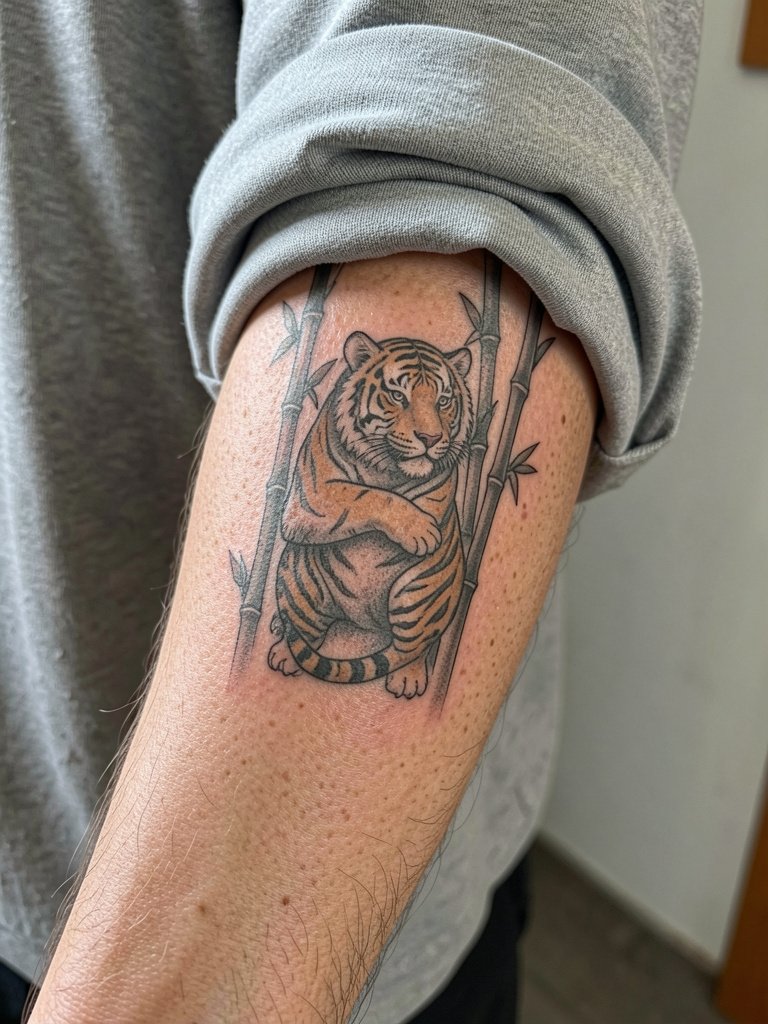
Inner forearm wraps look dramatic but the skin here is textured and moves with daily flexion, which can blur tiny detail. I recommend medium lineweight for the tiger and stipple shading for the bamboo to hold up. Session time is two to three hours depending on wrap complexity. A frequent mistake is packing the wrap too tightly so the tiger's face reads narrow when viewed straight on. Bring front and side references and ask the artist to mark how the design reads at three different arm positions. For outfits that frame the wrap try a rolled-sleeve chambray shirt so the band of skin is intentionally visible.
6. Calf Tiger in Blackwork Silhouette
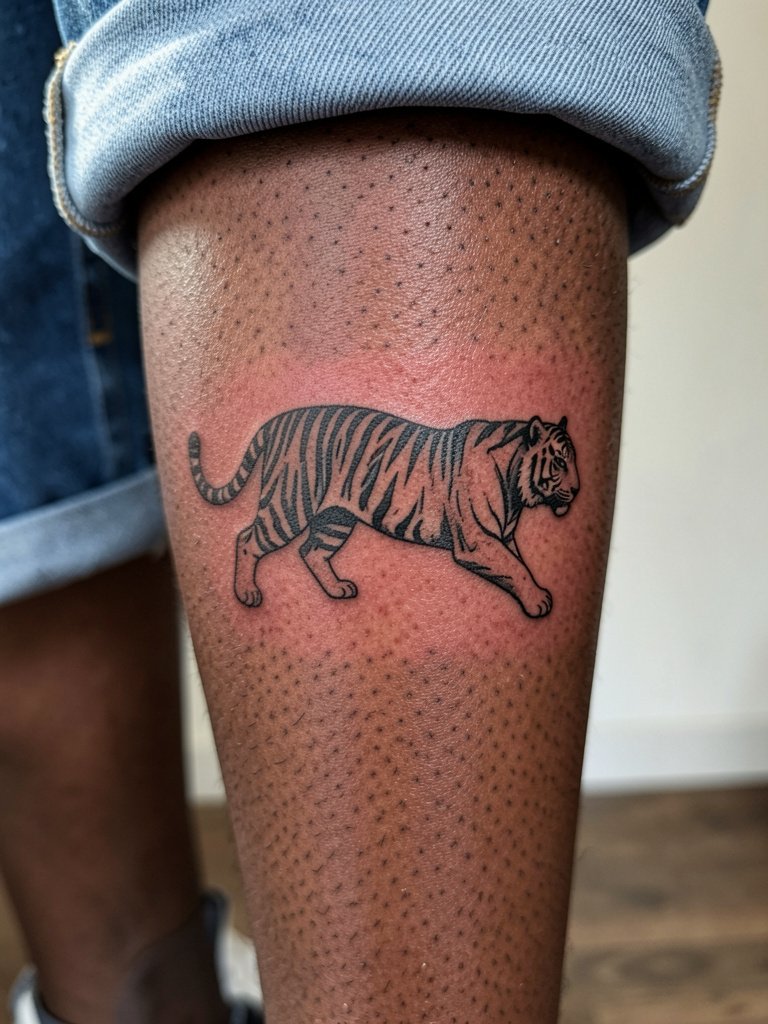
A calf piece tolerates bold fills well and blackwork silhouettes age sturdily because there is less fine detail to blur. Expect a two hour session for a moderate panel and plan a quick touch-up if any feathering appears along the edge. Mistakes include trying to force internal facial details into a silhouette. If you want facial expression, choose a larger canvas or a different style. Tell the artist whether you want the silhouette to read solid at distance or break into negative-space stripes close up. For showing off seasonal looks, ankle boots pull attention to the calf, but in warm months a mid-calf sandal keeps the work visible.
Before You Book
The shoulder, forearm, and calf pieces above heal differently because of movement and fabric friction. A few targeted supplies smooth the session and the first week.
- Stencil transfer paper kit. Lets you preview line weight on skin before committing, especially helpful for the forearm wrap and collarbone placement above.
- Topical numbing cream. Applied per instructions reduces discomfort for calf and forearm sessions without killing contrast.
- Thin protective film roll. Keeps ankle and wrist work clean during the first week of constant movement and washing.
- Fragrance-free body wash. Cleanses the healing area without irritating fine line edges.
- Aquaphor healing ointment. Thin layer for the earliest days locks in moisture for dense blackwork without suffocating the needle channels.
7. Neo-Traditional Tiger Head on the Chest
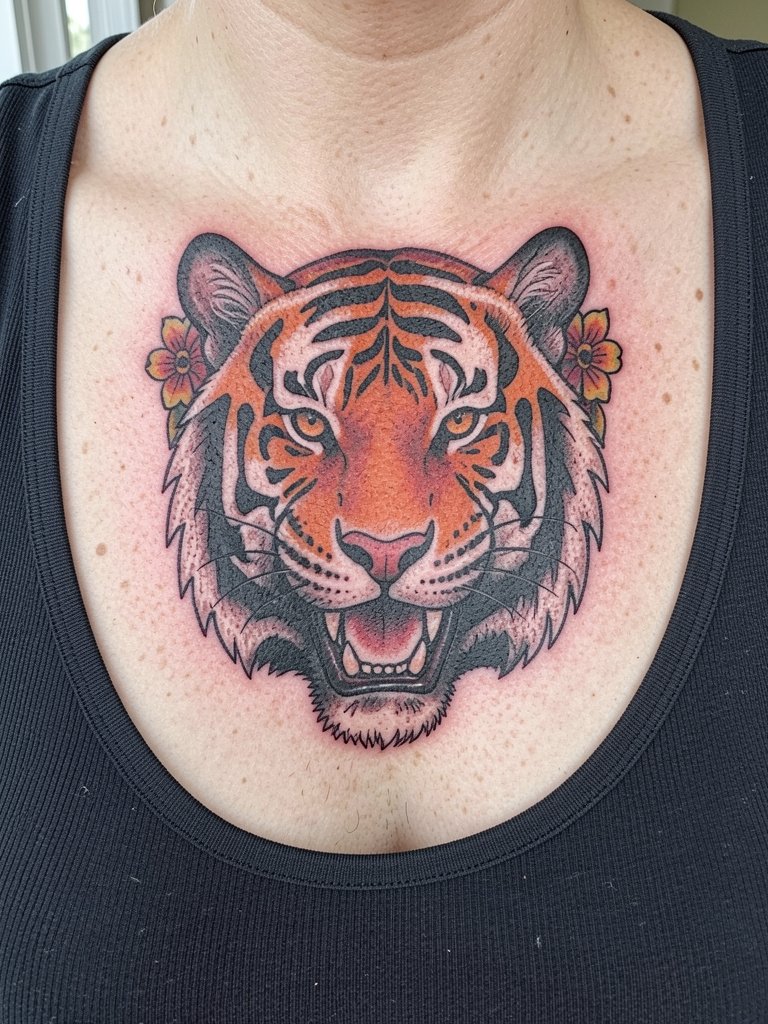
Sternum and upper chest give dramatic central placement but are high-motion and prone to stretch with weight fluctuation. For longevity pick bold outlines and avoid ultra-dense facial micro-detail. Session time ranges from one to three hours depending on size and shading. One camp of artists warns that chest skin shifts and thin-lined faces will blur in two to three years. The other camp says careful depth and slightly wider spacing lets detailed neo-traditional faces settle fine, and they will show healed photos to support that approach. During consultation request sample healed photos at three and five years for similar placement. For reveal outfits, open-front shirts frame the chest without rubbing the area while it heals.
8. Back-of-Shoulder Tiger with Floral Halo
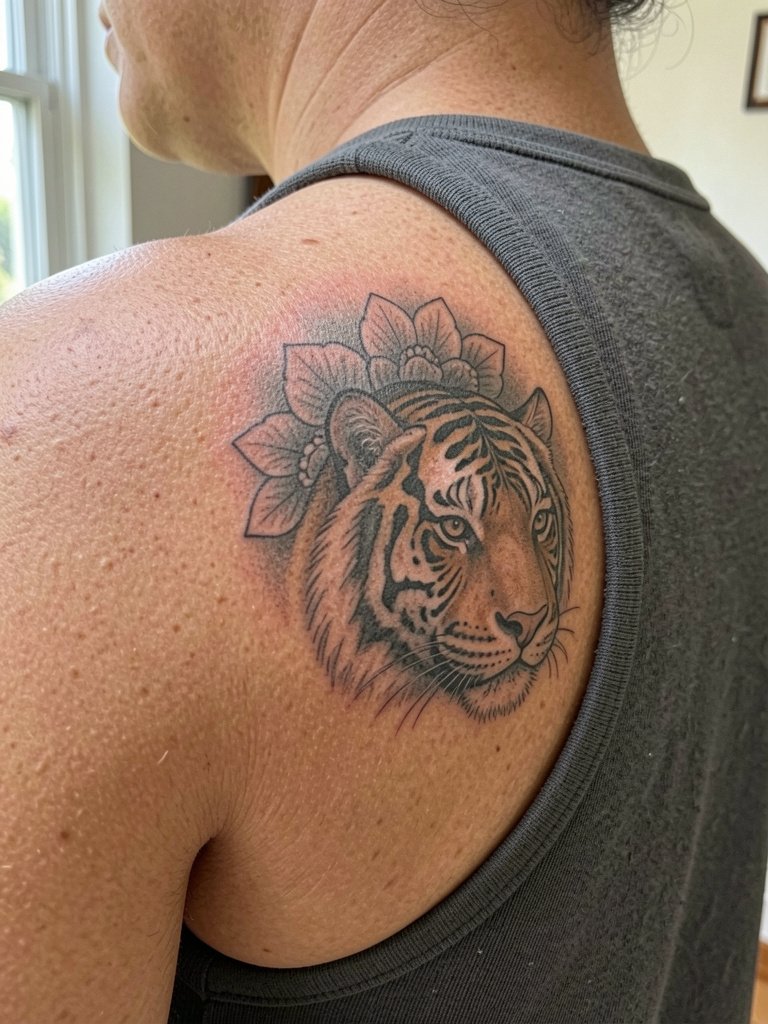
The back-of-shoulder sits where shirts and straps skim, so lower-contrast shading near edges risks early fading. I recommend saturated blacks for the outline and softer stipple within the halo so the flowers hold shape. Sessions run one to two hours and pain is moderate. People sometimes forget to consider strap friction and then complain about early edge loss. Ask the artist how the design will sit relative to typical bra or bag straps. For easy showing without rubbing the area choose a spaghetti-strap dress that reveals the shoulder without constant pressure.
9. Tiny Tiger Paw on the Ankle
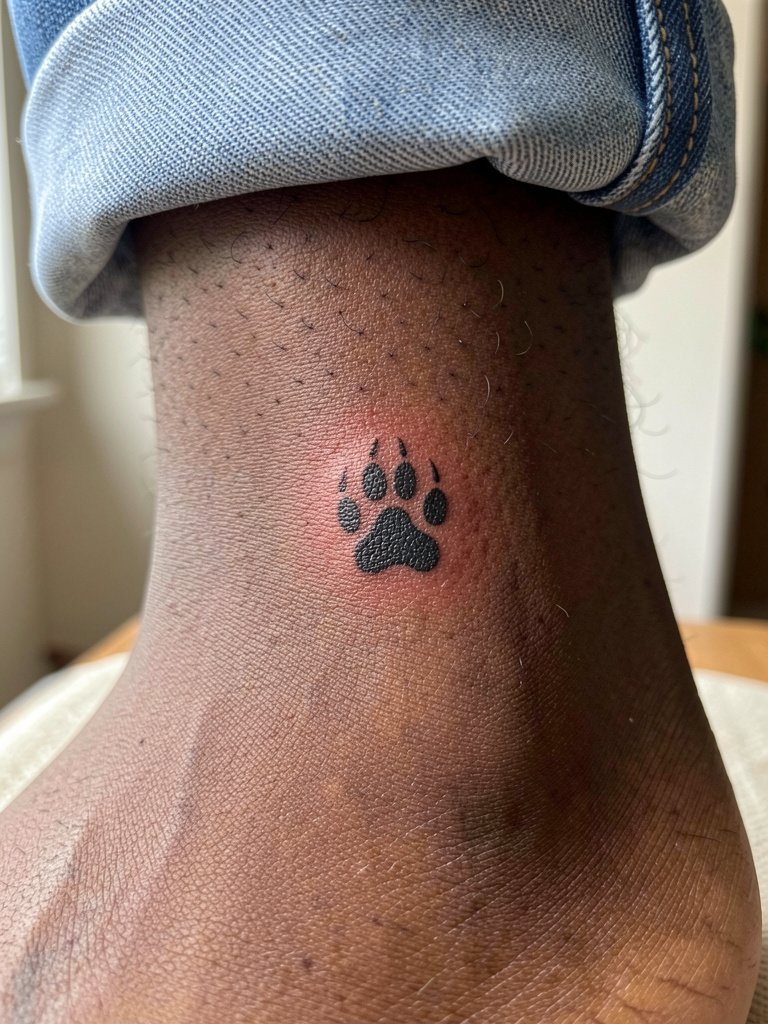
Ankle tattoos face constant friction from socks, shoes, and cuffs so small detail can soften fast. For a tiny paw, use solid simple shapes rather than inner texture. The session is brief, under an hour, but expect touch-up within a year if the piece is frequently covered. A common mistake is putting extremely fine fur texture into a small paw. Instead, ask the artist for clear pad separation and plan for a six to twelve month check. If you want to show it often, slip on a low-cut canvas sneaker that exposes the ankle and avoids harsh rubbing from high boots.
10. Ribcage Tiger with Wind Bars
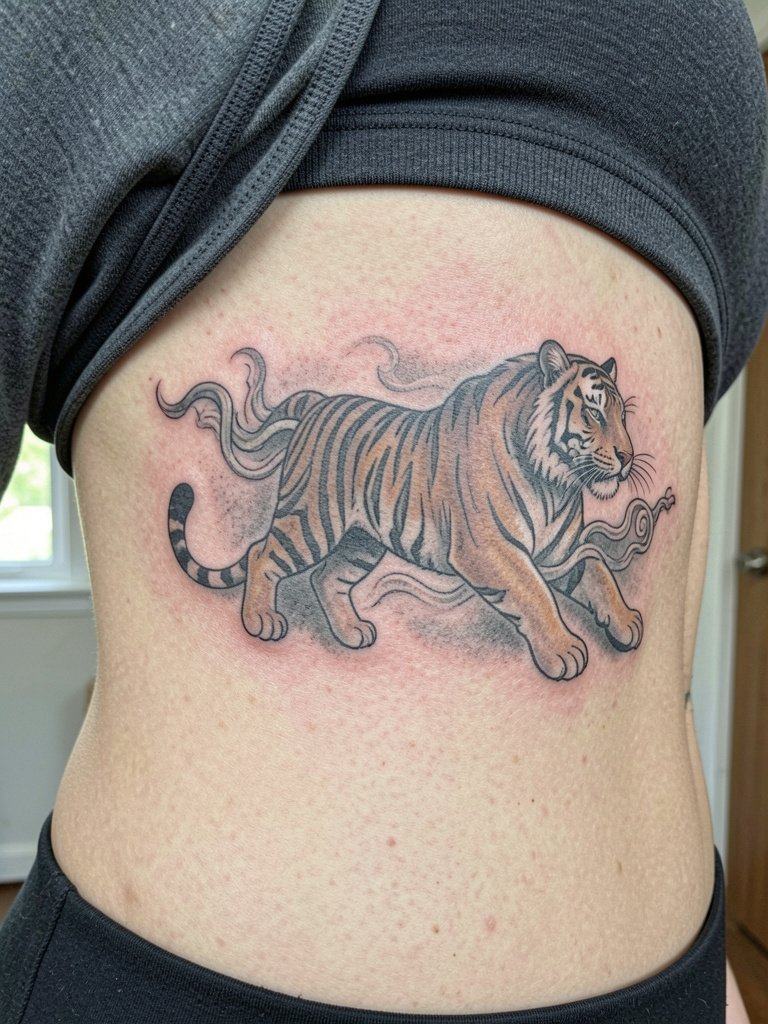
Ribcage tattoos are beautiful but the area is notorious for pain and shifting detail. One group of artists says fine line on ribs blurs within two years due to skin stretch. The opposing group argues that with slightly wider spacing and precise depth, fine line ribs can settle well and they will show three-year healed photos to prove it. If you lean toward this placement, request mockups scaled for the ribs and ask the artist to mark breathing positions so the key lines avoid hinge zones. Sessions often require breaks, so plan for longer appointment time and consider numbing strategies.
11. Sleeve Accent: Tiger Eye Peeking from Leaves
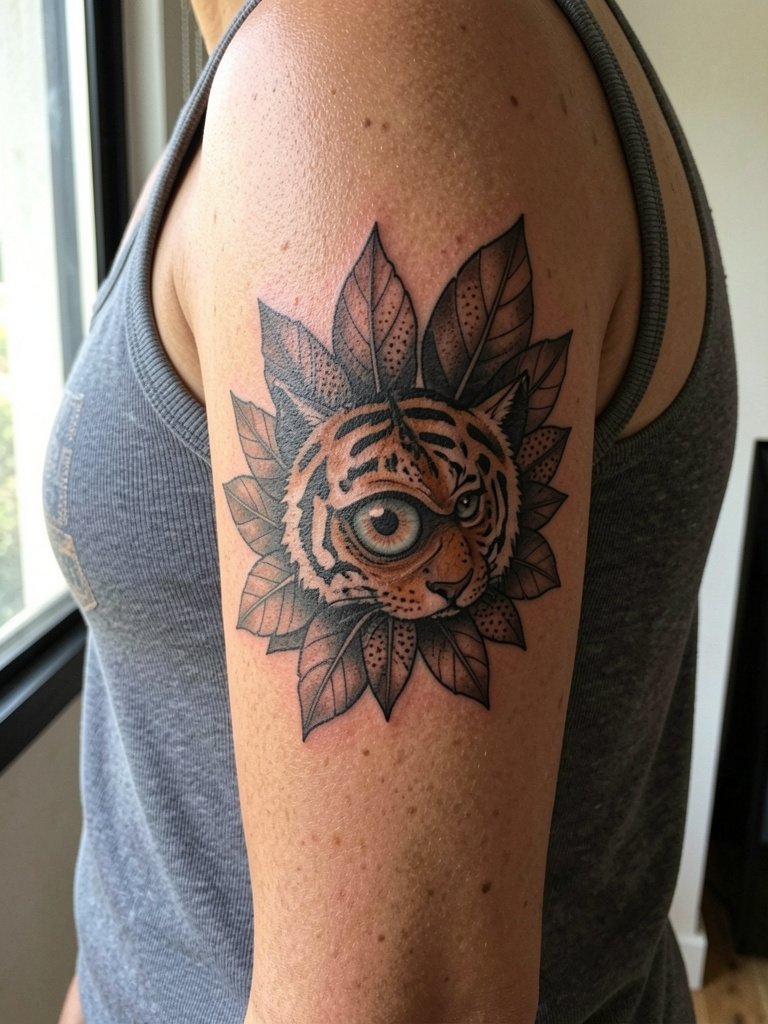
An inner bicep composition benefits from bold outlines because the skin here is softer and often hides small details. Sessions vary from one to two hours. The most common mistake is centering tiny focal detail in a spot that compresses when the arm is down. Ask the artist to simulate the arm at rest and at flex so the eye reads properly in both positions. For session comfort wear a loose tank top so the artist has clear access and the fabric does not press on fresh ink.
12. Small Back-of-Neck Tiger Silhouette
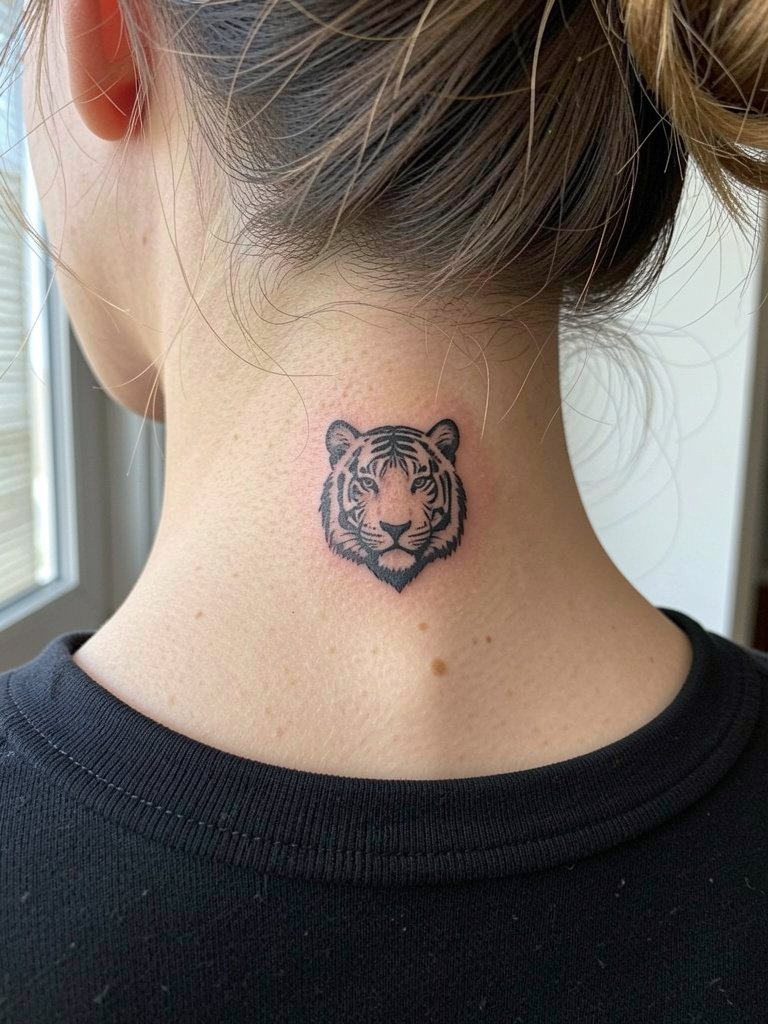
Neck placements are visible and heal under hairlines, so pick solid shapes that tolerate small touch-up needs. Session time is short but the area can be sensitive. A common oversight is expecting intricate lines to remain crisp under daily sun and shampooing. Tell the artist if you prefer the piece to peek above short hair or sit entirely below the hairline so they can position it accordingly. This placement often requires an artist experienced with nape work because of hair and curvature.
13. Thigh Panel Tiger with Watercolor Accent
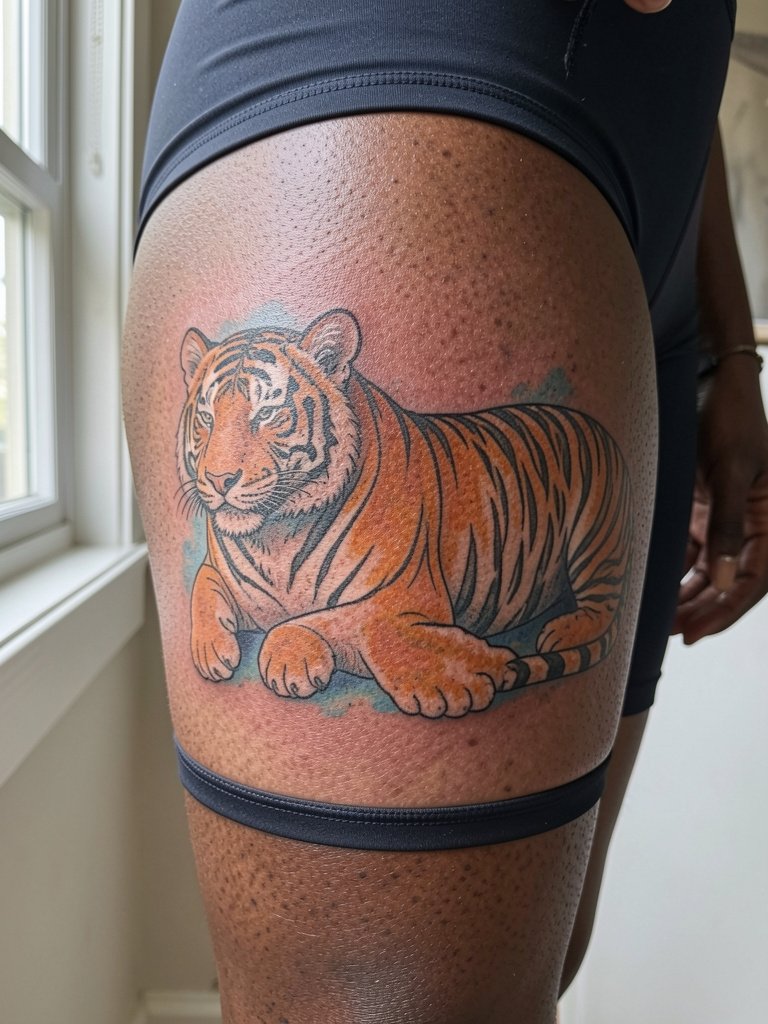
Upper thigh gives space for painterly watercolor accents if you want softer color that does not compete with heavy black outlines. Sessions for a large panel may take multiple visits. Because the thigh is less exposed to sunlight, color retention tends to be strong if saturation is properly built. A misstep is using diffuse watercolor without anchoring outlines, which can become a faded wash over time. Ask for a balance of anchor lines and soft fill, and for the artist to show healed watercolor pieces at two and five years. Wear bike shorts for the session so the artist has access while you stay comfortable.
14. Finger Micro Tiger Stripe Band
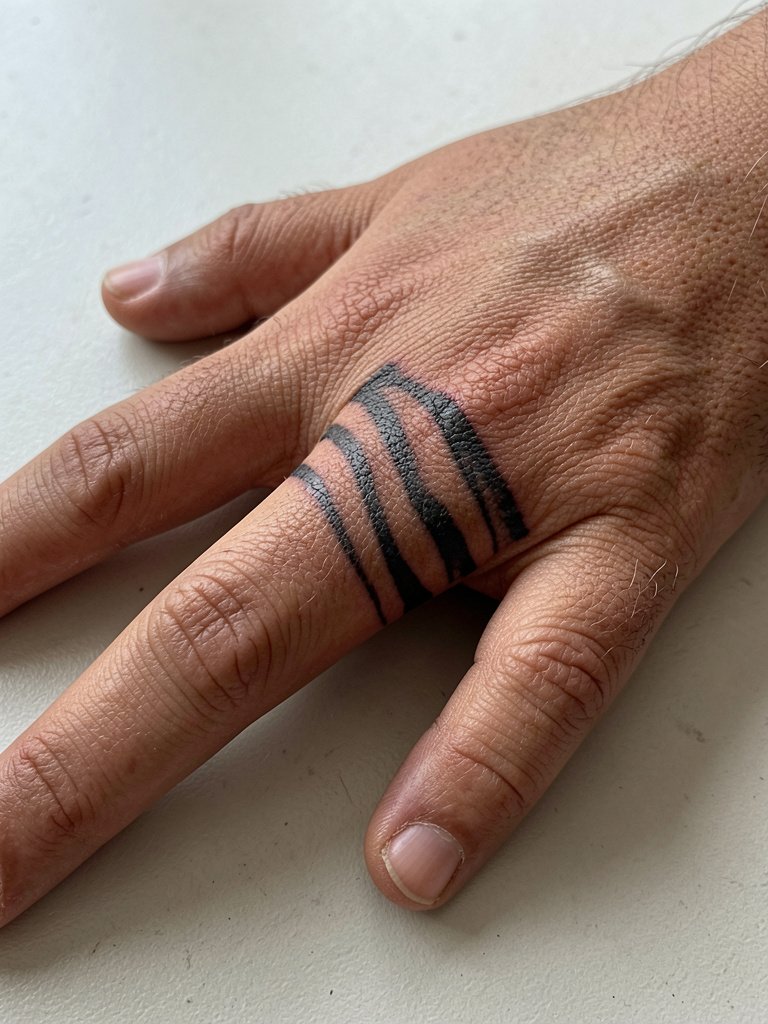
Finger work is high-maintenance because the skin regenerates and the area endures constant washing. Micro bands can lose crisp edges quickly, so plan for annual touch-ups. The typical error is expecting single-pass single-needle durability here. Discuss with the artist a plan for periodic reinforcement and ask whether a slightly thicker band will still match your aesthetic. Sessions are short but painful and expect some fading by six months. For showing the ring consider wearing a thin hammered ring that complements the stripes without covering them.
15. Chest-to-Shoulder Tiger in Black and Grey
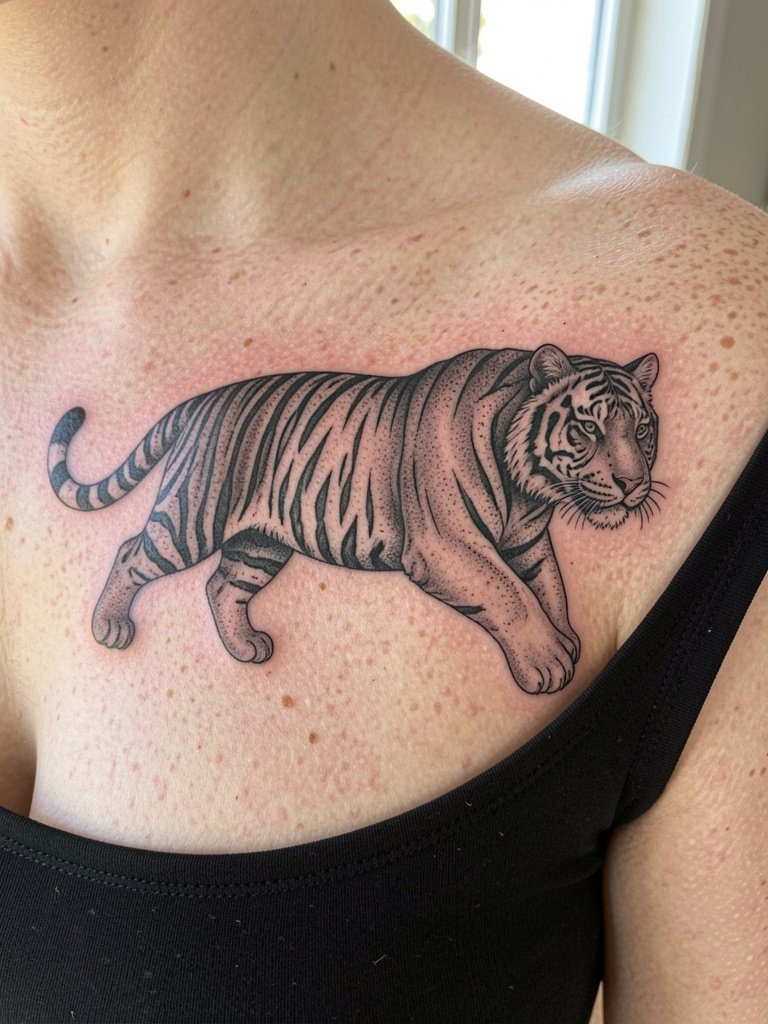
Transitional chest-to-shoulder pieces need attention to how the skin moves at the armpit and shoulder joint. A common mistake is placing fine facial detail too close to the hinge where the skin creases. Sessions often take multiple passes and pain varies. Specify how the design should read when your arm is resting and extended so the artist can position key facial lines away from fold zones. Black and grey holds well if the contrast between contour and midtones is preserved. For an outfit that frames the piece pick a wide-strap tank that keeps shoulder exposure stable.
16. Neo-Japanese Tiger Mask on the Upper Thigh
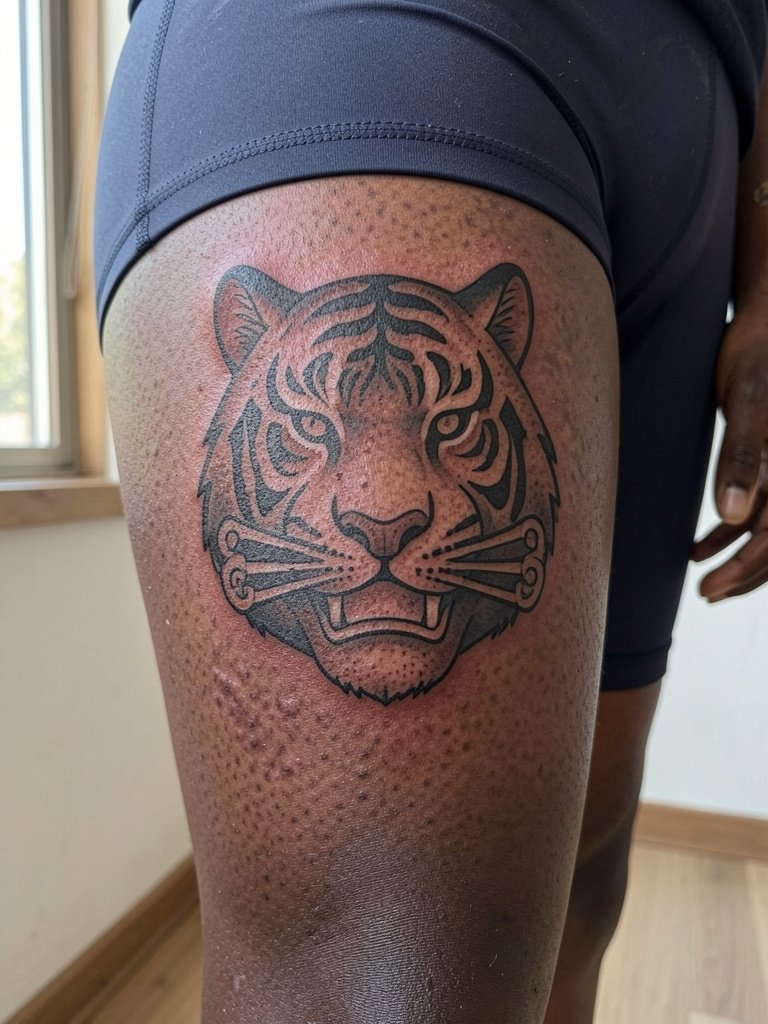
Upper thigh skin tolerates big, bold motifs and heals under less abrasion than the knee. Because of this you can ask for strong facial contrast and deep black saturation. Session time can be long for a detailed mask, so plan for breaks. A mistake is compressing the mask into a small oval, which loses menacing expression. Be specific about desired expression and ask the artist to show the face at target finished scale. For session comfort choose breathable athletic shorts so you can sit and shift without fabric chafing the area.
17. Micro-Realism Tiger Eye on the Wrist
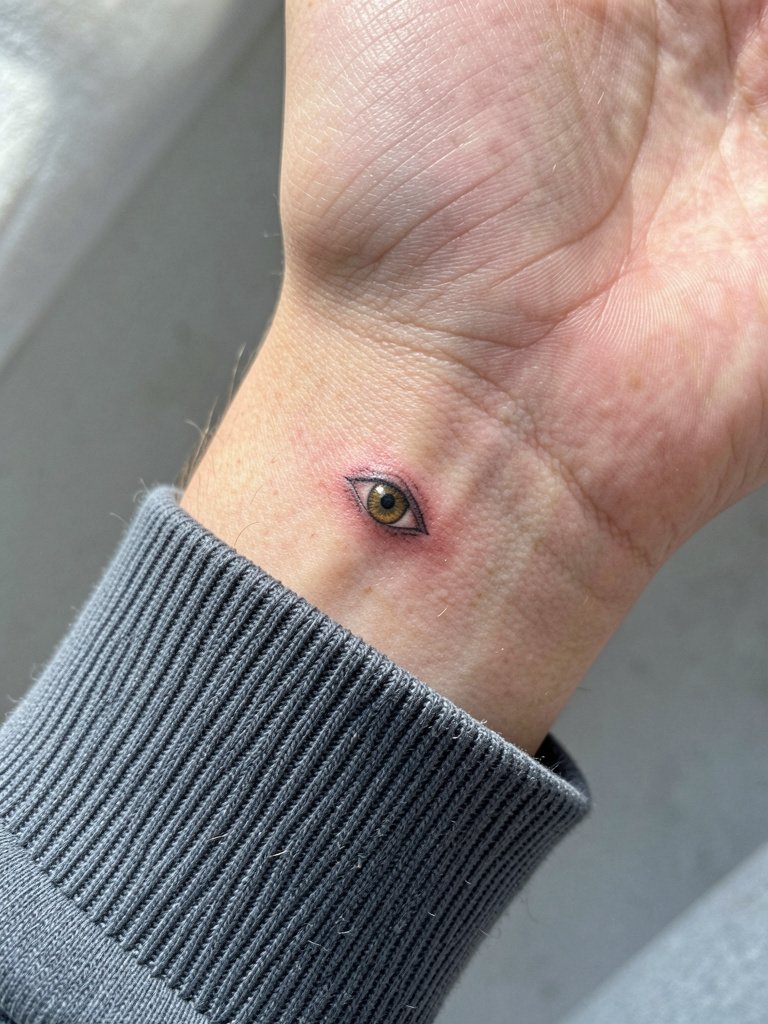
Micro-realism on the wrist looks stunning at first but can soften quickly because of frequent hand washing and motion. For longevity request a slightly bolder contour around the iris and a heavy highlight to read as contrast. The session is brief but twinges, and a touch-up at six months is common. The biggest mistake is demanding hairline textures inside a 1.5 centimeter plane. Instead, bring a scale reference so the artist knows how to compress detail for the wrist. For display pair it with a slim watch strap that does not rub directly on the tattoo.
18. Back Full-Panel Tiger with Koi and Waves
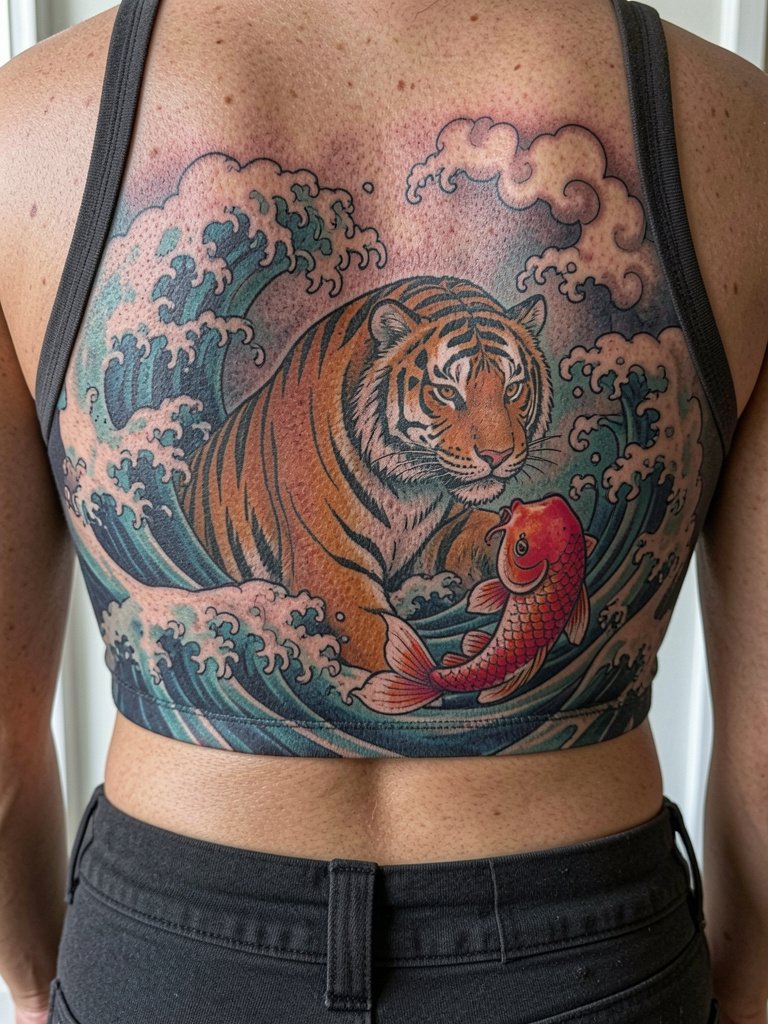
A full-back composition must respect Japanese iconography origins and avoid casual borrowing. One camp argues strict adherence to historical Irezumi motifs is essential to honor the form. The other camp supports modern reinterpretation as long as the artist understands the motifs and gives credit to the style roots. If you choose a full-back, request the artist map out narrative flow so the tiger and koi balance across the spine. Sessions will be multiple and can stretch over months. For session wear choose comfortable low-rise bottoms that stay fastened such as low-rise joggers so the lumbar area remains accessible without exposing underwear.
19. Geometric Tiger Linework on the Forearm
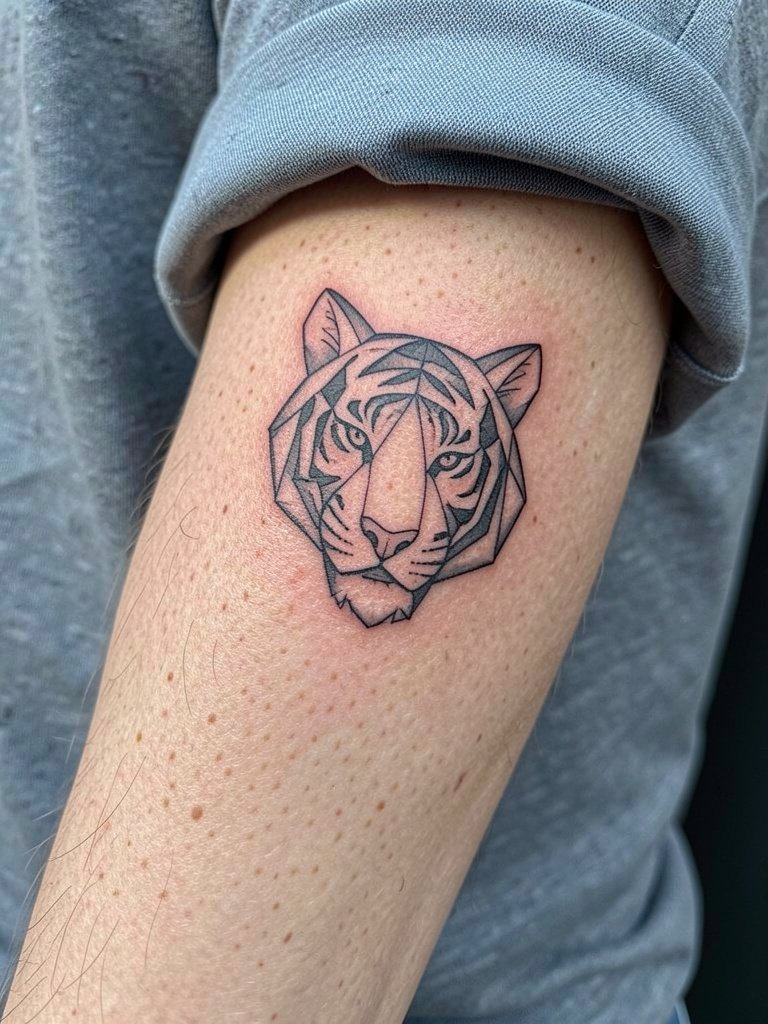
Geometric work relies on precision and room between lines, so avoid shrinking the design to fit a small forearm or the patterns will merge. Sessions can be one to two hours depending on complexity. A frequent mistake is choosing dense geometry on textured skin, which softens the pattern. Be specific about minimum line spacing and ask the artist to show a scaled stencil so you can judge the read at arm curvature. For a coordinated look try cuffing a structured blazer sleeve to expose the forearm geometry in a tailored way.
20. Watercolor Tiger Splash on the Side Rib
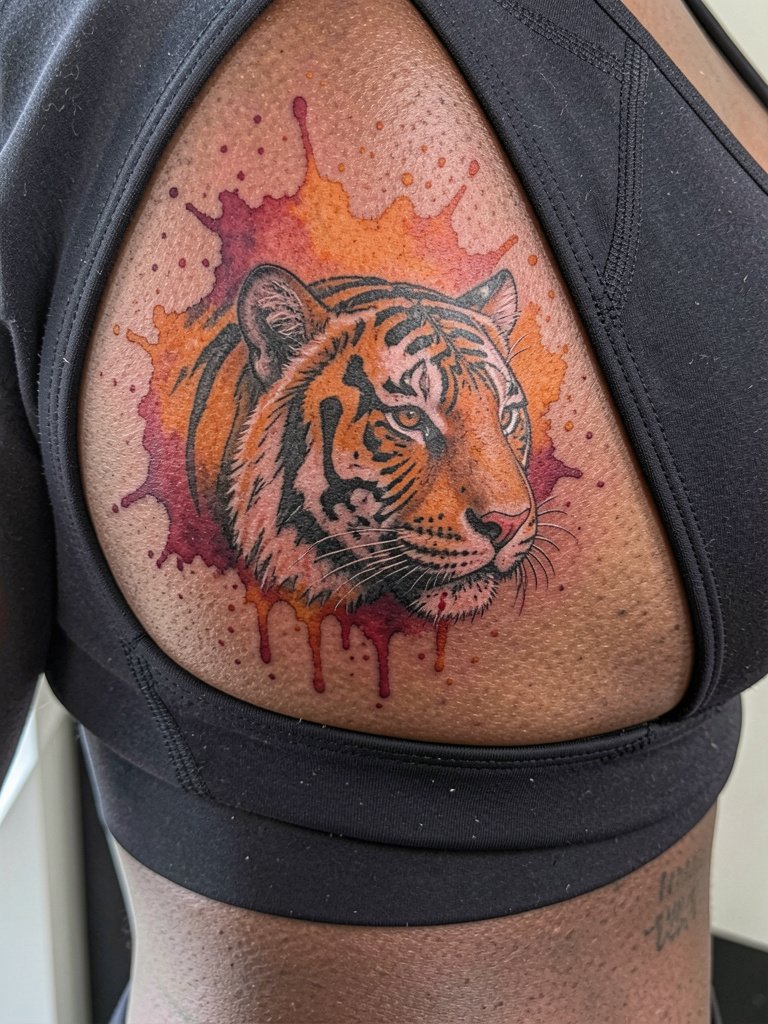
Watercolor accents can look striking on the rib but stay mindful that diffuse color requires proper saturation and anchoring black lines to avoid turning into a faded bruise over time. Sessions are often split because of pain sensitivity and breathing. The common error is using only wash color without backbone lines. Specify the exact areas where you want anchor lines versus soft wash and ask for a two-stage plan so saturation builds safely. Wear a fitted top that the artist can lift without strain, like a sports bra, rather than pulling at a loose shirt.
21. Collarbone Cluster: Tiger Fang and Script
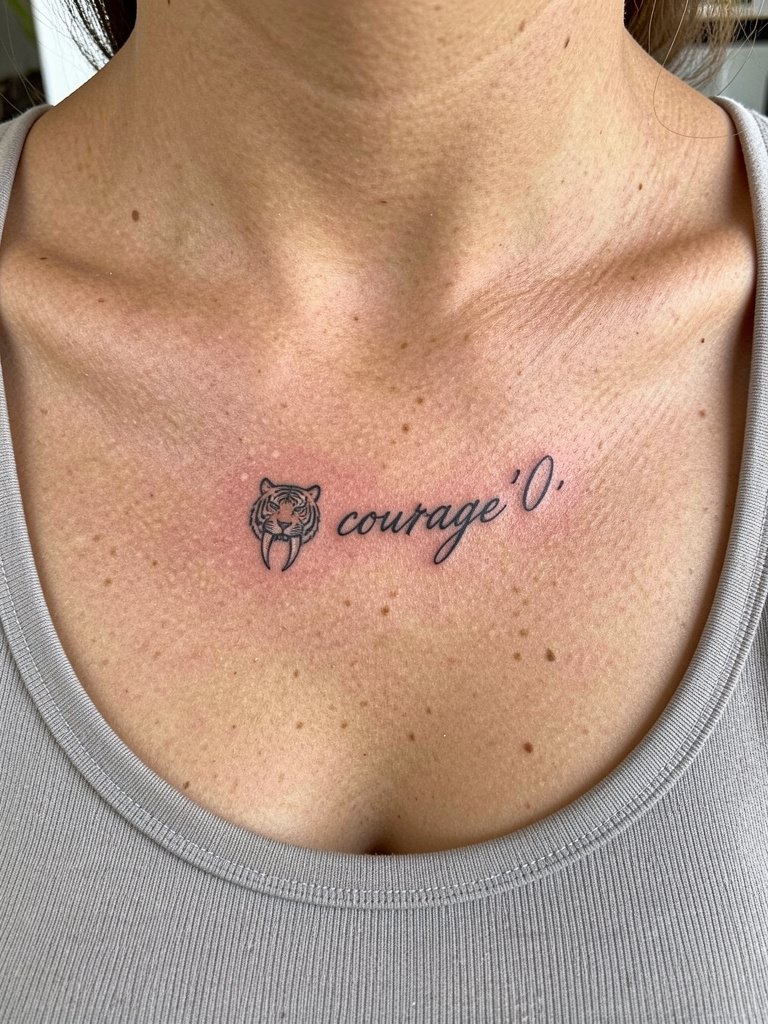
Delicate script near the collarbone needs to be slightly weightier than a typical lettering reference because the area sits near bone and moves with breath. Sessions are short but uncomfortable if over the bone. The usual mistake is choosing ultra-thin cursive that fades to illegibility. Ask the artist for the exact millimeter stroke for the script and a small outline around the fang to keep its edge. For evening looks pick a delicate pendant necklace that nests just above the collarbone without rubbing the ink.
22. Chest Pocket Tiger Peeking from Leaves
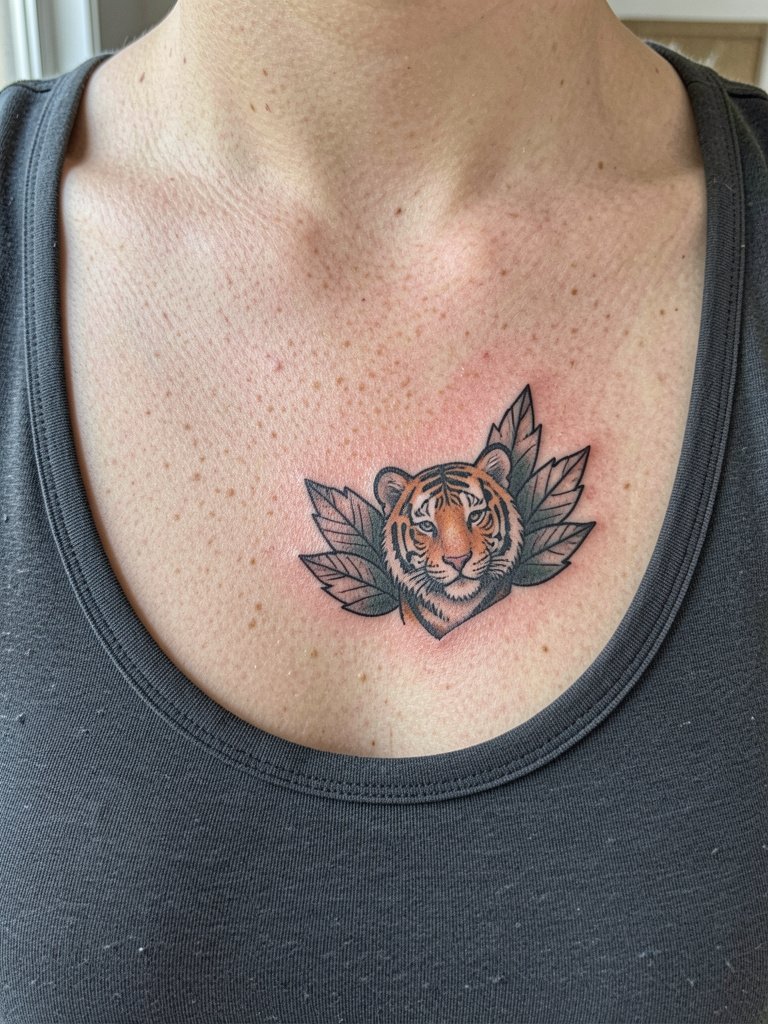
Small chest pocket motifs need balance between cuteness and longevity. Tiny leaf textures often blur, so prefer defined leaf veins and a bold silhouette for the tiger face. Sessions are brief and pain can spike over bone areas. Avoid compressing too many small elements into one tight patch. Request the artist show the piece scaled at the exact spot and ask for one revision of size if the first stencil seems too small. For wardrobe pair a v-neck tee that displays the motif while keeping the area comfortable.
23. Sternum Split Tiger with Symmetry Lines
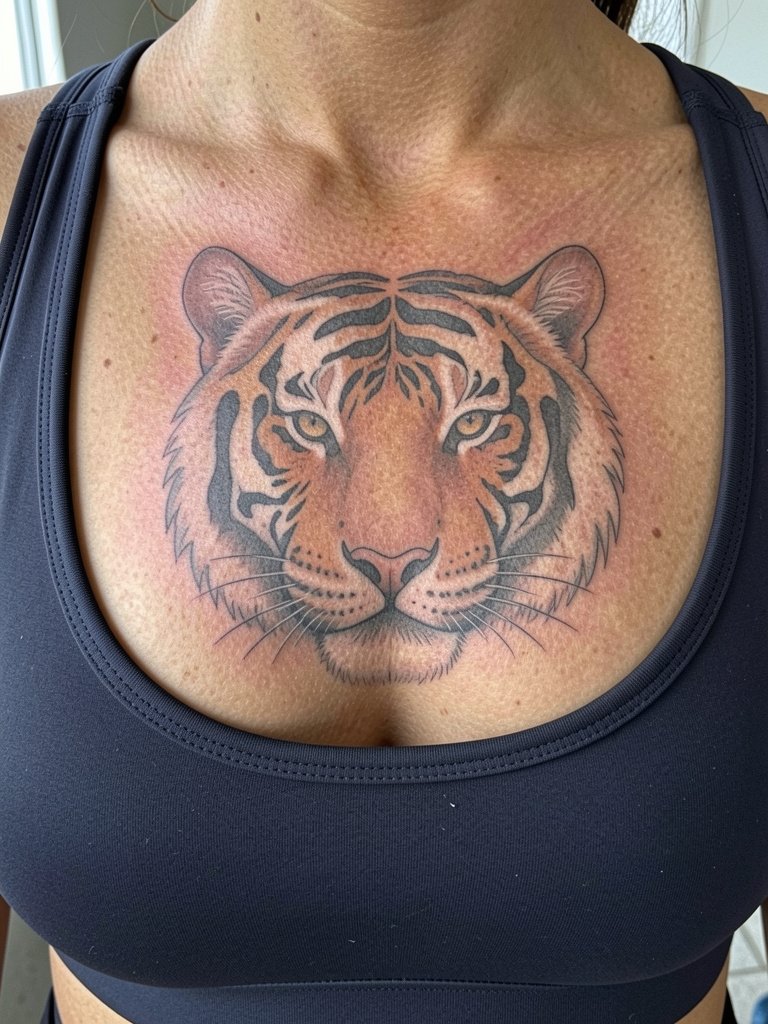
Sternum symmetry calls for careful mapping because the chest midline moves. A common mistake is expecting perfect mirror lines without accounting for natural asymmetry. Discuss the midline anchoring and ask the artist to check symmetry while you breathe in and out. Sessions here are higher on the pain scale and may need breaks. If you intend the piece to be visible in certain outfits, bring a fitted top to the consultation so the artist can visualize placement. For evenings choose an open-front kimono that shows the sternum area without tight fabric rubbing.
24. Small Upper Arm Tiger Cub Portrait
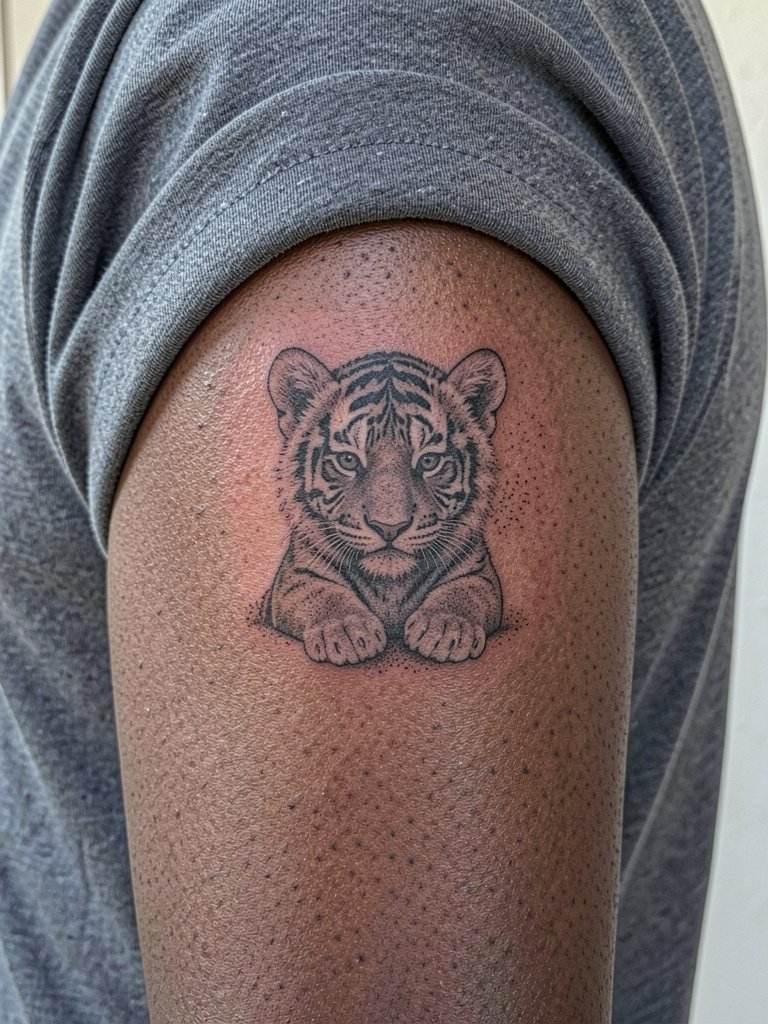
Small portraiture on the upper arm benefits from slightly larger scale than clients first imagine because realism needs room. Sessions are quick but the mistake is compressing facial features into a centimeter square. Ask the artist for comparison photos of portraits at your target size and request a six-month follow-up for detail retention. For casual display choose a rolled-sleeve tee that can be adjusted without directly rubbing the ink.
25. High-Contrast Tiger Mandala Hybrid on the Back
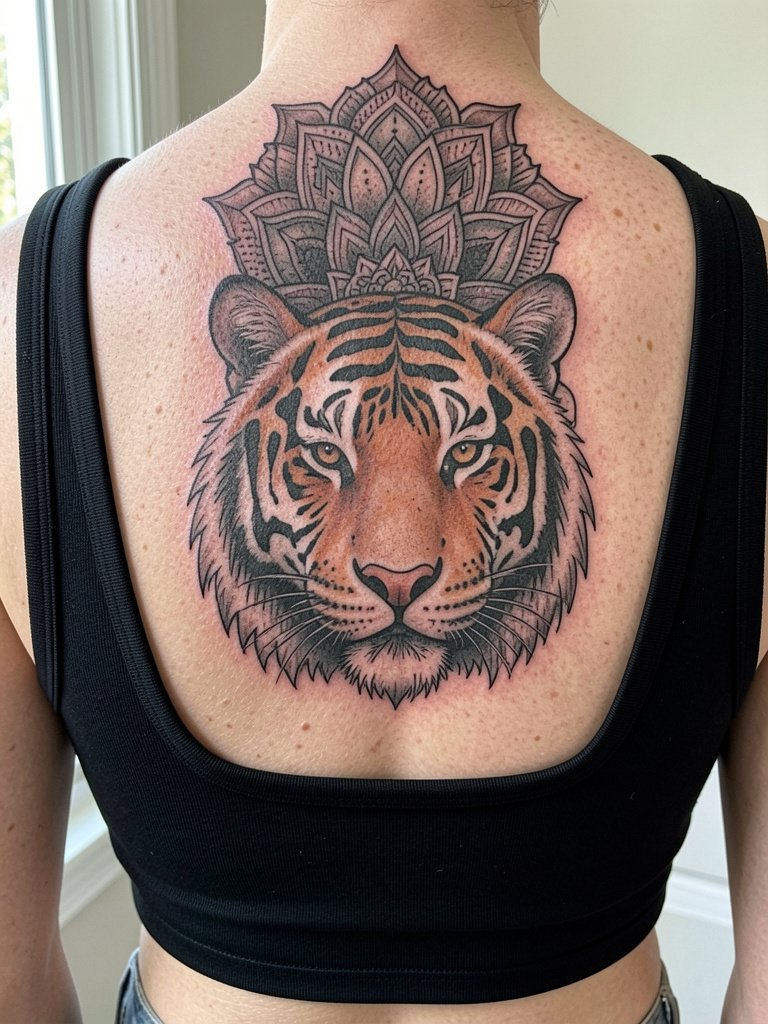
Mandala hybrids require cultural sensitivity and respect for ornamental sources. One position holds that borrowing mandala motifs without understanding their cultural meaning is problematic. The opposing position allows stylistic fusion when the artist discusses origins and gets permission for sacred elements. If you choose a mandala hybrid, bring references and ask how the artist will treat the ornamental motifs so the design avoids disrespectful appropriation. Back placement is forgiving for detail and sessions are long, so plan accordingly. For outfits that highlight the upper back try a backless dress that shows the art without friction.
26. Two-Tone Tiger Crest on the Bicep
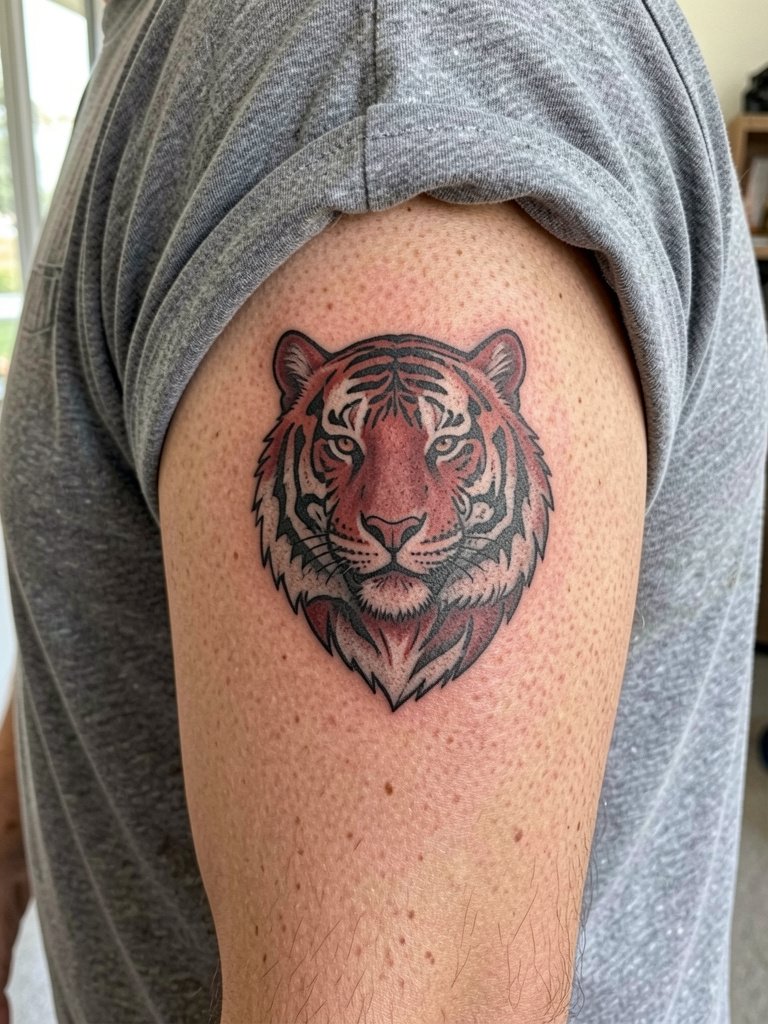
Crest designs read well on the bicep because of its cylinder shape and low motion. Two-tone approaches age better when the secondary color is used sparingly rather than filling wide fields. Sessions take one to two hours. A typical error is overfilling with the secondary hue, which can fade unevenly. Be explicit about color placement and the contrast level between black and red to ensure the crest remains legible. For casual display wear a rolled-up sleeve shirt that shows off the crest without tight arm compression.
27. Pocket-Sized Tiger on the Side Wrist
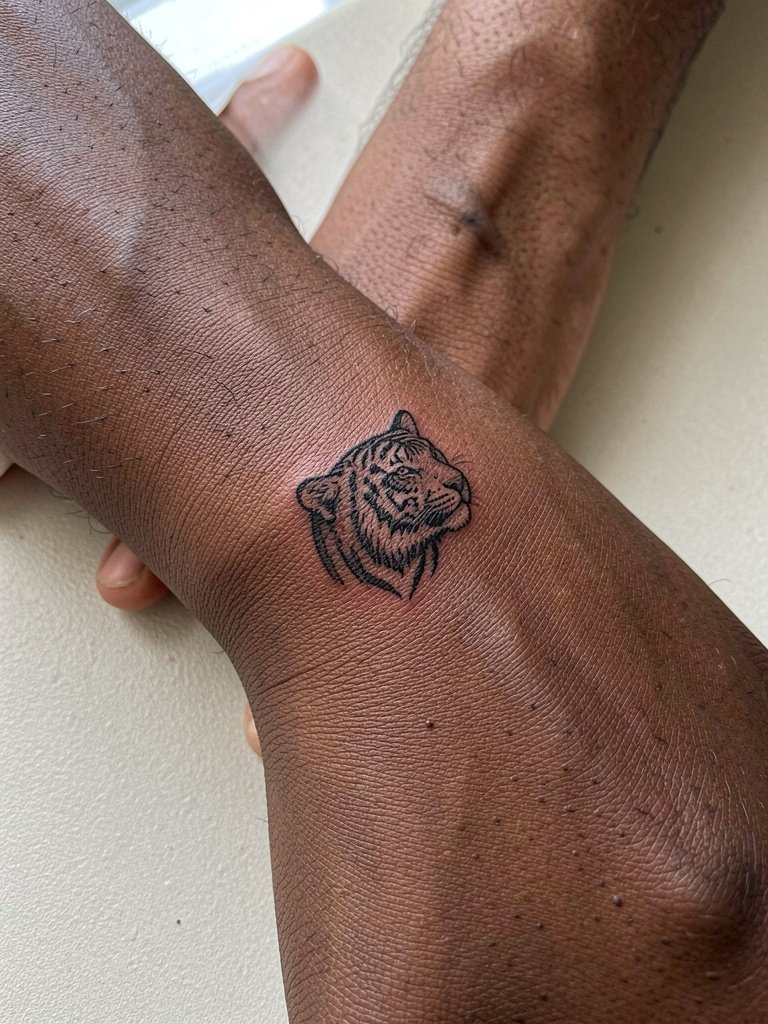
The side wrist gets frequent contact with clothing and surfaces so compact, bold silhouettes outlast fine detail. Sessions are quick but the spot is bony and sensitive. A common mistake is trying to place too much interior detail in a small pocket; ask the artist to simplify the face and emphasize a strong outer contour. Plan for a touch-up at six to nine months if you expect heavy daily rubbing. For everyday wear consider a slim leather cuff bracelet that frames the pocket piece without driving ink loss.
Frequently Asked Questions
Q: How do Japanese tiger styles differ and which one lasts longest?
A: Traditional Irezumi styles use bold outlines and heavy saturation which generally hold up better over time than single-needle or purely watercolor approaches. If longevity is your priority, prioritize saturated fills and clear spacing so the stripes keep contrast as skin ages.
Q: Can fine line tiger faces work on ribs and chest without blurring?
A: Some artists avoid fine line on ribs and chest because the skin there stretches and creases, and they report blurring in two to three years. Other artists say that with slightly wider spacing and controlled depth fine line can settle well. Ask for healed photos from the artist at similar placements and exact size to judge their track record.
Q: Where can I find healed Japanese tiger portfolios and avoid naming artists directly?
A: Search platform tags and curated portfolio sites using terms like #JapaneseTigerTattoo, #IrezumiHealed, and "Japanese tiger healed" with a city filter on image platforms to find location-specific examples. Reddit threads and portfolio aggregators often include several healed shots in different skin tones.
Q: How often will a tiger tattoo need a touch-up and what affects that timeline?
A: Touch-up timelines depend on placement, ink saturation, and daily friction. Hands, fingers, and ankles often need reinforcement within a year, while upper arm and back panels may not need a touch-up for two to five years if saturated well. Consider planned check-ins at six months and two years.
Q: What should I wear to a long back or thigh session for comfort and access?
A: For back sessions wear comfortable low-rise bottoms such as joggers and a fitted cropped top so the artist can access the area without you feeling exposed. For thigh work choose breathable bike shorts that the artist can roll up without moving the waistband. Both options keep fabric from rubbing freshly tattooed skin.
