
A lot of gothic ink that looks flawless on day one softens into blur by year two when the line weight was too fine for the placement. Pick the right linework, placement, and wardrobe and a dark rose or moon phases can still read crisp after years. Below you get 23 ideas that explain how each style ages, what to request in consultation, and how to actually wear the finished piece.
1. Black Rose with Skull on Outer Forearm

A black rose paired with a small skull gives you contrast that ages better than hairline petals. For longevity pick slightly thicker linework for the petals and ask for dense black saturation in the rose center. Common mistake is making the skull too tiny inside the petals, which merges after touch-ups are needed. Plan for a one to two hour session depending on size and expect a touch-up around year two if you wear sun or sit in the sun frequently. For showing it off, push sleeves up or wear a women's linen button down shirt in cream or charcoal so the forearm reads clean.
2. Gothic Cathedral Spire on Calf

This kind of intricate architecture loves space so pick the calf if you want fine details to survive. Tell your artist you want negative-space windows and stipple shading for stone texture so the piece keeps dimension as it heals. An error is squeezing too much line density into a small patch, which looks busy at six months and merges by year three. Calf sessions run one to three hours depending on detail and feel more like sustained vibration than deep scraping. Pair it with cropped legging styles for warm-weather reveals.
3. Raven Mid-Flight on Shoulder Cap

Ravens read beautifully in motion when the wing detail is spaced for healing. For darker skin tones pick bolder line weight and heavier saturation in key feathers so contrast holds in photos. A typical mistake is asking for hairline feathers that disappear in low light. Shoulder sessions are quick, usually under two hours, and feel like light stinging near bone. Wear an off-shoulder or off-shoulder top to frame the bird when you want it to show.
4. Crescent Moon with Occult Symbols Behind the Ear

Behind-the-ear pieces work best when compact and deliberately sparse. Ask your artist for 1mm to 1.5mm line weight instead of hairline single-needle if you want the design to appear in photos and on camera. Pain here is short and sharp, but sessions are brief. Styling tip for reveal is a sleek low ponytail with a black hair claw clip so the area is visible without full exposure.
5. Skeleton Hand Holding Wilting Flower on Outer Upper Thigh
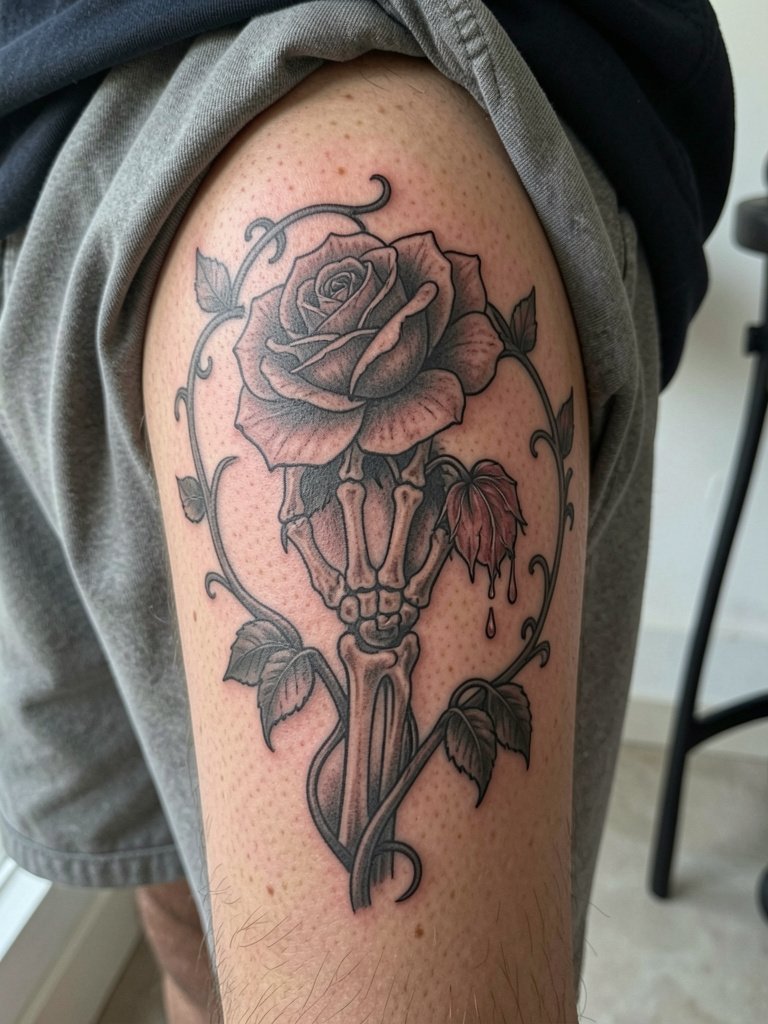
A thigh placement gives scale for decay detail and shaded bones. If you want long-term contrast choose black-and-grey shading around the bones instead of flat black silhouettes. One mistake is compressing too many small petals into the same area, which blurs with weight changes. Thigh sessions are comfortable for most people and last longer because the skin tolerates shading well. Pair with high-cut shorts or a thigh-slit skirt when you want to show it.
Heal Smart
These first six pieces cover small to medium blackwork and shaded designs. A few targeted products can smooth the chair time and the first week of healing.
- Tattooed Skin Care balm search. A lightweight balm some artists favor for reduced scabbing on shaded pieces, useful for the thigh and forearm designs above.
- Bepanthen Plus ointment search. A panthenol product often recommended in international circles for wound support when travel or supply differences matter.
- CeraVe Healing Ointment search. An occlusive option that some people prefer over traditional petroleum-based products for irritated or sensitive skin on frequent-exposure areas like the calf.
- Medihoney medical honey search. Niche antimicrobial honey that some users report helps with persistent weeping, especially on dense blackwork.
- Aquaphor healing ointment search. A familiar occlusive for initial days of healing on fine line and shaded work, particularly useful on wrist and forearm pieces.
7. Bat Wings Framing Upper Back

Bat wings read dramatically when scaled to the upper back and use negative space for membrane detail. Ask for bold outlines and solid fills so the silhouette stays clean over time. A common mistake is micro-detailing the wing veins in a tiny size; that detail clumps with movement and sweat. Back sessions can take multiple hours and may be broken into two sittings. Show it off with backless tops for evening wear.
8. Coffin Silhouette on Wrist

Wrist silhouettes must contend with constant washing and friction. Prefer a slightly thicker outline and ask the artist to center the shape so it avoids the wrist crease. The wrist takes touch-ups earlier than the forearm because of sun and washing. Sessions are short but sharp. For styling, stack delicate bracelets on the opposite wrist and consider a minimalist leather watch band worn slightly higher than the tattoo.
9. Vampire Fangs or Bite Marks on Collarbone
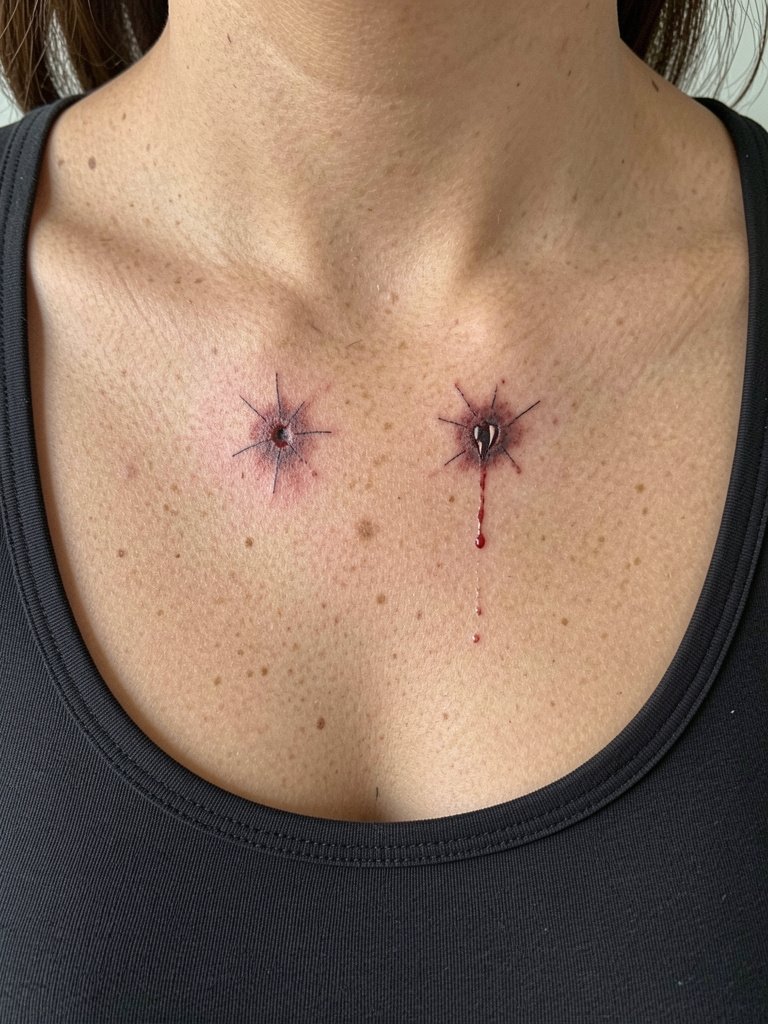
This is a playful horror motif that reads best when sized for the collarbone rather than squeezed into the neck. Ask for crisp linework and micro-drip shading, and request a mockup to check scale against the collarbone. The collarbone is bony so expect more discomfort after the first hour and mild tenderness for a few days. On reveal, low-cut tops or layered chains work well; try a layered chain necklace set to frame the area.
10. Thorned Vines Wrapping the Inner Forearm
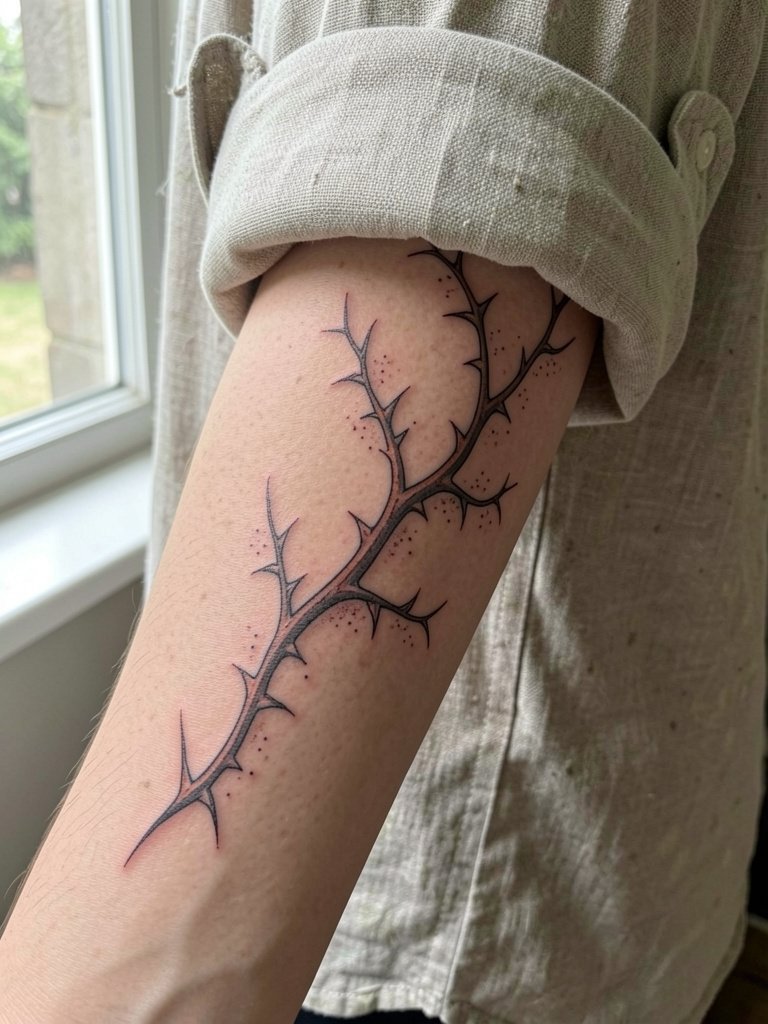
Thorned wrapping designs look gorgeous but demand mapping. Bring images that show how the vine should flow around natural contours and tell the artist you want slightly heavier linework on outermost thorns so they still read at year two. Inner forearm movement makes ultra-fine detail blur faster. Sessions vary from one to three hours depending on wrap length. To show it off, wear linen button downs with sleeves pushed.
11. Gravestone with Gothic Script on Outer Forearm

When text is involved, specify the exact lettering and ask to see a proof in the scale you will wear. Small gothic letterforms need space or they become illegible within a year. A frequent error is choosing a narrow blackletter at too-small a scale. Outer forearm text sits comfortably for healing and photos. For session wear, short sleeves or rolled cuffs are ideal. Pair the piece with a thin gold chain bracelet set on the opposite wrist.
12. Moon Phases in a Linear Arc on Collarbone

Moon phases are a versatile minimal piece but fine-line moons risk vanishing on darker undertones if the circles are too thin. Ask for slightly bolder ring weight and solid crescent fills where needed. The collarbone area tolerates this style well, although proximity to bone can increase tenderness. A common aging pattern is fainting of the thinnest crescents by year two, so plan for a light touch-up then. Wear scoop-neck tops or layer a delicate gold necklace for framing.
13. Ouija Board Miniature on Inner Forearm

Tiny symbol grids need decisive line weight for legible letters. Request the artist to mock up the planchette and test letter spacing at the precise size you want. A typical mistake is crowding ornate letters into a palm-sized square. Inner forearm lets you read the detail easily and heals predictably. Session time depends on lettering complexity. Style with rolled sleeves or an oversized cotton shirt to show it off casually.
14. Lace or Cobweb Panel on Side Torso

Cobweb and lace panels are delicate but need breathing room to avoid becoming a grey smudge. Ask for slightly thicker connecting lines in the pattern so the motifs stay distinct after healing. Ribcage movement and stretch can blur the finest filigree so this placement is best when you accept a small touch-up schedule. Sessions are longer and sometimes split. For session wear, bring a top you can lift without compressing the area. Crop tops and mesh overlays frame this placement in summer.
15. Stained-Glass Stipple Window on Back of Shoulder

A stained-glass approach gives gothic geometry but needs clear panel borders to age well. Tell the artist you want bold leading lines between panels and stipple shading rather than greywash that can flatten. Shoulder placement sits well for visibility with sleeveless pieces and tolerates a single long session. To display it, choose sleeveless or one-shoulder styles like a sleeveless tank dress.
16. Anatomical Heart Wrapped in Thorns on Sternum

Sternum placements age differently because skin flex and breast movement can soften the edges. For darker skin tones request clearer contrast and avoid ultra-fine cross-hatching. A major mistake is squeezing microstipple into high-motion zones. Sternum sessions can be painful and many artists break them into shorter passes. For reveal, low-cut or bandeau styles work; consider a fitted bandeau top when you want to display the piece.
17. Black Rose on Lateral Hip

Hip placements feel intimate and are prone to waistband friction. Ask for the bloom to be positioned slightly higher than the waistband line so it is not constantly rubbed. A common error is placing the piece too low where jeans chafe the edge during healing. Hip sessions are comfortable and brief. Show it with low-rise jeans or tie-front linen shirts; try low-rise jeans women when you want it visible.
18. Vampire Silhouette with Cityscape on Lateral Neck

Neck work needs decisive layout verification because it is highly visible and ages with sun exposure. Request a mockup at life-size and ask for slightly heavier outer contours to keep the skyline crisp after a year. Lateral neck pain is tolerable but sensitive. For showing it off, tuck hair behind the other ear and layer a minimalist chain choker to draw the eye.
19. Stippled Moon and Stars Sleeve Accent on Inner Arm

Dot-work looks magical when spaced properly, but inner-arm stretch can dilute the effect. Ask the artist to stagger dot clusters and avoid single lines of stipple that might blur. Inner arm sessions feel different from outer forearm work because of sensitivity near the ribs. To display the piece choose sleeveless or roll sleeves; linen sleeveless tanks are an easy choice.
20. Spider Web Lace on Medial Inner Thigh

Inner thigh designs are intimate and see more stretch, so radial lines should be drawn with a bit more weight to avoid thin spokes disappearing over time. One mistake is placing ultra-fine lace too close to the groin or pant line where friction accelerates wear. Sessions may be longer because artists work carefully around sensitive tissue. For session comfort wear loose shorts you can remove easily.
21. Candle with Wax Drips on Upper Chest

A single candle reads gothic and symbolic when the drips are rendered with contrast. Request stronger outline for the wax drips so they do not blur into the skin texture. Collarbone sessions are bony and can be more painful than nearby fleshy placements. For wearing, choose V-neck or layered short chains to keep attention on the motif; a scoop neck tee works well.
22. Plague Doctor Mask in Micro-Realism on Outer Upper Arm

Micro-realism portraits need an artist experienced with tiny tonal shifts. For outer upper arm choose a size that gives the face room to breathe. The biggest error is shrinking a portrait under three inches where features lose clarity. Outer upper arm sessions are tolerable and are good for experimental micro-portraits. Show it with rolled sleeves or a rolled sleeve linen shirt.
23. Black-and-Grey Ornate Cross on Upper Chest

Cross designs split opinion on whether pure black or black-and-grey is the right route. One camp argues that pure black-only keeps high contrast and the classic gothic starkness. Another camp says black-and-grey shading gives depth and dimension without sacrificing the aesthetic, and many modern portfolios reflect that view. If you lean darker-skinned ask for deeper contrast and more negative space in the filigree so the motifs remain legible. The upper chest can be sensitive near bone so expect a firm, focused session. Layer vintage chains or wear a delicate gold necklace layering set to frame the piece on dress occasions.
Frequently Asked Questions
Q: How do I find an artist who actually specializes in gothic fine line or blackwork in my city?
A: Search hashtags like #gothictattoo, #blackworktattoo, and #finelinegothic on Instagram and TikTok while using the location filter to narrow results to your city. Use Tattoodo keyword searches for style combos like "fine line rose" or "blackwork skull" and prioritize portfolios that include healed photos. Reddit communities such as r/tattoos, r/tattooadvice, and r/blacktattoos often have local recommendations and healed examples you can browse.
Q: Will fine-line moon phases or script fade faster on dark skin tones?
A: Fine line can become less visible sooner on darker or very warm undertones if the line weight is hairline thin. Many artists recommend slightly heavier linework or small black fills in key areas so the design keeps contrast. If you want crisp longevity choose bold contrast or plan for a touch-up at around 18 to 24 months based on your sun exposure.
Q: What is a realistic touch-up schedule and budget for gothic pieces?
A: Expect fine line pieces to commonly need a light touch-up around 18 to 24 months, with blackwork often needing refreshes at 24 to 36 months. A typical light touch-up runs from a modest fee for an emerging artist to higher for an established specialist, so plan for periodic upkeep rather than a single one-time cost.
Q: Does everyone recommend Saniderm for blackwork or is dry healing still fine?
A: Shops are divided. One group advocates Saniderm or second-skin for blackwork because it reduces plasma weeping and helps saturation remain crisp. The opposing group supports traditional dry healing with careful washing and thin moisturizing, saying second-skin is optional and not always necessary. Decide based on your artist's experience and your own healing history.
Q: Are certain placements especially prone to blowout or distortion after weight change?
A: High-movement and stretch-prone zones like the ribs, inner thigh, and lateral hip can distort with significant weight fluctuation or pregnancy. Placement on more stable areas like the forearm, calf, and upper back tends to keep its proportions more consistently. If future body changes are likely, discuss sizing and line spacing with the artist to reduce distortion risk.
Q: What should I wear to a session for a ribcage or side-torso lace piece?
A: Choose loose, easily removable tops that the artist can lift without stretching the tattoo zone. For ribcage or side-torso work a fitted cropped tee or sports bra in its normal worn state is ideal so the artist can expose the area safely and you can stay comfortable during a multi-hour session.
