
Glow-in-the-dark ink behaves like a prankster at a party. Under daylight it can read like any crisp black or color piece, and under a UV lamp it pops into a whole different mood. If you plan for how the ink sits, how bold the outlines are, and where it will rub against clothing, you get a tattoo that works in both lights. The first idea shows a safe, readable placement to try before you commit to full glow sleeves.
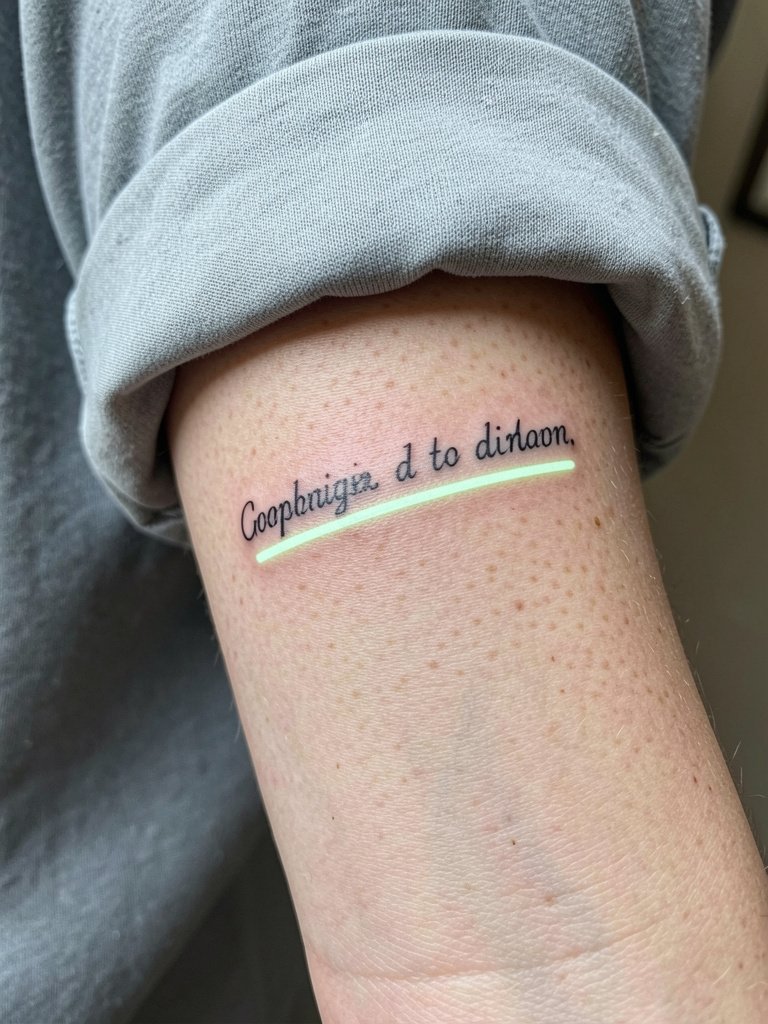
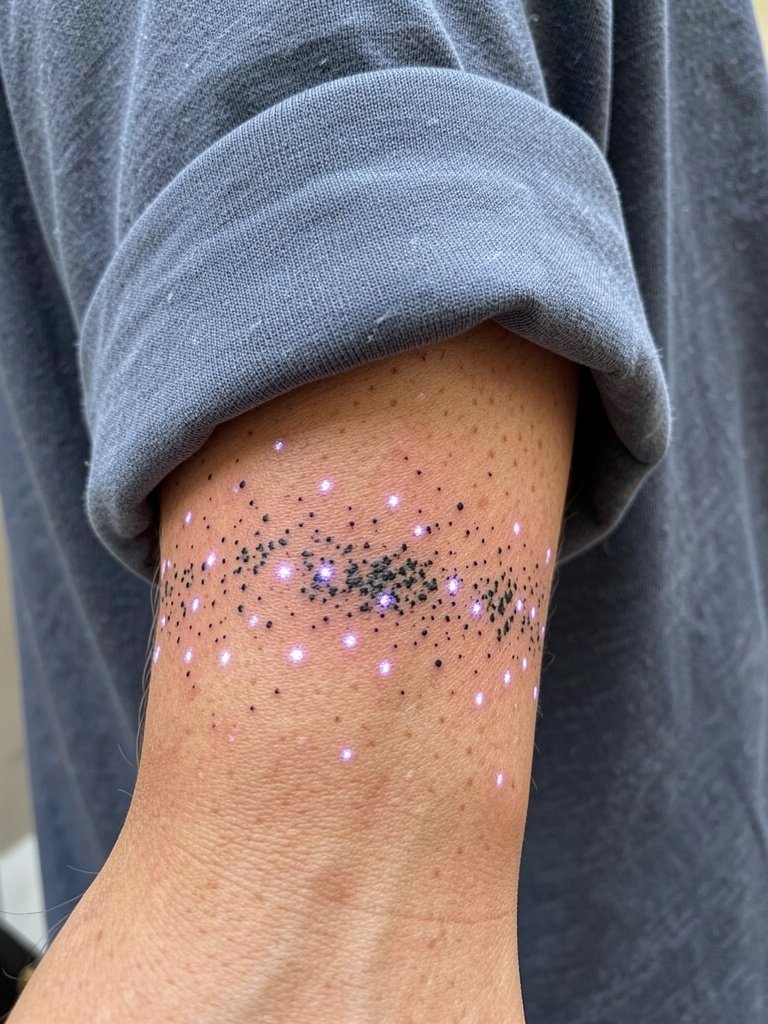
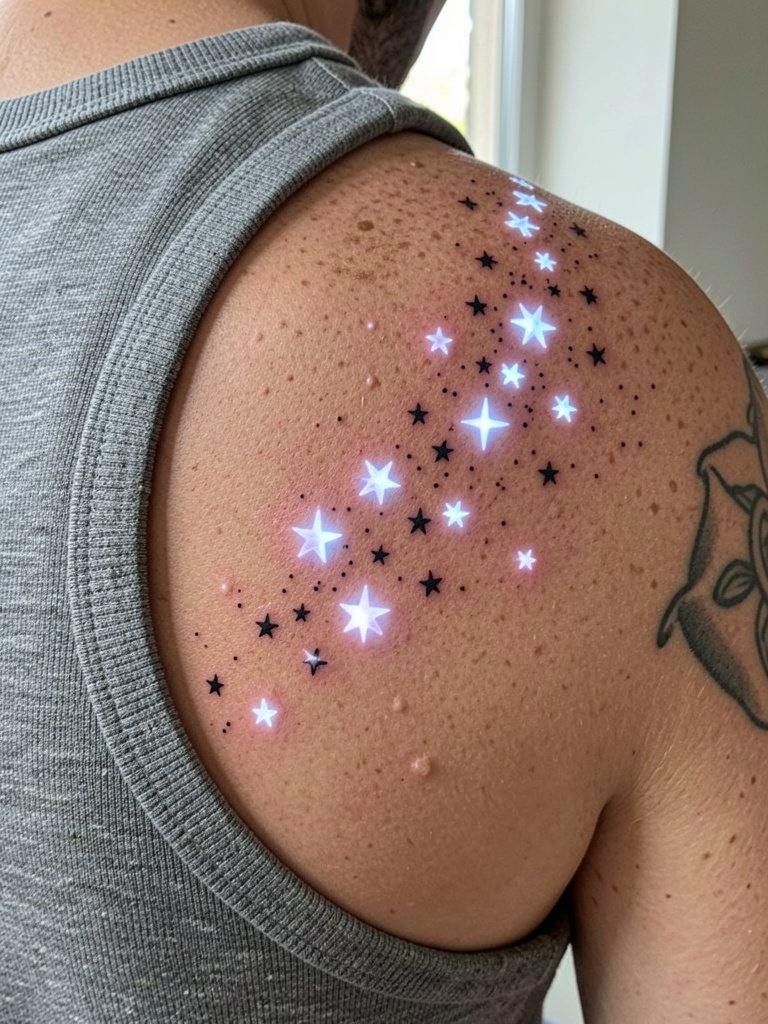
1. Constellation Band on Inner Forearm
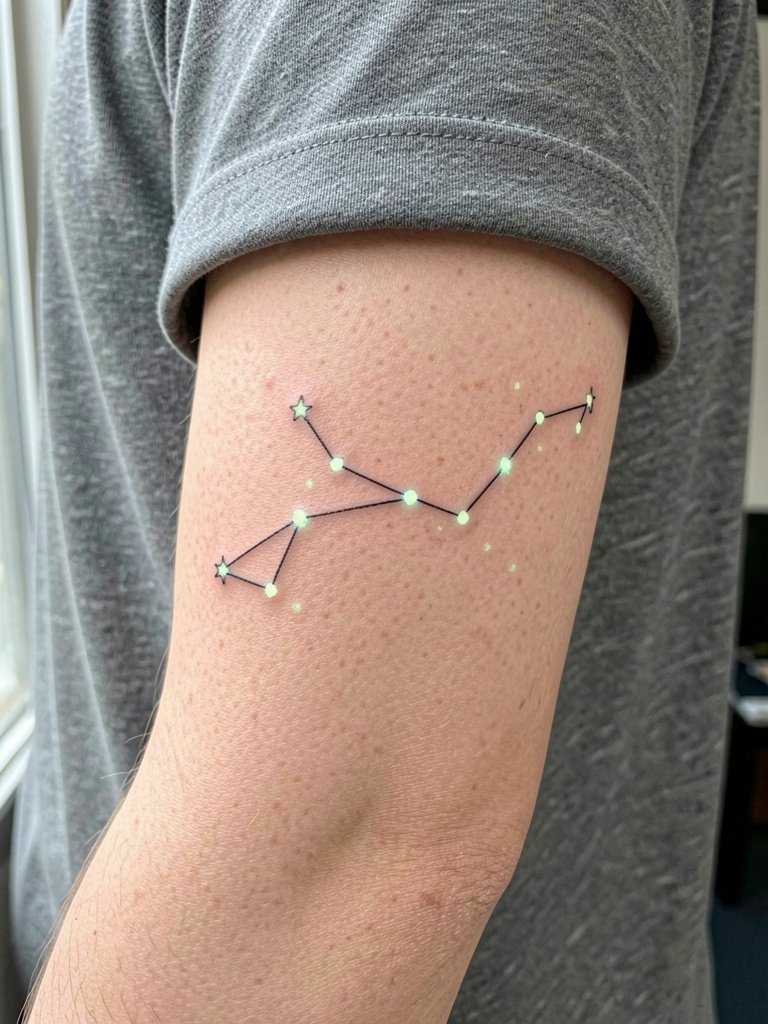
If you like discrete glow details, the inner forearm is a good test run. I suggest slightly thicker single-needle work rather than whisper-thin script so the tiny star points do not blur by year two. Bring a reference that shows the dot size at actual scale so the artist can map spacing. Expect a one to two hour session and mild hand fatigue when the palm-up surface sits for that time. Light daily wear on that spot is low risk for blowout, but frequent rubbing from bracelets can soften tiny dots, so plan touch-ups around year two. For evenings out, pair the band with rolled-cuff linen shirts that keep the forearm visible.
2. Glowing Micro-Realism Moth on Collarbone
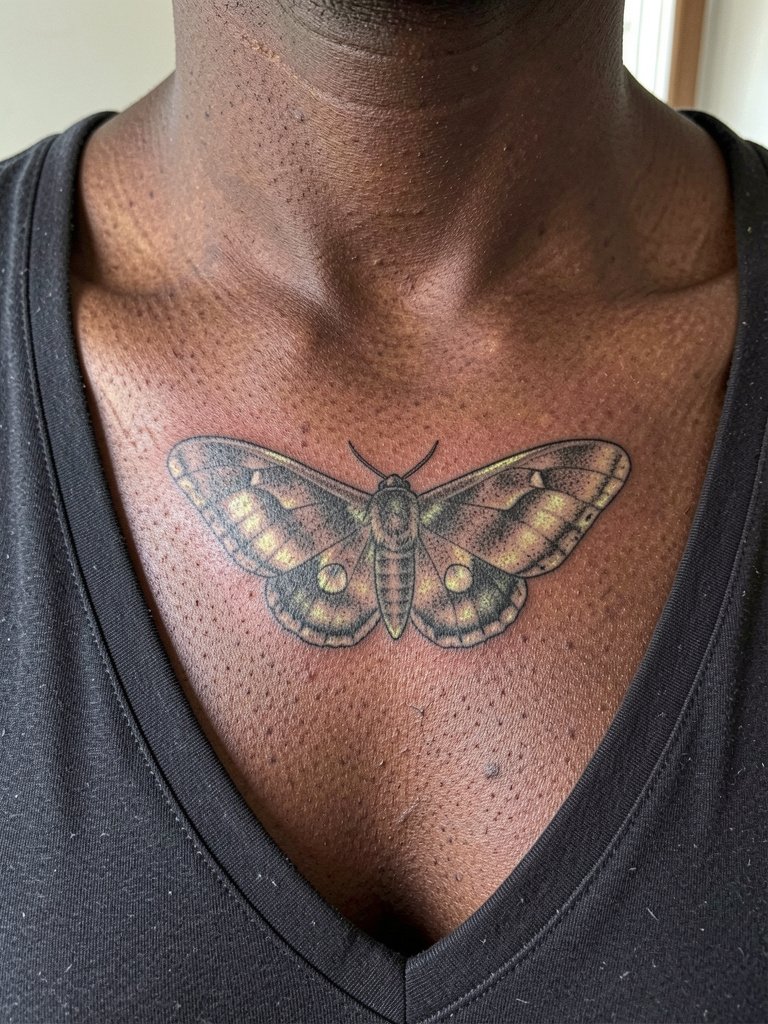
Micro-realism looks delicate on the collarbone, but glow ink loses nuance if you go too tiny. I recommend slightly increased saturation in the black areas so the silhouette reads under both lights. Ask the artist to show a scaled mockup over the collarbone curve to check wing placement relative to movement. Expect moderate discomfort when artists work over bone. The moth will look crisp at six months and soften around edges by two years, so plan a small touch-up at the two-year mark if you want the glow highlights to stay crisp. For show-off outfits try wide V-neck blouses that frame the piece.
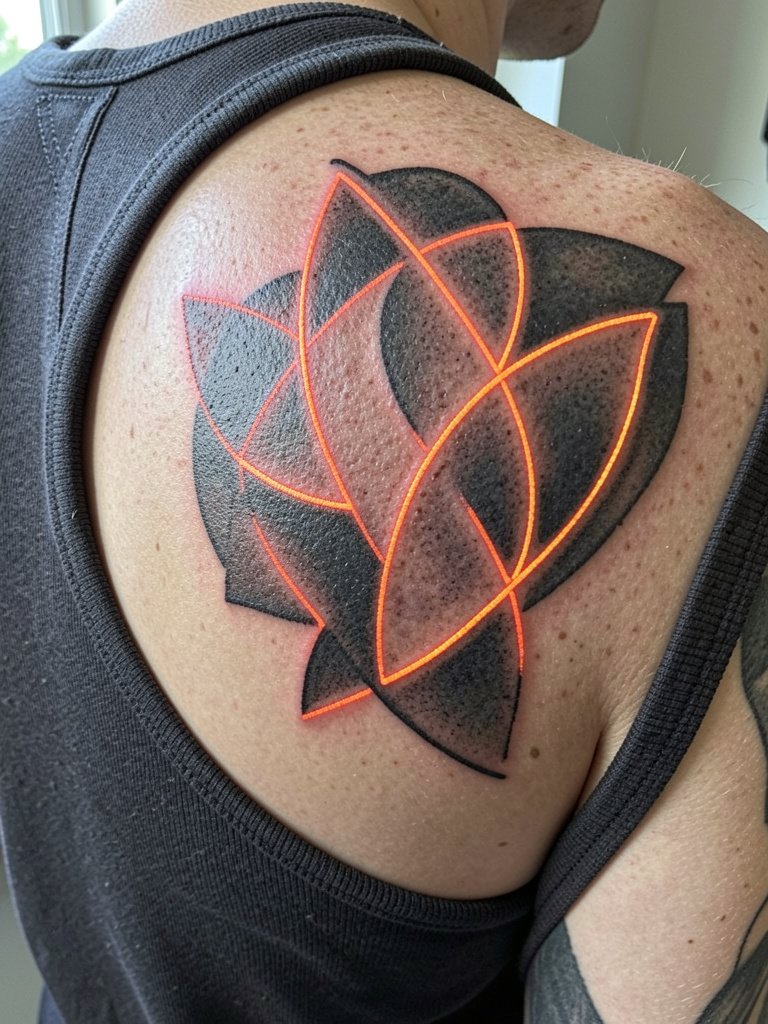
3. Neon Geometric Sleeve Accent on Outer Bicep
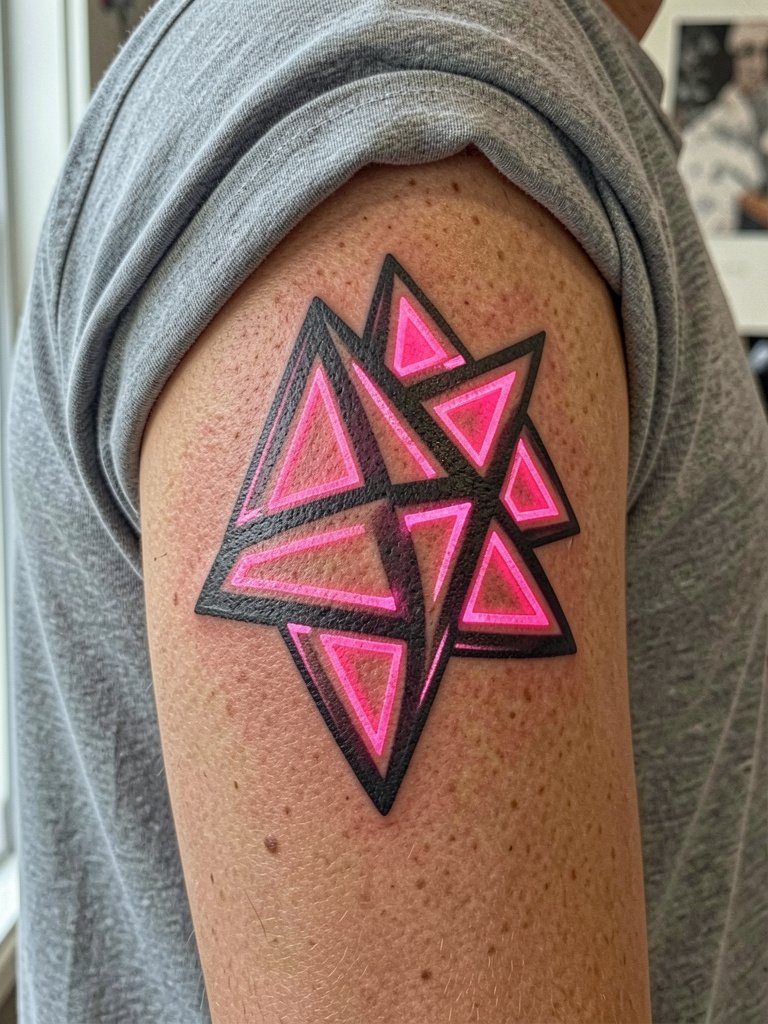
Geometric glow accents play well on the outer bicep since the area sees less friction. I advise a bold outline to protect the glow panels as they age. Bring a mockup that shows how triangles align when the arm is relaxed and when flexed so the artist can anticipate distortion. Sessions here are usually two to three hours for multiple color insets. Expect the glow pigment to dim faster than black ink, so plan touch-ups at year three for high-visibility pieces. For daytime pairing, a cropped utility jacket keeps the arm visible without rubbing the tattoo.
4. Tiny Glow Script Behind the Ear
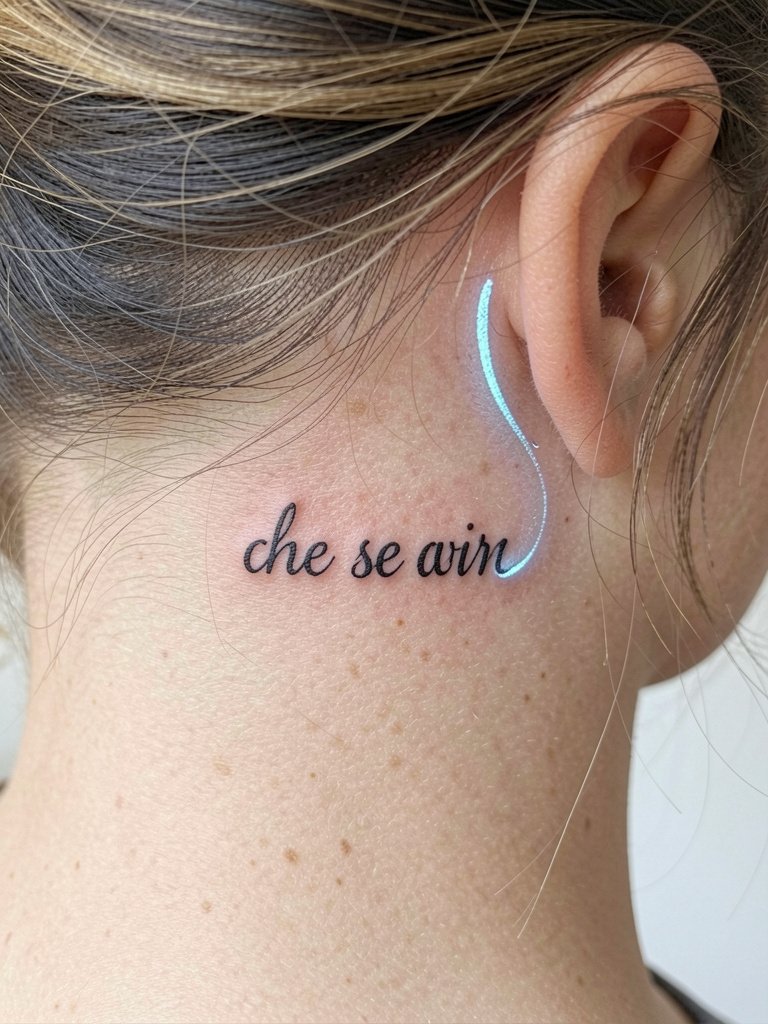
Behind-the-ear pieces are tiny and intimate, so glow accents need room. I suggest a slightly wider letter spacing than standard script so the glow edge still reads after settling. Have the artist stencil the exact placement while your hair is up so the word sits where you want it when hair is down. Sessions are short but the skin there is thin and sensitive. If you need a healed preview, ask for a photographic mockup on similar hair textures. Hand accessories or scarves can hide or reveal this spot, and a simple silk hair scarf frames the area without rubbing.
5. Subtle Glow Mandala on Upper Thigh
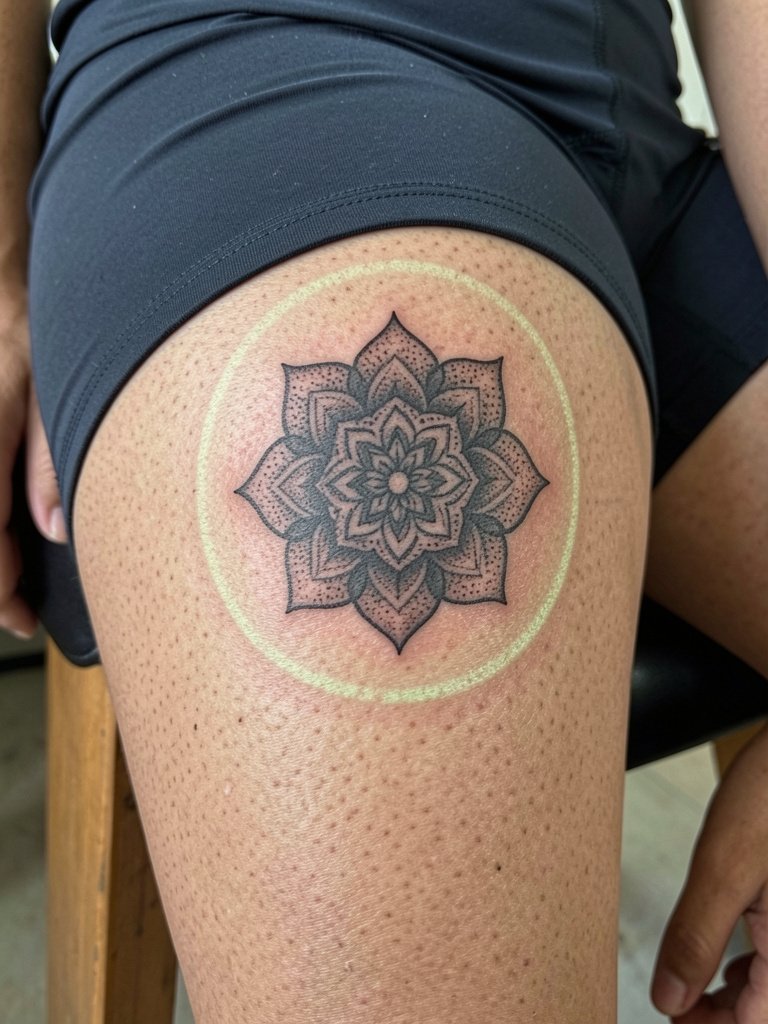
Inner-thigh placements let you keep glow details private unless you choose to show them. I recommend denser stipple shading and a glow ring at the outer edge rather than thin filigree toward the center. Bring seating and clothing choices for the session so the artist can set up without fabric interference. Sessions can be uncomfortable due to proximity to nerve bundles, so ask about pacing for breaks. Expect low blowout risk if the piece is mid-thigh and not too tiny. For evening wear try pairing with high-cut slip dresses that reveal the outer mandala when you sit.
6. Glow-Outlined Daggers on Outer Calf
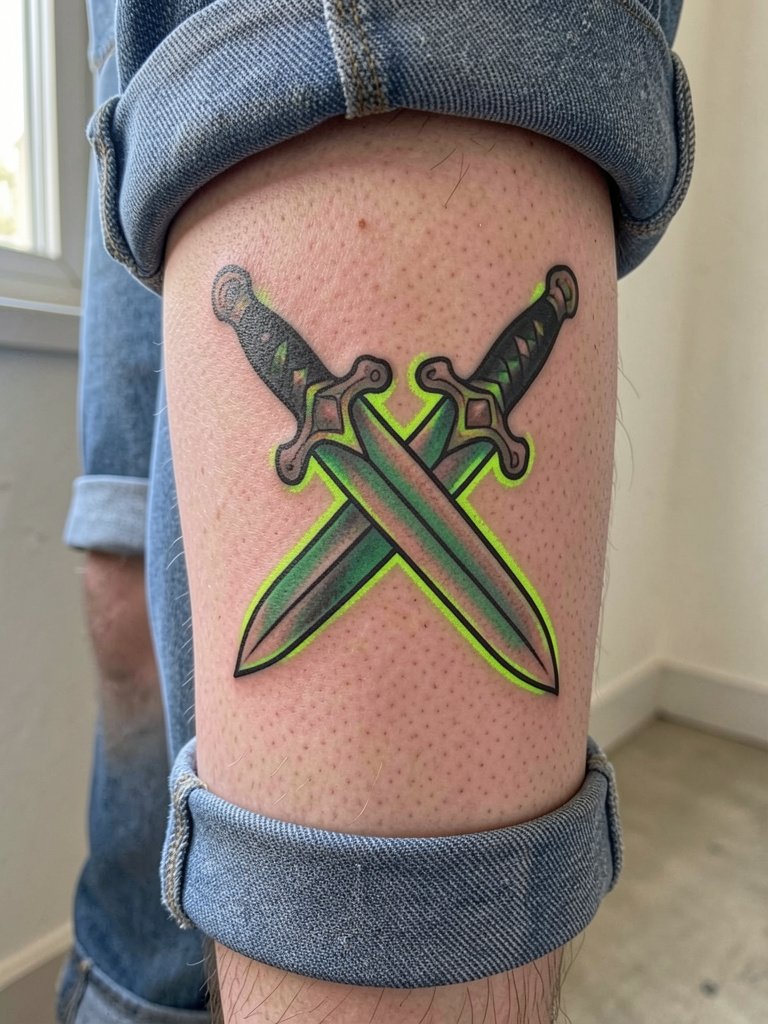
Calf work handles saturated glow outlines well because the skin is thicker and experiences less constant friction. I prefer bold black outlines around glow pigments so the contrast stays readable after a few years. Discuss how the blades sit on the calf curve so the crossing point does not stretch when you walk. Expect a two to three hour session and moderate soreness when seated. For day-to-day outfits the piece pairs with rolled cuff denim shorts that show the design without rubbing.
Session Day Picks
A few practical items make the first week easier, especially for small glow accents on arms and calves covered above.
-
Stencil transfer paper kit. Lets you preview scaled linework directly on skin before the needle starts, helpful for the fine script and constellation ideas above.
-
Topical numbing cream. Applied 30 to 45 minutes before can reduce discomfort during short wrist and ear sessions without interfering with linework.
-
Thin protective film roll. Useful for ankle and finger spots that meet friction from clothing and shoes during the first week.
-
Fragrance-free body wash. Mild cleansers help keep delicate glow inks from being irritated during showering while healed skin finishes sealing.
-
Aquaphor healing ointment. Thin layer for the first few days locks in moisture for small linework without clogging needle channels.
7. Pulsar Linework on the Side Ribcage
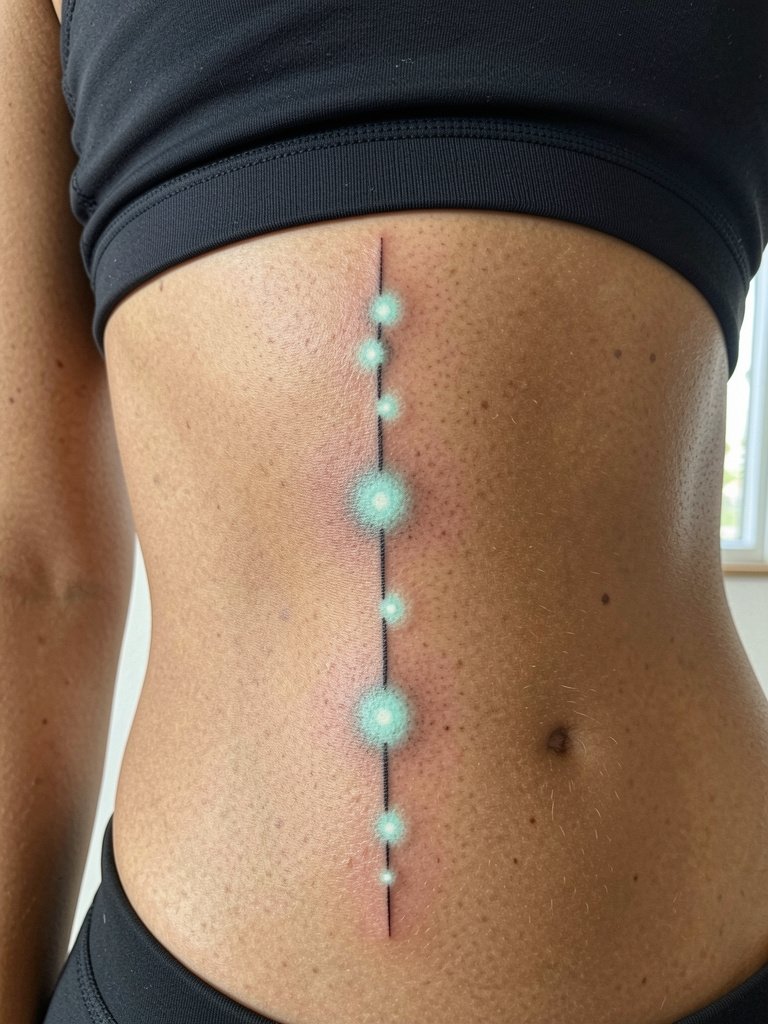
Rib placements are visually dramatic but controversial for fine glow linework. One camp argues that the skin and movement on the ribs cause ultra-thin lines to blur within two years. The other camp says that with slightly wider spacing and proper depth, fine lines can settle well and show good healed contrast. For this design pick slightly bolder nodes and more space between them so the glow elements do not merge with age. Sessions are painful for many people so plan incremental passes and a short session length. Expect a touch-up after the first healing cycle if the nodes need brightening. For session wear choose a fitted cropped sports top so the artist has unobstructed access without adjusting fabric.
8. Glow-Leaf Sleeve Accent on Lower Arm
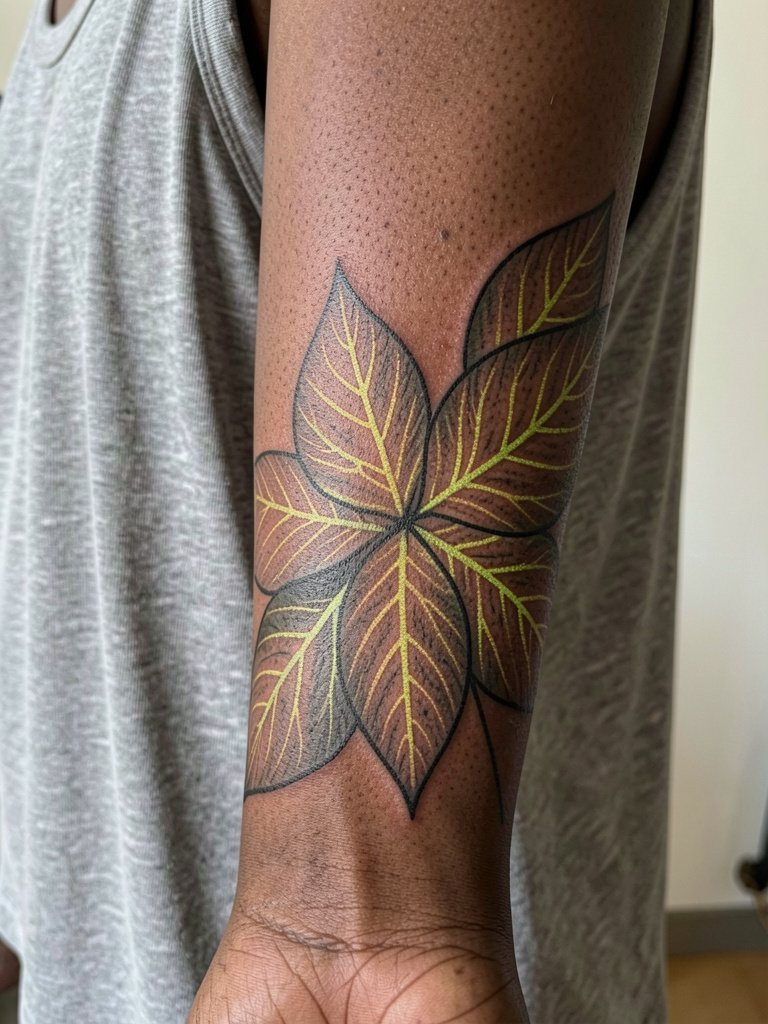
Botanical glow accents read best when paired with negative space so the leaf shapes breathe. Recommend the artist space the leaves so veins will not bleed into neighboring shapes after a year. Ask for a healed-size mockup showing how veins align when the wrist bends to avoid unexpected distortion. Sessions here are comfortable for most and last one to two hours. Touch-ups at year two maintain vein brightness. For showing the pattern, try rolled-up linen sleeves that keep the arm visible without constant friction.
9. UV Dotwork Halo on Nape
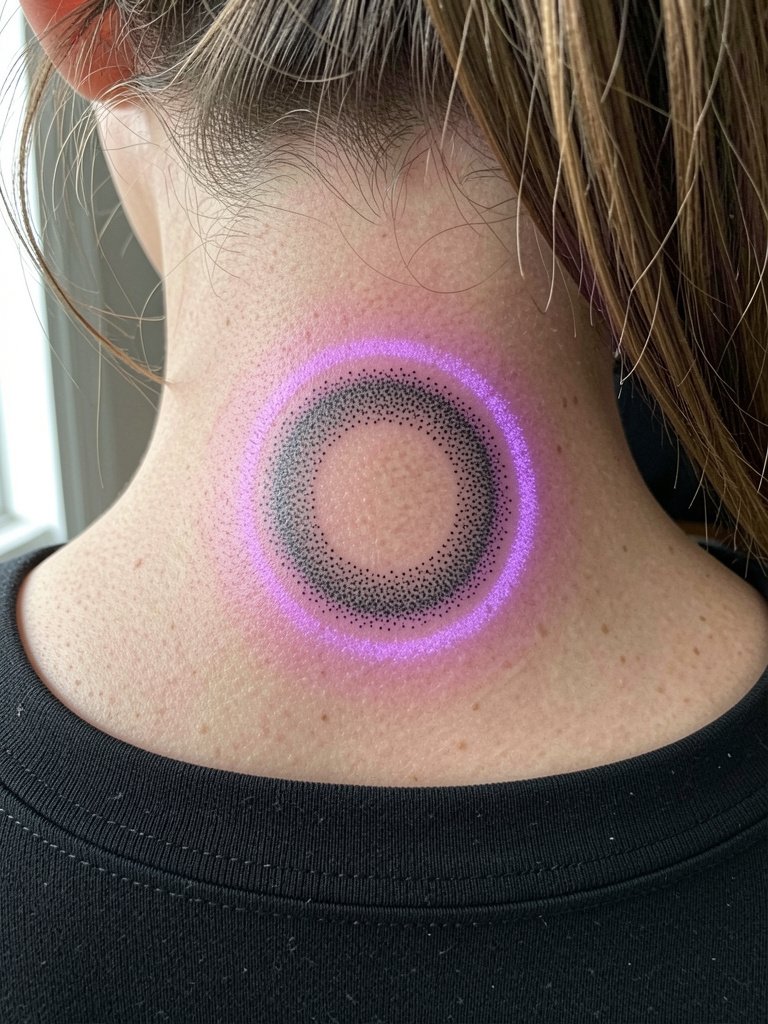
Dotwork halos on the nape look like freckles under blacklight. I prefer denser inner dots and a glow-reactive outer ring to maintain shape as the skin moves. Because of location, request the artist show how the halo sits when hair is down to avoid clipping into the hairline. Sessions are short but the area is sensitive for some people. For discreet reveal, a wide-neck top frames the nape without tugging at the tattoo.
10. Minimal Glow Arrow on the Side of the Finger
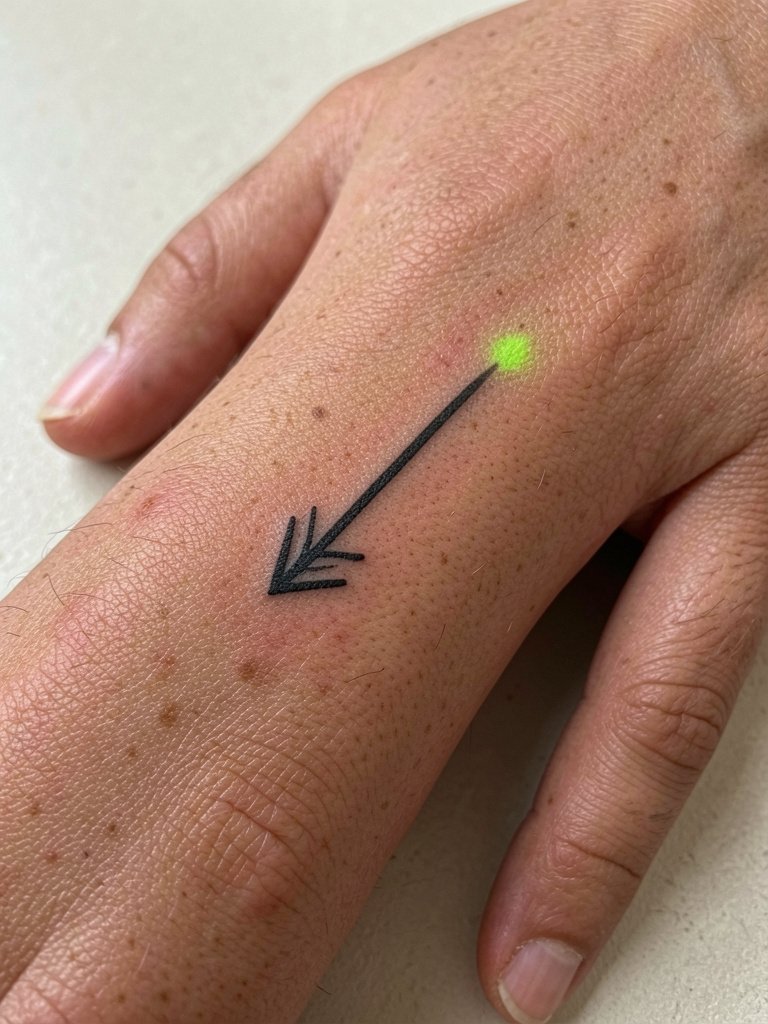
Fingers face heavy wear so glow tips need to be bold to survive daily use. I recommend a thicker outline and a slightly larger glow tip than the reference image. When you book, bring photos of other healed finger tattoos on similar skin tones so the artist can advise placement to avoid joints. Sessions are quick but expect faster fading and touch-ups every 12 to 18 months. For less rubbing during healing, wear thin gloves at home and choose soft cotton work gloves for chores.
11. Glow-Rimmed Neo-Traditional Rose on Shoulder Cap
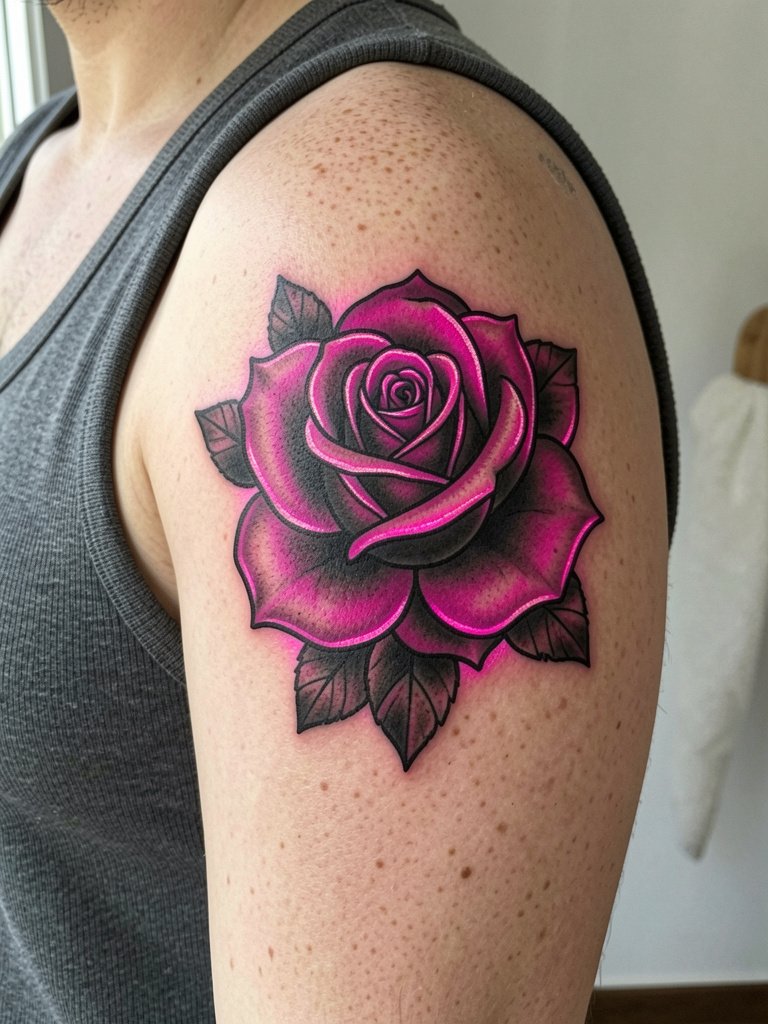
Shoulder caps tolerate saturated glow rims well because the skin is sturdy and the area is visible for showing off. Ask the artist to map the glow rim to the petal edges so the highlighted outline does not sit on a fold or crease. Sessions are comfortable and usually take two to three hours for color and glow layering. Expect minimal blowout risk here. For wardrobe, pair with spaghetti-strap tops when you want the rim visible.
12. Glow-Shadowed Portrait Accent on Upper Arm
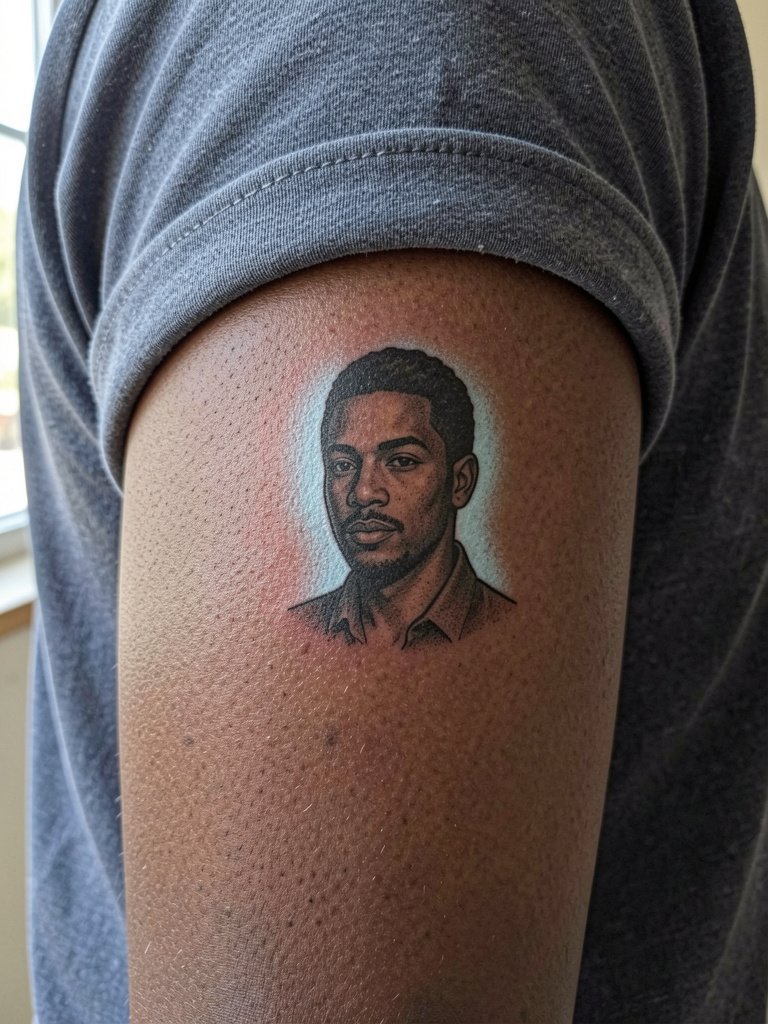
Portrait accents using glow ink need negative space so the silhouette reads clearly at night. I advise keeping the glow element as background shadow rather than filling facial detail. Bring a clear reference photo sized to the intended tattoo so the artist can show how features will scale at that placement. Sessions are medium length and require steady shading, so expect modest discomfort. For casual reveal, wear short-sleeve button-downs that keep the upper arm visible.
13. Glow-Infused Script on Inner Wrist
Inner wrist pieces show quickly but can blur if the script is too thin. I recommend slightly bolder single-needle spacing and a glow underline rather than glow filling the letters. Bring two scaled references so the artist can demonstrate how the word reads at three inches versus five inches. Sessions are short and the area is sensitive for many people. Plan for touch-up at year two if the letters soften. For daily style, a delicate layered bracelet frames the script without heavy rubbing.
14. Futuristic Circuit Mandala on Sternum
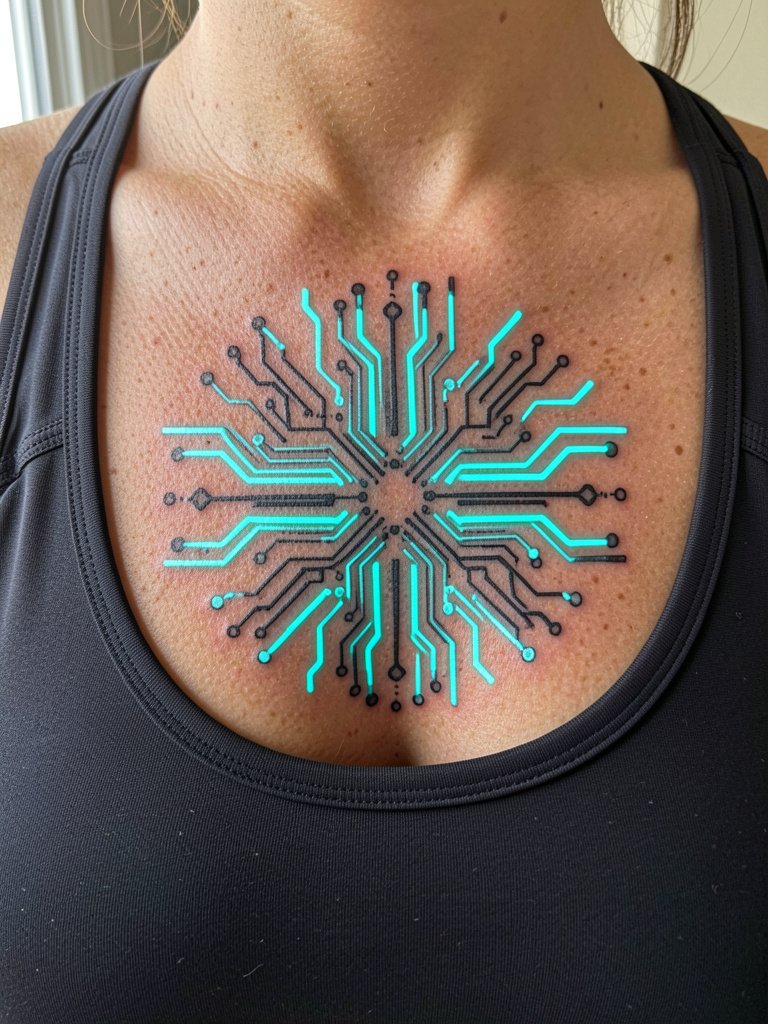
Sternum pieces demand planning because the skin stretches with breathing. One camp cautions that ultra-fine glow traces on the sternum blur as the area flexes. The other camp maintains that slightly wider spacing and consistent depth allow tracer details to hold over several years. For this design pick moderate line weight and ask the artist to show how the mandala sits both at full inhale and at rest. Sessions can be intense due to sensitivity, so request pacing and breaks. For session comfort, wear a fitted sports bra so the artist can access the sternum without fabric moving.
15. Glow-Trimmed Armor Plate on Lower Back
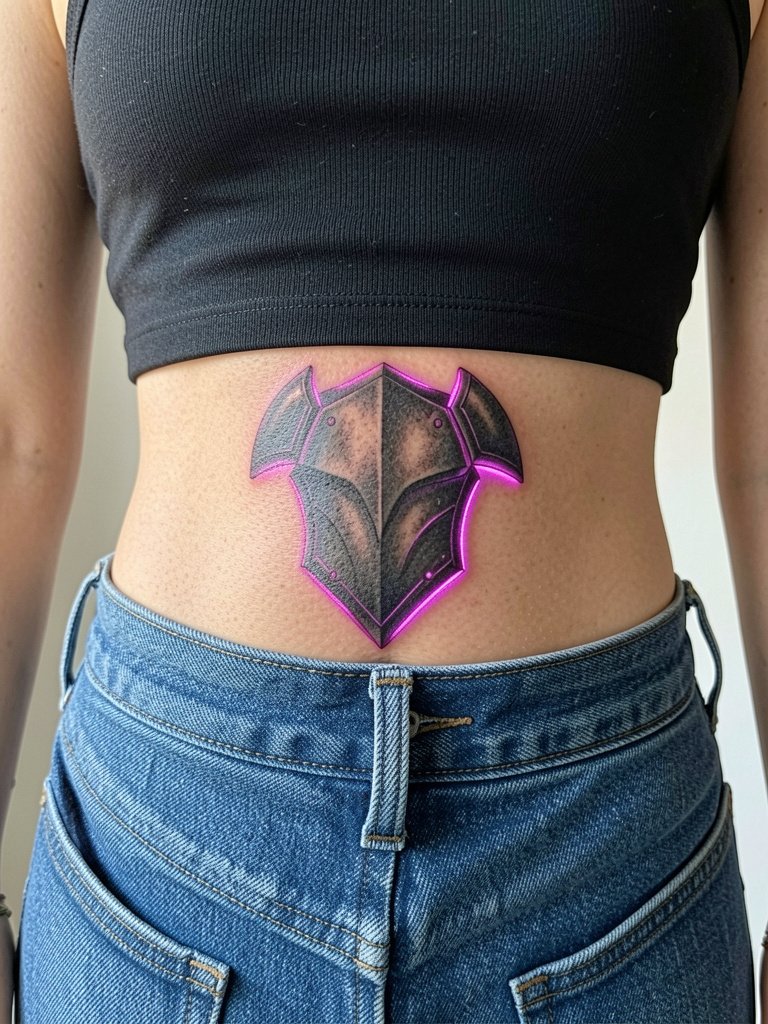
Lower-back glow trims pop when you want a peek but stay private otherwise. I recommend anchoring the plate with solid black shading and using a glow trim rather than filling the interior. Ask for the stencil to be aligned to your spine so the plate remains centered as you move. Sessions are low to moderate pain. For day-to-day hiding or showing pair this with low-rise jeans and cropped tops that sit naturally without tugging.
16. Lunar Phases Along the Collarbone
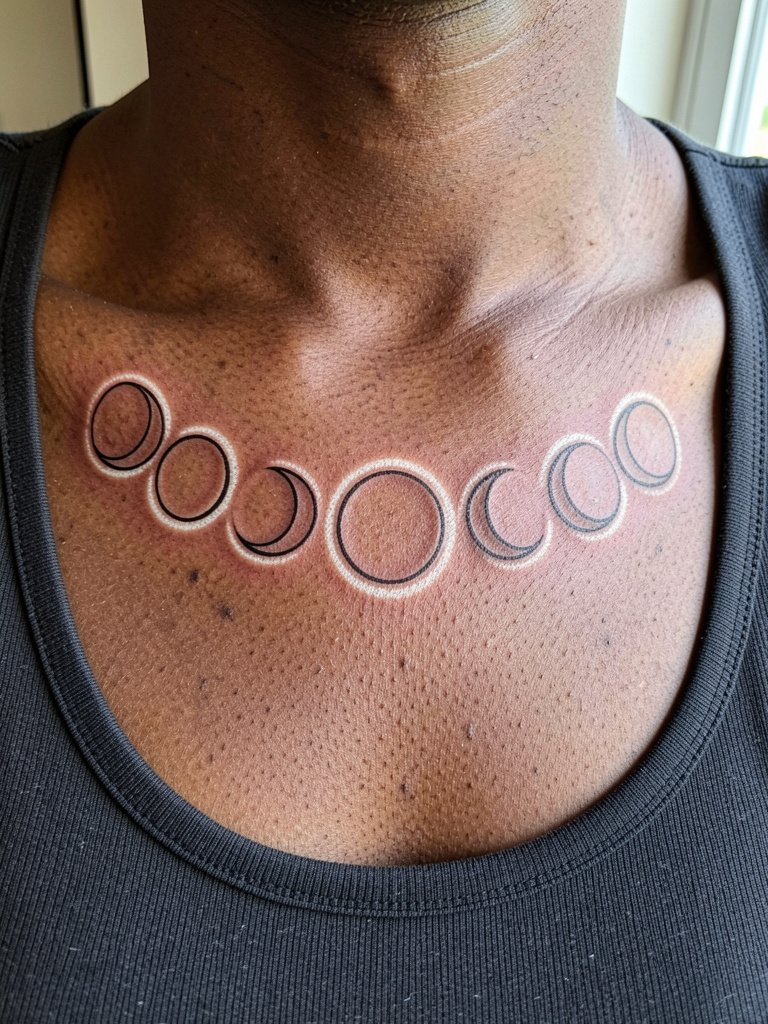
Collarbone phase lines read well across different lighting when the crescent shapes are bold. I advise slightly heavier lines on the crescents so the silhouette holds up. Ask the artist to map each moon relative to the collarbone dips to avoid a moon sitting on a bone prominence. Sessions are short to moderate. The glow halo around the new moon will need a light touch to avoid looking like a bland ring after a few years. Pair with open-collar shirts to show the sequence.
17. Glow-Flecked Wave on Ankle
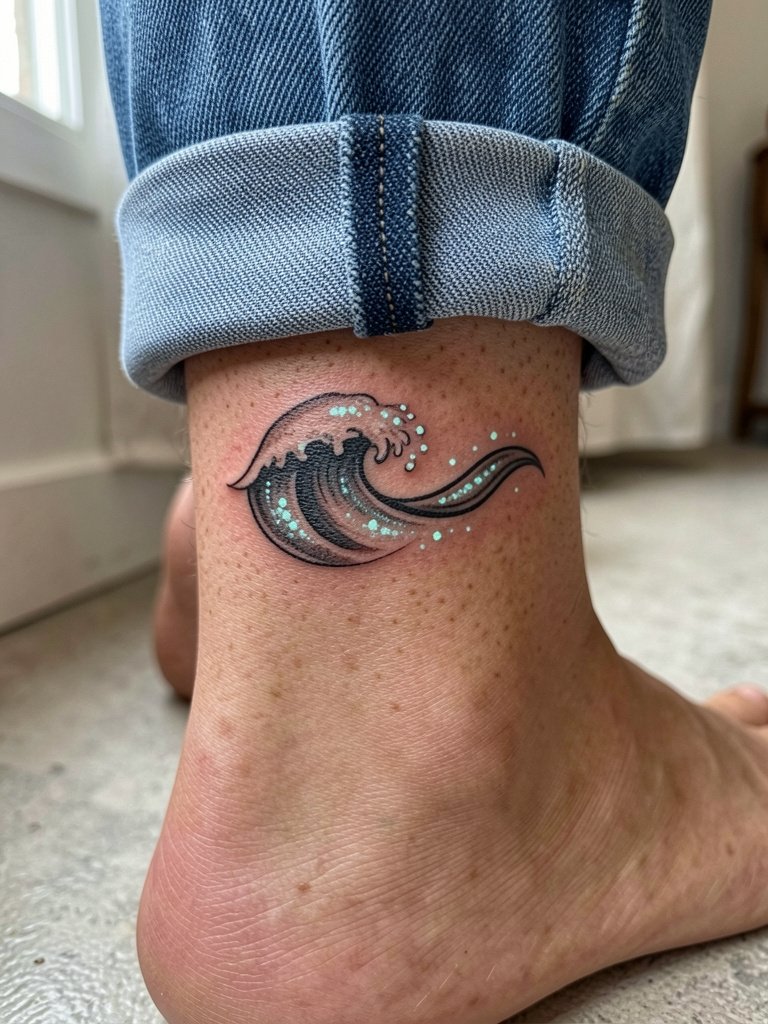
Ankle pieces face shoe and sock friction so glow flecks should sit away from high-rub zones. I recommend placing the flecks on the outer crest so they avoid the area where shoes hit. Sessions are quick but expect more fading than larger placements. Plan touch-ups every 12 to 24 months for bright flecks. For showing the piece, wear rolled jeans or ankle-length skirts that expose the area without rubbing.
18. Glow-Edge Nautical Star on Upper Back
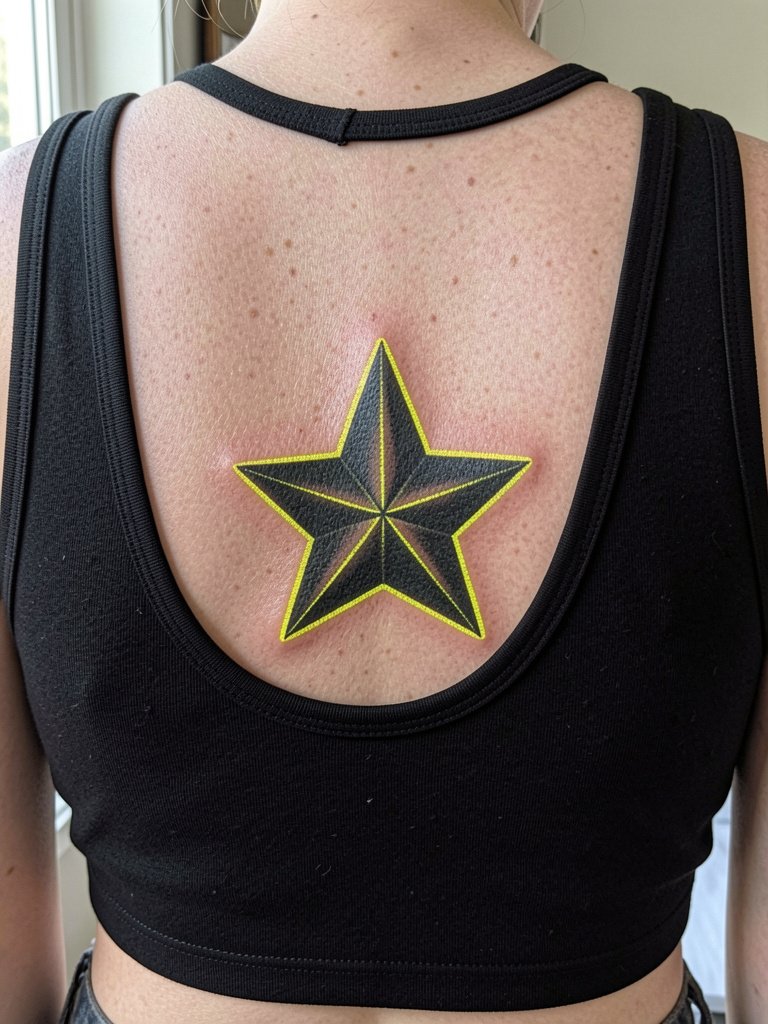
The upper back handles strong glow rims well since the area is flat and rarely rubbed. I suggest full black fills edged with glow ink rather than thin glow lines inside the star. Ask for the stencil centered on your spine so the star balances with shoulder symmetry. Sessions are medium length and feel like firm pressure rather than sharp pain. For revealing the piece choose backless dresses or scoop-back tops that show the star cleanly.
19. Glow-Linked Chain on Side Rib
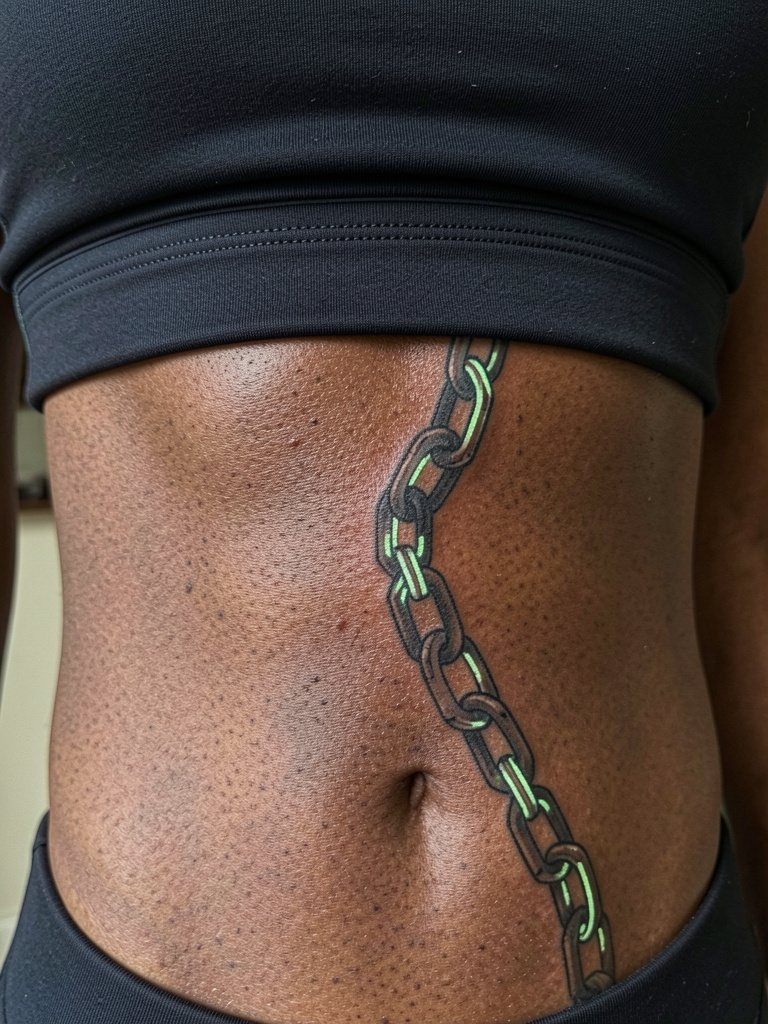
Chain links down the ribs can lose clarity if links are too narrow. One camp insists the ribs blur thin link designs within two years. Another camp argues that with modestly wider link gaps and consistent needle depth the chain can hold. To be safe choose link widths that give the glow seams breathing room. Sessions on ribs are painful for many so book in short passes. Expect touch-ups if any links soften. For session comfort wear a fitted cropped top so the artist has easy access without fabric shifting.
20. Glow-Speckled Wrist Cuff
A speckled cuff reads as delicate by day and playful under UV. I recommend denser outer speckles and a clear gap at the skin crease so the cuff does not smear with wrist flexing. Sessions are short but the wrist is sensitive. Plan a touch-up at year two if the speckles soften. For showing the cuff, a rolled-cuff long sleeve blouse keeps the wrist visible without pressure.
21. Glow-Accented Sleeve Fragment on the Shoulder Blade
Shoulder-blade fragments integrate into larger sleeves cleanly because the surface is stable. I suggest glow thread accents follow muscle contours so they read with movement. Bring photos of the sleeve direction you plan so the fragment ties into future work. Sessions can be moderate and comfortable. For wardrobe choose spaghetti-strap dresses to show the piece without rubbing.
22. Glow-Flecked Side Portrait on Hip
Hip portraits are private and stay protected under clothing, so glow flecks add a secret layer. I recommend anchoring the portrait in dark linework and keeping glow flecks in the background rather than on skin contours. Sessions are medium and can be uncomfortable when you sit unevenly, so bring a cushion. For showing the portrait at events, low-rise jeans and cropped tops reveal the area without pulling at the skin.
23. Glow-Tipped Feather on the Side Neck
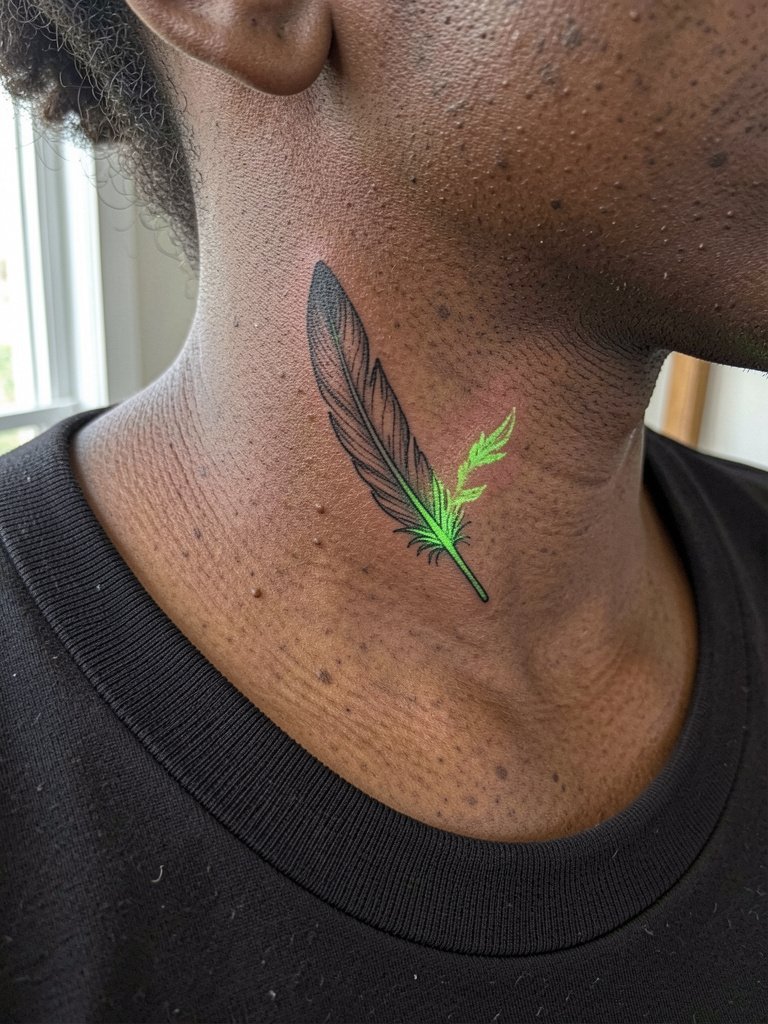
Side-neck feathers read elegantly with a glow tip if the linework is not too thin. I suggest the tip be slightly larger than your reference so the glow remains visible over time. When you book, ask for a stencil placed with the head pointing away from the jaw to avoid shifting into the hairline. Sessions on the neck can be sharp; pace the work and plan a short session length. For showing the feather try wide-neck sweaters that reveal the lateral neck cleanly.
24. Glow-Outlined Compass on Upper Thigh
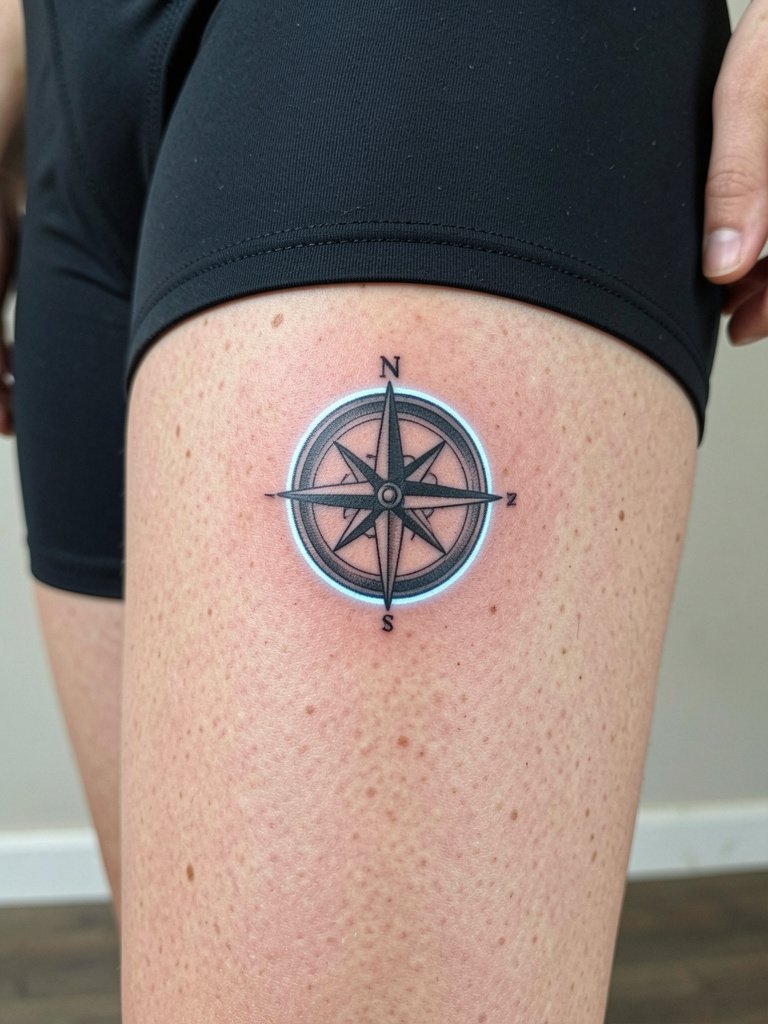
Thigh compasses carry well because the surface is broad and receives low friction. I prefer a glow outline rather than filling the needle so the compass reads day and night. Ask the artist to show how the compass sits when you walk to avoid angular distortion. Sessions are comfortable for most and take one to two hours. For reveal, pair with modest athletic shorts that keep the area visible without binding.
25. Glow-Starfield Across the Shoulder Blade Edge
A starfield along the shoulder blade edge works as a subtle highlight that glows in clusters. I recommend varied star sizes and a few larger glow stars to avoid uniform fading. Ask the artist to distribute the cluster so it reads when you move your arm. Sessions are short and feel like light scratching rather than deep pressure. Choose spaghetti-strap tops to reveal the cluster without friction.
26. Glow-Edged Pocket Watch on Inner Forearm
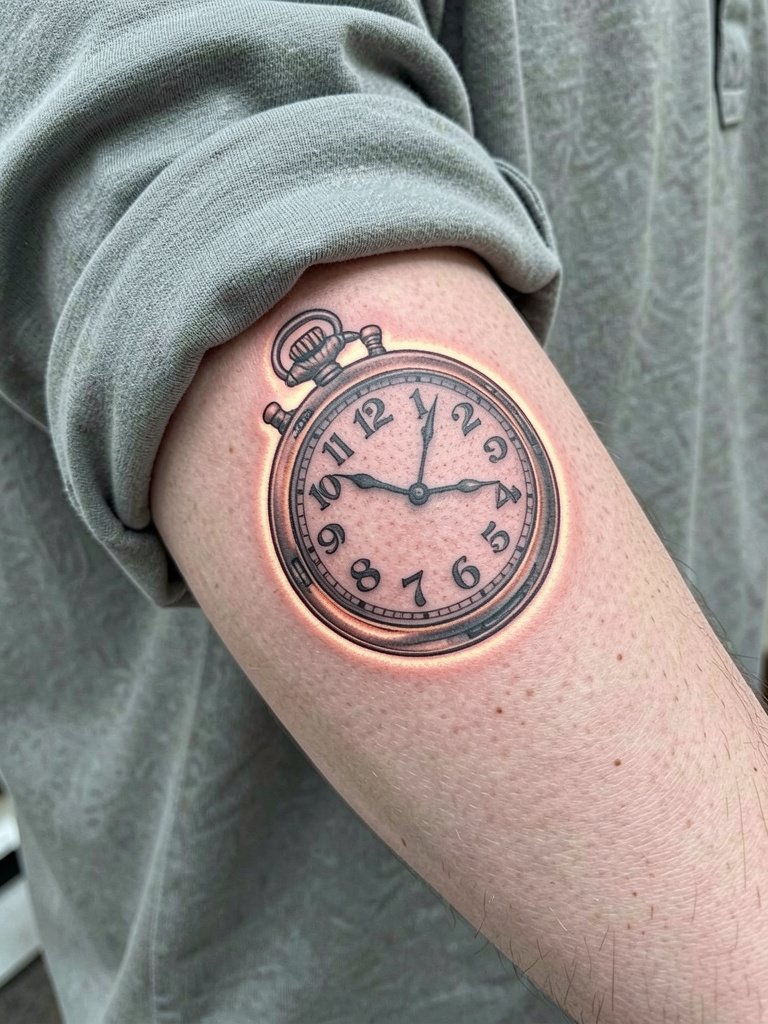
Inner-forearm watch faces can age well if numerals are bold. I recommend bold numerals and a glow edge rather than fragile micro-detail inside the face. Ask the artist to place the watch so the face centers naturally when your arm is relaxed. Sessions are moderate and take one to two hours for shading and glow layering. For showing the piece, a rolled-sleeve oxford shirt displays the inner forearm cleanly.
27. Glow-Highlighted Fingerless Knuckle Script
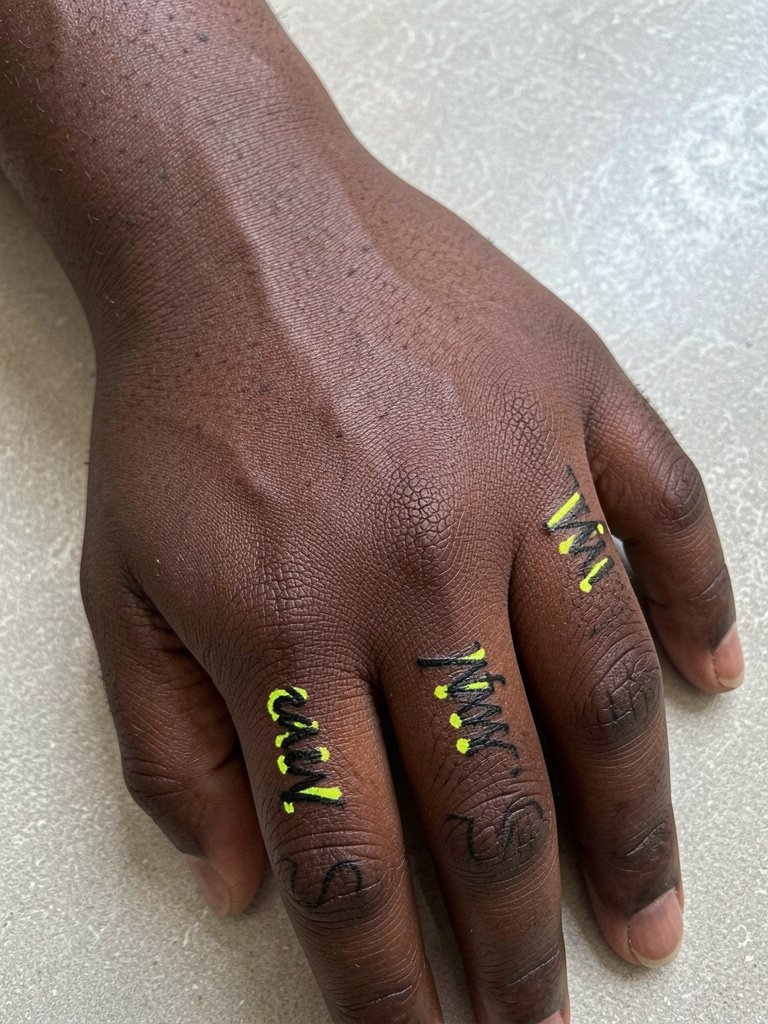
Knuckle and finger scripts fade faster than other spots so glow underlines help keep the phrase visible under blacklight. I suggest slightly larger letter spacing and robust underlines to prevent letters from smudging with hand use. Sessions are short but expect more frequent touch-ups, often yearly. For protective wear while healing use thin cotton gloves at night, and for styling try minimalist rings and open-finger gloves that let the script breathe without constant rubbing.
Frequently Asked Questions
Q: Are glow-in-the-dark inks safe for everyone?
A: There is a split in the community on ink safety. One group warns about potential allergic reactions and older UV inks that were not regulated. The other group points to modern glow pigments formulated for skin and shows healed examples that look fine across years. If you have sensitive skin, mention past reactions to topical products and request a small patch test at least 48 hours before the session.
Q: How long does glow ink stay visible under a blacklight and in daily life?
A: Glow visibility depends on pigment type and saturation. Most glow pigments dim over hours of light exposure but are brightest after a short charge under UV or strong light. Expect the glow effect to require occasional touch-ups if you want peak intensity at year three and beyond.
Q: Where can I find healed examples and portfolios without naming artists directly?
A: Search platform tags and keywords such as glowing tattoo, UV ink healed, and glow ink portfolio with location filters on social video apps. Reddit tattoo communities and portfolio galleries often include healed shots across different skin tones. Use keyword filters and include terms like healed and blacklight to find realistic results.
Q: How should I dress for a session depending on placement?
A: Wear clothing that gives the artist clear access without fabric movement. For chest or collarbone work, a scoop-neck tank works. For thigh and hip pieces, fitted bike shorts are practical. For wrist and hand work, choose loose sleeves that roll easily. Bringing the right clothing speeds the session and reduces fabric rubbing during healing.
Q: How often will glow tattoos need touch-ups compared to regular color?
A: Glow pigments tend to fade faster than standard blackwork, so plan on touch-ups earlier. For highly exposed spots like fingers and wrists expect touch-ups every 12 to 24 months. For thicker-skin areas like calves and shoulders, a touch-up every two to four years is common depending on sun exposure and care.
