
The birds that still read like birds five years later are often the simplest choices, not the loudest ones on trend. A tiny single-needle silhouette can outlast a watercolor splash if you pick the right placement and plan for touch-ups. Read this like a shop chat. I name the styles that hold up, the placements that frustrate fine line, and the wardrobe tips that make these pieces look intentional every day.
1. Neo-Traditional Majestic Eagle on the Shoulder
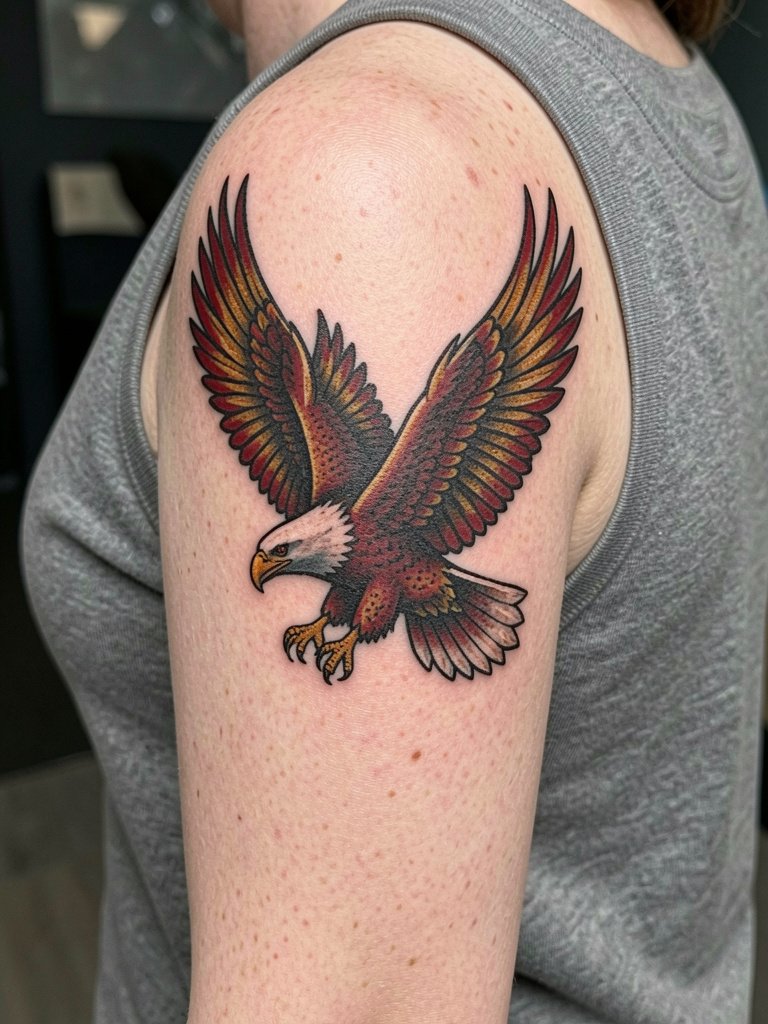
A shoulder eagle reads from a distance because of bold outline and strong color blocks. For longevity request flat color fills and a slightly wider outline so the wing details have room as the piece softens over time. Bring a clear reference showing wing spacing at six to eight inches. Expect two to three sessions for saturation and layering. Common mistake is asking for tiny feather detail at a scale that will blur. For the session wear a sleeveless tank top so the artist has full shoulder access.
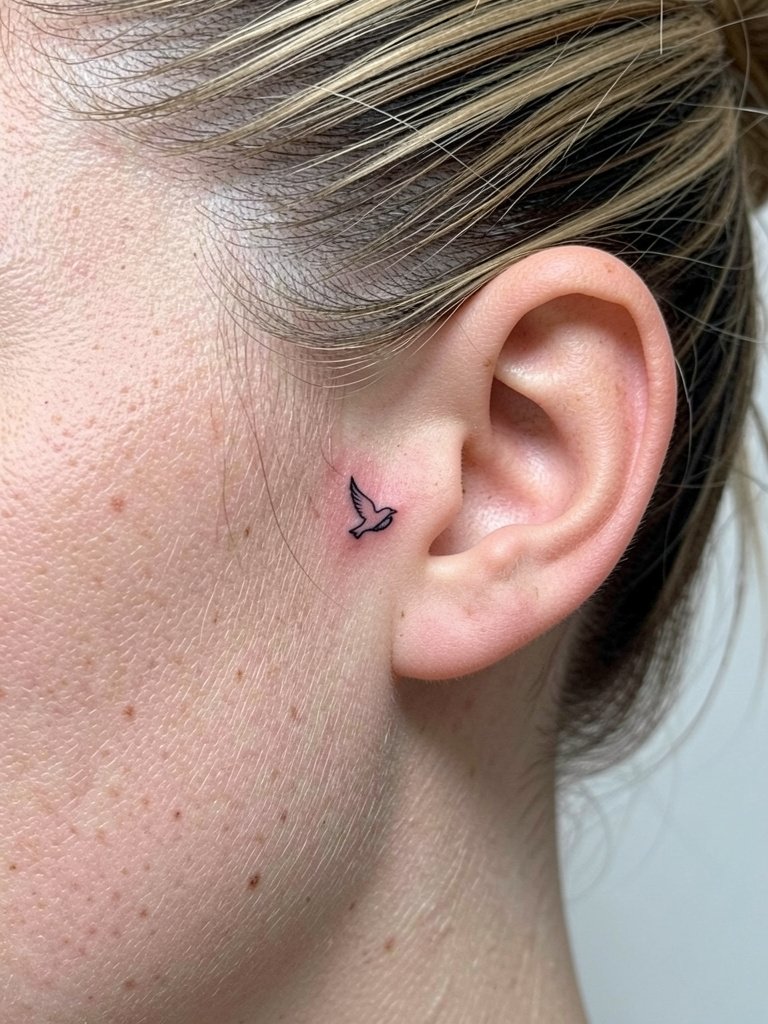
2. Fine Line Single-Needle Bird on the Inner Wrist

A single-needle bird on the inner wrist suits someone who wants subtlety. Ask for slightly heavier single-needle weight than the thinnest reference so the line can survive everyday washing and typing. Expect one session and a touch-up window at six to twelve months for crispness. A common error is placing ultra-microscopic details too close together, which can bleed and soften. Style note, the wrist looks polished with layered thin chain bracelets on the opposite wrist, so bring a thin chain bracelet stack to preview how the piece will read with jewelry.
3. Blackwork Flock of Three on the Upper Back

Three solid silhouettes across the upper back give movement without relying on fine detail that will blur. Discuss spacing and negative space with your artist so each bird keeps its shape as the skin ages. One session often suffices for this span, but plan a short follow-up if edges soften after settling. Mistake to avoid is clustering the birds too close to the spine, where movement and bra straps increase wear. For showing off, open-back tops pair perfectly with a shoulder-spanning flock, so consider adding an open-back tank top to your wardrobe.
4. Watercolor Bird with Ink Drip on the Inner Forearm

Watercolor looks spectacular fresh but divides opinion on aging. One camp says watercolor fades faster because thin pigment layers migrate and the washed edges separate after a few years. The other camp insists watercolor can age nicely if the artist packs color properly and uses long-lasting pigments. If you choose watercolor, accept it as aesthetic statement rather than guaranteed longevity and schedule a touch-up plan at year two to refresh tones. For the session wear a linen button-down that rolls up cleanly so the artist can access the inner forearm without fabric rubbing.
5. Minimalist Geometric Bird at the Ankle
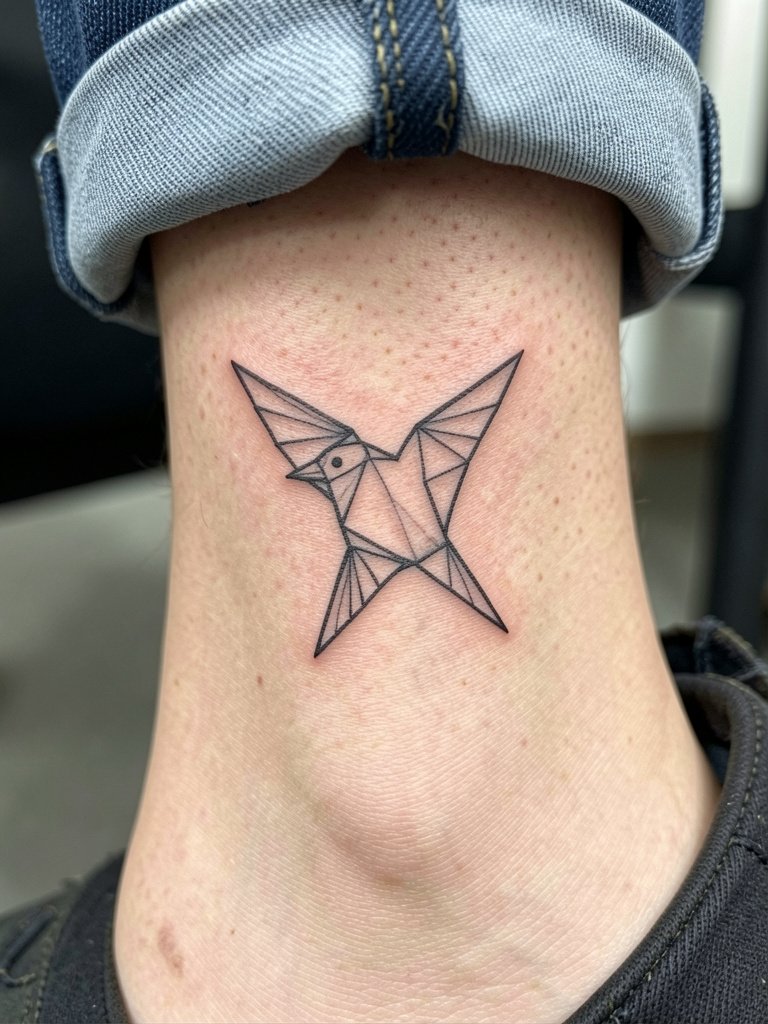
Geometric bird outlines at the ankle need room to breathe. Request larger negative spaces between triangles so the geometry does not fuse after seasonal swelling. Ankle is prone to rubbing from socks and shoes in the first two weeks, so plan footwear that keeps the area exposed and dry. A common mistake is asking for ultra-fine intersecting lines that end up blurring into a single mass. Pair this design with delicate ankle chains for photos. Bring slip-on shoes so you can remove footwear easily on session day.
6. Traditional Flash Bird on the Upper Thigh

A traditional flash bird on the upper thigh ages predictably because of its bold lines and flat fills. Tell the artist you want classic saturated fills and thick outlines so feather separation remains visible at year five. Session is usually one visit and low blowout risk for this placement. Avoid asking for tiny facial details at thigh scale. For the appointment wear loose shorts so the artist can roll the leg up without pressure, and consider mid-thigh shorts that are easy to remove.
Session Day Picks
These items help with the small friction and clothing issues that come up in the first week after wrist, thigh, and forearm pieces from the designs above.
- Bepanthol Plus search results. A non-greasy European balm that some clients prefer for minimal residue on delicate fine line work, especially in humid months.
- Bepanthen search results. The Australian-formulation salve recommended by some studios for quick healing without heavy greasiness.
- After Ink balm search results. A vegan-friendly tattoo balm used by collectors who react to petroleum products.
- Calendula salve search results. Gentle plant-based salves work for sensitive skin, but use thin layers to avoid over-moisturizing.
- Saniderm search results. Second-skin dressings are the preferred option for some placements with friction, like inner forearm under sleeves, but follow the artist's guidance on wear time.
7. Realistic Micro-Realism Bird on the Outer Forearm

Micro-realism packs high detail into a small area and reads beautifully on the outer forearm. During consultation bring a high-resolution reference and ask the artist to map how the feathers will read at three versus five inches. Expect two to four sessions depending on density and a realistic touch-up at year two if highlights fade. Mistakes include requesting excessive contrast at tiny scale that ages into hard edges. For display, roll sleeves up and try on a linen button-down to see how the portrait sits with neutral fabrics.
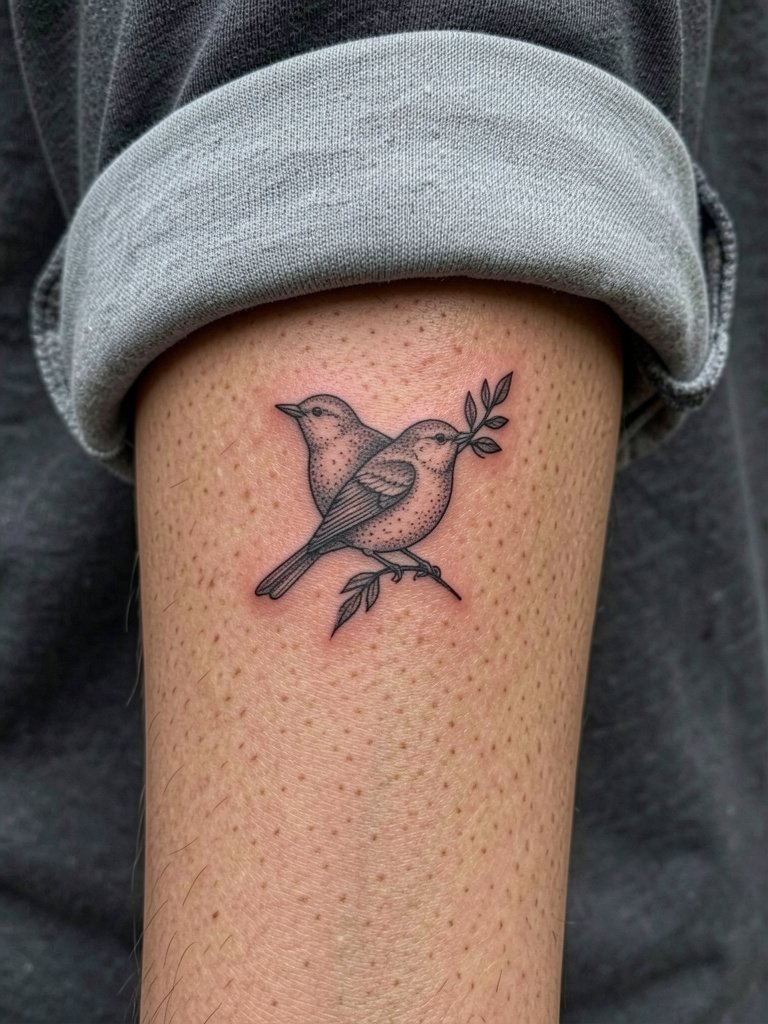
8. Fine Line Bird with Botanical Branch on the Inner Upper Arm

A botanical bird on the inner upper arm balances intimacy with visual interest. Specify single-needle stippling for leaves and a slightly bolder outline for the bird so it stays legible amid arm movement. Inner arm can stretch, so discuss spacing and avoid micro-detail that sits on the crease. Typical timeline is one to two sessions and a six- to twelve-month review. This placement reads well with rolled-up shirts and delicate chains on the opposite wrist, so try layered neutrals and a thin stacked gold chain bracelet for photos.
9. Dotwork Stipple Bird on the Lateral Hip

Dotwork on the hip creates a textured, wearable piece that photographs well at the beach. Tell the artist you want dot density maps so highlights hold at a distance. Hip placement can be affected by waistlines and tight clothing during healing, so plan loose waistbands for the first three weeks. A common misstep is choosing extremely dense dot patterns too small for the area, which can merge with weight change. Consider pairing the piece with high-waisted styles when showing it off and bring loose bottoms for the session.
10. Ignorant Style Playful Bird on the Wrist

Ignorant style embraces imperfection, which is the point, but scale still matters. Ask for bold line weight so intentional wobble reads as design, not a healed error. Wrist placement is high-motion, so expect touch-ups sooner than on low-movement areas. The typical session is short and casual, but avoid tiny shapes that the skin will smooth out. Style pairing: a minimalist watch on the opposite wrist frames the piece and keeps attention balanced. Wear a short-sleeve top on the day of your appointment.
11. Ornamental Bird with Mandala on the Ribcage

Ribcage pieces split opinion on fine line longevity. One camp says fine line on ribs blurs within two to three years because skin stretches with breathing and clothing friction. The other camp says careful spacing and correct depth let fine line settle well and that experienced artists have healed photos to back it up. For this ornamental take, request stronger primary outlines for the bird and more open mandala spacing so the composition keeps structure as the skin shifts. Rib sessions can be painful and need breaks. Bring a loose, comfortable bra for aftercare and a soft top you can slip on without rubbing the area.
12. Single Continuous-Line Bird at the Nape

A continuous-line nape bird reads like a small secret when hair is down and a neat reveal when hair is up. Ask the artist to sketch the single flow live so you can see if the curve sits right under your hairline. Nape skin can hide faint blur, so fine line wears acceptably if given room. The session is quick and low-bleed risk, but avoid heavy lotions before appointment. Style tip: wear your hair in a bun for a week of photos, and bring an updo hair tie for the appointment so the artist has clear access.
13. Flock Scattered Across the Collarbones

A collarbone-spanning flock gives a narrative feel without overwhelming detail. Plan the scale carefully so smaller birds do not disappear into skin texture. Ask the artist to map bird sizes across the collarbone to preserve readability with movement. Clavicle area can be sensitive during application and in early healing if necklaces rub. For show-off looks, V-necks and scoop-neck tanks frame the birds neatly. Bring a low-cut top on session day so the artist can place stencil exactly where you want it.
14. Bird Escaping a Cage on the Thigh

A narrative silhouette with partial cage lines creates dramatic focus on the bird. Specify that cage bars stay faint so the bird remains the focal point even after settling. Thigh placement keeps the piece private when needed and visible with shorts and swimwear. A common mistake is overloading the cage with detail that competes with the bird. For session wear bring loose shorts that can roll comfortably and avoid skinny jeans right after the session.
15. Small Geometric Bird on the Ankle Bone

An ankle geometric piece benefits from slightly heavier lines and larger shapes than you might expect. Ask the artist to scale up the triangles a touch so the geometry survives seasonal swelling and footwear friction. The session is short but the early healing stage needs sock-free shoes and open footwear. A common error is requesting micro-angles that become indistinct. Style tip: ankle chains and open sandals keep the design visible when wearing summer looks.
16. Ornamental Wing Fragment on the Upper Back

A single ornamental wing fragment reads like a hint of larger work and is great for people building a back piece over time. When consulting, bring images of both small fragments and full wings so the artist can plan flow. Shoulder blade placement tolerates detail well but avoid extremely thin micro-lines that sag with time. The session is moderate in length and usually has a low blowout risk. Racerback tops show this area well; consider a racerback tank top for summer styling.
17. Micro-Realism Finch Near the Collarbone
Micro-realism close to the collarbone looks delicate and intentional when properly scaled. Ask for a test stencil so you can check how the highlight and shadow sit against your bone structure. Collarbone skin sees movement from shoulders and necklace wear, so plan for a minor touch-up window at six to twelve months. The biggest mistake is asking for too-small highlights that vanish. For display pick scoop necklines to frame the piece and try a short pendant or no necklace while it heals.
18. Blackwork Silhouette on the Upper Arm

Solid black silhouettes on the outer arm are low maintenance and age well. Tell the artist you want dense black saturation in one session and a follow-up if any patchiness appears. Outer arm sees sun exposure, so plan SPF once healed to protect saturation. Mistake to avoid is placing thin feather lines inside a large black block which can get lost. Cap-sleeves and sleeveless tops show this placement beautifully. For session comfort, wear a loose tank top to allow easy arm rotation.
19. Minimal Bird with Single Leaf on the Inner Forearm
Inner forearm botanical birds read clearly and are practical choices for first-timers. Request slightly increased spacing between line elements so the leaf and bird maintain separation at year two. Typical session time is one to two hours and touch-ups are common around year one for very fine single-needle work. A common error is overcomplicating the leaf veins at this scale. Style tip: rolled-up linen shirts in neutral shades keep the piece visible and polished.
20. Small Winged Portrait on the Outer Thigh

Outer thigh pieces carry detail well and are forgiving with weight changes. Ask the artist to show a mockup at life-size so you can judge proportion with your body. The session is comfortable and usually one visit, though larger portraits need extra time. Avoid requesting ultra-fine hatching that will merge. For showing off pair with mid-thigh shorts or skirts and bring loose bottoms for the studio.
21. Tiny Flying Bird Behind the Ear
Behind-ear birds are discreet and quick. Ask the artist for a conservative scale and clear single-line silhouette so the small shape stays readable. Hands-on time is short, but the area is sensitive and requires careful aftercare to avoid hair product contamination. A common misstep is making the image too detailed for such a small canvas. If you want it to peek when hair is up try simple studs or short hair styles while it settles.
22. Ornamental Chest Flock below the Clavicle

A chest flock demands composition planning to avoid overcrowding near the sternum. Specify exact spacing and bring vertical and horizontal references so the pieces do not migrate into cleavage or under bra lines as you age. Expect two to four small sessions if you want varied styles in the flock. Mistakes include adding too many tiny birds close together. Wear scoop necklines to preview how the composition sits and pick a comfortable bra to remove during the session.
23. Geometric Folded Wing on the Ankle

A folded-wing geometry piece reads best with simple planes and bold negative space. Ask the artist to scale shapes so corners do not sit directly on areas that crease with movement. The ankle heals with friction so avoid tight socks for two weeks. Common mistake is micro-angles that soften. For styling, cropped denim or ankle-strapped sandals keep the ankle visible and frame the design.
24. Dotwork Mandala Bird on the Side Torso

A dotwork mandala on the side torso looks intricate and meditative. Ask the artist to show a healed-size stencil so you can see how dot gradients will settle. One camp cautions that ribs distort fine dots with body movement. The practical approach is to use slightly larger dot spacing to keep contrast over time. For the session bring a soft, loose bra and a fitted top that you can remove easily for placement checks.
25. Tiny Perched Bird on the Thumb Side of the Wrist

Thumb-side wrist tattoos are visible and vulnerable to daily abrasion. Recommend slightly bolder outlines and ask the artist to avoid fractions of millimeter detail that will be lost to washing and wear. Sessions are brief but expect earlier touch-ups than on protected areas. People sometimes pick entrenched detail that fails; keep the design bold and simple. For the studio wear short sleeves and remove bracelets from both wrists.
26. Winged Geometric Chest Accent

Small geometric accents over the chest call for balanced negative space so shapes do not merge with clavicle shadows. Ask for mockups on the body so you see how angles align with your bone structure. Clavicle skin can show slight softening in two to three years if lines are microscopic. For showing off a V-neck works well. Wear a V-neck on session day for accurate placement.
27. Bold Back-of-Shoulder Bird with Flight Lines

A back-of-shoulder bird with flight lines is a high-impact choice that still ages well if the lines are bold. Ask the artist to design the motion lines with breathing movement in mind so the composition flows with shoulder motion. One session usually nails the saturation. Common mistake is overly thin trailing lines that break up with muscle movement. For styling racerbacks and open-back tops show off the sweep of the design, so bring one you like on session day.
Frequently Asked Questions
Q: How much should I expect to pay for a small bird tattoo and why do shop minimums vary?
A: Small bird tattoos commonly fall into broad ranges depending on style and region. Simple fine line pieces often start around $80 to $300 while micro-realism and color work usually start at $300 to $1,200. Studio minimums exist because shops cover sterilization and setup costs and because even quick sessions require concentrated skill. If price matters, ask for a flash variation or a compact custom option that fits a lower time slot.
Q: How do bird tattoos show up on darker skin tones and what should I request during the consultation?
A: Black ink holds best on darker skin, while subtle grey washes and pale colors read less predictably. Request healed photos on similar skin tones and bring the exact stencil size you want so you can judge contrast. Ask the artist to use stronger primary outlines and deliberate spacing choices rather than thin grey lines that disappear. Portfolio diversity is the clearest signal an artist adapts to different complexions.
Q: When should I get a touch-up and how often do bird tattoos need refreshing?
A: Most shops recommend waiting until month six to evaluate settled ink. Many clients choose a minor touch-up at year one or two for fine line and watercolor pieces. Touch-up frequency depends on placement, style, and sun exposure. Plan for a possible touch-up within two to five years, and budget accordingly.
Q: Where should I look to find artists who show healed bird tattoos across different skin tones and styles?
A: Search platform hashtags like #flyingbirdtattoo, #finelinebirdtattoo and filter by location on Instagram and TikTok. Use Tattoodo to search keywords like "fine line bird" and look specifically for healed work. Reddit threads in r/tattoos and r/tattooadvice often include peer-shared healed photos and real experience notes. When you contact a studio request healed examples on a similar skin tone and the exact size you want.
Q: Are ribs and watercolor styles higher risk for fading or blurring?
A: Ribs are a high-movement area and can blur fine line work faster than low-movement sites. Watercolor relies on thin pigment layers and often fades faster than saturated color. Both choices are valid if you accept the maintenance trade-off. If you want less ongoing work, select bolder outlines or blackwork alternatives.
Q: What should I wear to my appointment for a thigh or rib cage bird tattoo?
A: For thigh pieces wear loose shorts or pants that roll comfortably without compressing the fresh tattoo. For rib cage work choose a fitted cropped top or soft bra that you can remove without tugging. Comfortable, easy-to-remove clothing reduces friction and speeds setup.
Q: Can I use numbing cream for sensitive placements like the ribs?
A: Numbing cream is commonly used and can help you sit through longer sessions. If you plan to use topical numbing request specifics from the shop about timing and product so it does not interfere with saturation. Some artists prefer clients who pre-apply a specified product 45 minutes before the session.
