
The simplest crosses often carry the most weight. A tiny single-needle cross on the inner wrist can feel like a private talisman, while a saturated blackwork cross over the chest reads like a vow. Expect choices that trade subtlety for longevity, and placements that change how people see the symbol at a glance. Below the first idea you will find designs that balance meaning, aging, and everyday style.
1. Fine-Line Crucifix on the Inner Forearm

A thin crucifix on the inner forearm reads intimate and can be scaled up later if you want more detail. Pain here is low to moderate and most sessions finish in under an hour. The common mistake is asking for single-needle detail too small, which the inner forearm will swallow by year three. For longevity err toward slightly heavier linework and allow some inner spacing between cross arms. At six months the lines look crisp, at two years they soften and may need a touch-up around year four. For outfit pairings show the piece with rolled sleeves and a slim linen button-up that frames the forearm for evenings out.
2. Micro-Realism Cross Behind the Ear

Behind-the-ear crosses read discreet and personal. Expect a short session and a quick healing window, but pick an artist comfortable with micro-realism on tight skin. One camp argues micro-detail in that spot fades or blurs quickly. The other camp says with the right spacing and depth a tiny cross can stay legible for years. I recommend a slightly bolder outline than you think you need to give negative space room. Wear your hair up during the session for clear access and consider a light scarf in cooler months so the area stays warm during the first week.
3. Geometric Celtic Cross on the Upper Arm

A geometric Celtic cross balances pattern and clarity when sized properly. Pain on the outer arm rates low and a single two-hour session usually covers it. The mistake is shrinking knotwork to fit a smaller canvas; knot details need breathing room. Ask for slightly wider knot gaps and clean negative spaces so the cross reads after touch-up fading. At six months the knots fill in slightly, and at five years the bolder outlines are what preserve the pattern. Pair this with a fitted short-sleeve tee when you want the arm on display.
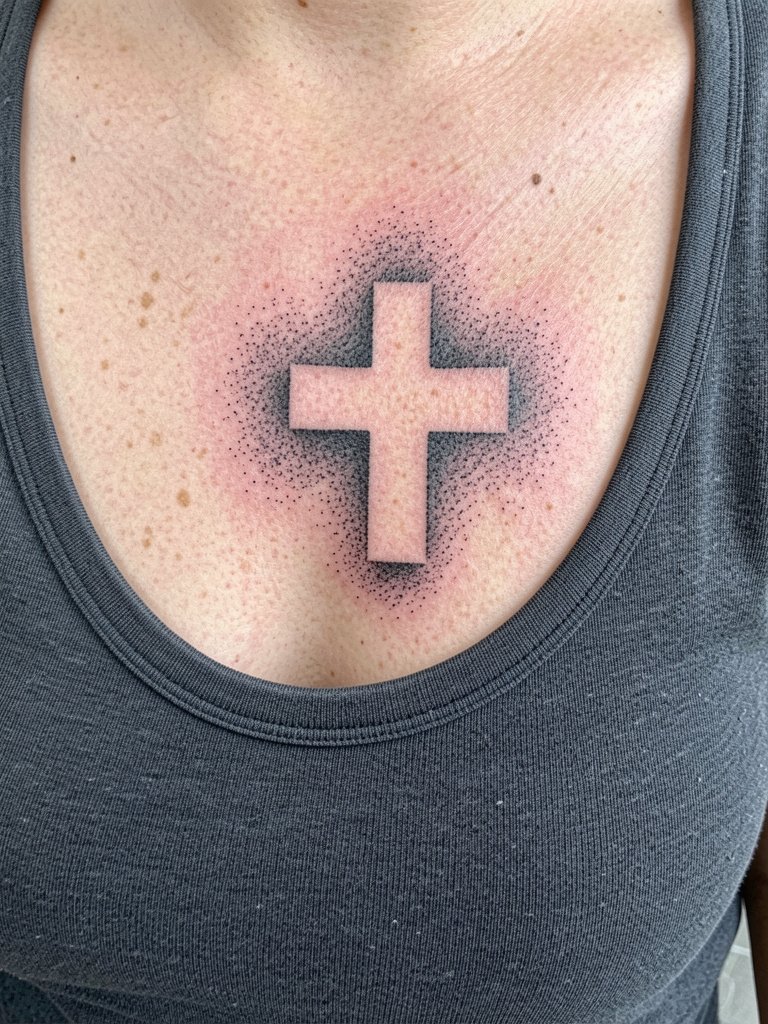
4. Blackwork Latin Cross Across the Sternum

Sternum crosses are high-impact and need an artist experienced with chest curvature and healing there. Expect moderate to high pain and multiple short passes for saturation. One group of artists avoids extremely fine detail on the sternum because the skin shifts and blurs with movement. The opposing group says with professional technique and correct spacing you can retain crisp edges even after years. If you choose this spot ask the artist to map the cross so the vertical axis follows the breastbone to prevent distortion. During the session wear a fitted sports bra that provides coverage yet allows easy access.
5. Minimalist Micro Cross on the Side Finger

Finger crosses age differently because the skin and constant washing create friction. Pain is sharp but quick. A common mistake is going too tiny; lines often blur in twelve to eighteen months. Instead pick a simplified shape with slightly thicker arms and accept a touch-up at year one. For day-of-session wear short sleeves and avoid jewelry that rubs the area during the first week. For show-off wear a thin sterling band ring on the opposite hand so attention balances across both hands.
6. Wood-Textured Cross on the Calf

Calf placements tolerate texture and larger pieces and the skin there keeps saturation well. Sessions are moderate and can be split over two sittings if you want heavy shading. Mistakes include over-detailing small wood grain; scale up the pattern so knot marks are visible after healing. At six months the shading settles into skin tone, and at two years a touch-up on darker veins may be all you need. For wardrobe pairings a cuffed jean or a casual ankle boot frames the calf cross when you want people to notice.
Session Day Picks
The wrist and finger examples above heal with more friction than chest and calf pieces, so a few targeted items smooth the session and first week.
-
Stencil transfer paper kit. Lets you preview how the cross will sit on curved areas like the inner forearm and calf before the needle hits skin.
-
Topical numbing cream. Applied per product instructions before hand or rib sessions eases the sharp sensations and helps you finish finer work in one go.
-
Thin protective film roll. Useful for finger and wrist pieces to reduce friction from daily washing during the first 48 hours.
-
Fragrance-free body wash. Gentle cleansing avoids irritation around detailed linework, especially on chest and inner-arm pieces.
-
Aquaphor healing ointment. Thin layers during the initial days help retain moisture for single-needle line work without suffocating tiny needle channels.
7. Dot-Work Latin Cross on the Back of the Shoulder

A stipple or dot-work cross reads graphic at a distance and detailed up close. Expect a moderate pain level on the shoulder and a single two-hour session for small-to-medium sizes. The typical mistake is packing dots too tightly which makes the pattern look muddy after a year. Specify dot density and distance during consultation so the gradient breathes. At six months the stippling smooths visually, and at two years the silhouette is what holds the design. Pair with a sleeveless athletic tank for beach days when you want the shoulder art visible.
8. Ornamental Cross on the Collarbone

Collarbone crosses are visible and flattering, but the skin there is thin and unforgiving. A common pitfall is asking for ultra-fine scrollwork too close to the bone, which can blur. One camp says fine filigree will always soften on collarbone skin. The other camp argues that slightly wider line weight and careful depth can keep detail readable. For the session wear something with a natural V-neck so the artist has clear access and you avoid fabric friction during healing. For evening wear frame it with an open-collar shirt or a light chain necklace that sits above the design.
9. Anchored Cross with Rope Detail on the Lower Forearm

Rope-detailed crosses take advantage of the forearm's flat canvas. Sessions are moderate and you will feel more during shading passes. The mistake is over-detailing the rope so it becomes a textured blur as the skin stretches. Request slightly bolder rope strands with clean negative space to preserve the twist. At six months the rope reads as texture, at two years the bold silhouette sustains the motif. Show it off with a cuff rolled to mid-forearm and a rugged leather bracelet for layered wrist styling.
10. Anchor-and-Cross Nautical on the Calf Sleeve

Crosses that tie into nautical themes work well when scaled into a sleeve. Sessions will be longer and may require multiple appointments for full saturation. A real mistake is treating the calf like a flat poster; curvature changes how the rope sits. Ask the artist to preview the wrap in movement so the cross reads while walking. Staged healing photos at two months help you decide if a touch-up is needed. Boots and rolled jeans make this type of piece read as intentional rather than accidental.
11. Etched Metal Cross on the Upper Thigh

The upper thigh gives space for textured, graphic crosses that read well under clothing and in swimwear. Expect moderate pain and a comfortable session where the artist can work without contortions. The common error is compressing metallic texture into too small a surface. Keep the scale larger and ask for high-contrast shadowing so the etched effect survives a few years. Wear loose shorts to the appointment for easy access and minimal rubbing during the first week. For showcasing, a pair of mid-length swim trunks exposes the upper thigh cross without overexposure.
12. Single-Stroke Box Cross on the Ribcage

Ribcage crosses look striking but require realistic expectations about pain and healing. One camp insists fine single-needle ribs blur because the skin stretches with breathing. The other camp maintains that slightly increased line weight and careful spacing let fine work hold. Given that split, I recommend a measured compromise: stronger outline with reserved inner detail. Sessions are longer and many people schedule a break halfway through. Wear a fitted cropped top for access and expect tenderness during the first two weeks.
13. Rosary-Style Chain Cross on the Wrist

Wrist chains are intimate and read like jewelry, but they face abrasion from watches and washing. For durability avoid ultra-thin chain dots and select slightly bolder dots so the chain keeps shape. At six months the chain will smooth into the skin, and many people plan a touch-up at the one-year mark. Session time is short and pain is low to moderate. Show it off with a rolled sleeve and a slender minimal watch band that sits opposite the tattoo to reduce rubbing.
14. Neo-Traditional Cross with Rose on the Shoulder Blade

Combining floral elements with a cross gives a softer narrative and benefits from the shoulder blade's generous canvas. Sessions are moderate and shading holds well there. A common mistake is adding tiny petals that disappear after healing. Keep petals larger and contrast high so the rose remains distinct. At two years the saturated blooms will still read if touch-ups happen every few years. For wardrobe use a racerback tee to put the shoulder blade art on display with a clean back line, and consider a lightweight open-back shirt for warmer days.
15. Gothic Block Cross on the Upper Back

Upper back crosses can be statement pieces that age gracefully because the skin is stable. Sessions can be longer and often require multiple passes for deep saturation. The real mistake is overshading small negative spaces which kills contrast over time. Leave crisp edges and let the blackwork anchor the shape for longevity. For showing the upper back pick shirts with a clean back cut or a low neckline to reveal the top of the cross in motion.
16. Minimal Line Cross on the Side Neck

Side neck crosses are visible and require an artist comfortable with neck anatomy. Pain is moderate and healing needs attention because of movement and clothing contact. The mistake is choosing lines so thin they blur with natural neck movement. Opt for a slightly stronger line weight and ensure the placement sits just below the hairline or above the shoulder to avoid tugging. For outfits, a wide-neck top frames the cross without rubbing and a lightweight scarf can protect the area in cooler weather.
17. Hollow Negative-Space Cross on the Chest Pocket Area
Negative-space crosses rely on surrounding shading to define the shape and age gracefully if the surrounding work is saturated enough. This is a moderate session, and the main risk is under-saturation of the surrounding fill leaving the cross faint after a year. Ask for layered stipple packing so the void remains clear. At two years the contrast between void and shade determines how legible the cross remains. Pair with button-downs that leave the chest slightly open for a subtle reveal.
18. Tiny Morse-Code Cross on the Ribcage
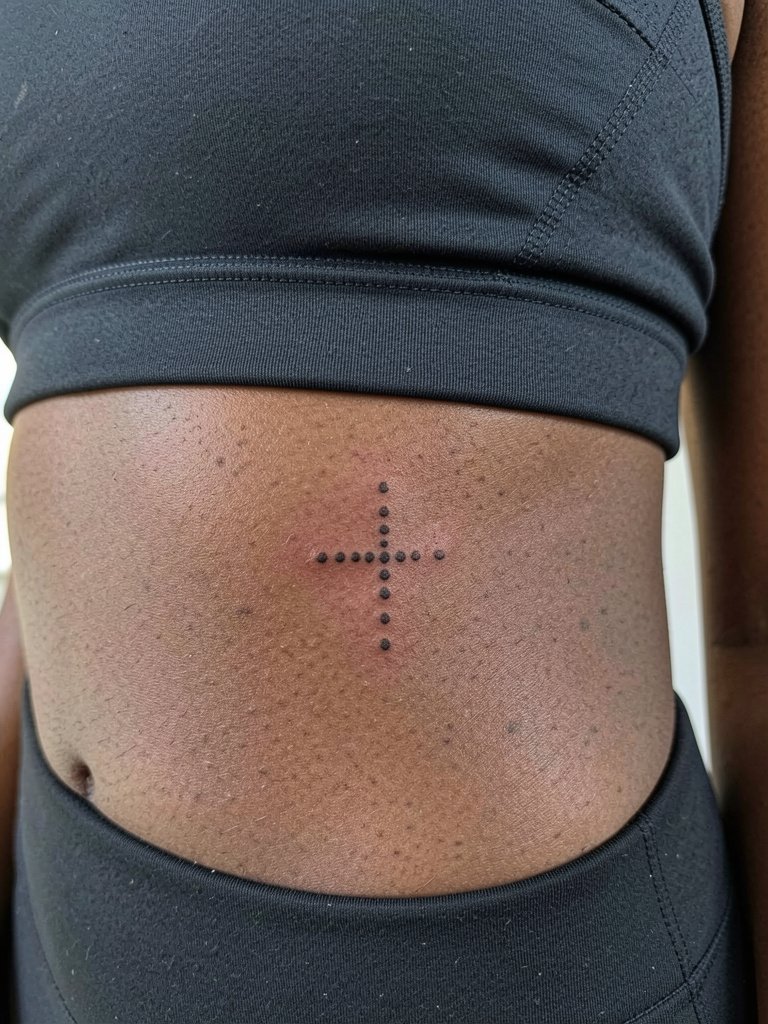
Morse-code crosses feel modern and private, but the ribcage is unforgiving for tiny marks. One camp warns that tiny dot and dash patterns on ribs blur with breathing and movement. The other camp counters that if each dot and dash is given slightly more surface area the pattern stays readable. Given those views opt for slightly larger dots and allow for a short touch-up window. Sessions will be sensitive and you should plan for breaks. Wear a fitted top that exposes the area without shifting during healing.
19. Heraldic Cross on the Thigh Panel
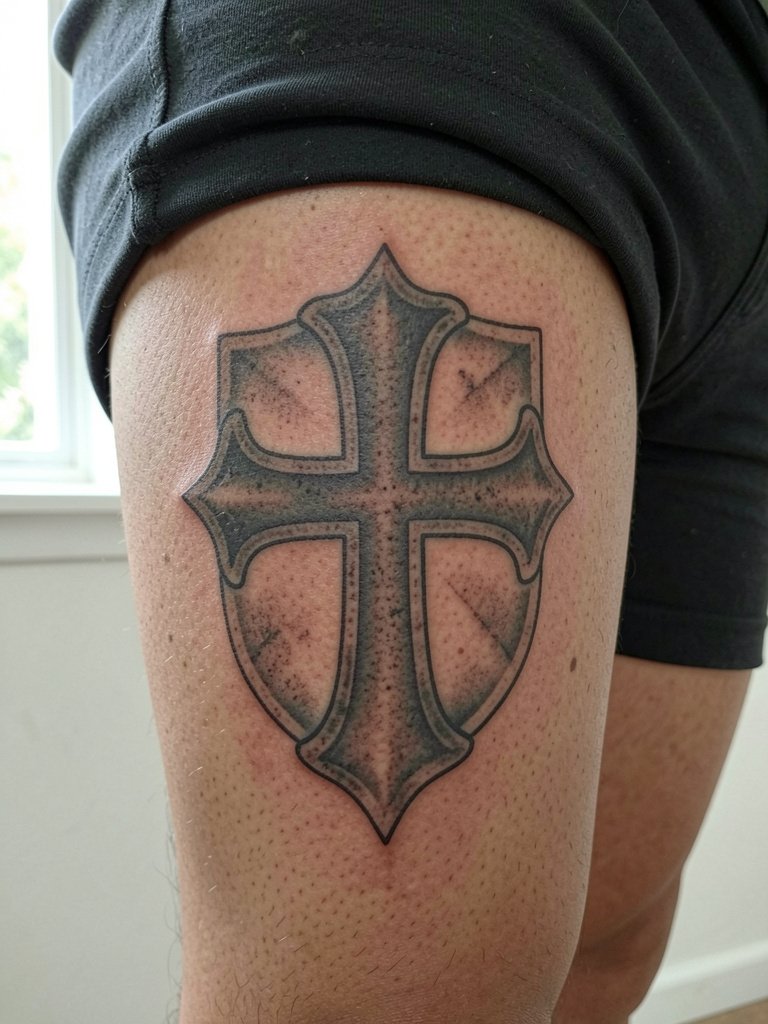
Thigh panels allow for heraldic motifs that tell a story across a broad skin plane. Sessions are comfortable and healing is typically uneventful. Mistakes include compressing crest details too close together; keep elements spaced so each holds after stretching. Expect a strong visual at six months and minimal change at five years if saturation is deep. For strolling or lounging, a pair of casual shorts displays the thigh art when you want it visible.
20. Scripted Name Cross on the Inner Bicep

Inner bicep placements feel personal and are visible when you want them to be. Single-needle script plus a cross can look delicate but beware of over-fine strokes. Artists split on whether fine scripts on inner biceps blur quickly. One group says the skin eats ultra-fine strokes and they fade into smudges. The opposing group says if the script uses a slightly heavier single-needle stroke and sits in the relaxed zone of the bicep it holds. I suggest slightly bolder script strokes and a photographed mock-up to confirm scale. Wear a sleeveless or loose tank top to the session for easy access.
21. Cross with Sunburst on the Center Chest

Sunburst crosses make the symbol feel radiant and can hide minor fading in the rays over time. These pieces need careful spacing so the rays do not merge. Sessions are moderate and require staged shading passes. A common error is packing rays too close which becomes a grey mass after a few years. Keep gaps and contrast high. For outfit choices, open-collar shirts or scoop-neck tanks place the cross in a natural focal point on the chest.
22. Cross Ring Tattoo on the Finger Band

Ring crosses are symbolic and practical for daily wear but have the highest fade rate of any placement. The skin on fingers is thin and exposed to frequent washing. Choose a slightly thicker band line and accept yearly touch-ups. Sessions are short yet uncomfortable; plan for a quick session and a strict hydration routine afterward. For visible styling pair it with thin stacking rings on adjacent fingers so the tattoo reads like jewelry rather than a raw mark. Consider a minimalist silicone ring for daily wear while the tattoo heals.
23. Cross Silhouette over the Knee Cap

Knee-area crosses are bold but sit on mobile skin which affects healing. Pain is moderate and you will feel pressure when the artist works close to the joint. The biggest mistake is placing detail directly on the joint crease where motion will distort the lines. Place the silhouette above or below the patella and keep the shape simple. For sessions wear shorts that let the artist work without fabric shifting. For daily looks a pair of athletic shorts keeps the area visible without friction.
Frequently Asked Questions
Q: How do fine-line crosses compare to bold blackwork for aging?
A: In my experience fine-line crosses look crisp early but many will soften within three to five years on high-motion areas. Bold blackwork sacrifices subtlety for longevity and often reads better a decade in because saturation prevents blowout from erasing the silhouette.
Q: Where can I find healed examples and portfolios without naming specific artists?
A: Search platform tags like #CrossTattooHealed, #MinimalCrossInk, and #BlackworkCross on Instagram and TikTok, use location filters to narrow to your city, and browse portfolio sites for keywords such as "cross blackwork" or "fine line crucifix." Reddit subthreads often link to healed photos by keyword and can show how tattoos look on different skin tones.
Q: What should I wear to a rib or sternum session for comfort and access?
A: Wear a fitted sports bra or bandeau that you can keep on while giving the artist access to the sternum or rib area. That protects modesty and prevents fabric from rubbing the fresh ink. A fitted sports bra in a simple fabric is practical.
Q: How soon will a small wrist or finger cross need a touch-up?
A: Expect smaller hands and finger pieces to often need touch-ups between six months and eighteen months depending on daily wear and washing. I advise budgeting a short session at the one-year mark for small placements to keep crisp lines.
Q: Are there special considerations for culturally inspired cross designs?
A: Yes. If a cross design draws from specific cultural heraldry or religious ornament, acknowledge its origin and choose respectful motifs rather than direct replication of sacred symbols. Many artists welcome a conversation about intent and can adapt visual language in a way that honors the source.
Q: Is neck or face placement worth it for a cross with deep meaning?
A: It depends on your lifestyle and tolerance for stigma. Neck and face crosses are highly visible and may affect job interviews or social impressions. They also require an artist experienced in those zones because skin texture and movement change how detail settles. If you choose that area, plan for slightly bolder line weight and a clear conversation about long-term visibility.
