
In my experience sitting in shop consultations for first tattoos, the same three mistakes come up: choosing a scale that eats detail, underthinking what to wear for access and healing, and skipping a quick stencil check. Those small decisions change how a piece looks at month six and year three. Start with the very first planning point below to lock your line weight and session outfit before you book.
1. Fine Line Script on the Inner Wrist
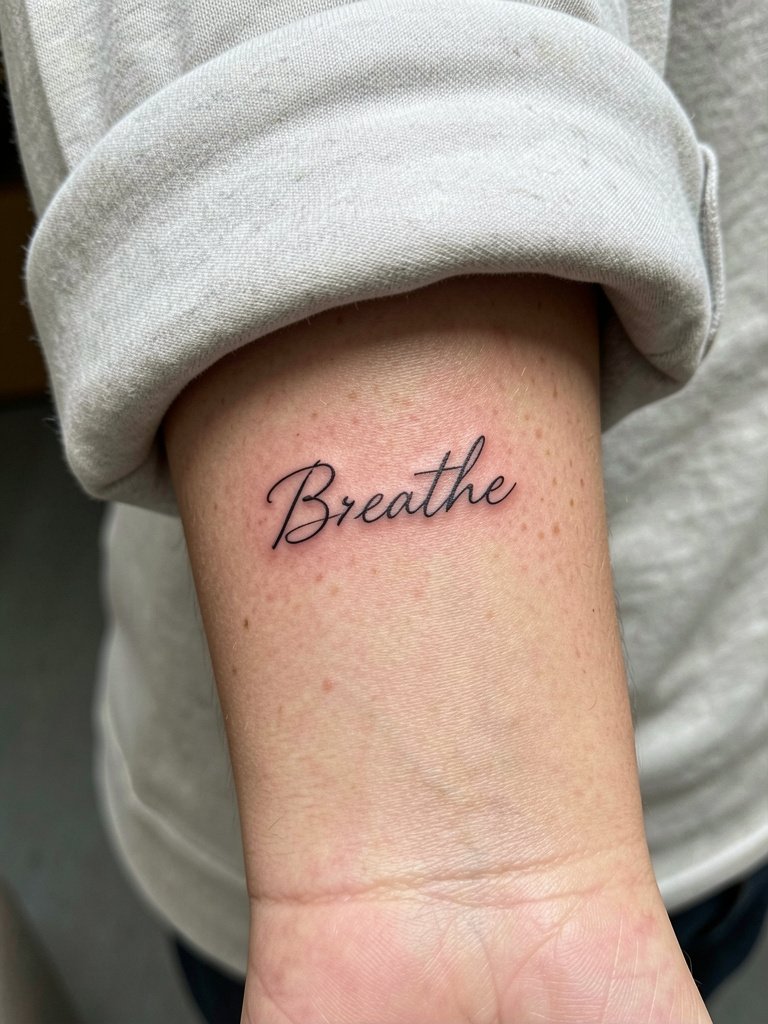
A fine line script on the inner wrist reads intimate and delicate when scaled correctly. Opt for a slightly heavier single-needle weight than what your saved reference shows so the letters do not blur into one another by year three. Common mistake is choosing a one-inch high script with hairlines meant for photo prints. Bring two reference scales to the consult so the artist can show how it will read at three versus five centimeters. Wrist skin moves and washes often, so expect a touch-up at 9 to 12 months for crispness. For the session wear a loose long sleeve you can roll without tugging, like a soft cotton long-sleeve so the artist has clear access.
2. Small Geometric Star on the Side of the Finger
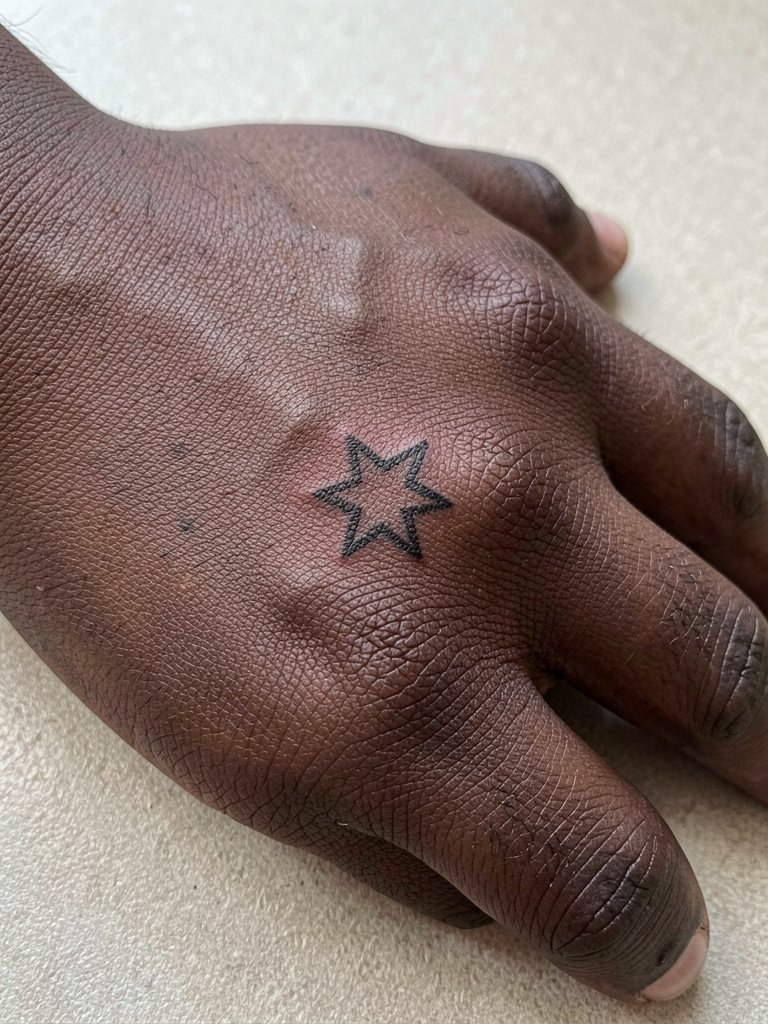
Finger placement feels bold but it ages differently than forearm work. The biggest issue is ink loss from constant hand use and frequent washing. Recommend sizing the star slightly larger than the Instagram reference so the geometry holds at six months. Discuss placement depth and plan for a three-month follow-up touch-up, not a one-off session. Pain on the finger tends to be short and sharp because of thin skin and bone proximity, but session time is minutes rather than hours. For the appointment wear a sleeve you can pull back cleanly, like a cropped tee or loose tank top, so the wrist and fingers are easy to access without stretching the skin.
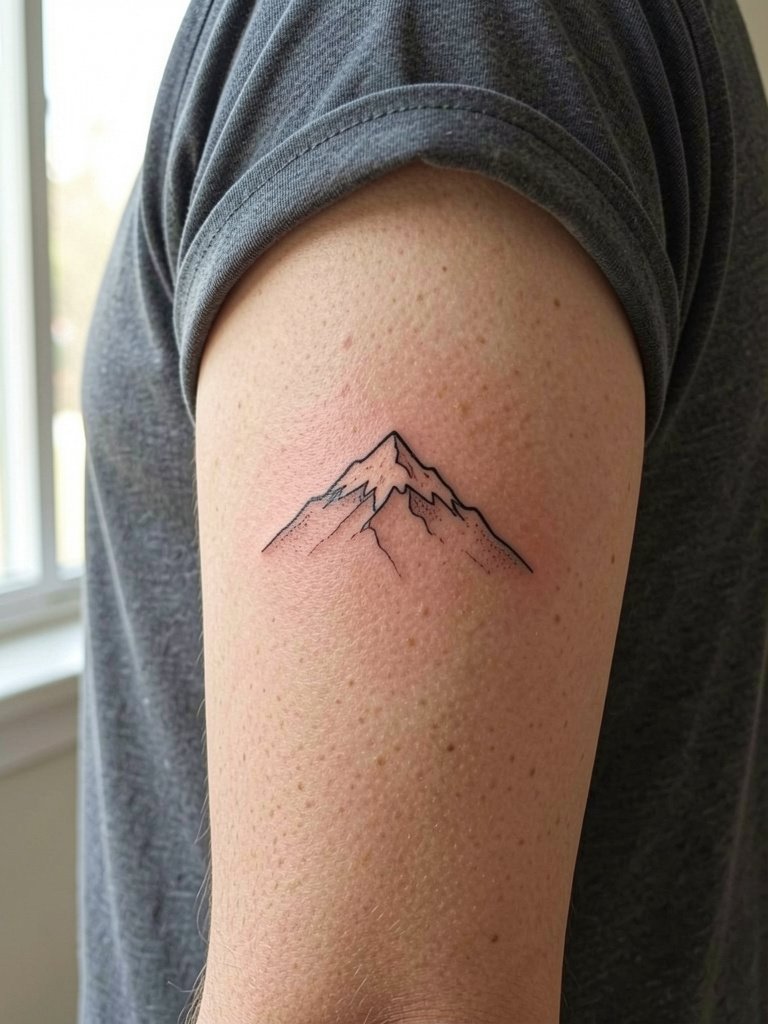
3. Minimalist Mountain Range on the Outer Forearm
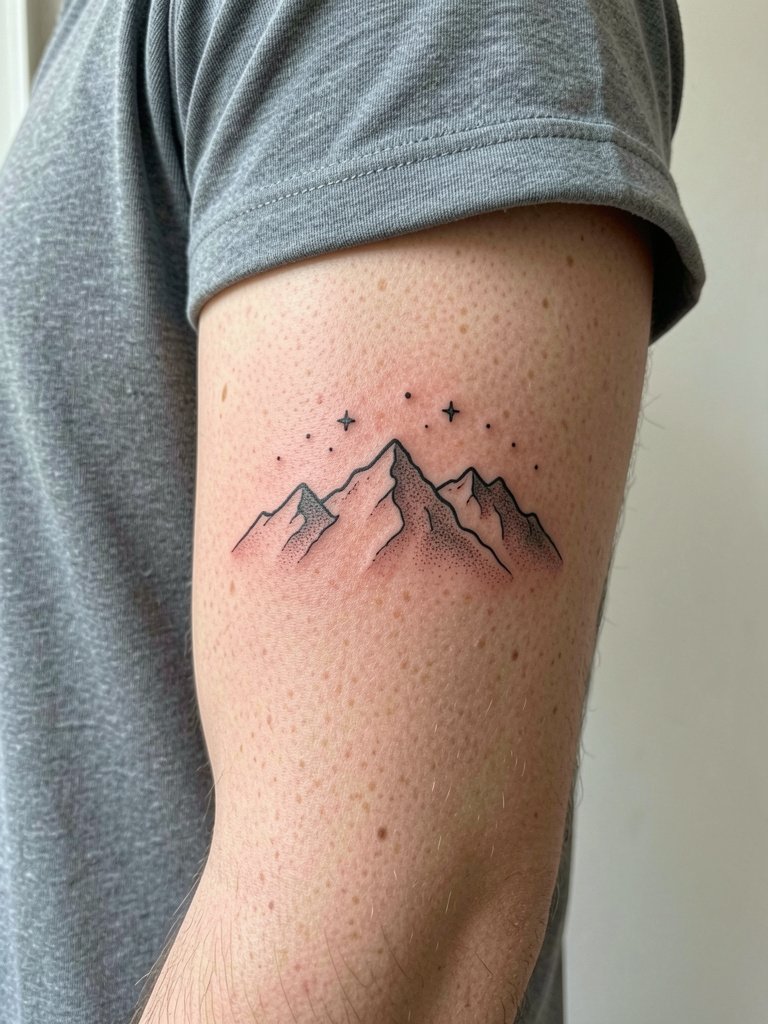
This classic forearm motif scales well for a first session and tends to keep its shape longer than ultra-fine single strokes across textured skin. If you want longevity, ask for a modest line weight increase and small areas of stipple shading under the ridge lines to hold contrast. A common mistake is asking for the entire range as hair-thin lines, which often soften into an indistinct smudge by year two. Expect a one- to two-hour session depending on size and a touch-up window at six to twelve months. Outfit tip: wear a short-sleeve tee that you can slide up without stretching the fabric during the session.
4. Tiny Constellation Cluster on the Collarbone
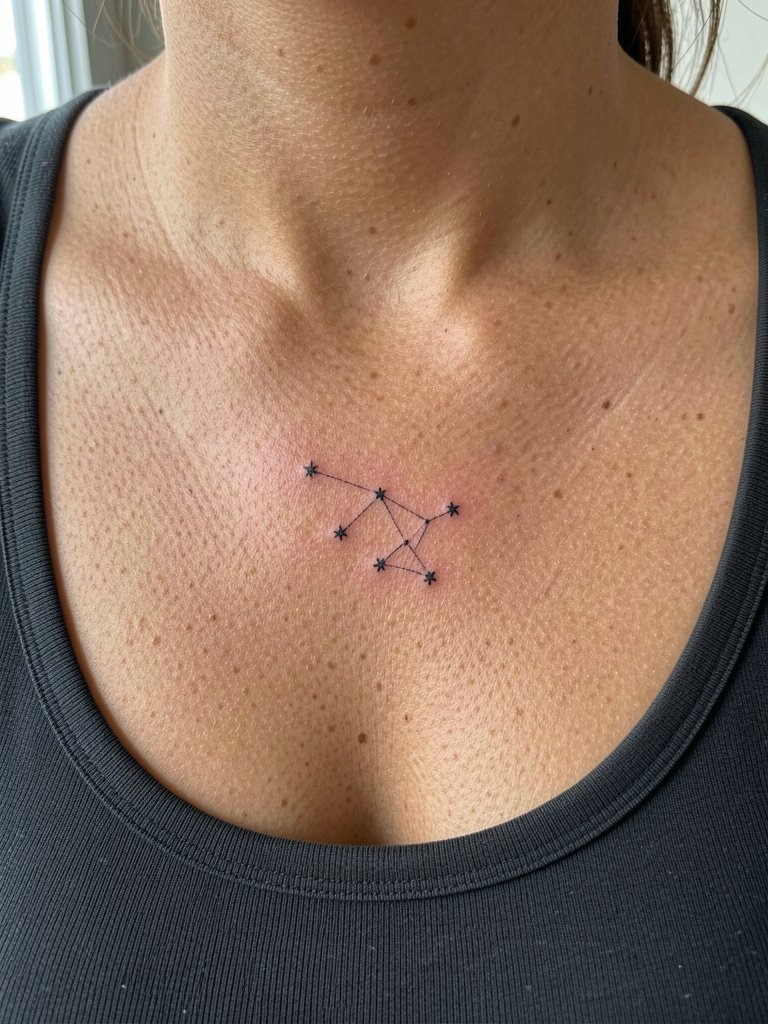
Collarbone lines show beautifully but are sensitive and move with breathing. There is a real split in opinion among artists about ultra-fine work on this area. Artists split into two camps. One camp argues that the collarbone's thin, mobile skin causes fine points to blur within two years. The other camp says with slightly wider spacing and careful depth control the design settles and can look crisp at three years. If you prefer delicate dots, plan for a conservative spacing and a touch-up at nine to twelve months. Session feels tingly and can run one to two hours. For showing it off after healing, pair with open-collar blouses that frame the area without rubbing the scar line.
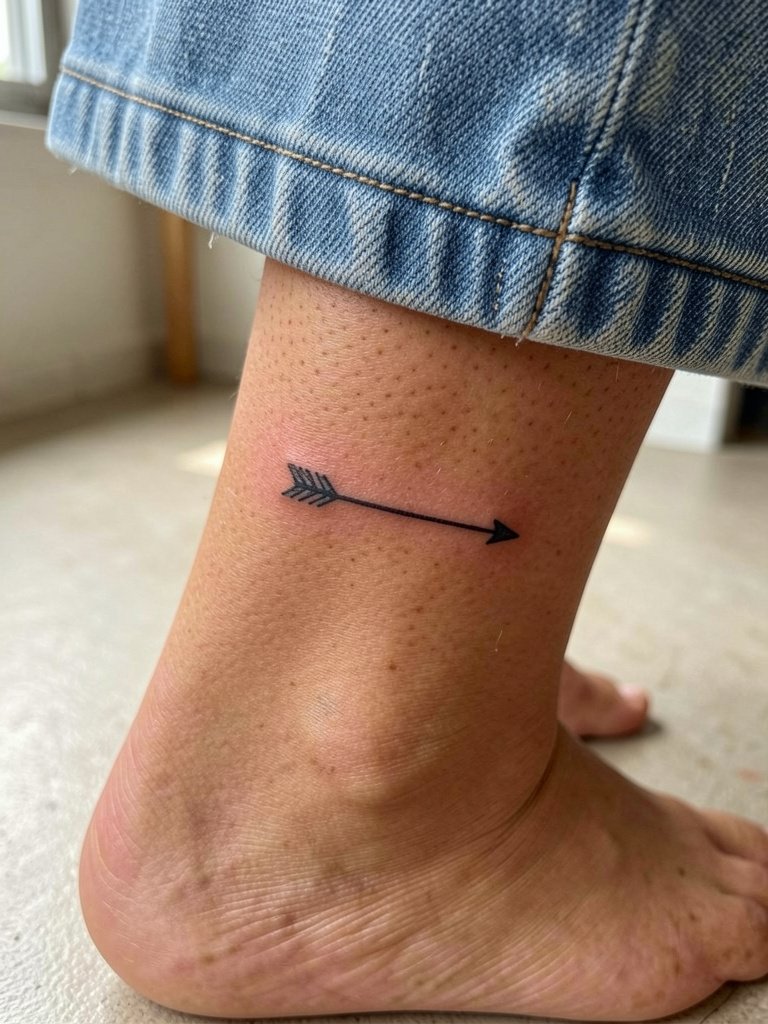
5. Classic Tiny Rose on the Ankle
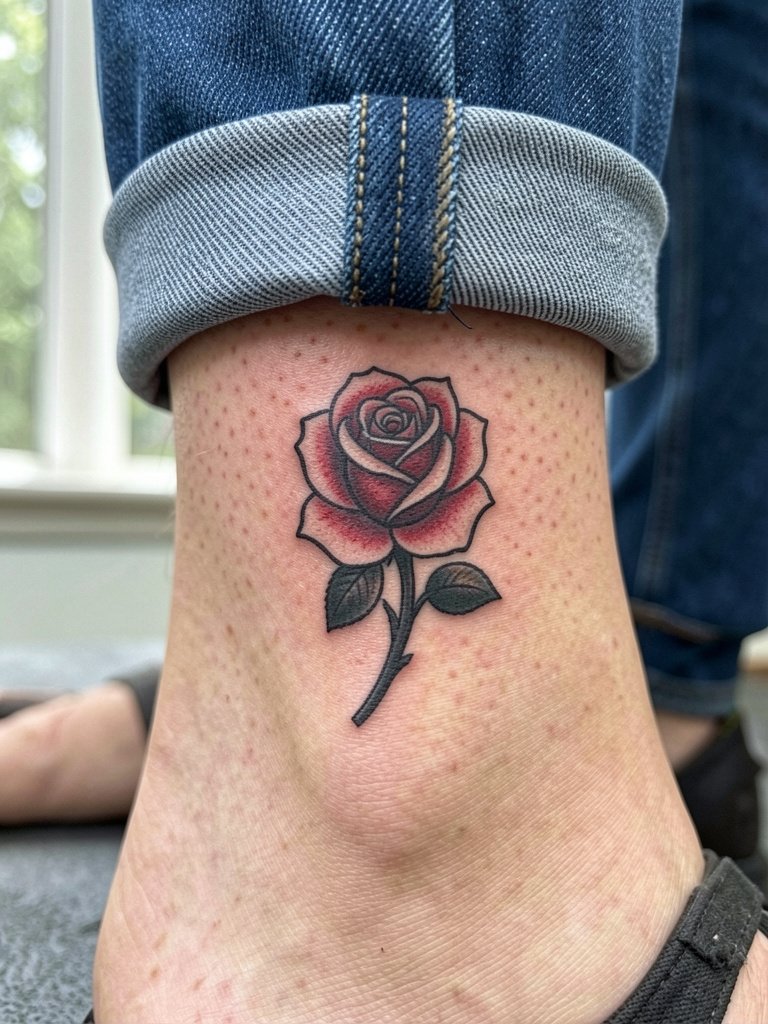
Ankle roses read well when executed with bolder outlines because friction from socks and shoes erodes thin detail. Recommend a classic outline with solid color pockets rather than fragile micro shading. Discuss shoe and sock habits during consult so the artist can suggest placement at the side of the ankle where abrasion is lower. Expect a 45 to 90 minute session and a likely minor touch-up after heavy summer use. If you plan to show it off, pair the healed piece with low-cut sneakers and cuffed jeans like rolled denim cuffs that keep fabric rubbing minimal.
6. Simple Blackwork Band on the Upper Arm

Solid black bands are forgiving for first-timers because saturation preserves contrast over time. Key planning item is exact circumference and placement relative to muscle flex. Request a paper stencil and stand up, sit, and flex with it on so you can see how the band moves. A common mistake is centering the band where the arm bulges at rest, which distorts when you lift weights. Session length is typically under an hour for one band but factors like wrapping a full circumference add time. For the appointment wear a sleeveless top you can slide off without rubbing the fresh ink, like a sleeveless tee.
Session Day Picks
Those first six small pieces and wrist placements above benefit from a few simple session tools and first-week items.
-
Stencil transfer paper kit. Lets you preview positioning and line weight on real skin before the needle starts, which is crucial for tiny scripts and bands.
-
Topical numbing cream. Applied per package instructions about 45 minutes before helps take the edge off quick but sharp wrist and rib sessions.
-
Thin protective film roll. Useful for covering ankle and finger tattoos during first showers and keeping friction down from socks and shoe straps.
-
Fragrance-free gentle body wash. Cleanses without irritation for areas like forearm and collarbone where soap residue can sting.
-
Aquaphor Healing Ointment. Widely recommended thin layer product for initial moisture retention and to prevent scab cracking on small delicate work.
7. Single-Needle Portrait Accent on the Inner Bicep
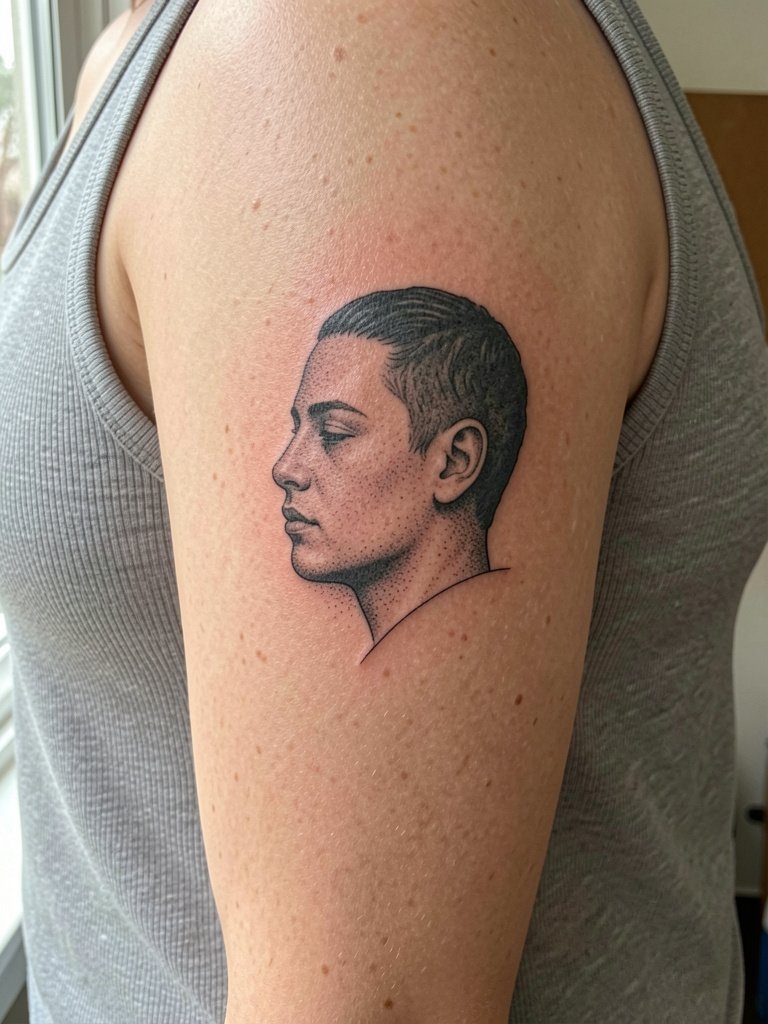
Inner bicep is forgiving for portrait accents but the skin is softer and can blur ultra-fine detail. Recommend increasing negative space and using subtle stipple shading rather than solid tiny lines. A mistake is contracting the portrait to fit a narrow band; allow a taller canvas so facial features breathe. Session time varies by complexity, often 90 to 180 minutes with breaks. Inner biceps see less abrasion so the piece tends to age better than fingers. For the session wear a sleeveless top that exposes the upper arm cleanly, like a relaxed tank, so the artist can work without fabric tugging.
8. Micro-Realism Flower on the Side of the Ribcage
Rib pieces can be breathy and vulnerable to motion blur. There is a well-known divide about fine line on ribs. Artists split into two camps. One camp insists that ribs move and fine single-needle detail becomes indistinct within two years. The other camp maintains that with slightly wider spacing and conservative detail a ribpiece can keep its form and looks great in three-year healed shots. If you want micro-realism here, prioritize spacing, expect a two-part session for larger realism, and plan for a touch-up at one year if shading blows out. Sternum and rib sessions are notably more painful than forearm work, so prepare mentally for longer breaks.
9. Stippled Moon Phases Down the Spine
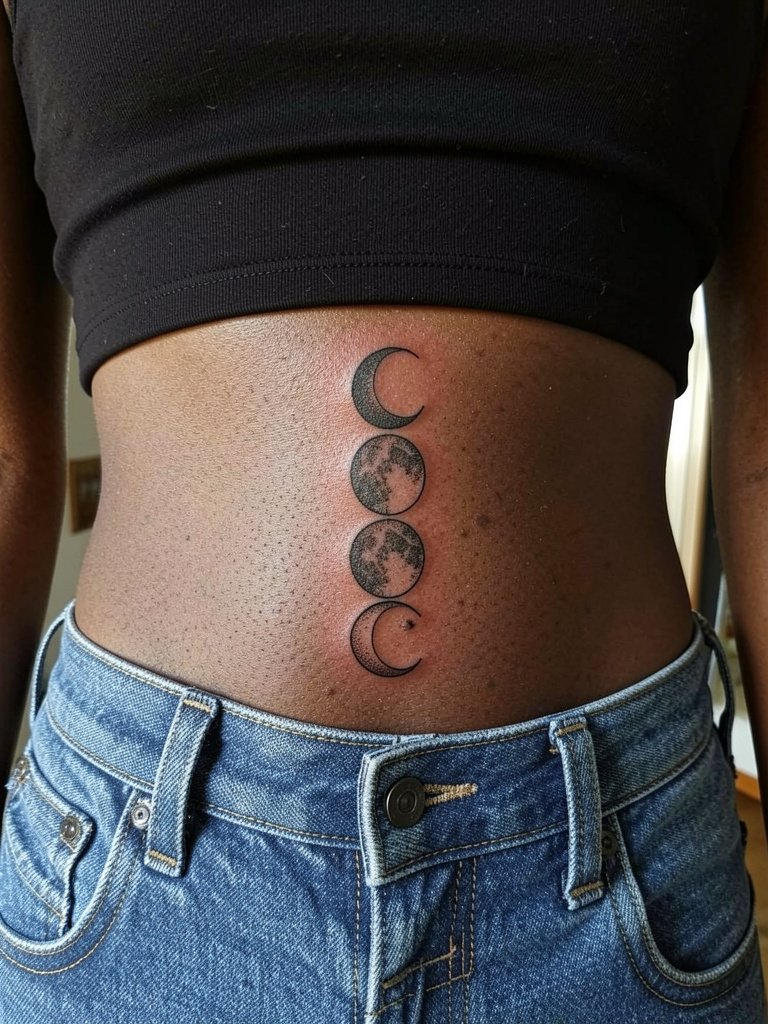
A vertical spine run of small moon phases reads elegant when spacing and dot density are balanced. Ask the artist to lay the stencil while you stand and bend forward so the sequence follows spinal curvature naturally. Common mistake is compressing the phases too tightly which creates a textured blur over time. The session can be split into short passes along the spine to manage pain and muscle tension. Healing on the lower back is usually straightforward if the waistband does not rub the line. For showing this off after healing, pair with low-rise waistlines and cropped tops, like low-rise jeans that sit below the design.
10. Tiny Anchor Behind the Ear
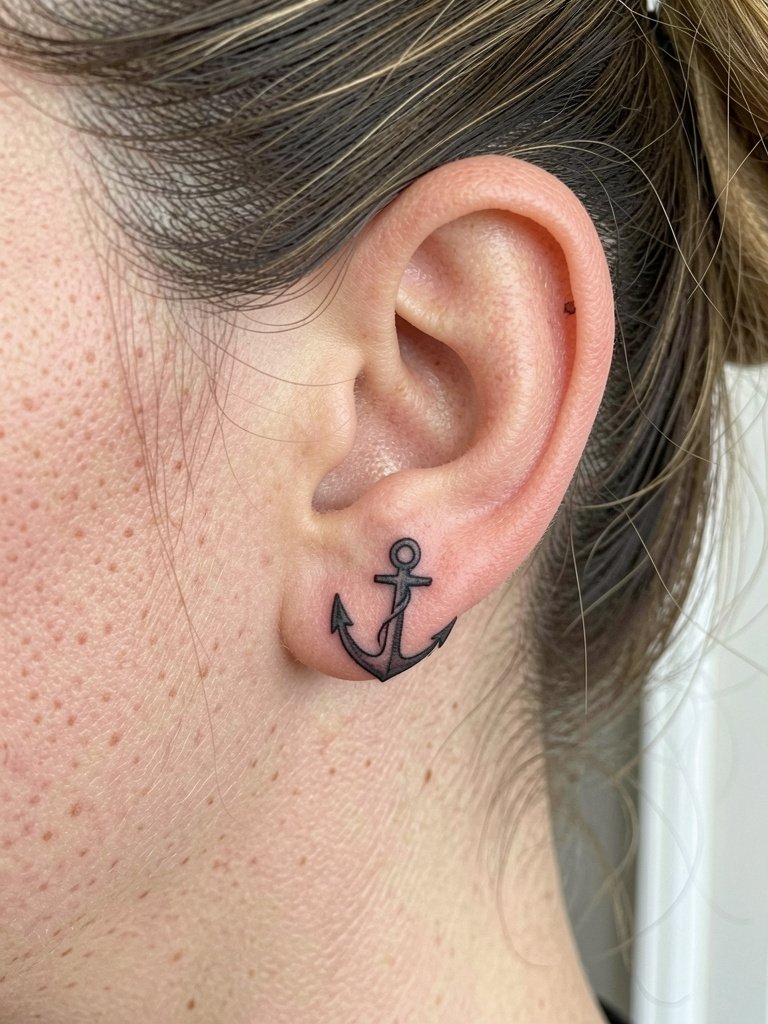
Behind-the-ear pieces need an artist comfortable with tiny, precise placements because skin here is thin and healing can be fussy. Discuss exact stencil position with a mirror before the needle. Expect a short, sharp session of under 30 minutes and a likely touch-up at six months if lines soften. Because of visibility and social considerations, confirm shop policies about facial-proximate placements. Keep hair up and clean for the session so the artist has unobstructed access.
11. Single-Line Wave on the Calf
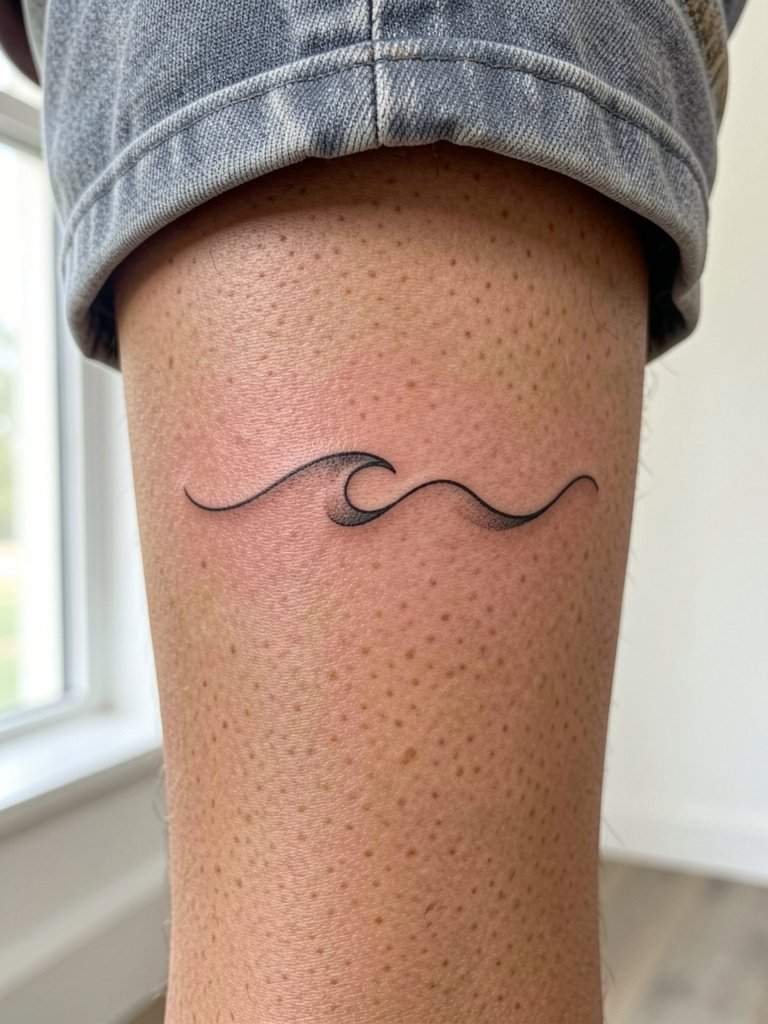
Calf placements tolerate linework well because of thicker skin and less constant abrasion than ankles. A single-line wave benefits from a steady hand and steady breathing, so plan for a seated session of 30 to 60 minutes. If you want the line to remain crisp for years, request a slightly bolder single pass rather than hairline tracing. A mistake is choosing a length that curves into muscle bulge areas which changes profile with flexing. For footwear after healing, the design pairs with cropped trousers or mid-calf boots like casual ankle boots that let the calf art read.
12. Blackwork Heart on the Sternum
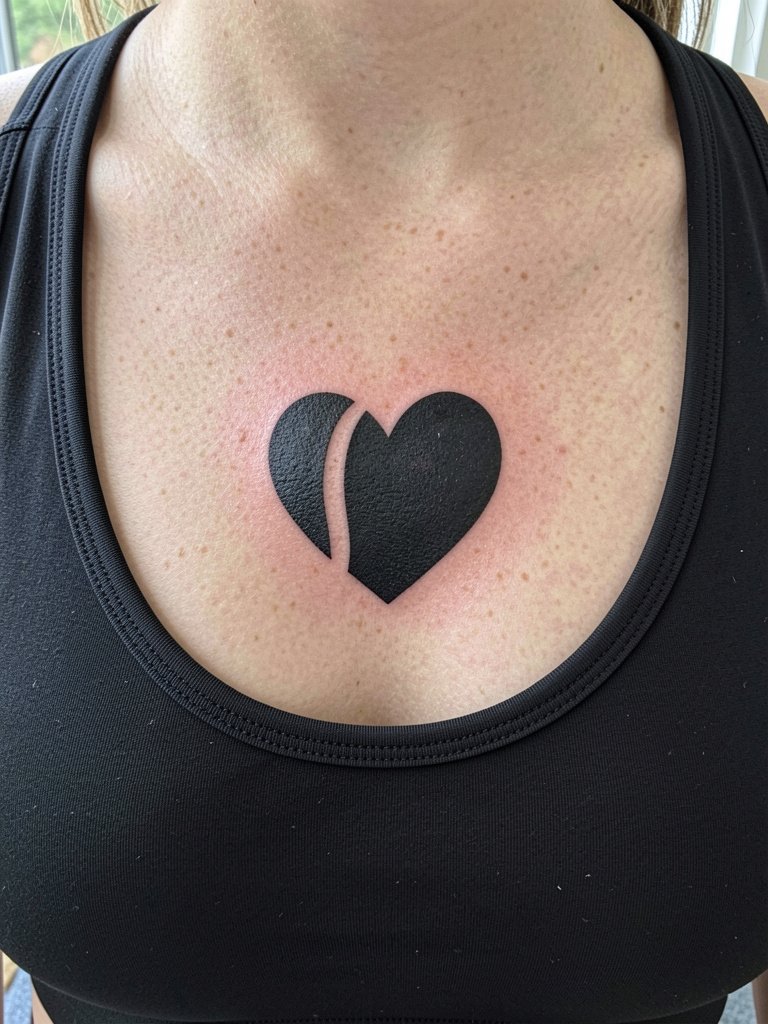
Chest and sternum work require an artist experienced with sensitivity and movement. There is a clear debate among practitioners over bold fills versus fine line on sternum. Artists split into two camps. One camp warns that large solid black on the sternum can migrate slightly and can be harder to touch up if it softens. The other camp points out that bold saturated fills often keep their presence better than fragile detail in a high-movement zone. For first-timers consider a moderate size with a small negative-gap detail so a later touch-up can keep the shape crisp. Pain here rates higher than forearm placements and sessions may be paused frequently.
13. Small Botanical Sprig on the Outer Thigh
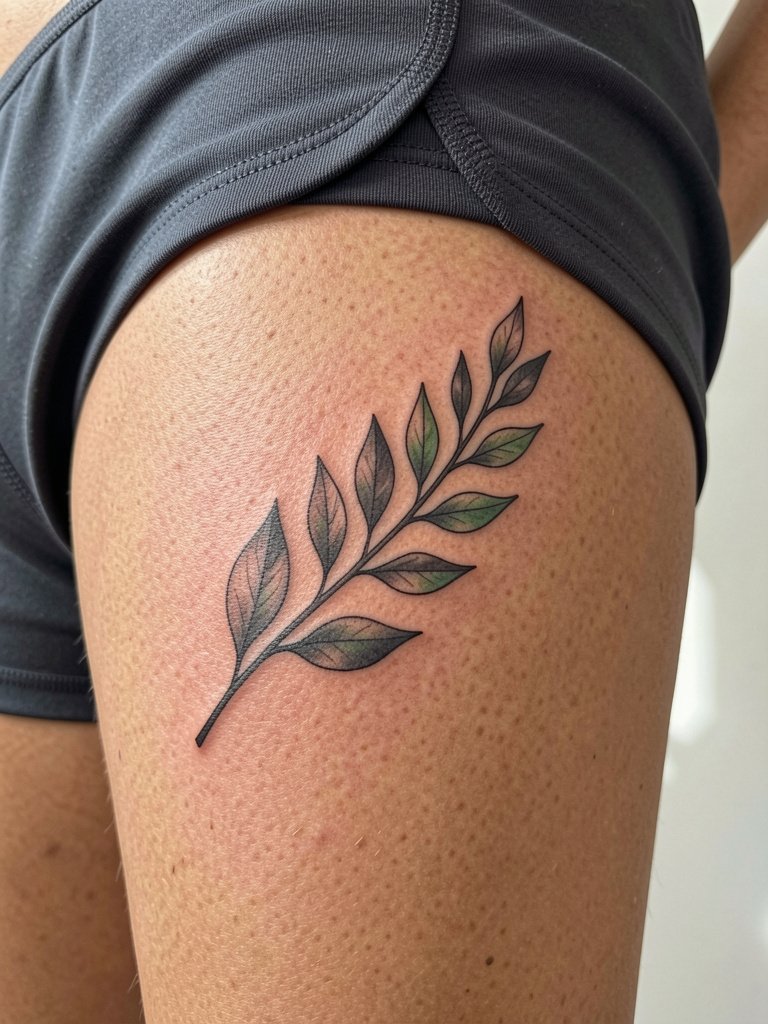
The outer thigh is a comfortable canvas for first-timers because session tolerance is usually high and touch-ups are straightforward. For a botanical sprig ask for slightly thicker leaf outlines and light whip shading to give texture without tiny fragile veins that disappear. Common mistake is crowding multiple tiny elements too close together which loses definition after healing. Session time will be 60 to 120 minutes depending on length. For the appointment wear shorts that you can sit in comfortably, like athletic shorts, so the artist has clear access without fabric pressing into the area.
14. Micro-Blackwork Dagger on the Rib Flank
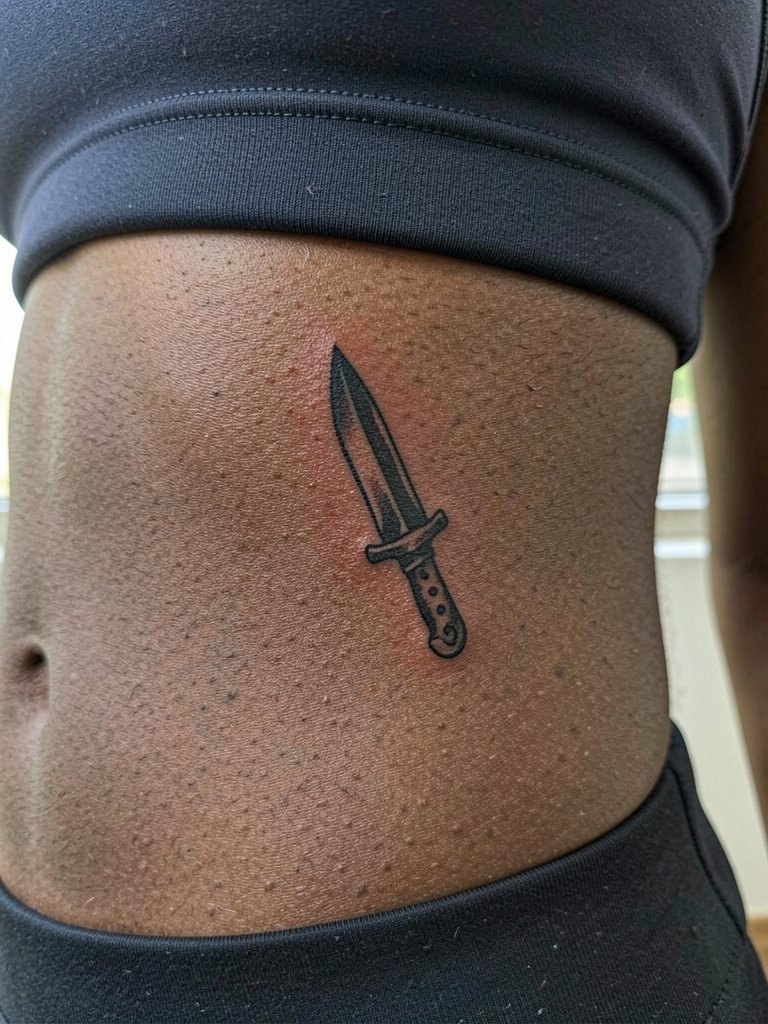
Dagger motifs on the ribs look striking but require realistic expectations about aging. Artists split into two camps about micro-blackwork in this area. One camp argues that ribs are highly mobile and slender blades tend to gape into blur over a few years. The other camp says careful spacing and slightly thicker core lines prevent migration and that they see stable healed daggers after three years. If you prefer a small dagger, ask the artist to draw both a micro version and a slightly bolder alternative and compare them on the skin. Pain and session pacing matter here, so plan for breaks and a possible two-part session.
15. Tiny Botanical Ring Around the Finger
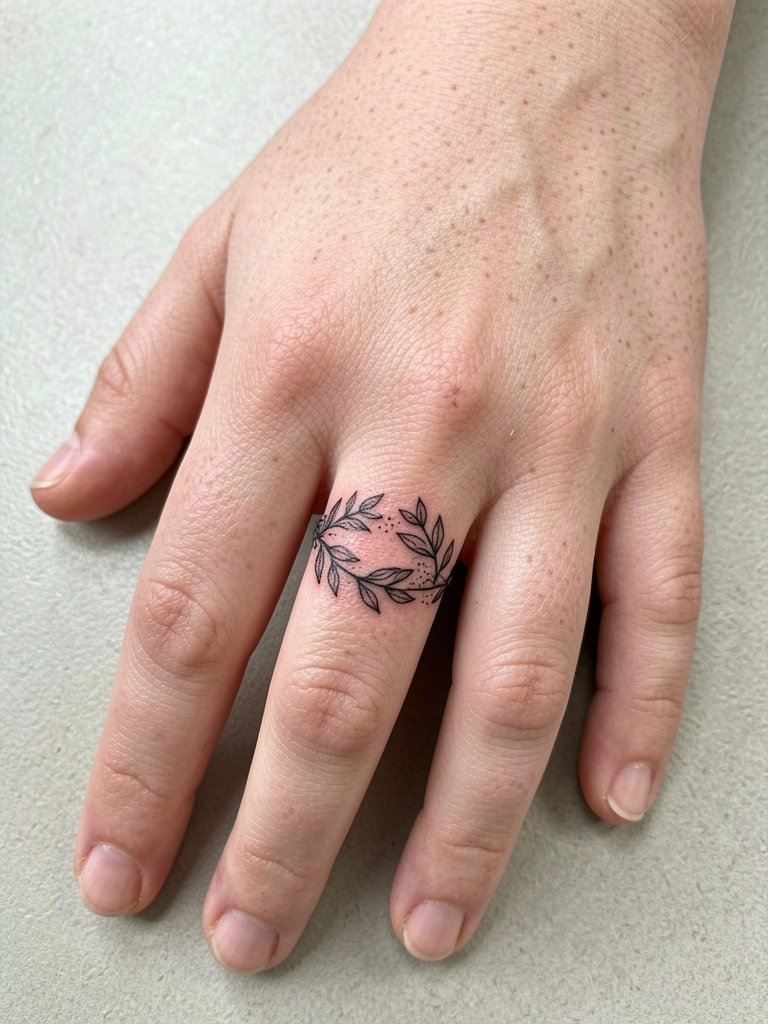
Finger rings are charming and tempting as first tattoos but they endure heavy use. Plan for a slightly broken ring rather than a continuous, tightly detailed band so normal swelling and movement do not close the gaps. A common mistake is requesting micro leaves with hairline stems which disappear after repeated washing. Expect to return for touch-ups more than you would for forearm work, typically within the first year. For showing healed finger rings, pair with stacked thin rings and open-finger gloves for cooler months, like thin stacking rings.
16. Minimalist Compass on the Back of the Hand
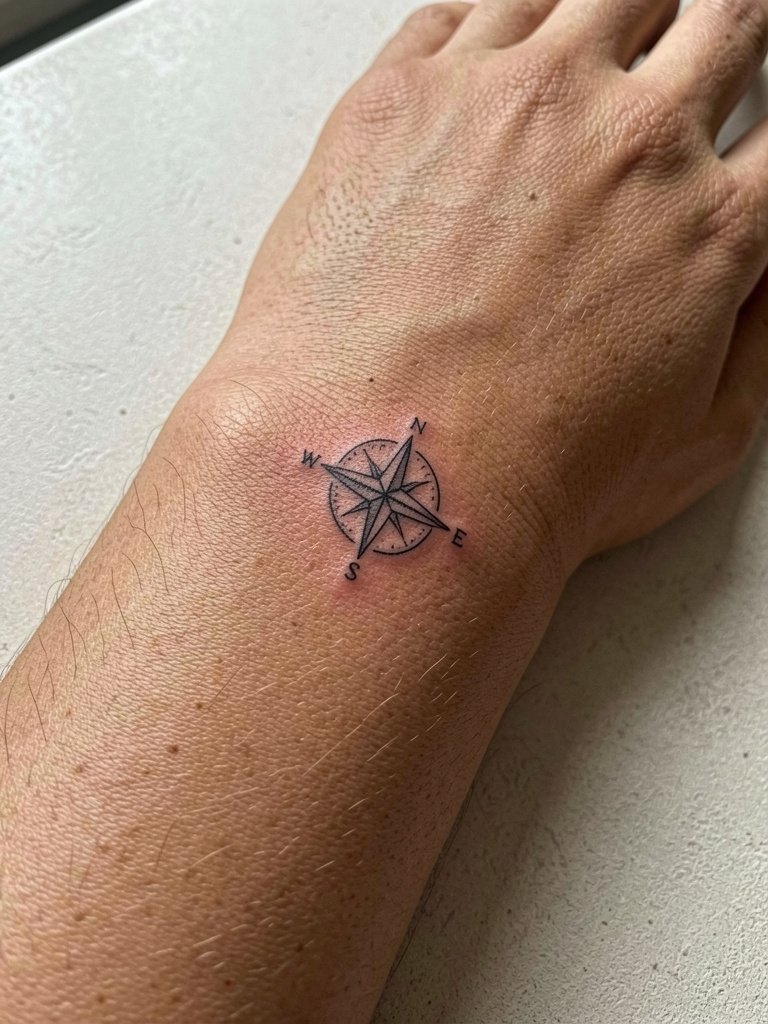
Hand tattoos are high-visibility and high-maintenance. The typical trade-off is immediate presence for more frequent touch-ups. If you want a minimalist compass, plan for a slightly bolder central pivot and minimal spokes to prevent early softening. Discuss your daily hand work and washing frequency so expectations align. Session is quick but the skin here heals with more scabbing risk, so aftercare adherence is critical. Consider placement closer to the wrist if you want longer durability.
17. Micro-Realism Eye on the Nape
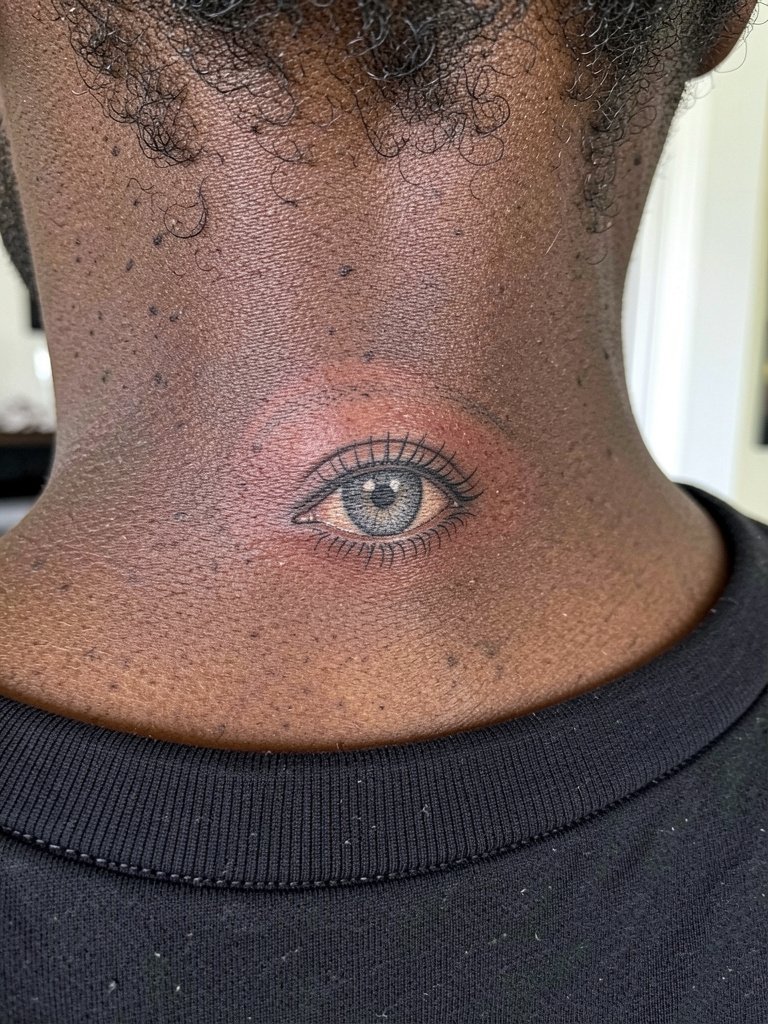
Nape placements are discreet and heal well for small realism. For a micro eye ask for slightly open negative space in the whites and a soft stipple iris rather than dense black, which preserves dimension over time. A mistake is compressing lashes too close to the pupil. Session time is brief but check how hair will cover the area during the first week to avoid friction from collars. For the session, wear hair up in a simple clip so the artist can work without fabric interference.
18. Single-Needle Script Along the Side Rib
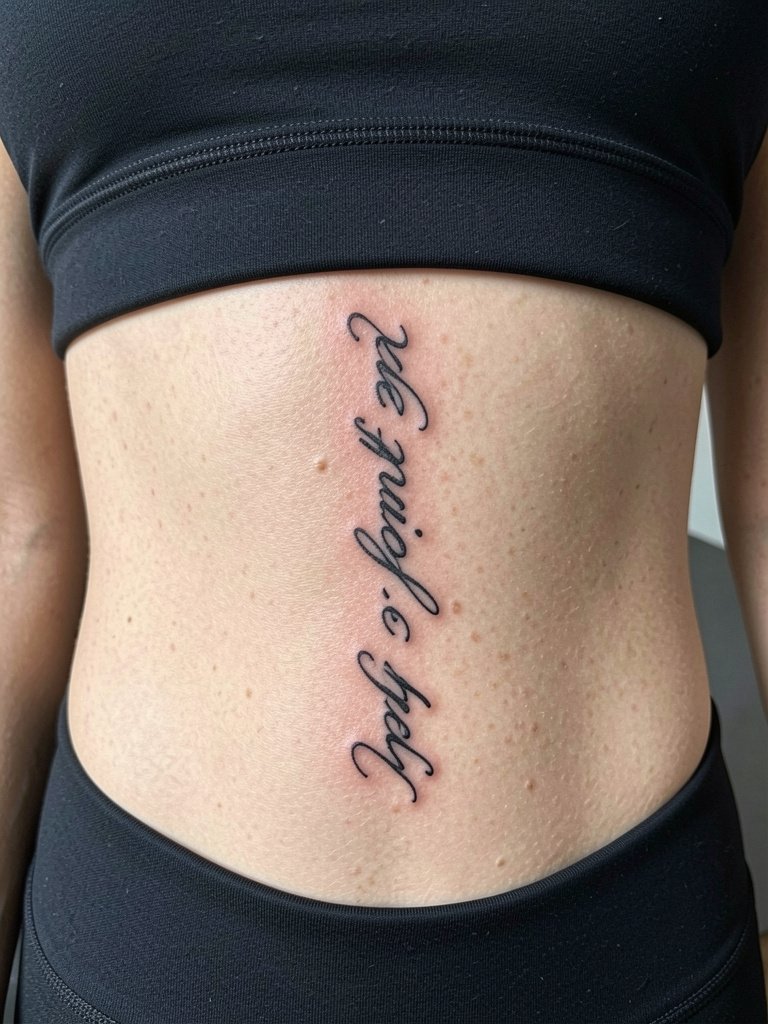
Single-needle scripts on the ribs read personal but can lose letterform clarity if the script is too tight. Ask the artist to demonstrate how each letter will look at the final scale and to space letters slightly wider than a photo reference. Expect a session that tests endurance and plan multiple short breaks. A common mistake is requesting very long phrases in one sitting which leads to fatigue and uneven line pressure. Plan for a touch-up in the first year to keep the script legible.
19. Small Graphic Palm Leaf on the Shoulder Blade
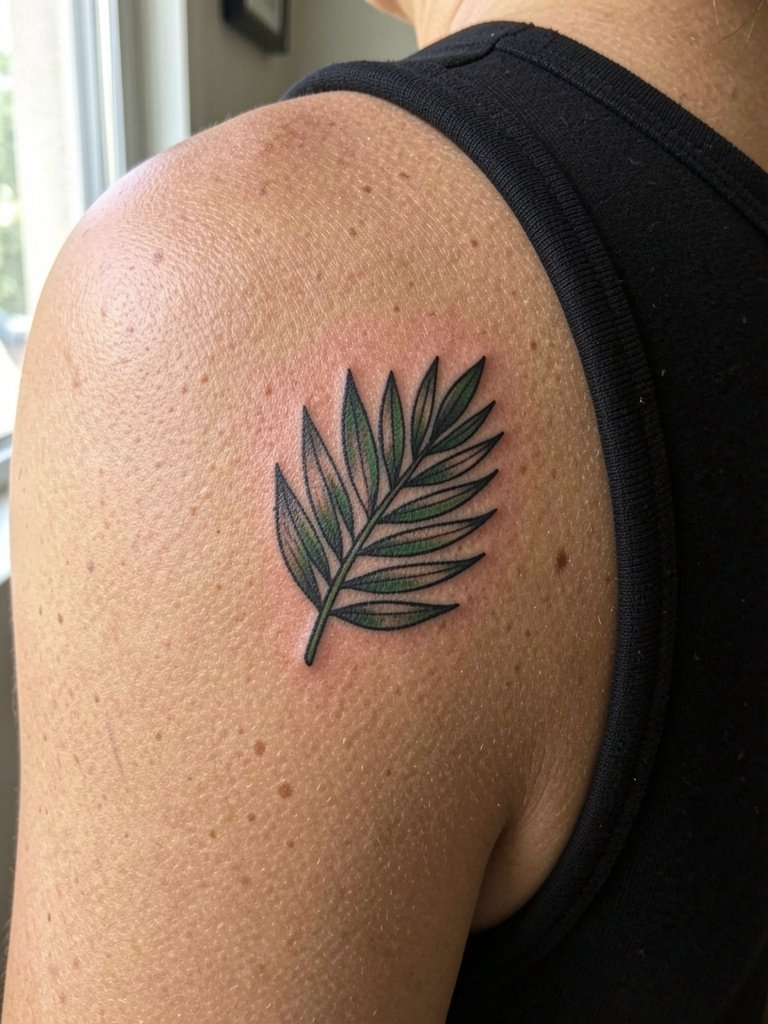
The shoulder blade provides room for shape and will tolerate bold contours. For a graphic leaf, ask the artist to test the outline on you standing and reaching so the placement aligns with shoulder movement. A mistake is centering the design where the scapula creases when you move; discuss how it looks in both relaxed and active poses. Session time is usually under 90 minutes for a small piece. For showing the healed work, pair with strappy tops or off-shoulder dresses like wide-strap tanks that leave the blade visible.
20. Micro-Illustrative Cat Silhouette on the Ankle
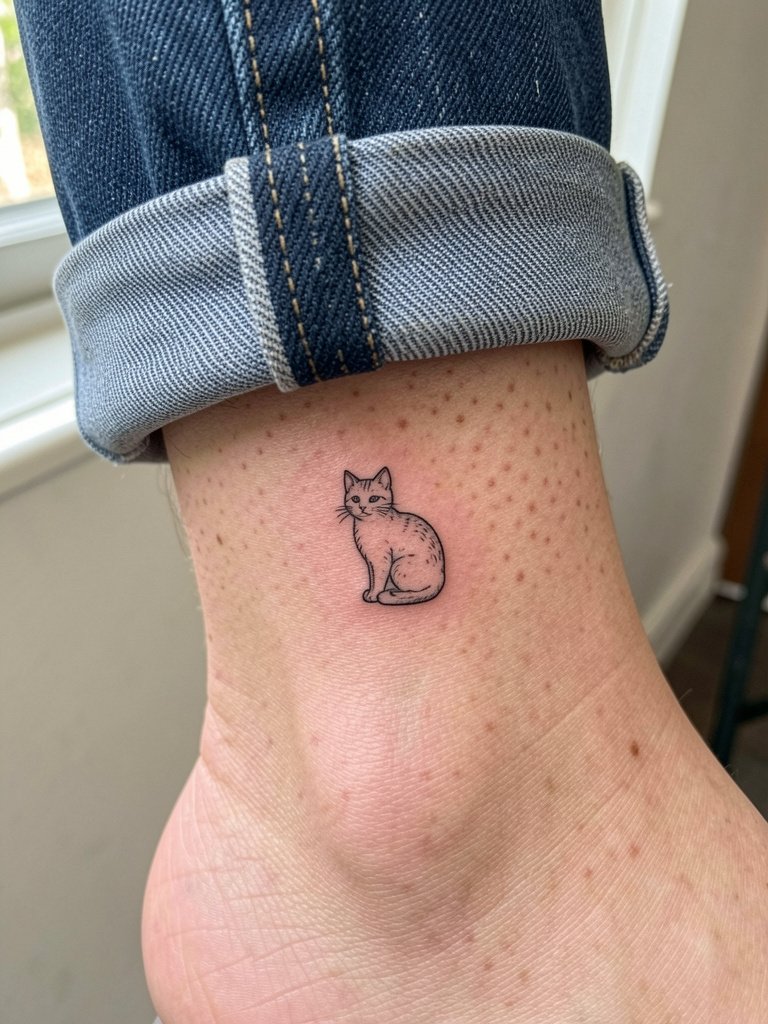
Small illustrative silhouettes take well to the ankle if lines are kept bold enough to resist shoe and sock abrasion. Ask your artist to place the silhouette where ankle bone contours do not distort the image when you walk. Sessions here are short. A common error is placing the silhouette on a seam of shoe contact which accelerates fading. For showing the piece, cuffed jeans and ankle boots highlight the area and reduce rubbing, try rolled jeans styles.
21. Minimalist Arrow Down the Wrist
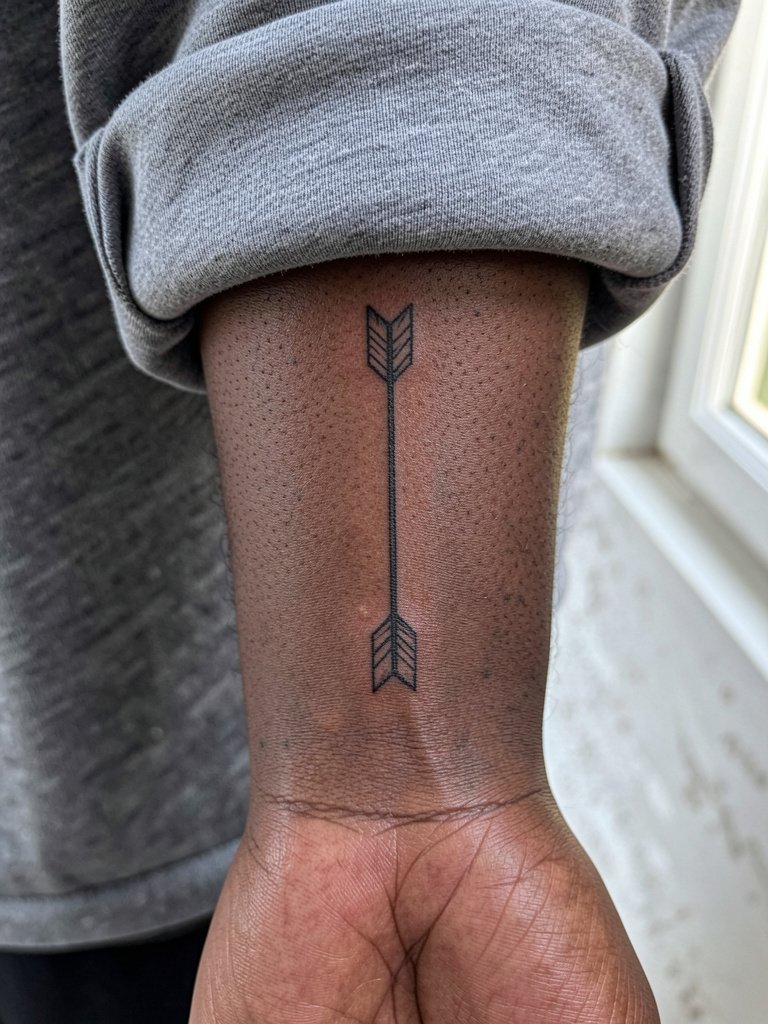
Arrows along the forearm are versatile and age predictably if line weight is chosen for the skin texture. Request that the shaft be drawn slightly thicker than the reference and that the artist shows the stencil on your arm while flexing to confirm placement. A common mistake is placing it too close to the wrist crease where movement blurs shafts. Session time is short and most first-timers tolerate it well. For the session wear a rollable long sleeve to protect the area after the initial bandage, like a soft cotton long sleeve.
22. Tiny Diamond Between the Clavicles
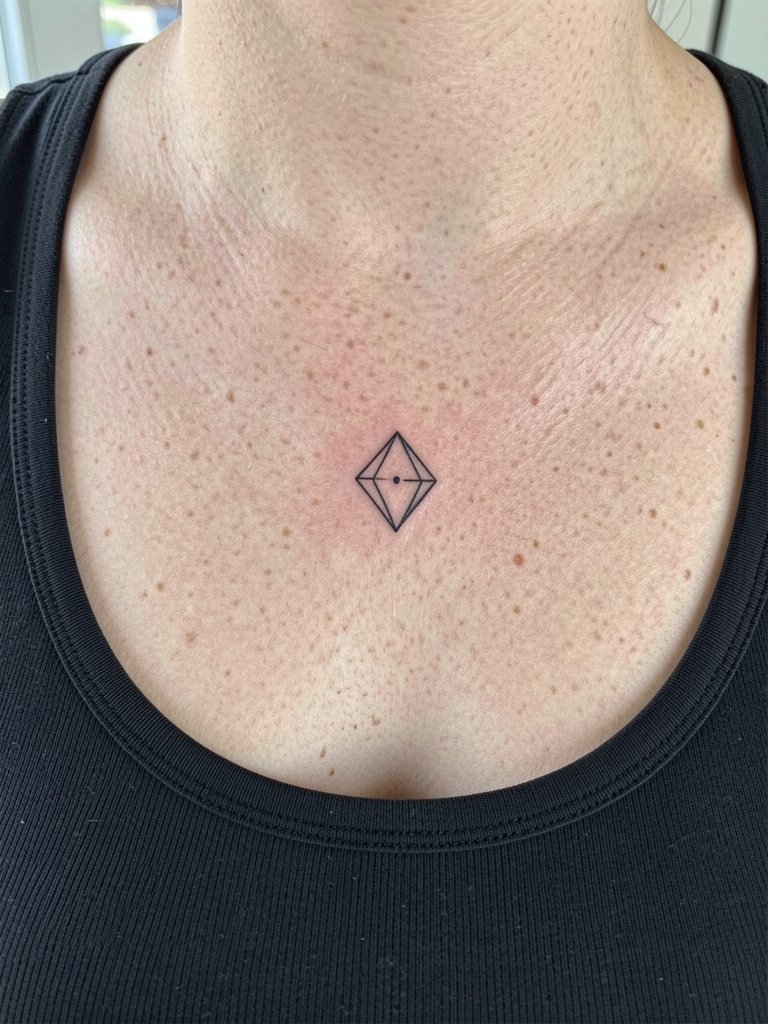
Mid-chest micro pieces are visible and easy to cover or show. Discuss symmetry precisely and have the artist place the stencil while you stand naturally and slightly rotate your shoulders so the diamond sits true in daily posture. Small geometric work can look off if centered on the sternum midline asymmetrically. Healing is usually straightforward. For showing this area after healing, scoop-neck tops frame the piece without rubbing the scar, like scoop-neck tanks.
23. Tiny Arrow on the Side of the Foot
Foot tattoos fade faster due to shoe compression and walking. For a lasting arrow, request a slightly thicker main line and position away from seams where your shoe presses. Expect a one to two-session process with touch-ups likely in the first year. If you walk a lot or wear tight shoes, prepare for additional maintenance. For the appointment, wear footwear that is easy to remove and does not press on the tattoo during the first week.
24. Petite Botanical Crescents on the Shoulder Cap
Shoulder cap work benefits from the rounded canvas and tolerates movement well. For crescents that follow the shoulder, ask the artist to mark the stencil while you lift and lower your arm so the curve lands where you want in motion. A mistake is forcing a flat composition onto a curved bone which shifts when you move. Session time for this size is usually under 90 minutes. For styling, strappy tanks and off-shoulder tops highlight the area and reduce friction from straps.
25. Tiny Geometric Sun at the Wrist Crease
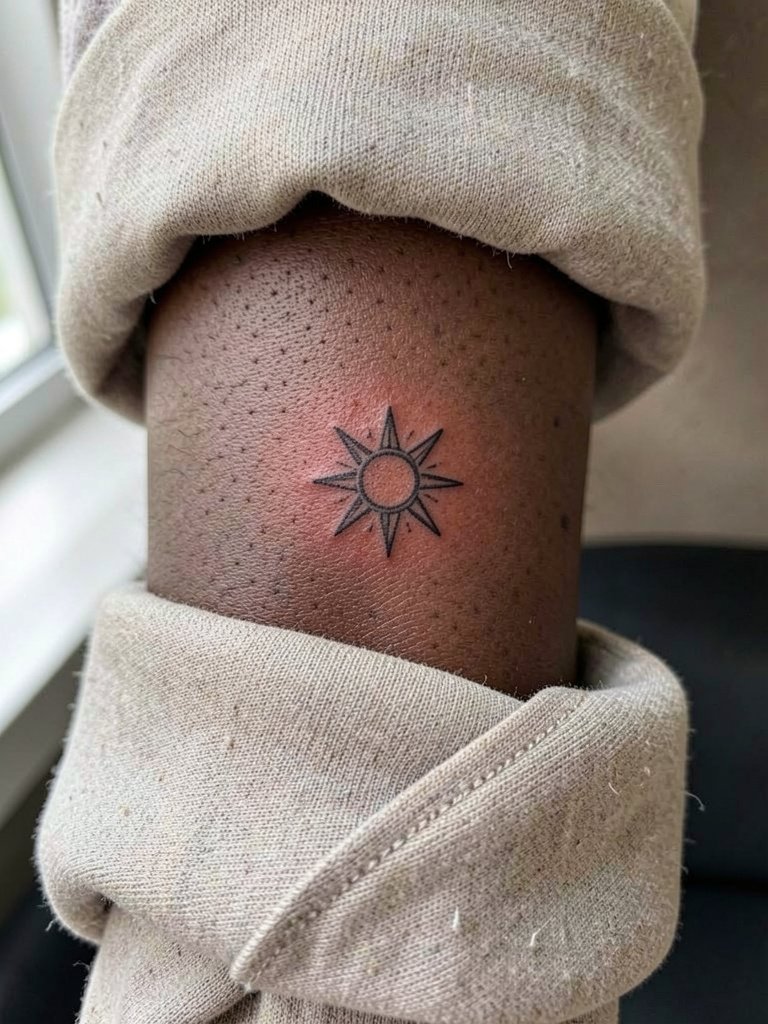
Wrist-crest motifs can be high-visibility and prone to rubbing from watches and bracelets. Size up slightly and place the sun just above the crease so movement does not smear the rays. Discuss your typical wristwear so placement avoids constant metal contact. Sessions are short and healing is quick if you avoid tight bracelets during the first two weeks. For showing the piece after healing, opt for minimal bracelets or a cuff that sits below the design like thin cuffs.
26. Small Outline of a Mountain Peak on the Back of the Arm
Back-of-arm pieces sit on a less-exposed canvas and often keep line clarity. For a mountain peak outline ask the artist to place the stencil so the peak reads when your arm is at rest. A common issue is having the design land on the tricep crease where motion disrupts the contour. Session time tends to be brief and touch-up needs are lower than hands or feet. For the appointment wear a tee that slides off easily so the artist can access the area without fabric rubbing.
27. Tiny Minimalist Anchor on the Side Hip
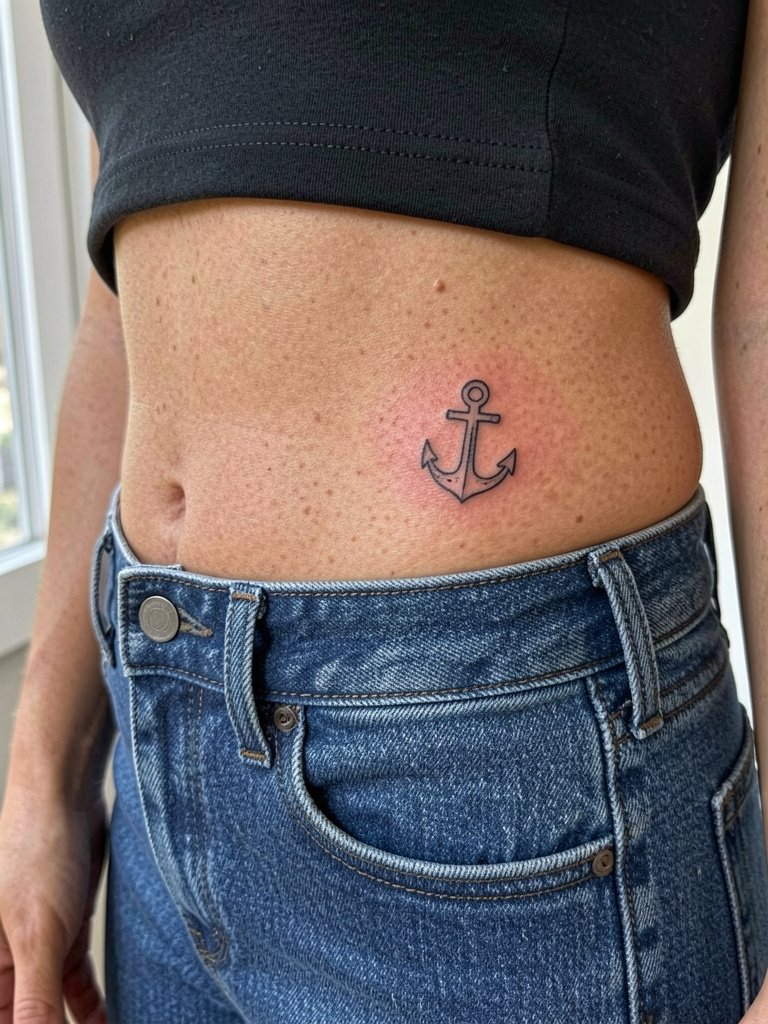
Hip tattoos are discreet and friendly for first sessions because you can control exposure. For a small anchor, placement above the waistband prevents constant friction and the design stays clean longer. Discuss your usual waistline with the artist so the piece sits where your clothes won't rub it. Session time is short and healing is simple if you avoid tight waistbands for two weeks. For showing the piece post-heal, low-rise or cropped tops work well with this spot, like cropped tees.
Frequently Asked Questions
Q: How do I pick the right scale for delicate first tattoos like tiny scripts or micro symbols?
A: Compare the same design at two real-world scales on your skin. Ask the artist to draw the stencil at the smaller and slightly larger sizes, then view them in a mirror while you move. If detail vanishes at the small scale when you stretch or flex, choose the larger option. Expect a light touch-up at the nine to twelve month mark for scripts placed on wrists and fingers.
Q: What should I wear to a session for placements like ribs, thigh, and shoulder?
A: For rib and sternum sessions wear a fitted cropped top or sports bra that the artist can work around without lifting fabric. For thigh work choose shorts or athletic wear with a wide hem. For shoulders pick a sleeveless top that slides off. A practical option to bring is a loose tank top so you have coverage and easy access.
Q: Where can I find healed examples and discovery paths without naming specific artists?
A: Search platform tags and keywords that match the style and placement you want. Use hashtags on social platforms that combine the motif and placement, filter by location to see local healed work, and browse portfolio aggregators for keywords like "healed inner wrist micro script" or "healed ankle rose." Look for healed photos across several skin tones and check timelines for one- and three-year images to judge longevity.
Q: How likely is a touch-up for small neck, hand, and finger tattoos?
A: Touch-ups are common for hands and fingers and somewhat common for neck and nape placements depending on your exposure and skincare. Plan for at least one scheduled touch-up within the first year for high-movement or high-wear placements. Keep in mind that touch-ups on thin or scar-prone areas may need more time between sessions.
Q: Are there cultural concerns I should be aware of for motifs like mandalas, tribal shapes, or religious symbols?
A: Yes. If a design draws from a culture or religion consider its origin and meaning. Mention that context during consult and request respectful interpretation rather than direct replication. An artist can suggest ways to honor the source through composition, appropriate symbolism, and attribution that avoids cultural misuse.
