
Someone I know spent eight months scrolling galleries before realizing the real question was not which design looked best fresh. The real question was which 3D work would hold depth, avoid blowout, and fit their life after a year of sun and sleeves. I visited five shops across Brooklyn and talked to an artist who specializes in realism, and what follows combines those takeaways with the 3D styles trending right now.
1. Realistic 3D Butterfly Wing on Outer Forearm
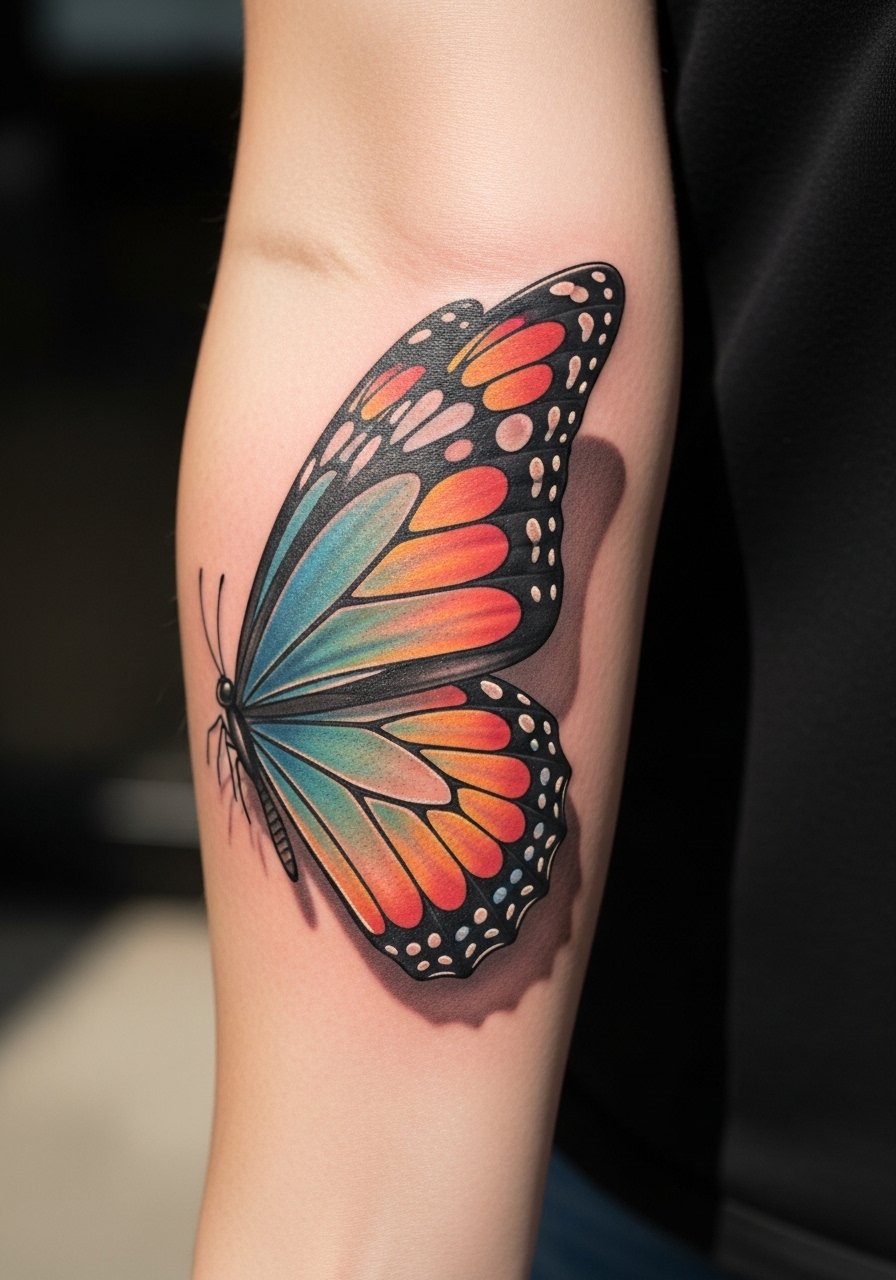
Someone I know first saw this style on a friend's forearm and booked a consultation the same week. It reads as micro-realism because the veining and stipple shading mimic a real wing. Tell your artist you want heavier saturation in the wing base and softer edges near the tips so the illusion keeps contrast as it heals. Pain here is moderate and session time usually fits two sittings. The common mistake is asking for too many tiny veins. Fine veins blur faster than bold veins, so plan a touch-up at 12 to 24 months to keep the flutter effect.
2. 3D Floral Bouquet Emerging from Thigh
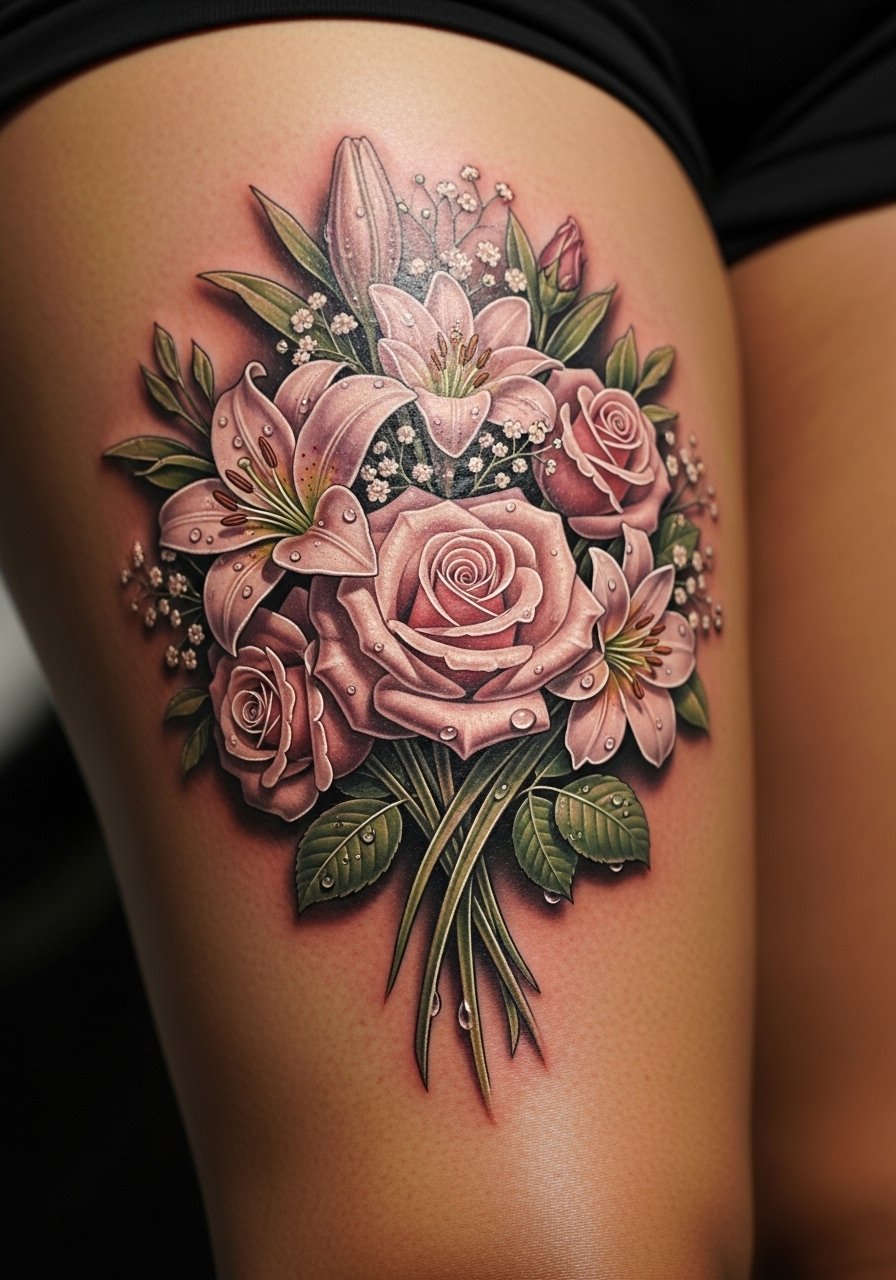
Fair warning, the thigh gives the artist room for layered depth with shadows that follow muscle curves. For larger florals ask for hyperreal shadows beneath overlapping petals so the bouquet appears to sit on top of skin rather than flat. The drawback is sitting time on the table can be long, but pain scores are lower than ribs. A common aging issue is overly thin petal edges. Ask for thicker contour shading at the base of petals so saturation holds. Expect a touch-up in the second year if you wear tight clothing that rubs the area.
3. Hyperrealistic Skull Crack on Inner Forearm
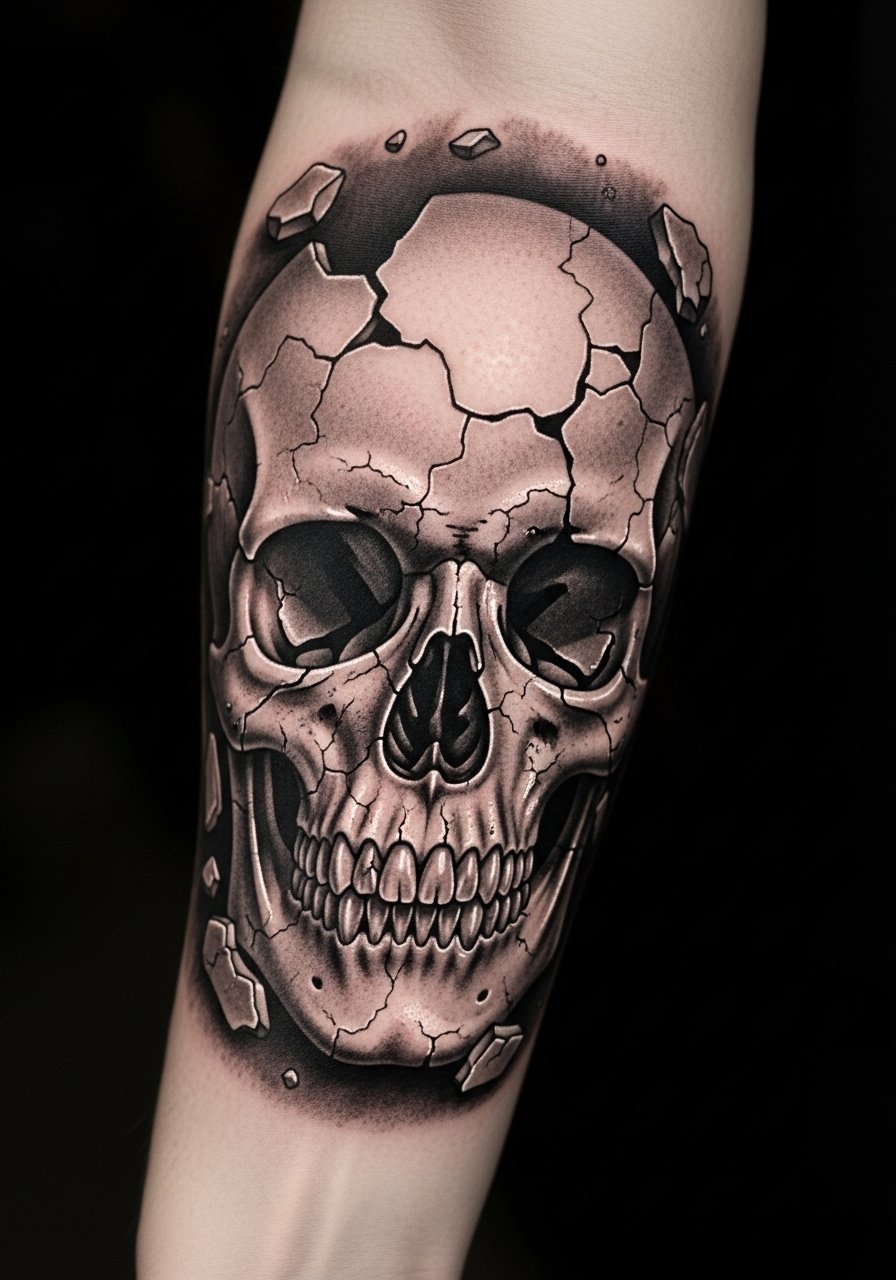
Most people choose this for the dramatic emergence effect. The inner forearm gives a flat canvas for deep black and gray transitions, and session time is often a single long sitting. Artists divide on color versus grayscale for this look. One camp prefers full grayscale because it ages with less color shift. The other camp argues a bit of muted color adds warmth and realism. Ask which camp your artist is in and why. A common mistake is asking for hairline cracks without enough negative space, which leads to muddied healing and earlier touch-ups.
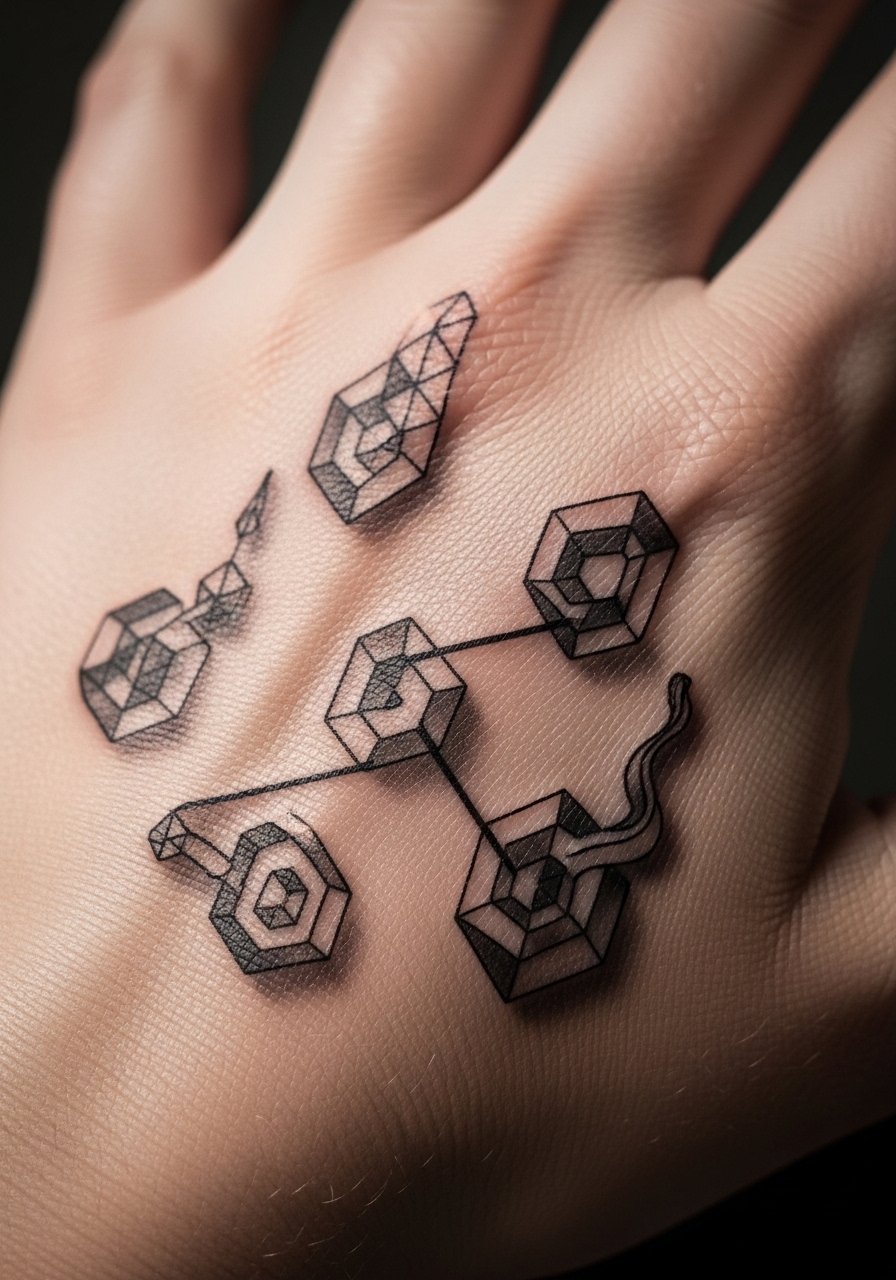
4. 3D Geometric Cube Center Chest
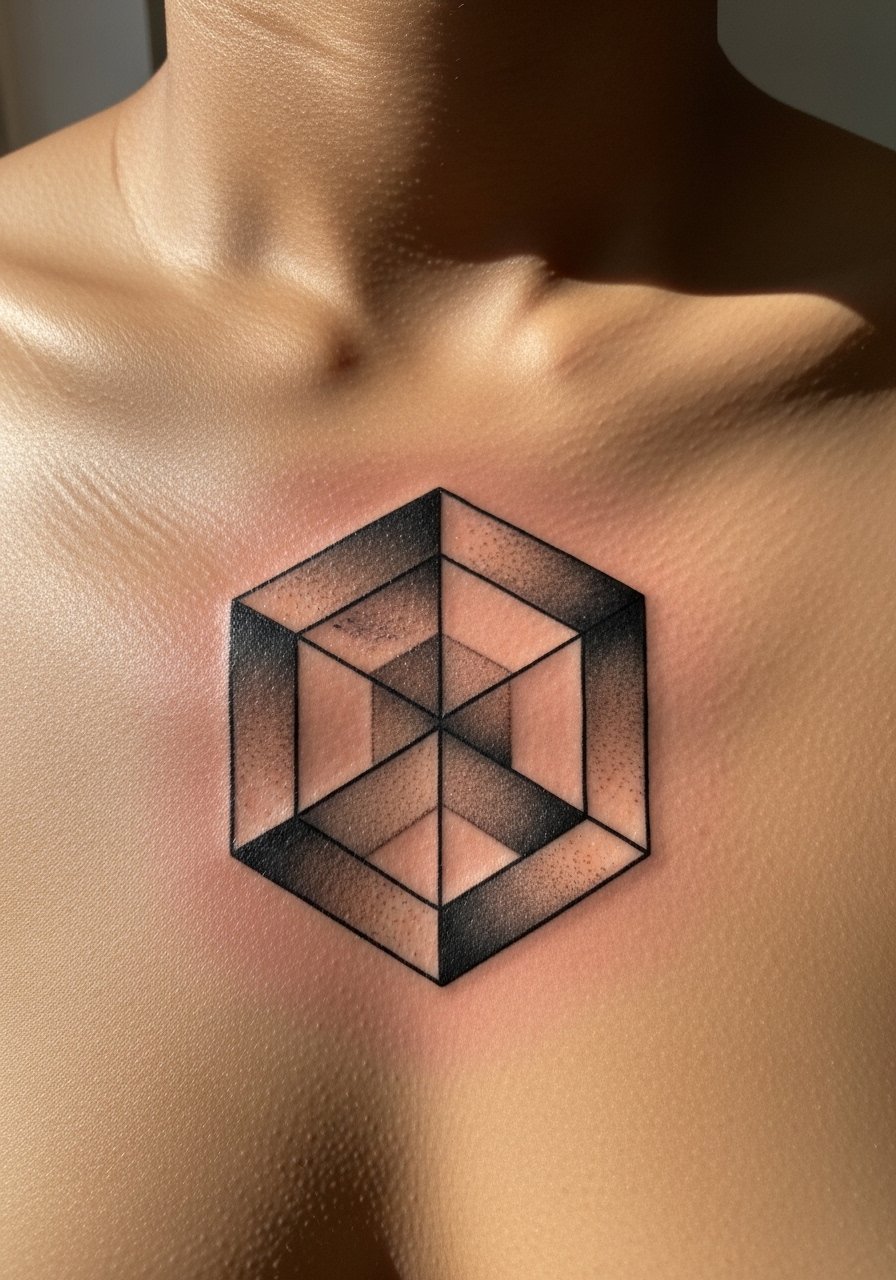
The chest moves with breath and posture, which makes cube illusions feel dynamic. When you sit down for this one, bring perspective photos that show how the cube should read from standing and reclining. Expect two to three sittings for crisp edges and solid shadow blocks. The biggest mistake is making the cubes too small over a contoured area, which invites blowout as lines age. For lasting depth ask for stronger saturation in shadow planes and plan a touch-up at two years if edges soften.
5. Portrait Eye with 3D Pupil on Outer Bicep
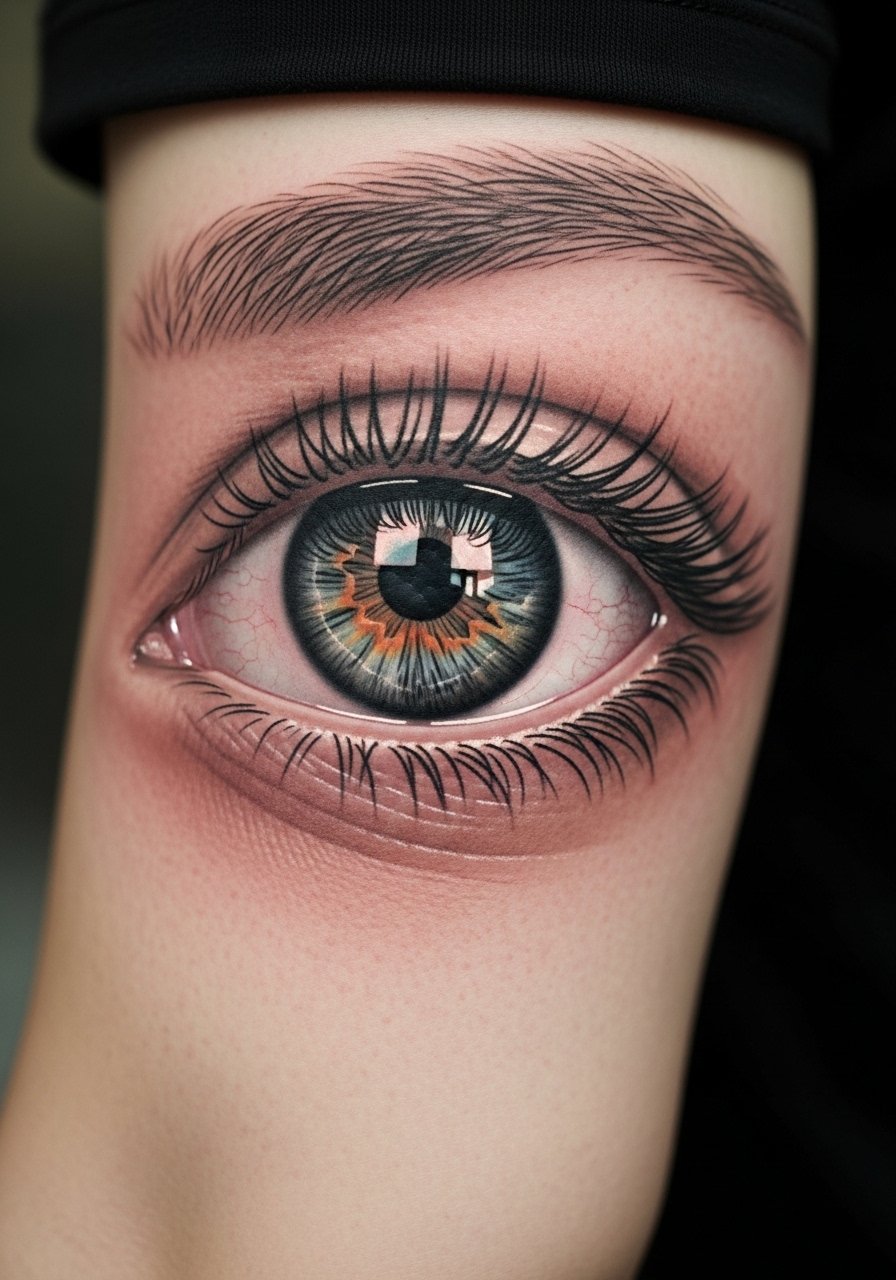
There is a reason collectors gravitate to eye portraits. They feel like they follow you because of precise pupil shading and micro high-contrast highlights. This placement is forgiving for motion but requires very steady linework and layered shading. In consultation say you want the iris saturation slightly muted so the black pupil reads deeper. Numbing debates come up for these long sessions. One group of artists avoids numbing to judge real-time pain tolerance and micro-strokes. The other group supports careful numbing for multi-hour detail work. Ask where your artist stands before booking.
6. Realistic 3D Snake Coiling Around Wrist
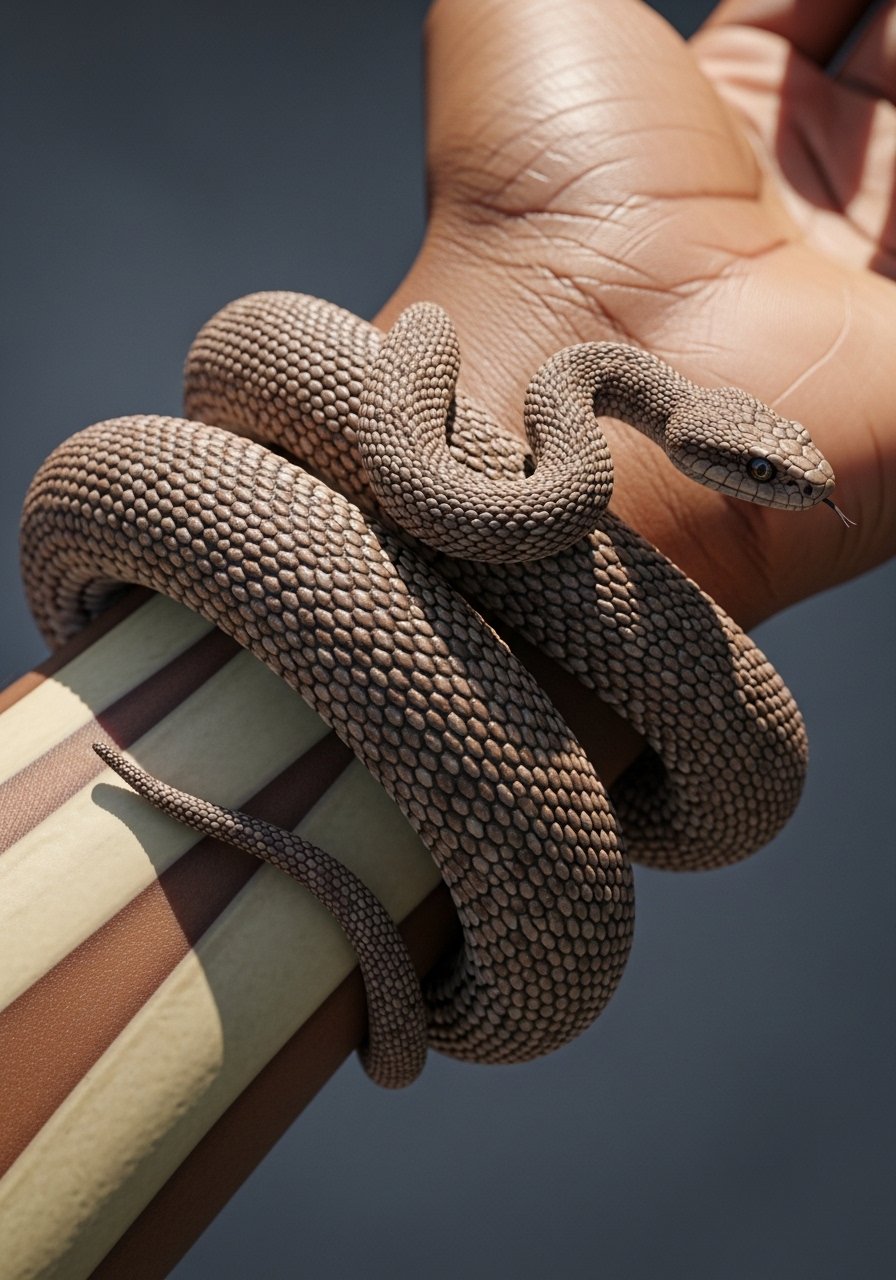
Wrist micro-realism makes movement part of the design but also brings faster fading. The wrist skin is thin and prone to blowout, so I usually recommend stronger scales with bolder outer contrast rather than hundreds of hairline details. A real mistake is sizing the snake too small for the joint. That causes early blurring and loses the coiling illusion. Expect one short session and a likely touch-up within the first year if you use your hands a lot.
7. Escher-Style Impossible Shapes on Calf
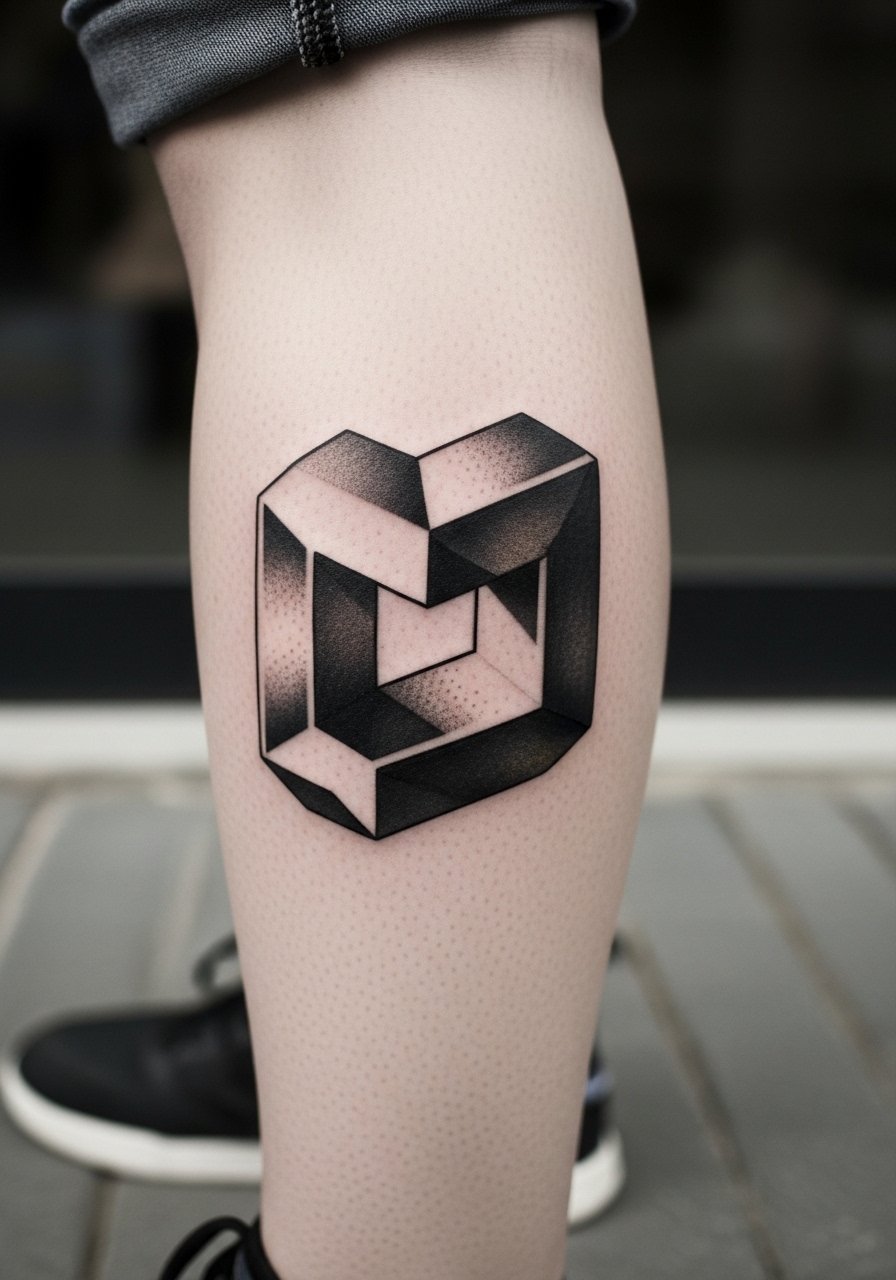
The calf is an ideal spot for optical art because muscle curves add natural shadowing to the illusion. The main win here is scale. These shapes need room for crisp linework and solid negative space to read as impossible. During consultation request a skin-stretch mockup so the artist can map edges to muscle. The common error is going too small. Too-small geometry loses its 3D effect as lines feather. Touch-ups are usually cosmetic and occur at two to three years if the black softens.
8. 3D Camping Tent on Shoulder Blade
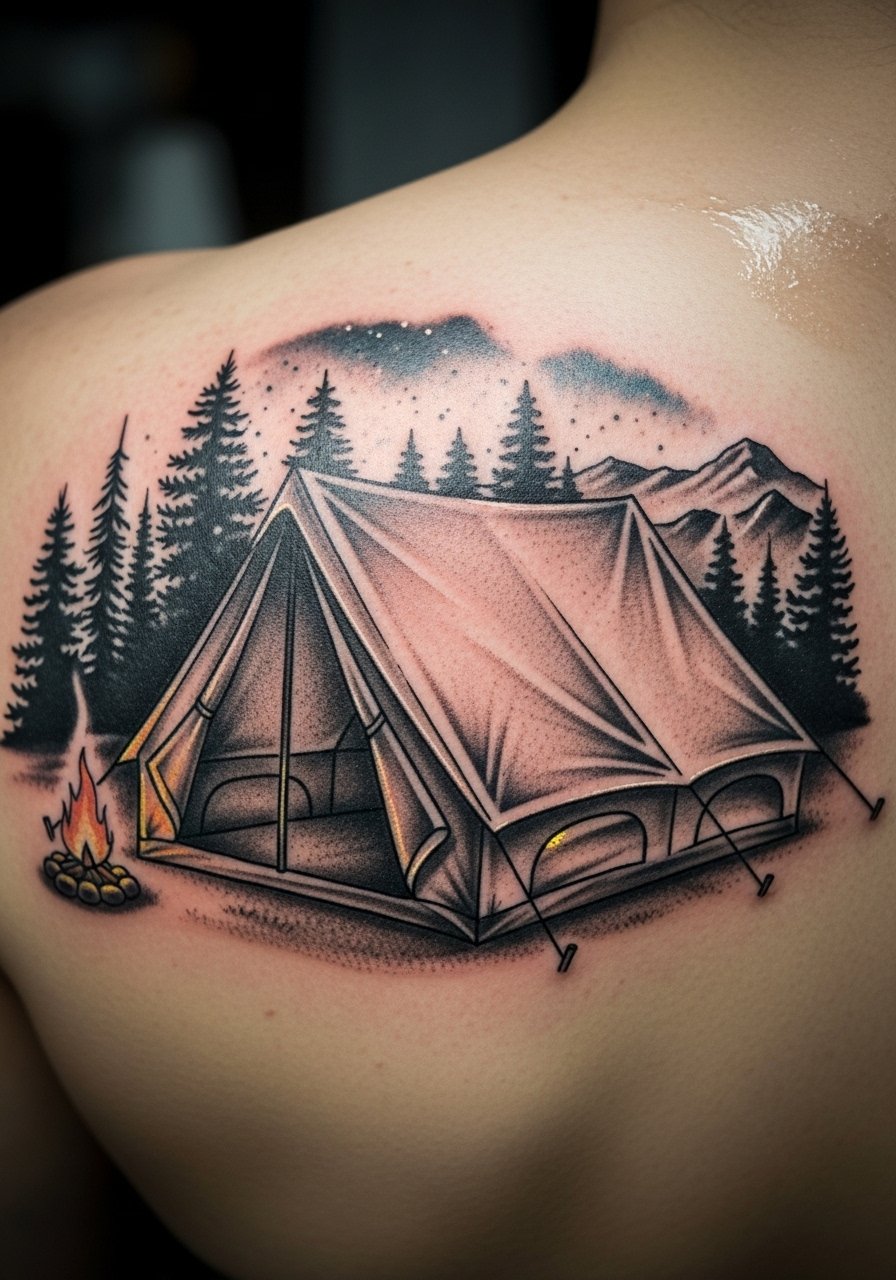
This quirky realism trend turns everyday objects into tactile illusions. Shoulders let fabric folds drape naturally, which helps the tent read like it sits on muscle. Ask your artist to emphasize cast shadows under the tent flap and to avoid tiny texture lines that fade. Sitting positions on the table matter here. The shoulder can be worked comfortably in two sittings. For long-term crispness request moderate saturation and a touch-up timeline at year two if outdoor gear rubs occur.
9. Hyperreal Character Portrait Emerging from Collarbone
Neck portraits read intimate and bold at once. The collarbone area is thin and requires careful depth work to keep features readable after healing. If you want a face emerging from the collarbone tell the artist the exact reference angle and the emotional tone you want conveyed. Expect multiple sessions for layered skin tones and highlights. Hands-off healing is critical in this zone because friction from clothing can soften edges. Discuss career and visibility considerations with your artist, since neck pieces still influence some professional settings.
10. 3D Flower Emerging from Cracked Skin on Ribcage
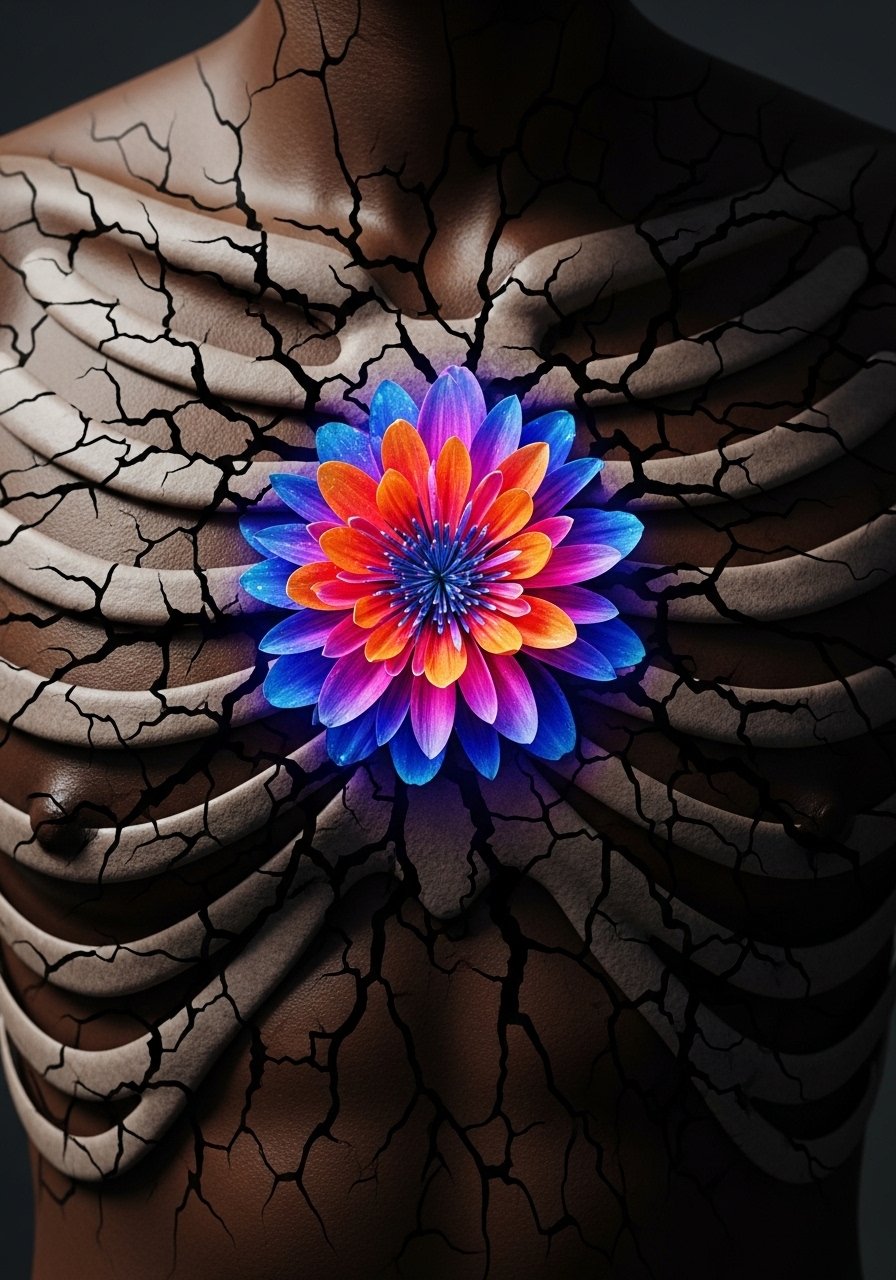
Fair warning, the ribcage is high on the pain scale but excellent for dramatic depth. Artists split on fine line here. One camp warns that ribs and stretch mean fine lines will blur in two years. The other camp says properly spaced fine line with deep contrast can last. Name both camps and ask which technique the artist uses. For this style ask for bolder crack shadows paired with slightly thicker floral outlines so the bloom keeps contrast as the body moves and ages.
11. Optical 3D Abstract Shapes on Back of Hand
Hand placements make a statement but age faster than most areas. The skin on the hand is exposed and thin, so I recommend bold shadow blocks and minimal hairline details. A frequent mistake is asking for too many tiny gradations on fingers. Those gradients fade and muddle. If you want interactive light play across knuckles request solid shadow planes and plan annual touch-ups. Also keep in mind hand tattoos can affect job prospects in some industries.
12. Tiny 3D Mechanical Gears on Ankle
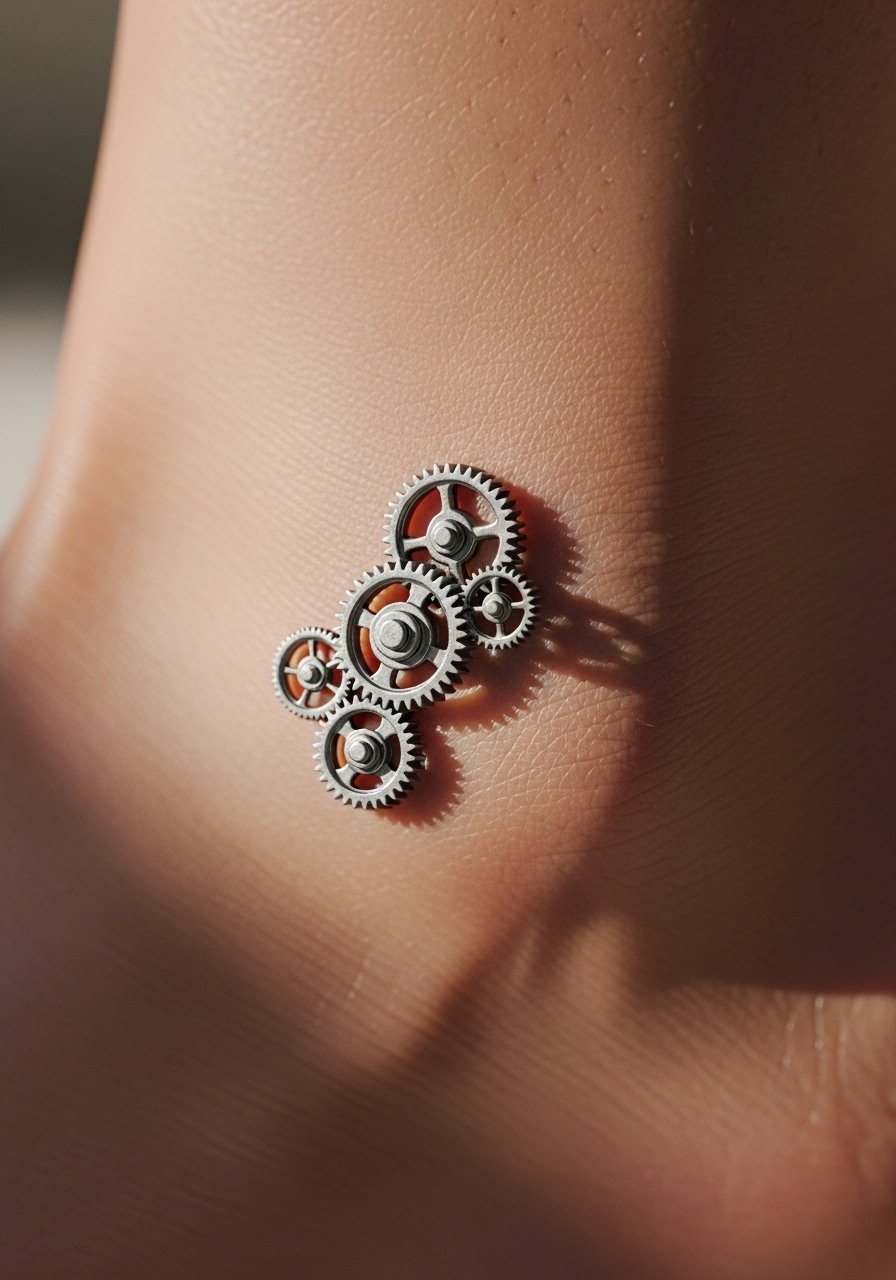
Ankles give tiny designs a natural frame, but the skin there takes ink differently. I recommend stipple shading for metallic texture rather than ultra-fine lines. During consultation say you want denser shadows in gear overlaps so the metal feels layered. These micro pieces often need a touch-up at year one because ankle movement and footwear abrasion can soften edges. The session is short but may sting more than you expect because the area is bony.
13. 3D Feather That Appears Under the Skin on Inner Arm
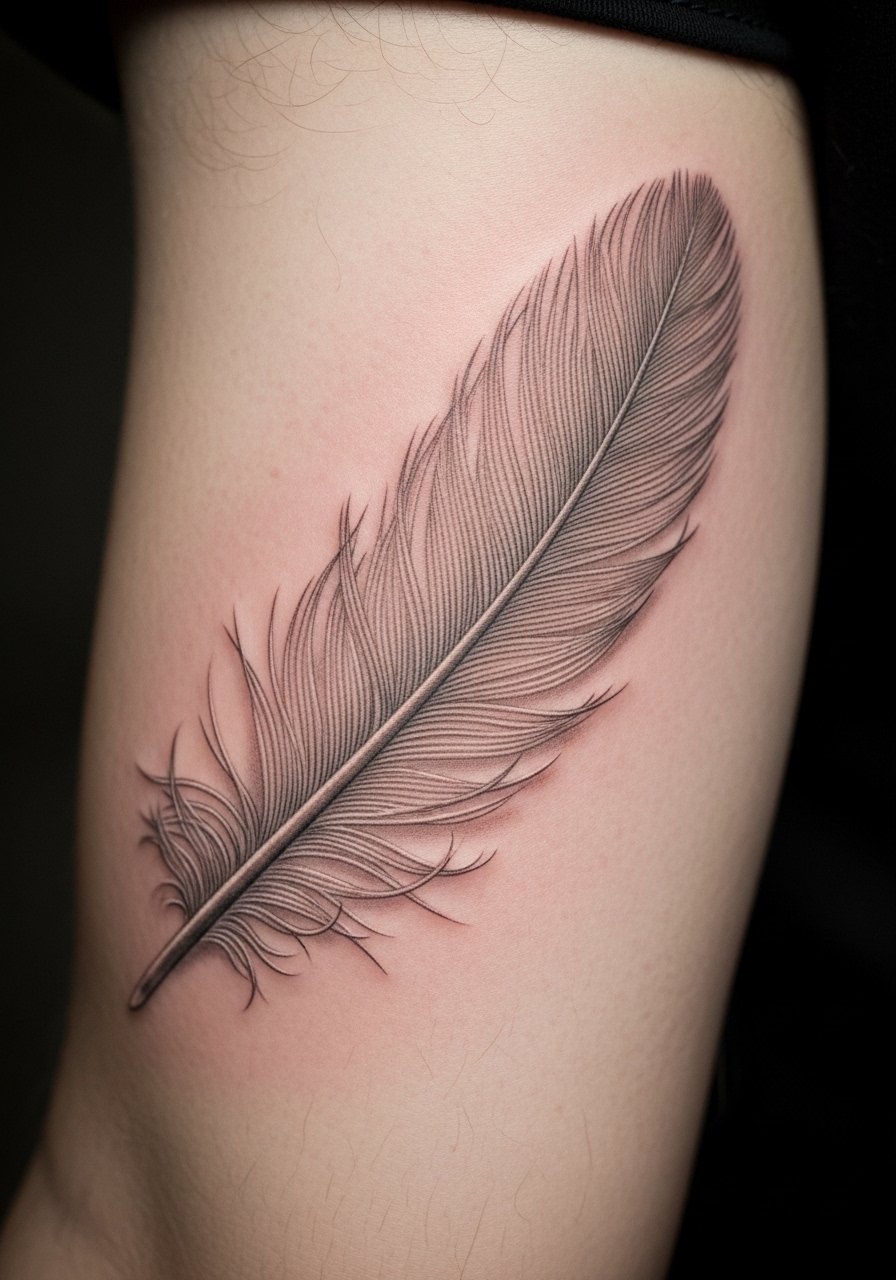
There is something about feather linework that ages beautifully when done with breathing room. The inner arm is forgiving for subtle depth but a common error is over-detailing the barbules. Too many micro strokes blur into a gray mass. Ask the artist for tapered barbs with stronger quill saturation and request a six to twelve month touch-up timeline. Pain levels are low to moderate and sessions fit into one sitting for a small feather.
14. Photorealistic Pocket Watch Wrapped in Skin on Lower Forearm
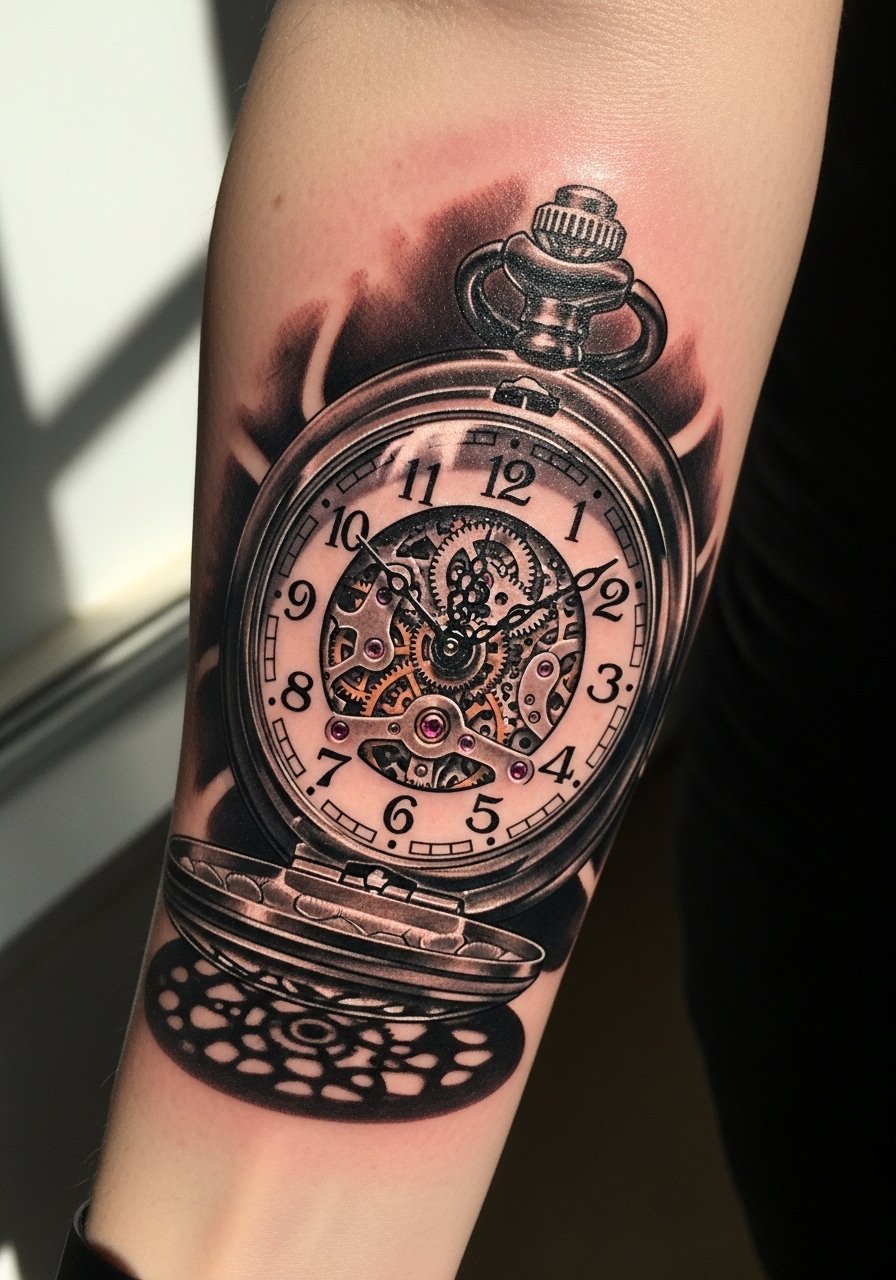
A reflective center is what sells this style, so tell the artist the exact light source you want portrayed. The lower forearm reads well for circular objects because the flat plane keeps reflections consistent. A frequent mistake is asking for tiny script inside the watch face. Micro lettering in reflective areas can blur. If you want numbers, request bold numerals or Roman numerals in a slightly larger size to preserve legibility. Expect layered sessions and a touch-up once the watch glass softens.
15. 3D Geometric Mandala Over Sternum with Dot Work
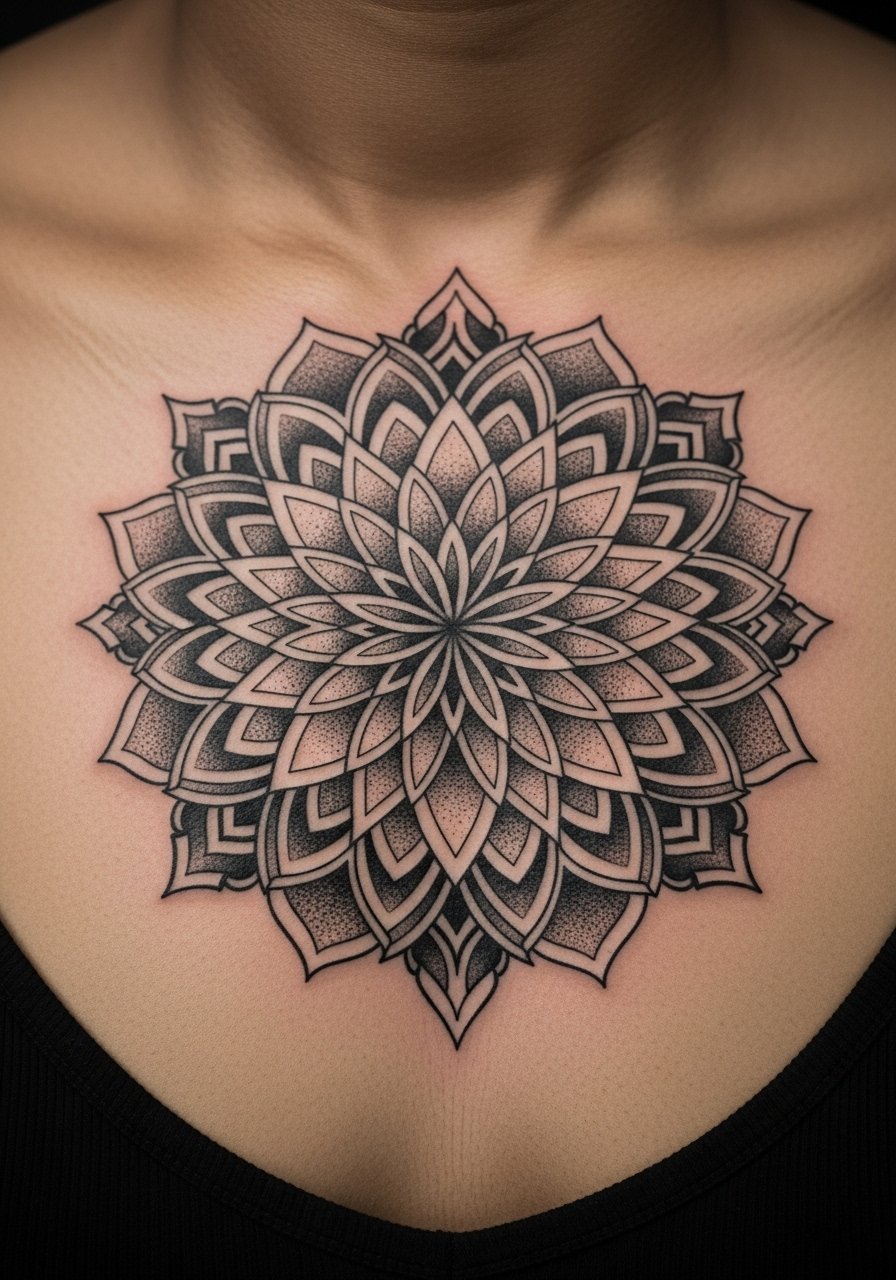
Sternum placements demand respect for symmetry and surface tension. The mandala benefits from dot work and whip shading that builds depth without relying on thin lines. Cultural origins matter here. This pattern traces to traditional mandala geometry, so many clients choose slight variations rather than direct replicas out of respect. The skin here moves with breathing, so ask for negative space buffers between radiating lines to prevent blurring. Pain is higher, and multiple sessions are standard.
Tattoo Prep and Aftercare Essentials
Fragrance-free moisturizing balm with gentle occlusive properties. A simple balm keeps new ink hydrated without perfume. Use sparingly in the first week when your artist advises.
Medical-grade second skin bandage, single large sheet. For pieces that the artist recommends to cover, this reduces friction and contamination during the first 24 to 72 hours.
Gentle fragrance-free foaming cleanser. A mild cleanser helps remove ointment residue without stripping ink saturation.
Lightweight fragrance-free balm for long-term maintenance. Use this after the initial healing phase to keep saturation looking fresh.
Aquaphor Healing Ointment (popular occlusive option). Many artists recommend this for the earliest stage because it forms a gentle barrier. Use only if your artist approves.
Sensitive-skin disposable razor for pre-appointment shaving. Shave the area the night before for a smooth canvas. Avoid shaving immediately before your appointment to prevent irritation.
Mineral sunscreen SPF 30 or higher, fragrance-free. Long-term UV protection preserves contrast in 3D work. Apply when the tattoo is fully healed.
Lightweight microfiber wrap or loose clothing for healing period. Comfortable clothing reduces rubbing and lets skin breathe during early healing.
Every tattoo is different. Always follow your artist's specific aftercare instructions. Consult a dermatologist if you have skin concerns or unusual healing issues.
Frequently Asked Questions
Q: How much should I budget for a realistic 3D tattoo?
A: Expect a broad range because size and realism drive time. From what I’ve seen, hourly rates often fall between 150 and 300 per hour and detailed 3D work can span multiple sessions. Ask for a time estimate and an hourly rate from three studios so you can compare.
Q: Will a fine line butterfly wing on the forearm fade faster on darker skin tones?
A: Fine lines can blur faster on any tone if the spacing and saturation are too light. For darker skin tones, I advise stronger base saturation and slightly thicker vein contours so the wing keeps contrast as it heals. Have a short test patch if you are unsure.
Q: Are ribcage cracked-skin florals worth the pain and how do they heal?
A: Ribs are painful but beautiful for large depth work. Expect longer sessions and more soreness while healing. Because of movement and stretch, thicker crack shadows and bolder petal bases help the design age better. Plan a touch-up after the first year.
Q: How often do wrist micro-realism designs need touch-ups?
A: Wrist pieces typically need the most maintenance because of exposure and friction. From what I’ve observed, a wrist micro-realism design often benefits from a touch-up within 6 to 18 months, then periodic refreshes after that.
Q: Does color or black and gray hold 3D depth better over time?
A: Artists are split. One camp says muted color gives initial pop but loses vibrancy sooner. The other camp argues that carefully mixed muted tones paired with strong black contrast can age well. My advice is to discuss how your chosen palette will translate after healing and get a touch-up plan.
Q: Should I expect longer sessions for photoreal portraits on the neck and collarbone?
A: Yes. Neck and collarbone portraits need layered work to capture skin tones and light. That often means multiple sittings and careful aftercare. Also discuss visibility and career considerations with your artist before committing.
Q: What should I ask during the consultation to avoid blowout on thin-skin areas?
A: Ask how the artist adjusts needle depth and spacing for thin-skin zones and request examples of healed work on similar placements. Also ask about their touch-up policy for areas prone to blowout so you have a realistic plan.
