
Someone I know spent months swiping through manga panels before booking anything. The real problem was not the designs. It was picking panels and line weights that survive real life, sun, sweat, and a job that still requires sleeves in summer. Below are 25 bold manga panel tattoos chosen for action, meaning, and how they age. Each idea includes what to ask your artist, where it heals best, and common mistakes I keep seeing so you book with a clearer plan.
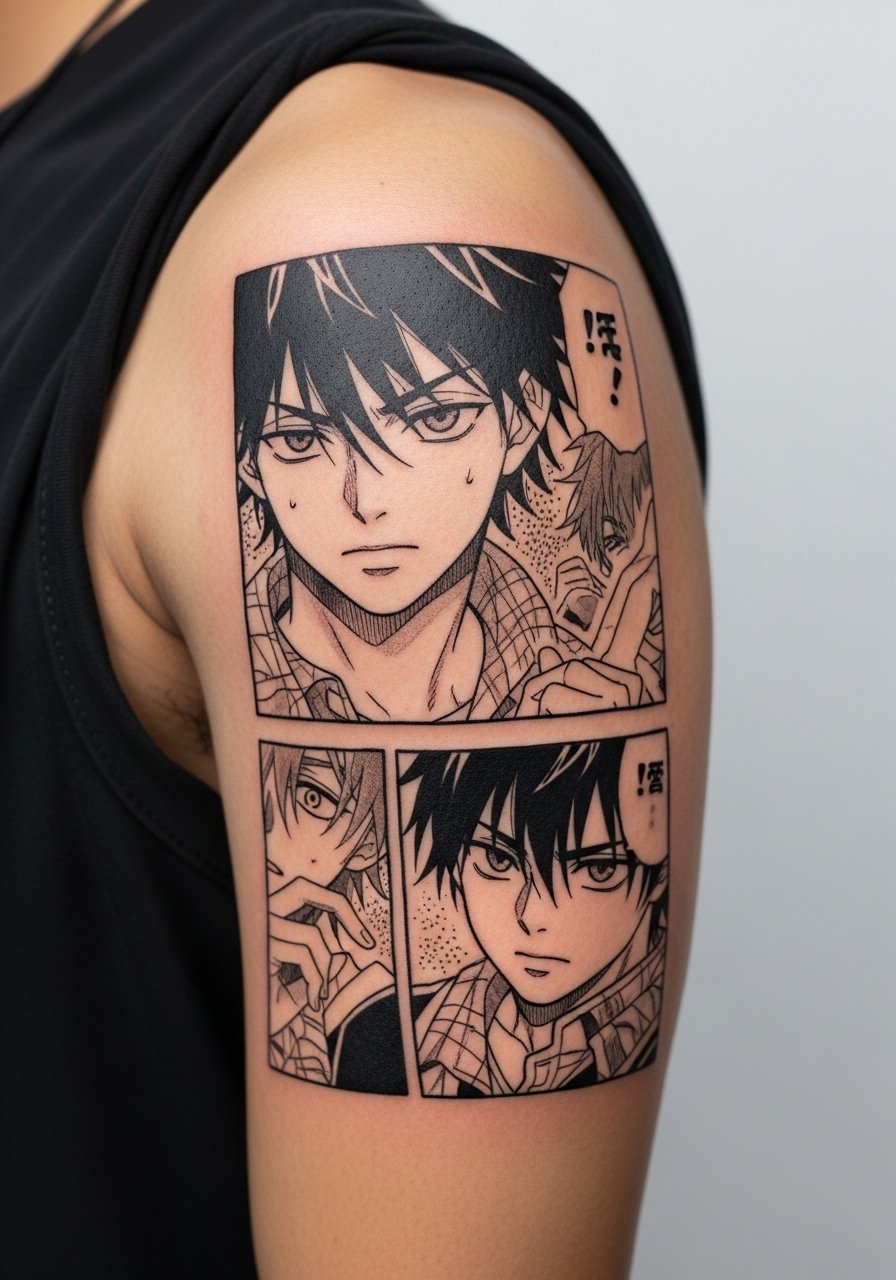
1. One Piece Gear Five Panel on the Outer Forearm
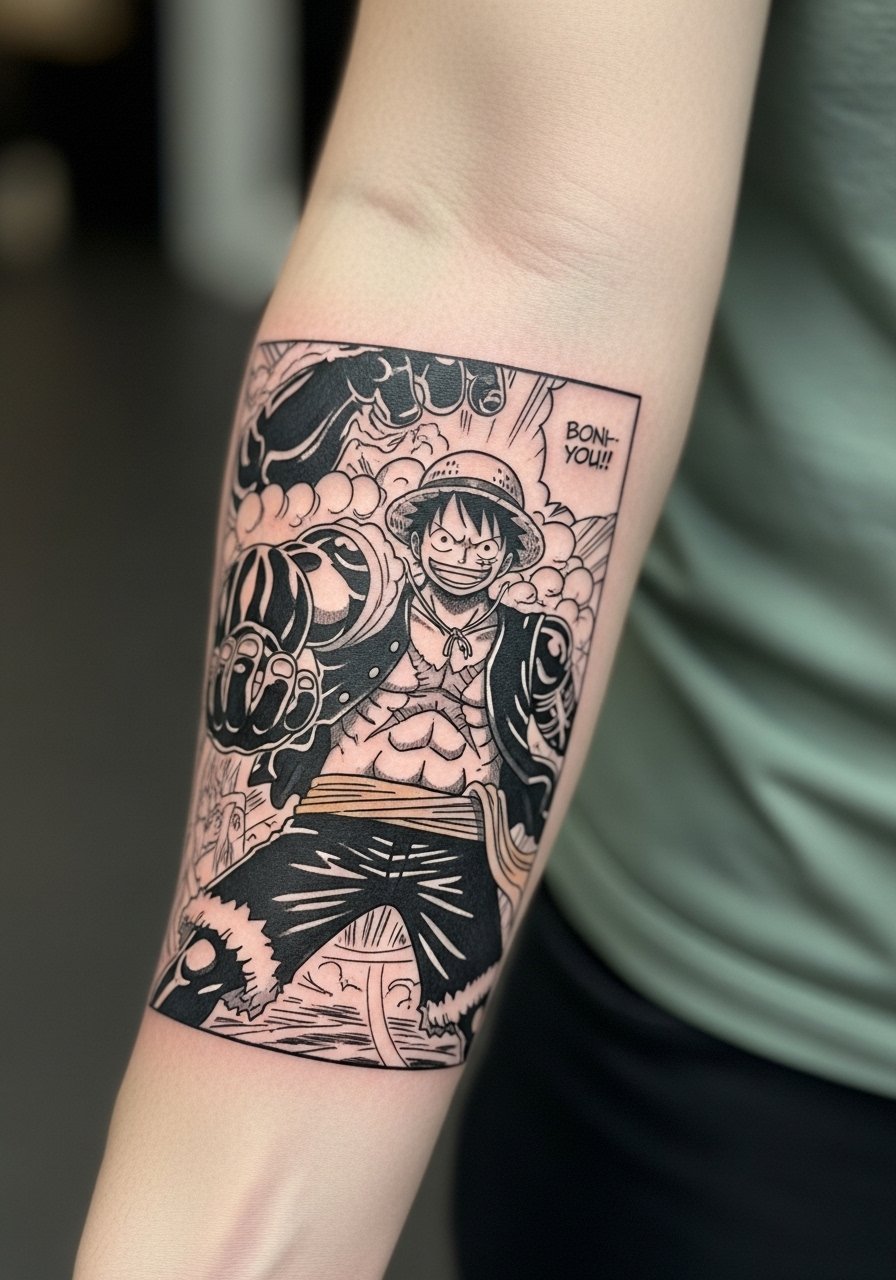
Someone I know chose this forearm panel because it reads from across a room. Forearms are flat and durable, so blackwork illustrative panels do well there. Expect moderate pain and a one to two hour session for a 4 to 6 inch crop. Tell your artist you want thick outlines with varied internal hatching and no micro details that will blur on movement. A common mistake is requesting tiny screentone stippling, which fades into a muddy patch at six months. For long-term maintenance, plan a touch-up at year two for saturation. Use hashtags like #BlackworkAnime to find matching portfolios.
2. Chainsaw Man Surprise Faces on the Thigh

Fair warning, the thigh is forgiving for neo-traditional panels and handles shading well. A 5 inch crop takes a single session and heals with good saturation. When consulting, bring the exact panel crop and ask for confident black outlines with soft gray wash for midtones. The biggest mistake is squeezing a complex facial panel too small, which destroys expression as it heals. Thigh skin stretches with weight changes, so if you expect fluctuation, ask about slightly thicker lines to resist wavy edges. This placement reads bold in shorts and provides a simple path for later sleeve work.
3. Gojo Blindfold Removal at the Collarbone
Artists split on fine line at the collarbone. One camp says the area moves and blurs fine needles fast. The other camp argues a skilled artist who spaces lines and drops depth finds it holds. Expect a sharp but painful sit near bone. Tell your artist to show healed examples on medium and dark skin before booking. A common mistake is asking for single-needle micro detail there without portfolio proof. If you love the subtle reveal, keep the panel compact and accept touch-ups at year two. Use local TikTok searches to find fine line specialists nearby.
4. Eren Scream on the Calf
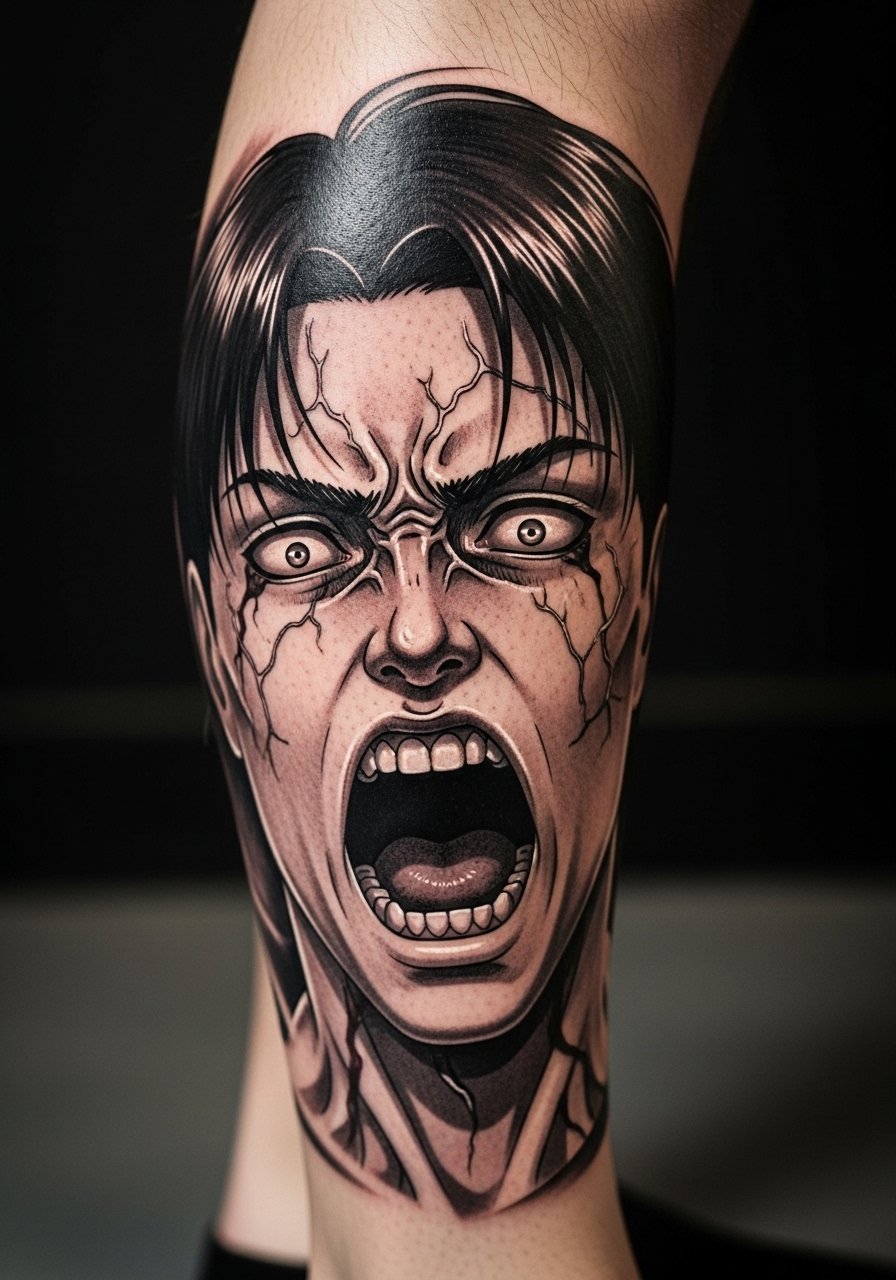
Calf panels suit dramatic, shadow-driven realism. A 6 to 8 inch panel usually needs two sessions. Calf skin is thick and tolerates heavier saturation without blowout, which makes it a good choice for high-contrast emotion panels. During the consult ask for crisp contour linework and deep gray washes behind the mouth and eyes. A frequent error is packing too many tiny teeth or screen tones into a small area. Healed at six months you still see the contrast, at two years expect some softening of the deepest grays. Calf panels pair well with black and gray legs or a full sleeve later.
5. Rasengan Explosion Cropped on the Bicep
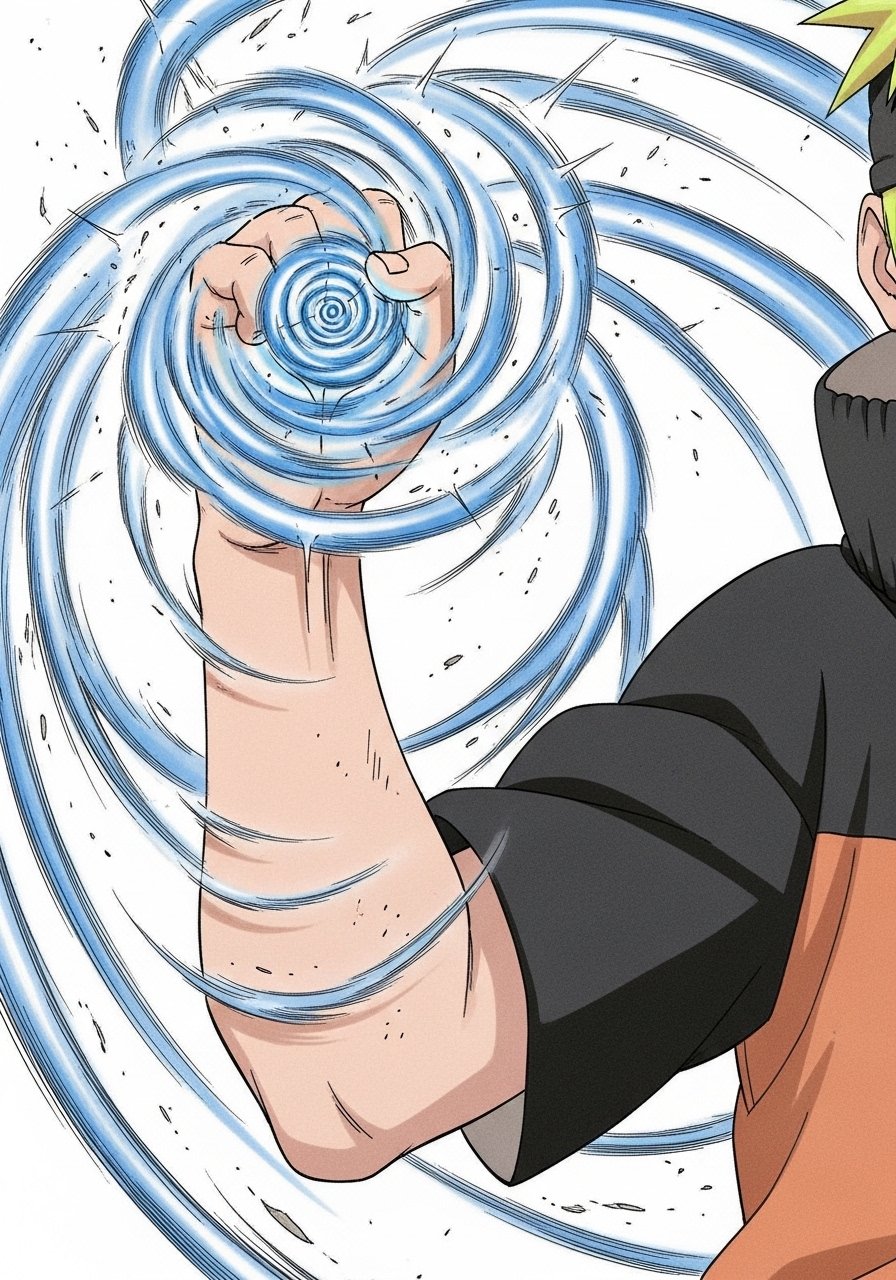
There is real visual payoff when you crop high-energy action and let motion lines breathe. Biceps provide muscle canvas that holds spirals and bursts. A 5×7 inch panel runs one to two sessions depending on color accents. Tell your artist you want the spirals to remain open and readable, and request heavier outer lines with light internal hatching. Mistake to avoid is dense dot work inside the Rasengan that clogs into a blob after healing. On dark skin prioritize strong black and limited color accents so contrast stays. Expect some stretch if your muscle size changes, so plan placement off the peak muscle if you gain weight.
6. Tanjiro Breathing Technique on the Ribcage
Fair warning, the ribs score high on pain. People pick this location for intimacy and vertical flow. A 4 inch vertical panel is a single-session piece if kept lean. Artists disagree on fine line on ribs because skin moves with breathing. One camp says tiny needles blur fast. The other says proper spacing and consistent depth keep lines crisp. Ask your artist where they stand and see healed ribs in their portfolio. Avoid asking for tiny gradients that depend on long stipple runs. If you want red accents, use very small areas so saturation survives on darker tones.
7. Deku Punch Inner Forearm Micro-Realism
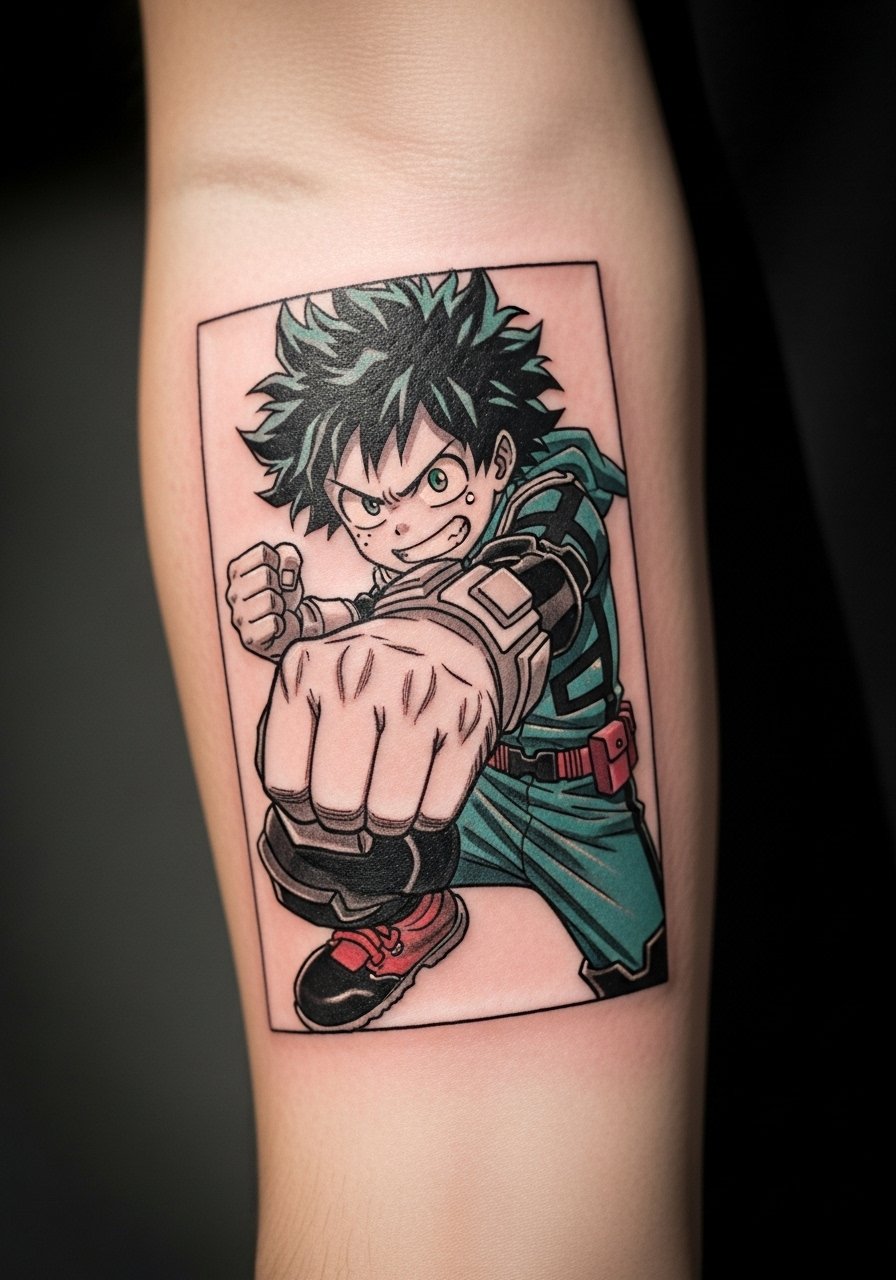
Inner forearm is a classic for readable micro-realism panels that you can show off easily. A 3×5 inch piece fits in one session. When you book, bring a cropped panel where the fist sits centered and ask the artist to preserve finger and knuckle shading over tiny screentone. A common mistake is asking for micro shading too close to wrist bones. That area loses saturation faster. Expect touch-ups in year one to keep contrast. For people who move between formal and casual settings, this placement slides under sleeves for work.
8. Goku Kamehameha Across the Upper Back
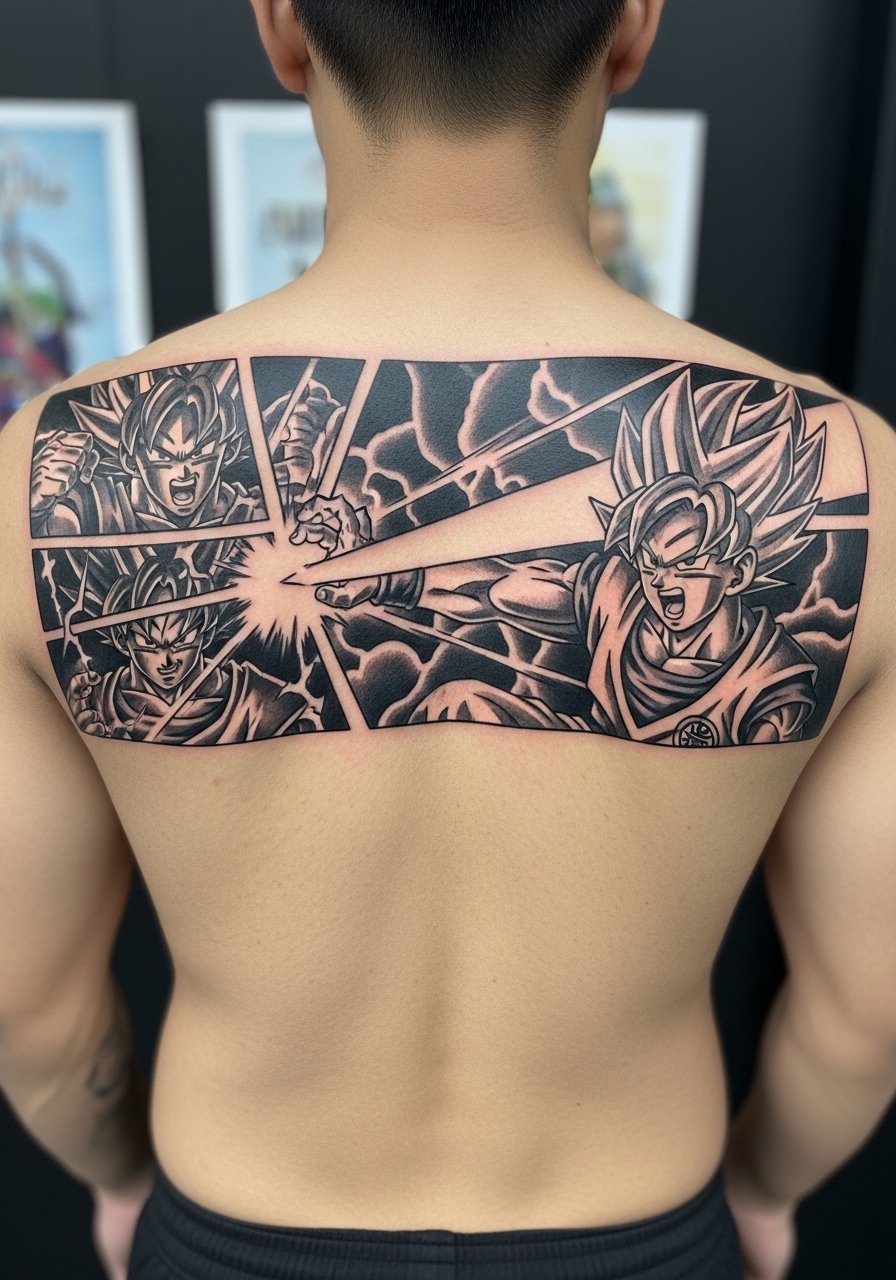
Back panels let you go wide and epic. An 8 to 10 inch wide Kamehameha often requires two to three sessions for heavy blackwork shading. Tell your artist you want strong beam contrast and blocky black silhouettes to keep the motion legible from distance. The biggest mistake is packing in too many small speed lines that muddy on larger, curved surfaces. Back skin handles saturation well, but healing depends on sleeping position and clothing. Expect slower initial healing but durable long-term saturation because of low sun exposure on covered days.
9. Anya Mind-Read Minimalist on the Ankle
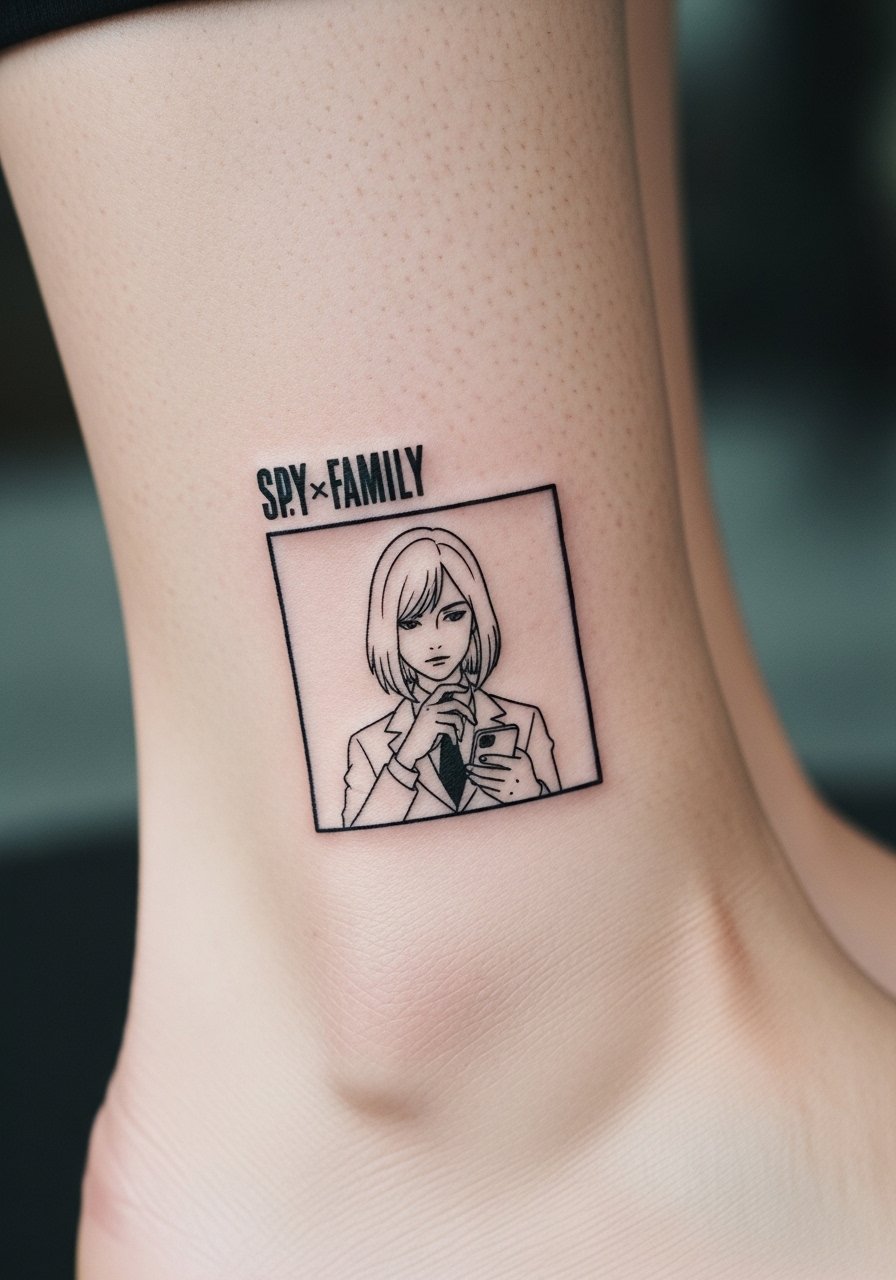
Ankle panels are tiny and cute, but they carry high blur risk. A 2 to 4 inch minimalist crop is a quick single session. Ask for bolder outlines than the original manga line weight so the expression stays readable as it fades. The common regret I see is keeping the panel too small. Fingers and ankles especially lose definition within six months. If you work in jobs that require closed shoes, consider placement higher on the lower leg. For ankle and foot work bring a posture plan for aftercare so swelling does not distort lines while healing.
10. Guts Dragonslayer Swing on the Shoulder Blade
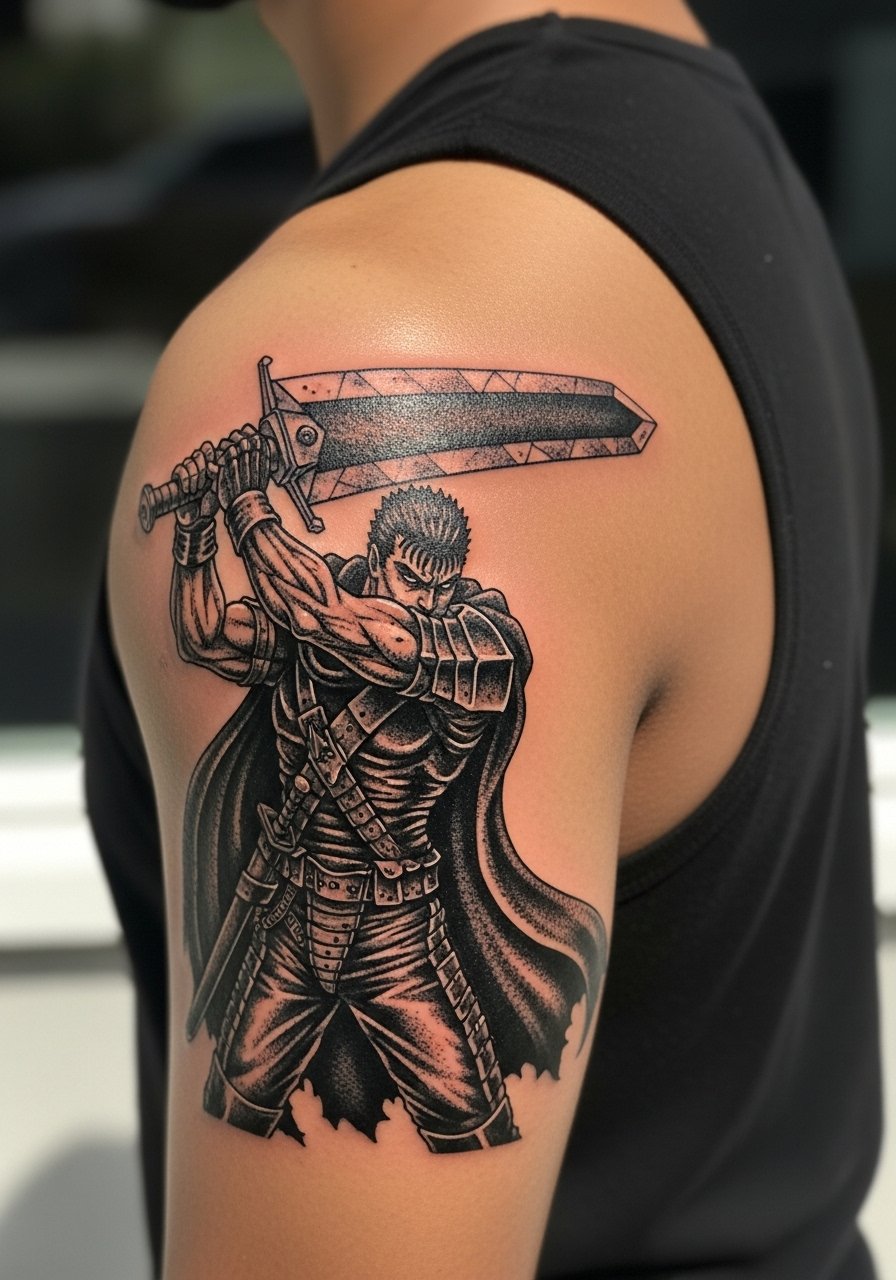
The shoulder blade offers a great flat plane for dark fantasy panels and weapon detail. A 7 inch panel tends to need three sessions for layered gray realism. Tell your artist you want contrast between sword edge and background grit and ask for heavier outlines near the edge to avoid blowout into the surrounding texture. One mistake people make is asking for ultra-fine cross-hatching in close quarters which clots as it heals. Shoulder blades are forgiving under clothing and age nicely if you avoid heavy sun exposure during the first month.
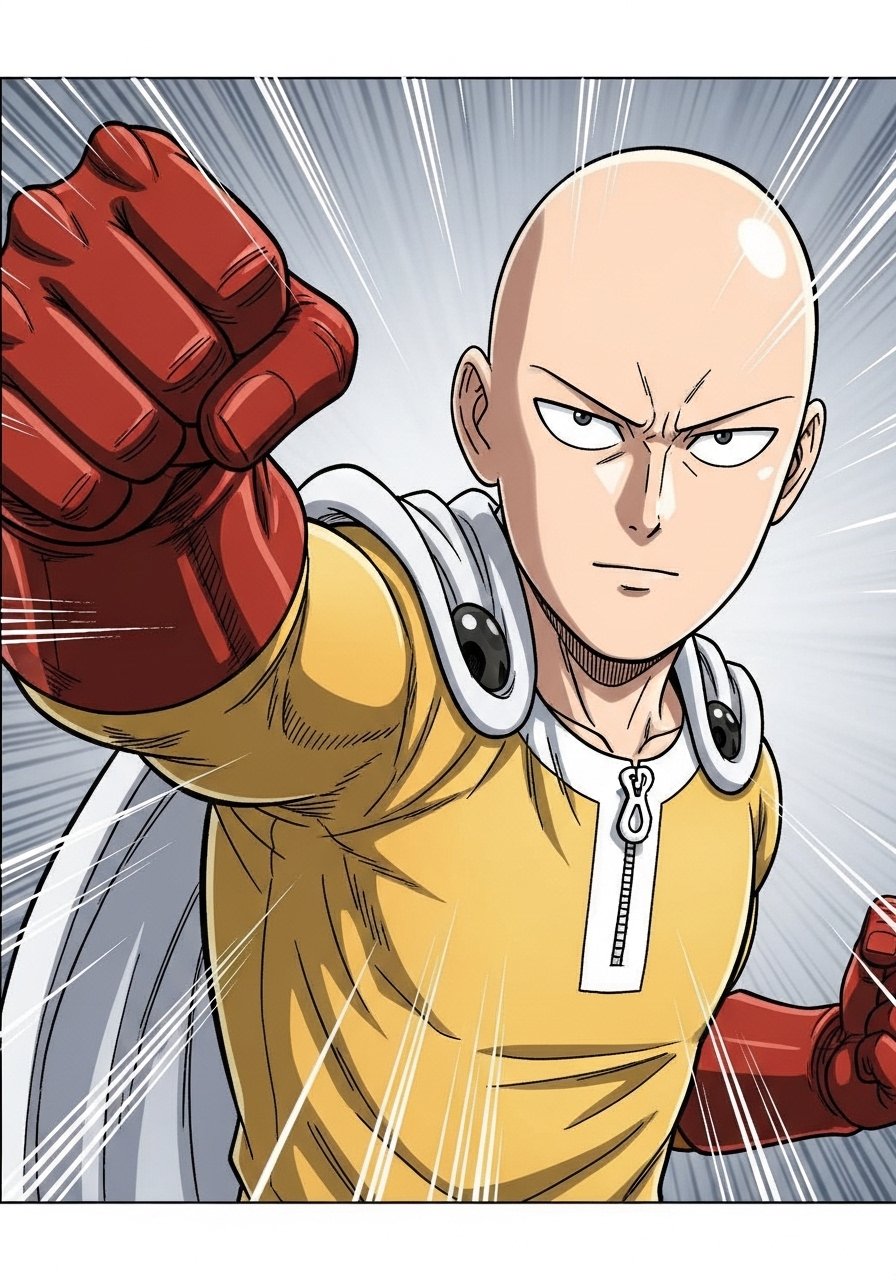
11. Saitama Punch on the Chest
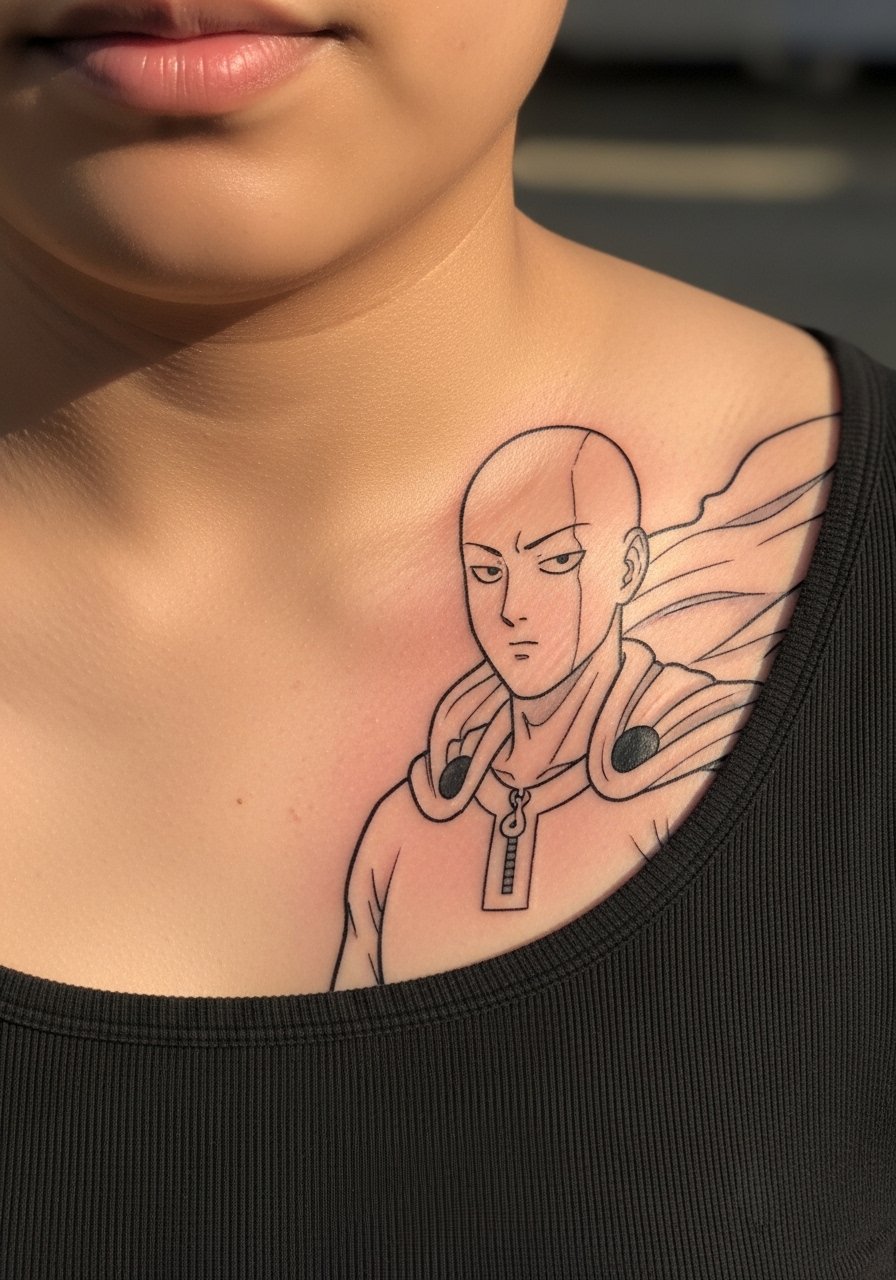
Chest panels can be surprising simple and bold. A 5×6 inch Saitama crop sits well between pecs for an ironic effect. Expect moderate pain and one session for a fine line action panel. A mistake is asking for faint single-needle outlines there without testing because chest skin moves with breathing and can shift thin lines. If you want contrast, ask for slightly thicker contour strokes around the character. The chest also takes sun well if you protect it, but be mindful of shirts rubbing during healing.
12. Flame Alchemy Circle on Forearm Sleeve Start
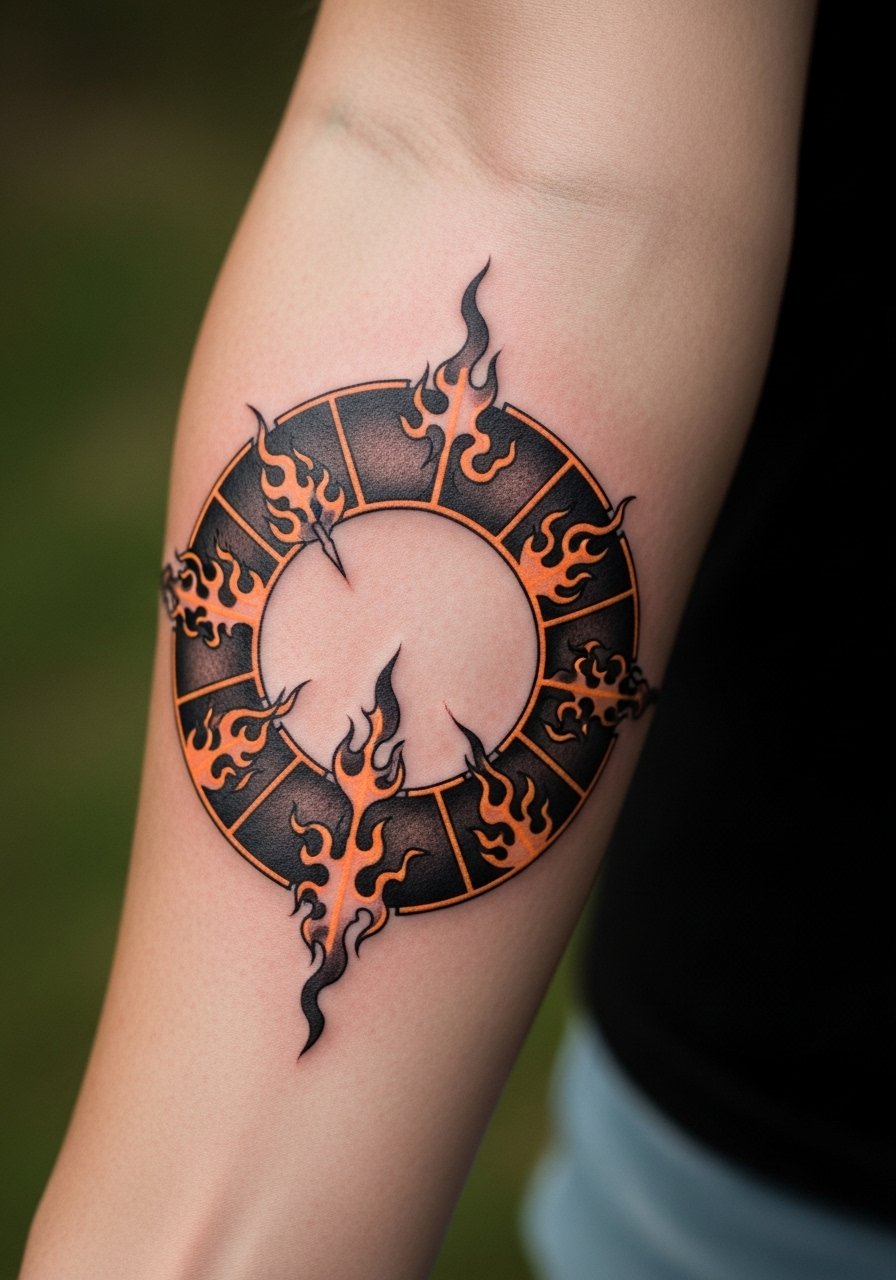
Geometric blackwork with a glow accent looks clean on forearms and begins a sleeve flow. A 6 inch panel usually needs two sessions for crisp geometry and a subtle orange overlay. During consult, ask for perfect symmetry in the circle and reserve the colored glow for limited areas to prevent color wash on darker skin. A common error is too many tiny intersecting lines that blur into one shape. Forearm placement is ideal for later sleeve expansion and shows well in short sleeves while still protecting most of the ink from constant sun.
13. Killua Electric Hand on the Finger or Hand
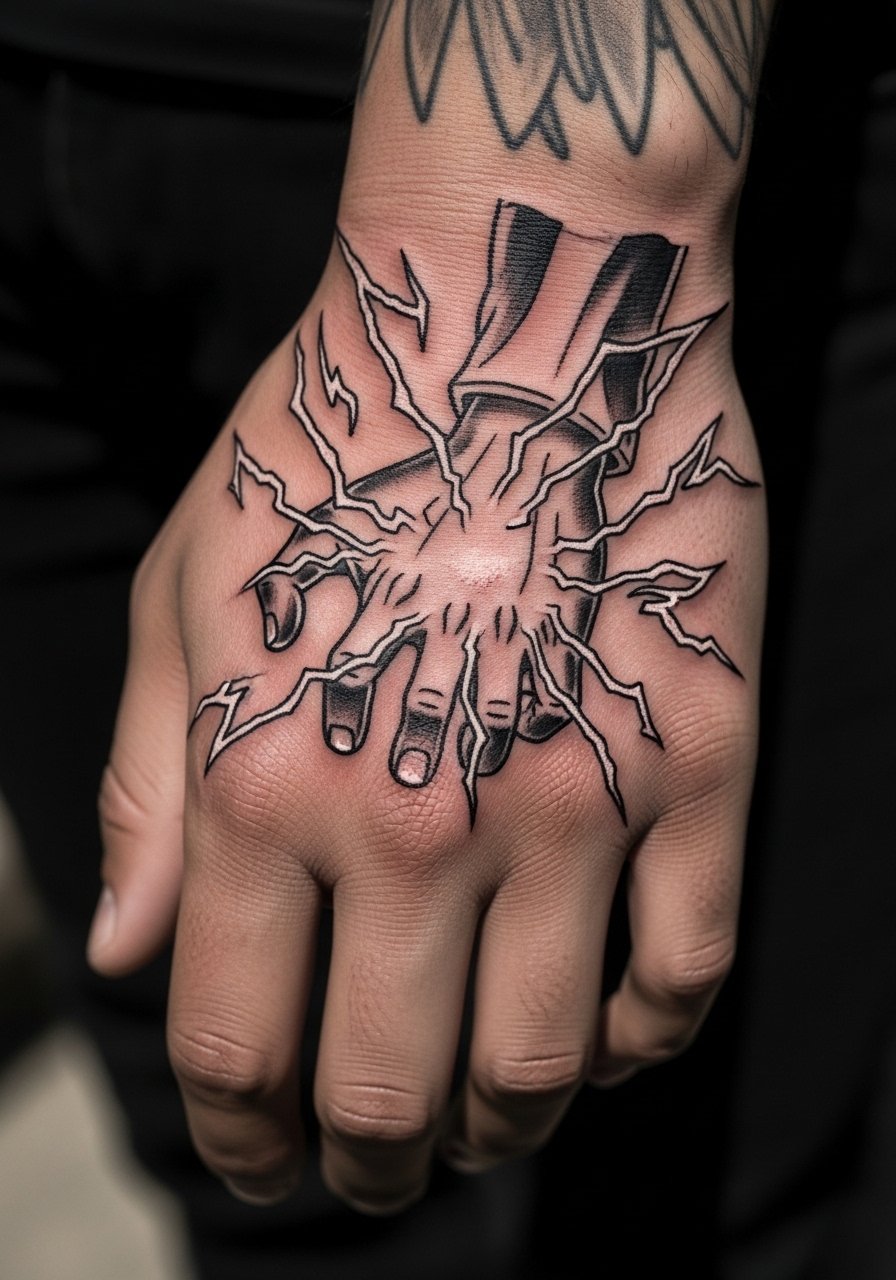
Hand and finger panels age fast. If you still want it there, choose bold blackwork and accept frequent touch-ups. A 4 inch hand piece needs a single skilled session, but plan annual refreshes. Tell your artist to avoid tiny white highlights and delicate hatching that will vanish. The mistake I see most is expecting finger detail to last without maintenance. Note for placement: hand tattoos still affect some job prospects, so consider that before committing. Find walk-in-friendly artists at conventions or use Tattoodo filters to search for hand specialists.
14. Micro Saitama Panel on the Sternum
Sternum panels pack a punch emotionally but hurt. Expect higher pain near bone and sensitive skin. A compact 3 inch panel heals well if the artist spaces lines and avoids ultra-fine screentone. A common mistake is asking for ultra-tight detail across the sternum which becomes distorted by chest movement. If you plan full exposure at the pool, consider how sun and friction from clothing will affect the piece. Booking someone who shows healed sternum examples across skin tones is key to setting realistic touch-up expectations.
15. Patchwork Panel Mix on the Upper Arm
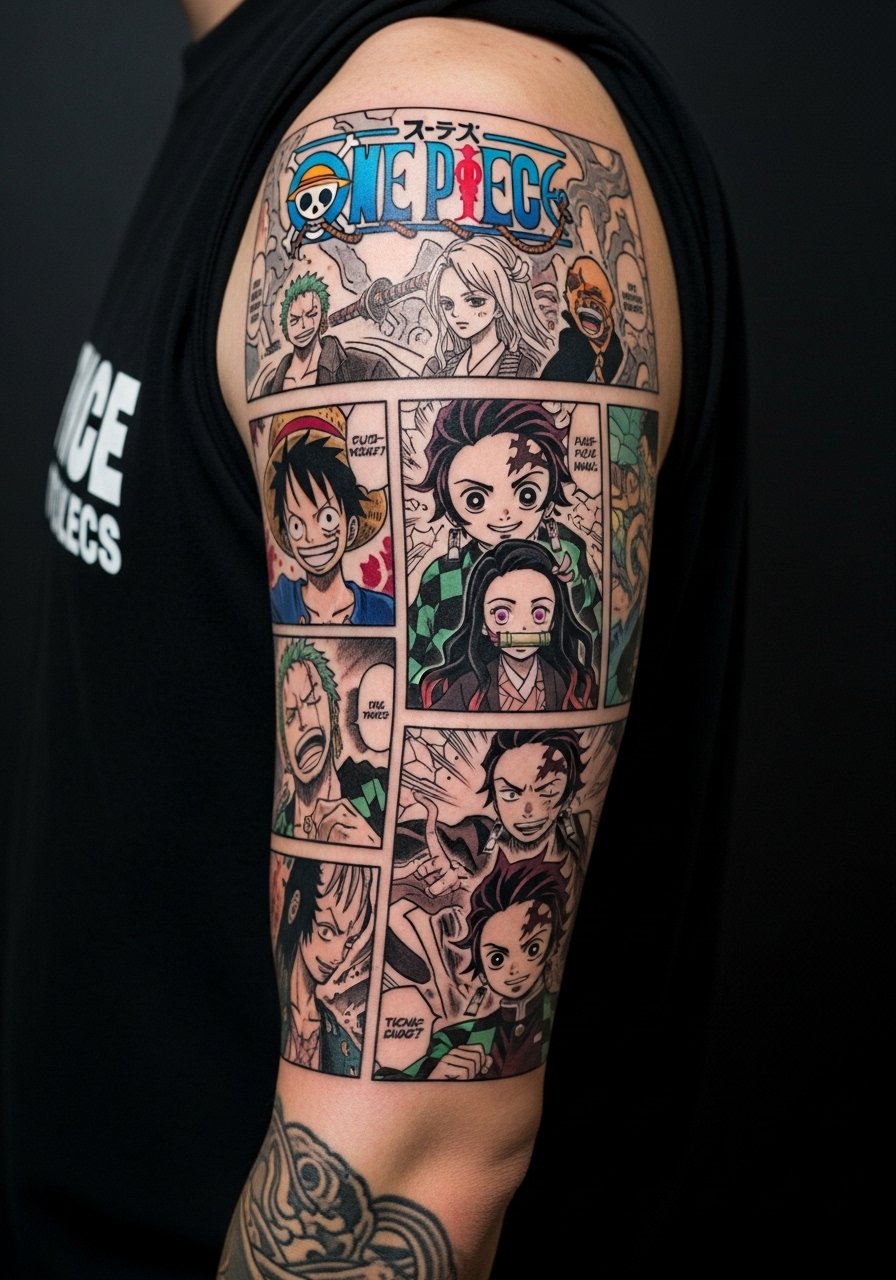
Patchwork panels are trend-forward, and they let you show multiple series without a full sleeve. Upper arm is ideal for mixing styles because it stays relatively flat and low movement. For a cohesive look, pick a consistent line weight and ask your artist to design connective negative space or irezumi-style waves to guide flow. Mistake to avoid is letting each saved panel dictate different line thicknesses. A designer approach where one artist adjusts crops for balance yields a cleaner healed result. Patchwork also gives space for touch-ups in specific panels without redoing the whole piece.
16. Phone-Screen Aspect Ratio Pocket Panel on the Inner Wrist
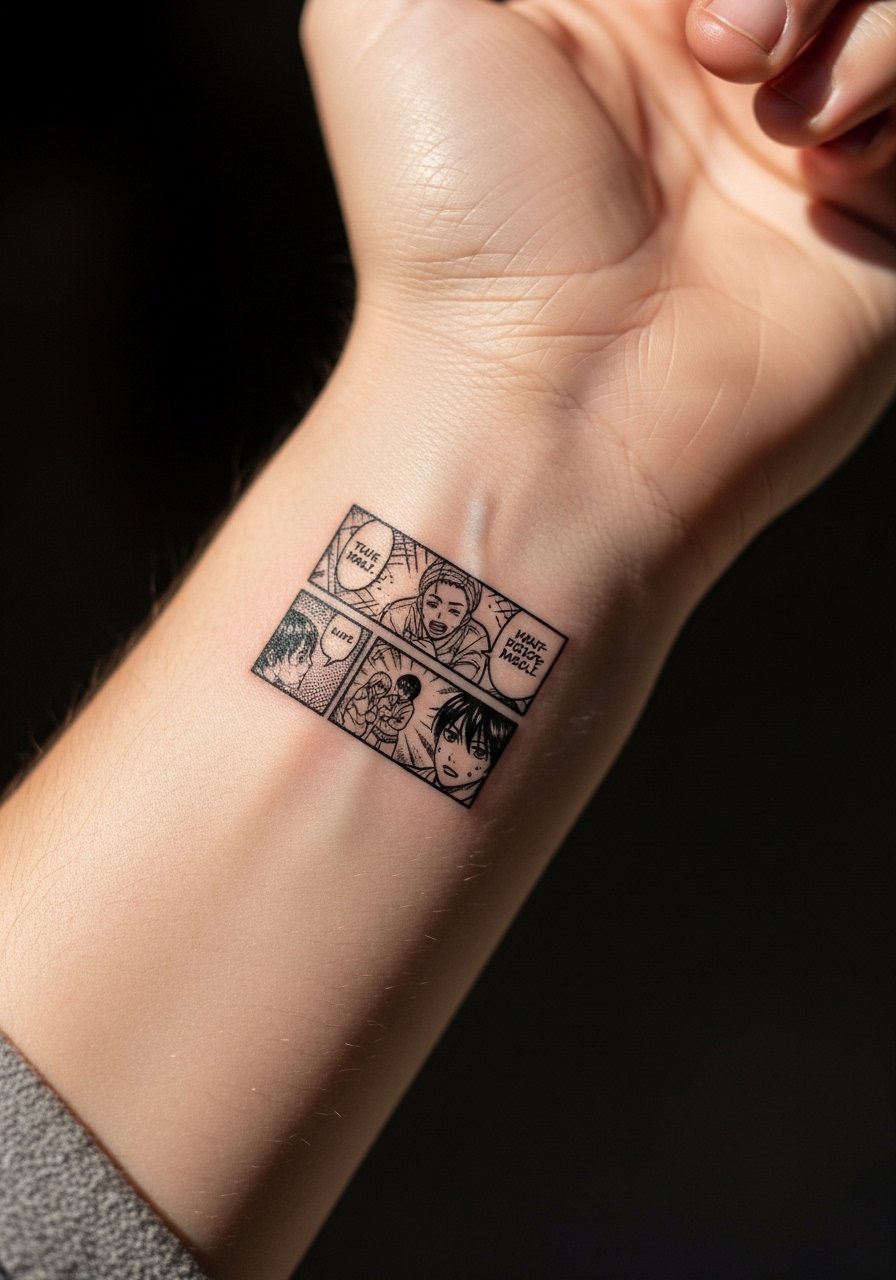
This is a niche idea I saw in one Reddit thread. Scaling a panel to match a phone screen makes the crop feel like a tiny comic pocket. The wrist is high-movement and often fades or blurs within months. Keep the design bold and avoid tiny screentones. A 3 inch panel takes one session but expect touch-ups at year one. The common mistake is copying tiny original line weights which disappear. If you want this location, ask the artist to thicken key contours and to place the art on slightly flatter wrist real estate to reduce distortion from bending.
17. Irezumi Wave Pairing with a Shonen Panel
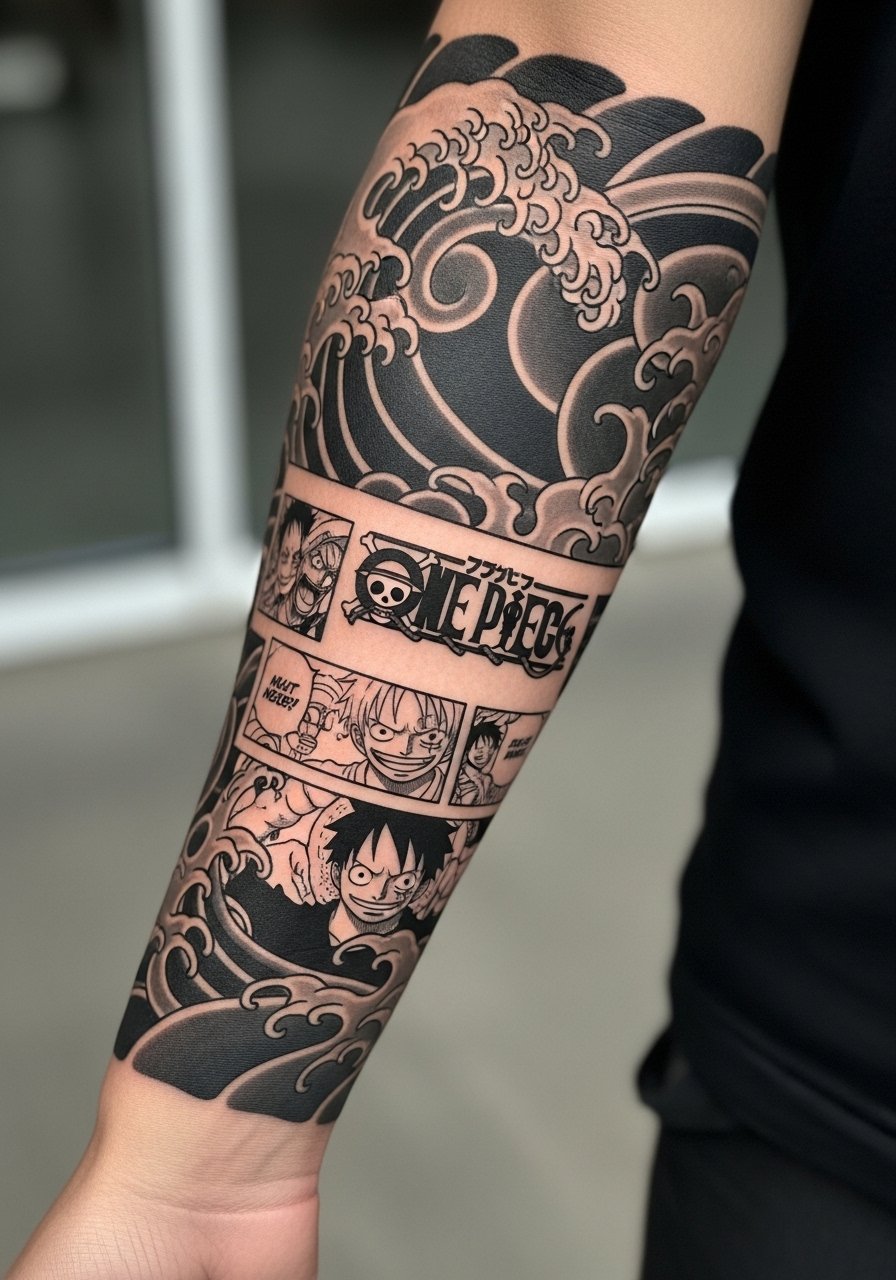
Pairing manga panels with traditional wave motifs tames panel edges and helps flow into sleeves. Forearm pairing works well because the waves guide movement around the arm. When briefing the artist, ask them to adapt wave scale to your anatomy so the panel does not look pasted on. A common error is pasting a panel without transitional elements which makes the piece read like two unrelated tattoos. Respect cultural origins by discussing the wave's stylistic choices rather than copying exact ceremonial motifs. This hybrid approach hides future touch-ups inside the wave texture.
18. UV-Reactive Hidden Detail Under Black Ink
UV ink paired with a normal black panel lets you hide Easter eggs that show only in club lighting. Use UV sparingly and in thin lines because it can behave differently while healing. Artists vary in availability for UV work, so search TikTok or convention guest spots for technicians who use safe pigments. A frequent mistake is expecting a neon underlayer to read in daylight. UV details are a night-only feature and require specific aftercare to preserve contrast. If you travel often, note some countries restrict UV pigments so plan accordingly.
19. Negative Space Optical Illusion on Curved Elbow Placement
Cropping panels to use negative space is under-covered but smart for curved placements like elbows. Elbows move and stretch, so designing with empty shapes reduces distortion. Expect a two-session plan if the panel wraps the joint. Ask for a mockup that shows the panel on a bent and extended arm. A common mistake is treating the elbow like flat skin and insisting on tight detail. Negative space illusions hold better and age cleaner because they rely less on tiny hatching that could spread into blowout.
20. Scaled Pocket Manga Panel for Side Rib Flow

Scaling panels to fit the rib's vertical flow keeps imagery readable and elegant. Ribs hurt, but the canvas is forgiving for thin vertical compositions. A 4 inch vertical panel is often a single session if details are restrained. Mistake to avoid is shrinking horizontal panels down vertically without re-composing the action. If you plan weight changes or pregnancy, discuss resilience with your artist because the rib area stretches differently. For ribs pick simpler linework and reserve dense shading for areas less prone to stretch.
21. Micro-Realism Deku Eye on the Inner Bicep

Inner biceps hide well under clothing and handle micro-realism if sized right. A 2.5 to 3 inch eye panel takes careful shading and one session. Tell the artist to leave breathing room around the pupil so it does not merge with stipple shading later. The usual error is overscaling the micro shading too small, which ages into a gray patch. Inner biceps see less sun, so saturation lasts longer there. If you exercise often, remember that bulk changes can slightly alter proportions over time.
22. Minimalist Anya with Subtle Facial Exaggeration on the Calf
Minimalist crops read large on the calf and stay legible. A 4 inch panel is a single session and is forgiving for subtle lines. The mistake I see is insisting on ultra-thin lines for minimalist details that vanish on darker tones. Ask for slightly heavier main lines and keep internal facial marks sparse. Calf placement also allows you to add more panels later without crowding. If you plan to travel for conventions, a calf piece protects well under pants and stays vivid with normal sunscreen use.
23. Berserk-Inspired Atmospheric Panel on the Rib Side
Atmospheric panels with grit thrive on side ribs because the skin holds layered shading. A 7 inch piece may need multiple sessions for depth. During consultation, ask for layered washes that maintain contrast between character silhouette and background. A common mistake is asking for all-over dense texture without breaks, which makes the piece look flat after a year. If you want that battered, lived-in feel, let the artist leave breathing space for highlights and plan a follow-up session in six months.
24. Minimalist Kamehameha Wrist Band
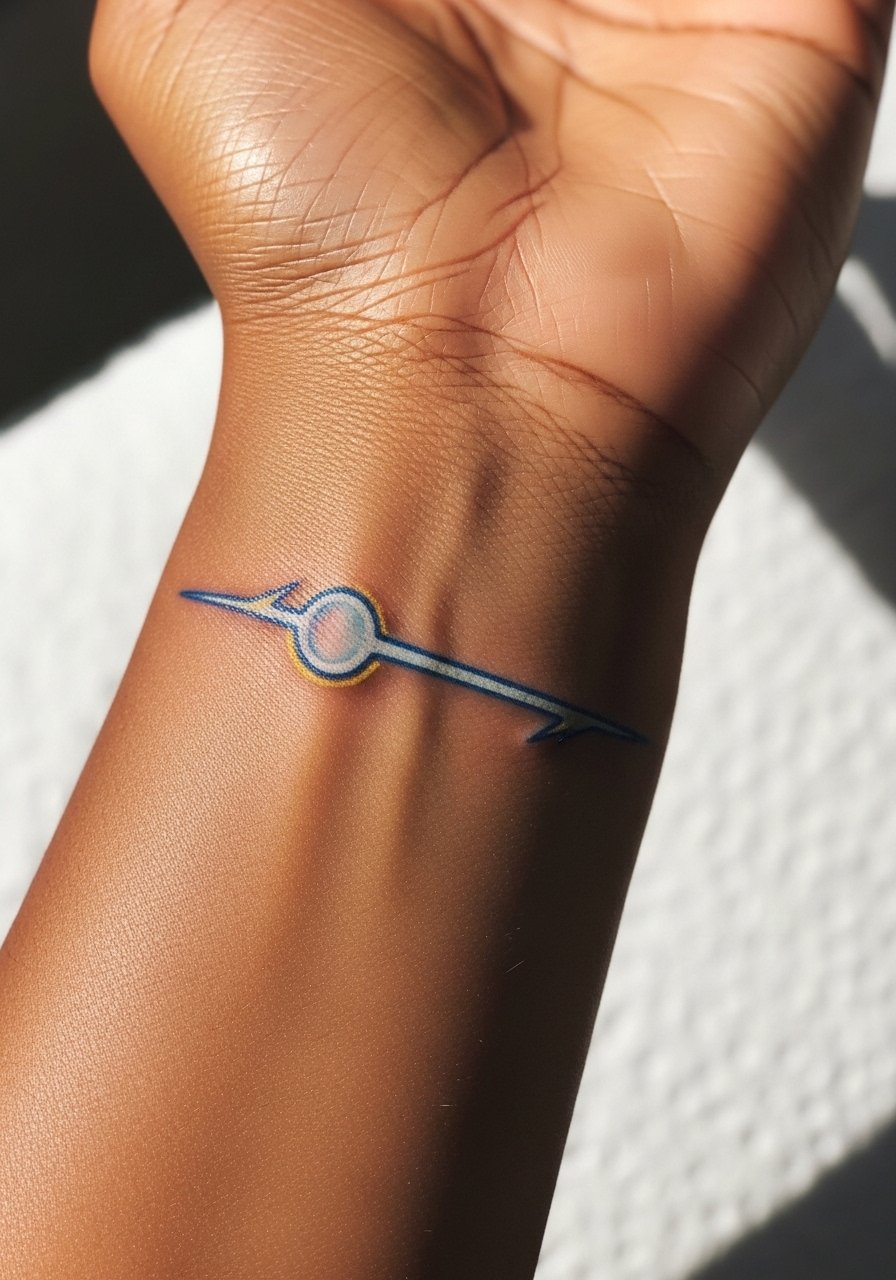
Wrist bands are subtle and wearable, but wrists fade quickly. A thin energy line around the wrist should use bold, continuous strokes rather than tiny dotted tones. The main mistake is pushing tiny internal detail into a band that becomes indistinct after healing. Expect annual touch-ups if you wear watches or bracelets that rub. For wrists pick slightly thicker, cleaner lines and consider placing the seam toward the inner forearm where friction is lower. If you work with a keyboard, expect some extra rubbing from cuffs during healing.
25. Pocket Memorial Panel with Subtle Text on the Inner Arm
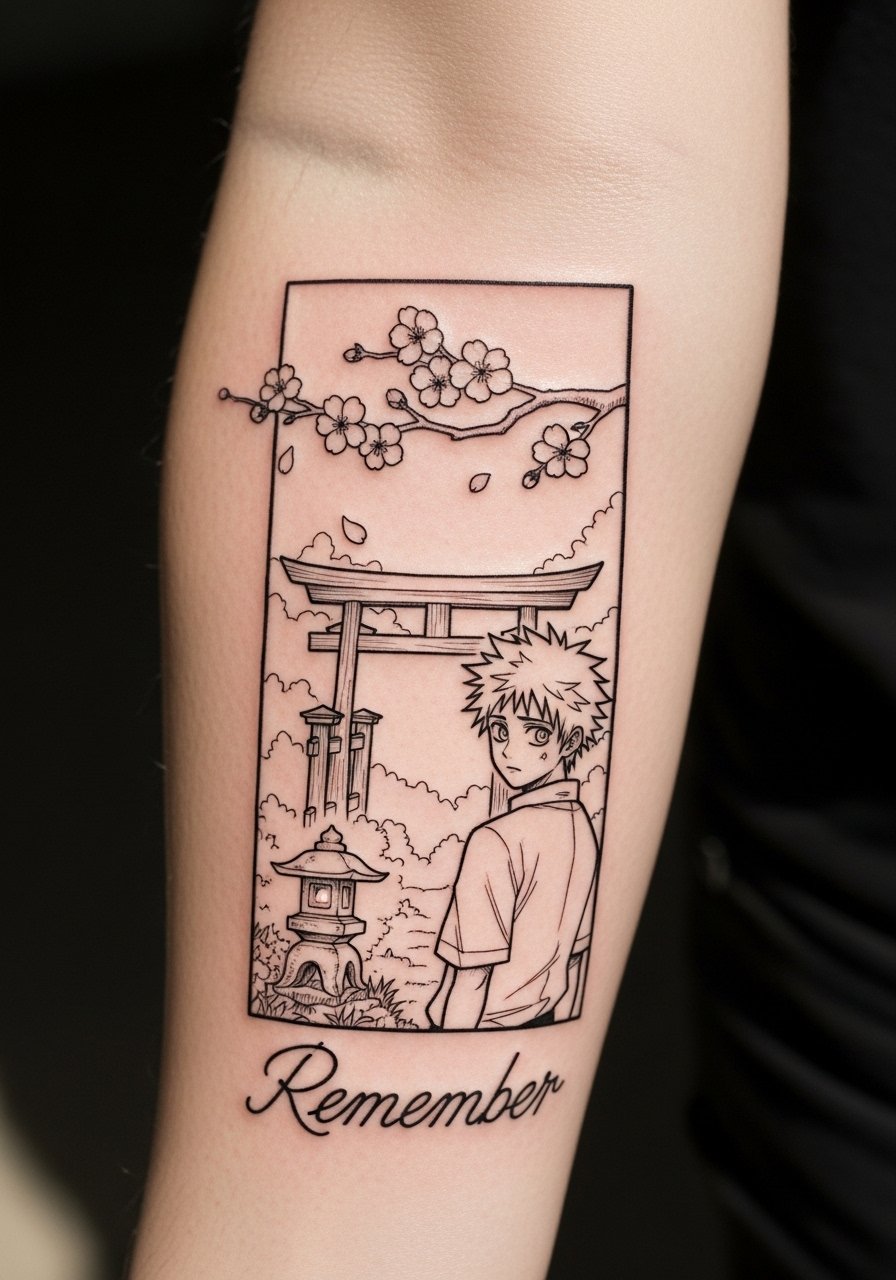
Memorial panels blend emotion and restraint. An inner arm pocket panel around 3 inches is readable and private. When adding text, specify the exact word or date you want so the image prompt and tattoo match. A common mistake is choosing ornate lettering that becomes illegible in a small panel. Ask for clean lowercase script and ask to see healed text examples on similar skin tones. Memorial pieces pair well with subtle blackwork and invite future panel additions without crowding.
Tattoo Prep and Aftercare Essentials
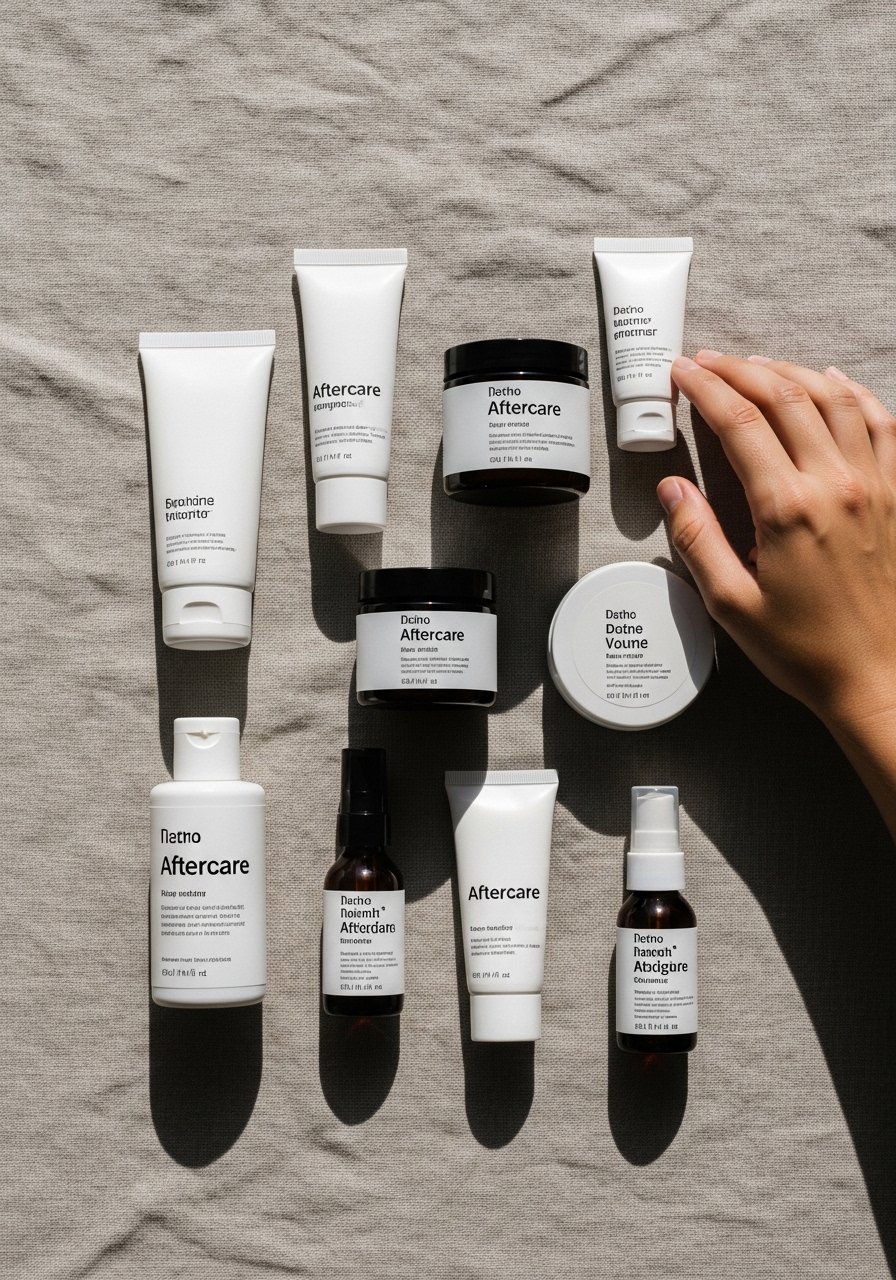
Shopping list (7 to 10 items). Links use Amazon search with affiliate tag.
- Tattluster balm for non-greasy matte finish. Use during days 3 to 14 for blackwork pieces to avoid clogged pores. Apply sparingly to keep saturation without shine.
- H2Ocean saline mist adapted for tattoos. Great for gentle dry healing and for panels that scab lightly. Spray and pat, do not rub.
- InkSafe UV protection spray. Use after full healing for arm placements to slow sun fade. Apply before long sun exposure.
- Holo Kokoro color-retention balm. Indie balm to help anime color accents hold vibrancy on medium tones. Use sparingly on colored accents.
- Lightweight fragrance-free balm. Generic option if a specific indie product is unavailable. Good for nights 4 to 14.
- Medical-grade second skin bandage, 6-inch roll. Useful for the first 24 to 48 hours on areas that rub or when sleeping on the tattoo.
- Fragrance-free gentle foaming cleanser. Clean the tattoo with lukewarm water and a gentle cleanser twice daily for the first week.
- Saniderm single-use barrier dressing search. If you opt for occlusive care, this brand is commonly used. Note that some people prefer dry healing, so ask your artist which they recommend.
Every tattoo is different. Always follow your artist's specific aftercare instructions. Consult a dermatologist if you have skin concerns or unusual healing issues.
Frequently Asked Questions
Q: Will fine line manga panels blur faster than bold blackwork on fingers and hands?
A: From what I have seen, fine line tends to lose crispness faster on hands because of constant movement and thinner skin. Bold blackwork that uses thicker contours and avoids tiny internal hatching will hold longer. Expect touch-ups every one to two years for hand pieces and ask your artist for healed photos of similar hand work.
Q: How should I ask my artist about the Saniderm versus dry healing debate for a forearm manga panel?
A: Name both camps and ask where they stand. One camp prefers Saniderm for active jobs because it protects from sweat and friction. The other camp favors dry healing to avoid over-moisturizing and maceration. Ask the artist what they have seen work best for forearm blackwork and whether they provide post-care instructions for either method.
Q: What placement is best for manga panels if I have darker skin and want color accents?
A: Darker skin tones show black and gray contrast best. If you want color accents, keep them limited and highly saturated. Forearm or calf placements give the artist room to keep strong black outlines and place small, bright accents inside black pockets so they read better. Ask to see healed color photos on similar skin tones before committing.
Q: How do I avoid a pricing surprise for a detailed manga panel during the session?
A: Get a written quote that outlines session time and an explicit clause for additional shading or rework. Ask for a three-shop comparison so you have a local baseline. If an artist says they will add detail mid-session, ask for a pause and a revised quote before they continue.
Q: Can I combine manga panels from different series into a patchwork sleeve and still make it look cohesive?
A: Yes, but cohesion comes from shared line weight, consistent spacing, and linking elements like negative space or waves. Commission one artist to design the transition or ask for a custom layout that adapts panel crops to your arm flow. Patchwork looks best when someone designs the connective tissue, not when panels are simply placed side by side.
Q: If my ribcage panel fades or warps after weight changes, will a touch-up fix the wavy lines?
A: Minor stretching can be corrected with a touch-up to redefine linework. Significant stretching from major weight change may require redesign or resizing by an artist experienced in reconstructive lining. Talk to an artist who has examples of reworked rib pieces before booking.
Q: Are there reliable ways to find artists who specialize in manga panel tattoos without following specific Instagram handles?
A: Use discovery pathways like #MangaPanelTattoo and #BlackworkAnime on Instagram, search Tattoodo filters for illustrative anime, look up city-keyword searches like "manga tattoo [city]" on TikTok, and check r/tattoos and r/tattooadvice for peer recommendations. Convention listings and Booksy can also help you find guest spots and availability.
