
Someone I know spent eight months scrolling portfolios before realizing the real problem was not finding a pretty picture. It was knowing which Japanese sleeve tattoos hold up on their arm shape, skin tone, and lifestyle. I pulled together the designs artists keep recommending right now, with realistic notes on pain, session planning, and how each look ages so you can pick the right direction from the start.
1. Dragon chasing pearl Nagasode sleeve

Someone I know booked this after seeing the dragon read across a shoulder at a convention. Tell your artist you want motion, not a static coil, and show photos of poses that follow the arm contour. Expect long sessions that focus on bold linework and color saturation. Common mistakes include tiny scales and a pearl buried in heavy filler so the layout reads cluttered. On a skinny arm ask for vertical wind bars so the dragon does not warp when flexed. Expect touch-ups around year three to five on high-sun exposure areas.
2. Koi fish half-sleeve (Gobu)
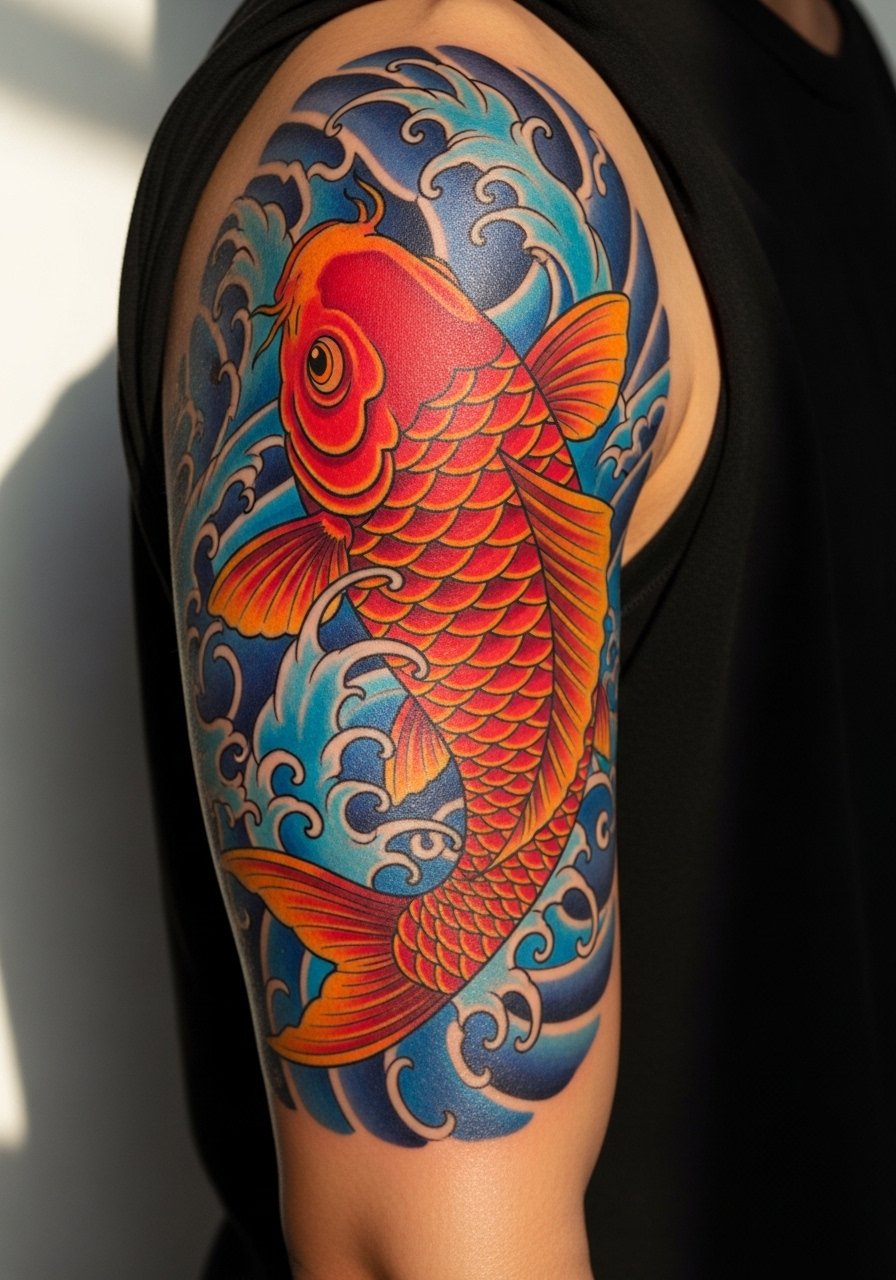
Fair warning, the upper arm takes color well but you will feel deeper packing when the artist builds the scales. For a Gobu, say you want the fish oriented to read the arm's natural rise. A common aging issue is tiny detail in fins that disappears after a year. To avoid that, ask for slightly heavier linework around the fins and bold wave backgrounds to anchor the koi. Plan 5 to 10 hours split into a few sessions. If you want to grow this into a full sleeve later, keep the background motifs consistent.
3. Hannya mask three-quarter sleeve (Shichibu)
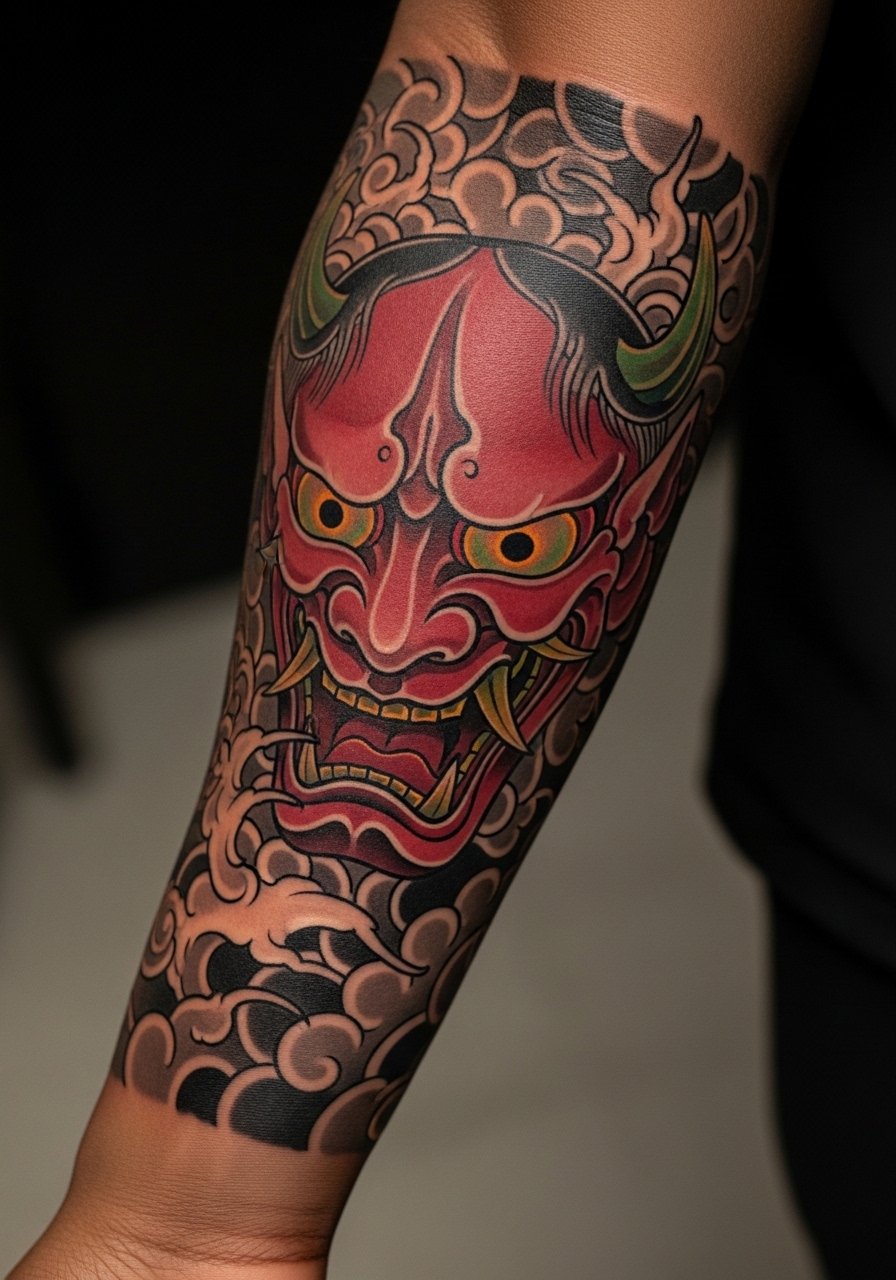
When you sit down for this one bring reference photos that show the exact facial expression you want, not just "a mask." The Hannya carries a strong emotional arc so be explicit about whether you want anger or sorrow emphasized. Elbow placement can be brutal on healing, so expect soreness on flex points during sessions. Artists disagree on how much red to pack into the eyes and mouth. One camp keeps red restrained to age clean, the other insists on saturated red for contrast. Ask their touch-up plan for the first two years.
4. Cherry blossom full sleeve

Most people pick cherry blossoms for a seasonal feel but forget to time the start. If you begin in spring you may prefer the way pinks settle with cooler weather. Tell the artist you want larger petals near the shoulder so details do not blur in five years. A common mistake is too many tiny petals which age into a mottled patch. This design benefits from bold branch linework and medium saturation so the blossoms keep dimension on darker skin tones. Plan multiple short sessions and a mid-life touch-up to refresh highlights.
5. Tiger and peony arm wrap

The forearm is a great place for an arm wrap because motion emphasizes the tiger's posture. Tell your artist you want the tiger face to align with the palm orientation so it looks alive when you move. A mistake I see is making the peony so detailed that it competes with the tiger's face. Keep the flower shapes bold and use wave backgrounds to separate motifs. Pain is moderate on the outer forearm but spikes near the inner wrist. Expect a single full-day session or two medium sessions.
6. Phoenix rising Nagasode

Most clients pick a phoenix when they want a transformation narrative. During consults say you want heat in the shoulder panel and cooler plumage toward the wrist. The biggest mistake is crowding the wings with tiny feathers that lose clarity. This sleeve demands heavy saturation and long sessions to pack color fully. Artists split on whether to use predominantly black outlines or softer whip shading. Both camps work if the artist explains touch-up expectations in years two to five.
7. Oni demon half-sleeve

If you want a bold statement pick the Oni for a concentrated half-sleeve. Tell the artist you want the horns and teeth to read from across a room, not just in a selfie. A common version that ages poorly is one with small, busy facial details. Ask for simplified contrast areas so the mask keeps character over time. Pain is higher on the inner bicep. Plan for a single long session or two back-to-back days depending on saturation goals.
8. Carp koi transformation sequence

This one is a narrative project that benefits from staged sessions. When booking, discuss breaking the sequence into distinct stages that can be added over years. A common mistake is making the carp and dragon too similar in scale size so the transition reads confusing. Ask the artist to sketch scale evolution and waterfall placement during the consult. Expect touch-ups where high contrast meets mid tone, and plan for 10 to 18 hours total depending on how many stages you want.
9. Geisha and lantern full sleeve

A geisha sleeve is a storytelling choice that needs careful fabric rendering. Tell your artist which era of kimono pattern you prefer and whether the lantern is a focal glow. Avoid tiny pattern fills on the fabric because those details often soften within a year. The chest panel extension is common to balance the arm. Pain varies across placement. Expect many fine shading passes and a touch-up to bring back lantern highlights after a year.
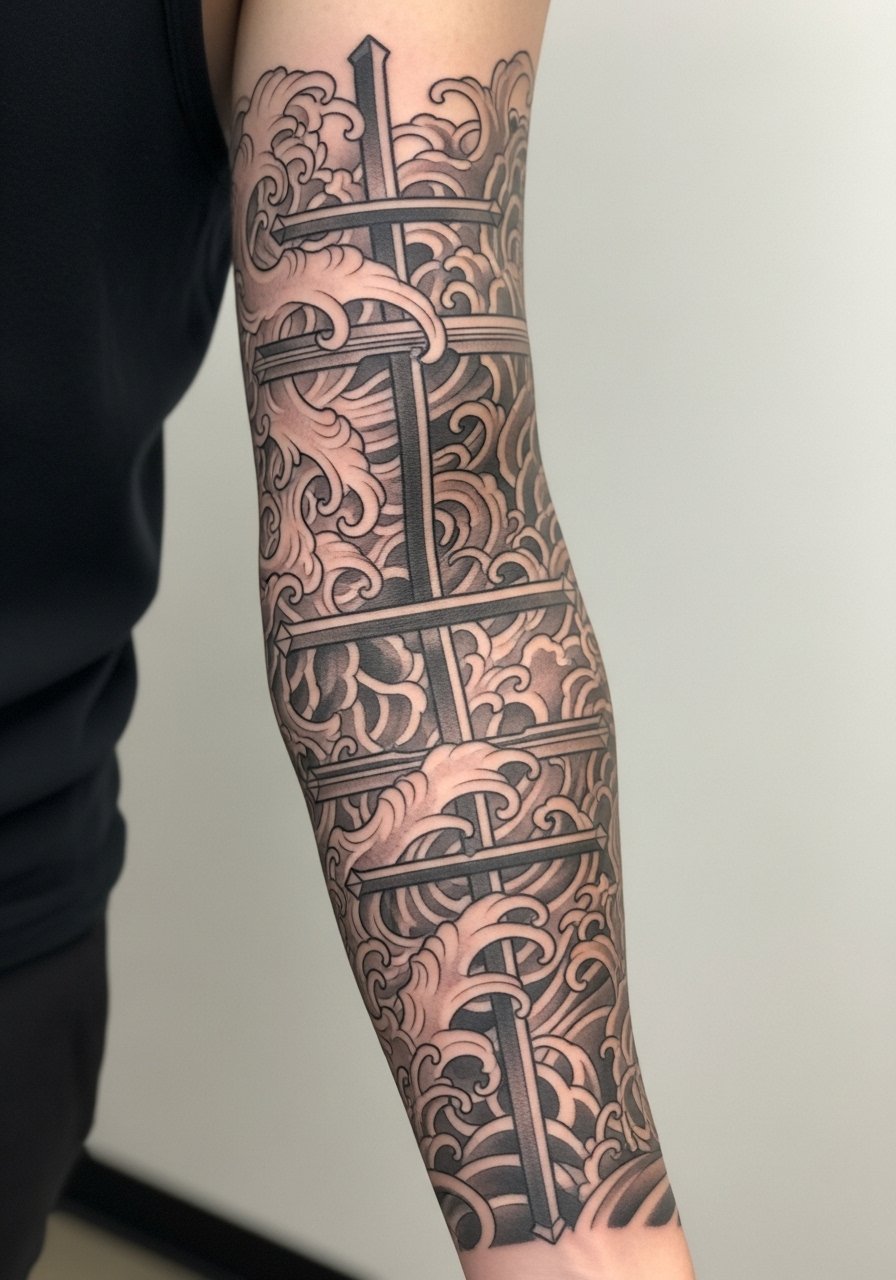
10. Samurai helmet Shichibu sleeve
This reads like armor when laid out correctly. During consults request the helmet sit on the thickest part of your arm so plates look proportionate. The usual mistake is over-detailing small rivets which can blur. Metallic shading needs bold contrast to hold on oily skin. Plan for nine hours or more spread over sessions to build reflective areas. Expect elbow and wrist touch-ups sooner because those zones take more wear.
11. Wave and wind bar cohesion sleeve
Wind bars are not filler. Say you want them to guide motif flow rather than hide gaps. A common error is using wind bars that fight the arm's curve. Tell the artist to sketch bars that run vertically on cylindrical forearms. If your arm is skinny, vertical bars prevent distortion when flexed. This design ages well because backgrounds take less sun exposure than exposed motifs, but they need consistent spacing to avoid muddiness over time.
12. Minimal fine-line koi band

Fine-line koi reads delicate on the forearm but it tests needle depth judgment. Artists split on fine line for sleeves. One camp says it blurs faster on high-motion areas. The other camp argues it can last with slightly heavier individual strokes. Tell your artist you prefer a little reserve in line fineness if you want longevity. Expect shorter sessions but more careful touch-ups in the first three years.
13. Peony and chrysanthemum floral column

If your goal is a floral sleeve that still reads bold, request larger petal planes and negative space between blooms. A common aging issue is over-texturing inside petals which becomes visual noise. Say you want stipple shading rather than tiny hatch lines for softer aging. Forearm placement tends to keep saturation, while the inner arm may need touch-ups sooner. This setup works well if you plan to add a central figure later.
14. Sumi ink wash sleeve
Sumi-inspired sleeves look like brushwork and demand controlled saturation. Tell the artist you want visible brush edges rather than tiny stippling. The mistake I see is trying to render every wash with micro detail which fades into a muddy patch. Plan for shading sessions focused on contrast and expect touch-ups where the skin creases most. This style can age gracefully if left a bit raw and bold rather than ultra-fine.
15. Moon, maple leaf, and autumn sleeve

Seasonal motifs can be timed for healing advantage. If you choose autumnal inks, consider starting in cooler months to limit sun exposure while pigments settle. Tell the artist which elements should remain crisp and which are allowed to soften. The common error is over-detailing leaves. Larger shapes with subtle veining last better. Expect moderate session times and a planned refresher after two to four years depending on outdoor exposure.
16. Yokai collage half-sleeve

A collage of yokai benefits from a clear hierarchy. In consultations, point to which creature should be the visual anchor and which are background characters. The frequent mistake is equal visual weight for too many figures so the eye has nowhere to rest. Use wind bars and wave fillers to separate elements. Touch-ups are common where bright colors meet dark outlines. If you plan to expand, keep consistent background language.
17. Kamon family crest sleeve band

Family crests can be precise and graphic. Make sure you verify the exact crest shape and its cultural meaning. The mistake to avoid is scaling the crest too small which blurs after a year. Ask for bold outline and slightly larger proportions to preserve geometry. This is a great choice for someone who wants a long-term, graphic statement. Expect a single focused session and minimal touch-ups if placed on the outer arm.
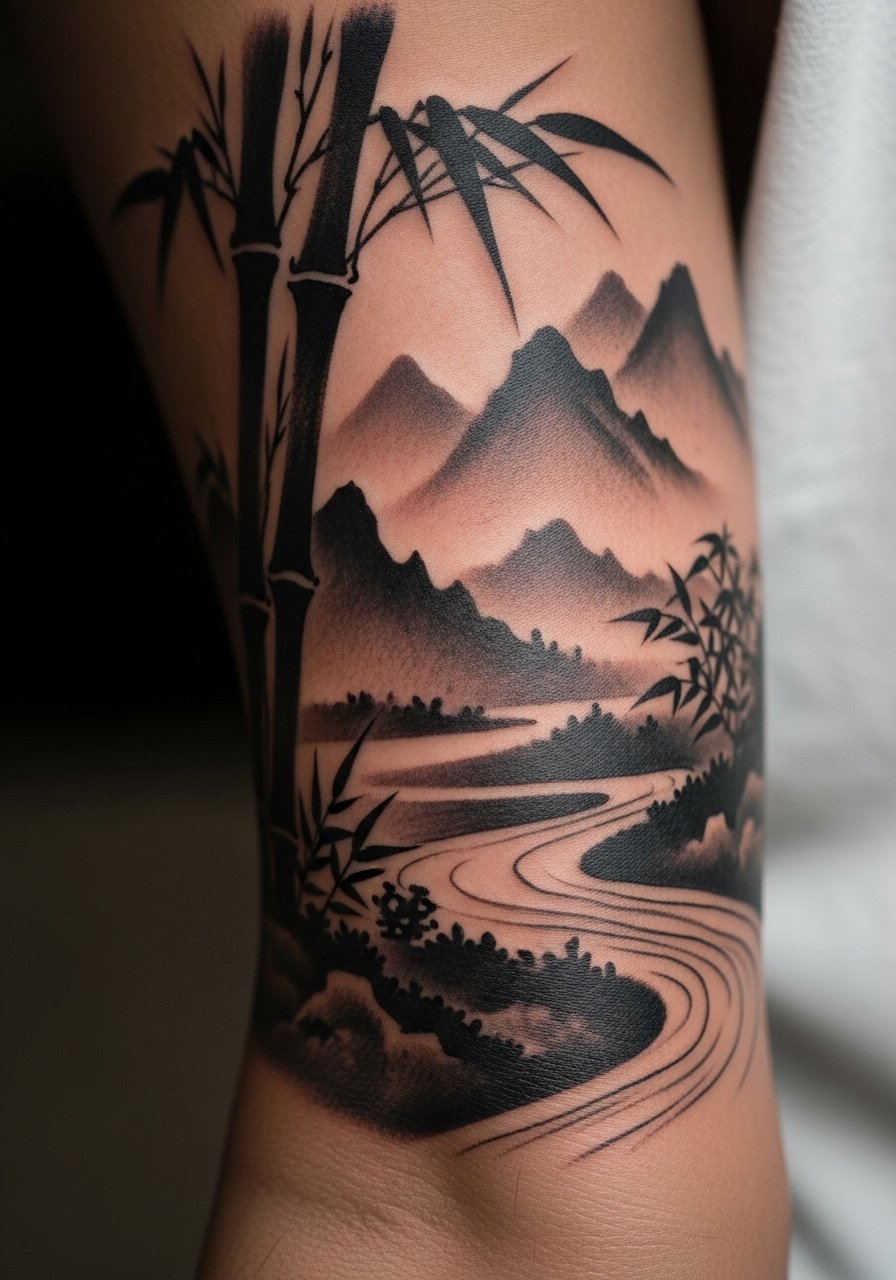
18. Bamboo and crane arm wrap

Bamboo lines need to align with the arm's vertical axis. Tell your artist you want negative space between stalks so the design breathes. A common mistake is packing thin bamboo details into small areas which disappears. Crane feathers are best rendered with simplified strokes rather than tiny hatch marks. This sleeve tends to age well when left slightly bold. Plan a couple of medium sessions and expect minimal touch-up work.
19. Blackwork dragon in negative space

Blackwork approaches can read modern and hold color longevity. During consults ask how much negative space they plan to use because too much fill can make the arm feel heavy. Mistakes include overfilling so a dragon silhouette becomes a block. Tell the artist you want deliberate voids to let muscles breathe visually. Expect longer packing sessions if you want solid black areas and touch-ups focused on edges during the first two years.
20. Stipple shading shrine panel

Stipple shading is time-consuming but rewards with texture. Tell the artist you want density maps so darker and lighter zones are predictable. A mistake is using stipple too tightly across the whole piece which can flatten after healing. Use stipple for shadowed areas and pair with bold linework for focal elements. Sessions are often long because stippling is slow work. Expect a touch-up timeline of two to three years for small contrast refreshes.
21. Minimal lantern and ink wash cuff

Wrist cuff pieces have high wear so be mindful of placement over tendons. Ask for a buffer zone so the lantern's bottom does not sit on a crease. Small, tightly detailed lanterns often blur. The smarter move is larger graphic shapes and softer washes. Pain is noticeable over the wrist bones. Touch-ups are common in the first year because of daily friction from clothing and watches.
22. Mixed neo-irezumi patchwork sleeve

If you want to mix styles, request a unifying background like wind bars or wave fills to prevent a pasted-on look. A common mistake is leaving each motif isolated without shared backgrounds. For add-on plans, bring photos and keep a consistent palette so later sessions do not read like separate tattoos. Plan your sessions to leave connecting space and expect mid-term touch-ups where the styles meet.
23. Dot work chrysanthemum forearm panel

Dot work needs rhythm and spacing that the artist must plan ahead. Tell them you want the densest dots near the center and softer edges to age organically. A mistake is inconsistent dot density which creates patchy heals. Forearm placement helps with visibility but also increases sun exposure. Schedule a refresher if you spend a lot of time outside.
24. Small-scale Nagasode shoulder anchor

If you are trying a full sleeve eventually, start with an anchor on the shoulder so you can grow outward. Tell the artist you want the wind bars planned for future expansion. A typical error is choosing an anchor too detailed for later blending. Keep the anchor bold and schematic so adjoining sessions can tie in. Shoulder placement heals well and is forgiving for touch-ups during the first few years.
25. Maple and moon patchwork for dark skin tones

I include this because darker skin tones need specific color strategies. Mention during consult that you want color choices and contrast that pop on melanin-rich skin, for example teal undertones with bold outlines. A frequent mistake is using pastel fills that vanish. Ask for saturated midtones and confident outlines. Touch-ups for contrast refresh are often needed earlier, especially on sun-exposed areas.
Tattoo Prep and Aftercare Essentials

When starting a sleeve schedule sessions with enough healing time between each sit. Plan 4 to 6 weeks between intense sessions so swelling and scabbing resolve. Artists and shops differ on taping and wrap use. Some prefer medical occlusive wraps for the first few days to limit scabbing, while others recommend dry, breathable healing. Name both camps during your consult and ask which method the artist has tracked results with. For summer starts consider scheduling heavier color packing in cooler months to reduce fading risk during initial healing.
Fragrance-free gentle foaming cleanser for healed and fresh tattoos. Use during the first two weeks after removing bandages to keep the area clean without stripping oils. Gentle foam helps remove residue without friction.
Lightweight fragrance-free balm for daily moisturizing. Apply thin layers after the first few days to keep saturation and prevent cracking. Choose a non-comedogenic formula if you have oily skin.
Medical-grade second skin bandage, 6-inch roll. Useful for the initial 24 to 48 hours on large packed areas to limit dirt exposure and reduce heavy scabbing. Replace per your artist's guidance.
Unscented silicone-based scar and pigment maintenance gel. Use months after healing to smooth raised areas and protect color. Silicone gels can help maintain a flat surface which helps saturation appear even.
UV protective arm sleeve for outdoor time. Wear this during long sun exposure to protect pigment while it ages. It is an easy way to prevent early fading.
Fragrance-free moisturizing lotion for long-term upkeep. Keep your sleeve hydrated long term to preserve saturation and skin health. Apply daily after showers.
Aquaphor Healing Ointment, small tube. Use sparingly in the earliest phase if your artist recommends an occlusive. This is the one mainstream product I include.
Reusable cold pack and comfort wrap for long sessions. Helpful between passes on sensitive areas to reduce swelling and extend comfort during multi-hour sits.
Every tattoo is different. Always follow your artist's specific aftercare instructions. Consult a dermatologist if you have skin concerns or unusual healing issues.
Frequently Asked Questions
Q: Will fine-line elements blur into bolder elements if I do a mixed neo-irezumi sleeve?
A: It depends on spacing and where you place each element. From what I've seen, mixing fine line with bold pieces works if you deliberately separate them with wind bars or negative space. Tell your artist which areas are allowed to age softer and which need crisp contrast so they can plan touch-ups accordingly.
Q: How do I decide between Saniderm-style occlusive wrapping versus dry healing for a full color sleeve?
A: Artists split into two camps. One camp prefers occlusive wraps for the first few days to reduce scabbing and retain saturation. The other camp favors dry, breathable healing for large areas to avoid trapped moisture. Ask your shop which method they track best on sleeves and follow that course for consistency.
Q: If I start with a half-sleeve Gobu koi, how do I plan future expansion so it does not look patched on?
A: Keep the same background language and palette. Plan wind bars or wave fills as connective tissue and leave deliberate space for future motifs. Bring consistent reference photos to later consults so the artist can match lineweight and saturation.
Q: Do certain placements need earlier touch-ups than others on a Japanese sleeve?
A: Yes. High-motion zones like the wrist, inner elbow, and areas exposed to the sun tend to need touch-ups sooner. Expect to budget for a touch-up at year one in these zones and another refresh around year three to five for bright colors.
Q: How should I find an artist who specializes in irezumi-style sleeves without relying on social handles?
A: Use style-specific hashtags, search location tags like "Los Angeles irezumi," browse Tattoodo filters, and check convention guest lists. Portfolio reviews in person are vital. Ask to see healed photos and inquire about previous full-sleeve timelines.
Q: Are there color strategies that work better on melanin-rich skin for Japanese motifs?
A: Yes. From what I've gathered, saturated midtones like teal and deeper warms pair well with bold outlines to maintain contrast. Avoid relying on pastel highlights. Discuss specific pigment choices with an artist who has documented healed work on similar skin tones.
Q: What's a reasonable session plan for a full Nagasode that balances healing and momentum?
A: Many people break a full Nagasode into 10 to 20 hours across multiple sessions, often six to ten longer sessions. Plan at least four to six weeks between heavy sessions so swelling and scabbing fully resolve. Expect to schedule a touch-up timeline into your first two years.
