
Tribal tattoos keep gaining attention because they carry cultural history, bold style, and personal meaning in one place. People search for designs that feel powerful, symbolic, and wearable in modern life. This guide brings together cultural inspiration from Polynesian patterns, Maori heritage, Samoan tools, Native American shapes, Celtic knotwork, African motifs, and more. Each idea is practical, easy to adapt, and friendly for beginners thinking about placement, flow, and personal storytelling.
1. Polynesian Shark-Tooth Strength
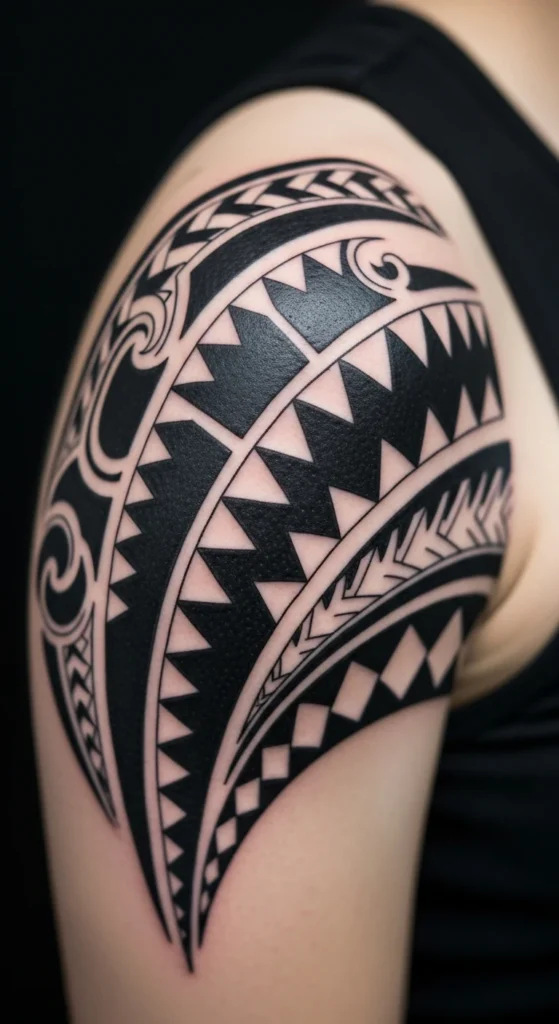
Shark teeth appear in many Polynesian traditions. They stand for strength and protection. The shapes repeat in neat rows, so the design flows well on shoulders and forearms. If you’re planning something small, start with a short band. It’s simple to map out with a black marker before committing. You can also print a shark-tooth stencil and hold it against your arm to see how the spacing feels. This is cheap, quick, and helps you avoid awkward gaps. Many artists like these patterns because they’re clean and easy to shape around curves. If you want a fuller look later, you can add waves or triangles beside the original band. Building the design step-by-step keeps the cost low and lets you learn what fits your body. Keep the lines bold. Thin lines fade faster. Ask the artist about thicker ink passes if you want a long-lasting finish. This is a great starter idea for anyone who wants cultural depth without a massive project.
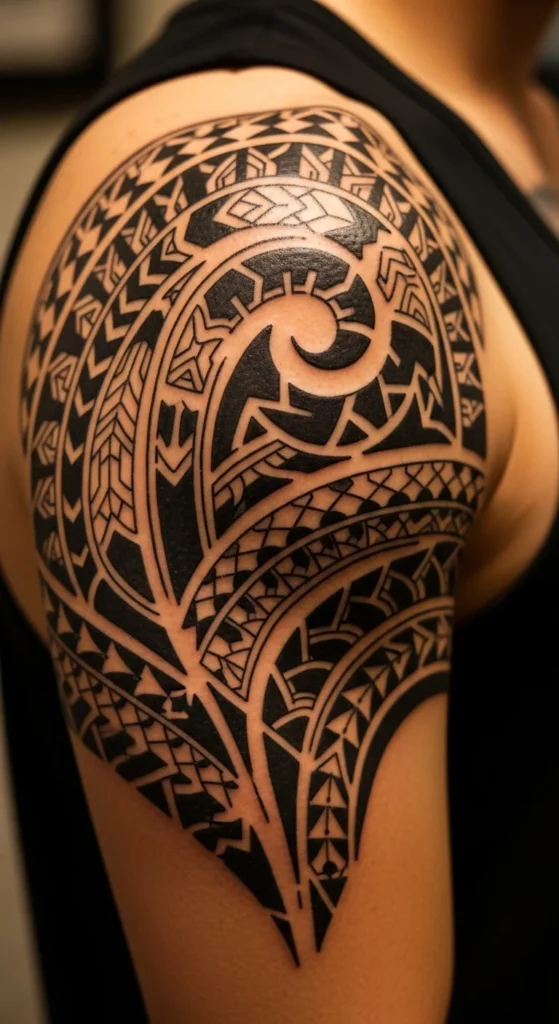
2. Maori-Inspired Spiral Flow (Non-Face Areas Only)
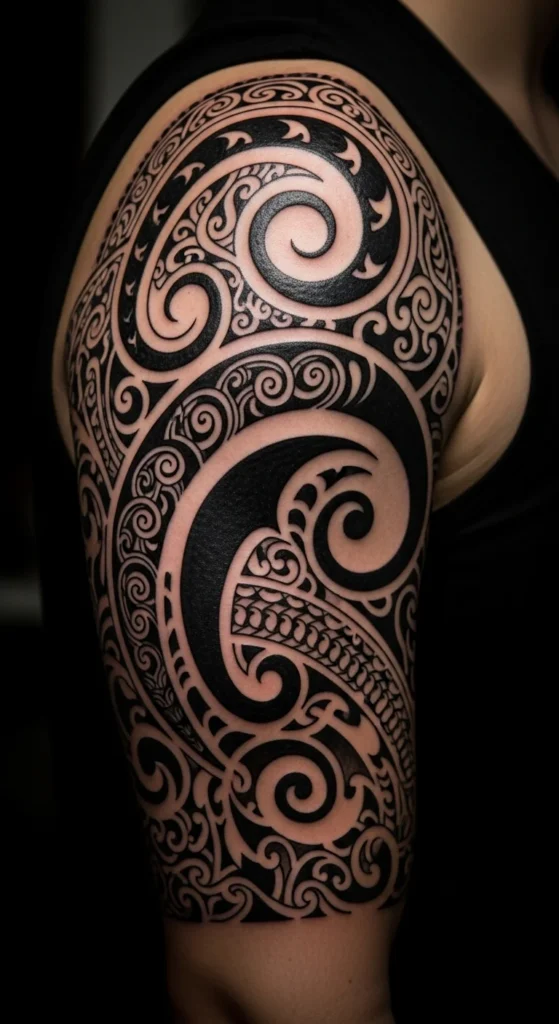
Maori tattoo culture carries a lot of meaning, especially when placed on the face. That area is sacred and not for non-Maori. But many people appreciate the flowing curves for arms or legs. Stick to non-sacred placements out of respect. Start with a simple spiral. Sketch it on paper a few times to see which direction feels natural. Use thick outlines with small filled shapes inside. This keeps the flow clear and readable from a distance. If you want a gentle way to preview the tattoo, cut shapes from black craft paper and tape them onto your arm. It costs almost nothing and helps you see how large or small the curves should be. Choose a placement that naturally bends, like biceps or calves. That makes the pattern look alive when you move. If you want a softer vibe, add negative space. White gaps create breathing room without extra detail. Keep the design practical so you won’t overspend on multi-session work.
3. Samoan Pattern Blocks for Arms
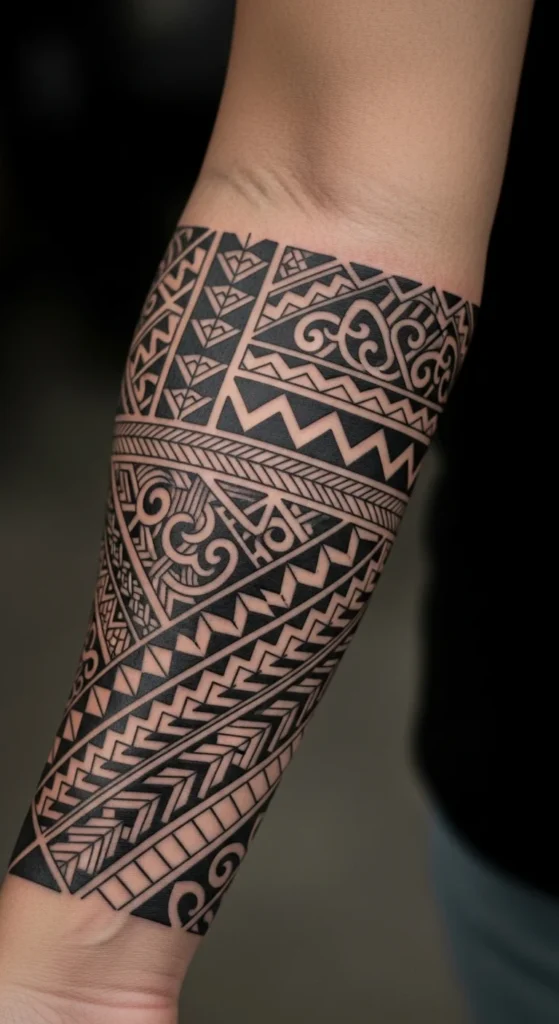
Samoan tattoos often include strong blocks of triangles and lines arranged in grids. They look great on arms because the natural cylinder shape helps the blocks wrap neatly. Start with one or two rows. That’s a budget-friendly move, and you can expand later into a half-piece or full sleeve. A simple trick: draw one row on your arm with black eyeliner to test thickness. It washes off easily and helps you plan spacing. Keep the shapes consistent so the pattern feels steady. Wide bands take longer to finish, so if you want a lower-cost tattoo, go for narrow rows. A small section on the forearm is an easy starting point. If you want deeper cultural alignment, search for traditional Samoan meanings behind each shape and pick the ones that match your personal story. Aim for clean edges and bold contrast. These patterns don’t rely on shading, which saves time and keeps the price manageable.
4. Marquesan Shoulder Badge
Marquesan tattoo symbols often form rounded “badge” shapes that fit perfectly on the shoulder. This makes them beginner-friendly. The circle-like design covers the shoulder cap and looks balanced from every angle. To plan it cheaply, use a traced circle from a bowl or lid and sketch inside it. Add shapes like triangles, curved peaks, or stacked lines. Keep the center simple. Let the outer ring carry the detail. This makes the piece easier to size and reduces session time. If you want to expand the tattoo in the future, add bands moving outward from the shoulder onto the bicep or chest. This gives the design a natural pathway. Use thick outlines because they hold up well as the skin stretches. If you’re unsure about the exact symbols, browse cultural symbols carefully and pick ones with meanings that relate to your story. This keeps the tattoo personal, not random.
5. Tribal Turtle With Protective Shell Motifs
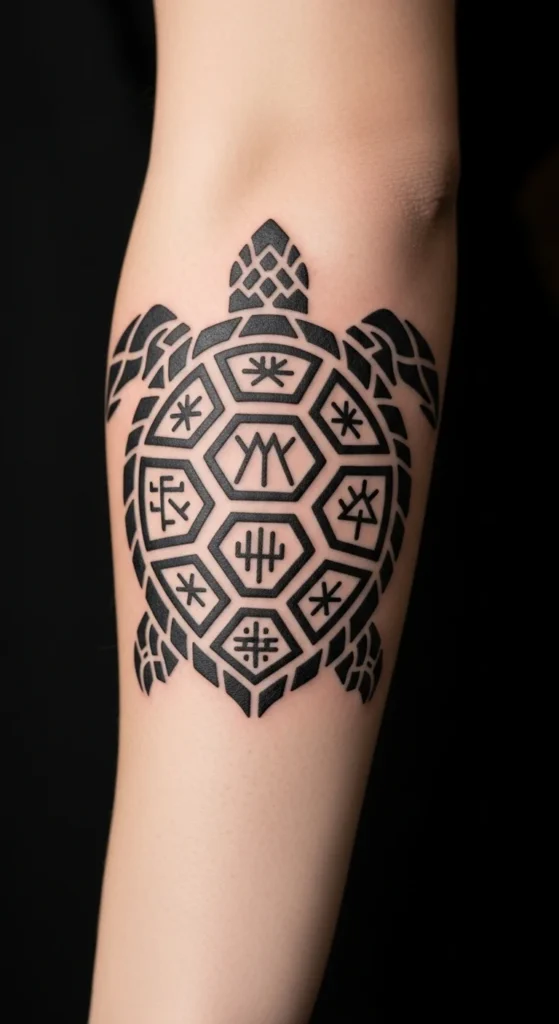
Turtles appear in many Polynesian designs as symbols of safety and long life. The shell offers a natural layout for tribal shapes. Start with the outline of a simple turtle. Inside the shell, add small triangles, waves, or straight-line patterns. Keep the outside plain. That contrast makes the inside pop. If you want to save money, ask the artist to focus on the shell only for now. You can add limbs or background shapes later. To explore design ideas at home, draw the turtle on transparent sheets and layer different patterns underneath. This low-cost trick helps you see which symbols feel right. The shape works well on the calf or forearm. Both areas give enough space for clear details. Choose bold lines for the shell so it stays clear over time. This idea fits people who want cultural references without going into large, intense patterns.
6. Tribal Sun With Radiating Points
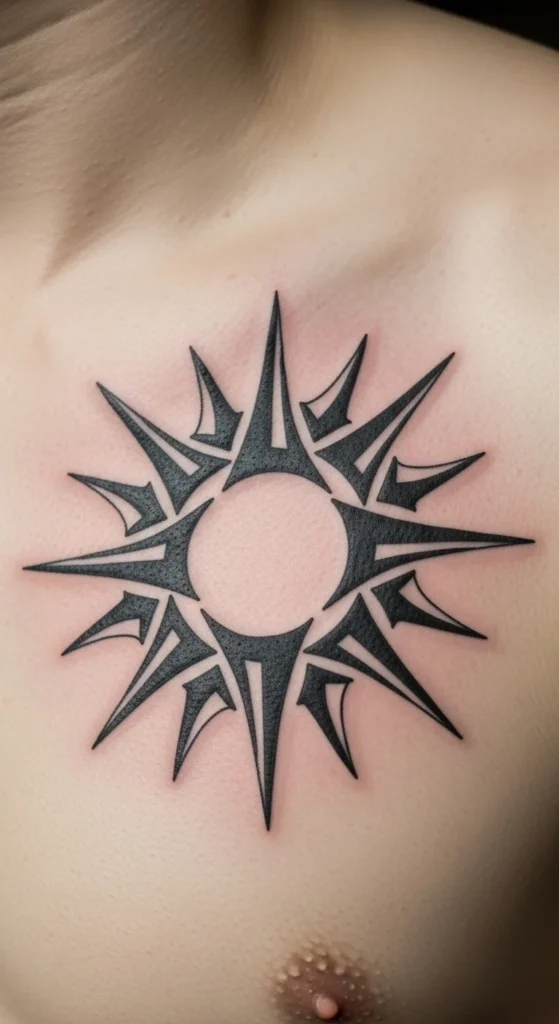
Tribal sun shapes show up in Polynesian, African, and Mesoamerican designs. They often stand for clarity, life, and direction. The round center gives artists a stable base, and the rays add energy. This is a good idea for anyone who wants a small-to-medium piece. To plan the shape at home, place a coin on paper as the center and sketch evenly spaced rays outward. Keep the rays thick so they don’t fade too thin. If you want a softer look, mix straight edges with curved edges. Place it on the chest or upper back. Both spots make the circle sit naturally. If you’re staying on a budget, go for fewer rays. It still looks strong. Many people start with a sun because it can be expanded later into a larger tribal project.
7. Forearm Tribal Band With Wave Motion
Wave patterns appear often in Polynesian tattoo work. They show life change and constant motion. A forearm band is a popular choice because it’s clean, simple, and easy to size. Wrap a strip of paper around your arm to test width. Adjust until it feels right. Sketch waves across it. Don’t overpack the shapes. Space makes the waves readable. A band like this is friendly on the wallet because it doesn’t require shading or multiple sessions. For a practical preview, cut wave shapes from black craft sheets and tape them in place. Check how it looks from different angles. If you want more detail later, add one or two small symbols above or below the band. That’s an inexpensive way to grow the tattoo over time.
8. Celtic Knot and Tribal Line Fusion
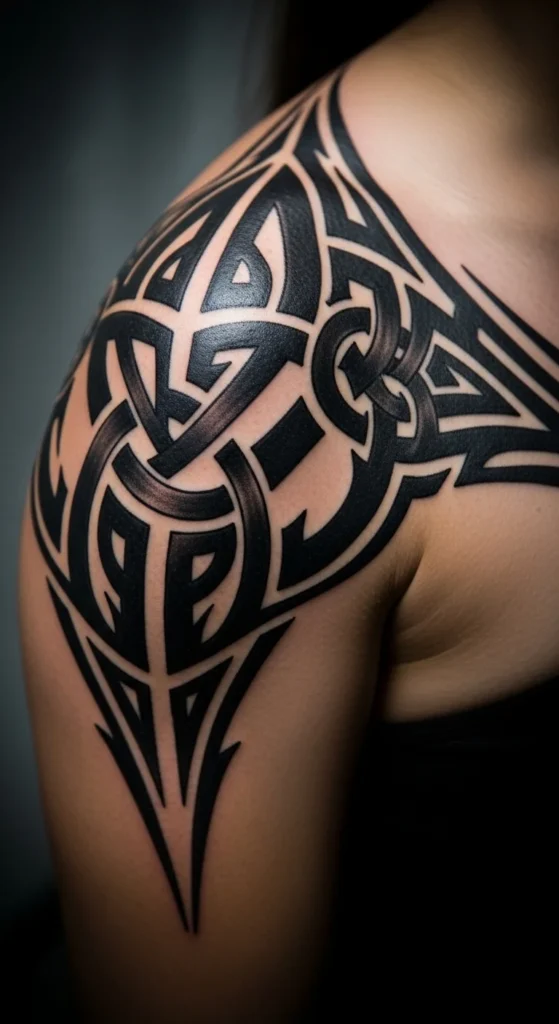
Some people want a mix of ancestral European designs and bold tribal lines. Celtic knots pair well with thick black shapes. Keep the knot simple—one loop or two. Too many crossings get muddy on skin. The idea works well on shoulders and upper chests. Start by sketching a basic knot. Then frame it with tribal curves. You can test the layout with a phone flashlight and stencil paper to see how shadows change the look. Keep lines thick so each part stands out. If you’re on a low budget, ask for the knot only during the first session. Add outer shapes later when you’re ready. Make sure each part has space so the knot doesn’t merge into the tribal frame over time.
9. Mesoamerican Warrior Symbols
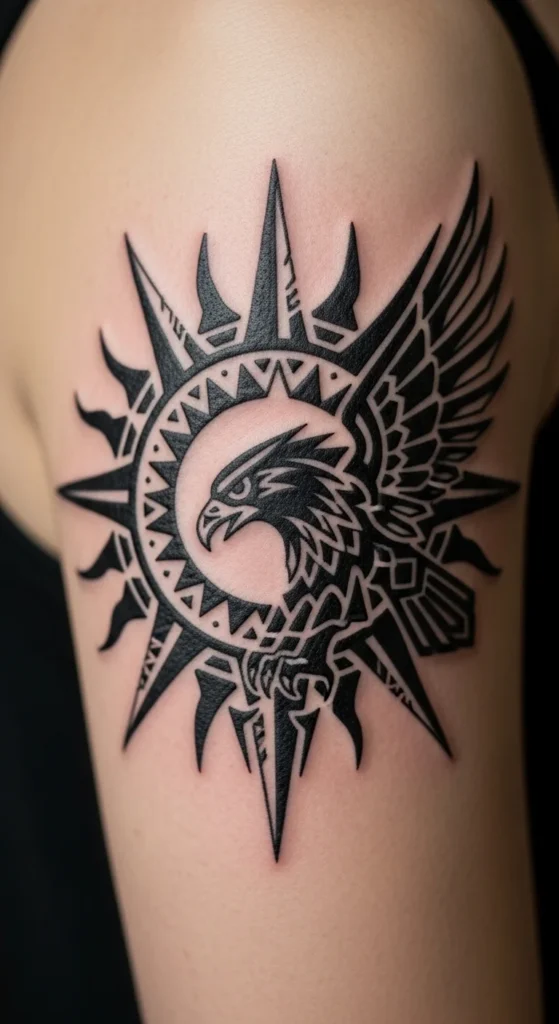
Mesoamerican symbols like suns, eagles, and calendar fragments bring a bold energy to tribal designs. They work well inside circles, squares, or half-sleeves. Many people like eagle heads because they’re easy to stylize with sharp edges. If you want a budget plan, start with an eagle facing sideways. Add small lines or triangles behind it for depth. Use thick shapes, not tiny details, because tiny details fade faster. You can preview an eagle by cutting a silhouette from black cardstock and placing it on your arm. That helps with tilt and direction. This theme also pairs nicely with forearm or chest placements. Keep shading minimal to keep the cost down.
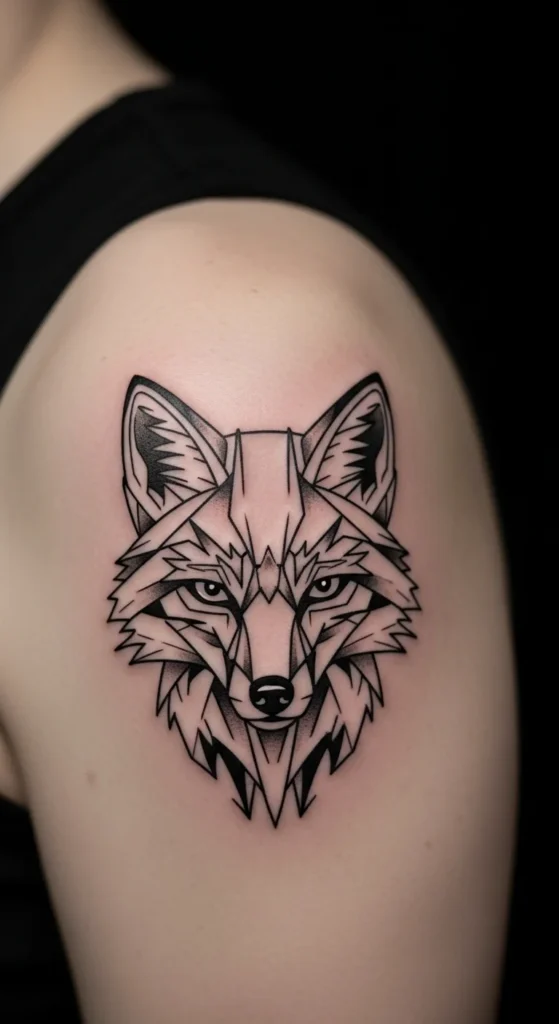
10. Tribal Wolf Mask
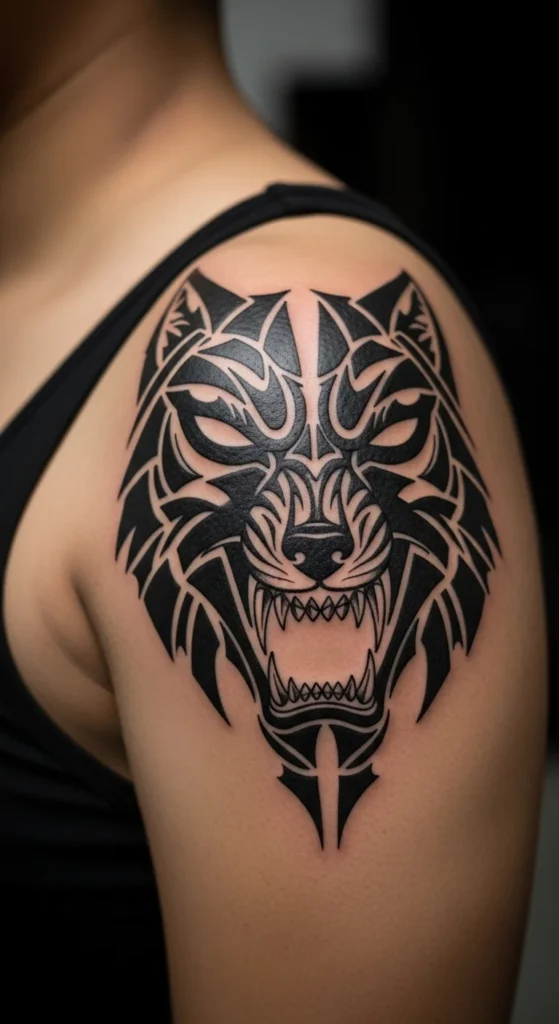
A tribal wolf mask blends animal energy with bold patterning. Keep the face simple. Focus on eyes, snout, and ears. Fill the rest with geometric shapes. This style works on shoulders, thighs, or upper back. If you want to test mask shapes at home, fold paper in half and cut a symmetrical shape. Open it to reveal a balanced mask. This trick costs almost nothing and gives you a quick layout. Ask the artist to keep the outline thick for long-term clarity. If you’re aiming for a low-cost session, skip shading. Plain black shapes age well and don’t require touch-ups as often.
11. Tribal Snake With Curved Body Flow
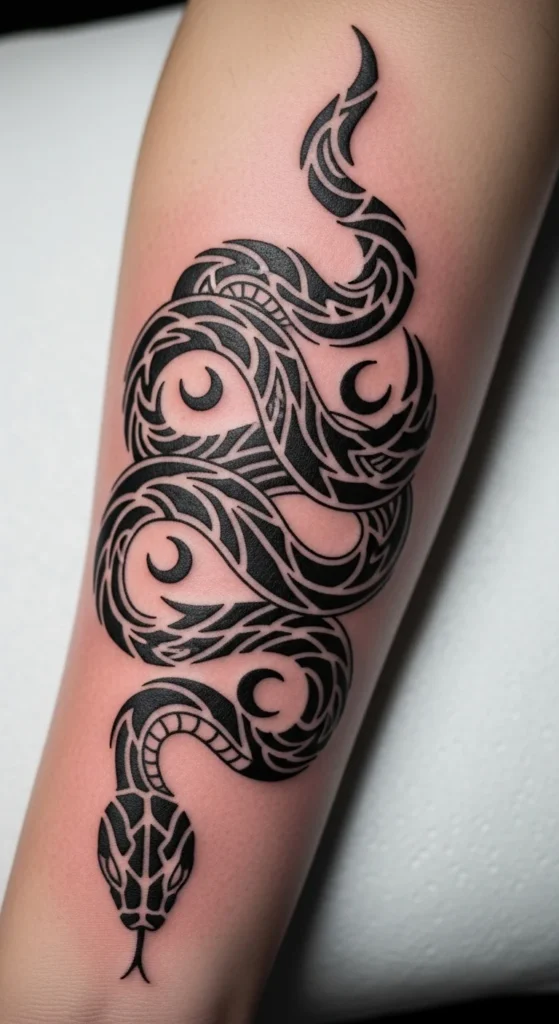
A snake naturally forms a long curved shape, which pairs well with tribal lines. Wrap it around the forearm or calf for a smooth flow. Start with the outline of the snake. Break the body into small panels of triangles or waves. If you want a smart planning trick, print a simple snake outline and cut it into strips. Place the strips around your arm to check the curve. This keeps the design controlled and low cost. Keep the head clear of details so the pattern doesn’t get lost. If you want gradual upgrades later, add background lines or dots behind the snake.
12. Filipino Batok-Inspired Chest Band
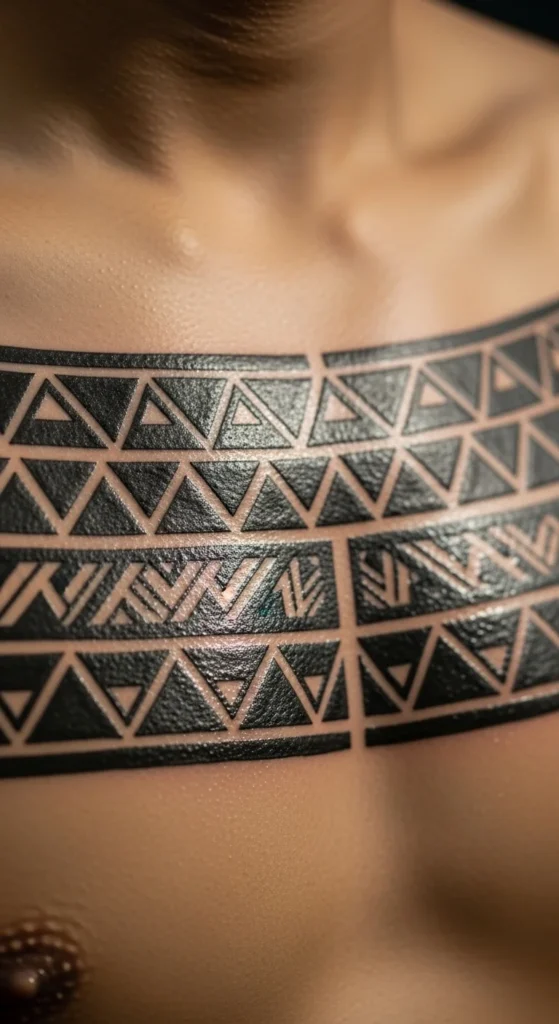
Filipino Batok designs often use thick blocks and step-like patterns. A chest band works well for these shapes. Start with one horizontal row. This keeps the session short and wallet-friendly. If you want to test ideas, draw a straight line across your chest with a washable marker, then tape small triangle pieces along it. Move them until they look natural. Pick a width that matches your comfort. Chest skin can be sensitive, so simple patterns reduce session time. If you want future expansion, add a second row below the first. Keep the shapes bold. Thin lines fade and require extra work.
13. African Tribal Face Shapes (Non-Facial Placement)
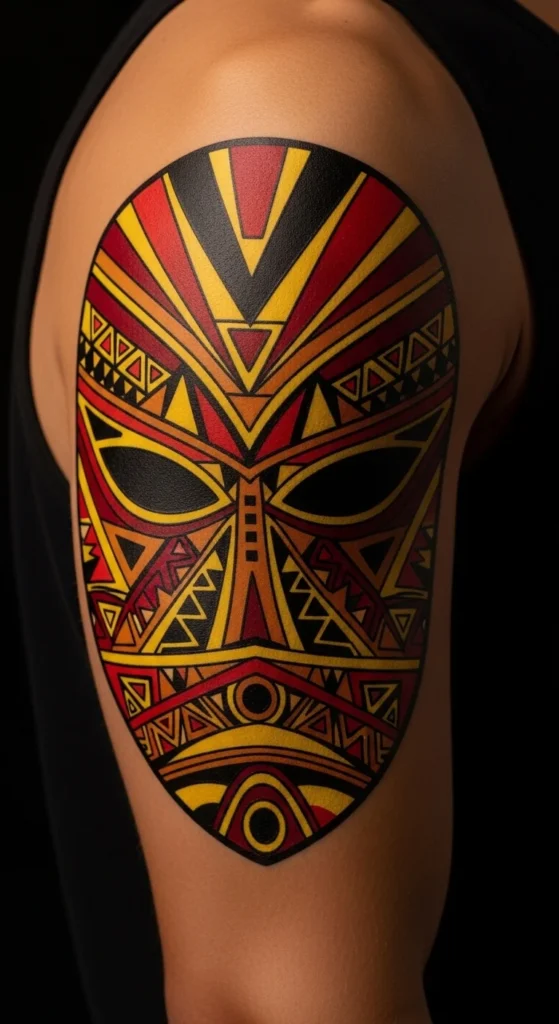
African mask forms carry cultural depth and shaped patterns. To avoid cultural distancing issues, keep these designs on arms, backs, or legs—not the face. Start with a mask-like outline. Fill it with triangles, rectangles, and bold arcs. If you want a simple test, draw half the mask on paper, fold, and trace it to make symmetry. This concept works nicely for shoulder or thigh areas. Keep the shape strong with thick lines. Avoid too many tiny details. If you want to stretch the design later, add lines around the mask to form a halo-like frame.
14. Native American Feather and Arrow Pattern
Feathers and arrows appear in many Native American traditions. To keep the design respectful, lean toward geometric interpretations rather than copying specific tribe symbols. Draw a feather using straight edges instead of realistic curves. Add a small arrow shape under or above it. This style fits the forearm or calf well. To preview cheaply, cut a feather shape from black paper and tape it on your arm. Adjust size until it feels right. Keep the ink thick and avoid tiny shading lines. A minimal, bold layout reduces cost and keeps the shape readable over time.
15. Tribal Bear Paw for Grounded Energy
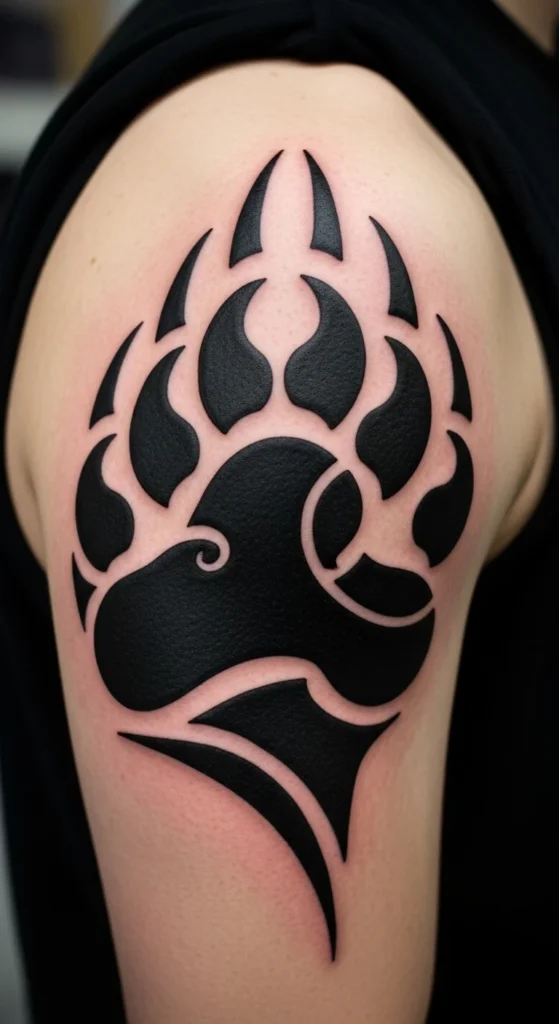
A bear paw has simple shapes that adapt well to tribal linework. Start with the outer paw shape. Add thick curves for the toes. Inside the paw, add small block shapes or triangles. The design works well for the shoulder or outer thigh. You can test the spacing by drawing the paw on sticker paper and placing it on your skin. A simple layout reduces session time, keeping costs low. If you want extra meaning, add small dots or short lines inside each toe. These small touches help personalize the piece without extra spending.
16. Tribal Lizard With Crawling Motion
Lizards show up in many Pacific and Caribbean tribal traditions. The long body and tail let you form fun shape patterns. For a low-cost planning method, print a lizard outline and cut out the body and limbs. Move them around your arm until the angle feels right. Fill the lizard with triangles, spirals, or simple block patterns. Keep the outer outline thick. This makes the shape pop against the skin. The idea works on the forearm, ribs, or calf. If you want to expand, add shadow-like lines behind the lizard later.
17. Tribal Hawk Head
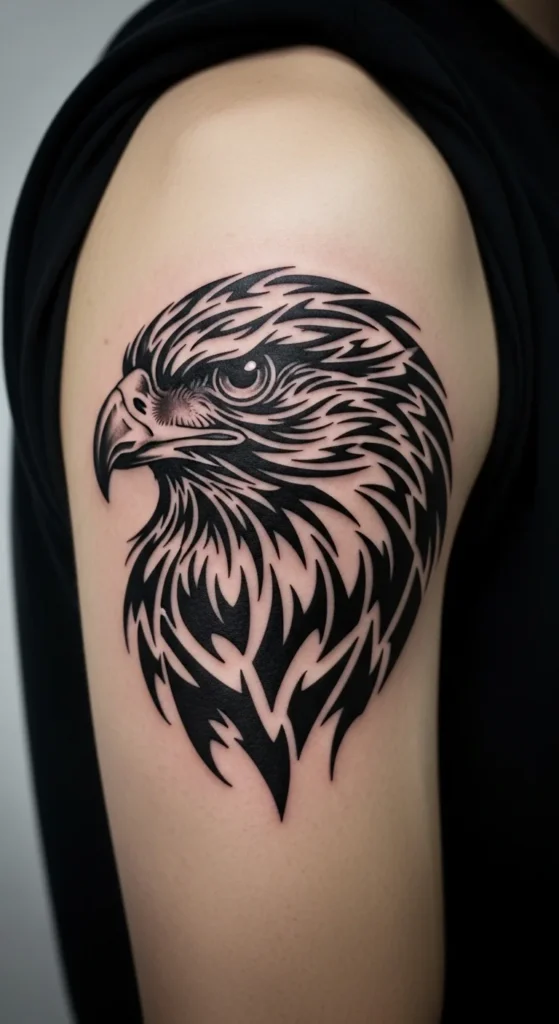
A hawk head combines strength and focus in a single shape. Keep the beak clean and sharp. Use bold blocks for the eyes and crown. Place it on the shoulder or upper arm where the curved area supports the outline. You can test the tilt by printing a hawk silhouette and taping it sideways, downward, or upward. Small angle changes affect the mood. If you prefer a simple session, stick to plain black shapes. Add background curves later when you’re ready for expansion.
18. Tribal Elephant Head
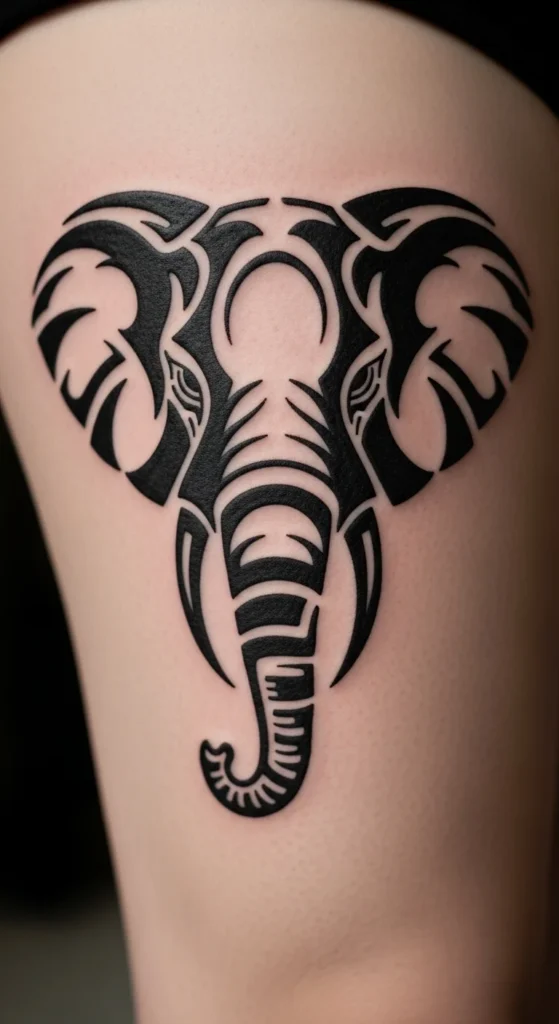
Elephant shapes look powerful in tribal lines. Keep the trunk long and simple. Use thick curves for ears and a solid outline so the shape doesn’t blur with time. To plan cheaply, fold a paper in half and cut out an elephant head silhouette. Open it to check balance. Place the tattoo on a flat area like the thigh or upper back. These spots give room for the curved ears. If you want to expand later, add geometric blocks around the trunk or behind the head.
19. Tribal Tiger Face

A tribal tiger face offers a strong look with simple shapes. Focus on the eyes, nose, and stripes. Use bold angled lines to form the basic structure. A practical planning tip: cut the tiger shape from black cardstock and tape it on your shoulder. Rotate it until the stripes match your arm flow. If you want a lighter session, skip extra background shapes. If you want to expand later, add a ring of triangles around the face.
20. Tribal Phoenix Rising Shape
Phoenix shapes adapt nicely to tribal patterns because wings naturally form curves. Keep the wings thick and simple. Avoid tiny feathers. This design flows well on the outer arm or ribs. If you’re planning the curve, sketch a rising “S” shape first. Build the wings along it. For a low-cost preview, tape long curved strips of black paper on your arm to check movement. This shape grows easily. You can add more wing layers or tail shapes over time.
21. Tribal Frog Symbol
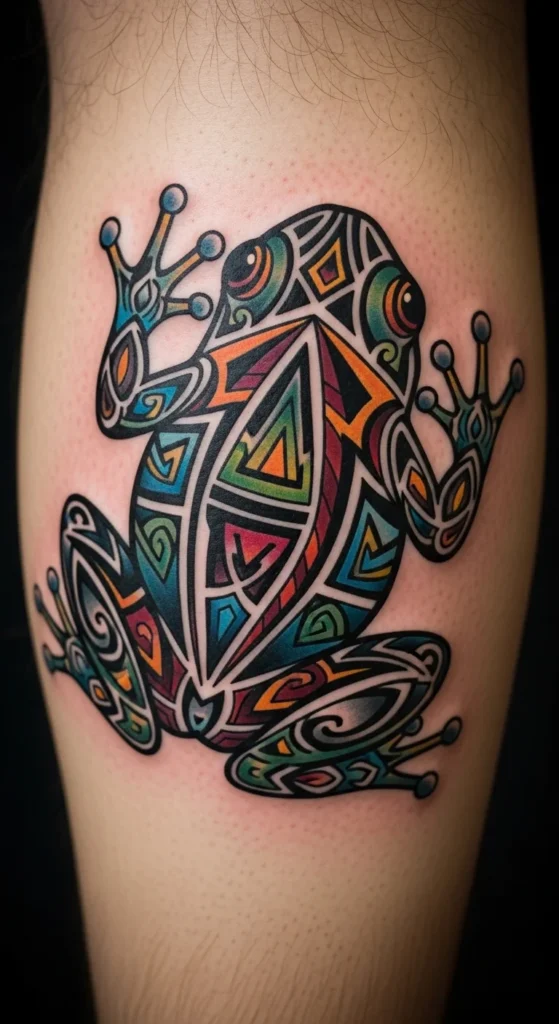
Frogs appear in several tribal traditions, symbolizing life changes. A frog shape is small, affordable, and beginner-friendly. Outline a simple frog stance—legs wide, body center. Fill the inside with block symbols or waves. To plan the size, draw the frog on sticker paper and try placements on your calf or arm. Keep the lines thick. Thin lines blur quickly. This is a great choice for people wanting meaning without large coverage.
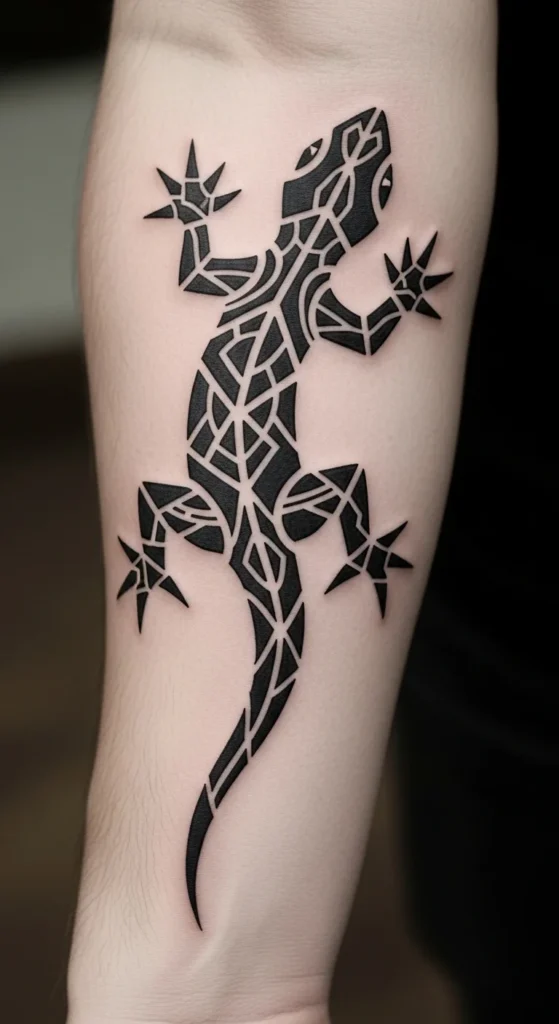
22. Tribal Gecko Wrap
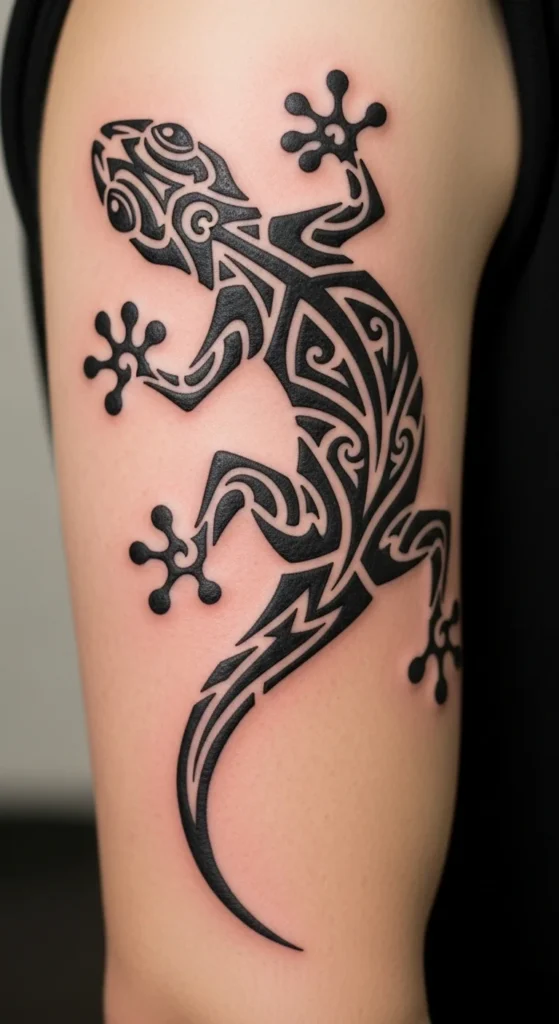
A gecko wrap gives playful motion. It climbs around the arm or calf with a long tail and splayed toes. Start with a simple outline. Add triangles or curves inside the body. To test wrapping, cut a paper gecko and bend it around your arm. This cheap method helps you adjust the pose. Keep the lines bold so the gecko stays clear over time. If you want upgrades later, add background dots or short streaks.
23. Tribal Fox Head
A fox head brings sharp angles and clever energy. Focus on the triangle-like ears and pointed snout. Outline the shape thickly and fill with repeating angles. This shape looks nice on the shoulder because the natural curve supports the face. A low-cost planning idea: print a fox outline and shade block areas with a black marker to see which areas should stay filled. Go for a simple version first, then add outer lines later.
24. Tribal Owl Mask
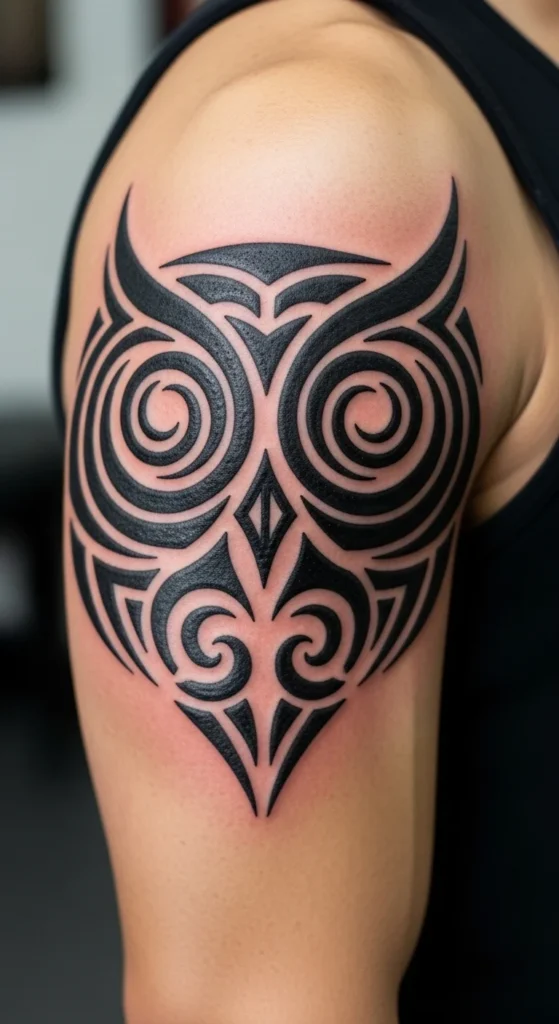
Owl masks combine circular eyes with strong block shapes. Start with two large circles. Add a curved top shape for the head. Fill the lower half with simple line groups. This works well on upper arms or chests. You can preview size by tracing circles from bottle caps or small bowls. A plain black version is affordable and fast. If you want more detail in the future, add layered arcs around the mask to form a frame.
25. Tribal Scorpion Symbol
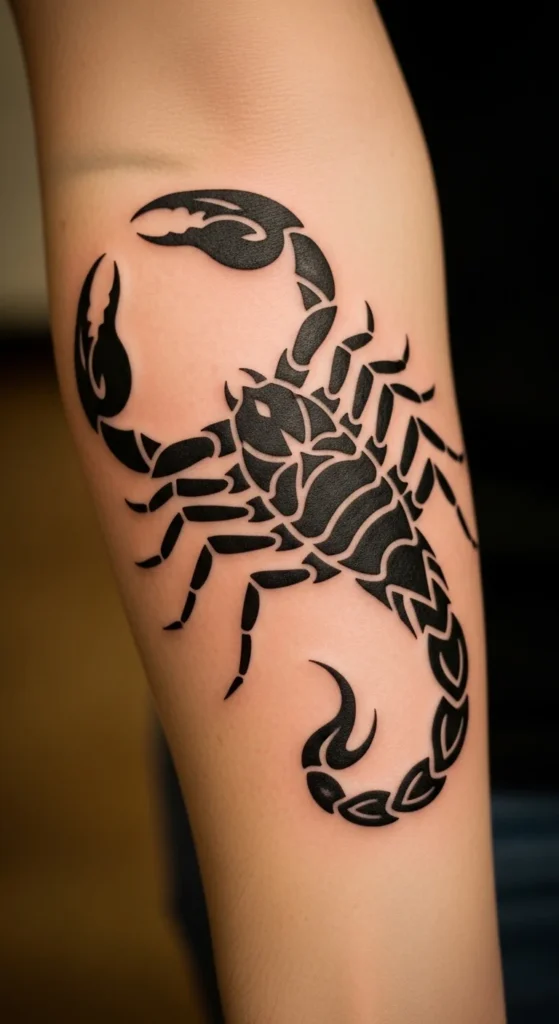
A scorpion brings a sharp, assertive look. The tail forms a natural curve that wraps along the arm. Draw the shape with clean lines. Keep the claws exaggerated and thick. Print a scorpion silhouette and tape it along your forearm to preview placement. If you want to keep costs low, stick to a silhouette rather than detailed segments. Later, add triangles or patterns inside the body if you want more personality.
26. Tribal Butterfly With Bold Wings
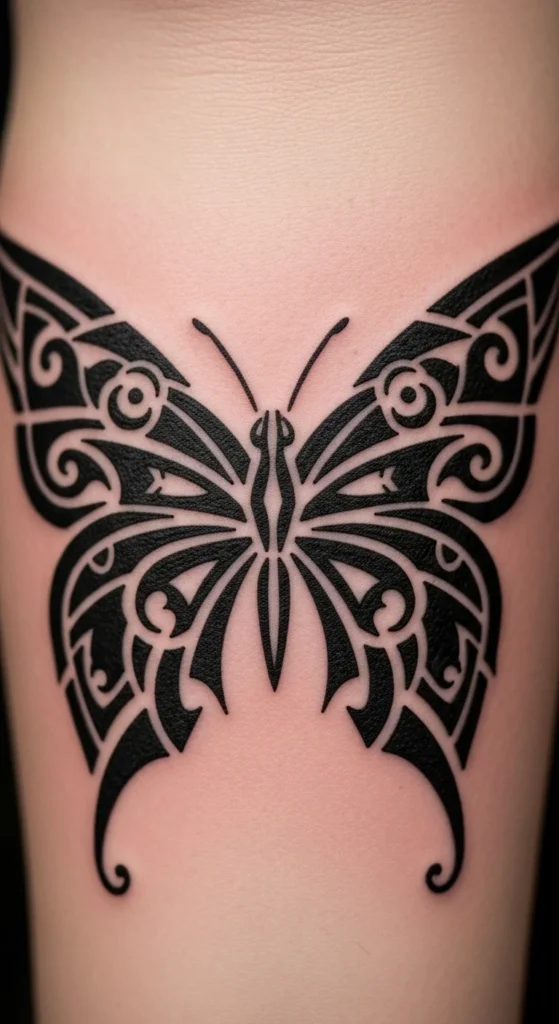
A butterfly might seem gentle, but tribal shapes turn it into a strong symbol. Keep the wings bold, not thin. Use triangles and curves to build patterns inside. Place the design on the forearm or upper chest. To test symmetry, fold paper in half, draw half a wing, cut it, and open the shape. This keeps everything balanced. Begin with a simple silhouette to keep the price low. Add inside patterns later when you’re ready.
27. Tribal Bull Head
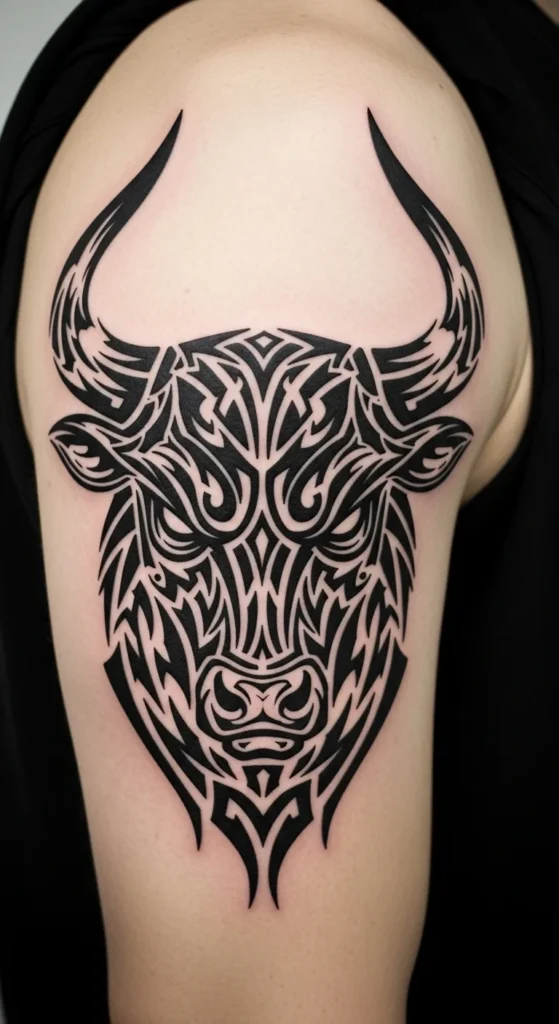
A bull head works nicely with tribal lines because the horns create clear arcs. Outline the head and horns with bold shapes. Keep the inside patterns minimal. A bull shape fits the upper arm well because the shoulder curve supports the horns. To test design angle, tape different horn shapes on your skin. Pick the one that feels the most natural. Stick to a plain black outline if you want an affordable session. Add background triangles later if you want upgrades.
28. Tribal Leg Sleeve Geometry
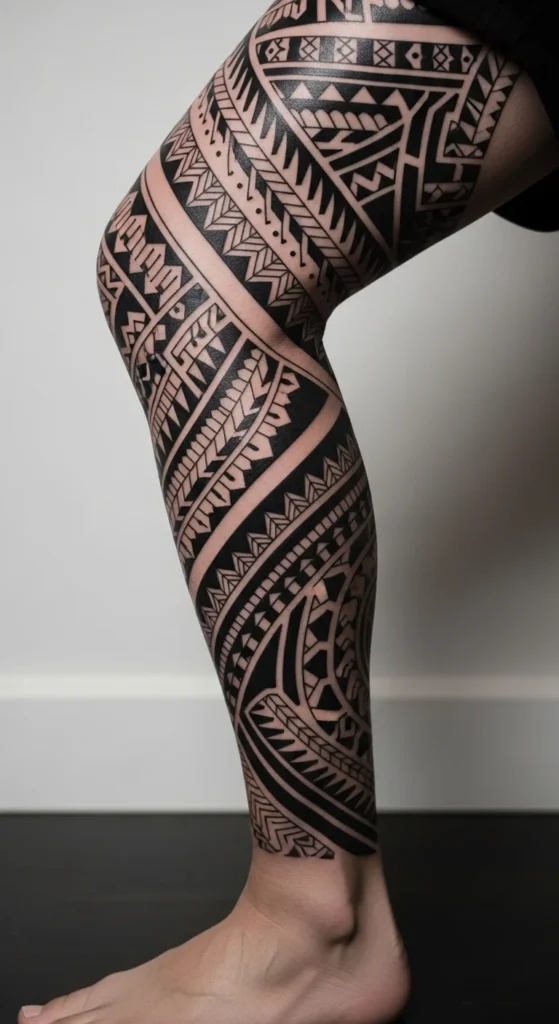
Leg sleeves are trending because they offer long vertical space for repeating shapes. Start small. Begin with one panel on the outer calf. Add more panels upward over weeks or months. This helps you spread out the cost and experiment with patterns. Use thick, repeating shapes like triangles, wave lines, or rectangles. If you want to plan the sleeve at home, tape pieces of black paper along your leg to test spacing. Keep the flow simple. Overcrowding makes tribal patterns blend together too much. Slow expansion keeps things affordable and lets you adjust your style as you go.
Conclusion
Tribal tattoos stay popular because they carry cultural depth, strong shapes, and room for personal expression. Whether you’re starting with a tiny band or planning a full sleeve, simple steps like paper cutouts, stencils, and small sketches help you design without spending much. Bold lines, clean shapes, and slow expansion keep everything practical. Pick one idea from this list and build it at your own pace—your story will grow with every piece you add.
