
Someone I know waited months to commit to a spine piece because the fears were real. The spine hurts more over bone, mirrors make aftercare awkward, and prices can spike between a small line job and a multi-session column. Read on for 20 easy spine tattoo ideas that work with those limits, what to tell your artist, and realistic notes on pain, aging, and touch-ups so you can pick a design that still reads well a few years from now.
1. Fine Line Floral Vertebrae Trail

Someone I know first spotted this along a friend’s spine and liked how the flowers gently followed each vertebra. Tell your artist you want slightly heavier linework on the vertebrae connectors so the petals keep contrast as the piece ages. Pain is moderate to high when the needle crosses bone, but sessions are short for a 4 to 8 inch version. A common mistake is asking for ultra-thin stems that blur in 12 to 24 months. Plan a touch-up around month 9 to restore crispness. This style expands well if you later add shoulder blade flourishes.
2. Minimalist Script Quote Down the Spine

Fair warning about pain when lettering crosses the lower thoracic vertebrae, but script reads elegantly while you move. In consultation, bring the exact font and the precise short phrase you want because line spacing is everything. Ask for slightly looser letter kerning to avoid the letters filling in as it heals. Expect a single session for six to twelve inches. A real mistake is requesting very small script that becomes unreadable after a year. If you plan sun exposure, mention long-term placement so your artist can suggest ink density for longevity.
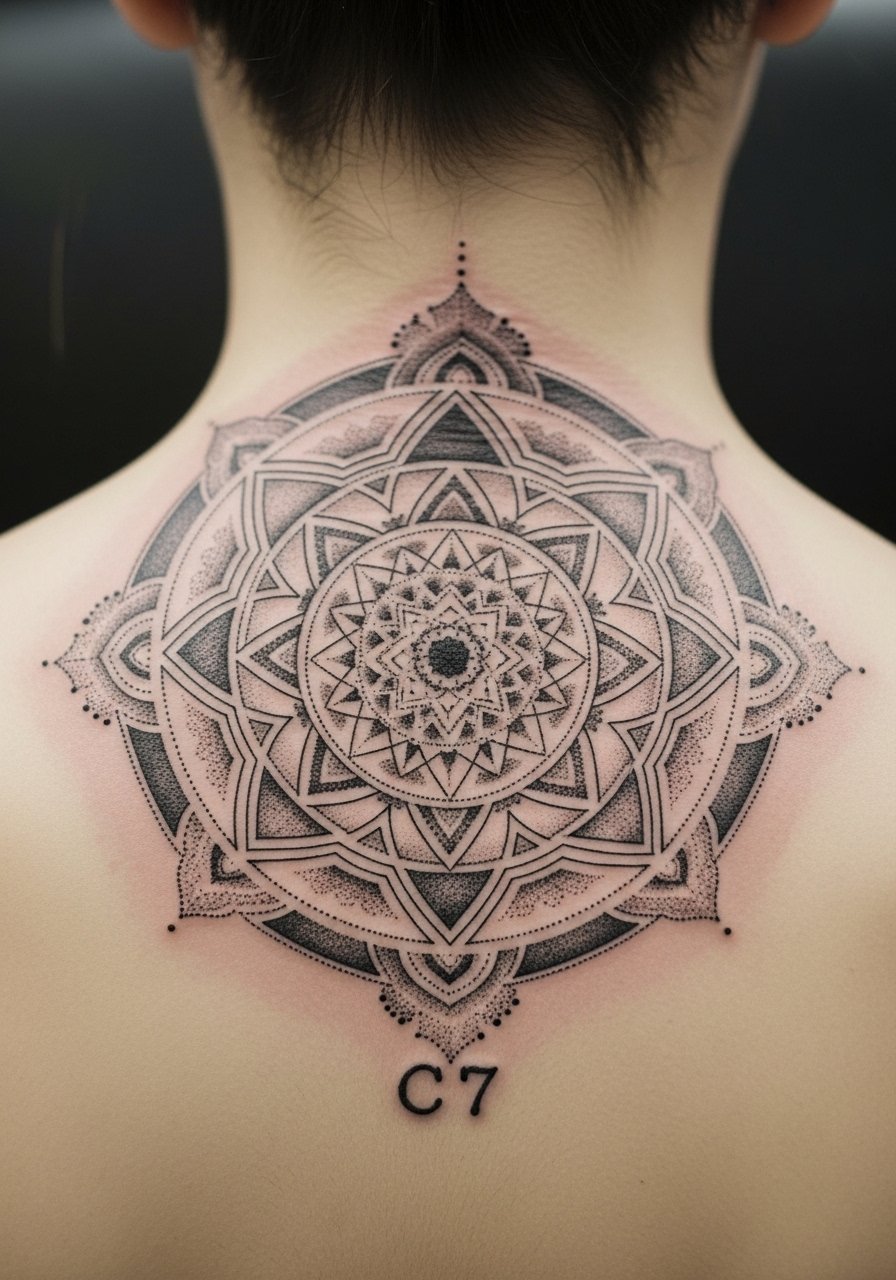
3. Geometric Mandala Spinal Column

Most mandalas look best when they mirror the vertebrae, so tell the artist to align the central axis to your spine rather than the shoulder line. Geometric work needs room so lines do not crowd. Expect longer sessions for shading and precise dot work. One aging issue is tiny gaps in saturation that turn into visible noise after a couple of years. A touch-up at year two restores black saturation. If you want future expansion, ask the artist to leave negative space between motifs so new elements flow without reworking existing linework.
4. Neo-Traditional Snake Coiling the Spine

There is a visual impact to a bold snake that follows the spine’s natural curve. When you consult, specify scale size and whether you prefer whip shading or stipple shading for texture. This is a higher-pain session when the needle hugs bone and usually takes multiple appointments if you go color. A common mistake is asking for tiny scales that lose detail. Over time, saturated color may need a touch-up at year three depending on sun exposure and skin type. Also think about how a snake’s head sits near the nape if you want it to read from behind.
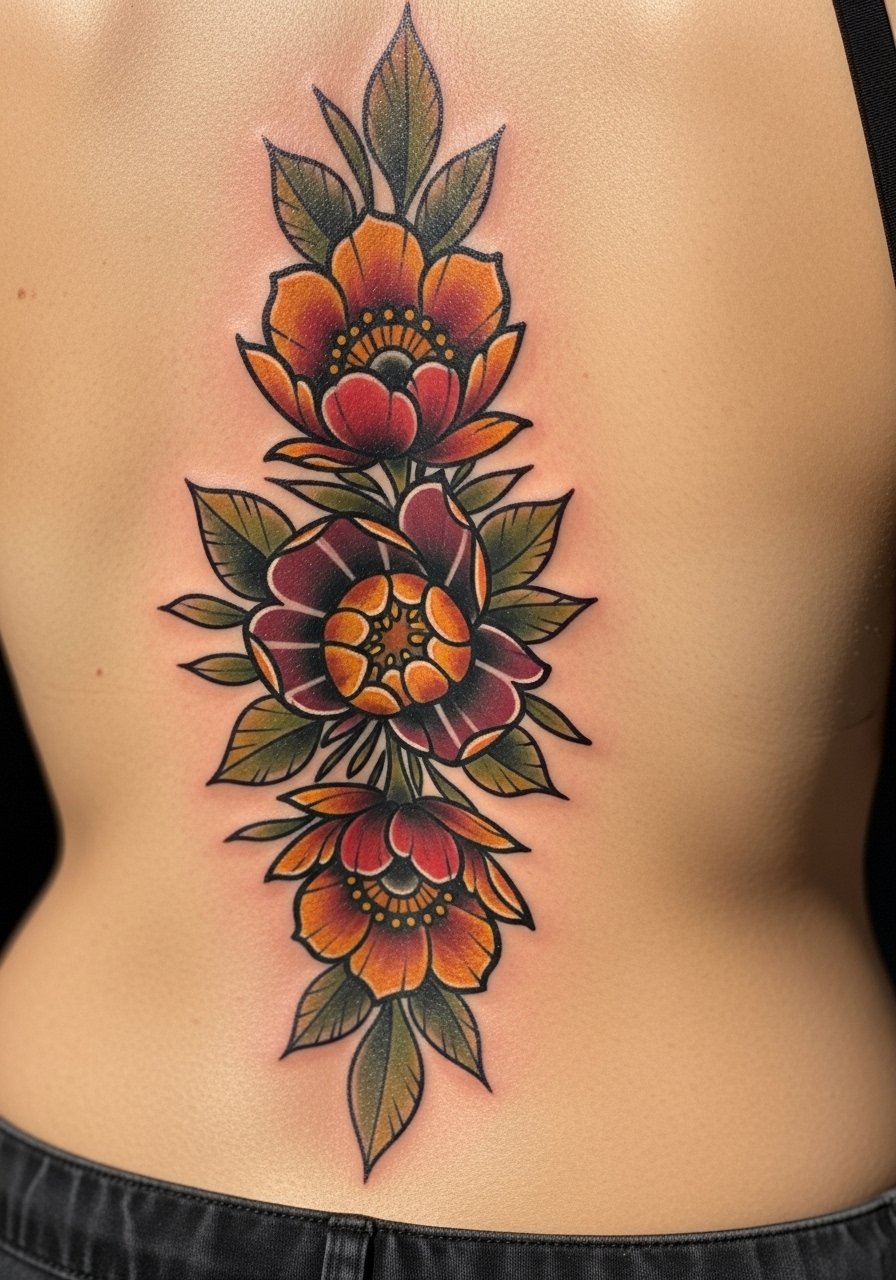
5. Ornamental Floral Cascade for the Lower Spine

The biggest mistake with ornamental cascades is squeezing too many tiny motifs into a small area. Say in the consult that you want open negative space and slightly bolder stems so petals keep definition. Pain is medium given the curve of the lower back. Most medium pieces finish in two sessions. At six months the contrast is strong, then it softens by year two. Plan a touch-up in year one if you notice uneven fading along the bony crest. This placement lends itself to later side extensions toward the hips.
6. Micro-Realism Animal Portrait Mid-Spine

When you want symbolic imagery such as an owl for wisdom, be specific about the eye detail you want because micro-realism depends on tiny, dense shading areas. Expect two to four sessions for a sharp five to ten inch piece. Pain fluctuates as the needle tracks over bone. A real mistake is choosing a scene with too many small elements; keep the composition focused so highlights remain crisp. Ask your artist for a healed reference in a similar skin tone. Touch-ups at 12 to 24 months help regain mid-tone contrast.
7. Watercolor Abstract Trail Across the Spine

Artists split on watercolor pieces on the spine. One camp says fluid washes read beautifully when done shallowly. The other camp worries that washes over bony skin fade into patchy areas. If you love the look, agree with your artist on slightly stronger anchor points in black or gray so the color has structure. Expect multiple sessions for blending. The typical mistake is asking for very low saturation initially to mimic true watercolor. That approach often fades fast. Plan a color refresh around year two if you keep it exposed to sun.
8. Blackwork Geometric Lines Emphasizing Vertebrae

I’ve seen collectors go for stark black lines to keep contrast for years. Tell your artist you want line spacing that avoids crowding near the bone so blowout risk is reduced. Pain is higher when the needle lays solid fills over the spine but the payoff is longevity. The session count is greater for full-column pieces. A common mistake is choosing very thin bars that lose definition. Expect heavy blackwork to need a 2 to 3 year touch-up depending on how much sun exposure the area gets.
9. Minimalist Single-Line Lotus at Base of Spine

Fair warning that single-needle work on bone can blur if placed too small. When you sit for this, specify the exact line weight and ask for a slightly larger scale than you think you need. This usually finishes in one session and pain is moderate. A typical mistake is wanting the thinnest possible stem which softens over months. At two years expect slight softening of edges and plan a touch-up only if you notice significant loss of shape. This is a neat starting piece for someone planning a later back expansion.
10. Hyperrealistic Snake Portrait Over Full Spine

There is a lot of visual drama in a realism snake but it requires serious session time and saturation. In consults, ask how the artist handles scale size and highlight placement so texture survives healing. This is one of the more painful options because it crosses many bony zones and takes multiple appointments. A common error is asking for ultra-high contrast without planning touch-ups. Expect a follow-up at year two to maintain shading depth. If you plan to expand into shoulders, let the artist map the head position accordingly.
11. Delicate Vine and Leaf Trail Along Thoracic Spine

There is a calming flow when vines trace vertebrae. Ask for slightly varied lineweight so leaves retain shape as the piece softens. This one tends to be lower pain than bold work but the bony ridge still registers each pass. Sessions are short and often completed in one appointment for eight-inch versions. A frequent mistake is over-detailing every leaf. Keep the motif airy so it ages well. Touch-ups at year one refresh the mid-tone lines. This design pairs well with small ribs or shoulder flourishes.
12. Mandala with Sacred Geometry Centered High on Spine
When you choose sacred geometry, note that symmetry is unforgiving. Bring front and side photos so the artist can center the axis precisely on the spine. Expect two to three sessions for dot work and stipple shading. Pain is moderate at the upper spine but concentrated where the vertebrae protrude. A mistake is shrinking the mandala too much which makes dots crowd and blur. At two years dot work may thin and a light touch-up restores rhythm. Some people choose to offset cultural motifs slightly as a gesture of respect rather than copying a direct symbol.
13. Micro-Line Vertebrae Symbols Stacked

When you want a compact column of icons, be precise about spacing because tiny glyphs need breathing room to avoid merging. This approach is session-efficient and usually tolerable pain wise if the symbols are spaced. The common mistake is cramming eight or more very small glyphs into a short span. Expect a touch-up in 9 to 18 months to keep each symbol distinct. If you want different meanings per vertebra, map them during consultation and ask the artist to sketch the healed spacing on your back before inking.
14. Ornamental Neo-Traditional Floral with Color Accents
There is a split among artists about color longevity on the bony spine. One camp recommends deeper saturation and color layering to preserve hue. The other camp prefers a restrained palette with more black anchors so color fades evenly. When you discuss this, ask which approach they use and why. Pain is higher where color layers sit on bone. A typical error is asking for heavy pastel coverage without structural blackwork. Plan for a color refresh in year two to keep petals lively if you spend time in sun or heat.
15. Vertical Compass or Arrow for Directional Meaning

I’ve seen simple directional pieces age gracefully because the geometry is straightforward. Tell the artist you want a slightly bolder shaft on the arrow so it keeps presence as lines soften. This is usually a quick session with moderate pain at bone crossings. A mistake is requesting tiny ornamental filigree that looks cluttered as the ink settles. Touch-ups at year one often sharpen the compass needle. This placement works well for someone who wants a centered, extendable column with later cardinal point additions.
16. Dot Work Spine Column with Stipple Shading

Pain with dot work is often less intense because the technique spreads sessions, yet the bony ridge still registers. In consultation, discuss density and whether you prefer denser centers or softer gradients. A common mistake is expecting very dense stipple to look identical to solid fill after healing. Dot work softens in two years and a touch-up restores contrast. If you smoke or regularly expose the area to sunlight, mention it because saturation longevity will vary. Dot work scales nicely for a long spine column.
17. Small Spine Flash Piece That Reads as a First Spine Tattoo

If this is a first spine tattoo, pick a flash piece sized larger than you think so the linework lasts. When you consult, ask which flash in the artist’s portfolio has held up on bony skin. Pain is brief for tiny pieces but still noticeable. The usual mistake is going microscopic for a first spine piece. Expect a single short session and a touch-up if lines soften. If you want to expand later, have the artist leave anchor points so the flash can be incorporated into a medium or full back design.
18. Color-Optimized Palette for Darker Spine Skin

Every artist I’ve talked to who works with diverse skin tones recommends long-wavelength colors for better photo and healed pop. In a consult, request healed photos that match your skin tone so you know how red or yellow behaves on your back. Pain patterns do not change by color but saturation sessions might be longer to build hue. A common misstep is choosing thin color washes that vanish on darker skin. Plan a color refresh at year two if you want bright saturation to persist, and ask about photographing in different lighting.
19. Spine Glyphs in Roman Numerals or Coordinates
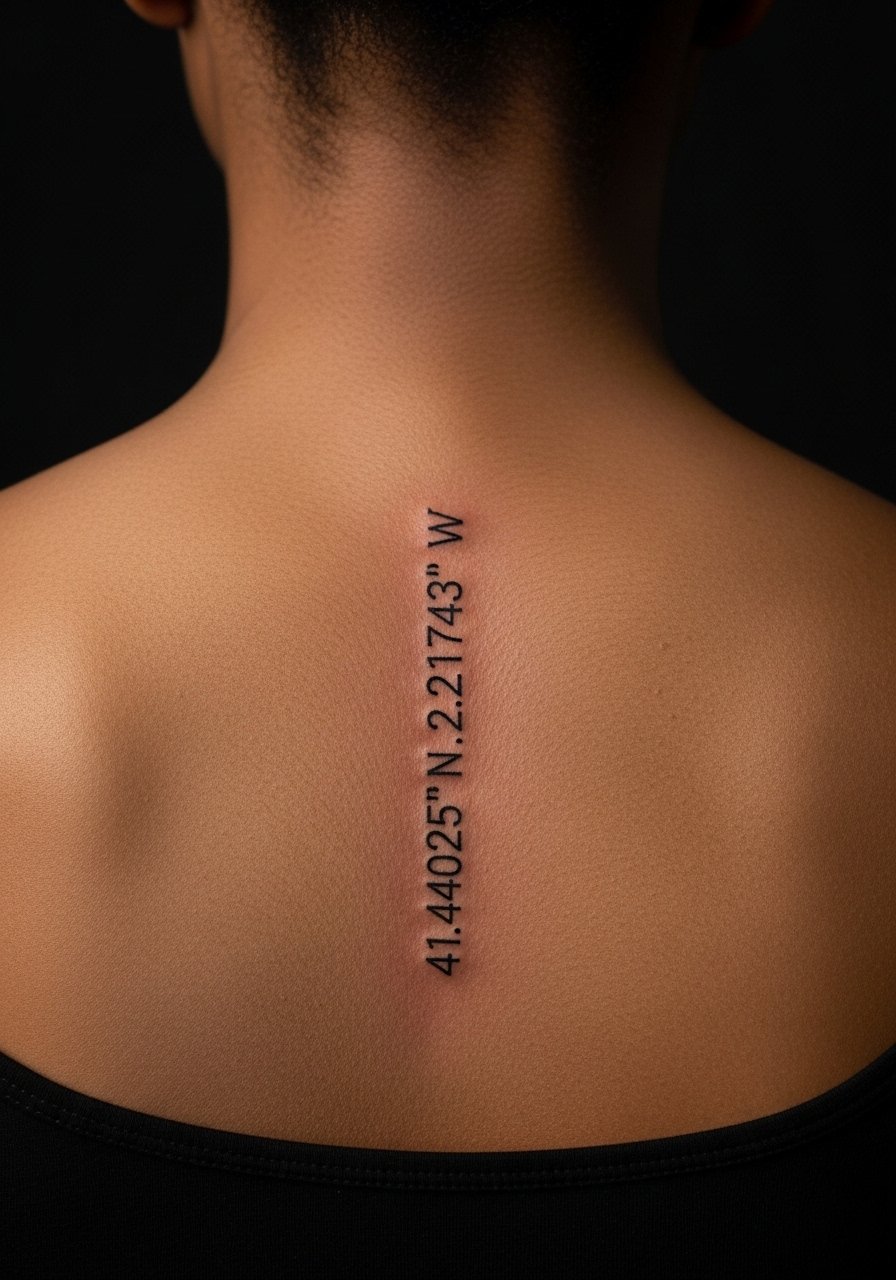
If you want dates or coordinates, specify the exact text because generators often produce nonsense. Decide on spacing so digits do not crowd along vertebrae. Pain is moderate, and a single session often suffices. The biggest mistake is selecting a tiny font that loses legibility after healing. Touch-ups at year one keep numerals sharp. This placement is discreet and expands cleanly into small motifs like compasses or stars later on.
20. Stacked Floral Medallions That Expand Into Full Back Work

When you want a design that can grow into a larger back piece, tell the artist you want staged medallions with consistent negative space between them. Pain varies across levels but staged sessions make this approachable. A common error is treating each medallion as an isolated flash without planning flow between them. Expect two to three sessions initially and a follow-up at year two to balance saturation. This plan lets you add lateral elements later without reworking the central column.
Tattoo Prep and Aftercare Essentials

Shopping list (7 items). All links go to Amazon search pages with the affiliate tag.
Fragrance-free gentle foaming cleanser for tattooed skin. Use from day two to keep the area clean without stripping oils. Gentle foam helps remove sweat and debris during showering.
Lightweight fragrance-free balm for daily aftercare. Apply thin layers two to three times daily for the first two weeks to ease dryness and reduce scabbing.
Medical-grade occlusive second skin bandage, 6-inch roll. Useful for the first 24 to 72 hours if your artist recommends it, especially for long spine sessions that ooze.
Silicone scar gel sheet or strip for long-term smoothing. After the surface heals, silicone helps even texture if raised areas develop from heavy saturation.
Long-handled mirror for self-application and checks. Makes rinsing and balm application easier without twisting your spine into awkward positions.
Cooling gel pack with soft cover for pre-session muscle ease. Use before a session to calm tight muscles and after to reduce short-term swelling.
Fragrance-free sunscreen for long-term protection. Once fully healed, protect spine tattoos from UV break down with daily sunscreen on exposed days.
Every tattoo is different. Always follow your artist's specific aftercare instructions. Consult a dermatologist if you have skin concerns or unusual healing issues.
Frequently Asked Questions
Q: How much does a spine tattoo typically cost by size range?
A: For budgeting, think in size tiers. Small spine tattoos often fall into an entry range, medium spine pieces sit in a mid range, and full-column or highly detailed color work belongs in a higher range. Exact pricing varies by city and artist, so get multiple quotes and ask about session hourly rates versus flat fees.
Q: Will fine line spinal tattoos fade faster than bolder blackwork on the spine?
A: Fine line on bony areas tends to soften sooner because the skin over vertebrae moves and has less cushioning. Some artists feel fine line can hold with careful depth and spacing. Others prefer bolder linework for longevity. Ask your artist which camp they follow and how they plan needle depth and spacing for your specific skin.
Q: Should I use a second-skin product or dry heal my new spine tattoo?
A: There are two clear camps. One group recommends occlusive second skin for cleaner short-term healing and less risk of friction. The other group prefers minimal covering to avoid trapping moisture on curved skin. Discuss with your artist which method they recommend for your spine placement and whether they have clinic-tested experience with that approach.
Q: How painful is a spine tattoo compared to other placements and what helps during sessions?
A: Spine tattoos score higher on pain when the needle goes over bone, while soft tissue areas feel less intense. Short breaks, good sleep, hydration, and discussing topical numbing with your artist can help. Some artists discourage numbing because it changes feedback, while others use it routinely for pain-sensitive clients. Bring snacks and schedule for recovery time after a long session.
Q: I have darker skin. What colors hold up best on the spine and how should I plan photos?
A: Long-wavelength colors such as red, yellow, and certain warm greens tend to show better on darker skin tones. Ask the artist for healed photos on similar skin and plan studio lighting for portfolio shots. Expect to possibly need a color refresh at year two depending on exposure and saturation.
Q: How soon should I plan a touch-up for a spine tattoo and what influences that timing?
A: Common touch-up windows range from nine months to two years. Factors include line thickness, how much the tattoo crosses bone, sun exposure, and your skin type. Plan a touch-up if lines blur or color loses evenness. If you want to avoid surprises, book a consultation follow-up around month nine to assess whether a touch-up is needed.
Q: What should I bring to my consultation to make sure my spine design ages well?
A: Bring photos of healed tattoos in similar styles and in your skin tone, clear references for the exact elements you want, and notes on how visible you expect the tattoo to be daily. Discuss expansion plans, expected sun exposure, and whether you want a touch-up schedule. Using discovery pathways like style hashtags and local booking platforms helps find artists with spine-specific portfolios.
