
The tiny, glossy dot representing Mercury reads sharp on day one, and then the wrist skin starts to soften the next year. Planet tattoos are one of those requests where size, spacing, and contrast matter more than style hype. Pick a placement and a scale that will still read at year five, and the design will feel intentional instead of posterized. Below the first idea, expect clear notes on aging, session feel, and how to style or dress the area for the appointment.
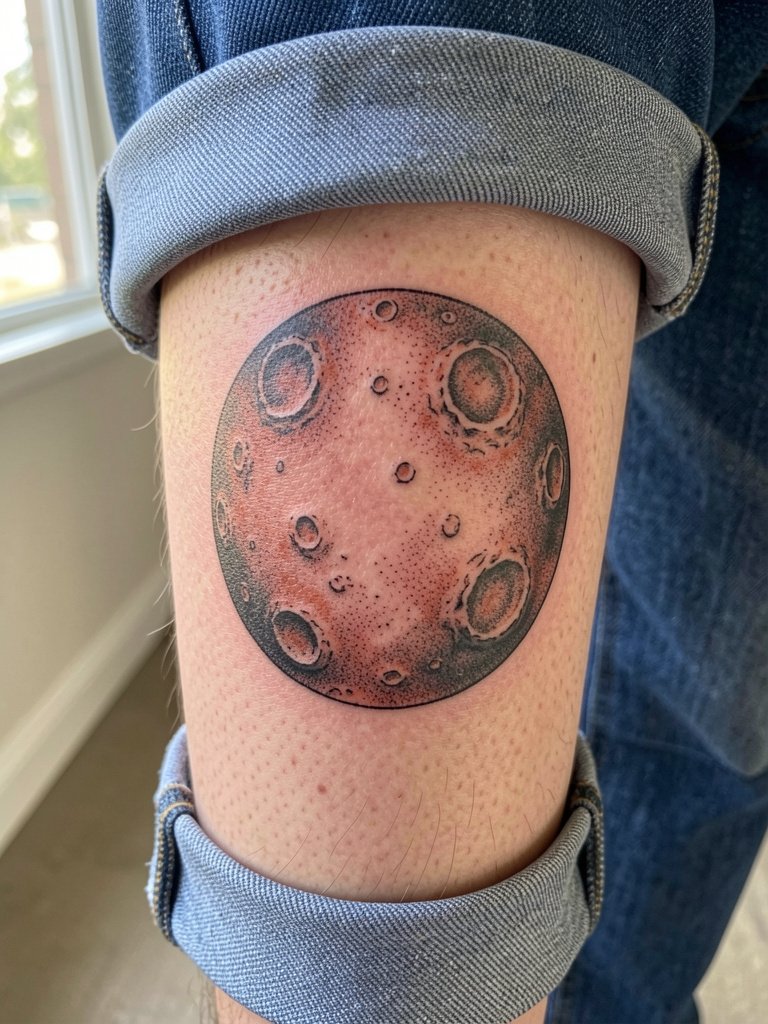
1. Minimalist Mercury Orbit on the Inner Wrist

A tiny single-dot planet and orbit looks elegant on the inner wrist, but the area eats micro detail over time. I recommend increasing line weight slightly from your reference so the orbit still reads at year three. Discuss line weight and spacing with your artist, showing a scaled reference so they can translate it into a three-centimeter mark that holds up. Expect a light tingle for 20 to 40 minutes, and plan for a touch-up at year two if you want crisp edges. For the session wear a loose short-sleeve tee and a low-effort bracelet like a slim cuff to avoid irritation during healing, try slim metal cuff bracelets.
2. Venus Watercolor Splash on the Shoulder Blade

Watercolor effects on Venus rely on subtle saturation rather than crisp linework, and that makes them vulnerable to blur. One camp says watercolor fades into an attractive, soft wash and that is part of the appeal. The other camp argues that without a faint anchor line the design loses its identity within a couple of years. If you want the painterly look with longevity, ask for faint haloing anchor lines around key planes and for slightly deeper saturation in the midtones. Session time runs one to two hours depending on color layering. For evening looks, pair this with open-back midi dresses that expose the shoulder blade.
3. Earth Micro-Realism Globe on the Upper Arm

A micro-realism Earth needs contrast to read. I usually recommend a slightly larger scale than clients expect so the continents do not merge into an indistinct mass. Bring two references at different sizes so your artist can show how a three-centimeter sphere compares to a five-centimeter sphere. The upper arm tolerates longer sessions, so plan for a single two-hour sitting or two shorter passes. Common mistake is asking for tiny text labels around the globe, which blur; opt for negative-space markers instead. This placement pairs well with rolled-up linen shirts in neutral tones; try linen short-sleeve shirts for a framed look.
4. Mars Stipple Topography on the Calf
Stipple dot work gives planetary texture and ages gracefully because it relies on tone instead of single lines. Tell the artist you want the dots spaced to hold at three-year and five-year marks, not so dense that the tone jams together. Expect a deeper session sensation on the calf than on the forearm, and a typical sit runs 60 to 90 minutes. A common mistake is asking for single-needle dot work too small; slightly larger stipple keeps the map legible. Show-off clothing like mid-calf boots and cuffed denim highlight this placement; pair with cuffed slim denim jeans.
5. Jupiter Storm Portrait on the Shoulder Cap
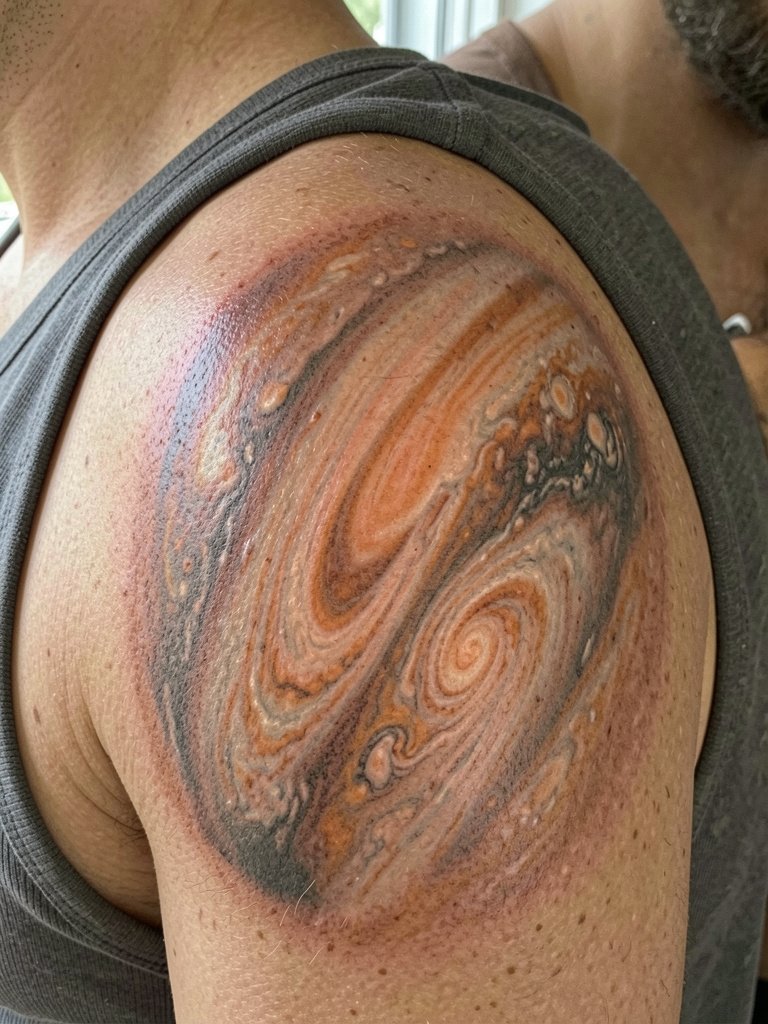
Large, saturated planets like Jupiter benefit from broader strokes and bold saturation. The shoulder cap takes color well and the natural curve helps the storm read three-dimensionally. A common error is cramming too many tiny bands into a compact area, which softens into a muddy blur. Ask for a bold anchor outline and layered color passes for saturation that lasts, and expect a session of one to three hours. For showing it off wear tank tops or wide-strap dresses; try sculpting tank tops that keep straps in place without rubbing the tattoo.
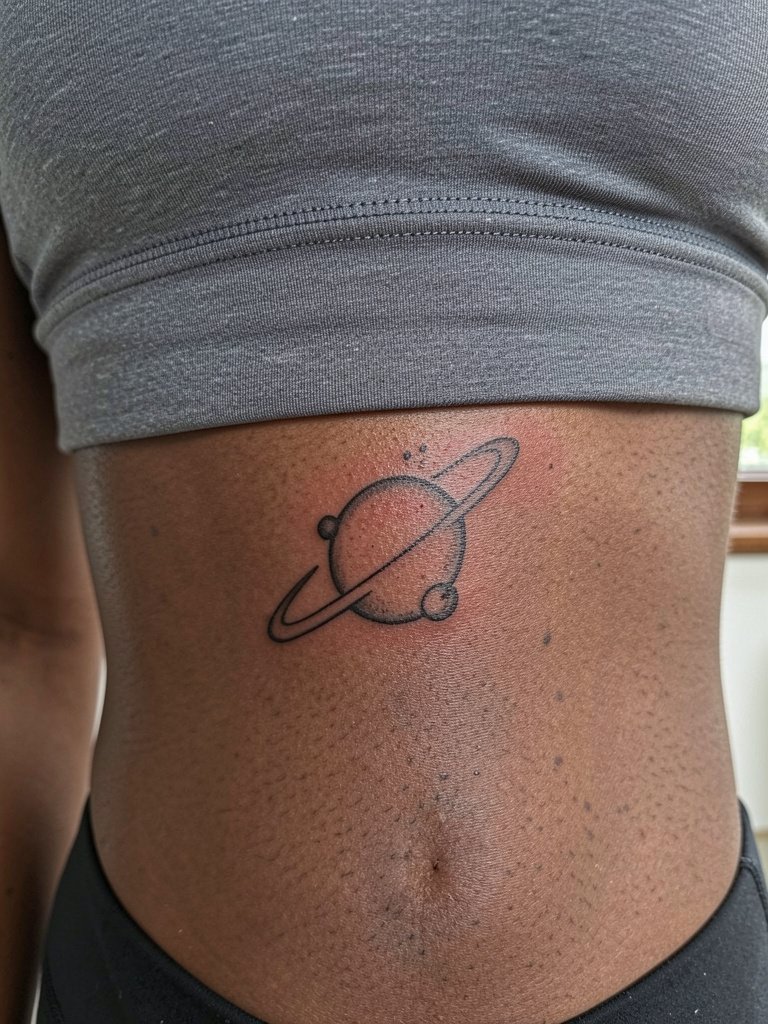
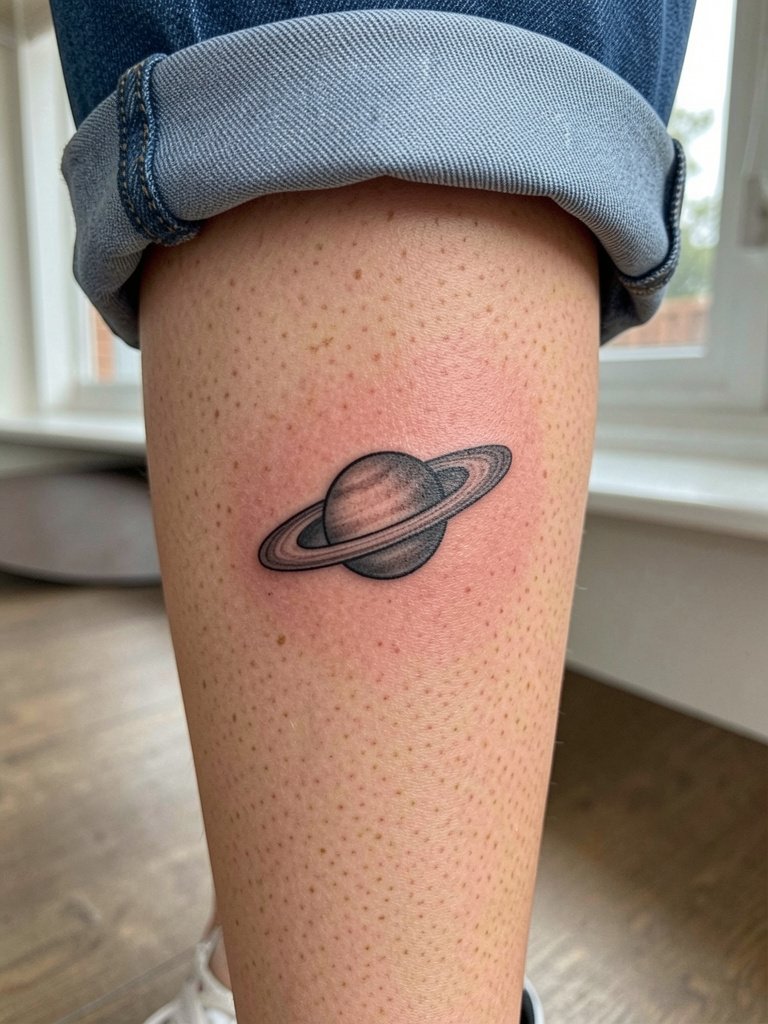
6. Saturn Ring Band on the Outer Thigh
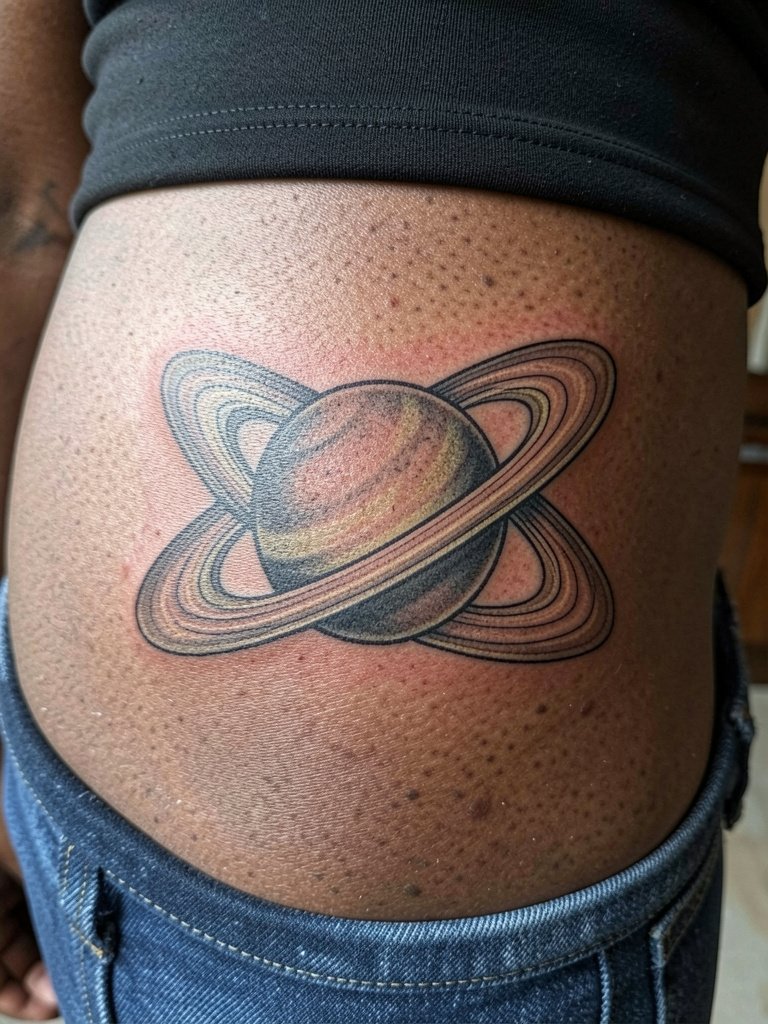
Ringed planets on the thigh make a bold visual and the extra surface area reduces blowout risk. There is a split among artists about ultra-fine rings. One camp says extremely thin ring lines will blur on fleshy areas within two years. The other camp maintains that with slightly deeper needle depth and spacing the rings will remain crisp. If you prefer a long-lasting band, opt for a thin but confidently visible line weight and ask the artist to simulate how the rings look when the leg moves. Session time is typically 90 to 150 minutes. For showing off choose high-waisted skirts or cropped shorts like high-waisted denim shorts.
Studio Day Picks
Those first six small-to-medium planet pieces vary in session length and friction exposure, so the items below help smooth the appointment and the first week of healing.
-
Stencil transfer paper kit. Makes it easy to preview placement and rotation for wrist, inner arm, and ankle ideas so you can visualize scale before any ink hits the skin.
-
Cooling gel pads. Useful for short breaks during longer shoulder or thigh sessions to reduce surface heat and improve comfort.
-
Thin protective film roll. Keeps small wrist and finger tattoos cleaner during the first days of frequent hand washing and movement.
-
Comfortable slip-on studio shoes. Supportive footwear matters during long sits for calf, thigh, or back pieces and helps you stay steady when the artist asks you to reposition.
-
Aquaphor healing ointment. A widely used option for the initial moist phase of healing on fine line work from the wrist or subtle color fills on the shoulder.
7. Uranus Geometric Linework on the Ribcage
Ribcage pieces read boldly when scaled correctly, but the area is higher on the pain scale. Expect repeated sharp jabs and a session broken into 30 to 45 minute increments if you need breaks. The biggest mistake is shrinking the geometry to a palm-sized mark and then wondering why the lines blurred. If you want longevity, increase spacing between lines and ask for a slightly thicker baseline so the composition survives skin movement. For the appointment, wear a fitted sports bra or bandeau so the artist has clear access without fabric shifting.
8. Neptune Waterline Across the Collarbone
A watery Neptune band across the collarbone is stunning but vulnerable to friction from necklaces and high collars. Tell the artist you want the pigment slightly more saturated in the midtones so the wash does not vanish with time. The collarbone area creates a crunchy session feeling over bone and often needs short breaks, with typical sit time around 45 to 90 minutes. For showing off, open-neck blouses or scoop-neck tanks work best; consider pairing with delicate pendant necklaces that sit above the ink during healing.
9. Pluto Tiny Accent Behind the Ear
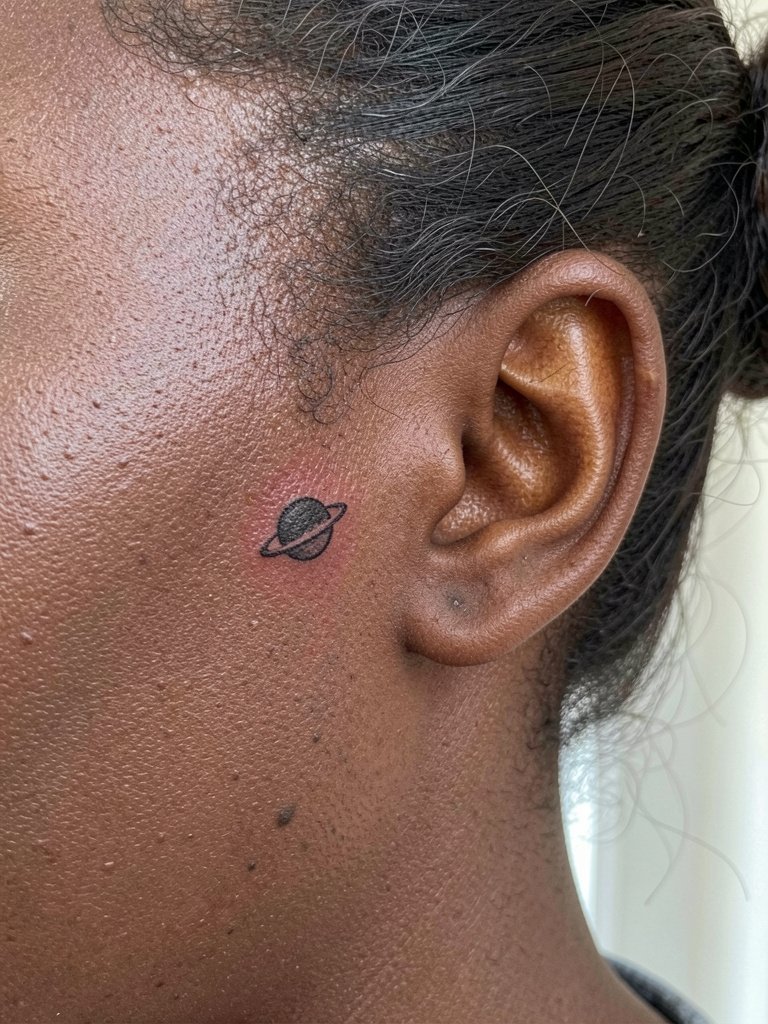
Behind-the-ear planet marks are discreet and low-friction, which helps micro work last longer. The area requires an artist comfortable with small detail on uneven skin and short needle passes to reduce trauma. Session time is brief, often under 30 minutes, but healing is sensitive because of hair contact. A common mistake is asking for script near this area rather than a small symbol; keep the mark simple. Note that finding an artist with portfolio examples on nape and behind-ear work is important because this placement needs steadiness and precision.
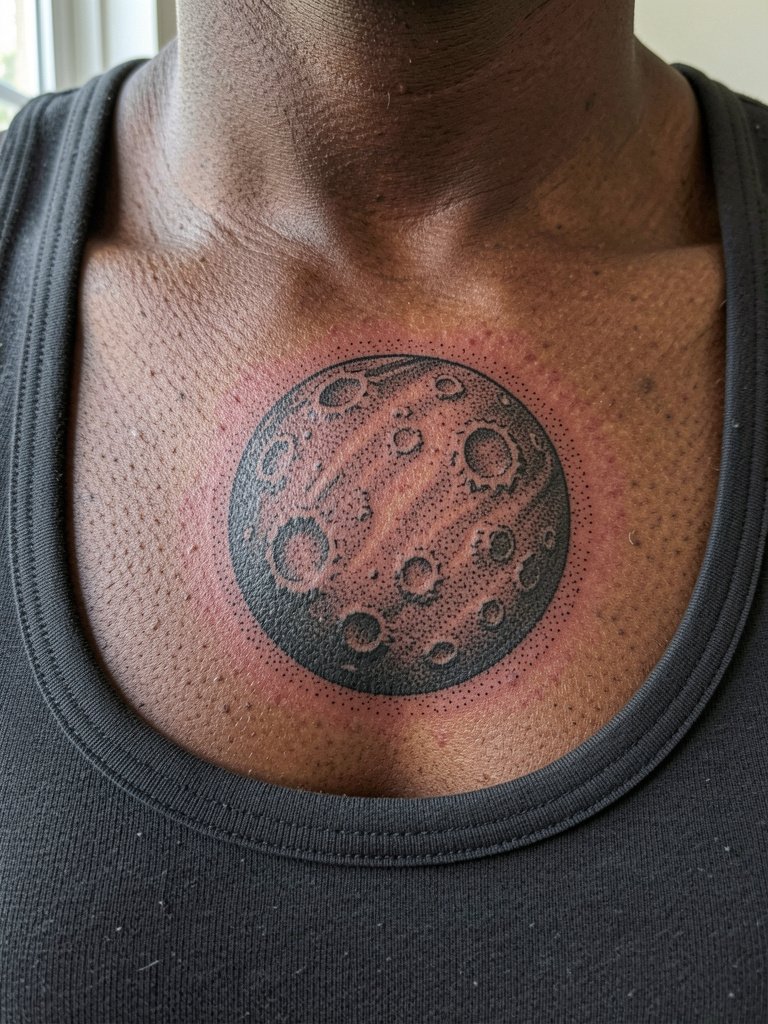
10. Moon Phases Wrapping the Forearm
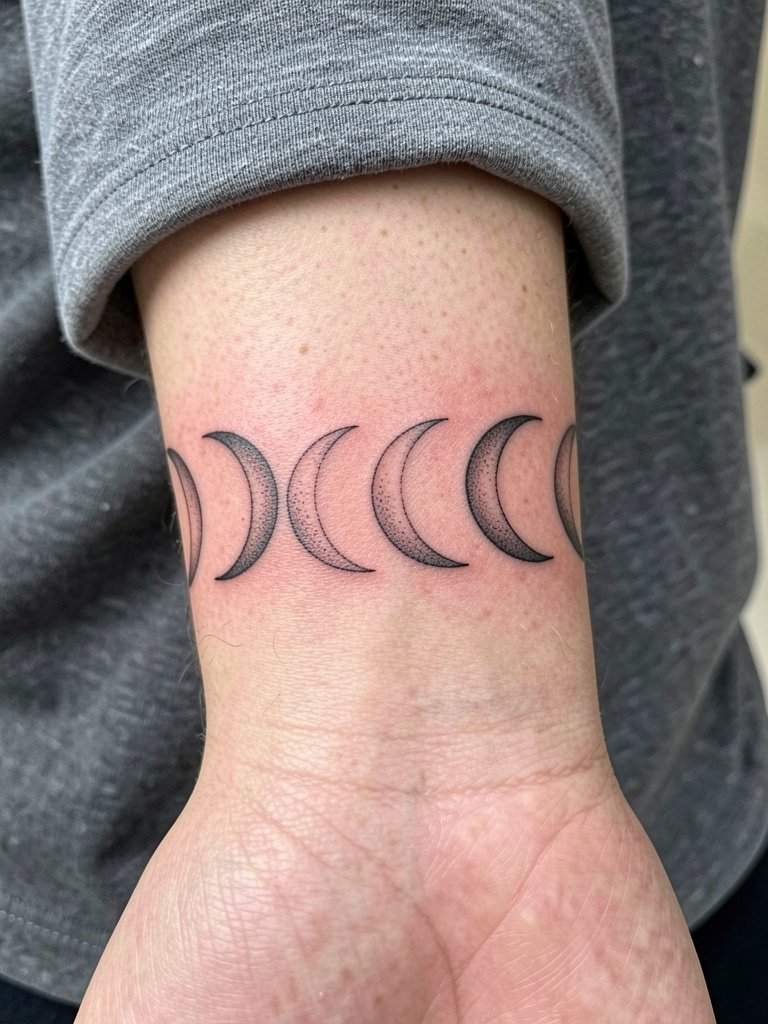
Phase bands work well on the inner forearm and the design ages predictably because it uses both linework and tone. Request slightly bolder crescent outlines at the start so the solid phases remain strong after a few years. Expect a mild vibration during the session and plan for a two-hour appointment if the band wraps far. Avoid tiny negative-space stars between crescents, which tend to fade; instead use dots spaced to hold. For daytime showing, roll sleeves to a three-quarter length and pair with lightweight linen shirts.
11. Planetary Lineup Down the Spine

A vertical planetary sequence on the spine is visually dramatic but requires careful spacing to avoid muddiness as the skin settles. The spine area can be painful and session comfort improves with strategic breaks. The common error is compressing seven distinct planet marks into a narrow column; allow at least one and a half finger widths between marks. Ask the artist to map the lineup on your back in different scales so you can choose what reads best from a few feet away. For sessions wear a fitted tank so the artist can work across your back without fabric shifting.
12. Full Solar System Minimalist Band on the Wrist
Wrist bands with many tiny planet dots find the line between delicate and illegible. The wrist is a high-motion area, so the smallest dots can lose definition. One camp argues for keeping dots micro and letting them fade softly. The other camp recommends spacing and slightly larger dots for lasting legibility. To keep this bracelet-like without blur, increase each dot to at least two millimeters and ask for a faint baseline for contrast. Sessions are short but healing needs a protective film for the first few days. For showing off choose lightweight bracelets that do not rub the ink; try thin leather wrap bracelets.
13. Retro Planet Poster on the Upper Back

Retro poster-style planets need confident color blocking and crisp edges to stay legible. The upper back gives enough canvas for mid-sized compositions and usually heals with minimal distortion. A common mistake is overcomplicating the palette; fewer flat colors keep the retro feel and reduce touch-up needs. Expect a two- to four-hour session depending on coverage. For appointments choose a top that you can easily step out of without stretching the back, like a comfy tank with fixed straps.
14. Asteroid Belt Scatter on the Hip

Clusters on the hip withstand abrasion better than inner thighs, but proximity to waistbands can create friction. Place the cluster a few centimeters above the waistband so everyday jeans do not rub the fresh ink. The hip surface favors short dot passes and light shading, which means a comfortable 60 to 120 minute session. Avoid placing dense textures directly under tight waistbands to reduce scabbing risk. Show this off with low-rise jeans or crop tops like high-rise, low-cut crop tops that keep the tattoo visible without rubbing.
15. Retrograde Orbit Line on the Rib Side
Linear orbit arcs on the ribcage make a clean graphic statement but are vulnerable to skin stretch during deep breaths. The rib surface can be painful and the session often happens in short bursts. The mistake is compressing too many markers into a small arc; give each marker breathing room. Ask the artist to draw the arc on you before any needlework so you can test movement and sitting positions. Expect a touch-up at year two if you want the thin arcs razor sharp.
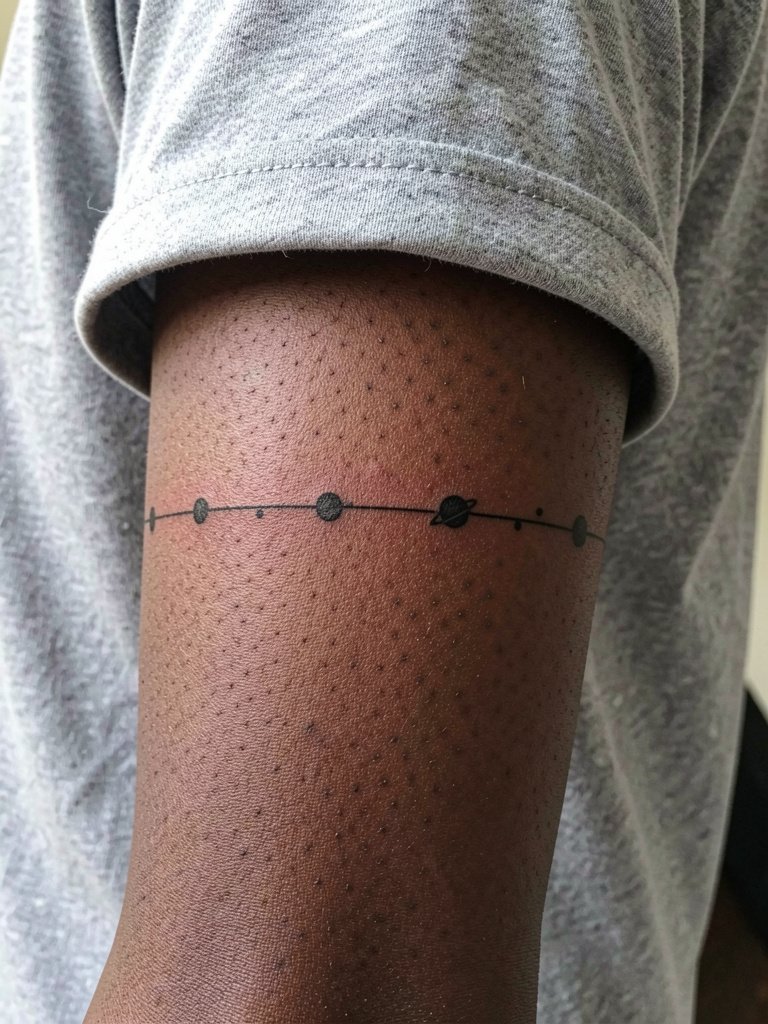
16. Planet Coordinates on the Inner Bicep

Inner bicep placements need extra attention to scale and line weight because the skin is softer there. Tiny type can become unreadable as the flesh settles. Instead of micro type, choose slightly larger numerals and request proofing on your skin at the appointment. The session feels tender but manageable for short blocks. Wear a tank top so the artist can access the medial surface without fabric interference. For everyday style, short-sleeve button-ups work well to frame the inner arm.
17. Comet Tail Accent on the Ankle

Ankle designs face abrasion from socks and frequent shoe contact. The biggest mistake is placing trailing fine hair-thin tails where friction will eat them. To avoid that, ask for slightly thicker tail strokes and position the comet where shoes do not sit directly above the ink. Sessions are brief and healing benefits from protective bandaging for the first two days. For showing the motif choose cropped pants or skirts and ankle jewelry like minimal ankle chains.
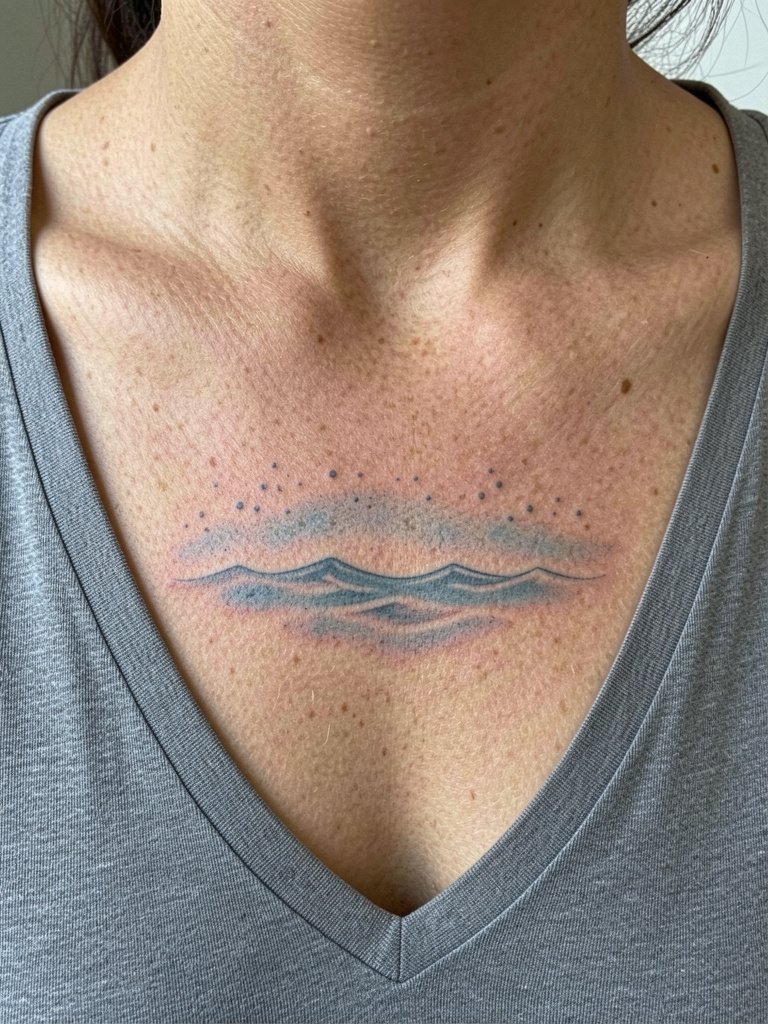
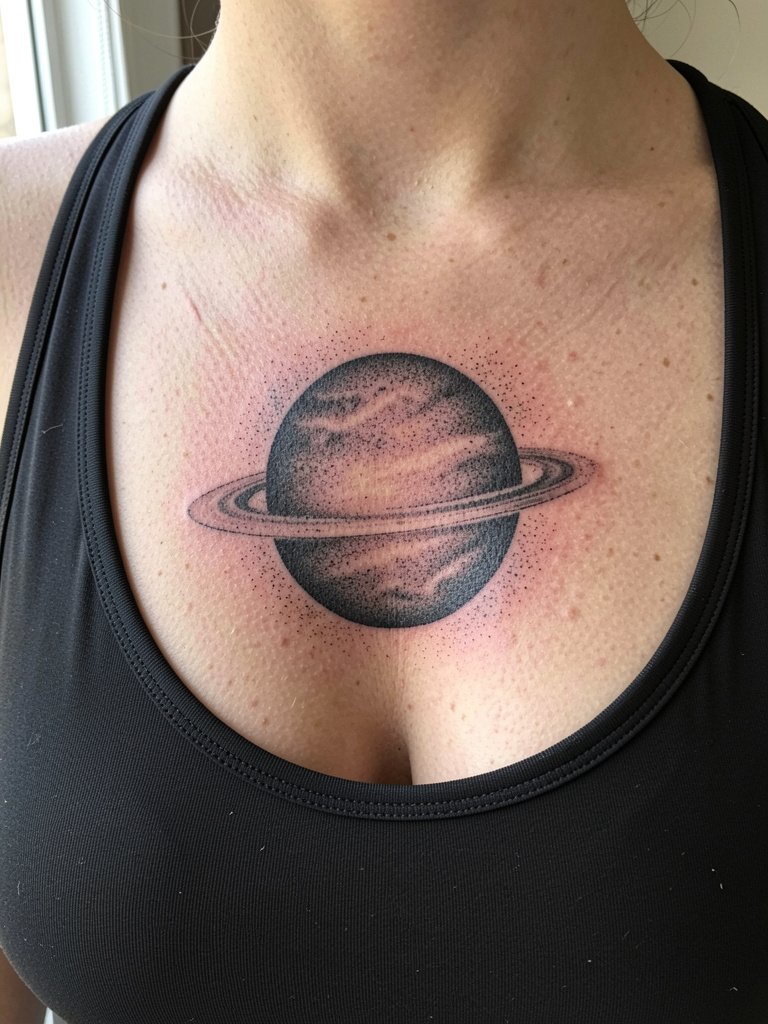
18. Surface Topography Dot Work on the Chest
Stipple topography across the sternum or upper chest looks tactile but requires precision. The chest area can shift and stretch, especially with arm movement, so larger dot spacing keeps the texture readable longer. One common error is compressing the stipple too densely. If you choose chest placement, expect a more intense session near the sternum and discuss break timing for comfort. For evening wear, scoop-neck dresses make the texture visible and elegant; pair with scoop-neck dresses.
19. Planetary Silhouette on the Hip Pocket Area

Bold silhouettes across the hip pocket area are forgiving and make strong graphic statements. Placement just above the waistband prevents direct rubbing from the top edge of jeans. A mistake is centering the silhouette where the button would press; offset the mark laterally for comfort. Sessions for single silhouettes are brief, and touch-ups are rarely needed if the outline is placed away from clothing friction. For showing it off, pair with low-rise waistlines or crop tops that do not sit directly on the ink.
20. Ringed Planet Calf Sleeve Accent
Calf accents can be scaled up into half sleeves, and the area tolerates heavier saturation. For small ringed planets within a larger calf composition, confirm that ring lines are slightly thicker than your reference so they stay visible after movement. Sessions are comfortable and usually done in one sitting if limited to a few elements. A practical mistake is underestimating the time needed when combining planets with background shading; plan accordingly. For summer looks pick mid-calf boots or rolled denim like rolled cuff jeans that keep the area visible.
21. Micro Planet Cluster on the Back of the Hand
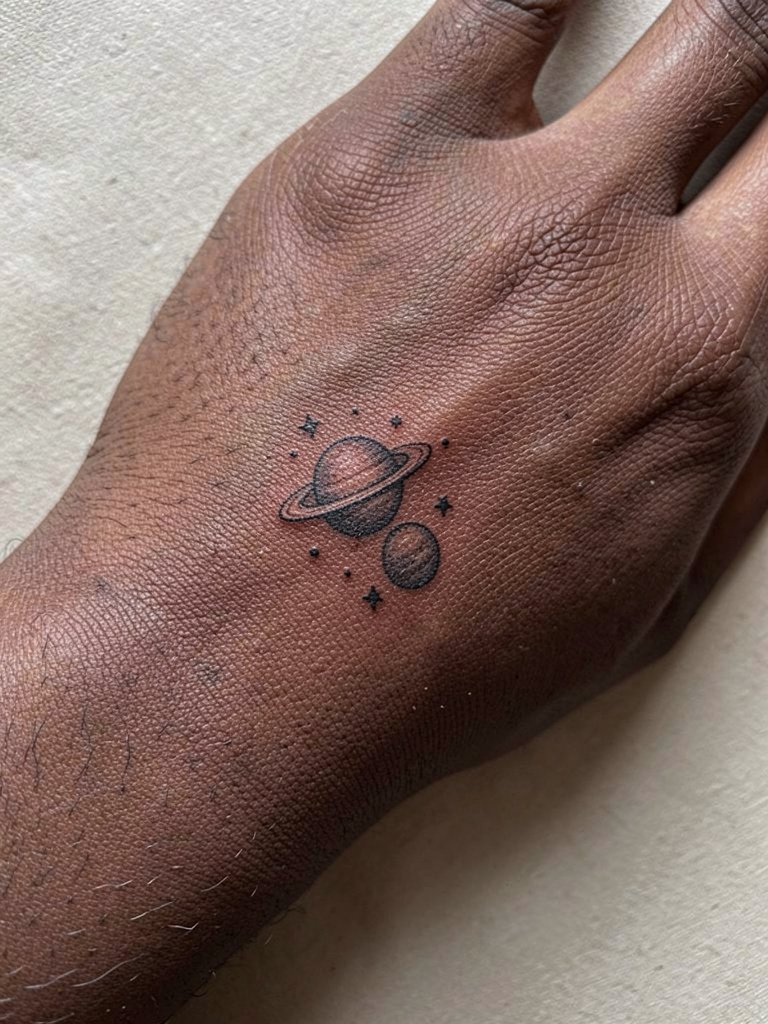
Hand tattoos are high-wear and need realistic expectations about longevity. The hand's constant washing and exposure means micro clusters will soften sooner than forearm work. One camp of artists discourages hands for fine detail. The opposing camp will do the work if the client accepts that touch-ups will be common. If you still want it, prioritize bolder dots and accept a regular touch-up routine. The session is quick but the healing period needs vigilance to prevent pigment loss.
22. Negative Space Planet on the Sternum
Negative-space planet work on the sternum relies on surrounding tone rather than ink inside the shape, so the artist must balance shading to keep the planet silhouette distinct. The sternum can be a sensitive area, and session comfort improves with planned breaks and numbing strategies. Avoid requesting too subtle a negative edge because the body can soften contrast over time. For this placement, fitted undergarments that do not press on the area during healing are essential; consider low-compression bralettes to keep fabric from rubbing.
23. Tiny Planet on the Ankle Bone

Ankle bone tattoos are small, meaningful, and easy to hide, but expect faster softening due to shoes and friction. Place the dot slightly above the most contact-prone ridge to extend clarity. Sessions are brief and tolerable, but keep in mind a thin cuff or anklet can press on fresh ink, so wear protective covers for the first week. For footwear pairings, sandals and cropped pants show the work best; try minimalist slide sandals.
Frequently Asked Questions
Q: How do fine-line planetary dots age compared with bolder planet silhouettes?
A: Fine-line dots and very small details tend to soften by year two to five, especially on high-motion areas like the wrist and hand. Bolder silhouettes and slightly larger dots retain legibility longer because they resist the subtle ink migration that happens with healing and daily wear.
Q: Where can I find healed planetary portfolios and discovery pathways without naming artists directly?
A: Search platforms with keywords and healed-photo tags, and use location filters to narrow to nearby shops. Hashtags that focus on healed work and placement filters on image platforms surface portfolios; also check community threads where people share long-term healed shots in multiple skin tones.
Q: Is it safe to put a planet tattoo on the ribcage if I am worried about pain and aging?
A: The ribcage is higher on a common pain scale, and sessions often need short breaks. Aging depends on scale and line spacing; choose slightly larger spacing and a bolder baseline line to keep lines from merging as skin moves. Numbing strategies and planned breaks help with comfort.
Q: How often should I expect touch-ups for small planet tattoos on the hands or feet?
A: Hands and feet wear faster and often need touch-ups every one to three years to restore crispness. If you prefer fewer touch-ups, opt for slightly larger, bolder marks rather than micro details.
Q: What should I wear to my session for a thigh or hip planet so the artist has access and the fabric does not rub the fresh ink?
A: Choose fitted bottoms you can step out of or low-rise jeans worn normally with the waistband below the tattoo so no fabric is moved during the appointment. Lightweight skirts and well-fitting shorts work too. A loose top that can be removed without stretching the area is a practical choice.
