
Realistic clock tattoos often look best when the design starts with a constraint, not a flourish. Thin, decorative hands that read great in a phone photo can merge into a blur on the wrist after two years. I prefer advising slightly bolder linework, deliberate spacing between numerals, and a timed touch-up plan for pocket watches and floral clocks so the face still reads as intended when the skin settles.
1. Small Pocket Watch on Inner Forearm
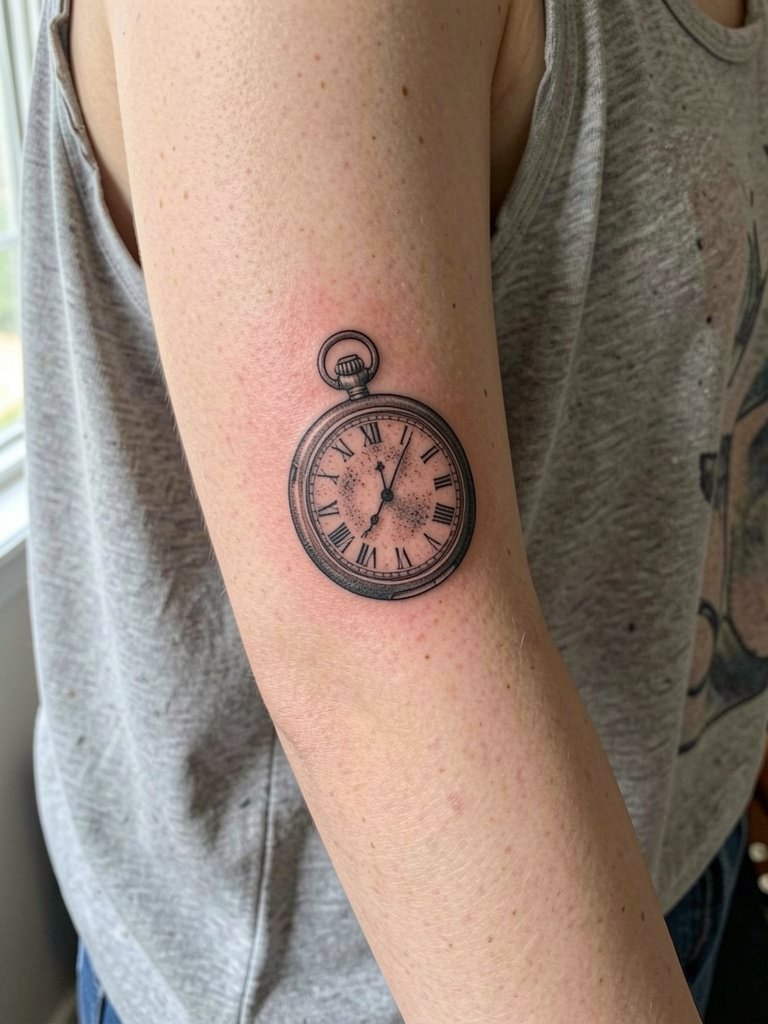
A small pocket watch reads best with slightly heavier linework than single-needle script. For this placement request that the artist increase the numeral spacing and keep the internal details sparse so the face does not clog by year three. Expect a 60 to 90 minute session and mild forearm tenderness that is easy to manage. The inner forearm can show blowout if needles go too deep near the wrist crease, so ask for controlled depth and a later touch-up at 12 to 18 months. For showing it off, a rolled linen sleeve pairs well with this clean silhouette, try rolled linen shirts for casual days.
2. Realistic Sundial on Wrist Band
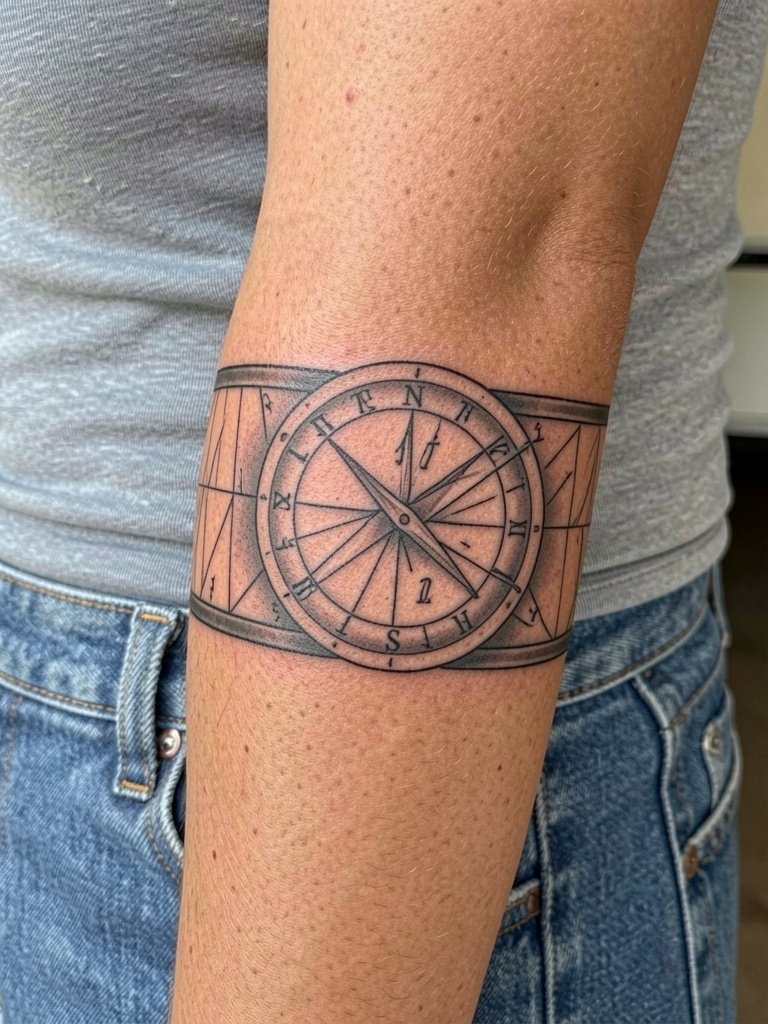
A horizontal sundial band on the wrist reads like jewelry for weeks, but friction from watches and bracelets speeds edge fade. Recommend a slightly thicker gnomon shadow and higher saturation around the band edge to resist abrasion. Session time is typically 90 minutes, and the wrist is sensitive, expect sharp moments during shading. Common mistake is cramming tiny numerals into the band, which blur into a single grey line over time. For outfits, this placement pairs with simple metal bracelets or a slim watch, try a minimal leather strap watch to frame the piece.
3. Melting Pocket Watch with Drips on Ribcage
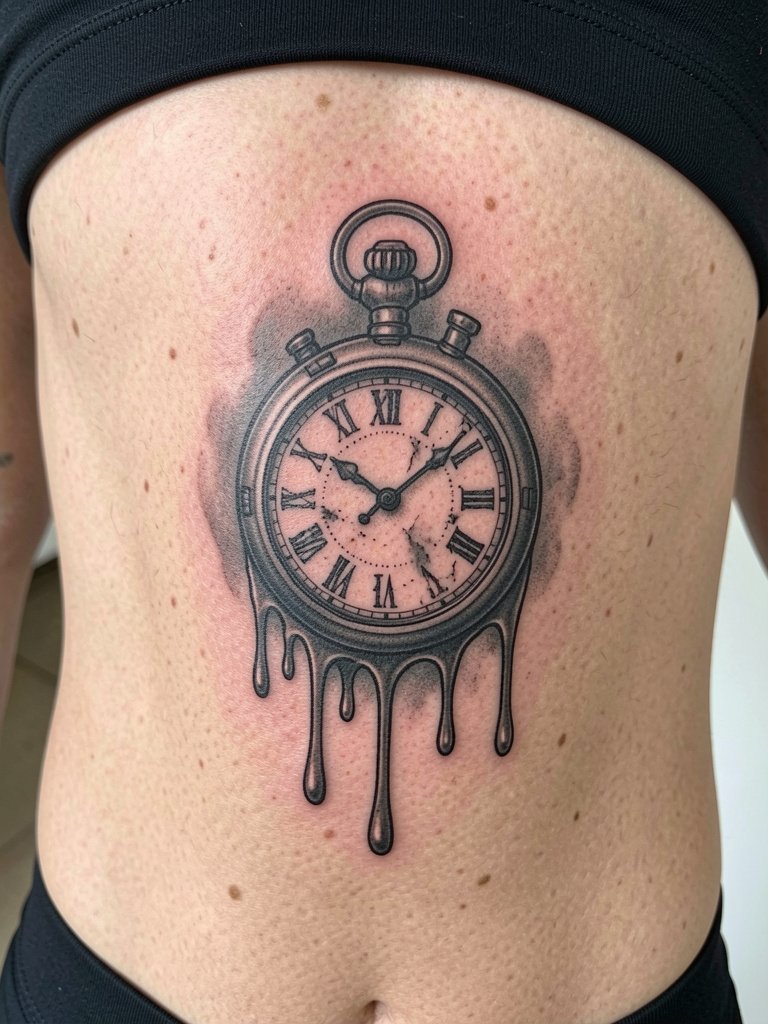
Ribcage work ages differently because skin there flexes with breathing and weight changes. Artists split into two camps. One camp warns tiny detail on ribs blurs quickly and recommends bold shapes instead. The other camp argues that careful needle depth and slightly wider spacing let fine detail settle well, and some will show healed three-year photos as evidence. For this piece, plan two short sessions to allow touch-up if needed, and expect a 7 out of 10 pain rating for the ribs. Wear a fitted sports bra for access on session day, and mention to the artist that you want the drips read clearly from a standing distance, not only in close-up photos.
4. Clock Face Fragment with Glass Shards on Shoulder Blade
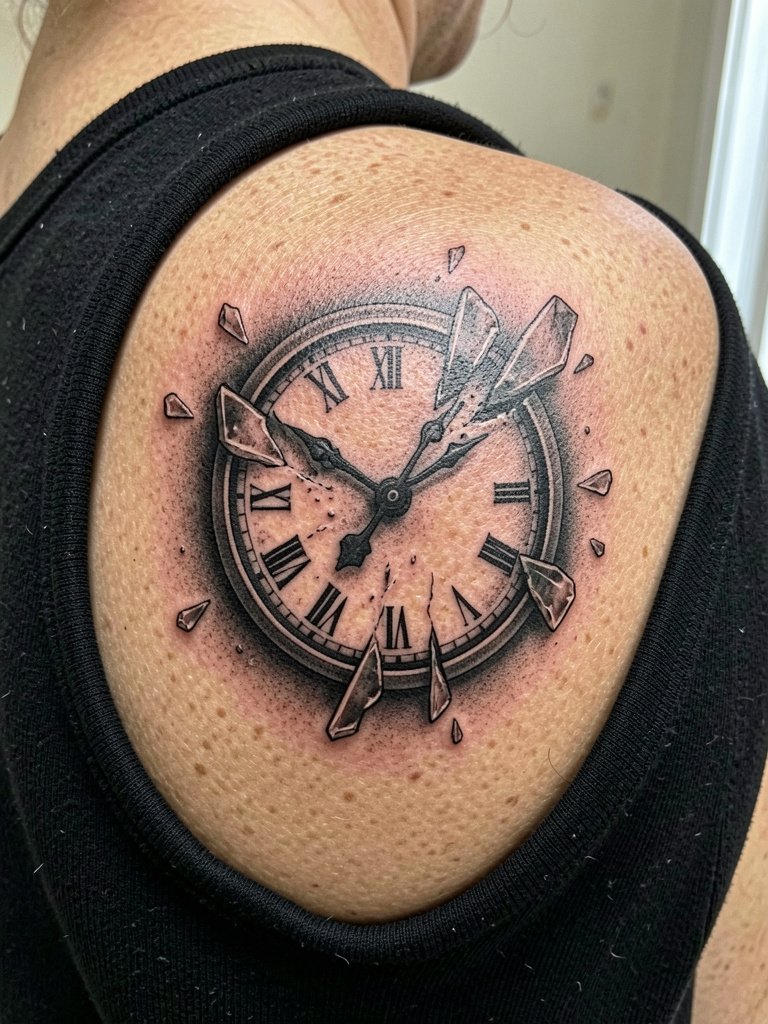
Shoulder blade pieces allow larger compositions that age well with movement. I suggest asking for negative space between shard edges to avoid early merging of fine cracks. The session usually runs two hours, with mild to moderate discomfort when working near the spine. A common mistake is overfilling tiny shard details that later look like grey blotches. For evening wear, an open-back dress or camisole makes the fractured face visible, try pairing it with an open-back midi dress for nights out.
5. Baroque Frame Clock on Upper Arm
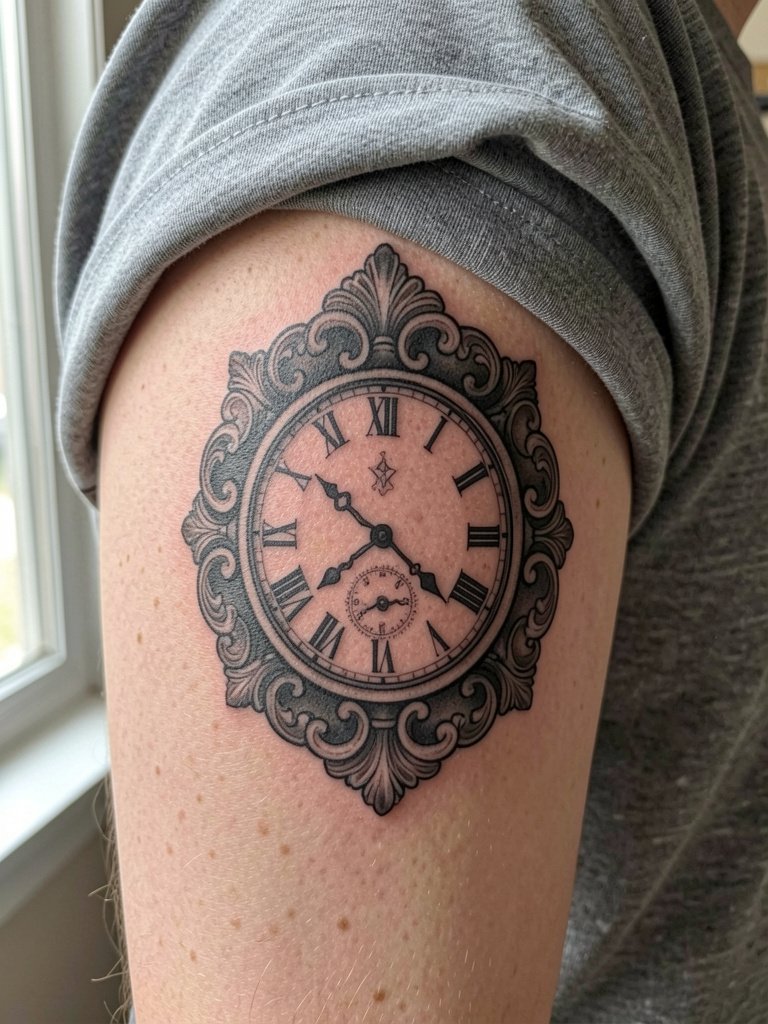
The outer upper arm tolerates saturation well, so ornate frames and heavy blackwork are excellent choices. Plan a single three-hour session for the frame and a follow-up touch-up around year one to refresh saturation. A mistake is asking for micro-detail inside the filigree too close to the frame edge, which loses definition. For daily wear, short-sleeve shirts or rolled sleeves reveal the art without it feeling overexposed. Try a short-sleeve linen shirt that rolls up neatly and keeps the piece visible.
6. Timepiece with Botanical Wreath on Collarbone
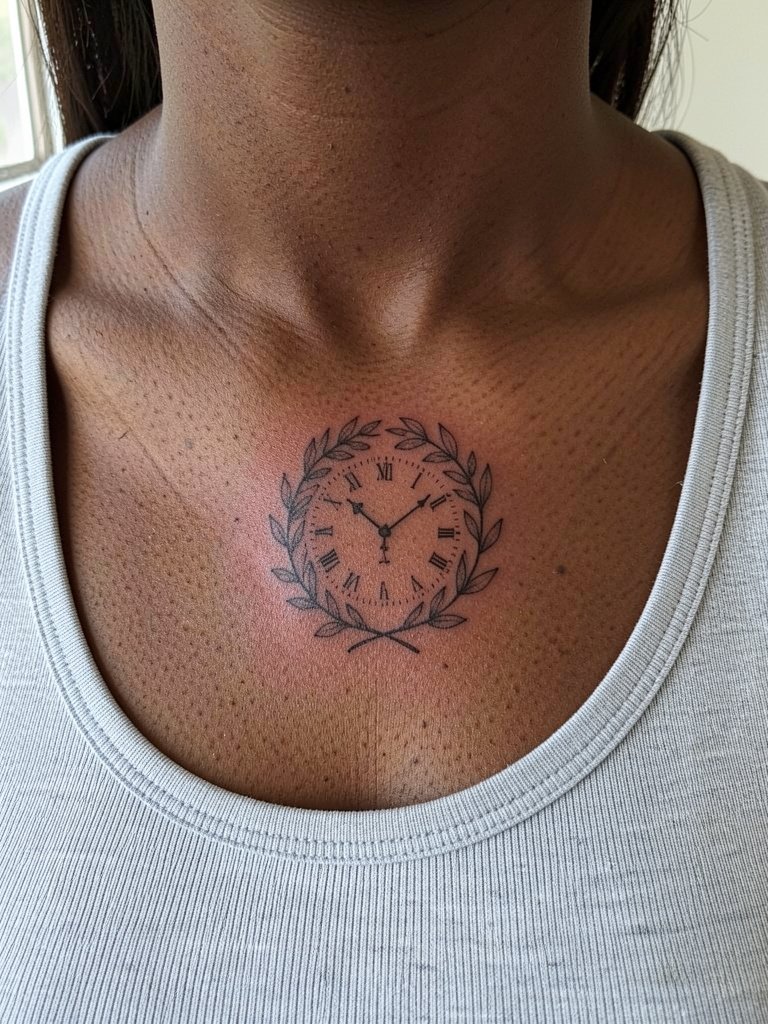
Collarbone placements read best when the clock face is compact and the wreath has negative space between leaves. The clavicle area can be bony and sensitive, expect a 6 to 7 out of 10 pain level for short sessions. Avoid ultra-thin leaf veins that will soften, and request slightly stronger linework around the clock rim. Wear open-neck tops to show this placement after healing, and for the session choose a scoop-neck tank so the artist has clear access without fabric shifts.
Session Day Picks
These tools smooth the session and address wrist, collarbone, and arm pieces discussed above.
-
Stencil transfer paper kit. Lets you preview how the clock face and wreath sit on curved collarbone or forearm skin before the needle goes on.
-
Topical numbing cream. Apply 30 to 45 minutes before short but sensitive collarbone or rib sessions to reduce surface pain without changing the artist's linework.
-
Thin protective film roll. Keeps wrist bands and small wrist tattoos clean during the first few days of frequent hand washing.
-
Disposable clip cord cover set. Small studio item that reduces cross-contamination on shorter forearm or wrist sessions.
-
Aquaphor healing ointment. Thin application during the first 48 hours helps keep delicate clock linework moisturized without smothering.
7. Brass Gear Clock with Exposed Mechanics on Calf
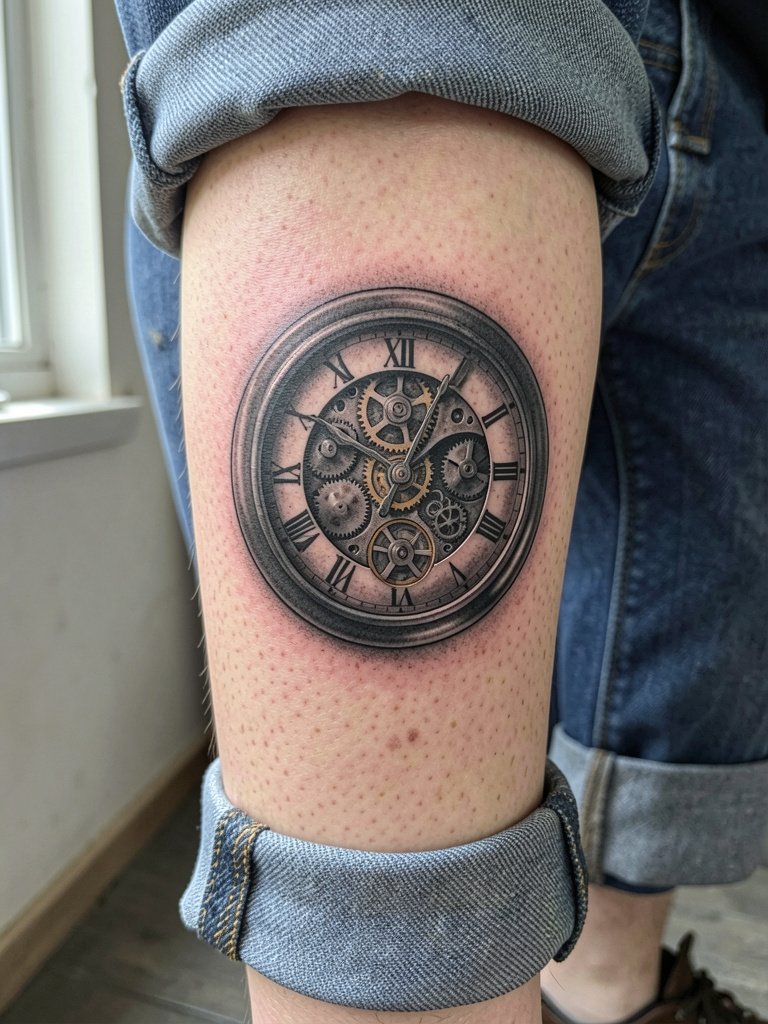
Calf pieces let the artist work larger on gear detail, which is helpful for longevity. Ask for moderate saturation in the gear teeth and avoid tiny engraved text inside cogs. Session time ranges two to three hours, and the calf is noticeably less painful than ribs. A real mistake is insisting on photorealistic metal sheen with tiny highlights that vanish into skin texture, instead opt for contrast and stipple shading to imply depth. Show-off pairing works with ankle boots or cropped denim, try rolled denim jeans to reveal just enough of the piece.
8. Moon Phase Clock on Side Neck
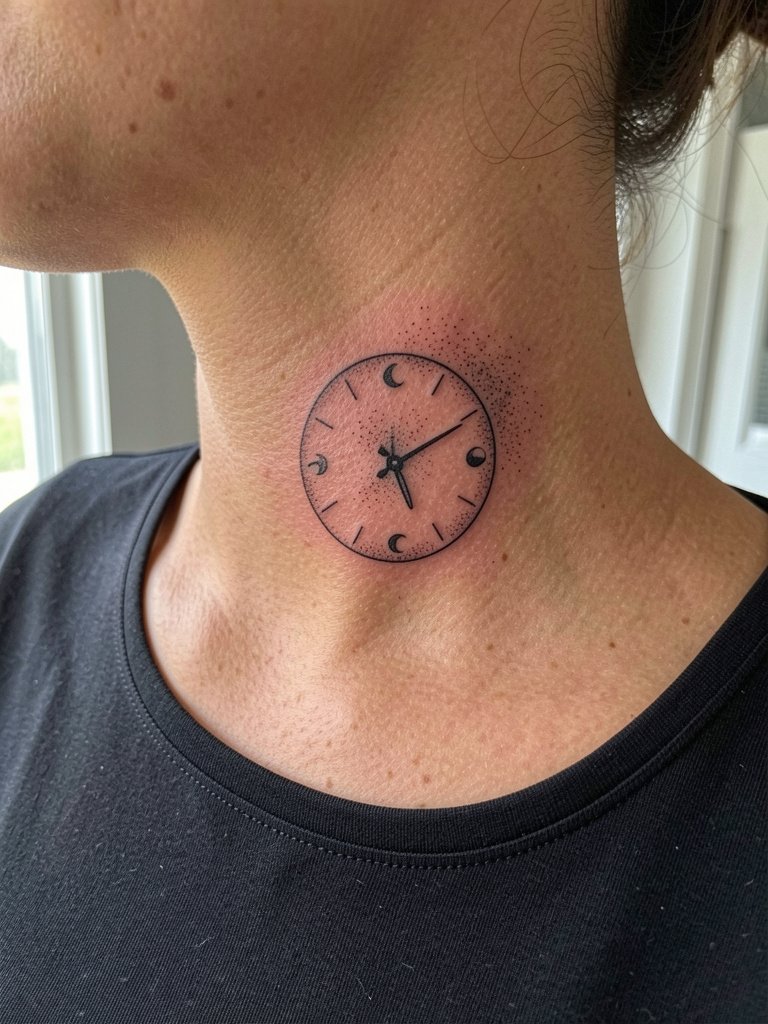
Side neck tattoos need clear spacing between elements so the moon icons remain readable as skin settles. Plan a focused one-hour session for a minimal face and a short two-week touch-up window if edges soften. The neck is visible and sensitive, pain tends to be sharper but brief. A common error is cramming tiny moons into a narrow band, which loses definition with movement. For styling, a wide-neck top or v-neck shows the clock cleanly, pair with a thin pendant rather than chunky chokers for balance, try a wide neck top.
9. Anatomical Heart Clock on Sternum
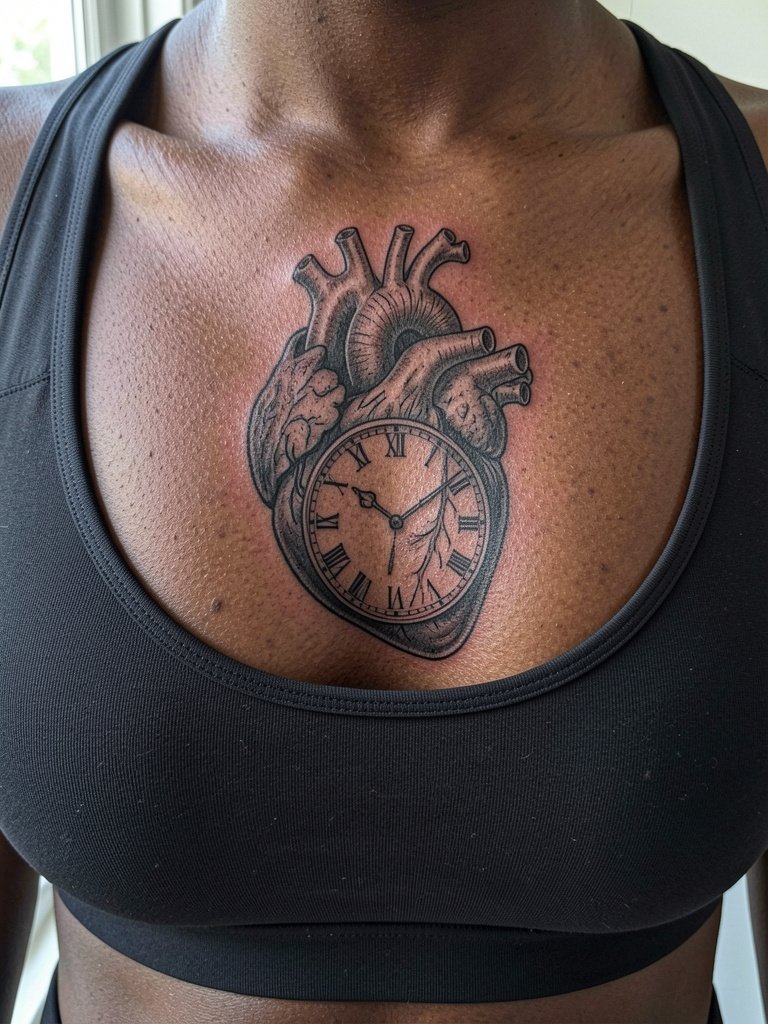
Sternum pieces combine sensitivity with skin that moves subtly under clothing, so ask for slightly bolder valves and simplified internal detail to preserve readability. Pain on the sternum is on the higher side, and many artists split this into two shorter sessions. A frequent mistake is overworking microvascular detail that later looks like grey smudges. Respect for the area is important, choose an artist experienced with sternum anatomy and be prepared for a touch-up at year one. For session wear, a fitted sports bra makes access simple without constant fabric shifting.
10. Broken Clock with Roman Numerals on Thigh
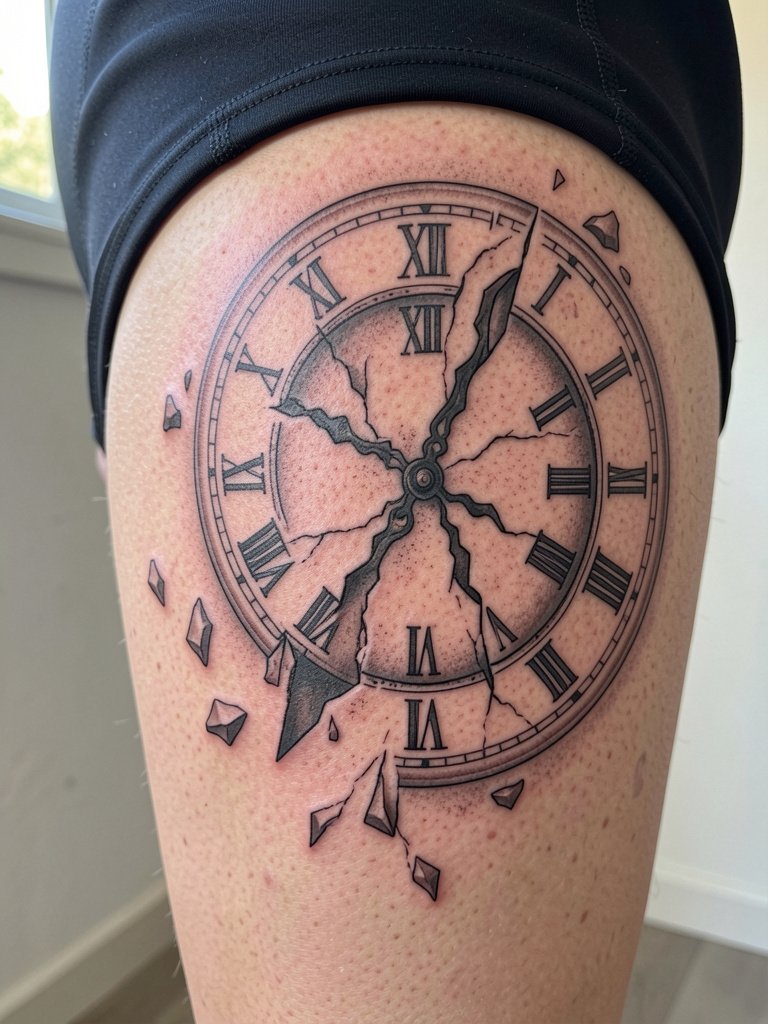
Outer thigh is forgiving of detail and holds saturation well, so broken numeral fragments can be rendered with crisp edges. Session time typically two to three hours with moderate discomfort that is manageable. A common mistake is placing small shards too close to the underwear line, which exposes them to friction and faster fading. Discuss exact placement markings with the artist while seated so the piece aligns with clothing lines. For reveal moments, a midi skirt or slip dress shows the outer thigh elegantly, try a slip dress.
11. EKG Line Merging into Clock Hands on Forearm
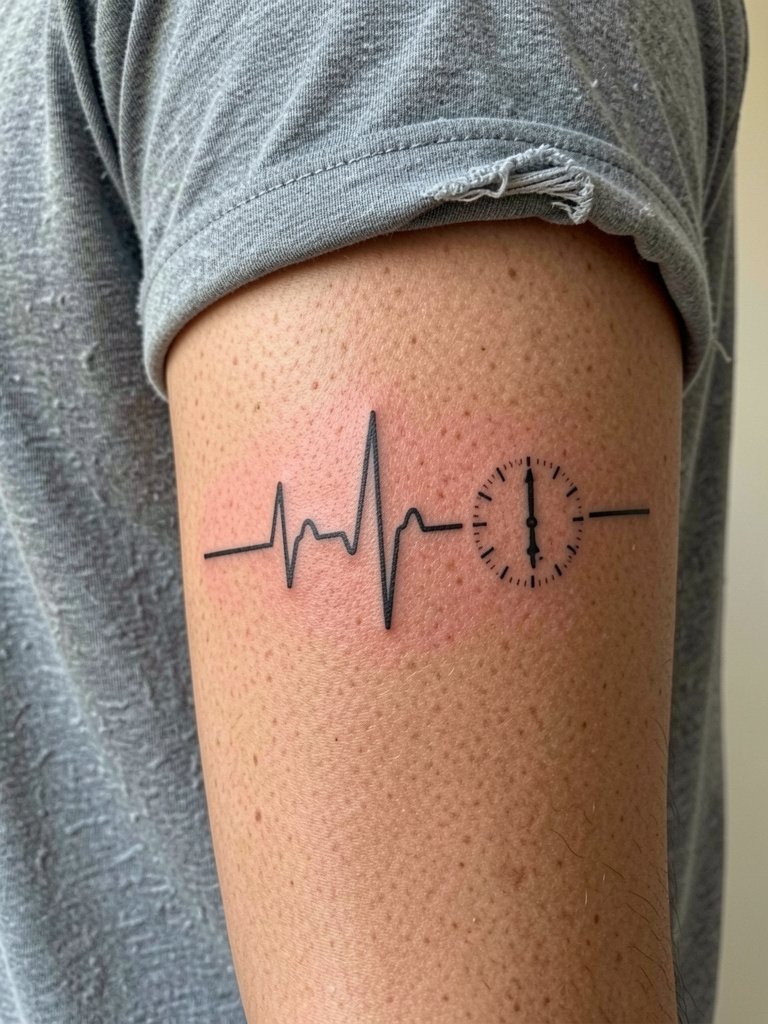
A forearm EKG that becomes clock hands needs a deliberate transition zone so the two elements do not look like one indistinct line later. Request slightly heavier weight where the heartbeat becomes hands, and avoid ultra-fine single-needle for the final hands. Session time is 45 to 75 minutes, pain is mild. A typical mistake is using a low-contrast grey for the EKG, which fades into skin tone; ask for crisp black for longevity. Show-off pairing works with rolled sleeves and a slim watch, try a minimalist bracelet to accent the wrist without covering the art.
12. Sundial Compass Hybrid on Back of Hand
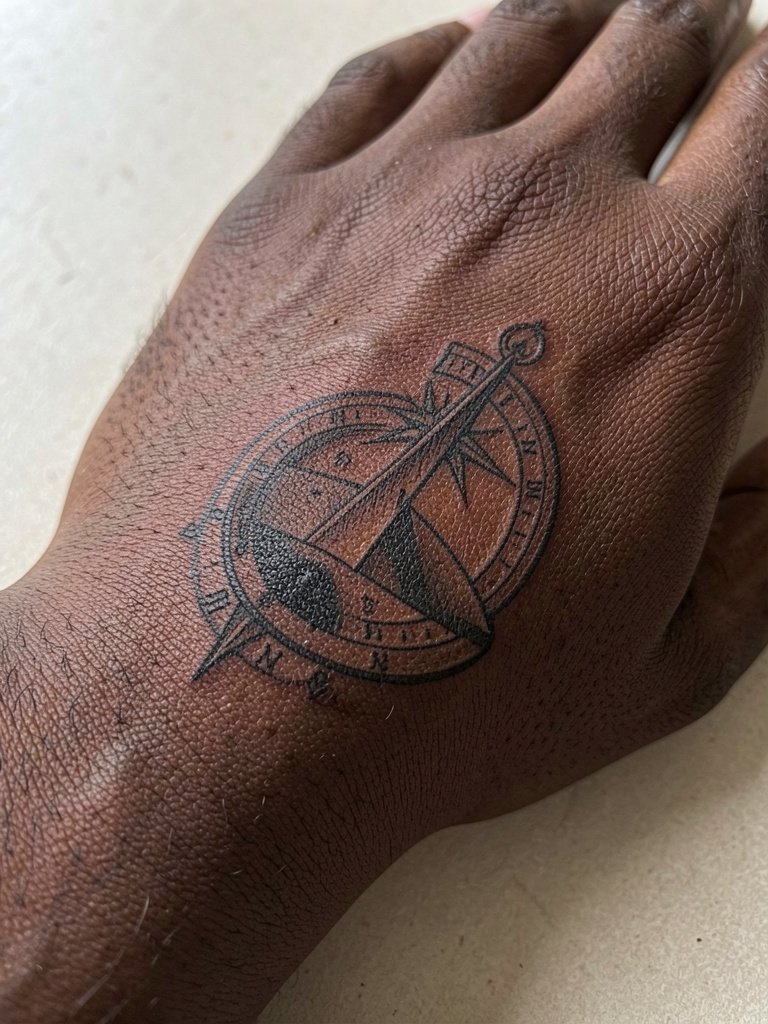
Hand pieces face heavy abrasion and frequent washing, so compact designs with bolder center saturation last better. Artists split on hand work, some avoid intricate faces entirely and others accept touch-ups as part of the plan. For this hybrid, expect a short initial session and a likely touch-up at six months. A real mistake is asking for ultra-fine numerals, which can blur into the knuckles. For daily styling, slip on thin rings rather than covering the back of hand with large bracelets, and keep in mind the piece may need refreshes.
13. Clock Wound into Tree Rings on Upper Back
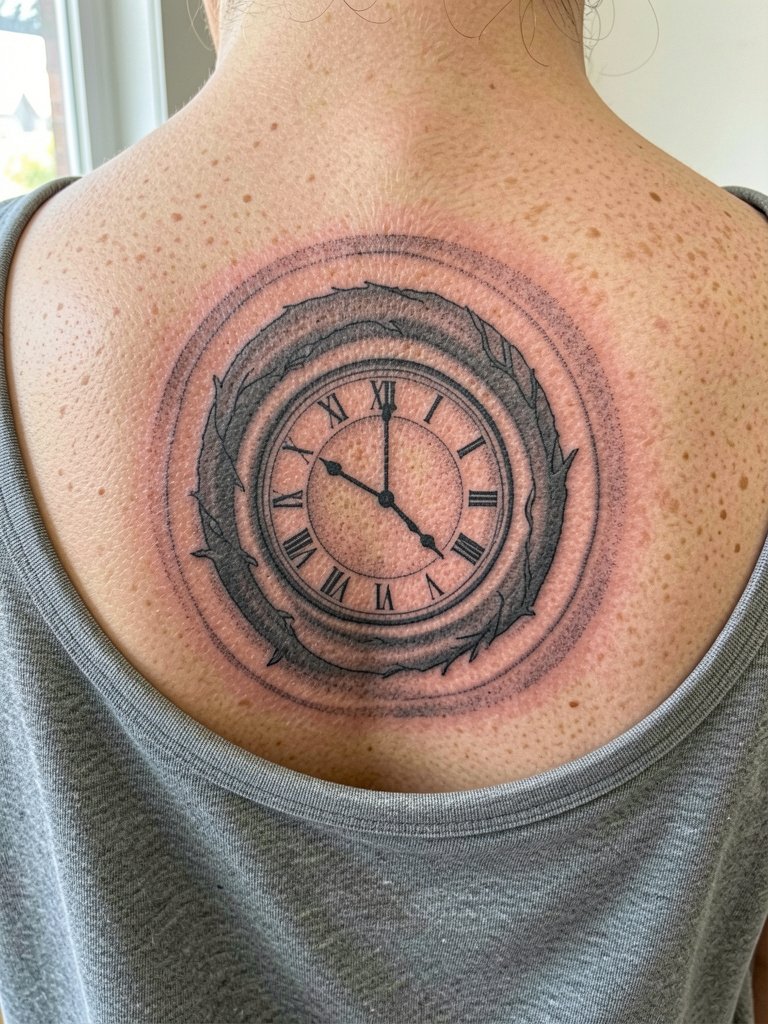
Upper back pieces can hold expansive texture, making tree-ring clocks a natural fit. Ask the artist to emphasize ring spacing so growth-like lines remain readable over time. Sessions are longer, often split across two visits, and pain is moderate. A common error is packing too much micro-detail into the rings, which flattens as healing finishes. For evening wear, wide-neck backs and low-backer tops highlight the composition, try a wide-back blouse that keeps the art visible.
14. Compass Clock with Coordinates on Side Hip
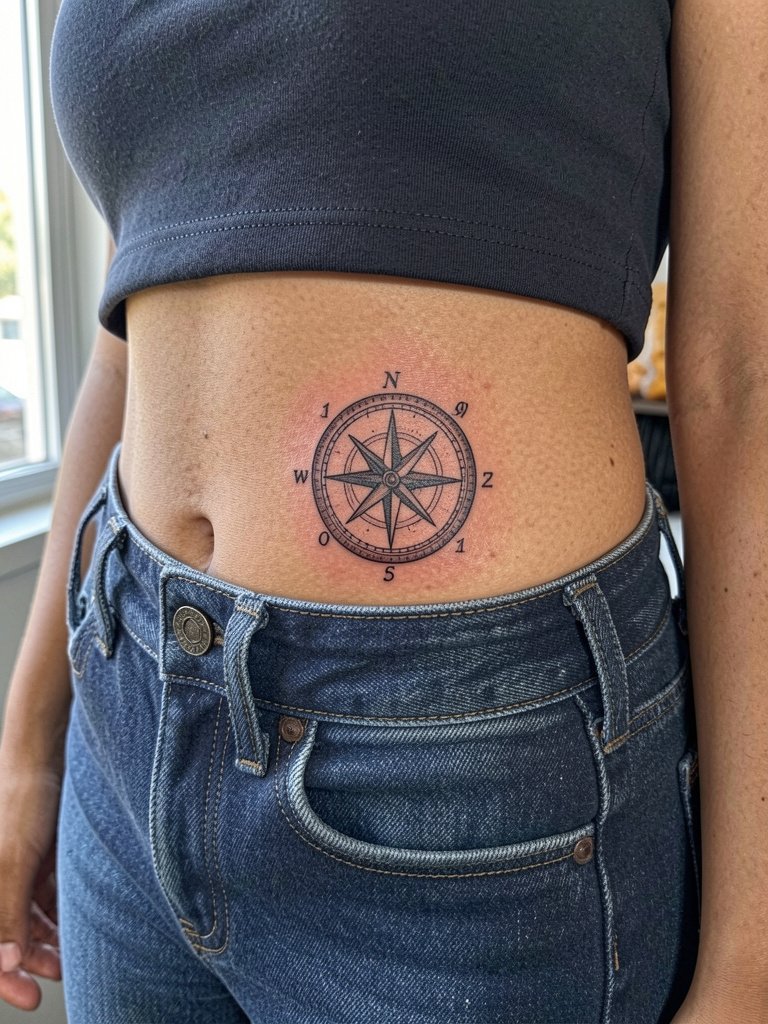
Hip placements are discreet and can tolerate small text if the font is slightly bolder than single-needle. For coordinates, specify exact type and size with your artist so numbers remain legible at five years. Session time is usually 60 to 90 minutes and discomfort is lower than ribs. A mistake is choosing a hairline typeface that fades into a grey line, so request a cleaner mono weight. For showing it off, low-rise jeans and crop tops work well, try a pair of low-rise jeans that sit below the tattoo.
15. Solar Clock with Color Wash on Lower Shoulder
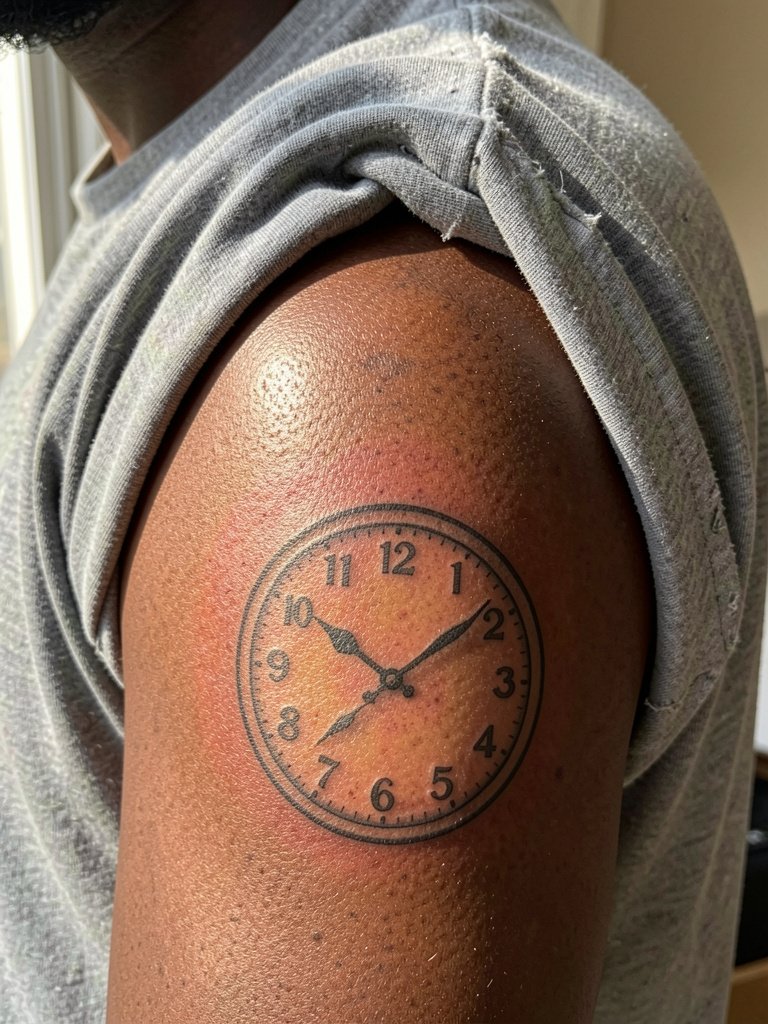
Adding a muted color wash behind realistic blackwork can look striking, but color saturation requires an artist skilled in layering to avoid bleeding into the linework. Ask for the color applied in a separate pass and for test patches so you can see healed results on similar skin tone. The shoulder is a forgiving spot for touch-ups. A common mistake is too bright a wash that distracts from the clock face lines. For summer outfits, sleeveless tops let the color read cleanly; consider a sleeveless linen top that keeps the area visible.
16. Pocket Watch Inside Palm Corner
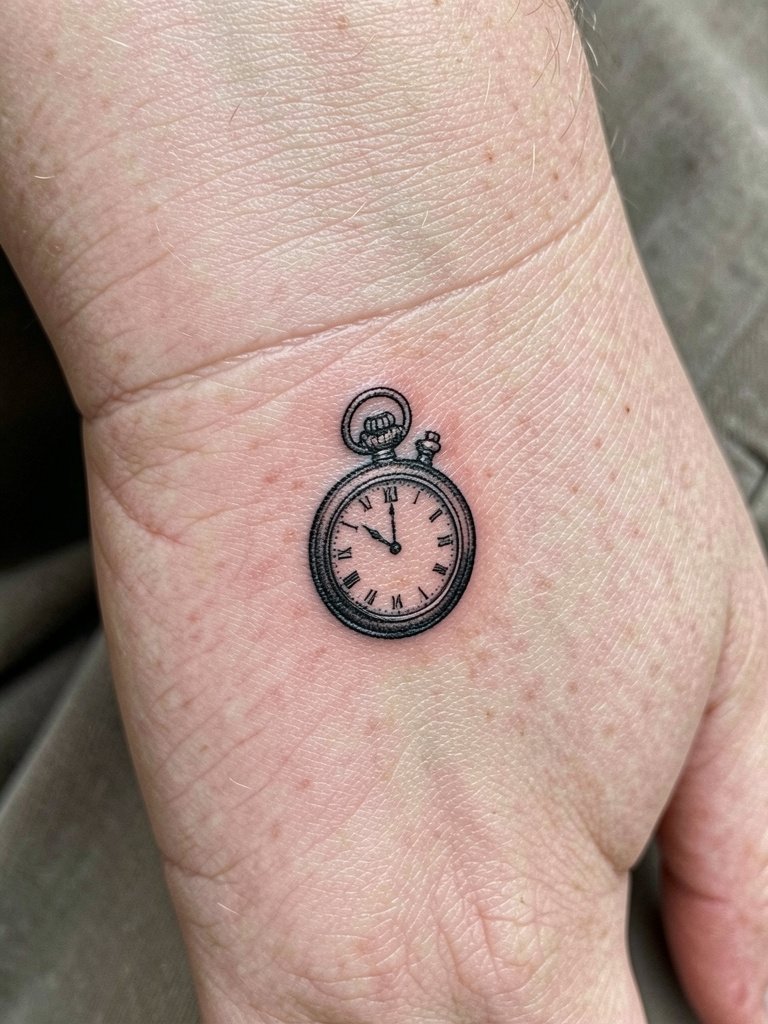
Palm and inner-hand tattoos face the highest wear and risk of rapid fading, so this placement demands bold black and acceptance that touch-ups will be frequent. Artists are divided on palm work, with one group avoiding it due to rapid pigment loss and another willing to do it if clients accept planned refreshes. Expect multiple short sessions and a realistic timeline of frequent touch-ups. A mistake is choosing fine detail for the palm; opt for a strong silhouette and clear black fills. For everyday handling, avoid heavy moisturizers right before typing sessions to protect the fresh ink.
17. Clock Embedded in Wolf Portrait on Bicep
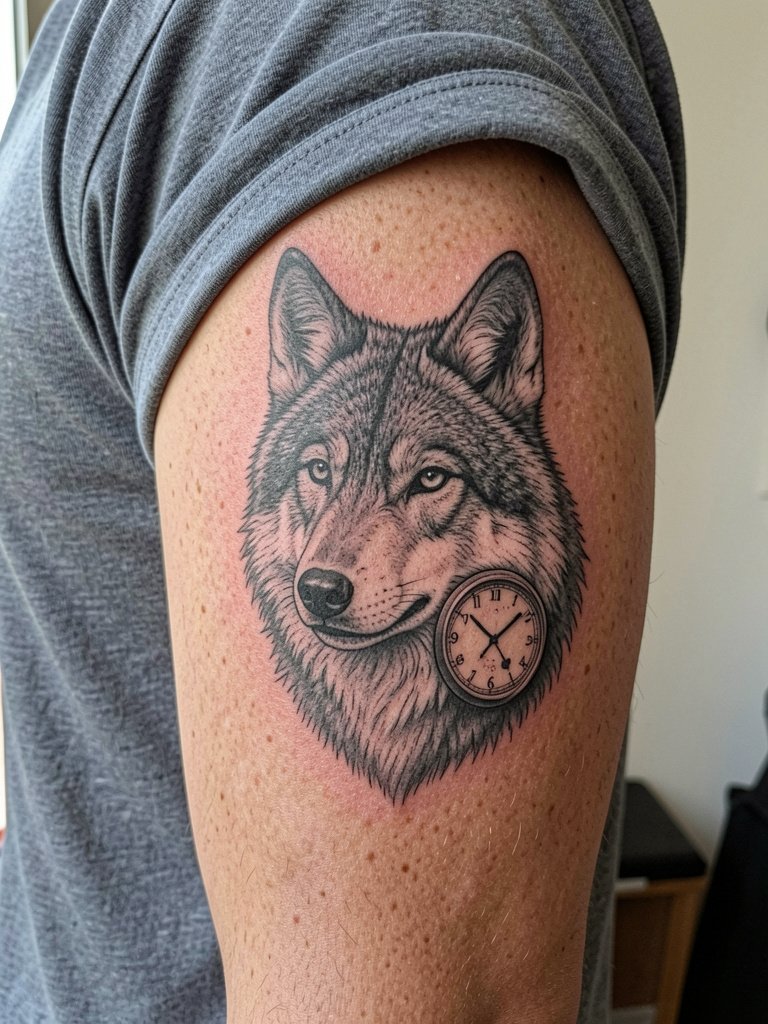
Combining portrait realism with a clock motif works well on the bicep because it offers space for facial detail and a secondary element. Ask the artist to keep the clock face slightly simplified to avoid distracting from the portrait. Session time is often three to four hours, and muscle movement can affect healing so plan light activity for three days. A frequent error is insisting on micro-detail in both the fur and the clock, which can muddle after healing; prioritize which element you want most crisp. For casual wear, sleeveless tops let the bicep piece shine and pair well with a cotton tank.
18. Negative Space Clock on Inner Wrist
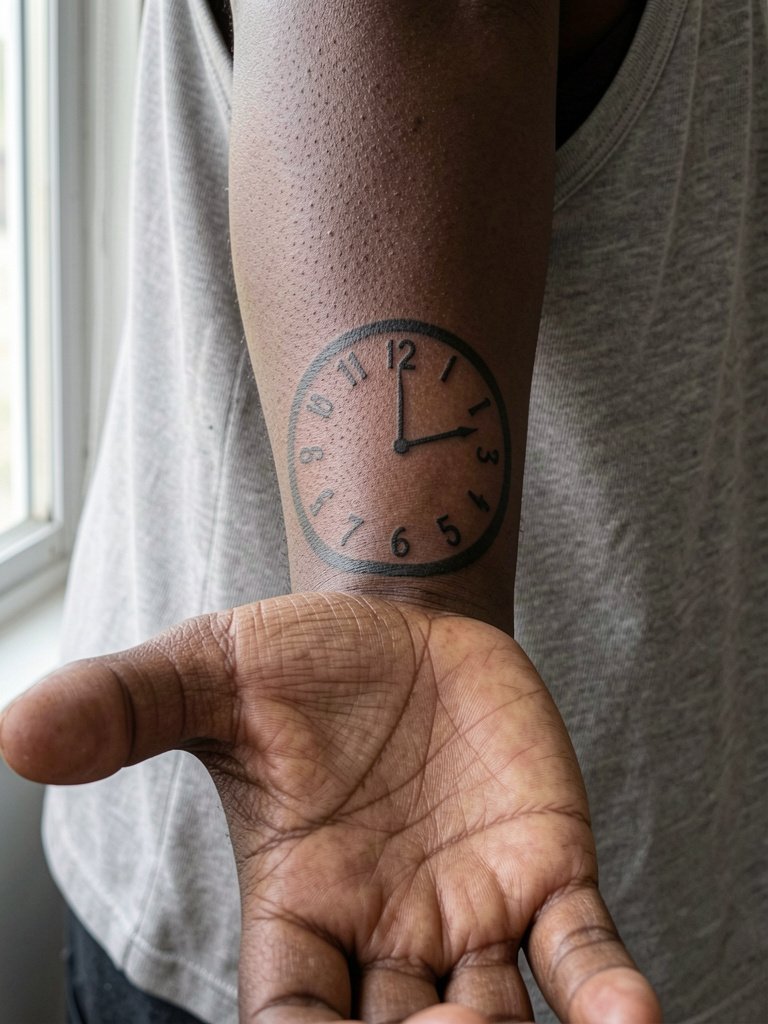
Inner wrist negative-space clocks rely on the contrast between skin tone and surrounding ink, so discuss with the artist how the negative areas will age on your skin. This is a sensitive spot that sees frequent movement, so expect touch-ups between six months and two years. A common mistake is making the negative numerals too narrow, which collapse into grey lines. For session wear, remove tight wrist accessories and wear a loose tank top so the artist has clear access.
19. Steampunk Clockwork Sleeve Fragment
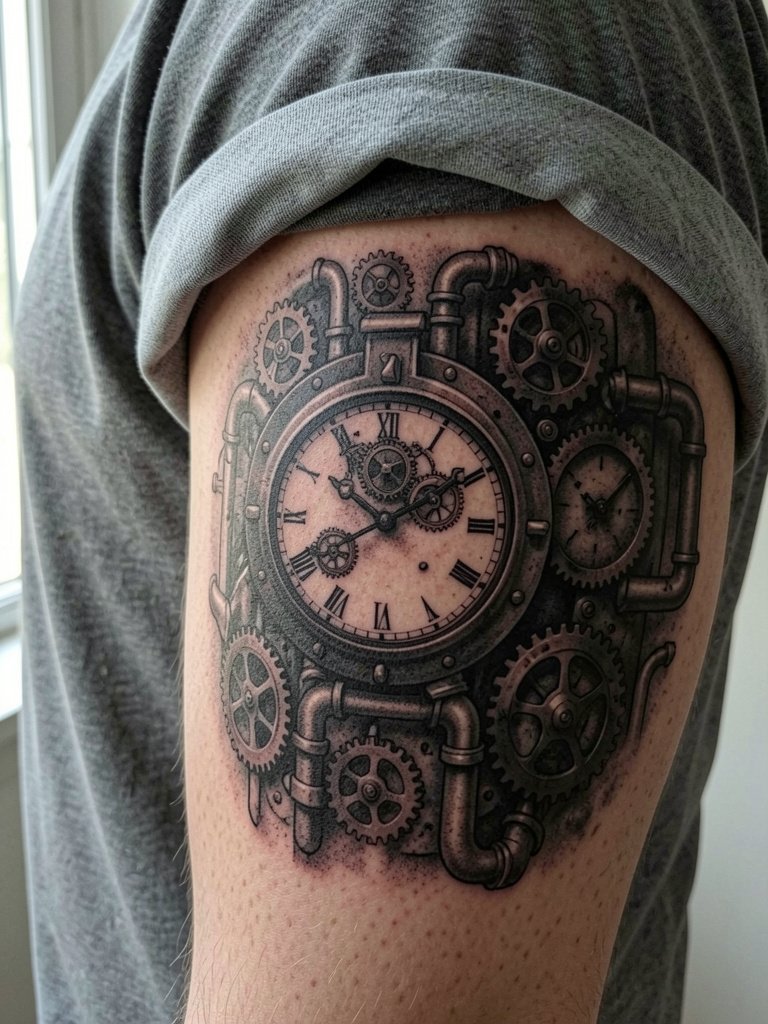
A sleeve fragment with complex gearwork benefits from deliberate spacing so each cog keeps its identity as the skin settles. Plan multiple sessions and accept a staged touch-up schedule over the first year. A common error is jamming too many micro-gears into a small forearm area, which reads like texture not structure after healing. For everyday looks, cropped sleeves and rolled cuffs reveal the mechanical detail, try a long-sleeve shirt you can roll that frames the fragment.
20. Lunar Clock with Starfield on Chest
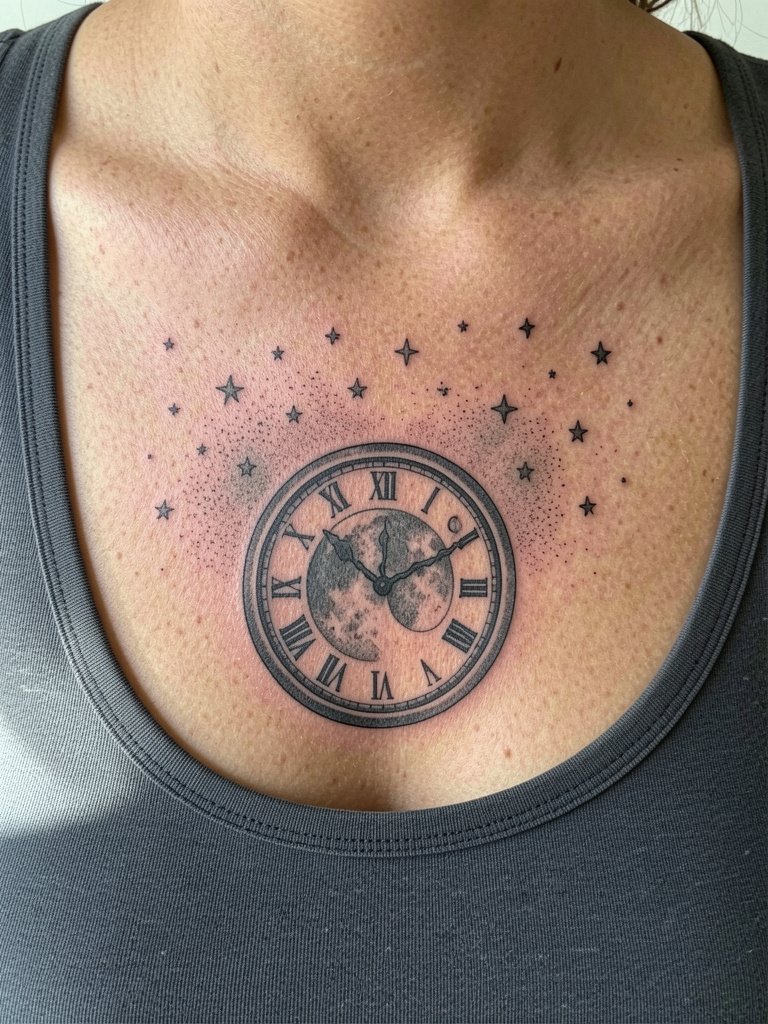
Chest pieces allow airy compositions with tiny stars, but star dots need spacing to stay distinct. For a lunar clock, request dot sizes that read as stars at arm's length, and schedule a touch-up at about one year if dots soften. The chest can be moderately painful, especially near the sternum. A typical mistake is scattering too many micro-dots that merge into a grey wash. A scoop-neck or low V shows the lunar field nicely, consider a scoop-neck tank for post-heal reveals.
21. Mechanical Heartbeat Stopwatch on Inner Arm
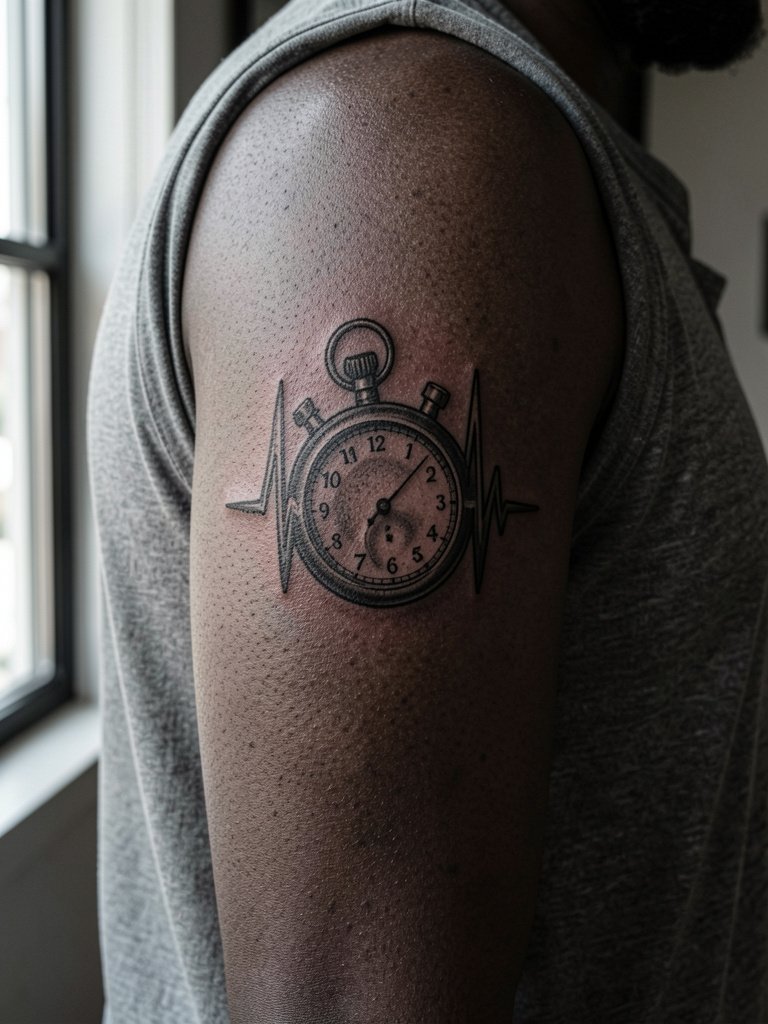
Inner arm placements keep visual elements private and age with modest change. For a stopwatch-beat combo ask for clear separation between the mechanical stopwatch edges and the heartbeat lines so both read distinctly at a glance. Session time is 60 to 120 minutes depending on detail, and pain is tolerable. A mistake is making the heartbeat too tight, which blurs into the stopwatch rim. For session comfort, wear a sleeveless tee so the artist can work without fabric shifting, pair it with a sleeveless tee that stays out of the way.
22. Broken Glass Clock on Ankle
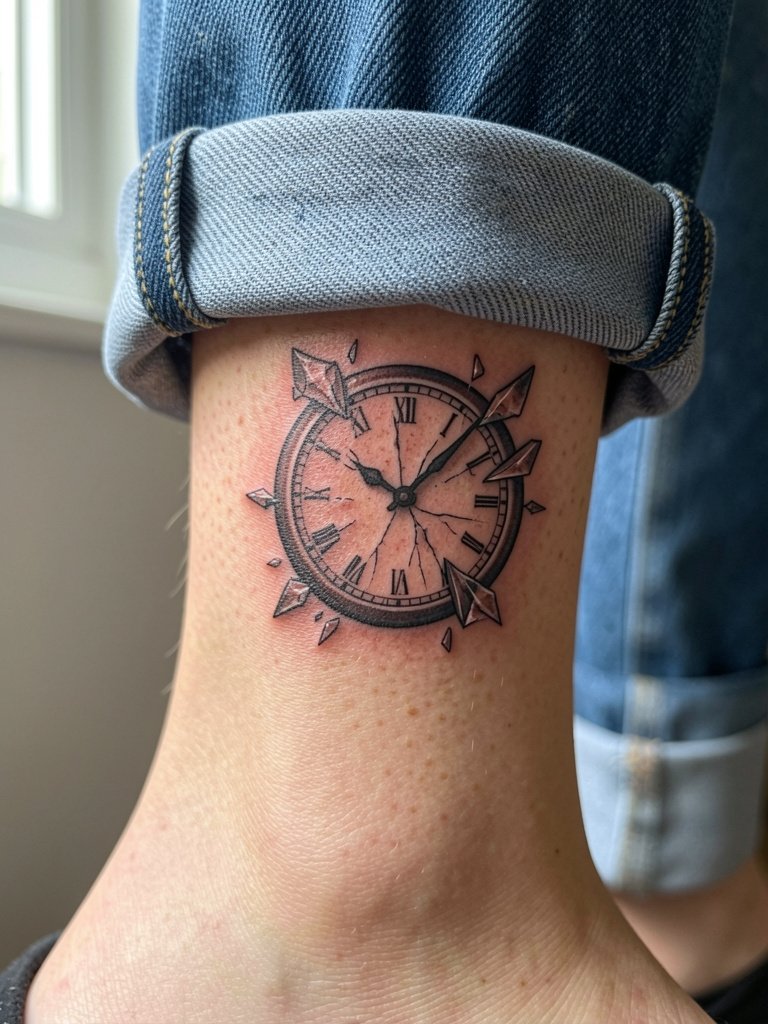
Ankle tattoos face friction from socks and shoes, so choose thicker shard edges and avoid micro-fractures near the bone. Expect a short, fairly painful session and a touch-up at six to twelve months for heavy abrasion areas. A common mistake is tiny glass lines that disappear into callused skin. For footwear, ankle boots or cropped pants show the art cleanly, try a pair of ankle boots that frame the piece.
23. Clock with Seasonal Petals on Throat
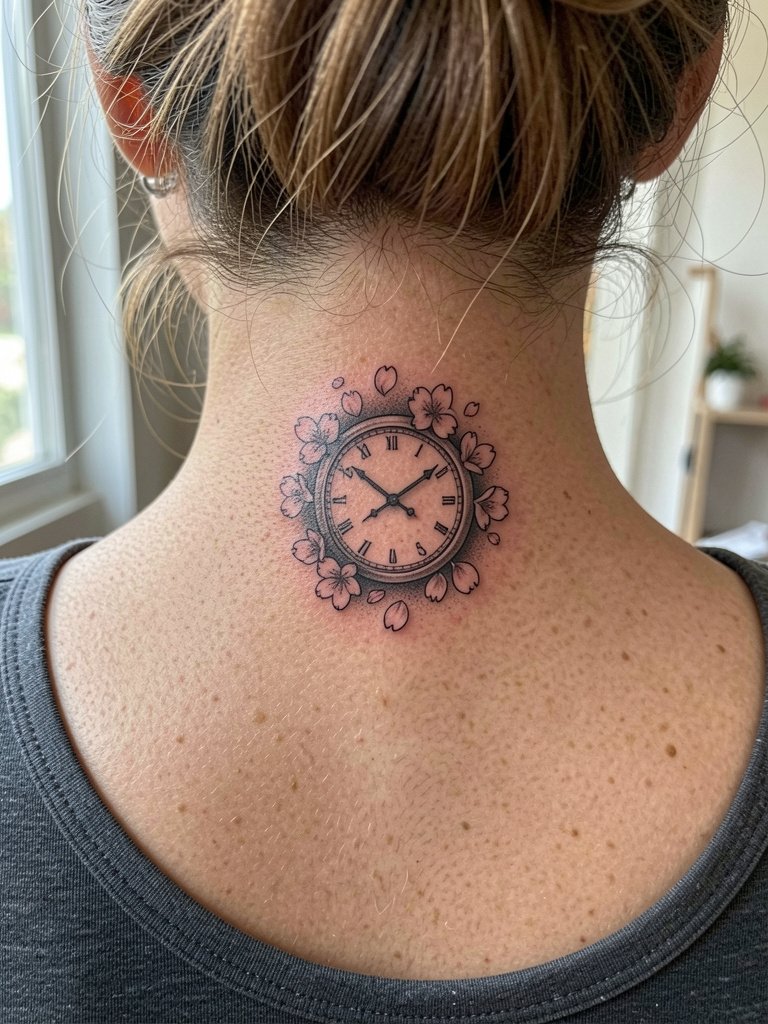
Nape placements are discreet and can take fine detail if scaled appropriately. Ask for petal spacing that keeps each shape distinct once the skin contracts. Sessions are short but the nape is sensitive and may sting more than the shoulder. A mistake is overcomplicating the petal veins, which soften and merge. For styling, wear your hair up to show the tattoo, and try a natural updo clip that keeps hair clear during both session and reveal.
24. Pocket Watch with Map Fragment on Ribcage Side
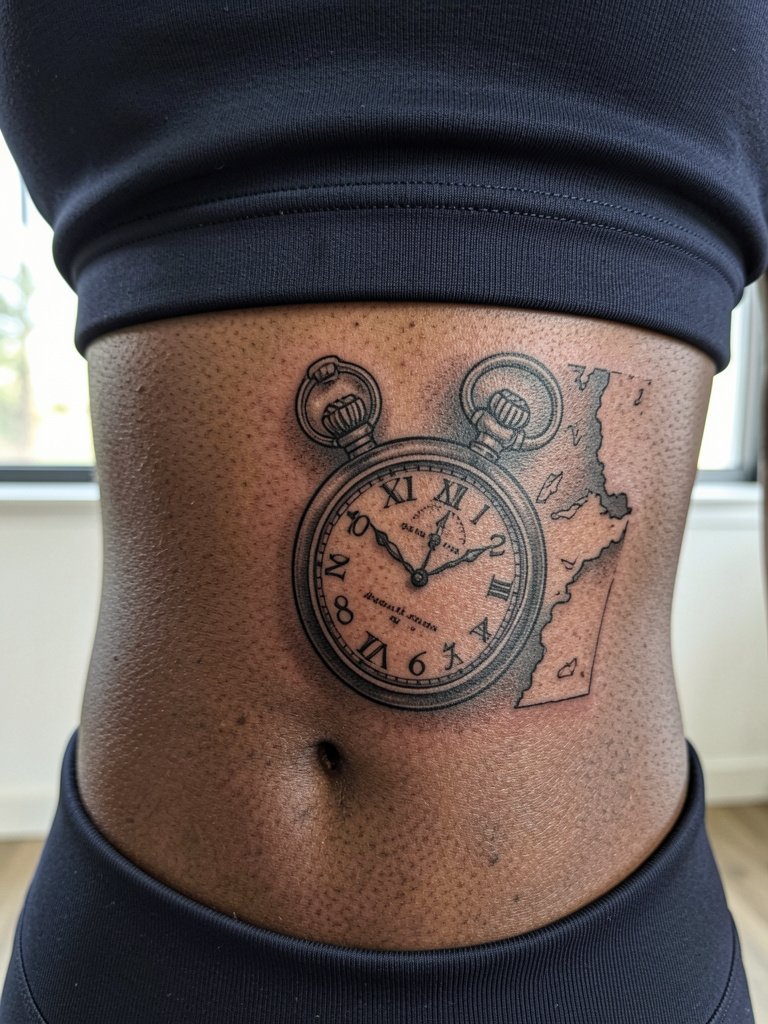
Side torso pieces blend well with map detail because the area has room for thoughtful spacing. The ribs are sensitive so consider splitting the work into two sessions and plan for touch-up if the coastline lines soften. A common mistake is squeezing too much tiny map text into the fragment; instead pick a single readable label or coordinate. For the session, wear a fitted cropped top so the artist has full access without fabric shifting.
25. Antique Timepiece Locket on Sternum Edge
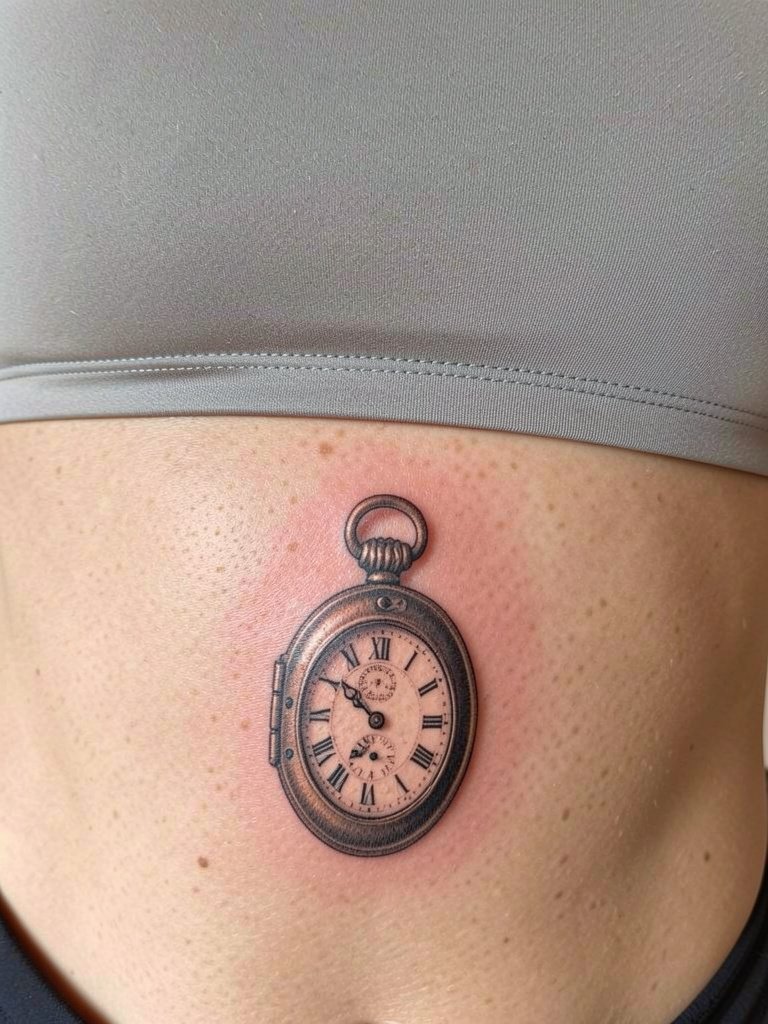
This delicate placement demands clear borders and moderate saturation to survive friction from clothing and movements. Sternum edge work can be painful and often benefits from short breaks. A frequent mistake is choosing micro-ornamentation in hinge areas that later read as a grey smudge. For session comfort, choose a fitted bandeau so the artist can ink without constant fabric adjustment, and be ready to book a planned touch-up.
26. Clockwork Keyhole on Thumb Side
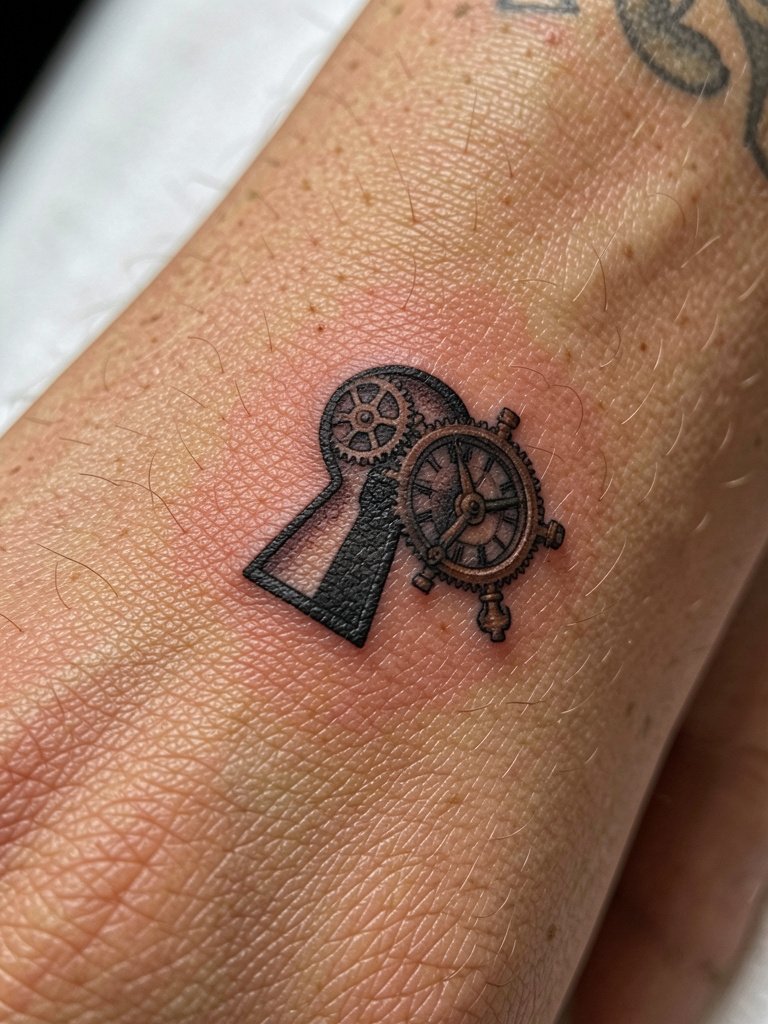
Thumb-side tattoos confront constant rubbing and may fade faster than other hand areas, so pick strong black fills and accept a future touch-up. Expect a brief but sharp session and plan for extra aftercare precautions during the first week. A mistake is asking for ornate micro-detail that will not survive daily use. For hand visibility, minimal rings or no rings in that finger keep the keyhole legible and unobstructed.
27. Time-Lapse Clock with Phases on Back Shoulder
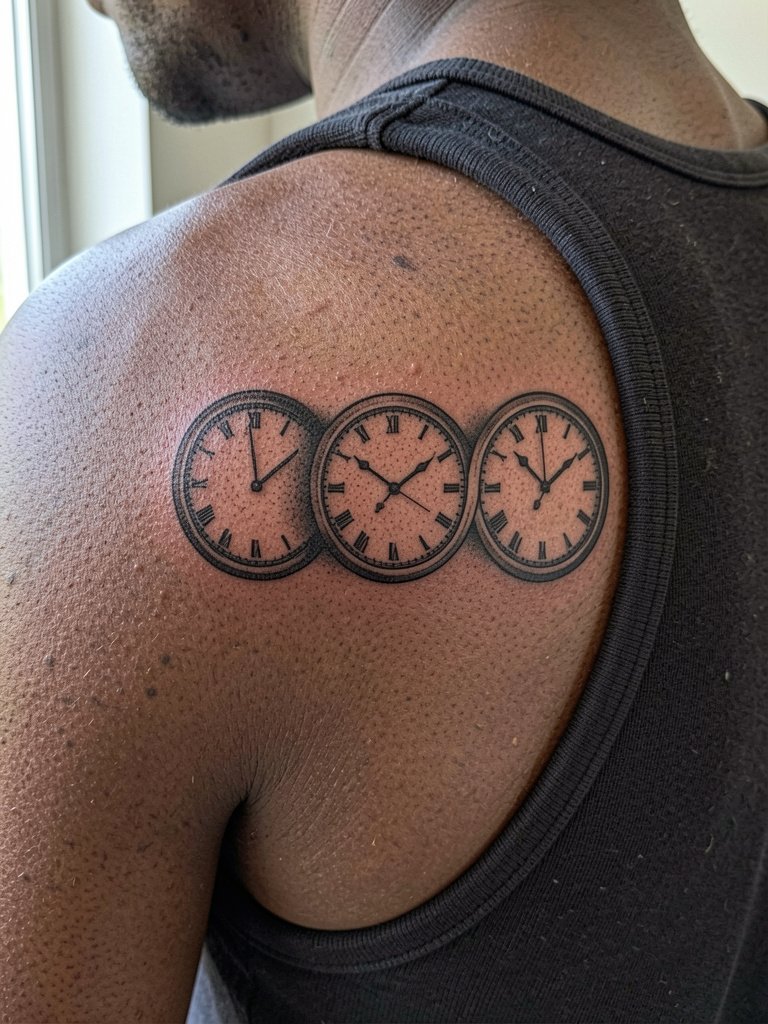
Sequenced clocks across the back shoulder read well because the skin there is stable and the spacing preserves separation between faces. Ask for distinct negative space around each face so the phases remain clear at a glance. Sessions will be moderate in length and discomfort is usually low. A common mistake is placing faces too close together, which later blends into a single grey shape. For clothing, open-back tops and camisoles highlight the progression, and a camisole top will frame the sequence without bunching.
Frequently Asked Questions
Q: How do realistic clock tattoos age over time on high-motion spots like wrists and ribs?
A: High-motion areas tend to soften fine details faster because movement and friction spread pigment, so expect numerals and tiny hands to lose sharpness sooner. For wrists and ribs I recommend slightly heavier linework, deliberate spacing, and a planned touch-up at 12 to 18 months, which keeps the face readable as the skin settles.
Q: Can color washes be added to realistic clock faces without harming linework?
A: Yes, if the artist applies color in a separate pass and avoids oversaturating near thin lines. Ask for the color to be blended lightly behind the clock rim, not on top of fine numerals. For wardrobe pairing that shows color subtly, try a neutral slip or camisole like a slip dress so the tint reads without overpowering the blackwork.
Q: I want a themed clock design without naming copyrighted characters, where can I find inspiration and healed examples?
A: Search social platforms with genre tags rather than character names, use keywords like "vintage pocket watch realism," "heraldic crest tattoo healed," and filter by location to find nearby portfolios. Reddit tattoo threads and platform filters on TikTok and Instagram reveal healed shots across skin tones, and portfolio sites let you search by style keywords to see long-term healing.
Q: How should I prepare clothing for a session depending on placement?
A: Wear clothing that gives the artist direct, comfortable access without being pulled or adjusted. For collarbone and chest pieces choose scoop-neck or wide-neck tops. For ribs and hip work wear a fitted cropped top or sports bra. A loose tank top is a good choice for many arm placements and keeps fabric out of the way.
Q: Are there design choices that studio artists commonly advise against for clock realism?
A: Artists often advise against ultra-fine numerals or tiny engraved flourishes in high-contact areas because those details blur. They also caution that too many overlapping micro-elements in a small space reduce long-term readability. A clear priority conversation about which element should stay sharp helps the artist plan line weight and spacing.
