
Patchwork sleeves work when each small piece earns space to breathe, not when the artist stacks tiny motifs until the arm reads like noise. Start with a clear plan for scale, negative space, and a unifying element so the sleeve reads intentional from ten feet away. The sections below show how to mix styles, what to ask during the consultation, and which wardrobe choices make those patches sing while you heal.
1. Geometric Patchwork Band on Inner Forearm
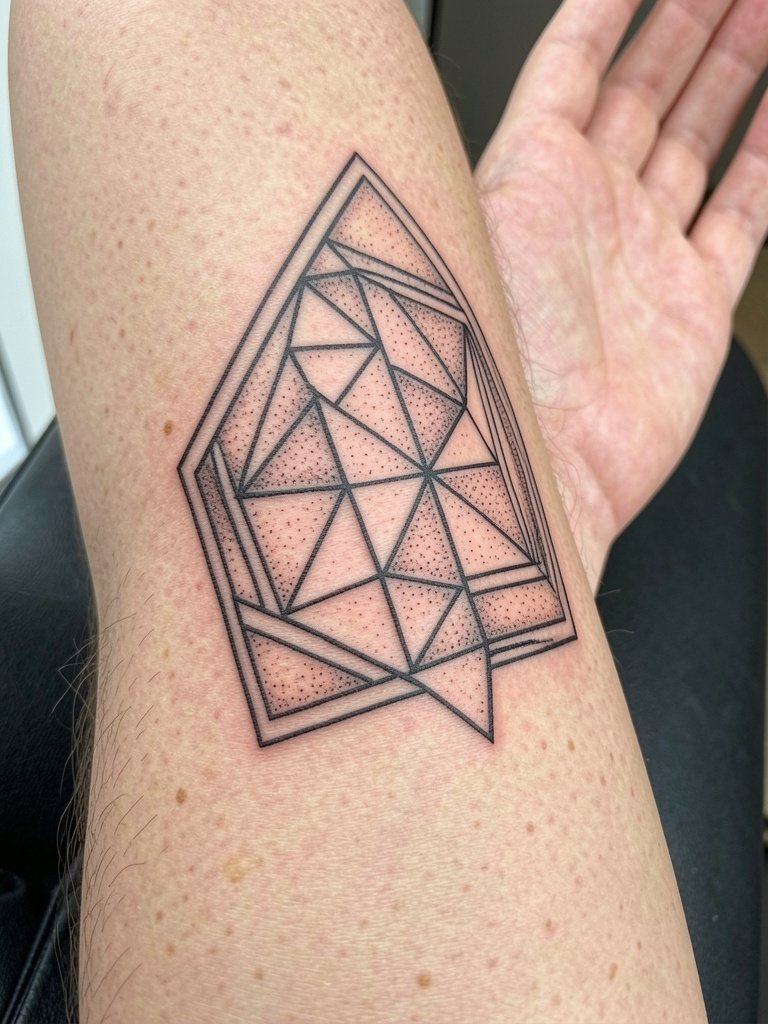
Fine geometry reads best larger than people expect, so plan for elements at least three inches across. Expect a moderate pain level on the inner forearm and a typical session of one to two hours for a compact band. Ask for slightly heavier lineweight than a single-needle reference to avoid early softening. The common mistake is packing too many tiny triangles; they blur into a pattern at year three. This placement pairs well with rolled-up linen shirts for showing the band. Try rolled-up linen sleeve shirts for a casual reveal during warm months.
2. Floral Patchwork with Saturated Color on Outer Bicep
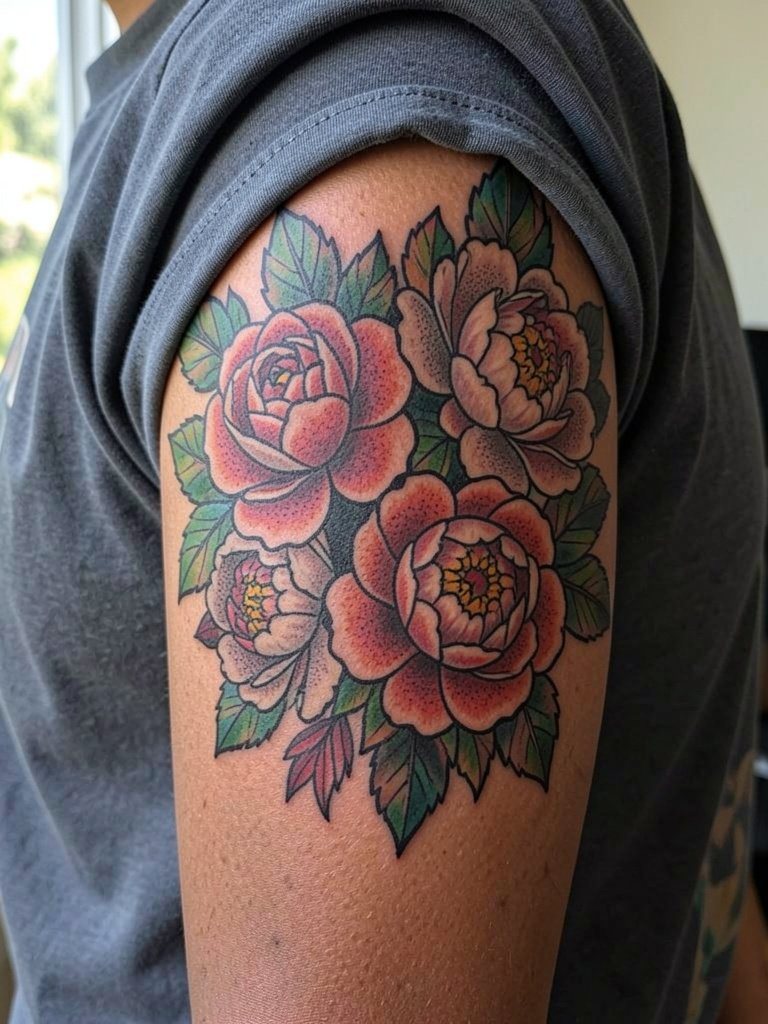
Outer bicep is a forgiving canvas for saturated florals because wider petals hold pigment longer than thin stems. Pain is generally low to moderate and a four-hour session lets an artist lay several colored patches. Discuss saturation goals in the consult and bring healed color references to show how deep tones read on your skin tone. A common aging issue is letting reds sit too shallow and needing a touch-up at year two. Pair the piece with short-sleeve tees or sleeveless dresses to show off the blooms. For summer outfits try a sleeveless linen dress that frames the arm without distracting from the ink.
3. Blackwork Patch Quilt on Upper Arm

Blackwork patches age differently from colored patches because saturation creates a strong silhouette that stays readable even as fine detail softens. Expect longer sessions of three to five hours for solid fills and shading. During consultation specify edge crispness and request a small healed photo sample from the artist so you can see expected saturation. The common mistake is overfilling too close to the arm's contour, which can look heavy after swelling subsides. For wearing out, a fitted short sleeve shirt or a cropped blazer showcases the upper-arm contrast. Try a fitted short sleeve tee to keep the panel visible without bunching.
4. Fine-Line Script Patchwork Along Inner Wrist
Wrist script in a patchwork format reads best when each word has its own little buffer of negative space. The wrist is sensitive and sessions are short, around 30 to 60 minutes per patch. Specify slightly heavier single-needle weight and ask for the script spacing shown at three inches so you avoid curls that blur. A frequent error is requesting ultra-tiny cursive that softens into legibility issues by year two. For showing off, delicate bracelets or a slim watch frame the wrist without hiding the words. Consider a minimal leather bracelet to highlight each small patch.
5. Watercolor Patch Accents Between Bold Outlines

Watercolor touches add vividness to a patchwork sleeve when they sit inside strong borders that protect the delicate fields from wandering. The outer forearm tolerates the softer shading, and sessions vary from one to three hours depending on the number of patches. Discuss pigment depth and edge containment in the consult so washes do not feather out during healing. Watercolor areas often fade faster and need a color boost at year two. Wear three-quarter sleeves or cuffed shirts to tease flashes of color without exposing the whole arm. A lightweight cropped cardigan helps you layer while letting colors peek through.
6. Micro-Realism Portrait Patches on Tricep

Micro-realism needs room to breathe. On the tricep, these portrait patches take two to four hours each and benefit from slightly larger scale than a thumbnail. During the consult show the artist clear photo crops and note which facial features are essential so they place emphasis where it matters. The common mistake is shrinking a portrait to fit a patch and losing eyes or expression. Tricep skin stretches with muscle movement, so expect a touch-up window at year two. A short-sleeve tee or sleeveless tank shows the back of the arm well. Consider a sleeveless muscle tank for sessions so the artist has full access.
Session Day Picks
Those first six patches include both fine-line wrist work and saturated bicep panels, so a few session-day items smooth the appointment and the first week.
-
Stencil transfer sheet kit. Lets you see how each patch sits next to the next one before the needle touches skin, which is critical for patchwork composition on forearm and wrist pieces.
-
Breathable chair cushion cover. Helps comfortable positioning during long tricep or bicep sessions so you stay steady for micro-realism work.
-
Cooling gel pack wrap. Eases soreness after longer fill sessions and fits around arms without compressing fresh ink.
-
Lightweight zip-front hoodie. Easy to remove and put back on without rubbing freshly tattooed outer-arm panels.
-
Aquaphor healing ointment. A widely used thin layer in the first 48 hours keeps moisture balanced for color and fine-line patches without clogging.
7. Collage of Small Traditional Sailor Patches
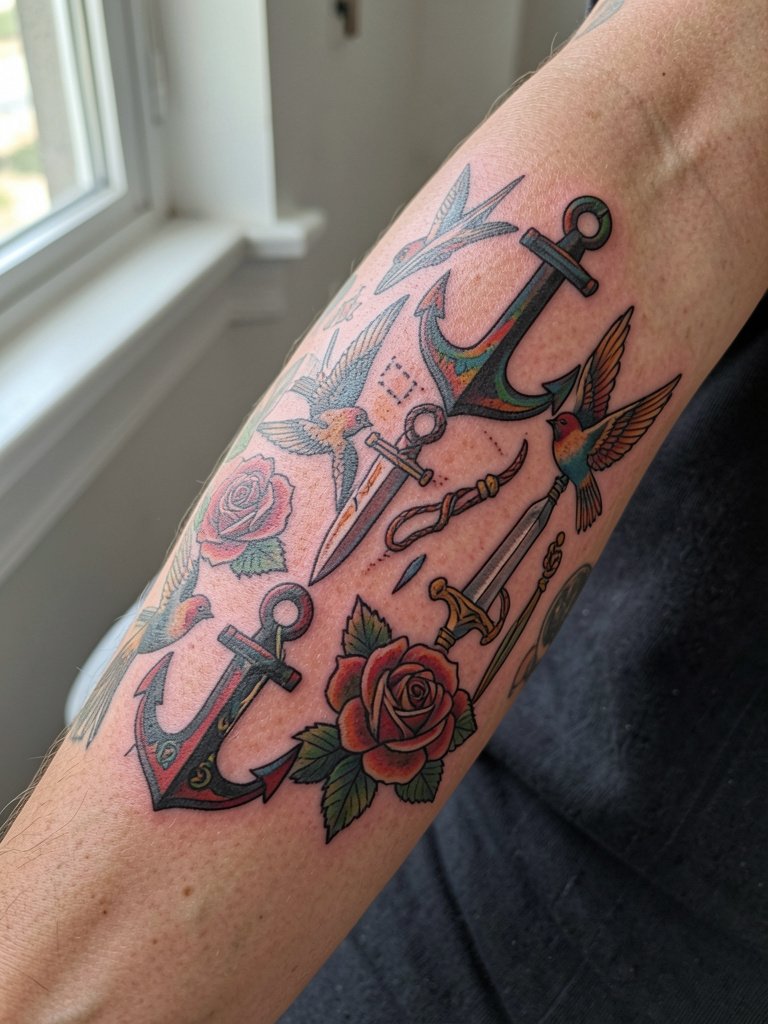
Traditional sailor motifs form patchwork well when each icon keeps its strong outline and space around it. Sessions are chunked into short bites of one to two hours per patch, which suits a sampler approach. Tell the artist which icons must be bold and which can be background so the composition avoids a muddled center. A common mistake is asking for tiny detailed ships that lose masts after a year. For daytime wear pair the sleeve with cuffed denim and a crisp white tee that lets the saturated colors read clearly. Try cuffed denim shorts when you want the forearm panels visible in warm weather.
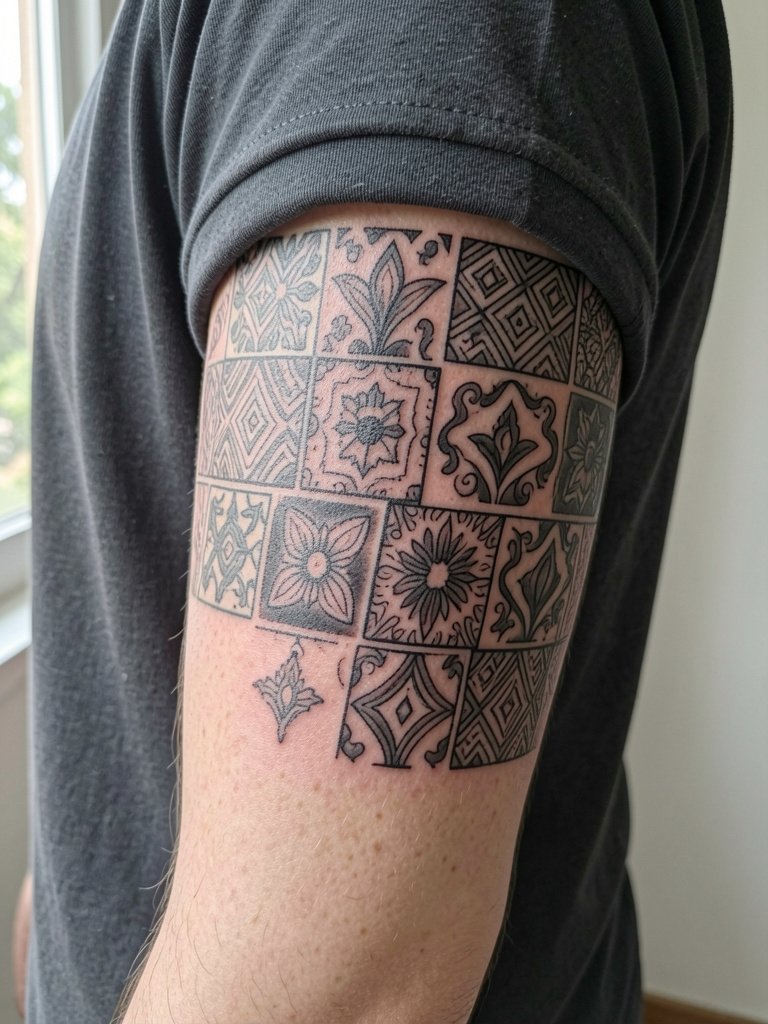
8. Mandala Tile Patchwork on Upper Forearm
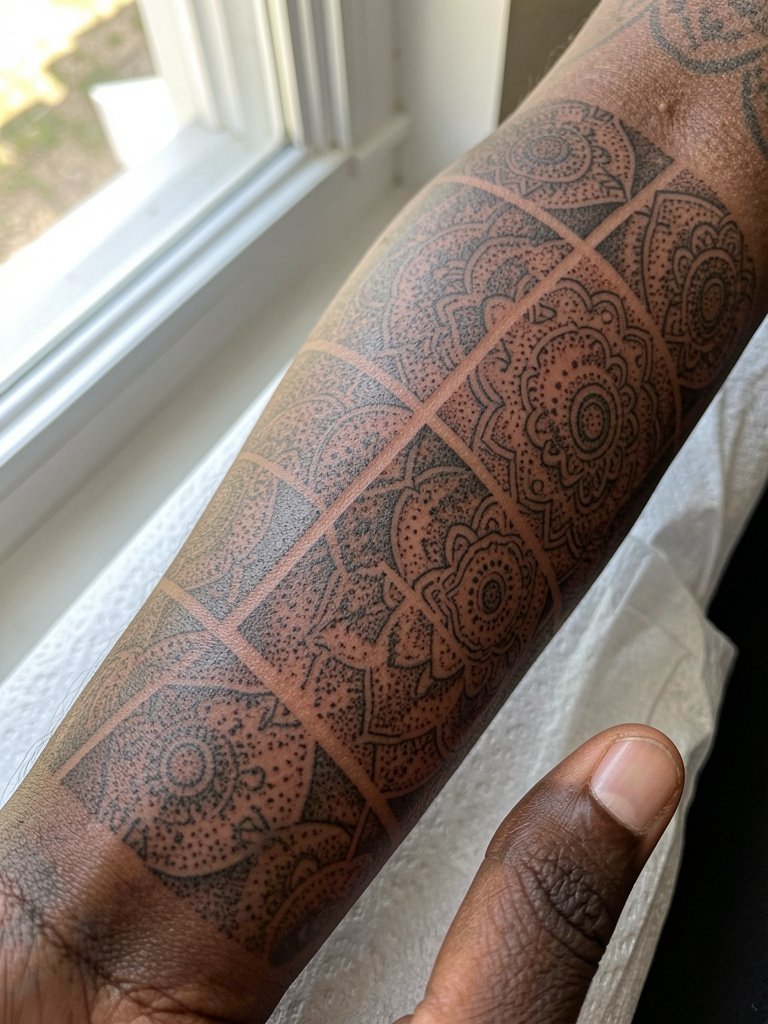
Mandala tiles need breathing room or the radial details blur. On the upper forearm allow each tile at least three to four inches across so stipple shading keeps its texture. Clarify whether you want crisp black linework or softer grey shading, because each ages differently. One camp favours dense dot work to keep edges crisp. The other camp prefers slightly wider line spacing to prevent merging. Discuss the spacing and bring examples at full scale. For outfits, a three-quarter sleeve blouse or banded cuff frames the mandala without swallowing it. Consider a banded cuff blouse to reveal just enough detail.
9. Script Patch Banners Interspersed with Icons

Banners with single words act as connective tissue between pictorial patches when spacing is correct. The outer forearm allows for readable script at one to two hours per banner patch. Specify exact lettering style and the exact word so you avoid the shrinking script trap. A mistake is mixing script sizes without a clear hierarchy, which makes the sleeve look uneven. For showing off the banners, lightweight long-sleeve shirts with cuff rolls help reveal a single line at a time. Try soft roll-cuff shirts for controlled reveals.
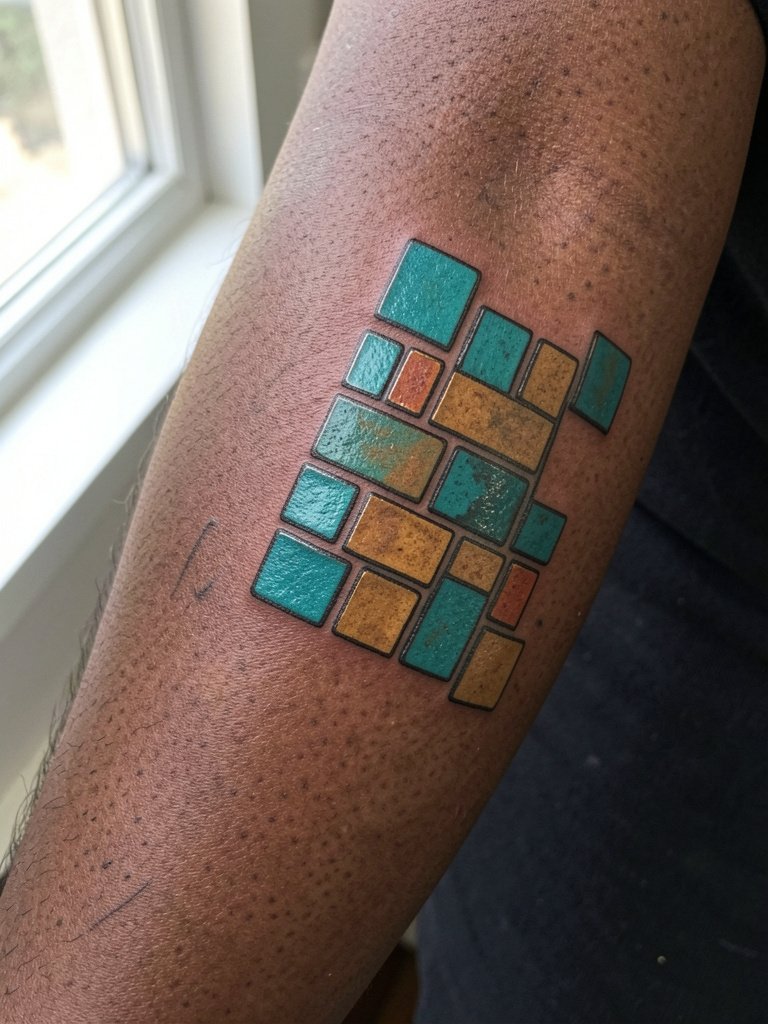
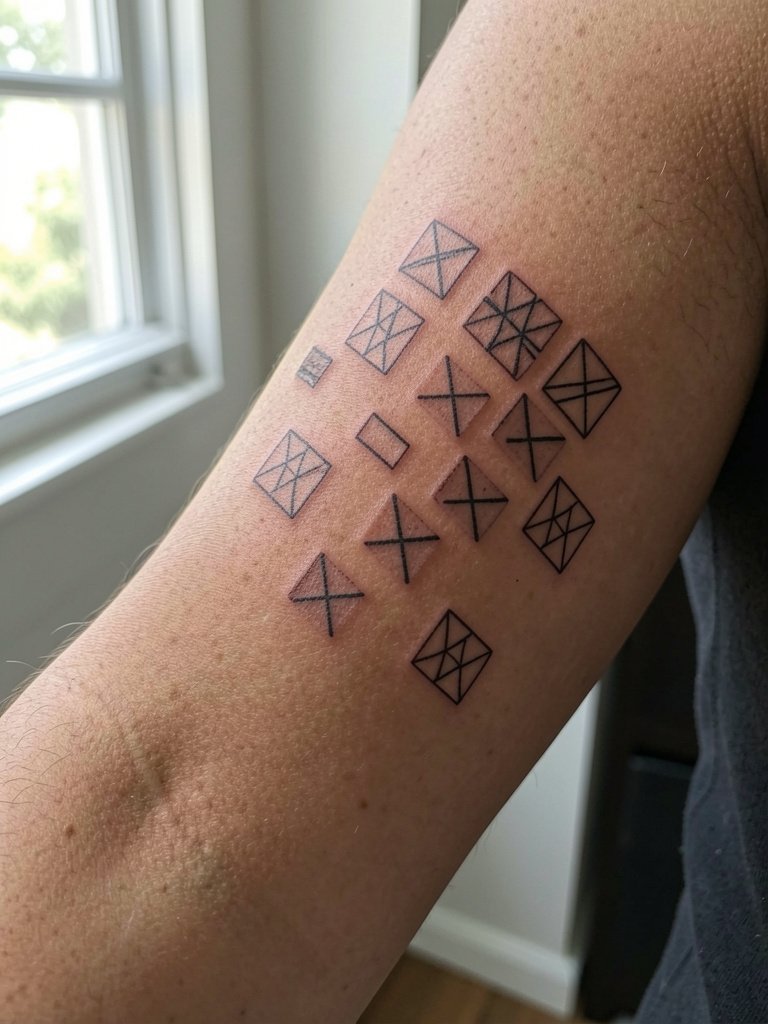
10. Checkerboard and Negative Space Blocks
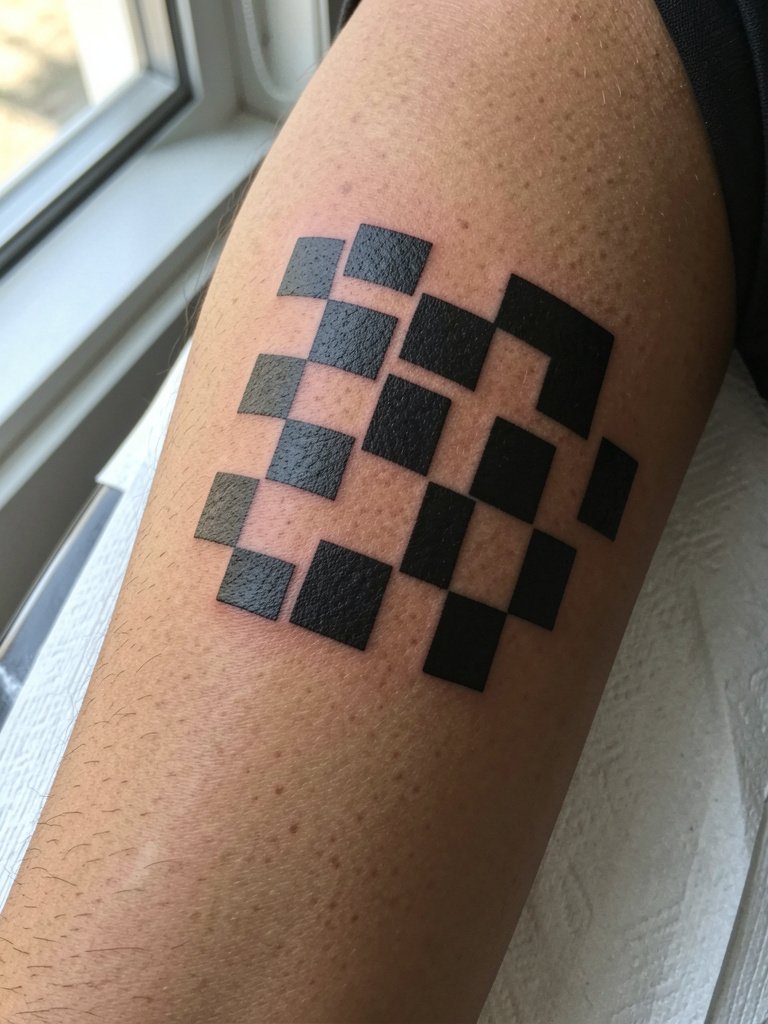
Checkerboard blocks create architectural rhythm within a sleeve and they support more detailed patches around them. Solid black squares are forgiving for aging, but precise edge work is crucial during the session. Expect two-hour fills for multiple squares. A typical error is too many tiny squares that make the arm look busy at distance. For outfits, short sleeves and open cuffs emphasize the geometric read. A boxy short sleeve tee keeps the pattern visible while fitting comfortably during sessions.
11. Collaged Botanical Sampler Down the Arm
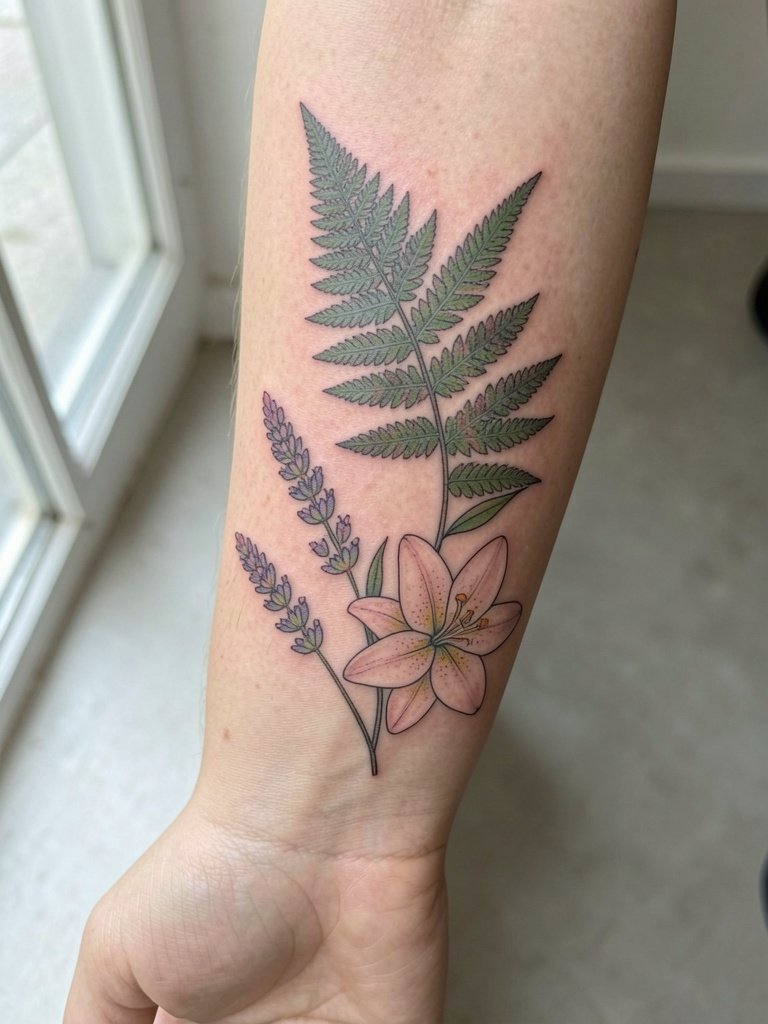
Botanical samplers are great for storytelling when each plant represents a moment or place. Lower outer arm sessions are moderate in pain and usually run one to two hours per patch. Tell the artist which plant needs clear vein detail so they can scale lines accordingly. A frequent mistake is putting tiny leaf veins into too small a space, which melts into blur. Dress for the session in a loose sleeve that pulls up easily. Try a button-up linen shirt so you can roll sleeves without putting pressure on fresh ink.
12. Patchwork of Miniature Map Fragments
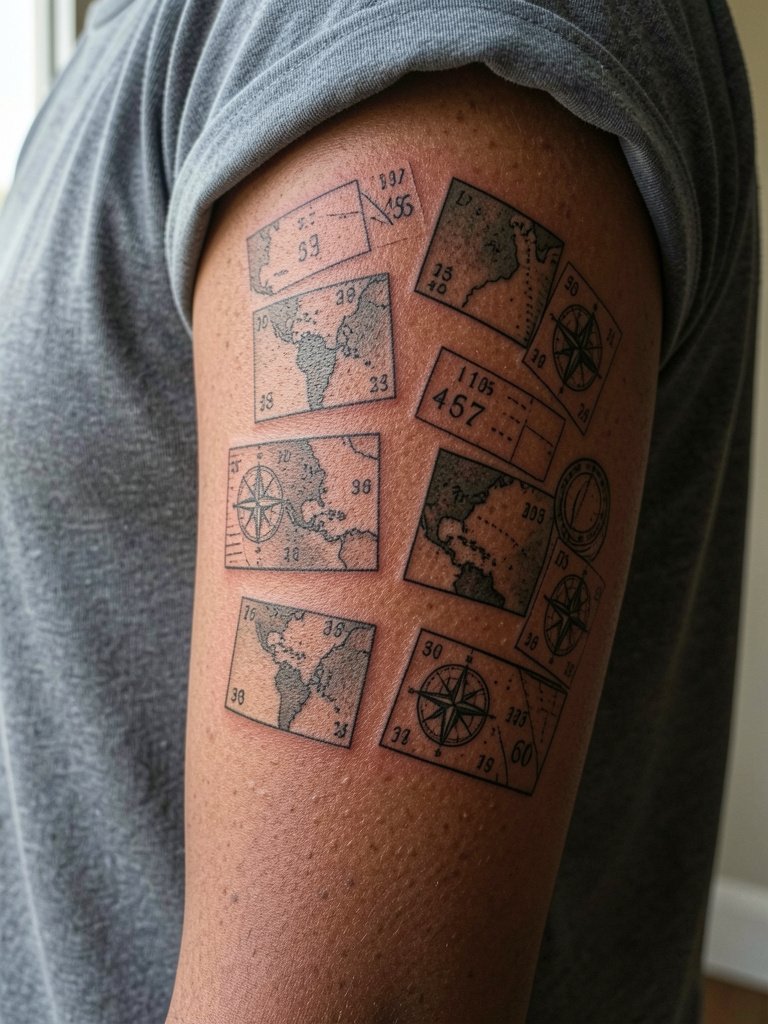
Map fragments work best when each patch carries one readable element like a compass rose or a coastline. The outer bicep tolerates thin linework but avoid extremely tiny scripts for coordinates. Each fragment may take 45 to 90 minutes. A common error is compressing too many place names into a small patch. If you want exact coordinates be explicit about font size and numeral thickness. For outfits, rolled sleeves and casual jackets highlight the travel story. A light utility jacket offers layering without hiding the arm.
13. Mosaic Tile Patchwork with Color Accent
Mosaic tiles are ideal if you want pockets of color that read like ceramic inlay. Outer forearm placement means a mid-range pain and sessions of one to three hours for multiple tiles. During the consult specify which hues should stay saturated and which can be muted for age. A common mistake is using too many colors in tiny tiles; focus on two or three to preserve clarity. Wear cropped sleeves or sleeve slits to frame each tile. A sleeve-slit top makes showing mosaic patches effortless.
14. Minimalist Line Patches with Heavy Black Borders

Thick-border minimalist patches age well because the silhouette remains bold even as inner detail softens. Upper arm is a lower pain zone for many and sessions typically last one to two hours per patch. During the consult indicate exact border thickness to keep consistency across the sleeve. People sometimes request borders that are too thin and then notice gaps at year two. For outfits choose short sleeves and clean lines to echo the patch borders. A clean-cut short sleeve shirt pairs well with this look.
15. Vintage Postage Stamp Patches with Portrait Miniatures
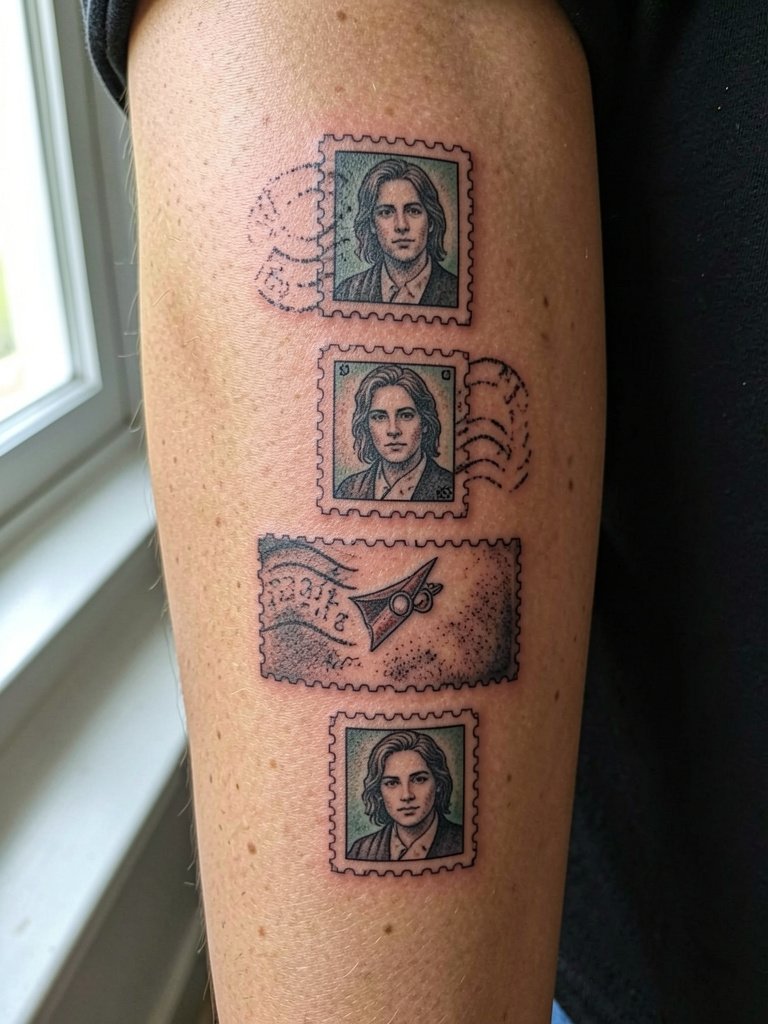
Stamp-style patches read like a curated collection and are perfect for micro-realism or iconography. Outer forearm placement handles fine detail better than wrist. Sessions are often 60 to 120 minutes per stamp depending on detail. Tell the artist which stamp needs the portrait focus and which should be simplified. A common error is over-detailing the perforation lines so they look muddy when healed. For wearing out, a long-sleeve that can be cuffed back creates a reveal. Try a cuffable long sleeve shirt to manage exposure during social events.
16. Steampunk Mechanical Patchwork with Gears

Gears and mechanical imagery need crisp contrast to read as texture rather than blobs. Outer bicep sessions of two to three hours let an artist detail cogs and shading. Specify whether you want metallic sheen or matte finishes because shading styles age differently. A frequent mistake is packing too many overlapping gears without space for shading to settle. For outfits, sleeve length that ends at mid-bicep highlights the mechanical panels. Try a fitted short sleeve shirt to display the work cleanly.
17. Negative Space Portrait Patches
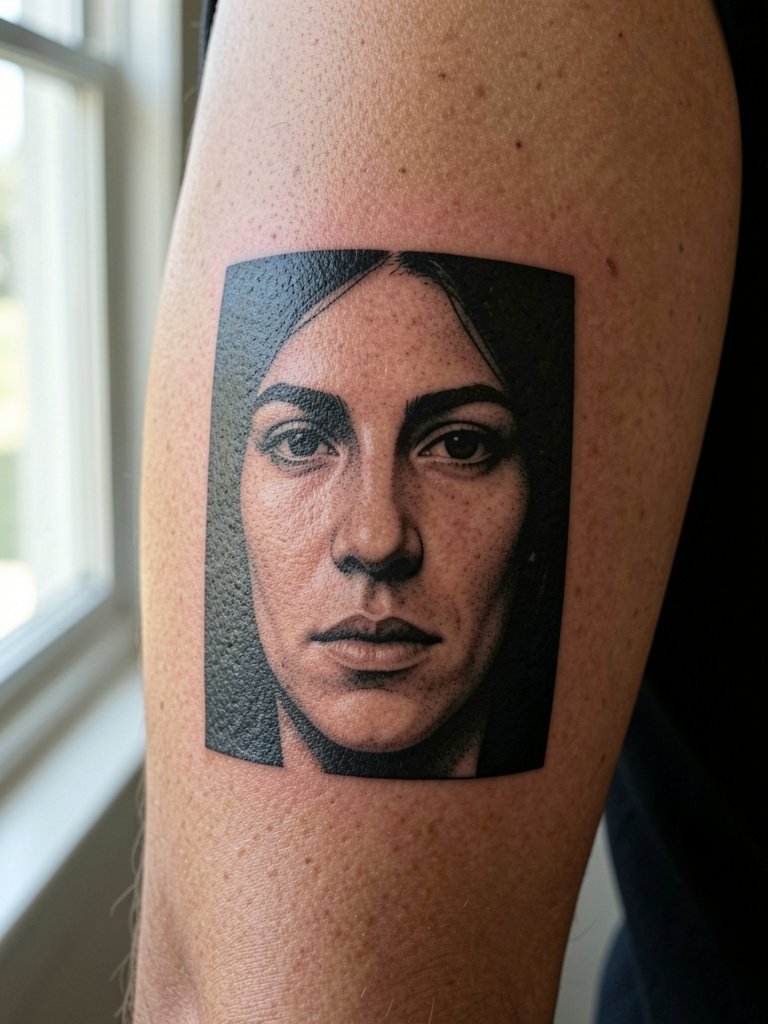
Negative space portraits rely on surrounding saturation to define the subject, which helps them age well because the silhouette stays readable. Inner upper arm placement is moderate on pain and sessions vary by panel size. During the consult show examples of negative-space references and mark which facial planes matter most. A common mistake is leaving too little bare skin so the portrait reads like a blob once minor spreading occurs. For wardrobe, sleeveless tops that reveal the inner arm at the right angle make these portraits intriguing. Consider a sleeveless blouse with narrow straps to keep the look refined.
18. Cultural Motif Patchwork with Respectful Sourcing
Cultural motif use splits people into two camps. One camp argues that borrowing sacred symbols without community context erodes meaning and can feel exploitative. The other camp believes respectful adaptation with proper sourcing and artist collaboration can honor origin while allowing personal expression. If you want motifs from another culture, research the symbol's meaning, ask the artist about cultural protocols, and consider commissioning a community-aware artist. Sessions depend on complexity and usually run two hours per tile. For showing respect in presentation pick neutral wardrobe that does not appropriate the culture further. A simple neutral tee keeps focus on the art and not on stylized costume.
19. Color-Block Patchwork with Gradient Fills

Color-block patches create a modern collage when gradients are executed with strong color packing. Outer forearm is ideal for showing transitions and sessions include two to three hours for multiple blocks. Discuss how saturated you want the gradients because lighter washes fade faster. People sometimes stack too many gradient shades that end up muddy when they age. For outfits, monochrome tops make the color blocks pop. A solid color tee is an easy pairing.
20. Animal Portrait Patches with Bold Frames

Animal portraits need eye focus to carry emotional weight across small patches. Forearm or outer arm placements handle detail better than wrist. Sessions for animal mini-portraits often run two to three hours each. Clarify which facial feature must remain crisp so the artist can prioritize those strokes. A common mistake is requesting fur texture at too small a scale. For showing off, sleeveless tops and cropped jackets frame the faces nicely. Try a cropped denim jacket to spotlight the portraits.
21. Photo-Frame Polaroid Patchwork
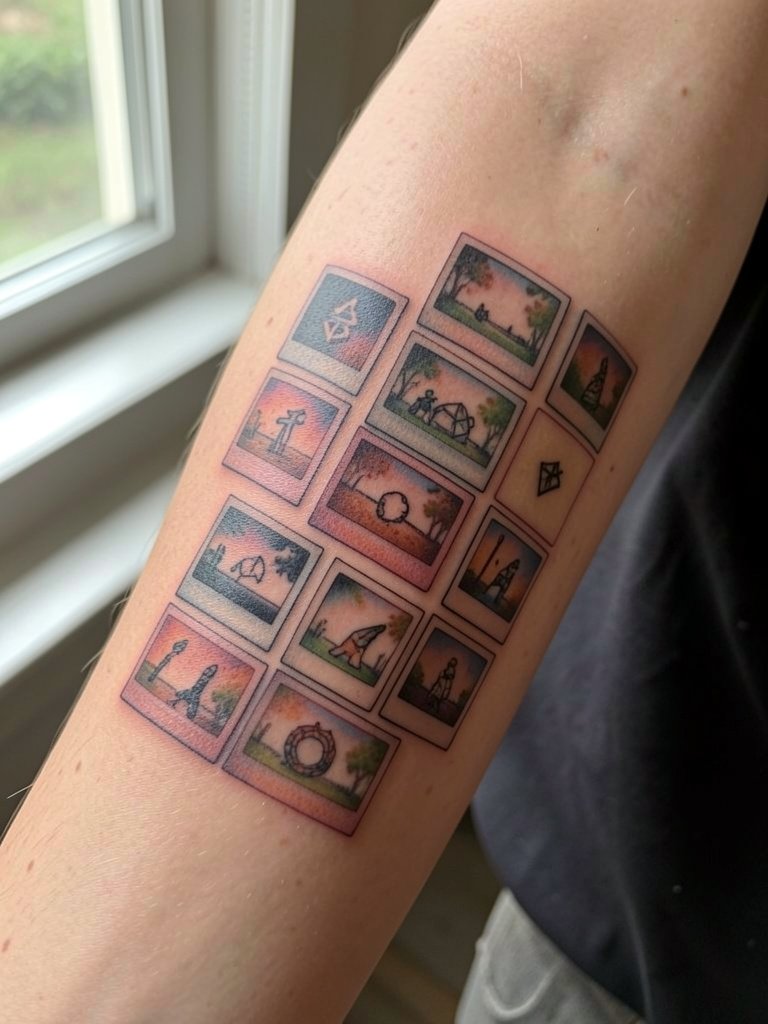
Polaroid frames act as mini canvases that let each vignette breathe within a clear border. Outer forearm sessions for several frames may take multiple visits of one to two hours each. When booking, bring the exact cropped images you want because the artist will need to simplify details for scale. The common error is asking for full landscape shots that become illegible at postage-stamp sizes. Wear short sleeves or cuffed long sleeves to reveal a single row of frames at a time. A cuffable long sleeve tee helps you choose how much to reveal.
22. Checkerboard of Minimal Symbols Around Elbow
Elbow-area patchwork must account for the skin’s movement and higher blowout risk. Sessions will be shorter due to the sensitivity and the skin texture. Ask for slightly heavier lines around the elbow so shapes remain readable as the skin shifts. One camp argues that detailed work near joints blurs quickly. The other camp maintains that careful placement and slightly wider spacing allow small symbols to settle well. When planning, choose simple symbols and request edge reinforcement for longevity. For sessions wear a loose shirt with easy sleeve access. A loose button-up shirt lets the artist access the elbow without fabric rubbing.
23. Stitched Patchwork with Faux-Thread Borders
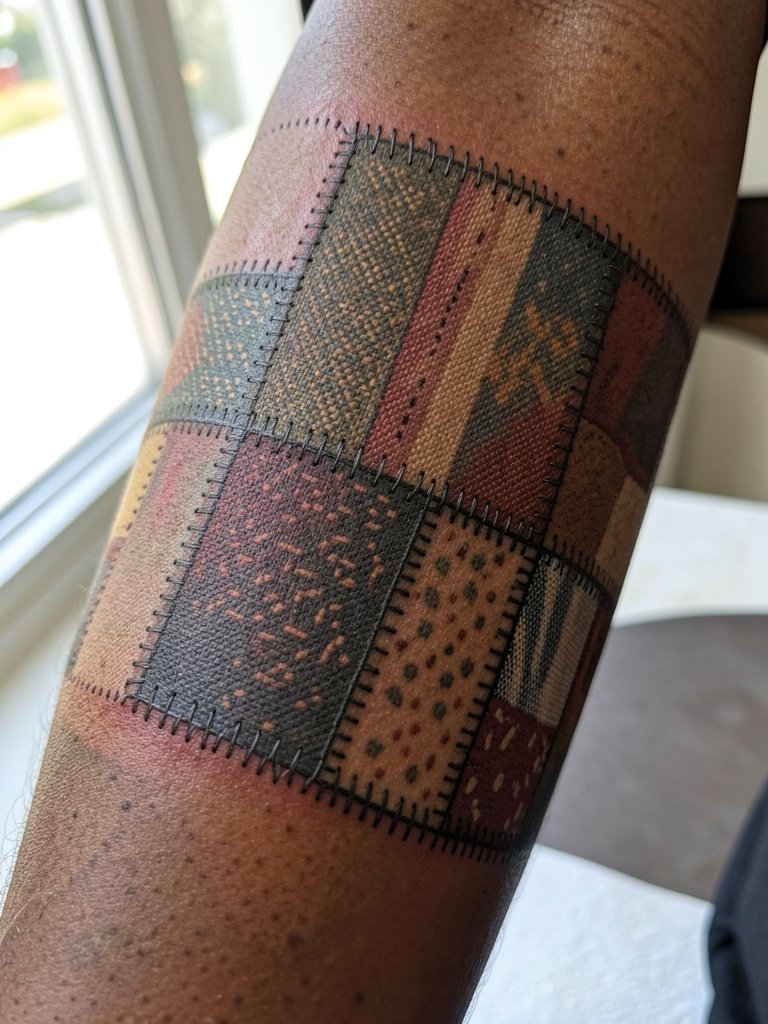
Faux-stitched borders add a tactile idea to patchwork that reads as handcrafted. Outer forearm placement is reliable for the small dotted lines that create a stitching illusion. Sessions vary and each stitched panel may take one to two hours. Specify stitch density and whether stitches should be single-needle dots or short hatch marks so the artist plans for durability. A common mistake is asking for ultra-fine dot stitches that vanish over time. For styling, textured fabrics echo the stitched feel. A textured knit sweater complements stitched patches without overpowering them.
24. Framed Botanical Portraits with Thin Margins
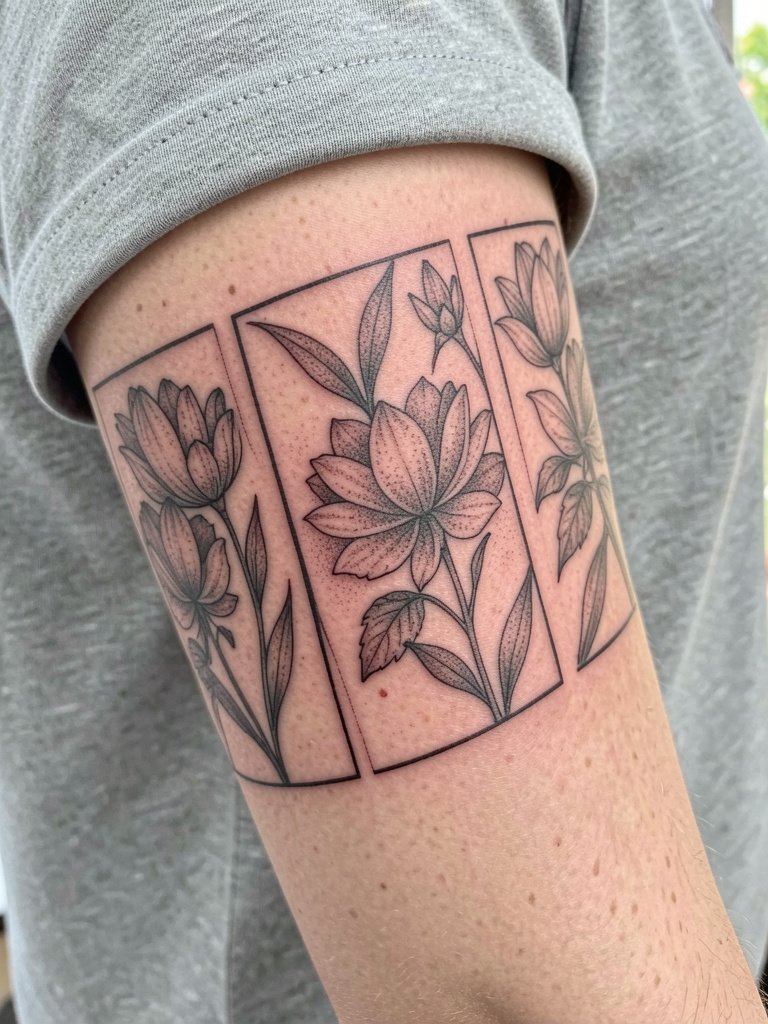
Framed botanicals look collected when margins are consistent across patches. Outer forearm lets petals breathe and sessions usually last one to two hours per portrait. During the consult point out which botanical elements are essential and ask the artist to scale them for clarity. People often request ultra-thin frames that disappear as skin settles. For outfits pick tops with clean sleeves so each framed portrait reads like an artwork. Try a minimal short sleeve top to let frames stand out.
25. Collage of Tiny Tools and Everyday Objects
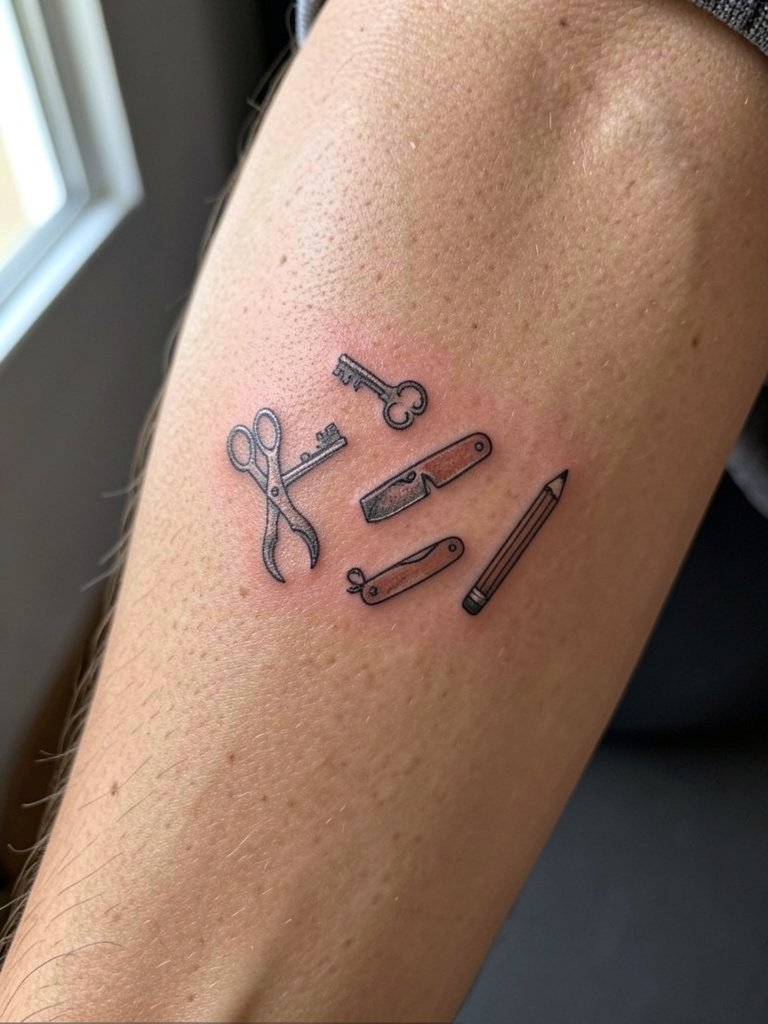
Everyday object samplers tell a story without large scale commitment. Outer forearm sessions are quick and often fit into one-hour slots per object. Be precise about which small details must remain so the artist can prioritize those strokes during the session. The common mistake is cramming too much micro detail into tiny objects that lose clarity. For showing off, roll cuffs and short sleeves highlight the small items in a playful way. Consider a short sleeve henley for effortless reveals.
26. Patchwork of Bold Symbols with Negative Separators

Using negative separators gives each symbol room to be read as its own statement, which is a strong strategy for patchwork that spans the arm. Outer forearm placement is visible and sessions vary by the number of symbols. Tell the artist which symbols must be dominant and which should be secondary so separators are sized correctly. A common error is underestimating how much negative space a symbol needs to remain distinct. For clothes, short sleeves and open cuffs work well. Try a relaxed short sleeve shirt that frames each bold symbol.
27. Heirloom Sampler Sleeve with Mixed Techniques

An heirloom sampler is the classic patchwork sleeve concept that pulls many techniques into a single arm narrative. Expect multiple sessions spread across months with sessions ranging from 45 minutes to five hours depending on patch complexity. During planning prioritize which patches are anchors and which can be fillers so composition remains coherent long term. A frequent mistake is building the sleeve without a unifying element which makes it read like a random collection. For gallery-ready looks pair the sleeve with tailored short sleeves and neutral layers. A tailored short sleeve shirt keeps the collection looking curated.
Frequently Asked Questions
Q: How do I plan scale so my patchwork sleeve reads well from a distance?
A: Start by picking three anchor patches and decide their minimum sizes in inches. During the consult show full-scale prints so the artist can map negative space. Aim for most patches to be at least two to three inches across unless they sit inside a strong border.
Q: Where can I find discovery pathways for healed patchwork sleeve examples without naming artists?
A: Search platform tags and keywords like #PatchworkSleeve and #SleeveSampler on Instagram and TikTok, use location filters to find local studio portfolios, and browse community forums for healed photos tagged with terms like "healed sleeve detail." Reddit threads often have side-by-side healed shots in different skin tones that help set realistic expectations.
Q: How often will I need touch-ups for different patch types in a sleeve?
A: Fine-line script and watercolor usually need touch-ups sooner, often around year two, while saturated blackwork and bold outlines hold longer. Expect a touch-up window anywhere between year one and year three depending on placement, sun exposure, and how well you follow healing guidance.
Q: What should I wear to the studio for a full sleeve session that covers arm and tricep?
A: Wear a loose short sleeve or a button-up shirt that can be unbuttoned and removed without pulling over the head. Bring a zip-front hoodie to put on after the session that will not rub the fresh ink. A zip-front hoodie fits the bill and is easy to manage during breaks.
Q: Are there placements within a sleeve that increase blowout risk?
A: Areas over joints and where skin is thin, such as the inner elbow crease and the wrist, have higher blowout risk. Plan to give more spacing and slightly heavier lineweight in those zones so the design maintains clarity as the skin moves and ages.
