
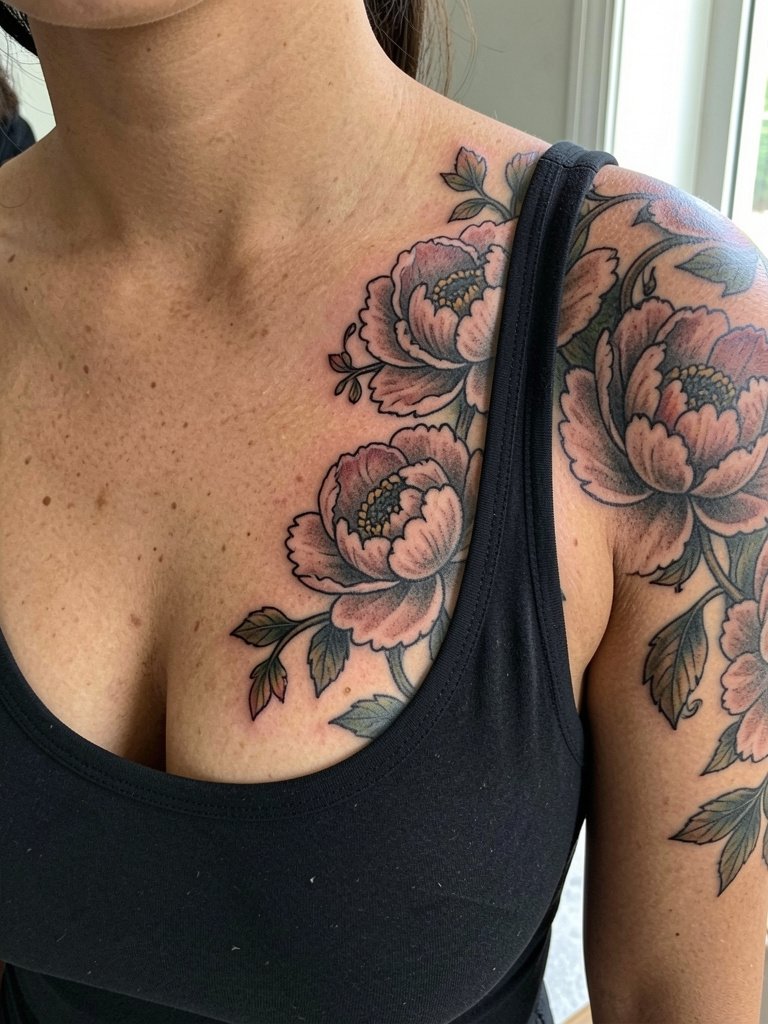
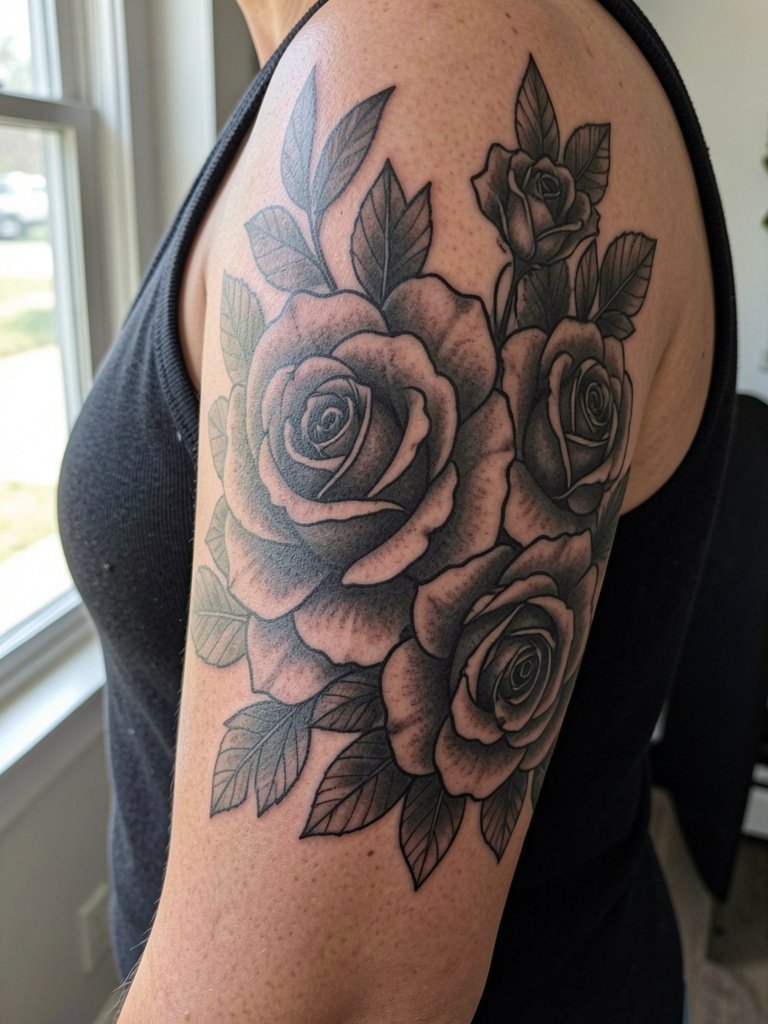
A floral sleeve is more than a bouquet around your arm, it is a decision about scale, season, and how the piece will sit with your daily outfits. Expect at least two sessions, a discussion about spacing to avoid early blurring, and a realistic touch-up plan. Pick a style that matches how you move and dress, not just what looks good in a saved photo, and plan for the sleeve to age over years, not weeks.
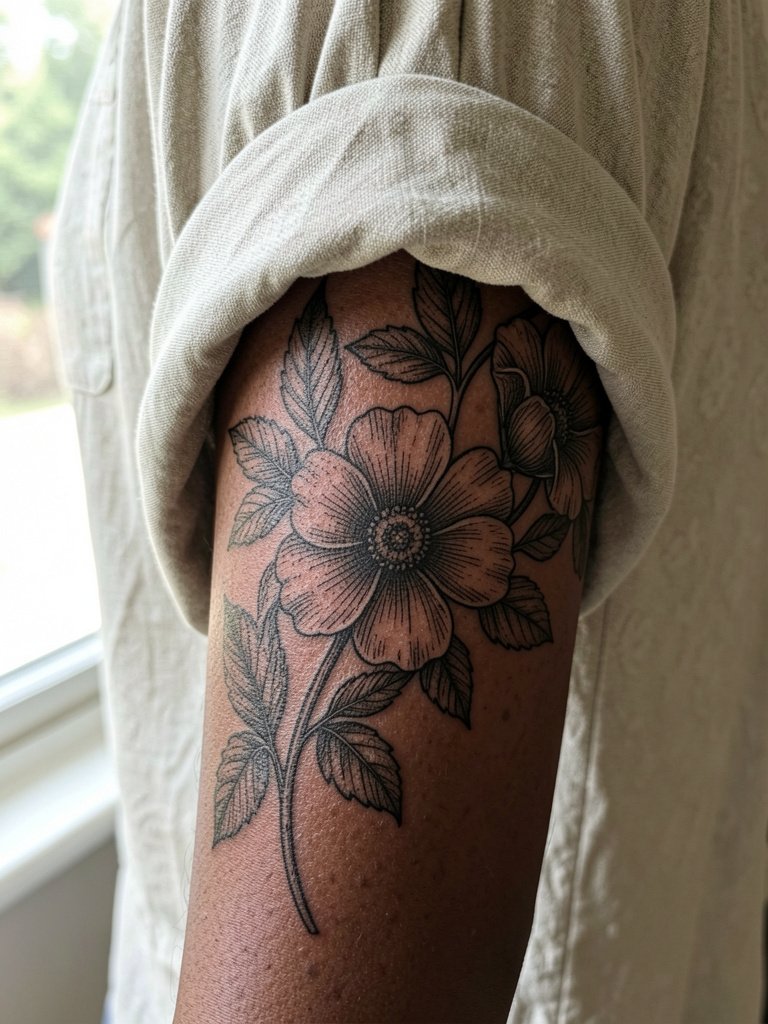
1. Fine-Line Botanical Sleeve on Inner Forearm

This inner-forearm sleeve uses single-needle linework to keep the botanical shapes airy without heavy color. For this placement expect low to moderate pain and session blocks around two hours each. The biggest mistake is going too small with petals because the inner forearm can blur fine detail if lines sit too close. During consultation bring a reference that shows both the exact line weight and a version scaled up to three times so the artist can map negative space. At six months the stippling shows texture, by two years the single-needle needs a tiny touch-up in spots. For showing off, pair it with rolled sleeve linen shirts that let the underside peek through.
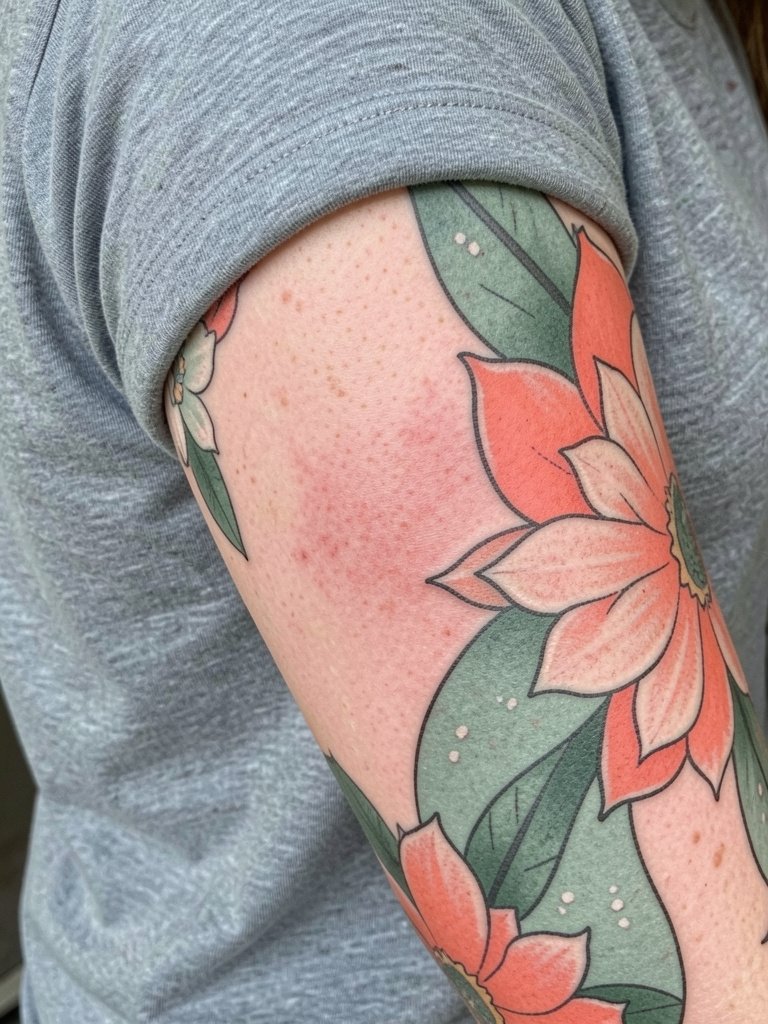
2. Watercolor Floral Wrap on Outer Bicep

This outer-bicep watercolor sleeve reads like a painting from a short distance because the washes create movement between blooms. The outer bicep is forgiving for softer edges, but watercolor that is too diffuse can age into a smudged look on oily skin. Ask for anchor lines around focal flowers so the color has structure. Session time for a wrap this size is typically two to four hours per sitting depending on saturation. At two years expect some fading where the sun hits most, and plan for a color refresh if you want the original pop. For evenings wear short-sleeve wrap dresses that frame the bicep.
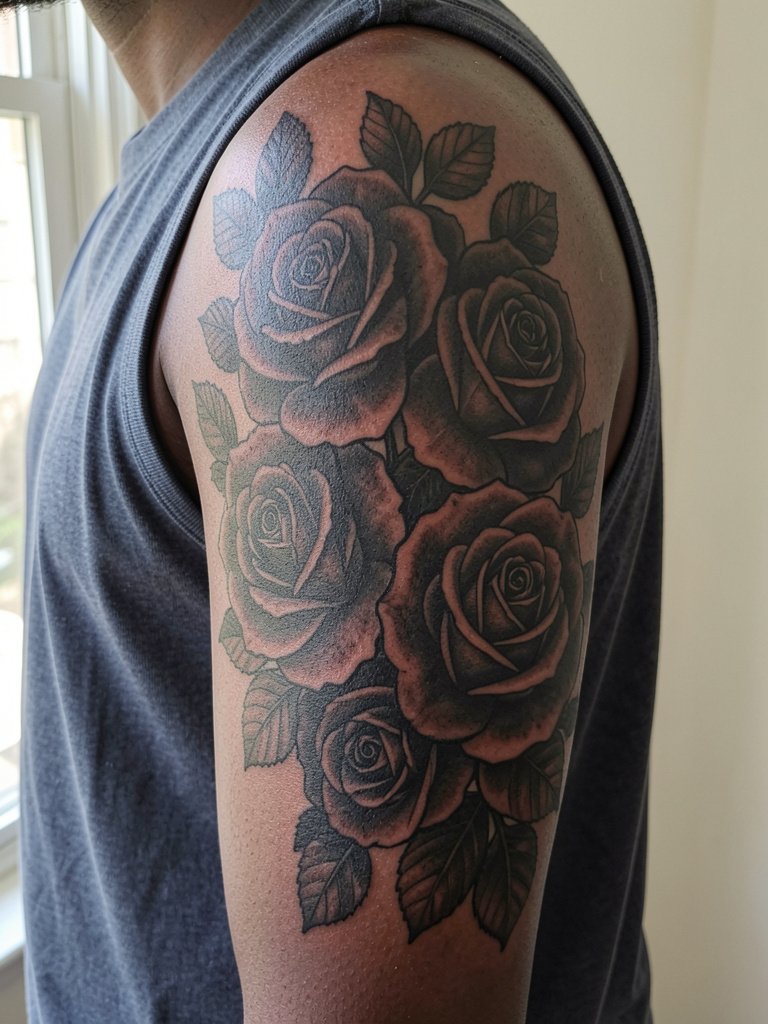
3. Blackwork Floral Sleeve with Negative Space
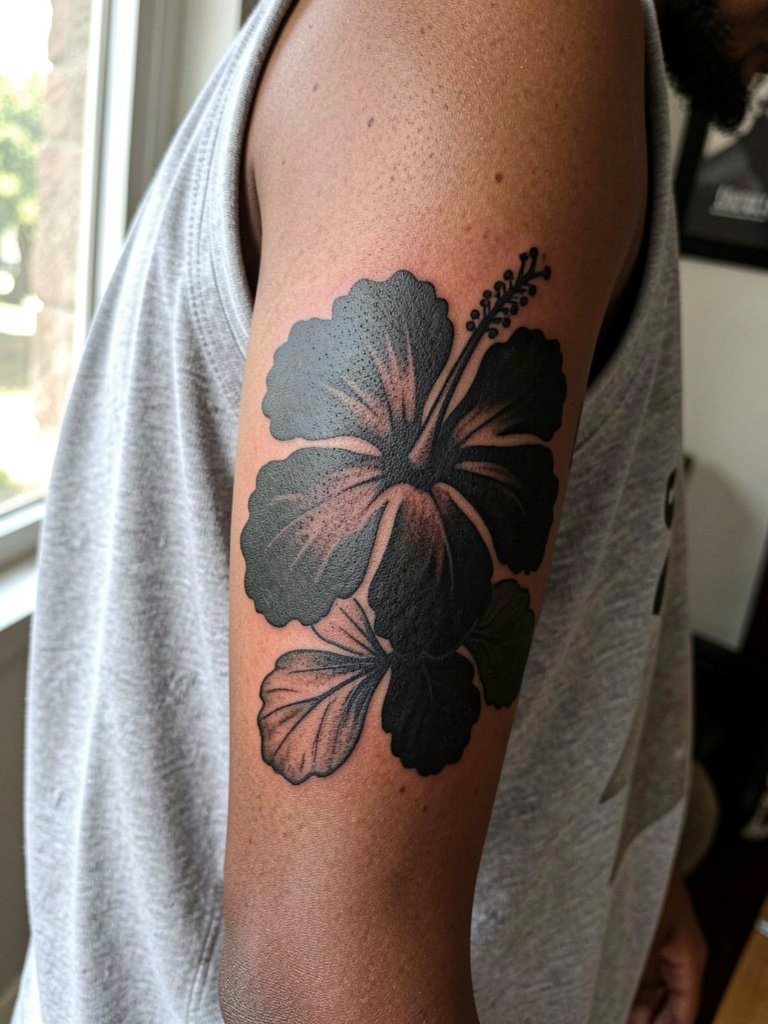
Blackwork gives a strong graphic statement and holds well over time because saturation resists early feathering. The trade-off is a heavier visual weight that limits fine internal detail. A common error is trying to pack too many tiny leaves inside big black fields, which kills the contrast. Talk through negative-space placement with the artist and map which slivers will remain untouched skin. Sessions feel intense when filling solid fields, expect longer single sittings and more recovery for soreness. For daytime looks pair the sleeve with sleeveless knit tops so the silhouette reads clearly against clothing.
4. Neo-Traditional Floral and Moth Full Sleeve
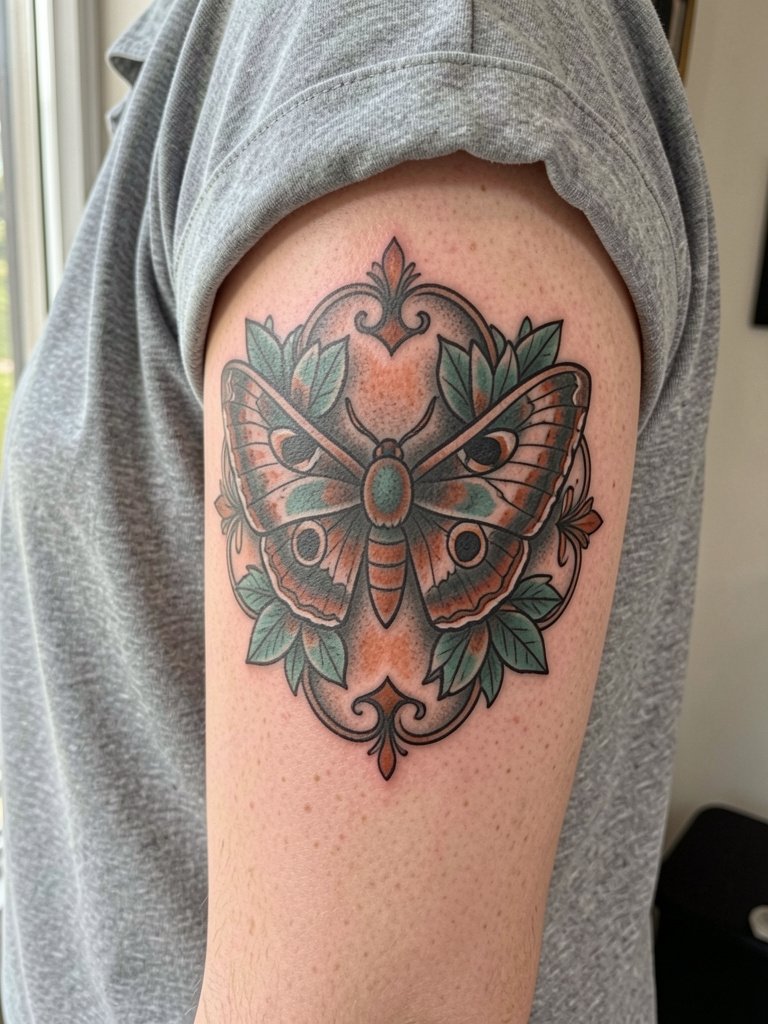
A neo-traditional sleeve pairs florals with a central creature like a moth to give structure and a visual anchor that ages cleanly. The outer arm tolerates bolder lines, so push for saturated fills and contrast instead of micro-detail. One mistake I see is requesting pastel-only palettes without solid black anchors. That leads to a washed-out look after a few years. Expect three to five hours per session for a full sleeve segment and a moderate pain level. For nights out the piece pairs well with open-back midi dresses that let the shoulder and upper arm show.
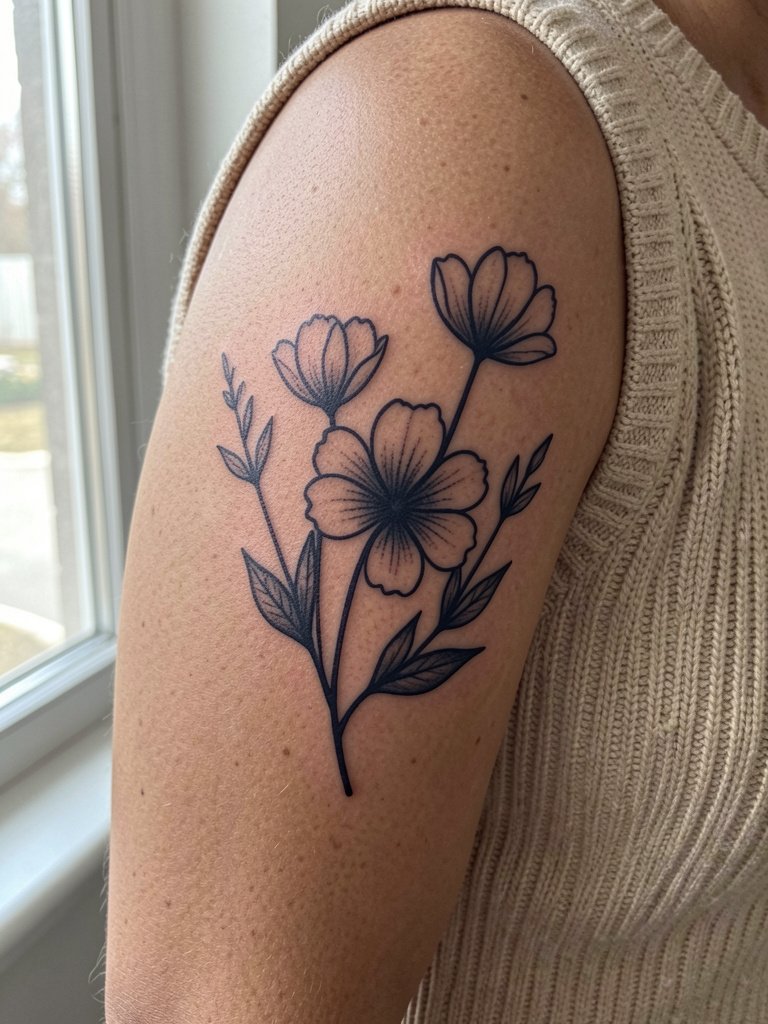
5. Botanical Sleeve with Script Band
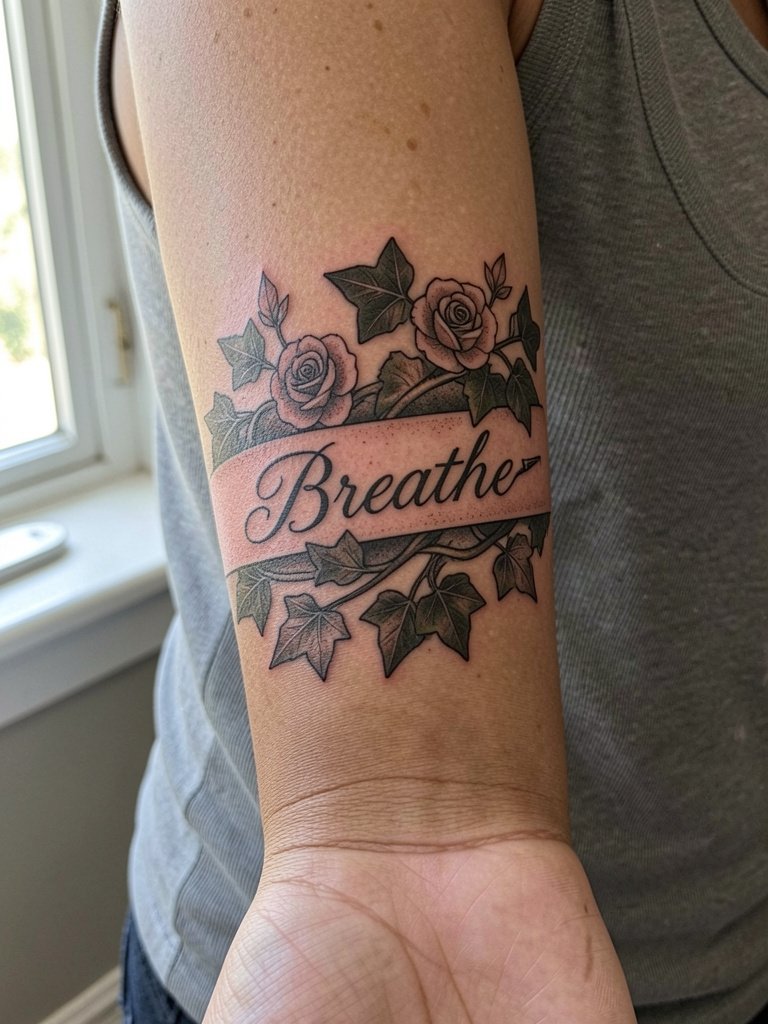
Combining botanical imagery with a script band creates rhythm along the arm and helps the sleeve read coherently from elbow to wrist. For longevity favor slightly heavier script than the thinnest single-needle, because wrists and forearms slowly soften detail. Bring two sizes of your chosen word to the consultation so the artist can test readability at distance. Expect a low to moderate pain curve and a touch-up at the one-year mark for the fine lettering. For casual styling try thin stackable bracelets that sit above the band and draw the eye up the sleeve.
6. Full-Sleeve Mixed-Scale Garden
A mixed-scale garden balances impact and delicacy by spacing big blooms and small filler flowers so each element breathes. Two camps form when people choose scale for sleeves. One group prefers lots of tiny detail and argues it reads more like lace. The other group pushes for larger forms, saying they age better and keep the composition readable. Both positions have merit, so decide based on how small details at the wrist have looked on skin similar to yours. For session planning set aside longer sittings for large petals and a separate session for the dense wrist work.
Session Day Picks
The arm and shoulder work above often need different prep than a small wrist flash, so a few targeted items smooth the day and the first week.
-
Stencil transfer paper kit. Lets you preview exact placement on skin before the first pass, especially useful for the mixed-scale and script band pieces above.
-
Topical numbing cream. Applied as directed takes the edge off longer full-sleeve blocks without compromising the artist's ability to work.
-
Thin protective film roll. Keeps forearm and wrist work clean during the first few days of frequent handwashing.
-
Fragrance-free gentle body wash. Cleanses healing skin without stripping sensitive pigments, which helps color sleeves hold their tone.
-
Aquaphor healing ointment. Thin layers support initial moisture retention for fine-line and watercolor areas without clogging channels.
7. Fine-Detail Ankle-to-Wrist Floral Chain
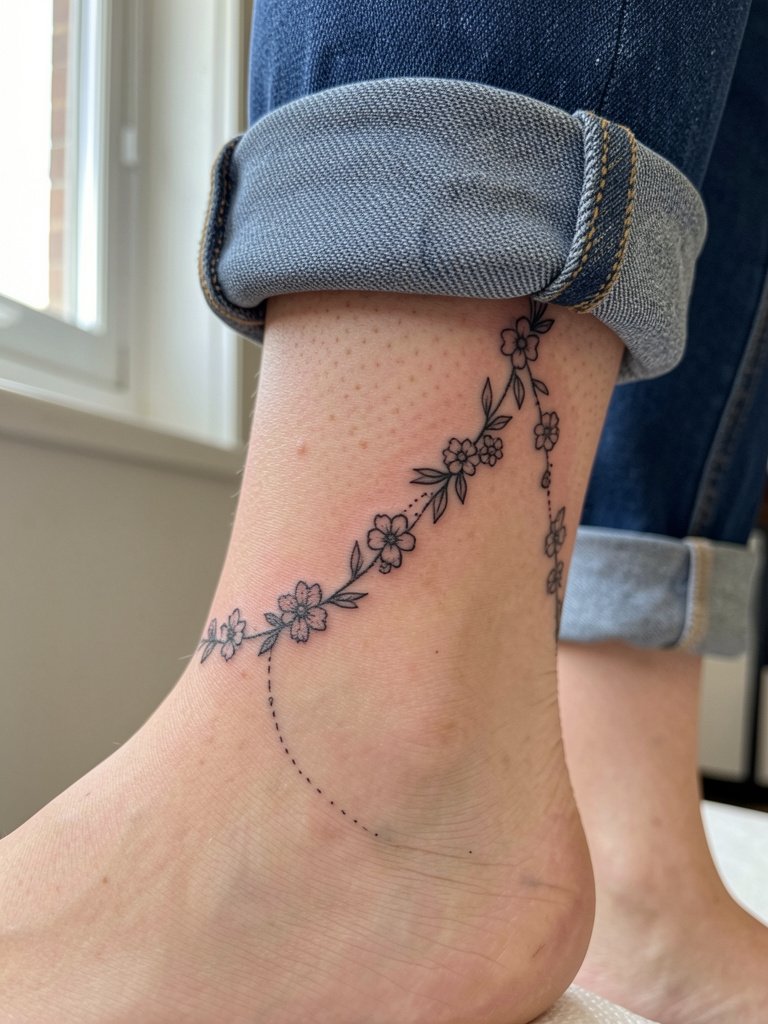
An ankle-to-calf chain brings sleeve ideas to the lower limb while keeping a delicate feel. The ankle is high friction and tends to blur very fine links faster than upper-arm skin. For durability favor slightly stronger line weights and space between chain links. Session time is usually shorter but can be repeated across visits if you want uniform spacing. Wear cuffed jeans or ankle boots that do not rub the fresh ink while it heals. Professional consideration: ankle work can be trickier for low circulation, so discuss circulation and aftercare with the studio.
8. Botanical Sleeve with Geometric Frames
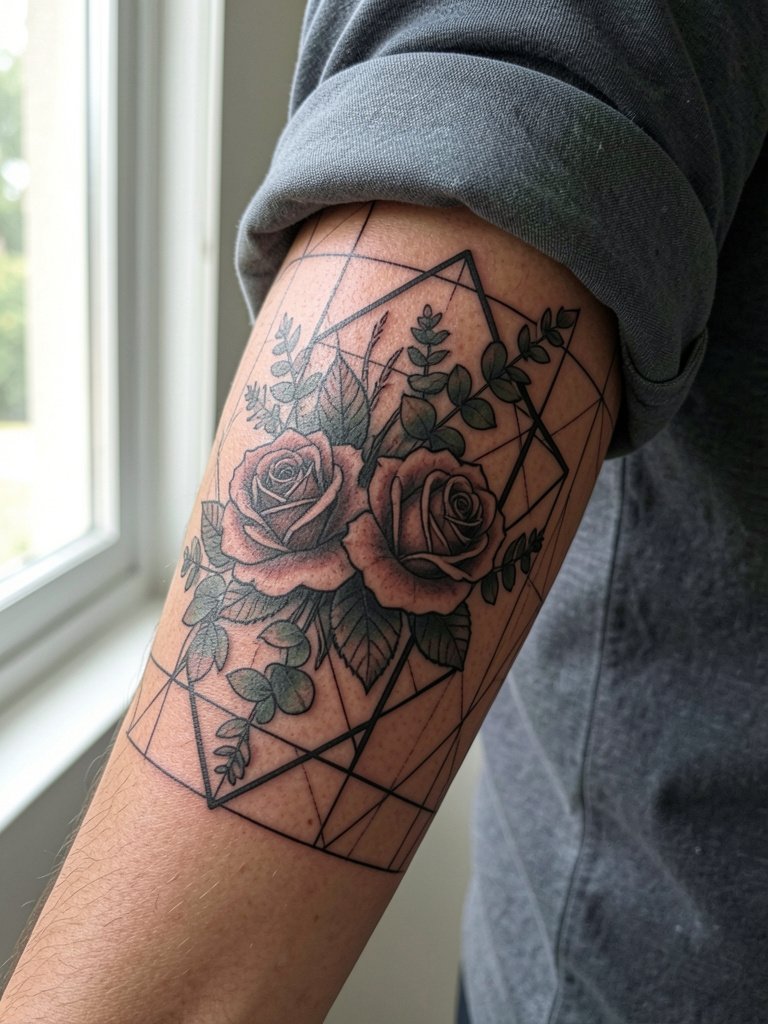
Pairing geometry with florals creates tension that keeps the composition readable from a distance. The primary risk is crowding lines against fine petals which can make both elements compete. Ask the artist to map which frames will be fully black and which will retain skin for legibility. Expect low to moderate pain on the forearm and a touch-up after one to two years to keep crisp grid lines. For front-row visibility choose three-quarter sleeve blouses that let the forearm frame be seen.
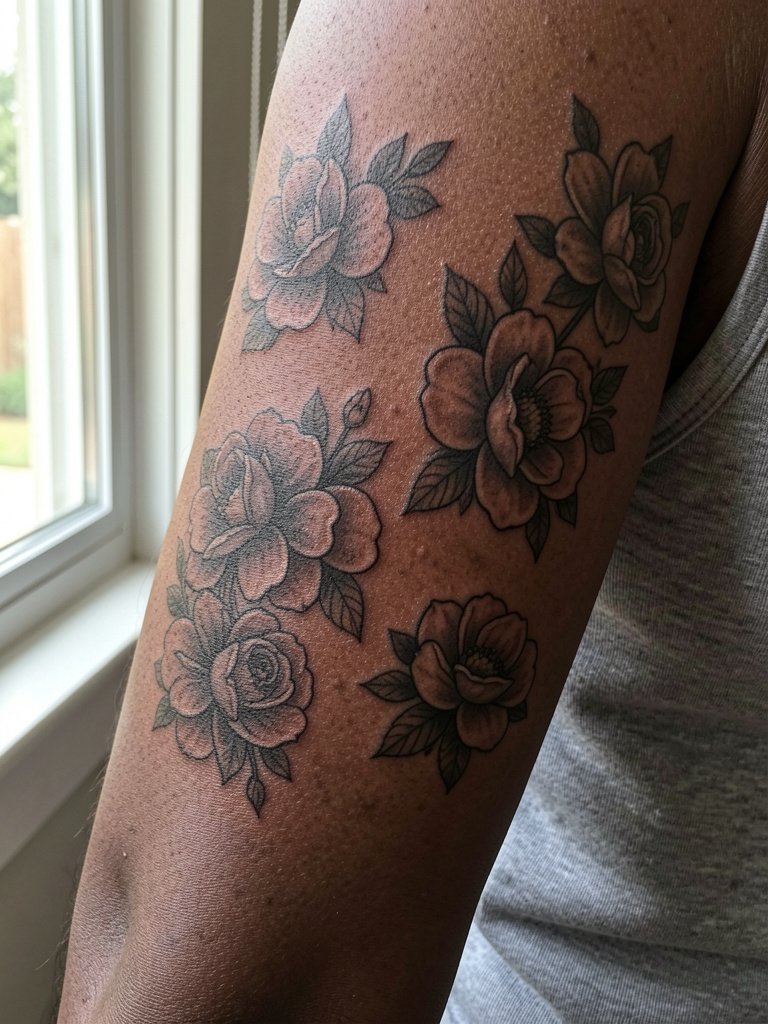
9. Stipple-Shaded Vintage Floral Full Sleeve
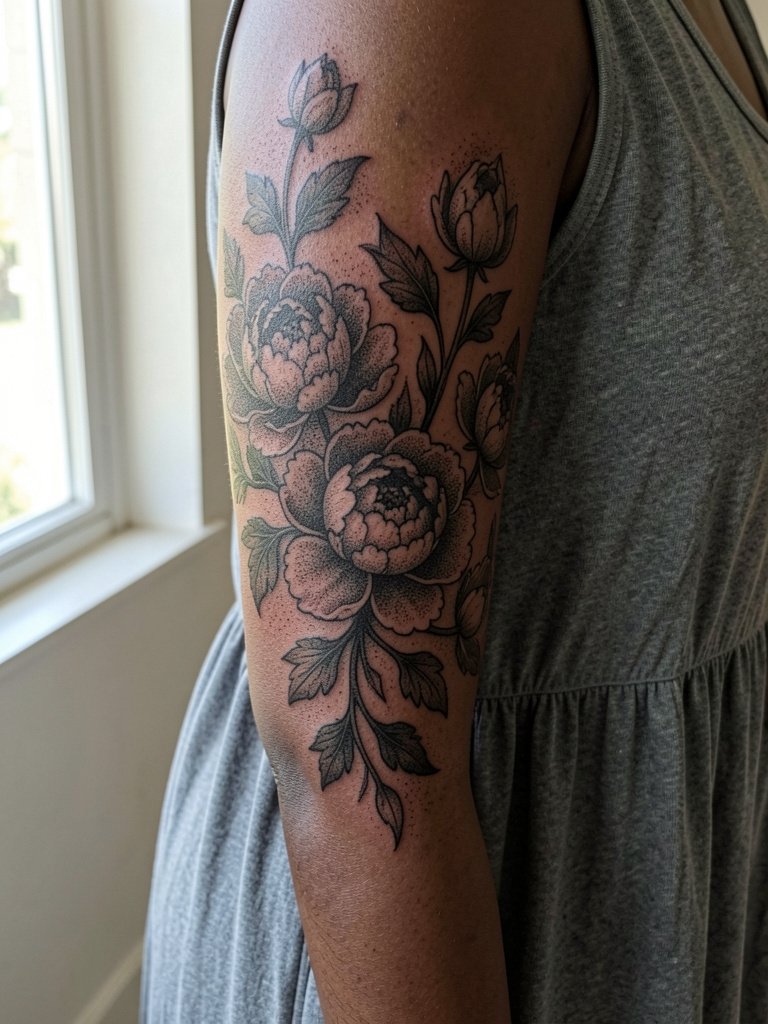
Stipple shading produces a timeless, textured look that photographs very well in black and grey. The technique is slow so sessions are paced to avoid overworking the skin. A common mistake is asking for full stippling across large fields which can age into a muddled tone. Instead plan stipple for shadow and allocate flat black for silhouettes. At six months the stipple reads as grain, and at five years the pattern may need a soft touch-up to restore midtones. For a refined display try pairing with sleeveless sheath dresses that let your arm be the focal point.
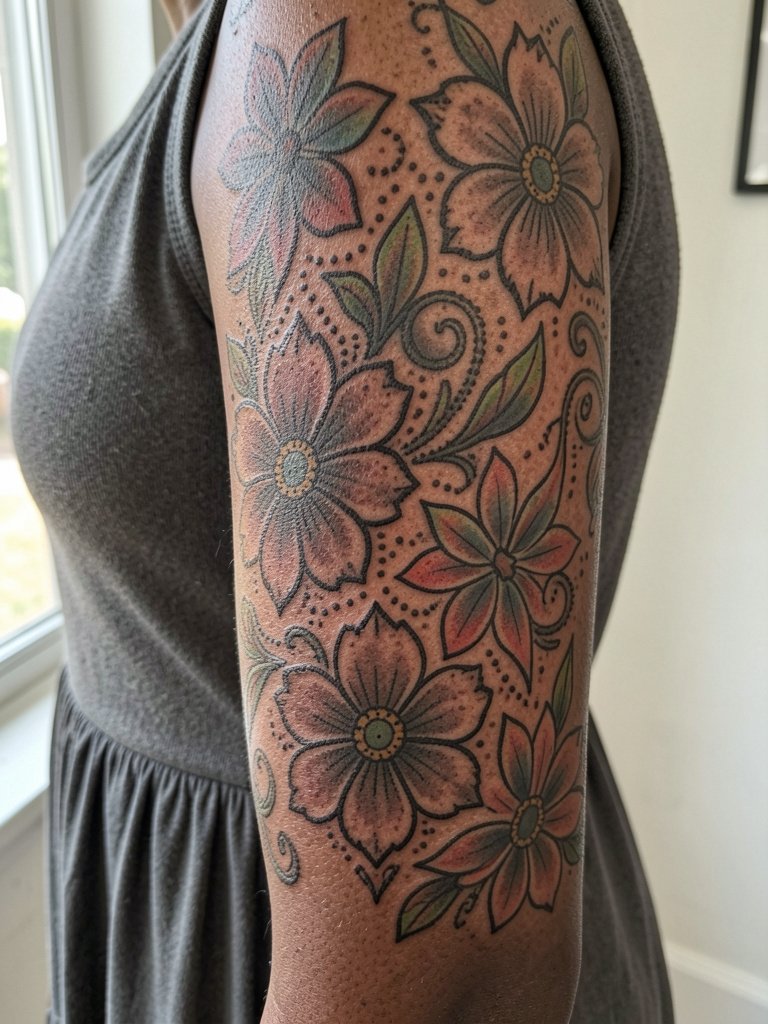
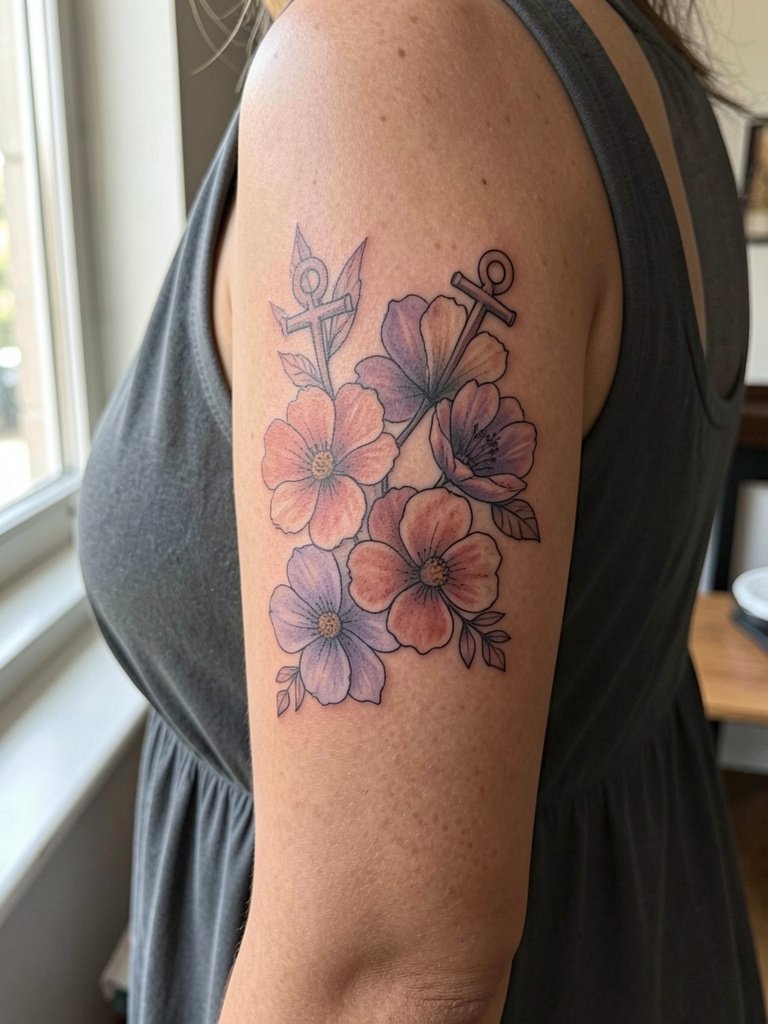
10. Color-Blocked Floral Sleeve with Pale Skin Highlights
Color blocking keeps a sleeve graphic and modern while using pale-skin highlights to suggest light on petals. White ink highlights can fade faster than other colors, so plan them as accents rather than structural elements. Discuss pigment placement in the initial mapping session and ask where white will likely thin. Sessions involve multiple color passes which can be more abrasive, so plan recovery accordingly. For outfits pick short-sleeve linen shirts that contrast with the color fields and help the highlights pop.
11. Wraparound Chest-to-Arm Floral Sleeve
When a sleeve wraps onto the chest the skin quality and stretch differ, which affects line stability. For sternum-adjacent work expect higher sensitivity and a different healing timeline than the arm. One frequent error is using identical fine detail on sternum and arm, which the chest may not hold. In the consult point out where the arm transitions to chest and ask the artist to scale elements accordingly. For showing off choose low-cut wrap tops that sit naturally and reveal the composition. Professional consideration: sternum pieces are more sensitive and some artists require additional experience before taking them on.
12. Saturated Black Floral Sleeve That Reads From Afar
Large, saturated black florals are durable and keep their silhouette as the skin ages. Artists split into two camps when asked for heavy black saturation on forearms. One camp warns that large black fields can mask future work and may be harder to alter. The other camp says black ages reliably and can anchor mixed styles. State your long-term plan so the artist can advise on future additions. Sessions for saturated fill can be longer and feel more intense in the muscle-heavy arm regions.
13. Botanical Sleeve with Metallic Ink Accents
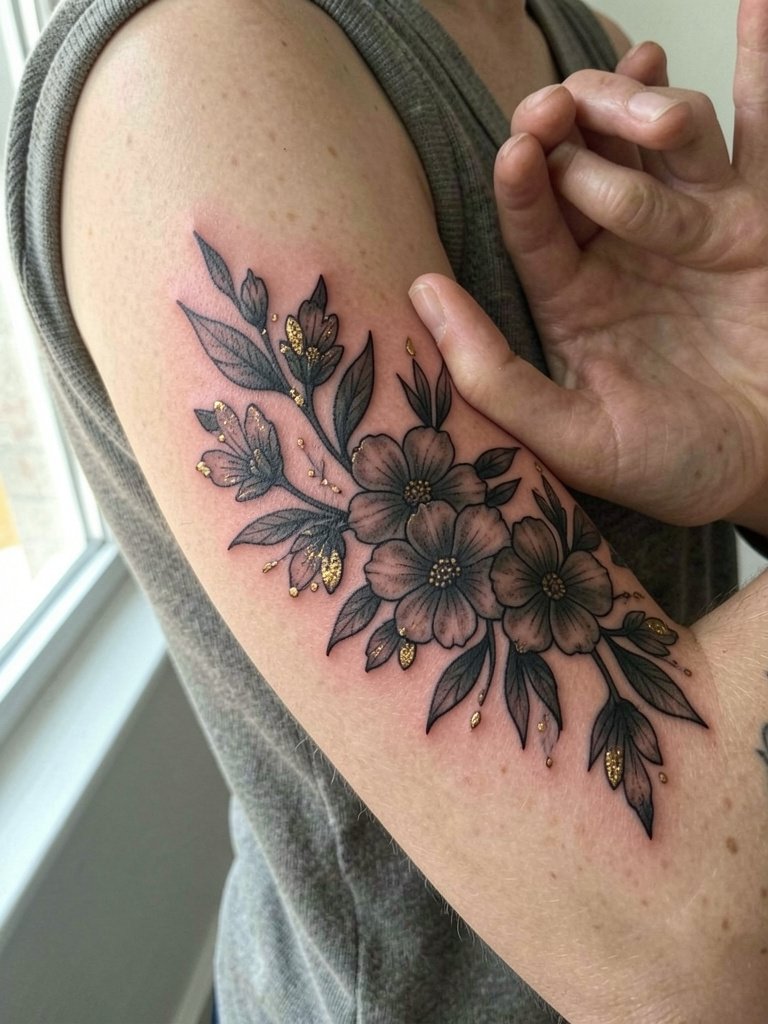
Metallic inks add a refined flash but they are not as stable as standard pigments. If you want gold accents ask for placement in raised petal tips where the shimmer reads and plan for a touch-up within a year. The metallic will fade unevenly in high-friction spots, so avoid placing it on inner wrist or areas that rub. Expect moderate session length and slightly longer healing monitoring. For dates and events try open-back evening tops that let small metallic accents catch light.
14. Sleeve Composed Around a Single Focal Bloom
Designing a sleeve around a single focal bloom ensures a clear reading that anchors the composition. A mistake is distributing equal visual weight to multiple flowers, which removes the anchor and flattens the piece. During consultation mark the focal bloom and have the artist show how surrounding elements lead the eye. Sessions vary by saturation but plan on several sittings for shading and transitions. The focal approach pairs with cap-sleeve dresses that balance coverage and exposure.
15. Vintage Etching Style Floral Sleeve
An etching approach looks like a plate illustration and rewards precise linework. The risk is over-detailing areas that will blur, which is why spacing and slightly bolder hatch marks often perform better long term. Ask the artist to produce scaled samples of hatch density on forearm skin so you can see how contrast will appear at six inches. Sessions can be meticulous and take steady hands. For gallery-style settings wear three-quarter sleeve blouses that show the forearm texture without overpowering it.
16. Floral Sleeve with Geometric Sleeve Cuff

A cuff provides a neat finishing edge to a sleeve and helps the piece feel intentional when you push a shirt sleeve down. The knit of the wrist skin can cause tight dot work to blur if packed; request spacing tests for the cuff dots. Sessions for cuff work are shorter but require steady patching to ensure even density. For styling wear thin stacking rings and a cuff bracelet that sits above the tattoo to emphasize the band.
17. Minimalist Single-Color Floral Sleeve
Single-color sleeves reduce palette complexity and can look cohesive across multiple sessions. Navy and other non-black pigments fade differently from black so ask the artist about pigment longevity for the color you choose. A common misstep is mixing too many color families without testing healed photos on similar skin. Sessions for minimalist color are quicker, but a color refresh may be needed sooner than black. For low-key display choose cropped tees that let the arm read cleanly against neutral tones.
18. High-Contrast Linework with Sparse Color Pops

Strategic color pops direct the eye and prevent a sleeve from feeling visually uniform. The typical error is scattering color without hierarchy, which makes the piece read as confetti. During the mapping phase pick one or two petals per major bloom to carry color and plan the rest in black. Expect moderate session times and a small touch-up timeline for the color accents. For casual show-off pair with short-sleeve button-ups that allow a controlled reveal.
19. Full-Sleeve Floral with Hidden Symbolism

Incorporating micro-symbols into florals personalizes a sleeve without overwhelming the aesthetic. The danger is placing micro-details where they will blur, like near the elbow crease or wrist. Have the artist map each symbol at scale and show how it reads at arm distance. Sessions vary depending on how integrated the symbols are. For outfits that reveal small details try cap-sleeve tops that let glimpses peek through.
20. Sleeve with Botanical Mandala Panels

Mandala panels structured into a floral sleeve need careful spacing to avoid visual clutter. Cultural origin concerns come up with mandalas in two distinct ways. One camp treats mandala forms as geometric patterns with universal appeal and incorporates them freely. The other camp urges respect for cultural and spiritual origins and suggests learning the symbols before adopting them. A respectful route is to discuss symbolism openly and request the artist adapt the geometry without copying sacred iconography. Sessions for mandala panels emphasize symmetry checks and may take longer per section.
21. Sleeve Built from Flash Floral Panels
Using flash panels can speed a sleeve project because each element is designed to read as its own badge. The key is a unifying link such as background shading or a consistent outline thickness. A common mistake is mixing flash from different eras without a unifying palette, which makes the sleeve feel disjointed. Sessions can be booked as multiple shorter appointments. For casual styling pick sleeveless woven tops that let the panels be visible.
22. Sleeve with Seasonal Flower Sections

Segmenting a sleeve by season gives narrative and variety while allowing different palettes to breathe. The planning conversation should allocate space for each section and test transitions so the sleeve does not look fragmented. A mistake is trying to cram too many micro-palettes into narrow bands, which reads noisy. Sessions can be scheduled by season block to manage healing and budget. For display wear short-sleeve linen shirts that let each seasonal panel be seen.
23. Black and Grey Floral Sleeve with Skin-Work Highlights
Leaving intentional skin gaps as highlights can make black and grey florals read more three-dimensionally. The common error is leaving too little skin which then closes up as the ink spreads. Discuss specific gap widths with the artist so you can see how they look at different distances. Sessions are medium in length and the touch-up plan should target edges where skin meets heavy shading. For smart-casual looks choose sleeveless blazers that expose the arm while keeping an elevated silhouette.
24. Sleeve with Creeping Vines and Negative Space Bands
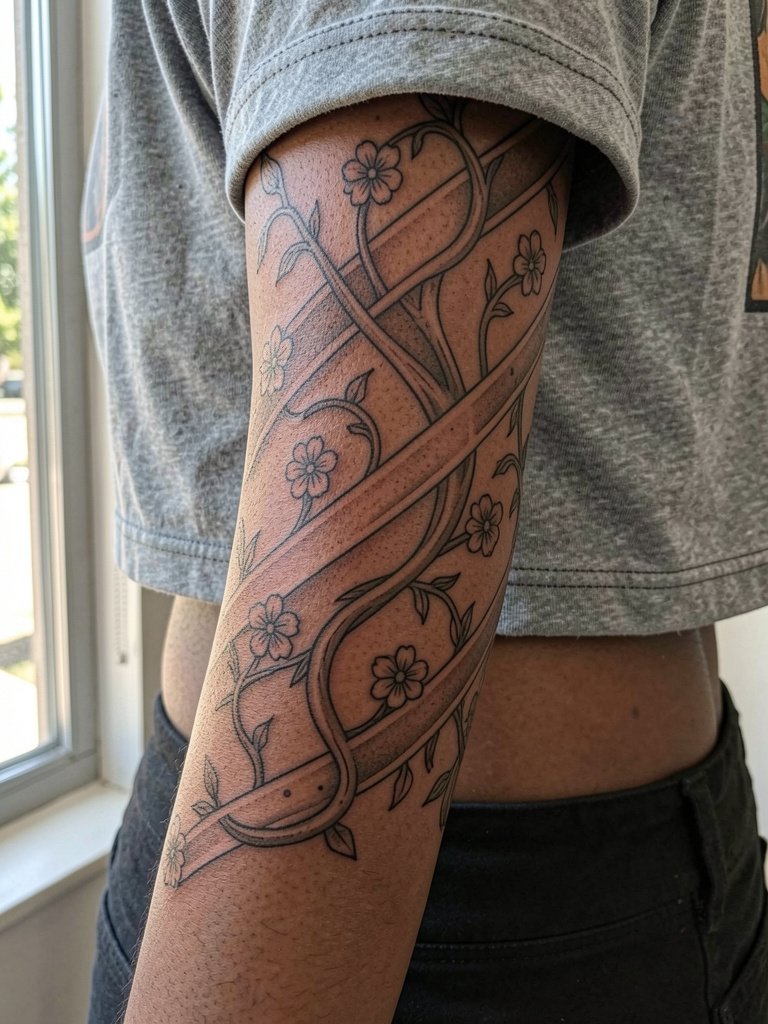
Vines wrapping the arm create movement and can be composed so negative space becomes rhythm. Over-connecting vine lines is a common mistake that makes the pattern read as a single texture. Ask the artist to plan small breaks in the vines to create breathing room and to demonstrate how the negative bands will look healed. Sessions can be shorter and spread out. For a casual look choose cropped tees that naturally show the lower arm wrap.
25. Bloom Cluster Sleeve for Wide Arms

Designing for wider arms means scaling forms up so they read instead of shrinking detail into the skin. A frequent error is transferring a thin-wrist design directly onto a wider arm without resizing, which loses impact. Bring a photo of your arm and ask for mockups at full scale. Sessions for cluster work focus on layering and depth. For showing off try short-sleeve knit tops that complement broader shapes.
26. Sleeve with Subtle Color Gradient Washes
Gradient washes produce a painterly flow that feels modern and cohesive across a sleeve. The concern is uneven fading where gradients overlap, so request a healed photo sample or a small test patch to see how transitions age on your skin. Sessions often layer color slowly to avoid oversaturation. For evening wear try open-back midi dresses that let shoulder-to-elbow gradients show.
27. Sleeve with Micro-Realism Floral Portraits
Micro-realism offers intimate floral portraits that reward close inspection but may lose clarity from a distance. The inner forearm can hold fine tonal work if the values are mapped with slightly bolder midtones. Avoid requesting too many ultra-tiny portraits adjacent to each other. Sessions are detail-oriented and often require very steady hands and shorter blocks to maintain accuracy. For minimal reveal choose thin strap camisoles that let the inner forearm be visible without distraction.
Frequently Asked Questions
Q: How painful is a full floral sleeve and how should I prepare for sessions?
A: Pain varies by placement and your personal threshold. Expect lower pain on the outer arm and higher sensitivity on inner bicep and sternum areas. Eat a good meal, hydrate well, get a solid night of sleep before long sessions, and wear clothing that gives the artist clear access such as a tank top or a sweater you can slide off easily.
Q: How often will I need touch-ups for a floral sleeve?
A: Touch-up timelines depend on style and saturation. Bold blackwork may only need minor corrections every five to eight years. Fine-line and watercolor elements often benefit from a small touch-up within one to three years. Plan with your artist on an initial touch-up about six to twelve months after finishing the sleeve.
Q: Are some floral styles more at risk of blowout or fading?
A: Yes, single-needle fine lines and tiny dot work on low-firmness areas like the inner wrist, ribs, and ankle have higher blowout risk. Heavy black saturation resists blowout but can hide later additions. If you are worried about blowout, ask the artist to demonstrate healed images on similar skin and to space lines a little wider in vulnerable spots.
Q: Where can I find healed portfolio examples and discovery pathways without naming specific artists?
A: Search platform tags and location filters on social media for healed examples. Try hashtag searches like #FloralSleeveHealed and #BotanicalSleeve for pictures across skin tones. Explore portfolio sites and community threads that allow location filters so you can find healed work near you. Reddit tattoo forums also have healed threads where people post timelines and touch-up histories.
Q: How should I dress for a session based on sleeve placement?
A: Wear loose, accessible clothing that leaves the area exposed without being held in an awkward position. For shoulder and upper-arm sessions a tank top is ideal. For inner-arm work choose a sleeveless top that does not rub the area afterward, and bring a light jacket you can take on and off without stretching the fresh ink. A helpful item is an easy-to-remove top that keeps the rest of you comfortable while the artist works.
