
Someone I know spent eight months pinning forearm tattoos, then realized the real problem was knowing which styles actually last on skin and which look dated after two years. I walked through five shops across Brooklyn and saw the same handful of styles keep coming up, and I also heard the two sides of the fine line debate. Read on for 12 forearm tattoo ideas that fit different vibes, how they age, what to say at your consult, and a sensible prep and care shopping list to help the ink heal clean.
1. Minimalist Fine Line Arrow on Inner Forearm

Someone I know first saw a single-needle arrow on an inner forearm and booked a walk-in because the placement reads private but easy to show. Fine line is low on pain for most people, and a small inner forearm piece often takes a single short session. Tell your artist you want shallow, single-needle linework with even spacing, not hairline-dot filler. Artists split on fine line longevity. One camp says thin lines tend to blur and need touch-ups around year two. The other camp says correct needle depth and spacing keep the lines intact for years. Expect a light touch-up by year two or three. The common mistake is asking for an arrow too small for the needle; give the lines breathing room.
2. Geometric Mandala Band on Outer Forearm
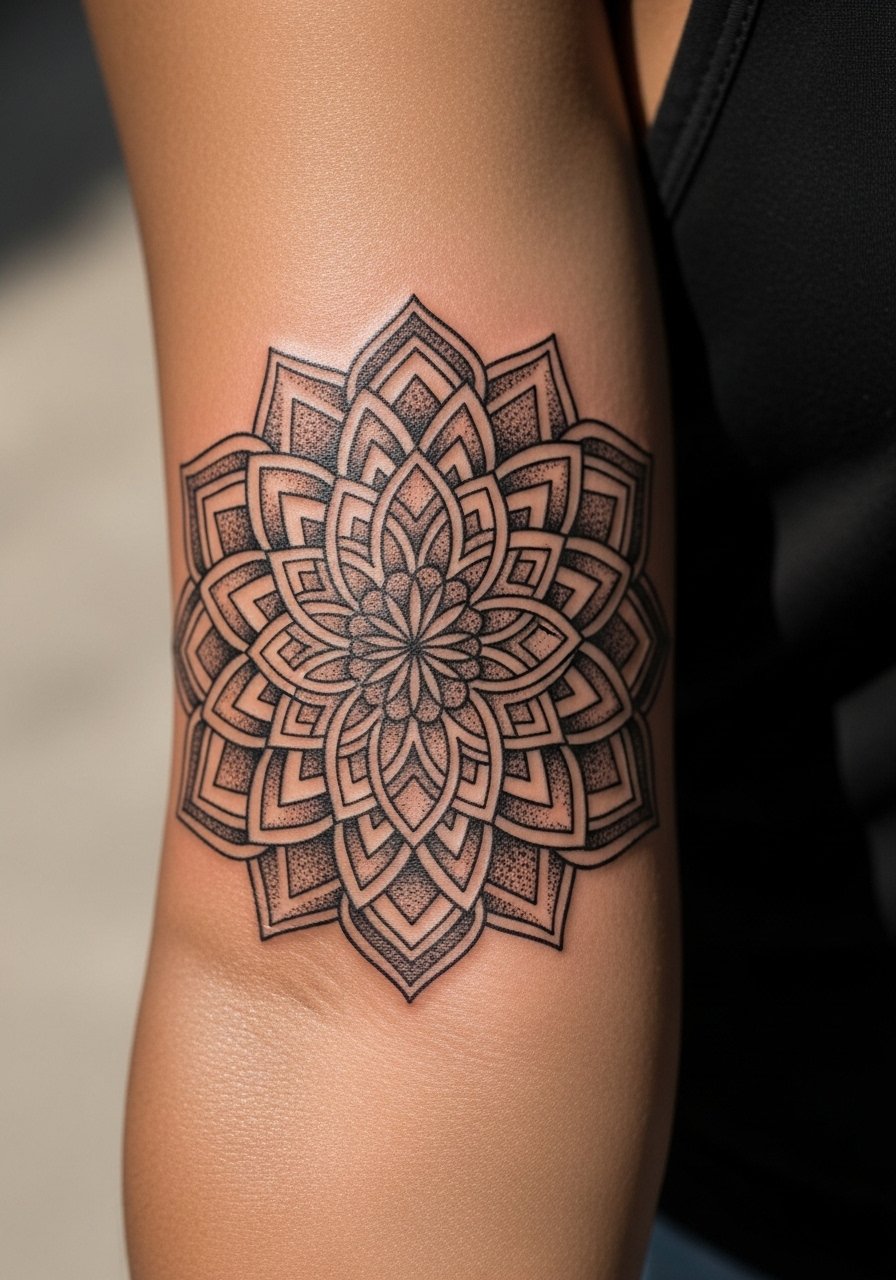
When you want structure that scales up later, a mandala band reads clean from a distance and still holds detail up close. Geometric pieces benefit from thicker primary linework and deliberate negative space so the pattern does not visually collapse as the skin ages. In consultation, bring photos that show line weight and spacing, and ask for slightly larger gaps between spokes than you think you need. Session time is typically two shorter sittings for medium complexity. A common mistake is compressing too many spokes into a small area, which raises blowout risk on the outer forearm. Plan a touch-up around year two for saturation refresh and crisp edges.
3. Nature-Inspired Branch Wrap Along the Forearm
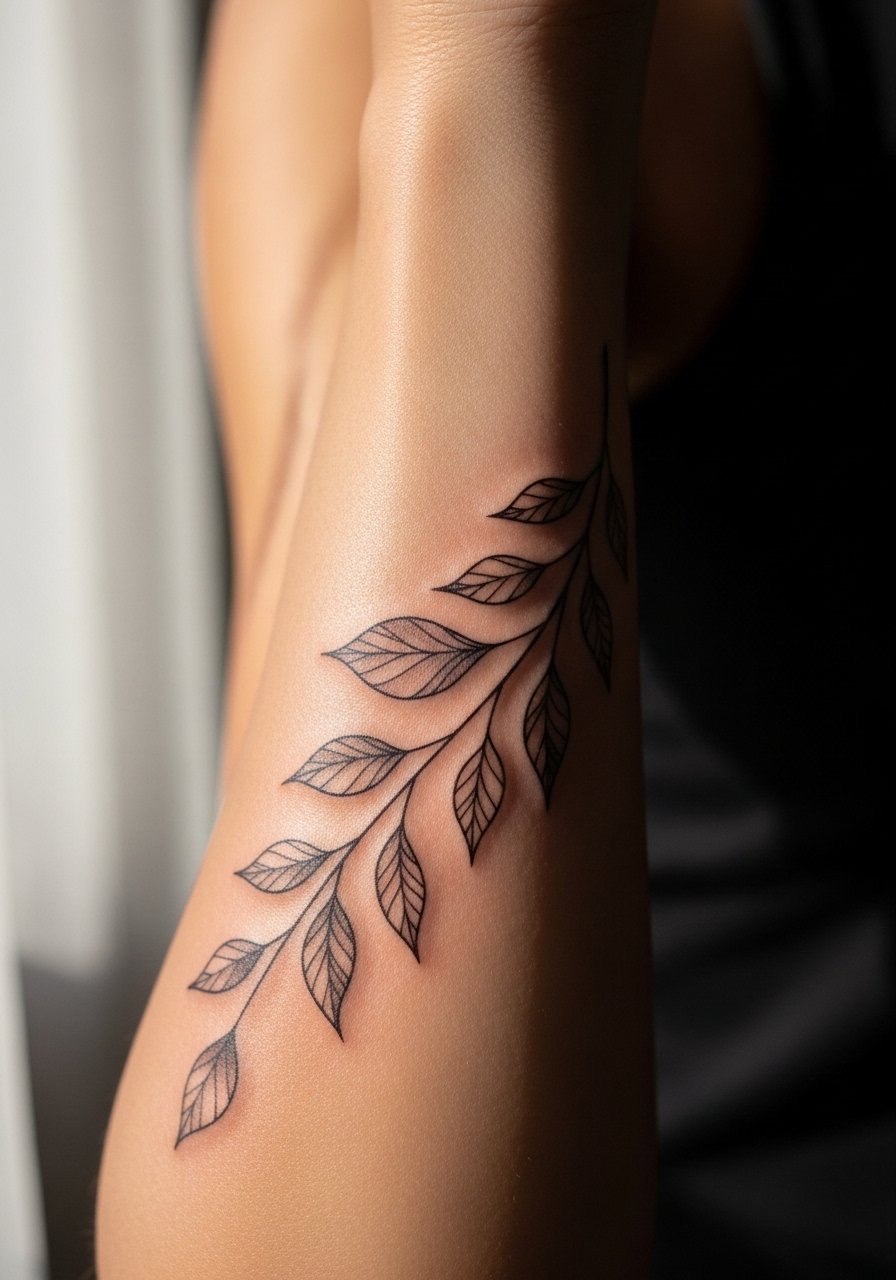
Most people choose botanical wraps when they want something organic that works with the arm's contour. The branch style is forgiving because you can follow muscle lines and avoid sharp curves that stress the ink. Tell the artist you want flow that follows the ulna and radius, and request light gray wash behind leaves for depth without heavy saturation. Expect two sessions for a medium wrap. Aging looks like softening of tiny veins and leaf tips, so thicker leaf stems help the motif last. A real mistake is forcing the branch into a straight line. Let the design breathe with the arm's motion to reduce future touch-up needs.
4. Neo-Traditional Lion Head on Outer Forearm

There is something about thick outlines combined with controlled saturation that reads well from across a room while still holding detail up close. Ask for classic neo-traditional linework, not photorealistic shading, if you want durability. Pain is moderate on the outer forearm and the piece usually needs two sessions for color saturation and linework. Healed at six months you will see crisp outline and calmer color, and at two years the thick strokes keep the design readable. The common error is asking for too many tiny color transitions. If you want long-term clarity, request fewer color layers and deeper saturation in one session.
5. Sun and Moon Balance on Inner Forearm

Most geometric celestial tattoos read as symbolism without needing heavy detail, which makes them ideal for inner forearm placement. The inner forearm is a flat canvas so small, balanced motifs like a sun and moon work well with single-needle and small dot work. Tell your artist you want equal negative space around both symbols so one does not crowd the other. Pain is low to moderate, and a one-session piece often holds up with light touch-ups in three to five years. A frequent mistake is cramming too many stars and tiny dots around the pair. Keep surrounding elements sparse to avoid early blur.
6. Compass with Mandala Elements, Full Forearm

When travel or guidance is the theme, a compass built into mandala structure scales well from wrist toward the elbow. For this, ask for concentric spacing that widens slightly with each ring so the detail does not merge. Expect two to three sessions depending on size, and plan for stipple shading to add texture without heavy saturation. At six months the dot work will look crisp, and after a few years the spacing preserves the radial pattern. People often make the mistake of placing the compass too small, which kills radial clarity. If you plan a sleeve later, mention where you want connecting elements to sit.
7. Thor's Hammer Mjölnir in Runic Style on Outer Forearm
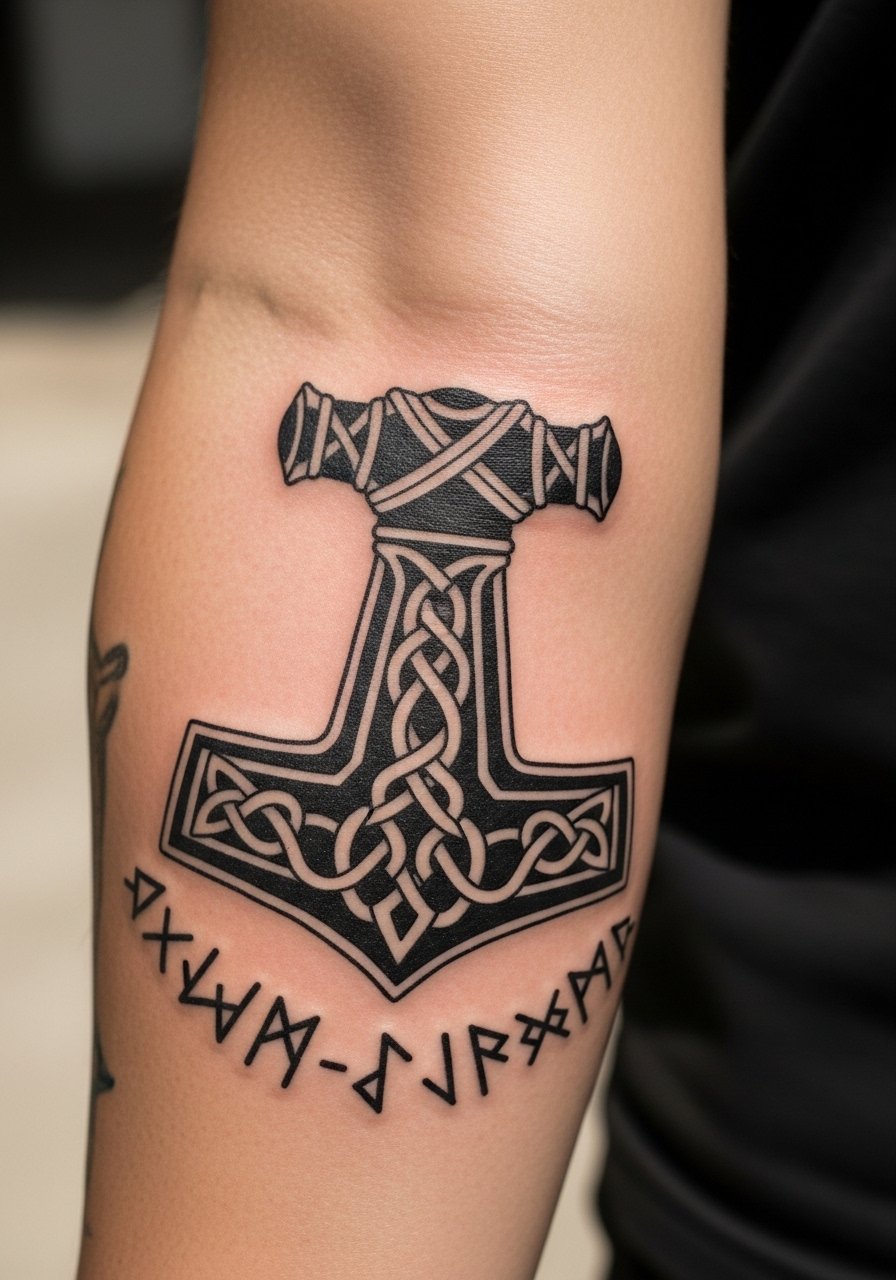
A runic Mjölnir reads rugged and compact, and the outer forearm handles solid blackwork well. When you consult, say you want bold black fill with clean negative runes, and be clear on symbol accuracy. Session time can be one long sitting for a medium piece. A common mistake is copying runes without checking meaning and layout. For cultural origin sensitivity, note the design draws from Norse tradition so many people alter proportions rather than replicate ritual pieces. Solid blackwork holds its shape longer, but expect a touch-up in three to five years where saturation softens.
8. Stipple-Shaded Skull with Rose on Outer Forearm

When you want a classic juxtaposition of mortality and growth, stipple shading gives a softer, textured look that ages differently than smooth gradients. Tell your artist you prefer dot work in shadow areas and whip shading for midtones, not heavy gray fill. Pain is moderate on outer forearm and two sessions often produce the depth you want. At six months dot density will settle, and over time the stippling keeps the form readable because there are no large blended swathes. The mistake is asking for super smooth photo gradients in a small area. That approach needs heavy saturation and often muddies with time.
9. Vintage Rose Sleeve Starter from Wrist to Elbow
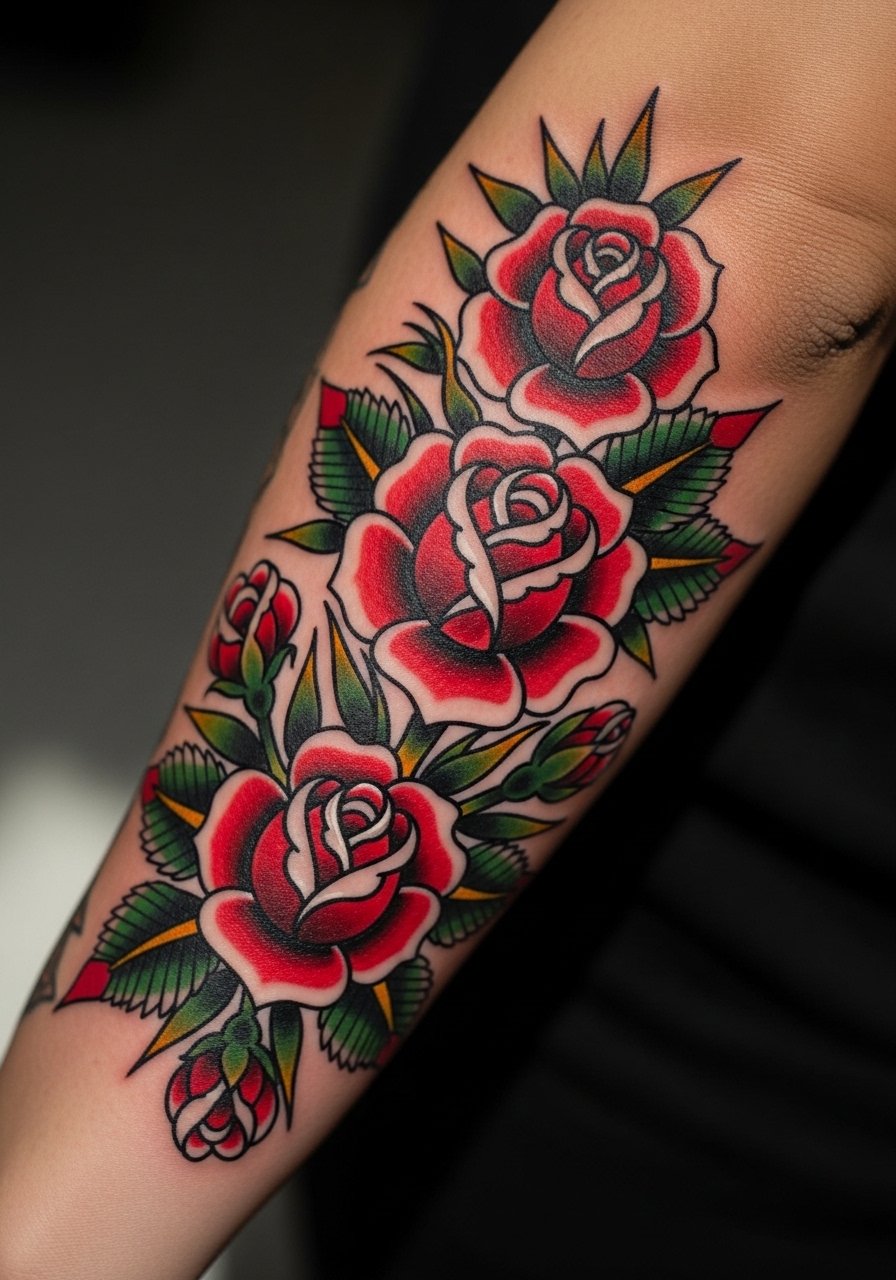
If you want a sleeve starter that can grow, classic roses work as anchor pieces and link well to other motifs. In the consult, show where you want scaffolding for future pieces and ask for thicker outlines at the base of petals to prevent early feathering. Expect multiple sessions for color saturation and layering. Healed color at six months will be softer than fresh ink, and over a few years traditional outlines maintain composition better than tiny delicate petals. A frequent error is requesting tiny roses for a sleeve. Bigger motifs age with more dignity and make expansion easier.
10. Angel Wings Behind a Sword with Rose, Inner Forearm
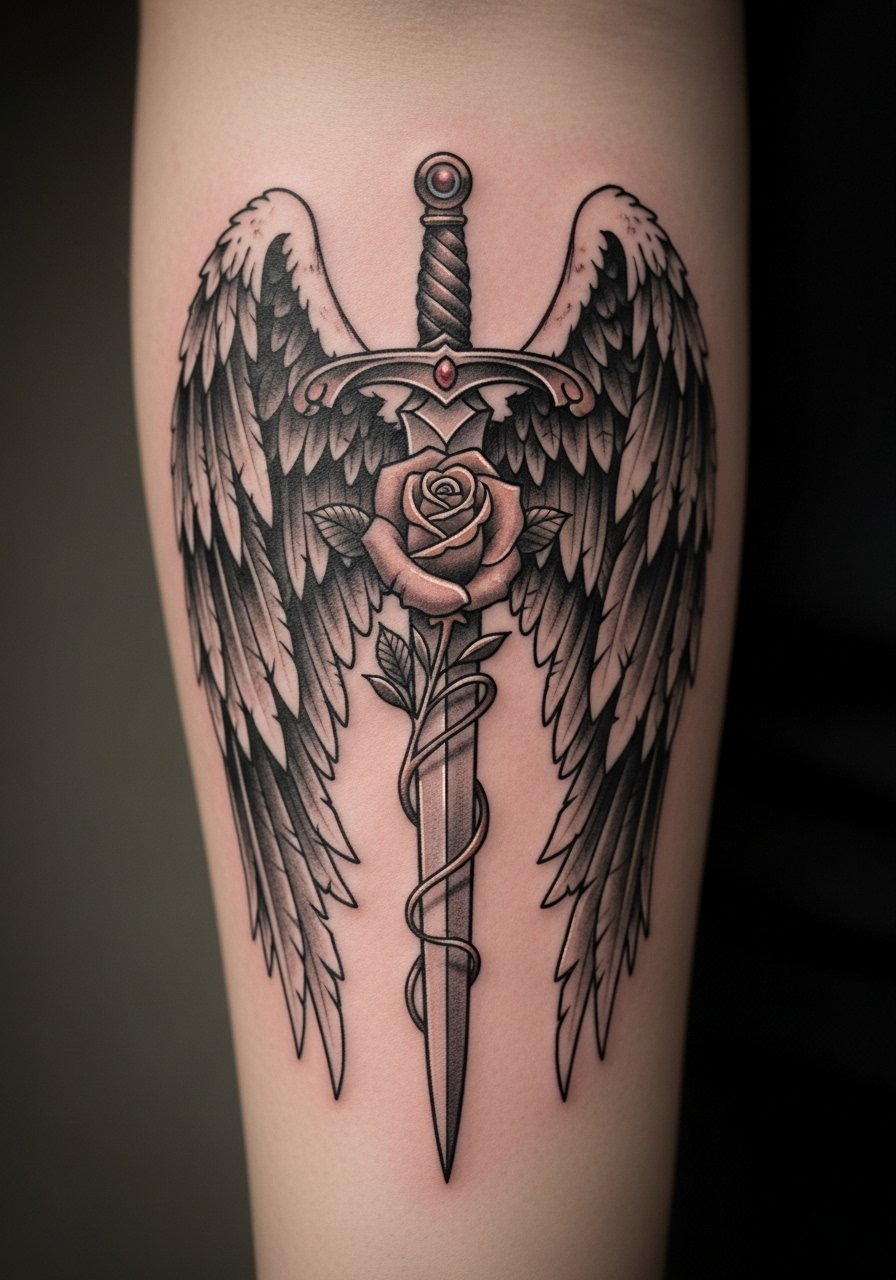
There is a balance between ornament and narrative in this motif that suits inner forearm storytelling. Ask for mixed black and gray shading with single-color accents on the rose to avoid heavy saturation everywhere. Pain is on the lower side for most, and plan three sessions if you want layered shading and color. Over time the mixed approach retains contrast because the black and gray anchors the piece and the single color can be refreshed as needed. The common mistake is piling color into the wings. Keep wings monochrome so the rose reads as the focal point.
11. Norse Odin with Ravens, Upper to Forearm Transition

When you want mythic scale a transition piece from the upper arm down reads intentional and gives room for storytelling. Mention during consultation you want a clear shoulder-to-forearm flow and leave space at the elbow for future linking. Pain increases slightly as you move nearer the elbow, and expect multiple sessions to handle portrait elements and feather details. At six months the raven wings will start to sit into the skin, and realistic detail holds up if the face and feathers use decisive linework rather than tiny hairlike strokes. The mistake is crowding portrait detail near the elbow joint where motion stresses ink.
12. Realistic 3D Tiger or Warrior on Outer Forearm

A micro-realism warrior portrait makes the forearm feel cinematic but it demands planning. Start with reference photos that show clear facial planes and ask for midtone control rather than overworking highlights. Pain is moderate and session time is long, often two to three sittings for depth and saturation. Expect realism to need a touch-up around year two, especially in high-motion areas. The most common mistake is shrinking the portrait to wrist size. Realistic portraits need room to render planes and avoid the muddy look that comes from compressed detail. If you plan a sleeve, discuss how this piece will read from each angle.
Tattoo Prep and Aftercare Essentials
Fragrance-free moisturizing balm for tattoos, unscented, lightweight salve with natural oils. Use a balm like this after the initial wash to keep skin supple without clogging pores. Apply thin layers during the first two weeks to avoid smothering the tattoo.
Medical-grade second skin tattoo bandage, single-use sheet. Useful for protecting fresh work for the first 24 hours when humidity or clothing friction is a concern. Follow the product timing your artist recommends.
Lightweight fragrance-free lotion for long-term hydration. Keep healed tattoos moisturized to preserve saturation and reduce flaking during dry months.
Fragrance-free foaming facial or body cleanser, gentle pH. Use this for the initial washes to remove ointment and surface dead skin without stripping the ink. Pat dry, do not rub.
Aquaphor Healing Ointment, small tube. One mainstream option many people use for the very first day. Use sparingly and only if your artist agrees, because some prefer breathable care.
Disposable single-blade razor pack for pre-appointment skin prep. If your artist asks you to shave the area, use a fresh single blade the night before to avoid irritation.
Broad spectrum mineral sunscreen SPF 30 or higher. Sunscreen is the long-term defender of saturation and contrast on any forearm tattoo. Apply daily when exposed.
Soft exfoliating washcloth to remove dead skin before sessions. Use gently a day or two before a session to smooth the canvas without causing microtears.
Every tattoo is different. Always follow your artist's specific aftercare instructions. Consult a dermatologist if you have skin concerns or unusual healing issues.
Frequently Asked Questions
Q: Will fine line tattoos blur into each other if I get a full sleeve?
A: It depends on spacing and line weight. Fine line works best when artists leave deliberate gaps between motifs and avoid tiny clustered details. For a sleeve, ask for a mix of single-needle elements and slightly thicker anchor lines so the composition still reads if some hairline work softens over time.
Q: How often do geometric mandalas need touch-ups on the forearm?
A: Plan on a touch-up every two to four years for most mandala work. The outer forearm holds radial designs well, but sun exposure and tight patterning can soften edges. A targeted refresh of outer spokes is common and usually quick.
Q: Are Norse symbols like Mjölnir or Odin cultural appropriation?
A: People are split. One group treats these symbols as cultural heritage and uses accurate forms with respect. Another group prefers stylized or inspired versions to avoid copying ritual objects. If you choose Norse imagery, ask your artist about origin and consider slight personal adjustments rather than direct replicas.
Q: What is the forearm tattoo pain level and how can I manage it?
A: Most report forearm pain as low to moderate, with outer forearm less sensitive than inner areas near the wrist or elbow. Manage discomfort by staying hydrated, getting sleep before your session, and scheduling short sessions if you are nervous. A thin layer of fragrance-free balm helps after the first wash, and mineral sunscreen protects healed ink.
Q: Should I pick black and gray realism or color for an outer forearm portrait?
A: Both work, and your lifestyle guides the choice. Black and gray tends to age with more predictable contrast and needs fewer color refreshes. Color portraits look vibrant but usually require earlier touch-ups for saturation. Discuss the reference photo and expected viewing distance with your artist to decide which approach suits your plan.
