
Delicate crescent moons are easy to love and easy to lose definition. Tiny single-needle crescents on wrists can blur into a smudge, finger crescents often suffer from blowout, and ribs hurt more than many expect. Pick a line weight that survives years, plan placement for visibility, and prioritize touch-up timing so the moon still reads clearly long after the stencil comes off.
1. Fine Line Crescent with Tiny Stars on Inner Forearm
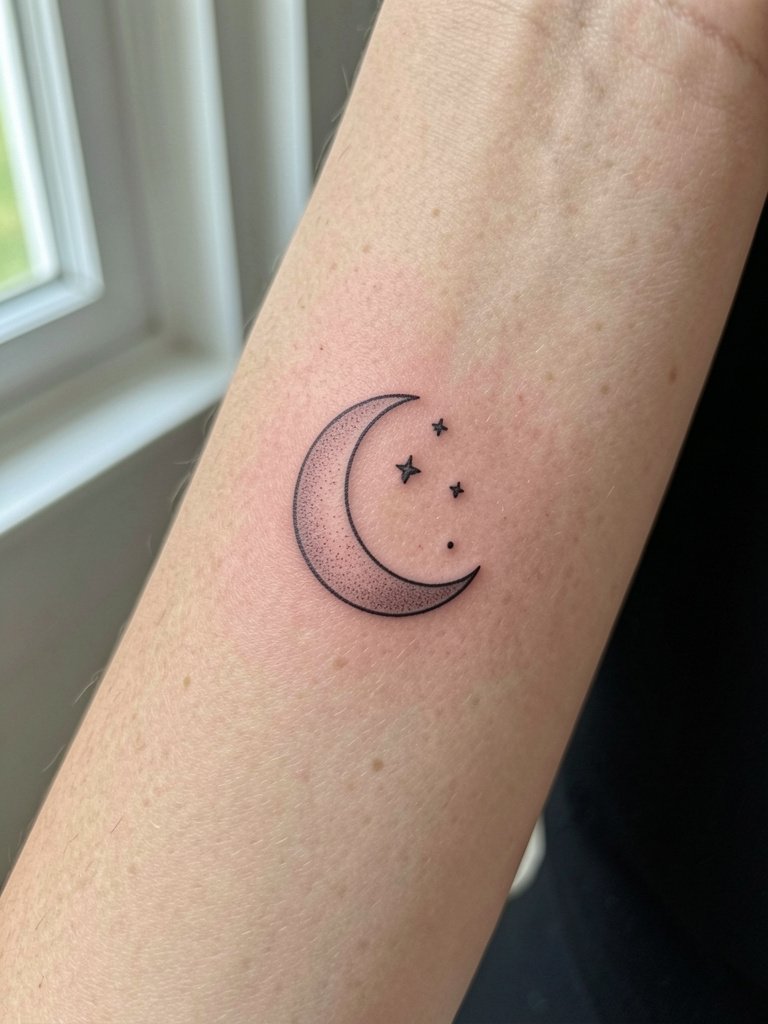
A single-needle crescent on the inner forearm reads elegant at first. I recommend asking for a slightly heavier single-needle contour than a true micro line to avoid early softening around the curve. Expect a one- to two-hour session depending on exact size, with low pain but steady vibration. The biggest mistake is going too small. At six months the curve will look crisp. At two years it may need a touch-up if the client has oily skin or frequent sun exposure. For showing this one off, pair it with a rolled-sleeve linen shirt that keeps the forearm visible and a slim bracelet for contrast.
2. Black Crescent Cradle with Dot Work on Collarbone
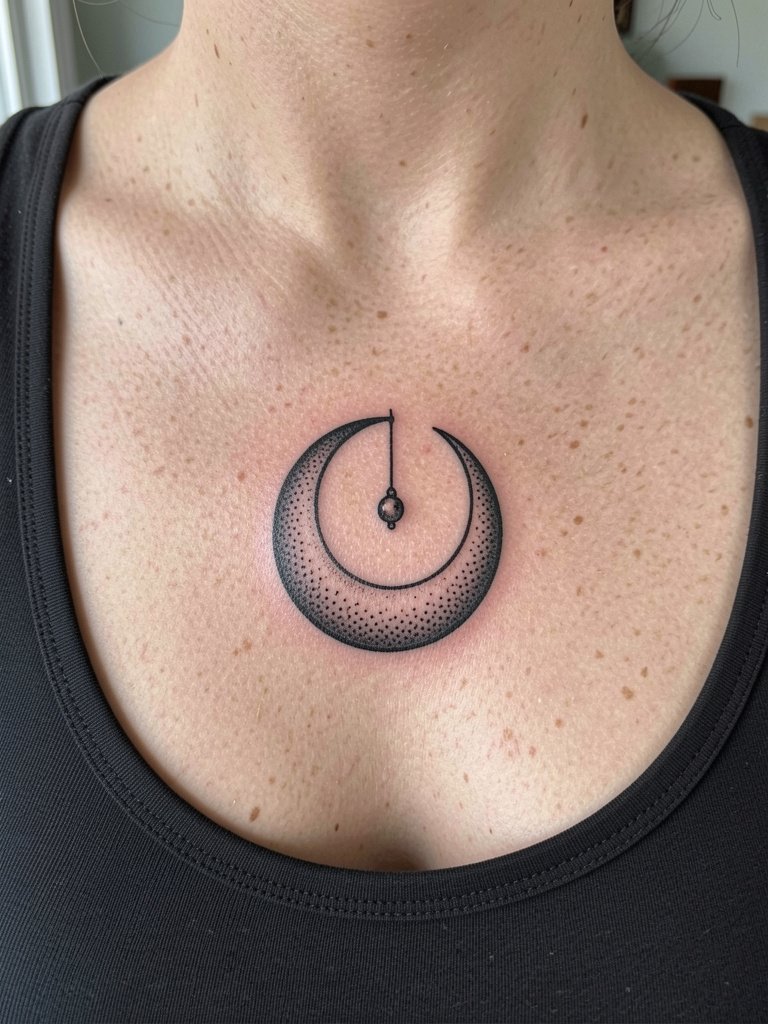
A saturated black crescent along the collarbone holds detail well because the skin there is relatively stable. Linework needs confident depth. In the consultation bring reference photos that show exact spacing between dots and the crescent edge so the artist can translate the cradle into negative space. Expect a one-hour session and moderate pain when needles cross the bony collar area. Avoid tiny dot clusters placed too close to the bone. For nights out, pair this placement with an open-back midi dress to frame the crescent without hiding it.
3. Minimal Geometric Crescent on Ankle
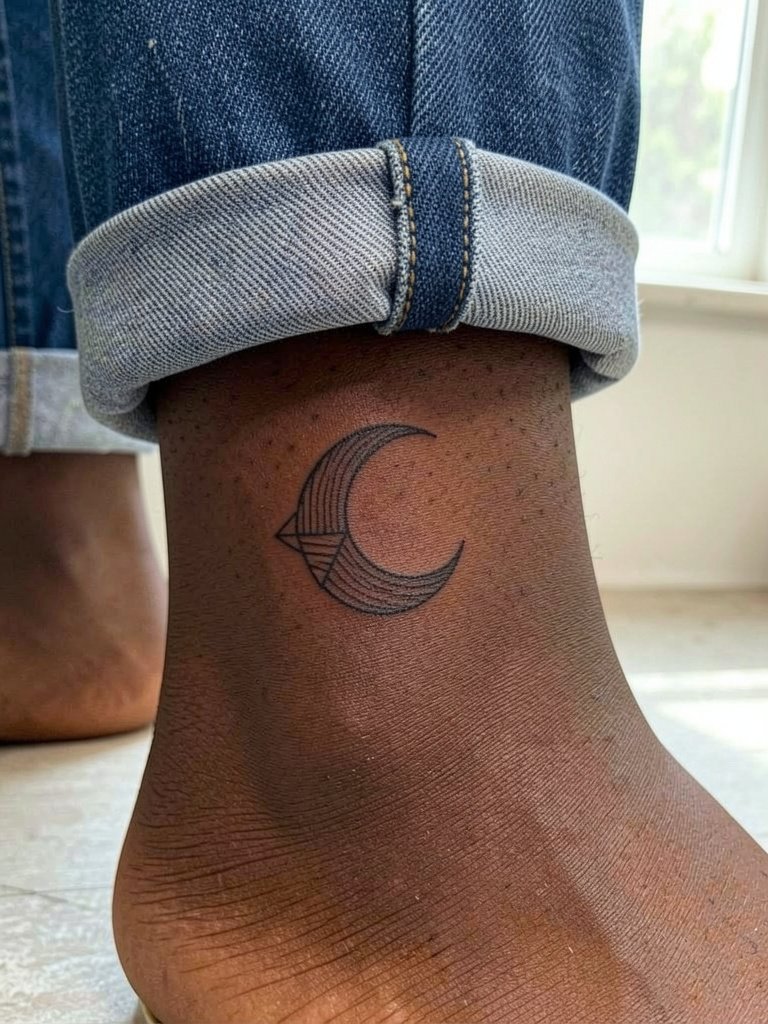
Ankle crescents are a great option if you want something discreet yet visible in sandals. The common error is making the elements so fine they fall prey to footwear friction and constant washing. Ask the artist to balance parallel-line spacing for longevity. Sessions are short, thirty to forty-five minutes depending on detail, with moderate pain on the bone. Blowout risk is low if the artist avoids shallow pass strokes. Show-off styling works with strappy sandals that keep the ankle exposed.
4. Micro Script Crescent on Inner Wrist
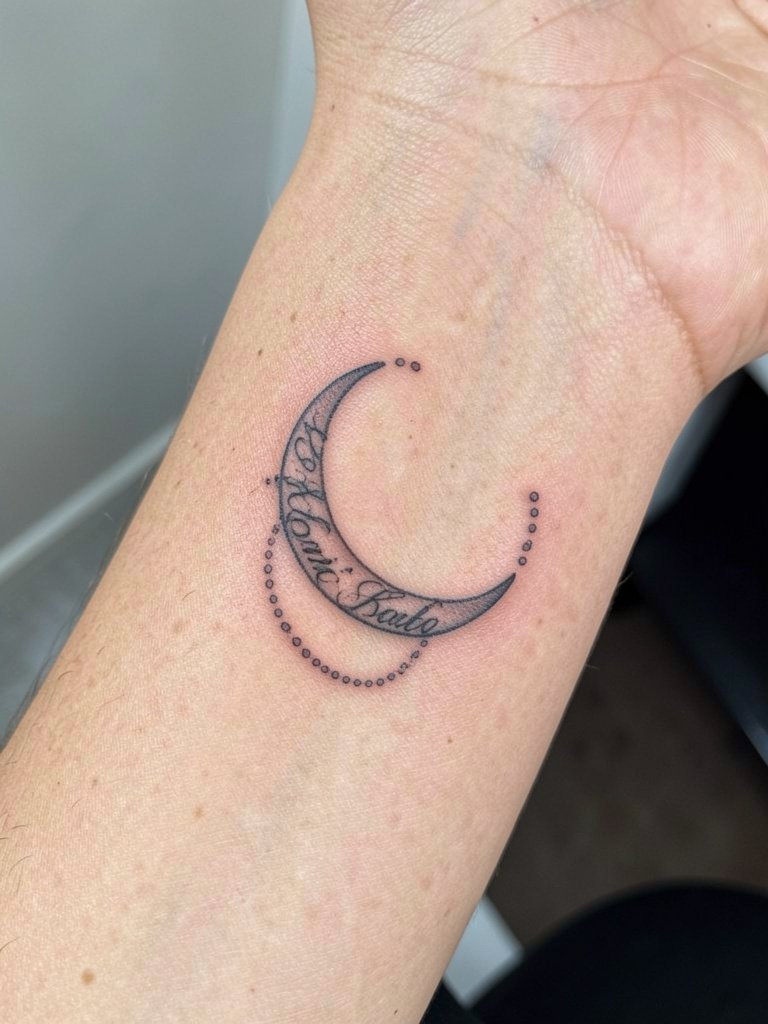
Fine line on the inner wrist splits artists into two camps. One group argues the wrist skin moves and the thin lines will blur within two years, especially where the tendon crosses. The other group says with slightly bolder single-needle depth and careful spacing it still settles well, and they will show healed photos to make the case. If you favor a script crescent, bring two scale references so the artist can show how it reads at three inches versus five. Expect a short session and sensitive pain near the bone. Avoid getting the crescent tucked into the wrist crease. For casual wear, a slim wrap bracelet complements the arc without covering too much.
5. Neo-Traditional Crescent with Floral Accent on Outer Bicep
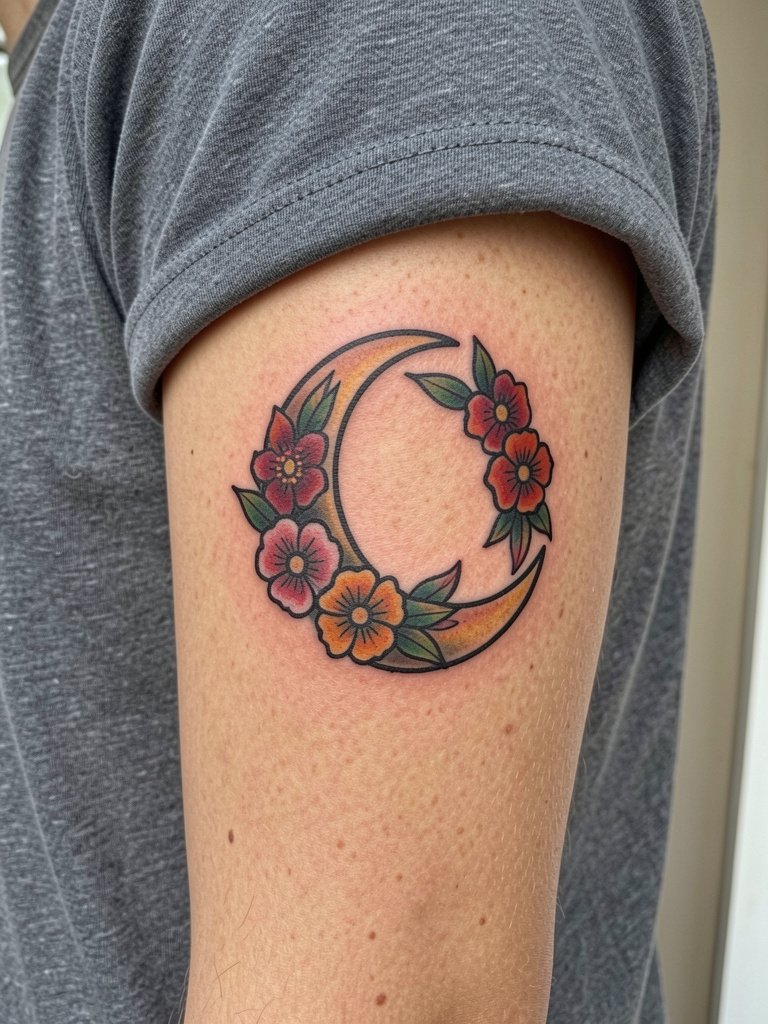
The outer bicep is forgiving for heavy saturation and color. I recommend this version if you want the crescent to stay bold without frequent touch-ups. During the consult, specify which colors you want saturated and ask about healed color photos on similar skin tones. Sessions run one to two hours, with tolerable pain and little movement interference. Common mistakes include using too many tiny elements that age into a visual muddle. For summertime wear, pair the piece with sleeveless cotton tops that let the color read from a distance.
6. Stipple-Shaded Crescent on Side Ribcage
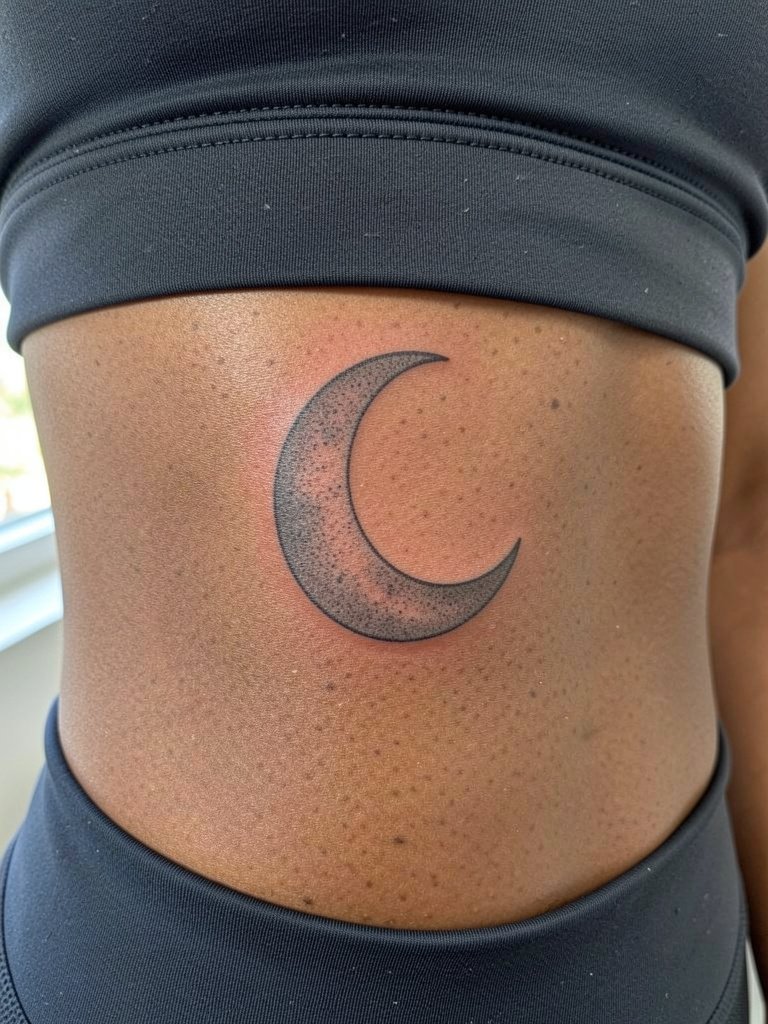
Ribcage crescents look intimate and dramatic. Pain is higher here and sessions can require breaks. Artists are split about fine line on ribs. One camp says the constant movement of breathing and the thin skin leads to softening and blurring within a couple of years. The other camp argues that with slightly wider spacing and skilled needle depth, this area can retain crisp stippling for many years. If you choose stipple shading, ask for staging options so you can spread the work over two shorter sessions. Plan for touch-ups around year two. For session comfort, wear a fitted sports bra so the artist has clear access without you being exposed.
Session Day Picks
The rib and collarbone pieces above need a calm chair day. These picks smooth the experience for the placements covered in ideas 1 through 6.
-
Stencil transfer paper kit. Lets you preview placement on the arm and chest before the needle hits skin, which is helpful for forearm and collarbone crescents.
-
Topical numbing cream. Applied 45 minutes before eases the edge during sensitive rib sessions without reducing artist control.
-
Thin protective film roll. Useful for wrist and ankle tattoos to reduce friction from socks and daily hand washing in the first week.
-
Fragrance-free body wash. Cleanses healing skin near the collarbone and ribs without stripping ink retention.
-
Aquaphor healing ointment. Thin layers support healing for fine-line work on the inner forearm and wrist.
7. Watercolor Crescent with Faint Wash on Outer Thigh
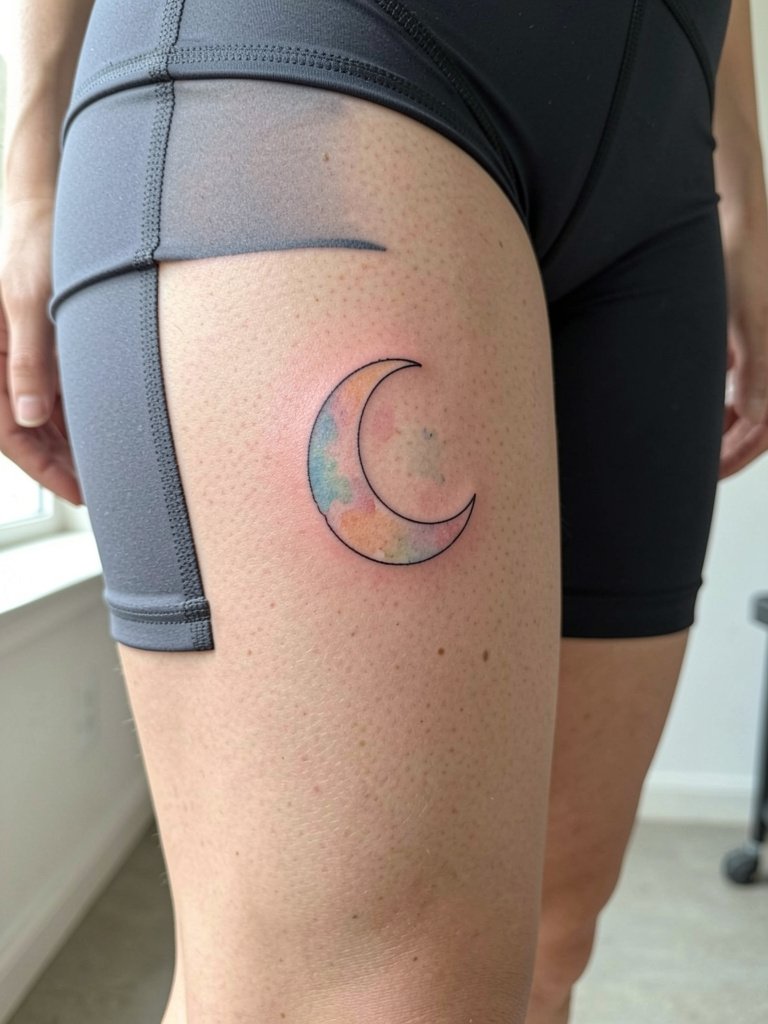
Watercolor moons look painterly but often need maintenance. The common issue is fading where the pigment was placed superficially. I recommend the watercolor wash be framed with a faint hairline contour to keep the shape readable. Sessions are longer for larger thigh pieces and the pain is low to moderate. Expect a touch-up at one year if you spend time in sun or wear abrasive clothing. For appointment day, wear loose drawstring linen pants so you can roll the leg without pressure on the fresh ink.
8. Tiny Crescent on Finger Side
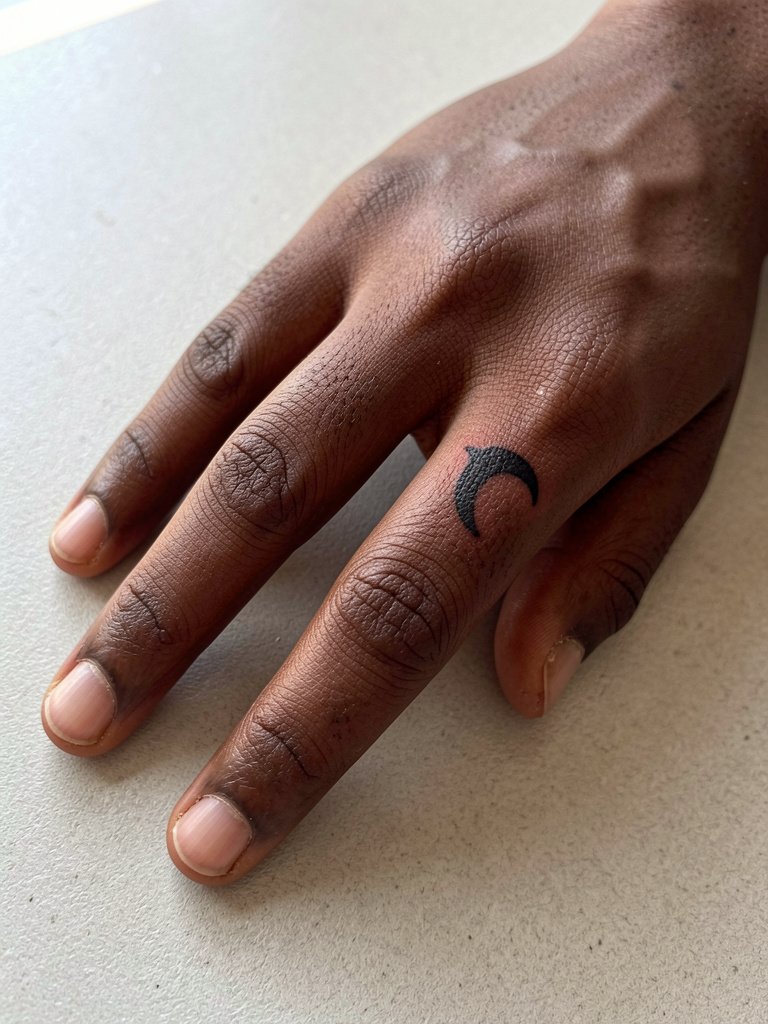
Finger crescents are visible and fragile. The skin there moves constantly and is exposed to washing. I tell people the piece may need touch-ups every one to two years. The session is fast and intensely sensitive. Avoid super-fine detail that will bleed into the creases. For preserving line clarity, consider positioning the crescent on the side of the finger rather than the pad. A slim adjustable ring pairs well with the tiny arc without rubbing it.
9. Celestial Chain of Crescents on Spine
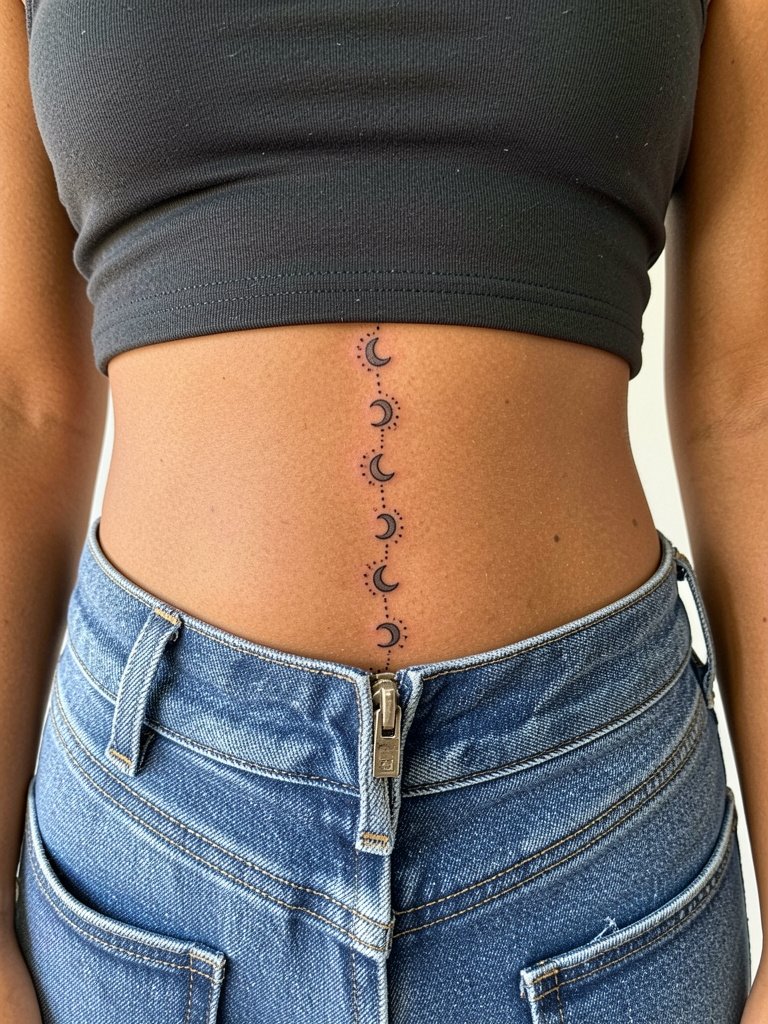
A spine chain reads beautifully when spaced to the anatomy. Because the lumbar area experiences friction from waistbands, keep the chain centered and avoid tiny linkwork close to the waistband line. The session runs one to two hours with moderate pain depending on proximity to the bone. A common mistake is placing crescents too low where jeans rub. For photos, crop tops or low-rise jeans that reveal the small of the back help show this line.
10. Crescent with Geometric Halo on Upper Arm
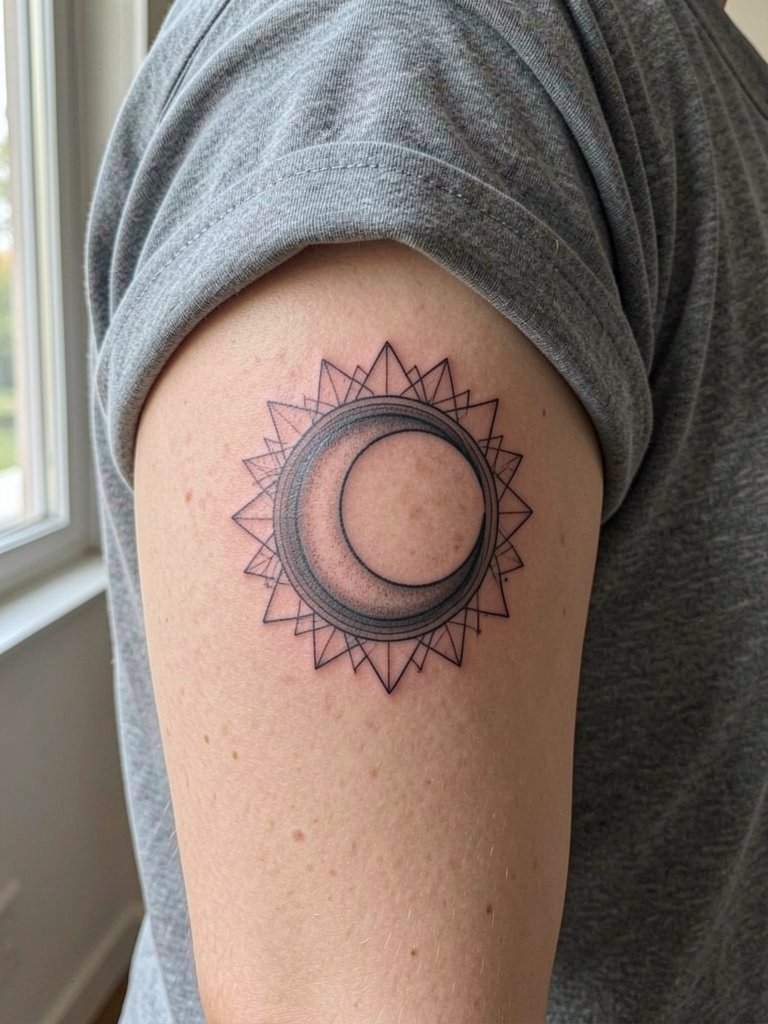
Upper-arm crescents take bold geometry well. If you want the halo to stay crisp, ask for slightly wider line spacing than a reference image. Session time can be under an hour for mid-sized designs. Pain is low and the placement tolerates heavier saturation. A mistake I see is overcomplicating the halo with too many micro triangles that age into a grey patch. For casual wear, a sleeveless denim vest frames the upper-arm design without covering it.
11. Crescent and Constellation on Calf
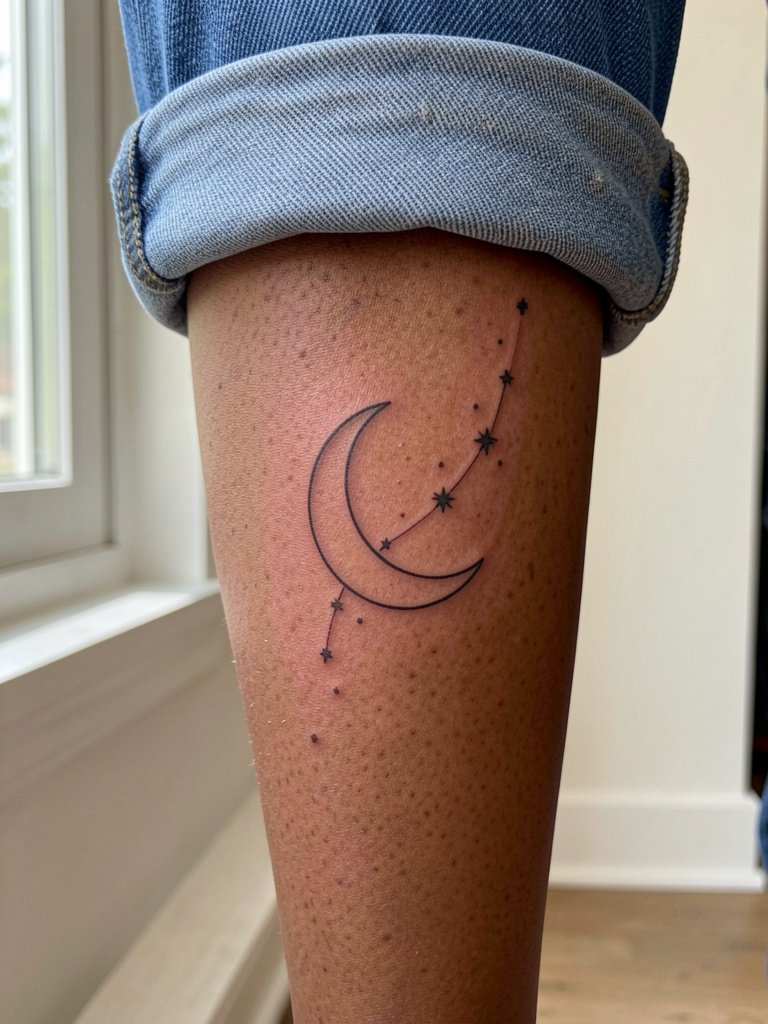
Calf crescents read well from a distance and age predictably. This placement tolerates detail so the constellation can include small connecting lines. Plan the scale with a reference so the constellation does not crowd the crescent. Sessions are low pain and can be completed in one visit. Touch-ups are seldom required unless you run or shave the area aggressively. For weekends, pair the piece with ankle boots that naturally reveal the calf.
12. Fine Line Crescent Under the Breast
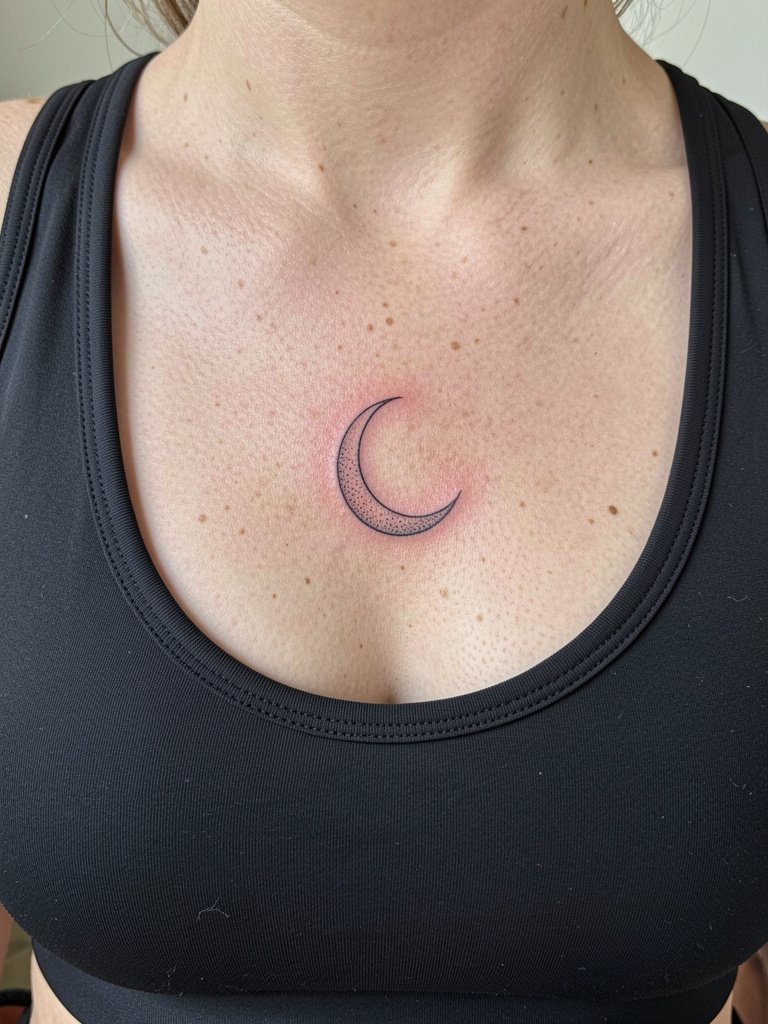
Fine line underbust pieces are sensual and high-contact with fabric. Artists debate whether single-needle lines last here. One group points out that the skin movement under the breast and frequent friction from bras cause early blurring. The other group counters that with slightly deeper single-needle passes, careful spacing, and a staged healing plan, the result can remain sharp. If you go for this placement, plan on a staged session and ask about proper bra fit during healing. Pain ranges from moderate to high. Wear a fitted sports bra to your appointment so the artist can access the area without you disrobing.
13. Negative-Space Crescent on Back of Shoulder
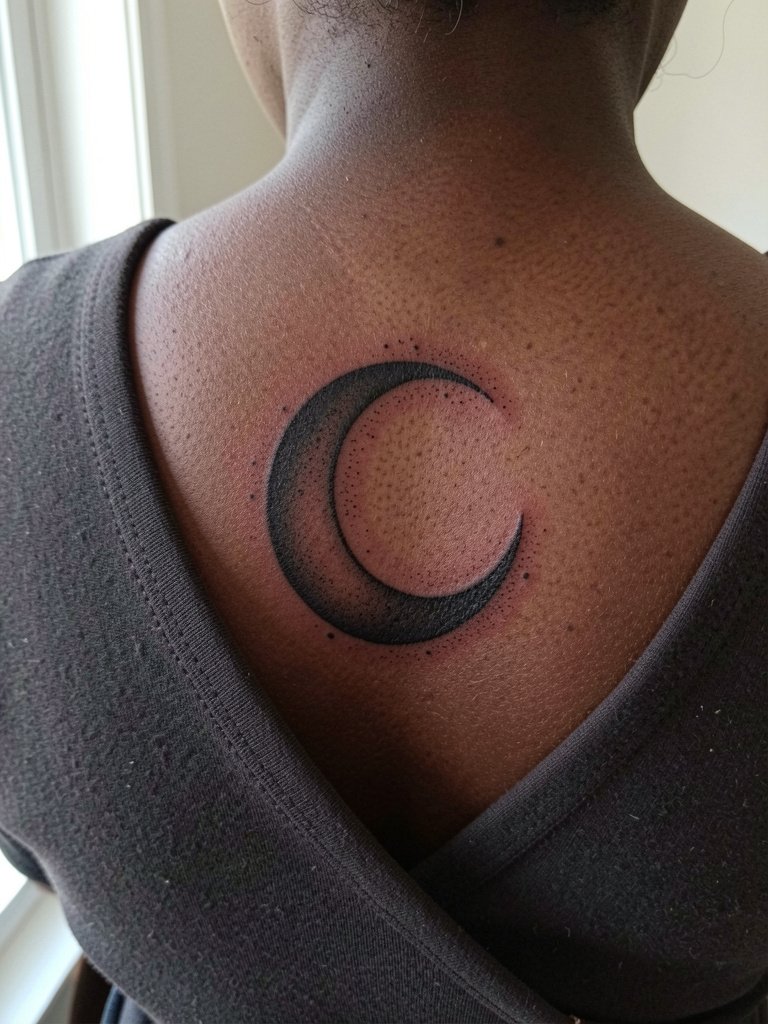
Negative-space crescents benefit from bold surrounding fill because the uninked crescent remains readable longer than an ultra-thin black outline. For the back shoulder choose saturation levels your artist recommends for negative space preservation. Sessions are comfortable and usually under an hour. A common mistake is skimping on contrast which lets the crescent disappear into skin tone. For evening wear, an open-back top showcases the negative space without competition.
14. Crescent Encircled by Botanical Vine on Hip
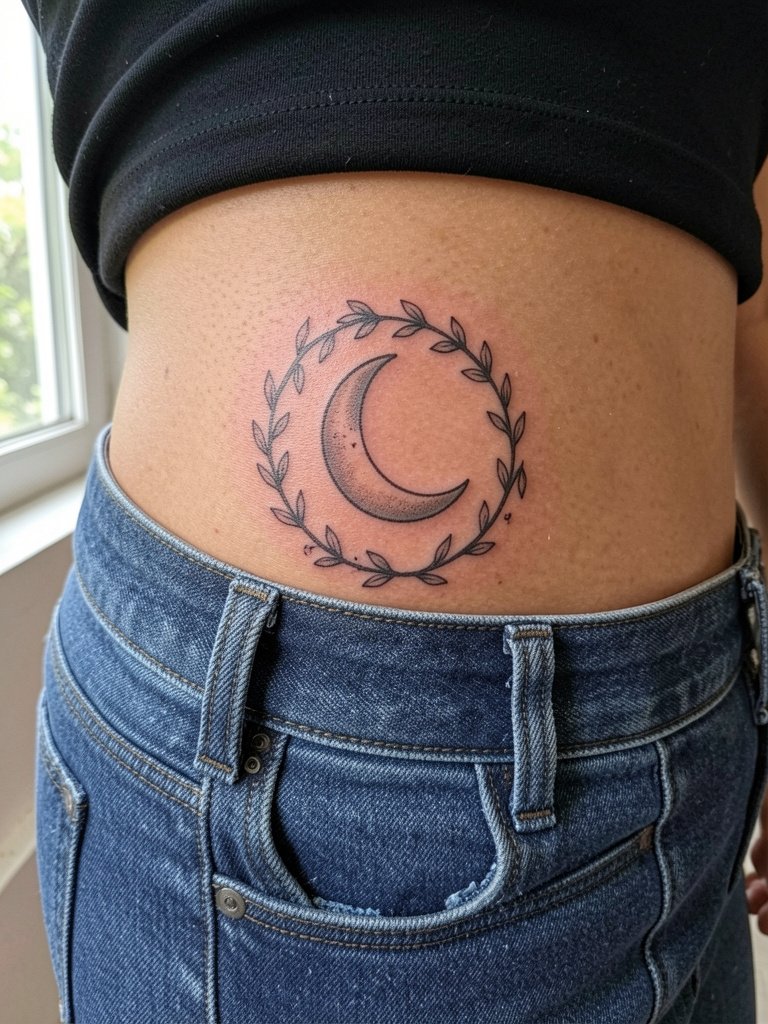
Hip crescents sit near tight clothing so placement matters. I advise positioning the vine so it rests above the waistband to avoid constant rubbing. The session time and pain are moderate. Many people ask for lots of small leaves which can blur if placed too close together. During consult bring photos of similar hip placements on comparable body types. For reveal moments, pair this with a low-rise skirt that leaves the hip exposed in a flattering way.
15. Tattooed Crescent with Metallic Accent on Earlobe Area
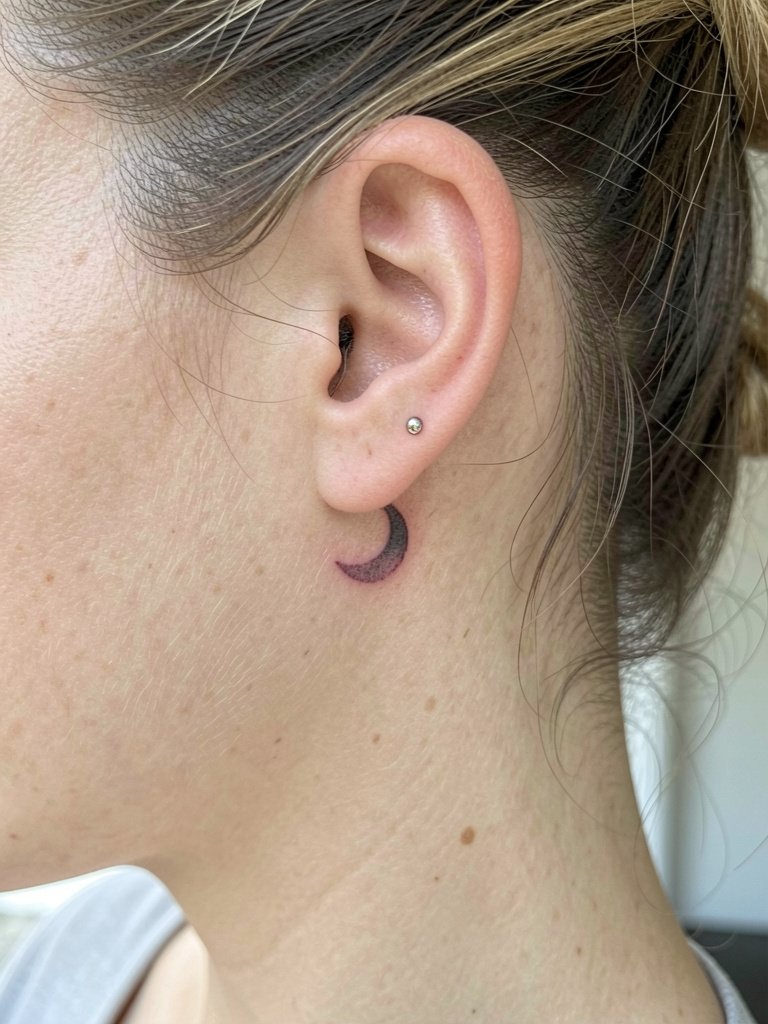
Behind-the-ear crescents are intimate and require an artist skilled with small curved placements. Pain is low but touch-ups may be needed because of hair growth and shampoo friction. A common mistake is placing too much detail where the area cannot hold it. If you want a metallic look, discuss greywash contrast rather than metallic pigments. Sessions are short so you can do this between other appointments. For accessorizing, small hoop earrings emphasize the arc without covering it. Include a note for the artist about keeping the piece just below the hairline.
16. Dual Crescent Mirror on Upper Chest
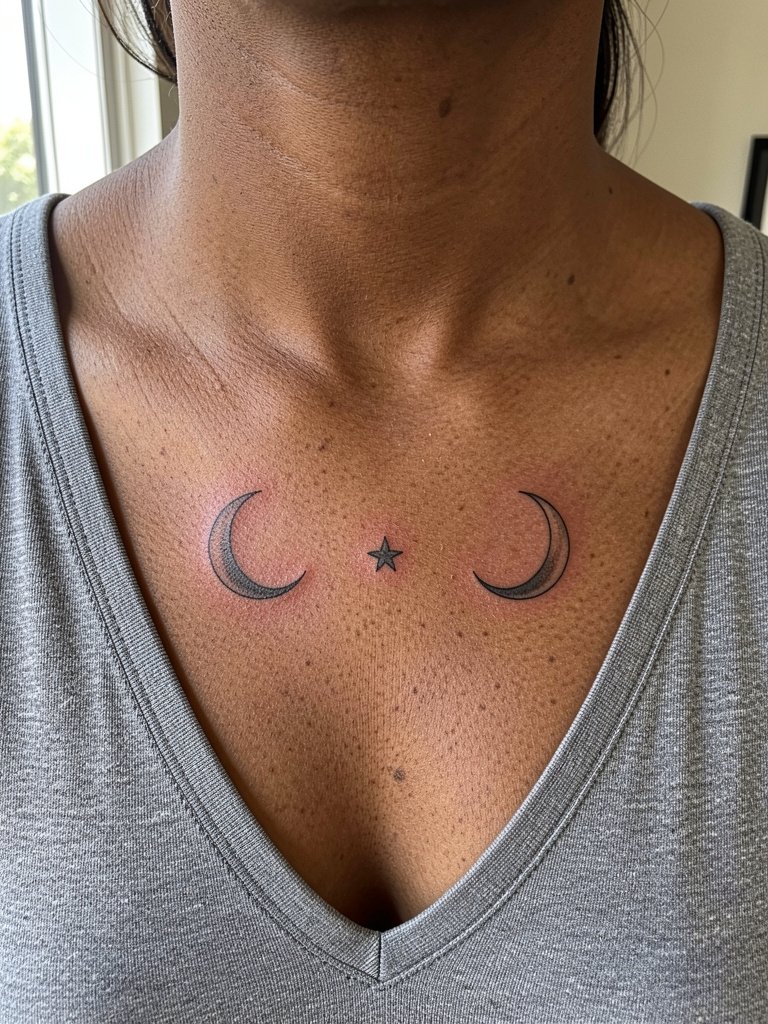
Symmetrical chest crescents require precise stenciling so both sides read evenly. Bring a measuring photo or have the artist mark live to ensure symmetry relative to the sternum. Sessions are short and pain is moderate near the bone. Avoid placing the crescents too close to collarbones which can distort with movement. Expect a one-year check for evenness. For outfit pairing, scoop or V-neck tops frame the mirrored moons and keep them visible.
17. Crescent with Mandala Fill on Thigh
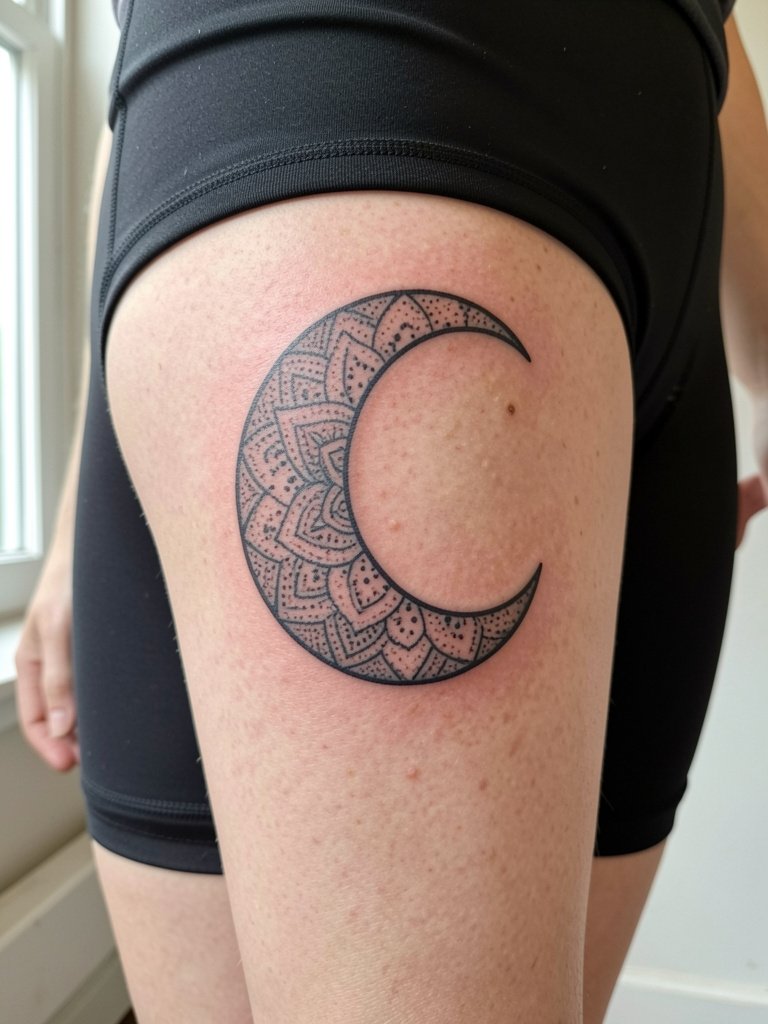
Mandala-filled crescents need space to breathe. On the thigh you can include detailed stipple work that holds because the skin is stable and less exposed to friction. The session can run multiple hours and pain is moderate. The usual mistake is cramming mandala elements into too small a radius. If you want the mandala to age cleanly, ask for slightly larger negative spaces between patterns. For summer, a flowy midi skirt highlights the thigh art without compressing it.
18. Tiny Crescent and Bar on Rib Side
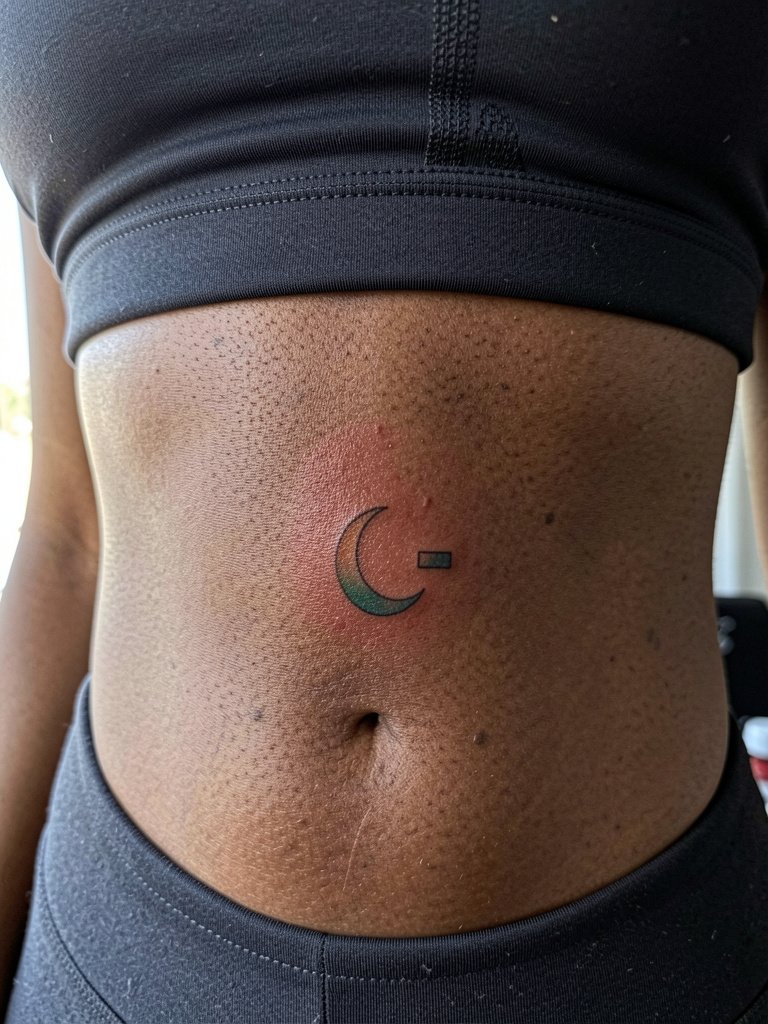
A small rib crescent with a bar reads modern and discreet. Because ribs are sensitive, request a staged session with short breaks. Tiny single-needle bars can blur if placed too shallow. Talk with your artist about spacing and angle so the bar complements the crescent curve. Expect a touch-up at year one if you sleep on the side or wear tight undergarments. For appointment comfort, wear a fitted crop top to allow access while maintaining modesty.
19. Crescent with Soft Grey Wash on Lower Leg
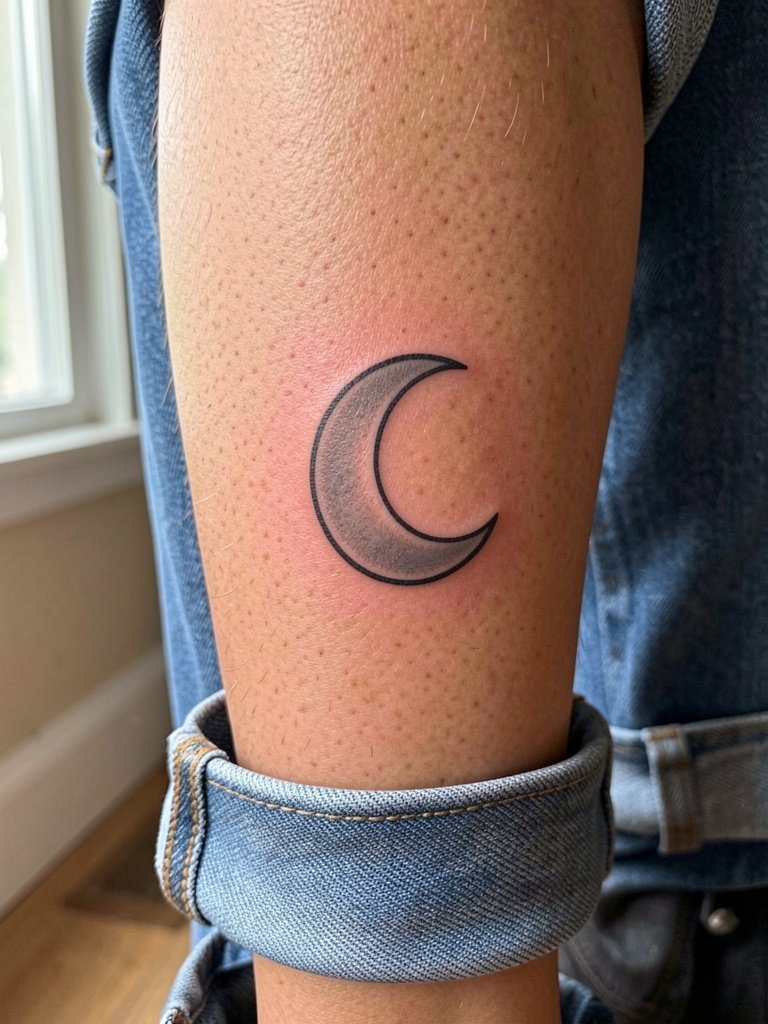
Lower-leg crescents withstand outdoor exposure but can fade with heavy sun. Ask for slightly stronger initial saturation and apply regular SPF once healed. Sessions are low pain and quick. Common errors include using too pale a grey wash that disappears on darker tones. For styling, mid-calf boots allow you to show or hide the crescent easily.
20. Crescent Integrated into Floral Sleeve
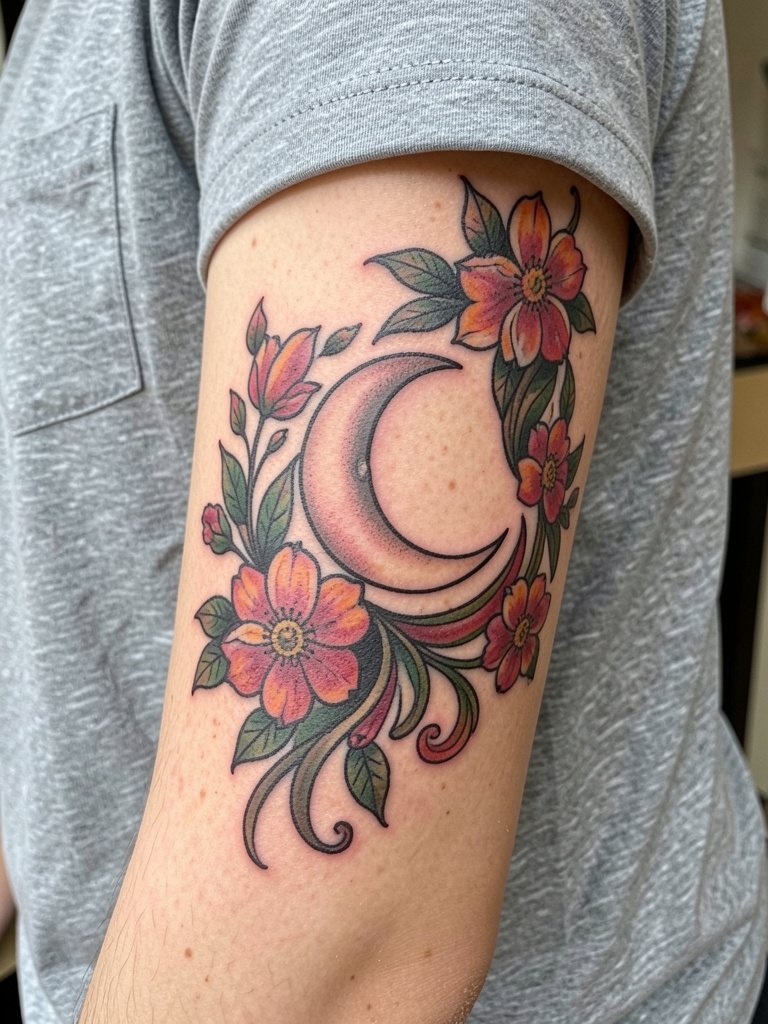
When the crescent is part of a sleeve, its longevity is tied to the surrounding saturation and contrast. I suggest anchoring the moon with a solid dark neighbor to keep the shape visible as the colors soften. Discuss how the crescent will sit next to saturated petals so the artist designs transitions that age predictably. Sessions vary based on sleeve progress. For day-of comfort wear a short-sleeve shirt that gives the artist full forearm access without pulling fabric.
21. Micro Crescent Above the Navel
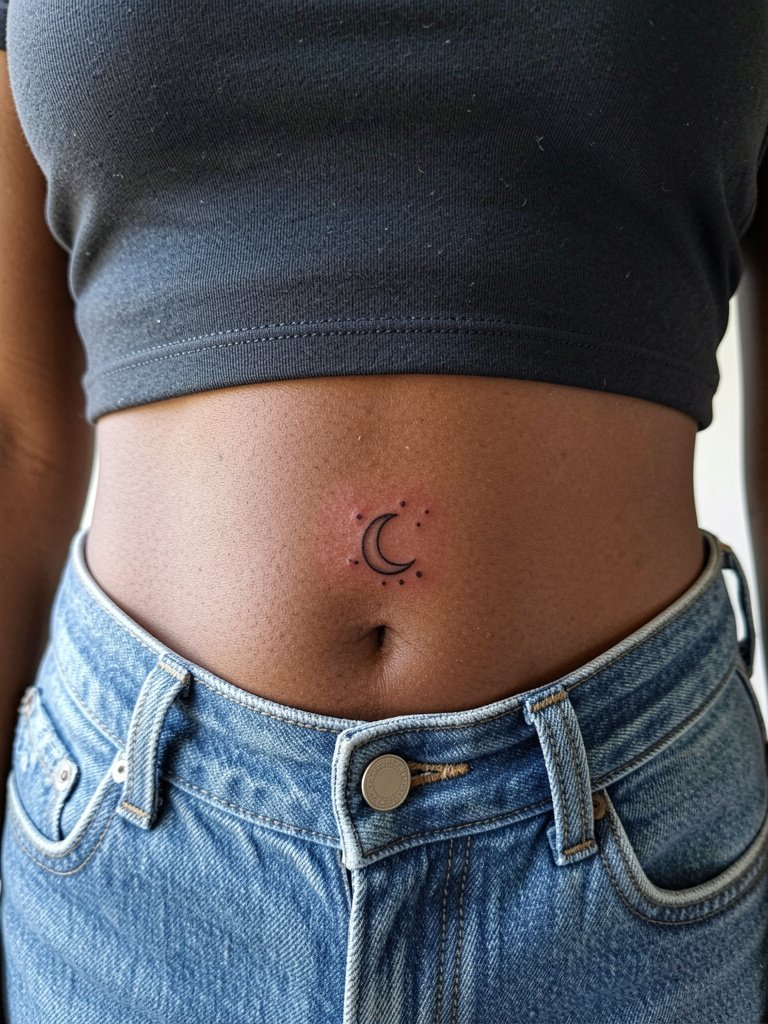
A small crescent at the navel is a discreet statement. The area is relatively low-friction if your clothing line sits above or below the design. Ask the artist about curvature so the moon sits centered over the navel when you are standing relaxed. Sessions are short and pain is low to moderate. Avoid placing the crescent where the waistband will sit. For outfit pairing, cropped tops keep the navel crescent visible without pressure.
22. Bold Silhouette Crescent on Hand Back
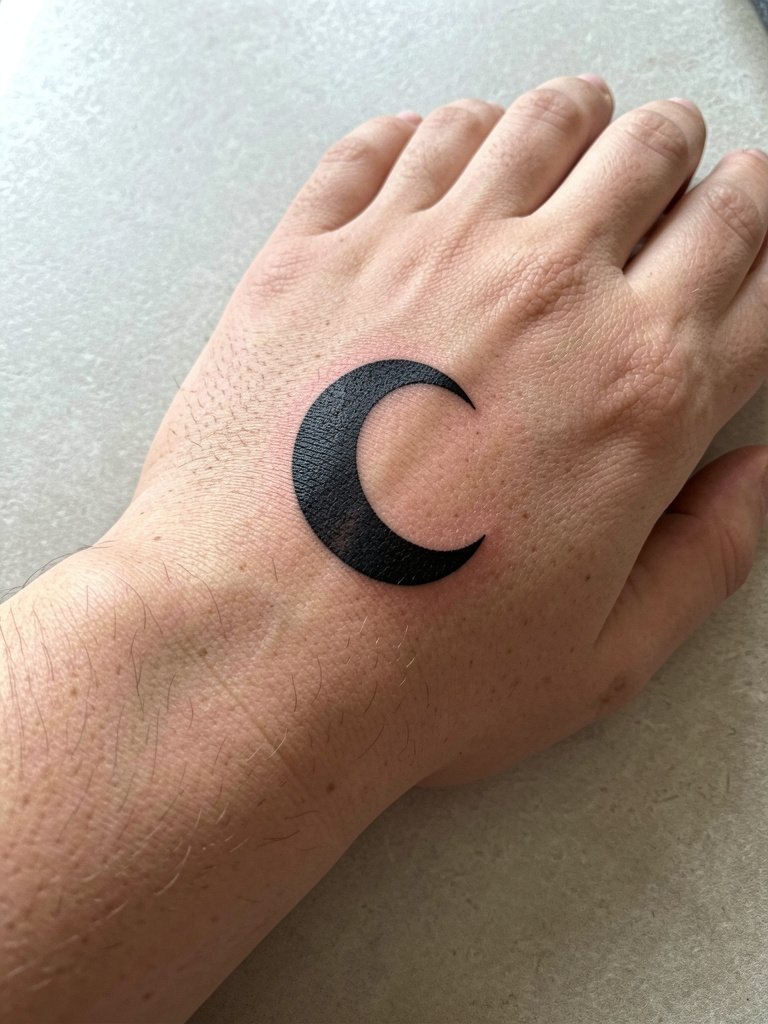
Hand crescents age fast because of daily use and washing. If you want durability, choose a bolder silhouette that reads through early fading. Talk with the artist about expected touch-up frequency. Sessions are short but painful because the area lacks padding. A common mistake is fine filigree on the hand that disappears within a year. For minimal rubbing, pair the placement with slim statement rings worn above the knuckles so the crescent remains visible.
23. Crescent with Script Date on Upper Forearm
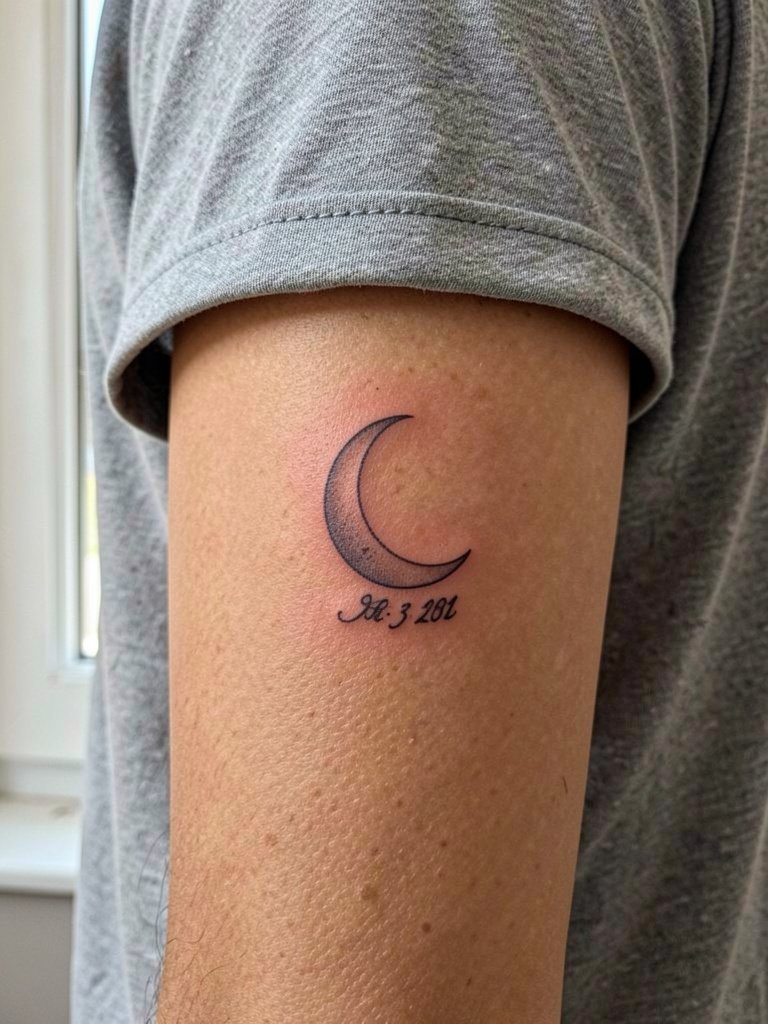
Adding a date to a crescent calls for legible script that will survive future softening. Provide the exact lettering style and size during the consult so the artist can test how the script reads at the intended scale. Expect a one-hour session and mild pain. The common error is choosing an ornate script too small for long-term legibility. If the date is meaningful, consider a slightly bolder hand script. For everyday looks, a rolled-up sleeve shirt keeps the piece visible.
24. Crescent Framed by Tiny Dots on Throat Side
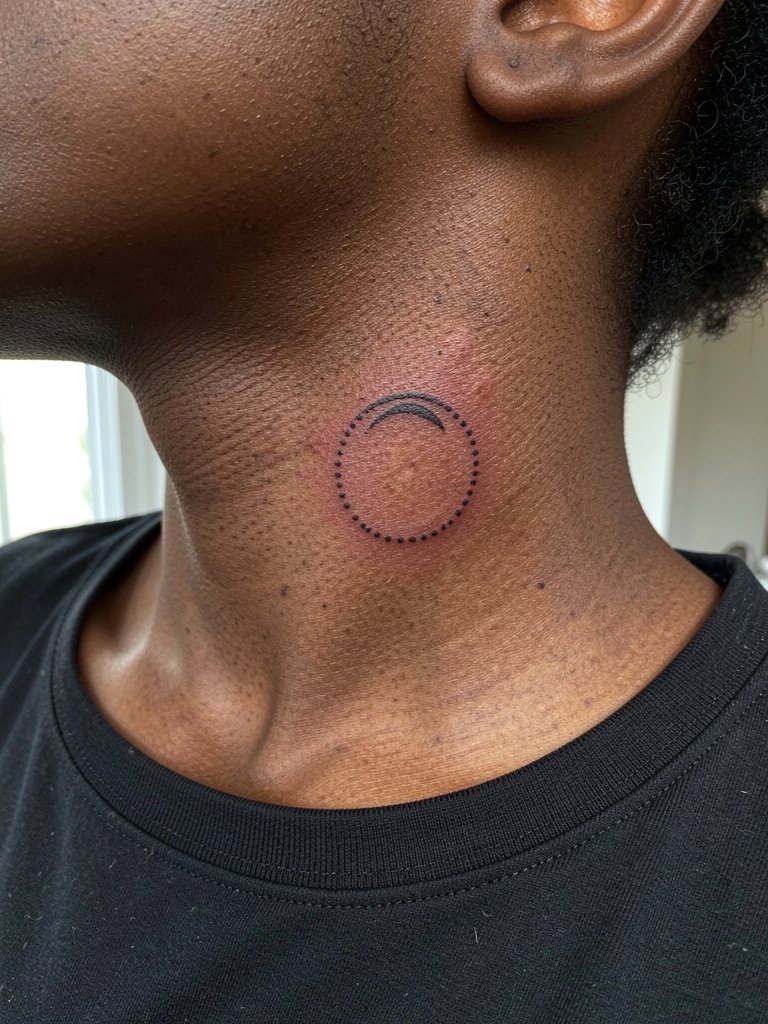
Side-neck crescents are visible and bold statements. The skin there can hold dot work if the artist spaces the dots adequately. The session may be short but the pain is notable. Artists differ on how close to the hairline to place neck work so bring photos and ask about visibility versus professional considerations. A common mistake is crowding dots into the jawline where movement distorts them. For accessorizing, a low-collar shirt or choker can frame the crescent without covering it.
25. Crescent in American Traditional Style on Upper Arm
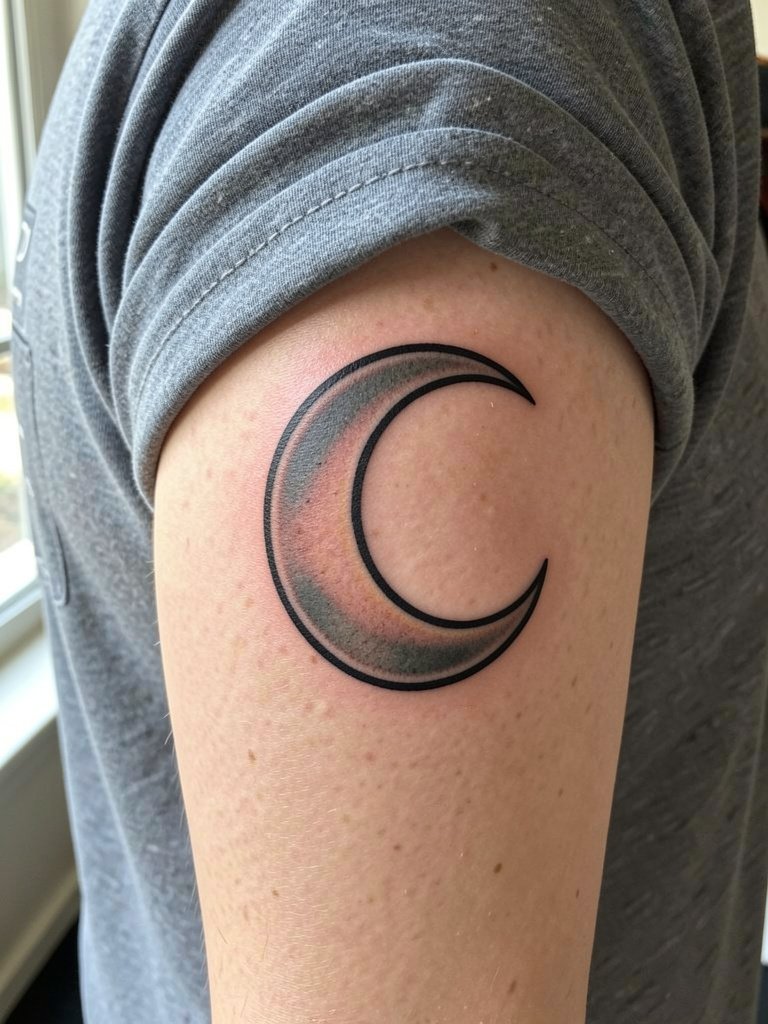
If you want the crescent to endure with minimal touch-ups, American Traditional aesthetics are a reliable choice. The bold outlines and saturation age into a defined silhouette. During the consult, specify color saturation expectations and request healed photos on similar skin tones. Sessions are comfortable for this size and the pain is moderate. Avoid adding hyper-fine ornament that clashes with the bold traditional language. For casual styling, a cotton band tee lets the upper arm tattoo breathe.
26. Micro Crescent Tattooed on Thumb Side
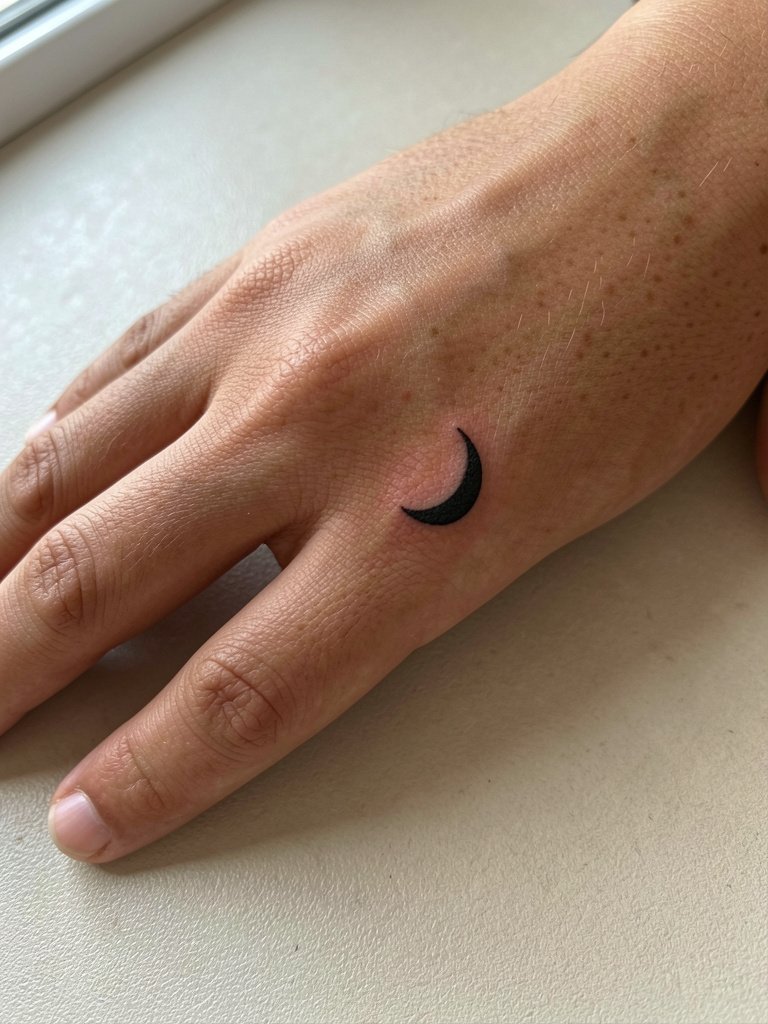
Thumb-side crescents are highly visible and face constant use and washing. If you want this area to remain crisp, plan on annual touch-ups. The session is quick and extremely sensitive. The frequent mistake is expecting micro detail to last here. Keep the shape bold and simple. For daily wear, avoid rings that slide over the area. A slim thumb ring can accent the placement without rubbing the fresh ink too much.
27. Crescent in Minimal Negative Line on Inner Wrist Wrap
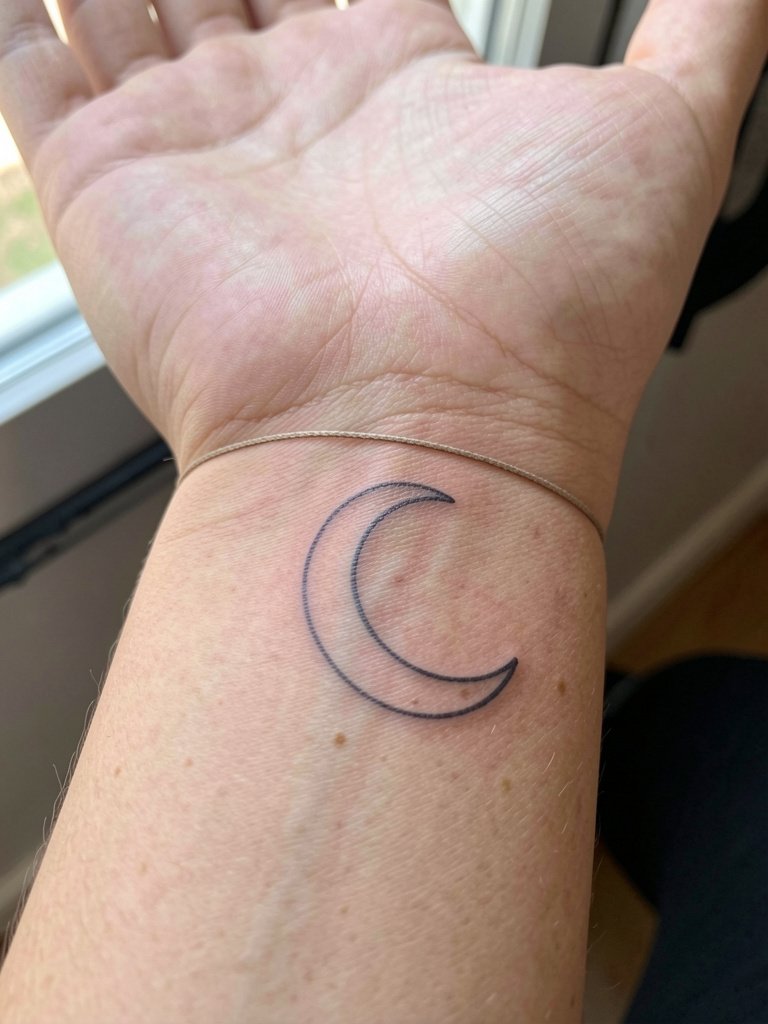
An inner wrist wrap that includes a crescent can look delicate but requires careful spacing to prevent merging into the crease. Ask the artist to map how the wrap sits with your wrist at rest and in motion. Sessions are brief and sensitivity is high. The typical mistake is placing elements across the wrist crease. Expect to return for a touch-up at year two if you wash hands often. For showing it off, choose short cuff bracelets that sit above the wrap and do not press against it.
Frequently Asked Questions
Q: How painful is a crescent tattoo on the ribcage compared with the forearm?
A: The ribcage usually rates higher on common pain scales than the forearm because the skin is thin and close to bone. Forearm pieces are lower pain and tolerate longer sessions. Plan rib work in shorter stages and use topical numbing if your threshold is low.
Q: What placements have the highest blowout risk for tiny crescent lines?
A: Fingers, sides of the thumb, and very small wrist scripts carry increased blowout risk due to thin skin and constant motion. Inner bicep and outer thigh are lower risk. For risky placements, request slightly heavier line weight and discuss spacing during your consult.
Q: Where can I find healed crescent tattoo portfolios and discovery options without naming artists?
A: Search social platforms with targeted tags like #CrescentMoonInk and #MicroMoonTattoo and use location filters on short video apps to see healed timelines. Reddit tattoo threads often include before-and-after photos. Also browse portfolio sites for keywords such as "crescent crescent moon stipple healed" to compare work on different skin tones.
Q: How often will a tiny crescent on the finger need touch-ups?
A: Expect one to two touch-ups within the first two years for finger placements. The skin and wash cycles speed fading. Many people budget an annual small session if they want the moon to stay defined.
Q: What should I wear to the studio for a collarbone or sternum crescent session?
A: Wear a fitted wide V-neck or sports bra that provides access without full undressing. For collarbone work pick a scoop-neck tank. A lightweight top helps the artist reach the area while keeping you comfortable. For showing healed collarbone work, an open-back midi dress or scoop-neck tops frame the piece well.
