
I spent months saving black-and-white references before I booked my first big piece. The problem wasn’t finding bold blackwork tattoos — it was knowing which ones actually hold up and match my daily style. Below are 27 high-contrast blackwork ideas I’d pick or recommend, with placement notes, real-healed expectations, and practical aftercare.
Quick context: This list focuses on stark, high-contrast blackwork tattoo designs — geometric, tribal, dotwork, and dark-art styles that wear well on arms, ribs, thighs, and spines. Black ink resists fading more than many colors (Pew Research Center notes tattoos are common across ages) and sun exposure is the main fading culprit (American Academy of Dermatology).
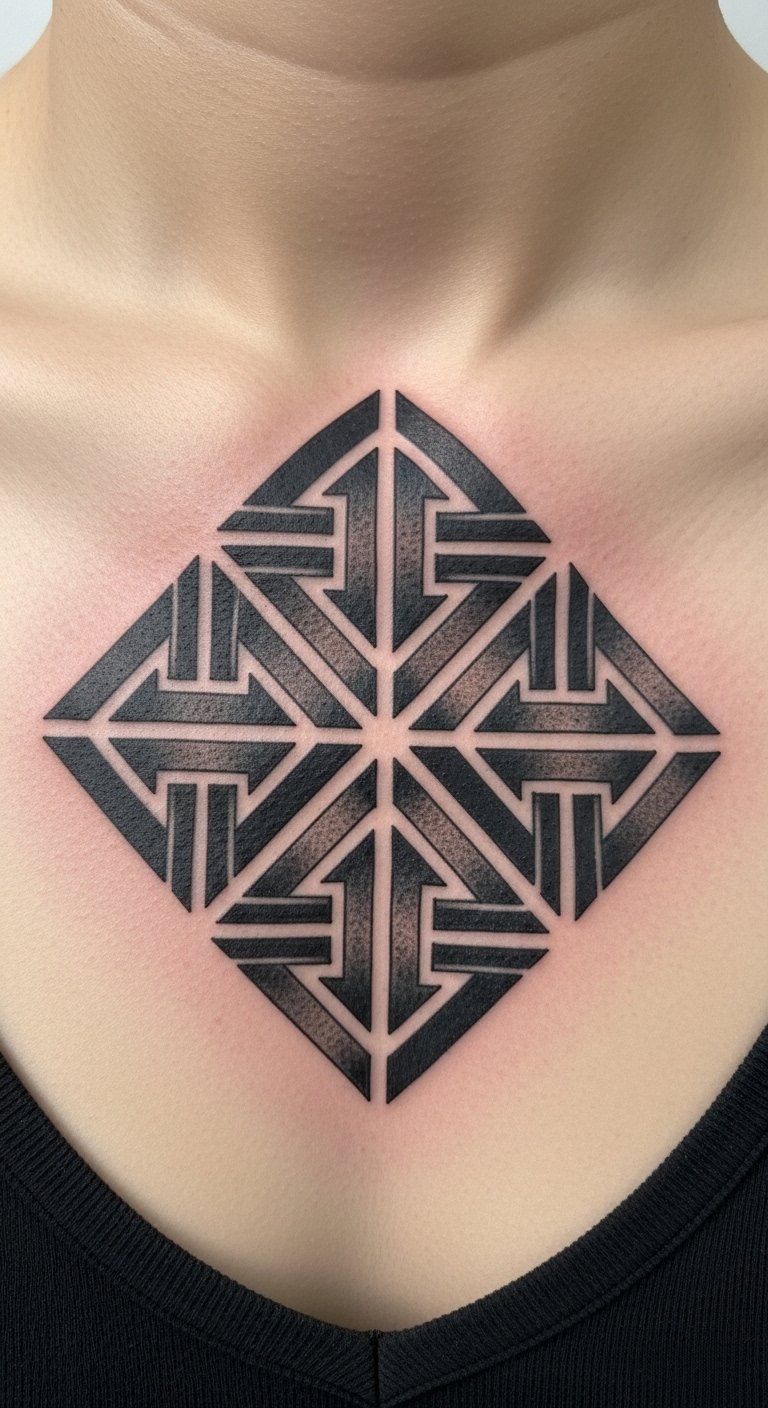
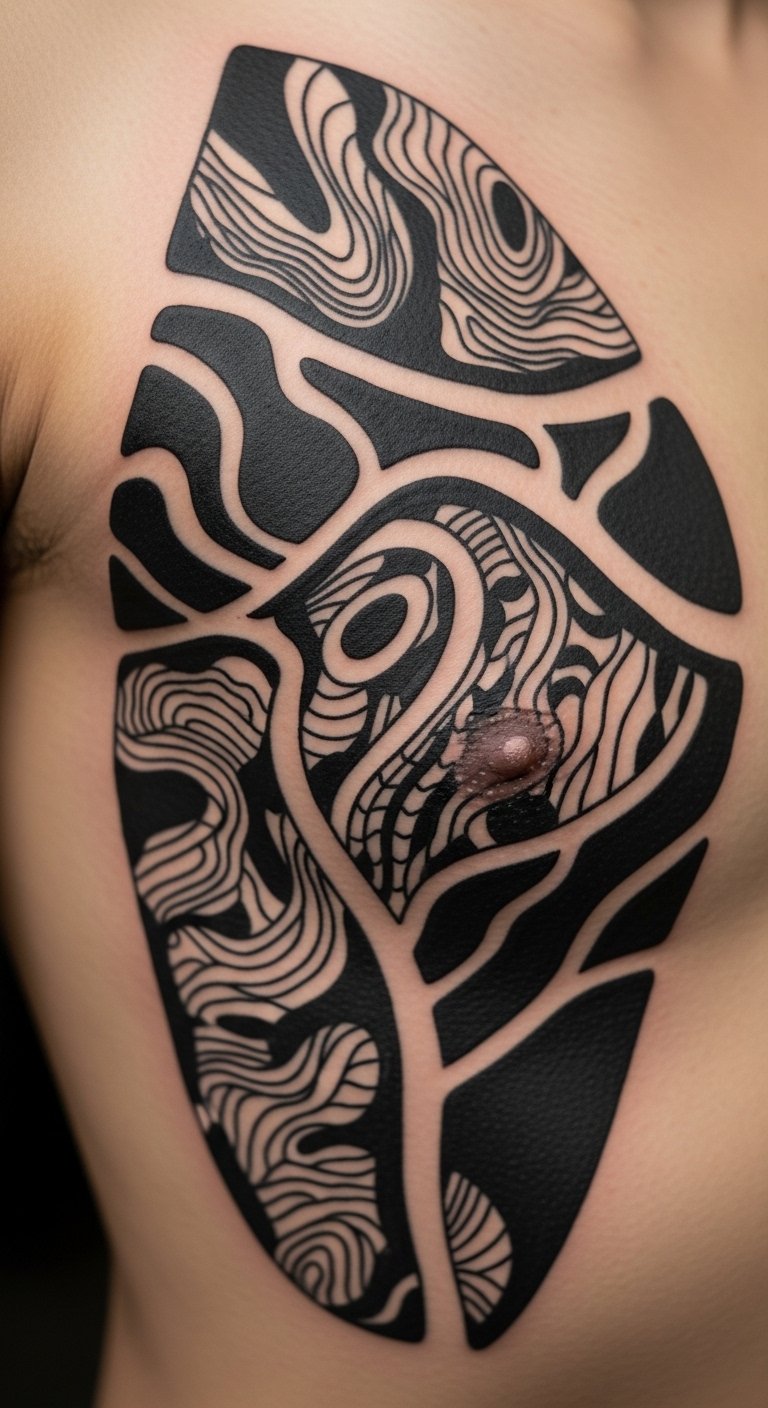
Geometric Mandala Down Spine
Style/Technique: Geometric / Dotwork
Pain Level: High (rib/spine sensitivity)
Session Time: Multiple short sessions
Best For: Statement piece, central symmetry
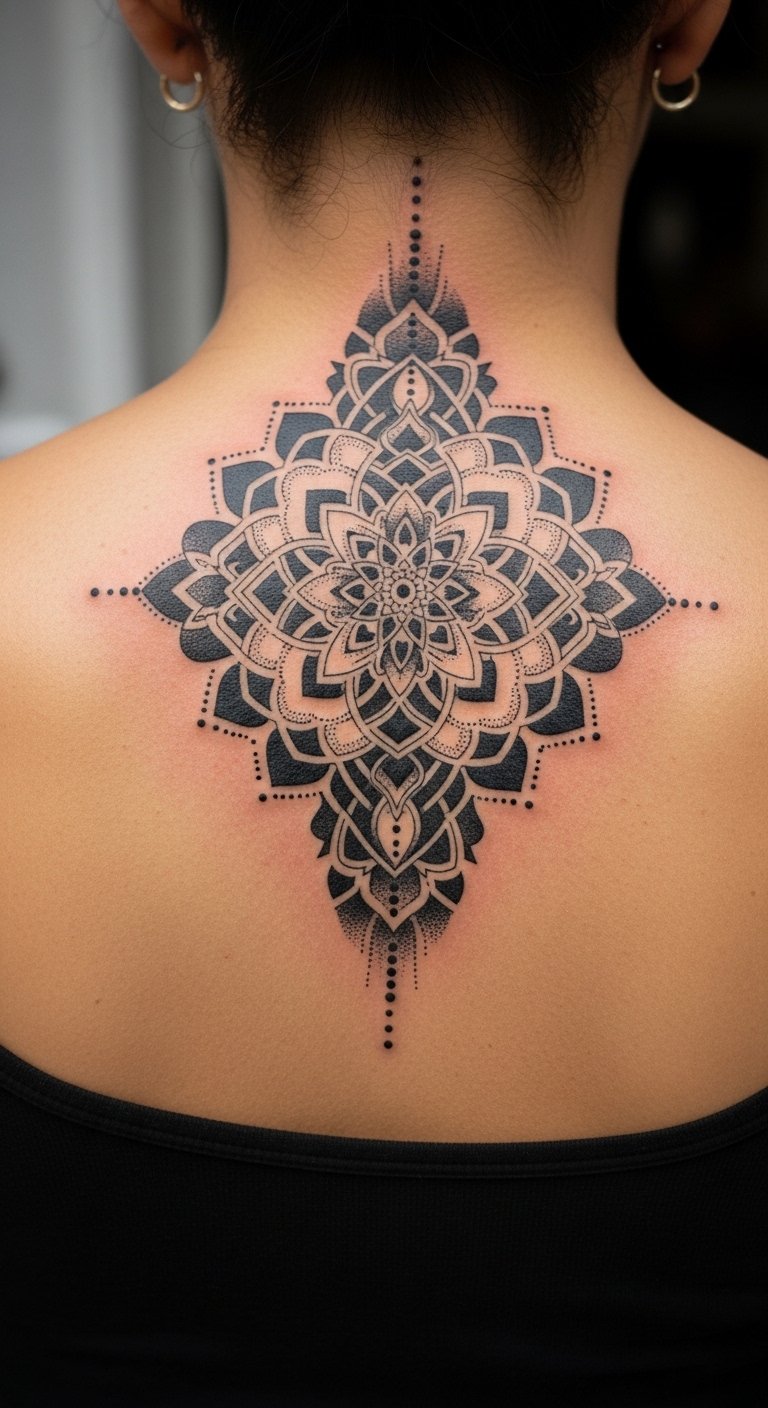
I love mandalas for how negative space becomes part of the art. Down the spine the pattern reads bold from afar and delicate up close. Expect sharp pain near the vertebrae but clean healed lines if the artist spaces sessions to avoid overworking skin. Avoid tiny fine details that blur; ask for slightly heavier line weight for long-term clarity.
Bold Polynesian Arm Band
Style/Technique: Tribal / Traditional Blackwork
Pain Level: Medium (outer arm)
Session Time: 2–4 sessions
Best For: Cultural rhythm, sleeve integration
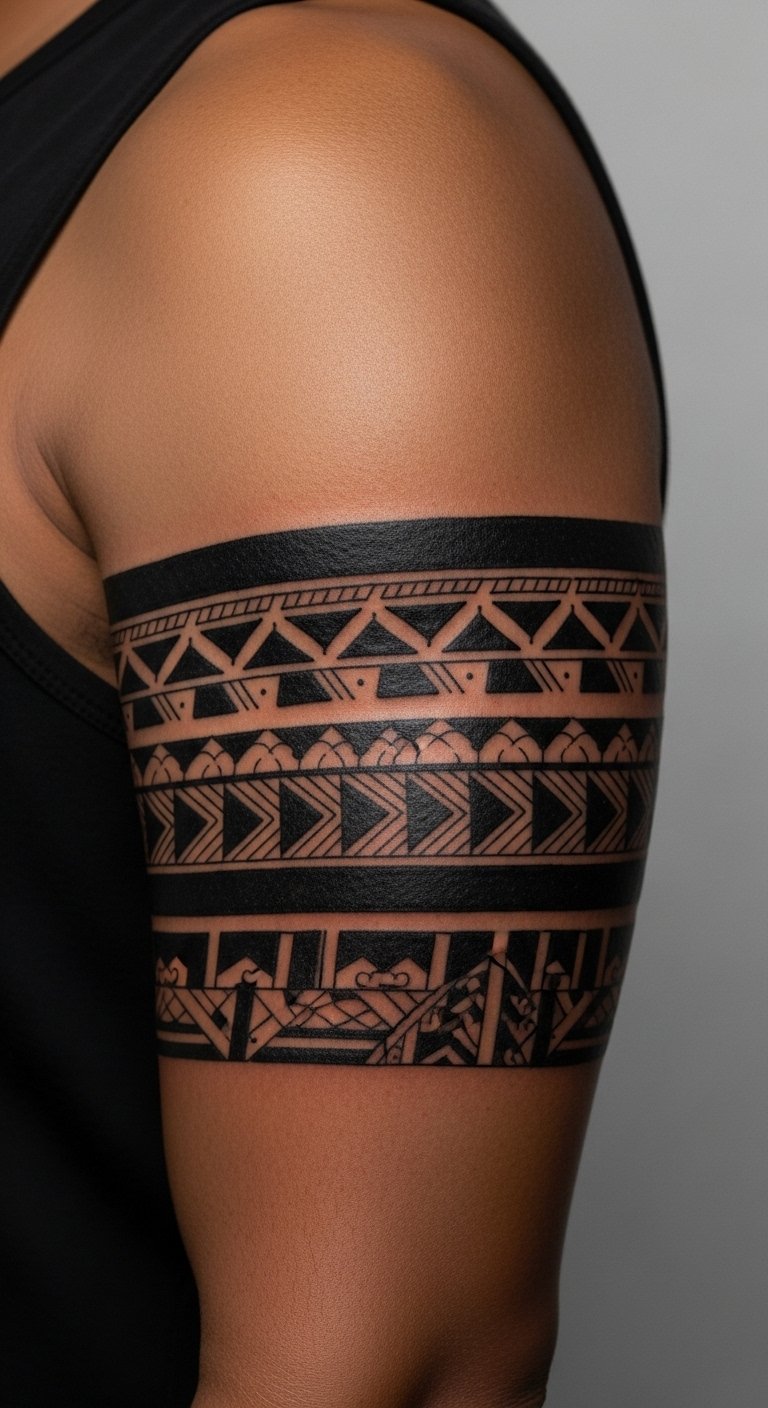
Tribal blackwork reads instantly bold and ages gracefully because of heavy fills and strong contrast. Placement on the upper arm makes sessions manageable. Respect cultural origins — discuss symbolism with your artist. Common mistake: overcomplicating traditional motifs; stick with clear, repeated shapes for longevity.
Fine Line Botanical Sleeve On Inner Forearm
Style/Technique: Fine-Line / Illustrative Blackwork
Pain Level: Medium (inner forearm)
Session Time: 2–4 sessions
Best For: Elegant statement, visible but easy to cover
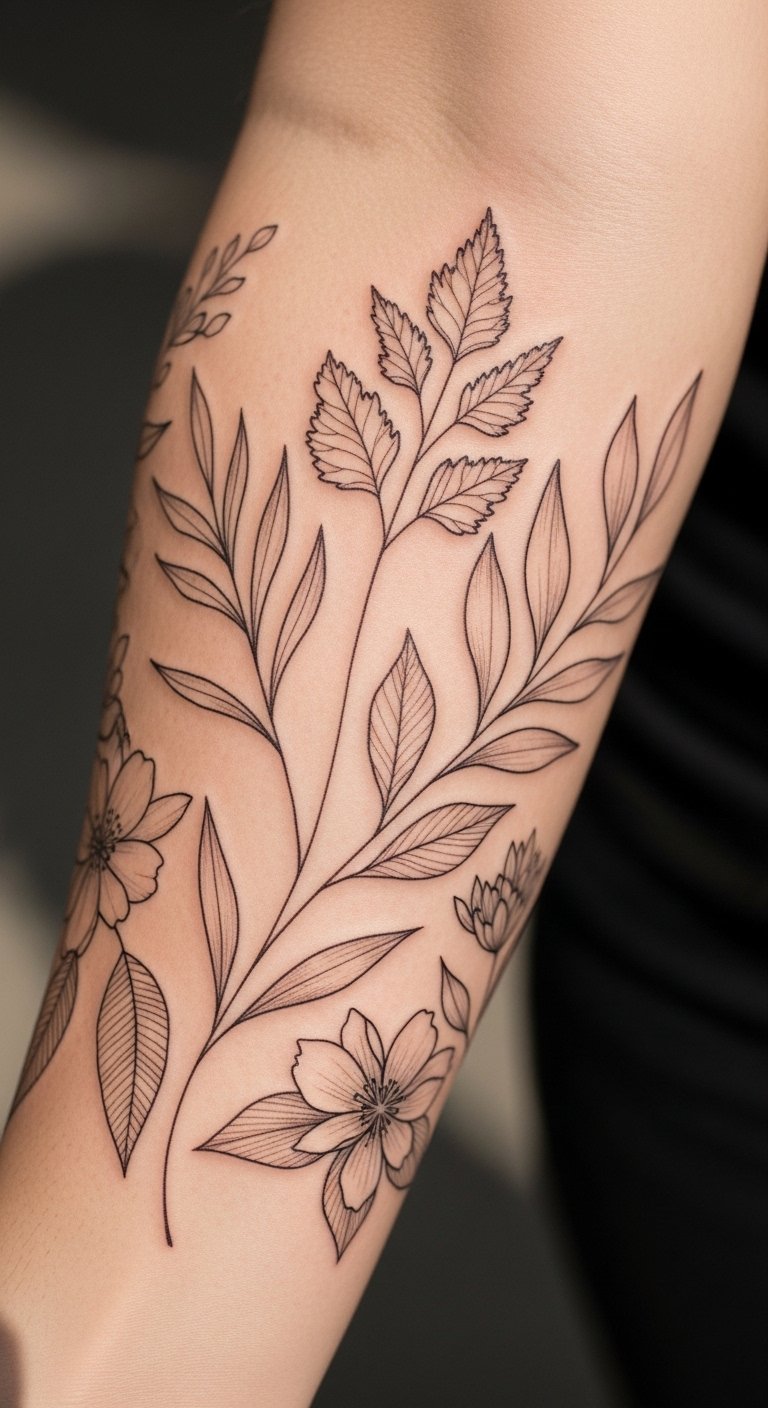
I chose inner forearm for botanical pieces because movement accentuates stems and leaves. Fine-line blackwork looks elegant healed, but single-needle work needs an experienced hand — otherwise lines can blur. Keep aftercare strict first two weeks and avoid sun; thin lines require more TLC to stay crisp.
Dotwork Crescent Moon On Shoulder Blade
Style/Technique: Dotwork / Stipple
Pain Level: Low-Medium (shoulder blade)
Session Time: 1–2 sessions
Best For: Subtle detail, texture-rich pieces
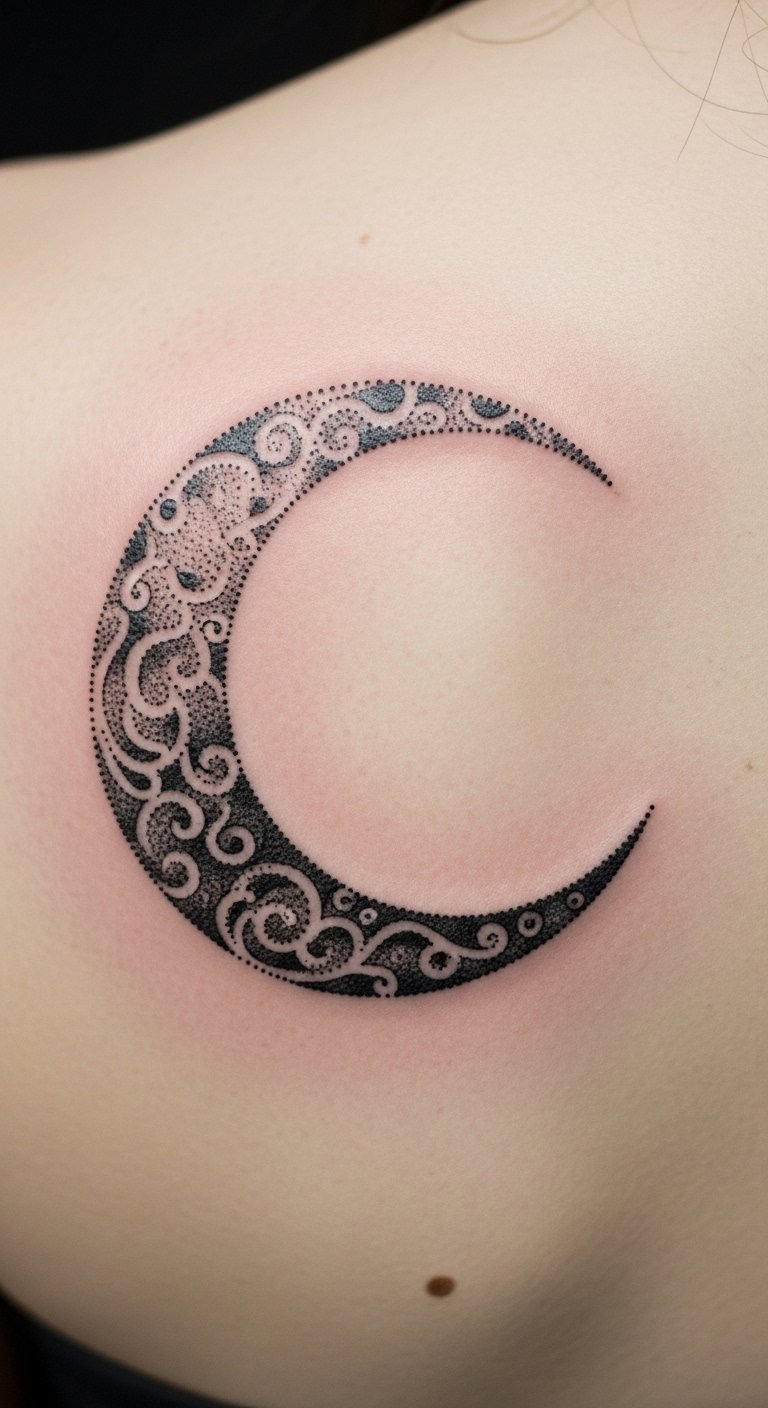
Dotwork creates depth without gray shading by using density. On the shoulder blade it’s easy to protect during healing. Healing takes patience; stippled areas can scab lightly and look dull before they settle. Avoid asking artists to rush density — true dotwork is deliberate.
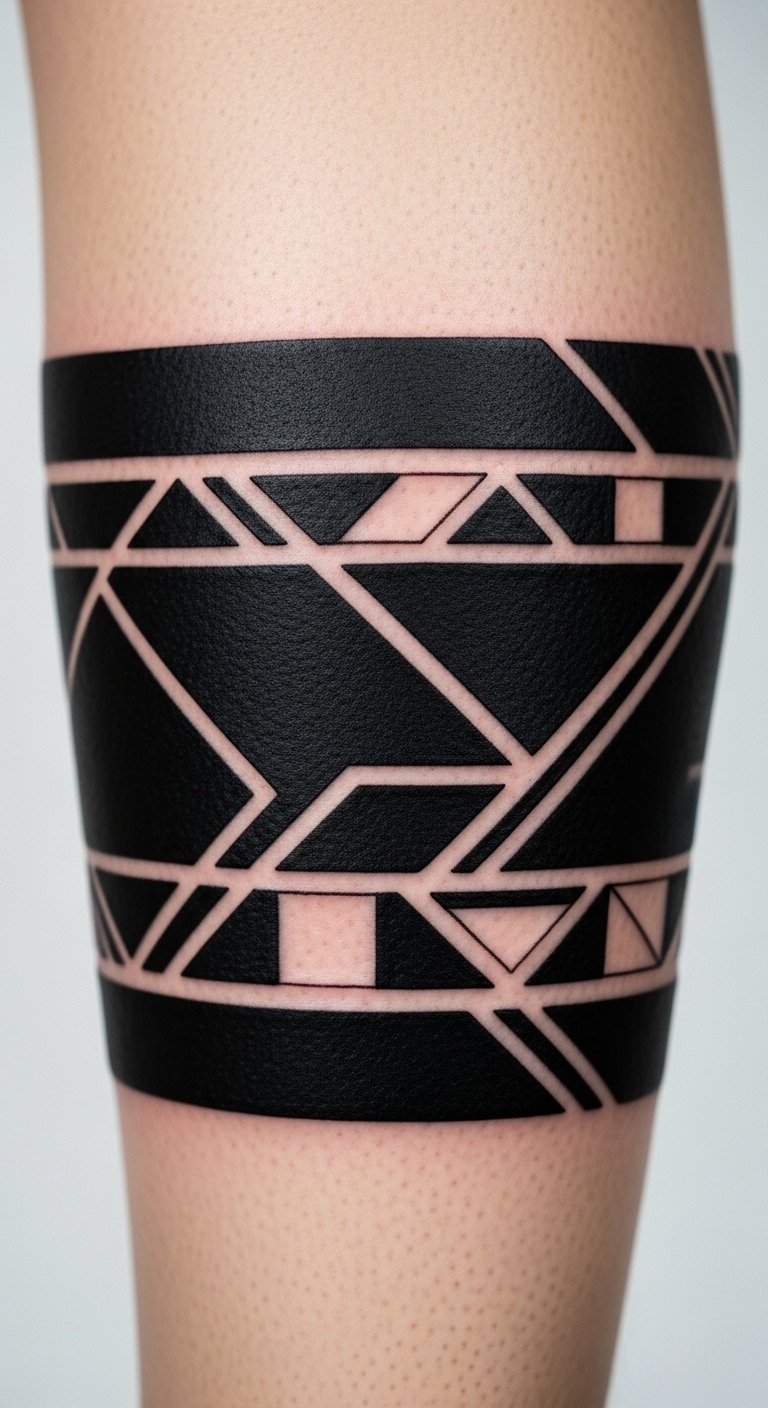
Blackwork Geometric Pattern Down Thigh
Style/Technique: Geometric / Ornamental
Pain Level: Low-Medium (thigh flesh)
Session Time: 1–3 sessions
Best For: Large canvas, statement visibility
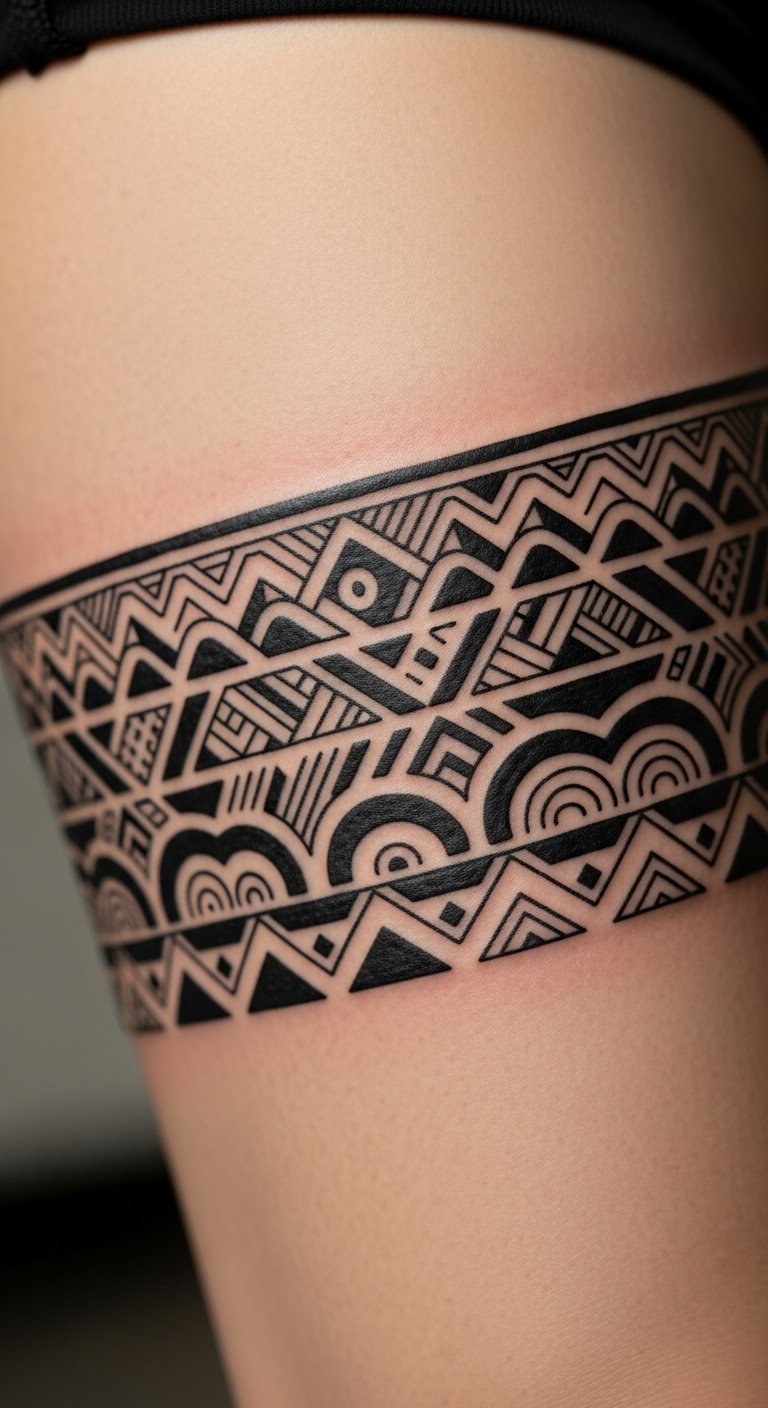
Thighs are forgiving for big geometric blocks. The scale lets you play with negative space and high contrast. I find these hold up well because lines are thicker and the area avoids constant sun. Watch for overly tight repeating details — give each motif room to breathe.
Dark Art Occult Sleeve On Upper Arm
Style/Technique: Dark Art / Illustrative Blackwork
Pain Level: Medium-High (inner arm spots higher)
Session Time: Multiple sessions
Best For: Narrative, occult symbolism
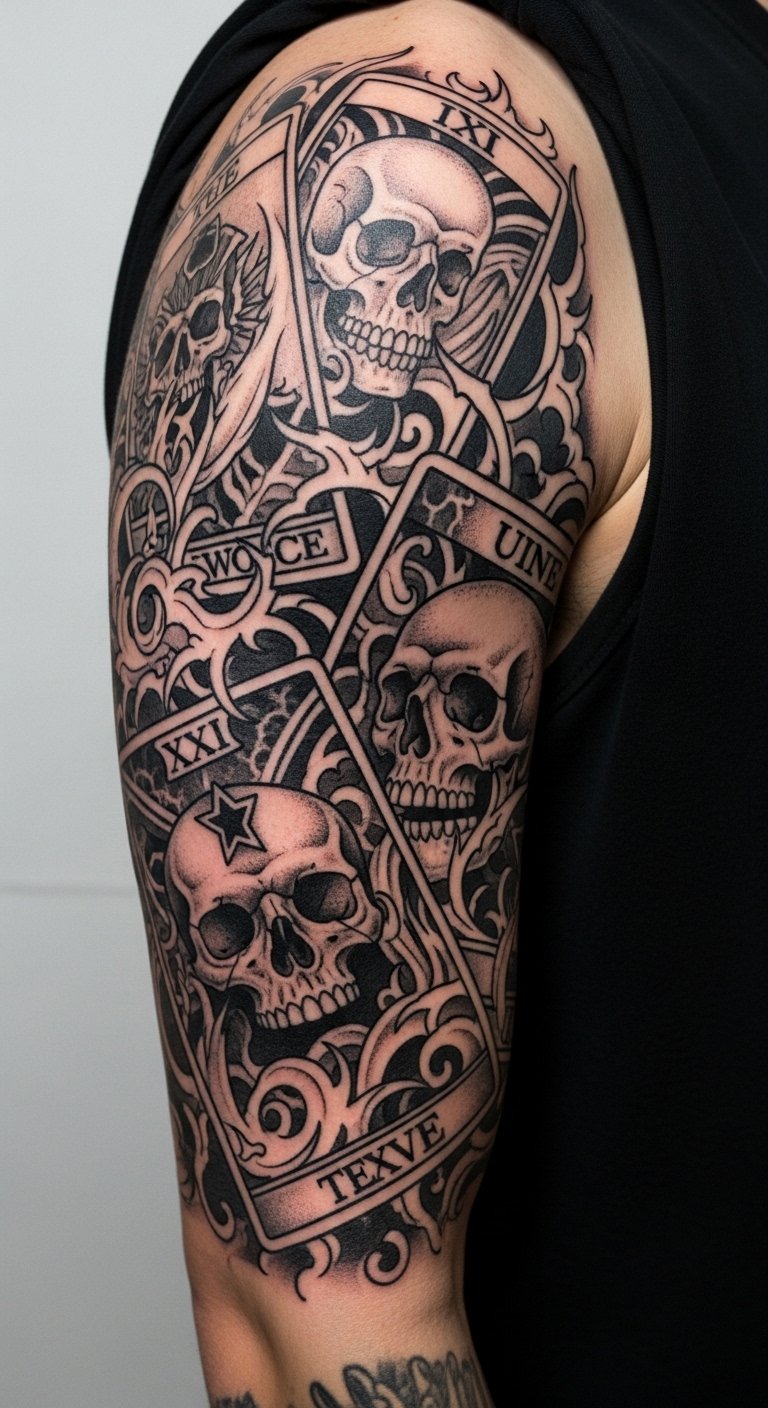
Dark-art blackwork thrives on heavy blacks contrasted with clean skin-breaks. These sleeves tell a story and age well because of bold areas. Expect longer sessions and heavier aftercare. One pitfall: crowding small symbols; prioritize readable imagery over tiny filler.
Minimalist Line Mountains On Ankle
Style/Technique: Minimalist / Blackwork Line
Pain Level: High (ankle bone)
Session Time: 30–60 minutes
Best For: First small tattoo, hidden when needed
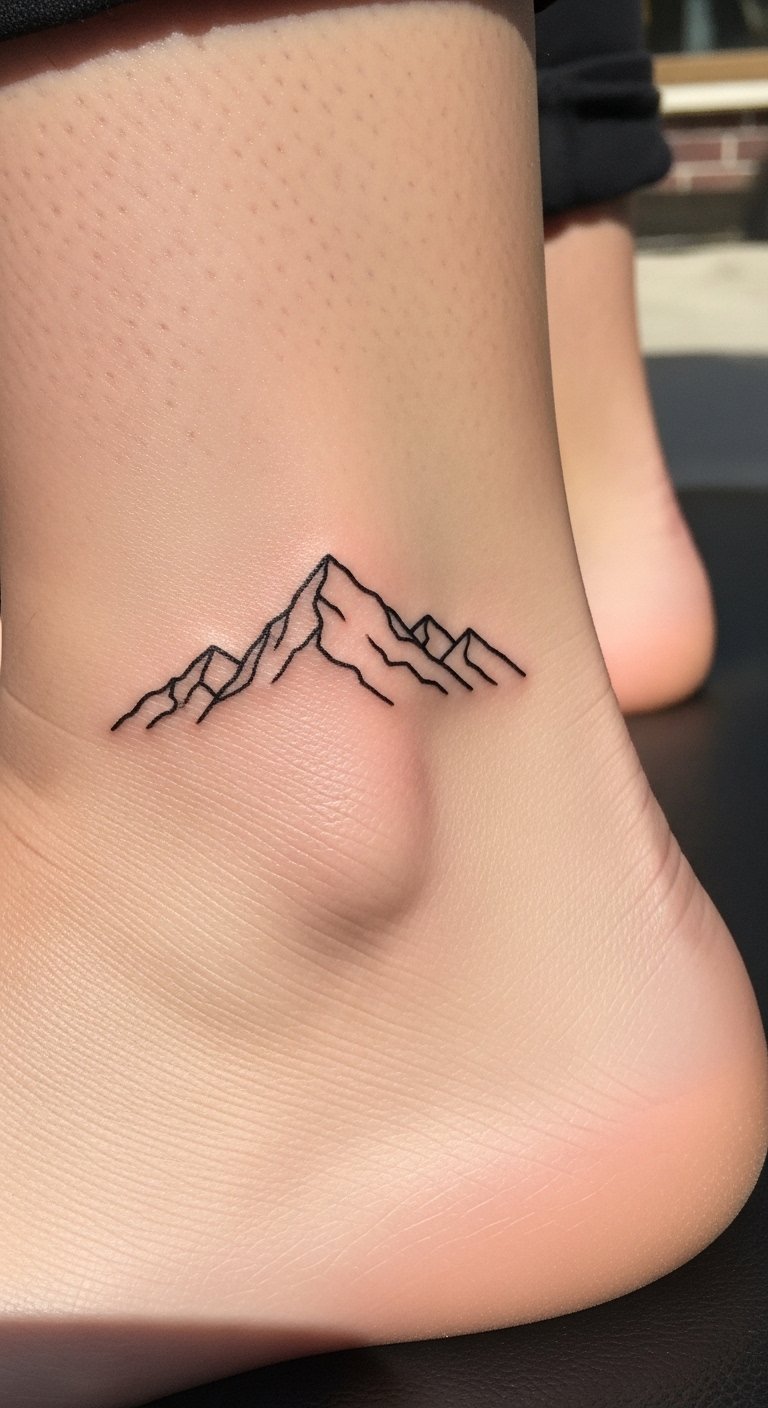
Ankle tattoos can hurt more than they look because of thin skin. Minimalist blackwork suits the spot, but very thin single lines may blur over years — ask for a slightly stronger line if you want durability. Keep the area dry and sun-protected while healed.
Engraving-Style Portrait On Upper Arm
Style/Technique: Engraving / Etching Blackwork
Pain Level: Medium (upper arm)
Session Time: Multiple hours
Best For: Portraits, illustrative detail

Engraving-style pieces mimic woodcuts with cross-hatching. They read dramatic in blackwork and age well when lines are planned with sufficient weight. Demand healed portfolio examples — this technique needs precision. Expect the artist to plan direction of lines for natural-looking contours.
Blackout Accent Patch On Calf
Style/Technique: Blackout / Negative Space Integration
Pain Level: Medium (calf)
Session Time: 1–3 hours
Best For: Cover-ups, high-contrast anchors
Blackout patches (used carefully) make surrounding negative-space designs pop. Calf placement is straightforward to care for. Ensure even saturation; uneven fills show on healed skin. Use blackout sparingly — it’s powerful when paired with geometric or tribal elements.
Neo-Traditional Dagger And Rose On Forearm
Style/Technique: Neo-Traditional / Blackwork Hybrid
Pain Level: Medium (forearm)
Session Time: 1–2 sessions
Best For: Timeless symbolism, visible display
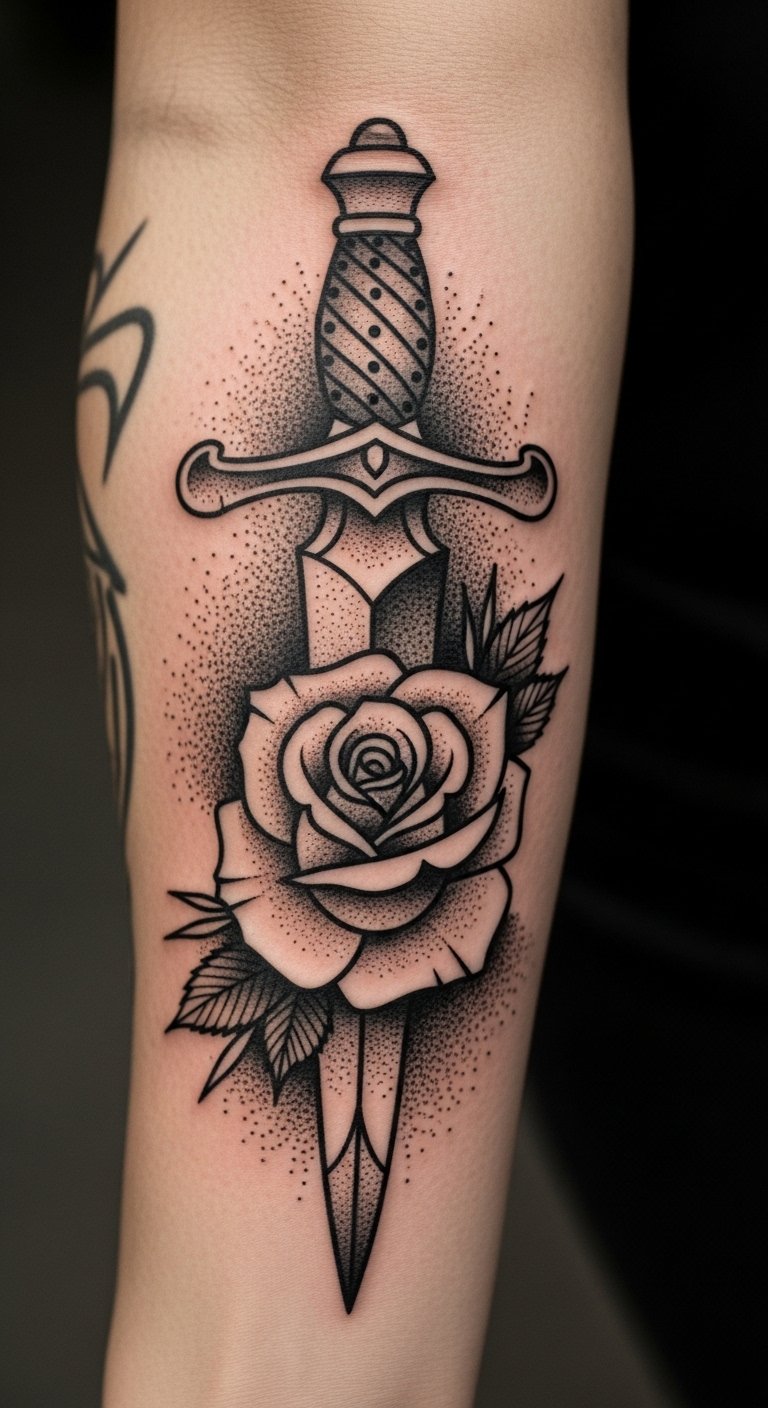
A dagger and rose reads classic in blackwork with bold outlines and dot shading. Forearm placement shows movement as you use your hand. Ask your artist for slightly heavier outlines to keep edges clean as the tattoo ages.
Negative Space Animal Silhouette On Ribcage
Style/Technique: Negative Space / Silhouette Blackwork
Pain Level: High (ribs)
Session Time: 1–2 sessions
Best For: Personal symbolism, larger but hidden pieces
Rib tattoos hurt, but using negative space for the subject keeps sessions efficient. Healed silhouettes look graphic and timeless. The main risk is placing too many tiny interior details — silhouettes age best when simple.
Ornamental Half-Sleeve On Upper Arm
Style/Technique: Ornamental / Mixed Blackwork
Pain Level: Medium (upper arm)
Session Time: Multiple sessions
Best For: Cohesive arm coverage, mixed motifs
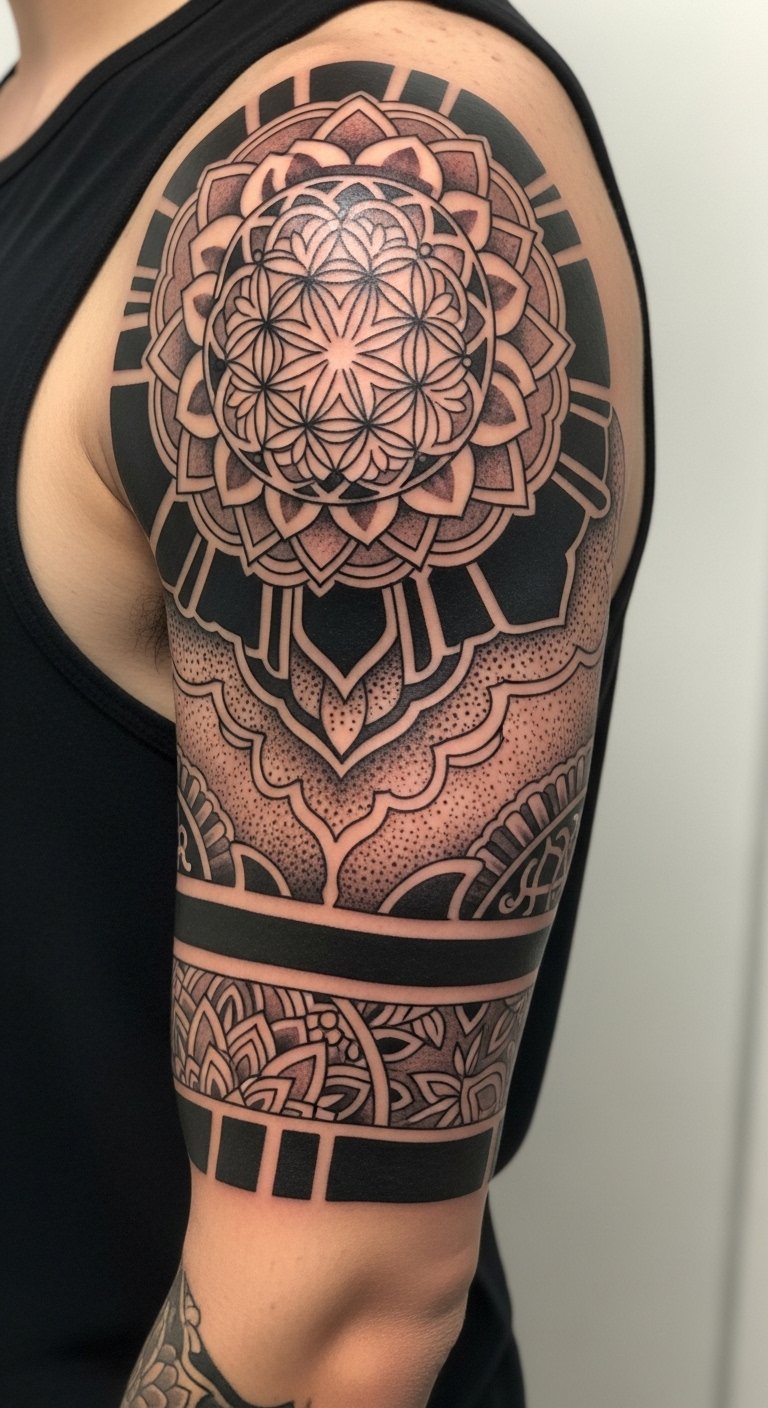
Half-sleeves let you blend mandalas, geometric blocks, and ornamental curves. I appreciated how mixed techniques keep visual interest while heavy blacks anchor the look. Space sessions and protect from sun to preserve contrast across elements.
Micro-Realism Eye On Wrist
Style/Technique: Micro-Realism / Fine Blackwork
Pain Level: Medium-High (wrist)
Session Time: 1–2 hours
Best For: Small focal pieces, visible detail
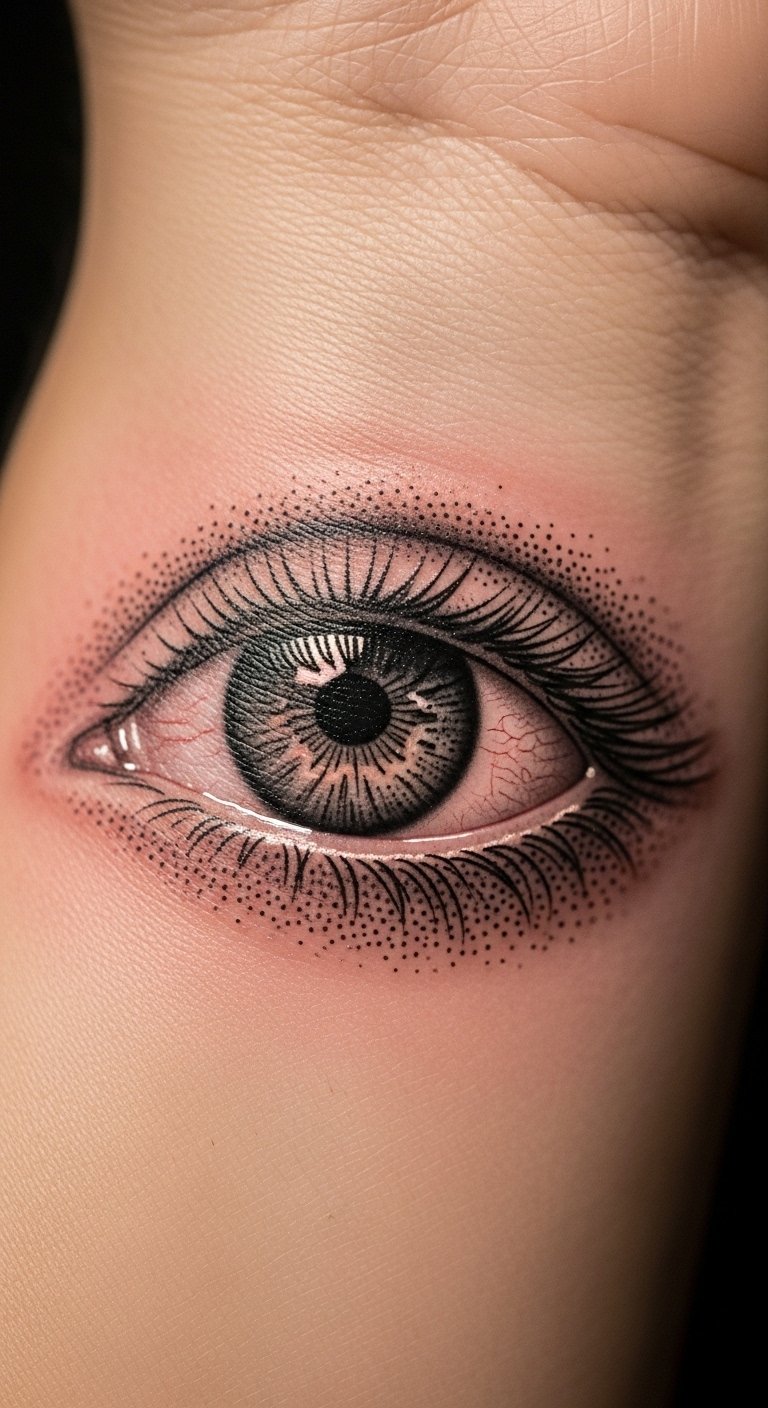
Micro-realism in blackwork can look incredible if the artist shows healed examples. Wrist skin moves and can spread fine detail; pick slightly bolder micro-lines to keep the image legible in five years.
Abstract Swirl Block On Chest
Style/Technique: Abstract / Contemporary Blackwork
Pain Level: Medium-High (chest)
Session Time: 1–3 sessions
Best For: Statement without literal meaning
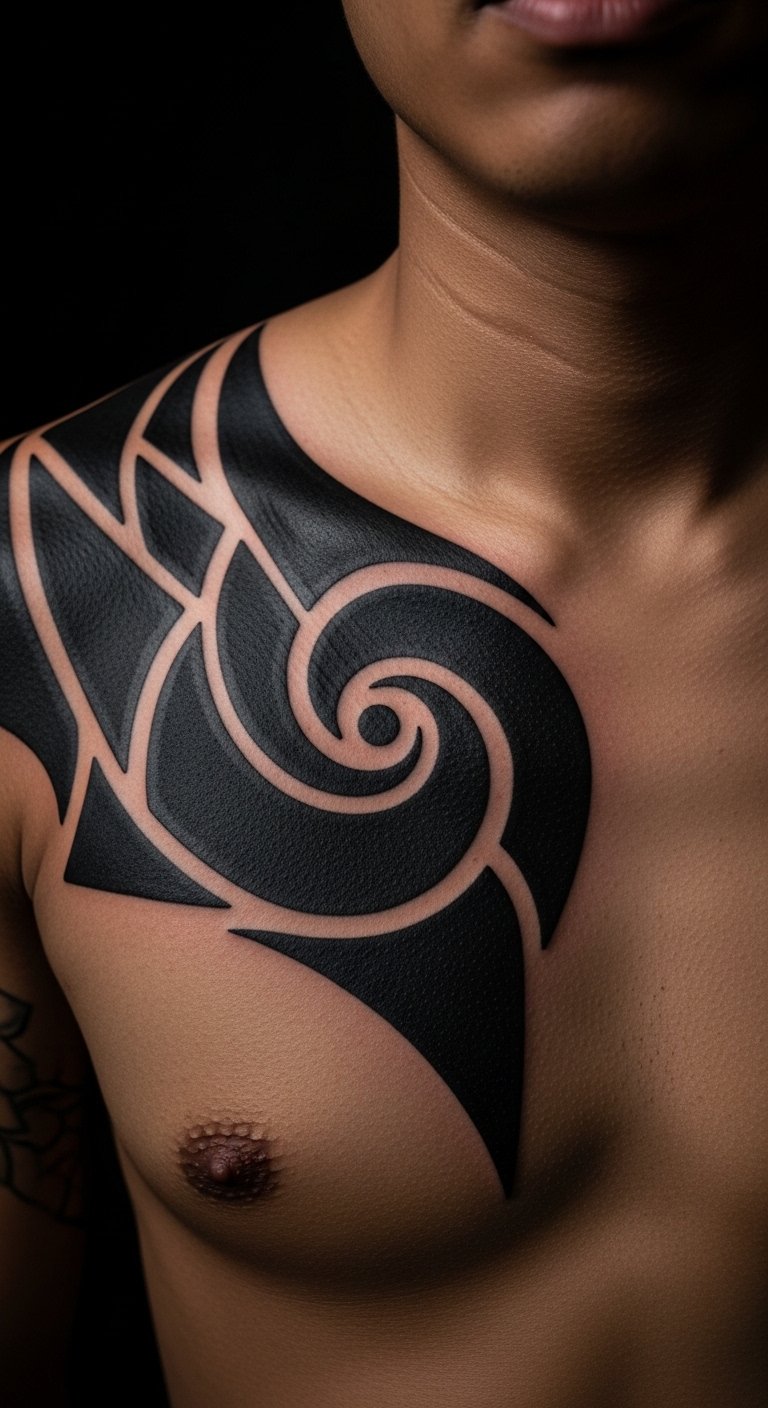
Abstract blackwork lets the artist use bold shapes and play with negative space. Chest tattoos show well under clothing but need extra sun-care. Avoid extremely tight small shapes that might merge during healing.
Calligraphic Script Across Collarbone
Style/Technique: Lettering / Calligraphic Blackwork
Pain Level: Medium (collarbone area)
Session Time: 1–2 hours
Best For: Names, phrases, visible but elegant
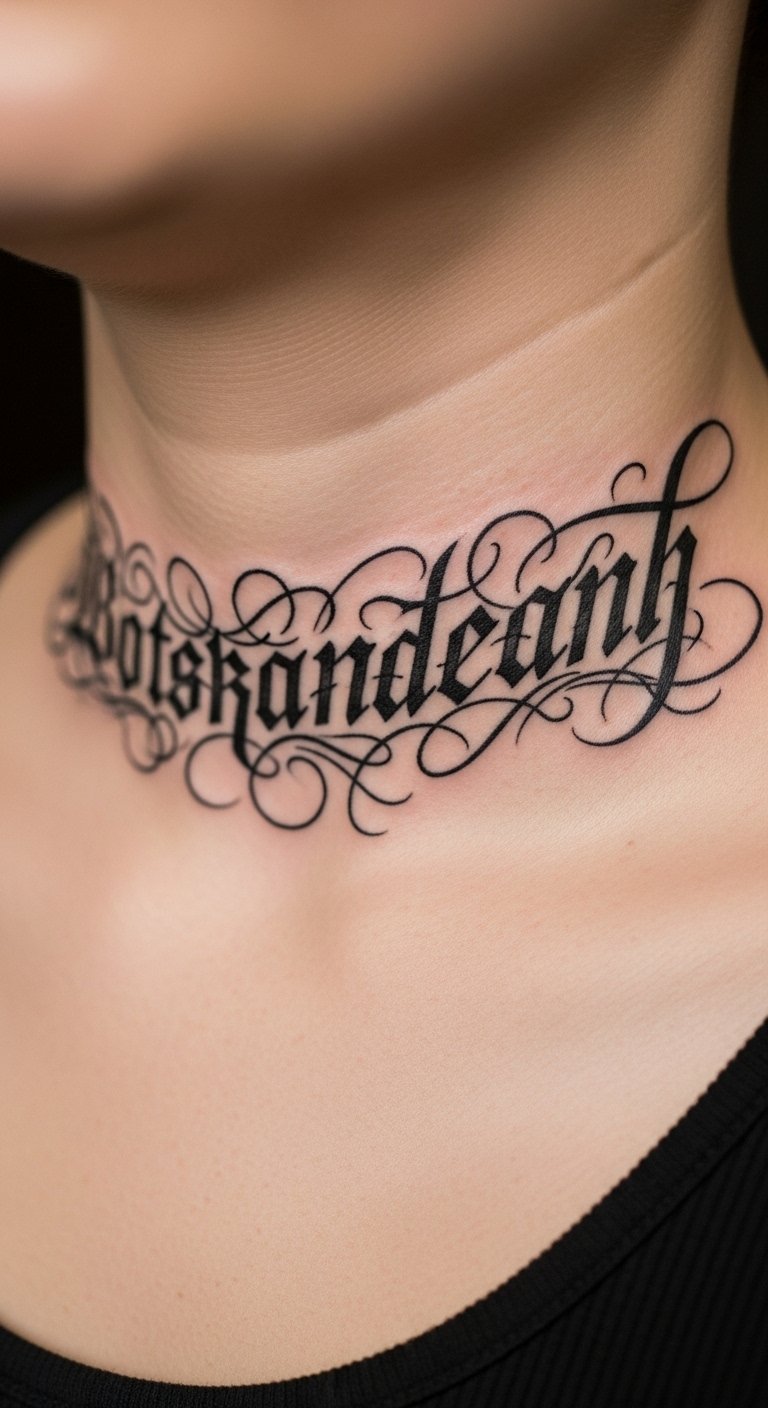
Script in pure blackwork looks graphic and readable when line weights are optimized. Collarbone will be more painful near bone — choose slightly bolder strokes to prevent blurring. Proof the stencil and spacing thoroughly before inking.
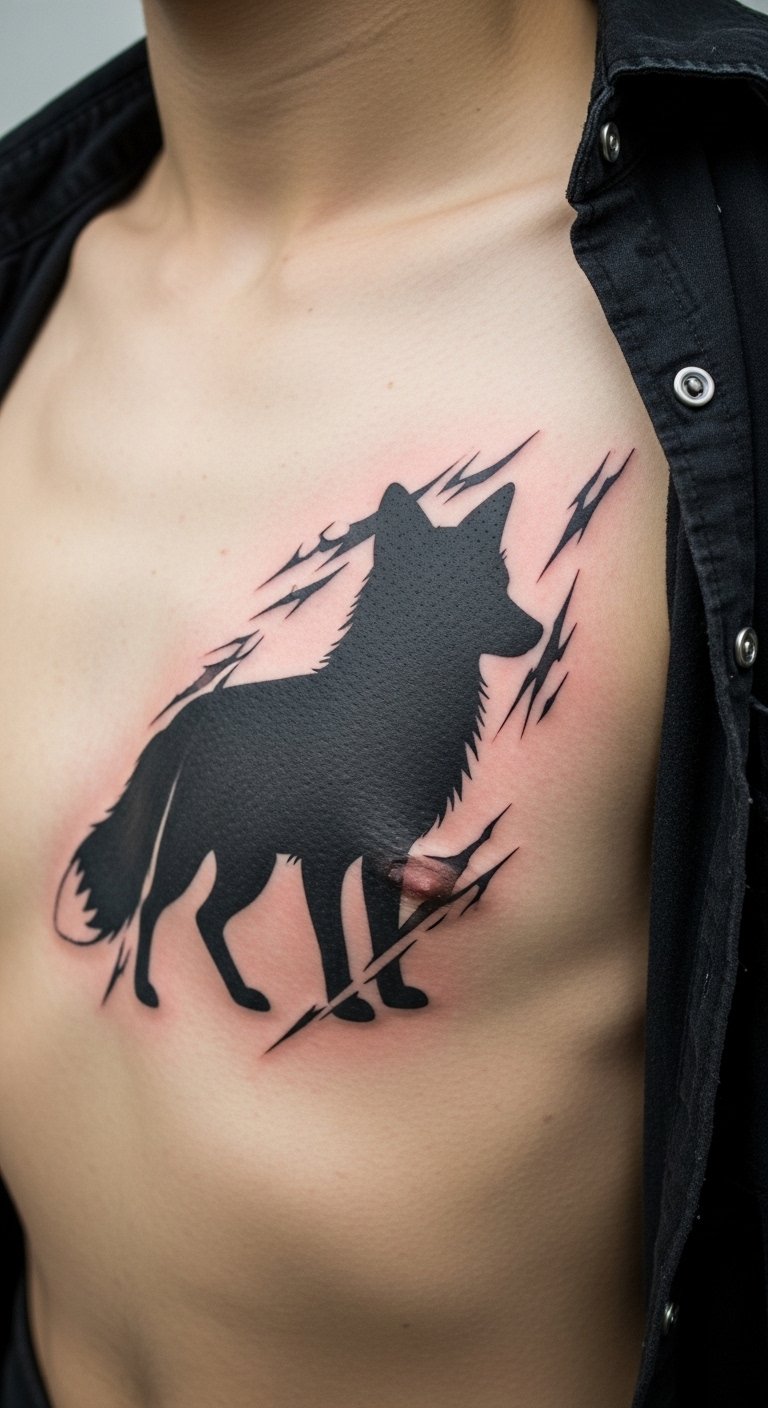
Fox Silhouette With Botanical Details On Thigh
Style/Technique: Silhouette + Dotwork / Illustrative
Pain Level: Low (thigh)
Session Time: 1–2 sessions
Best For: Feminine-sylvan motifs, coverable
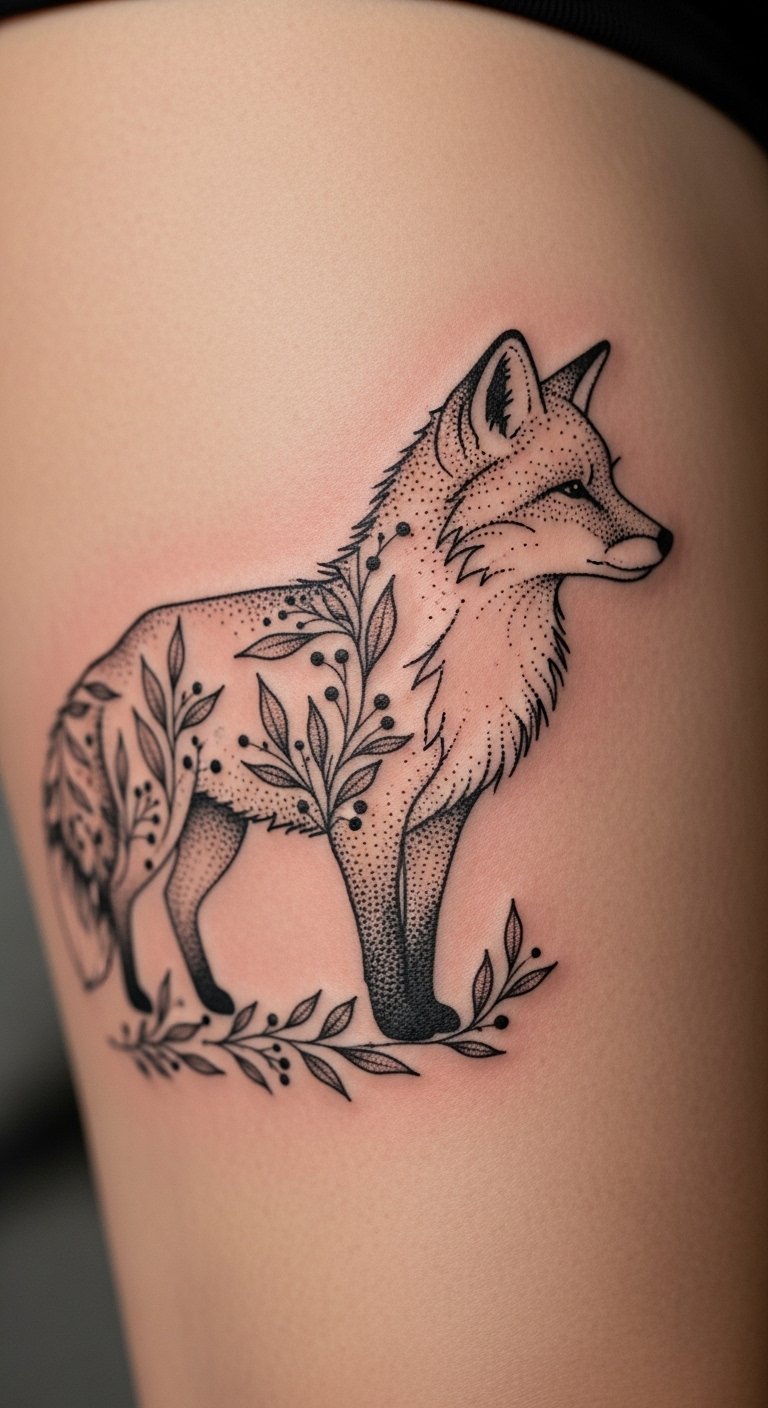
Animal silhouettes framed by botanical dotwork age well because the fills are bold and surrounding details use stippling. Thigh location offers space for scale and protects the piece during healing.
Stacked Geometric Rings On Fingers
Style/Technique: Minimalist Blackwork / Geometric
Pain Level: High (fingers)
Session Time: Short sessions per finger
Best For: Minimal visible tattoos, ring alternatives
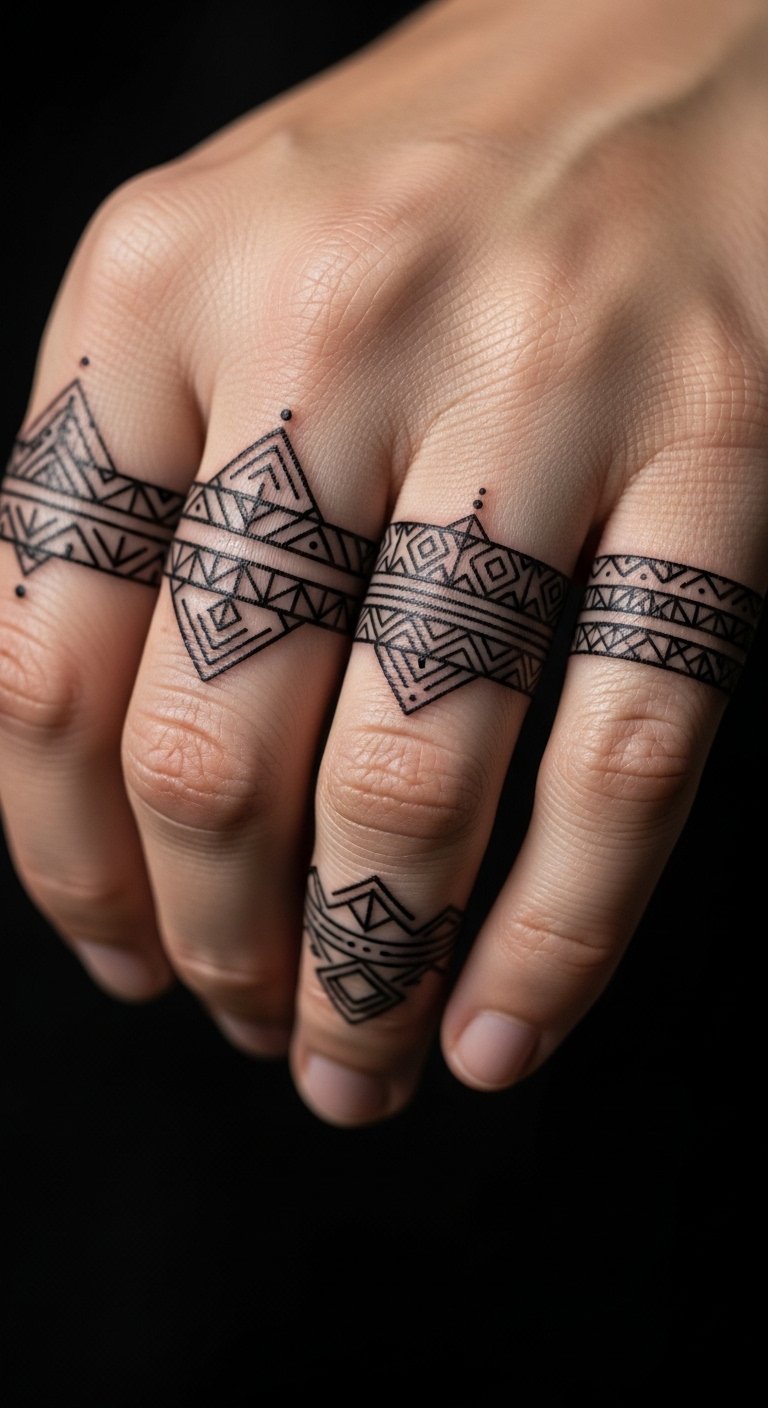
Finger tattoos fade faster due to constant use and washing. Solid simple bands with intentional negative space do better than tiny intricate lines. Expect touch-ups long term, but well-executed rings can look striking healed.
Compass And Map Lines On Outer Calf
Style/Technique: Illustrative Blackwork / Nautical
Pain Level: Low-Medium (calf)
Session Time: 1–2 sessions
Best For: Travel symbolism, longer designs

Calf is a forgiving spot for linework and illustrative blackwork. The large area lets negative space form pathways. Keep line thickness moderate to avoid future blurring of map details.
Etching-Style Skull On Forearm
Style/Technique: Engraving / Dark Art Blackwork
Pain Level: Medium (forearm)
Session Time: 2–3 hours
Best For: Macabre aesthetic, bold storytelling
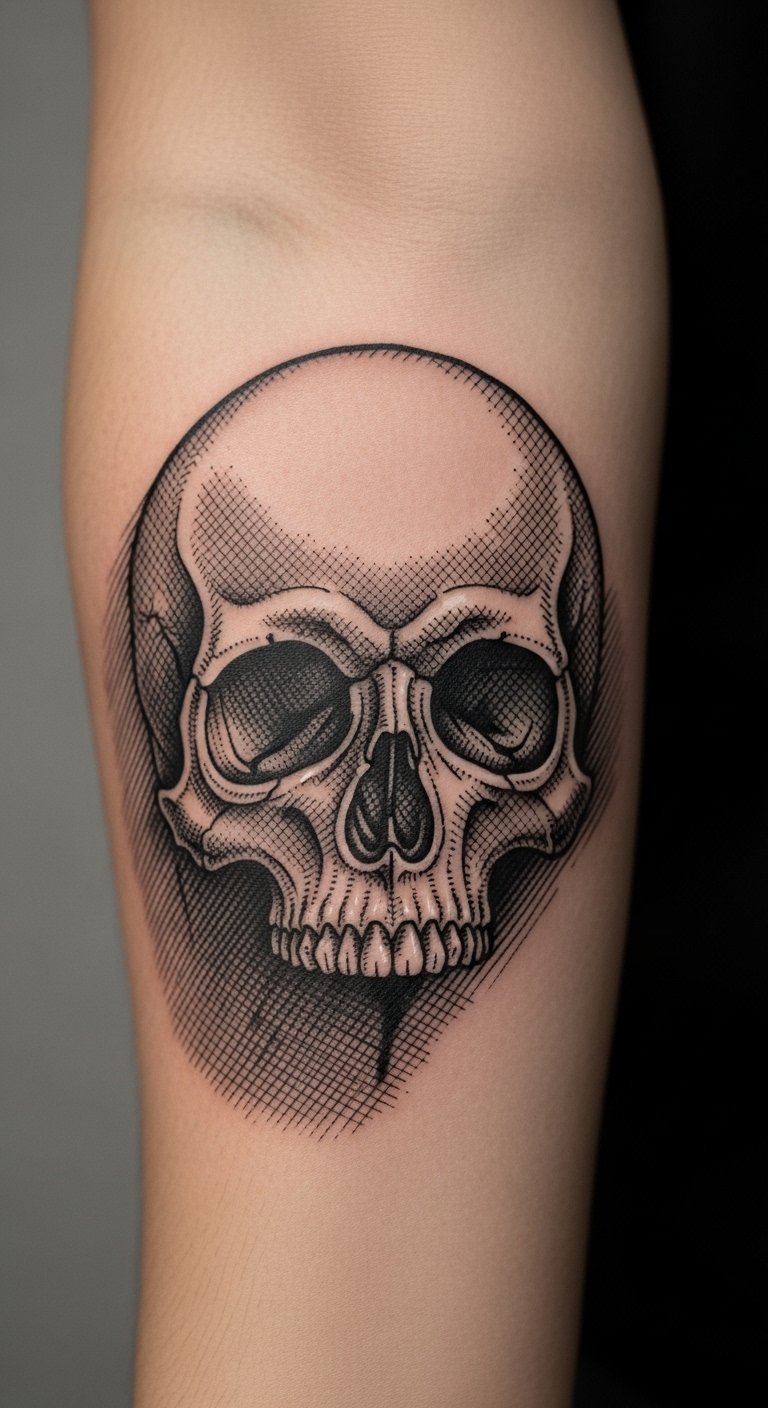
Etching or engraving styles read like prints and benefit from heavier line direction to maintain form when healed. Forearm placement is great for showing this kind of illustrative work.
Symmetrical Chest Plate Mandala
Style/Technique: Geometric / Large-Scale Blackwork
Pain Level: High (sternum area)
Session Time: Multiple sessions
Best For: Centerpiece, dramatic symmetry

Sternum pieces hurt more but look powerful. Thick central blacks paired with measured negative space keep the design strong over time. Avoid ultra-fine spokes that risk merging with movement and healing.
Floral Lace On Inner Thigh
Style/Technique: Fine-Line / Ornamental Blackwork
Pain Level: Low (inner thigh flesh)
Session Time: 1–2 sessions
Best For: Feminine, intimate placement
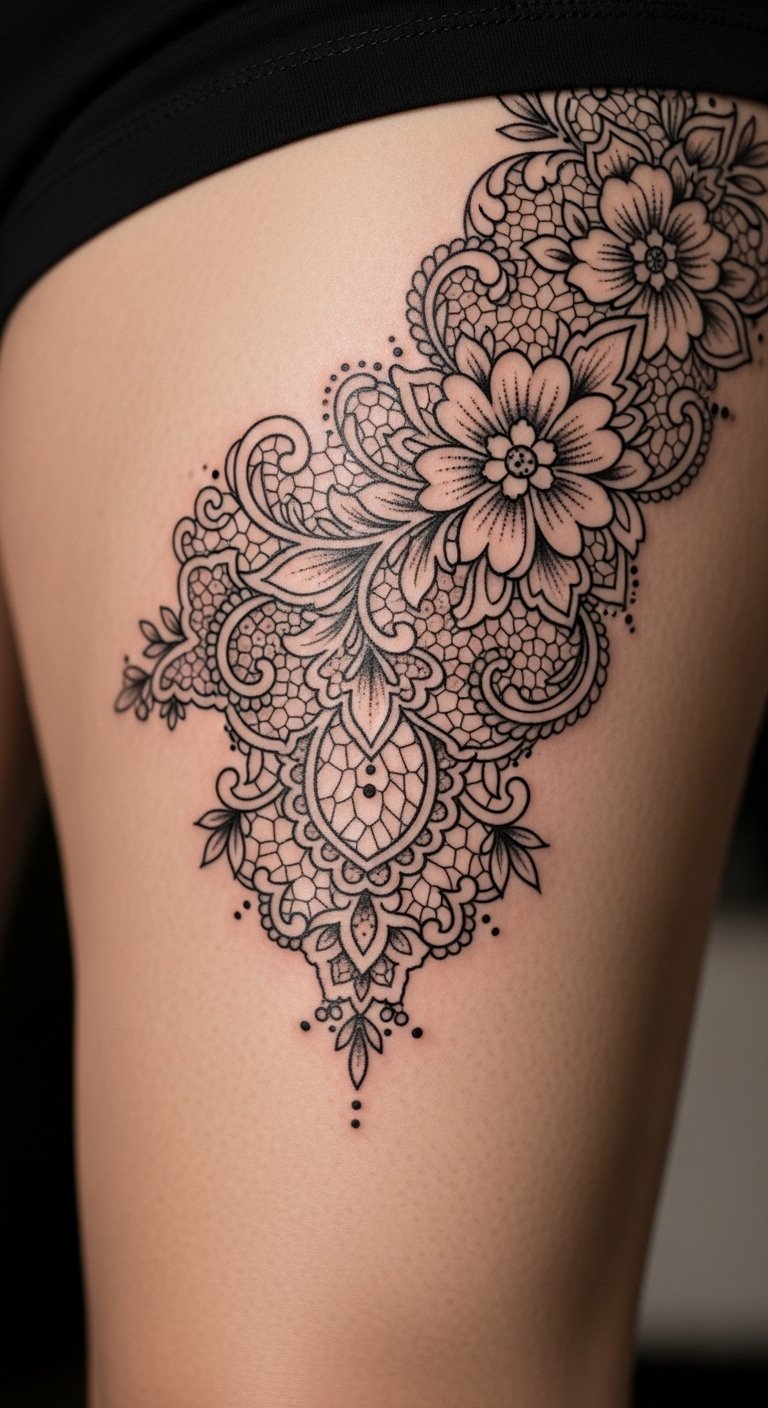
Inner thigh tattoos can be hidden or revealed and age well when lines are slightly bolded. Keep pieces spaced and avoid ultra-fine filigree that may blur with time.
Minimalist Eye Behind Ear
Style/Technique: Minimalist / Micro Blackwork
Pain Level: High (behind ear)
Session Time: 30–60 minutes
Best For: Tiny symbolic marks, hidden detail
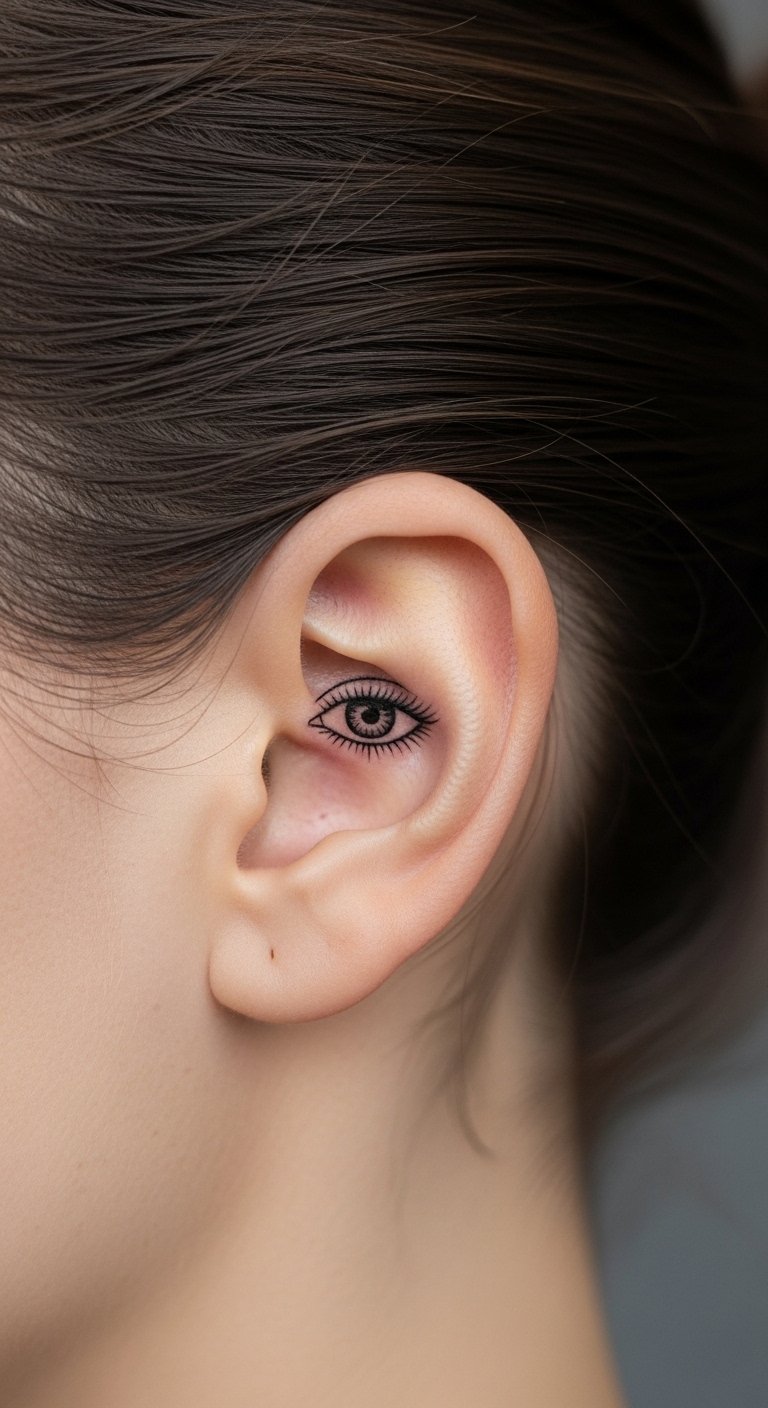
Small behind-ear pieces hurt due to thin skin and can blur if lines are microscopically thin. Ask for a slightly thicker line for endurance; the spot is easy to conceal with hair.
Large Raven On Back Shoulder
Style/Technique: Illustrative Blackwork / Dark Art
Pain Level: Medium (upper back)
Session Time: 2–3 sessions
Best For: Movement-focused imagery, bold silhouettes
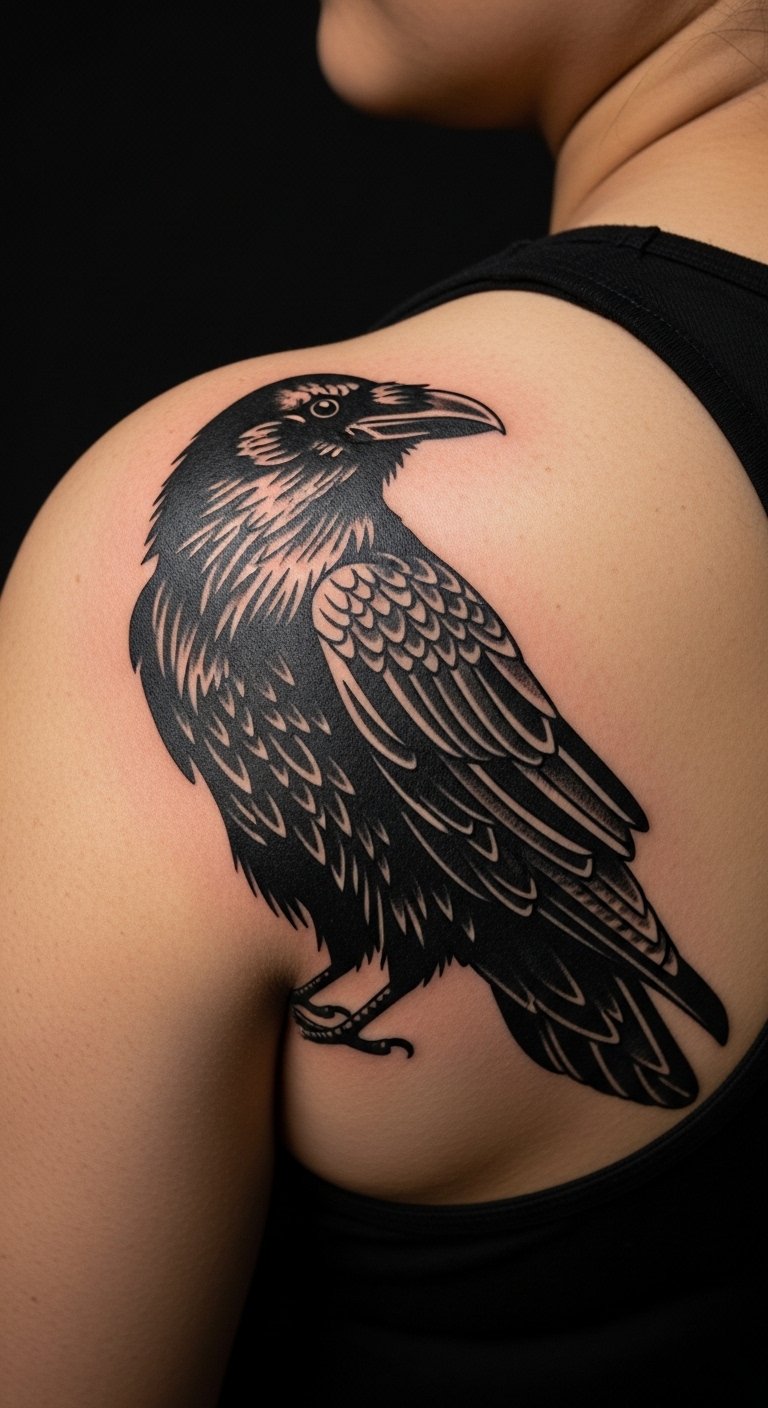
Bird silhouettes with negative-space feather lines read dramatically in blackwork. Upper back provides room and heals nicely with less constant friction. Keep feather details bold enough to avoid loss of definition.
Interlocking Triangles On Sternum
Style/Technique: Geometric Minimal / Blackwork
Pain Level: High (sternum)
Session Time: 1–2 sessions
Best For: Bold small centerpieces
Sharp geometric shapes look crisp on the sternum if line weight is robust. Very thin triangles risk softening; ask for clear divides and strong edges.
Crescent And Stars On Lower Back
Style/Technique: Minimalist / Celestial Blackwork
Pain Level: Medium (lower back)
Session Time: 1–2 sessions
Best For: Hidden or low-slung reveal
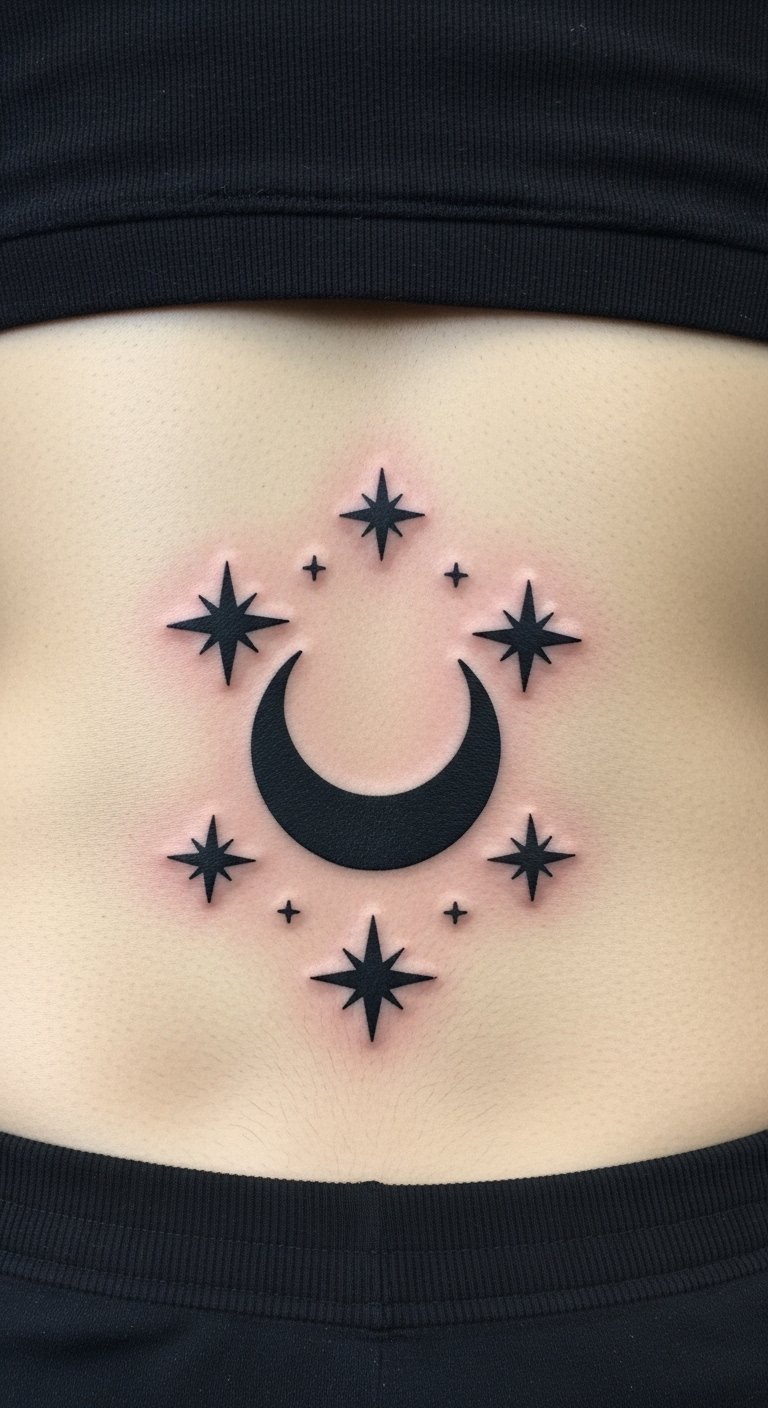
Lower back offers a smooth canvas. Celestial motifs rely on solid blacks and clear negative space and survive well if you avoid tiny constellation dots that may spread.
Split-Face Portrait On Upper Thigh
Style/Technique: Hybrid Realism / Blackwork Contrast
Pain Level: Low-Medium (thigh)
Session Time: Multiple sessions
Best For: Experimental hybrids, large portraits
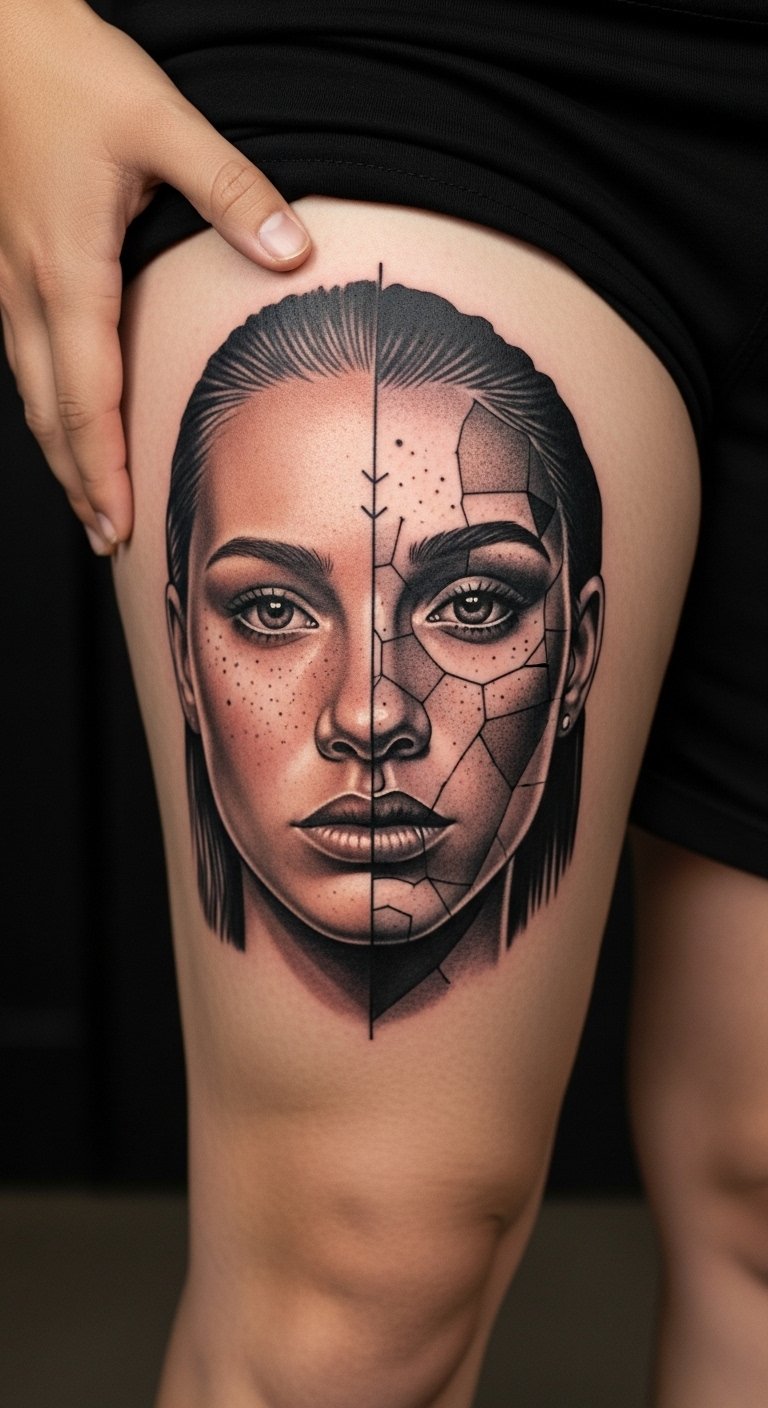
Hybrid pieces pair realistic halves with bold black panels for dramatic contrast. Thigh placement preserves detail and allows larger scale. Ask your artist for healed examples of similar hybrids.
Mandala Wrist Cuff
Style/Technique: Mandala / Mini Blackwork
Pain Level: Medium-High (wrist bone)
Session Time: 1–2 hours
Best For: Tiny circular statement
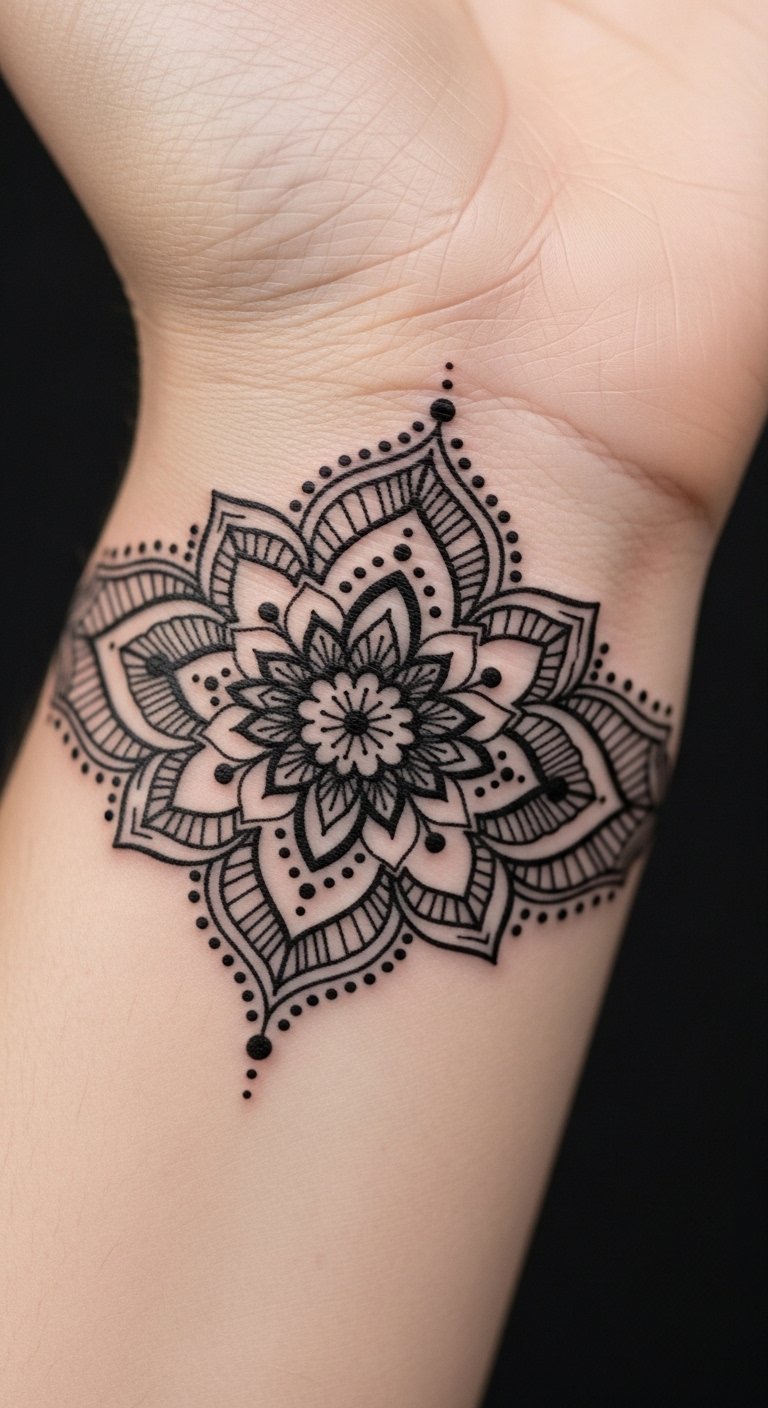
Wrist cuffs show quickly and need slightly bolder linework than micro-mandala stencils. Keep inner details roomy to avoid future merging.
Abstract Negative Space Rib Panel
Style/Technique: Abstract / Negative Space Blackwork
Pain Level: High (ribs)
Session Time: Multiple sessions
Best For: Bold but non-literal statement
Abstract rib pieces are striking but require patience during healing. Large blacks balanced with skin-breaks keep the design readable over time. Don’t cram micro-details into shifting rib skin.
Tattoo Prep and Aftercare Essentials
After a lot of trial and asking artists, these are the products I actually use and recommend for blackwork healing and long-term maintenance.
Aftercare (first 0–14 days)
- Aquaphor Healing Ointment, 14 oz tube — Use first 3–5 days for heavy protection (apply thin layer).
- Saniderm Transparent Adhesive Bandage, 6-inch roll — Wear per artist’s instructions for waterproof protection.
- Dr. Bronner's Unscented Castile Soap, 8 oz — Gentle cleaning during first week.
- CeraVe Fragrance-Free Moisturizing Lotion, 12 oz — Fragrance-free daily moisturizer after ointment phase.
Before Appointment / Numbing
- Topical Numbing Cream, 5% Lidocaine — Ask your artist before use; I apply per directions 30–45 min prior if agreed.
- Comfort Gel Ice Pack — For swelling and soreness post-session.
Long-Term Maintenance
- SPF 50 Sunscreen Stick for Tattoos — Apply daily to exposed tattoos to prevent UV fading.
- Mad Rabbit Tattoo Balm, 2 oz — Good for ongoing vibrancy and moisturization.
- Hustle Butter Deluxe, 4 oz — Vegan aftercare alternative for healed skin.
Optional Comfort
- Hydrocolloid Bandages, Large — For spot protection on scabs or after sessions.
- Tattoo Aftercare Kit (multi-item) — Good for travelers or first-timers.
Frequently Asked Questions
Q: How bad does a tattoo actually hurt?
A: Pain depends on placement and tolerance. Outer arm and thigh = lower; ribs, sternum, ankle = higher. It’s often more like a burning scratch than sharp pain. For sensitive areas, discuss topical numbing (see 5% lidocaine cream) with your artist.
Q: How long to heal and when does it look normal?
A: Surface healing is 2–3 weeks; full settling can take 2–3 months. Blackwork may look dull while skin regenerates, then snap back once fully healed.
Q: How do I keep blackwork from fading?
A: Daily sunscreen is essential. Use an SPF 50 stick whenever your tattoo sees sun (even in winter) and moisturize regularly to keep skin healthy.
Q: Should I pick custom or flash blackwork?
A: Both work. Flash is quick and reliable; custom lets you tailor negative space and symbolism. Sit with the idea and look at healed portfolios.
Q: Can I work out after getting inked?
A: Wait at least 48–72 hours and avoid heavy sweating for a week on the area. Sweat can trap bacteria and affect ink retention.
Q: Do blackwork tattoos age well on deeper skin tones?
A: Yes — blackwork’s high contrast generally shows well across skin tones. Ask to see healed examples on similar skin.
Conclusion
I recommend taking your time with placement and stencil approval — blackwork is forgiving if the design uses clear negative space and solid line weight. Keep the basics on hand (Aquaphor and SPF) and check healed portfolios before booking. Which of these high-contrast ideas are you leaning toward?
