
Tiny micro realism can read like a whisper that holds decades of detail. When done with thoughtful spacing and slightly bolder linework at the start, a tiny portrait or botanical stem stays legible longer than the single-needle fad suggests. Expect a little touch-up at two years for high-motion spots and plan wardrobe choices that either protect the area while it heals or highlight it once healed.
1. Tiny Photoreal Daisy on Inner Forearm
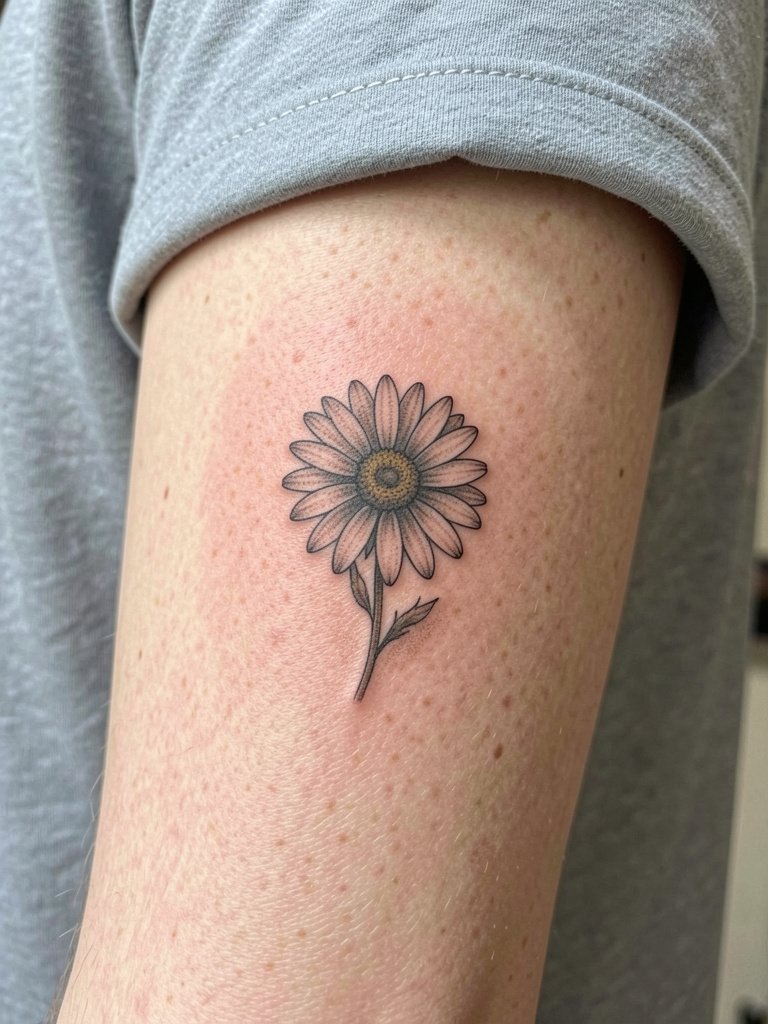
A tiny photoreal daisy on the inner forearm reads like jewelry when placed midway between wrist and elbow. I recommend this over ultra-fine single-needle petals if you want the center detail to hold up. Bring two close-up photos of daisy textures so the artist can match the stipple shading and set line weight slightly heavier than the smallest reference. Expect mild scabbing at day three and a softening of the tiniest hairs by year two, so plan a light touch-up at the two-year mark. For the session wear a short-sleeve tee that you can roll up easily, which helps the artist keep the arm relaxed and lowers the blowout risk.
2. Miniature Cat Portrait on the Sternum
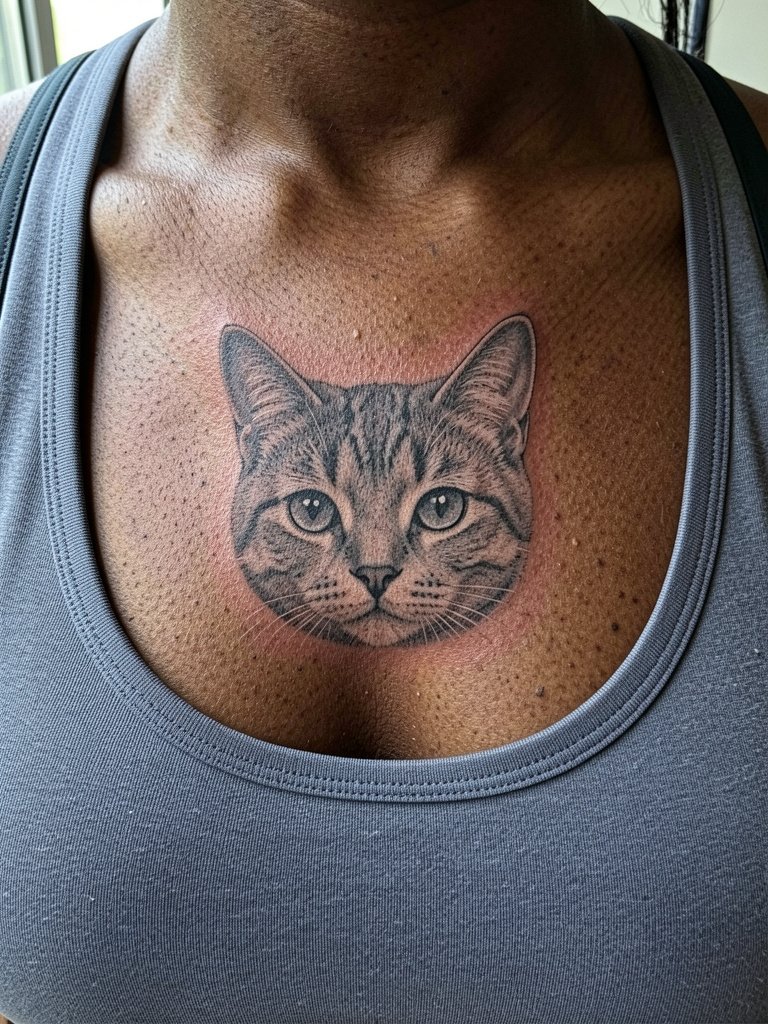
Sternum skin moves with breathing, so a tiny photoreal pet portrait needs slightly larger negative space around key facial features to avoid early blur. Talk with your artist about spacing around the eyes and nose, and ask for a scaled mock-up on the skin while you sit to confirm placement. Professional considerations include having an artist experienced with chest micro realism and an assistant for stencil positioning during deeper inhalations. At six months lines will have settled and contrast will soften; at two years the tiniest hairs inside the whisker area may need a small touch-up. This placement suits people comfortable with occasional coverage during the healing window.
3. Micro Geometric Mountain on Outer Wrist
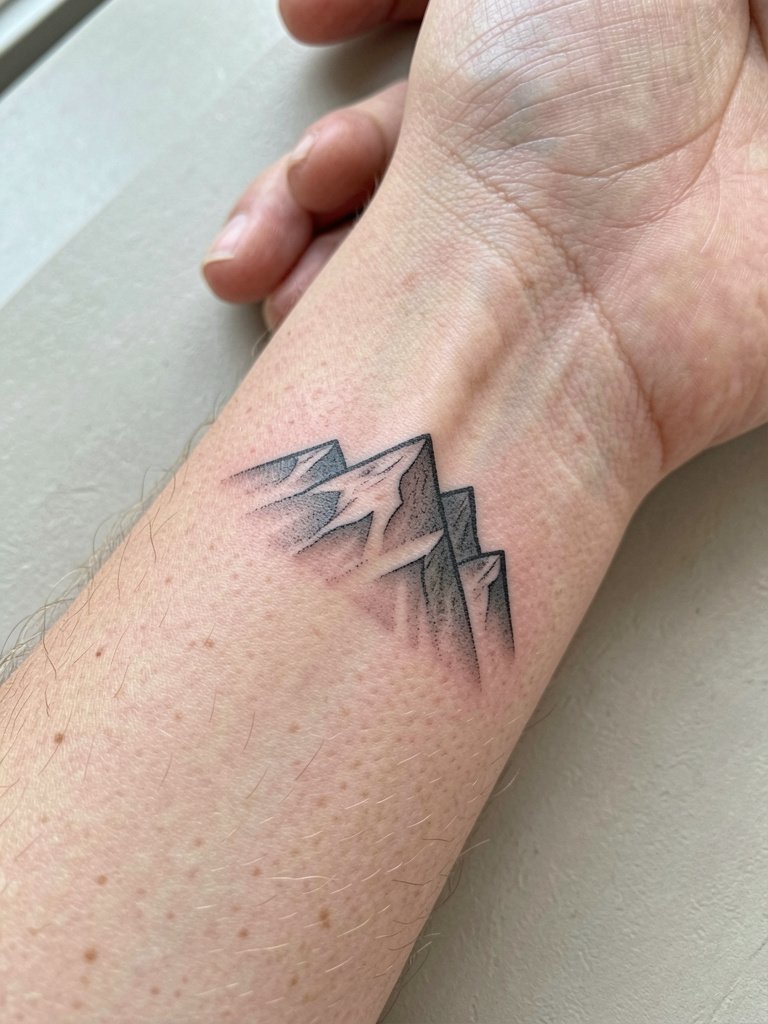
A small geometric mountain on the outer wrist works when you allow the peaks a little breathing room. The wrist is high-motion and repeatedly washed, so thicker anchor lines and slightly more saturation up front reduce early fade. Show the artist exactly how wide you want the peaks to be so they can plan for line spacing that resists merging by year three. During the session you will feel intermittent sharpness as the area sits over bone. For showing it off, pair this with a slim rolled-cuff linen shirt so the wrist sits in exposed light without harsh contrast. Expect a touch-up around 12 to 24 months for the highest-motion edges.
4. Tiny Eye with Stipple Shading Behind the Ear
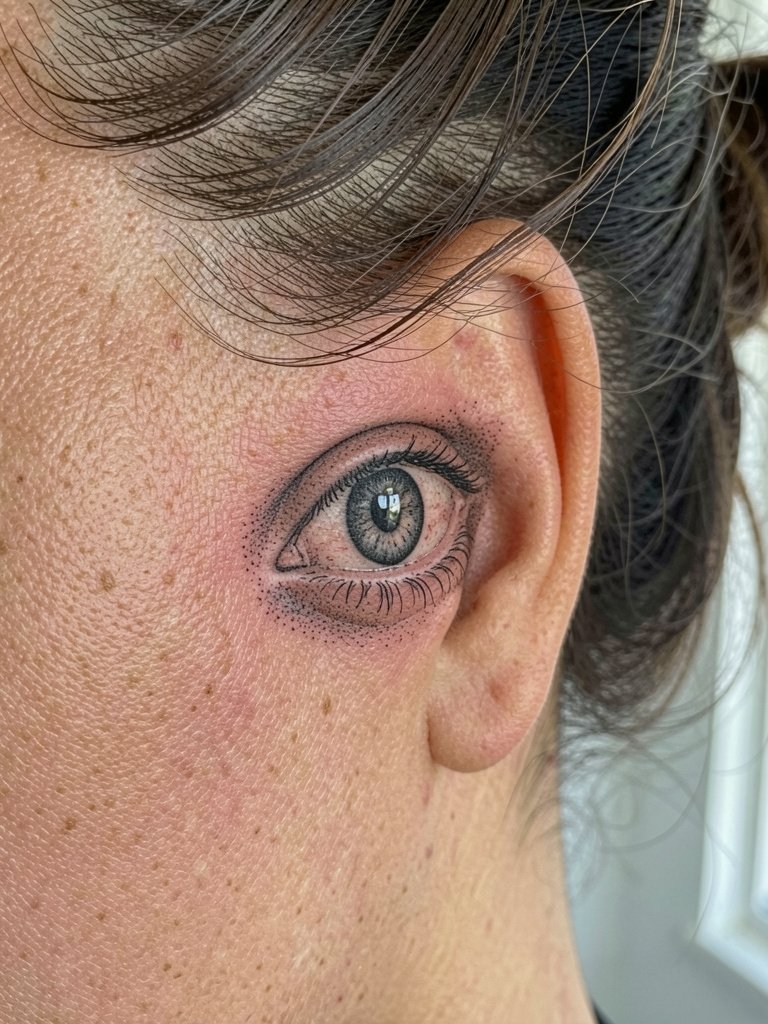
Behind-ear micro realism reads as a discreet accent and benefits from stipple shading rather than heavy outlines. The skin there is thin and delicate, so request a test stencil to confirm placement against the hairline. People often choose single-needle outlines and then find the design looks faint in photos; add crisp stipple texture and a couple of slightly stronger anchor points to keep the eye readable in low light. For session prep, wear hair tied up in a simple clip or choose a lightweight hair claw so the artist has a clean working area without tugging at the scalp. Behind-ear work usually needs only a short touch-up at the one to two year mark.
5. Micro Leaf Sprig on the Ankle
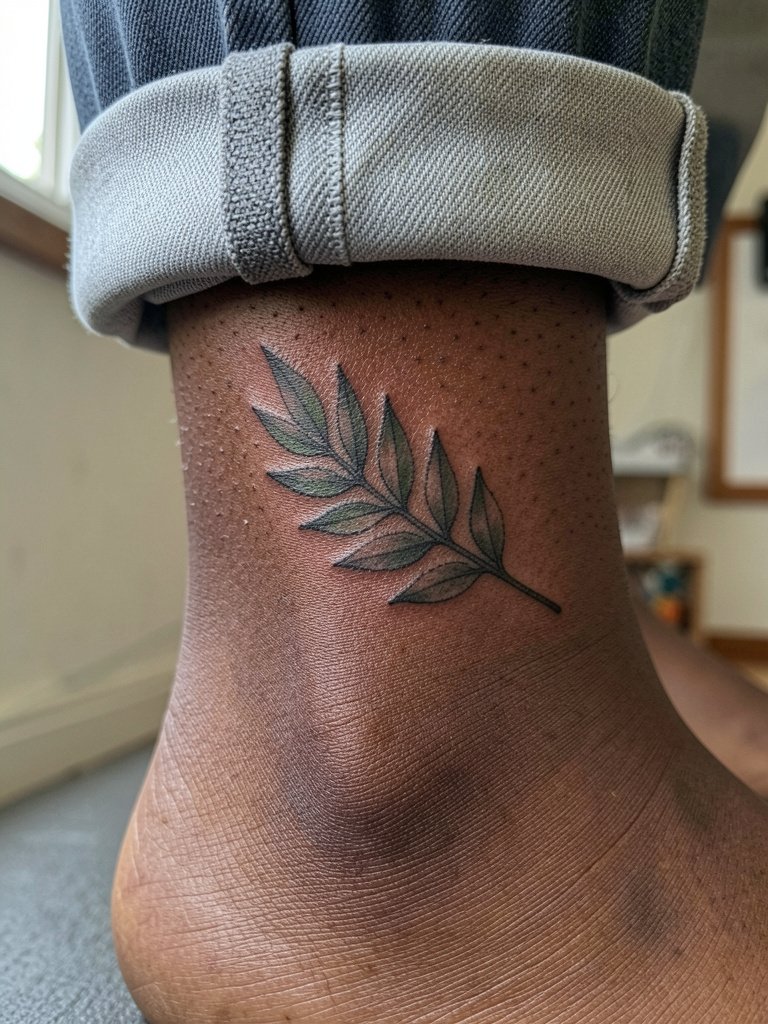
Ankle sprigs face daily friction from socks and shoes, so crisp contrast and a slightly larger leaf midrib help the design survive regular wear. Ask for minimal spread in the outer veins and request the artist to keep lines a touch thicker than the thinnest reference so the veins do not dissolve into blur. The session feels sharp when the needle crosses the bone prominence, but it is brief. For showing it off pair the healed ankle with ankle-strap sandals or a delicate anklet chain that frames the sprig without covering it. Plan for a touch-up in the first two years if your footwear causes repeated rubbing.
6. Miniature Ribbon Book Spine on the Ribcage
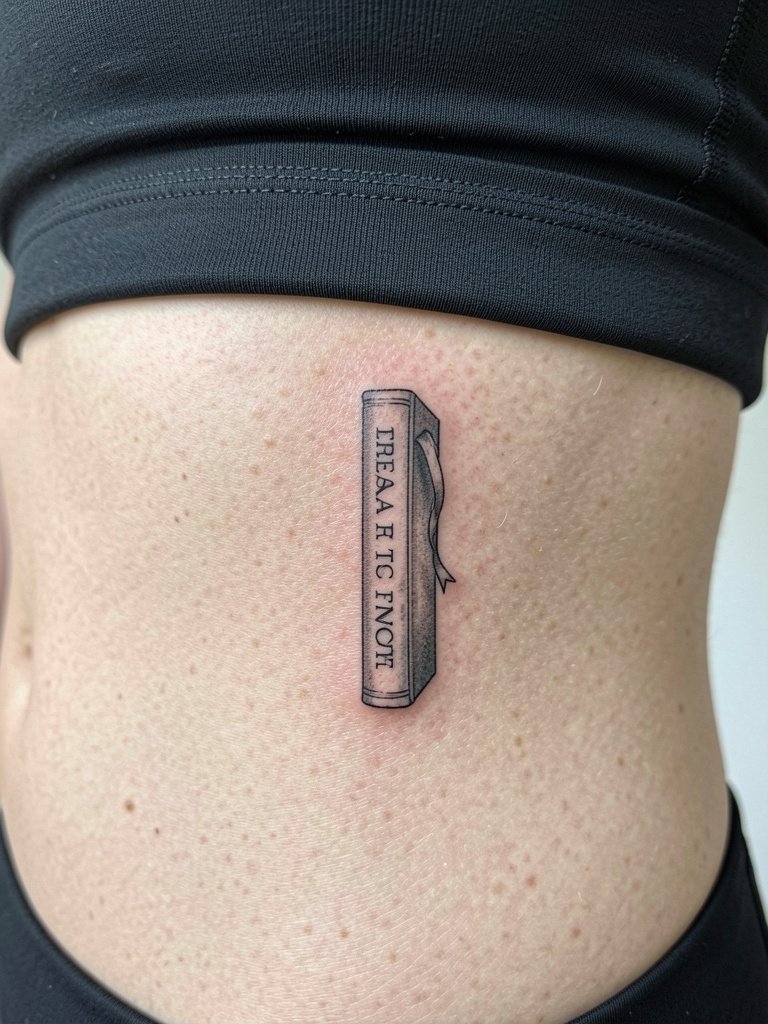
Ribcage micro realism divides artists into two camps. One camp argues that the constant expansion and contraction of rib skin blurs fine single-needle work within two years. The other camp insists that slightly wider spacing and careful needle depth let fine detail settle beautifully, and they will point to healed photos as proof. If you want this area to last, ask your artist for a scaled sketch with slightly more negative space and a roadmap for a touch-up at the one-year mark. For the session wear a fitted sports bra so the artist has clean access and you stay supported during deeper breathing.
Session Day Picks
The tiny placements above need precise stenciling and protection for the first week, so these are the items I find useful for wrists, ankles, ribs, and the behind-ear area.
-
Stencil transfer paper kit. Helps preview exactly how the tiny linework sits on curved skin, which matters for the wrist and inner forearm pieces above.
-
Topical numbing cream. Apply 30 to 45 minutes before the appointment for high-motion spots like the ankle and wrist when you want to avoid flinching.
-
Thin protective film roll. Useful for small ankle and finger tattoos to reduce friction from socks or shoes during the first 48 hours.
-
Fragrance-free gentle body wash. Keeps healing micro realism clean without stripping the tiny ink channels.
-
Aquaphor healing ointment. Thin layers during the initial days lock in moisture for fine line work without clogging small scalings.
7. Micro Realism Eye on the Thumb
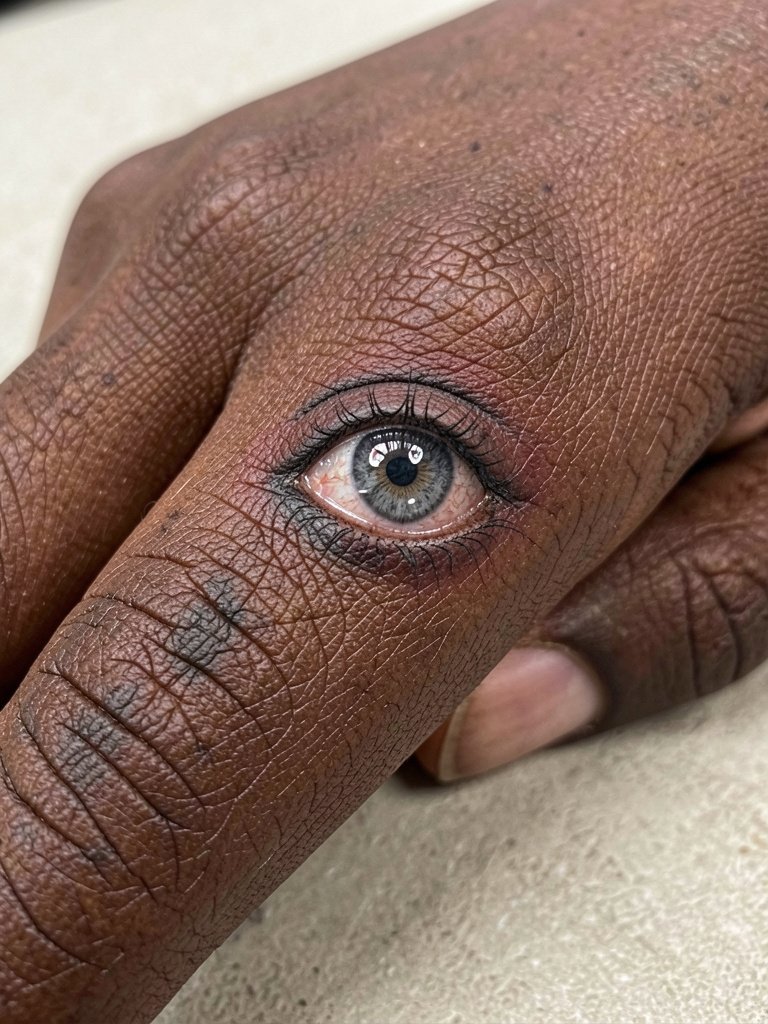
Thumb tattoos are high-touch areas and classic candidates for early fading and spread. I recommend slightly bolder anchor lines on the boundary of the eye and subtle stipple inside to keep contrast. During the consult present a photo of your daily hand work so the artist can forecast friction points and plan ink depth accordingly. The session feels sharp when the needle crosses the joint area, and you should expect color softening by year one. For wearing choices that highlight the piece, try a minimal thin silver ring on the adjacent finger rather than covering the thumb.
8. Tiny Solar System Cluster on the Collarbone
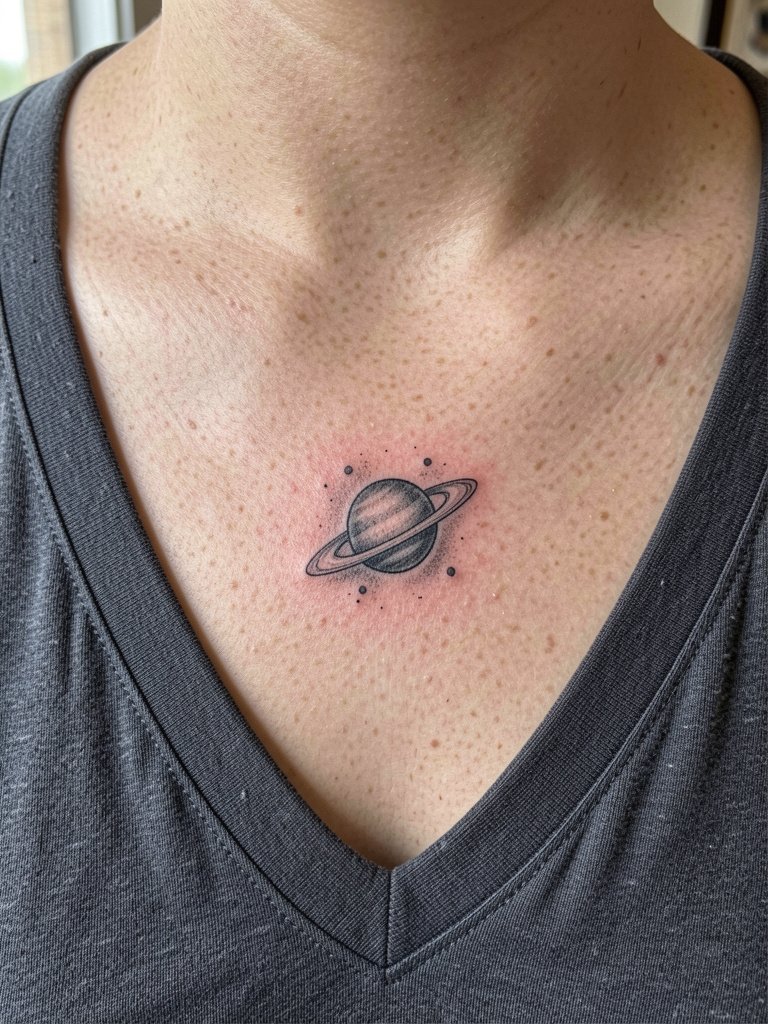
A collarbone cluster benefits from negative space so each tiny planet keeps its roundness over time. Ask the artist to space the mini-planets slightly wider than your first instinct so shading does not merge near the bone shadow. Expect a sharp look at six months and a softer contrast by two years, with touch-ups focused on tiny highlights. For showing this area off, try an open-back midi dress or scoop-neck tops that let the collarbone sit in even light. The session is short and often done seated, and the collarbone gives a crisp photographic silhouette when healed.
9. Miniature Fox Silhouette on Inner Bicep
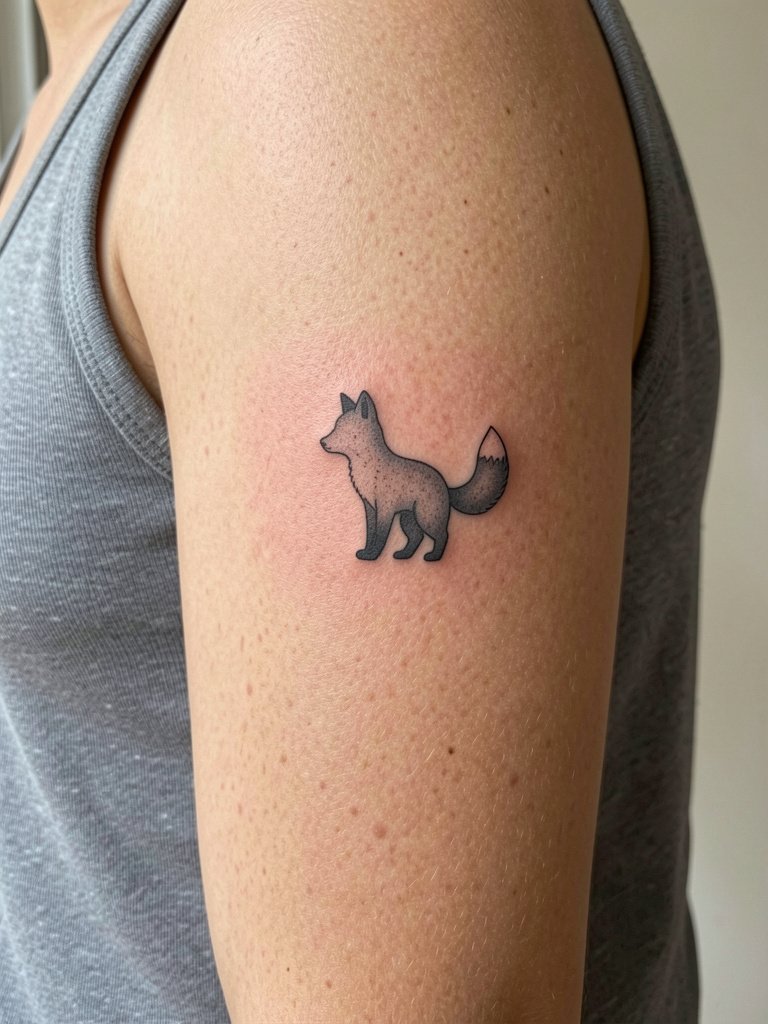
Inner bicep skin is soft and protected from sun, which helps tiny silhouettes age well if given room. If you want more longevity, have the artist thicken the outer silhouette line a hair and keep interior textures minimal. A common mistake is cramming too much interior stipple into a small silhouette, which blurs within a couple of years. The session feels more sensitive as the needle approaches the underarm side, so plan for short breaks and wear a sleeveless top for easy access. Touch-ups for this area are usually minimal at the two-year checkpoint.
10. Tiny Paper Crane on the Nape
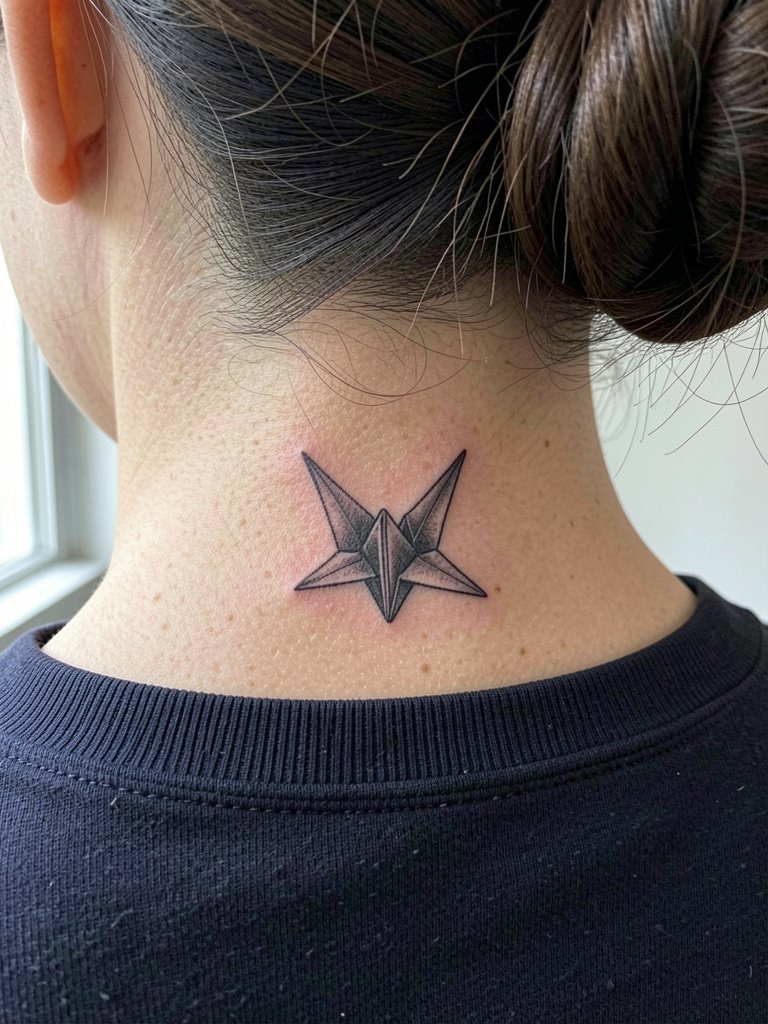
The nape is great for tiny micro realism because it avoids constant friction from clothing. Ask for a slightly bolder silhouette edge so the crane reads in photos from a distance. During the session plan for short hair clips or a loose bun to keep the area accessible without stretching the skin. For show-off styling try a simple hairpin or a low chignon that reveals the nape. Expect the piece to hold well with only minor softening after two to three years.
11. Miniature Rosebud on the Finger
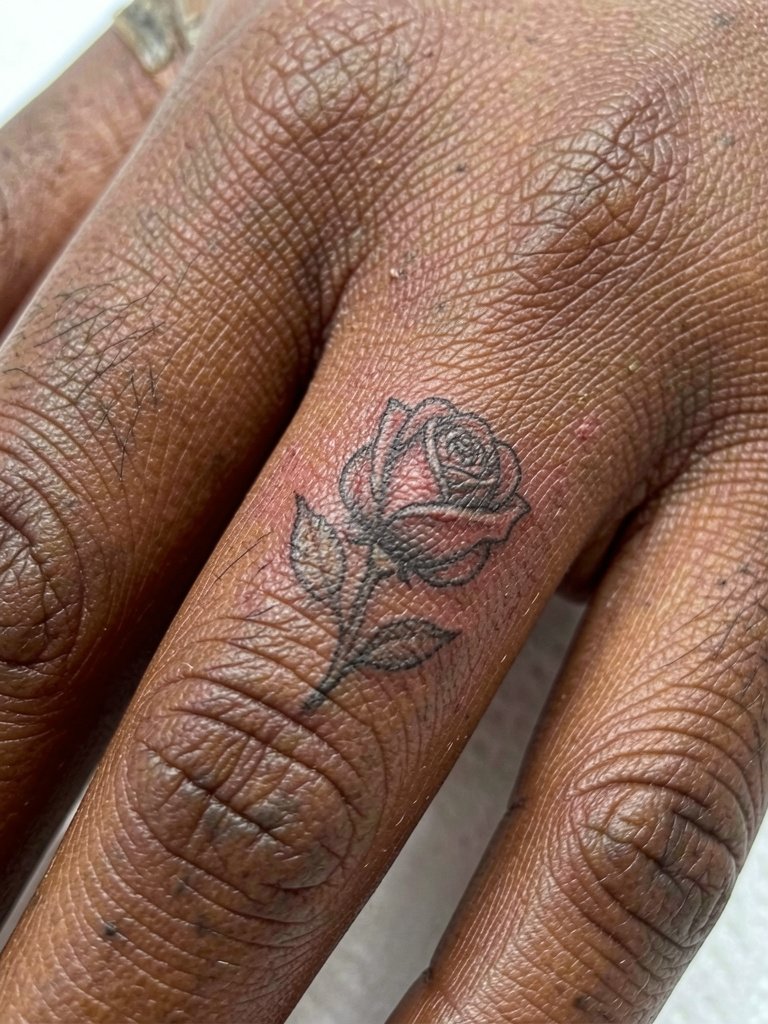
Finger micro realism draws a sharp debate among artists. One camp says the constant washing and thin skin will blur single-needle floral detail within a year. The other camp points to careful placement on the finger pad edge and deeper anchor lines as a way to keep detail crisp longer. If you accept a likely early fade, plan the design slightly larger than your initial impulse and set expectations for a touch-up at 12 months. Rings and daily exposure create friction, so choose ring styles that do not rub the tattoo directly and consider a band that sits one finger away.
12. Micro Realism Moon on the Calf
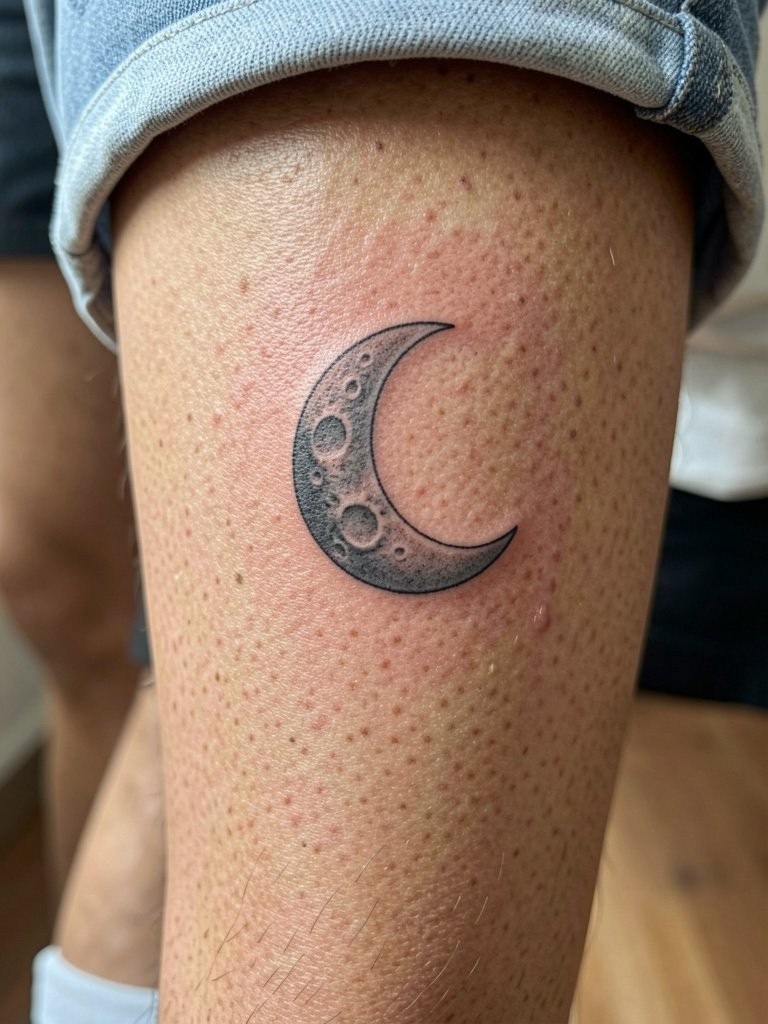
The calf is a forgiving canvas for micro realism and rarely needs early touch-ups. For a moon design ask the artist to emphasize crater contrast with pinpoint stipple and a slightly darker rim to preserve depth in low light. The session is straightforward and feels like a long, even scratching sensation rather than sharp jolts. For warm-weather show-off pair the healed moon with high socks or casual slide sandals to frame the lower leg. Expect this placement to remain legible for many years with only occasional touch-up.
13. Tiny Portrait Silhouette on the Upper Thigh
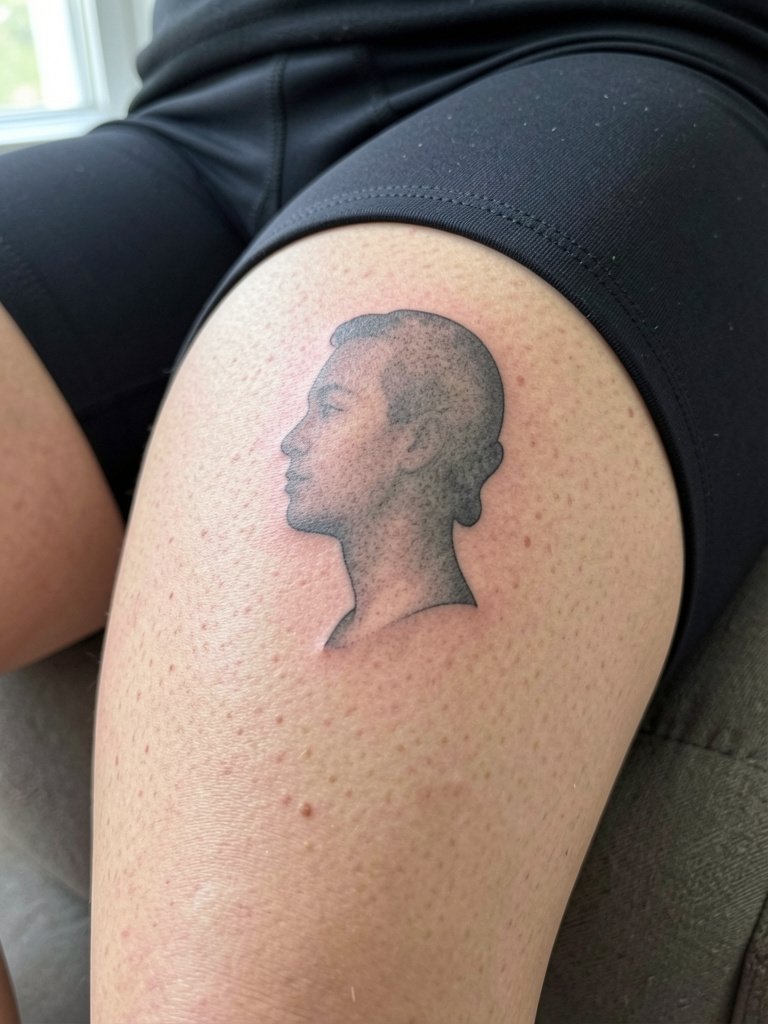
Upper thigh micro realism is intimate and benefits from an artist comfortable with sensitive placements. Professional considerations include longer appointment times and careful positioning to avoid compressing the area during shading. I advise specifying the amount of negative space you want and confirming how the piece will look when standing and seated. The thigh heals well when kept dry and out of friction from tight waistbands. Touch-ups at two years are common for the smallest highlights.
14. Miniature Compass on the Ankle Bone
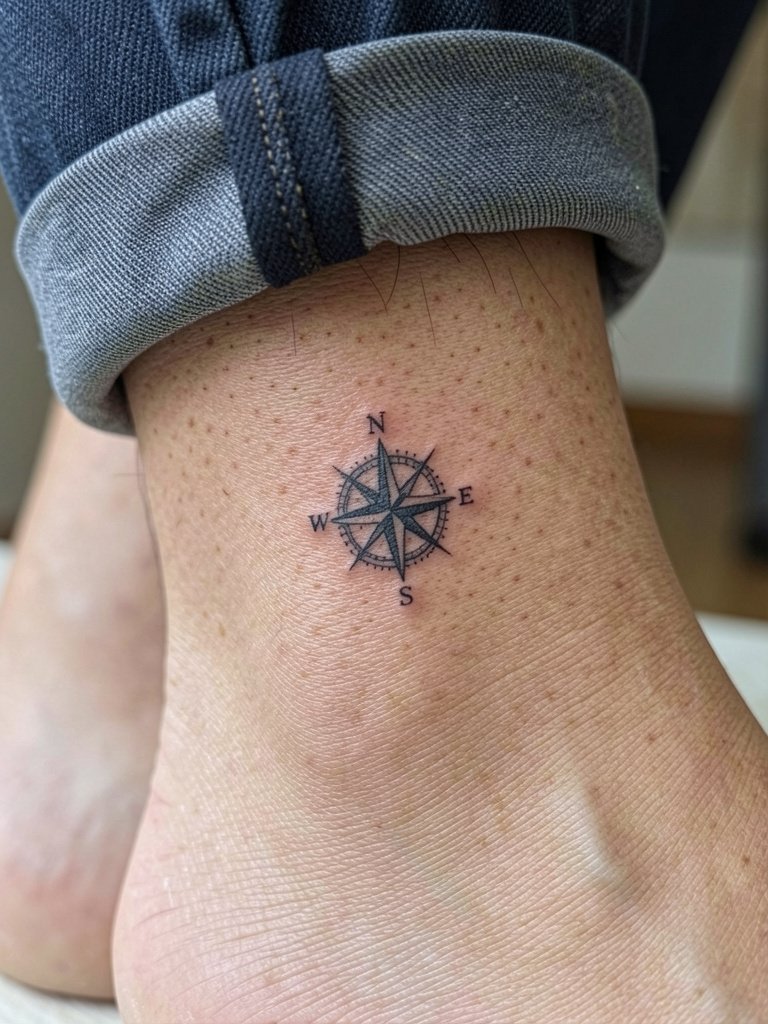
The ankle bone gives crisp edges but takes more pain on the initial passes. For a compass, request a slightly thicker needle pass for the outer ring and keep internal markings spaced to avoid merging with footwear friction. Ankle bones can soften in appearance if the outer ring is too fine. For styling pair the healed compass with delicate ankle-strap sandals or a thin anklet so the design sits in view without being rubbed by shoe seams. Expect a one-year check for light sharpening if you wear structured shoes daily.
15. Tiny Bird in Flight on the Shoulder Blade
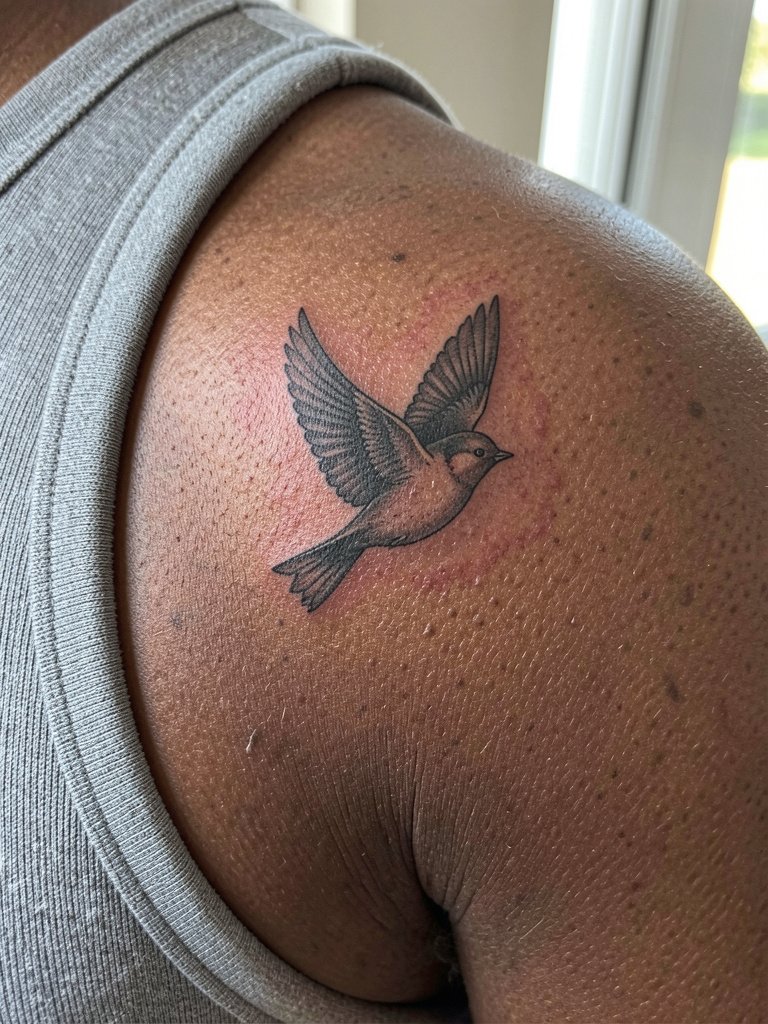
Shoulder blade micro realism benefits from slightly larger wing feather spacing to keep motion readable from a distance. The skin there is stable, so tiny texture holds well with standard saturation. During consultation specify how the bird should align with your muscle contours so it looks natural while you move. For showing it off, sleeveless tops or a strappy back dress work well and let sunlight reveal the shading. Touch-ups are rare for this spot unless you get heavy sun exposure.
Frequently Asked Questions
Q: How long do tiny micro realism tattoos typically last before a touch-up is needed?
A: Small micro realism tattoos often need a touch-up between 12 and 24 months, depending on placement and daily friction. High-wear spots like fingers and thumbs fade faster, while areas like the calf and shoulder blade usually hold longer.
Q: Are single-needle micro realism tattoos always a bad idea on ribs or fingers?
A: There is real disagreement here. One group of artists avoids single-needle on ribs and fingers because the thin skin and repeated motion can blur detail quickly. Another group says careful spacing and slightly heavier anchor lines let single-needle pieces settle well. The honest answer is that it depends on your skin type and how much maintenance you are willing to accept.
Q: What should I wear to my appointment for a sternum, rib, or thigh piece?
A: For sternum and ribs wear a fitted sports bra or crop top so the artist has clear access without exposing more than necessary. For upper thigh choose fitted bike shorts so the artist can see mid-thigh placement without moving fabric. A simple tank top often works across several placements.
Q: How can I find portfolios with healed tiny micro realism examples without naming artists?
A: Search platforms and hashtags for healed examples like #MicroRealism, #TinyTattoo, and #HealedTattooShots. Use Instagram and TikTok location filters to find nearby studios and browse subreddits that collect healed images. Inspect multiple healed photos across skin tones to judge how a style ages rather than relying on fresh photos.
Q: Do dark skin tones change how a tiny micro realism piece should be planned?
A: Yes. On deeper skin tones artists often plan slightly stronger anchor lines and focus on contrast rather than relying on pale highlights. Bring healed-photo examples on similar skin to the consult and be specific about which tiny elements you want emphasized.
Q: Will my tiny micro realism tattoo limit my clothing choices while it heals?
A: Expect to avoid tight belts, waistbands, or rubbing straps for the first week on placed areas like the ankle, ribs, or sternum. Lightweight, breathable fabrics and loose seams over the site speed healing and reduce early abrasion.
