
Tiny, scattered stars on small canvases keep showing up in saved boards, but the versions that still read crisp after years are not always the ones getting the most likes. Tiny single-needle stars can blur on high-motion skin, and compact clusters can age into one soft shape if spacing and line weight are wrong. The list that follows favors versions that last while still feeling delicate, starting with a wrist piece that proves the point.
1. Fine Line Single Star on Inner Wrist
A single-needle star on the inner wrist reads elegant at first and then depends on spacing and line weight to survive. I recommend making the line weight a touch heavier than the thinnest single-needle reference to prevent early softening. Expect light discomfort, roughly a 3 to 4 out of 10, and a quick 20-40 minute session for a single small star. The common mistake is asking for ultra-fine detail inside the star and then watching the center fill in by year two. Bring two scaled references so the artist can show how the star reads at one inch versus two. For showing this off, pair it with a delicate chain bracelet that rides just above the wrist for contrast.
2. Tiny Constellation Along the Collarbone

Collarbone constellations look ethereal, but artists split into two camps on the best approach. One group prefers extremely fine single-needle dots to keep the stars tiny and airy; they warn that the collarbone skin sometimes spreads those dots into faint smudges. The other group argues slightly stronger dot work and micro-spacing will keep each star distinct long term. If you lean toward the delicate look, plan for a possible touch-up by year three to restore pinpoints. Session time is usually 30 to 60 minutes with a moderate pain rating. For evenings out, the placement pairs well with open-back dresses that let the collarbone read as part of the outfit.
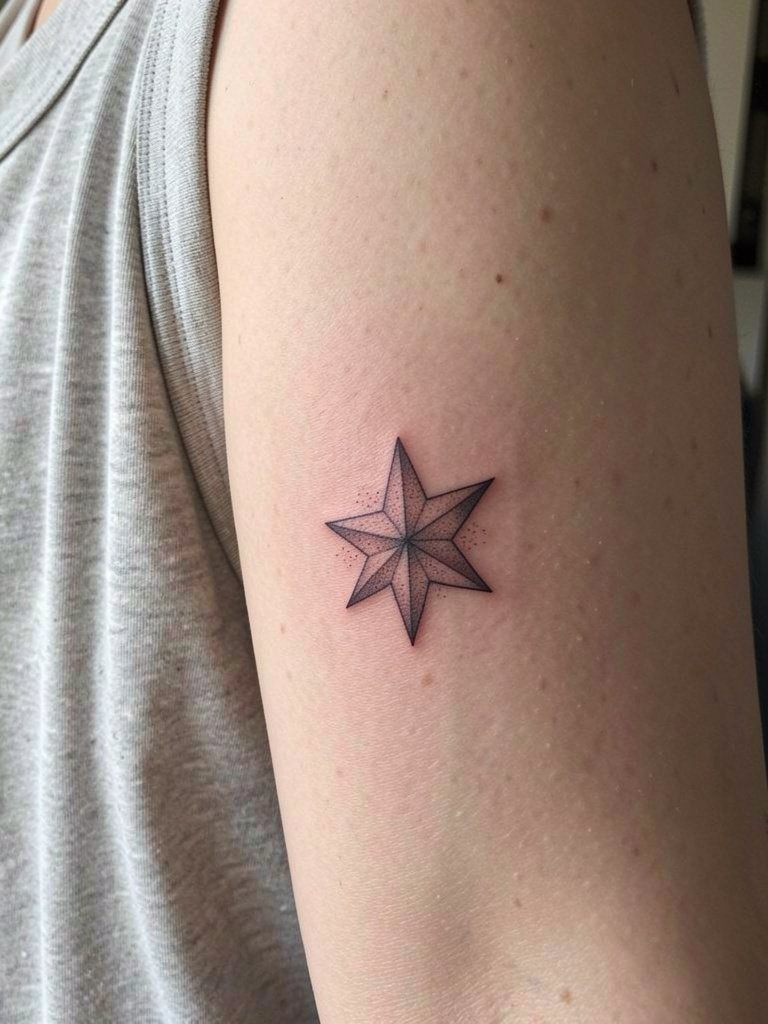
3. Mini North Star on Outer Forearm

A compact north star feels purposeful on the outer forearm. Choose a slightly bolder primary spike so the cardinal point reads from distance and the other spikes can be finer for detail. Most people want it tiny and end up with a star that loses its directionality after a couple of years. This placement tolerates touch-ups well and has low blowout risk compared with the finger or ribcage. Expect a 30 to 50 minute session and mild soreness during the first two days. For casual outfits, roll a sleeve cuff or wear linen short-sleeve shirts to frame the piece and let the shape show when you move.
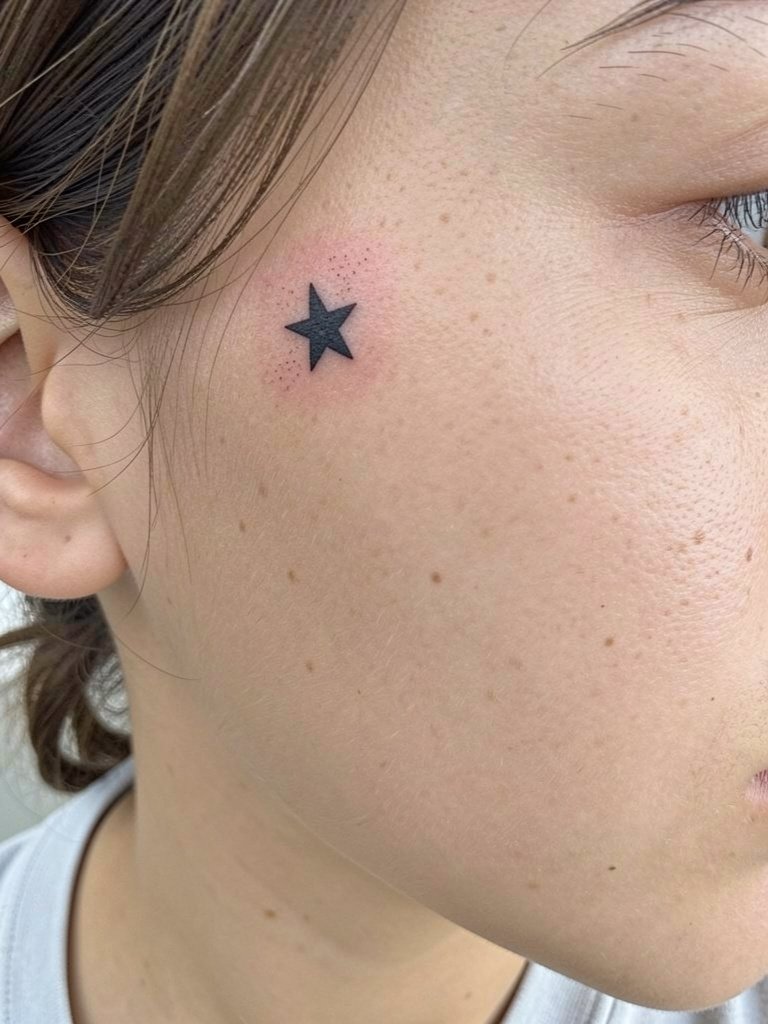
4. Dot Work Starburst Behind the Ear
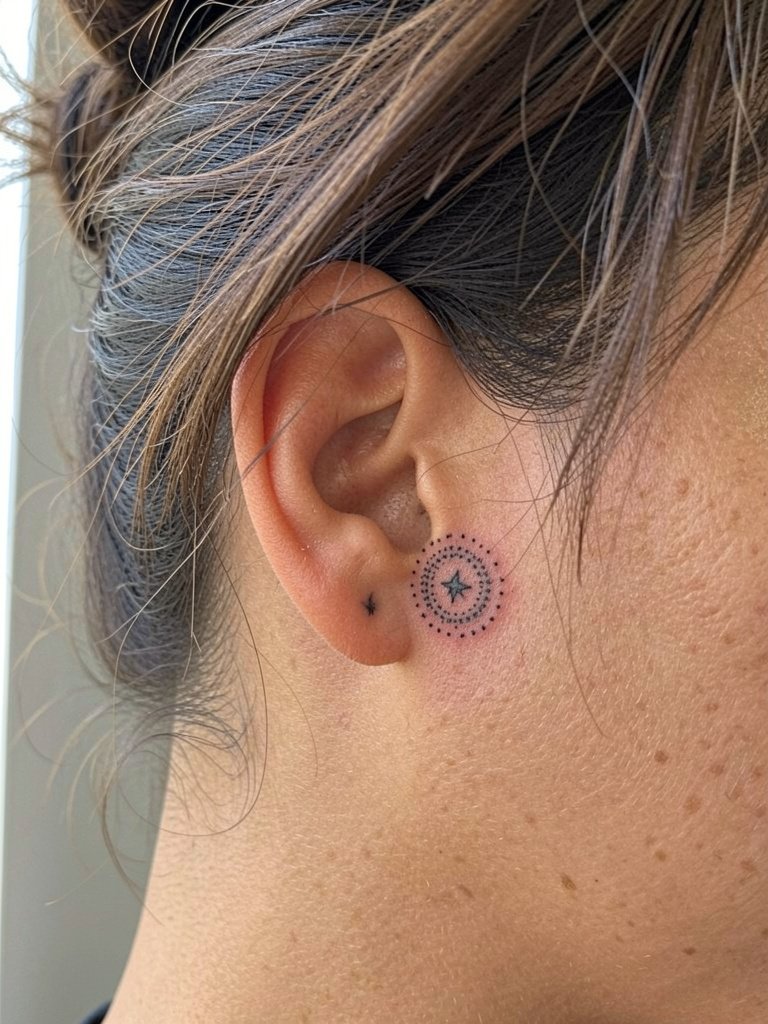
Behind-the-ear stars are discreet and age well if you avoid trying to cram too much into a tiny spot. The skin here is thin so dot work looks crisp but is prone to fading faster than forearm work. Sessions run 15 to 30 minutes and the pain is on the higher side for small placements because of proximity to bone. The common mistake is overscaling the detail. Keep the burst compact and expect a touch-up around year two if you want the dots to stay dense. For daily wear that highlights the spot, try simple studs or small hoop earrings that draw attention while letting the tattoo peek through.
5. Micro Geometric Star on the Side Rib
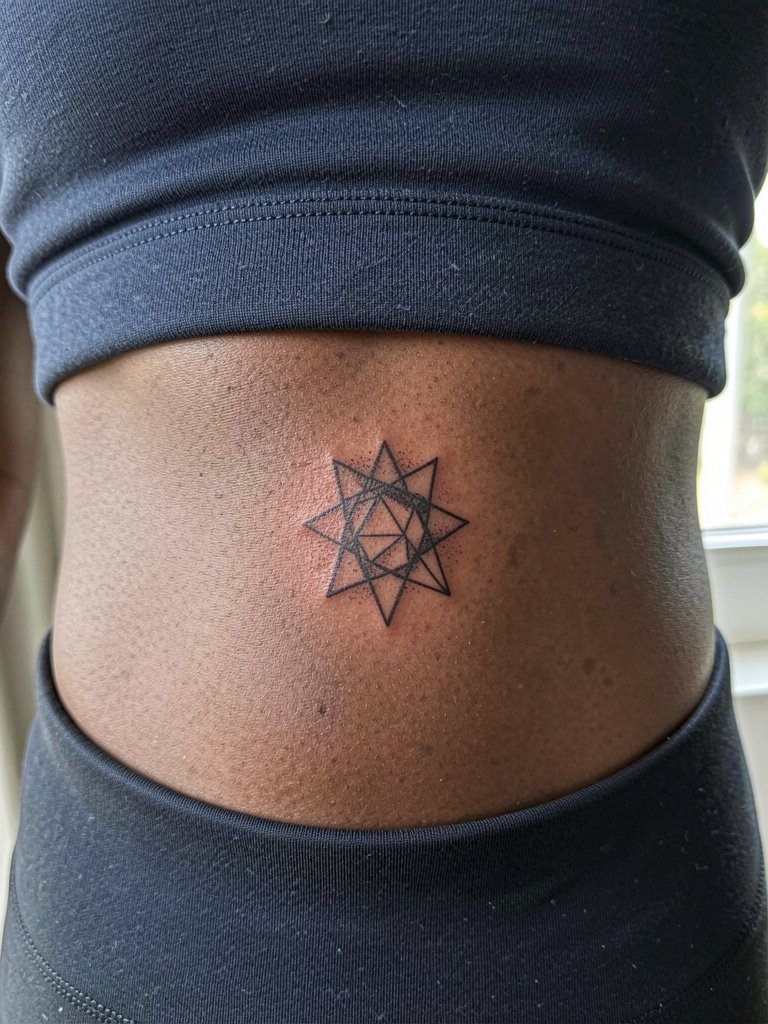
Rib placements demand careful spacing because the skin stretches and moves a lot. For a geometric star here, slightly widening the interior negative space helps the angles stay readable over time. Pain is higher, often a 7 to 8 out of 10, and session time can be 30 to 60 minutes. Artists disagree on whether single-needle holds on ribs; one camp says the movement blurs fine lines quickly. The other says properly placed slightly heavier lines with modest spacing settle well. If you pick this area, plan for longer aftercare and a likely touch-up window at 12 to 18 months. For the appointment, wear a fitted sports bra so the artist has clear access while you stay covered.
6. Tiny Filled Star on Finger Side

Finger stars have high early visibility but also high fade and blur risk from repeated washing and friction. Solid filled tiny stars often hold up better than fine line stars on fingers because saturation wins over thin contour lines. Sessions are short, 10 to 20 minutes, but expect frequent touch-ups, often yearly. The typical mistake is underestimating how often the finger sees soap and sanitizers. Protect the new ink by minimizing soaking the area in the first two weeks. For daily style, a thin leather or silicone ring can frame the tattoo and prevent direct impact during activities. For session comfort, you might bring a small, portable hand rest to steady the finger.
Session Essentials
The wrist, collarbone, and finger pieces above need different prep than larger pieces, so these five items smooth the chair time and the first week.
-
Stencil transfer paper kit. Lets you preview placement across small areas like the wrist and behind the ear so you can adjust spacing before ink hits skin.
-
Topical numbing cream. Applied 40 to 60 minutes before reduces edge pain on ribs and behind-the-ear sessions without affecting linework when used sparingly.
-
Thin protective film roll. Useful for finger and wrist pieces to shield against early friction while showering.
-
Unscented gentle body wash. Keeps healing skin clean without stripping natural oils, especially helpful for collarbone and rib areas.
-
Aquaphor healing ointment. Thin application during the first three days locks in moisture for fine work while allowing the needle channels to heal.
7. Tiny Celestial Chain on the Ankle
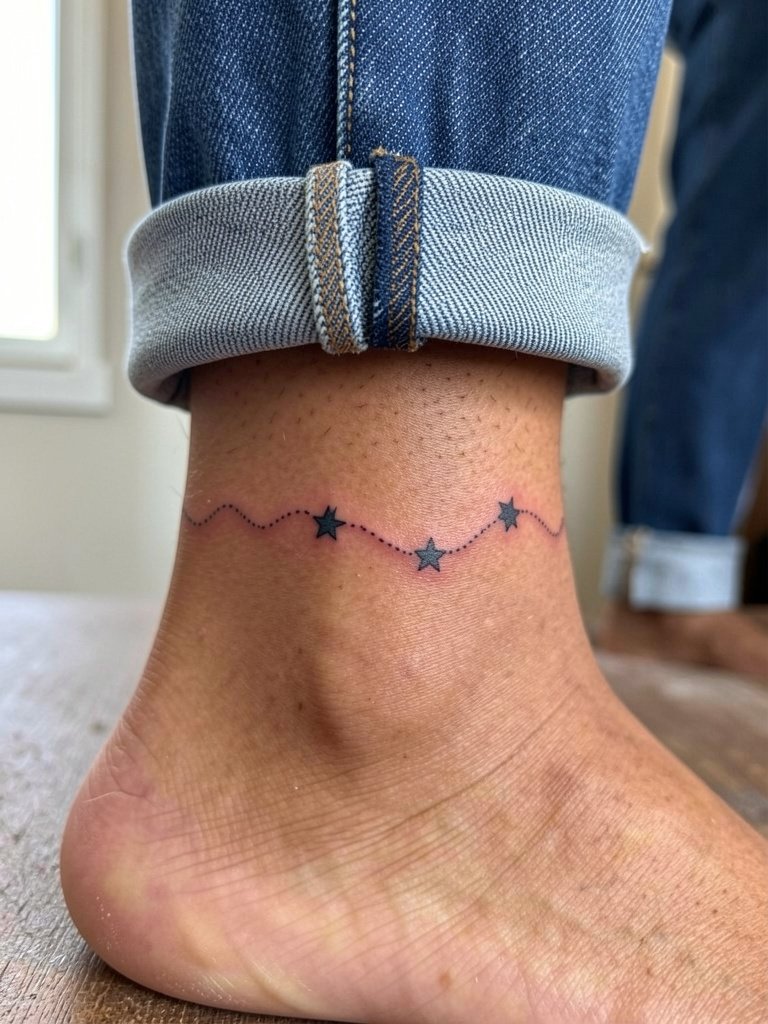
Ankle star chains read as subtle jewelry and often survive longer than expected because the skin there is relatively stable. The usual issue is placing the link dots too close; allow breathing room so the chain looks intentional after swelling subsides. Expect a 20 to 40 minute session with moderate soreness and the need to protect the area from shoe friction for the first week. People sometimes ask for micro-dots that the ankle skin then blurs together. If you want to show it off, pair the tattoo with low-top sneakers or ankle bracelets that sit below the piece so the art remains visible.
8. Blackwork Mini Star Cluster on the Nape
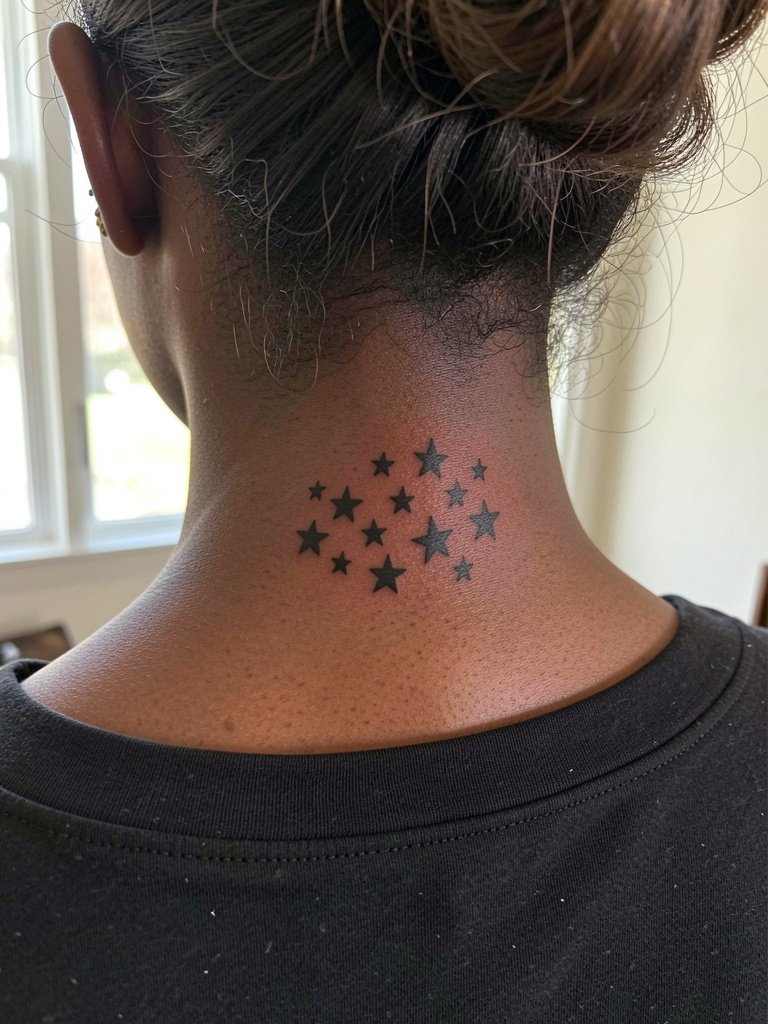
Bold black clusters at the nape age differently than fine-line counterparts. One camp of artists argues that heavy blackwork here reads best over the years because the contrast resists fading. The other camp prefers spaced, fine stars to keep the area light and airy. Both positions are valid. If you choose blackwork, expect stronger initial saturation and a single session of 30 to 50 minutes. For neck pieces, the professional consideration is hairline proximity, which may require a specialist comfortable working near the scalp. For styling, updo hairstyles and collared shirts highlight this spot, and you can use small hoops to draw the eye upward.
9. Micro Halo Star on the Thigh
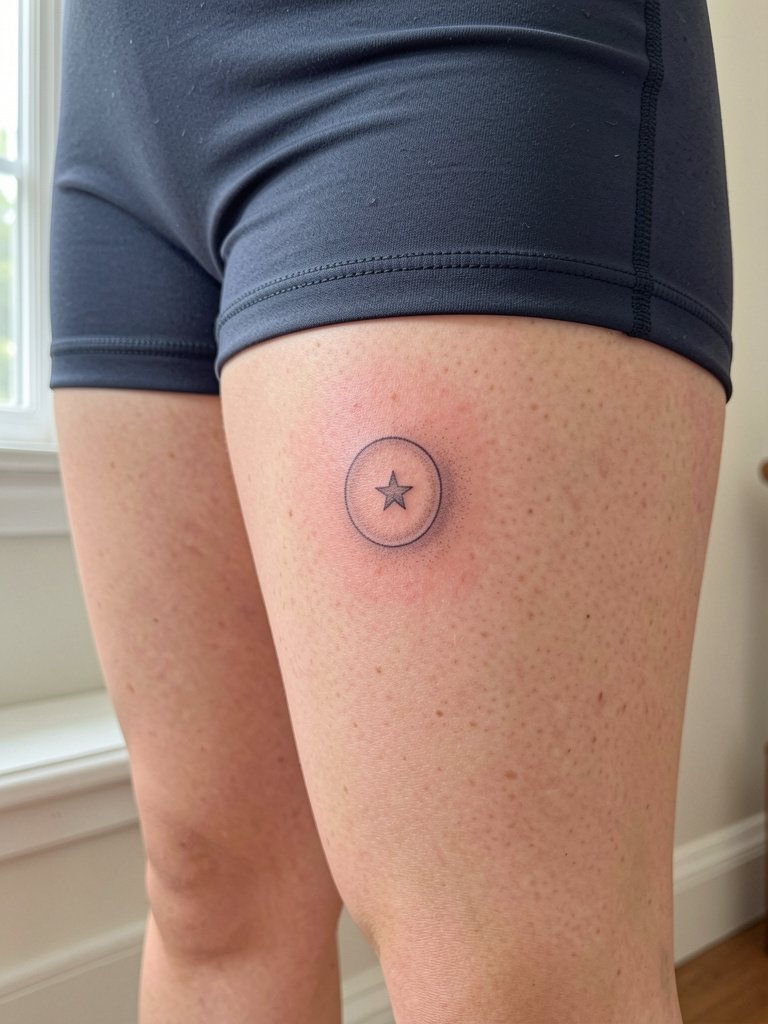
Thigh spots are forgiving for tiny stars because the skin is thick and low-motion. This halo variant benefits from a slightly wider ring so the central star does not fill in over time. Sessions are comfortable for most people and can run 30 minutes. A frequent mistake is placing the halo too close to the underwear line where friction accelerates fading. Choose mid-thigh and plan to wear modest shorts to appointments to avoid fabric rubbing the fresh ink. For evening looks, this placement pairs nicely with a slightly sheer skirt or slip that lets the piece peek through.
10. Single Tiny Star at the Collar of the Sternum

Sternum stars need a careful consultation because skin tension and proximity to breast tissue affect how lines settle. Pain can be high around the bone, and session time is around 20 to 40 minutes depending on shading. Avoid trying to cram extra detail. The usual mistake is underestimating how breathing and movement change the stencil during the session. For the appointment, wear a fitted bandeau or sports bra so the artist has access without exposing more than needed. For show-off styling, open-neck or low-cut tops reveal this placement while staying tasteful.
11. Mini Shooting Star on the Shoulder Blade
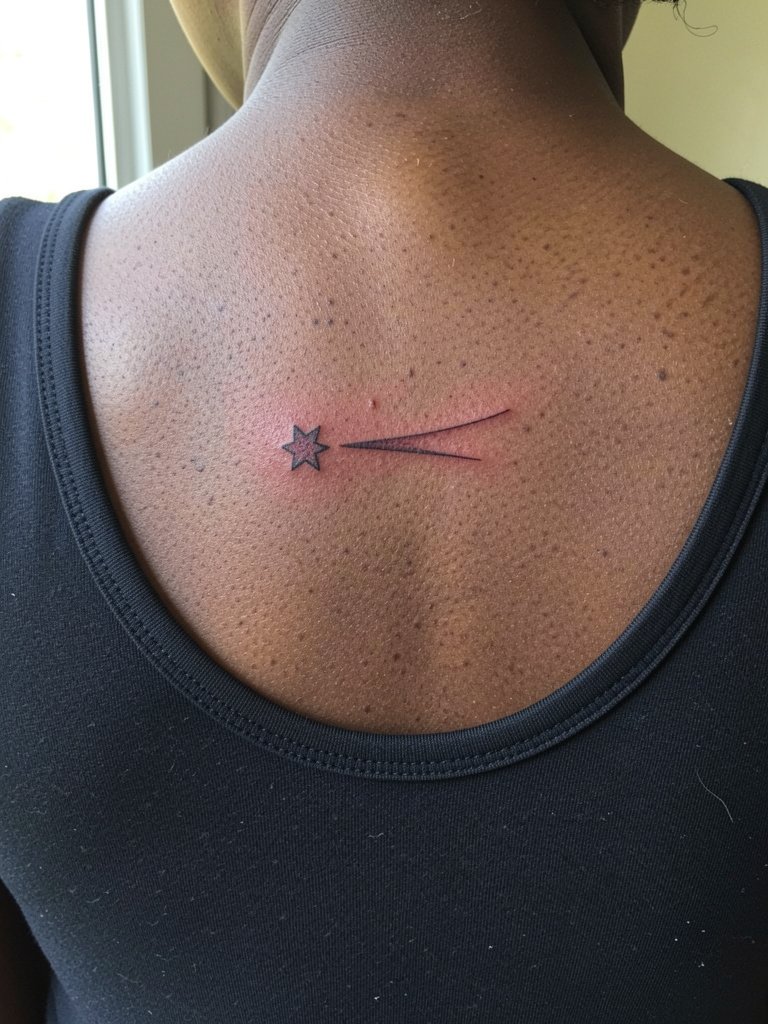
Shoulder blade shooting stars have low blowout risk and age cleanly because the area moves predictably. The recommended tweak is a slightly stronger tail with stipple fill to keep motion readable after a few years. Sessions are low to moderate in discomfort and usually take 20 to 35 minutes. A common mistake is centering the design too close to the spine; shifting it laterally improves visibility in clothing and reduces stretch risk. For warm months, this placement pairs with racerback tanks that frame the star and show off the tail movement. Consider light touch-ups at year three if you want the tail to retain sharp contrast.
12. Tiny Star Outline on the Calf

Calf outlines benefit from medium line weight so the outline does not feather over years. The calf is forgiving and suits elongated designs, but the mistake is making the outline too thin when you want it visible under socks or during workouts. Sessions are quick and discomfort is low. If you plan to run or cycle often, expect slightly brighter initial fading because of friction from compression gear. For gym days and streetwear, pair the calf star with mid-calf socks or rolled joggers to highlight the placement.
13. Tiny Cluster with Negative Space on the Chest Center
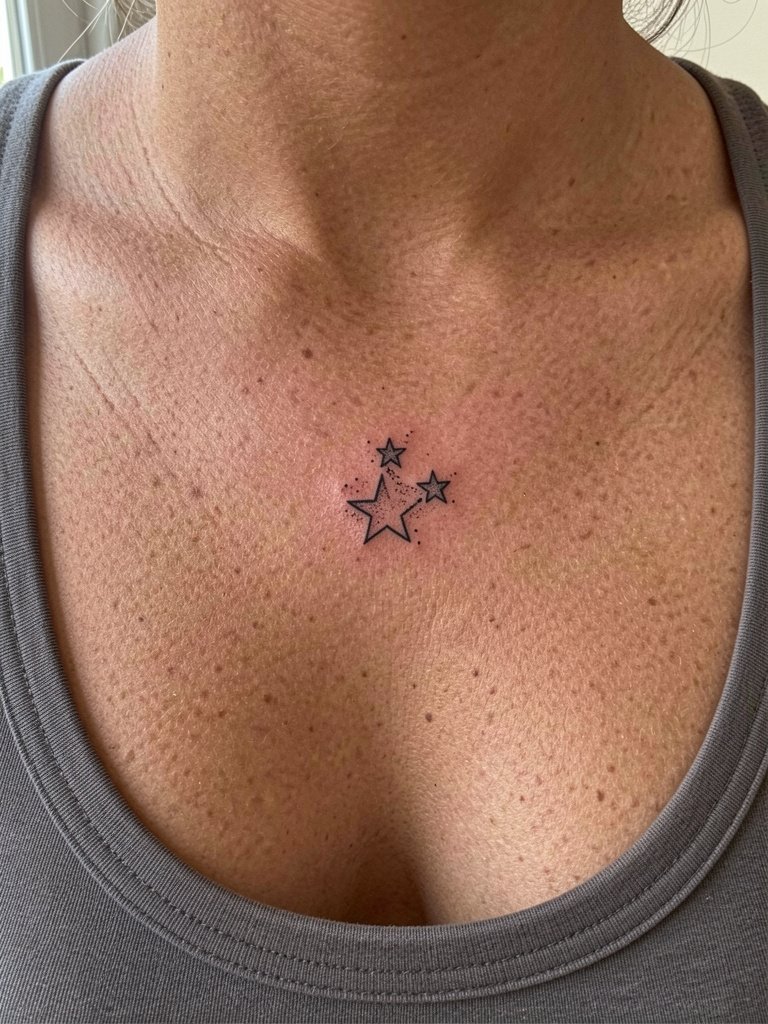
Center-chest clusters read as a small statement when you respect spacing. The trick is using negative space to separate stars rather than relying on tiny dots that can blur. Expect a 30 to 45 minute session and moderate pain for people with lower chest padding. A common error is compressing the cluster for fear of it being too visible. Let each star breathe and the composition will remain readable. Styling pairs well with wide-neck tops and a simple pendant that sits below the cluster so the eye flows naturally.
14. Micro Stipple Star on the Hip Bone

Hip bone stipple gives a soft, tattooed freckle effect that stays surprisingly clear because the area sees less repetitive motion than hands or fingers. The key is density control. Too sparse and it fades into a bruise; too dense and it reads heavy. Session time is usually 20 to 35 minutes and pain is variable. Avoid placing it right at the waistband where chafing accelerates fading. For nights out try low-rise jeans or a cropped tee that frames the spot while keeping the tattoo above the waistline.
15. Tiny Star Accent at the Temple
Temple accents are bold choices for minimal marks. The skin here is thin and close to bone, so expect sharp initial pain and crisp healed edges. The common mistake is placing the star too close to the hairline where hair growth obscures it. Session time is 10 to 25 minutes. Keep in mind some workplaces have conservative policies on visible face-area tattoos, so consider placement accordingly. For showing off in a subtle way, try swept-back hair or a thin headband that frames the temple without covering the star.
Frequently Asked Questions
Q: How do small star tattoos age on different skin tones?
A: I have seen tiny stars hold up across the spectrum when line weight and spacing are adjusted for skin texture. Lighter skin can show crisp single-needle dots longer, while medium and darker tones often benefit from a touch more saturation so the star keeps contrast. Ask for healed photos on similar skin tones during consultation to set realistic expectations.
Q: Which tiny star placements need the most touch-ups?
A: Fingers, hands, and the very inner wrist typically need touch-ups more often because of washing, friction, and frequent sun exposure. Collarbone and thigh pieces usually hold their shape longer. Plan realistic touch-up windows: finger work may require yearly refresh, while forearm and calf work often goes several years before a little top-up.
Q: How should I prep clothing for session comfort based on placement?
A: Wear clothes that give your artist clear access without forcing a lot of fabric movement. For ribs or sternum bring a fitted sports bra. For outer thigh wear bike shorts that expose the mid-thigh. For collarbone and chest pick a scoop neck. A helpful item is a loose drawstring linen pant for thigh appointments because you can roll the pant leg up without discomfort.
Q: Are there consensus places to find healed small-star portfolios and inspiration online?
A: Search platform-specific tags and filters rather than individual artists. Try hashtags like #SmallStarTattoo, #TinyStarInk, and #MicroStarTattoo on Instagram and TikTok, and use Reddit tattoo threads to find healed shots across skin tones. Filter results by "healed" or date ranges when possible to see longer-term outcomes.
Q: Do I need a specialist for face, neck, or sternum tiny star pieces?
A: Yes. Face, neck, and sternum placements require an artist experienced with thin skin and sensitive placement. They will plan spacing, depth, and the exact needle approach. Expect a slightly higher cost for specialists and a careful conversation about how the piece might shift with body changes.
Q: What are realistic pain and session times for these small star ideas?
A: Most tiny stars are short sessions from 10 to 60 minutes depending on placement and detail. Pain ranges widely. Fingers and ribs are on the higher end. Outer forearm, calf, and thigh are usually low to moderate. Bring snacks, dress for access, and plan a calm travel route post-session to avoid jostling new ink.
