
Someone I know booked a fine line cat portrait for their wrist, waited months, and then watched the lines ghost away in photos. Fading, artist no-shows, and placement surprises are the three things that keep people up before their first pet portrait. Read the list below for styles that work well for beginners, what to ask your artist, and the practical trade offs that decide whether a design still looks sharp after a year.
1. Fine line single cat portrait on the wrist
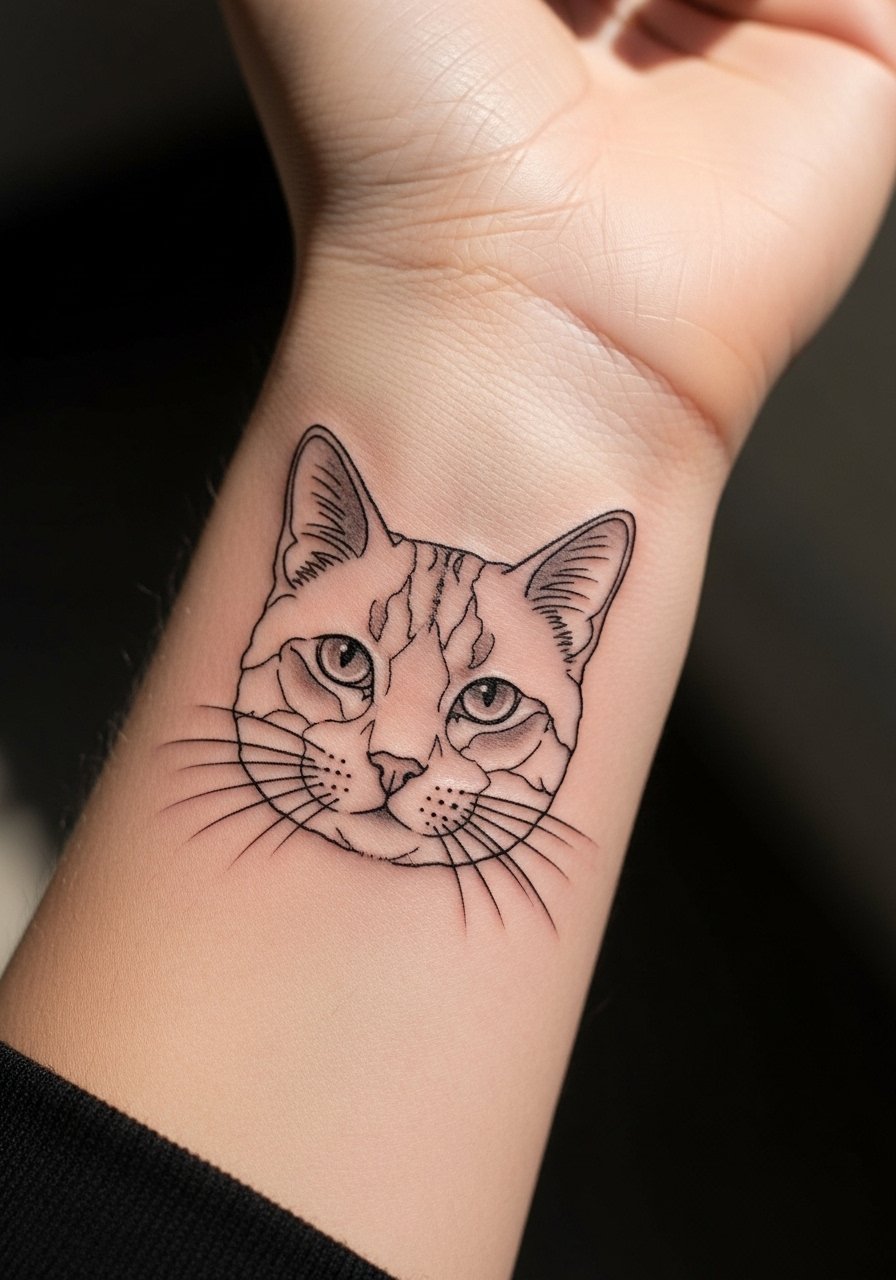
Someone I know first saw this on a friend's wrist and booked it right away. Fine line captures an exact likeness in a subtle way and the wrist reads small in everyday life. Fair warning, fine line fans and bold line purists are split on longevity. One camp says fine line fades faster and needs touch-ups sooner. The other camp points to needle depth and spacing and says a good artist can make it last. For a first-timer, bring 10 reference photos and ask the artist to draw the stencil slightly bolder than a single hair-thin line. Expect low pain, one short session, and a likely touch-up at six to twelve months if you like crisp detail.
2. Micro-realism cat face on the forearm
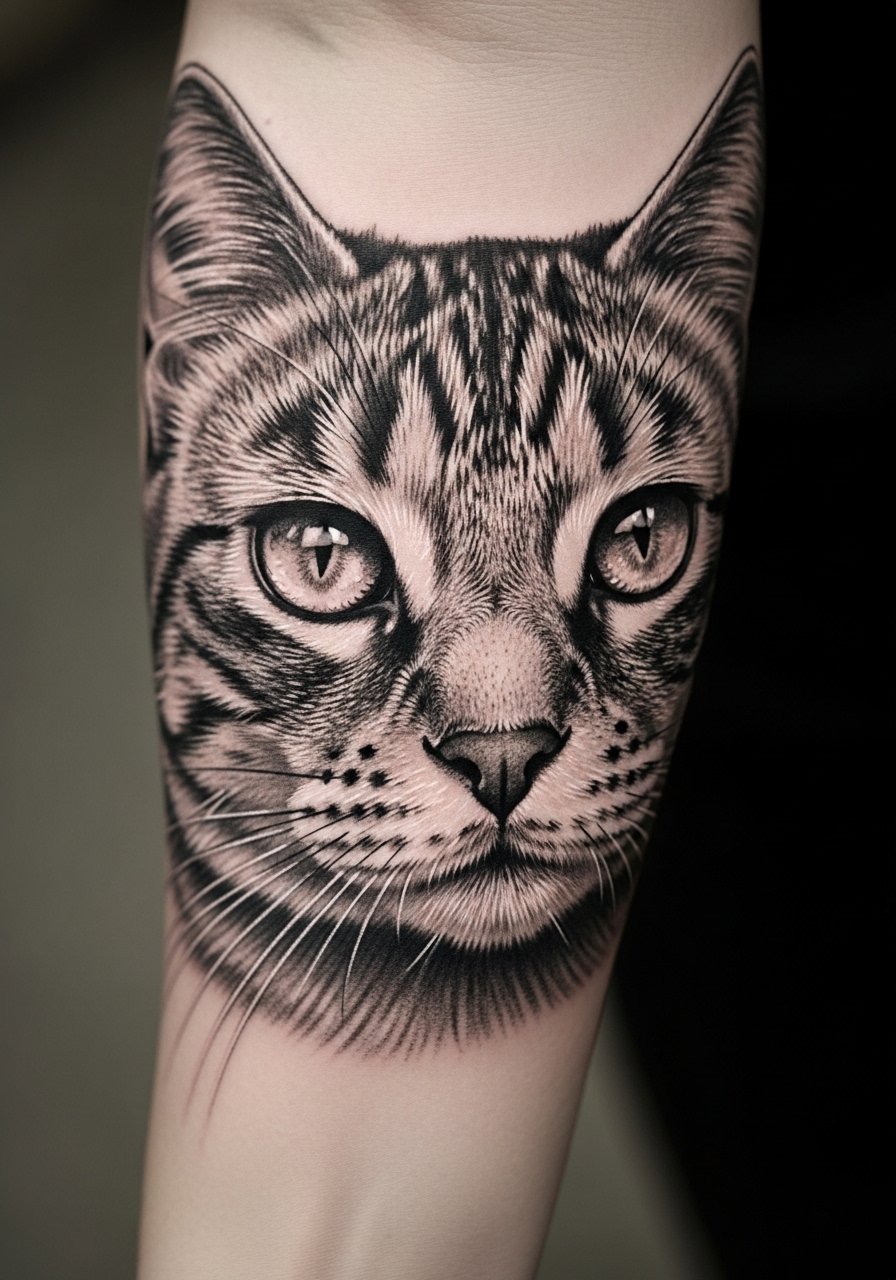
When you want the stare to be unmistakable, micro-realism is the move. Tell your artist which feature matters most, eyes or whisker curl, and ask them to center that in the stencil. This style takes longer than fine line and usually needs two short sessions. Expect moderate pain on the forearm and plan for a careful dry-healing window if you have oily skin. A common mistake is asking for the image too small; the eyes need room or the detail collapses. Healed at six months this reads sharp. At two years you may need a touch-up on shading unless saturation was prioritized.
3. Neo-traditional cartoon cat with seasonal flowers, upper arm

There is a playful energy to neo-traditional cats that also photographs well for memorial pieces that want color. Bring seasonal flower photos if you want cherry blossoms or autumn leaves. Upper arm allows 2-3 inch sizing so the colors keep saturation longer than tiny ankle pieces. The session feels comfortable for most first-timers and usually takes two sessions for clean color blocking. Avoid watercolor-only fills here unless you accept that colors may feather and require refreshes later. Ask the artist to lock in linework first so the colors sit inside a sturdy frame.
4. Blackwork geometric cat silhouette on the thigh

Blackwork is one of the safest bets for darker skin tones and for people who want low-maintenance longevity. The thigh is forgiving for size and less affected by everyday sun exposure. This is usually one session and relatively low pain. Tell your artist you want solid saturation rather than thin hatching, because thin fills can patch out on darker tones. The common mistake is shrinking the design too much. Larger solid fields keep their visual weight for years and resist blur better than a crowded tiny silhouette.
5. Watercolor cat portrait splash on the ribcage

Fair warning about ribs, they rank higher on pain charts. People pick the ribcage for the breathing-effect that can make fur read alive when you inhale. That same placement also adds movement that can soften fine detail. Watercolor looks painterly fresh but tends to fade faster than micro-realism. If you want the rib breath illusion, ask for a bold outline tie-in or small dark accents in the eyes so the portrait keeps a focal point as colors age. Schedule two sessions and expect careful sun avoidance for the first month.
6. Minimalist cat ear outline behind the ear or on the finger

Minimalist options are ideal for first-timers who want low commitment. The behind-ear spot is discreet and quick. The finger is more exposed and will blur faster because the skin moves and sheds. A common error is choosing the finger without realizing touch-ups will be more frequent. This is a one-session, low-time investment piece. If you want an office-friendly option that still hides a portrait, ask about disguising the line into an abstract pattern that only reads as a cat up close.
7. Traditional American cat head with banner on the calf
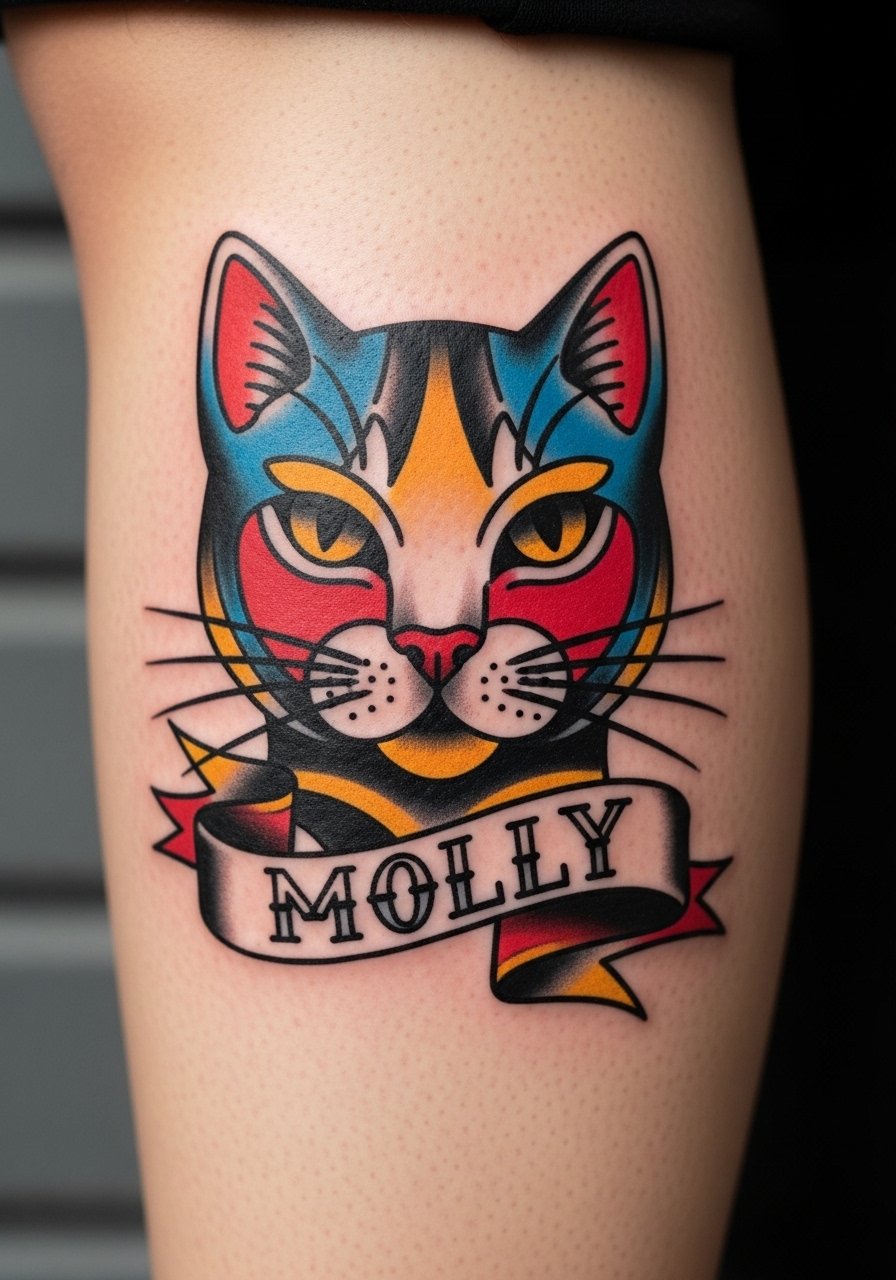
Traditional work is classic and holds up because of bold linework and solid saturation. The calf gives enough real estate for a full 4-5 inch design and a readable banner with a pet name. Bring the exact name text you want to the consult so the stencil shows spacing. Sessions typically run longer for color packing and may require two appointments. The biggest mistake is asking for tiny lettering inside a small banner. Make the letters at least medium-weight so they read from a few feet away.
8. Dotwork cat mandala portrait on the shoulder blade

Dotwork gives texture and meditative depth but it is time-intensive. The shoulder blade is a great canvas for 4-6 inches of stipple shading without too much distortion from body changes. Prepare for multiple sessions and expect a moderate pain level when the needle revisits the same area. A common mistake is compressing the mandala elements into too small a space. Ask your artist to map the dot density at the consult so the central portrait keeps contrast and the mandala reads from a distance.
9. Ignorant style chubby cat face on the inner bicep

This is the humorous option that ages surprisingly well through weight changes. The inner bicep is a comfortable place for one or two sessions and often feels moderate on a pain scale. The ignorant style trades fine detail for bold shapes, which means fewer touch-ups and a design that still reads after a year. The common mistake is asking for too much micro detail in an ignorant layout. Ask for clean, thick shapes and keep eyes and mouth as the focal point.
10. Ornamental cat with runes across the back

Large ornamental projects are for people ready to commit to multiple sessions. The back offers scale and room for blackwork elements and runic motifs that echo fantasy lore. Note the cultural origin when using runes or mandala elements. Some people prefer modified motifs rather than direct replicas out of respect for the source. Plan for four or more sessions and ask your artist about spacing so that the ornamentation frames rather than overwhelms the portrait.
Tattoo Prep and Aftercare Essentials
Find artists and healed examples through tag searches like #cattattoo and #finelinetattoo on Instagram, by filtering "realism pet" on the Tattoodo app, or by searching Booksy for guest spots in your city. I have spent time in five shops across Brooklyn and have noticed that asking to see healed photos on similar skin tones is the best way to judge results. For first-timers, consider booking one hour longer than your estimate so the artist can adjust the stencil if needed.
Shopping list (7-10 items). Replace YOURTAG with the affiliate tag in each link.
Healing and aftercare essentials
Frida Matte Paste. Reddit users praise its matte finish on blackwork cats so photos show less shine. Use sparingly after the initial peel, especially on dense black fills.
Ink-Illusions Balm. Recommended for dry winter heals on watercolor and color pieces since it absorbs faster than greasier balms.
Australian Tea Tree Salve. A forum favorite for anti-itch relief on dotwork portraits, especially when you want a natural option.
Indie Sugarcane Butter. Small-batch breathable balm many guest-spot collectors use on ribcage pieces.
Japanese Hada Labo Lotion. Light hydrating lotion that photographers and some artists recommend for fine line heals on oily or Asian skin tones.
Second Skin occlusive bandage. The one mainstream product here. Use it carefully for fine line portraits and remove after 3-5 days to avoid maceration.
Fragrance-free gentle foaming cleanser. Use for gentle wash cycles days 1-14. Avoid antibacterial soaps that leave residue.
Medical-grade occlusive bandage, 6-inch roll. Useful for travel days or extra protection when humidity spikes.
Every tattoo is different. Always follow your artist's specific aftercare instructions. Consult a dermatologist if you have skin concerns or unusual healing issues.
Frequently Asked Questions
Q: Will a fine line wrist portrait fade faster on darker skin tones?
A: From what I've gathered and what people in community threads report, thin fine lines do tend to lose contrast faster on darker tones. A blackwork outline or slightly heavier line weight will keep the portrait readable longer. Ask to see healed examples on a similar skin tone before booking.
Q: Do watercolor-style cat tattoos need different aftercare than traditional ones?
A: Yes. Watercolor pieces often rely on soft color transitions, so you need to avoid heavy ointments that can cause pigment migration during the peel phase. Lighter balms like Ink-Illusions absorb faster and pair well with careful sun avoidance. If you use an occlusive bandage, follow timing guidance closely.
Q: How do I find a micro-realism artist who posts healed photos, not just fresh work?
A: Search #cattattoo and #petrealism on Instagram and filter recent posts, or use Tattoodo with the "realism pet" tag. Reddit threads asking for local recommendations are also useful. Request healed shots spanning six months to two years and look for the same artist showing the same pose across time.
Q: If my artist cancels a guest spot, what are reasonable next steps?
A: Book through platforms that protect deposits when possible, and keep screenshots of booking terms. If you must reschedule, try to find a local artist who accepts the same stencil with credit to the original artist. It helps to have flexible timing and a backup shop in another city.
Q: Does ribcage placement really give a breathing fur illusion, and is it worth the pain?
A: Many people choose the ribcage exactly for that soft movement. The effect is real when the design follows natural muscle motion, but ribs are higher on the pain scale. If you want the breathing illusion but want less pain, ask about a collarbone or upper chest placement that still moves with breath.
Q: How often do micro-realism and realism cat portraits need touch-ups?
A: From conversations in forums, many realism pieces require a touch-up within one to two years depending on sun exposure and skin type. Budgeting for a touch-up at six to twelve months is a sensible plan, especially for fine shading around the eyes and whiskers.
