
The forearm is deceptively fussy when you want real 3D depth. Tiny single-needle pieces that look incredible the day you get inked often soften into smudged grey at year two. Choosing slightly bolder contrast, planned negative space, and a placement that respects the forearm's stretch zones keeps the illusion of volume longer. Below the hero image is a compact set of designs to show your artist and specific stencil notes to lock in before the first pass.
1. Micro-Realism Rose on Inner Forearm
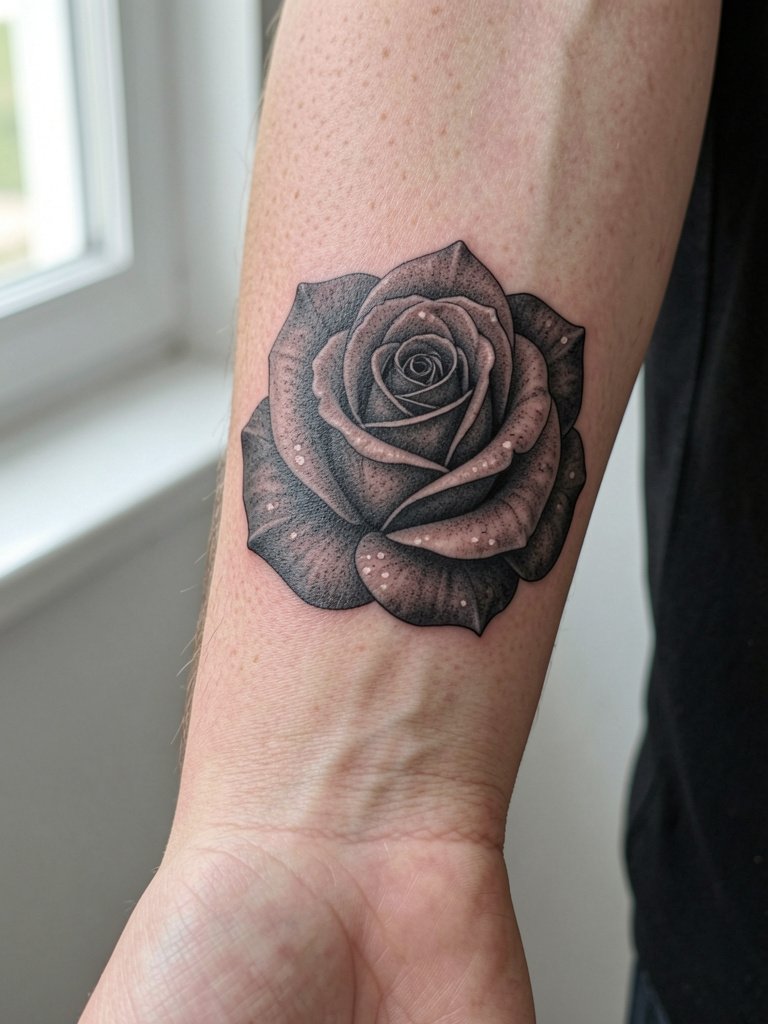
A micro-realism rose reads very three-dimensional when the shadow placement follows the forearm curve. I recommend a slightly wider petal separation than typical micro work so the darker shadows do not bleed together over time. Tell the artist you want visible negative space around each petal and stipple shading rather than a continuous gradient, that keeps contrast on the palm-up surface where skin stretches more. Common mistake: requesting ultra-tiny petals and then wondering why the center fogs at year one. Session time is often 1.5 to 2 hours. For showing it off, roll up a linen button-down in cream or olive and pair with a dainty gold bracelet, the neutral palette keeps the rose readable linen button down shirt women.
2. Cubist Geometric Block on Outer Forearm
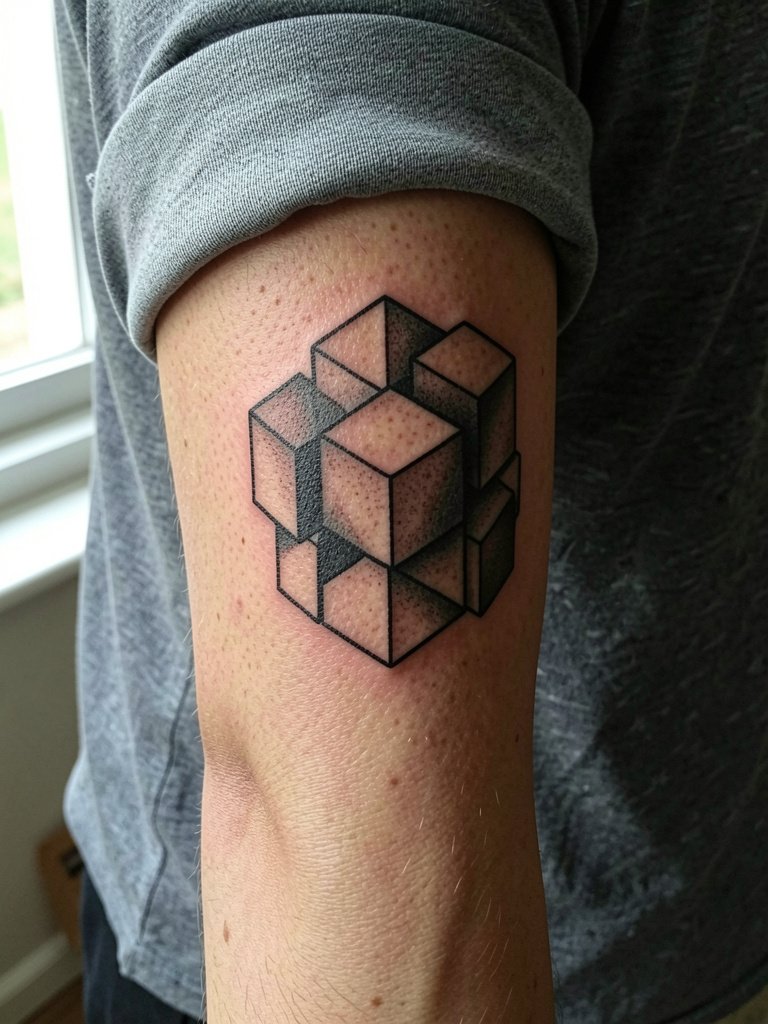
Sharp geometric facets read well on the outer forearm because the surface is lower-stretch and holds crisp edges. Ask for a mix of solid fills and negative-space facets so the eye reads depth even when parts soften. A common aging issue is over-detailing small faces; avoid packing in tiny facets under 6 mm wide. This piece usually runs 1 to 2 sessions depending on how many filled planes you want. For an urban look, wear a charcoal henley with the sleeves rolled and a minimalist matte watch that echoes the design lines charcoal henley men.
3. Ethereal Vines on Inner Forearm
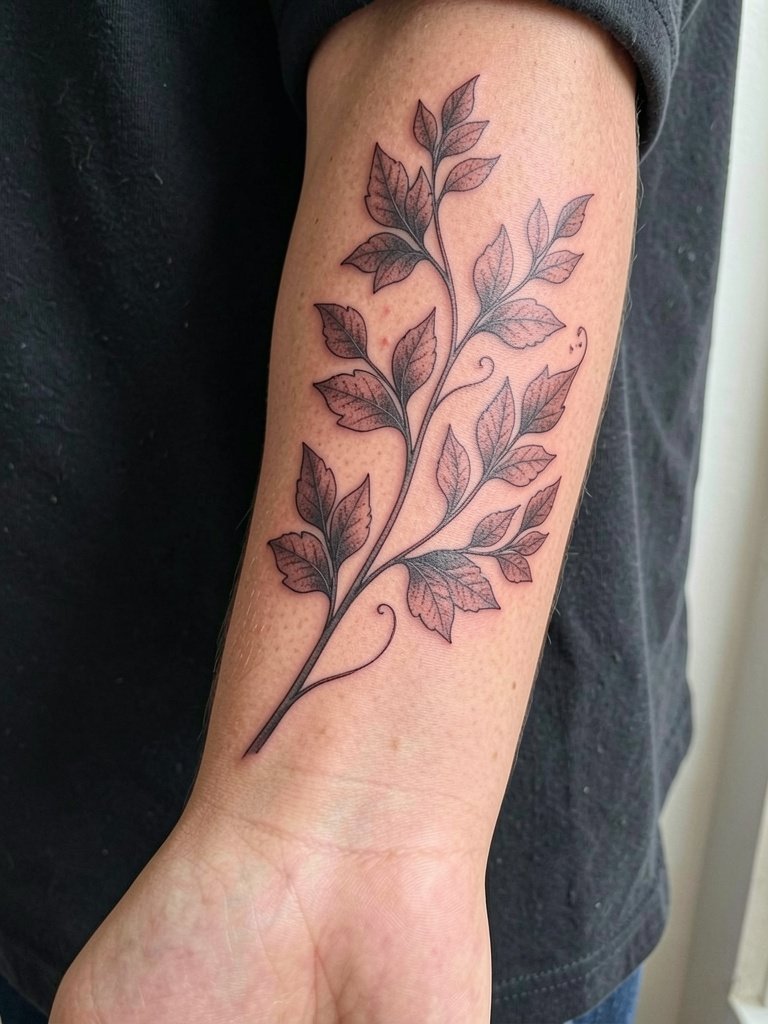
Vines that follow the forearm's natural curve feel like they grow with movement instead of against it. Request soft stipple shading between leaf layers and ask for slightly thicker separation at the stem junctions so the negative space holds over time. The inner forearm stretches more, so avoid single-needle leaf veins that can disappear by year two. Plan for two sessions if you want wrapped vines that cross over each other. For photos, roll sleeves on a cream linen shirt and pair the look with a dainty gold stacked bracelet set to keep attention on the flow dainty gold stacked bracelet set.
4. Water Droplets Near the Wrist
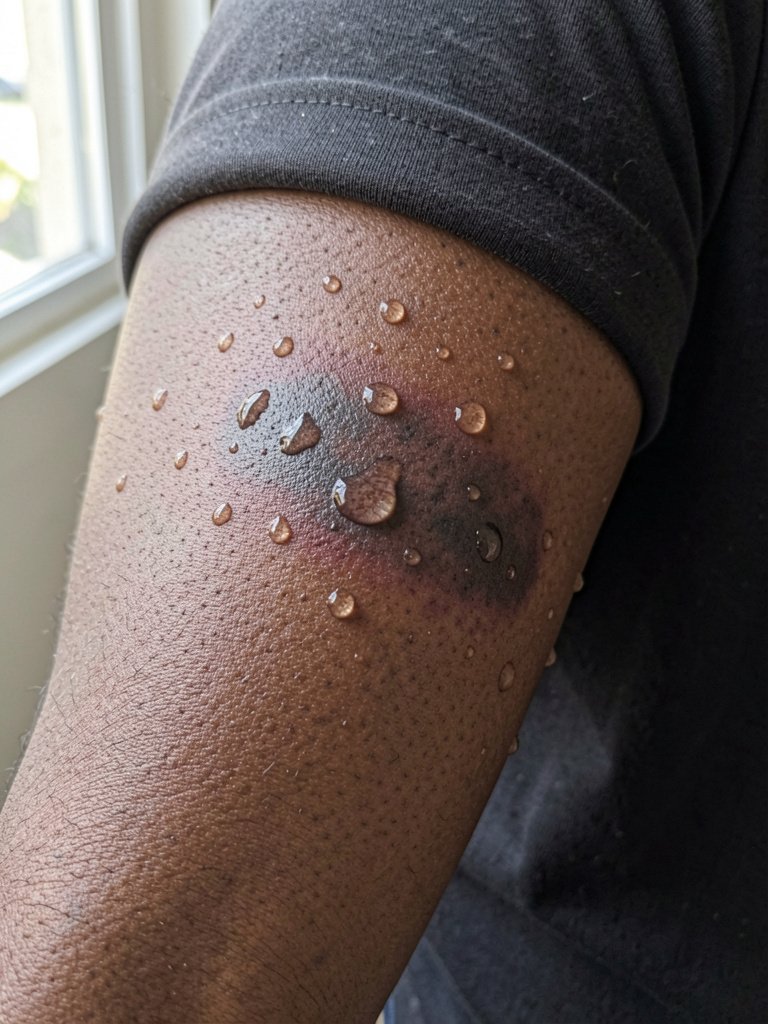
Water drop illusions live or die on highlights and crisp shadow anchors. On darker skin tones ask for bold shadow stippling rather than very soft gray gradients so the droplet still reads as raised. A mistake is requesting too many tiny drops close together; they can merge into a patch of gray. These are quick 45 to 90 minute sessions when scaled small. For showing the wrist off, avoid chunky watches on the tattoo side and instead wear a minimalist watch on the opposite wrist and thin chain bracelets on the other thin chain bracelet set.
5. AR-Ready Minimalist Mark on Outer Forearm
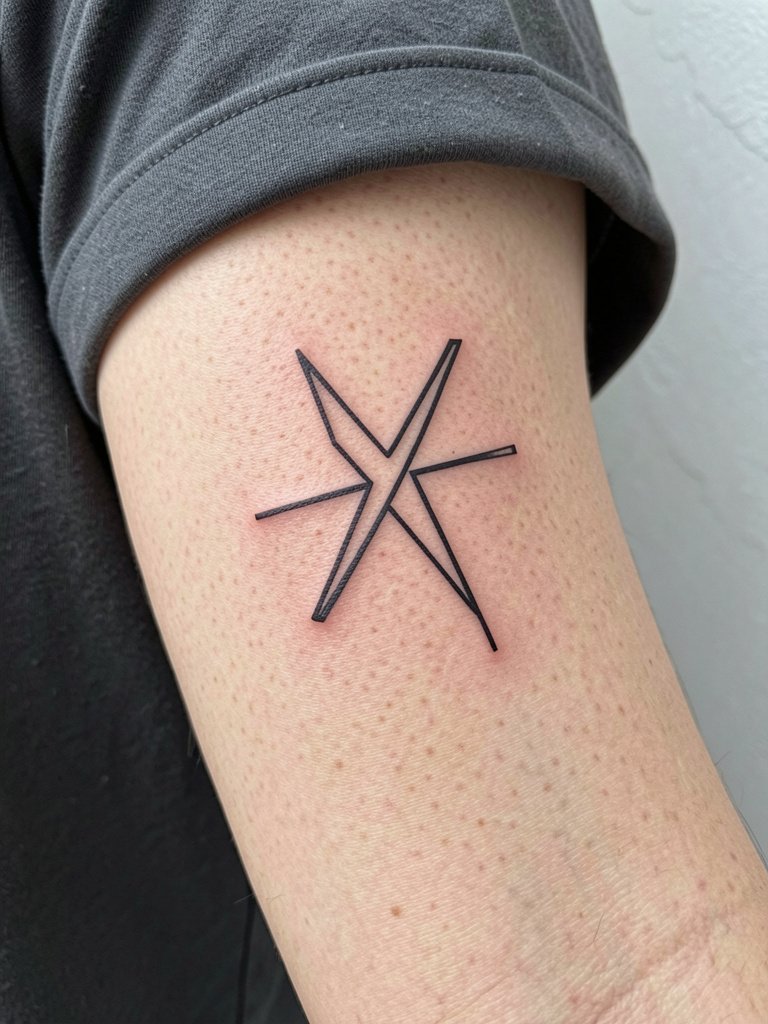
Augmented reality tattoos need simple, high-contrast anchors so the app can register the design. Bring the exact image file and ask the artist to center two high-contrast points in the stencil for easier app calibration. Too much fine detail defeats the AR trigger. This is typically a single session under two hours for the linework. For a tech-forward presentation, pair it with a matte black phone case and a charcoal henley to echo the digital aesthetic matte black phone case.
6. Snake Wrapping the Outer Forearm
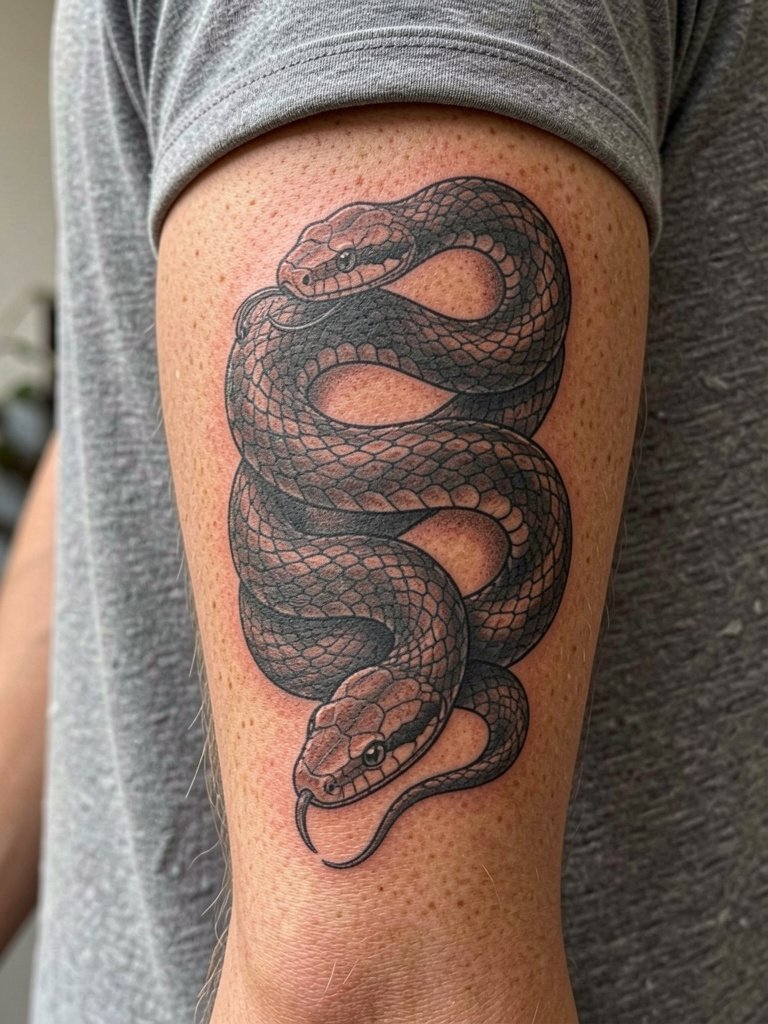
A coiling snake benefits from strong cast shadows and scale texture to sell the wrap. Ask the artist to map the coils to the forearm's natural musculature so the head and tail read from multiple angles. Common error: a snake drawn as a flat band with no shadowing, which loses the 3D effect as the body settles. Expect 2 to 3 hours for a mid-sized wrap. Show-off tip: a solid black or navy tee with rolled sleeves frames the snake, keeping focus on the wrap rather than busy patterns solid navy tee.
Pack Smart
These first six designs cover wrist-to-elbow placements that face different friction and stretch patterns, so a few session and healing tools make a big difference.
- Bepanthen Tattoo. A thin, less-greasy ointment that some people use in the first 48 hours to avoid clogged pores on highly shaded micro-realism pieces.
- Tattoo Goo. Plant-based balm that many owners say keeps saturation visible without producing an overly shiny surface on healed black-and-gray work.
- After Inked Moisturizer. Lightweight lotion that does not reflect light off fresh shading, handy for photos of 3D feather or rose pieces during week two.
- C-Tattoo Balm. Thin Australian-style balm used by some artists on large shaded zones to prevent heat trapping on dense blackwork.
- Saniderm Second Skin. A protective film option that reduces early friction, which can help preserve fine contrast on the first five days for wrist and inner-forearm tattoos.
7. Cracked Skull with Layered Depth
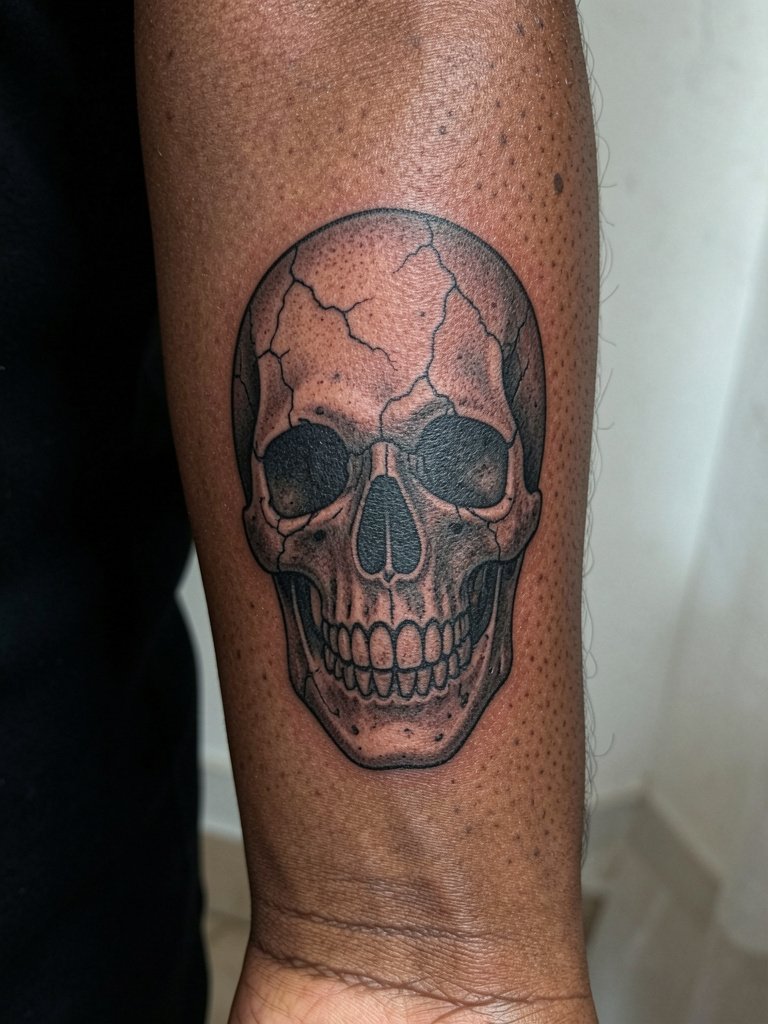
A cracked skull gets its 3D punch from carved-in shadow lines and deep hollow shading. Ask for separated fracture lines with a thin band of negative skin tone between fractures so they do not merge later. The inner forearm's motion risks softening fine cracks, so request bolder fracture gaps near high-movement areas. Typical session time is one to two hours for a medium composition. For an edgy pairing, wear a vintage black tee with rolled sleeves so the skull reads clearly against a dark background vintage black tee men.
8. Butterfly Mid-Flight on Inner Forearm
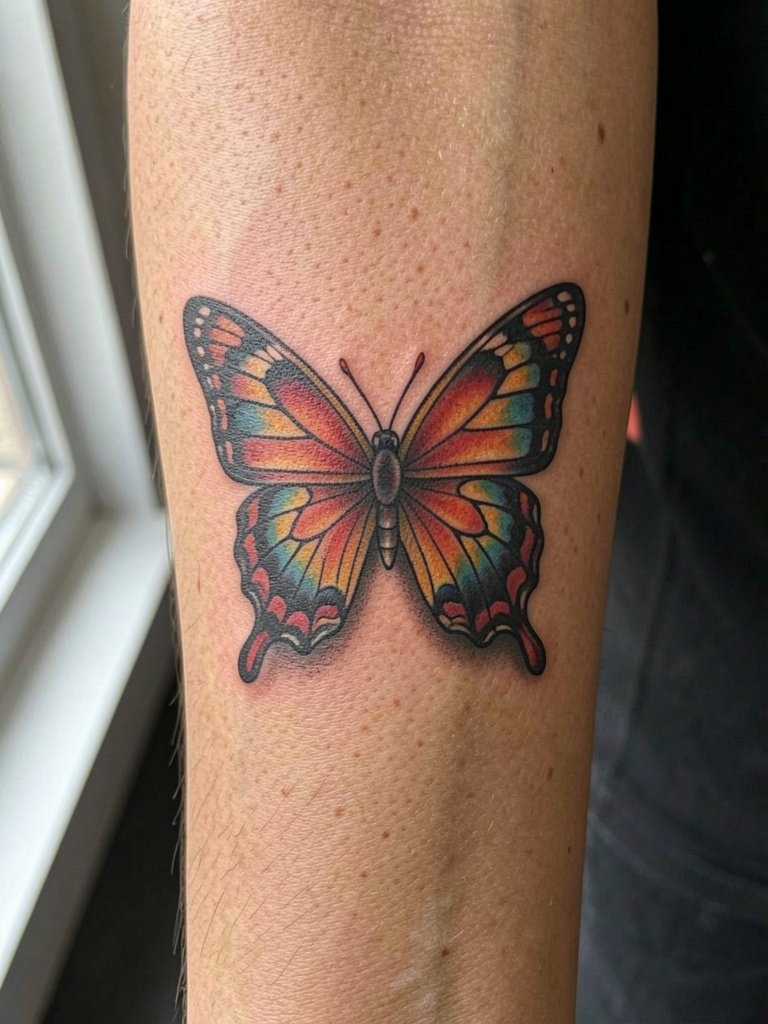
A mid-flight butterfly needs clear wing separation and a consistent cast shadow to sell the lift. On darker skin tones favor saturated spots and strong outlines rather than pale gradient fills. Many people ask for ultra-fine wing veins that vanish; insist on visible primary veins that will hold for years. This is usually one session under two hours. Session wear: loose short sleeves so the artist can access the entire forearm without cuff pressure.
9. Architectural Mini Buildings Across the Outer Forearm
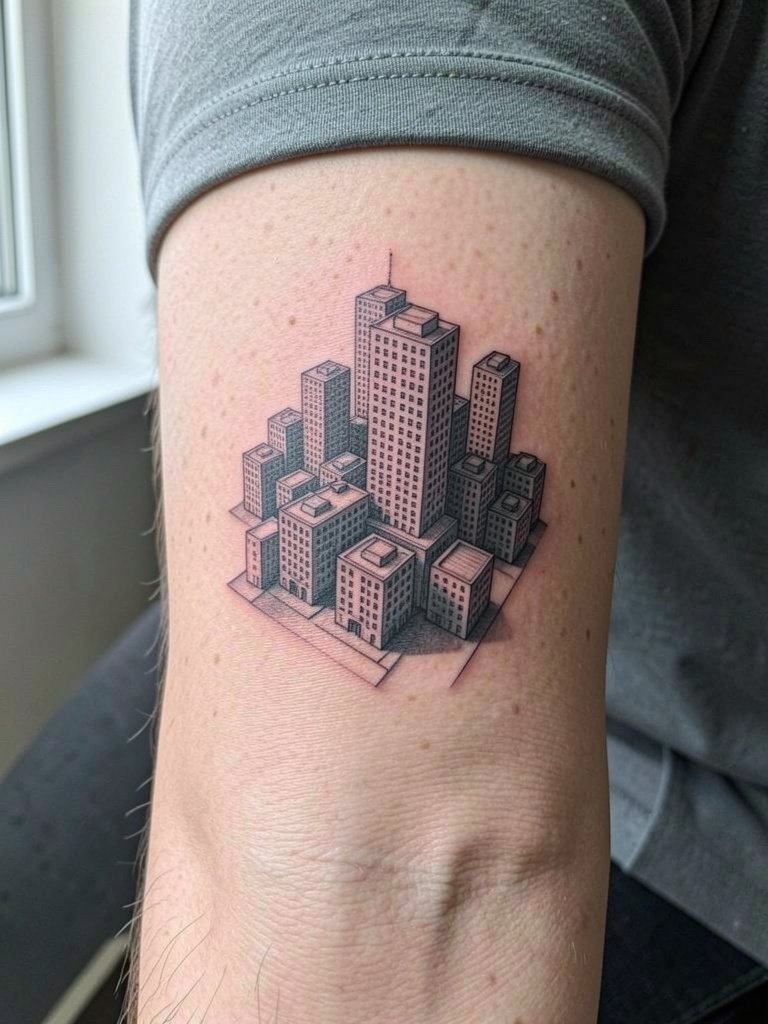
Miniature architectural scenes work best with deliberate spacing between structures so perspective lines do not blur together. Ask the artist to enlarge key windows and shadow blocks so the depth remains legible at arm distance. A common mistake is over-detailing tiny facades which become a textured gray pocket after healing. Expect two sessions for a row of buildings with layered shading. Pair this with a minimalist watch and a rolled sleeve henley to complement the urban feel minimalist watch men.
10. Flame Rising from the Wrist
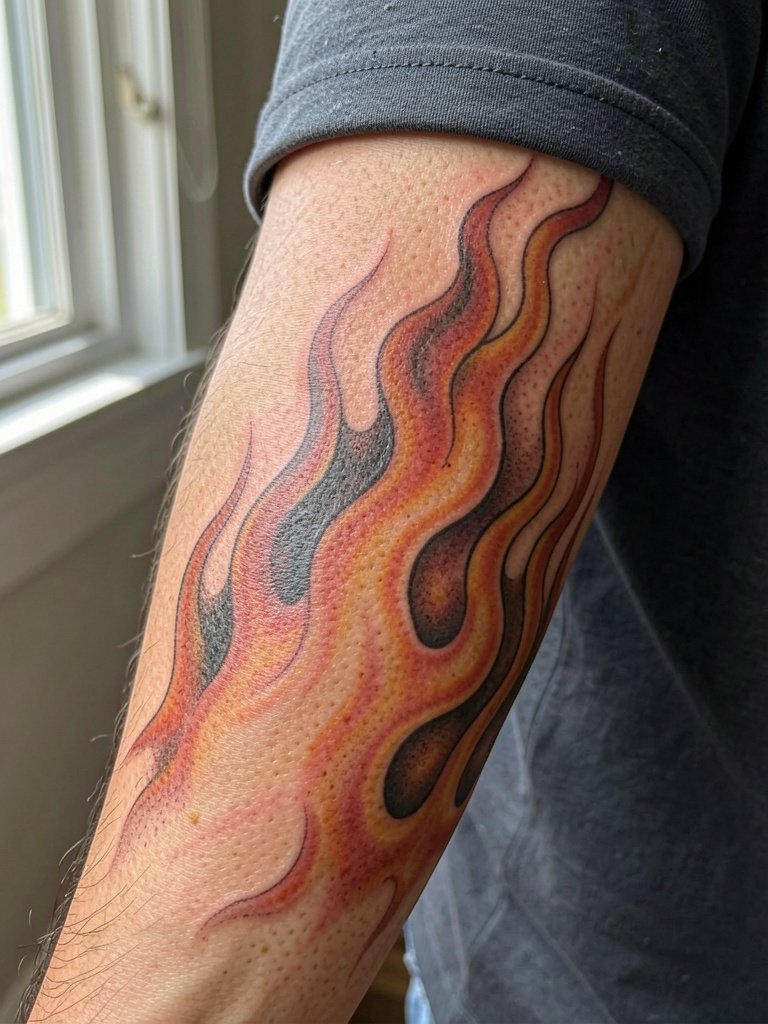
Motion pieces like flames need directional shading and crisp contrast where the flame meets bare skin. For longevity avoid very fine flicker lines in the hottest zones. Color fades faster than black, so request a saturated core and plan a touch-up window around year two to keep pop. Sessions vary from two to three hours for a long flame with color blends. Wear a solid-color tee for nights out to let the flame be the visual anchor.
11. Winged Heart with Volume on Inner Forearm
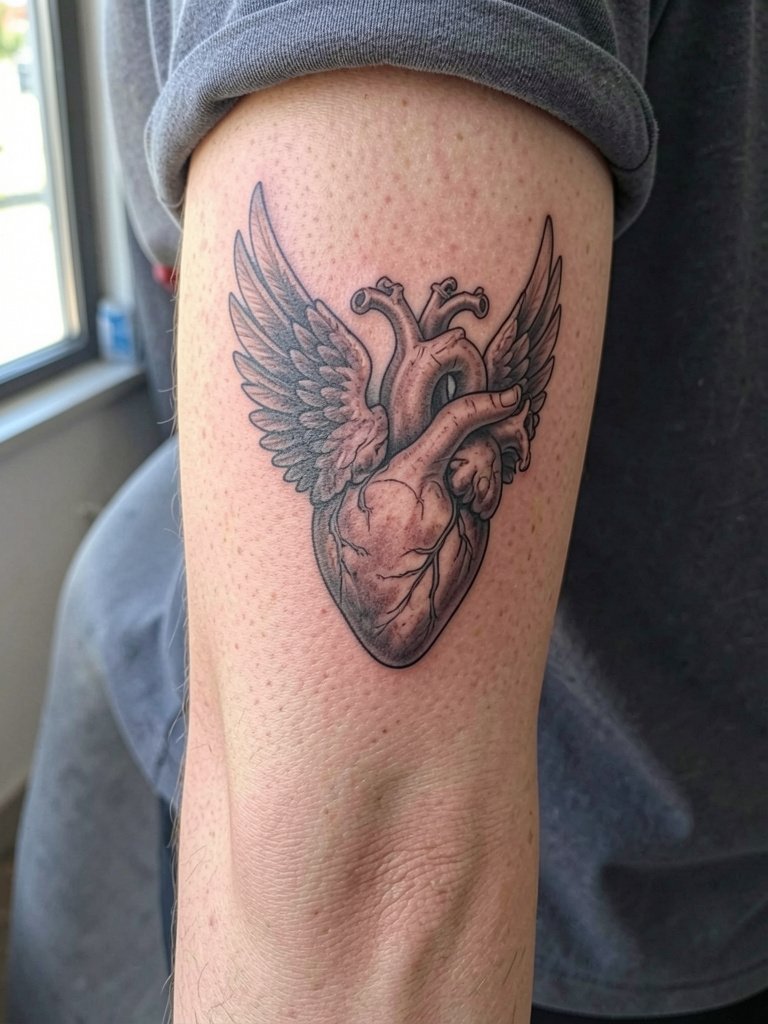
A winged heart gains depth from feather layering and a clear shadow plane beneath the heart. Ask for feather groups drawn with slight spacing so individual feathers stay readable rather than a blended mass. Inner forearm motion can compress the wing bases, so request robust shadow anchors there. This one-session piece typically finishes in under two hours. For styling, match with rolled cuff linen shirts and a thin gold bracelet on the opposite wrist rolled cuff linen shirt.
12. Realistic Eye with Iris Depth
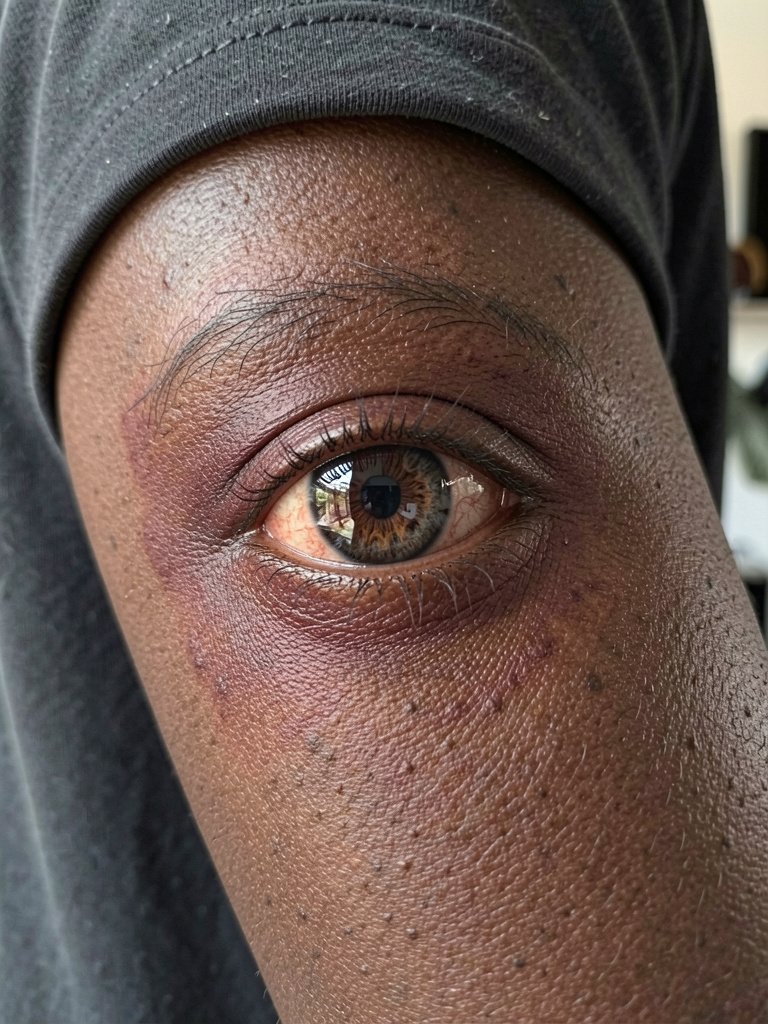
An eye needs crisp whites, micro highlights, and a dark pupil to read as a portal. On darker skin tones focus on strong contrast lines and saturated color in the iris rather than subtler white gradients. A real mistake is asking for too small an eye; scale matters for the 3D look. Expect two sessions for color micro-realism. For a gallery-ready look, choose minimal accessories so the eye is the focal point in photos.
13. Feather with Layered Texture on Inner Forearm
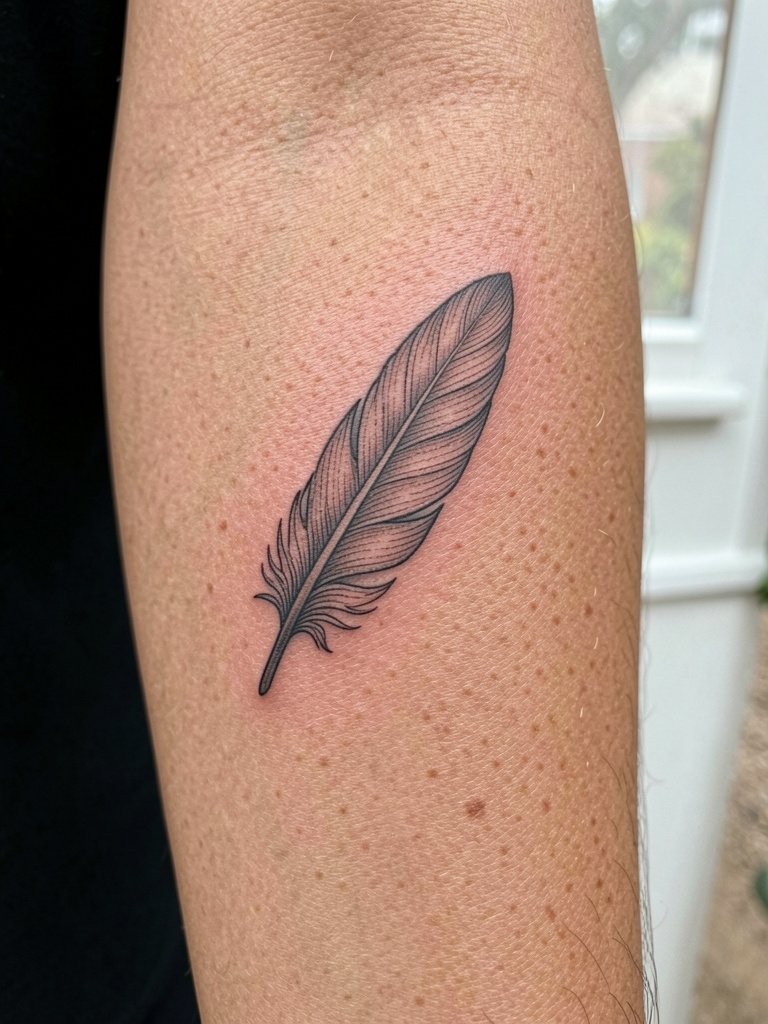
Feathers read as three-dimensional when barbs have alternating light and shadow. For inner forearm applications request slightly bolder primary barbs and soft stippling between them so the texture does not collapse as the piece ages. The usual mistake is expecting a single-needle feather to behave like a micro-realism one; ask for visible spacing and a small cast shadow. Session time is often one hour. Show-off pairing: a rolled-up linen shirt in neutral tones keeps the delicate texture visible rolled cuff linen shirt.
14. Abstract Fluid Smoke on Outer Forearm
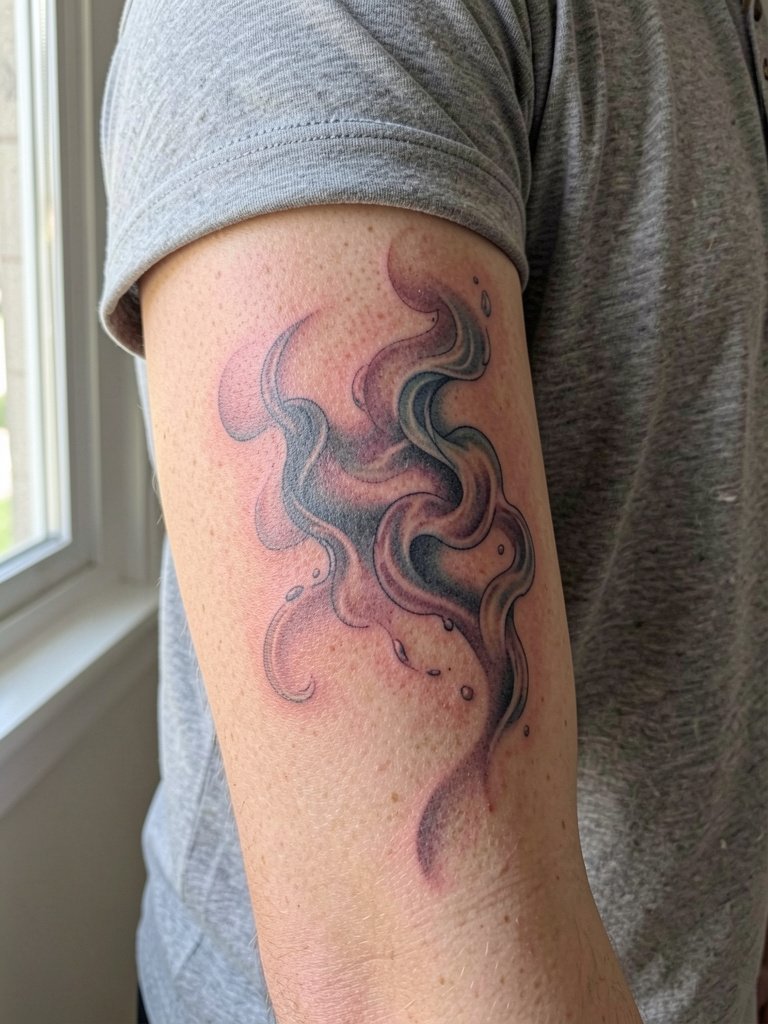
Fluid shapes rely on careful gradation and crisp edge placement so swirls keep their form as ink settles. Ask for breaks in the shading where negative skin acts like highlight; that helps motion survive touch-ups. A common error is too many blended gray zones that merge into a single flat patch. These usually take one to two sessions. For a moody vibe, pair with a black or charcoal henley and matte accessories charcoal henley men.
15. Small 3D Patchwork Cluster on Inner Forearm
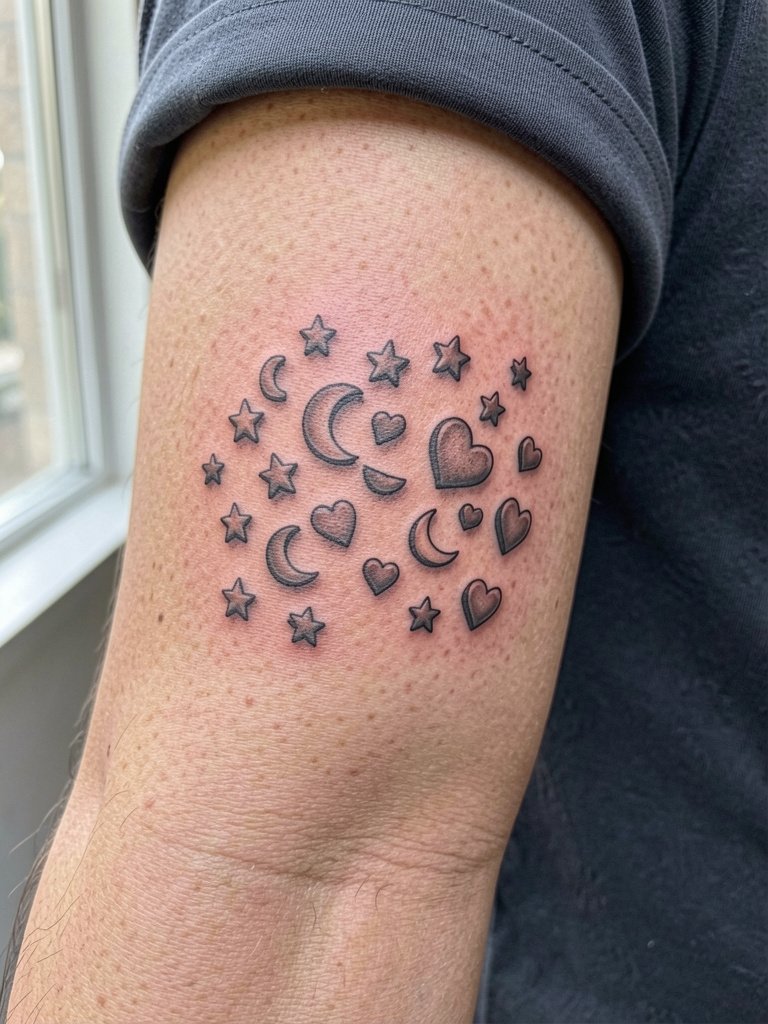
Curated clusters let you build a sleeve over time while keeping individual pieces legible. For inner forearm clusters ask the artist to space icons so each has its own shadow field and a consistent light source across the group. Mistake: packing icons too close so their shadows merge after healing. Small pieces are usually 30 to 60 minutes each, and planning touch-up windows every 18 to 24 months preserves crispness. Session wear: loose short sleeves and avoid bracelets on the tattoo wrist during the appointment.
16. Curved Mandala Band on Mid Forearm
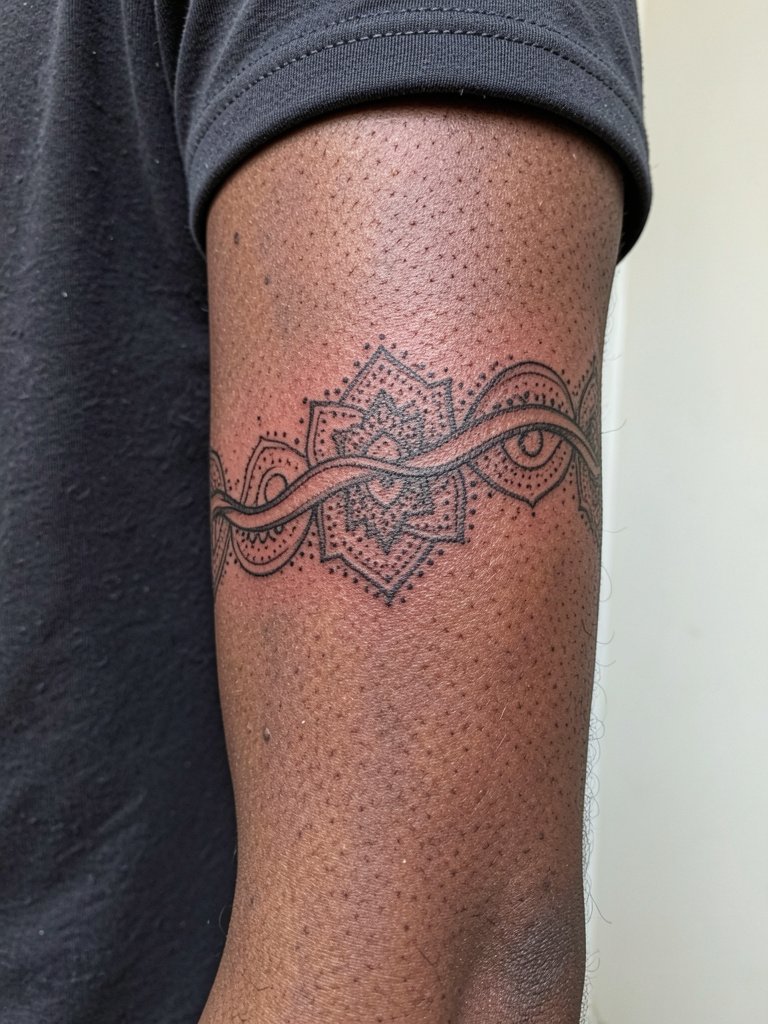
Circular and band designs need breathing room, or the dot work fills in and the geometry is lost. On deeper skin tones insist on stronger dot contrast and slightly thicker outline bands so the mandala holds its shape. A common mistake is requesting an intricate band that is scaled too small for the forearm circumference. Expect two sessions for a detailed band with stippling. Keep forearm accessories simple to avoid competing textures.
17. Tiny Mechanical Gear Cluster on Outer Forearm
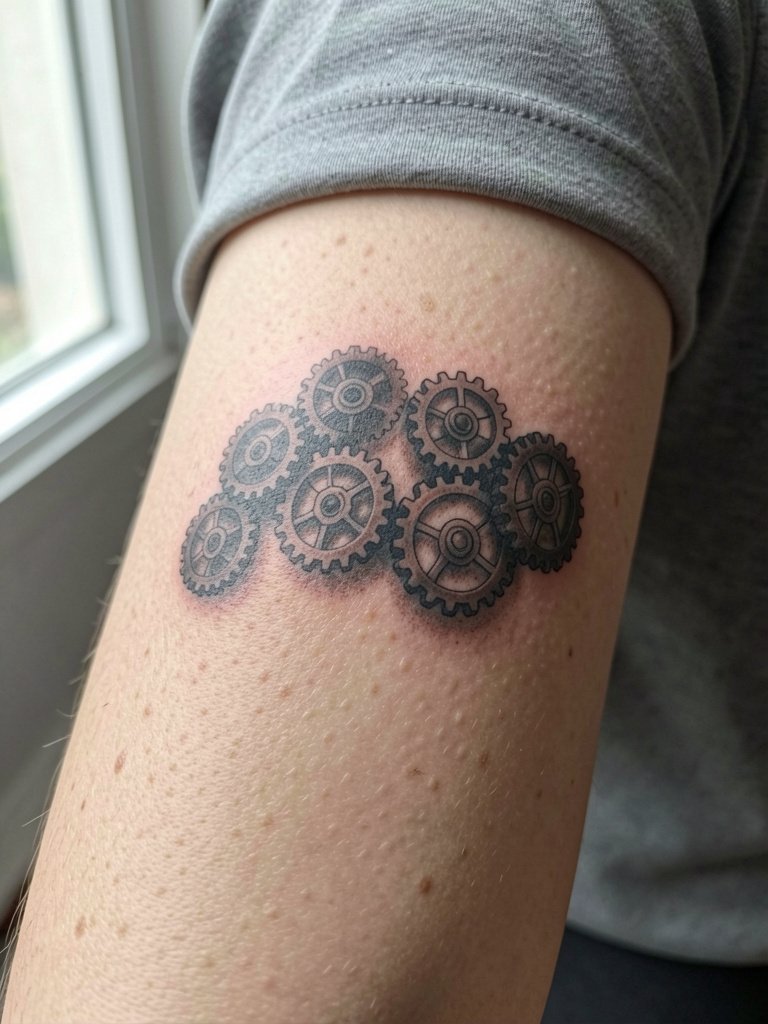
Mechanical clusters sell depth when the teeth and shadow relationships are precise. Ask for a clear light source so each gear casts a predictable shadow. The mistake is trying to shrink a gear set below a reliable scale; tiny teeth blur into texture over a year. Session time is usually 60 to 120 minutes depending on count. Pair it with a minimalist watch and a plain tee for a balanced, engineered look minimalist watch men.
18. Floating Ribbon Script with Shadow
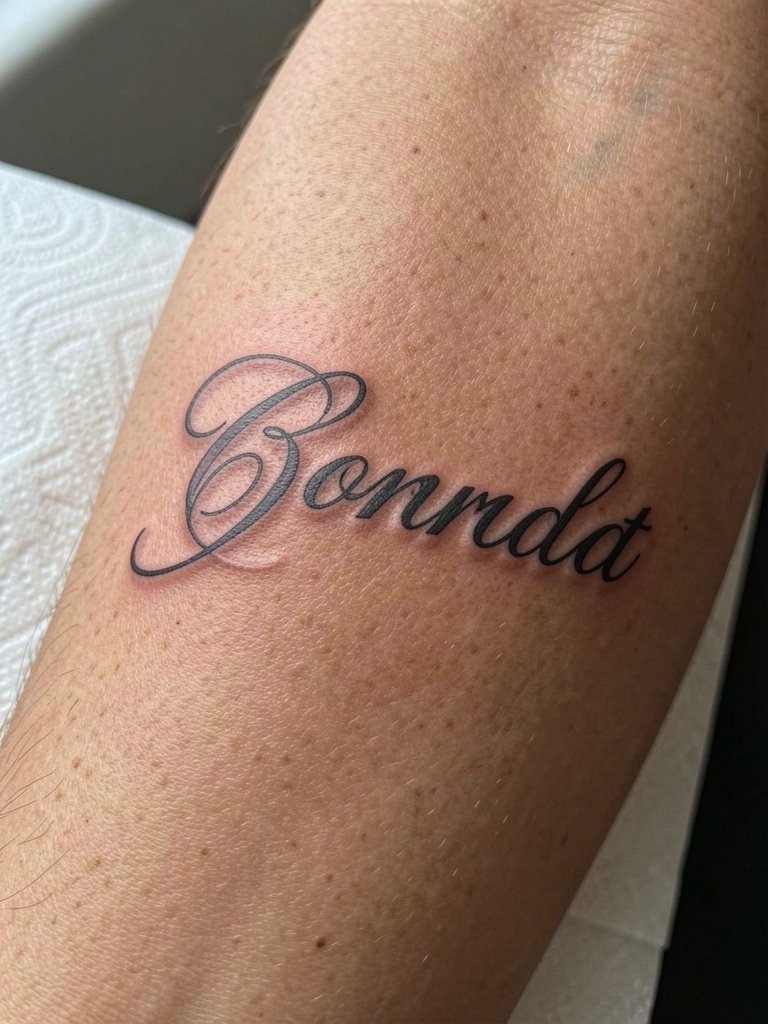
Script with a ribbon shadow looks lifted when the shadow follows consistent light direction and has a slight fade at the edges. Request larger letter spacing and a bold shadow anchor so single-needle script does not vanish on the palm-up surface. Fine script that sits too closely to the skin often merges into a darker streak after healing. One session usually suffices. For session wear a loose button-down so the artist can move sleeves without snagging.
19. Tiny Planetary Stack on Outer Forearm
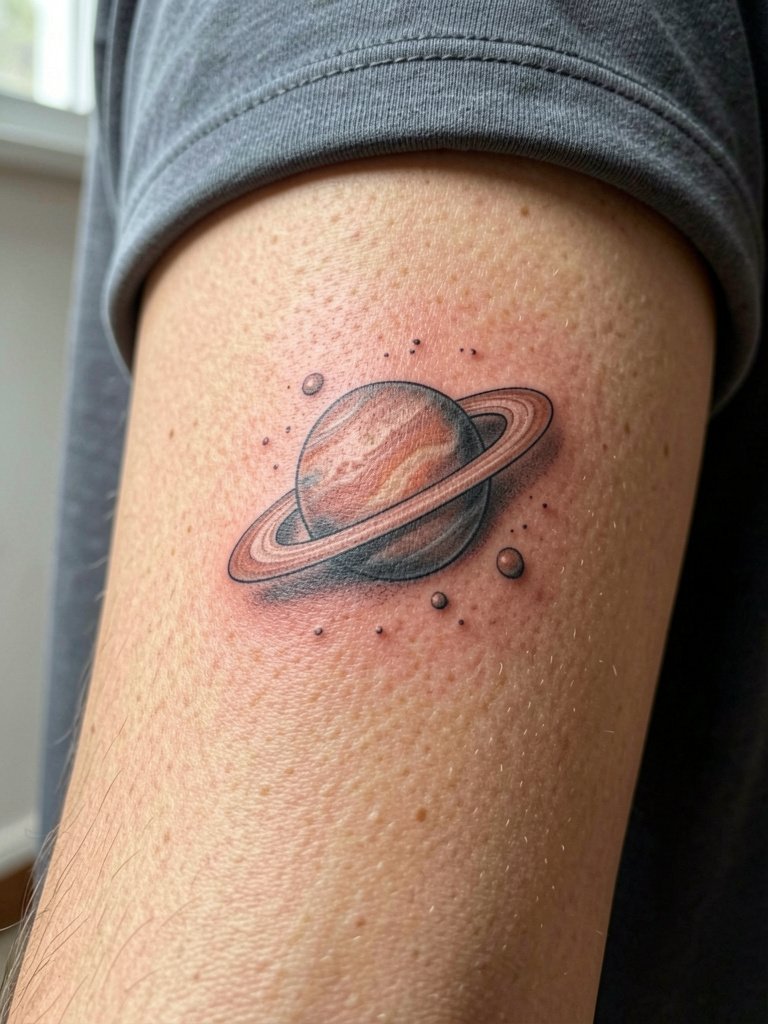
Stacked tiny planets read as volume when separated with deliberate negative skin bands between orbits. Ask the artist to keep the largest planet at least three times the diameter of the smallest to preserve perceived depth. A common error is equalizing sizes, which flattens the composition as inks settle. These micro pieces are quick, often under an hour each. For a subtle reveal, wear short sleeves and a thin chain bracelet on the opposite wrist.
20. Low-Relief Relief Knotwork on Inner Forearm
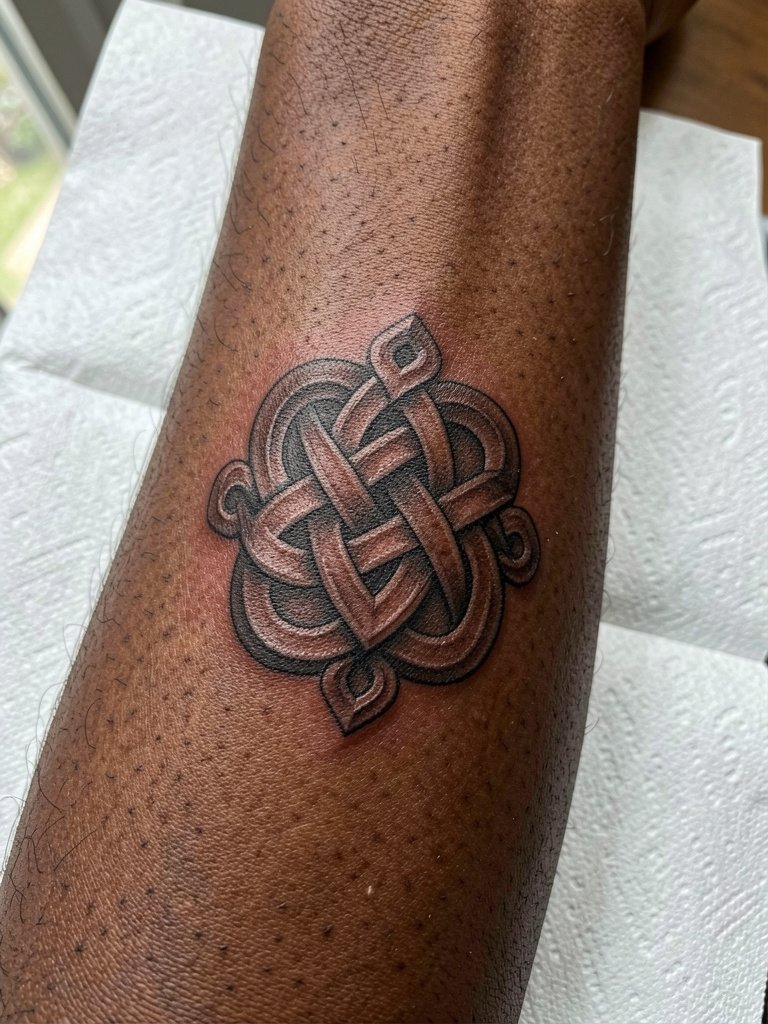
Knotwork that reads carved requires subtle bevel shadows and consistent light direction. On deeper tones choose stronger shadow stippling so the "carved" look remains visible at distance. The wrong move is adding fine interior knot filigree that blurs into a dark patch. Expect two sessions if you want a wider band with layered shadings. Session wear: sleeveless or loose short sleeves so the artist can wrap the stencil cleanly.
21. 3D Botanical Sleeve Starter on Outer Forearm
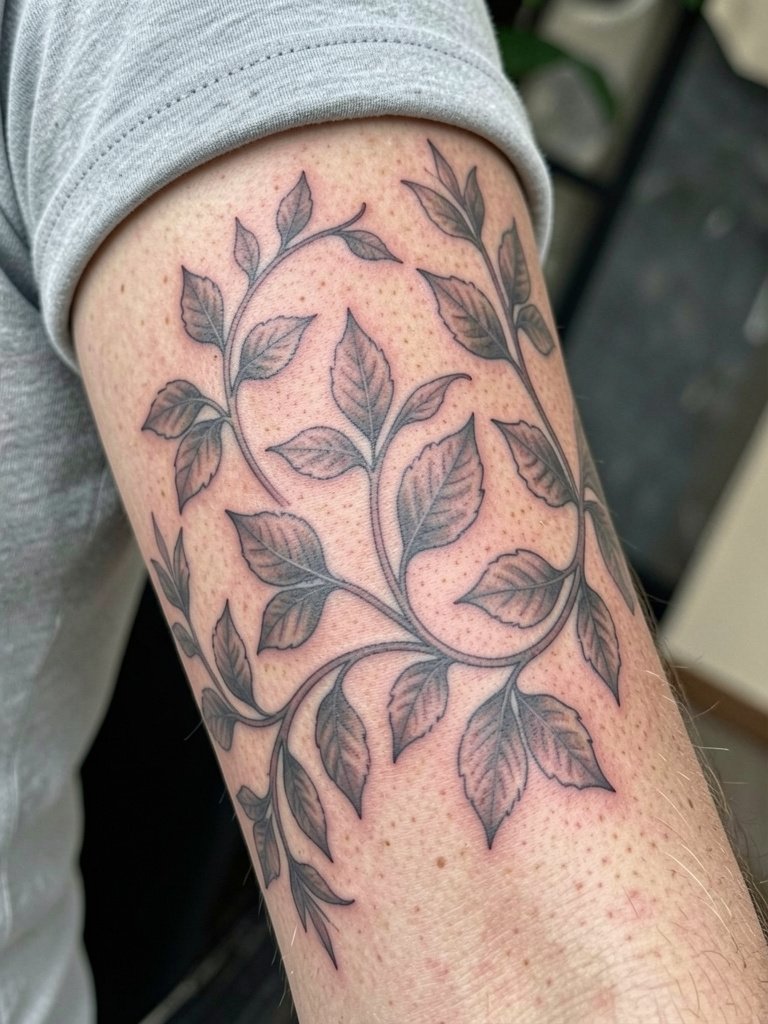
If you are building a sleeve over time, plan anchor panels with distinct shadow fields so later additions sit around them rather than on top. Discuss stencil overlap zones and ask the artist to leave margin space for future pieces. A common complaint is starting too small; larger anchor panels age more gracefully. Sessions are staged panels over months. For show-off wear a solid-color tee with rolled sleeves to keep the panel visible solid navy tee.
22. Optical Illusion Fold on Mid Forearm
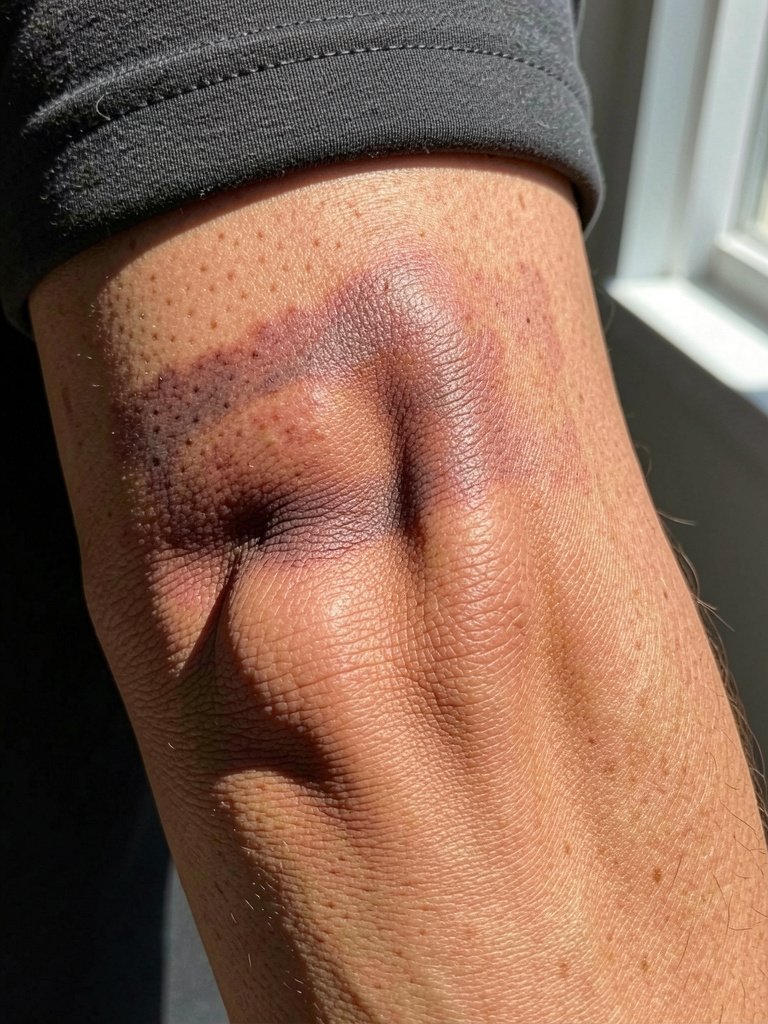
Illusion folds need decisive shadow and crisp edgework so the "lift" reads clearly. Ask for high-contrast darker anchors at fold bases and a small internal highlight band to simulate separation. Mistake: relying on soft gray smudges without defined anchors, which loses the effect after healing. These often take one to two sessions. Keep forearm accessories minimal to avoid distracting from the illusion.
23. Solid Blackwork Volume Band on Outer Forearm
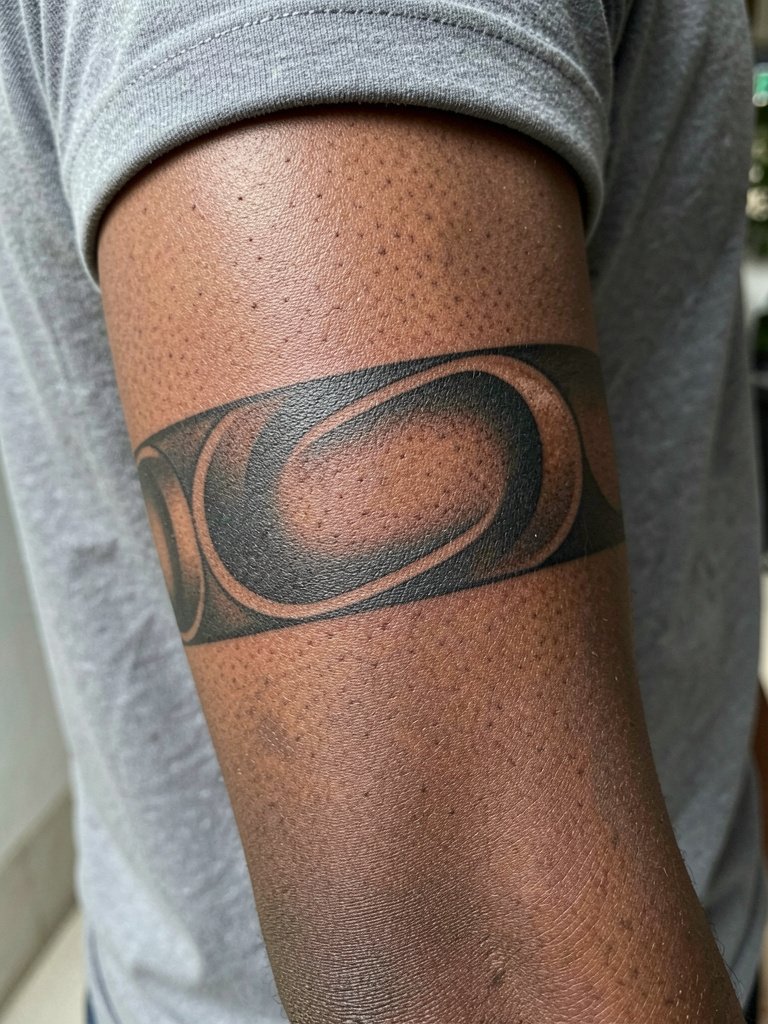
Solid black bands with carved highlights age predictably because they rely on silhouette and contrast rather than tiny detail. Discuss saturation plans and ask the artist how they handle touch-ups for dense blackfill pieces. One common issue is late-stage patchiness if the first pass is uneven, so expect a follow-up pass scheduled at the artist's recommended interval. Session time depends on width and detail. Pair with short sleeves and a minimalist watch to show the bold band minimalist watch men.
24. Fluid Ink-Splash Abstract on Inner Forearm
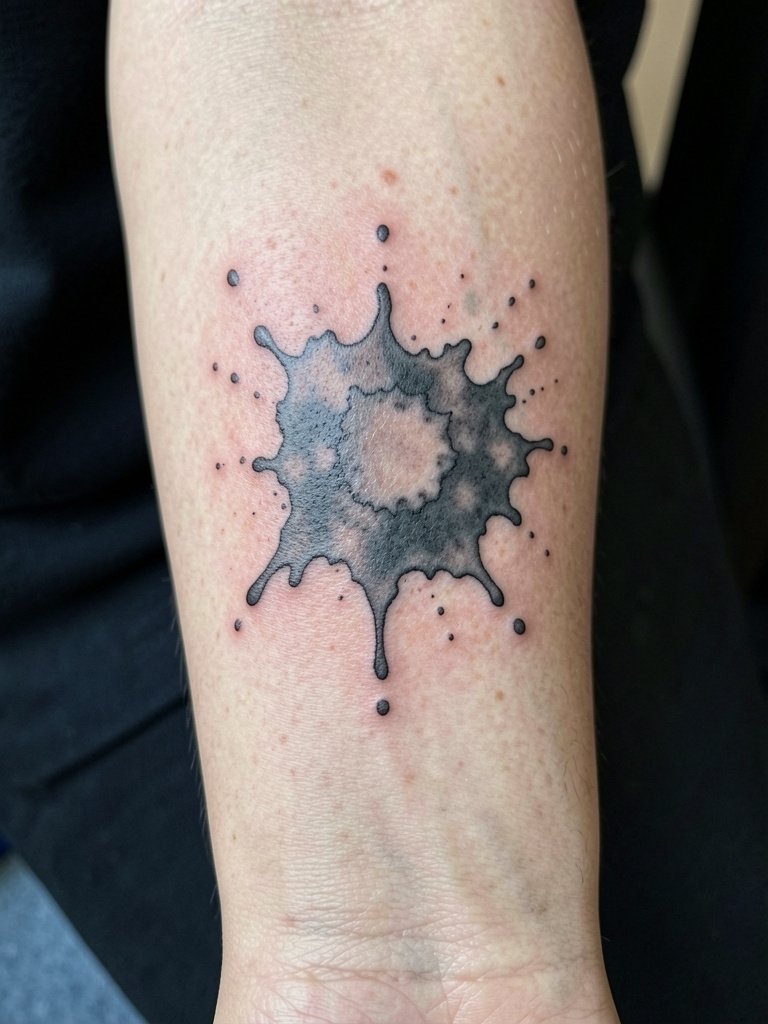
Abstract splashes need planned dark anchors and lighter float zones so the eye reads depth rather than a single gray wash. Ask for specific anchor points in the stencil and request that the artist not overblend during the first shading pass. Many people underestimate how much negative space this style needs. This is typically one session. For evenings out choose neutral tops so the splash remains the focal point.
25. Stippled Dotwork Planetary Band on Mid Forearm
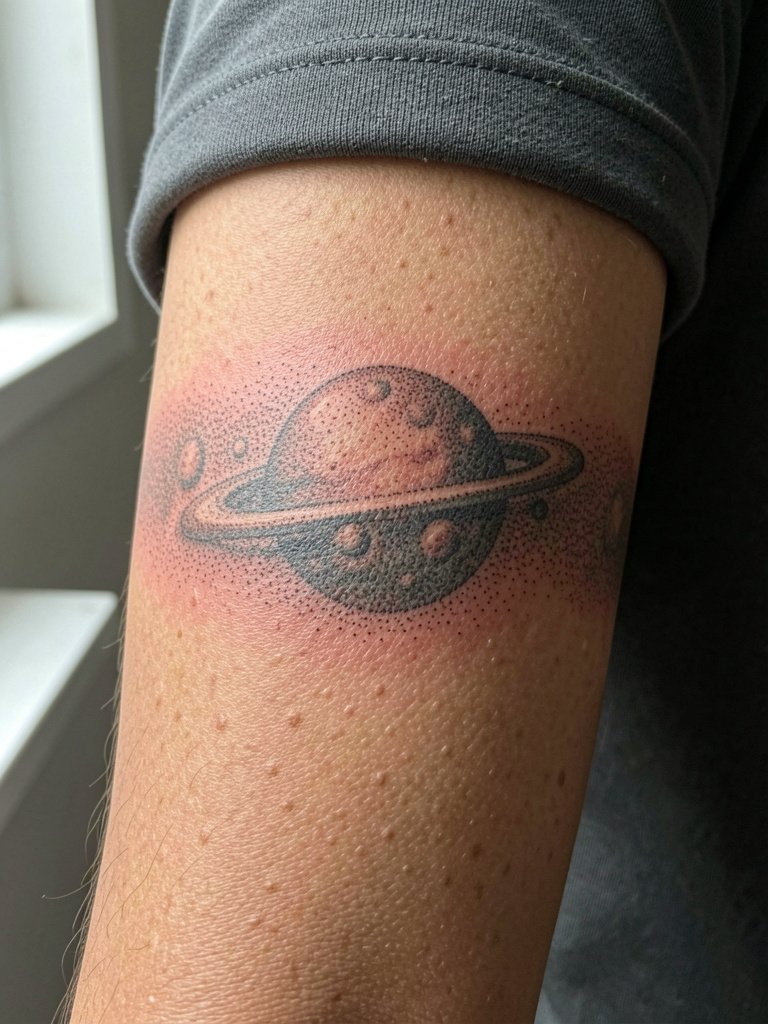
Dotwork builds 3D volume gradually with density shifts. When placing on the forearm, ask the artist to plan denser stipple fields near the anchor side and lighter dots for the highlights. A frequent misstep is asking for too tight stipple in a small area, which compacts into a dark patch. Sessions can be longer because stippling is meticulous. For styling, a rolled-up sleeve and a thin bracelet on the opposite wrist keeps the dotwork readable rolled cuff linen shirt.
26. Layered Map Fragment on Outer Forearm
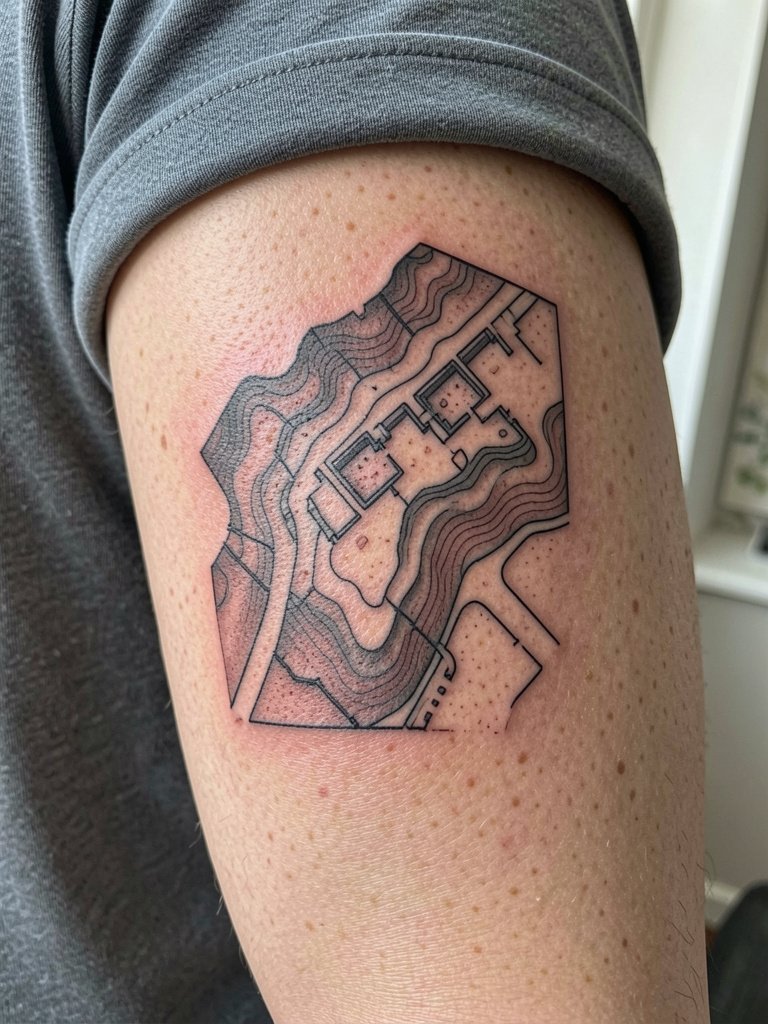
Topographic or map fragments translate to 3D when contour lines get subtle internal shadowing. Ask for clear spacing between contour bands and a directional light source to create slopes. Overly tight contour lines will blur, so request slightly thicker spacing than a printed map. Sessions are staged based on area. Pair with neutral tees to keep attention on line and shadow relationships.
27. Curated Micro-Realism Mosaic on Forearm Edge
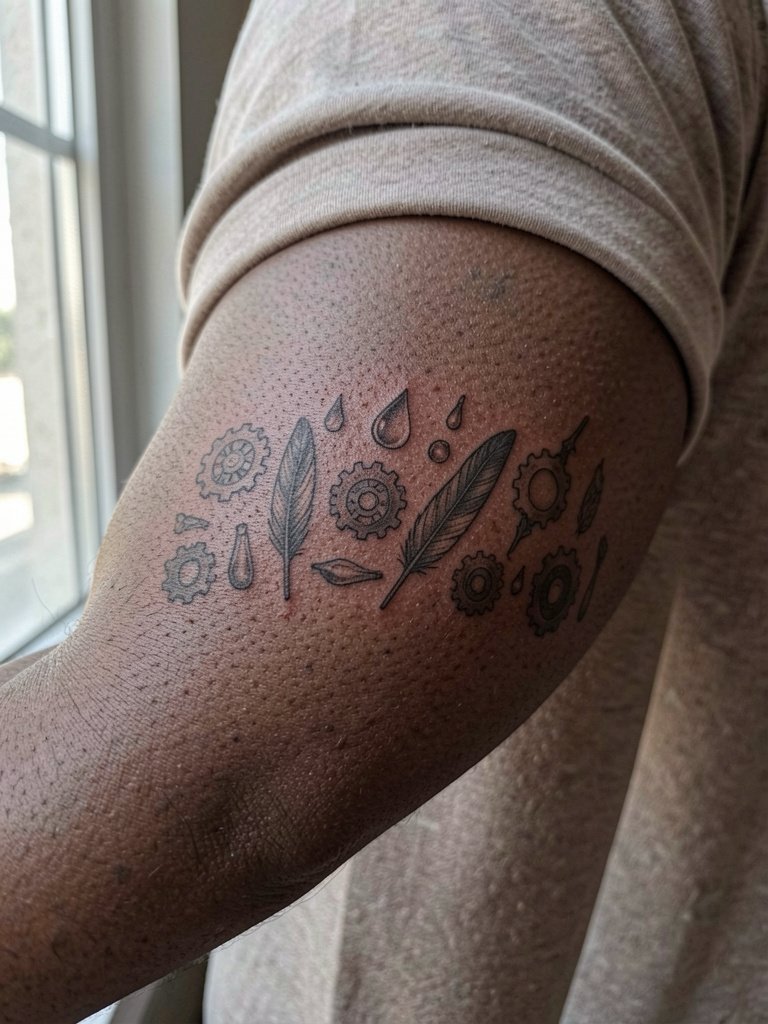
A mosaic of tiny realistic bits works if each object has a distinct shadow field and you plan the viewing distance. On darker skin use bolder anchors and avoid tiny mid-tone fills that can't be read. The usual mistake is crowding many micro pieces too close. Plan touch-ups at year two if you want the micro-realism to remain crisp. For wear during the appointment pick a loose short-sleeve so the artist has full access to the outer edge of the forearm.
Frequently Asked Questions
Q: How do I find artists who show healed 3D forearm work?
A: Search hashtags like #3dtattoo, #microrealism3d, and #3dforearm on Instagram and TikTok, then filter by city to narrow local options. Tattoodo and similar portfolio sites let you search keywords such as "3D micro-realism forearm" and look for healed photos rather than only fresh shots. Reddit threads and community forums also surface peer-recommended healed examples across skin tones.
Q: Does numbing cream ruin 3D shading or help clients get through longer sessions?
A: Artists and clients split into two camps on numbing. One camp says topical numbing causes skin swelling that softens delicate 3D shading and they prefer no cream for micro work. The other camp uses numbing for sensitive clients and adjusts needle depth and pressure so clarity is preserved. If you are considering numbing, tell the artist exactly when it will be applied and how long before the session so they can plan needle depth accordingly.
Q: Should I pick black-and-gray or full color for long-term 3D depth?
A: There are two clear positions here. One group argues black-and-gray ages better because it preserves contrast longer and avoids the faster fade of many color pigments. The other group points to saturated color work that still shows strong depth at five years when high-quality inks and skilled saturation are used. Your choice should factor in how visible you want the contrast to be on your skin tone and whether you are ready to schedule periodic color touch-ups.
Q: How soon will a 3D forearm tattoo need a touch-up?
A: Expect most 3D micro-realism or fine shading to benefit from a touch-up around year two, especially on inner forearm placements. Outer forearm pieces with strong blackwork can go longer between top-ups. Touch-up timing depends on skin type, sun exposure, and whether the design uses lots of color versus black-and-gray.
Q: What should I wear to the appointment for a forearm piece?
A: For inner forearm work wear a loose button-down or short sleeve so the artist can roll or shift fabric without tugging the cuff. For outer forearm or wrist pieces a sleeveless top or short-sleeve tee gives clear access. For a polished after-session look, carry a neutral linen shirt or a solid dark tee to frame healed photos of the tattoo.
