
A small, well-placed phoenix can feel fresher at year five than an overworked color piece that aimed for maximum detail up front. Pick scale and line weight for the body area, not for the photo you liked at full size. These 15 directions map styles to placement, session prep, and what to tell your artist so the design still reads after a few touch-ups.
1. Vibrant Full-Back Phoenix With Spreading Wings

This is the cinematic phoenix that uses scale to sell the motion. Choose this when you want wing span and feather detail that breathe across the shoulder blades. For your consultation bring a full-body photo so the artist can map how the wings curve with the scapula, and ask for reference stencils at life size to confirm where the tail will sit. Common mistake: asking for tiny feathers in a design meant for a back canvas; that detail collapses when pulled to a smaller scale. Session time often runs multiple long appointments, and touch-ups are typical after the first year for saturated color pieces. For the session, wear a loose button-down shirt or a zip hoodie you can pull off backward and a sports bra that unclaspes easily.
2. Watercolor Phoenix Across the Upper Back

Watercolor gives a soft, painterly movement but it ages differently than packed color. One camp values the immediate visual delicacy and recommends loose washes that mimic flame motion. Another camp warns that shallow watercolor blends can lose saturation and need earlier touch-ups. If you choose this look, ask the artist how much pigment they will pack at the base of the feathers so the colors do not disappear within two years. Healed photos at six months versus two years look very different with this style, so request healed examples on similar skin tones. For session wear, pick a racerback or scoop-back tank so the artist can work without fabric rubbing the area during healing.
3. Minimalist Black Phoenix on the Inner Forearm

This is the go-to for a wearable symbol you want visible and low maintenance. Recommend this when someone wants readable iconography rather than feather micro-detail. Specify that the silhouette be drawn slightly larger than your initial idea so the form keeps negative space as it settles. A common version that ages poorly uses single-needle internal feathers at small scale and loses definition by year three. The appointment typically fits in a single session under two hours and the forearm tolerates the work well. Style-wise, this pairs with rolled-cuff linen shirts and a clean bracelet on the opposite wrist, so include a linen button-down women link in your prep notes.
4. Feminine Phoenix With Floral Framing, Outer Upper Arm

Floral elements soften the phoenix shape and help the composition read as feminine without being cute. Use this when you want decorative framing rather than a separate bouquet tacked on. Tell the artist which flowers to scale down or remove so they do not compete with feather flow. A common mistake is adding too many small blooms that clutter the silhouette at a distance. This area tolerates moderate detail and heals predictably, so plan for one to two sessions. For the session, wear a sleeveless top and bring a lightweight jacket to pull on after work if needed. Also try pairing the healed piece with off shoulder top women looks when you want to show it off.
5. Fine Line Phoenix, Delicate Features for Wrist or Inner Forearm

Fine line is elegant but controversial for longevity. One camp argues that very thin neck and wrist lines blur quickly, especially on moving skin. The other camp says with slightly wider spacing and a modest line weight the design settles cleanly and keeps its dainty look. For this placement ask the artist to show line weight comparisons at the same scale and to plan slightly thicker contour than the Pinterest reference. The wrist experiences frequent washing and friction so expect a touch-up within a couple of years. For showing it off, keep the opposite wrist minimal and try a minimal watch women to balance the look.
6. Black and Grey Phoenix With Smoky Flames, Ribcage
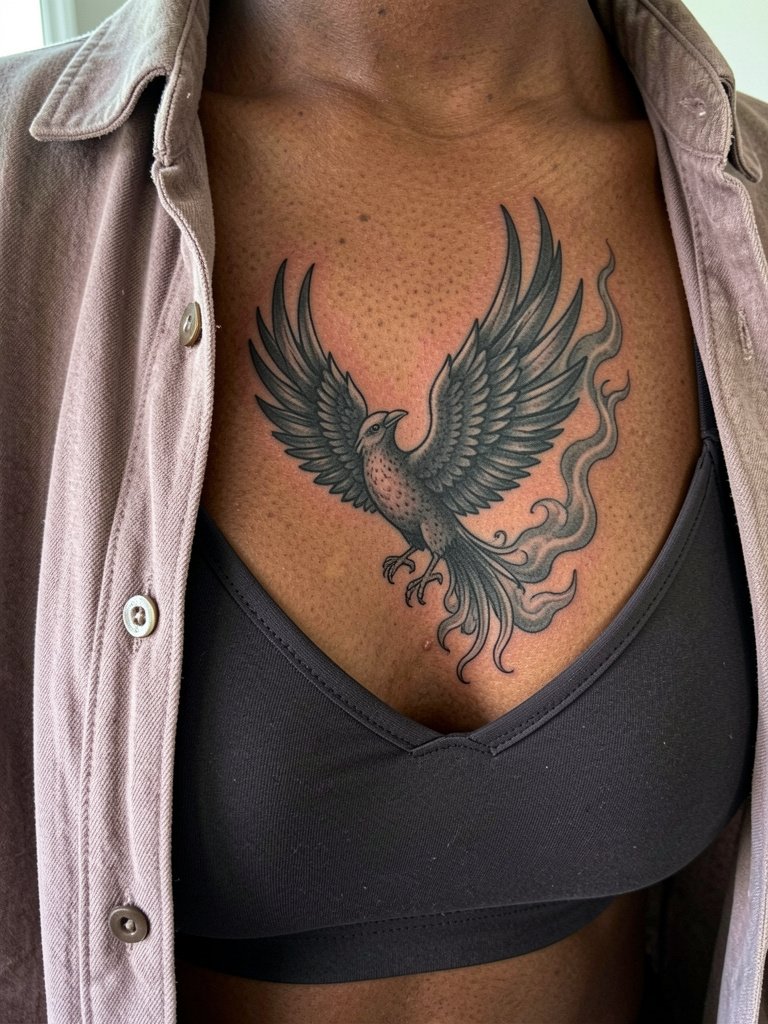
Black and grey works well where longevity matters more than immediate color drama. One camp favors color for the phoenix because warm gradients feel true to flame. The other camp favors black and grey because it holds crisp contrast over time and is easier to refresh. If you want the darker mythic mood, request grey wash depth for the flame transitions and avoid tiny stipple that can fill in on the ribs. Warning about pain: the ribcage is a higher pain zone and needs realistic booking for breaks and possible numbing. For session wear pick a loose sports bra or button-front shirt so the artist has side access without fabric pressure.
7. Phoenix Spine Tattoo, Vertical Composition

The spine naturally suits vertical phoenix layouts and looks striking when hair is up. When recommending this, emphasize how the body's vertical anatomy will bend the wings and tail, and ask the artist to mock the design with the client standing and sitting. People often mistake a narrow ornamental spine piece for detailed feather work; the spine needs negative space to avoid blur. Pain is higher along the spine so expect shorter passes and a few breaks. Showing this off works best with hair clipped up, so consider a hair claw clip for styling after healing.
8. Small Phoenix Wrist Tattoo, Micro Scale

Small wrist pieces are discreet and beginner-friendly but need to be bold enough to survive daily hand motion. Recommend a compact silhouette with a single small flame or negative-space tail rather than tiny internal details. Ask the artist to map the design at true size and test how it looks with the wrist flexed. The wrist sees the most washing and sun exposure so a realistic touch-up at two years is common. For showing this off, avoid bracelets on the tattoo wrist and opt for a thin bangle on the opposite side or a thin bangle bracelet on the other wrist.
9. Thigh Phoenix, Curved Composition for the Leg

The thigh gives room for feather flow and looks great when curved to the leg shape. Choose this if you want medium-to-large detail without scaling up to a back piece. Tell the artist how the piece should sit with both standing and sitting references so the tail does not warp awkwardly when you bend the leg. The thigh heals well with low blowout risk compared with the forearm or finger. For show-off outfits, high-slit skirts or shorts with a clean hem frame the design; bring a pair of high waisted shorts for session comfort and coverage.
10. Geometric Phoenix on the Outer Forearm

Geometric phoenixes modernize the form and need breathing room to avoid looking cramped. Recommend a clear grid or axis to the artist so the angles align with the forearm's length. The common mistake is going too small and losing the geometry, so plan for at least three inches of canvas. The outer forearm has lower blowout risk and typically fits in a single longer session. This pairs well with structured shirts or a tailored blazer, so try a tailored blazer women to complement the sharp lines.
11. Tribally Influenced Phoenix on the Shoulder

Bold blackwork makes the phoenix readable at a distance. Use this when contrast is your priority rather than feather detail. When planning, clarify cultural influences and ask the artist to explain the specific tribal motifs they intend to use to avoid accidental appropriation. The shoulder tolerates dense black fills but check for saturation level so the skin does not feel overworked. Session time varies by fill area and may need a follow-up pass to even saturation. For showing this off, sleeveless tanks or off-shoulder tops in solid colors keep the silhouette strong.
12. Phoenix and Dragon Pairing, Large Dual Composition

Pairing the phoenix and dragon creates a duality composition and usually requires a large canvas. This direction is for people who want mythic scale and relationship symbolism in one piece. Ask the artist to sketch both creatures at full size on photocopies so you can test balance before inking. These pieces are multi-session projects and commonly need a color layering session and a follow-up for line crispness. For back placements plan wardrobe that gives easy access and avoids friction on fresh work during healing.
13. Micro Phoenix Behind the Ear, Subtle Placement

Behind-the-ear micro work reads as a private accent and is quick to apply. It suits a single small symbol or word and is often a one-pass session under an hour. Tell the artist the exact text if any, because micro text needs clear letter choice and size. Expect that hair will cover the area when you want it to hide and that exposed styling with small hoops or studs frames the spot nicely. For session prep, pull hair into a clip and wear a top that does not press at the neckline.
14. Ornamental Phoenix Along the Collarbone

Ornamental work on the clavicle can feel elegant without florals. Ask the artist to map how the filigree sits relative to the bone so the piece balances both sides of the chest. Small, busy filigree near the clavicle is a common mistake because the bone and thin skin can make details appear harsh after healing. This area heals well but is visible during most clothing choices, so plan show-off outfits like square-neck tanks or layered fine chains and consider a layered chain necklace that sits above the tattoo.
15. Geometric Minimal Phoenix on the Ankle

The ankle is ideal for a compact geometric mark that keeps presence without taking a lot of room. Choose crisp negative space so the small angles remain readable. The ankle experiences friction from socks and shoes, so avoid ultra-fine internal detail. Expect faster fading if you repeatedly wear tight footwear during the first month. For session wear roll your jeans or pick cropped pants and bring a comfortable slip-on shoe. This placement pairs well with casual footwear when you want to show the piece.
Session Day Picks
These items help with access and first-week handling for the placements covered above.
- Silicone barrier film roll. A thin protective film is handy for keeping large back and rib pieces from rubbing on clothing during the first day.
- Low-odor gentle body wash. A no-fragrance wash soothes freshly healed skin without stripping inks used in watercolor and black-and-grey pieces.
- Thin breathable healing bandages. Useful for ankle and wrist tattoos that risk friction from socks or watches.
- Stencil transfer gel kit. Lets you preview stencil positioning on the spot for pieces like the spine and thigh so placement is exact.
- Aquaphor healing ointment. A mainstream option many artists recommend for the first 48 to 72 hours on dense blackwork and color-packed areas.
Frequently Asked Questions
Q: Which phoenix style holds up best on darker skin tones?
A: High-contrast blackwork and bold silhouettes tend to photograph and age more predictably on darker skin tones. Ask for healed examples the artist has done on similar tones and request slightly heavier outlines or increased saturation in the darkest areas to retain definition.
Q: How should I prepare clothing for a ribcage or sternum session?
A: Wear a loose sports bra or a button-front shirt that zips or buttons, so the artist can expose the side or center torso without you removing too much clothing. For thigh work choose loose shorts that can be rolled up; for upper back pieces pick a button-down you can take off backward. Consider packing a spare fitted tank to put on immediately after if you need coverage.
Q: I want a small fine-line phoenix but worry it will blur. What exactly should I specify?
A: Request the artist space the lines slightly wider than the reference and to use a modestly heavier contour for the primary silhouette. Also ask for a healed photo of a similar design at two years on comparable skin so you can see the result. Specify that internal feather detail be simplified to avoid crowding.
Q: Where can I search for healed phoenix portfolios and local artists without naming specific accounts?
A: Search Instagram and TikTok with combined tags like #phoenixtattoo, #finelinephoenix, or #blackworkphoenix and add your city name to narrow local portfolios. Use Tattoodo-style keyword searches such as "phoenix forearm healed" or "watercolor phoenix healed" to find images of settled work. Reddit threads on forums about tattoos also surface long-term photos and owner feedback.
Q: Are there placements I should avoid for a first-time phoenix if pain is my worry?
A: If you are nervous about pain avoid the ribcage and direct spine work for a first piece. Inner forearm, outer thigh, upper arm, and upper back are generally more comfortable and heal with predictable results. Plan for shorter sessions and numbing timing if you choose a sensitive area.
Q: How often do phoenix tattoos usually need touch-ups?
A: It depends on style and placement. Fine-line micro pieces often need a touch-up around year two. Saturated color pieces commonly benefit from a touch-up within the first one to three years to refresh gradients. Black and grey pieces tend to require less frequent touch-ups, but heavy sun exposure speeds fading.
