
Minimalist nature tattoos live in the space between subtlety and statement. Tiny botanicals, single-stroke mountains, and whisper-thin animal silhouettes can read like jewelry on skin when the line weight, placement, and spacing are right. Expect notes on how each design holds up over years, what to bring to the consult, and wardrobe pairs that actually help the tattoo show off rather than hide.
1. Tiny Sprig on the Inner Wrist
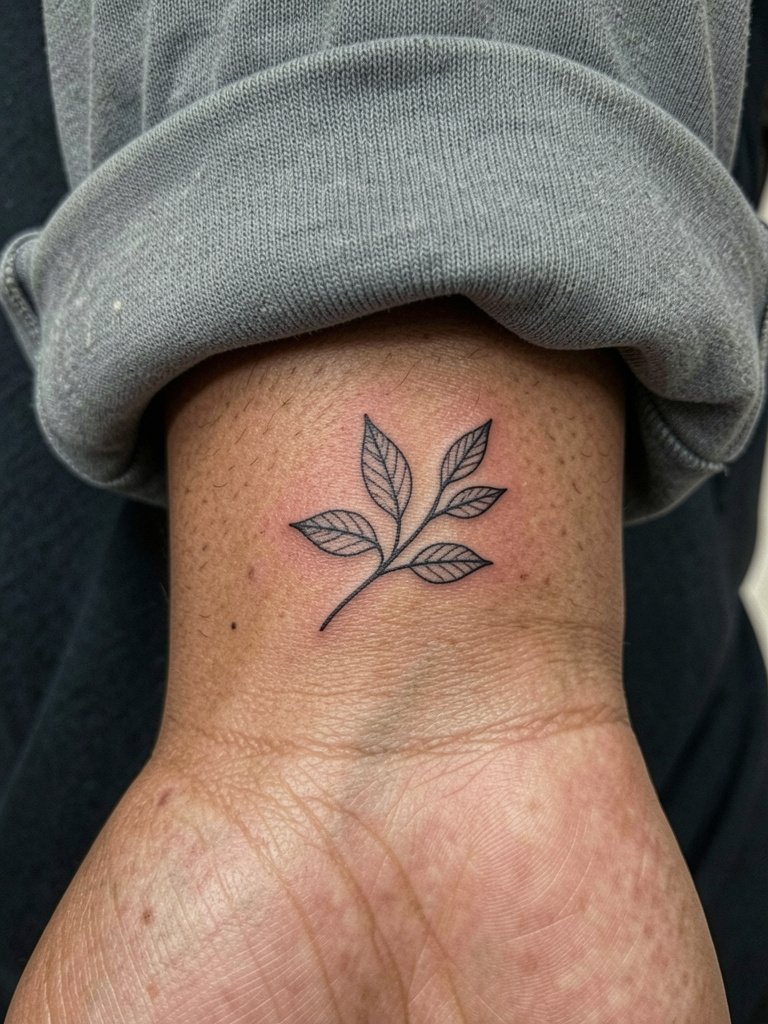
A tiny sprig reads like an accessory and is forgiving on the wrist if you start with slightly bolder linework than the reference image. Expect a short session, often under thirty minutes, and light soreness for a day. The common mistake is asking for single-needle hairline stems that vanish into blur by year three. Ask for measured spacing between leaves so they keep negative space as the skin shifts. For showing off, pair it with a rolled-sleeve linen shirt and a slim stacking bracelet that frames the wrist without rubbing the tattoo.
2. Crescent Moon Behind the Ear
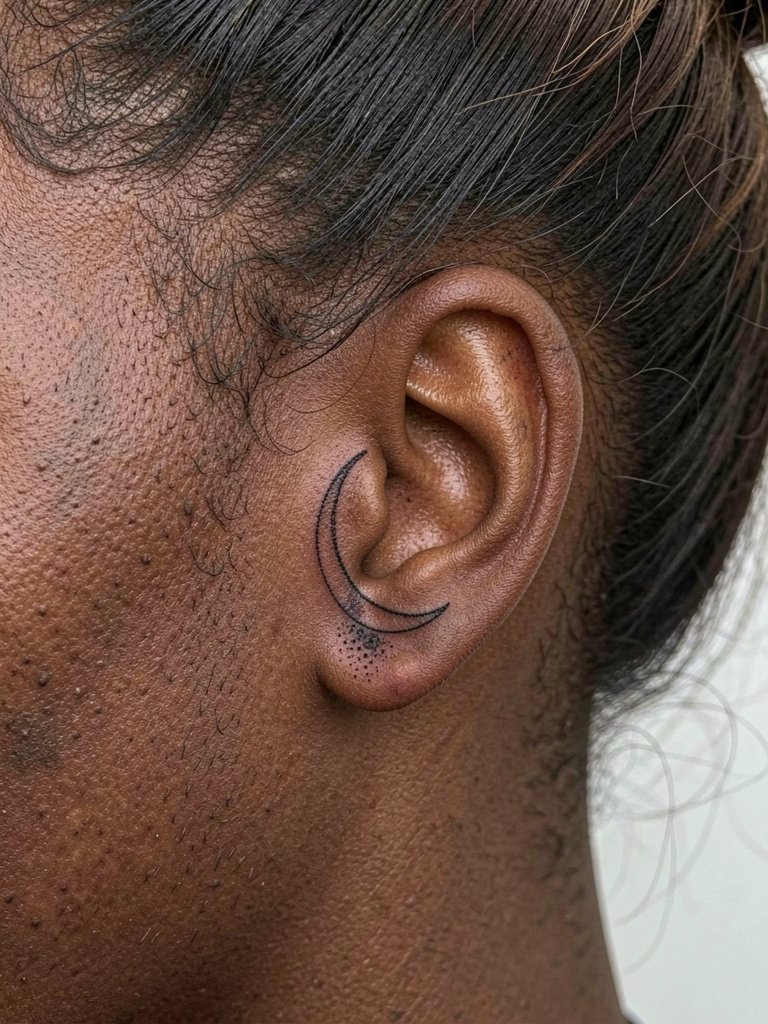
Behind-ear work is tiny and feels like a short, sharp series of taps rather than a long grind. Expect fifteen to thirty minutes of needle time and targeted soreness that fades quickly. A frequent error is requesting ultra-fine cursive or tiny dots that the skin there will spread, so request slightly thicker contour lines to survive touch. For wardrobe, a soft cotton button-up shirt with a clean collar keeps hair off the area when you want to show the moon without tugging at hair or clothing.
3. Single-Line Mountain on the Ribcage
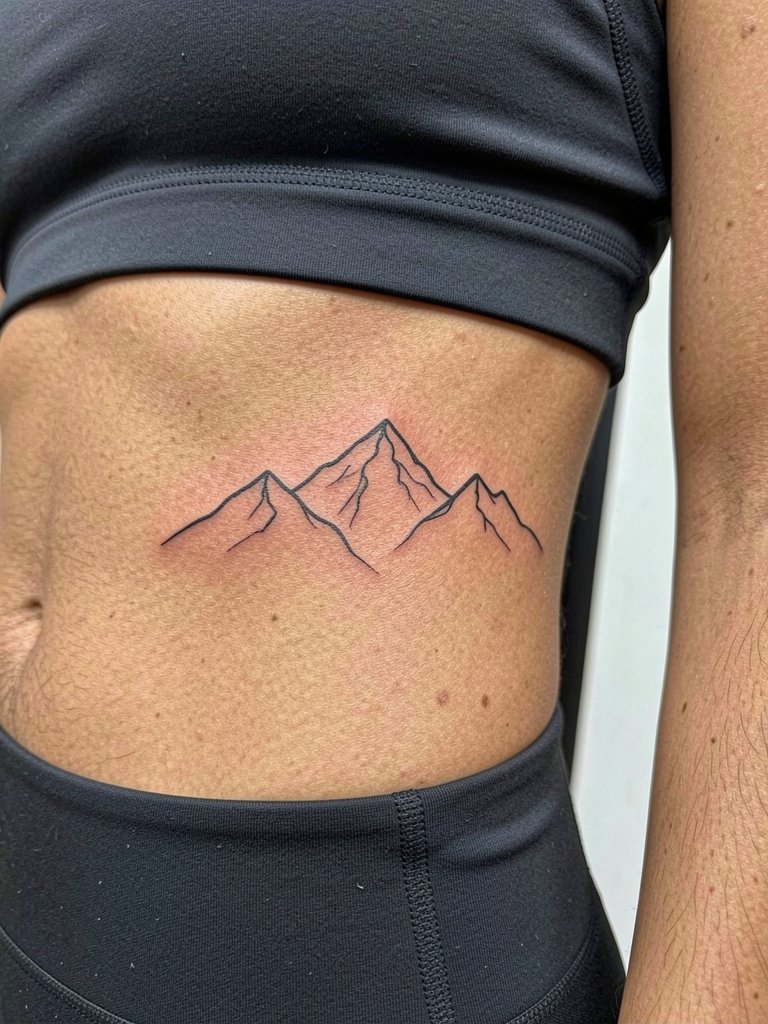
Fine line on ribs is tempting because the curve of the body makes the design intimate. Pain is above average for most people and session time varies with size. The biggest mistake is going too small for a curved area, which causes peaks to merge as the skin stretches. Request mockups that map how the line follows your rib curvature, and plan for a possible touch-up at year two if the peaks soften. Wear a fitted sports bra to the appointment so the artist can access the area easily.
4. Mini Fern Along the Side Thigh
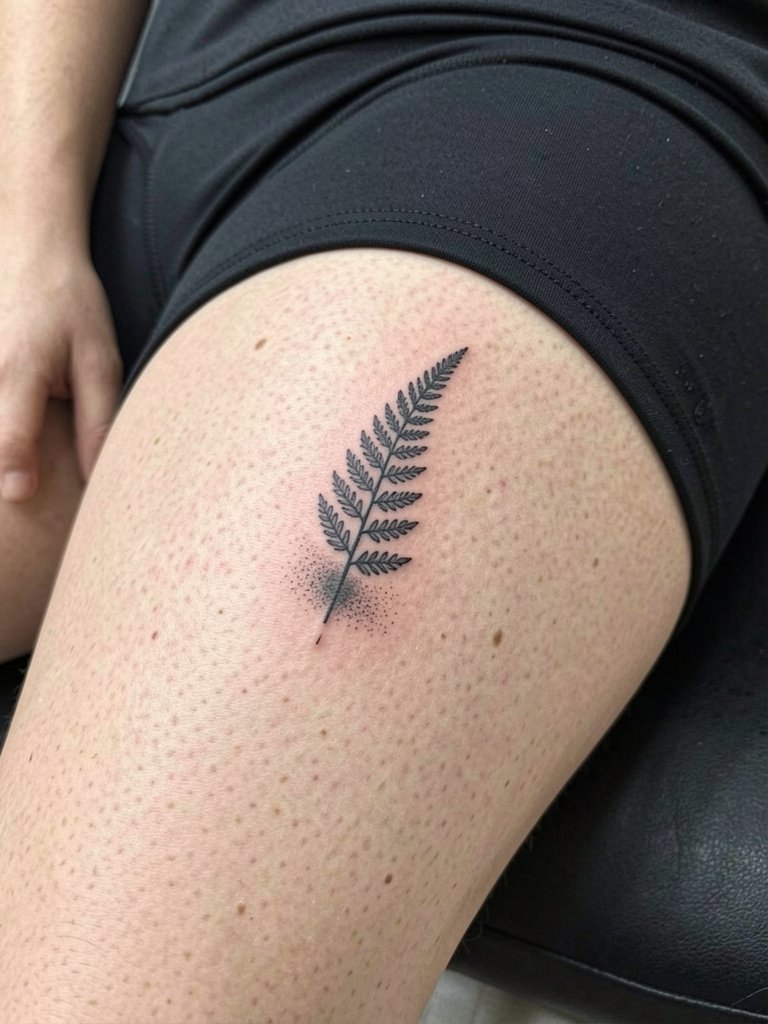
Inner-thigh tattoos are private and heal under friction from walking and clothing. One camp of artists warns that fine single-needle leaflets will blur quickly in this warm, mobile zone. Another camp argues that with slightly heavier stems and ample spacing the details can hold for years. If you want longevity, choose a fern with bolder midrib spacing and plan a touch-up at year one. For session comfort, sit in breathable shorts and bring a loose towel to keep the area cool after the appointment.
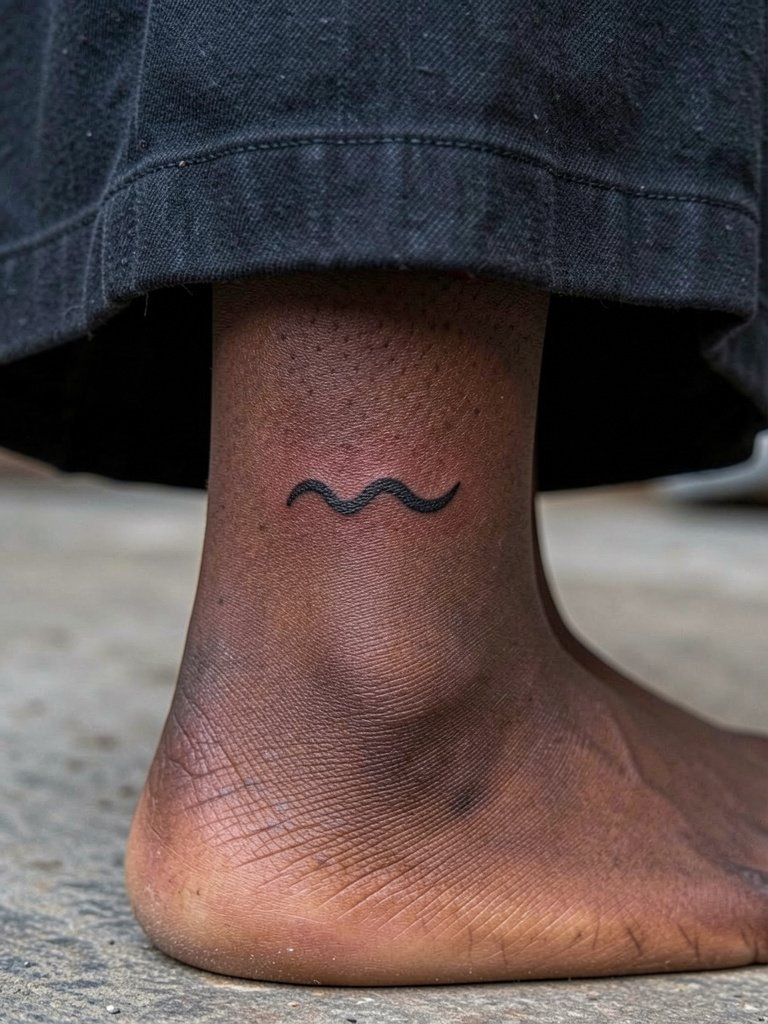
5. Petite Wave on the Ankle

Ankle pieces face constant friction from socks and shoes, so a compact silhouette outperforms tiny filigree. Expect a short session and brisk sensitivity over the bone. A common mistake is asking for hairline curls that blur into blotches after months of wear. Specify a single clean curve with slightly increased lineweight to preserve the curl. For showing off, pair it with cropped denim and delicate anklets that complement the wave without rubbing the fresh ink.
6. Tiny Pinecone at the Collarbone
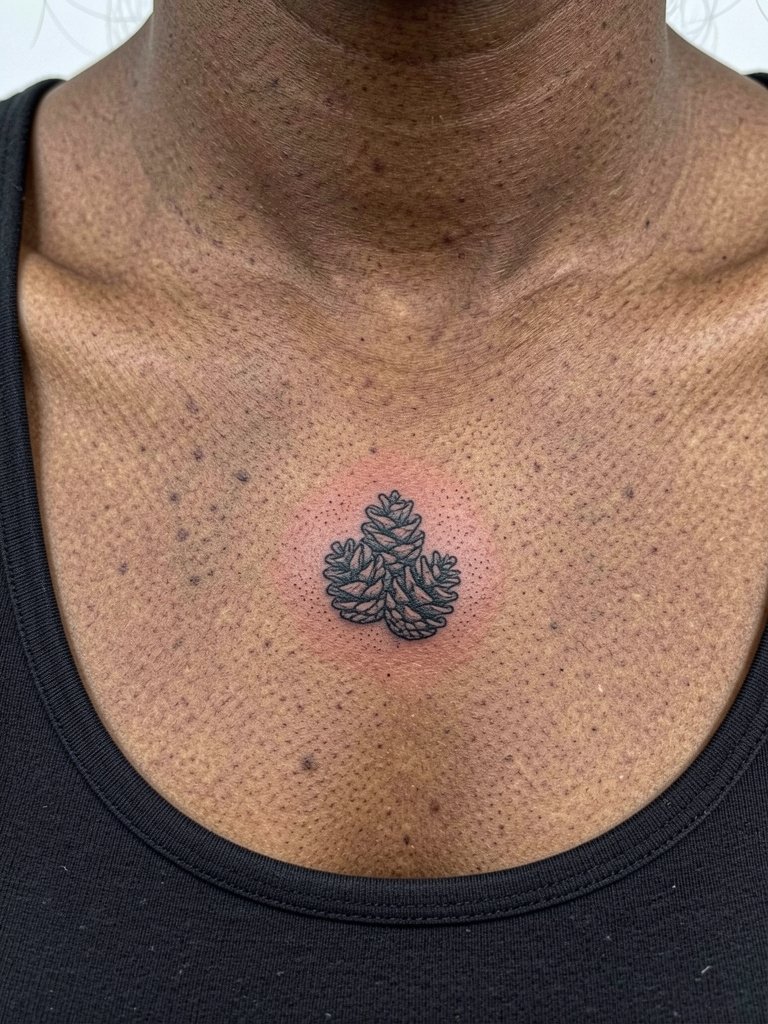
Collarbone pieces are visible and delicate. Pain can spike over the bone, and sessions are short. The mistake is placing too many tiny scales in the pinecone. Ask for a simplified silhouette with negative space so the pattern does not fill in as the skin ages. For styling, low scoop or off-shoulder tops show the cluster cleanly and reduce fabric friction. Wear a soft cotton top to the session so the area stays calm afterward.
Pre-Session Essentials
These small items make the first week smoother for the wrist, ankle, and collarbone pieces above and for other compact placements in ideas 1 through 6.
-
Stencil transfer paper kit. Lets you preview line placement on skin before ink, which is handy when checking symmetry along the collarbone and forearm.
-
Topical numbing cream. Applied about forty-five minutes before reduces bite on sensitive spots like ribs and behind the ear without affecting movement.
-
Thin protective film roll. Helps keep ankle and finger tattoos clean during the first days of airborne dirt and frequent hand washing.
-
Fragrance-free gentle body wash. Cleanses without irritation for delicate linework on chest or inner thigh.
-
Aquaphor healing ointment. Thin application for the initial day or two helps preserve saturation in fine pieces while the skin scabs and starts to peel.
7. Leaf Ring Around the Finger
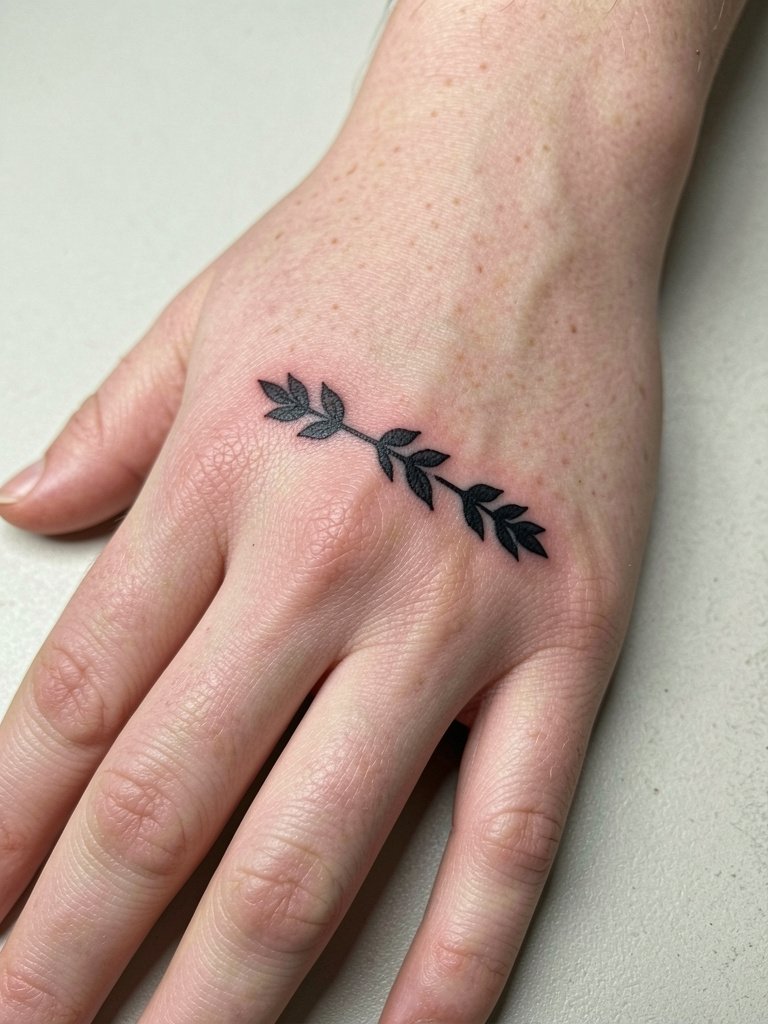
Finger rings wear faster than other skin because of constant washing and movement. One argument among artists supports fine dotted leaves for the look, while another insists on slightly thicker strokes to maintain form. Choose the thicker outline if you want the rings readable after a year. The session is brief but can sting more than wrist work. For showing off while minimizing wear, pair with thin adjustable stack rings worn on adjacent fingers so the tattoo becomes part of your everyday jewelry.
8. Stippled Dandelion on the Calf
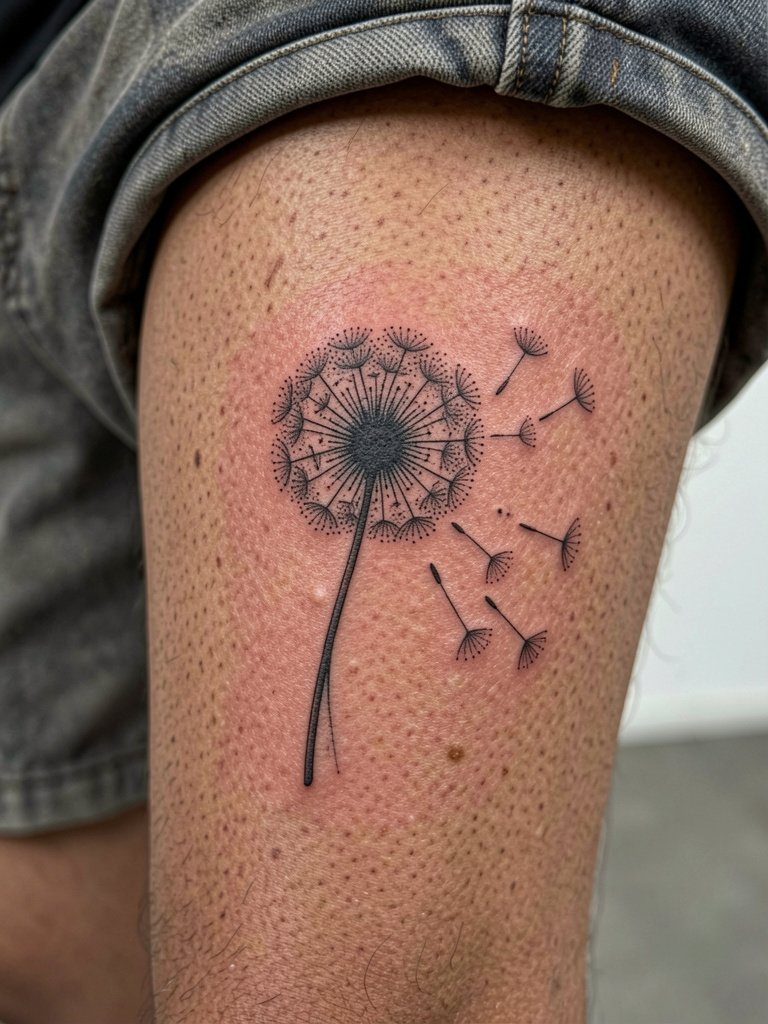
Calf pieces give the artist room to breathe and let stipple shading read without crowding. Sessions are comfortable and often under an hour. The frequent error is cramming too many detached seeds into a small field, which can look noisy within two years. Ask for a spaced composition with larger seed negative space to age well. For display, pair with mid-calf boots or a cropped summer dress so the silhouette is visible on walks.
9. Single Birch Trunk on the Side Rib
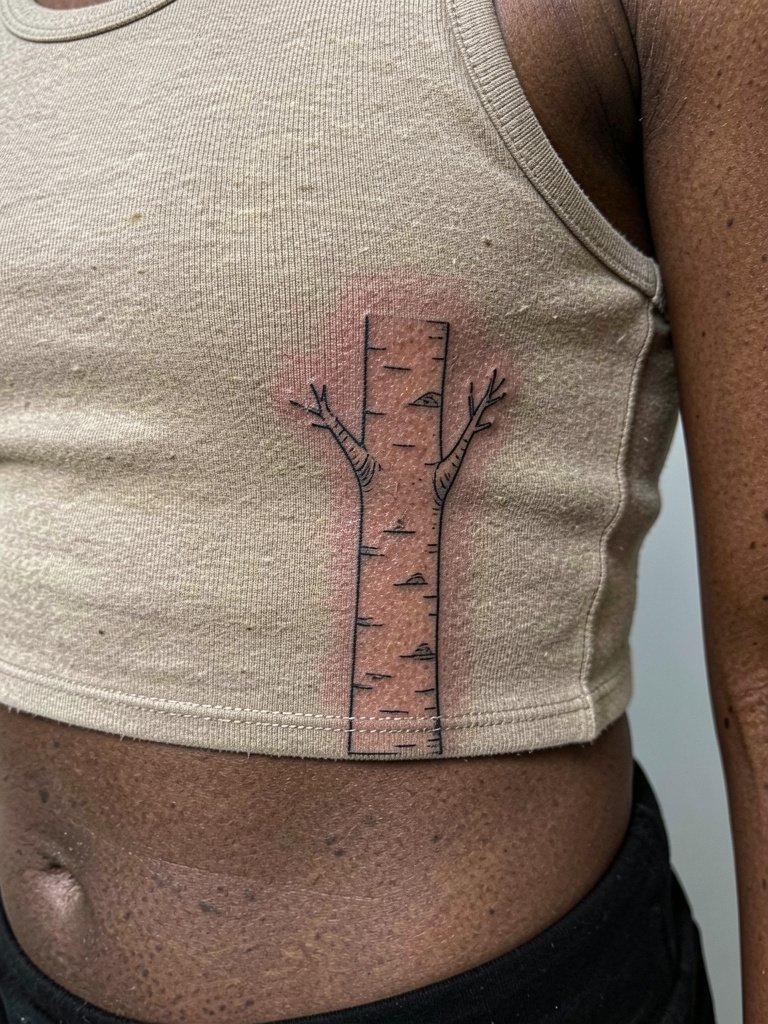
A single vertical trunk can follow the body and look elegant. Ribs move with breath, so lines that are too fine can wobble as the skin shifts. Specify a slightly increased lineweight and ask for a healed mockup mapping how the trunk sits when you inhale versus exhale. Pain is higher here and sessions vary. For after visibility, wear low-rise jeans and a cropped top to frame the trunk when showing it off in warm weather.
10. Minimalist Fox Silhouette at the Shoulder Blade
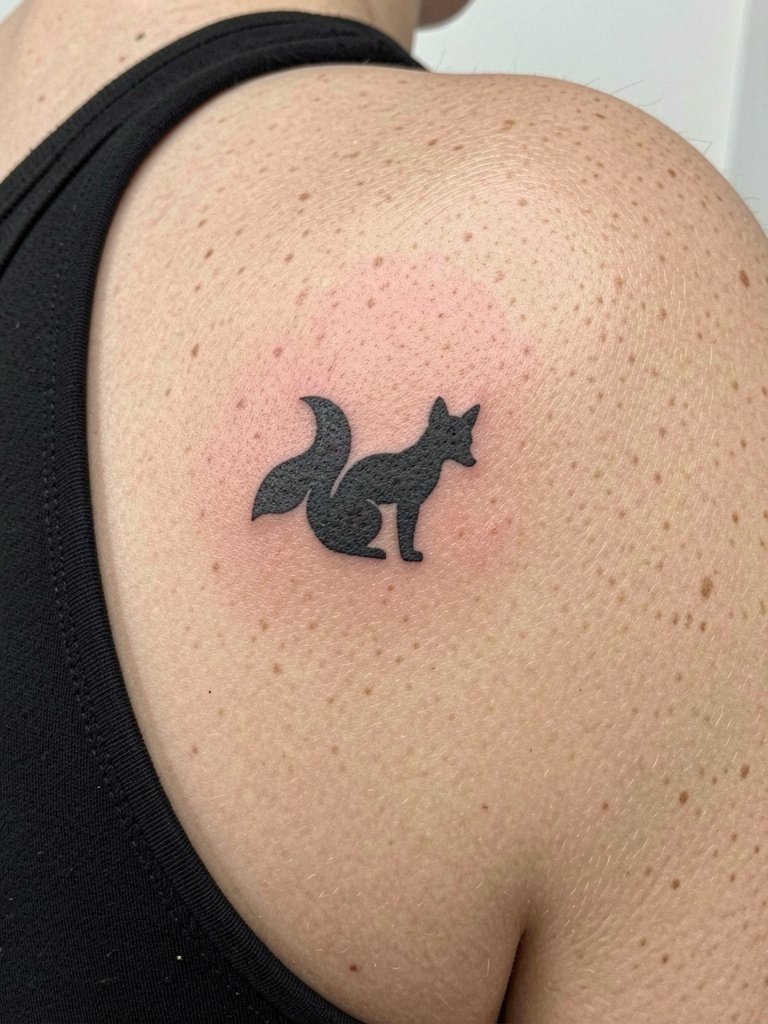
Shoulder blade placements are low-friction and age well if sized correctly. Sessions are comfortable and usually under an hour for a small silhouette. A common mistake is over-detailing a tiny animal, which becomes a blob over time. Ask the artist to reduce detail and emphasize clean negative space for recognition at a glance. For styling, a racerback or open-back top like a strappy tank lets the fox peek out without disturbing the healing area.
11. Tiny Constellation Along the Forearm
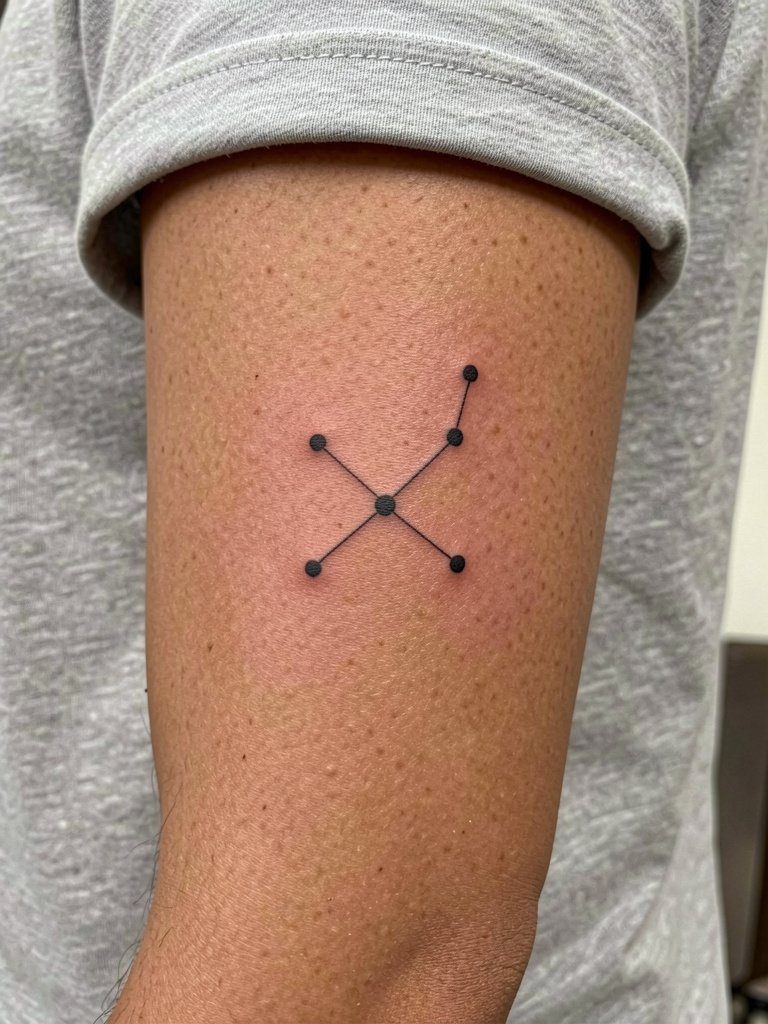
Constellation designs look airy but need room between dots so lines do not merge. They are low-pain and often a single short session. The mistake is tightening the dots too close together to force a compact shape. Request spacing that reads at both three and five inches so the pattern stays legible on different arm widths. For a casual reveal, roll up a linen button sleeve and let the constellation rest on bare skin.
12. Micro Moss Patch on the Sternum
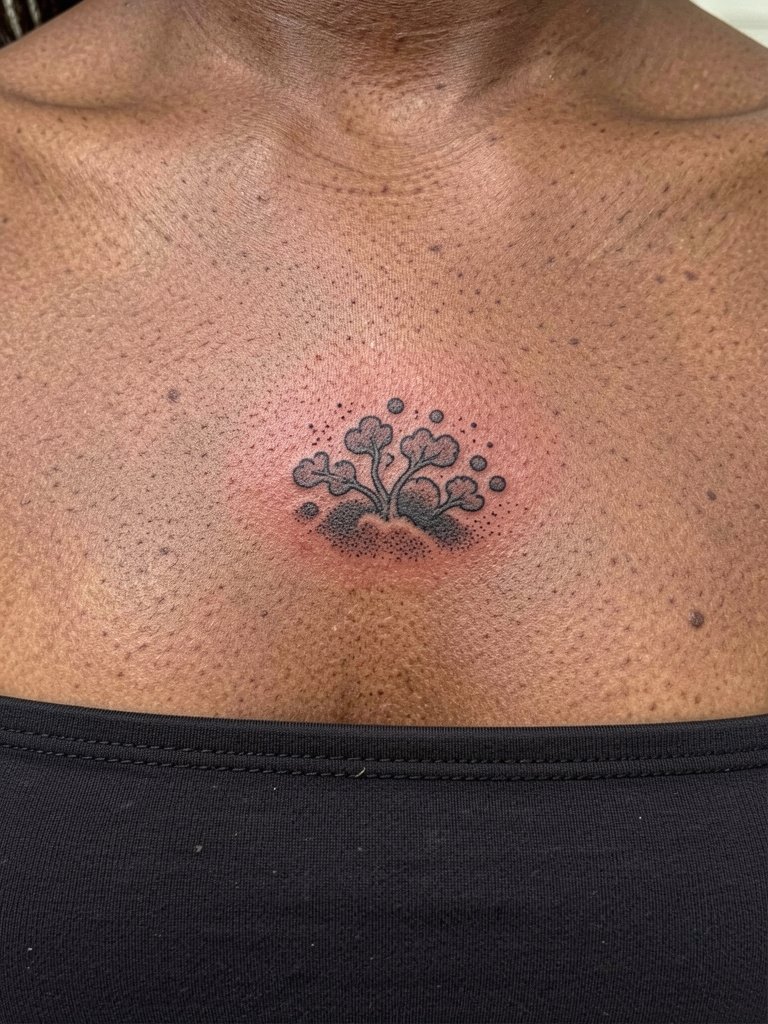
Sternum work is intimate and the skin there moves differently than flat surfaces. One camp of artists cautions that single-needle micro botanical work on the sternum blurs because of skin tension. The other camp says slightly exaggerated spacing and deeper, consistent saturation lets micro botanicals stay crisp. If you choose this spot, ask for layered spacing and plan for a touch-up at the one-year mark to maintain contrast. Wear a soft bandeau top to the session for easy access and minimal pressure afterward.
13. Tiny Ridge Line on the Upper Arm
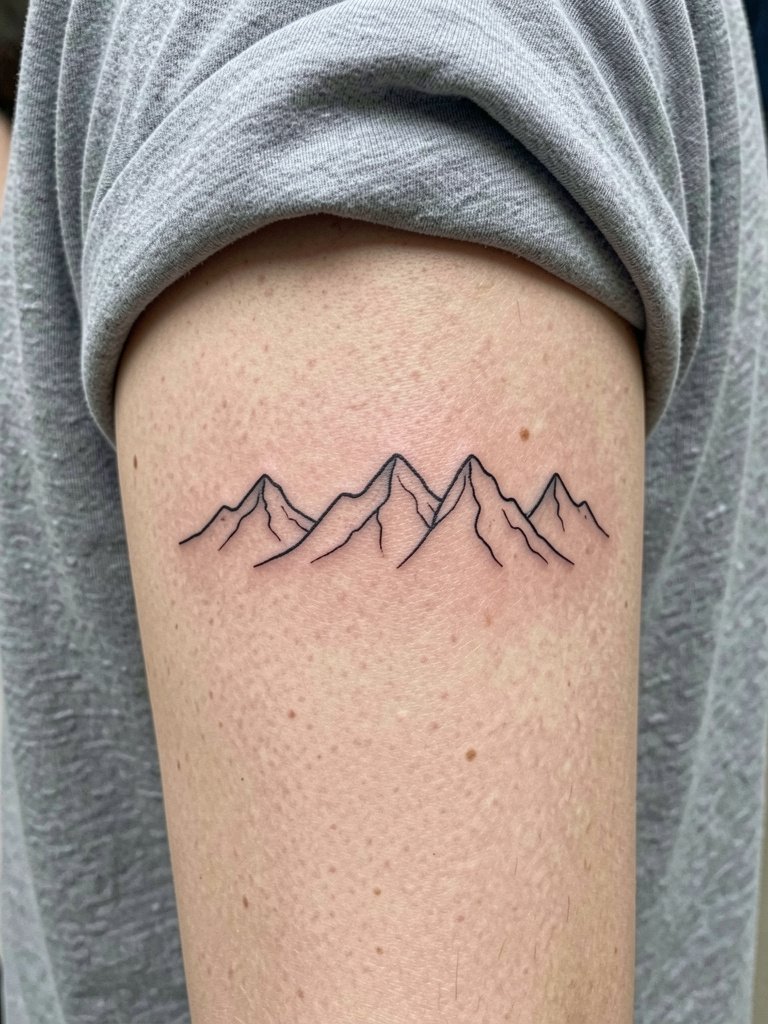
Outer upper arm is forgiving and shows designs well with minimal aging. Sessions are comfortable and usually quick. A frequent misstep is centering a tiny ridge line too close to the inner arm where movement makes it read odd. Choose lateral placement, and ask the artist to map the curve so peaks read as intended when your arm hangs naturally. For outfits that highlight the ridge, try a breezy sleeveless linen top.
14. Seed Pod on the Back of the Neck
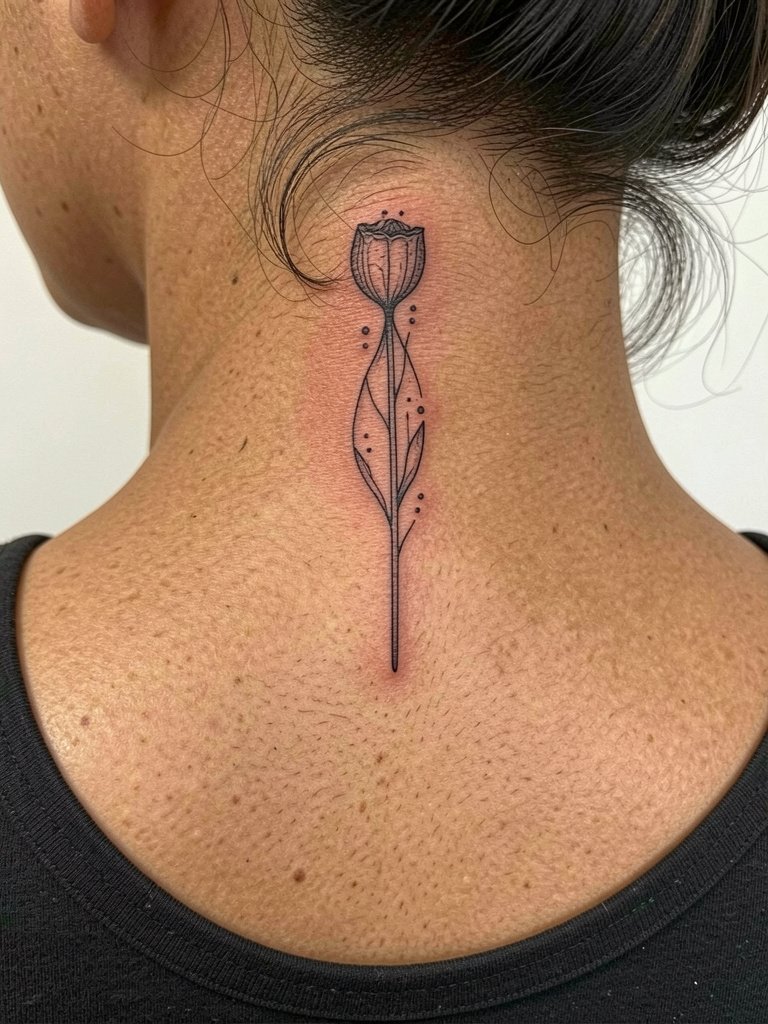
Nape tattoos are subtle and easy to hide under hair when needed. The session is brief with moderate sensitivity. A common error is crowding the piece with extra flourishes that age into muddiness. Ask for a simple vertical composition and a healed photo mockup to ensure it reads from behind. For pairing, a low bun or updo complements the seed pod, and a lightweight silk scarf can highlight the area without rubbing the ink.
15. Minimalist Poppy Near the Ankle Bone

Delicate floral motifs at the ankle need a thicker anchor line to survive shoe friction and washing. Sessions are short but the skin over the bone is sensitive. Avoid lace-like petals that lack a supporting contour. Request a small dot of central shading and a slightly stronger stem to reduce the chance of softening. For evenings out, pair the poppy with cropped trousers or strappy sandals that let it peek through without chafing.
16. Pebble Cluster on the Palm Edge
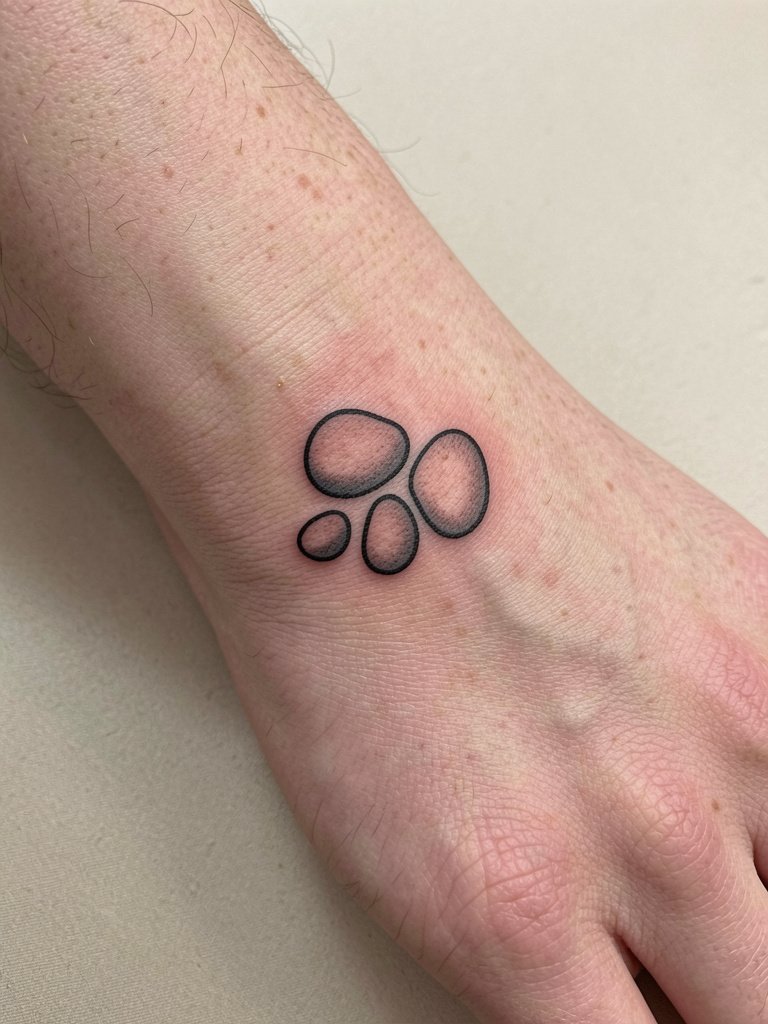
Hand-edge tattoos demand planning because of constant movement and washing. One common mistake is choosing hairline contours that disappear within months. Ask for compact, bolder forms and expect multiple touch-ups over time to keep edges crisp. Sessions are short but painful in spots. For minimizing wear, avoid tight gloves after healing and consider wearing a slim cuff bracelet like a leather wrist cuff when you want to frame the area.
17. Outline of a Single Leaf on the Upper Thigh

Upper-thigh pieces age well because the skin there is stable and protected. Sessions are comfortable and allow slightly more time for subtle detail. The typical error is placing the leaf too close to the underwear line where friction can dull edges. Ask for placement mid-thigh and a mockup while standing so the leaf sits where you want it. For show-off looks, pair with a flowy midi skirt that parts to reveal the outline on warm days.
18. Tiny Heron Silhouette by the Ankle
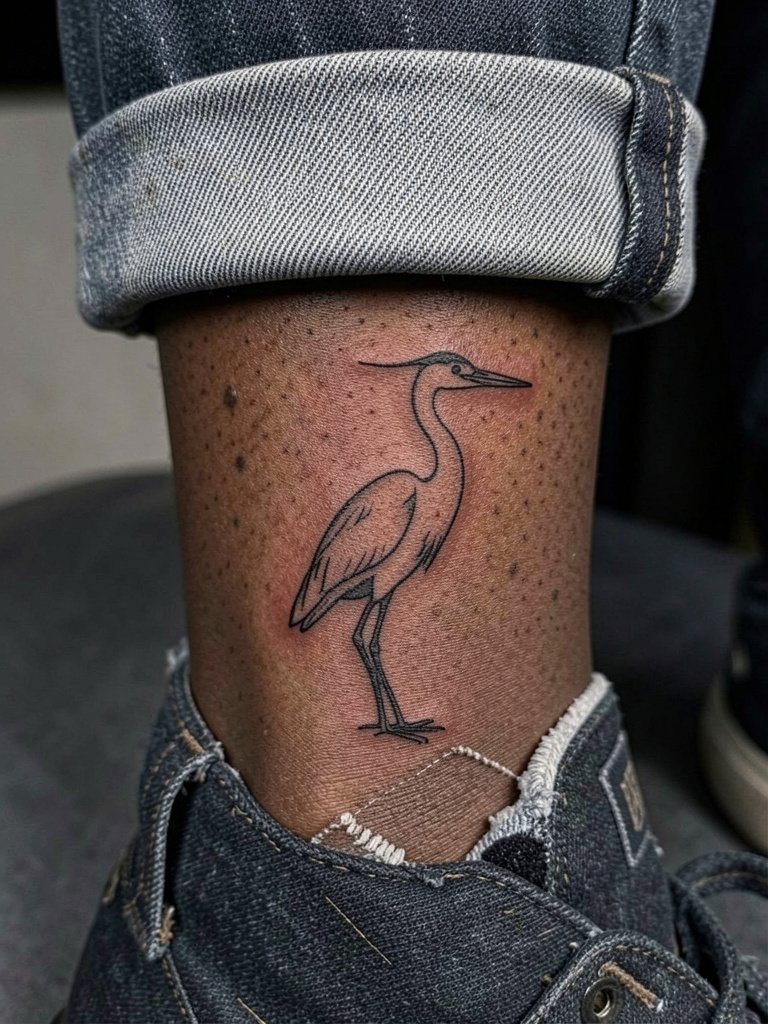
A bird silhouette near the ankle reads like a talisman and needs clean negative space to maintain the leg line. The area feels sensitive over the bone, and short sessions are typical. Avoid too many internal lines that will smudge with friction. Request the artist show how the leg line reads in shoes and barefoot. For presentation, wear cropped linen pants or a slip skirt that lets the heron catch light without rubbing.
19. Minimal Crescent Leaf at the Elbow Pit
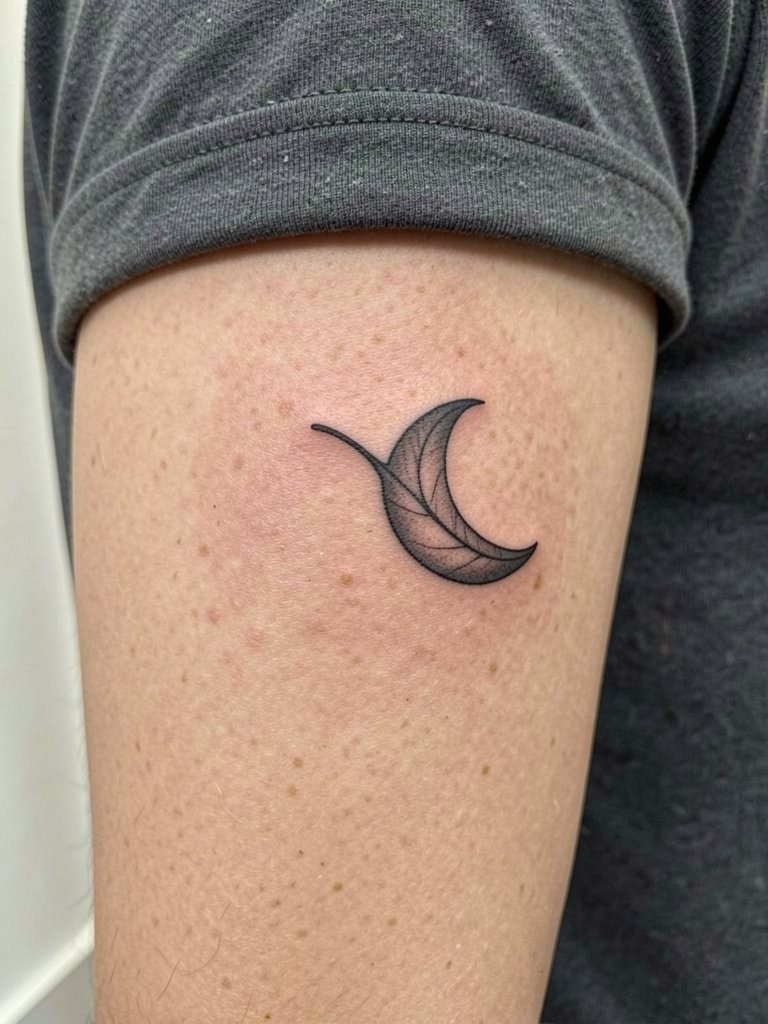
Elbow crease tattoos stretch with movement, so designs that span the fold often soften. The mistake is putting high-detail inside the crease. Opt for a compact crescent leaf that sits just off the pivot. Healing can be slower because of flexing, and you may need a touch-up at twelve months. For outfits, short sleeves or rolled cuffs that end above the elbow give the crescent a clean frame, try a lightweight short sleeve knit.
20. Tiny Acorn on the Back of the Hand
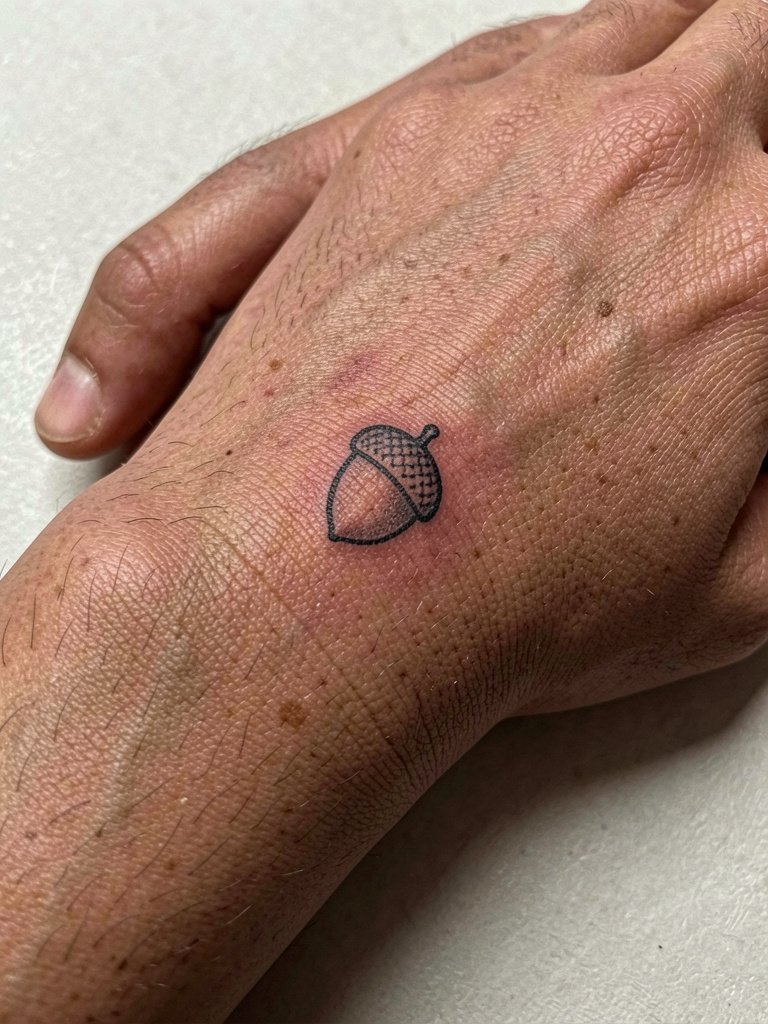
Back-of-hand tattoos age faster than other areas and require realistic expectations. Many artists split into two camps on hand detail. One group warns that delicate single-needle motifs become ghosts after months because the skin regenerates quickly. The other group suggests bold outlines and heavier saturation so the shape keeps reading. If you prefer durability, choose a strong outer contour and expect touch-ups. For styling, a minimal bracelet or a wide band ring draws attention to the hand without grinding against the ink.
21. Tiny Wavelet on the Top of the Foot
Top-of-foot tattoos are delicate and catch shoe movement. The common mistake is choosing ultra-thin curls that disappear after shoes and socks rub them. Request a slightly bolder crest and plan for a touch-up at the first anniversary. Healing can be fussy because shoes press the area, so bring open-toe footwear when possible for the initial days.
22. Minimalist Pine Needle Cluster on the Shoulder Cap
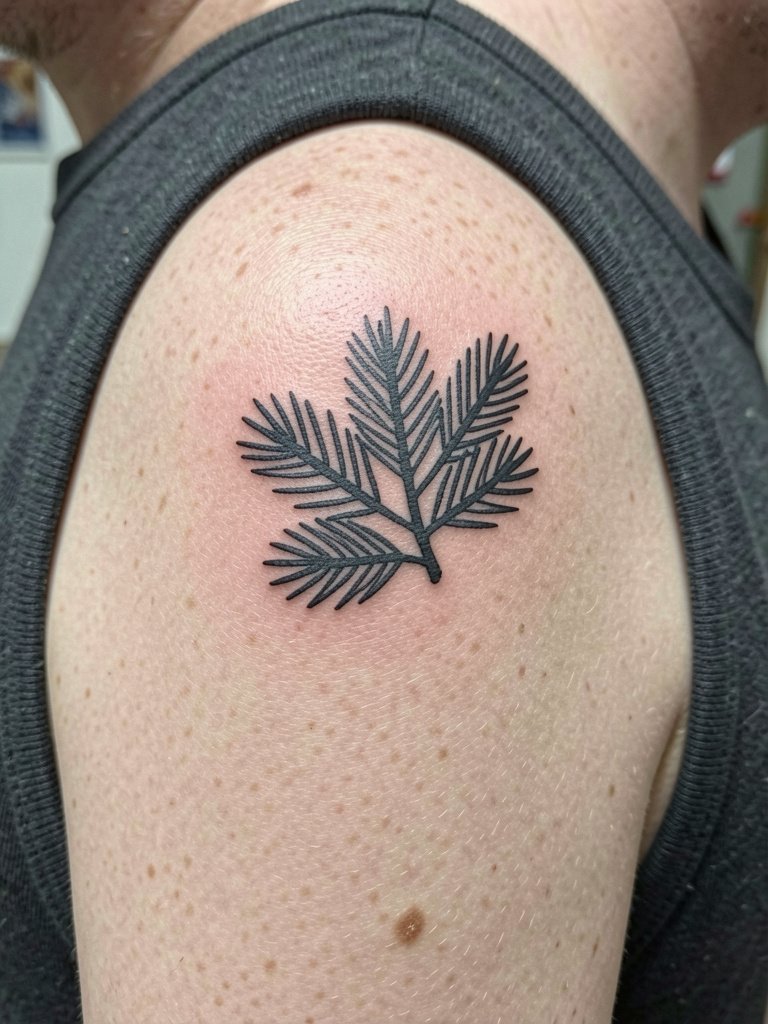
The shoulder cap is stable and forgiving for short linear motifs. Sessions are easy and the work ages predictably. Avoid asking for extremely tiny at-scale needles that the skin will soften. Ask for slightly longer strokes with balanced spacing so the cluster maintains movement. For styling, off-shoulder tops and tank dresses like a ribbed tank frame the needles without rubbing.
23. Small Rock Outline Behind the Knee

Behind-knee tattoos face skin folding and frequent movement. The mistake is over-detailing a tiny shape where folding will distort it. Request a simplified silhouette and a placement map for both standing and seated positions. Healing may feel tight when you bend, and you will sleep with a pillow to reduce tension. For outings, pair with casual shorts that do not rub the area.
24. Single-Needle Meadow Grass on the Hip
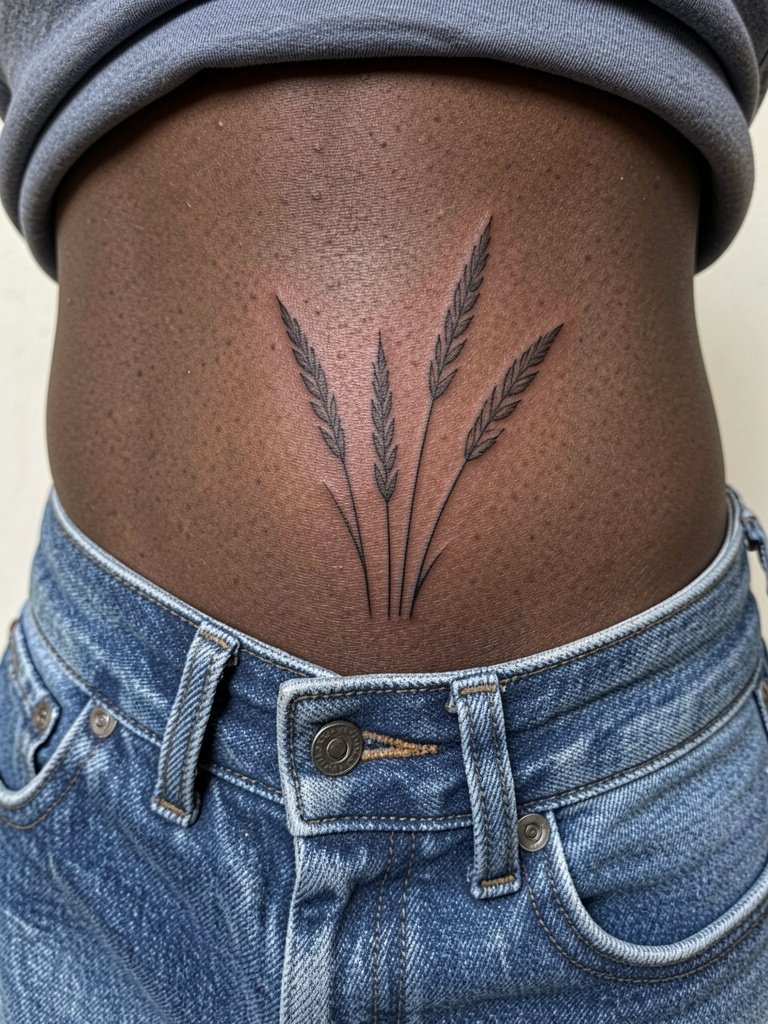
Hip tattoos can be playful but need protection from waistbands. The common error is placing the design under a tight waistband where friction fades edges. Pick a spot above the waistline and ask for slightly wider spacing between blades. Sessions are comfortable when you wear low-rise jeans so the area is exposed naturally. For display, high-cut briefs or a crop top help the meadow read at the hip line.
25. Tiny Mushroom Cluster on the Inner Forearm
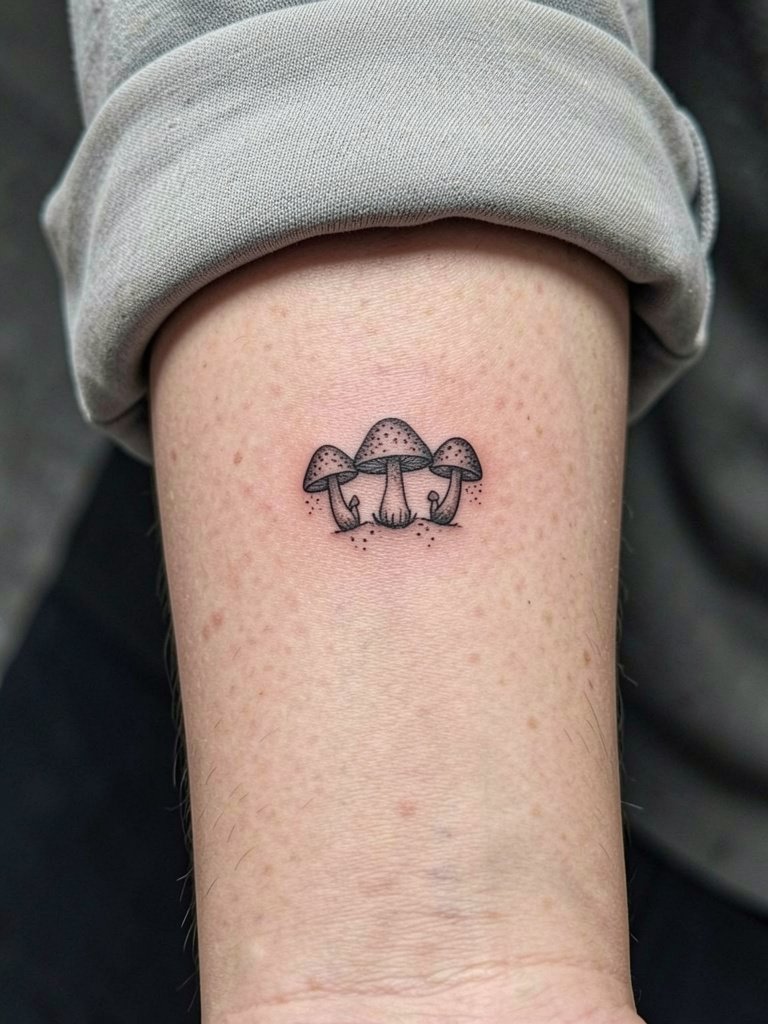
Inner-forearm tattoos age well and are low-risk for blowout when spaced correctly. The frequent mistake is cramming caps too close together in a tiny cluster. Ask the artist to space the mushrooms so each cap holds its own negative space over time. Healing is straightforward and usually low discomfort. For showing off, roll a linen sleeve or wear a short sleeve tee and add a slim canvas tote when you want the cluster visible on errand days.
26. Tiny Sunburst on the Navel Line
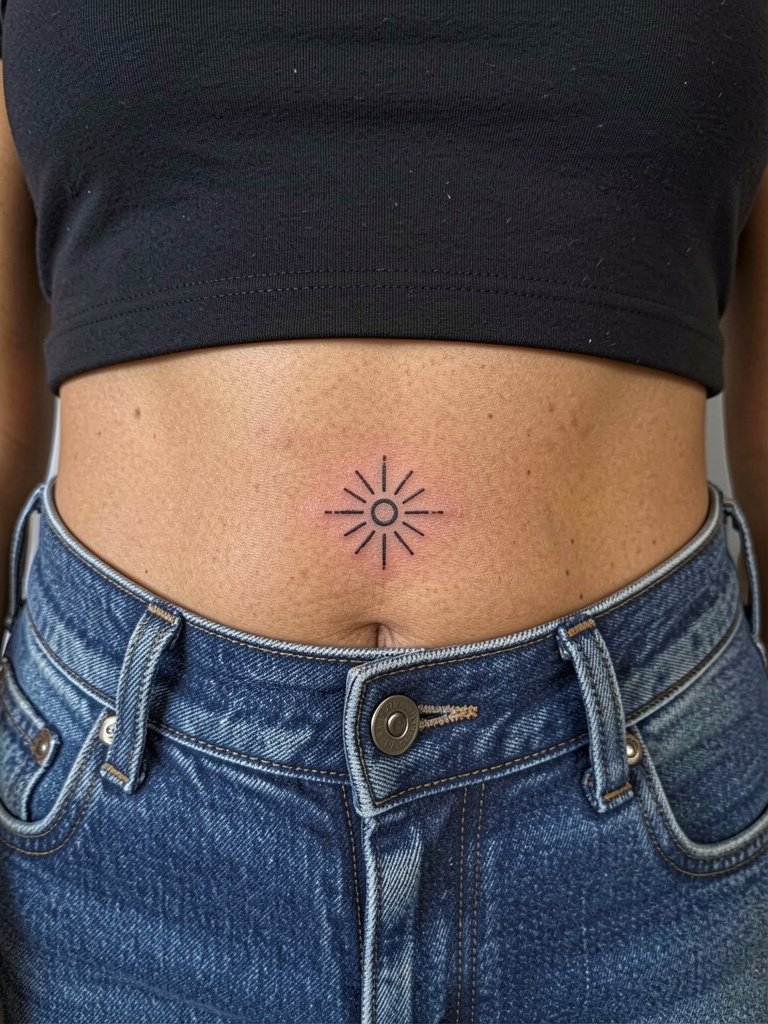
Abdomen placements depend on weight fluctuation and pregnancy history. The mistake is putting tiny rays too close to the navel where stretching alters spacing. Ask for a compact burst with clear negative gaps and discuss future touch-ups if you anticipate body changes. Sessions are moderate in length and healing needs loose waistbands for the first week.
27. Tiny Ridge of Hills Across the Lower Back
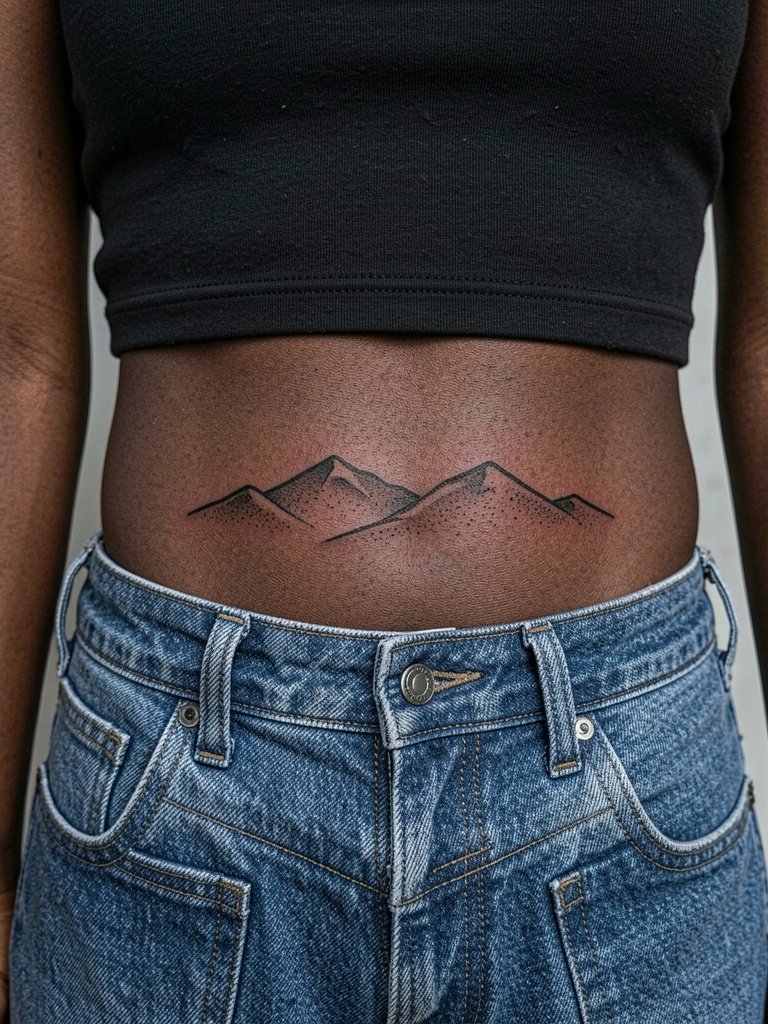
Lower-back placements are private and stable. The common error is making the ridge too tight to the waistband where shirts and belts rub. Choose a placement that sits above the waistband and ask for slightly elongated peaks so the composition stays readable as your posture shifts. Sessions are medium length and the area tolerates a fair amount of linework without early blowout. For casual looks, a cropped tank or low-rise jeans highlights the hills when you want them visible.
Frequently Asked Questions
Q: How long do minimalist nature tattoos generally take to heal and when will they look like the tattoo in these images?
A: Healing for most small minimalist pieces is about two to four weeks for the outer scab to fall away and roughly three months for full settling. Expect the first week to involve scabbing and itching, then a dulling period as the skin regenerates. Results in the healed images are typically photographed at three to six months post-session when saturation and line settling are stable.
Q: Are single-needle fine lines a bad idea for areas like ribs or hands?
A: Fine single-needle work can be risky on high-movement or high-friction zones because the skin there often softens details. If you want the fine aesthetic on ribs or hands, request slightly heavier lineweight and extra spacing between elements. Plan for touch-ups, because a maintenance session within one to three years is common for longevity.
Q: Where can I find healed examples and portfolios without naming specific artists?
A: Search platform tags and keywords that match the style and placement you want, for example hashtags for "minimalist botanical healed" or "fine line nature healed" on photo and video platforms. Use location filters to narrow nearby portfolios, and browse portfolio sites for keyword searches like "minimalist sternum plant" to see user-submitted healed images in different skin tones.
Q: What should I wear to a session for inner thigh, sternum, or shoulder blade placements?
A: For inner thigh, wear fitted bike shorts so the artist can access the area without you disrobing. For sternum, a fitted sports bra or bandeau works. For shoulder blade, a loose tank or racerback makes access and aftercare easier. Bringing garments that you can put on without rubbing the new ink helps reduce early irritation.
Q: How often do minimalist nature tattoos need touch-ups compared with bolder styles?
A: Minimalist pieces often need touch-ups sooner because they rely on single lines and small negative spaces. Expect to budget for a touch-up anywhere from twelve months to three years depending on placement, sun exposure, and skincare. Thicker lines and conservative spacing reduce the frequency of maintenance.
Q: Can I wear jewelry or accessories right after the first week if I have wrist or hand tattoos?
A: Wait until the initial peeling phase is over and the scabs have fallen off before sliding on most jewelry. For wrist and hand pieces, lightweight bracelets and slim rings can work after two to three weeks if the skin looks fully re-epithelialized. Steer clear of tight bands that press into the area until the tattoo is fully healed.
