
Someone I know spent months collecting wave photos, then cancelled a session because the small wrist piece looked like a smudge a year later. The real issues I see are predictable: fine line waves that fade fast, trouble finding authentic irezumi without Western mashups, and hand or wrist color that needs frequent touch-ups. Read on for dozen practical Japanese wave tattoo ideas, what to ask your artist, and which designs hold up over time.
1. Kanagawa Great Wave quarter sleeve

Someone I know first saw this as a sleeve starter and booked it for the upper arm for visibility without committing to a full back piece. The quarter sleeve version channels the woodblock composition but keeps session count reasonable. Tell your artist you want bold linework around the crest and solid black anchoring waves. Thin, sketchy outlines are the common mistake. At six months the black should still read crisp, at two years expect mild softening along tight curl lines, and by year five plan a light touch-up to revive blues and outer linework. Pain is moderate for the upper arm and most sessions run one to three hours. For irezumi-inspired work, mention you value respectful motifs rather than direct reproduction of sacred prints.
2. Hokusai Great Wave full back piece
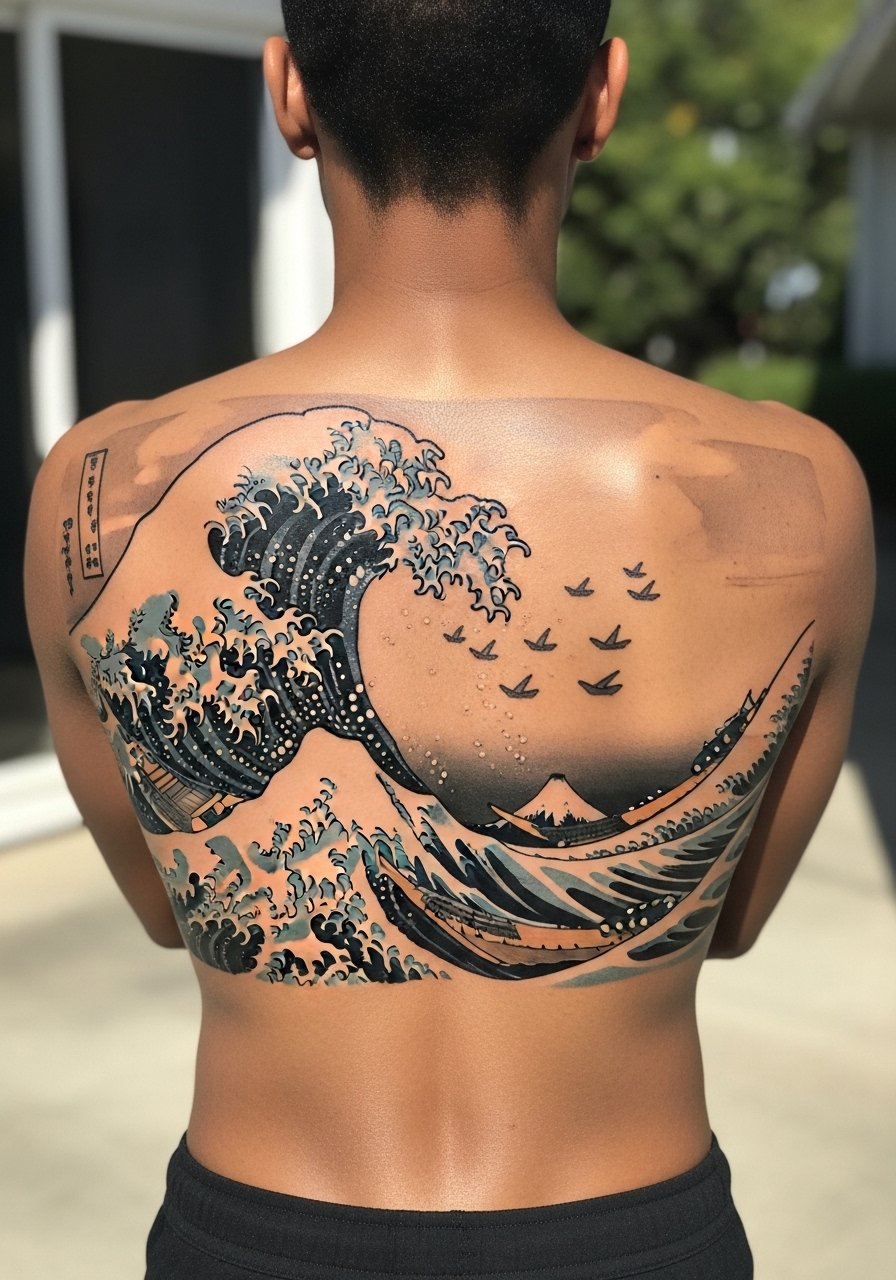
Fair warning: a full back is a commitment on pain and time. The big benefit is scale. A large canvas lets the artist keep linework thick where needed so the composition ages more predictably than a shrunken recreation. In consultations ask for reference showing how the wave reads from meters away, not just close-up sketches. A common error is insisting on tiny Hokusai detail without room, which leads to blurring. Expect multiple long sessions. For authenticity some collectors prefer black and gray with blue accents while others want saturated Hokusai blues. Name both camps when you ask your artist which route they favor. Back pieces tolerate touch-ups well if you plan ahead.
3. Wave and koi fish forearm sleeve
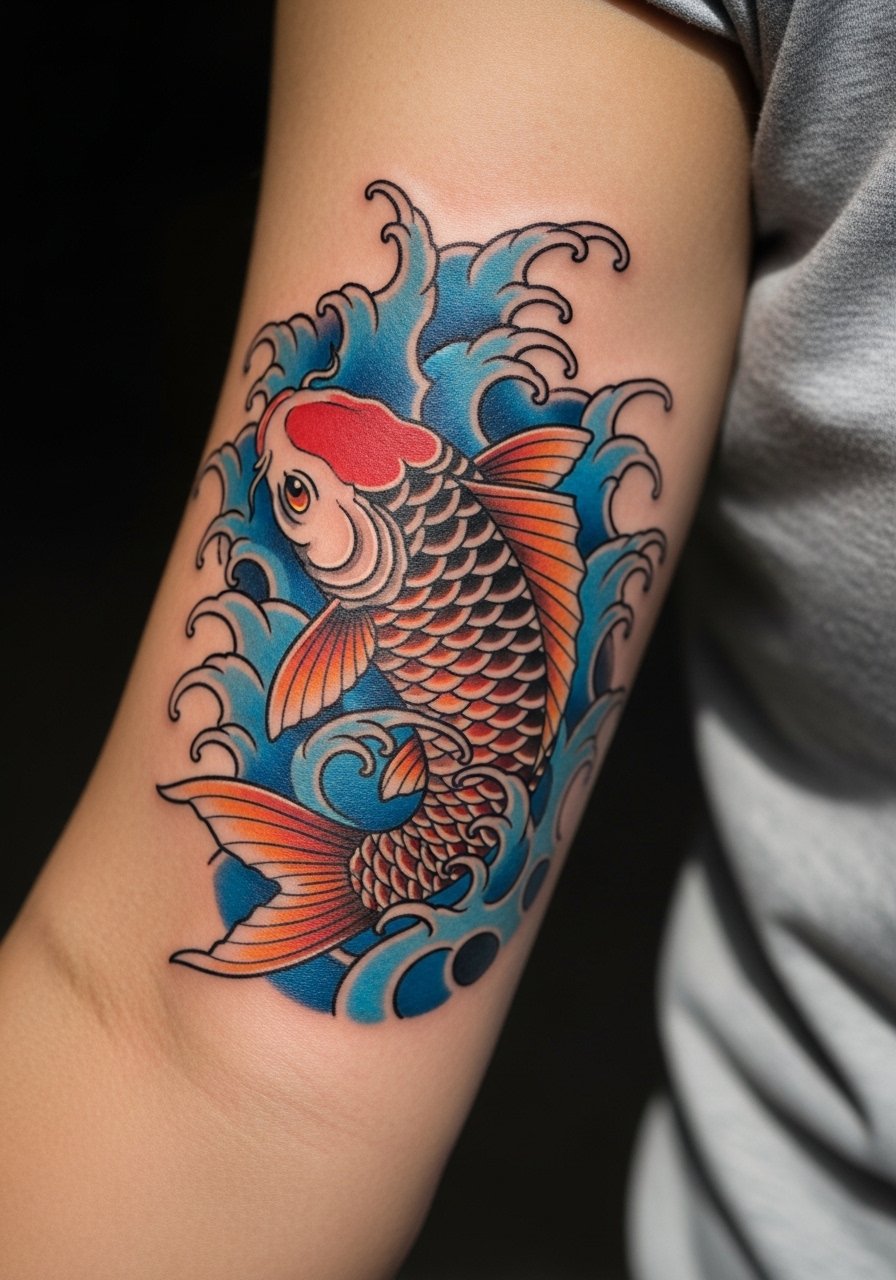
When you sit down with your artist for this forearm sleeve, bring photos that show koi scale and wave overlap. I recommend placing the koi head near the elbow fold so movement animates the composition. The forearm is forgiving for color saturation but the mistake is packing too many tiny scales into a small area. At six months bright oranges hold better than pale blues, at two years expect the blues to need a refresh. Sessions usually divide into two to three visits. Pain is moderate. This design is for people who want a motivational motif they can show or cover easily with sleeves. For discovery try local searches like "Japanese style tattoo studio" or Tattoo-specific apps to find artists who specialize in neo-traditional fish work.
4. Crane and wave hand tattoo

The biggest mistake with hand placements is underestimating fading. Hands see constant friction, so color often fades quickly. Artists are split on whether to use vibrant blue on hands. One camp avoids bright color and uses deep black for longevity. The other camp will pack color and plan touch-ups every year. If you want this, ask your artist about expected touch-up timelines and tell them you prefer bold outlines over fine detail. Also remember hand tattoos still affect some hiring situations, so consider placement carefully. Sessions are short but painful and expect yearly maintenance.
5. Wave and cherry blossom leg piece
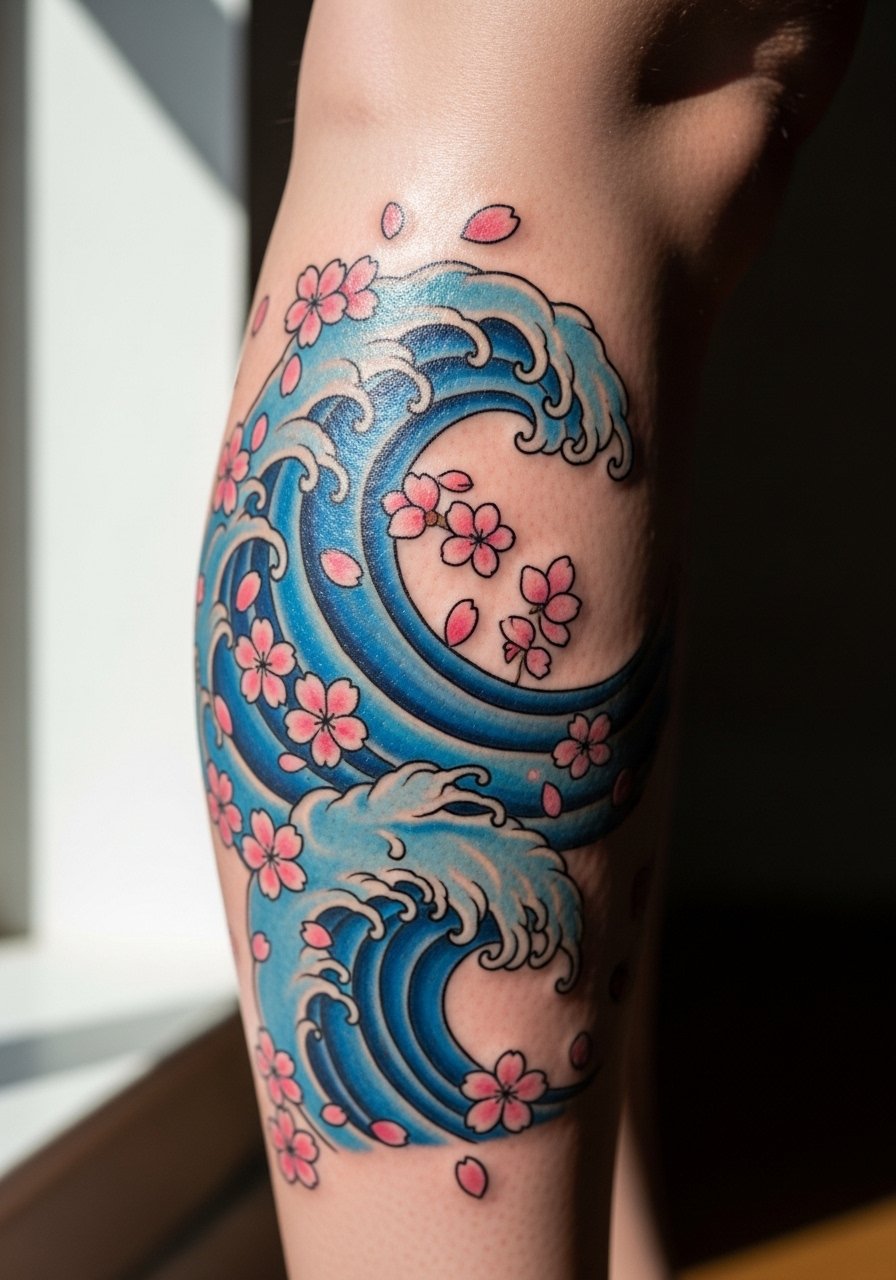
Most people I see pick the calf for leg pieces because it hides under pants but reads well when shown. Pairing waves with sakura adds seasonal contrast and gives an intentional balance between movement and a delicate floral motif. A common version that ages poorly uses pale pinks that wash out on darker undertones. Ask for slightly richer pinks and stronger black outlines around blossom clusters. Healing in summer can be a challenge because sweat collects in the area. Use breathable wraps for the first week and avoid tight athletic shorts while scabbing. Session length typically two sessions for a medium calf piece.
6. Black and white armband wave

Someone I know used this as an entry into Japanese motifs because it reads clean and scales easily. The armband is best with bold, continuous linework so the band reads solid over time. The common mistake is making the band too thin which invites blowout and patchy edges. Tell your artist you want at least two millimeters of lineweight around the perimeter and to avoid tiny internal details that will blur. Pain is low to moderate on the bicep and sessions can be one short appointment. This option suits people who want a minimalist nod to Japanese waves without a large commitment.
7. Oni mask with crashing waves chest tattoo

There is a real visual impact when an oni face meets wave motion across the chest. I often tell clients this is for people who want a fierce narrative that reads from a distance. Common mistakes include crowding the face with too many small wave curls. Ask for negative space around the eyes so the mask keeps expression as it heals. Chest tattoos can sting more in the sternum area and sessions are often split into two to three visits. Expect rich blacks to hold best, while reds may dull and need a touch-up at year two. Mention Irezumi roots to your artist so they avoid accidental cultural missteps.
8. Dragon coiling through waves thigh tattoo
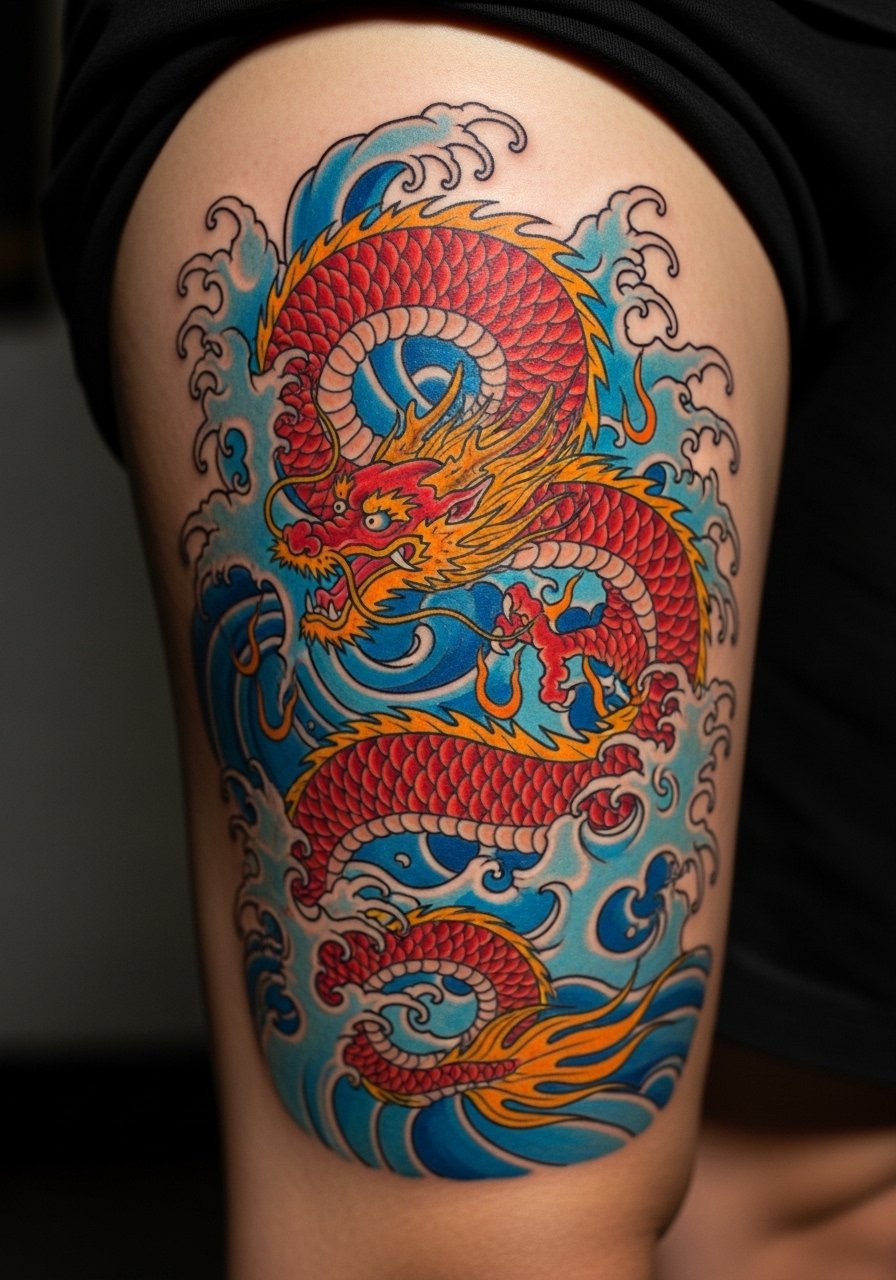
When you book a thigh dragon, remember the canvas gives you room for scale and movement. A consultation tip is to bring photos showing how the dragon's coils should sit when you stand and when you sit. A common error is placing a long curve across a joint so it distorts with motion. Thigh skin tolerates heavy saturation well, and people report the area hurts less than ribs but more than the outer arm. Expect three to five sessions for a large thigh piece and plan a touch-up at year three to refresh greens and blues. For discovery, try specific hashtags and local convention guest lists for neo-traditional artists.
9. Wave and lotus flower shoulder cap

A shoulder cap is easy to conceal and looks complete even at a small to medium scale. I recommend asking your artist to treat the lotus as the focal motif, with waves as supporting shapes so the cap reads well from different angles. The mistake I see is trying to cram a complex landscape into the cap, which flattens detail when healed. At six months the shading should remain soft, at two years the stipple shading may need a light top-up depending on sun exposure. Sessions are one to two short visits and pain is usually moderate. Mention you want stipple or whip shading to get textured contrast without heavy saturation.
10. Simplified Hokusai wave wrist tattoo
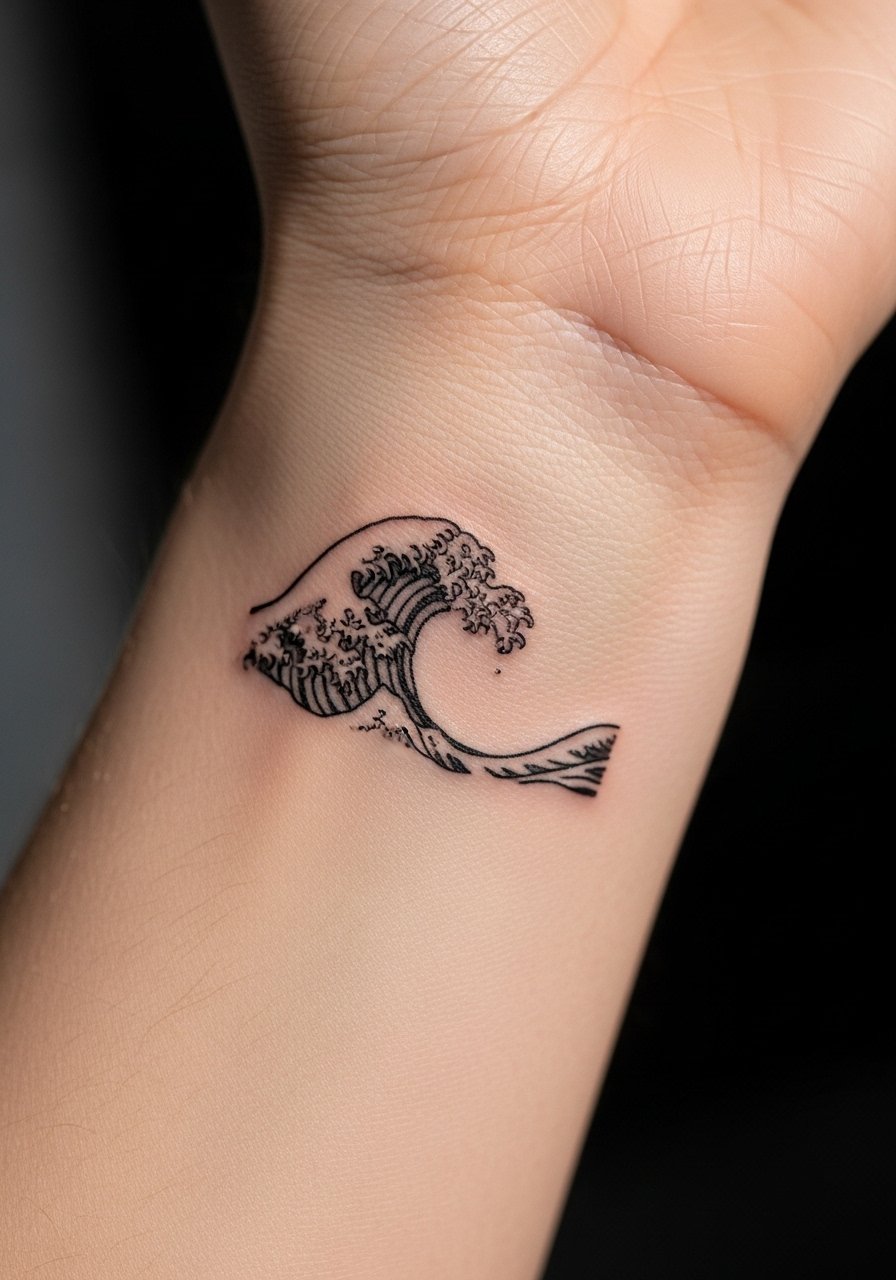
A note on controversy. Fine line wrist waves split artists into two camps. One group says the wrist skin and movement blur fine lines within two years. The other group says with correct needle depth and spacing fine line can hold well. Personally I side with asking for slightly thicker contour on wrists to avoid early blur. This design is small and subtle but the common mistake is asking for ultra-fine detail that ages into a smudge. Pain is noticeable on the inner wrist. Plan a one-hour session and discuss a realistic touch-up plan with your artist before booking.
11. Mount Fuji with waves half-sleeve

When I see a Mount Fuji half-sleeve done well, the mountain anchors the composition while waves provide motion around the arm. A practical tip is to request readable silhouettes for the mountain peak so the motif does not rely solely on tiny gradient work. The common mistake is over-detailing the background, which becomes noise once healed. This placement needs three sessions on average and ages well if you protect it from strong sun. If you want a faithful Hokusai-style nod ask about how the artist interprets woodblock textures without copying a single source exactly.
12. Koi swimming against waves calf wrap

When you opt for a calf wrap, expect the design to read differently when viewed from the side versus the back. A consultation direction to give is where you want the koi head to face during most activities. People often make the mistake of crowding multiple koi into a narrow calf; give each fish room. Calf pieces tolerate color well but summer heat and friction from shorts can complicate early healing. Sessions are usually two visits. Plan a two-year touch-up rhythm for bright oranges and blues to keep saturation lively.
Tattoo Prep and Aftercare Essentials
I recommend prepping by hydrating skin for a week, avoiding alcohol the day before your session, and bringing loose clothing for the area. Healing choices vary, and artists are split on occlusive bandages versus dry healing. One camp favors breathable occlusive dressings for less mess. The other camp prefers letting a scab form for stronger line longevity. Ask your artist which they use and why.
Shopping list
Fragrance-free gentle foaming cleanser for new tattoos. Use this to gently wash your tattoo twice a day during the first week. It reduces film without stripping pigment.
Lightweight fragrance-free balm for daily moisturizing. Apply thin layers once initial scabbing softens to keep skin supple.
Medical-grade second skin bandage, small rolls. For people who prefer occlusive protection during the first 48 hours this helps limit movement and contamination.
Disposable non-latex gloves pack. Useful if you need to change dressings at home while keeping things sanitary.
Breathable tattoo aftercare wrap sheets. Good for leg or arm pieces when you want minimal sticking and some air flow.
Sun protection mineral SPF 30+ stick. Long-term maintenance depends on sun avoidance. A stick makes reapplication easy over healed ink.
Silicone scar gel, travel tube. For raised areas after full healing this can help with texture.
Saniderm medical-grade occlusive dressing. One mainstream product listed here. Some people love it for less mess while others prefer dry scab healing. Use based on the method your artist recommends.
Every tattoo is different. Always follow your artist's specific aftercare instructions. Consult a dermatologist if you have skin concerns or unusual healing issues.
Frequently Asked Questions
Q: Will a simplified Hokusai wrist tattoo blur faster than a quarter sleeve version?
A: It depends on lineweight and placement. Wrists see constant movement and contact, so ultra-fine contour often blurs sooner. For wrists ask for a slightly thicker outer contour and plan a touch-up at year one or two rather than expecting no maintenance.
Q: How much extra healing trouble do leg pieces have in summer compared with arms?
A: From what I have seen, legs catch sweat and friction from shorts more often. That increases risk of prolonged scabbing. Use breathable wraps and avoid tight clothing the first week. If you sweat heavily, discuss occlusive dressing options with your artist.
Q: For hand or back-of-hand wave work, should I choose black and gray instead of bright blue?
A: Many artists recommend black and gray for high-movement areas because pigment sits more reliably. Others still pack blues and plan regular touch-ups. Name both camps and ask which approach the artist prefers for hands.
Q: How soon should I plan a touch-up for a koi and wave forearm sleeve?
A: A realistic plan is to book a light touch-up at year two to boost saturation in blues and reds. Forearms see sun exposure and friction, so that rhythm keeps the sleeve looking fresh without heavy revision.
Q: Where do I find artists who do authentic irezumi styles without Western twists?
A: Try targeted discovery paths like #IrezumiWave or #KanagawaWave on Instagram, search the Tattoodo app with location filters, check Pinterest boards for specific examples, or ask in r/tattoos for local recommendations. Also look at guest artist lists at conventions and Booksy for specialists in traditional Japanese work.
