
Someone I know spent eight months staring at feeds before realizing the real problem was not finding pretty pictures. It was knowing which geometric sleeve choices hold up on real arms, which ones need touch-ups, and how to budget for multiple sessions. I’ve seen linework blur, artists go quiet after a deposit, and sleeves that felt great until gym gains warped them. Read these 15 reliable geometric sleeve approaches and what to tell your artist before booking.
1. Flower mandala full sleeve from shoulder to wrist

Someone I know first saw this style on a friend’s sleeve and booked a consult the same week. Start by asking the artist to plan negative space so the mandala petals breathe and do not collapse into each other after a year. For a full shoulder-to-wrist build expect multi-session pacing that helps manage pain and cost. Common mistake is shrinking the central motifs too small, which causes blurring when the arm moves. At six months the dot work reads crisp, at two years expect slight softening in tiny stipple areas. If you want a cultural note, mention the mandala’s Buddhist origins and ask for respectful variations rather than a direct replica.
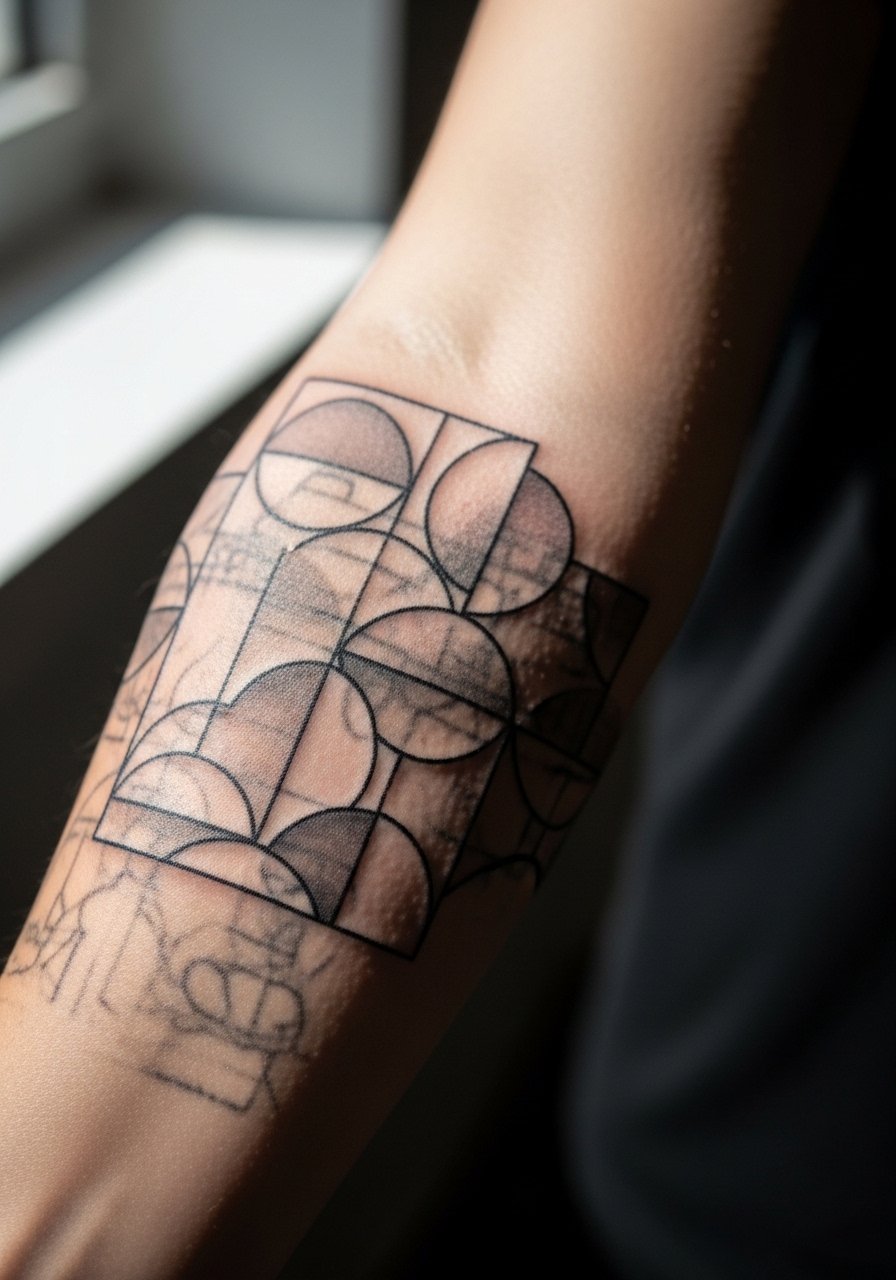
2. Tessellation wave wrap that locks without gaps

Fair warning: full-coverage tessellation is a time and wallet commitment, but it solves patchy arm canvases. Tell your artist you want consistent line weight across the wrap and filler cells sized to the muscle contours. The trick is design that follows the arm rather than fighting the anatomy; otherwise the pattern looks warped when you flex. Sessions are long and often split into 4 to 6 appointments, so plan short breaks. Blurring risk is lower with thicker outlines, so avoid ultra-fine lines in dense tessellation. This style reads well at distance, and touch-ups at year one keep the blacks saturated.
3. Negative-space circular cluster for clean aging

When aging is your priority, negative space is a practical choice. I’ve noticed forearm clusters with generous skin gaps tend to age cleaner than jammed fine-line variants. During consultation request slightly heavier contour lines but keep the inner rings airy. A common mistake is asking for tiny rings too close together. At six months the contrast is sharp, and by two to five years the skin gaps still read as design if spacing was planned. Pain is moderate on the inner forearm and sessions are usually short, so build the sleeve in blocks to test how the look settles.
4. 3D cube illusion across the upper arm and forearm

There is an optical thrill when a flat arm turns into an apparent volume play. For this one, bring reference photos that show shading from the same angle as your arm. Artists will map light source and shadow so cubes read consistently across biceps and forearm. Session time is moderate to long depending on how many cubes you want. Watch out for a common error where shadows are applied inconsistently, which kills the illusion. On darker skin tones increase contrast in the shading. Expect touch-ups to refine edges at the one-year mark if any blowout softens the cube outlines.
5. Maze-wrap from the base of the hand up to the elbow

The hand-to-elbow route reads as commitment. Hand tattoos age differently and can affect job prospects in some fields, so think it through before booking. For a maze that begins at the hand, plan clear entry and exit points so the pattern looks intentional rather than patched on. Sessions feel sharp on the hand and wrist, so many people split this into shorter blocks. The biggest mistake is asking for too-fine detail on the hand where skin is thin. Expect the hand portion to need touch-ups more often than the forearm portion because of wear and sun exposure.
6. Hexagon and spiral symmetry for paired-arm projects

When you want balance across body zones, hexagons and spirals let you mirror patterns while keeping visual flow. If you plan bilateral coverage or an arm-to-chest sweep, tell the artist you want anchor points at the shoulder and elbow to prevent a floating look. Pain is moderate on the upper arm and chest blends add extra sessions. A real mistake is forcing exact mirror symmetry without accounting for chest contours. At two years the hexagon edges hold if outlines were given room. This is a good pick if you value structured geometry with room for subtle shading.
7. Repeating semi-circle patchwork for filler problems
If you have random older pieces, semi-circle patchwork is a clever way to knit them together. I advise bringing photos of the old tattoos so the artist can size the patches to overlap smoothly. The usual error is letting the patchwork compete with the existing art, so instruct the artist to use scale and negative space to guide the eye. Sessions are short and you can start on the forearm to test how the pattern ages. Because outlines do most of the work here, touch-ups at six to twelve months keep the seams crisp.
8. Webbed circle shoulder sleeve that mimics natural textures

There is a tactile quality to webbed circles that echoes natural patterns. Ask your artist to vary cell size and use stipple shading to suggest depth without solid blocks of black. This shoulder placement takes four sessions on average and can be intense on the collar zone. One common mistake is making every cell identical, which flattens the composition. Dense blackwork tends to age well on shoulders because the skin sees less friction than the forearm. Plan a touch-up window around year one to re-saturate any larger black areas.
9. Seed of Life hexagonal pattern on the forearm

This pattern traces to older geometric motifs, so consider respectful adaptation rather than exact reproduction. When you consult, show the specific hex layout you prefer and ask for dot work transitions that keep negative space readable. Fine detail on the forearm sits well if spacing is generous. A common mistake is compressing too many small hexes into a narrow band. At six months the dot gradients pop, and by two years expect subtle softening in the smallest stipple areas. Touch-ups for dot work are usually localized and quick.
10. Clover-outline cluster for subtle symbolism

If you want low-key symbolism, clover outlines give you luck motifs without screaming for attention. Tell the artist you want larger outlines and skin gaps to avoid fine-line merging over time. This lower forearm spot is relatively low pain and lends itself to two to three short sessions. The biggest mistake is requesting tiny, closely packed clovers that blur into a blob. Expect touch-ups at around one year if the stems settle shallow. This approach works well to insert meaning without covering the whole arm.
11. Warping multi-shape sleeve that extends to chest

I’ve seen bold collectors choose this for narrative flow across zones. The consulting note is to map how shapes will interact at the pectoral seam so the wrap looks intentional, not accidental. This is a long-term build, often six or more sessions, and sessions on the chest can be more painful than on the arm. A typical mistake is starting heavy chest work without a clear plan for how the arm shapes will continue. Expect more frequent touch-ups on the chest area because skin tension there is different from the arm.
12. Triangle and square balance on the inner forearm

When stability is the concept, precise geometry like triangles and squares reads clean and intentional. During consultation, specify exact spacing and ask for a mockup that shows how the composition looks when the arm bends. Fine line versions of this idea spark debate among artists. One group says thin lines will blur too fast on inner forearms. The other group says careful depth and spacing keeps fine lines crisp. Ask your artist which camp they belong to and look closely at healed photos in their portfolio. Touch-ups at the one-year mark are common.
13. Repeating dotwork gradient sleeve for texture transitions

There is a quiet effect to sleeves built from stipple shading that transitions across the arm. Tell the artist you want clear density changes so the gradient reads even when healed. A common error is not leaving enough negative space between densities, which merges the gradient. Sessions are methodical and can be long because stipple shading is time intensive. At six months the density looks deliberate, and by two years tiny dots may soften but the overall gradient still reads if spacing was planned. This technique pairs well with small geometric anchors.
14. Optical wave compression sleeve for motion
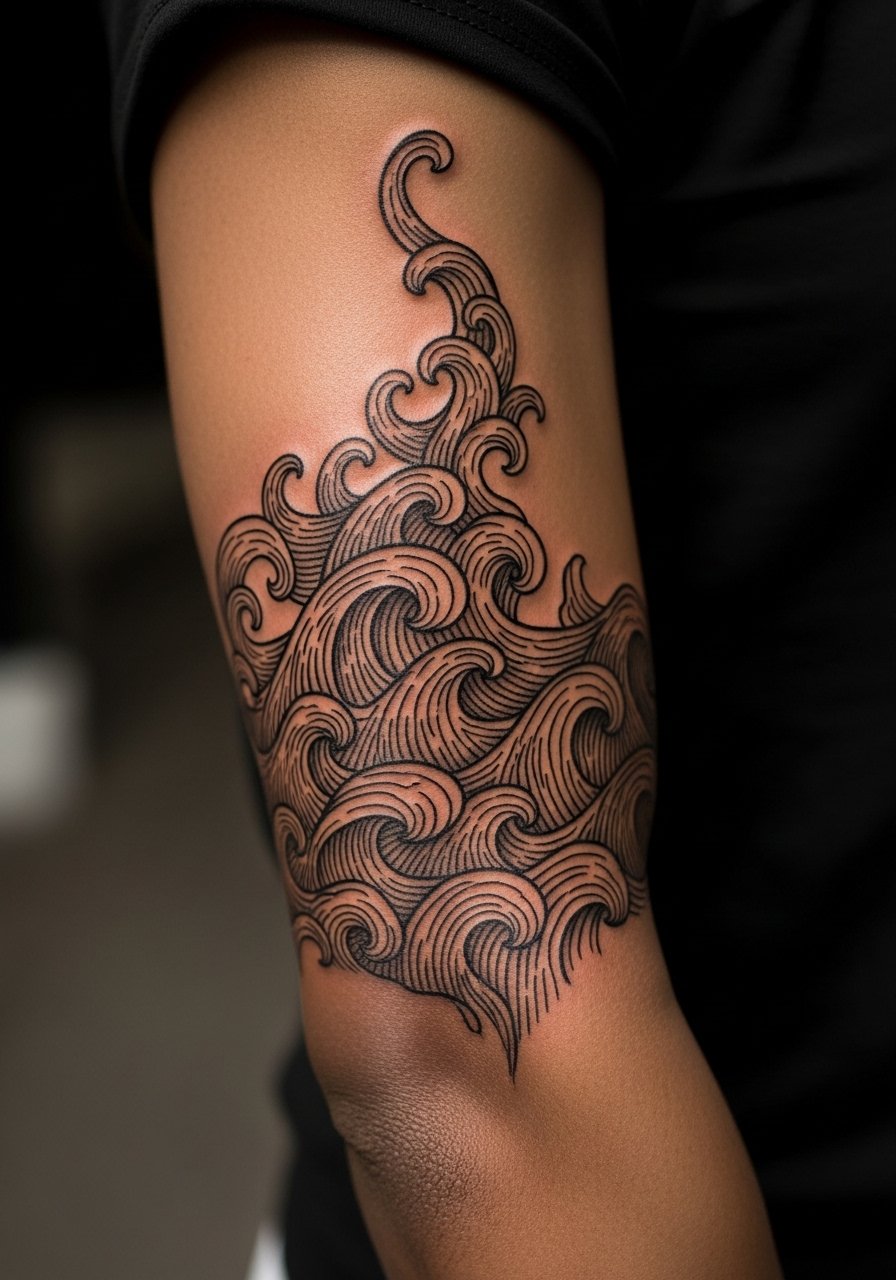
There is a kinetic quality to patterns that deliberately compress around joints to emphasize motion. When you brief the artist, ask them to mock the pattern while you flex so the wave reads dynamically. A real mistake is ignoring muscle movement, which makes the design fight the body. Sessions on and around the elbow are higher on the pain scale, so break them into shorter appointments. Expect touch-ups at the year mark where lines around the joint endure more friction and possible blowout.
15. Minimalist semi-full forearm patches for modern collectors

If you want a sleeve feel without full commitment, semi-full forearm patches unify the area and leave options for future expansion. When you consult, ask for a plan that shows future connection points so new work integrates cleanly. Beginners often choose too-dense detail for small patches and later regret the limited expansion room. Sessions are shorter and easier to manage for first-timers. At two years the patches hold if outlines were given breathing room. This is an efficient way to test how your arm tolerates sleeves before scaling up.
Tattoo Prep and Aftercare Essentials

I recommend prepping your skin by hydrating well the week before and avoiding sunburn or heavy exfoliation on the arm. Bring comfortable clothing that gives the artist access to shoulder and forearm areas. For pain management weigh the numbing cream debate up front. Some people use topical numbing for long sessions to manage endurance. Others feel it masks depth feedback that helps line consistency. Ask your artist where they stand before applying anything.
Shopping list, grouped for clarity:
Healing and daily care
Lightweight fragrance-free balm for tattoos. Use sparingly after the first few days to keep the skin supple without clogging pores.
Medical-grade occlusive second-skin bandage roll. Useful for immediate post-session coverage when recommended by the shop.
Antibacterial gentle foaming cleanser, fragrance-free. Clean with lukewarm water and this cleanser during the first week.
Saniderm transparent tattoo bandage. This is the one mainstream option I mention. Some artists prefer it for short-term occlusion, others avoid it.
Pre-appointment prep
Soft, breathable long-sleeve shirt for travel home. Comfortable clothing reduces friction on a fresh sleeve.
Light electrolyte drink mix packets. Helpful if you have a long session and want to avoid lightheaded moments.
Long-term maintenance
Lightweight broad-spectrum sunscreen, SPF 30 or higher. Sunscreen protects blackwork and keeps contrast longer.
Shea-free, fragrance-free daily moisturizer. Keeps healed skin hydrated and ink looking even.
Every tattoo is different. Always follow your artist's specific aftercare instructions. Consult a dermatologist if you have skin concerns or unusual healing issues.
Frequently Asked Questions
Q: Will fine-line geometric sleeves blur faster than bold blackwork?
A: From what I have seen, fine-line pieces tend to lose crispness sooner because thin contours sit closer to the epidermis. Bold blackwork usually holds up longer because the thicker lines tolerate slight migration. That said, spacing, placement, and the artist’s depth control all matter. Ask your artist for healed photos of similar work before committing.
Q: How should I approach aftercare if I plan to use a transparent bandage like Saniderm?
A: People split into two camps. One group prefers Saniderm for short-term occlusion to reduce mess and risk of infection when applied correctly. The other group favors traditional open-air healing and worries about trapped moisture. If you consider Saniderm, follow the exact timing your artist recommends and watch for excess fluid under the film. Use the lightweight fragrance-free balm for follow-up day care after removal.
Q: If I have darker skin, which geometric styles photograph best?
A: High-contrast blackwork and negative-space layouts photograph and age well on medium to dark tones. Denser black fills and clear gaps help shapes read from a distance. Avoid relying on very fine gray wash transitions as they can disappear in photos. Ask for bold contouring and check healed examples from the artist on similar skin tones.
Q: How many sessions should I budget for a full arm geometric sleeve?
A: Expect multiple sessions. Many sleeves break into four to six sessions for full shoulder-to-wrist work. Factors that change session counts include density of blackwork, dot work volume, and how much chest or hand integration you plan. Pacing sessions helps manage pain and cost, and it allows you to reassess the composition as it grows.
Q: Do hand or chest extensions require special artist experience?
A: Yes. Hand and chest zones behave differently from the arm and can demand specialized technique. For sensitive placements ask for artists who show healed work on those areas and who understand how to plan for future expansion. Professional considerations apply for hand tattoos in some industries, so factor that into your decision.
Q: What is a realistic touch-up timeline for geometric sleeves?
A: From what I have gathered, expect a touch-up around six to twelve months for most linework and black fills. Fine stipple or thin lines may need work sooner. After that, touch-ups every few years help maintain crispness, especially on areas that get high sun or friction.
Q: Can I use numbing cream for long sessions without affecting the outcome?
A: Artists and clients disagree on this. One camp uses topical numbing to help clients tolerate long appointments. The other camp worries numbing hides depth feedback that helps consistent line placement. If you use numbing, tell your artist beforehand so they can adjust technique and timing.
