
Someone I know spent months scrolling guitar tattoos and still felt stuck. The real problem was picking a tiny design that would still read as a guitar five years from now. I visited five shops across Brooklyn, talked to artists who specialize in small instruments, and tracked what holds up on different skin tones. Below are 15 compact electric guitar tattoos that work on wrists, ankles, forearms, and behind ears, plus what to ask for at your consult.
1. Detailed Electric Guitar Headstock with Fretboard Outline

Someone I know first saw this on a forearm and booked it because the headstock lets an artist show craftsmanship in a small space. Ask your artist to keep 1.5 to 2 mm between fine details so the tuners and fret markers do not blur. Expect a single 60 to 90 minute session and moderate forearm pain. The common mistake is asking for microscopic screws and expecting them to hold. If you want longevity, request slightly bolder primary outlines and delicate internal shading. At six months the headstock should still read clearly. At two to five years you may need a light touch-up on tuning pegs if you play outdoors a lot.
2. Minimalist Electric Guitar Silhouette with Pickguard Detail

Fair warning the wrist is a high-motion area and tiny linework can blur faster. For a subtle look that lasts, ask for the silhouette with a slightly thicker outer contour while keeping one-needle detail inside the pickguard. Session time is usually under 45 minutes and the pain is low to moderate. Common aging issue is overfined internals that vanish after a year. Tell the artist you prefer an anchor line around the silhouette so the shape stays readable as the ink settles. This is a great first tattoo idea when you want something discreet and quick to heal.
3. Micro Electric Guitar Fret Markers Only

The finger placement is notorious for fading and partial loss. If you opt for micro fret markers, expect annual touch-ups and plan for touch-ups in your budget. A single 20 to 30 minute session will do the trick but the pain is sharp and healing is tricky because of constant use. A real mistake is asking for tiny shaded details on a finger. Keep it strictly dot work or micro geometry and ask the artist for deeper single-needle placement that works for hands. For darker skin tones add a tiny white highlight or a thin surrounding black ring to keep contrast.
4. Fine Line Telecaster Outline with String Vibrations

When you sit for this one, bring photos that show the exact string vibration curve you want. There is a controversy about fine line on visible skin that splits artists into two camps. One camp warns fine line fades quickly on forearms and inner biceps. The other camp says that with correct needle depth and spacing it settles beautifully. Ask the artist where they stand and ask to see healed photos of similar placements. Expect one short session and a moderate pain level on the inner bicep. For durability ask for slightly larger spacing between parallel strings so they do not blur together over time.
5. Les Paul Neck with Soundwave Accent

There is a visual payoff in combining a recognizable neck profile with a single-line soundwave. Tell your artist you want the frets to read from across the room and the soundwave to match a specific riff or frequency pattern. This one usually takes one to two sessions and hurts moderately on the forearm. A common mistake is cramming too much fret detail into a short neck. If you plan a sleeve later, mention that this should be designed to flow into future elements. At two years you may notice light softening along the frets, so plan a touch-up around year three if you want crisp lines.
6. Flying V Electric Guitar with Mini Flames

There's something about a compact Flying V that reads loud without being large. For a tiny neo-traditional flame look, ask for bold outlines with concentrated saturation in the flames so they keep color longer. This placement takes one or two sessions and the upper arm pain is low. A mistake people make is requesting watercolor-style fading inside the flames at this scale. That treatment often loses punch and turns muddy. If you want color that pops, specify denser initial saturation and plan for a color touch-up in year two to three.
7. Fine Line Stratocaster Body with Musical Notes Cascade

The thigh is forgiving for tiny work because it stretches less with day-to-day motion. For a fine line Stratocaster body, tell your artist to keep the body silhouette slightly scaled up so the note cascade retains spacing. Expect one to two low-pain sessions. A common mistake is trying to cram too many notes in a narrow trail. That leads to muddiness at the six month mark. When you want the notes to show on darker skin, request either white ink highlights or small color accents for contrast. This placement also hides easily if you need to cover it for work.
8. Electric Guitar Burst Finish in Micro Watercolor

Watercolor for small guitars can be tricky. One camp argues color bursts pop initially but fade unevenly, while another camp points out that skilled color layering can give a soft, lasting glow. If you like watercolor, ask the artist to frame the splash with a thin black line so the shape stays readable as pigments diffuse. Shoulders take two short sessions and have low to moderate pain. Be realistic about touch-ups. Expect the color to soften at six months, and plan for a refresh at year two for bright tones.
9. SG Guitar with Skull Picks Scattered

If you want an edgier micro design, the SG silhouette reads well in small sizes because of its double cutaway shape. Tell your artist you want the skull picks to be simple black shapes with a single white dot for eye sockets to maintain clarity. The calf is a medium pain area and needs one to two sessions. A common mistake is over-detailing the skulls so they lose form after a year. Keep the skulls graphic and ask for bolder outlines on the SG body so the instrument reads even when the picks soften.
10. Electric Guitar with Amplifier Stack Outline

Chest and upper sternum placements are more painful but they show off small designs nicely when clothed. For this idea, ask for simplified amp rectangles and a scaled-down guitar so the composition breathes. One to two sessions are normal and the pain is higher near bone. A mistake is adding too many amp knobs and cables at this scale. Keep the amp graphic iconic rather than literal. On darker skin tones, choose single-tone blackwork with a thin negative-space line to separate elements.
11. Micro Pickguard Etched with Lyrics

When visible text is part of the design, specify the exact word you want. The ankle is a vulnerable spot for rubbing and movement during healing. For a micro pickguard etched with a single word, bring the exact script sample and tell your artist the letter height you need so letters do not fuse. Sessions are short and pain is moderate. A frequent error is asking for full lyrics in tiny script. That rarely survives. Pick a single word or year and make it a focal point instead.
12. Patchwork Mini Guitar with Bass Clef Vine Accent

This works for people who plan to build out a sleeve over years. The inner forearm placement lets you add modules later. Tell your artist to leave open margins so the patchwork can connect to future pieces. Expect moderate pain and one to two sessions. A common mistake is asking for too many tiny fill patterns in the initial patch. That makes expansion awkward. Design this as a modular unit and mark connection points with subtle negative space.
13. Electric Guitar Exploding into Notes, Micro Version

The hip area lets you keep a design concealed and still bold. For a micro explosion effect, limit the number of notes and scale each note so it reads at a glance. One session usually covers this and pain is low to moderate. The mistake is trying to scale too many tiny shards, which digest into a gray smudge after healing. Ask for heavier note outlines and a simple fade rather than many micro fragments when you want the energy without a busy heal.
14. Neck Wrap Around Joint Illusion

The wrap idea uses joint motion to animate the neck when you bend your arm. Fair warning the elbow crease is a high-movement area and lines can blur. If you want this, ask the artist to keep the wrap shallow and avoid parallel micro-lines across the crease. Expect a longer 90 minute session and higher pain on the joint. A common error is wrapping too tightly so the design loses form when the arm straightens. Plan for a touch-up in year one if you are frequently active.
15. Tiny Ornamental Guitar with Gold Ink Accents

Gold and metallic accents give pop on melanated tones but they behave differently than standard pigments. If you choose gold ink, ask about healed examples on similar skin tones first. The wrist placement is visible and low to moderate in pain. A typical mistake is expecting metallic ink to perform exactly like standard ink. It may fade differently and sometimes needs color reinforcement. Keep metallic accents minimal and structural outlines bold so the guitar remains readable even as gold softens.
Tattoo Prep and Aftercare Essentials
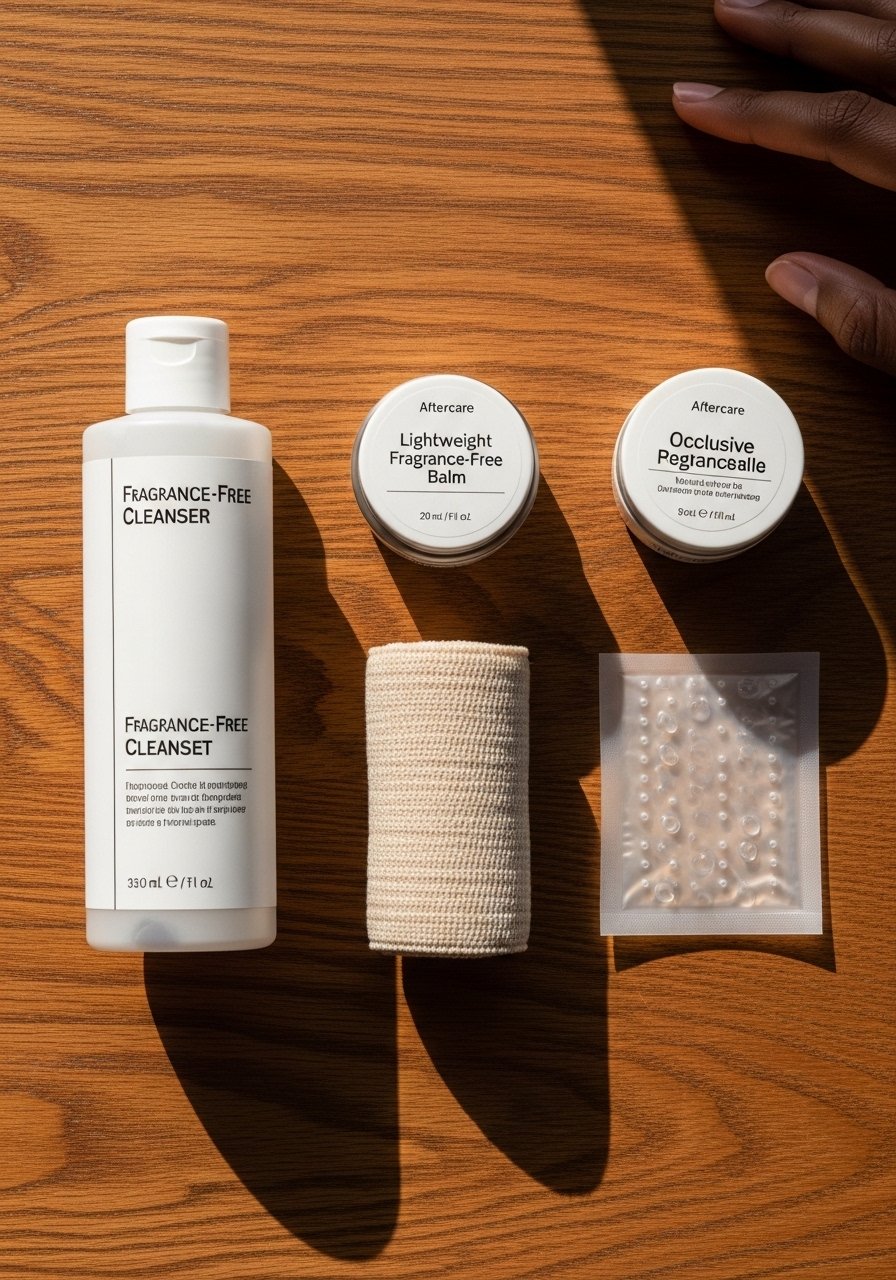
Below are practical items I recommend bringing and keeping nearby during healing. I filled gaps with careful generic descriptors because lesser-known niche names were thin in the research. The list aims to solve common problems I saw across shops, like ink that fades or micro lines that need touch-ups.
Fragrance-free gentle foaming cleanser. Use for the first week to remove ointment and bacteria without stripping moisture. Apply with clean hands and pat dry.
Lightweight fragrance-free balm for day use. Choose a balm that absorbs quickly and does not clog pores. Use sparingly during the first two weeks.
Medical-grade second skin bandage, single large sheet. Useful for the initial 24 to 48 hours when you need a barrier for wrists or hands.
Silicone scar-reducing gel sheets, small pack. Helpful for raised scabs or if you have hypertrophic scarring tendencies.
Breathable non-stick gauze pads, small pack. Keep a few on hand for initial dressing changes.
Hydrating long-wear SPF 30+ facial sunscreen. UV exposure is the biggest enemy of saturation and detail. Use after the tattoo fully heals.
Aquaphor Healing Ointment. One mainstream option that many shops still recommend for short-term sealing during the first 48 hours. Use sparingly.
Small cold pack reusable gel pack. Reduces swelling and soreness after longer sessions.
Lightweight breathable long-sleeve shirt for post-session coverage. Natural fibers help wounds breathe and protect from sun during healing.
Every tattoo is different. Always follow your artist's specific aftercare instructions. Consult a dermatologist if you have skin concerns or unusual healing issues.
Frequently Asked Questions
Q: Will fine line guitar tattoos blur faster on forearms than bold line versions?
A: From what I've gathered, artists split into two camps on this. One group says fine line on forearms blurs within two years under heavy sun exposure and wrist motion. The other group says correct needle depth and spacing allow fine line to settle nicely. Ask your artist to show healed forearm examples and request slightly bolder anchor lines if you want the look to remain readable for longer.
Q: Do watercolor-style tiny guitars need different aftercare than black and gray ones?
A: Yes. Watercolor relies on pigment saturation and can fade unevenly if exposed to sun. Keep fresh watercolor tattoos out of direct sunlight while healing and use a high SPF once healed. Expect a possible color refresh at year two. The aftercare steps are similar otherwise, but be extra diligent with sunscreen and moisturization for color longevity.
Q: How do I find an artist who can render a tiny headstock without it looking cartoonish?
A: Use discovery pathways like the #electricguitartattoo hashtag on Instagram and check portfolios on Tattoodo or Booksy. Look for healed photos of similar small instrument work and ask the artist specific questions about line spacing and healed examples. During consults show clear reference photos and request a small mock-up scale so you can judge whether the artist can keep detail without overcomplicating.
Q: Are there placement choices that help a tiny guitar age better if I plan to gain weight or build muscle?
A: Yes. Elongated shapes like necks wrap around muscle-friendly areas and distort less visually than compact bodies on fluctuating flesh. Thighs and calves are generally more stable than inner biceps or stomach. Discuss long-term body plans with your artist and design around natural lines so the guitar remains recognizable as your body changes.
Q: How often should I expect to book a touch-up for a tiny guitar tattoo?
A: It depends on style and placement. For fine line pieces in high-motion spots expect touch-ups every two to four years. For bolder blackwork you might go four to seven years. Watercolor and metallic accents often need earlier refreshes. Budgeting for a touch-up at year three is a reasonable starting point for most small electric guitar designs.
Q: Is gold or metallic ink safe and effective on darker skin tones?
A: Metallic accents can offer contrast on melanin-rich skin but they behave differently than standard inks. Ask to see healed examples on similar tones and accept that metallics may require a color boost down the line. Keep metallic elements minimal and structural outlines strong so the design reads even if the metallic softens over time.
