
White ink on deeper skin does not behave like a pastel on a pale sleeve. It often heals to a chalky highlight rather than a bright white, so the designs that still read after a year are the ones planned with contrast and realistic spacing. Read these practical picks and the exact placement, line weight, and styling choices that help white detail stay visible on darker tones.
1. White Mandala on the Forearm or Upper Back

A mandala reads as a soft glow on darker forearms when you give the pattern room. I recommend medium-sized radial spacing so the inner petals do not blur into one another by year two. During consultation bring a printout showing the exact dot scale and ask for slightly heavier linework at the outer rim so the silhouette holds. Fresh white often looks high-contrast and crisp. At six months the dots soften and by two years the overall shape is what carries the piece. For session wear, roll a linen sleeve up so the artist has a flat palm-up surface to work on. Expect low pain and a single session for medium-scale work.
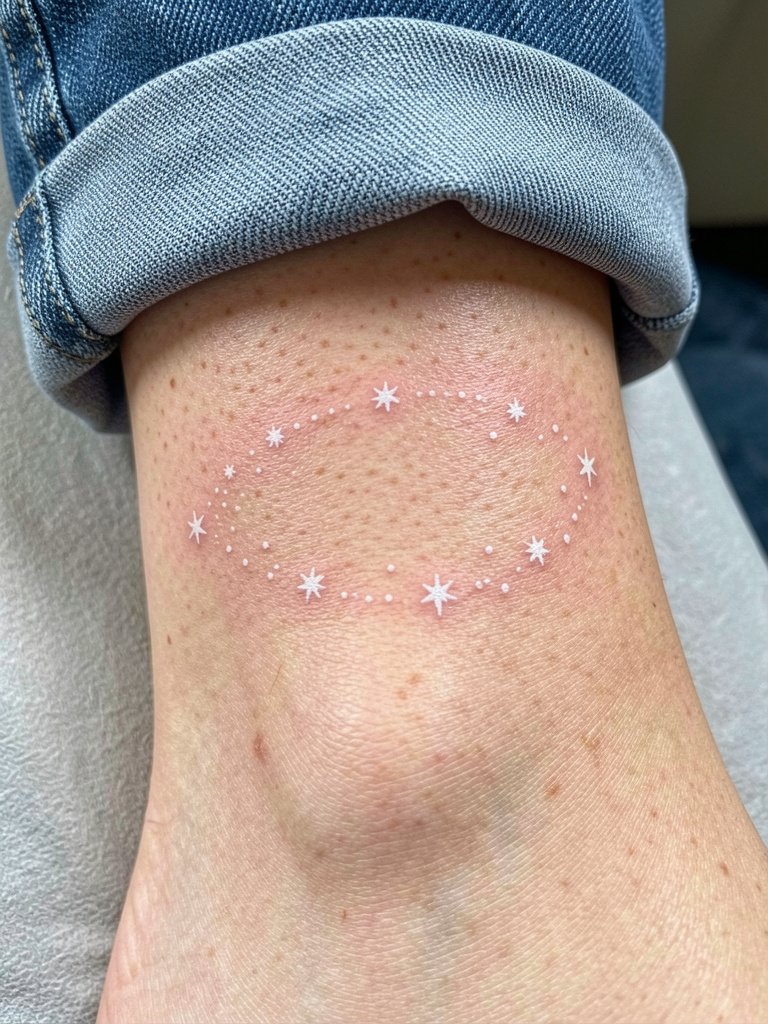
2. Constellation or Zodiac Star Map on the Inner Forearm

Small star fields and zodiac dot maps work because negative space helps the white read as points rather than blocks. Ask for a sample grid preview transferred to the skin so you can check spacing under ambient light. A common mistake is packing too many tiny stars close together. That causes merging after healing. At six months the stars mellow into faint chalky dots and by two to three years they may need a touch-up to keep crisp. For showing the piece, open-cardigan layers or a loose button-down make the inner forearm feel intentional. Session time is short and pain is low, but insist on healed-photo examples from the artist.
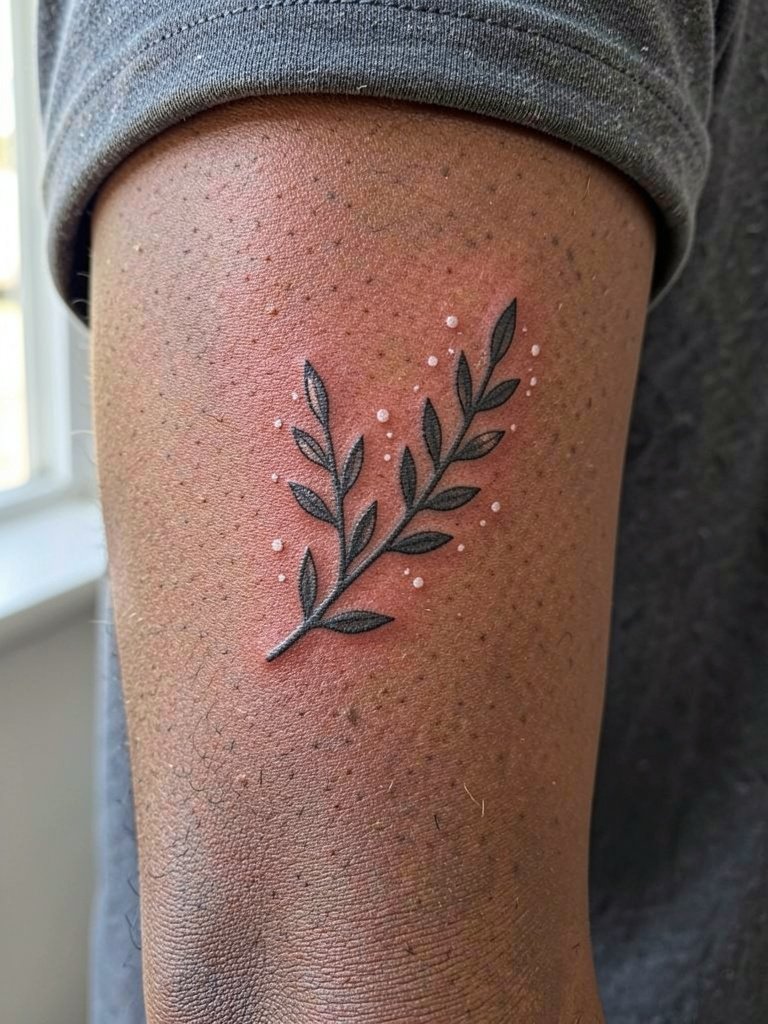
3. Single Bloom Linework on the Inner Upper Arm

Botanical sprigs age well when the petals are simple and the negative space is dominant. Tell the artist to keep petal contours single-needle but to thicken connection points slightly so the bloom keeps shape after a year. The typical error is overworking shading inside petals, which can create a muddy patch on deeper tones. At six months expect a chalky highlight with visible outline. At two years the overall silhouette still reads if spacing was allowed. For session wear go sleeveless or bring a loose tee you can shift without rubbing. This placement is easy on pain and often finished in one visit.
4. Feather or Bird Silhouette on the Wrist

Wrist silhouettes look airy in white because the flat surface and low curvature let the pigment sit evenly. Ask for slightly bolder shaft lines and tiny internal negative strokes so the feather reads after the initial fade. The common mistake is too-fine filigree that disappears within months. Expect the first six-week photos to be brighter than healed images, and plan a touch-up at 6 to 12 months if you want the white renewed. For showing off, keep the tattoo wrist free of watches and pair with a thin bracelet stack on the opposite wrist. Session time is quick but wrists can feel more sensitive than the forearm.
5. Moon Phases Running Down the Spine or Arm
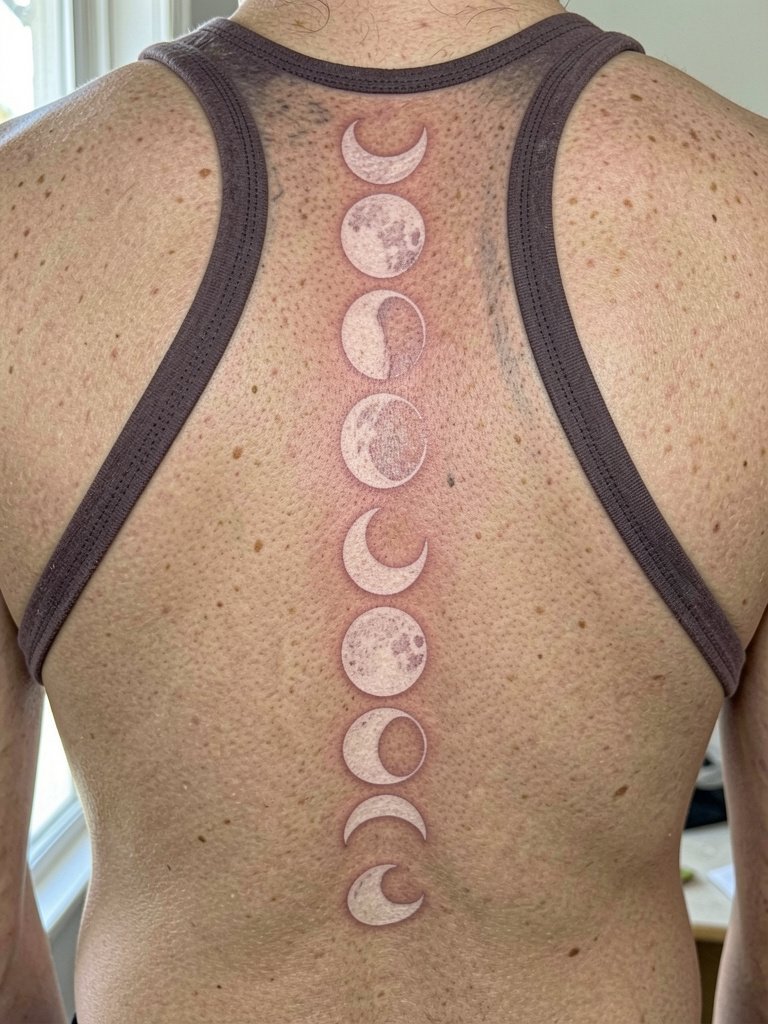
Moon phase columns work as vertical anchors because each element is distinct and spaced. For spines, request small but clearly separated circles so the crescents do not merge with time. A failure mode is compressing phases to save space. After healing the whites will appear more subdued than in-studio photos, so expect a chalky look at six weeks. By two years the rhythm of the column is what holds visual weight. For session wear choose a button-front or racerback top that can come off without tugging. Spine tattoo sessions can be stiffer on pain, especially near the vertebrae.
6. Angel Wing Fragments Across Shoulders or Upper Back

Wing fragments on the shoulder look deliberate when you favor open gaps between feathers. Ask for the outer feathers to have a touch of negative space so the wings do not heal into a raised white block. A common mistake is filling too densely. Shoulder skin is forgiving for white highlights, but heavier fills increase the chance of raised texture. For showing the piece wear off-shoulder tops or wide-strap tanks that do not rub the area. Sessions may take longer for larger wings and usually finish in one to two sittings depending on scale.
Session Day Picks
The shoulders, forearm, and spine pieces above each benefit from a small kit that protects fresh white detail and helps you judge healed tone.
-
Fragrance free thin healing ointment. A light, non-greasy ointment keeps delicate white highlights from clogging and helps avoid the heavy scab texture that exaggerates raised healing.
-
Healed-photo request checklist printable. Use a short checklist when asking artists for healed shots so you get consistent angles and time points for forearm and back placements.
-
Artist white-ink highlight reference sheet. Bring a one-page sheet showing the white-as-accent approach so the artist knows you prefer highlights over large white fills.
-
Second-skin protective film. Helpful during the first 48 hours, especially for wrist and hand pieces where friction is constant.
-
Aquaphor healing ointment. Thin applications during the earliest phase can keep fine line work soft without suffocating the needle channels.
7. Henna-Inspired White Patterns for Hands, Fingers, or Feet
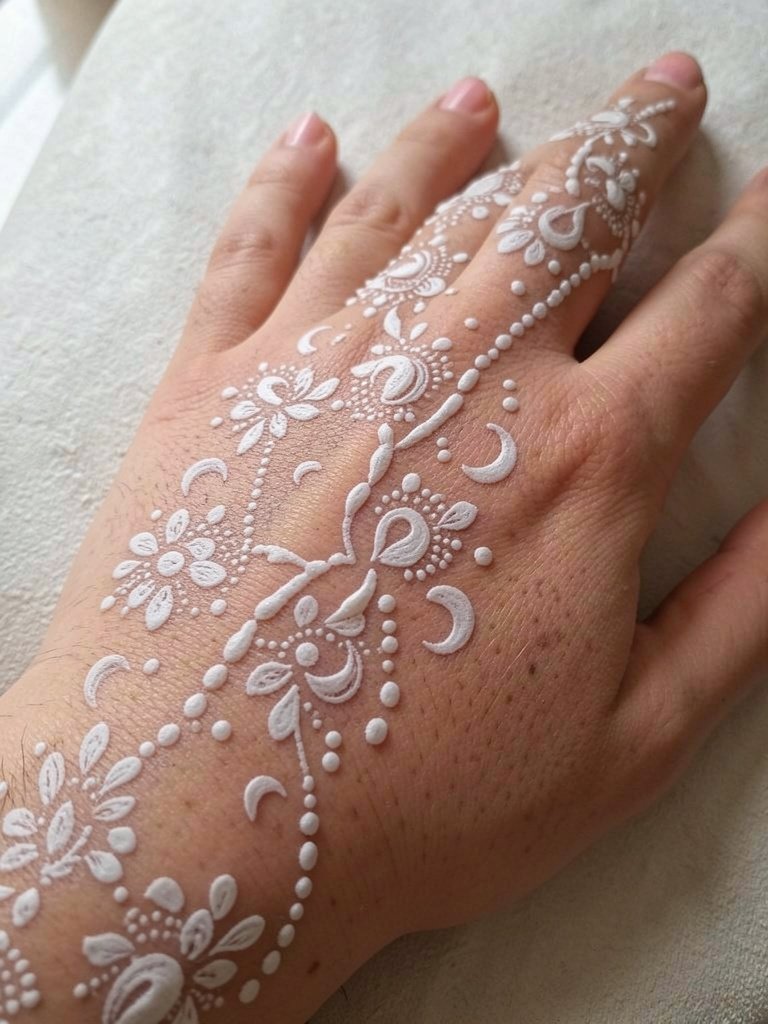
Hand and finger work wears faster than forearms, so plan for touch-ups. Ask the artist which parts they recommend as tiny accents versus full white filigree. The big mistake is treating fingers like a stable canvas; constant washing and friction fade white quickly. Healed-tone varies a lot across people, so expect a soft, chalky finish at six months. Session wear: short sleeves and no watch on that wrist. For showing off, thin bracelet stacks on the opposite wrist keep attention balanced. Budget for at least one touch-up within a year for hand placements.
8. Infinity Symbol or DNA Helix on Wrist or Ankle

Simple loops and helixes read well because the negative spaces create definition. Specify the loop thickness during consult and request slightly heavier terminal points so the shape keeps definition. A frequent error is ultra-thin lines that vanish on darker tones. At six weeks the white will look brighter than after three months, when it softens to a faint chalk. An ankle symbol needs consideration around footwear. For showing off choose cropped jeans or strappy sandals so the ankle stays visible. These are short sessions with mild pain.
9. Minimalist Portrait or Pet Line Art on the Inner Forearm
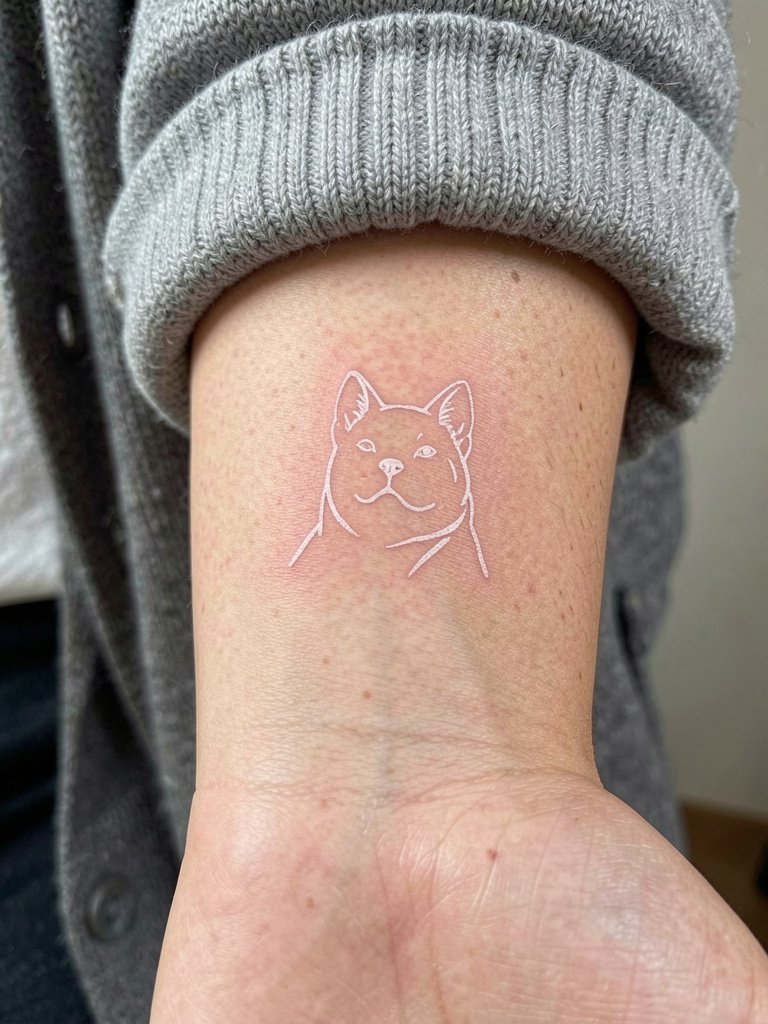
Single-line portraits translate into white highlights best when the negative space defines eyes and muzzle. Bring two reference photos at different scales so the artist can show how the same lines read at three inches versus five inches. The common mistake is trying to cram realistic shading into white only. That leads to loss of identity after healing. Expect crispness at six weeks and increased softness by a year. For session wear keep short sleeves or a loose rollable sleeve. Touch-ups may be needed to sharpen facial micro-details.
10. Geometric Ornamental Back Piece

Large geometric white pieces benefit from the back because there is room for spacing. Ask for layout mockups at full scale on tracing paper so the artist can confirm spacing avoids merging edges. A mistake is overfilling small compartments with white, which can become raised. At six months the shapes maintain pattern but the white itself will be subtler than fresh images. For showing the piece pick open-back dresses or racerback tanks that do not press on the area. Sessions are longer and may be split into multiple sittings.
11. White Bird Motif on Arm, Shoulder, or Back
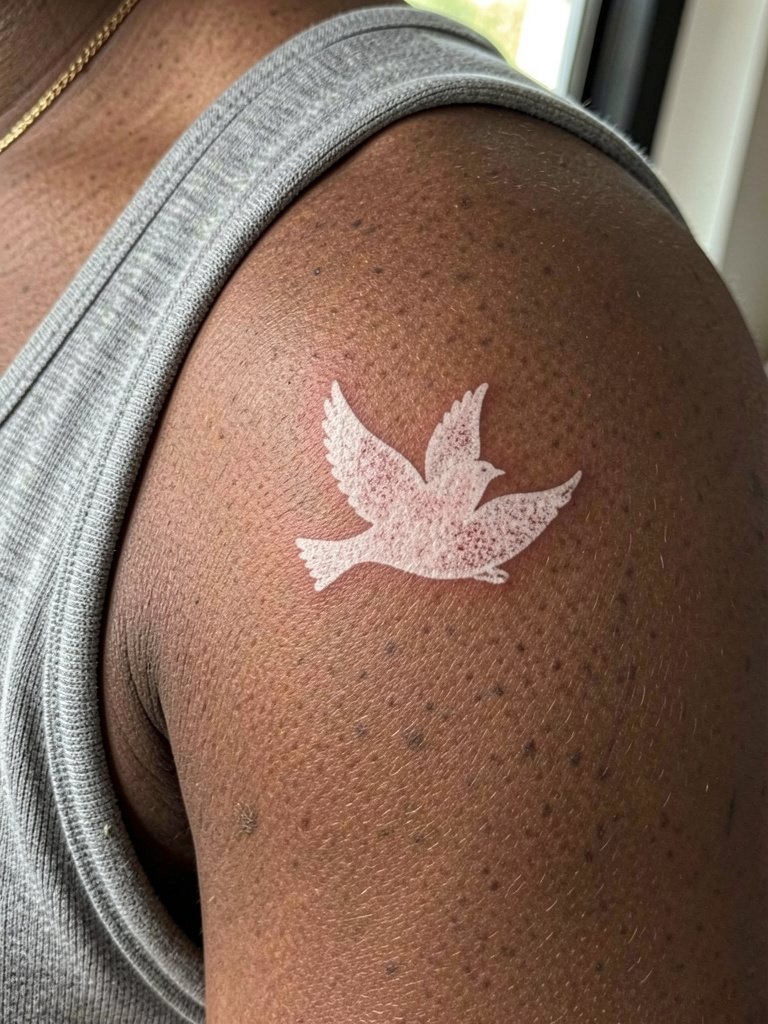
Birds keep identity with minimal detail, which is ideal for white ink. Ask the artist to show wing spacing and to thicken key contour lines slightly. The usual error is adding tiny feather detail that disappears during healing. At six weeks expect faint highlights and by two years the shape carries recognition if spacing is preserved. For wardrobe, off-shoulder tops and racerback tanks show shoulders without tugging. Pain is moderate at the shoulder and sessions are usually short.
12. Elephant or Dreamcatcher Rendered in White

Symbolic motifs like dreamcatchers work when simplified to linework and space. When you consult, specify which elements you want as white highlights and which you accept as outline or negative space. A common mistake is demanding full white fill for hanging details, which fades into blurs on darker skin. At six months the web will appear softly highlighted and the elephant silhouette should remain recognizable. For showing off, roll sleeves or wear a cropped jacket. This placement is friendly for mid-length sessions and may need a single touch-up later.
13. White Ink with Black Outline Accents

Artists split on all-white versus outlined work. One camp insists pure white keeps the ethereal look and accepts subtle fading as part of that aesthetic. The other camp argues black outlines are the safer choice because they preserve the shape and readability when white fades. If longevity matters, ask for a thin black frame around white fills so the design survives into year three and beyond. The black framing usually reduces the chance the piece becomes a soft, unreadable patch.
14. Small White Accents Instead of Full White Fills
Using white as an accent reduces the risk of raised or muddy white fills. One group of practitioners treats white as a novelty best kept to tiny highlights. The opposing view thinks broader white fills can be managed if the artist spaces ink properly and accepts the need for touch-ups. In practice, small highlight dots last longer and read as intentional even when the white softens. For session wear keep the area uncovered and clean. Touch-ups are common for accent-heavy pieces but the amount of maintenance is far less than for full white panels.
15. Script or Quote on the Ribs or Collarbone Area

Thin script can read well when placed where skin is flat and not subject to heavy friction. For ribs, ask for slightly heavier line weight than a standard single-needle so the letters do not blur from breathing motion. The major mistake is choosing ultra-tiny handwritten fonts that the skin cannot hold. At six weeks the script will still show shape but by two years letters can soften. For session wear, bring a loose bra or a button-down shirt that can be removed without tugging. Pain on the ribs is higher than on the collarbone.
16. White Dotwork Celestial Band Around Ankle or Wrist
Dotwork bands look intentional because the repeated points form texture rather than a solid white area. Specify dot size and spacing in the consult and get a wrist or ankle mockup transferred to skin to check how it reads at life size. The common mistake is packing the dots too closely, which leads to a blurry band over time. For showing the ankle pair with cropped jeans or strappy sandals. Ankle work is low to moderate pain and often needs a minor touch-up after a year.
17. Minimalist Arrow on the Inner Forearm
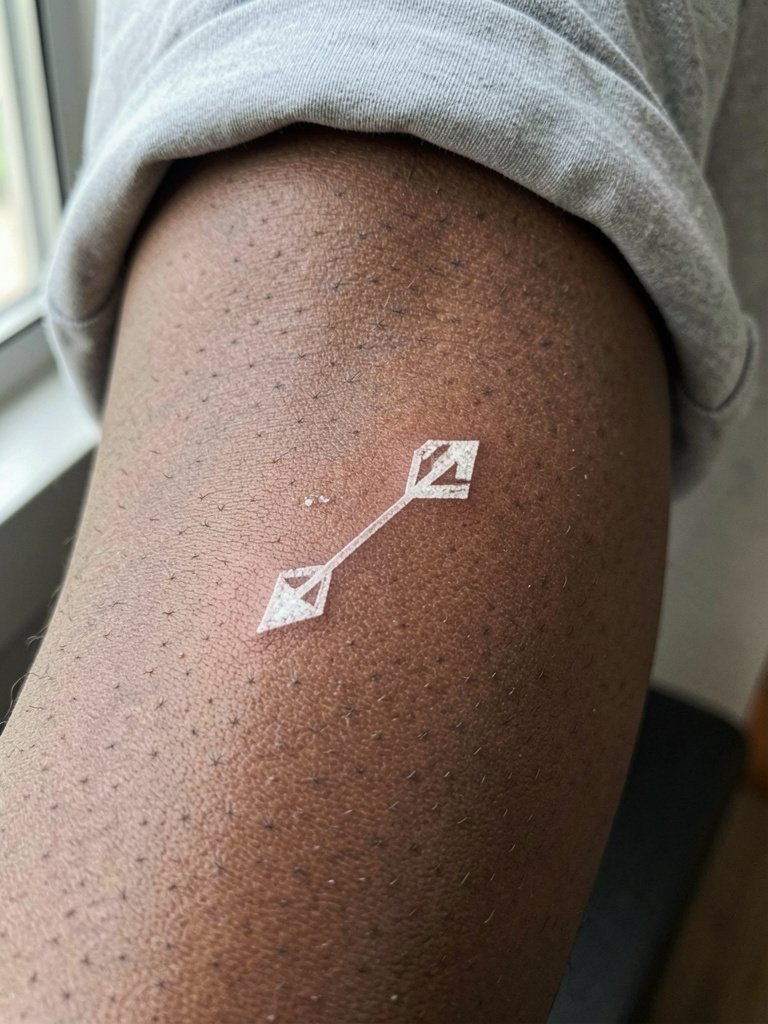
Arrows translate to white well when the shaft is given a little thickness toward the middle so the silhouette stays visible. Ask for a size mockup and specify that the tip stays bold. Tiny tips are the typical mistake because they disappear into skin texture. At six months it will read as a chalky line and by two years the arrow will still read if the main shaft was built with modest thickness. For session wear choose a short sleeve or loose cuff to avoid rubbing after. The inner forearm is a forgiving surface with short session time.
18. White Negative-Space Symbol on the Calf

Negative-space white within darker framing helps the highlight resist complete disappearance because the surrounding black preserves edges. Discuss with the artist how much black bordering to leave so the white reads as a carved channel. The mistake is squeezing white into tiny pockets without a strong border. After healing the white will be subtler but the negative-space effect remains. For show-off outfits choose cropped pants or skirts so the calf is visible. Calf sessions are generally comfortable and can be done in one visit.
19. Vertical Ornamental Linework Along the Spine
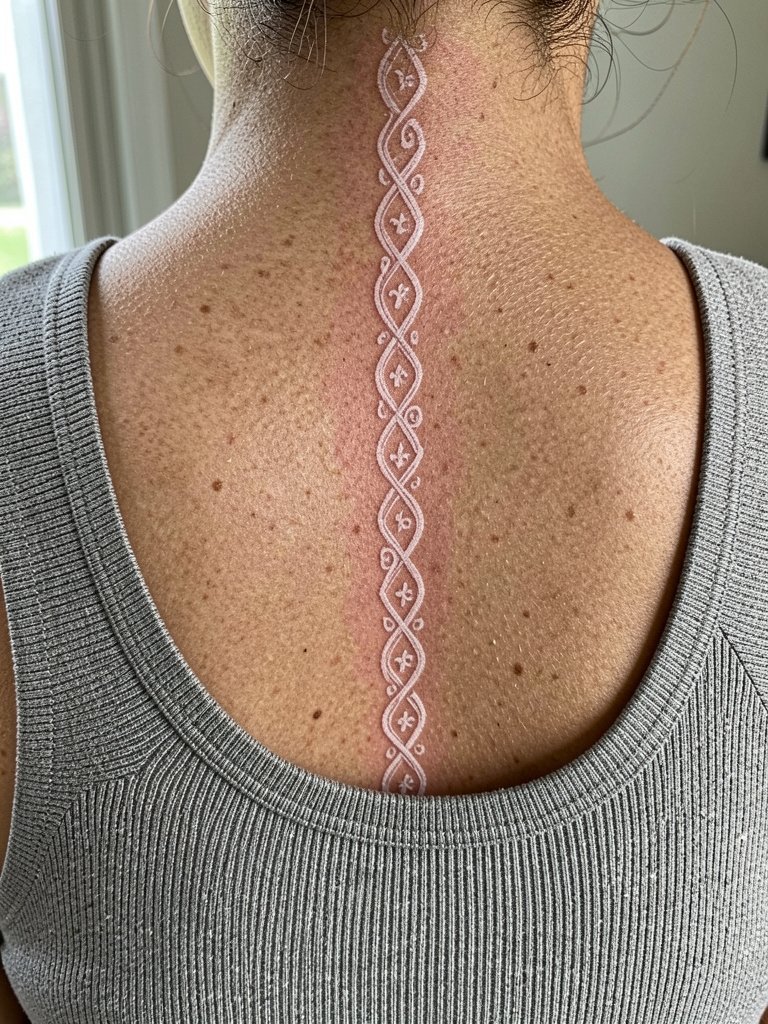
Narrow vertical ornamentation reads when spacing is generous between motifs. Ask the artist to map the negative space for each repeat so the column does not blur into a single block. A typical error is compressing repeats to shorten the column. At six months highlights will soften and by two years the column silhouette should remain if spacing was allowed. For session wear choose a racerback or button-front top. Spine placements can be sensitive depending on exact vertebral exposure.
20. Medial Inner Thigh Ornamental Vine
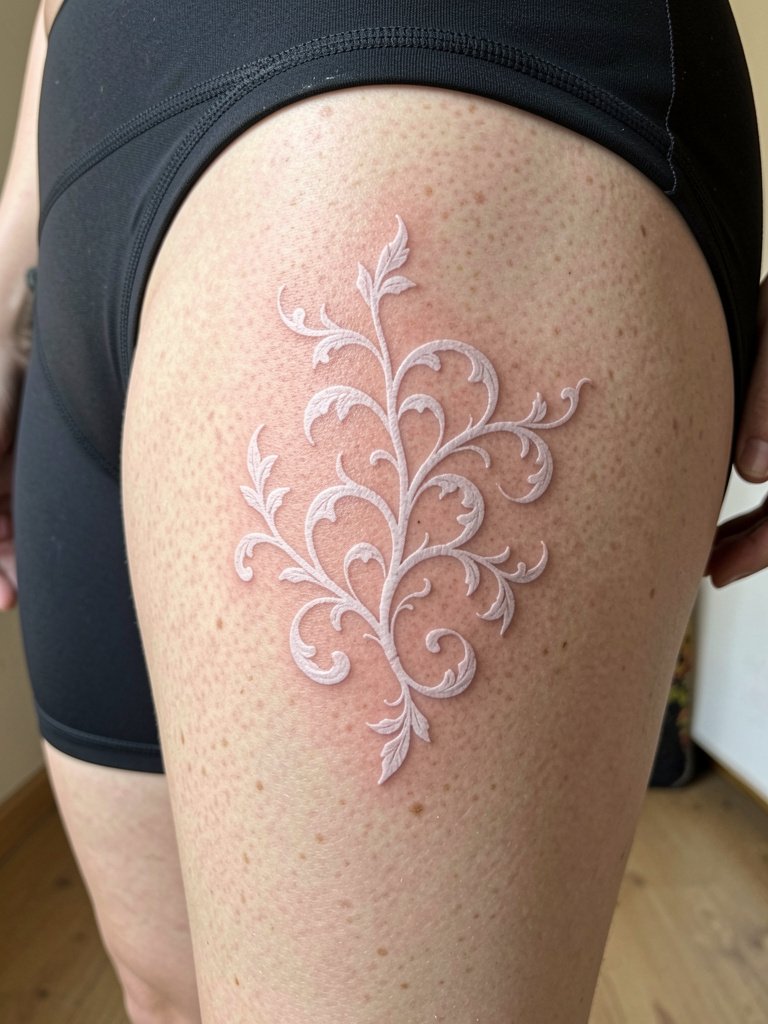
Inner-thigh placements avoid sun and daily friction, which helps white hold up, but they need careful hygiene during healing. Ask the artist about spacing and touch-up expectations because the skin here heals at a slightly different pace. The error to avoid is overly intricate lacework that needs dense white fills. At six weeks the vine will show as pale highlights and by a year the silhouette should still be there. For the session wear loose shorts or a skirt that you can lift comfortably. This area is private and pain varies by person.
21. Lumbar Lower Back Symmetrical Motif
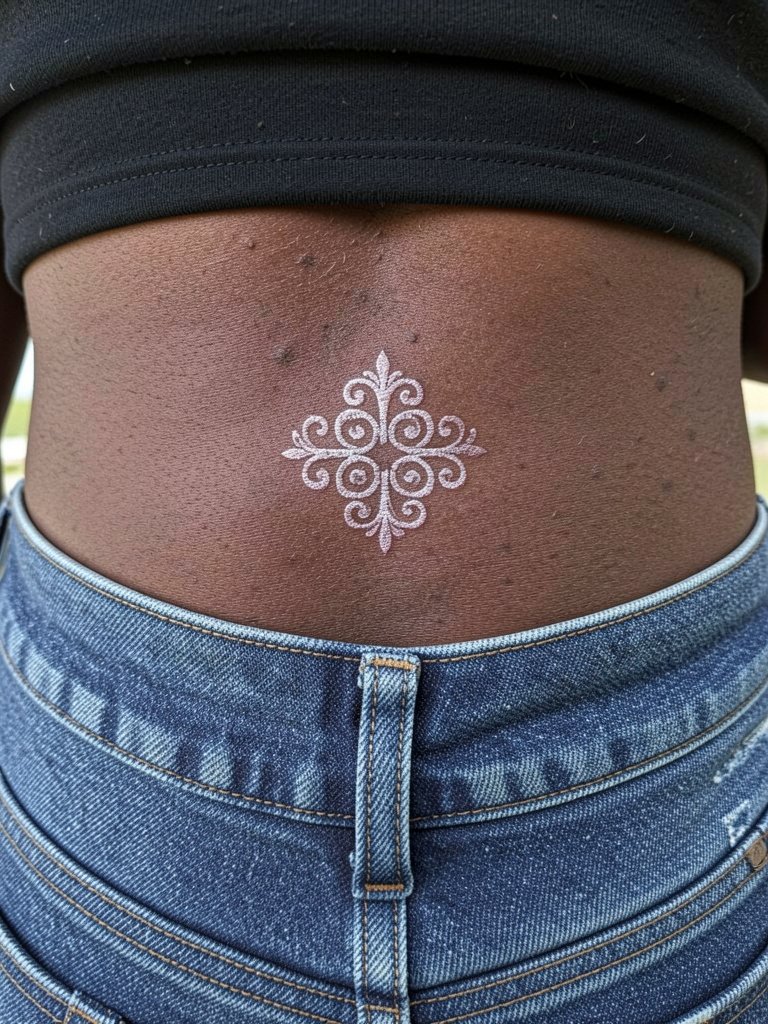
The small of the back gives you a central canvas for symmetry, and white motifs here avoid constant sun exposure. Specify the exact distance from the waistband so daily clothing does not chafe the area. A mistake is placing the design too low where waistbands sit, which causes friction. Healed tone is usually softer than fresh shots. For session wear use soft drawstring pants or low-rise jeans that do not press the site. Pain is moderate and touch-up needs are uncommon unless friction is present.
22. Sternum or Upper Chest Geometric Accent

Sternum work can show beautifully because the area is relatively protected, but it needs an artist experienced with chest contours. Request a mock stencil and ask the artist about breathing and placement so the geometry remains centered as you move. The common mistake is ignoring how the chest shifts with respiration. After healing the white is subtler and may require a single touch-up. For session wear bring a bandeau or sports bra that can be removed or shifted without tugging. This placement often has higher sensitivity.
23. Calf or Inner Calf Geometric Band
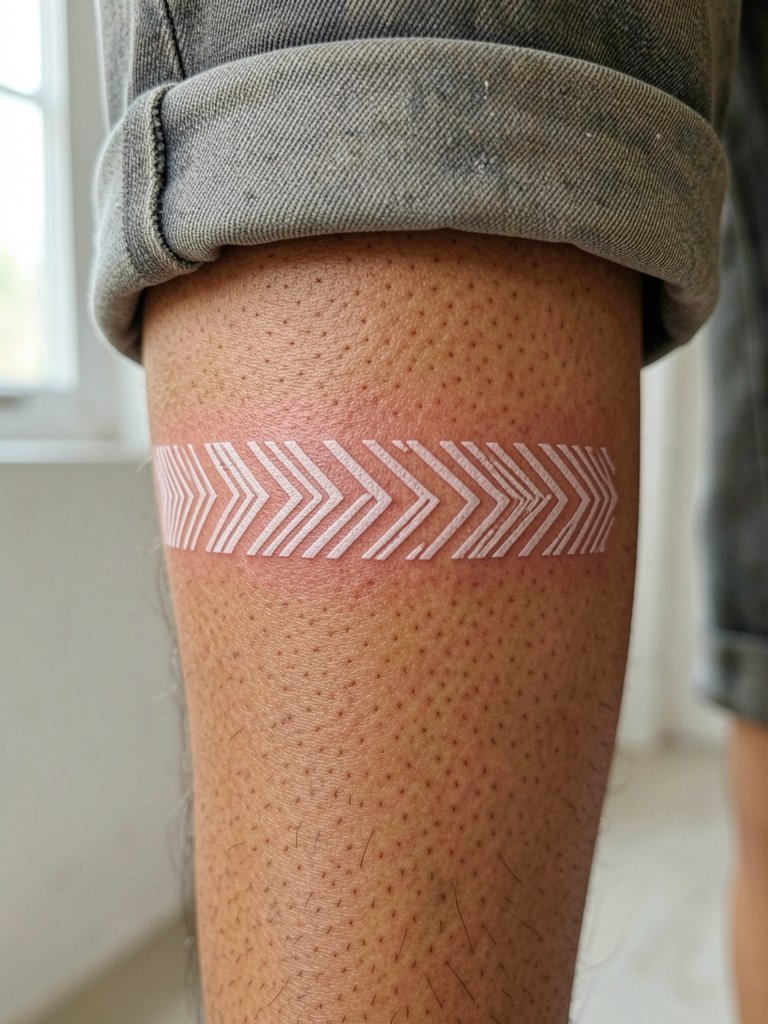
Calf bands benefit from visibility and low friction if you avoid socks rubbing the site. Ask the artist to map the band width so the negative lines keep separation across the calf curvature. A typical error is making the band too thin around a bulky muscle, which then blurs with time. At six months expect the white to be a subtle ribbon and by two years the geometry holds if spacing was preserved. For the session wear loose drawstring pants or cropped trousers that allow easy access. Pain is moderate and sessions are brief.
Frequently Asked Questions
Q: Will white ink actually show up on darker skin tones?
A: It depends on design, placement, and expectations. White rarely stays bright white like a paint stroke. On darker skin it usually reads as a soft highlight or chalky tone. The safer approaches are tiny white accents, white used as a highlight within blackwork, or designs with spacing and slightly heavier line terminals so the shape reads after healing.
Q: How should I vet an artist for white ink on dark skin and where do I search?
A: Search Instagram and TikTok with hashtags like #whiteinktattoo, #whiteinktattoos, #darkskintattoo, and #tattooadvice and then filter by location. Look for healed photos rather than only fresh reels. Reddit threads in r/tattooadvice and r/tattoos often show real experiences and practical questions. For local options use Google Maps or booking platforms and include "white ink" plus your city when searching.
Q: What are realistic touch-up expectations for white highlights?
A: Expect at least one touch-up within the first 6 to 12 months for most white highlights on deeper tones. Tiny accents can last longer between touch-ups, while broader fills usually require more maintenance. Ask the artist to outline a three-point timeline so you know when to return for a refresh.
Q: Which aftercare approach helps white ink heal with less texture or raised feeling?
A: Thinner, fragrance-free ointments and short second-skin coverage windows often reduce friction and scab thickness. Some clients respond better to a light daily balm routine rather than thick creams. If you are prone to sensitivity, discuss the timeline for removing protective film and switching to a thin ointment.
Q: Can wardrobe choices make white ink read better or worse?
A: Yes. Open-back dresses, rolled-cuff linen shirts, cropped pants, and wide-strap tanks frame white highlights so they read as intentional. For the session itself, wear easy-to-remove clothing that gives the artist flat access to the placement, such as a loose tank for shoulder work or cropped pants for ankle pieces. Here is a simple option for showing off forearm work: open cardigan.
Q: If I worry about raised or scar-like healing, should I avoid white ink entirely?
A: Not necessarily. Some practitioners recommend avoiding heavy white fills on areas that flex or receive friction. One camp warns that white often heals raised on stressed skin. Another camp says light-handed white highlights with conservative depth and minimal overwork can avoid raised texture. If texture is a primary concern, request a conservative highlight approach and a low-traffic placement.
