
I spent months testing glow-under-blacklight tattoos and talking with artists before I trusted UV ink on my own skin. The surprise for me wasn't that they glow—it's how hidden, personal, and crisp they can stay if you pick the right style and placement. Below are 21 UV tattoo ideas I actually sketched, saw healed, or had friends get. Each one notes pain, healing, and what to ask your artist so the glow lasts.
This list focuses on UV-enhanced versions of familiar styles—fine line, traditional, micro-realism, blackwork and minimalist pieces. These ideas work best on areas that don't get constant sun exposure (inner forearm, thigh, ribcage, behind ear). From what I've seen, artists in 2026 are layering UV as highlights, underpainting, or fully glowing mini pieces depending on how bold you want the night effect.
1. Fine Line Botanical Accents on Inner Forearm
Style/Technique: Fine Line with UV Highlights
Pain Level: Medium (3-4/10)
Session Time: 1–3 hours
Best For: Subtle statement, easy to hide
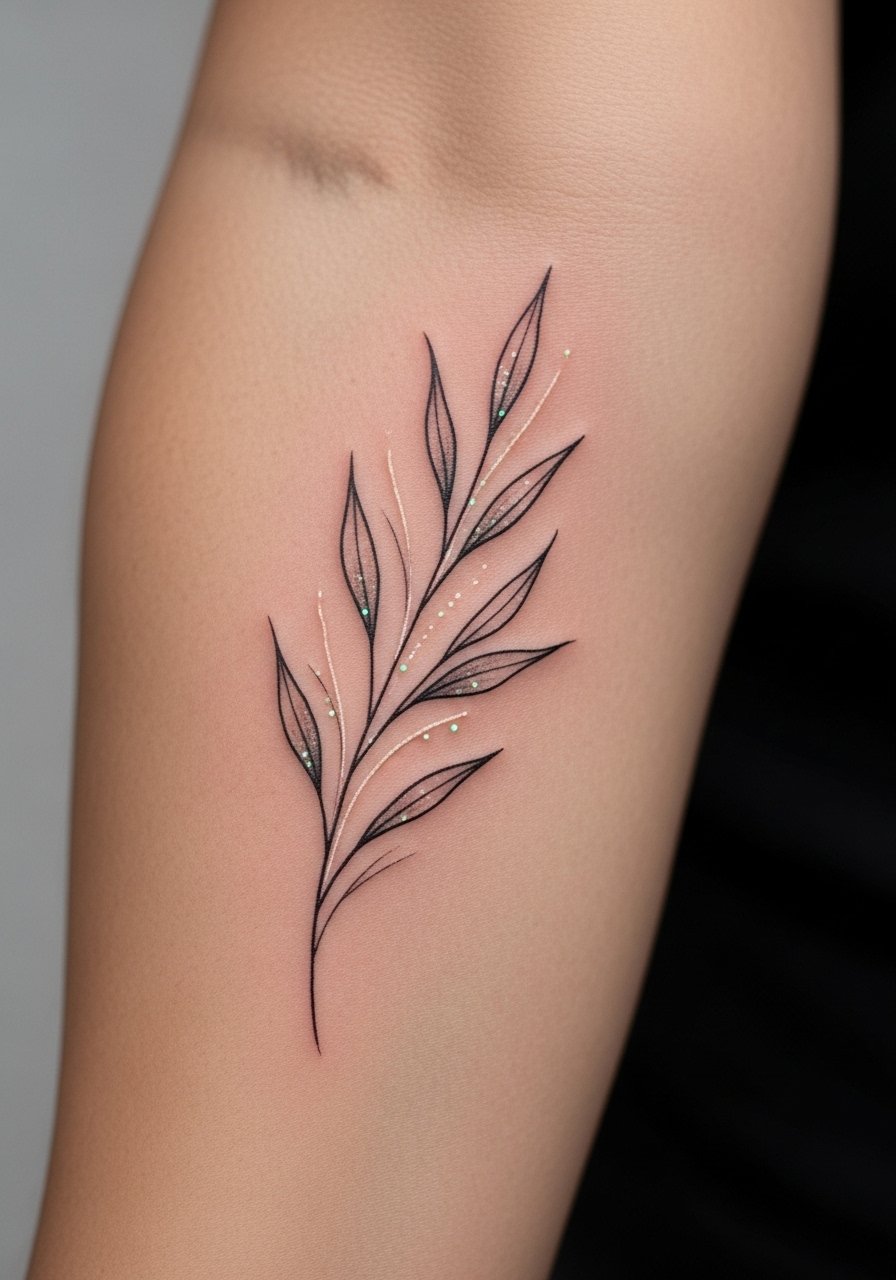
I love using UV as a secondary layer on fine line botanicals. The main outline uses traditional black for longevity. Then the artist adds UV to veins, pollen dots, or tiny dew drops so it looks normal in daylight but comes alive under blacklight. Expect fine needles and a steady hand—this needs an experienced artist because fine lines blur faster. Healing is standard: 2–3 weeks surface healing, full settling by 2–3 months. Since UV pigments can be less opaque, ask your artist to do a healed-sample patch or show healed photos on your skin tone. Avoid tiny isolated UV-only lines; they can fade quicker. Tell your artist you want contrast between blackwork and UV highlights so the daytime look remains meaningful.
2. Bold Traditional Rose with UV Petal Highlights on Upper Arm
Style/Technique: Traditional / Neo-Accent UV
Pain Level: Low-Medium (2-3/10)
Session Time: 2–4 hours
Best For: Timeless design with a playful night effect
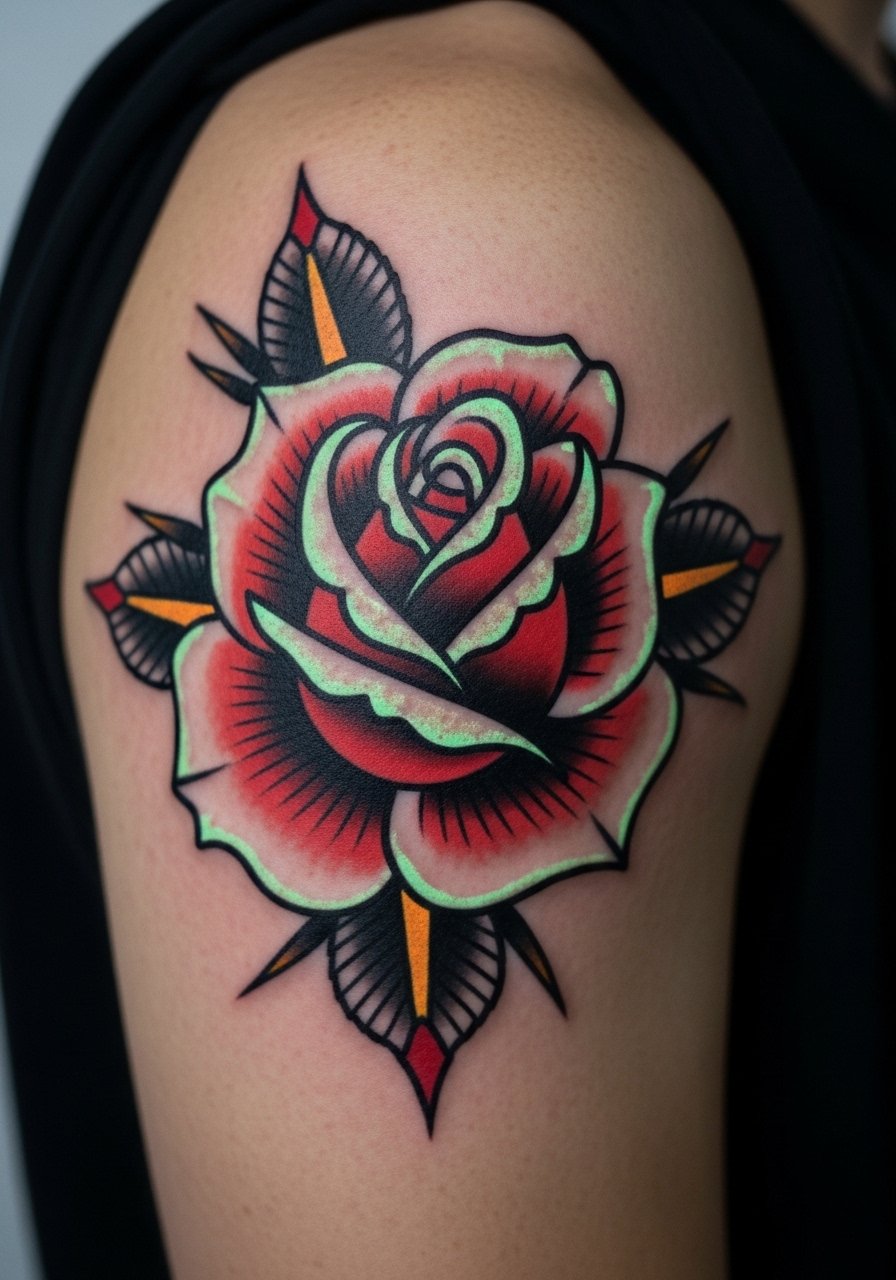
A traditional rose is forgiving for UV. The strong black outlines anchor the design. I’ve seen artists add UV to petal tips or inner shading so the rose reads classic by day and vivid by night. The upper arm heals reliably and isn’t sun-exposed as much if you wear short sleeves sometimes. Pain is mild here. UV inks can sit a bit more shallow, so artists often layer color carefully. Ask for healed-photo examples of similar skin tones. A common mistake is expecting full daylight color from UV—it’s meant to surprise, not replace regular pigments. If you want longevity, insist the artist seals UV only where skin is healthy and avoid overly thin UV-only fills.
3. Micro-Realism Pet Portrait with UV Glowing Eyes on Thigh
Style/Technique: Micro-Realism + UV Detail
Pain Level: Medium (3-4/10)
Session Time: 2–5 hours
Best For: Personal keepsake, big enough for detail
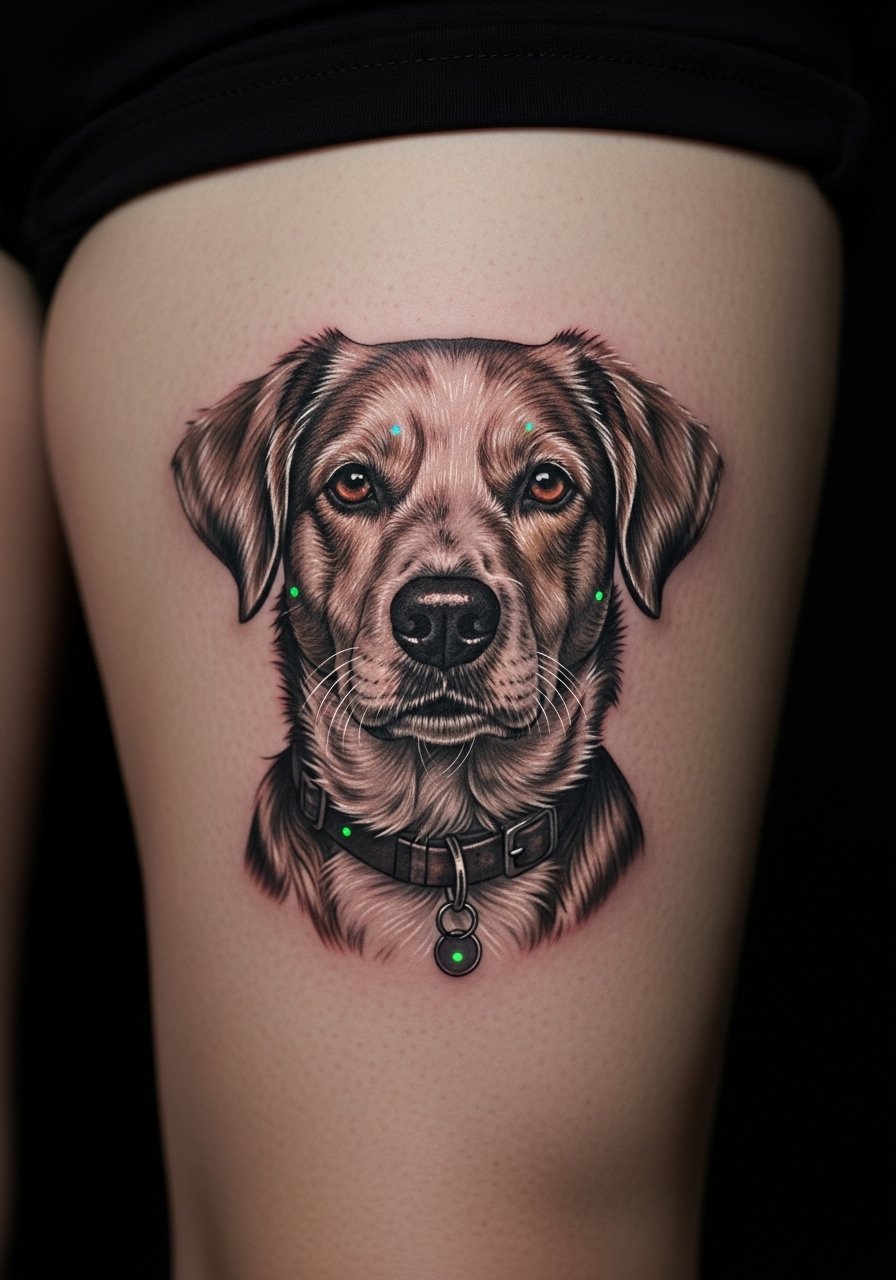
Micro-realism requires skill, and adding UV is a delicate move. I saw a friend get a pet portrait where only the eyes and collar had UV ink. In daylight the portrait looks fully realistic. Under a blacklight the eyes glow, adding an emotional flicker that isn't gaudy. Thigh placement keeps it private and away from harsh sun. Pain is moderate—thighs tolerate sessions well. UV pigments don’t always blend like regular color, so expect the artist to plan lines and tones as separate passes. A mistake I’ve noticed is oversaturating UV in small shaded areas; it can look fluorescent and flat. Ask for a test patch or a small UV accent first.
4. Minimalist Line Mountains With UV Starfield on Ankle
Style/Technique: Minimalist Line + UV Dotwork
Pain Level: Medium (4/10)
Session Time: 1–2 hours
Best For: Small, meaningful, partially hidden
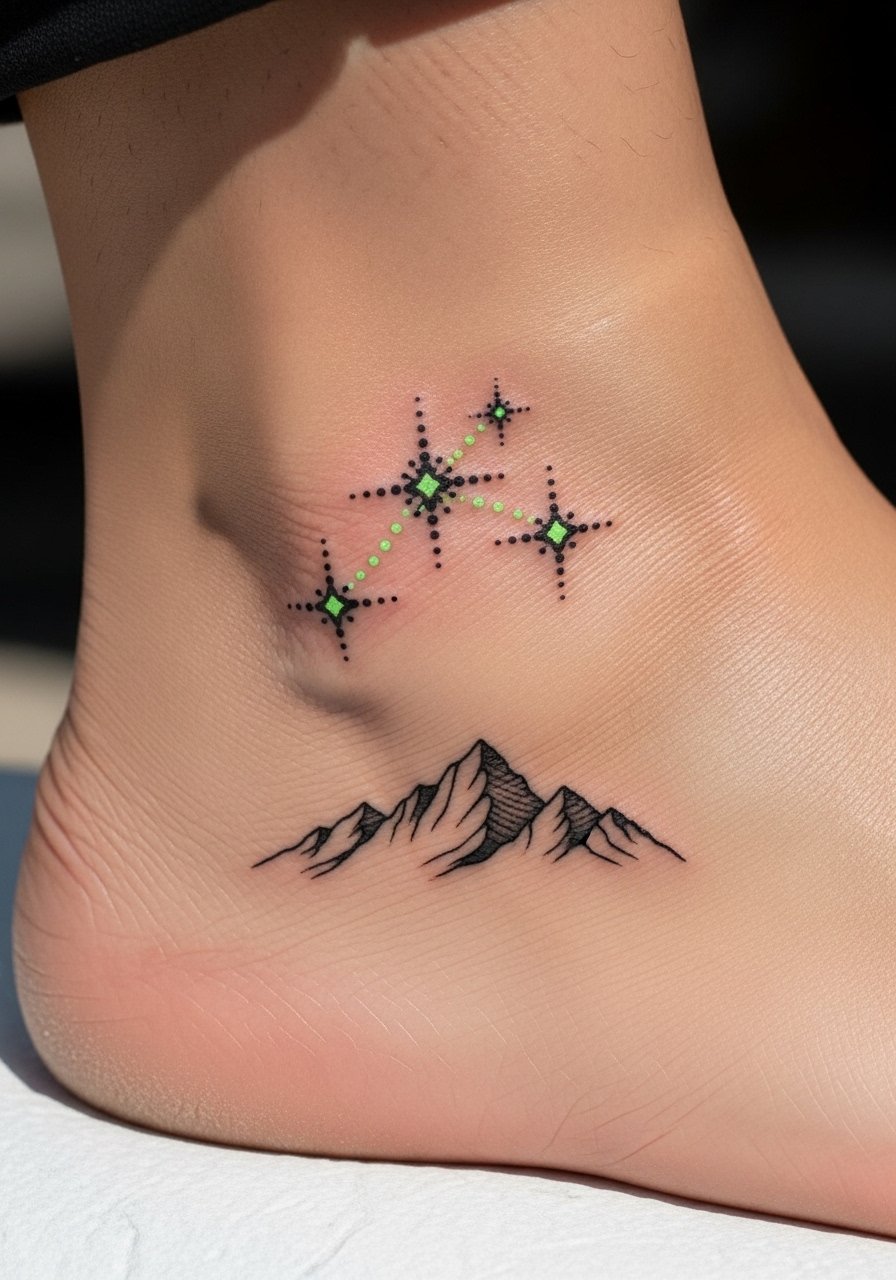
I recommend ankle placement for minimalist mountain lines with a UV starfield. The black linework stays readable in daylight. The UV dotwork night sky is a secret you reveal at parties or shows. Ankles sting more than the forearm, so count on medium pain and avoid extended sessions in one sitting. UV dots can blur if placed too close; artists I trust space them for longevity. Heal time is the same as a small piece, but watch for friction from shoes and socks. A typical mistake is choosing high-friction ankle spots for tiny UV dots—they peel faster. Ask your artist to map the placement with your footwear in mind.
5. Blackwork Geometric Spine With UV Dot Accents on Spine
Style/Technique: Blackwork / Geometric with UV highlights
Pain Level: High (7-8/10)
Session Time: Multiple sessions, 3–6 hours each
Best For: Statement piece, dramatic under blacklight
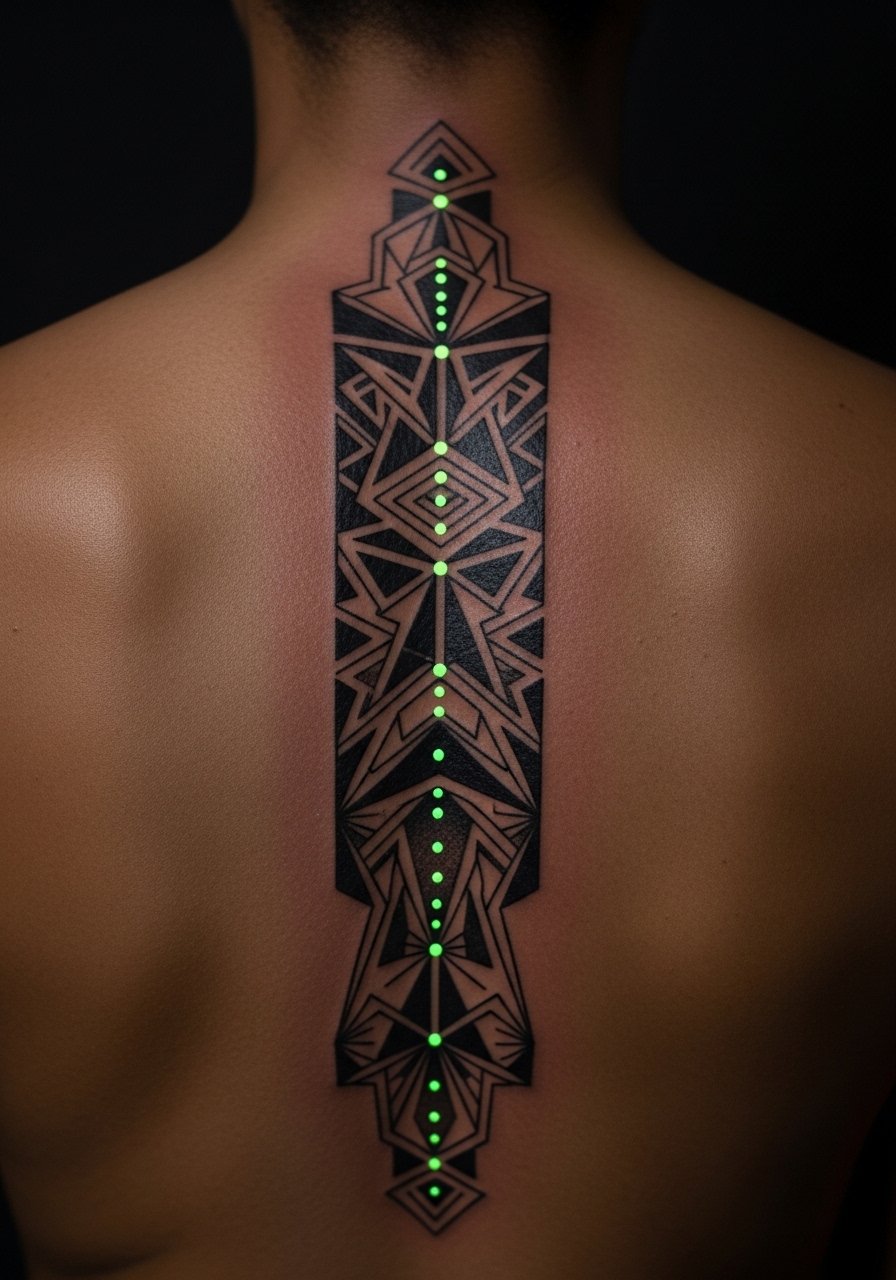
Spine tattoos hurt, and adding UV doesn’t change that. What I like about this pairing is how bold blackwork reads day-to-day, while UV dots in the geometry create a constellation effect at night. Expect longer sessions and breaks. UV pigments sometimes sit differently than black ink, so artists place them intentionally to avoid migration. Healing on the spine is slower because clothing rub and movement matter. Avoid thin UV-only lines along the spine; they’re prone to break up. Talk to your artist about layering strategy—most of the artists I follow suggest doing blackwork first, then adding UV in a second pass when the skin has calmed.
6. Neon Watercolor Swash on Ribcage
Style/Technique: Watercolor-inspired with UV overlay
Pain Level: High (6-8/10)
Session Time: 2–5 hours
Best For: Bold, artistic, hidden when needed
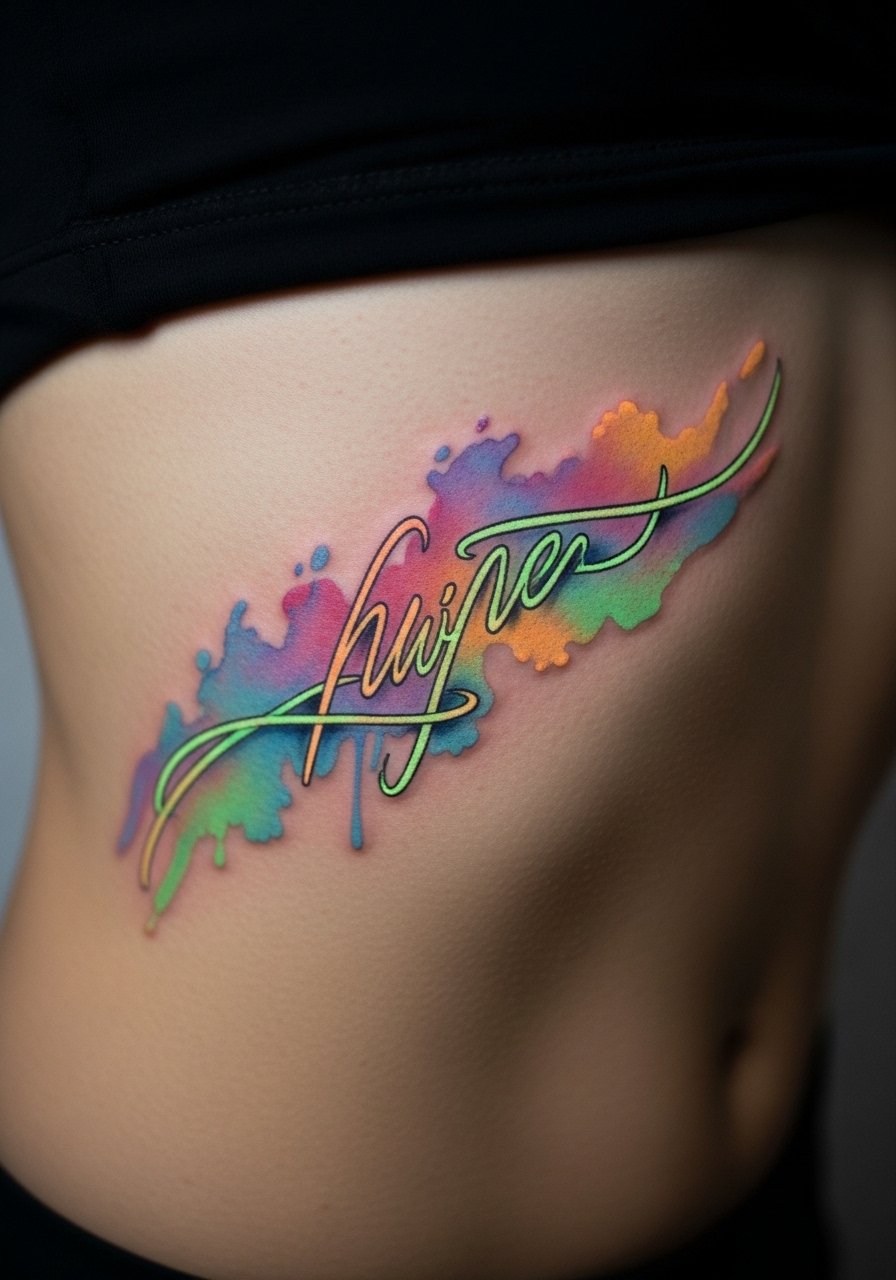
Ribcage watercolor and UV is theatrical. By day the piece reads like soft wash colors; under blacklight the same areas pulse neon. Ribs are painful and sensitive, so be ready. UV watercolor looks great because the glow emphasizes washes rather than lines. But watercolor techniques demand an artist who understands how UV inks layer—too much can muddy the effect. Expect a peeling phase where colors mute before brightening as skin heals. One mistake is choosing large rib pieces if you have a history of keloiding; UV can exaggerate texture visually. Ask for healed examples and plan for longer aftercare in this area.
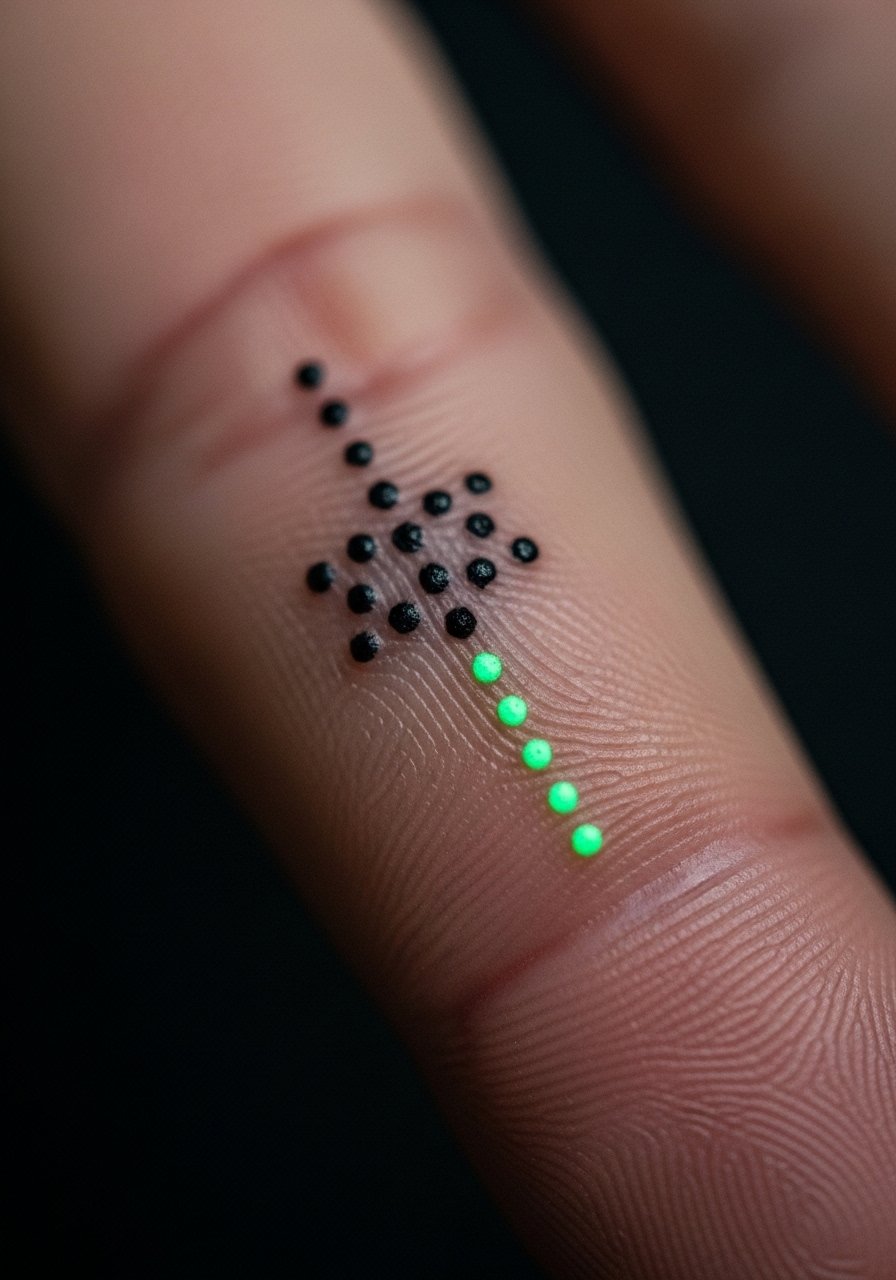
7. Tiny UV Constellations Behind Ear
Style/Technique: Minimalist Dotwork / UV-only accents
Pain Level: Low (2-3/10)
Session Time: 30–60 minutes
Best For: Secret, low-commitment glow

Behind the ear is perfect for tiny UV constellations. It's discrete. It’s easy to hide with hair. Pain is low but the area is bony and sensitive. UV-only tiny dots can be almost invisible by day, which many people want. I advise testing small UV dots first, since some inks can settle lighter than expected. Common mistake: expecting large-sized UV effects in a tiny space—scale matters. Ask your artist to place dots with spacing so they don’t merge during healing. Keep the area dry from hair products while it heals.
8. UV Barcode Wrist Tattoo (Secret Message) on Inner Wrist
Style/Technique: Minimalist + Tech-Inspired UV
Pain Level: Medium (4/10)
Session Time: 1–2 hours
Best For: Personal codes, hidden messages
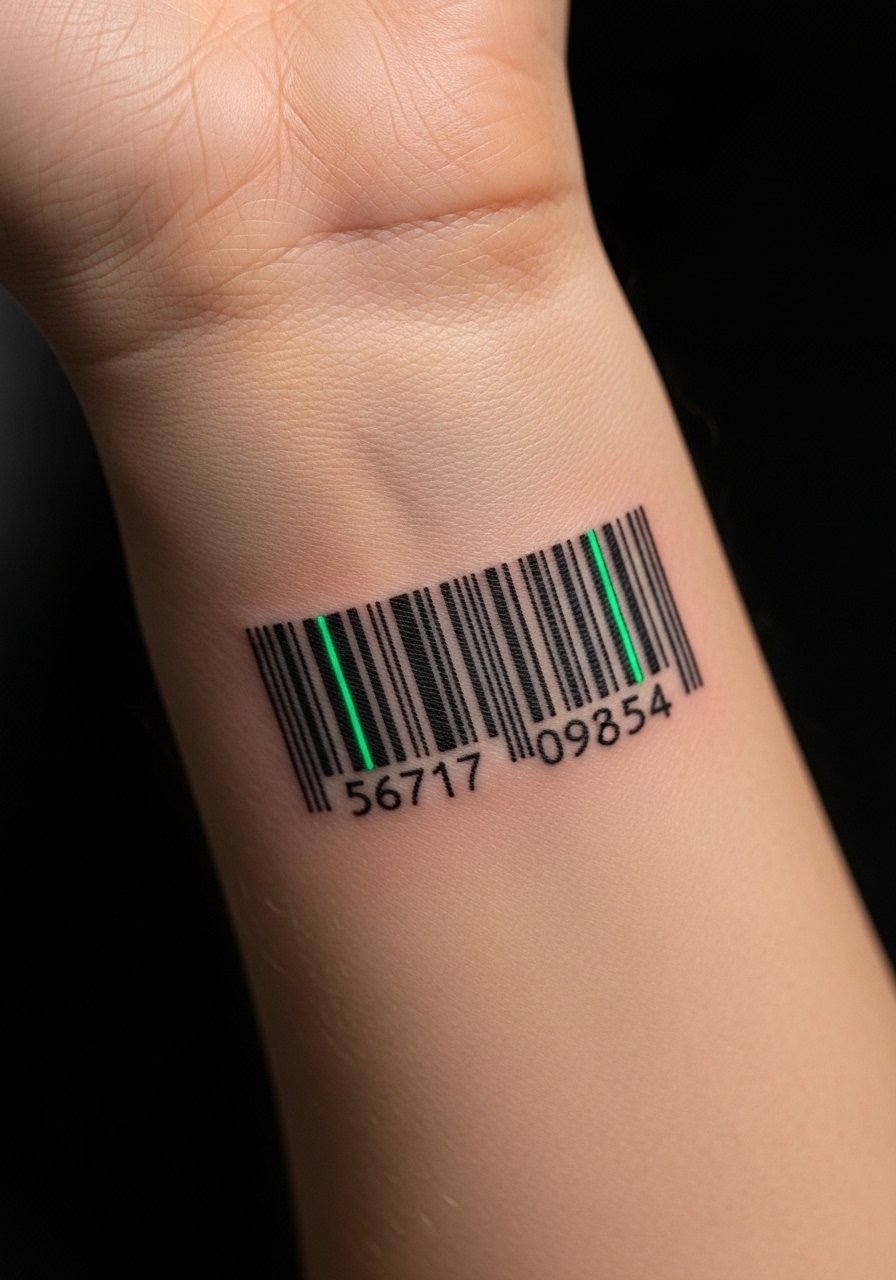
A UV barcode across the wrist is a unique secret. Daytime it can read as a thin black barcode or faint lines. Under blacklight it reveals a hidden code, date, or phrase. Wrist placement means visibility and easier blacklight checks, but it also sees sunlight and friction. UV lines on wrists may need touch-ups sooner. I’ve seen artists suggest combining black baseline bars with UV fills so the barcode still reads if UV fades. Avoid tiny, intricate UV-only bars—they can blur. If you want this, ask for a simple readable pattern and check healed samples on similar skin tones.
9. Hidden UV Script Along Collarbone
Style/Technique: Script / Fine Line with UV underlayer
Pain Level: Medium (3-4/10)
Session Time: 1–2 hours
Best For: Meaningful text that’s private
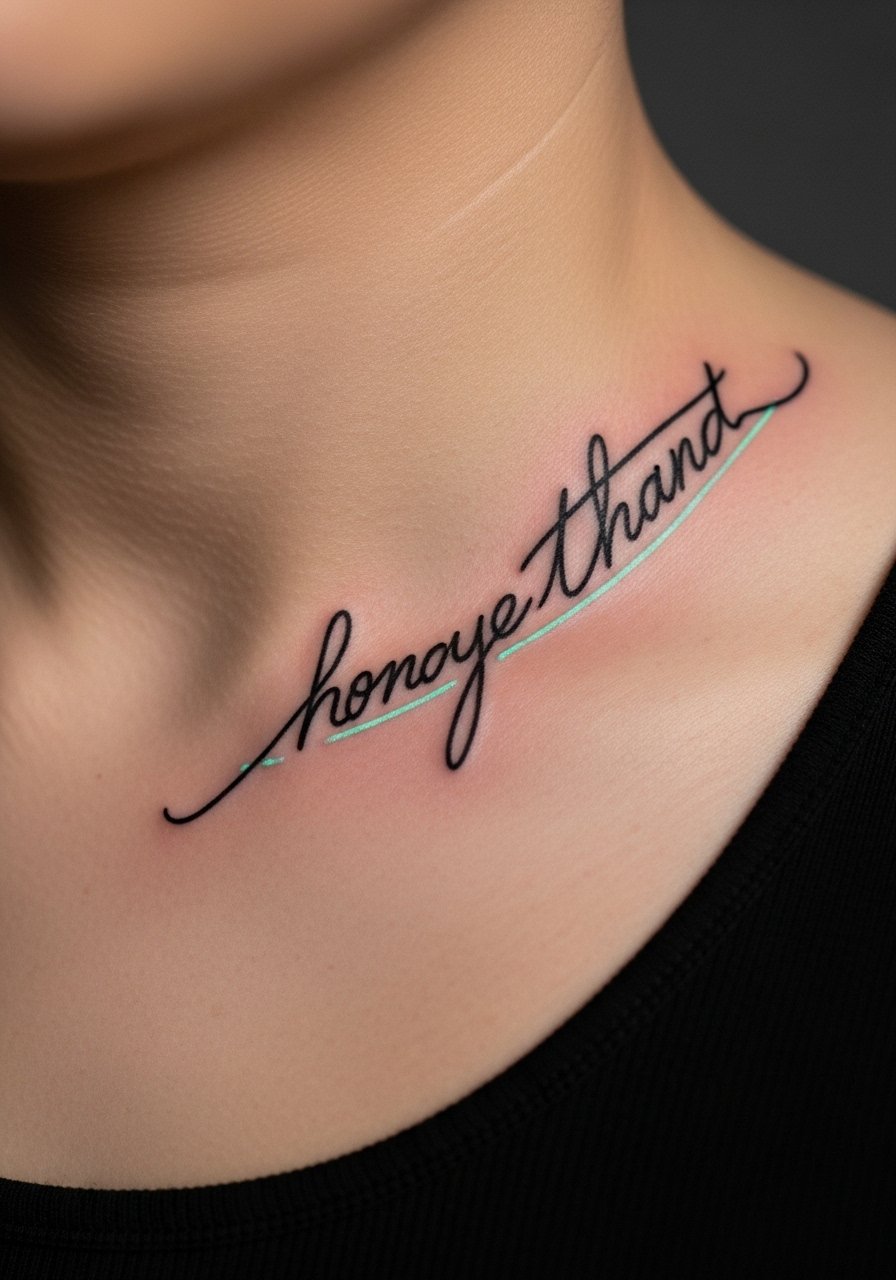
Script along the collarbone takes on a new level when UV is incorporated as an underline or shadow. It's subtle by day and intimate under blacklight. The collarbone is sensitive; expect moderate pain, especially near the bone. Because UV underlayers can shift, your artist should plan spacing so letters remain crisp. A mistake I see is putting too many words—small letters and UV details compete. I recommend short phrases or single words. Ask your artist to show healed script examples on similar skin tones to set expectations for contrast and readability.
10. Neo-Traditional Skull With UV Ornamentation on Calf
Style/Technique: Neo-Traditional + UV Glow Details
Pain Level: Medium (3-5/10)
Session Time: 2–4 hours
Best For: Bold, decorative pieces with night drama
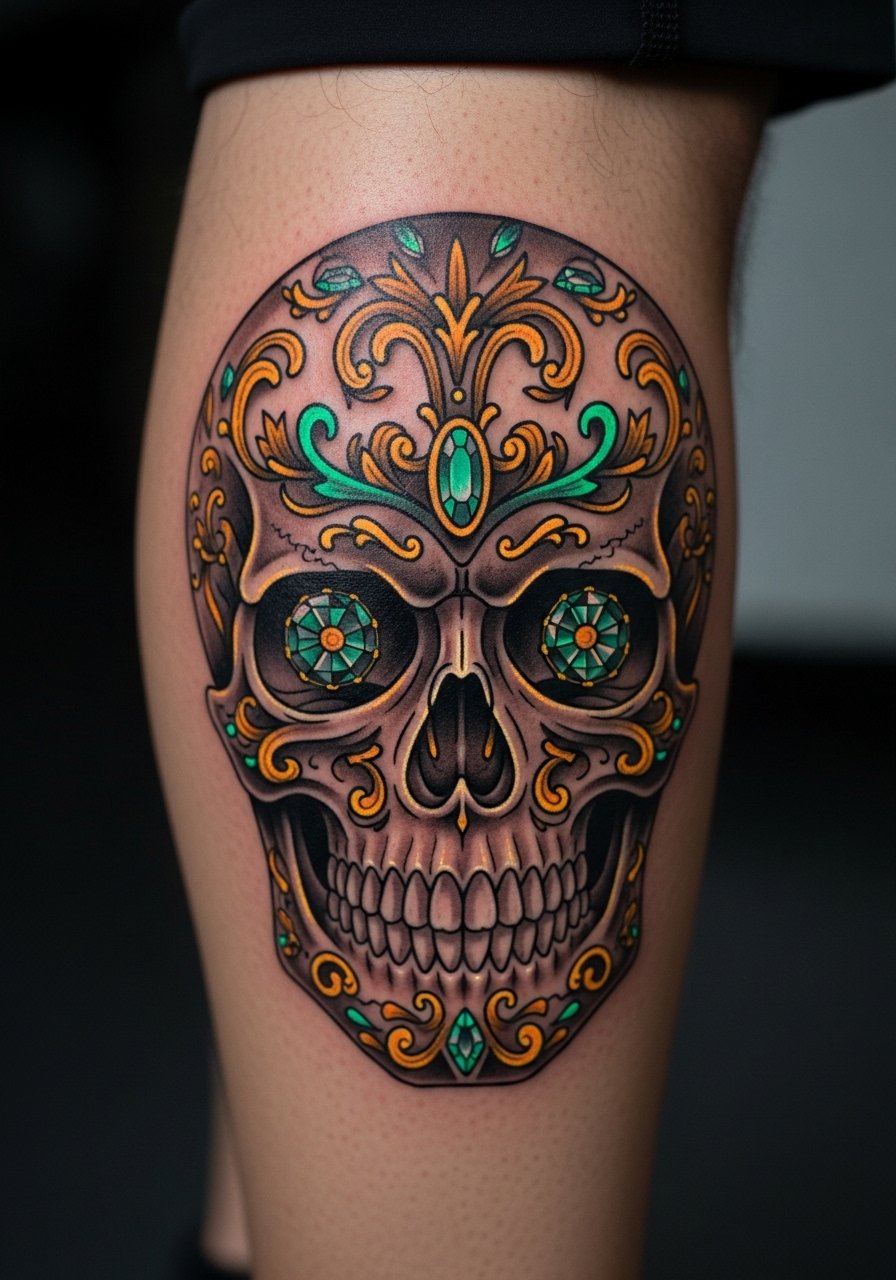
Neo-traditional designs pair well with UV in decorative spots: eyes, gems, or filigree. Calf placement handles larger canvases and heals well with minimal sun exposure if you cover up. I’ve seen skulls with UV jewel highlights that look classic by day and jewel-like at night. UV can accentuate texture, so artists often use it sparingly to avoid flattening the depth. One mistake is over-relying on UV for the main focal point; UV should enhance, not carry, the piece. Discuss balance with your artist and ask for healed photos of similar multi-layered work.
11. UV White Ink Lace on Shoulder Blade
Style/Technique: White Ink Lacy Work + UV Threading
Pain Level: Low-Medium (3/4/10)
Session Time: 1–3 hours
Best For: Bridal-style, delicate but secretive
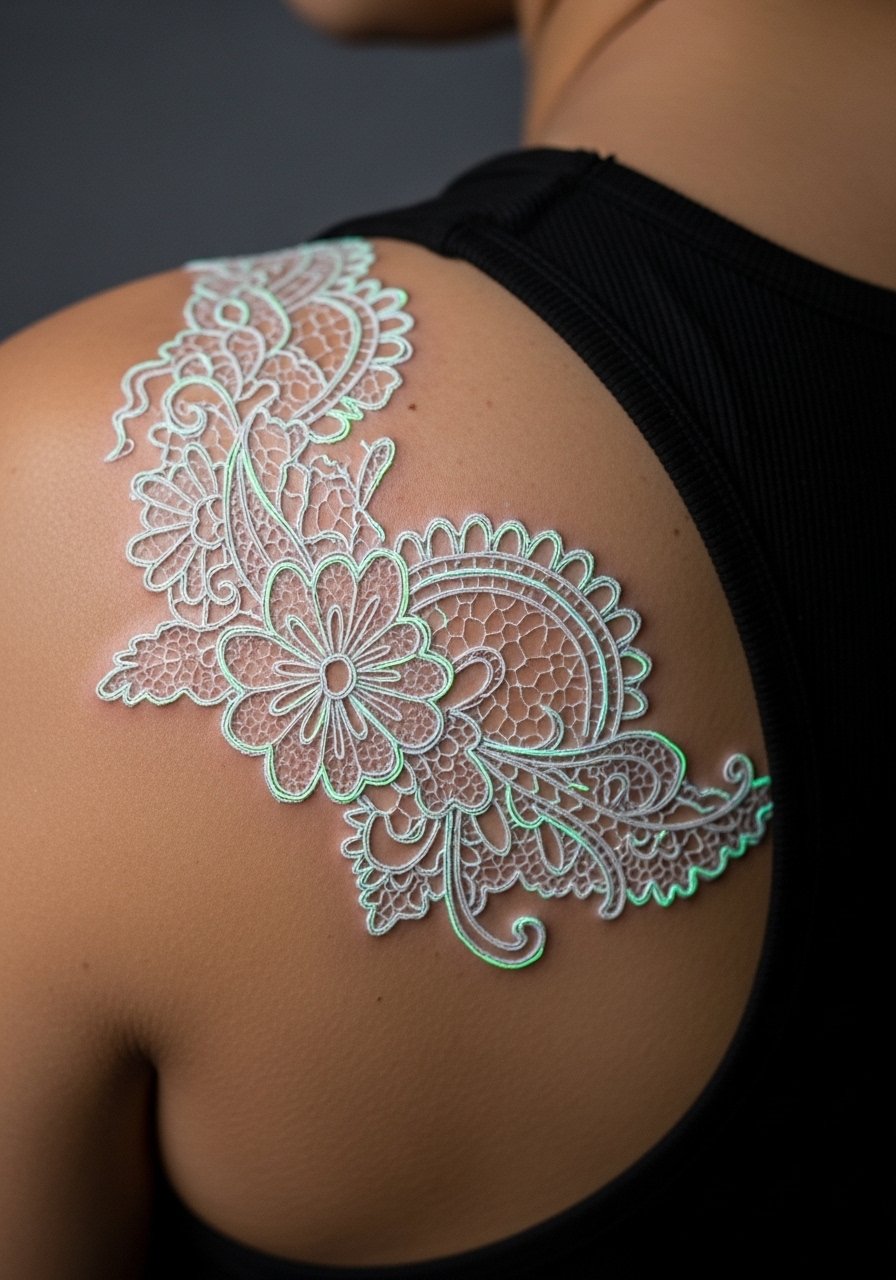
White ink lace gets a boost with faint UV threading. By day the lace reads delicate; at night the UV outline gives a ghostly glow. White ink itself can fade or yellow on some skin types, so combining it with UV needs an artist who’s used to layering pigments. Shoulder blade placement is forgiving and easy to protect from sun during healing. Avoid expecting bold white in all tones; white is subtle. Ask to see healed white-on-similar-skin examples. A common misstep is placing dense UV where white already vanishes—space them for clarity.
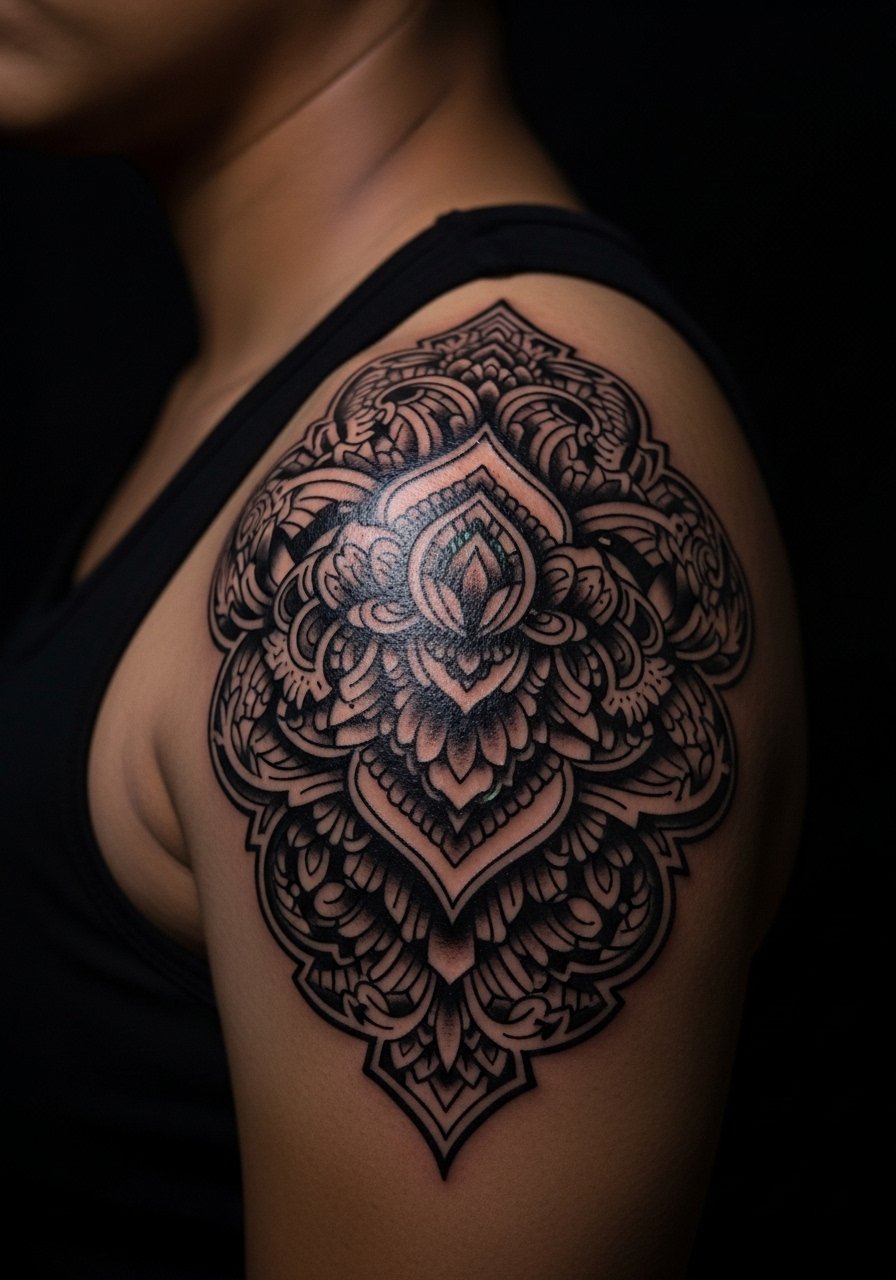
12. Glow Tribal Armband With UV Patterns on Bicep
Style/Technique: Tribal / Blackwork with UV Patterns
Pain Level: Medium (3–5/10)
Session Time: 1–3 hours
Best For: Statement band that’s both classic and playful

Tribal armbands benefit from UV patterning inside bold black shapes. The black provides structure; the UV fills create an internal glow that’s only visible under blacklight. Biceps tolerate sessions well and are easy to hide under sleeves. UV in armbands can age differently than blackwork depending on sun exposure—rotate your sleeve choices during sunny months to protect it. Don’t ask for tiny UV filigree inside thick black bars; those details can get lost. Ask your artist for placement that lines up with muscle curves so the pattern flows when you move.
13. UV Freckle Cluster on Cheekbone
Style/Technique: Minimalist Dots / UV Micro-Accents
Pain Level: Low (2-3/10)
Session Time: 30–60 minutes
Best For: Subtle beauty marks, facial accents
Tiny UV freckles on the cheekbone are an under-covered idea I’m seeing more of. They read as barely-there beauty marks in daylight and pop under blacklight. Facial skin heals differently—slower surface peeling but often better color retention for tiny dots. Pain is low, but be cautious with swelling and facial products during healing. A mistake is choosing too many dots; less reads natural. Have your artist use small, shallow placements and show healed photos on faces of similar tone. Avoid placing them where makeup will constantly rub during the first week.
14. UV Mandala Palm Accent (Inner Palm Edge)
Style/Technique: Dotwork / Mandala with UV highlights
Pain Level: High (8-9/10)
Session Time: 1–3 hours, may need touch-ups
Best For: Statement that’s extremely private

Palms are notorious for fast fading and heavy touch-ups. I only recommend UV mandala edges on the inner palm for people who accept frequent retouches. The design reads hidden and is dramatic under blacklight. Pain is high because the palm is sensitive. UV pigments on palms often migrate or lighten, so artists may use bolder black anchors around UV to extend life. If you want this, plan for maintenance and use protective bandaging early. A common error is expecting palm pieces to last like forearm work—plan for upkeep.
15. UV Sleeve Underpainting Beneath Blackwork
Style/Technique: Layered Blackwork Top + UV Underpainting
Pain Level: High (6–8/10)
Session Time: Multiple long sessions
Best For: Long-term collectors, spectacle when revealed
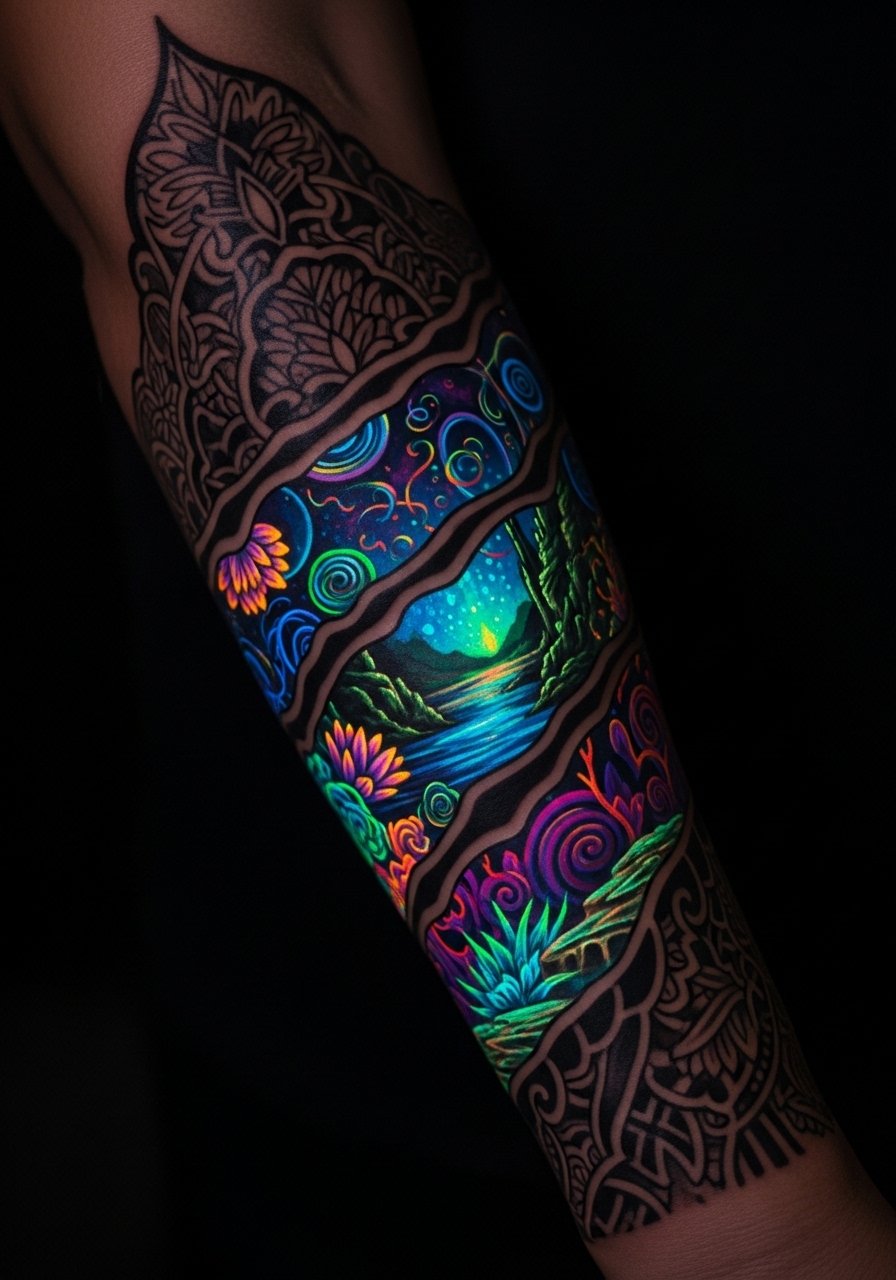
This is a fresh angle: painting a UV underlayer first and then doing blackwork on top so certain cuts or gaps reveal the glow under blacklight. I’ve watched artists develop this for sleeves. It lets you have a fully normal-looking black sleeve by day and a second hidden design by night. Expect multiple sessions and careful planning—UV underlayers need time to settle before black layers go on top. A mistake is not accounting for how much skin trauma stacking sessions causes. Talk to your artist about staging and about how the black top layer will affect UV visibility under blacklight.
16. Micro UV Morse Code on Finger
Style/Technique: Micro Minimalist + UV Dots on Finger
Pain Level: Medium-High (5-7/10)
Session Time: 30–90 minutes
Best For: Secret messages, intimate placement
Fingers are great for tiny secret codes, but expect more fading and touch-ups. UV dots can carry a message only you and friends under blacklight can read. Pain is higher than the forearm because the finger has thinner skin. I’ve seen artists recommend slightly larger dot sizes than typical micro tattoos to compensate for migration. Avoid placing too close to joints. If you want longevity, plan on occasional touch-ups. Ask your artist for spacing and healed examples of micro-dots on fingers.
17. UV Floral Ankle Wrap With Pastel Glow
Style/Technique: Neo-Realism Floral + UV Pastel Accents
Pain Level: Medium (4/5/10)
Session Time: 1–3 hours
Best For: Romantic, wearable art
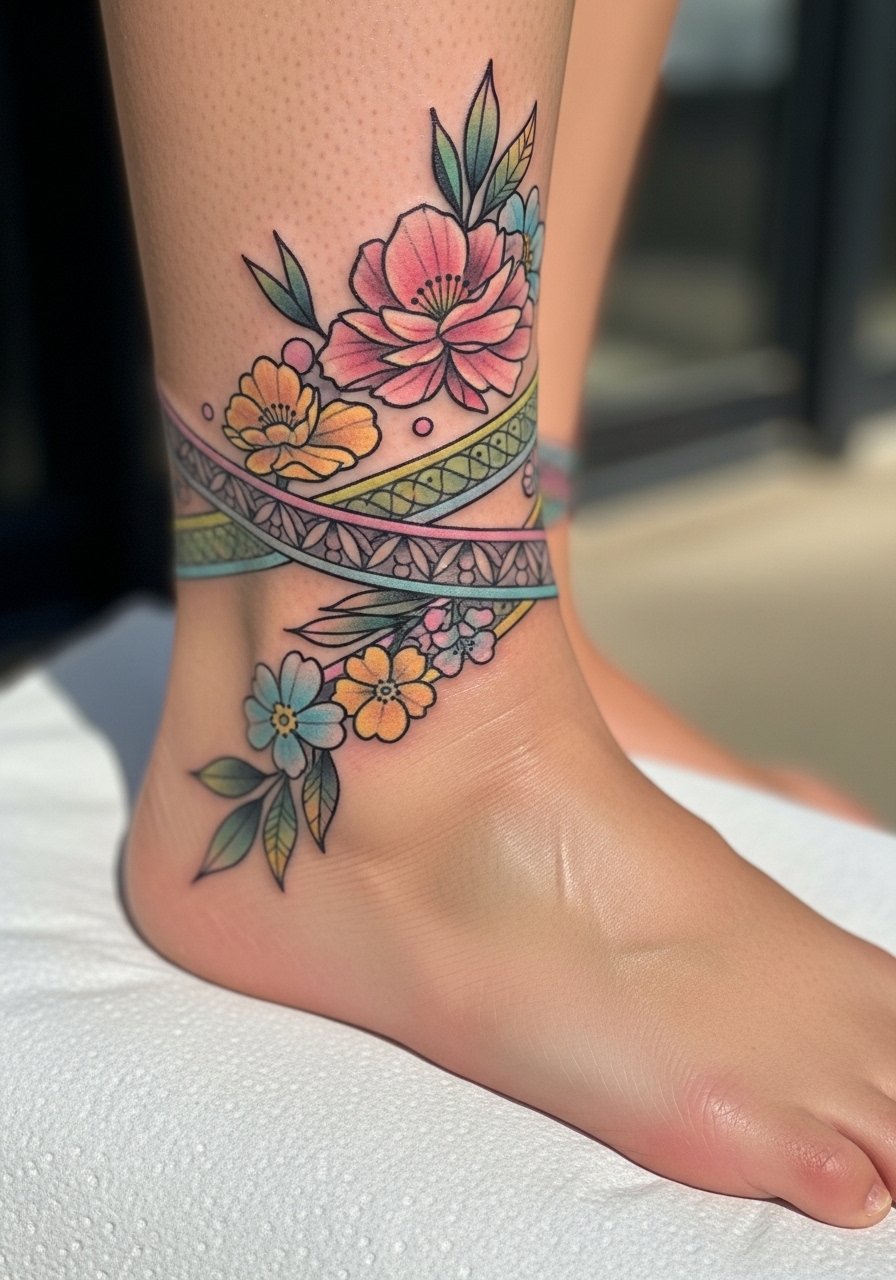
An ankle floral wrap with UV pastel highlights looks feminine by day and ethereal at night. UV pastel shades (pinks, lavenders) can glow softly. But pastel UVs can be the first to fade, so artists often use them as highlights rather than full fills. Expect medium pain on the ankle. Protect from shoe friction during healing. A common mistake is choosing ultra-faded pastels expecting them to glow brightly—talk to your artist about pigment opacity and healed examples. Consider a touch-up plan if you love the night effect.
18. Solar System Orbit Line on Sternum With UV Planets
Style/Technique: Minimalist Orbits + Micro-Realism UV Planets
Pain Level: High (7-8/10)
Session Time: 1–3 hours
Best For: Centerpiece with private reveal
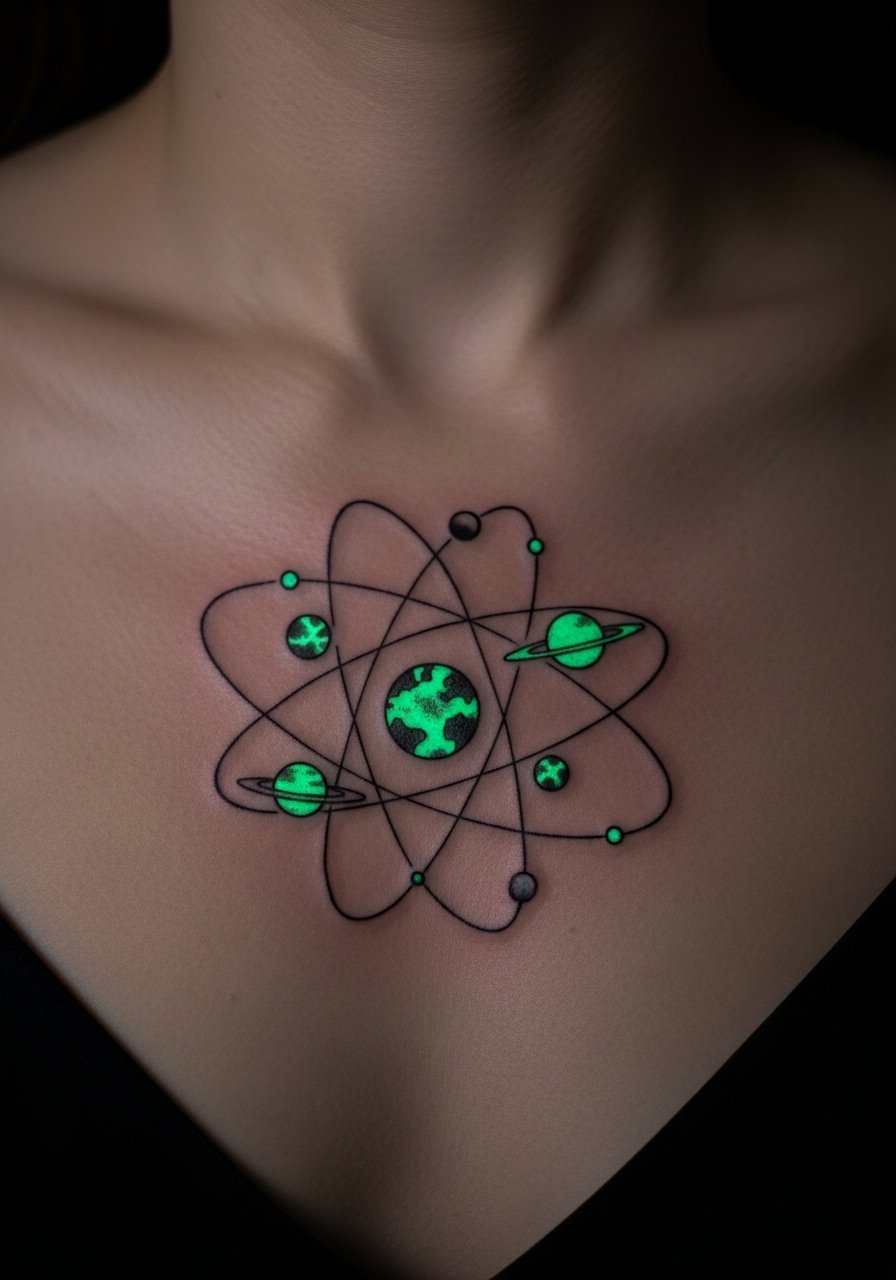
Central chest or sternum spots are intimate and hurt more. A solar system orbit line with UV planets is symbolic and dramatic under blacklight. I like that the black orbits age predictably while UV planets remain a secret accent. Sternum moves a lot with breathing—expect slower settling. A mistake is tiny planet dots that get lost—go a size up for durability. Discuss breathing and movement with your artist to place orbits that follow natural contours.
19. UV Kintsugi-Inspired Scar Lines on Forearm
Style/Technique: Fine Line Kintsugi + UV Inlay
Pain Level: Medium (3–4/10)
Session Time: 1–2 hours
Best For: Symbolic scars, reflective pieces
Kintsugi-inspired lines look like repaired cracks. UV inlays can make those repairs glow as if they’re lit from within. I’ve seen this idea used to mark recovery or transformation. The forearm holds detail well and is easy to protect. UV can emphasize the “repair” without overpowering the daytime look. Avoid making lines too thin—UV in single hairline cracks may disappear. Ask to preview the stroke thickness on your skin tone before committing.
20. UV Music Notes Behind Ear/Neck
Style/Technique: Micro-Realism + UV Accents
Pain Level: Low-Medium (3–5/10)
Session Time: 30–90 minutes
Best For: Musicians, playlist memorials
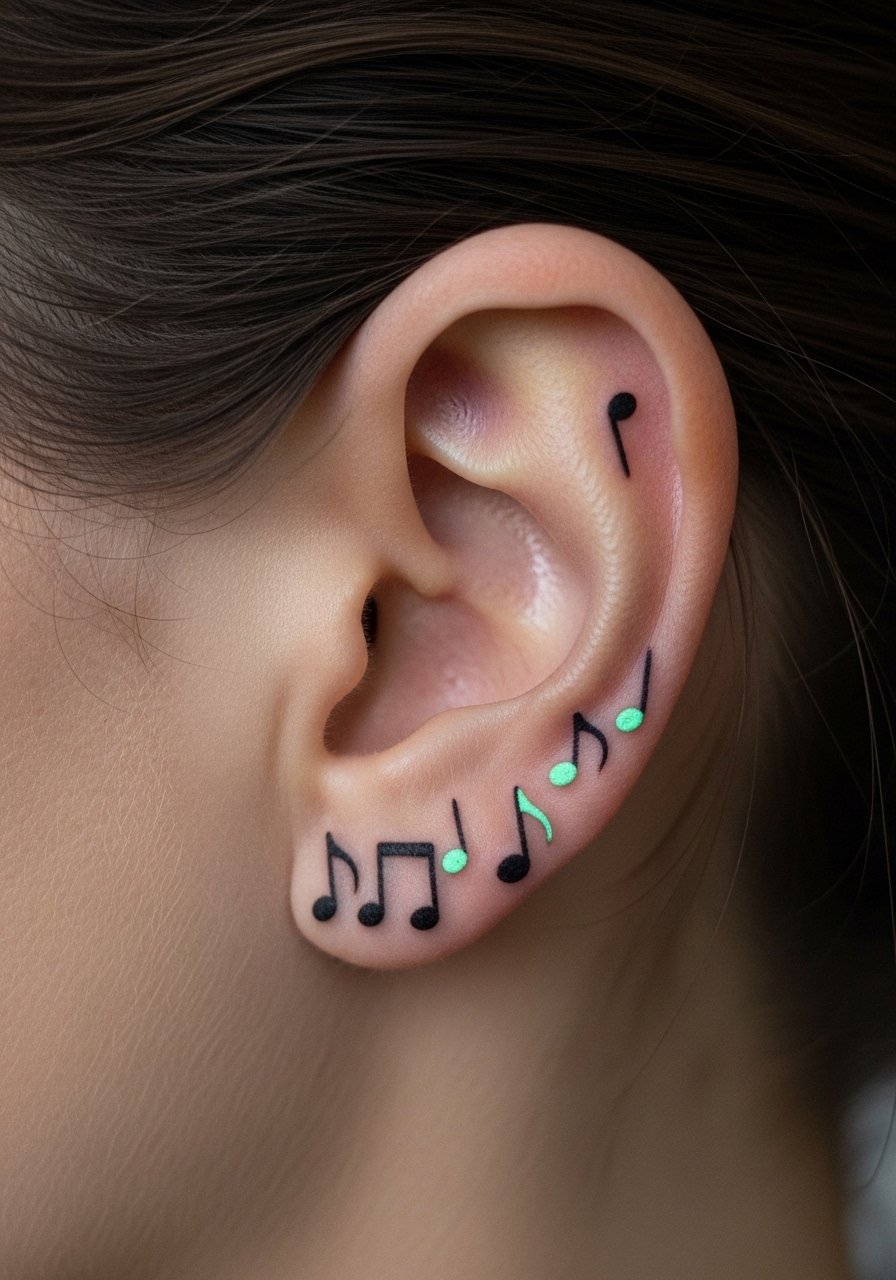
If music is your language, small notes with UV fills behind the ear or at the nape are memorable. They’re low-visibility by day and light up in venues under blacklight. Pain is moderate—behind the ear stings less than the neck but heals with care because of hair product contact. A frequent mistake is picking too dark a UV color expecting visible color in daylight—UV is for night. Ask your artist for healed photos of similar placements and plan to protect it from shampoo and sprays during the first week.
21. Custom UV Cover-Up Blend on Shoulder
Style/Technique: Cover-Up / UV Integration
Pain Level: Medium (3–6/10)
Session Time: Multiple sessions, staged
Best For: Updating old ink, secret rejuvenation
Using UV in a cover-up is an advanced tactic. I’ve seen artists use UV to mask edges or to add a second design that only reveals itself under blacklight. This can save you from an obvious multi-layered look by day. Cover-ups need planning: skin texture, old pigment, and scar tissue change how UV sits. Pain varies with how much work the artist needs to do. A common error is expecting a one-session miracle—cover-ups with UV often require staging. Ask your artist about test patches and realistic expectations for how the healed cover will read in daylight and under blacklight.
Tattoo Prep and Aftercare Essentials
Aftercare Essentials:
- Aquaphor Healing Ointment, 14oz tube — For first 3–5 days to keep area protected
- Saniderm Transparent Adhesive Bandage, 6-inch roll — Popular second-skin option for early healing
- CeraVe Fragrance-Free Moisturizing Lotion, 12oz — For days 4–14 to soothe and hydrate
- Dr. Bronner's Unscented Castile Soap, 32oz — Gentle cleanser for rinsing tattoos
Before Your Appointment:
- Numbing Cream With 5% Lidocaine — Use only if your artist approves and follow instructions
- Tattoo Stencil Transfer Paper, 11×14 pack — If you like to tweak placement at home
Long-Term Maintenance:
- SPF 50 Sunscreen Stick For Tattoos, 0.55oz — Apply daily to prevent UV fading of standard inks and protect UV areas
- Mad Rabbit Tattoo Balm, 1oz — For healed tattoo upkeep and vibrancy
- Hustle Butter Deluxe, 4oz — Vegan option artists recommend for long-term skin health
Optional Comfort & Fixes:
- Tattoo Numbing Spray — For touch-ups or sensitive zones, discuss with artist first
- Hydrocolloid Bandages (Large) — For small scabs or areas that need a moisture barrier
- Tattoo Aftercare Kit (Starter) — Good for first-timers who want a curated set
I’ve listed items artists I follow actually recommend and those that are hyped. For example, many pros still name Saniderm and Aquaphor as daily go-tos for the initial phase, while Hustle Butter or Mad Rabbit are great for long-term moisture. Use numbing products only with your artist’s go-ahead.
Frequently Asked Questions
Q: How bad does a UV tattoo actually hurt?
A: Pain depends on placement. Outer arm = 3/10. Ribcage/spine = 7–8/10. UV ink doesn’t inherently hurt more; it’s the spot that matters. For sensitive areas, ask about a numbing cream with 5% lidocaine and follow your artist’s advice.
Q: Will my UV tattoo be visible in daylight?
A: Usually UV is subtle by day. Many pieces use black or color anchors so it looks like a normal tattoo in daylight, then glows under blacklight. From what I’ve seen, fully UV-only large fills can appear faint in daylight.
Q: How do I keep UV ink from fading faster than regular ink?
A: Sunscreen is non-negotiable. Use an SPF 50 sunscreen stick on exposed tattoos every day. Also, avoid prolonged sun during the first few months and keep tattoos moisturized with a fragrance-free lotion.
Q: Can I work out after getting a UV tattoo?
A: Wait 48–72 hours at minimum, longer for high-friction placements. Sweat can irritate fresh ink and increase infection risk. If you’re worried, keep the area clean with a gentle soap like Dr. Bronner’s Unscented Castile Soap and avoid heavy sweating for a week.
Q: Are there extra risks with UV ink?
A: Some people report sensitivity to certain pigments. From conversations with artists, allergy reactions are rare but possible. If you have sensitive skin or allergies, ask for a patch test and discuss ingredients with your artist.
Q: How long does a UV tattoo take to heal?
A: Surface healing: roughly 2–3 weeks. Full settling: 2–3 months. Use a sealing product like Saniderm in the first phase or Aquaphor for the initial 3–5 days, then switch to a light fragrance-free lotion.
Q: Do UV tattoos work on all skin tones?
A: Yes, but contrast and color choices matter. Darker skin tones can still glow beautifully under blacklight, though some pastels won’t pop as strongly by day. I always suggest seeing healed examples on similar skin tones and asking your artist which pigments they trust.
Q: Should I expect touch-ups for UV tattoos?
A: Plan on them. UV dots and pastel fills often need refreshes more than solid blackwork. Hydrocolloid bandages can help small scabs heal without picking. If longevity is crucial, discuss retention strategy and staging with your artist.
