
I spent months obsessing over tiger tattoo portfolios before I got my first big piece. The hard lesson: a tiger can look fierce the day you leave the shop and very different once it heals. These 27 tiger tattoo ideas are the ones I keep recommending—styles that read strong, age well, and actually fit body movement. Use them to pick a look that demands respect.
This list focuses on traditional, Japanese Irezumi, realism, and fine-line approaches. Placements range from hands and biceps to ribs and full sleeves. From what I’ve seen in 2026 trends, tiger sleeves with backgrounds and black-and-grey portraits are what artists keep recommending for longevity and impact.
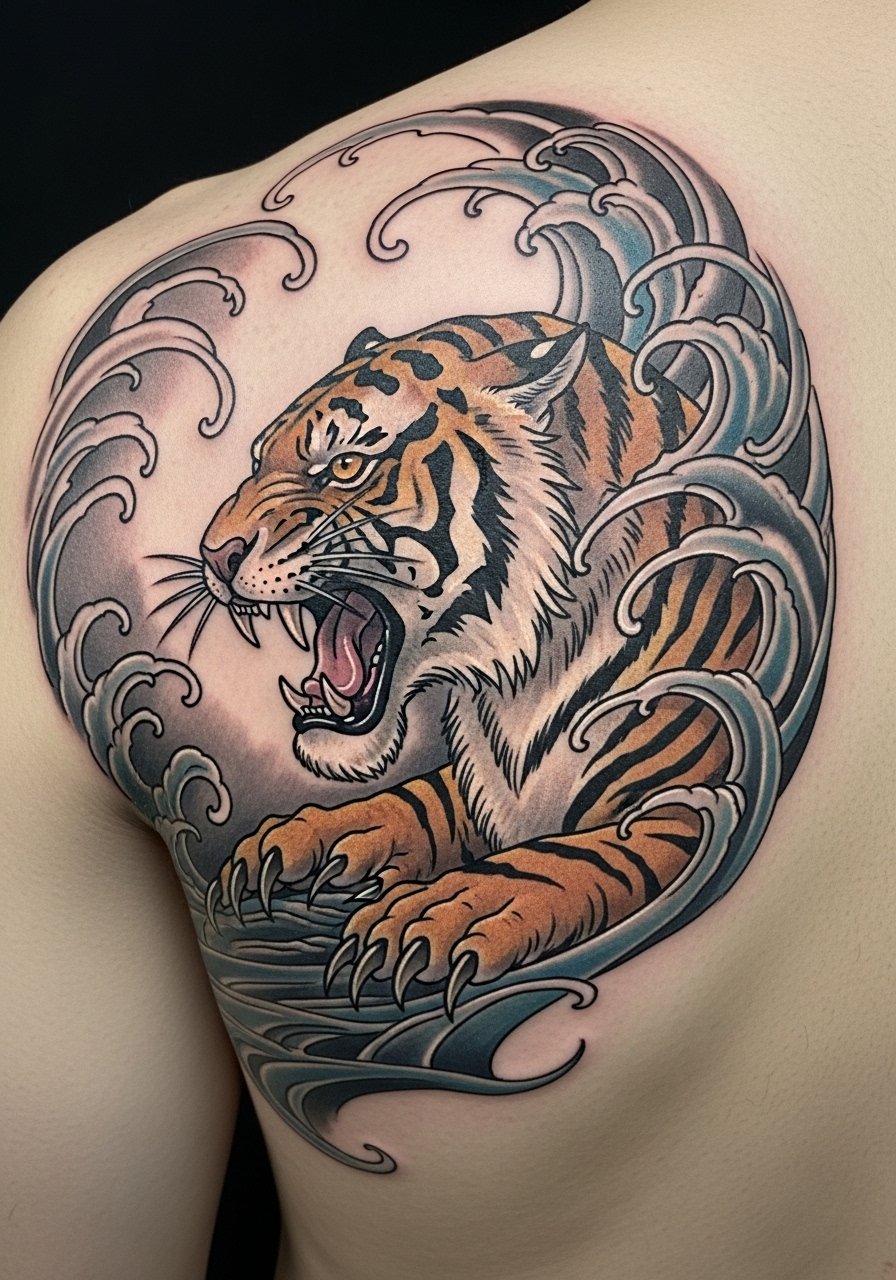
1. Traditional Orange Tiger Head on Bicep
Style/Technique: American Traditional / Bold Color
Pain Level: Medium (3-5/10)
Session Time: Single session, 2-4 hours
Best For: Visible statement, easy to cover with sleeves
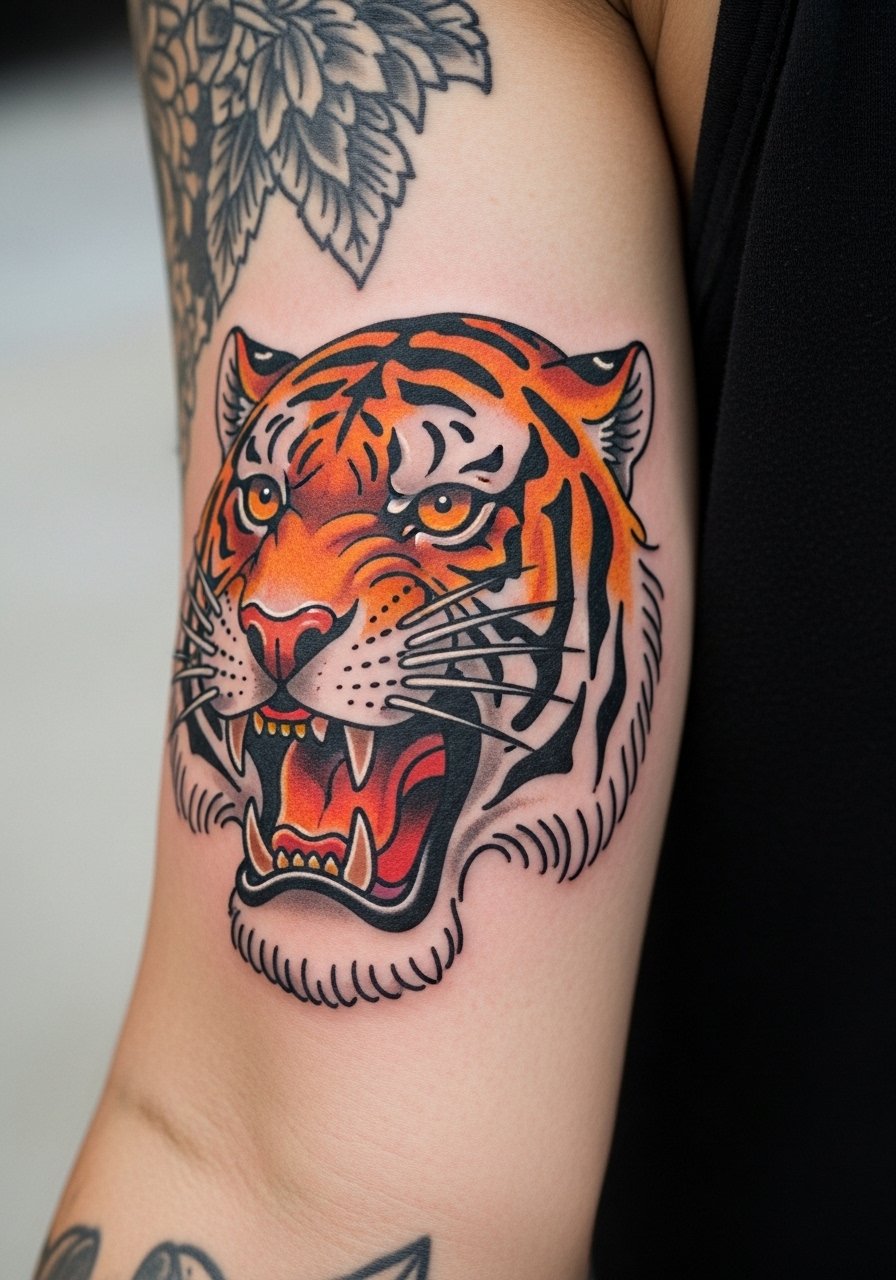
The classic orange-and-black tiger head screams raw power and willpower. I first saw this at a storefront portfolio and knew why it’s timeless: strong lines mask small healing shifts. The bicep sits well with the tiger’s circular form, so muscle movement keeps the piece dynamic. Expect moderate pain and standard healing—keep it clean and moisturized. This style holds color nicely when you protect it from sun; I’ve noticed bold outlines age best. Common mistake: asking for too much tiny detail inside the stripes—traditional work benefits from simplicity. Ask your artist for heavy contrast and clear negative space so the head reads at a distance. Search for portfolios under "traditional tiger tattoo" when vetting artists.
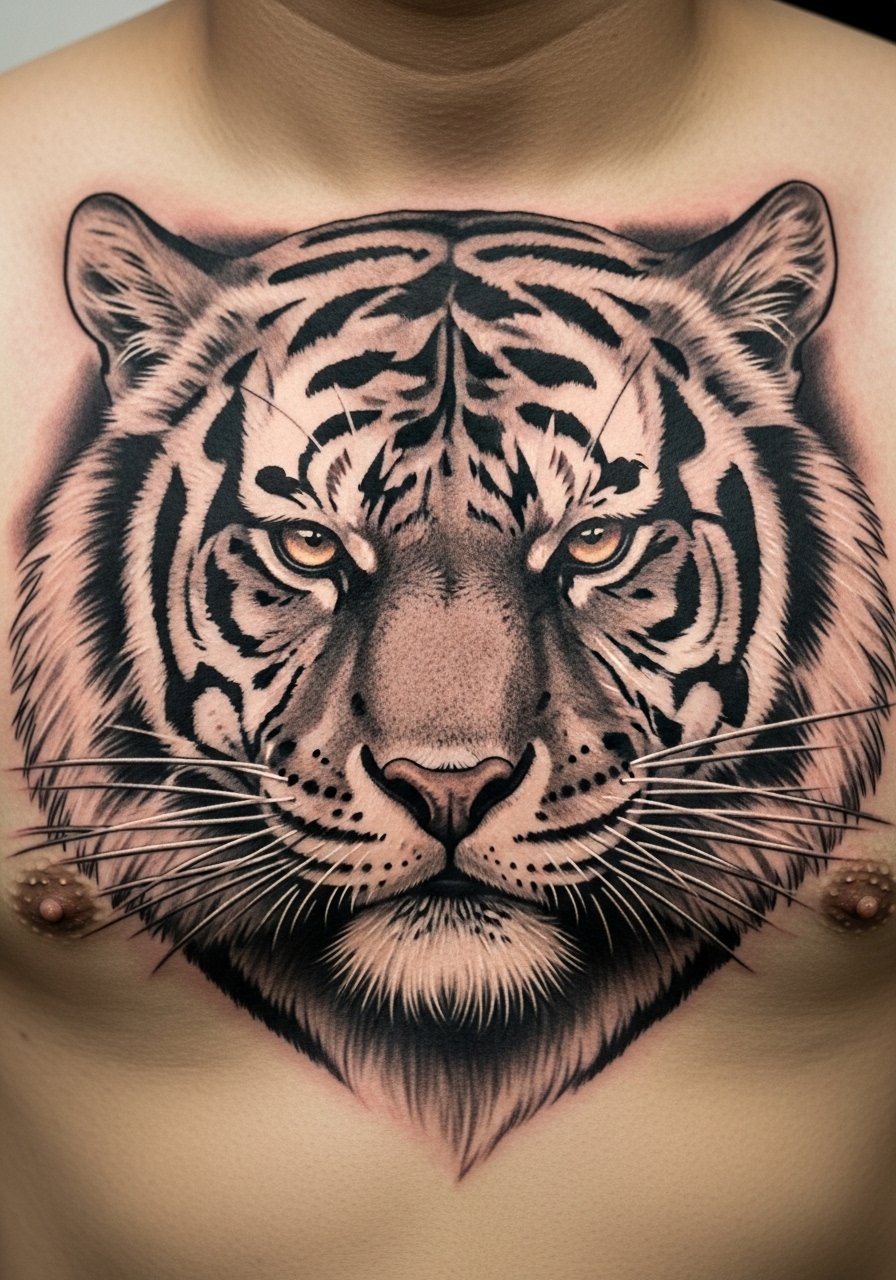
2. White Tiger Portrait on Shoulder Blade
Style/Technique: Realism / Black & White
Pain Level: Medium (3-5/10)
Session Time: 2-3 sessions, 2-4 hours each
Best For: Subtle spiritual vibe, easy to hide
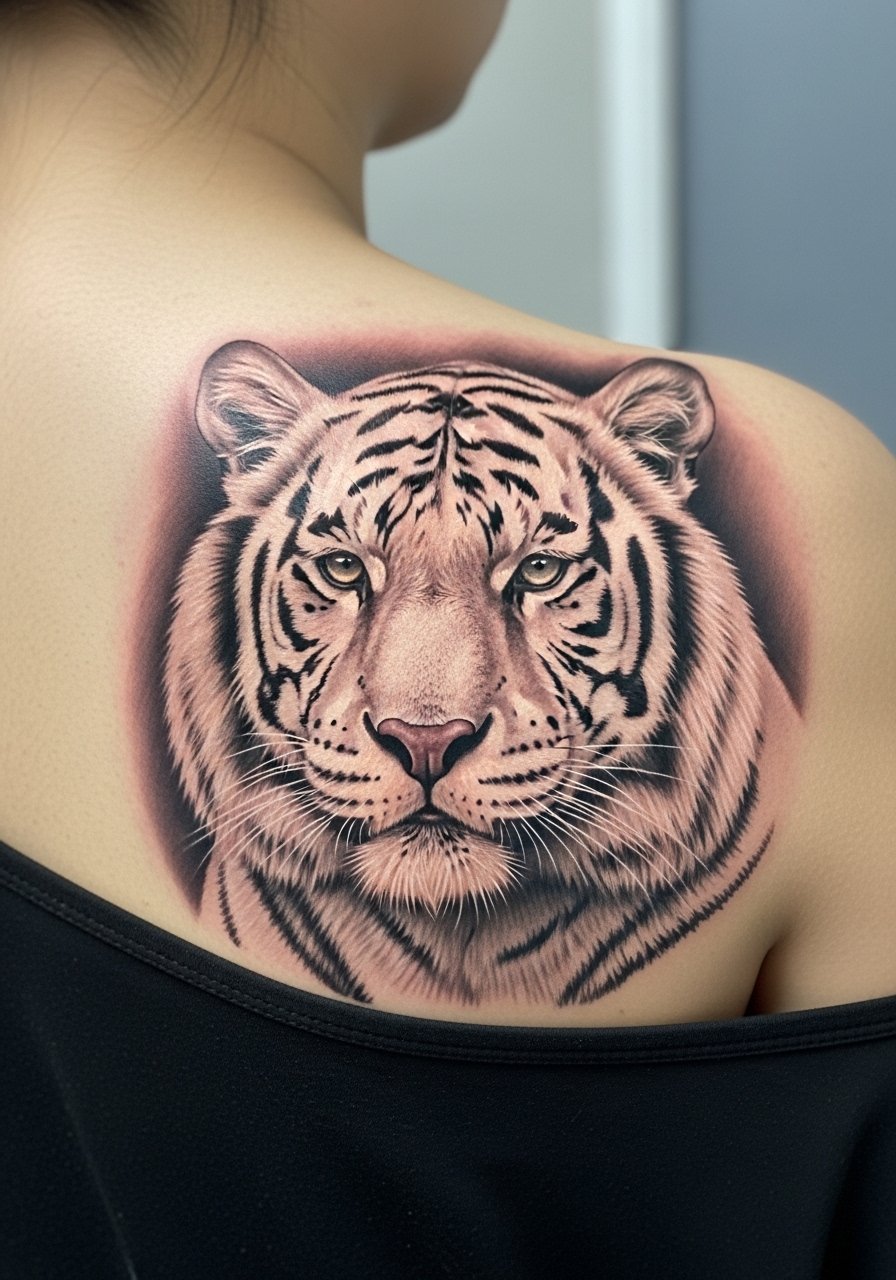
White tiger portraits feel otherworldly. I ran into a white-tiger shoulder piece at a convention and it read like quiet power. The shoulder blade gives enough flat surface for delicate shading and keeps the image personal. Pain is manageable, but shading sessions can sting more than linework. Healed white-tiger portraits age gently if done in high-contrast black and grey; pure white ink highlights rarely last on darker skin tones. A common error is overusing white ink as a main color—use it sparingly for highlights only. When you consult, ask to see healed black-and-grey portraits on similar skin tones. This design speaks to uniqueness and "spiritual guardian" energy without shouting.
3. Japanese Tora Guardian Across Back
Style/Technique: Irezumi / Ornamental Background
Pain Level: High (6-8/10)
Session Time: Multiple sessions over weeks
Best For: Full-back protection motif, cultural depth
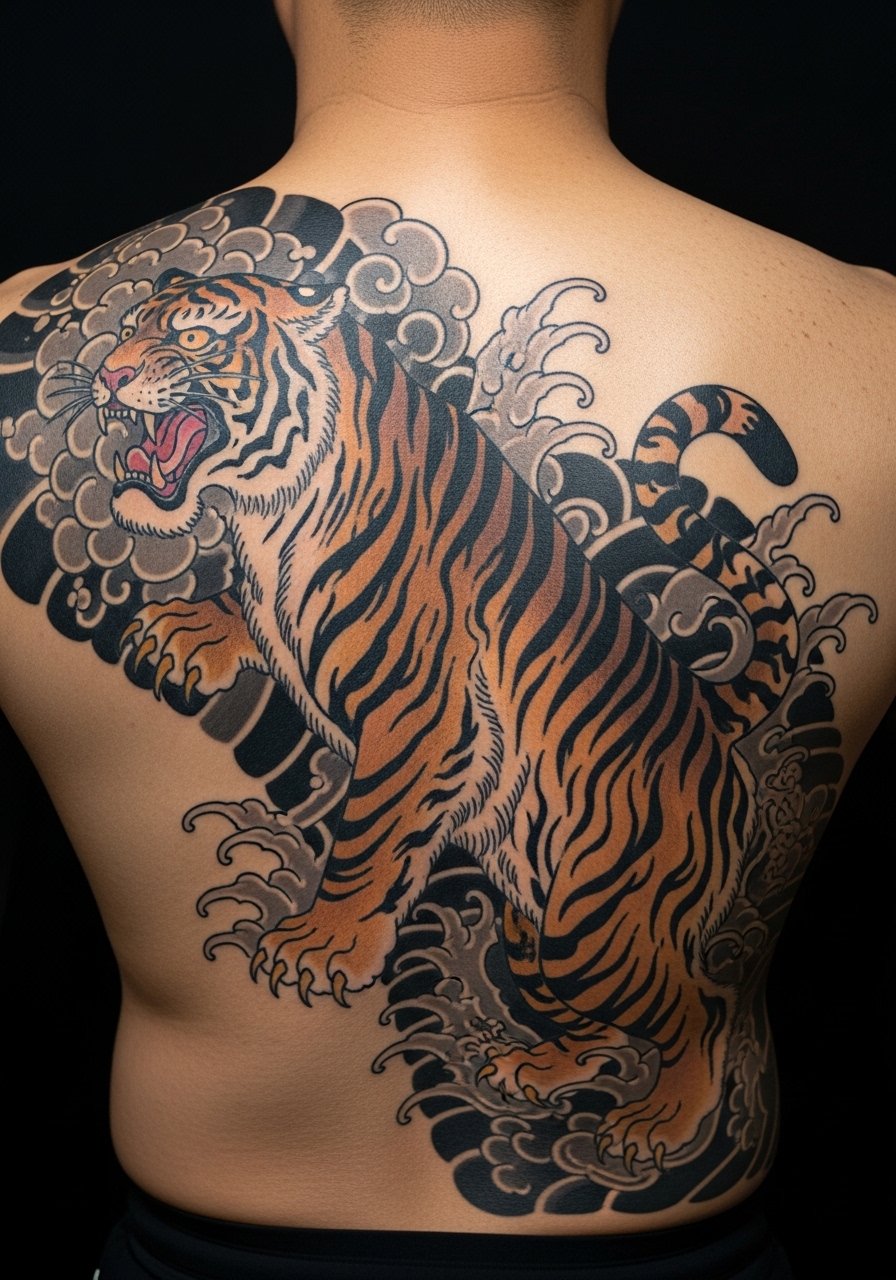
A Tora guardian on the back feels like armor. I first learned about these in a studio chat about cultural symbolism—artists talked about protection and warding motifs. The back allows sweeping backgrounds: clouds, wind bars, maple leaves. Pain ramps up near the spine and ribs, so prepare for tougher sessions. Healed Irezumi with strong black shading resists fading best; color gradients in the background should be rich but not over-detailed. Common mistake: asking for tiny facial details on a huge panel—let the negative space and flow do the work. If you want cultural authenticity, mention "Japanese tiger tattoo" to artists who do irezumi-style work and ask for healed examples.
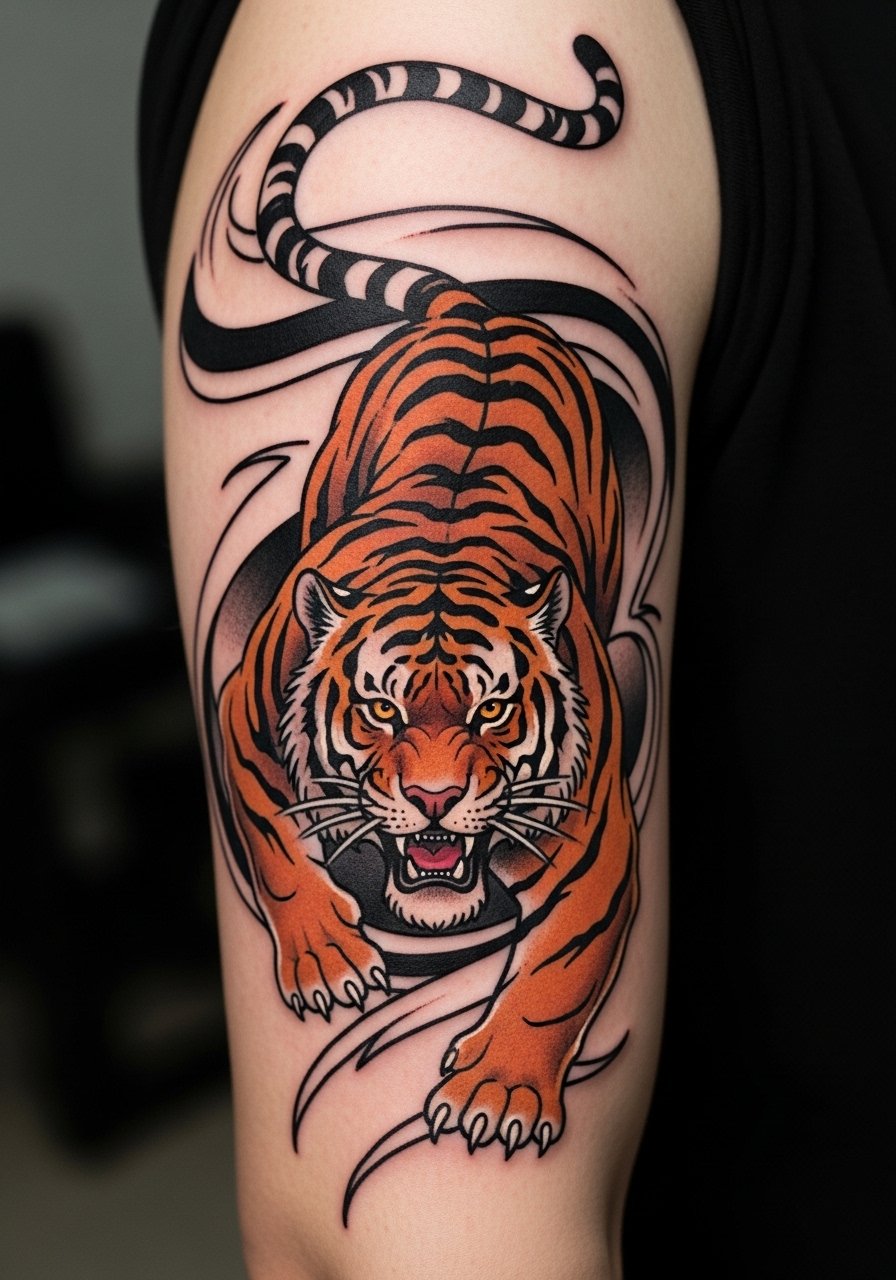
4. Tiger With Dragon Yin-Yang Sleeve
Style/Technique: Neo-Traditional / Full Sleeve
Pain Level: High (6-8/10)
Session Time: Multiple sessions across months
Best For: Statement sleeve, yin-yang symbolism
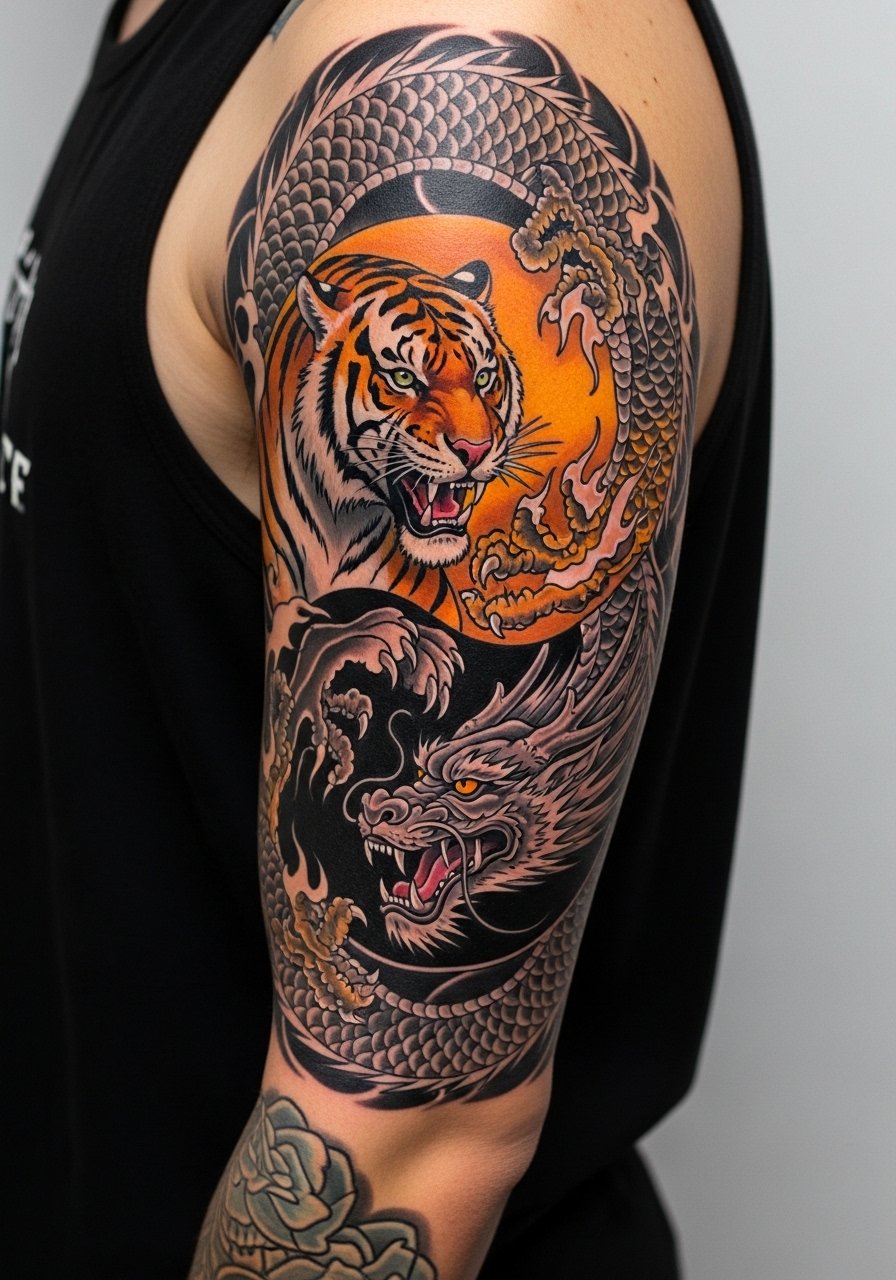
When you want balance, pair a tiger with a dragon. I saw this motif in a tattoo shop that specialized in sleeves—people treat it like a life philosophy piece. The tiger plays earth and raw strength; the dragon handles celestial motion. Sleeves require body-flow planning so the tiger's pose should curve with your arm. Expect long sessions and slow healing between appointments. Over time, black-and-grey sections age cleaner than sunlight-exposed color. A mistake I notice: cramming too many small symbols—keep major elements bold. Tell your artist you're exploring "tiger sleeve ideas" and discuss how negative space will preserve clarity.
5. Bamboo-Tempered Tiger on Outer Forearm
Style/Technique: Japanese Illustrative / Color Accents
Pain Level: Low-Medium (2-4/10)
Session Time: 1-2 sessions
Best For: Forearm visibility, symbolism of flexibility

I love the bamboo-tempered tiger because it reads strength plus adaptability. I caught one on someone’s forearm at a coffee shop and it stayed with me—the green bamboo softens the ferocity. The outer forearm is friendly for healing and visible enough to show off the symbolism. Pain is mild compared to ribs or hands. Expect the green accents to need touch-ups long-term unless protected. Avoid too many thin bamboo stems; they blur if ink is too fine. Ask your artist for bold foreground lines with softer background greens. This design answers the question of a tiger tattoo meaning that includes resilience, not just raw power.
6. Roaring Tiger on Back of Hand
Style/Technique: Traditional / Small Bold Piece
Pain Level: High (6-8/10)
Session Time: Single short session, 1-2 hours
Best For: Very visible statement, raw energy
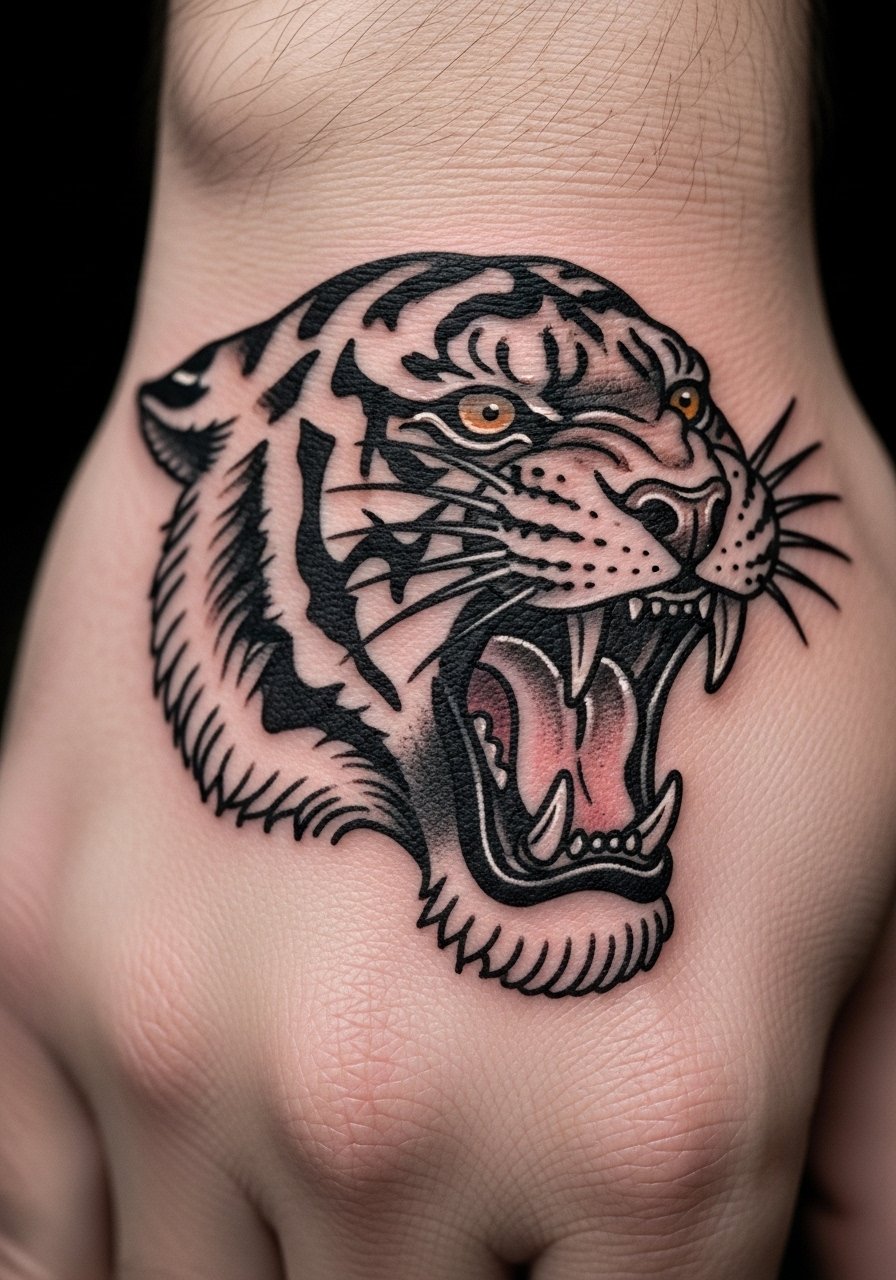
Back-of-hand tigers announce themselves. I watched an artist do one and the client's confidence change instantly—it’s that immediate. Hands hurt more and heal differently because the skin is thin and mobile. Expect scabbing and possible touch-ups later. Healed traditional hand tattoos often soften around the edges; that's normal. Big mistake: asking for tiny internal detail—the hand needs bold shapes. If you want a daring visible piece, say you want "raw power" and heavy outlines so the roaring gaze keeps impact as it ages.
7. Black and Grey Realistic Tiger on Thigh
Style/Technique: Realism / Black & Grey
Pain Level: Medium (3-5/10)
Session Time: 2-3 sessions
Best For: High-detail portrait, private placement
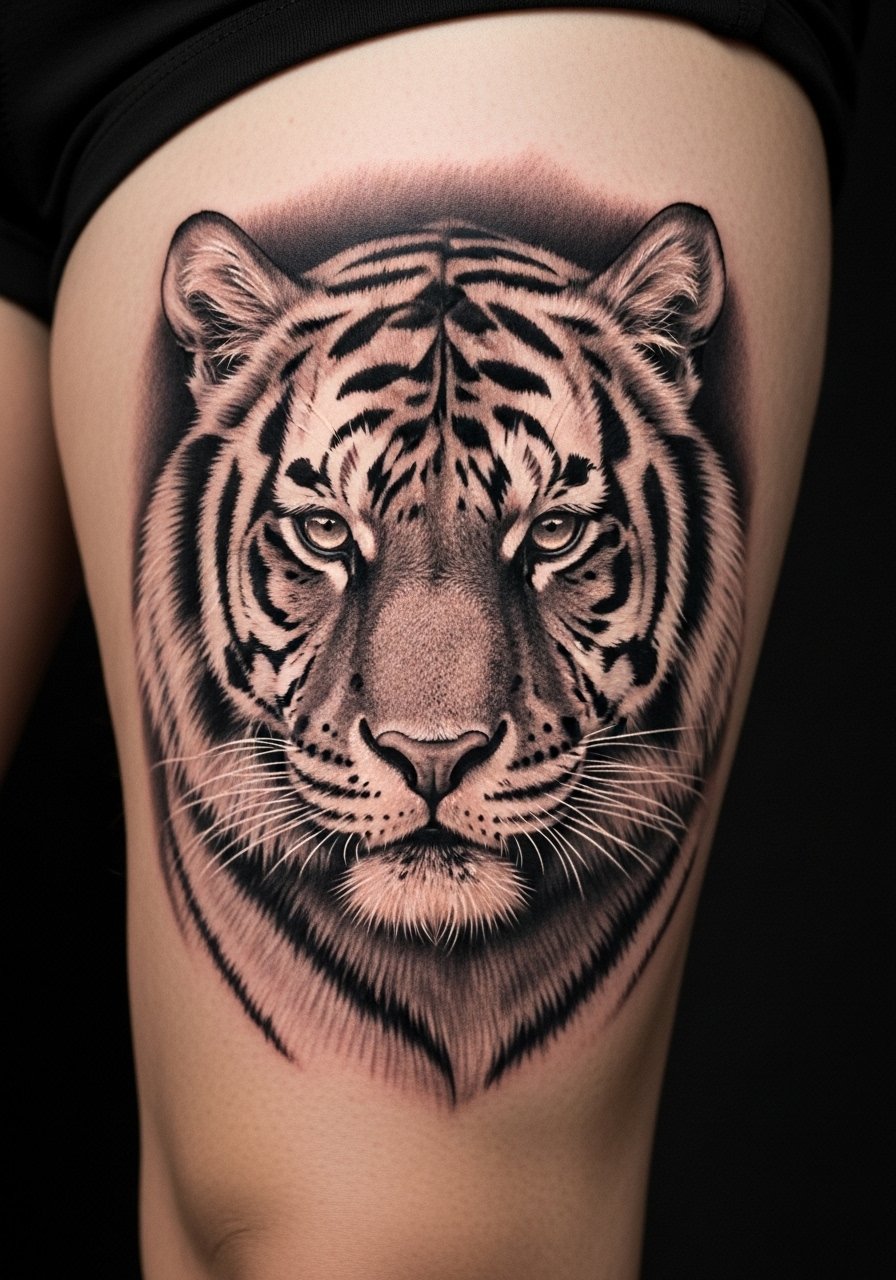
Black-and-grey realism reads as a protective presence. I inked a friend with a thigh tiger and it became their anchor piece. The thigh gives room for large, subtle shading that ages gracefully. Pain is lower on fleshier areas, but long sessions can tire you. Black-and-grey holds up better over years than bright oranges, from what I’ve noticed. Mistake to avoid: choosing an artist who lacks realism examples—ask for healed black-and-grey tiger photos. This style signals "personal transformation" without loud color.
8. Fierce Stalking Tiger on Upper Bicep
Style/Technique: Neo-Traditional / Dynamic Pose
Pain Level: Medium (3-5/10)
Session Time: 1-2 sessions
Best For: Upper arm visibility, personal growth symbolism
A stalking tiger on the bicep feels like forward momentum. I saw this on someone who'd just finished a major life shift; it matched their story. Upper-arm placement flexes with muscle, making the tiger seem alive. Pain is moderate; shading along the inner arm is more sensitive. This design ages well if the linework is bold and color fills are solid. Common mistake: tiny motion lines that blur—insist on clear, weighty outlines. Use phrases like "personal resilience" or "fierce gaze" when describing what you want to your artist.
9. Full-Body Tiger Sleeve Down Arm
Style/Technique: Black & Grey or Color / Full Sleeve
Pain Level: High (7-8/10)
Session Time: Many sessions over months
Best For: Full narrative piece, maximum impact

A full-body tiger sleeve is commitment and storytelling. I’ve watched sleeves evolve session by session into a living panel. The arm’s curves let the tiger slink and coil naturally, and backgrounds tie elements together. Expect multiple sit-downs; healing between sessions matters. Black-and-grey sleeves maintain clarity longer than high-exposure color sleeves, in my experience. Mistake: over-detailing every inch—let major shapes breathe. If you want "tiger sleeve ideas," bring reference images and discuss flow so the tiger reads from any angle.
10. Tiger Head Kneecap Blast
Style/Technique: Traditional / Small Bold Spot
Pain Level: High (6-8/10)
Session Time: Single short session
Best For: High-impact mini, compact ferocity
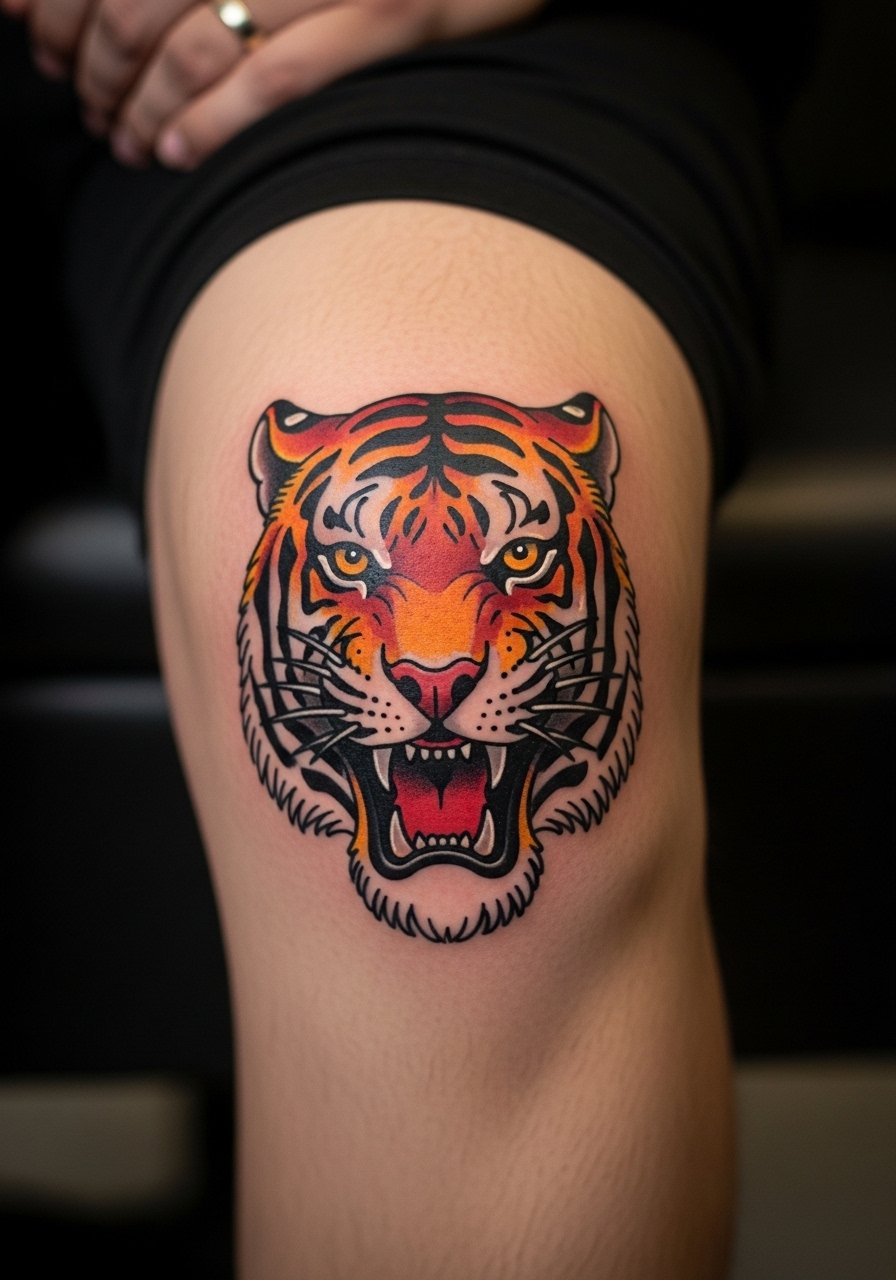
The kneecap blast is tiny and ferocious. I was surprised how much attitude a small tiger on the knee gives. It’s an edgy placement—movement and skin texture mean healing can be noisy and it may need touch-ups. Pain is higher because of bone proximity. This spot is great if you want a statement without a sleeve. Mistake I see: requesting super-fine shading here—pick bold, simple shapes. Mention "small tiger tattoo" when booking if this is your test piece.
11. Samurai Tiger with Wind and Water on Shoulder Blade
Style/Technique: Traditional Japanese / Background Elements
Pain Level: Medium-High (5-7/10)
Session Time: 2-3 sessions
Best For: Symbolic warrior energy, shoulder display
Samurai tigers feel noble. I first saw one in a gallery of Japanese-inspired work—artists tied the tiger to rank and noble ferocity. The shoulder blade supports curved backgrounds like wind bars and water, which give motion. Sessions can bite when near the scapula edge. Healed pieces with controlled black and grey fare well. Avoid throwing in unrelated Western symbols; keep the aesthetic consistent. Ask your artist about "samurai tiger" motifs and healed references.
12. Minimalist Tiger Outline on Wrist
Style/Technique: Fine Line / Minimalist
Pain Level: Low-Medium (2-4/10)
Session Time: Single short session
Best For: First-timers, discreet symbolism
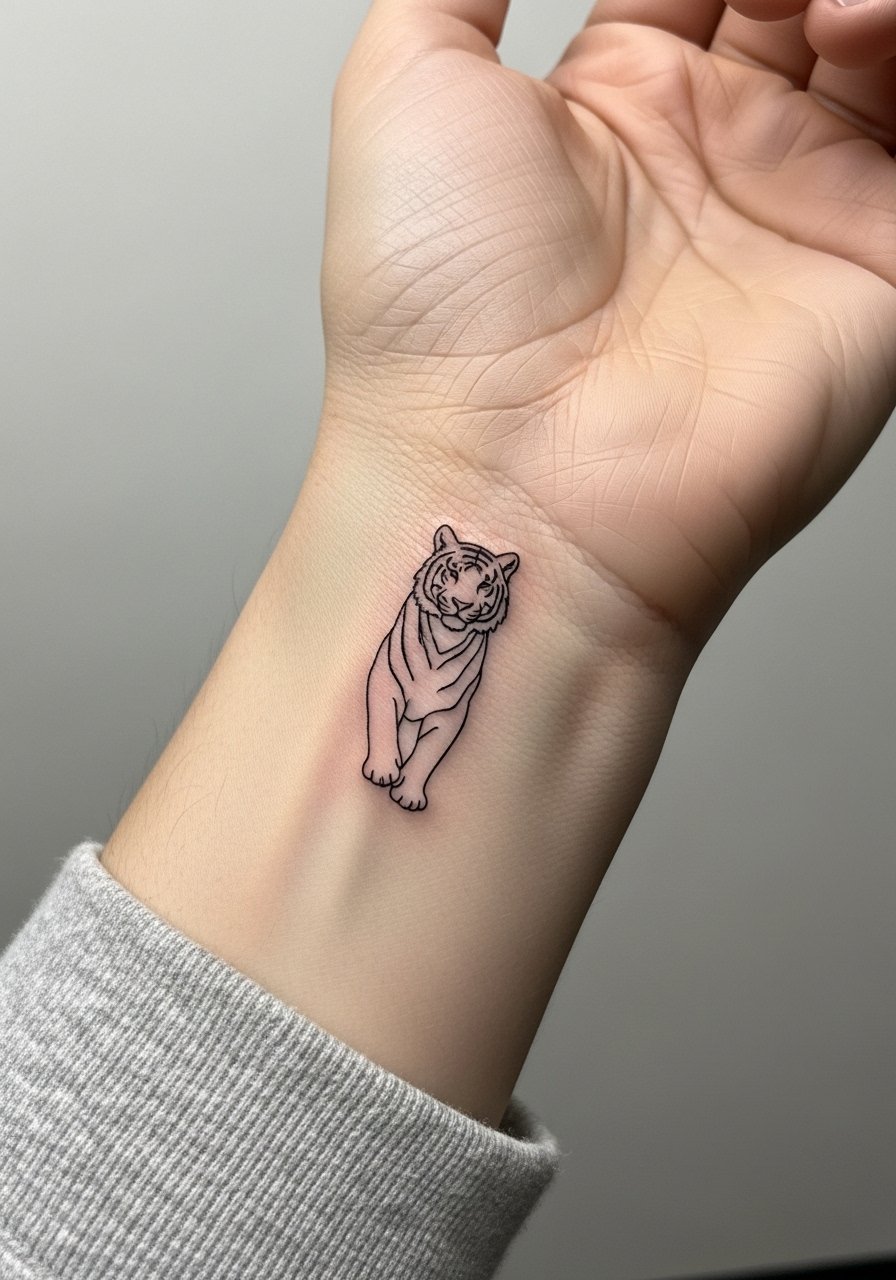
Minimalist tiger outlines are quiet but firm. I recommended this to someone nervous about commitment—they loved the symbolic nod to courage. The wrist heals relatively fast but shows wear; fine lines can blur over years. Pain is short and sharp. Common mistake: requesting lines too thin—ask for slightly thicker fine-line work so the design survives. Use "tiger tattoo meaning" to explain you want understated strength. Find artists known for fine-line precision and healed photos.
13. Tiger Peony and Dagger Forearm Combo
Style/Technique: Neo-Traditional / Floral Combo
Pain Level: Medium (3-5/10)
Session Time: 1-2 sessions
Best For: Forearm statement, contrast of beauty and danger
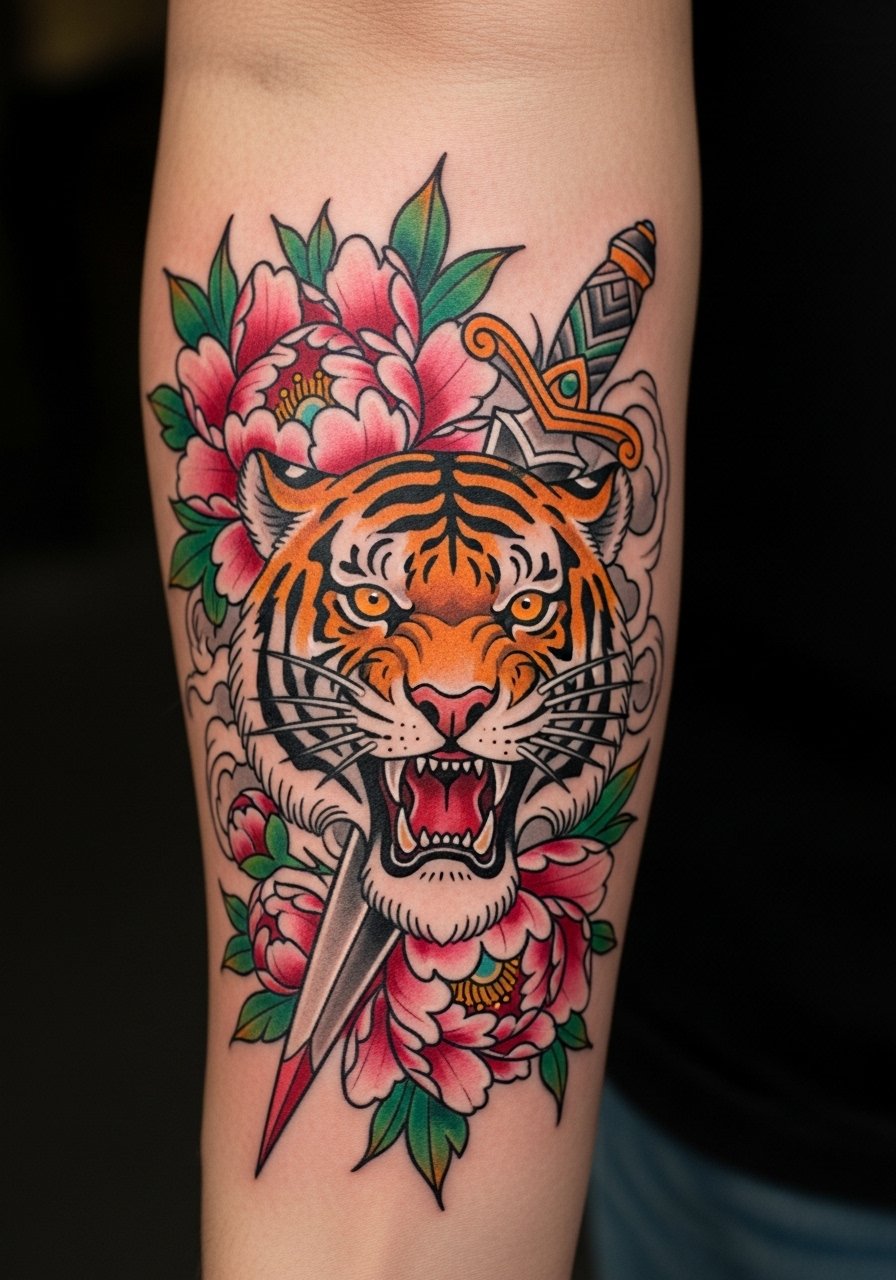
A tiger with peony and dagger blends grace and threat. I first bookmarked this combo after seeing it on an Instagram artist who pairs floral softness with a predator’s stare. Forearms display the full composition well and are easier to tend during healing. Colors in petals need sun protection to stay vivid. Mistake: crowding too many small flowers—pick one or two large elements. Tell your artist you want a balance—bold tiger, soft peony—to emphasize both "strength" and "beauty."
14. Spiritual White Tora Mandala on Ribcage
Style/Technique: Ornamental / Black & Grey with Geometry
Pain Level: High (7-9/10)
Session Time: 2-3 sessions
Best For: Introspective placement, spiritual symbolism
The ribcage is intimate and dramatic. I’ve talked to people who chose a white-tiger mandala here as a courage marker. Ribs are painful and need careful session planning. Black-and-grey mandalas sit well with tiger faces for contrast; white highlights should be used sparingly. Healed ribcage pieces can look muted during recovery but return with depth. Mistake: expecting fast sessions—this area needs pacing. If you want symbolism over show, this is a strong placement.
15. Stylized Geometric Tiger on Sternum
Style/Technique: Blackwork / Geometric
Pain Level: High (7-9/10)
Session Time: 1-2 sessions
Best For: Symmetrical chest statements, modern edge
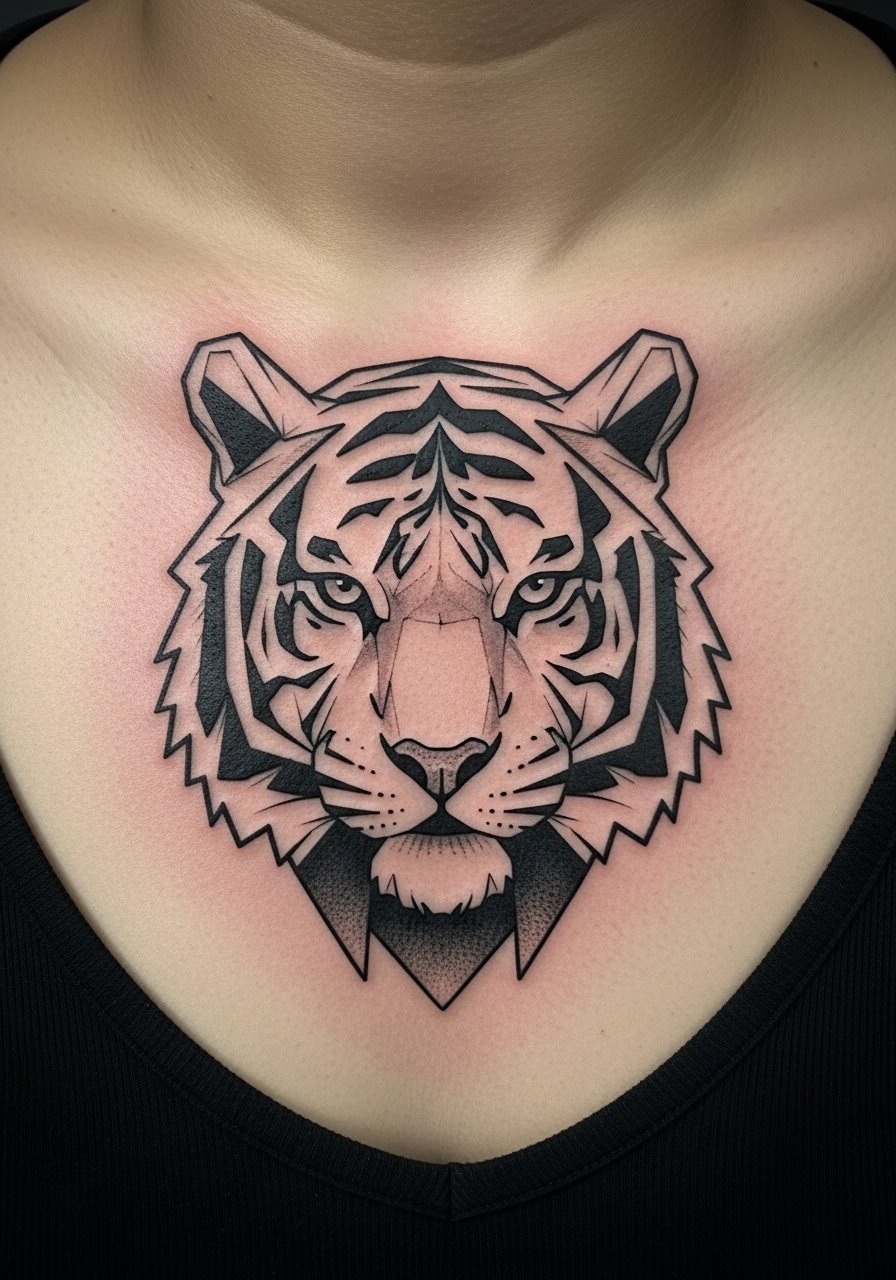
Geometric tigers give a modern, timeless feel. I first saw one in a minimalist portfolio and the symmetry felt powerful. Sternum pieces are painful and need calm breathing during sessions. Blackwork holds up extremely well across skin tones, and geometric lines keep impact as the skin settles. Common mistake: relying on too many tiny triangles—keep shapes bold. Ask for healed geometric chest examples so you know how the lines settle.
16. Watercolor Tiger Head Behind Ear
Style/Technique: Watercolor Accents / Small Placement
Pain Level: Medium-High (4-6/10)
Session Time: Single short session
Best For: Subtle pop, colorful accent
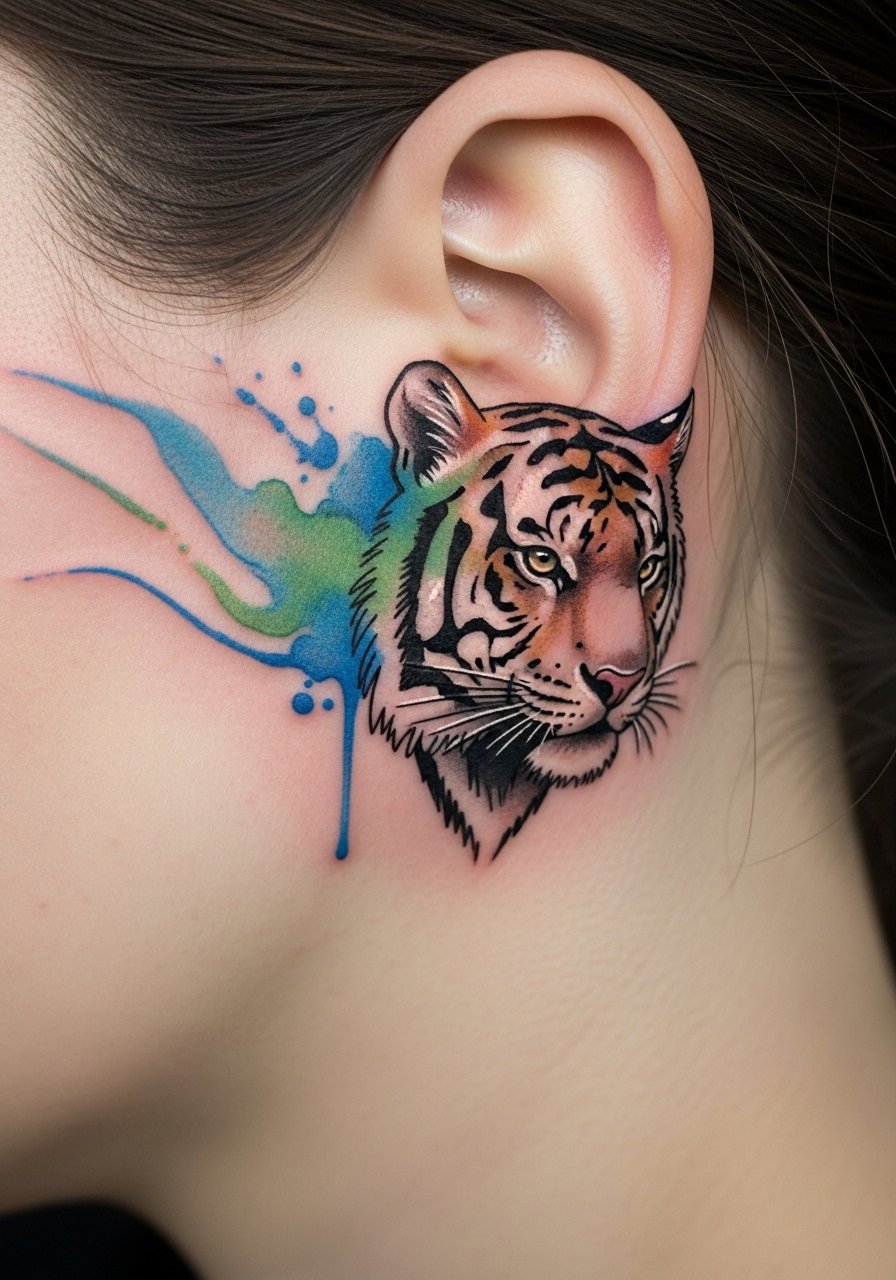
Behind-ear watercolor tigers are playful and bold at once. I noticed these on trend feeds as a way to wear color without full sleeves. The area is sensitive and healing needs care because of hair and sweat. Watercolor fades faster unless backed by strong black anchor lines. Mistake: asking for pure watercolor with no outline—get both so it ages. This spot is for someone who wants a small tiger tattoo with artistic flair.
17. Half-Sleeve Tiger With Bamboo and Waves
Style/Technique: Japanese Neo-Traditional / Half Sleeve
Pain Level: High (6-8/10)
Session Time: Multiple sessions
Best For: Narrative arm piece, nature themes
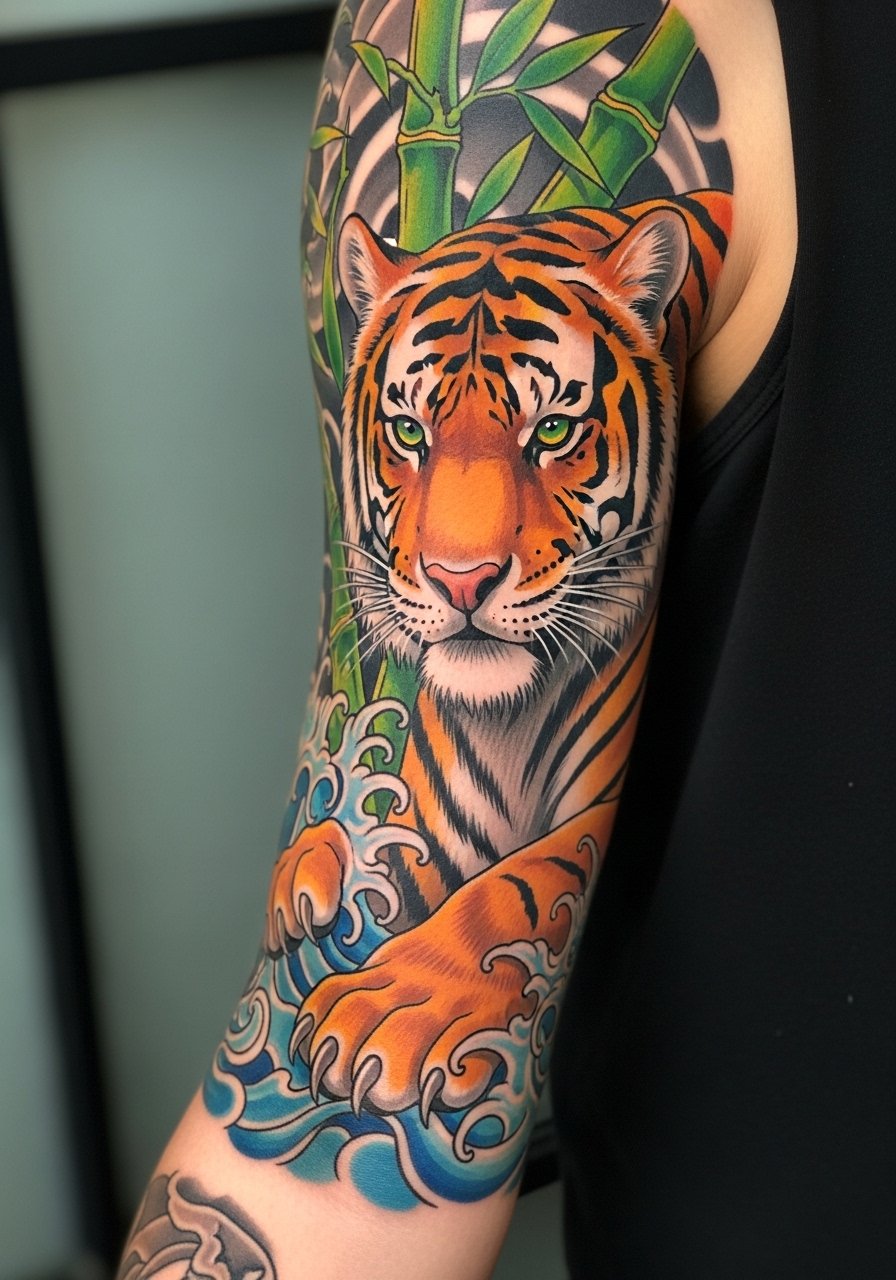
Half-sleeves offer storytelling room. I remember an artist explaining how bamboo tempers the tiger’s ferocity—perfect for a theme of adaptable strength. The arm’s curvature helps the tiger move visually as you flex. Expect longer sessions and planned shading to age well. Avoid overcompacting patterns; let the tiger breathe. If you like "tiger sleeve ideas" with nature elements, this is a balanced direction.
18. Tiny Tiger Paw on Ankle
Style/Technique: Minimalist / Micro Tattoo
Pain Level: Medium (3-5/10)
Session Time: Single brief session
Best For: Beginner-friendly, easy to hide
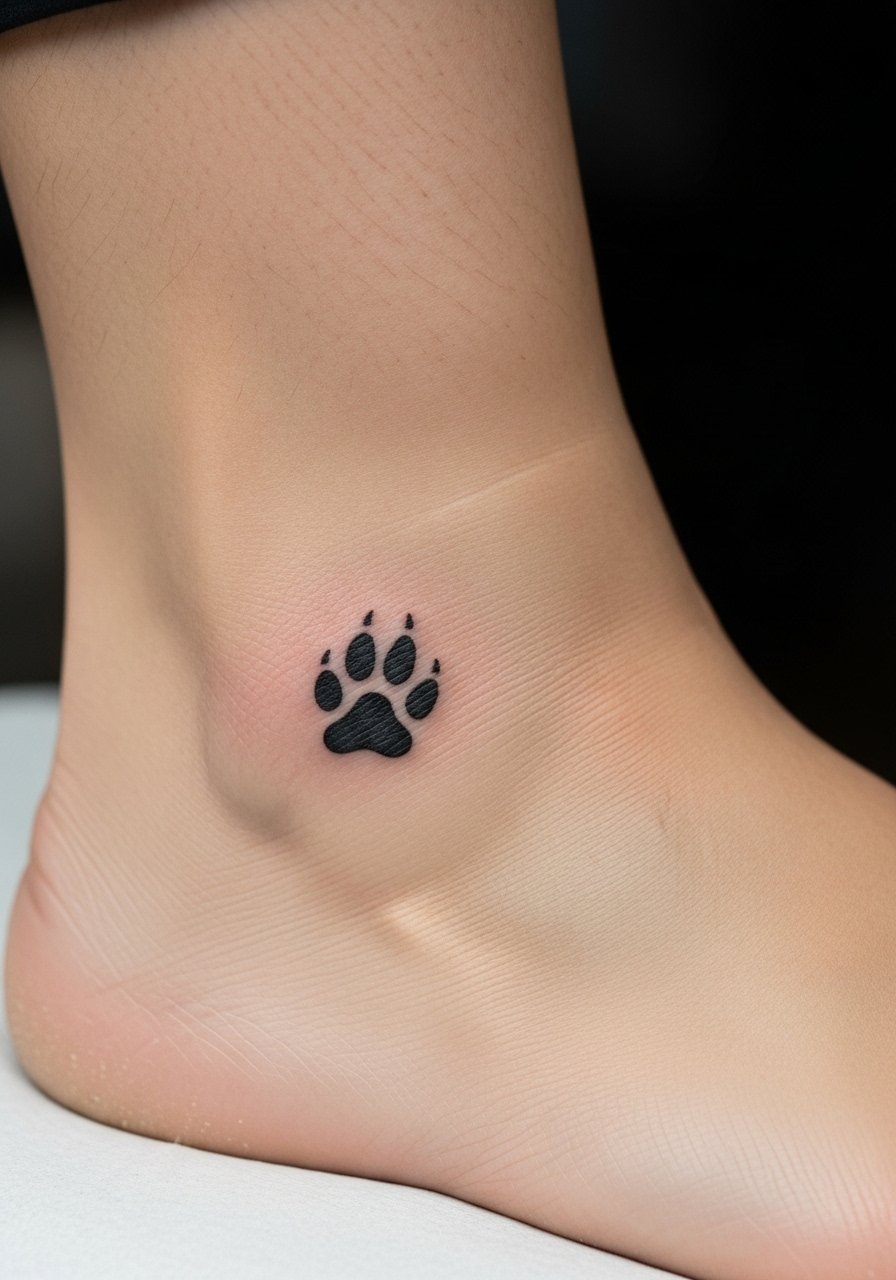
A tiny tiger paw is symbolic and low-commitment. I’ve seen these as starters for people testing longevity. Ankles are bony and can sting, but sessions are quick. Micro tattoos blur faster; pick slightly thicker lines. Mistake: expecting extreme detail in a tiny space—simplicity reads better. Use this as a "small tiger tattoo" test before bigger pieces.
19. Fierce Gaze Tiger Head on Chest
Style/Technique: Neo-Traditional / Center Chest
Pain Level: Medium-High (5-7/10)
Session Time: 1-2 sessions
Best For: Center-stage symbolism, fearless energy
A chest tiger is confrontational in a controlled way. I saw one on someone who used the piece as a reminder of stepping up. Chest skin can be sensitive near the sternum and clavicle. Healed chest pieces with strong contrast stay striking. Avoid tiny internal textures—make the eyes and jawline the focus. Tell your artist you want a "fierce gaze" that reads at a distance.
20. Back-Of-Neck Tiger With Mandala Halo
Style/Technique: Ornamental / Small-Medium
Pain Level: Medium (4-6/10)
Session Time: 1-2 sessions
Best For: Hidden unless hair up, spiritual vibe
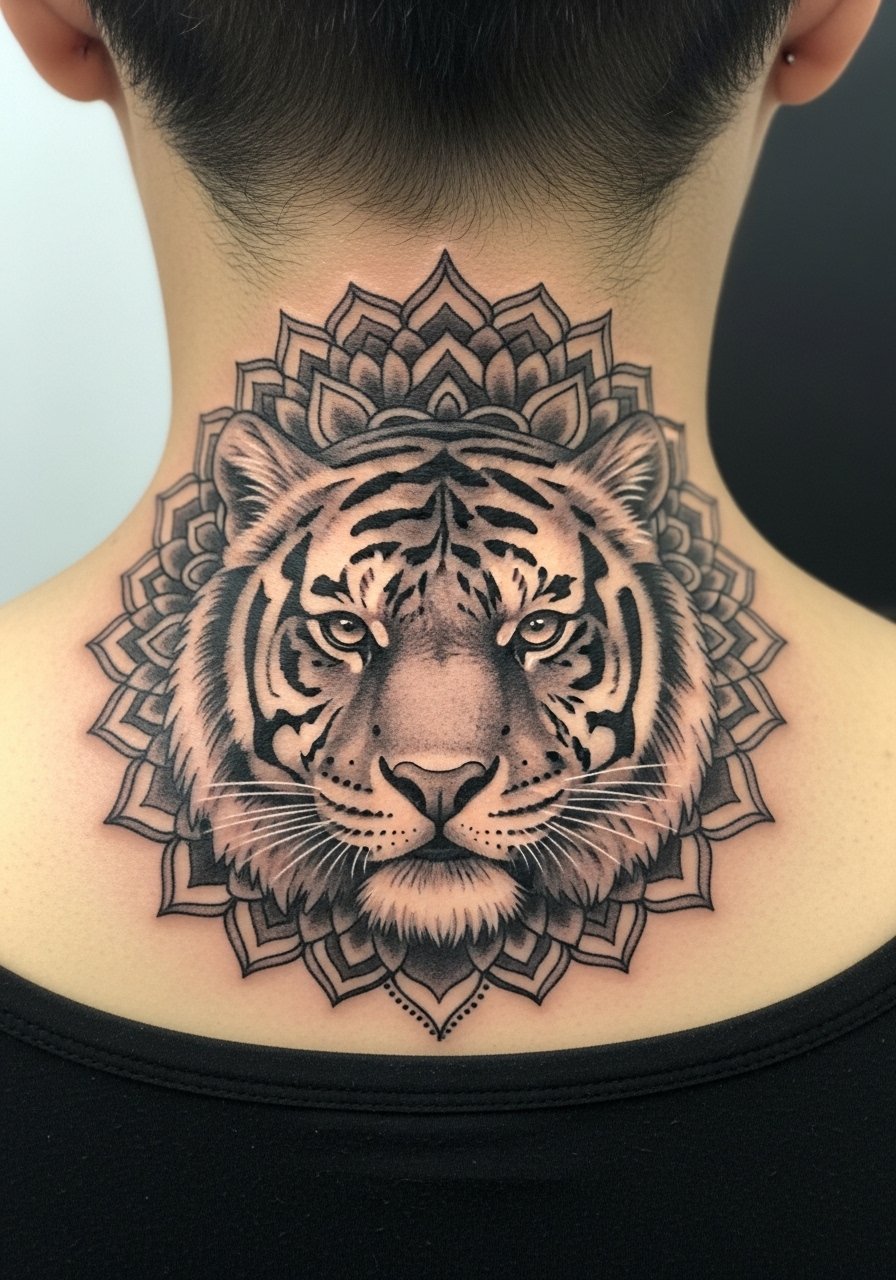
The nape is a great mix of privacy and statement. I recommended this placement to someone who wanted a personal protector visible only when they choose. Healing is straightforward, but hair can snag scabs—be gentle. Mandala halos add spiritual depth; keep the tiger's core lines heavy so it stays readable. Avoid ultra-fine halo lines that blur.
21. Collarbone Tiger Stripes Accent
Style/Technique: Fine Line / Accent Pieces
Pain Level: Medium (3-5/10)
Session Time: Single short session
Best For: Subtle accents, layered aesthetic
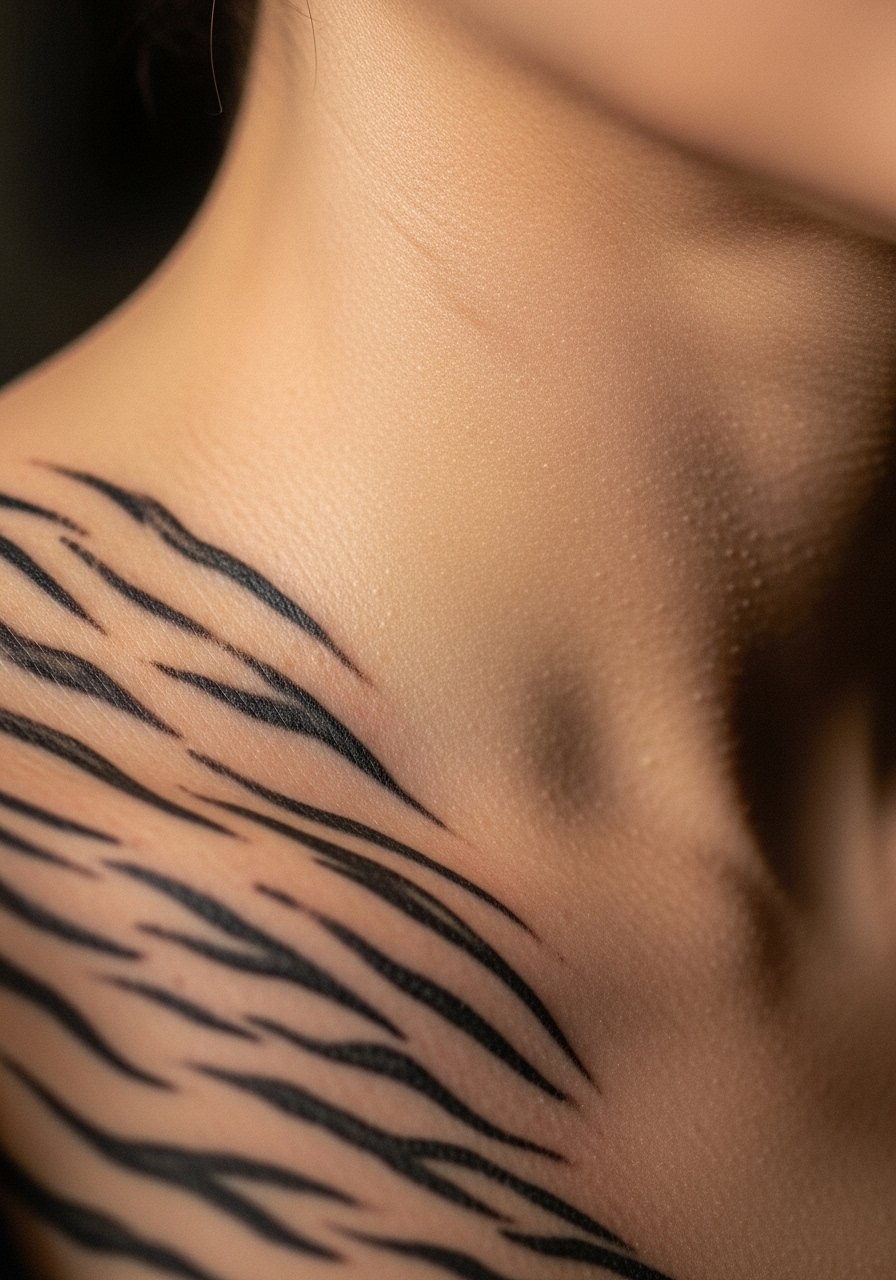
Stripes as collarbone accents are minimal and fierce. I’ve seen them layered with jewelry and clothing lines—very wearable. Collarbone areas are bony; stick to short sessions. Fine lines can soften, so ask for a slightly heavier line than you think you need. This answers the "small tiger tattoo" crowd who want minimal symbolism.
22. Calf Portrait Tiger With Moonlight
Style/Technique: Black & Grey Realism / Atmospheric
Pain Level: Medium (3-5/10)
Session Time: 2 sessions
Best For: Vertical pieces, nighttime vibe
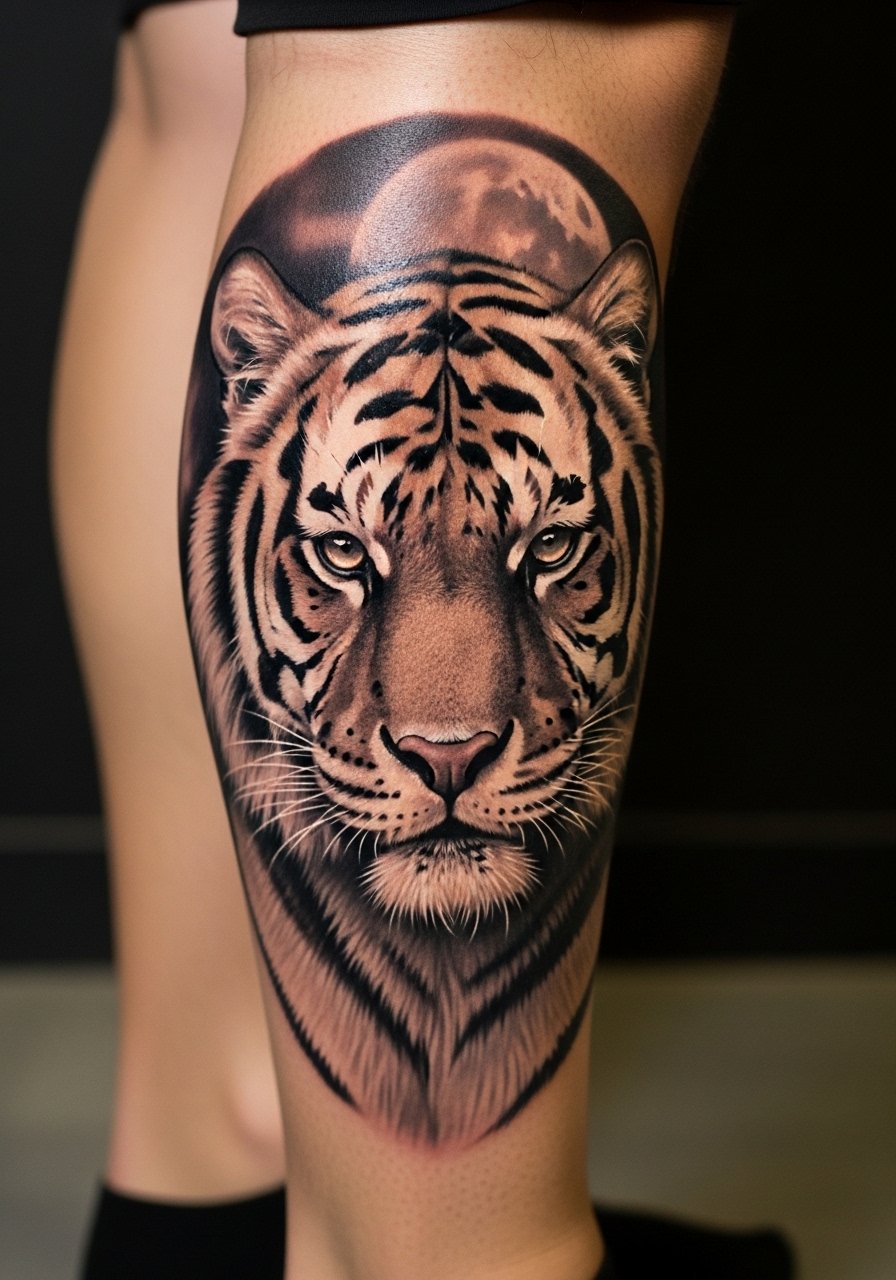
Calf portraits let artists play with light. I chose my calf for a nocturnal tiger and loved the moody effect. The calf is forgiving in pain and great for vertical compositions. Black-and-grey moonlight pieces tend to age well because of contrast. Avoid over-relying on white highlights—they can fade. Ask for healed calf portraits with similar shadow work.
23. Tiny Geometric Tiger on Finger
Style/Technique: Minimal Geometric / Micro Placement
Pain Level: High (6-8/10)
Session Time: Very short session
Best For: Subtle and symbolic, rings alternative
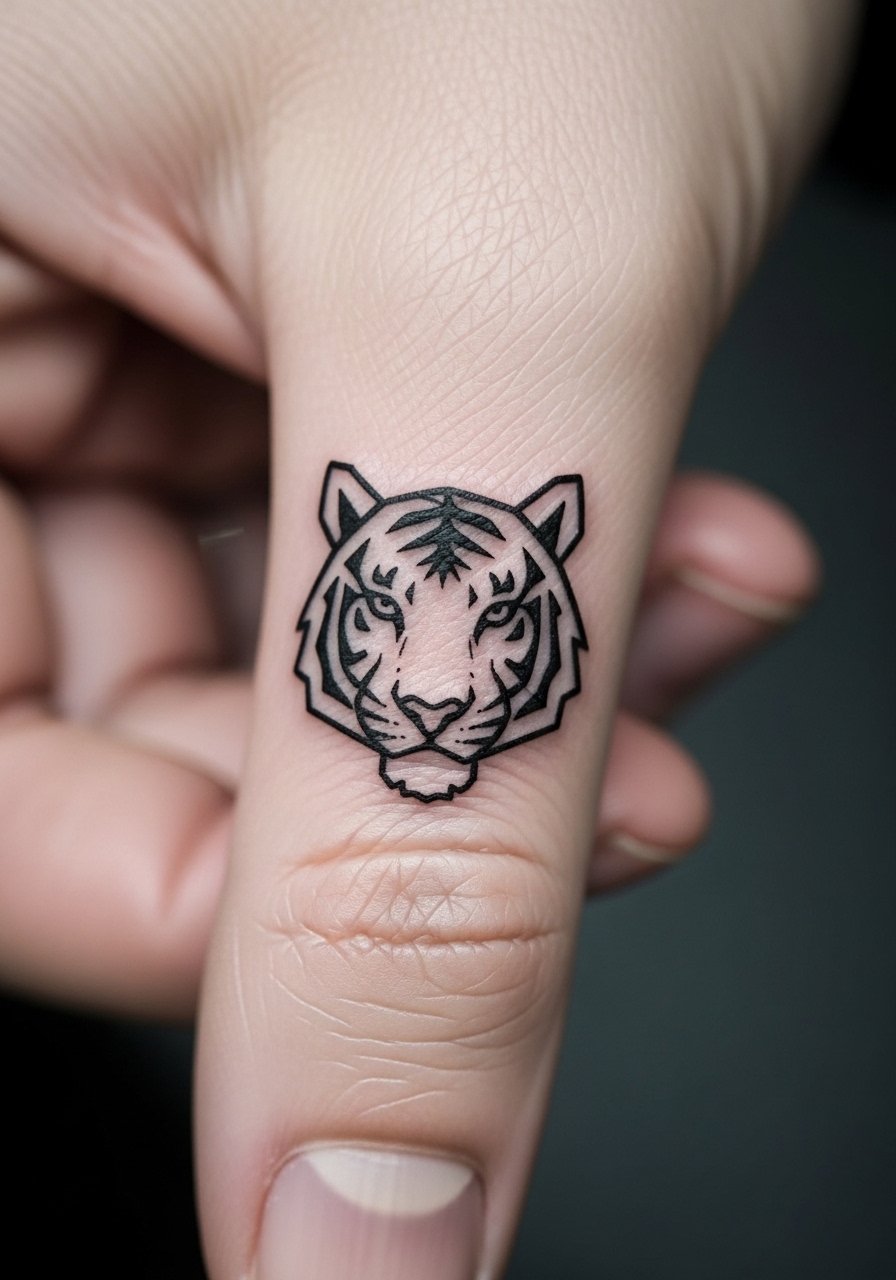
Finger tattoos read intimate and deliberate. I’ve seen them act as personal reminders. Fingers fade quickly and need touch-ups. Keep geometry bold and simple to survive constant use. Pain is sharp but brief. Common mistake: too much detail. If you want a "small tiger tattoo" on a finger, plan maintenance.
24. Tiger Claw Scar-Like Slash on Forearm
Style/Technique: Blackwork / Graphic Mark
Pain Level: Low-Medium (3-5/10)
Session Time: Single session
Best For: Edgy accent, layered with other pieces
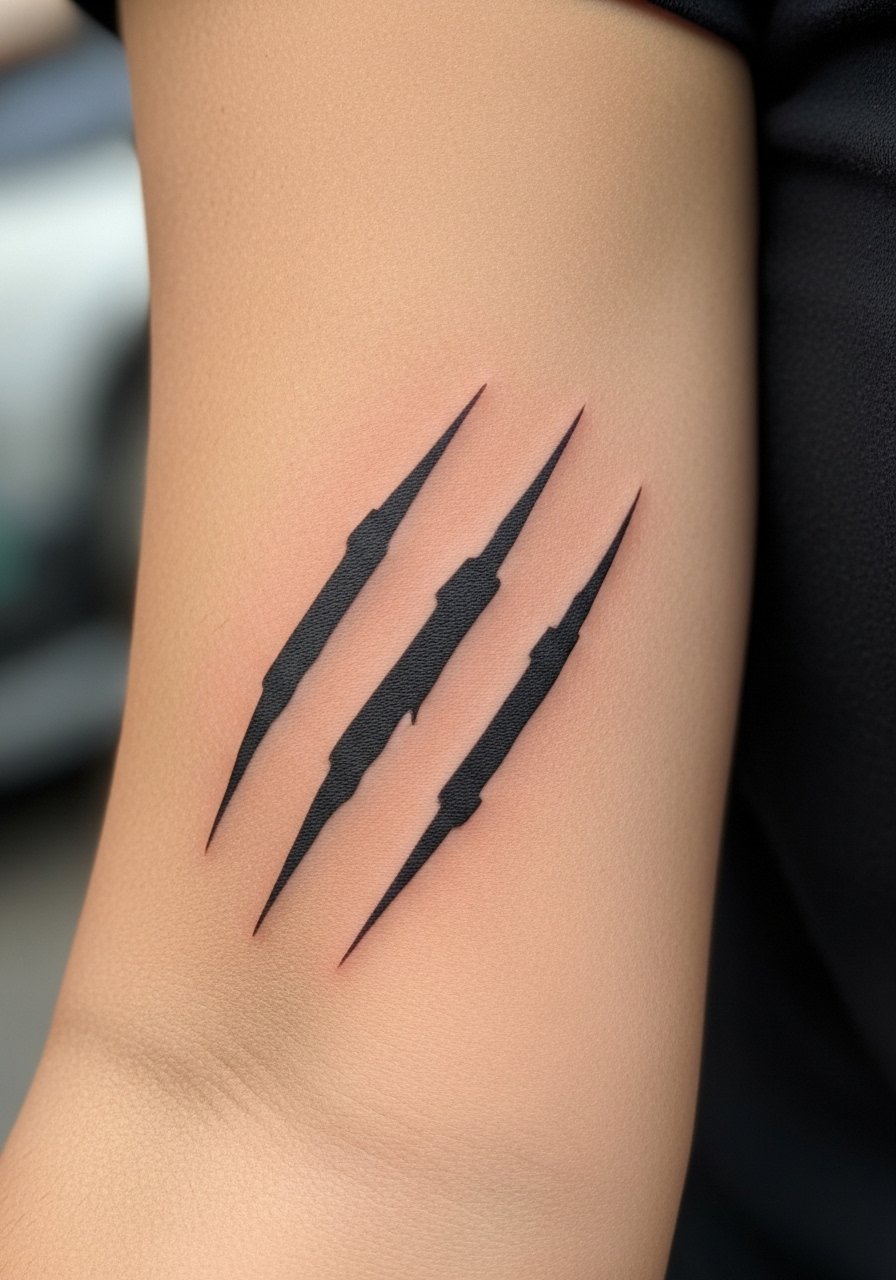
Claw slash marks are graphic and modern. I liked how they read as both wound and history. Forearm placement is easy to look after. This is less about portraiture and more about attitude—great for layering. Keep slashes thick enough to age without breaking up. Ask your artist for healed examples in similar ink weight.
25. Neo-Realism Tiger Eye on Inner Forearm
Style/Technique: Micro-Realism / Intense Detail
Pain Level: Medium (3-5/10)
Session Time: 1-2 sessions
Best For: Focused detail, emotive pieces
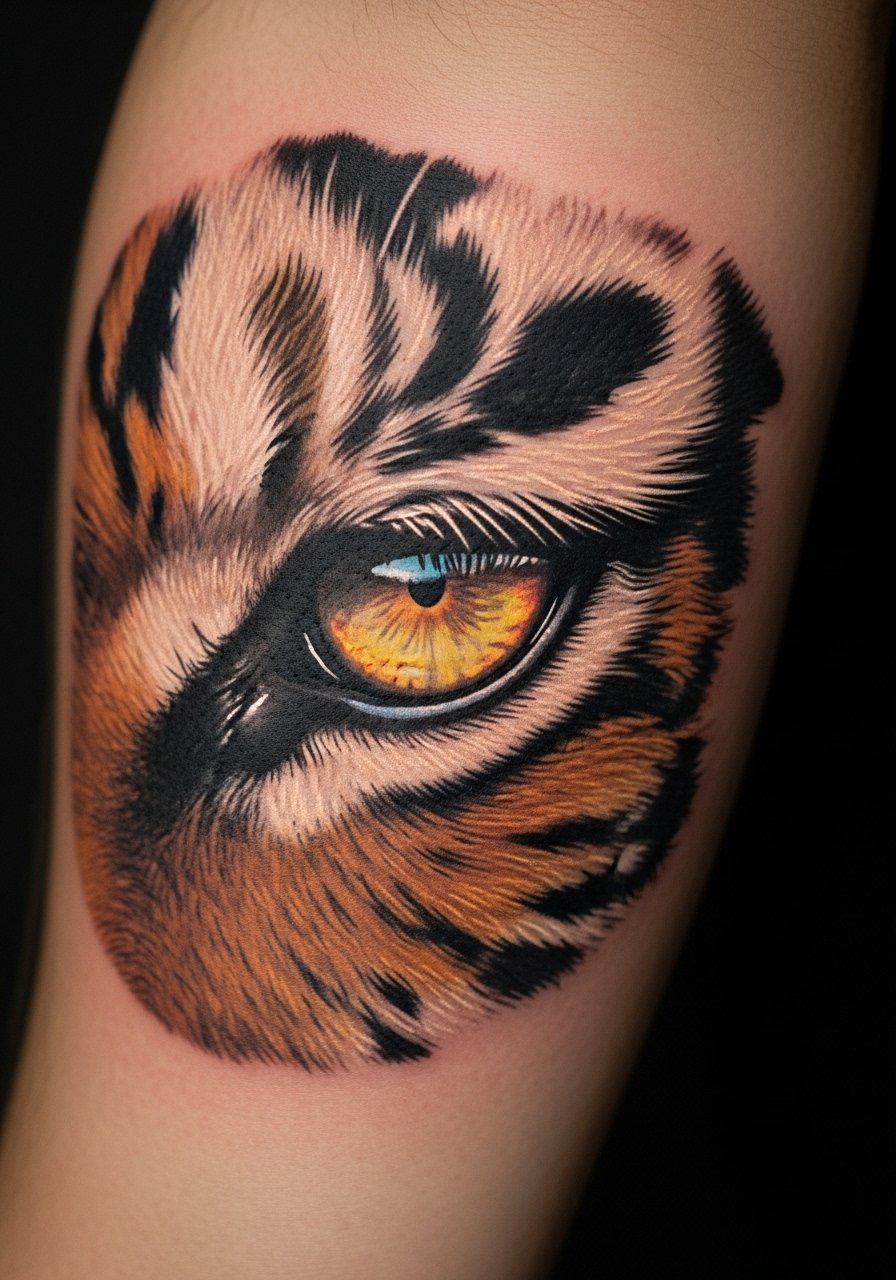
A single eye can be haunting. I noticed an inner-forearm eye that became a conversation starter—very emotive. Inner forearms accept detail well and the placement keeps it personal. Micro-realism needs an artist experienced in healed portraits; otherwise detail can blur. Ask for multiple healed close-ups. This is perfect if you want a concentrated symbol of vigilance.
26. Samurai Rank Tiger Badge on Upper Arm
Style/Technique: Japanese-Inspired / Emblematic
Pain Level: Medium (3-5/10)
Session Time: Single to two sessions
Best For: Fans of Samurai symbolism, badge-like pieces
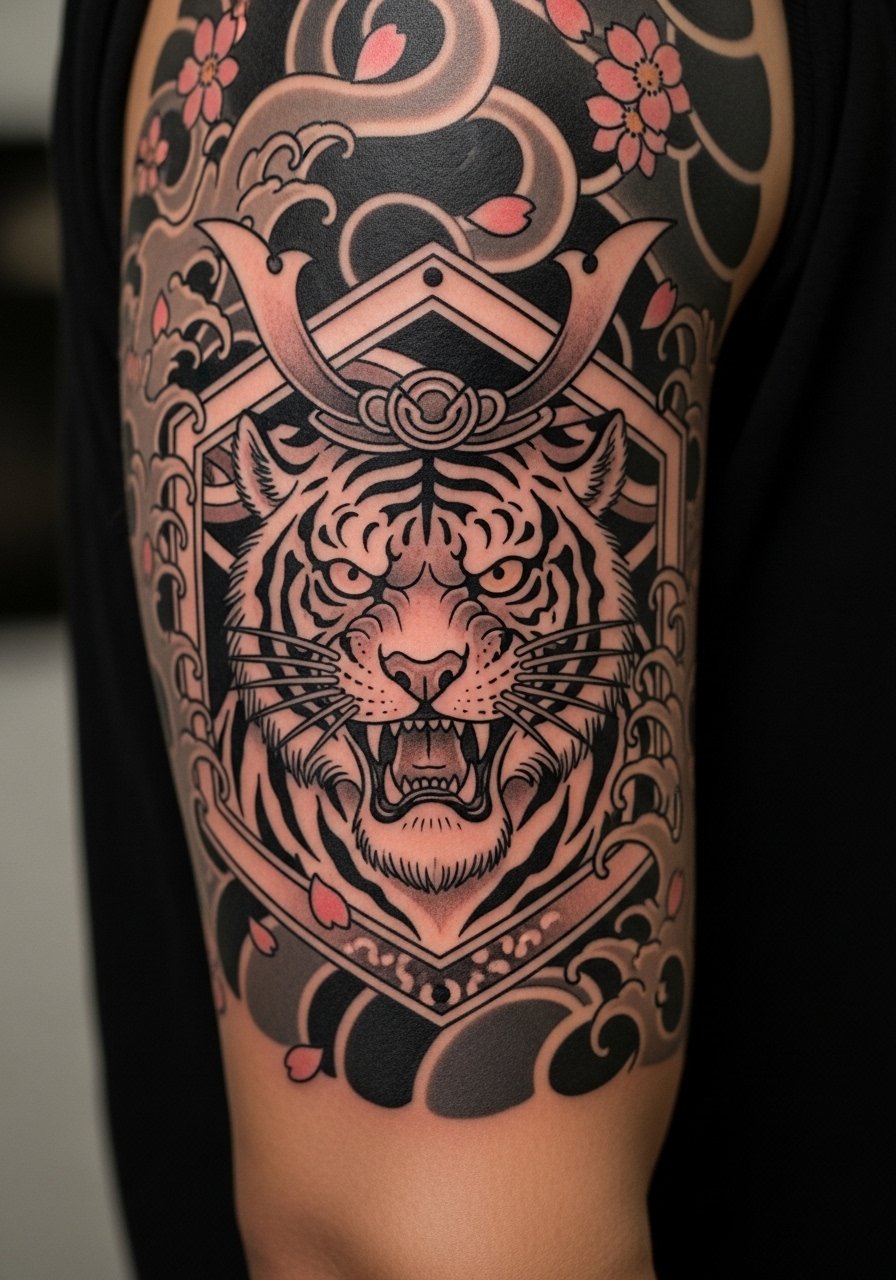
This is one of the under-covered customs I love: using tiger imagery as a rank or badge. I found this in older samurai references and adapted it for tattoo use. Upper arm placement is classic and easy to show off or hide. Emblems need clear shapes rather than fine texture. Mistake: imitating samurai armor details without cultural context—discuss symbolism with your artist if authenticity matters. This reads like honor and strength.
27. Kneecap Mini Tiger With Bold Eyes
Style/Technique: Traditional Mini / High-Impact Micro
Pain Level: High (6-8/10)
Session Time: Single short session
Best For: Small bold statement, playful ferocity

I saved a kneecap mini for last because it’s a fun, fierce option. Emphasized eyes give the piece personality even at tiny scale. Knees hurt and move a lot, so healing needs patience and gentle care. Keep the design bold—thin lines will vanish. This is great if you want a compact "demand respect" mark without a sleeve commitment.
Tattoo Prep and Aftercare Essentials
Aftercare Essentials (first 3–5 days):
- Aquaphor Healing Ointment, 14oz Tube — For the initial ointment phase right after the artist’s wrap. I’ve used it on fresh work to keep scabs pliable.
- Saniderm Transparent Adhesive Bandage, 6-Inch Roll — Many artists recommend second-skin protection for the first days; great when they actually advise it.
- Dr. Bronner's Unscented Castile Soap, 8oz — Gentle cleanser for daily washes during the first week.
Moisturizing & Ongoing Healing (days 4–30):
- CeraVe Fragrance-Free Moisturizing Lotion, 12oz — For keeping healed skin supple; use after peeling slows.
- Mad Rabbit Tattoo Balm, 2oz — Artists I follow often recommend it for long-term vibrancy.
- Hustle Butter Deluxe, 2.7oz — Vegan option some artists suggest for healed skin care.
Prep Items (before appointment):
- Tattoo Numbing Cream With 5% Lidocaine, 30g — Use only if your artist approves; I ask before applying.
- Thermal Transfer Stencil Paper, Tattoo Stencil Transfer — Handy if you’re refining custom designs with an artist beforehand.
Long-Term Maintenance:
- SPF 50 Sunscreen Stick for Tattoos, 0.6oz — From what I’ve seen, daily sunscreen is the single best guard against fading.
- Hydrocolloid Bandages (Large) — Good for small spots that need extra protection during life activities.
- Tattoo Aftercare Travel Kit (gentle soap + lotion) — Helpful for weekends away during healing.
Artists I trust regularly recommend Saniderm or Aquaphor immediately, then a fragrance-free lotion. Numbing creams and sprays are more marketing-forward; ask your artist first. Keep items small and specific—use the ointment only for the first few days, then switch to lotion.
Frequently Asked Questions
Q: How bad does a tiger tattoo actually hurt?
A: Pain depends on placement. Outer arm and thigh are much gentler; ribs, kneecap, hands, and fingers bite more. I tell friends to think of it as intense scratching that ebbs and flows. For very sensitive spots, ask your artist about a numbing cream with 5% lidocaine, but always check with them first.
Q: What if I regret my tiger tattoo later?
A: I’ve seen regret ease when the design has personal meaning. Sit with your idea for months and consider hidden placements if you’re unsure. Start with a small tiger tattoo if you want a test piece—then scale up later.
Q: How do I keep my tiger from fading?
A: Sunscreen is non-negotiable. From what I’ve gathered, daily use of an SPF 50 sunscreen stick on exposed tattoos preserves color. Also keep the skin moisturized with a fragrance-free lotion like CeraVe.
Q: Can I work out after getting a tiger tattoo?
A: Wait at least 48–72 hours before heavy sweating. For tattoos over joints or areas that flex a lot, give it longer. Sweat can irritate and affect scabbing in the first week.
Q: Should I get a small tiger first to test pain?
A: Only if you actually want a small piece. Pain is about placement more than size. A tiny wrist tiger can hurt as much as a larger piece on a fleshy area. Pick a placement you’re comfortable healing.
Q: How long does a tiger tattoo take to fully heal?
A: Surface healing is 2–3 weeks; full healing can be 2–3 months. The first week is critical—clean gently with a product like Dr. Bronner’s unscented Castile soap and follow aftercare steps. Expect peeling around day 3–7 and don’t pick the flakes.
Q: Do tiger tattoos look different on different skin tones?
A: Yes. Black-and-grey tiger work tends to show beautifully across tones. Bright colors can read differently; white highlights often disappear on deeper skin. I always ask to see healed examples on similar skin tones before committing.
