
I spent weeks testing different temporary methods before realizing the trick: the most convincing temporary tattoos mimic how permanent ink looks healed, not how it looks fresh. These 29 picks are the temporary styles that read as real on the skin—great for trying placements, events, or just switching looks without commitment.
This list focuses on temporary tattoos that mimic fine line, traditional, and micro-realism vibes. I picked placements that read natural for each style—forearm, upper arm, ribs, ankle—and noted whether the look is best as water-transfer, henna/Jagua, airbrush, or sticker. From what I've seen, henna and Jagua give the most believable healed-depth for brown/black tones, while micro water-transfer and foil can mimic color realism.
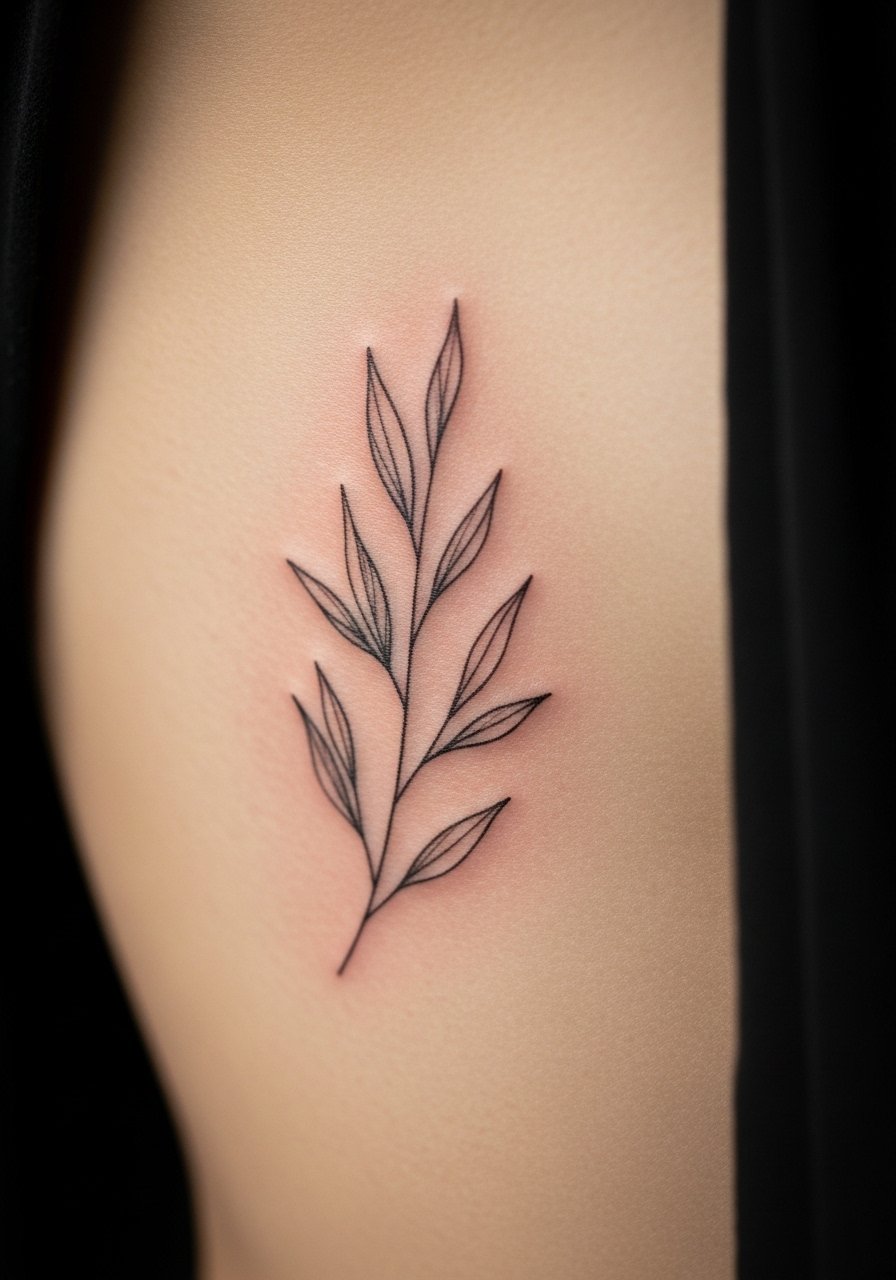
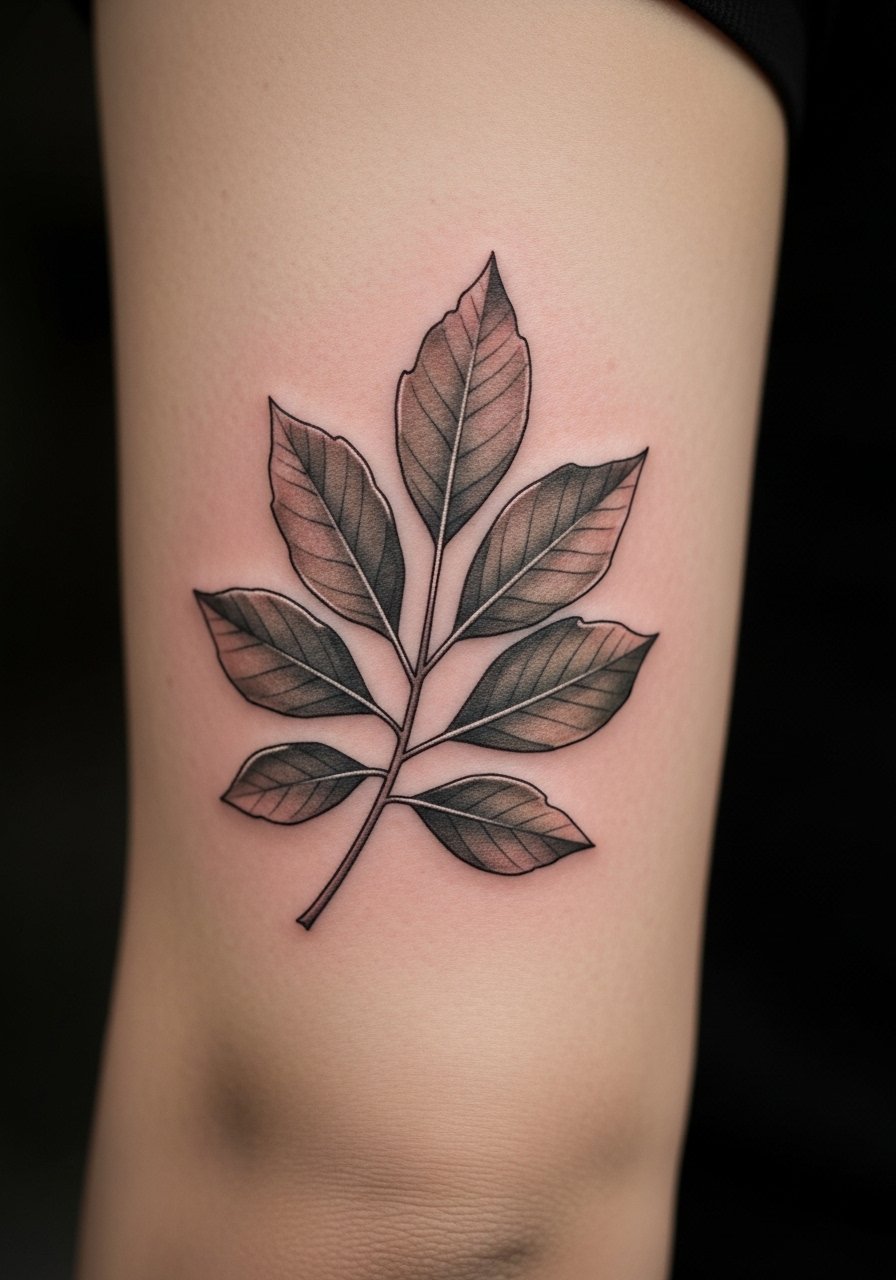
1. Fine Line Botanical on Inner Forearm
Style/Technique: Fine Line / Water-Transfer or Sticker
Pain Level: None (0/10)
Session Time: 5–15 minutes to apply
Best For: Trying sleeve placement, everyday subtle look
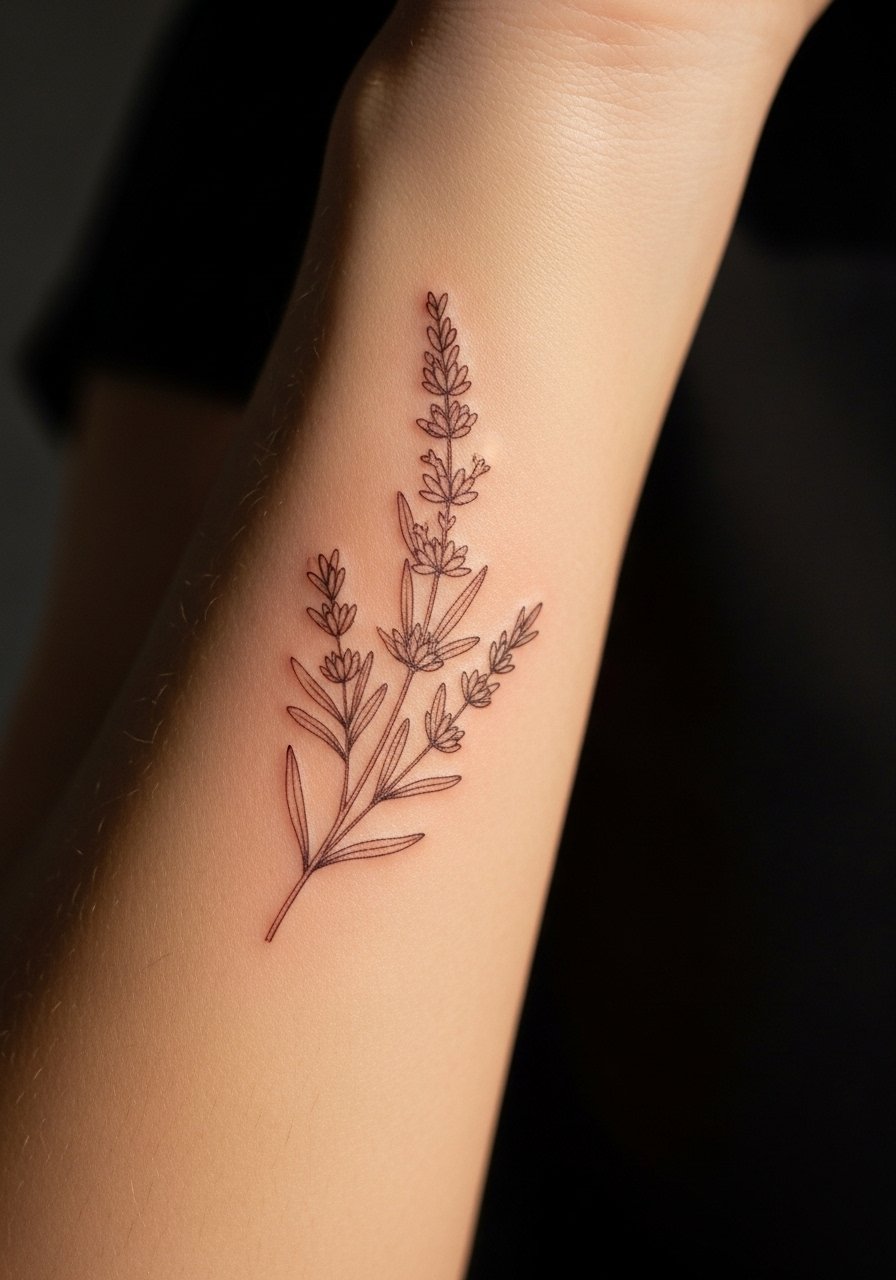
I love fine line botanicals because they read delicate yet intentional—especially when the transfer has slightly softened edges. For a realistic effect, choose a water-transfer or high-quality sticker with very thin lines and a matte finish. Inner forearm hides any tiny shine and mimics healed ink. Application is quick; no pain, and it lasts days depending on friction. Avoid overly glossy transfers—matte films and light patting after application help the ink “blend” into skin. Ask for micro-line detail on the sheet or look for designs tagged “fine line” so the lines don’t print too thick.
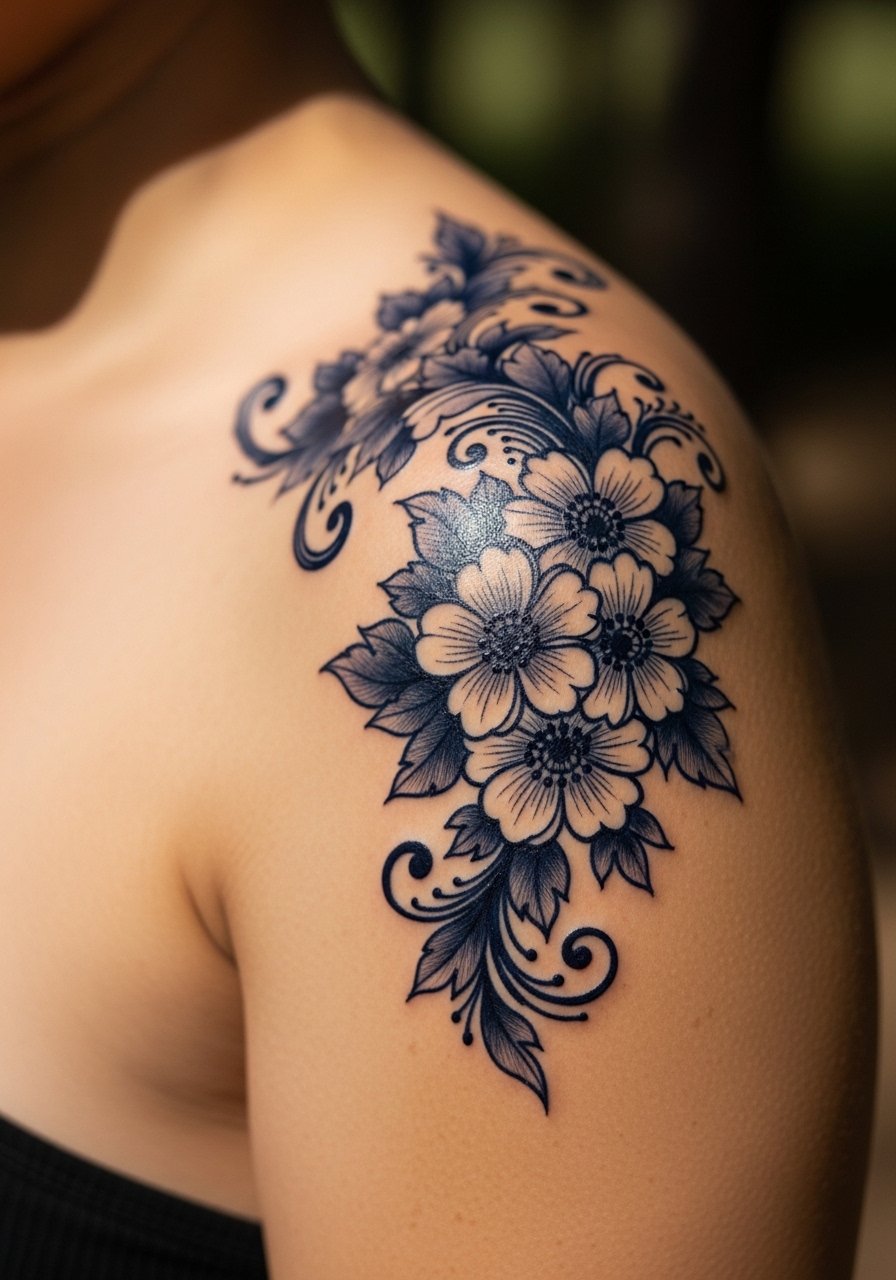
2. Traditional Rose on Upper Arm
Style/Technique: Traditional / Water-Transfer or Airbrush
Pain Level: None (0/10)
Session Time: 10–20 minutes
Best For: Timeless bold look, easy to hide
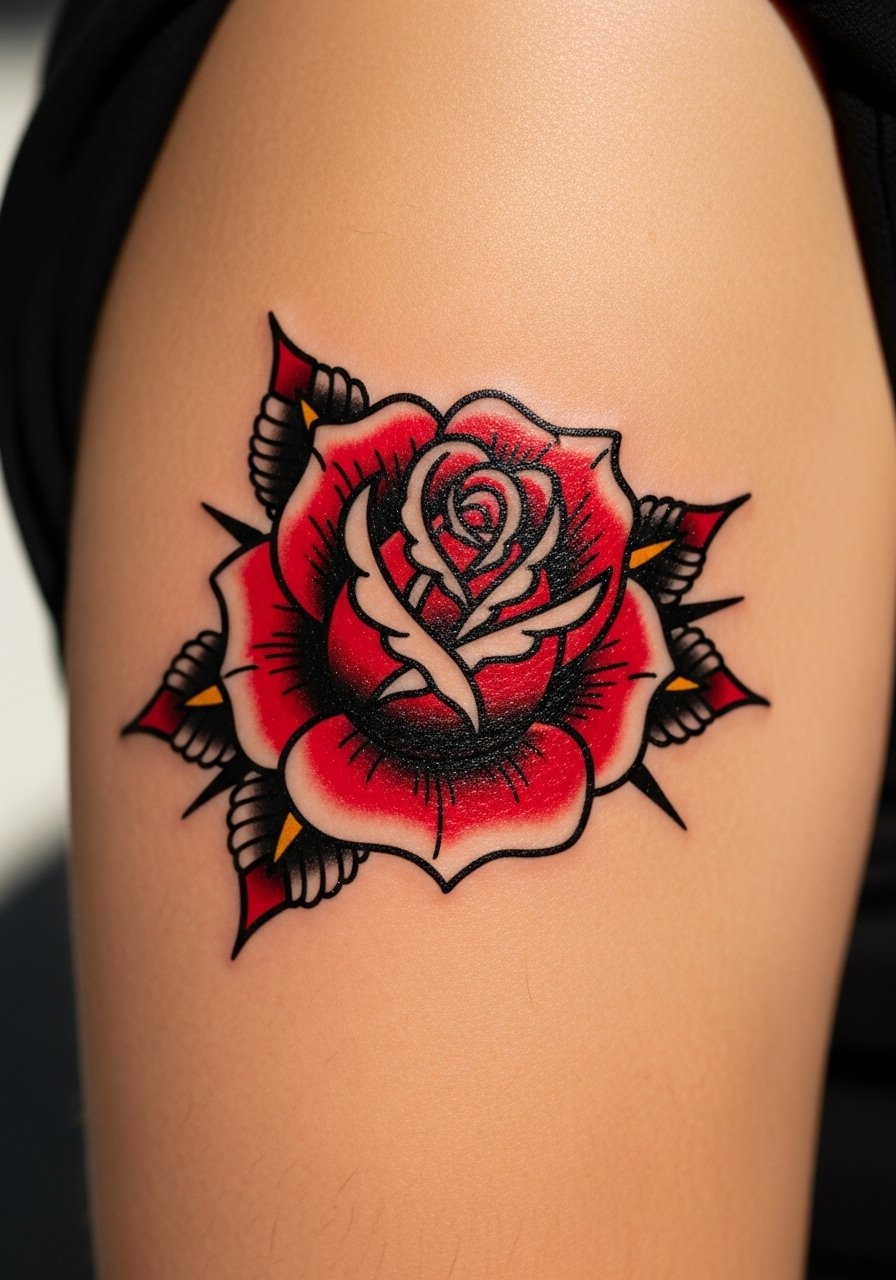
Traditional tattoos translate well to temporary methods because of bold outlines and solid color blocks. A water-transfer with rich pigment or an airbrush piece can mimic that saturated look. Placing it on the upper arm hides the transfer’s edges and gives the same silhouette as a permanent piece. The trick is ensuring the black outline is true black (not gray) and that the red sits slightly under the line to mimic healed color saturation. Avoid thin, intricate fills—that’s where stickers look fake. For a realistic aged feel, pick designs with slight texture in the color fills.
3. Micro Script on Side Wrist
Style/Technique: Minimalist / Water-Transfer Micro Script
Pain Level: None (0/10)
Session Time: 5–10 minutes
Best For: Testing a meaningful word or signature
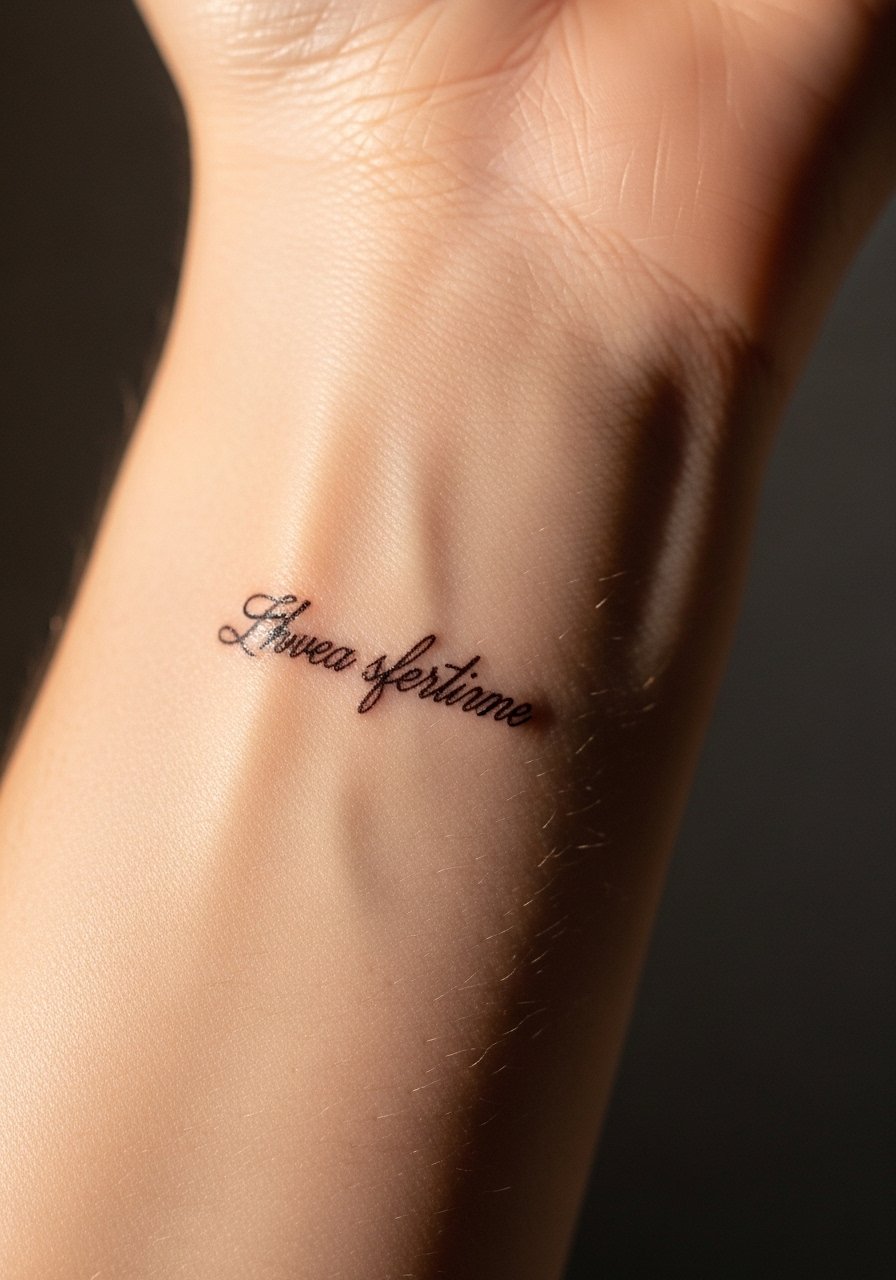
Tiny handwriting-style tattoos are a classic way to test a phrase without commitment. Realistic micro script has slightly irregular line weight and isn’t perfectly black—look for transfers labeled “handwritten” or “micro script.” Wrist placements get a lot of rub, so expect shorter wear, but the visual payoff is immediate. Avoid overly crisp machine-like fonts; the human touch reads real. If you’re checking visibility for work or daily wear, this is the spot to try first.
4. Henna-Inspired Mandala on Back of Hand
Style/Technique: Henna / Cone or Jagua Gel
Pain Level: None (0/10)
Session Time: 30–60 minutes to apply, sets 20–60 minutes
Best For: Statement piece that looks authentically cultural
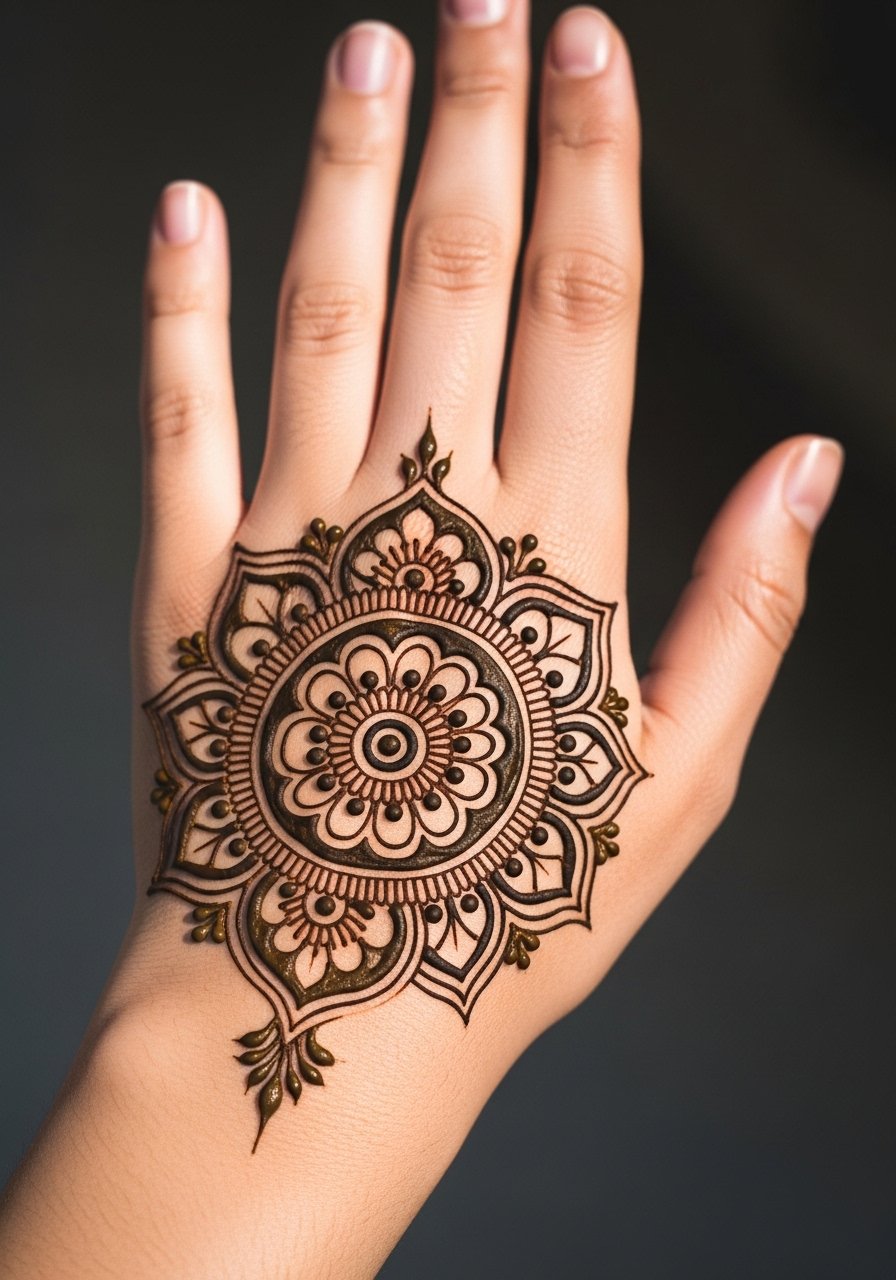
Henna and Jagua are the most believable for brown-toned, healed-looking designs. Mandalas on the back of the hand have the right balance of detail and negative space. Henna will come out orange then darken; Jagua gives a blue-black finish similar to black ink. Placement on the hand reads authentic, but hands wear fast—expect shorter longevity. I always tell people to avoid overly intricate filigree if you want it to read crisp; the dye can bleed slightly on the skin. Light application and letting it set properly make it look like a real healed design.
5. Micro-Realism Pet Portrait on Thigh
Style/Technique: Micro-Realism / Custom Inkjet Transfer
Pain Level: None (0/10)
Session Time: 15–30 minutes to apply
Best For: Trying a personal portrait before committing
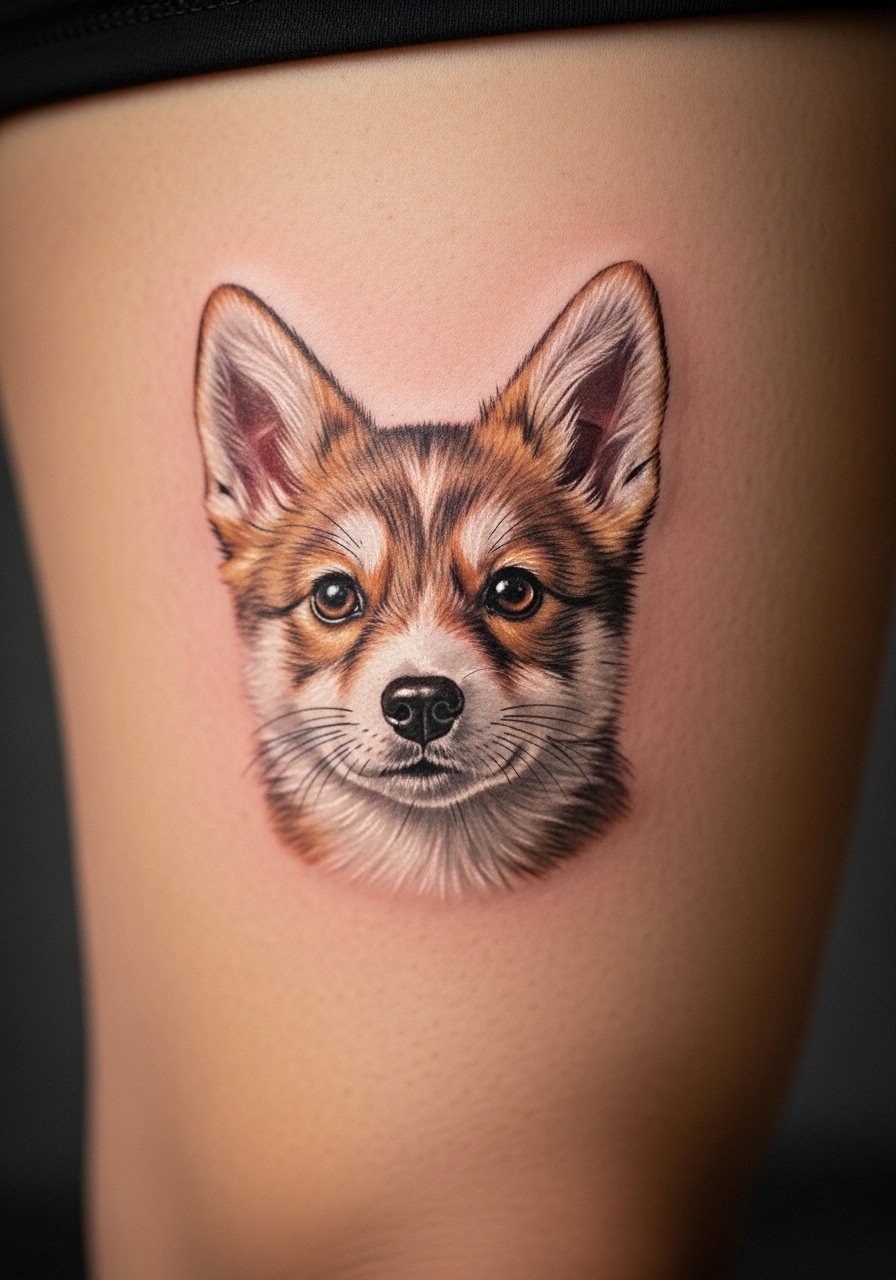
Micro-realism portraits can look incredibly convincing as temporary pieces when printed with high resolution on thin transfer paper. The thigh is forgiving—less friction and a larger canvas—so the gradation and fine shading stay intact. Expect realistic soft edges; avoid transfers with a white backing or glossy finish. I recommend testing a clear film print or decal; the result can help you decide whether a portrait will age well on you. Remember, faces age differently—use these trials to refine scale and placement.
6. Blackwork Geometric on Sternum
Style/Technique: Blackwork / Water-Transfer or Airbrush
Pain Level: None (0/10)
Session Time: 10–20 minutes
Best For: Bold center-chest statements without commitment
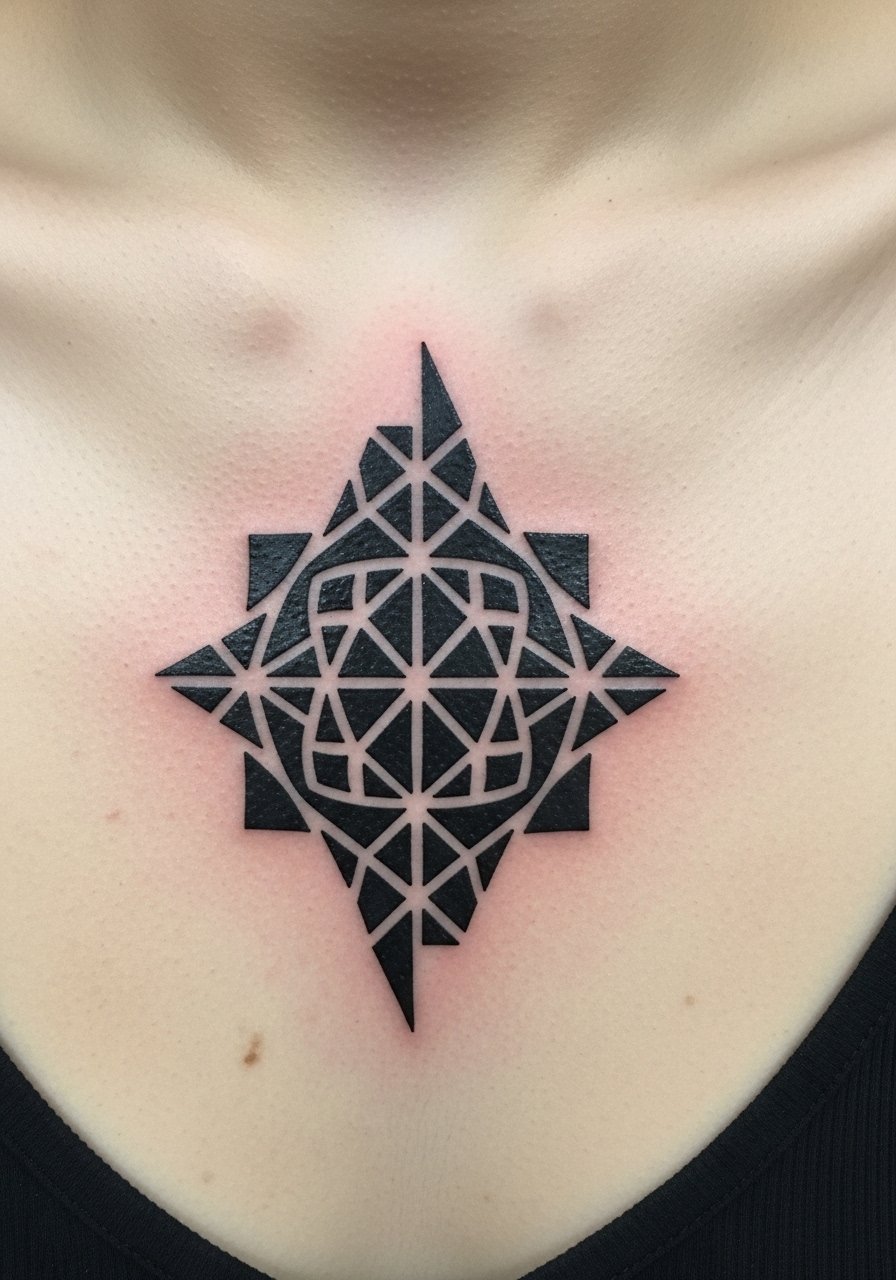
Sternum placements with high-contrast black shapes read like bold permanent pieces. For realism, choose transfers with saturated blacks and matte finish so they mimic healed ink depth. Airbrush can add subtle gradient to imply healed shading. Sternum designs show how a chest piece will sit under clothing and how intricate patterns align with body curves. The only caveat: chest transfers can smudge with sweat, so apply after cooling down. Designers doing geometric layouts help you visualize symmetry before going permanent.
7. Watercolor Splash on Shoulder Blade
Style/Technique: Watercolor / Water-Transfer or Airbrush
Pain Level: None (0/10)
Session Time: 10–15 minutes
Best For: Color tests and artistic statement
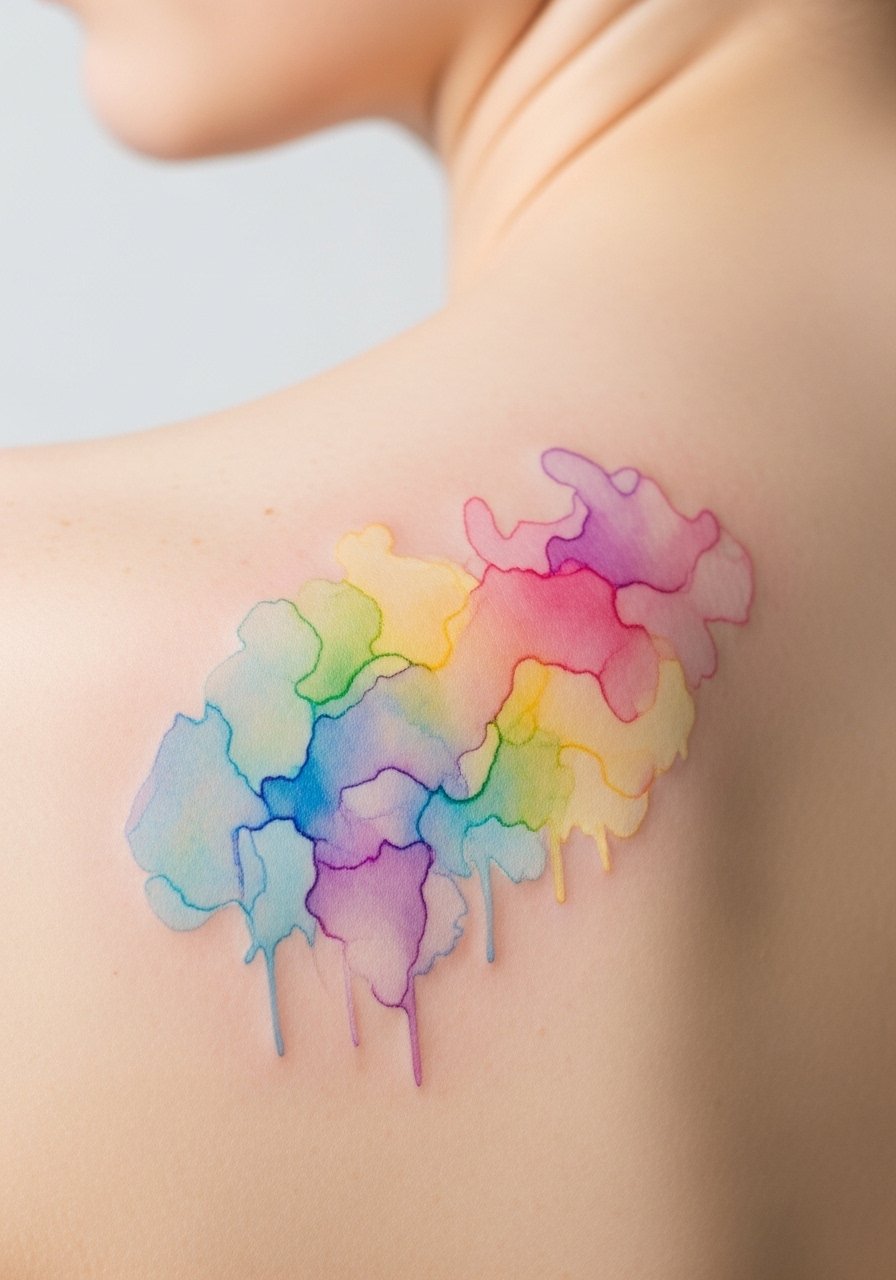
Watercolor tattoos are notoriously tricky to make look real because they rely on faded edges and soft blending. A skilled water-transfer or airbrush can mimic that washed-in look. Shoulder blade placement lets the colors breathe and reduces rubbing. If you want to see how a palette ages, this is perfect—bright spots will fade faster in real life, and you’ll see whether you prefer subtle or saturated washes. Avoid transfers with heavy white highlights; matte, semi-sheer pigments read more natural.
8. Metallic Foil Jewelry Around Ankle
Style/Technique: Metallic / Foil Sticker or Transfer
Pain Level: None (0/10)
Session Time: 5–10 minutes
Best For: Event glam or faux anklet without jewelry
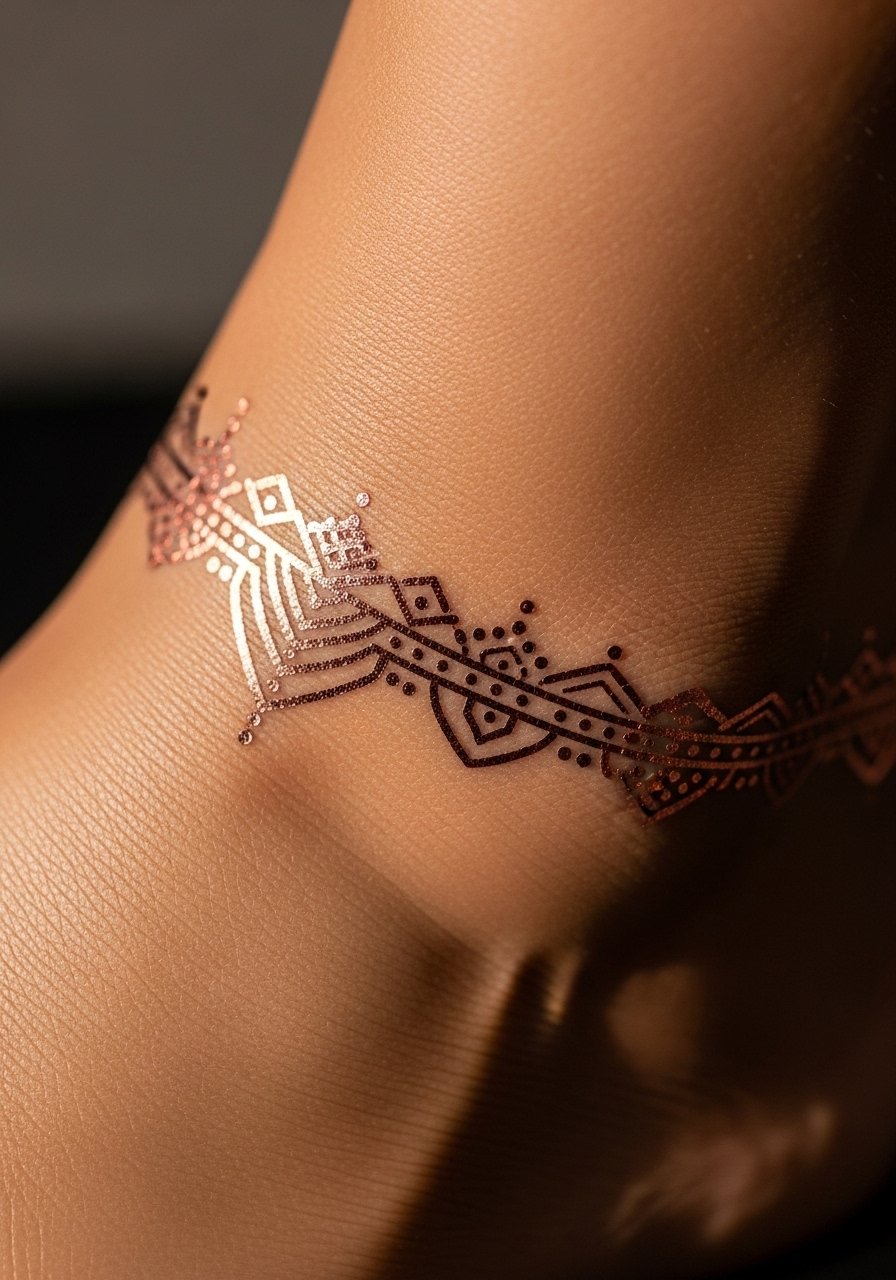
Metallic tattoos are great for holiday looks and read like jewelry from a distance. Foil transfers with semi-matte finish look less costume-y and more like delicate metalwork. The ankle is a classic jewelry spot; the thin strip mimics chain links well. These are more about surface shine than depth, so expect shorter wear if you’re active. For realism, choose thin-link patterns and duller gold tones—too bright a foil can scream temporary.
9. Faux Scar/Suture on Forearm
Style/Technique: 3D / Prosthetic-Look Transfer or Makeup Tattoo
Pain Level: None (0/10)
Session Time: 10–20 minutes
Best For: Costume realism or theatrical effect
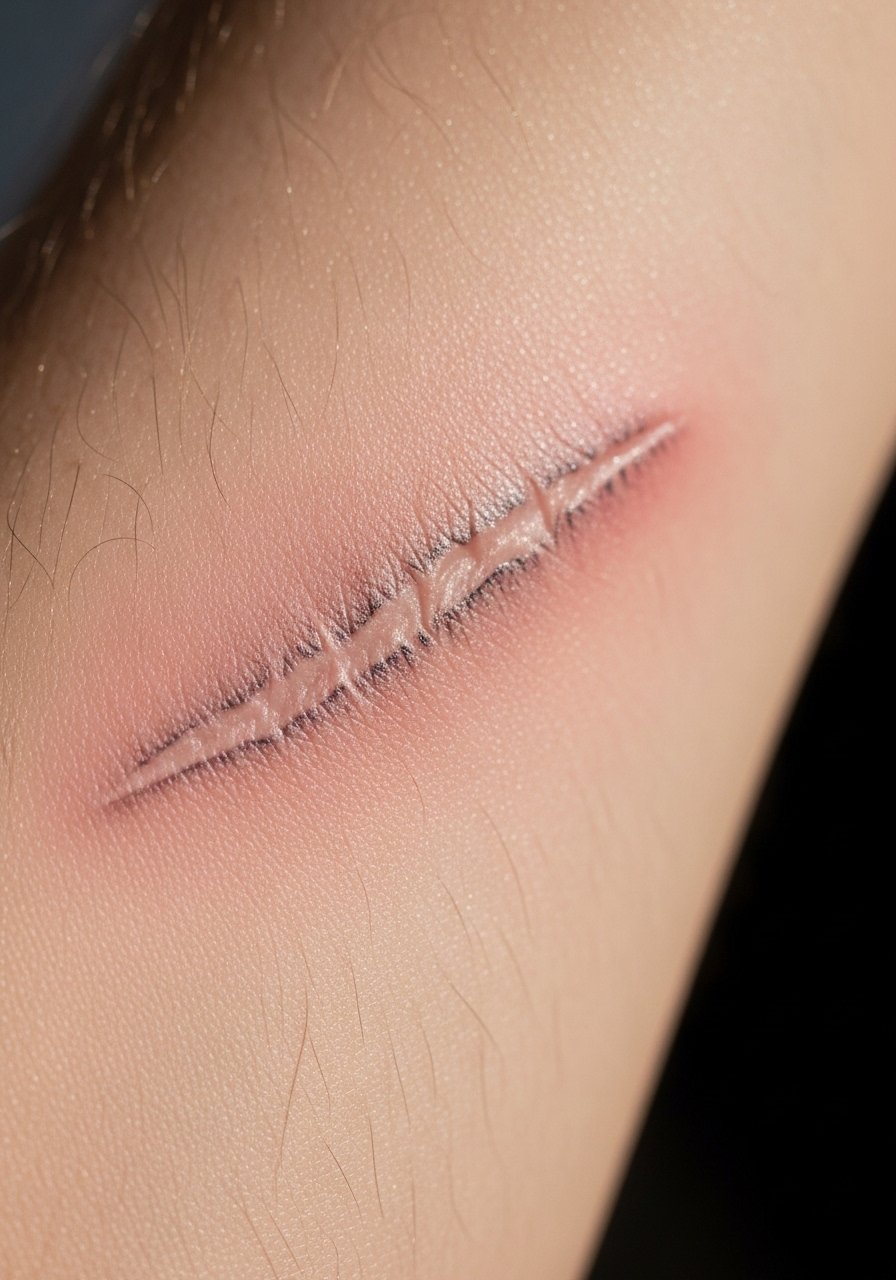
Faux-scar transfers can be extremely convincing when they mimic healed scarring—slightly pale central lines with subtle redness around it reads authentic. These are popular for cosplay and realistic effects. Apply with a thin layer of setting spray and blend edges with makeup for maximum believability. Since they’re visual tricks, they’re also useful for testing how a cover-up might look over a real mark. Avoid glossy or blatantly fresh-looking red tissue tones; healed scars lean toward softer, paler hues.
10. Mandala Spine Runner
Style/Technique: Mandala / Water-Transfer or Henna-Inspired Sticker
Pain Level: None (0/10)
Session Time: 15–30 minutes
Best For: Vertical spine symmetry trials
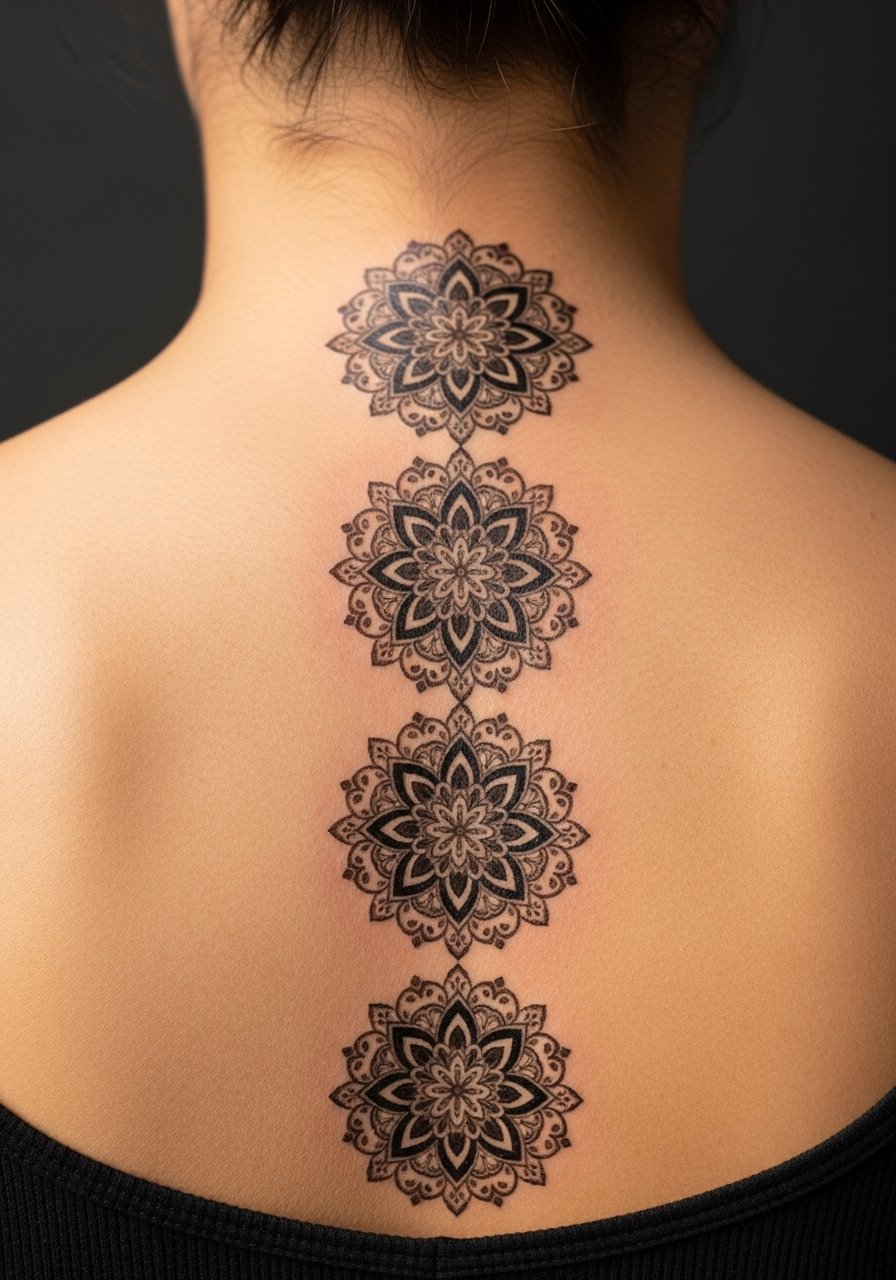
Spine runners read very tattoo-like when motifs are crisp and aligned. Water-transfer mandalas or henna-style transfers work well here; the vertical flow looks natural on the spine. I like this for testing how a vertical piece sits with posture and clothing. Because the back sees little rub, the detail holds longer. Avoid overly dense tiny dots—on curved skin they can blur; choose patterns with negative space to preserve clarity.
11. Minimalist Mountain Range on Ankle
Style/Technique: Minimalist / Water-Transfer
Pain Level: None (0/10)
Session Time: 5 minutes
Best For: Travel-themed subtle placement
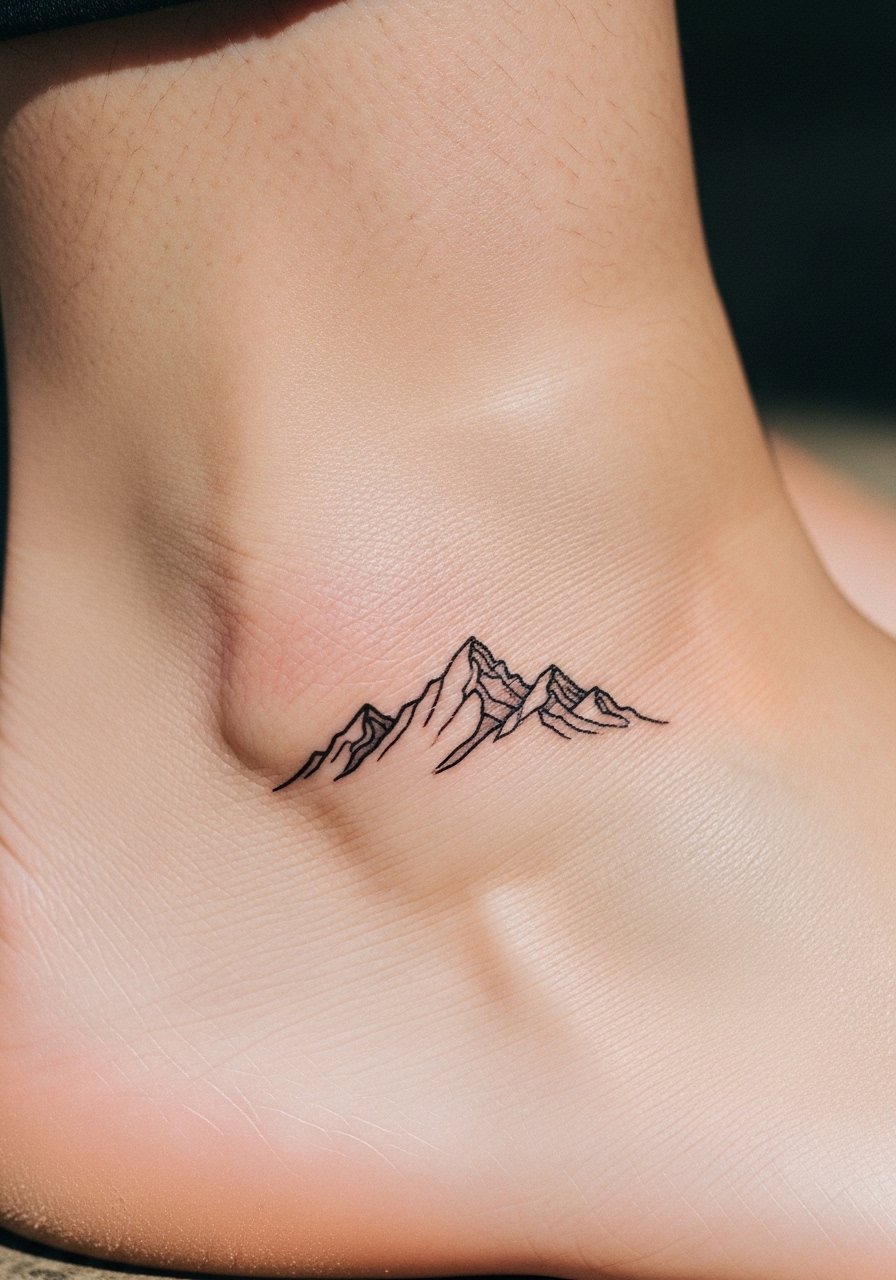
Small landscape silhouettes translate perfectly to temporary transfers. They’re quick to apply, look like healed single-needle work, and are great for testing ankle visibility. Because ankles see friction from shoes and socks, expect shorter life. For realism, pick a matte finish and slightly imperfect line weight—those tiny inconsistencies mimic real needle work. If you’re checking leg placement for a future sleeve, this is a low-stakes way to trial scale.
12. Celestial Neck Cluster Behind Ear
Style/Technique: Tiny Blackwork / Sticker or Water-Transfer
Pain Level: None (0/10)
Session Time: 5–10 minutes
Best For: Subtle visible placement
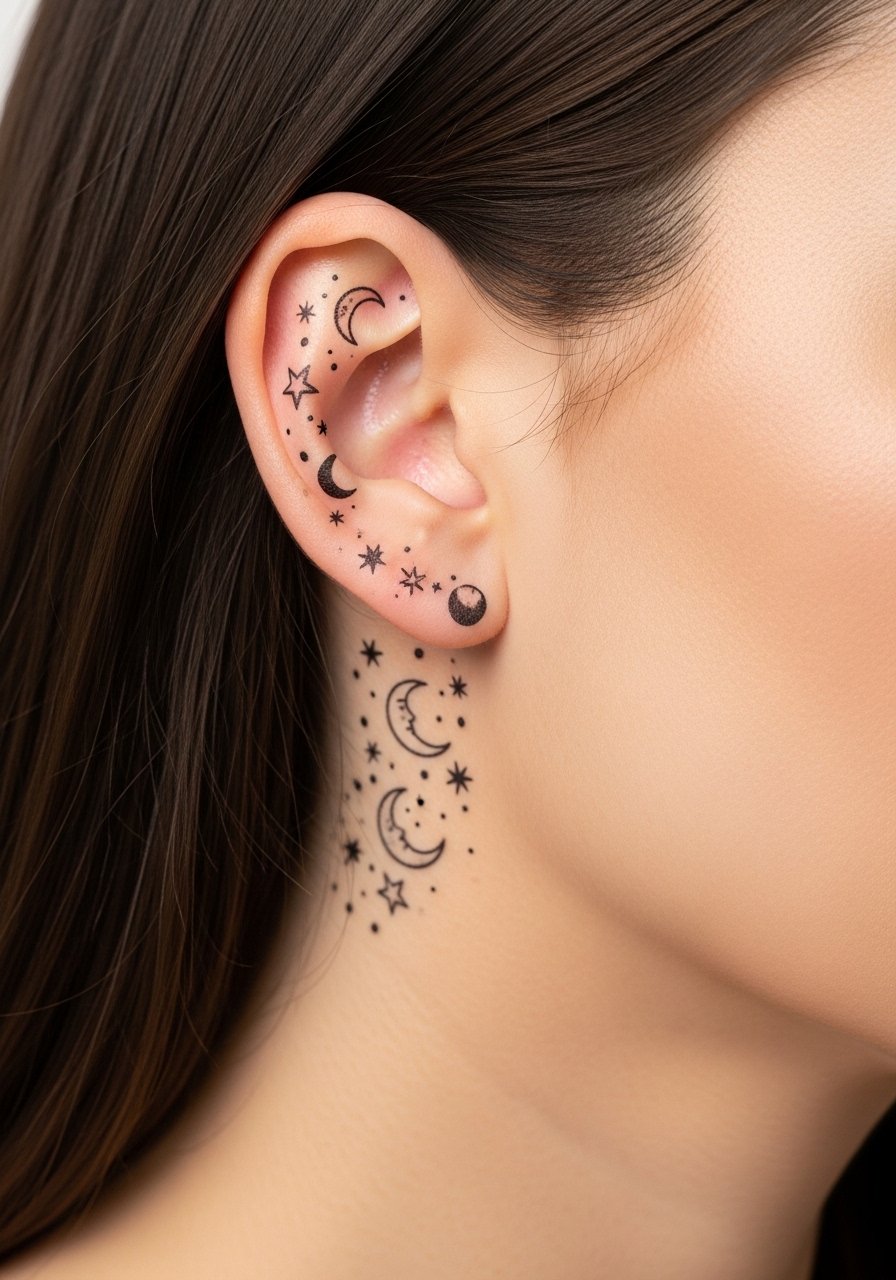
Behind-the-ear and small neck clusters are perfect for trying visible placements that remain discreet. Tiny blackwork moons and stars read like healed micro-ink when edges aren’t overly sharp. For realism, go with matte ink and avoid overly glossy films. These spots are good tests for how visible you want your ink in professional settings and how hair movement affects perception. The downside is short wear due to movement and hair oils; expect brief longevity.
13. Botanical Ribcage Sprig
Style/Technique: Fine Line / Water-Transfer or Sticker
Pain Level: None (0/10)
Session Time: 10–20 minutes
Best For: Testing scale for a side-piece
Rib placements show how curved surfaces affect a design. Fine-line botanicals look very convincing as temporaries here because the skin’s natural stretch gives lines a slightly softened edge. Use transfers with thin backing and matte finish. They also help you test whether the placement feels comfortable when you move or breathe. Common mistake: choosing too long a sprig that won’t sit straight when you slouch—try a shorter stem first.
14. Jewel-Tone Watercolor Thigh Bloom
Style/Technique: Watercolor / High-Quality Transfer
Pain Level: None (0/10)
Session Time: 10–20 minutes
Best For: Larger color tests, hidden statements
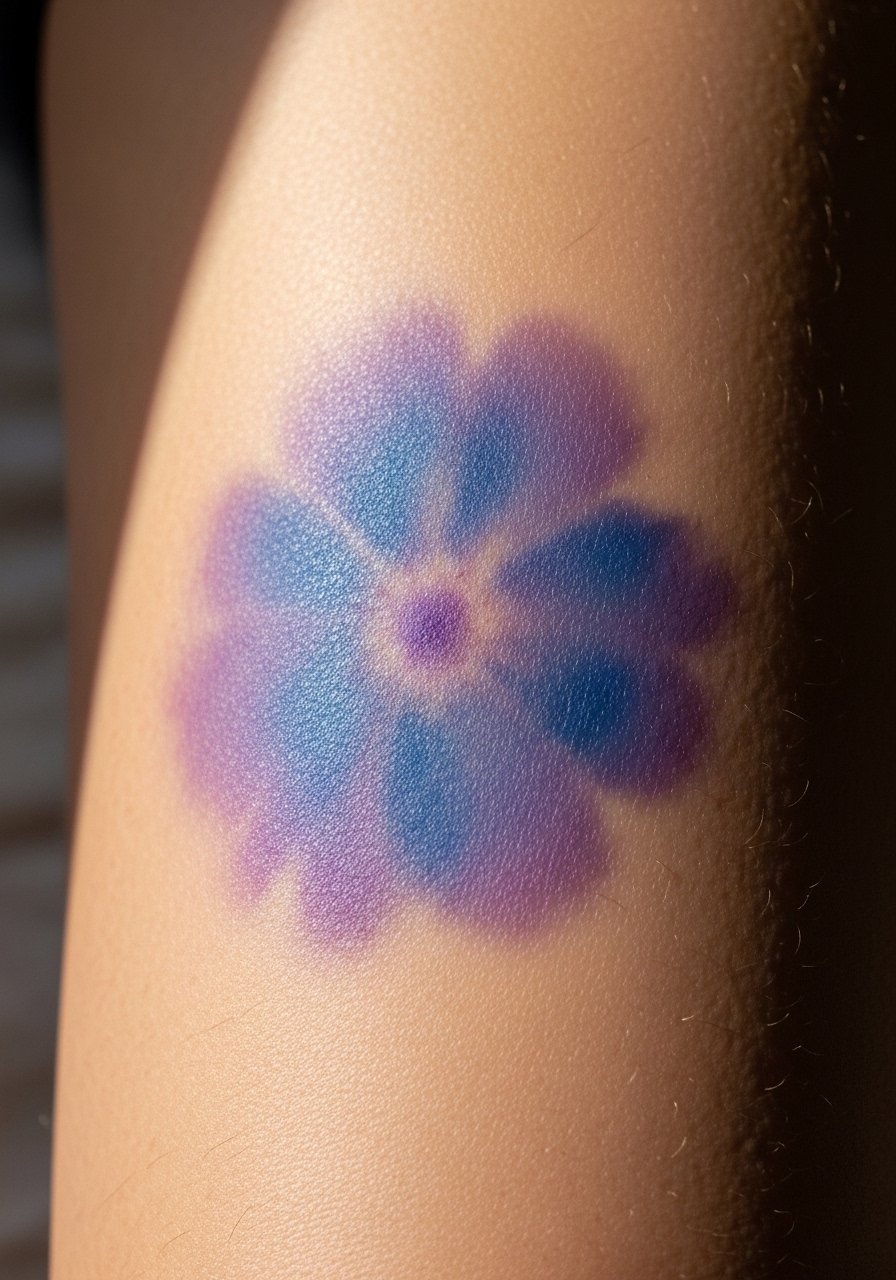
The thigh is forgiving for color experiments. Jewel tones printed on thin transfer paper can retain the subtle blending that mimics healed color. Because the thigh sees less abrasion, tones stick around longer and let you see if color saturation works with your skin tone. Avoid overly neon inks; jewel and muted shades read more permanent. This is a reliable way to preview a big colorful piece without commitment.
15. Single Needle Constellation on Collarbone
Style/Technique: Single Needle / Water-Transfer Micro Dots
Pain Level: None (0/10)
Session Time: 5–10 minutes
Best For: Elegant neckline accent
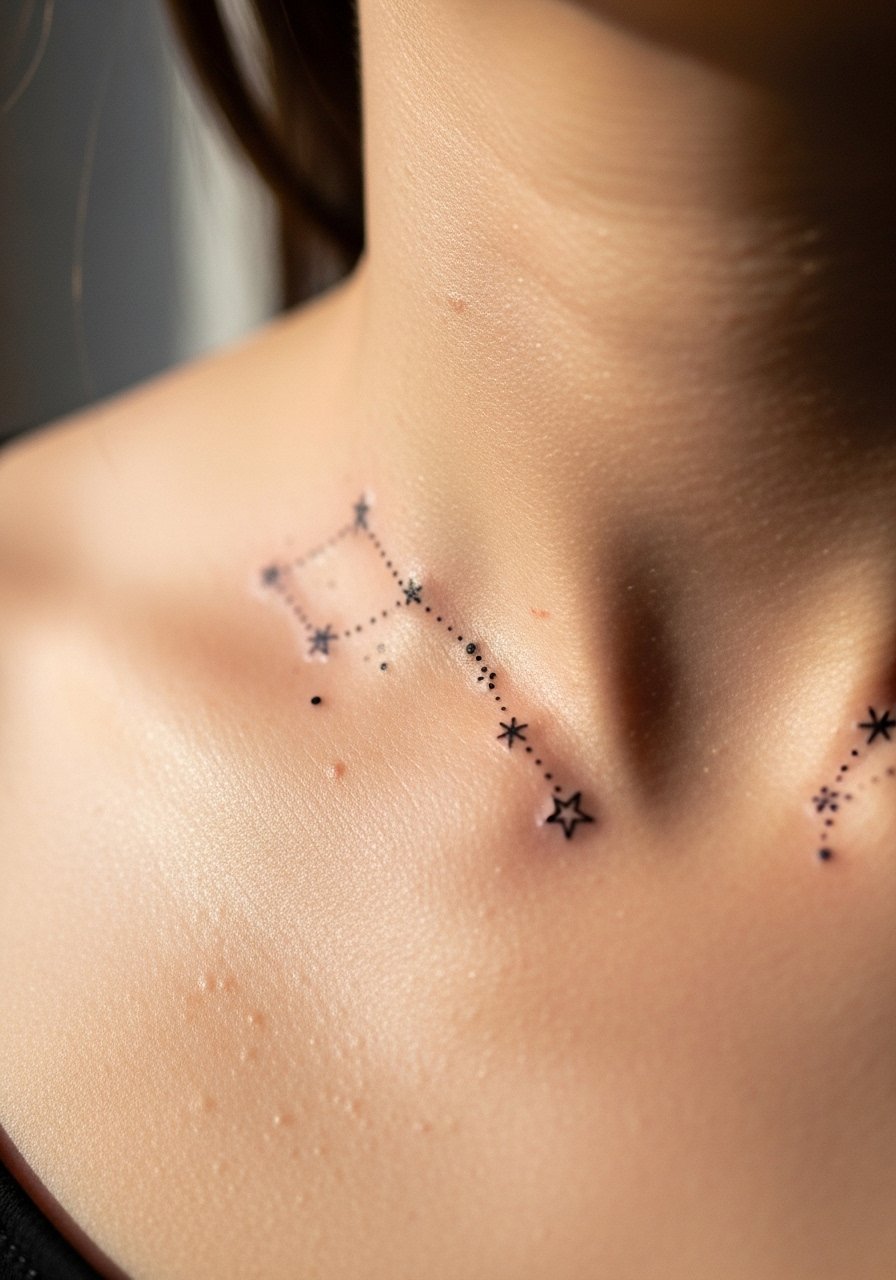
Tiny dotwork constellations on the collarbone can look very real when printed with varied dot sizes and matte ink. The collarbone area frames jewelry and necklines, so a temporary is perfect for testing visibility. Since this design is minimal, make sure dots aren’t uniform; slight variation sells authenticity. The main mistake is choosing glossy stickers that catch light and reveal edges—go matte.
16. Lace Bridal Motif on Hip
Style/Technique: Lace / Water-Transfer or Airbrush
Pain Level: None (0/10)
Session Time: 15–25 minutes
Best For: Weddings or photoshoots testing intimate placement
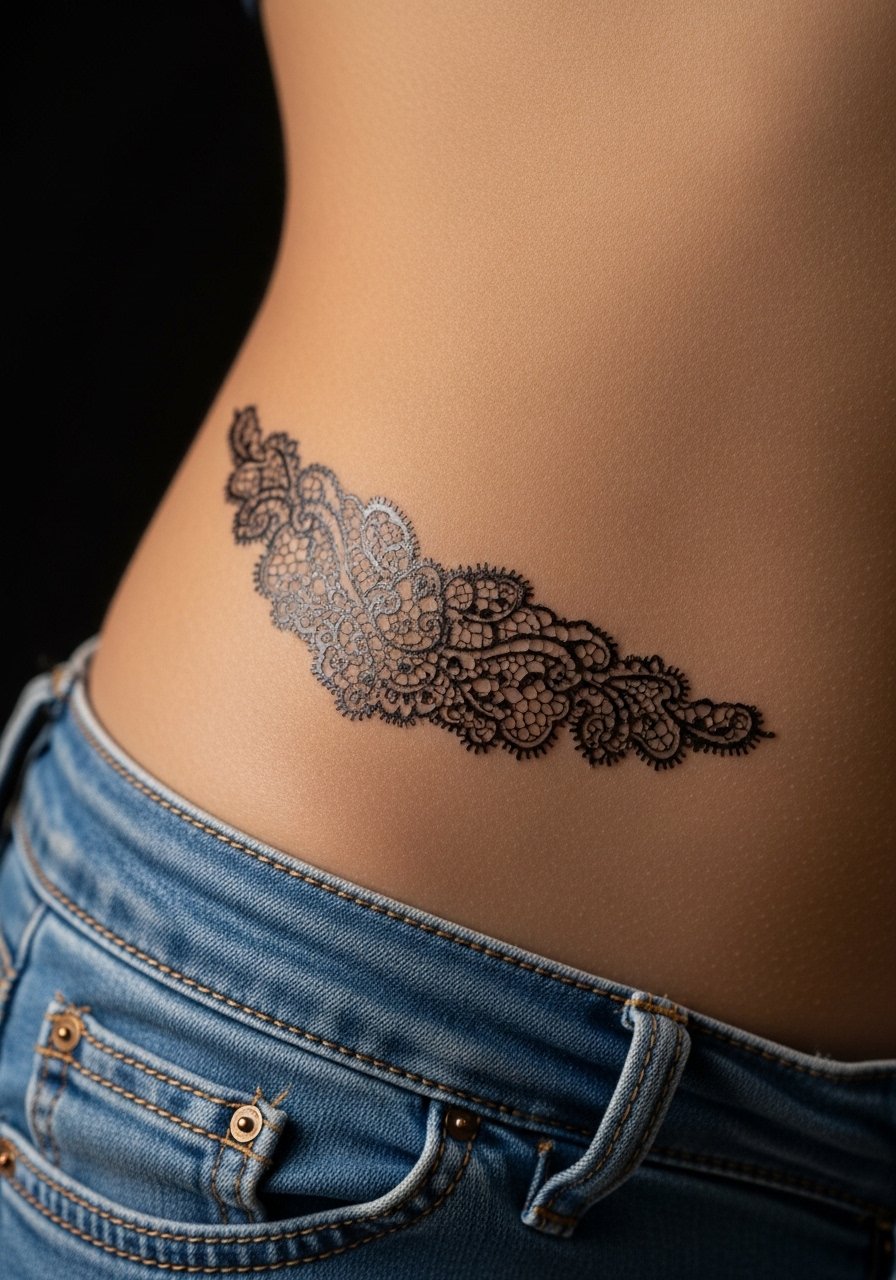
Lace motifs shine as temporaries for bridal looks. Detailed transfers or airbrush work can mimic the soft shading and negative space of real lace tattoos. The hip is great because it holds detail and is easy to conceal. Avoid transfers with heavy backing or thick borders; the illusion cracks if you can see film edges. I recommend a delicate pattern that follows body curves to read as custom work.
17. Micro-Realism Leaf Cluster Behind Elbow
Style/Technique: Micro-Realism / Custom Transfer
Pain Level: None (0/10)
Session Time: 10–15 minutes
Best For: Testing joint-area movement and longevity
Joint areas are tricky because movement changes how a design reads. A micro-realism leaf cluster behind the elbow looks surprisingly realistic if the print captures soft shading and slightly broken edges. It’s a good trial to see whether you want a permanent piece in a flex area. Remember, movement shortens wear, so use a transfer with strong adhesion and matte finish.
18. Traditional Sailor Anchor on Calf
Style/Technique: Traditional / Water-Transfer or Sticker
Pain Level: None (0/10)
Session Time: 5–10 minutes
Best For: Classic nautical test spot
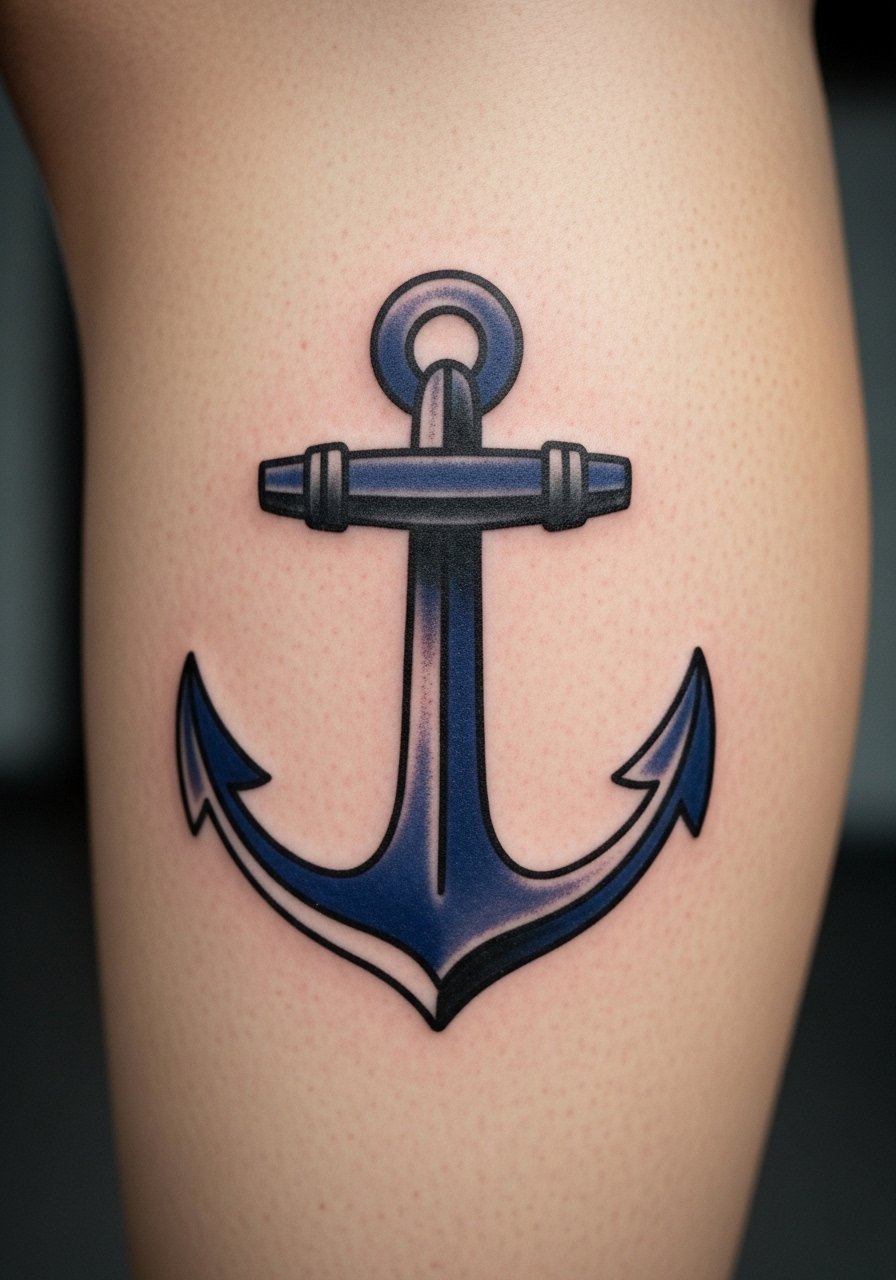
The calf gives a bold silhouette and is forgiving for scale—classic anchors read like real tattoos with the right outline thickness and saturated color. It’s a solid place to trial classic flash designs. Avoid transfers with overly smooth fills; a bit of texture in the color makes it feel like ink in skin. Use this to test whether you want a visible maritime piece or prefer a subtler placement.
19. Floral Wrist Cuff
Style/Technique: Floral / Water-Transfer or Sticker
Pain Level: None (0/10)
Session Time: 5–15 minutes
Best For: Bracelet-like floral accent
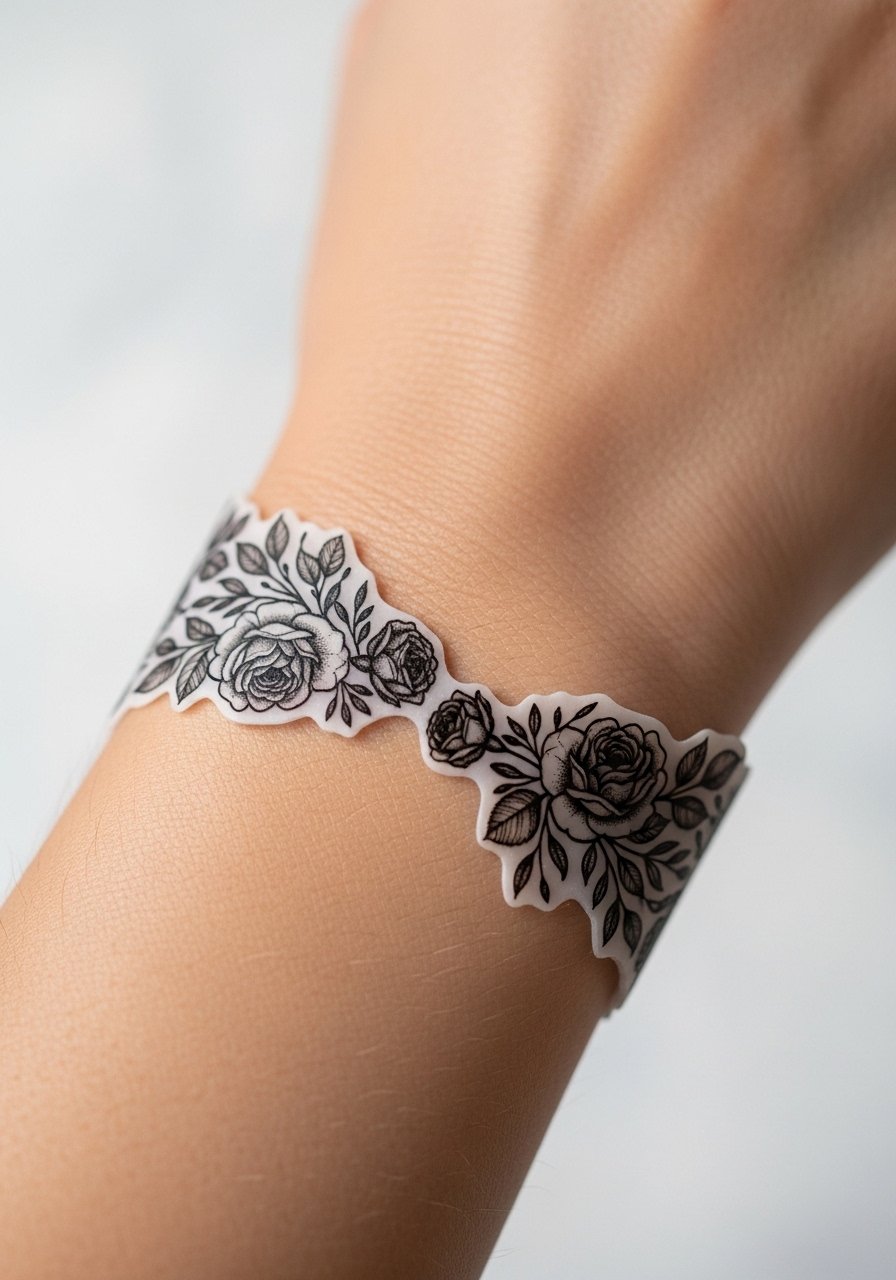
Wrist cuffs are an easy way to test jewelry-adjacent placement. For realism, select designs that aren’t perfectly symmetrical; tiny irregularities in petal edges mimic healed needle work. Because wrists face constant friction, expect short wear—good for events or short trials. Ensure the transfer is thin and the black lines aren’t too heavy; balanced line weight creates a natural look.
20. Tiny Geometric Finger Dot
Style/Technique: Minimalist / Water-Transfer Micro Dot
Pain Level: None (0/10)
Session Time: 2–5 minutes
Best For: Testing finger placement with minimal commitment
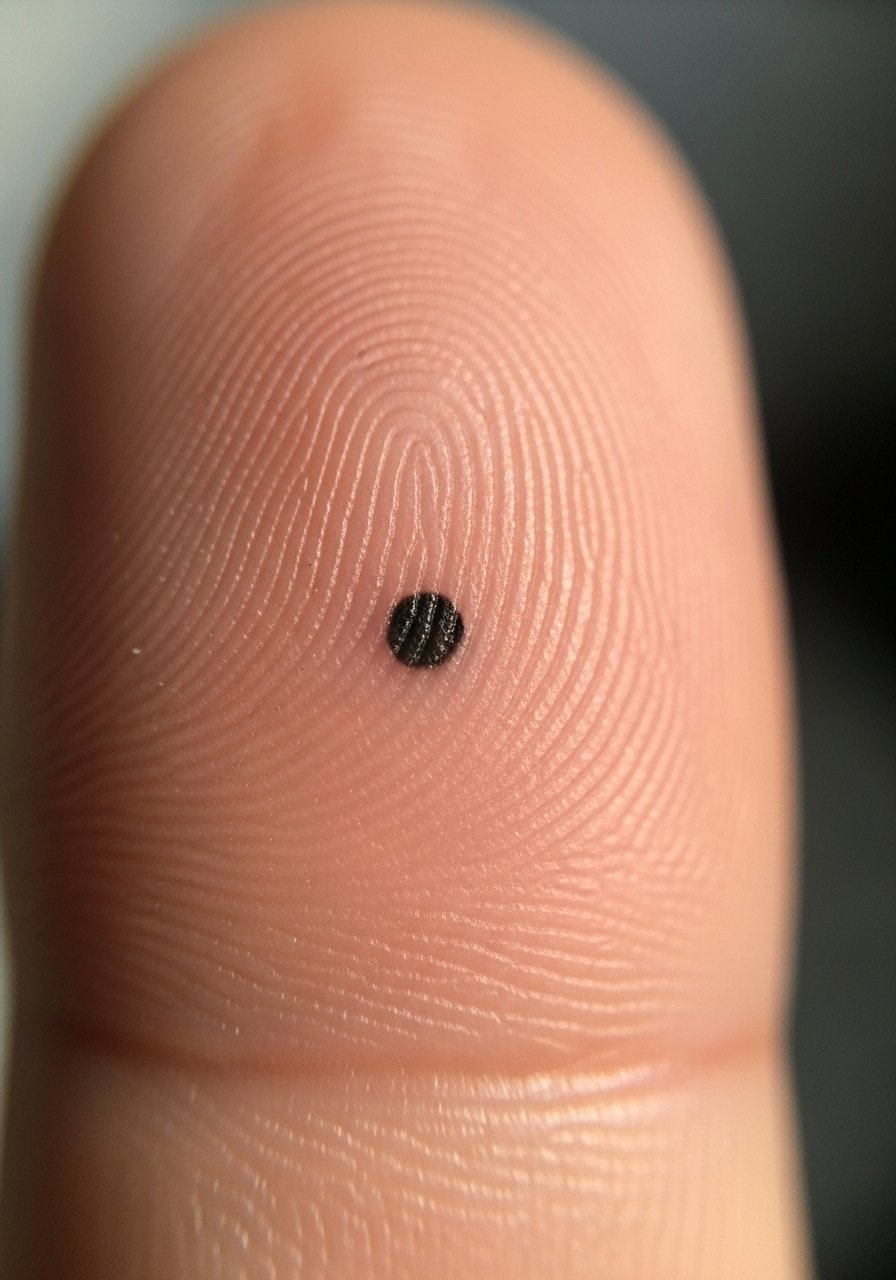
Finger tattoos are notorious for fading, so a temporary is ideal. A single tiny geometric dot or shape reads authentic as a micro-ink piece when matte and slightly imperfect. This helps you see how often you’d notice it and how it affects daily tasks. Don’t pick overly intricate designs for fingers—simplicity reads better and holds longer as a temporary.
21. Gothic Script Name on Rib
Style/Technique: Script / Water-Transfer Micro Script
Pain Level: None (0/10)
Session Time: 10–15 minutes
Best For: Testing typographic style on a larger curve
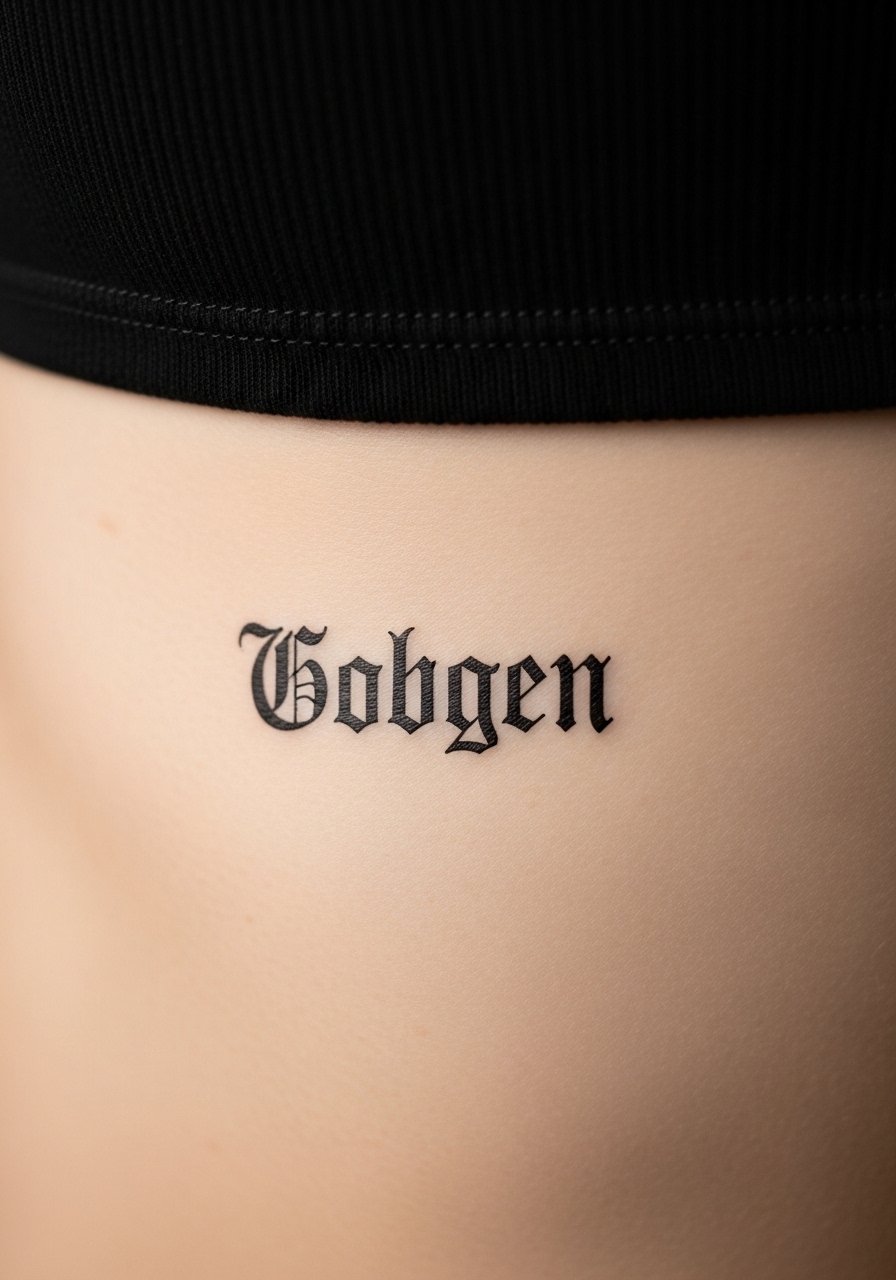
Script on the rib tests how lettering follows body curves. Gothic or ornate scripts need slightly thicker strokes to look real in a temporary transfer—too thin prints blur. This method lets you adjust font weight and spacing before committing. Because ribs move with breathing, a temporary shows whether you’ll like the look when sitting, stretching, or wearing certain tops.
22. Jagua Black Floral on Shoulder Cap
Style/Technique: Jagua / Gel Stain
Pain Level: None (0/10)
Session Time: 30–60 minutes to apply and develop
Best For: Deep black healed-look on lighter skin tones
Jagua gives a blue-black finish that resembles fresh-to-healed black ink, especially on light to medium skin tones. Shoulder cap pieces have low friction and look very authentic. Jagua needs time to set and darken, so plan applications accordingly. If you want a convincing black healed aesthetic without needles, this is my top pick. Make sure the artist or kit offers clear instructions—setting and aftercare affect final tone.
23. Filigree Sternum Necklace
Style/Technique: Ornamental / Water-Transfer or Airbrush
Pain Level: None (0/10)
Session Time: 10–20 minutes
Best For: Decorative chest accents for events
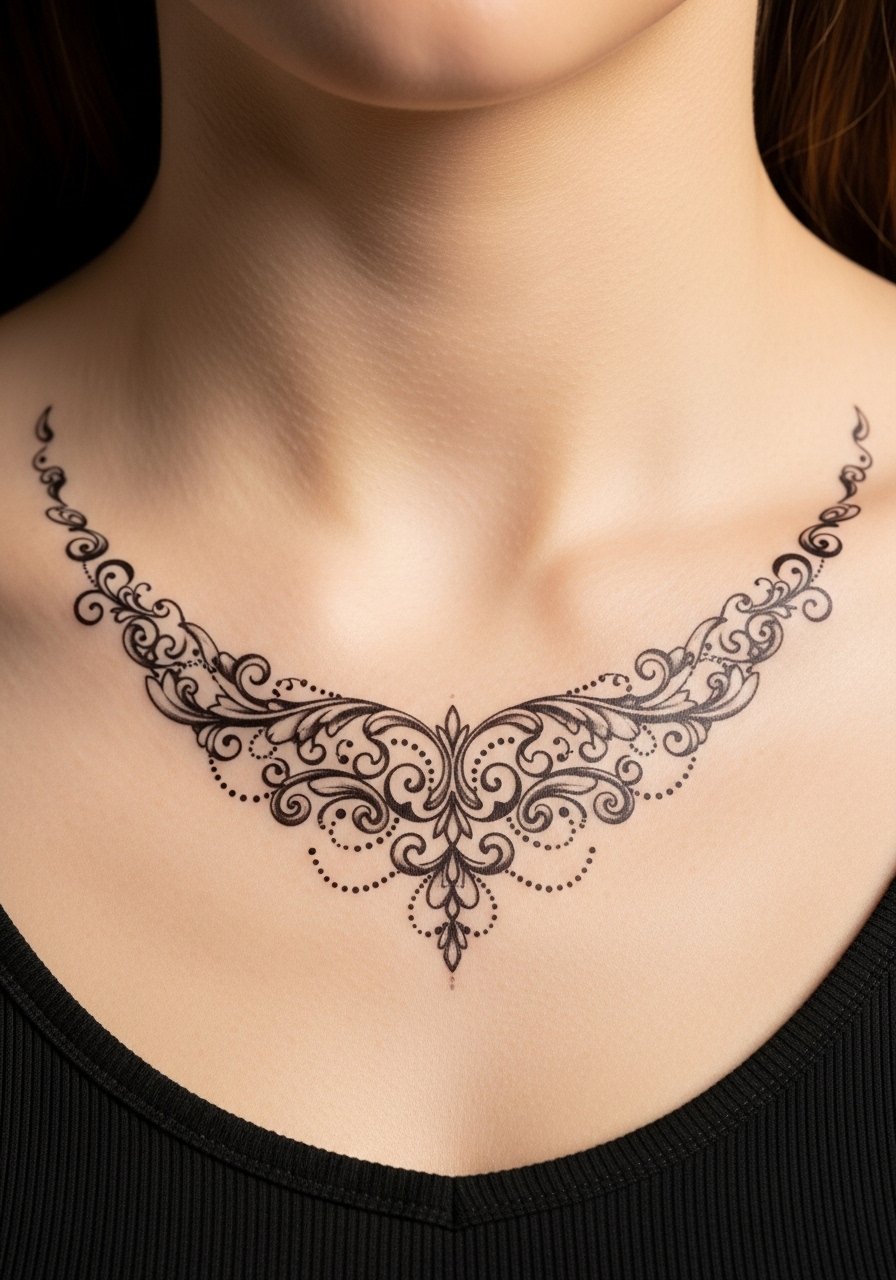
Ornamental chest pieces that mimic necklace shapes can be stunning and read as real if the lines are subtle and the transfer matte. They allow you to test scale under necklines before committing. Avoid stickers with heavy borders; the illusion fails if you see film edges. For weddings or shoots, a filigree temporary is an easy way to preview a permanent chest piece.
24. Realistic Feather on Side Rib
Style/Technique: Micro-Realism / Water-Transfer
Pain Level: None (0/10)
Session Time: 10–15 minutes
Best For: Flowing, delicate placement tests
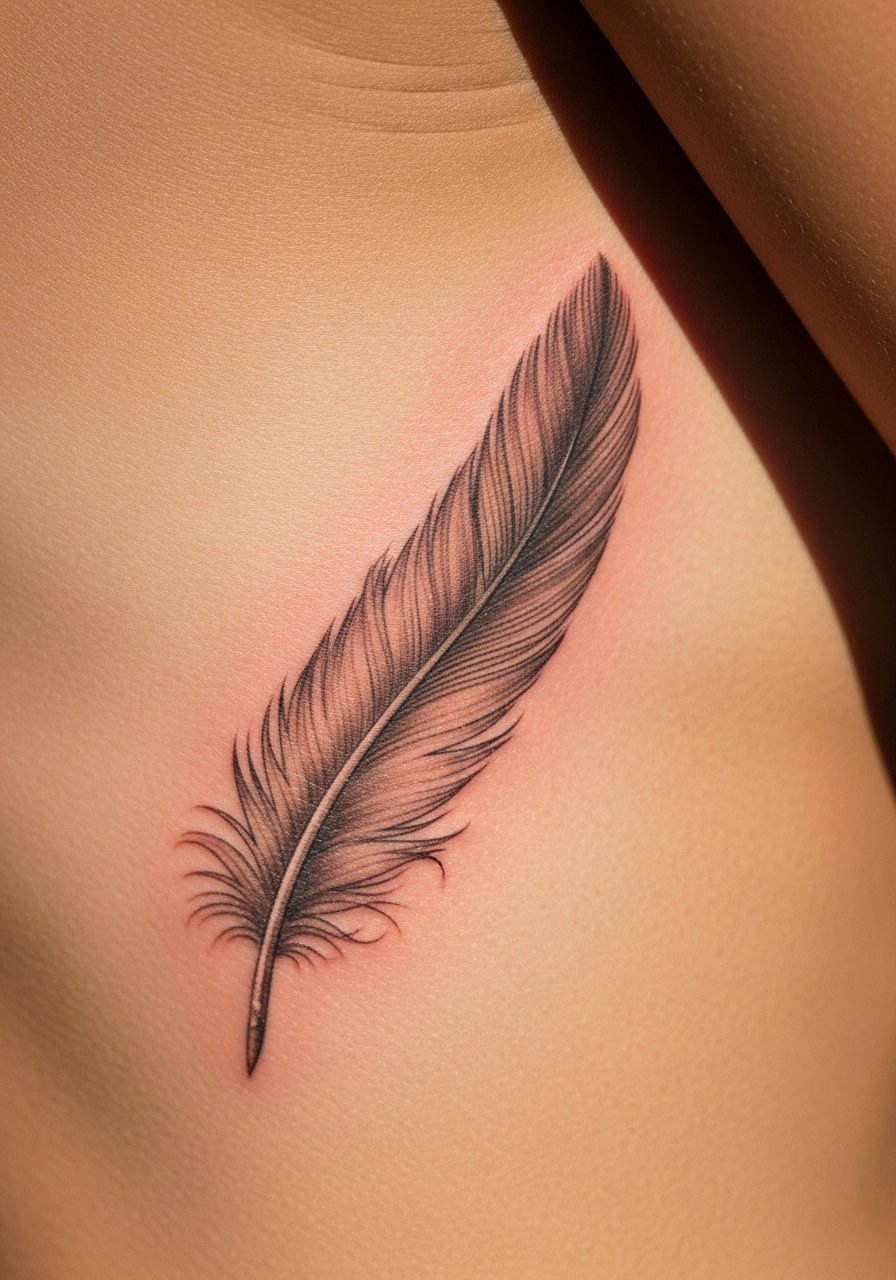
Feathers rely on subtle shading and broken barbs to look real. A high-resolution transfer with soft gradients mimics the feather’s texture well. The rib gives natural curve and movement that sells realism. If you’re considering a flowing piece that follows body lines, try this; it shows whether the feather will fold or sit flat when you move. Be wary of transfers with stark black outlines—feathers look more authentic with soft edges.
25. Foil Temporary Statement Necklace
Style/Technique: Metallic / Foil Transfer
Pain Level: None (0/10)
Session Time: 5–10 minutes
Best For: Dressing up without jewelry bulk
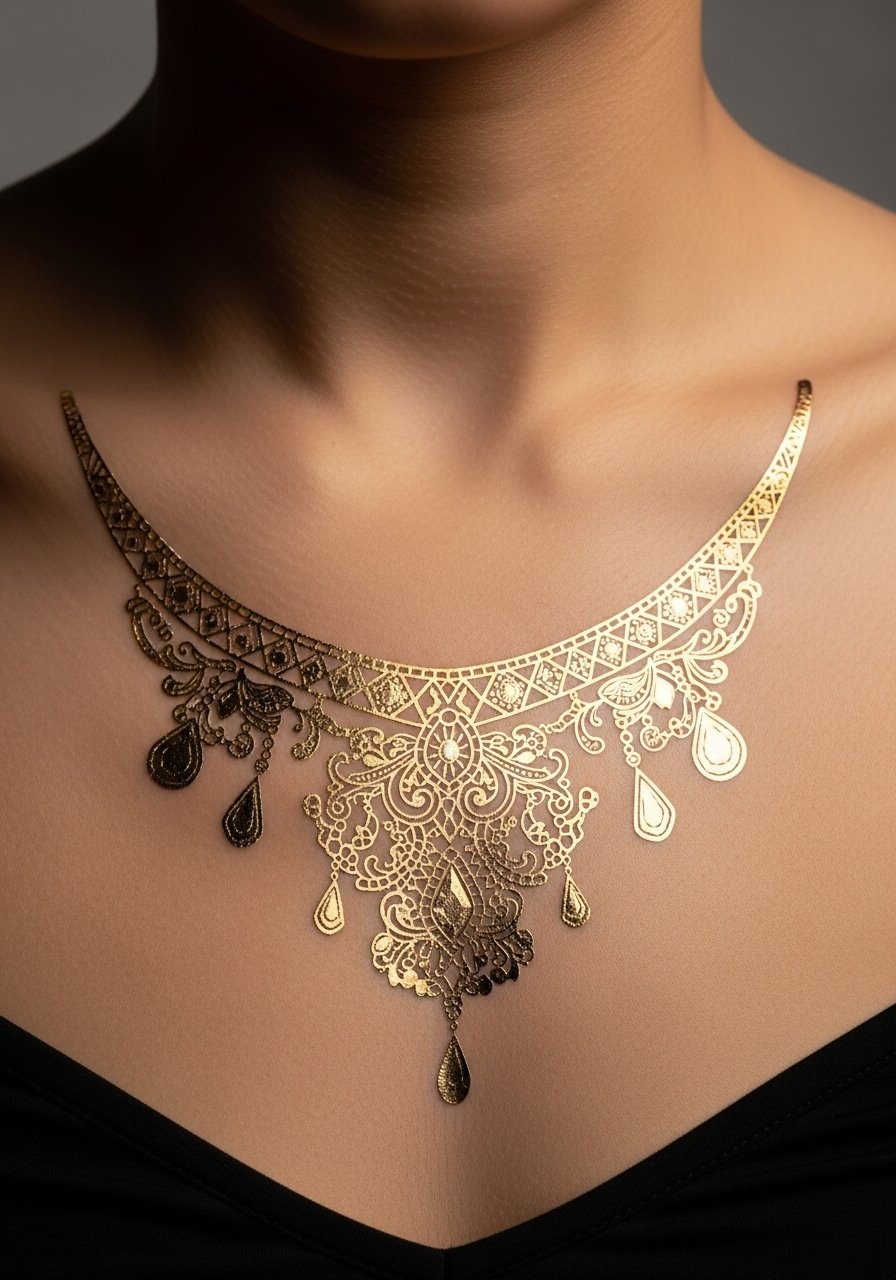
Foil statement tattoos photograph beautifully and can stand in for heavy jewelry in shoots. For a believable look, pick subdued metallic tones and thin links. These sit best on chest or clavicle where they mimic necklace placement. They won’t last as long as matte transfers, but the visual effect is immediate and convincing from a distance.
26. Faux Freckles Across Nose
Style/Technique: Cosmetic / Semi-Permanent Sticker or Makeup Tattoo
Pain Level: None (0/10)
Session Time: 2–5 minutes
Best For: Subtle complexion tweaks without permanence
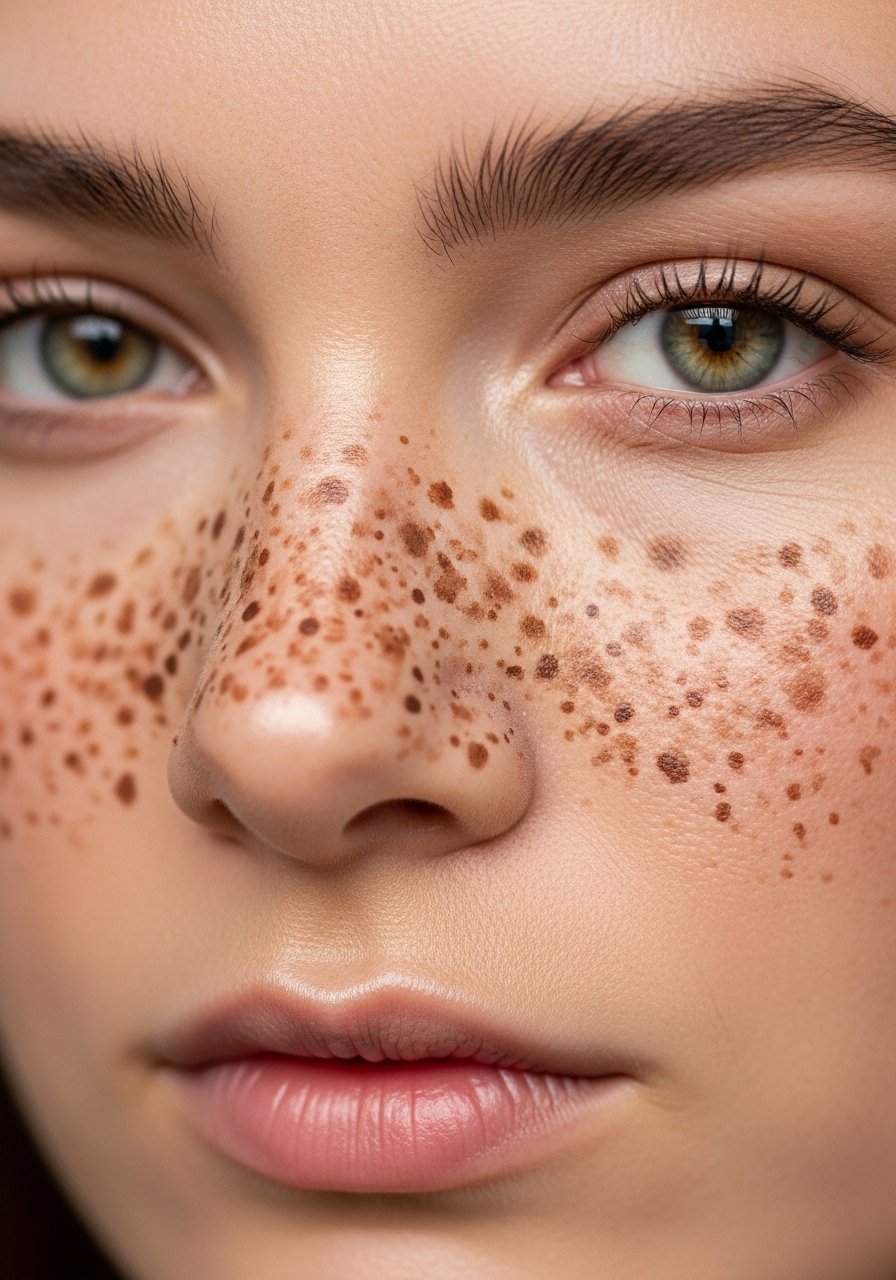
Freckle tattoos are a subtle way to test facial pigmentation. Temporary freckle stickers or cosmetic transfers that use soft brown tones can mimic healed freckle pigment. These are low-commitment and great for seeing whether you like the look daily. Keep spots varied in size and opacity to read natural. Avoid overly uniform stippling—that reads fake fast.
27. Mandala Thigh Band
Style/Technique: Mandala / Water-Transfer or Henna-Inspired Sticker
Pain Level: None (0/10)
Session Time: 10–20 minutes
Best For: Hidden statement and scale testing
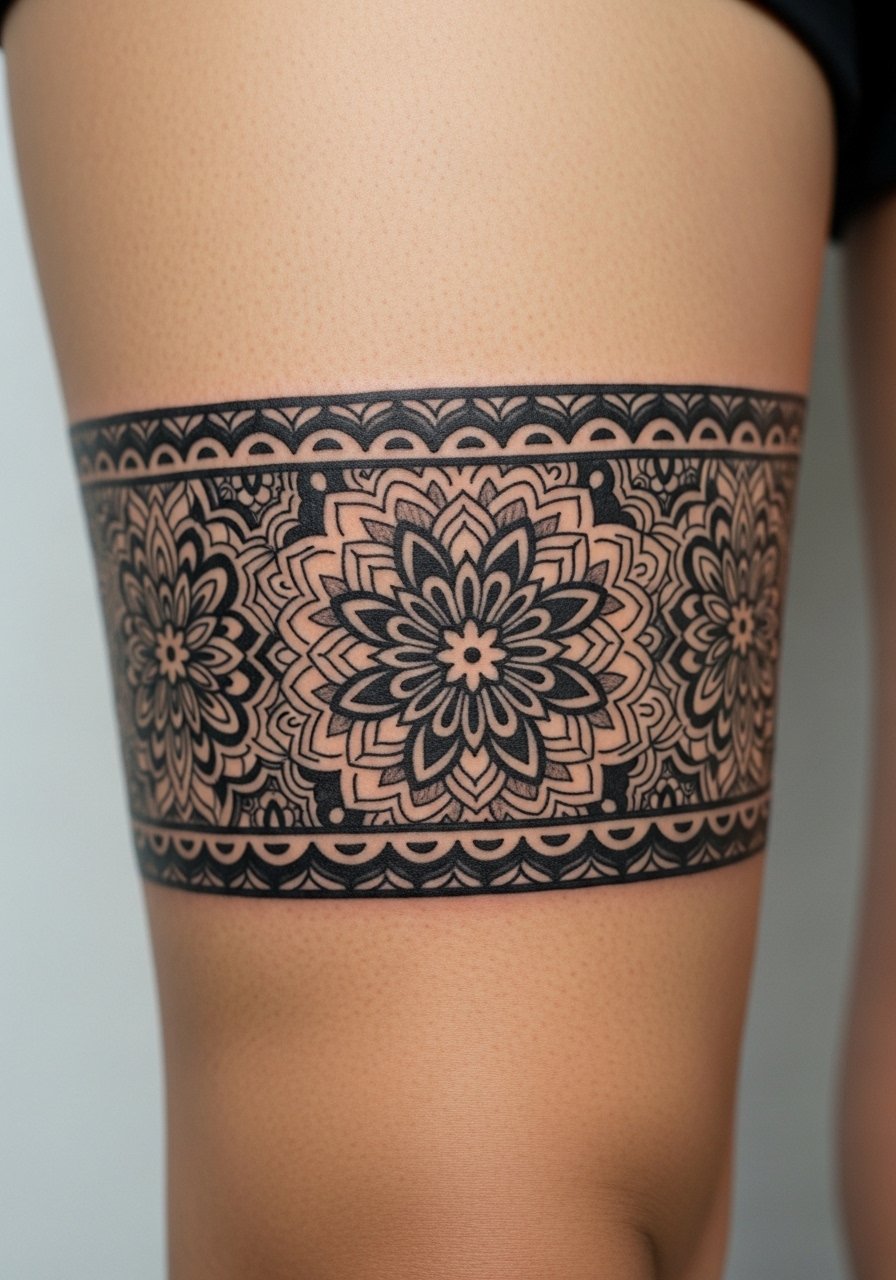
A thigh band mandala gives you a preview of a decorative band tattoo’s scale and symmetry. Because the thigh holds detail well, transfers look very convincing here. Be cautious about overly dense dotwork; the band should breathe with negative space. This is also a great spot to test whether you want a bold or delicate band permanently.
28. Neon Glow Temporary for Night Events
Style/Technique: Neon / UV-Reactive Ink or Glow Transfer
Pain Level: None (0/10)
Session Time: 5–10 minutes
Best For: Club nights, festivals, or photo effects
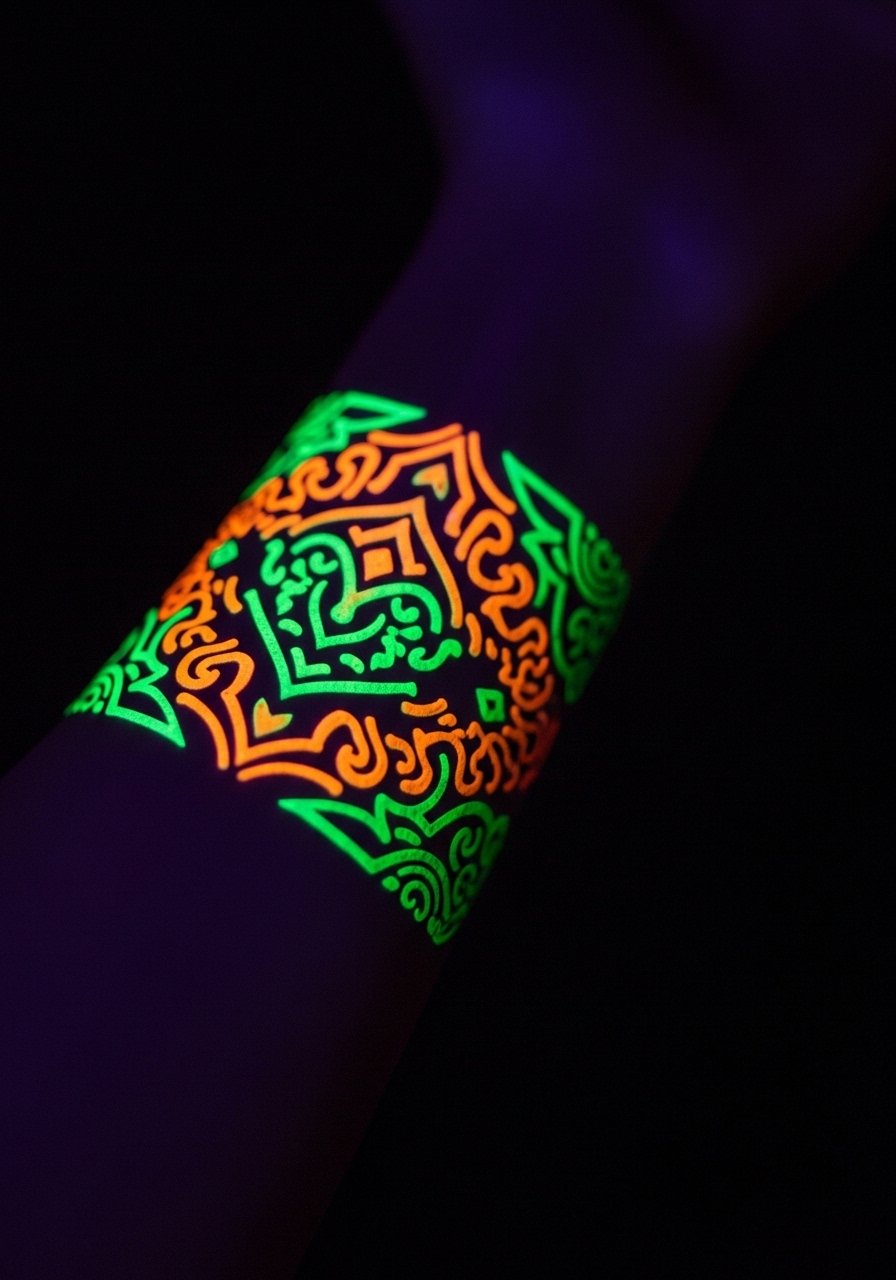
For nights out, neon or UV-reactive temporaries create an unmistakable effect that permanent ink can’t replicate without risk. They look convincingly vibrant under the right lighting and are perfect for testing bold palettes. These are intentionally eye-catching and read as a deliberate temporary look—useful for events where you want to stand out.
29. Bridal Henna on Feet
Style/Technique: Henna / Cone Application
Pain Level: None (0/10)
Session Time: 30–90 minutes to apply, sets overnight
Best For: Wedding trials or cultural celebrations
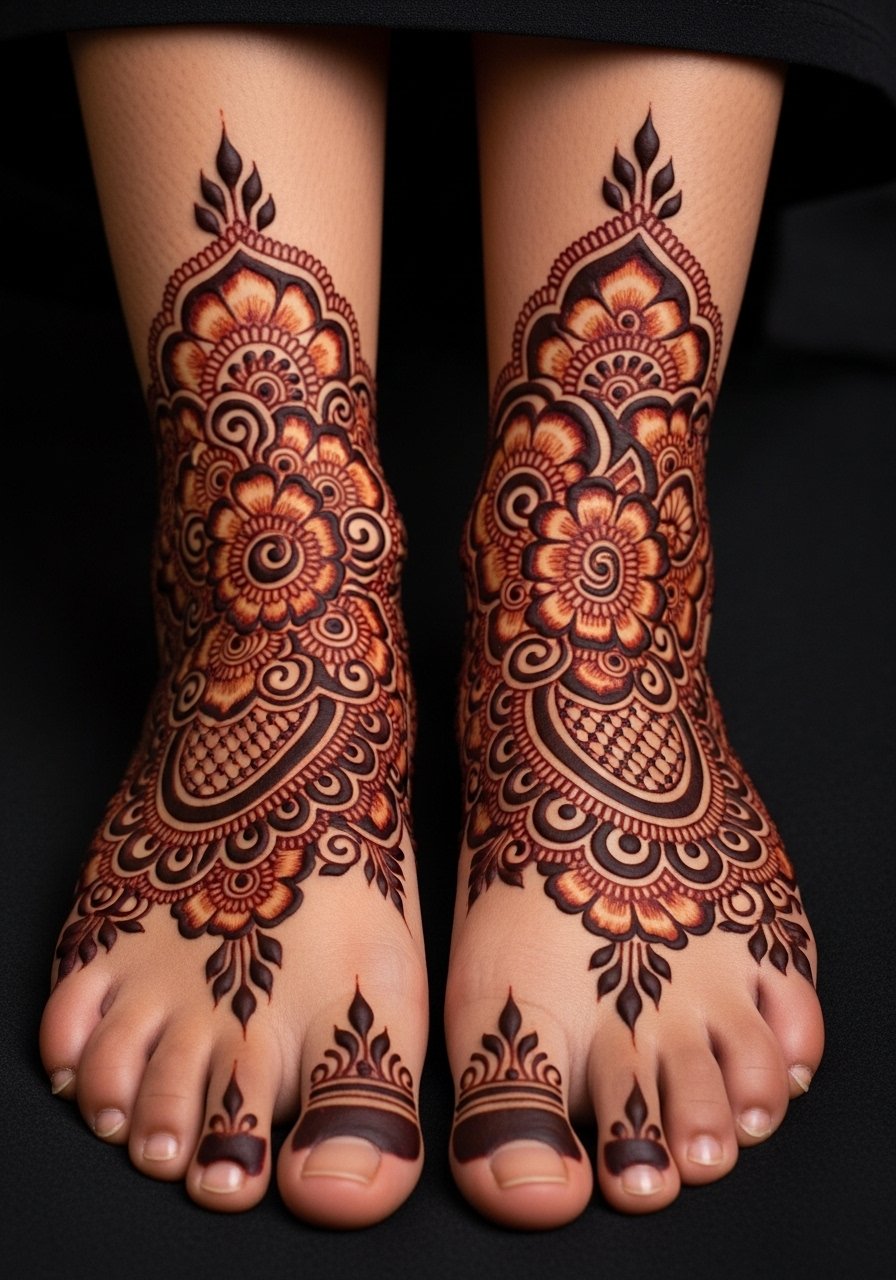
Bridal henna is one of the most convincing “real” temporary looks. The deep brown stain and traditional motifs read like authentic cultural work. Feet and ankles take henna well and show how patterns move with walking. If you’re testing a henna-based design for a ceremony, this is the way to see scale and intricacy. Let the paste set long and follow aftercare to deepen the stain.
Tattoo Prep and Aftercare Essentials
Aftercare Essentials:
- Aquaphor Healing Ointment, 14oz tube — Use for protecting fresh paste or sensitive skin after removing adhesives
- Dr. Bronner's Unscented Castile Soap, 32oz — Gentle cleansing before applying a transfer
- Isopropyl Alcohol Pads, 70% (pack) — Remove oils for best adhesion
Before Your Application:
- Adhesive Remover Pads — Clean off residue for seamless application
- Tattoo Transfer Paper (clear backing), pack — For custom inkjet transfers at home
Long-Term & Maintenance:
- SPF 50 Sunscreen Stick — Protects temporary color from quick fading in sun
- Hustle Butter Deluxe, 4oz — Moisturizes and softens skin after henna/Jagua
Optional Supplies:
- Setting Spray for Temporary Tattoos (matte finish) — Locks transfers in place for events
- Ben Nye Spirit Gum Remover — For stubborn adhesive or prosthetic pieces
- Disposable Gloves, Pack — Keep applications sanitary
I recommend testing any adhesive or remover on a small skin patch first. From what I've seen, a thin matte setting spray and careful skin prep (soap + alcohol wipe) make temporary transfers look most like healed tattoos.
Frequently Asked Questions
Q: Do temporary tattoos actually look real?
A: Yes—especially henna, Jagua, and high-res water-transfers. I've seen Jagua and dark henna read like healed black ink on many skin tones. Matte finishes and thin backing help the illusion.
Q: How long do different temporary types last?
A: It depends. Sticker/water-transfer pieces usually last days to a week. Henna can last 1–3 weeks depending on aftercare. Jagua often gives a blue-black tone that lasts similar to henna. Avoid heavy scrubbing; moisturize with Hustle Butter to extend life.
Q: How do I remove a temporary tattoo cleanly?
A: Use baby oil, an oil-based makeup remover, or adhesive remover pads. For foil and heavy adhesives, Ben Nye Spirit Gum Remover works well. Always moisturize afterward.
Q: Will temporary tattoos irritate sensitive skin?
A: Some people react to adhesives or dyes. I always patch-test a product and clean skin with gentle soap like Dr. Bronner’s Unscented first. If you get redness or itching, remove promptly and treat skin with a soothing ointment like Aquaphor.
Q: Can I make my temporary tattoo look more like healed ink?
A: Yes. Matte finishing sprays, gentle patting to remove shine, and applying to non-oily, exfoliated skin make transfers sink in visually. For henna/Jagua, letting it set fully and avoiding water for the first 24 hours deepens the stain.
Q: Are there temporary options for trying color realism?
A: High-res inkjet transfers and airbrush pieces are your best bet. Test jewel-tones on the thigh where colors hold longer. Use a matte setting spray and keep out of direct sun to retain vibrancy.
Q: How should I prep skin before applying a temporary tattoo?
A: Clean with gentle soap, remove oils with an alcohol wipe, and dry fully. For best adhesion, avoid lotions right before applying. If using paste (henna/Jagua), patch-test and follow the product’s setting instructions.
Q: Can temporary tattoos help me decide on permanent placement?
A: Absolutely. Temporaries let you test scale, alignment with clothing, and how a design sits when you move. Use a combination of water-transfer and henna/Jagua depending on the look you want to simulate.
