I spent months collecting sleeve references, asking artists a lot of questions, and living with a few pieces myself before I realized the real struggle: picking a sleeve that still looks intentional five years from now. These 29 sleeve concepts are what I keep returning to—they tell a story, work with body movement, and age the way good tattoos do.
Quick context: I focused on sleeve-ready ideas—full and half sleeves that flow with the arm. Expect styles from fine-line botanical to bold blackwork, Y2K fusion, and narrative Japanese sleeves. These picks reflect current trends and practical longevity—what looks good fresh and stays readable as skin settles.
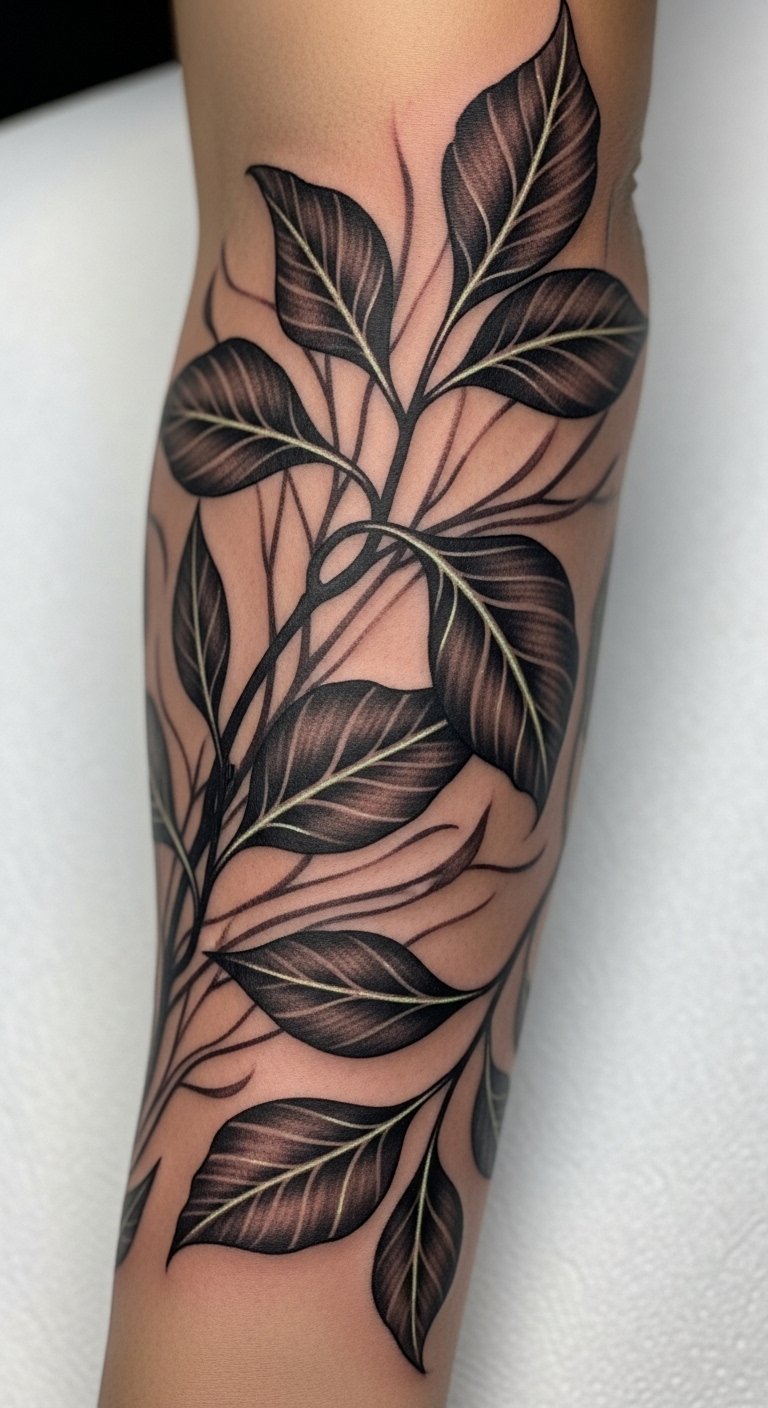
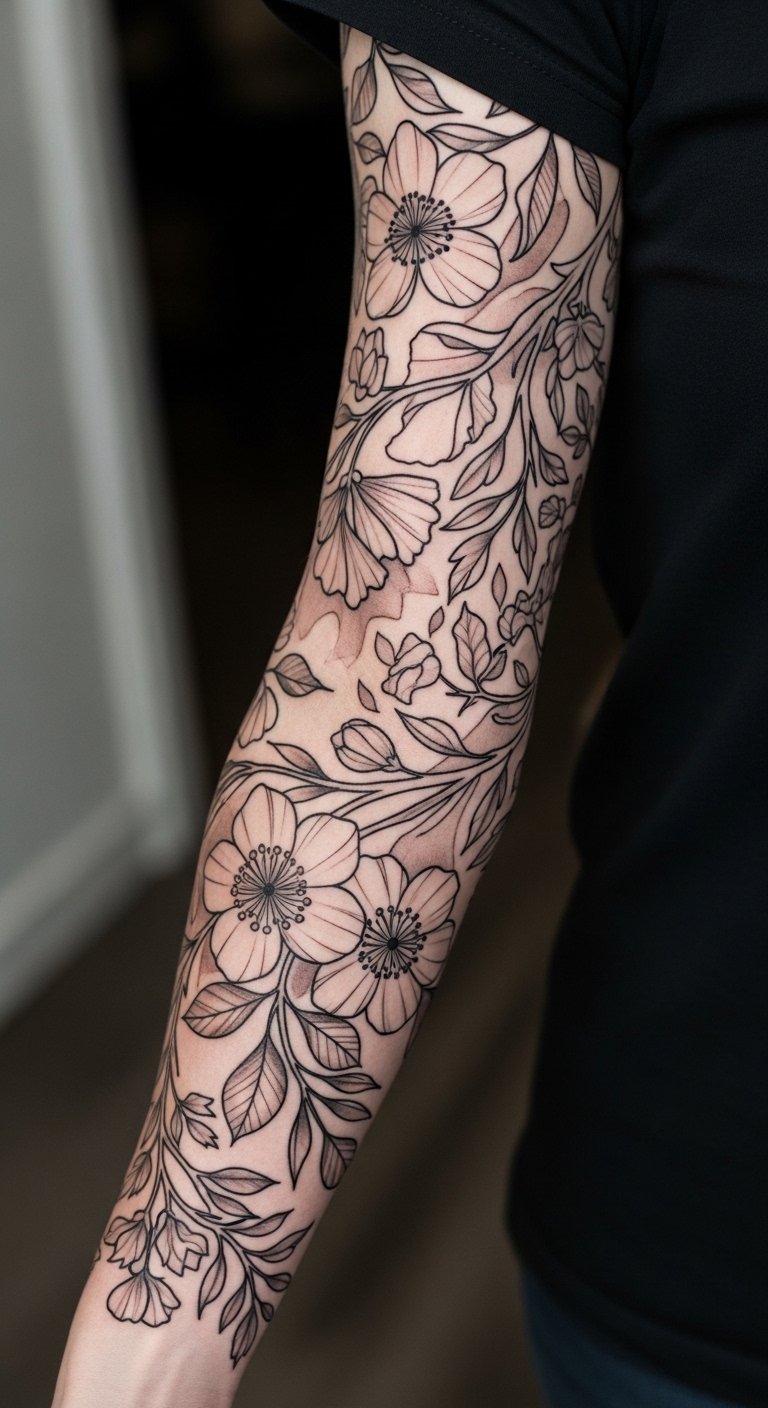
Fine Line Botanical Sleeve on Inner Forearm
Style/Technique: Fine Line / Illustrative
Pain Level: Medium (3-4/10)
Session Time: Multiple short sessions (2-4 hrs each)
Best For: Someone who wants delicate detail that still reads from a distance
I chose this for my first partial sleeve experiment—fine-line botanicals let you build a narrative of seasons and memories. Visually, the thin stems and tiny veins create movement along the arm without heavy saturation. Placement on the inner forearm balances visibility and concealability; pain is usually tolerable but expect tenderness on the inner elbow crease. Healing is straightforward: keep moisturized and avoid stretching the skin while scabbing. Fine-line work ages well if the artist avoids overly hairline strokes; ask for slightly bolder keylines so the design retains clarity after a year. Common mistake: picking ultra-thin single-needle lines that are impossible to touch up cleanly later. Look for artists who specialize in single-needle work and show healed examples on similar skin tones.
Micro-Realism Portrait Sleeve on Upper Arm
Style/Technique: Micro-Realism / Black & Grey
Pain Level: Low-Medium (2-4/10)
Session Time: Multiple long sessions (3-6 hrs)
Best For: Commemorative pieces and storytelling portraits
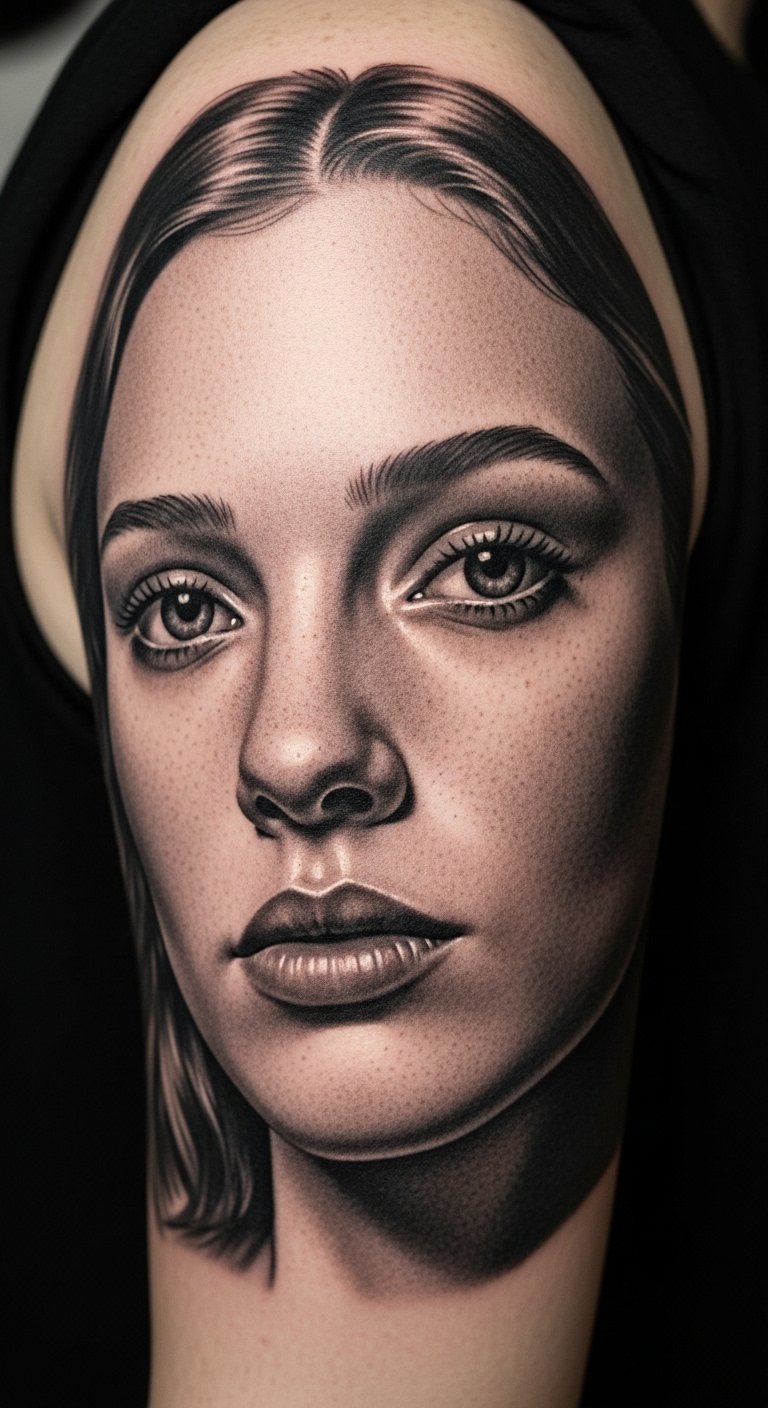
I’ve sat through a couple portrait sessions and learned that micro-realism is unforgiving: it needs precise contrast and healed reference photos. Upper arm placement allows for the detail the style demands and gives space for background elements—flowers, script, or a landscape to frame faces. Pain is moderate; the outer arm is forgiving. Healing takes longer when large shaded areas are involved—expect two weeks of surface peeling and a couple months before textures fully settle. Portraits hold up best in black and grey; color portraits often need denser saturation to avoid muddying. A common error is asking for too many tiny faces in one sleeve—give each portrait room to breathe. Ask to see healed photos, not just fresh ink.
Bold Traditional Narrative on Upper Arm and Shoulder
Style/Technique: American Traditional / Color
Pain Level: Low (2-3/10)
Session Time: 1-3 sessions (2-5 hrs each)
Best For: Timeless storytelling and high-contrast visuals

Traditional sleeves tell a story in panels—nautical scenes, roses around a portrait, or a mythic sequence. I admire how bold outlines keep the design readable as skin ages; the shoulder and upper arm give a natural canvas for scenes that wrap. Pain is usually low on the meatier upper arm, though the shoulder cap can be annoying. Color holds if the artist lays down saturated fills and uses solid black anchors. Aftercare: watch bright reds and yellows during healing—they can scab thicker. Newcomers often ask for too many tiny details inside traditional pieces; the style’s strength is in clear shapes and negative space. Request healed examples showing how colors soften, and tell your artist which panel should remain the focal point.
Japanese Sleeve With Flowing Koi and Waves
Style/Technique: Traditional Japanese / Color or B&G
Pain Level: Medium (3-5/10)
Session Time: Series of long sessions (3-6 hrs each)
Best For: Narrative sleeves with cultural symbolism and movement
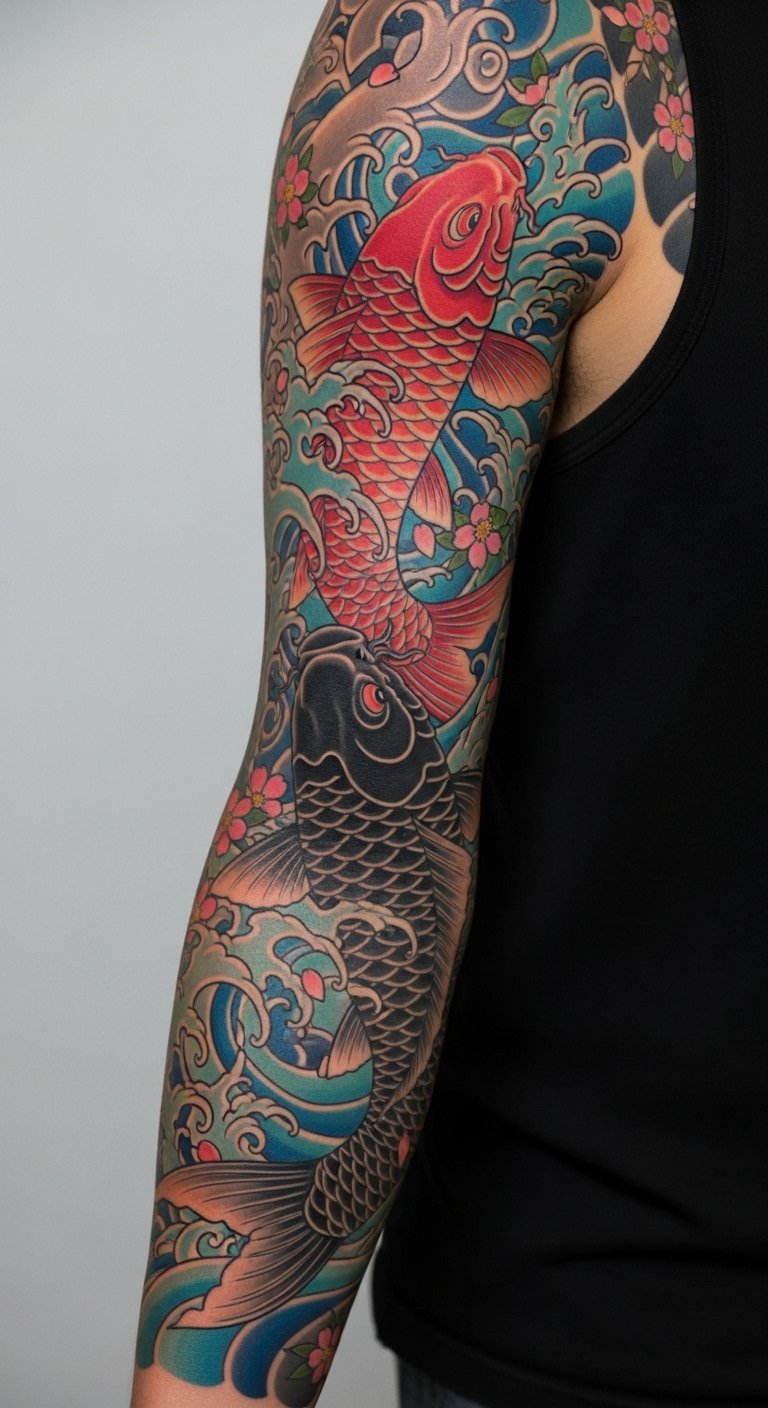
I’ve always been drawn to Japanese sleeves because they read as motion—koi swimming, wind bars, and waves wrapping the arm. Placement across the full arm lets the narrative breathe; the composition must follow muscle flow for the story to make sense. Pain varies—inner bicep and elbow folds are more sensitive. These sleeves are multi-session projects that demand planning for negative space and background continuity. Color choices are important: deep reds and indigos hold better than pastel fills. A mistake I see often is treating Japanese elements as stickers—work with an artist who composes full-body flow, not a collage of motifs. Ask them how they’ll connect panels across the elbow and shoulder.
Blackwork Geometric Sleeve on Full Arm
Style/Technique: Blackwork / Geometry
Pain Level: Medium-High (4-6/10)
Session Time: Multiple sessions, may include backfill days
Best For: High-impact, statement sleeves that emphasize contrast

Blackwork sleeves are striking because of their high contrast and sculptural presence. I’ve had friends who loved the immediate statement—these read from a distance and age predictably because solid black tends to hold. However, heavy black can be taxing to the skin during sessions; expect multiple long sittings and more intensive healing where large areas are saturated. Placement is flexible, but full-arm black absorbs heat and can feel heavier while healing. Common mistake: forgetting about movement—geometric shapes should follow natural arm curves or they’ll distort. If you’re thinking blackout panels near joints, check how your skin creases when you move. Ask for healed photos of large fills so you know what texture to expect.
Fluid Abstract Sleeve Inspired by Water and Smoke
Style/Technique: Fluid / Abstract Black & Grey
Pain Level: Medium (3-5/10)
Session Time: Several medium sessions (2-4 hrs)
Best For: Expressive, less literal sleeves that emphasize motion
I’m a fan of fluid sleeves because they feel alive—brushstroke-like shading and soft transitions follow your arm’s motion. This style avoids harsh outlines and reads almost like a living painting. Inner arms and forearms show the most movement; the flowing shapes can hide small touch-ups later. Pain is average, but note that soft shading across thinner skin can sting more than black outlines. Fluid work ages well if contrast is planned—ask your artist to include anchor points so the composition doesn't dissolve over time. A common error is too many near-identical swirls that make it look repetitive. Instead, map negative spaces intentionally. Look for artists who excel in smooth gradient shading and can show healed flow pieces.
Y2K Fusion Sleeve (Chrome, Fine Line, Tribal)
Style/Technique: Fusion / Fine-Line with Nostalgic Motifs
Pain Level: Medium (3-5/10)
Session Time: Multiple shorter sessions
Best For: Nostalgia with modern technique—retro elements reimagined
I saw the Y2K resurgence firsthand—tribal flames and chrome butterflies reappearing, but executed with a modern fine-line hand. The charm is nostalgia with contemporary aging in mind: fine-line execution avoids the thick, dated look of early 2000s pieces. Placement across the lower arm or bicep allows motifs to interlock. Pain is moderate depending on location; numbing may help for dense sessions. Common mistake: asking for exact throwback designs without adjusting line weight—ask for modernized contrast so the piece ages cleanly. Fusion requires an artist comfortable blending thick-referenced motifs into subtle single-needle elements; bring examples of both vintage and modern takes.
Mythological Full Sleeve with Gods and Symbols
Style/Technique: Neo-Traditional / Symbolic Narrative
Pain Level: Medium (3-5/10)
Session Time: Multiple longer sessions
Best For: Story-driven sleeves with personal symbolism
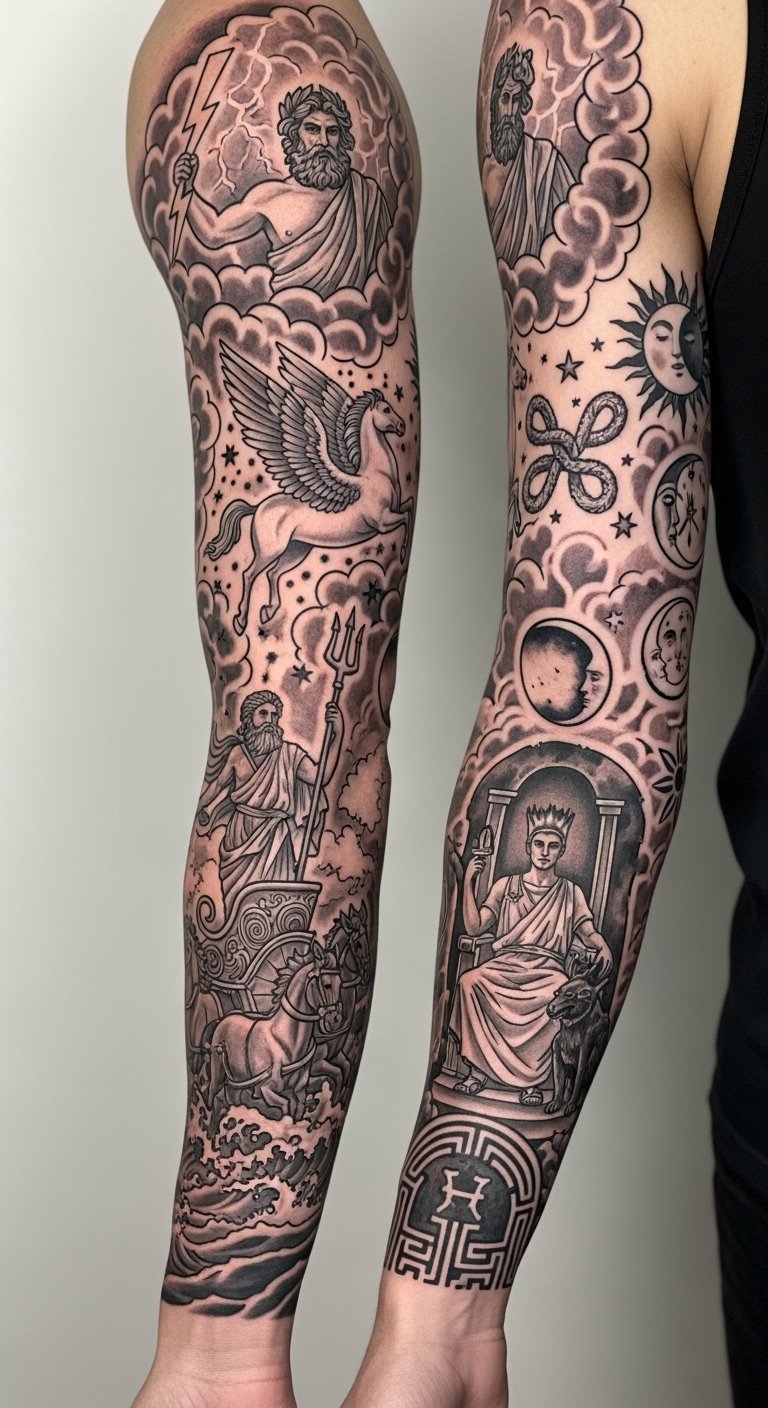
I’ve helped friends plan mythological sleeves that map personal values onto classic narratives. These sleeves work best when each element has meaning—a god, animal, or mythic object that connects to a life moment. Placement across the whole arm allows a sequence from shoulder to wrist, like chapters. Pain varies by spot; inner elbow panels are sensitive. Healing is typical for large shaded areas, and color decisions matter—muted palettes often age more gracefully. A common mistake is overloading the sleeve with unrelated symbols. Keep a thematic throughline and ask your artist how they’ll balance negative space and background filler so the story reads clearly over time.
Geometric Sacred-Mandala Sleeve on Outer Forearm
Style/Technique: Geometric / Mandala Black & Grey
Pain Level: Low-Medium (2-4/10)
Session Time: 2-4 sessions
Best For: Symmetry lovers and spiritual storytelling
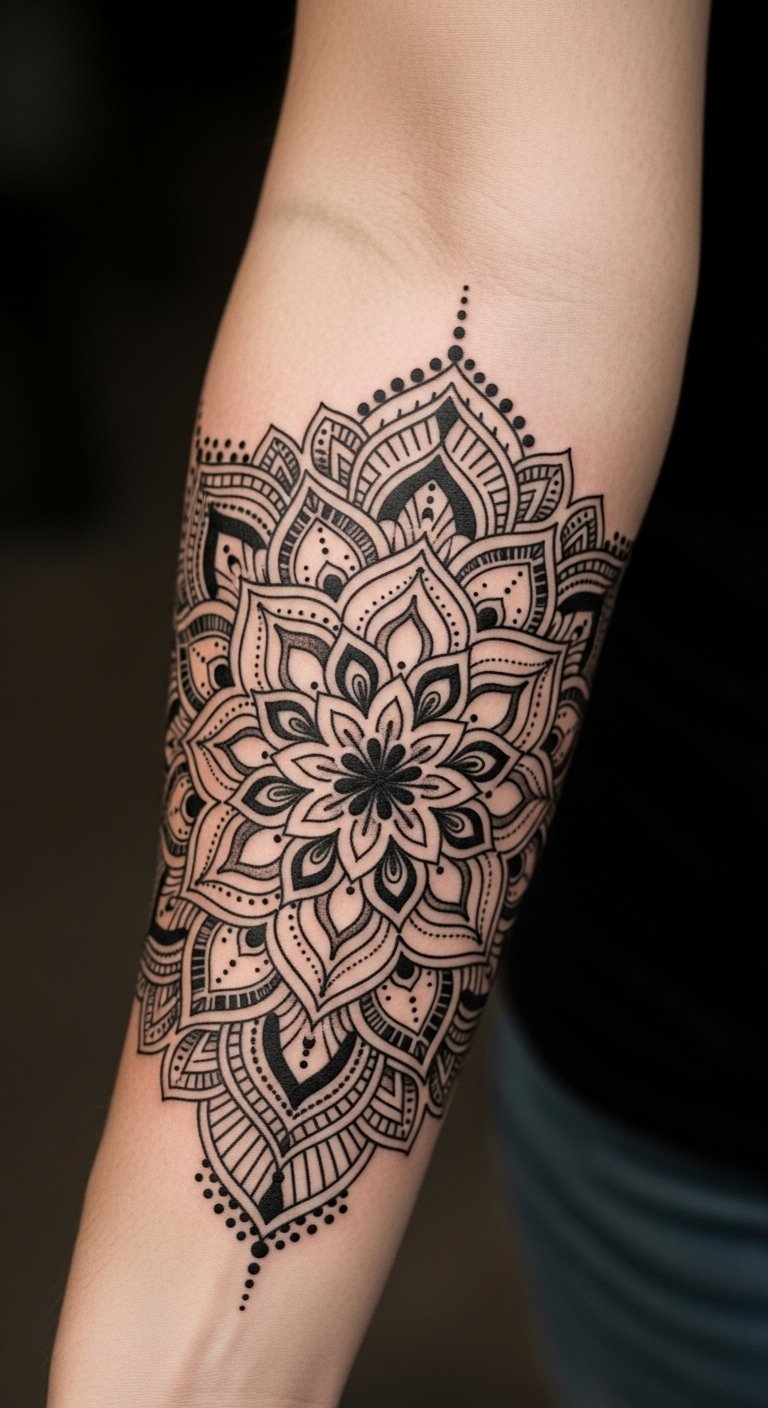
I’ve always recommended mandalas for clients who want repeatable symmetry and meditative visuals. Outer forearm placement keeps the design visible and easy to show off without heavy stretching. Pain is usually lower here, though dotwork sections can feel like repeated pinpricks. Mandalas often rely on contrast and precision; healed photos are crucial—ask to see how dotwork settles on similar skin tones. One common misstep is too much detail in a small area; mandalas scale best when they have room. Discuss how the mandala will interact with the rest of your sleeve—will it be a central piece or a component in a larger geometric narrative?
Minimalist Negative-Space Sleeve for Clean Lines
Style/Technique: Minimalist / Negative Space Fine-Line
Pain Level: Low (2-4/10)
Session Time: 2-3 short sessions
Best For: Clean, modern sleeves that prioritize space over saturation

I put this on a friend who wanted a sleeve that looks deliberate but not heavy. Negative-space sleeves use skin as part of the design—thin lines, sparse motifs, and well-planned gaps. The outer arm or lateral forearm is ideal since movement doesn’t distort the simplicity. Pain is on the lower side, but the inner arm can surprise you. Longevity depends on line weight: tiny hairlines may blur, so ask for slightly stronger anchor lines. Rookie mistake: over-planning every millimeter. Minimalism benefits from breathing room. Bring clear reference images and healed examples so you and your artist agree on how bold lines should be.
Nature-to-Sky Sleeve (Forest to Night Sky Gradient)
Style/Technique: Illustrative / Gradient Color and Blackwork
Pain Level: Medium (3-5/10)
Session Time: Multiple sessions for gradient and detail
Best For: Narrative landscapes that wrap the arm vertically
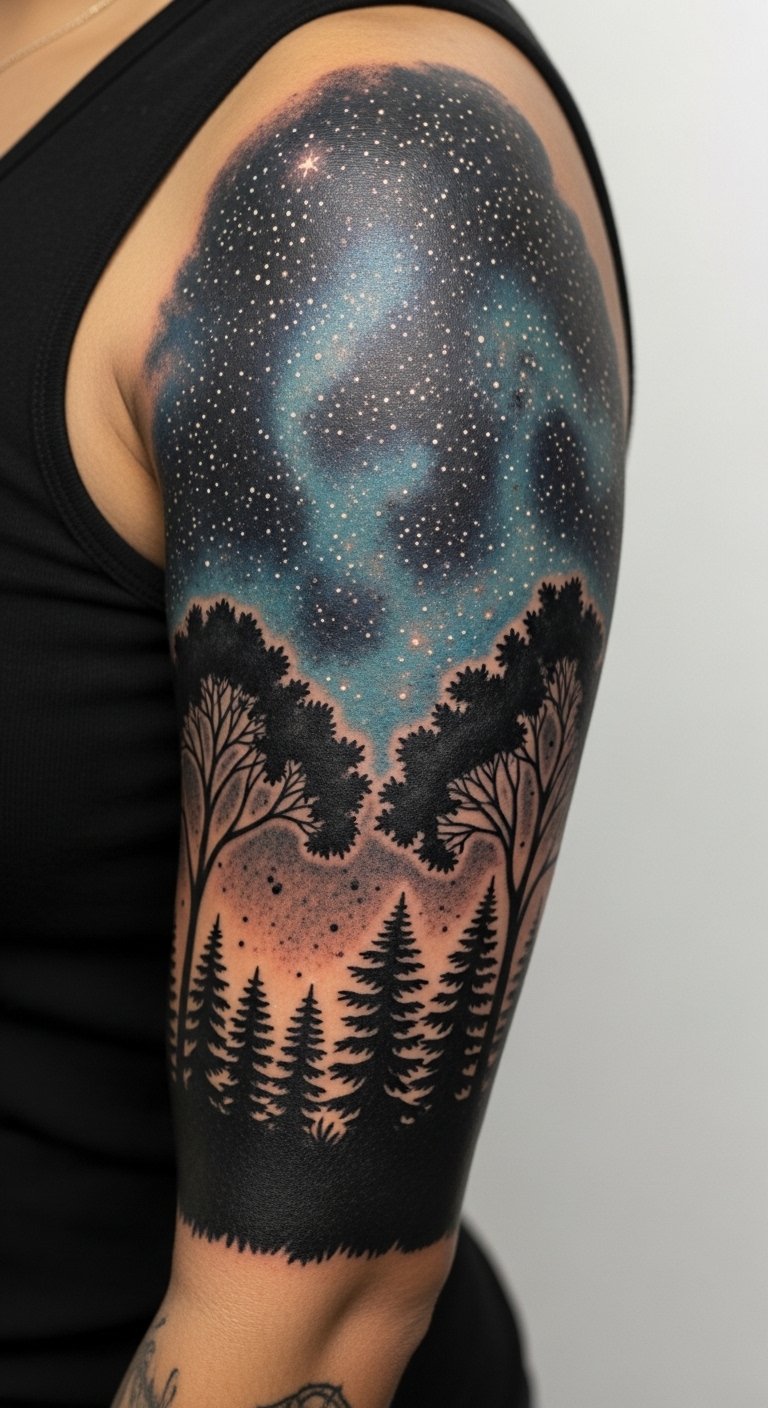
I sketched this concept after hiking—a sleeve that moves from forest floor to sky feels like a day in nature. The sleeve reads well because of vertical flow: dark tree roots and trunks at the wrist, lighter star fields on the shoulder. Pain is variable; inner arm tree lines can be tender. Gradients and small color dots for stars need careful saturation to avoid mottling. Common error: too many small elements fighting for attention. Keep a simple palette and use negative space for breathing. Artists who do landscapes well will show healed transitions—ask to see full-arm healed shots, not isolated patches.
Micro-Illustrative Animal Story Sleeve on Lower Arm
Style/Technique: Micro-Illustrative / Black & Grey with Color Accents
Pain Level: Low-Medium (2-4/10)
Session Time: Several short sessions
Best For: Personal symbolism featuring animals and small vignettes
I’ve recommended micro-illustrative animal narratives to people who want a sleeve composed of meaningful scenes rather than a single motif. The lower arm works great because it’s viewable and fits many small vignettes. Pain is usually mild. These pieces age well if each element has slightly bolder outlines and the color accents are saturated enough to survive fading. Mistake I see: using thin grey washes as the only filler—those can fade fast. Instead, plan for solid anchor points and subtle background shading. Ask your artist how they’ll ensure each vignette remains legible as the sleeve grows older.
Script and Lyric Sleeve Wrapped Around Forearm
Style/Technique: Script / Fine-Line with Decorative Anchors
Pain Level: Low (2-3/10)
Session Time: 1-3 sessions depending on length
Best For: People who want meaningful quotes or song lyrics integrated into a sleeve
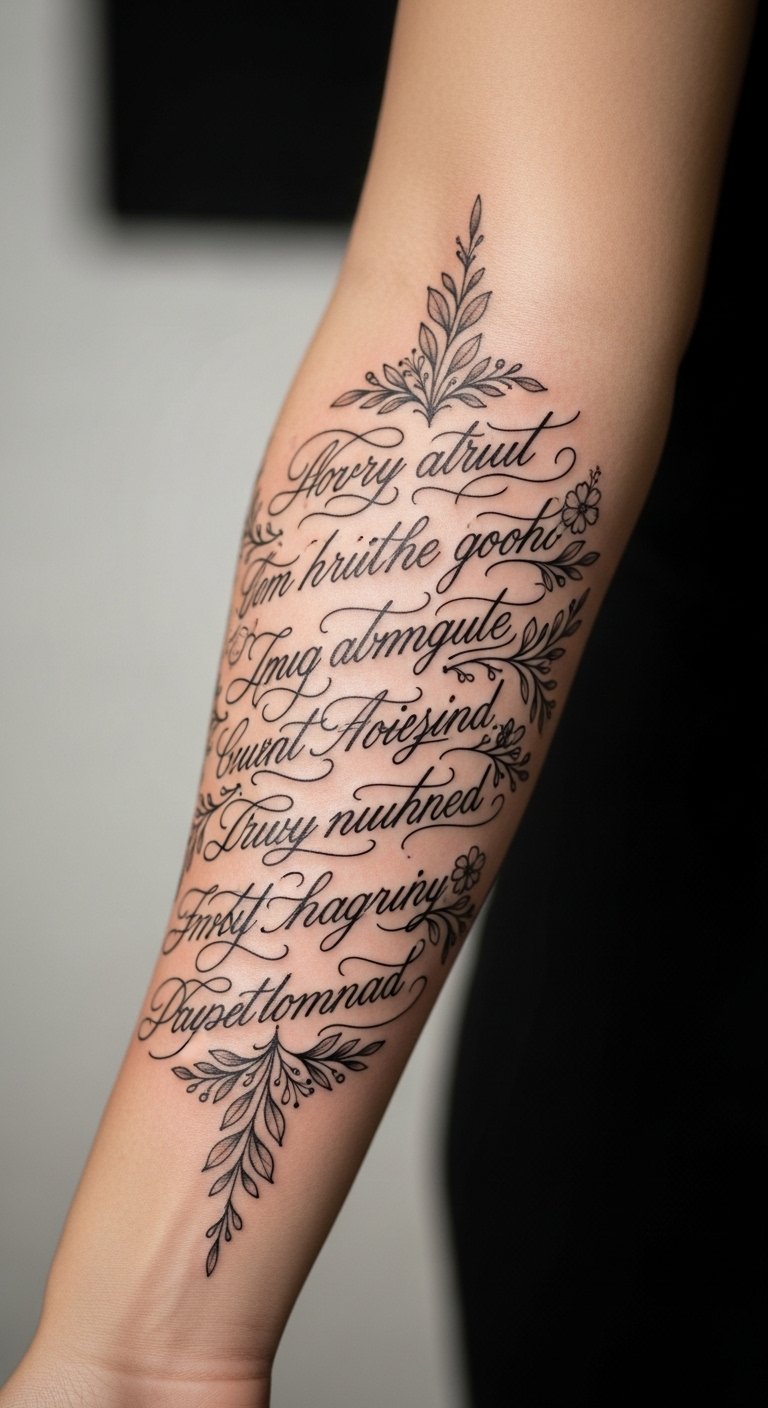
I’ve tattooed song lyrics across a forearm and learned that script can be powerful when combined with decorative elements. The challenge is legibility over time—ask for letters that aren’t too thin. Forearm placement is ideal for showing and reading the script. Pain is low. Healed script tends to soften, so aim for moderate stroke weight. Common error: using overly ornate fonts that merge into illegible lines after a year. Ask your artist to write the script on skin first and show a healed example on similar skin tone. Decorative anchors (small roses, dots, or vines) help tie script into a broader sleeve.
Neo-Traditional Animal Portraits With Floral Frames
Style/Technique: Neo-Traditional / Color and Bold Outlines
Pain Level: Medium (3-4/10)
Session Time: 2-4 sessions
Best For: Portraits of animals with strong color and stylized backgrounds
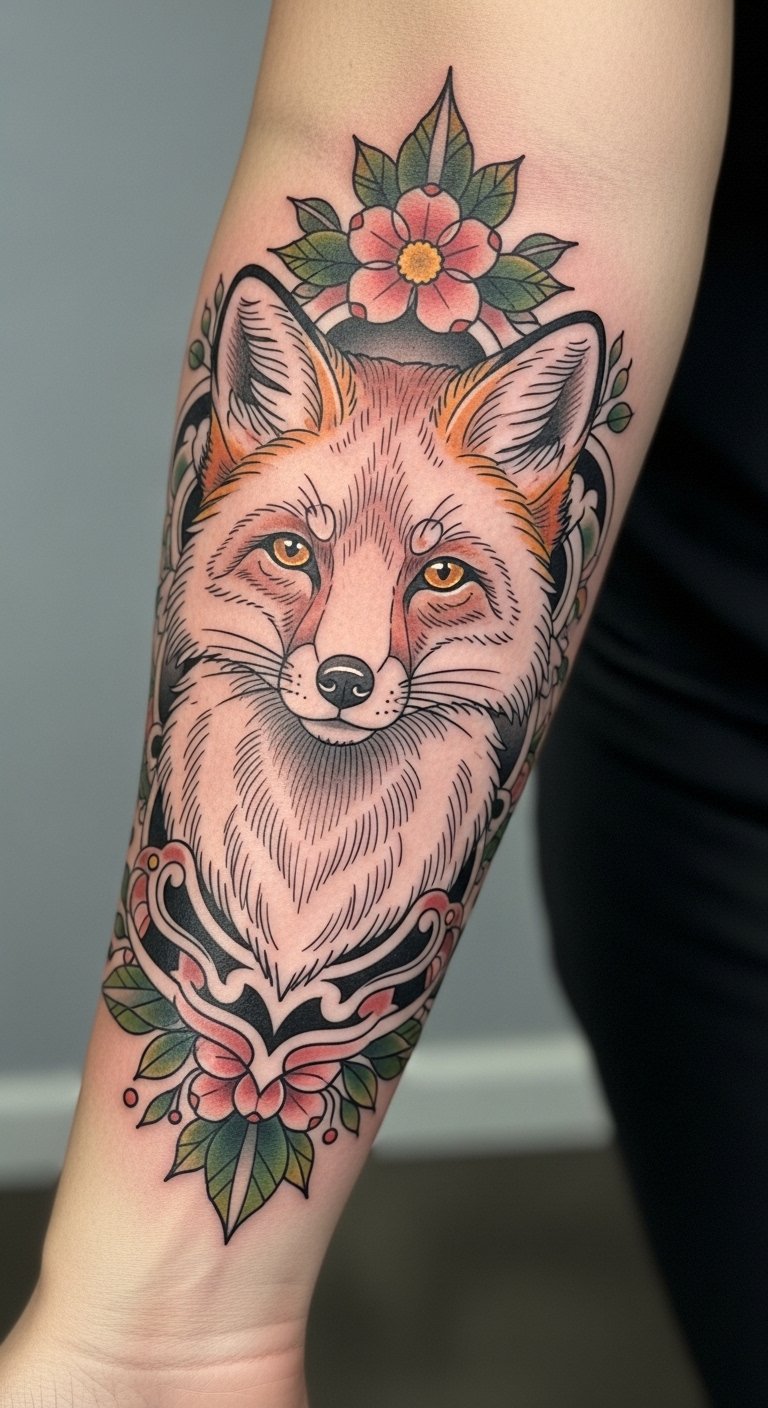
I love neo-traditional animal portraits—they combine realism with stylized framing. The upper arm allows the portrait to sit prominently with floral or geometric frames flowing down the arm. Pain is moderate. These pieces age well when outlines are decisive and color fills are even. A mistake is trying to force a hyper-realism portrait into a neo-traditional style—be clear about the mix. Ask your artist how they’ll balance realistic shading with bold outline work, and request healed photos showing edge clarity.
Surreal Collage Sleeve with Floating Objects
Style/Technique: Surreal / Mixed Media Look (B&G + Color)
Pain Level: Medium (3-5/10)
Session Time: Multiple sessions planned like chapters
Best For: Artistic collectors who want a personal dreamscape
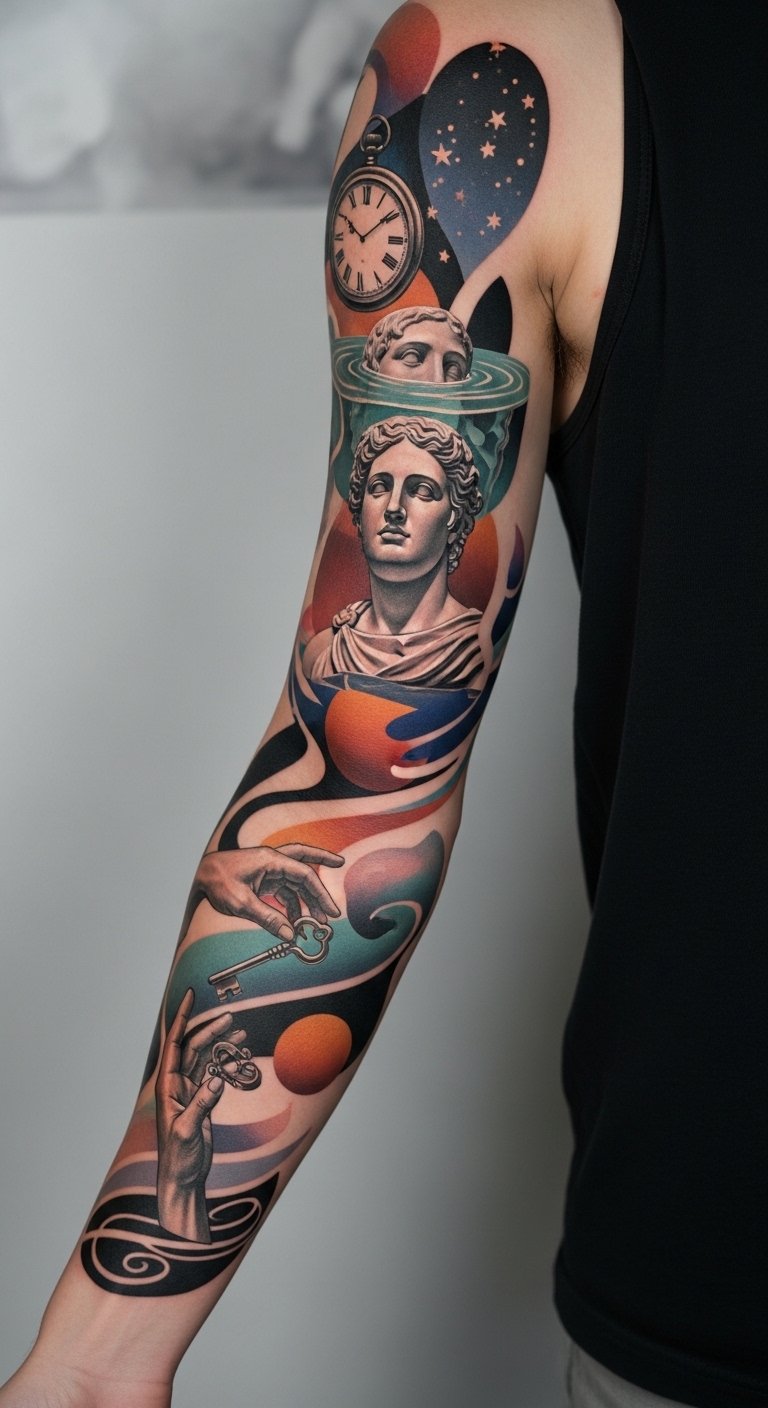
I sketched a surreal sleeve once to map life moments—floating objects that symbolized important memories. The sleeve reads as a dream when the artist creates soft transitions and deliberate negative gaps. Pain varies by area, and long sessions may be needed to build layered effects. Healing is standard, but fine blending requires careful aftercare to avoid patchy shading. Common mistake: too many competing focal points. Define a clear visual hierarchy—what floats forward, what recedes. Show your artist reference collages so they can plan cohesive color and contrast.
Pagan and Nature Ritual Sleeve With Runes
Style/Technique: Symbolic / Linework and Dotwork
Pain Level: Medium (3-5/10)
Session Time: 2-4 sessions
Best For: People drawn to spiritual symbolism and ritual imagery
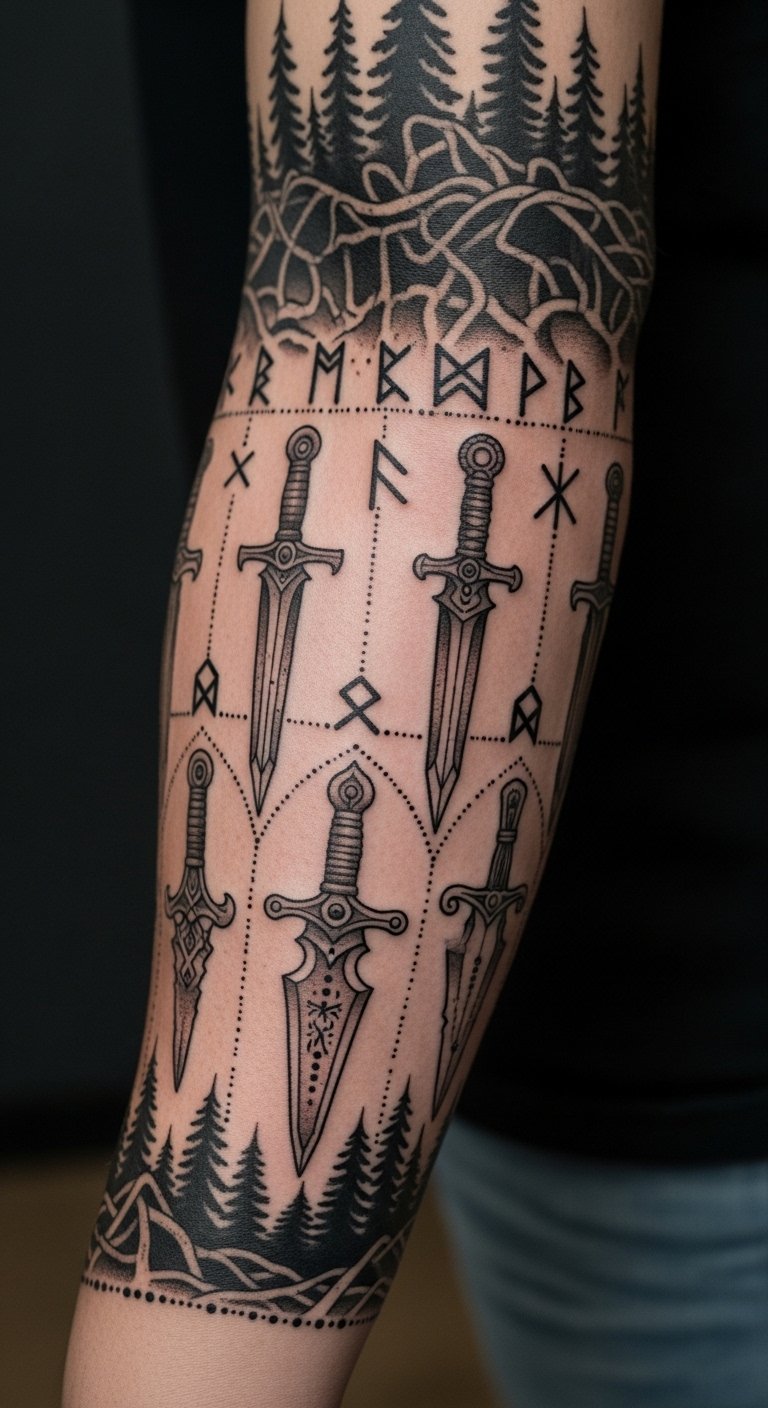
I’ve seen many clients bring in symbolic languages—runes, sigils, and ritual items—that form a personal code. Linework and dotwork suit these designs because they can be scaled and woven together without heavy color. Inner forearm placement helps keep the symbols private or visible on command. Dotwork can sting—expect medium pain. These pieces age nicely when dot density is considered; too fine dotwork can blur. A mistake is disregarding cultural context—respect symbols and know what they mean. Artists who work with symbolic languages can suggest layout that preserves readability and intention.
Sleeve of Architectural Lines and Cityscape Horizon
Style/Technique: Architectural / Fine-Line and Perspective Work
Pain Level: Low-Medium (2-4/10)
Session Time: Several sessions for perspective alignment
Best For: Urban lovers who want precise linework and skyline flow
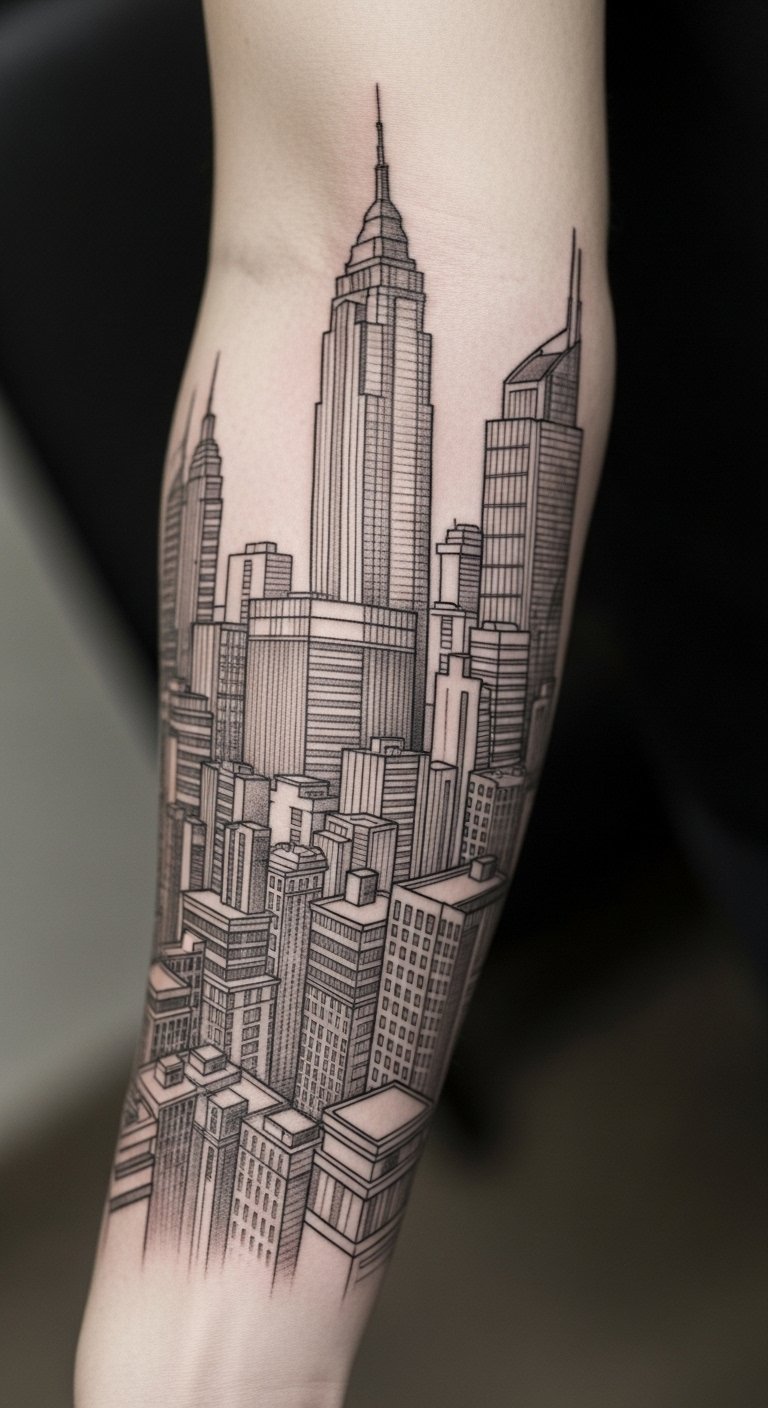
I drew this one for a friend who loves skylines—the sleeve reads like a city that wraps the arm, with perspective lines matching muscle flow. Outer arm placement lets the horizon read naturally. Pain is typically lower, but connecting perspective across the elbow requires expert line alignment. Healed results hinge on clean, steady lines; ask to see long-arm healed shots. The biggest mistake is inconsistent vanishing points—get an artist who plans on paper and maps the arm beforehand. Keep contrast in mind; tiny architectural details may need bolder anchors to survive years.
Religious Iconography Sleeve with Subtle Shading
Style/Technique: Religious / Realism with Symbolic Elements
Pain Level: Medium (3-5/10)
Session Time: Several long sessions depending on detail
Best For: Devotional pieces that double as narrative sleeves
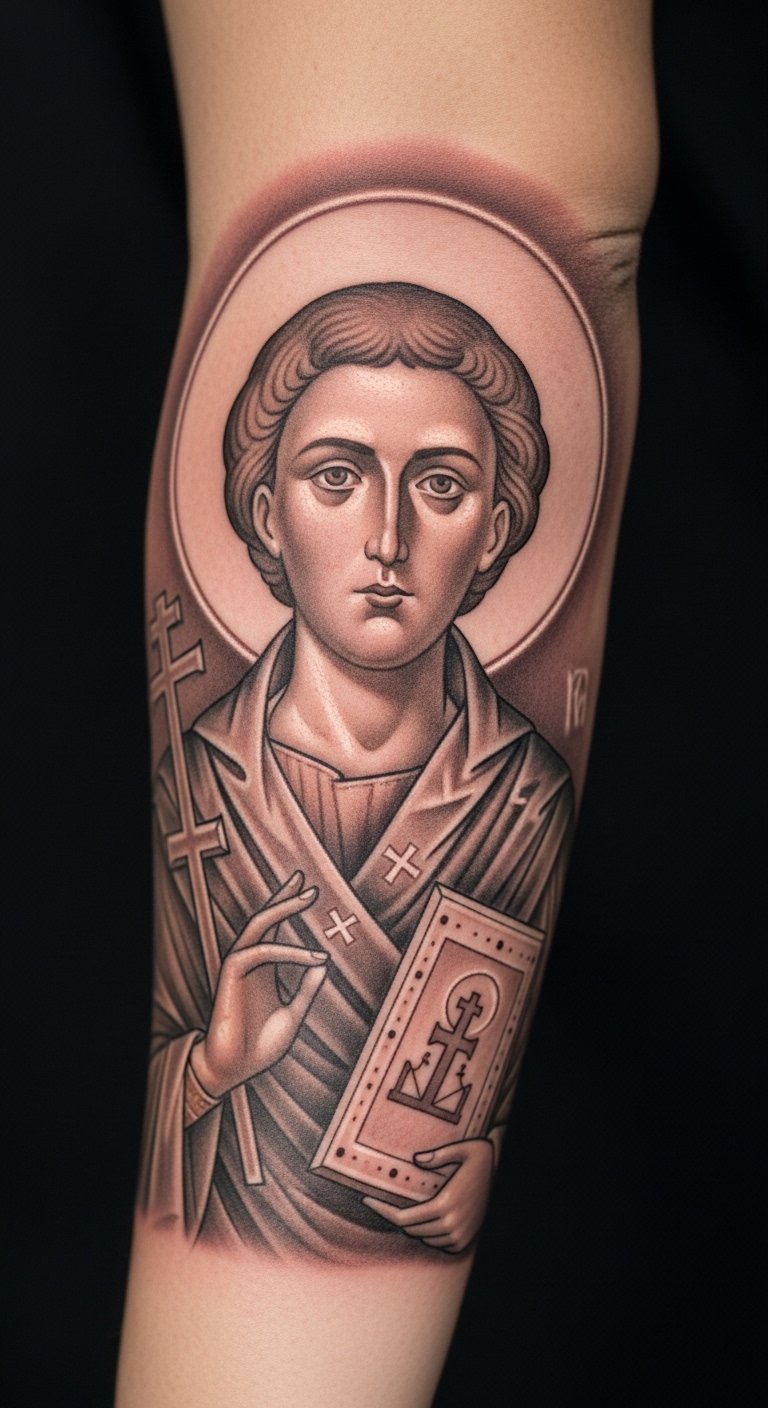
I’ve worked with clients who wanted religious themes woven across a sleeve—saints, symbolic items, and verses. These pieces require sensitivity and a clear brief because symbolism matters a lot to the wearer. Placement usually spans the upper arm and bicep, where portraits can be centralized. Pain is moderate. Realistic shading in religious pieces should be balanced with symbolic negative space for breathing. Common error: adding unrelated imagery that weakens the spiritual narrative. Ask artists about healed work for similar iconography and how they handle subtle shading over time.
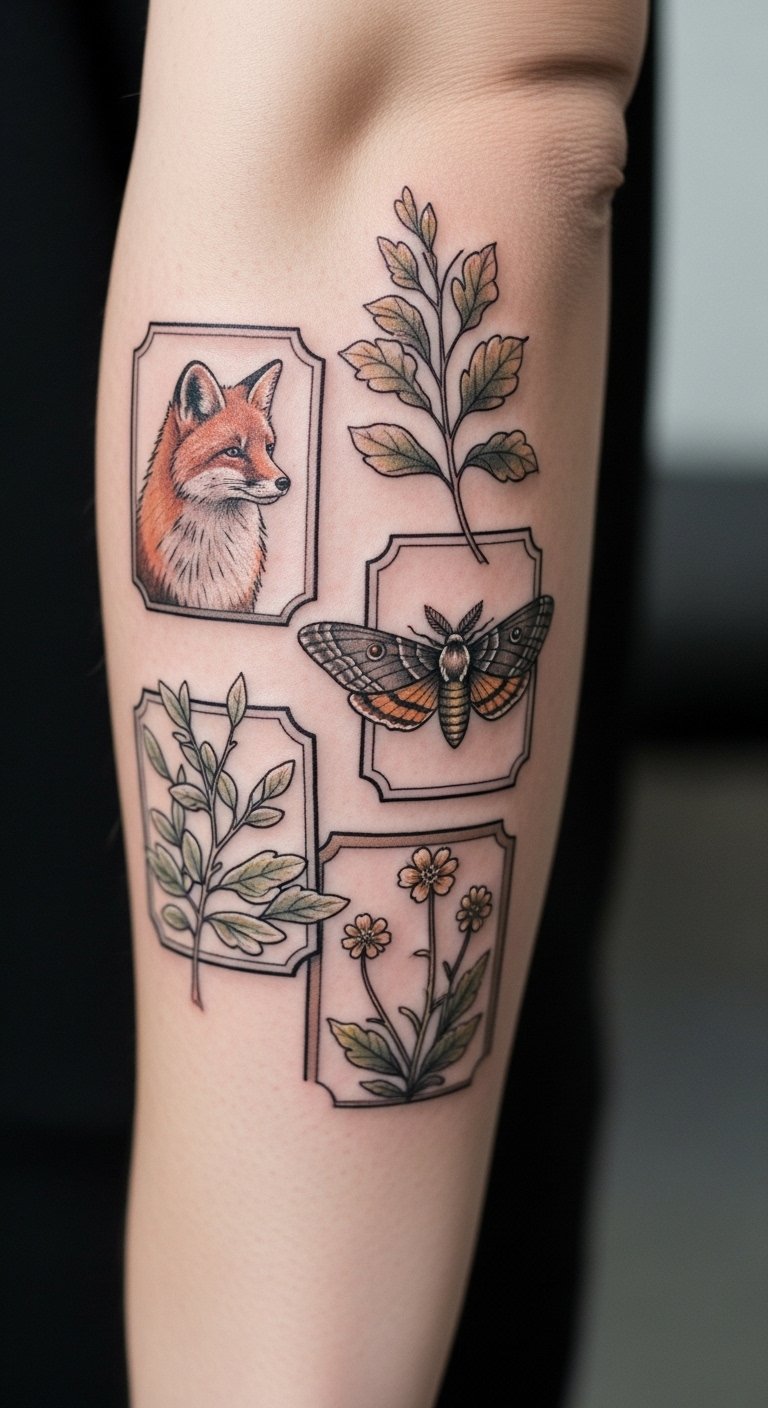
Botanical Black-and-Gray Sleeve With Hidden Critters
Style/Technique: Black & Grey / Illustrative with Micro-Details
Pain Level: Low-Medium (2-4/10)
Session Time: Multiple short sessions for detail
Best For: Nature lovers who want an exploratory sleeve with discoveries
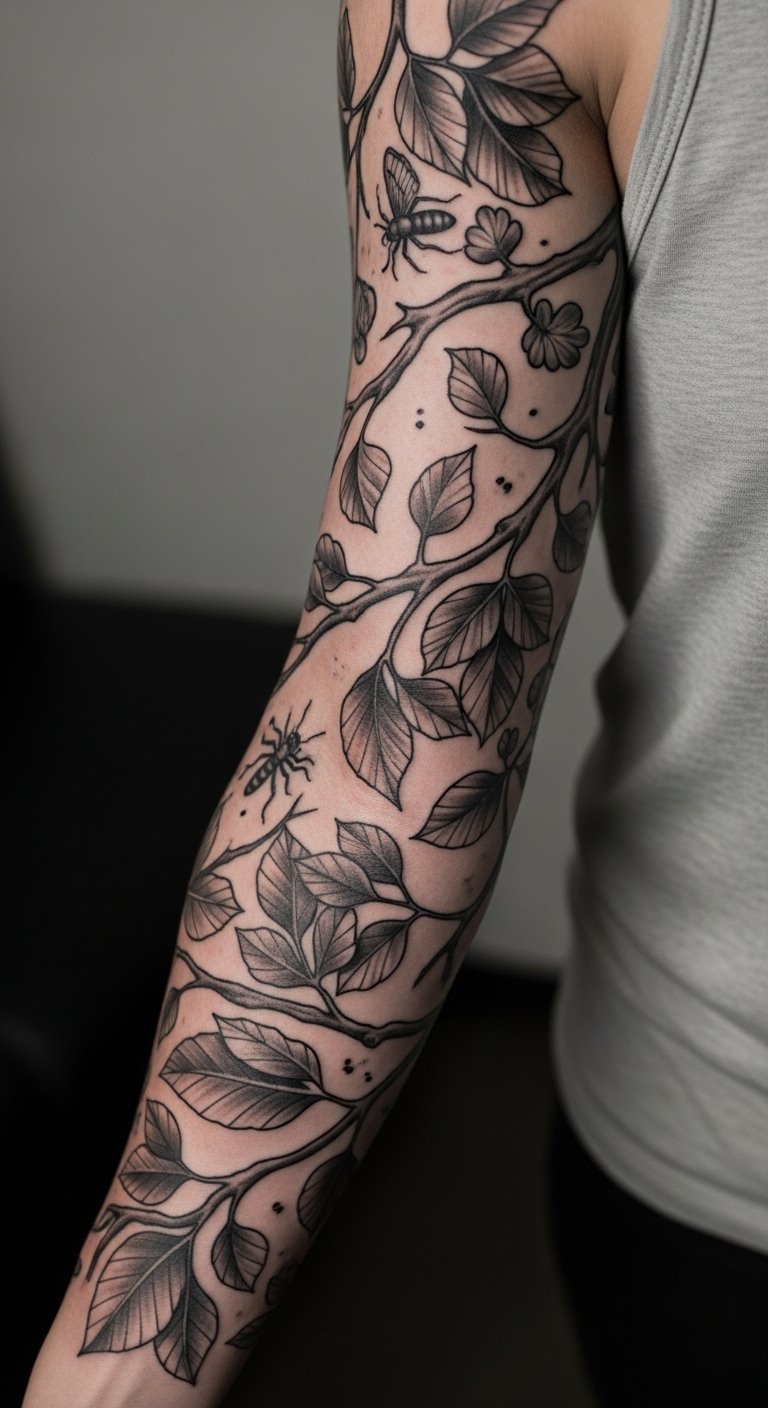
I’m partial to sleeves that reward close inspection: a small moth tucked behind a leaf, a snail path along a branch. Black-and-grey botanical sleeves age well because of strong contrast and the ease of touch-ups. Forearm or outer arm placement works great for viewing and for letting details flow. Pain is manageable, though line-dense sections can be tedious mid-session. A common misstep is overcrowding—plan breathing spaces so critters don’t compete. Look for artists comfortable with micro-details and ask for healed macro photos to see legibility.
Cover-Up Sleeve: Turning Old Ink into a Cohesive Story
Style/Technique: Cover-Up / Fusion of Styles and Heavy Blackwork
Pain Level: Medium-High (4-6/10)
Session Time: Multiple sessions with staged planning
Best For: Reworking old or unwanted tattoos into a unified sleeve

I’ve helped a few friends plan cover-ups. The key is composition: use negative space and heavier elements to mask old lines while building a new narrative. Full-arm cover-ups often require more intensive sessions and strategic layering. Expect higher pain where multiple inks and scar tissue exist. Healing can be more unpredictable—skin that’s been tattooed before may react differently. Mistake to avoid: trying to hide everything with sparse elements—cover-ups need confident shapes and sometimes bold black to anchor. Find an artist experienced in cover-ups and ask them to map how each old element will be transformed.
Anime and Comic Panel Sleeve in Color
Style/Technique: Pop-Culture / Color Graphic Panels
Pain Level: Low-Medium (2-4/10)
Session Time: Several sessions for color fills and linework
Best For: Fans who want sequential storytelling in a vibrant style
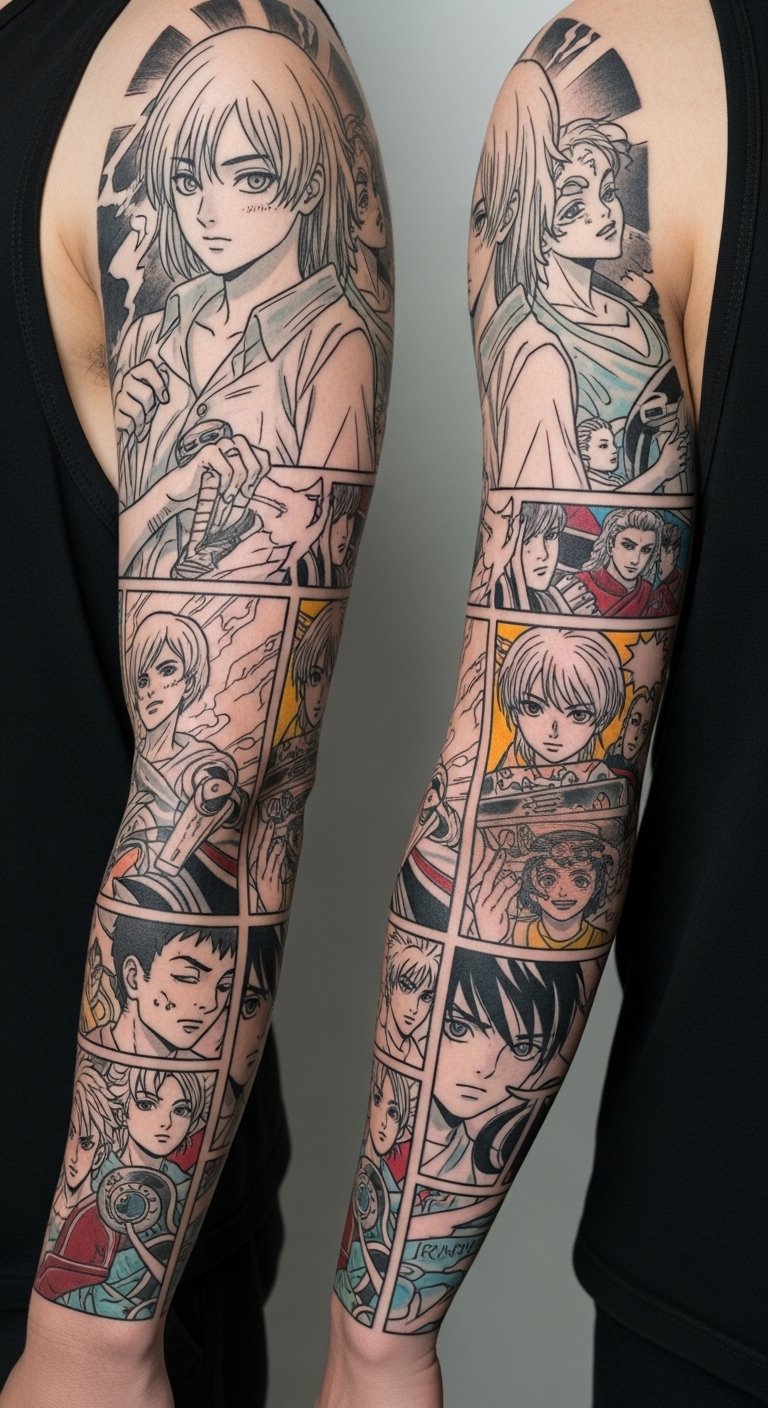
As a longtime anime fan, I appreciate sleeves that mimic comic panels—each scene a moment. These read well when the artist keeps clean lines and consistent color saturation. Outer arm or lower sleeve placement is ideal for panel sequencing. Pain is usually manageable. Color selection is important: primary saturated colors tend to hold better, while pastels fade faster. Mistakes include crowding panels or inconsistent line weight across scenes. Ask for color-saturated healed images and discuss how panels will age and interact.
Botanical Sleeve With UV and Glow Accents
Style/Technique: Botanical / Black & Grey with UV Accents
Pain Level: Low-Medium (2-4/10)
Session Time: Multiple sessions (UV separate session)
Best For: People who want a subtle day look with special accent under specific light
I experimented with UV accents on a small piece and learned they’re best used sparingly—veins, pollen, or small highlights that come alive under black light. For a full sleeve, combine stable black-and-grey anchors with planned UV highlights. Pain is similar to usual linework. Healing for UV ink is comparable, but touch-ups can be more frequent because UV pigments behave differently. Common mistake: overrelying on UV so the piece looks empty in daylight. Use UV as a secret layer, not the main visual. Ask artists experienced with UV ink to show healed photos in both natural and blacklight conditions.
Celestial Sleeve With Phases, Planets, and Maps
Style/Technique: Celestial / Fine-Line with Dotwork
Pain Level: Low (2-4/10)
Session Time: 2-4 sessions
Best For: Compositional sleeves focused on stars, maps, and personal astrology
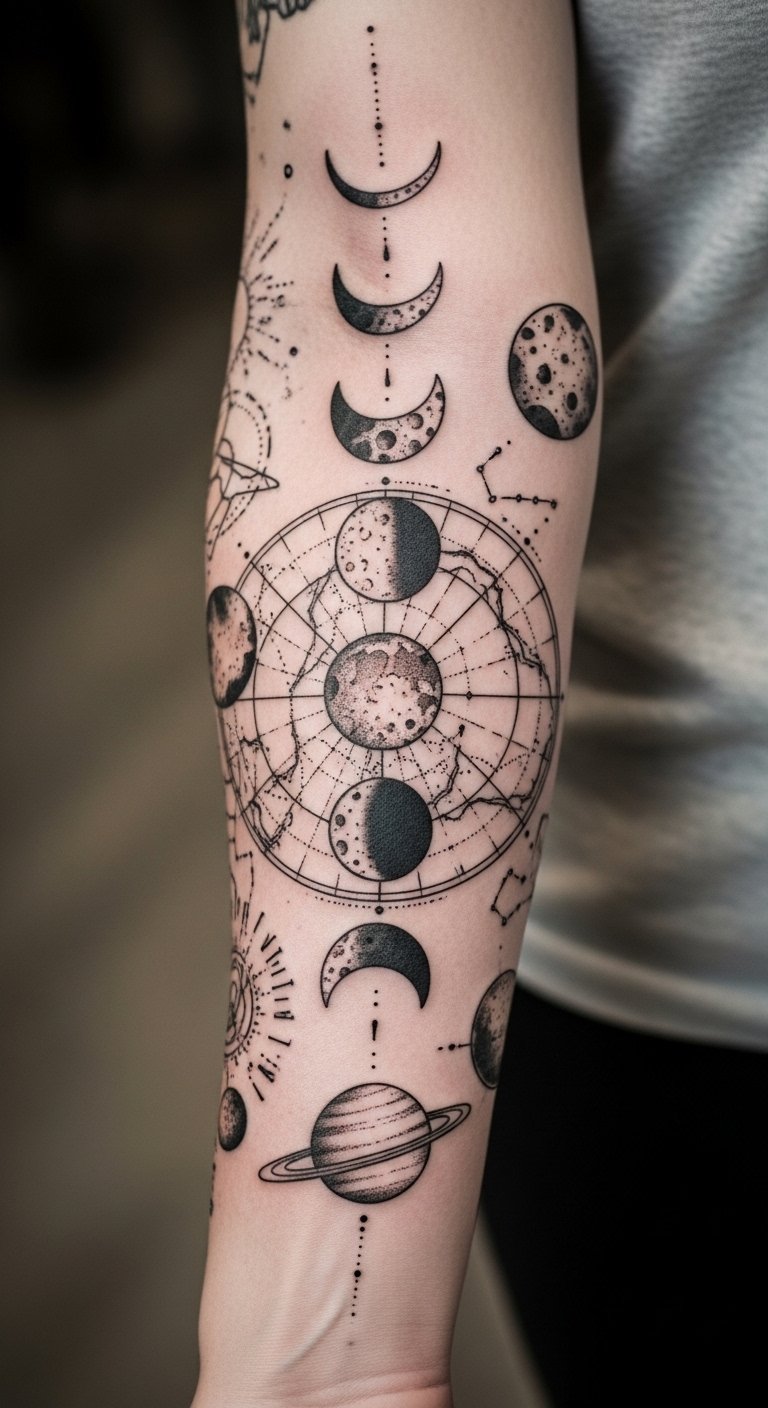
I worked with an astrologer friend to map her birth chart into a sleeve—the result read like a personal sky map. Celestial scopes look great spiraling from wrist to shoulder, and dotwork gives starfields texture. Pain is moderate but manageable. These sleeves age well when lines are slightly reinforced; very thin star dots can fade. Mistake: trying to include every constellation—be selective. Ask your artist whether they’ll use a slightly heavier staple line for anchors so the map stays legible.
Tattooed Textile Sleeve: Patterns From Fabric and Embroidery
Style/Technique: Textile-Inspired / Pattern Work and Color Blocking
Pain Level: Low-Medium (2-4/10)
Session Time: Several sessions to layer pattern work
Best For: People who love textiles, kilims, or embroidery motifs as continuous sleeves
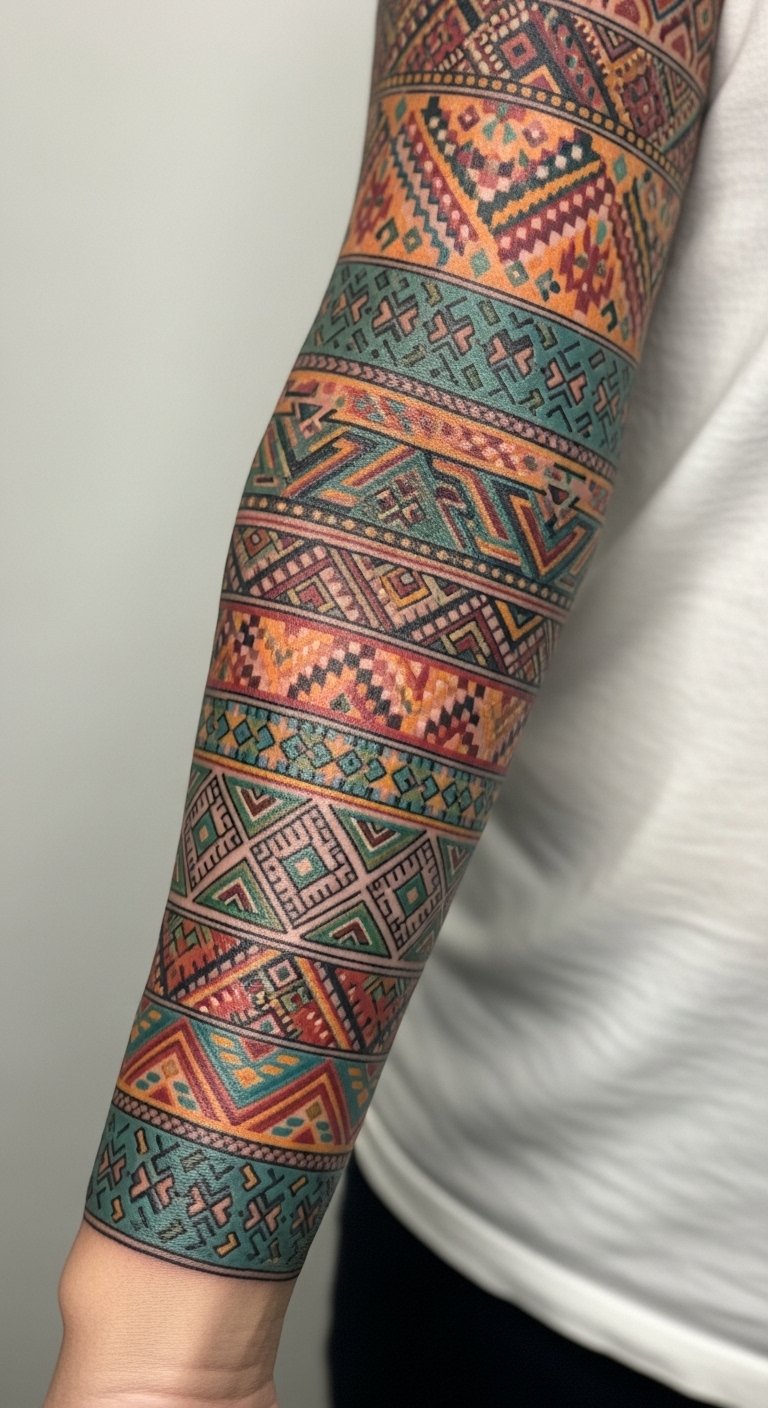
I’ve seen sleeves inspired by family textiles—kilim rugs, embroidered tablecloths—turn into sleeves that feel like wearable heritage. Pattern repeats wrap nicely around the arm and can be scaled to suit. Pain is moderate, depending on fill density. Colors should be bold enough to survive aging; pattern clarity is essential. Mistake: straight-up copying tiny textile stitches instead of translating them into tattoos—work with an artist who can interpret technique into lines and fills. Ask to see similar pattern-based sleeves healed.
Botanical Sleeve That Doubles as a Cover-Up for Scars
Style/Technique: Botanical / Illustrative with Strategic Foliage
Pain Level: Low-Medium (2-5/10 depending on scar tissue)
Session Time: Multiple sessions planned around scar healing
Best For: Concealing and integrating scars into a meaningful sleeve

I’ve helped people design sleeves to integrate scars—plants and vines are forgiving because their irregular lines can be tailored to cover texture. Scars require gentle needle work and sometimes different approaches; healing can be unpredictable and slightly more sensitive. Be patient: your artist may stage sessions to allow scar tissue to heal and settle. Mistake: expecting identical results to non-scarred skin—touch-ups might be needed. Work with someone experienced in tattooing scar tissue and ask for healed scar-cover examples.
Cybersigilism / Algorithmic Pattern Sleeve
Style/Technique: Cybersigilism / Abstract Digital Lines and Algorithmic Motifs
Pain Level: Medium (3-5/10)
Session Time: Multiple sessions for layering and alignment
Best For: Tech-forward collectors who want unique, algorithm-inspired geometry
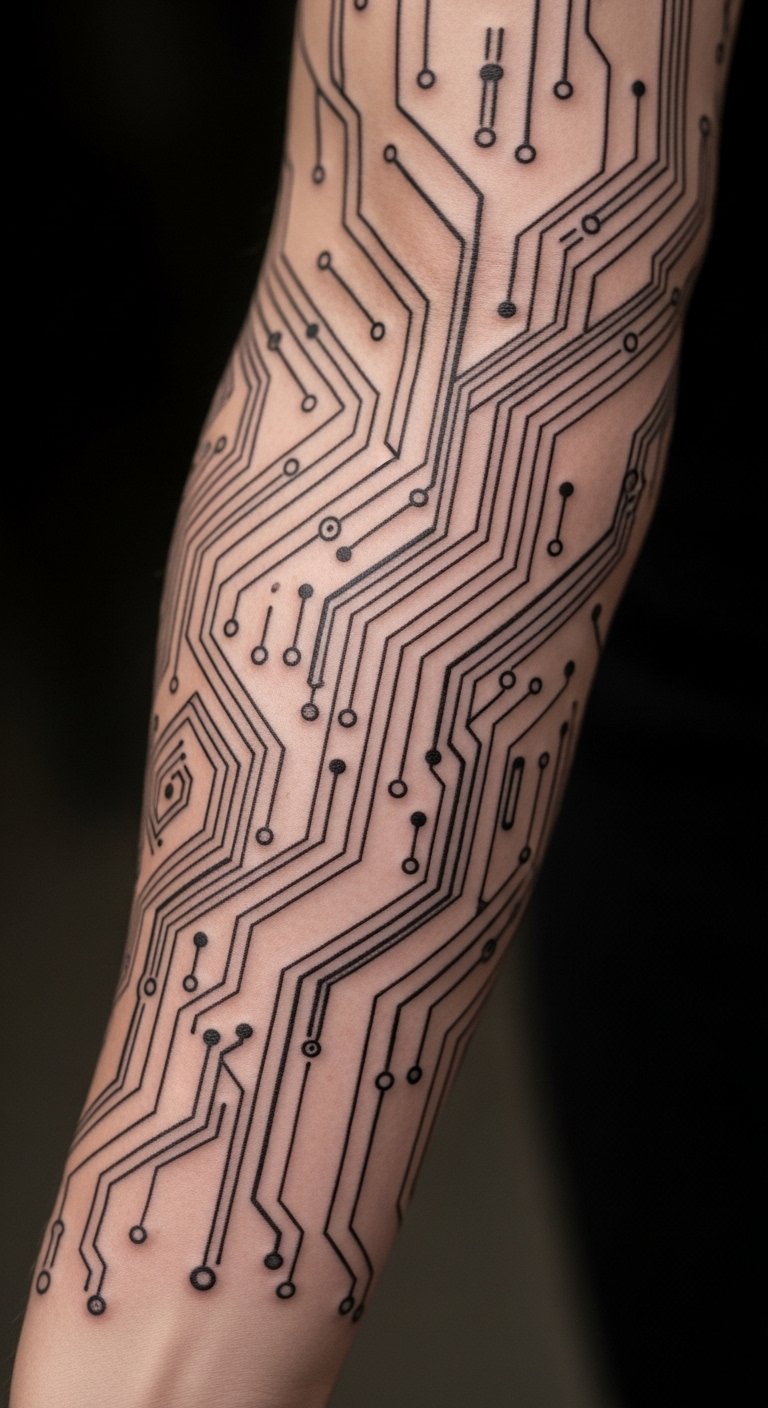
I’ve sketched algorithmic sleeves where motifs are generated and then curated—unique but coherent. This style blends digital aesthetics with organic placement, resulting in a modern gallery-ready sleeve. Pain is moderate depending on how dense the linework is. These designs age well if solid anchors are included; ultra-thin circuitry lines can blur. Common error: overcomplicating patterns so that movement makes them unreadable. Work with an artist who can translate digital files into body-friendly compositions.
Floral Sleeve With Hidden Dates and Coordinates
Style/Technique: Personalized / Illustrative Floral with Micro-Script
Pain Level: Low-Medium (2-4/10)
Session Time: Multiple short sessions for microwork
Best For: Personal memorials or meaningful place markers disguised as ornament
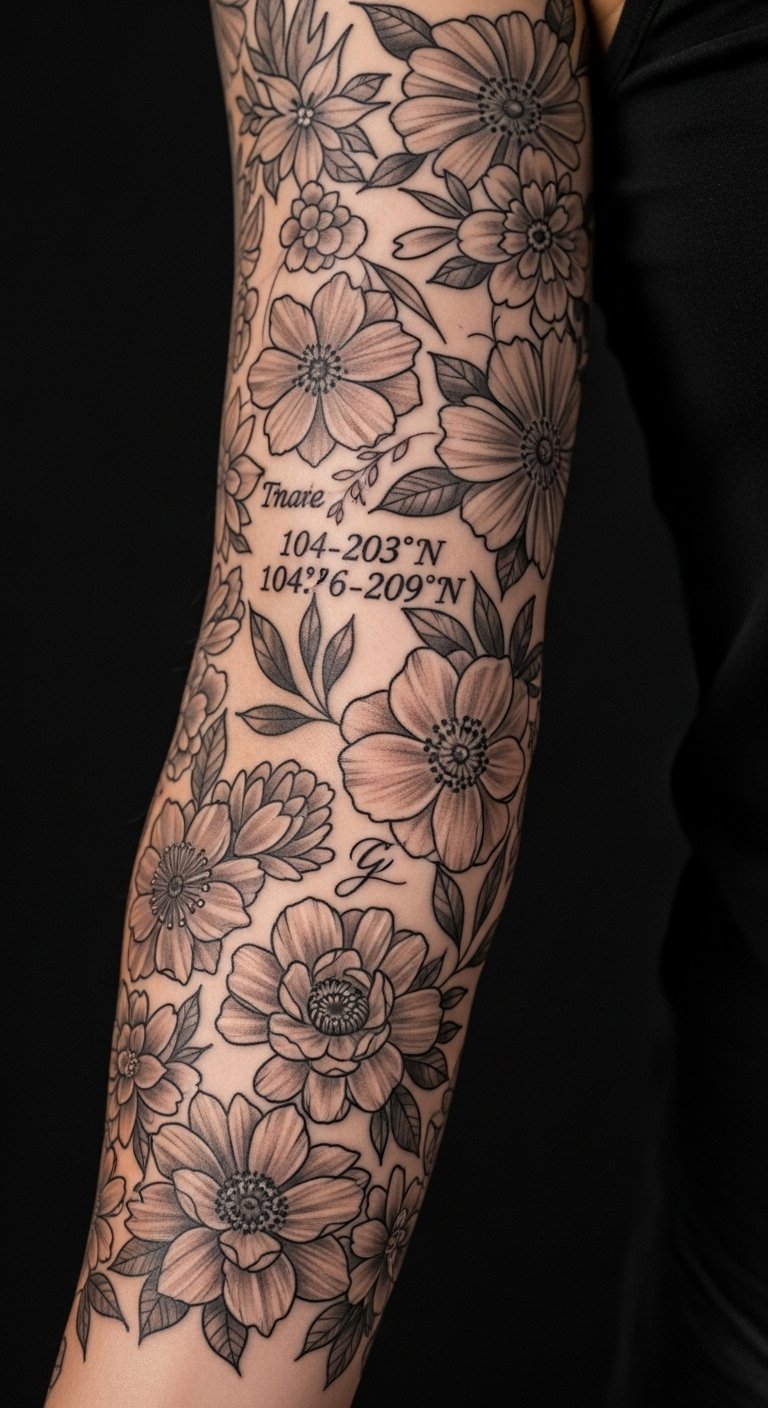
I often see clients embed dates and coordinates into floral sleeves—it's a neat way to keep meaning private yet woven into the design. Placement can be anywhere, but forearm and bicep are convenient for reading and hiding small text. Pain is mild but micro-script requires careful planning to remain legible after healing. Avoid trying to fit lengthy text into tiny spaces; keep it short and paired with a bold anchor so it stays readable. Ask to see healed micro-script examples on similar skin tones.
Full-Sleeve Timeline: From Childhood Sketches to Adult Symbols
Style/Technique: Collage / Mixed-Style Timeline
Pain Level: Medium (3-5/10)
Session Time: Large multi-session project mapped like chapters
Best For: Collectors who want a literal life-story sleeve mapped chronologically
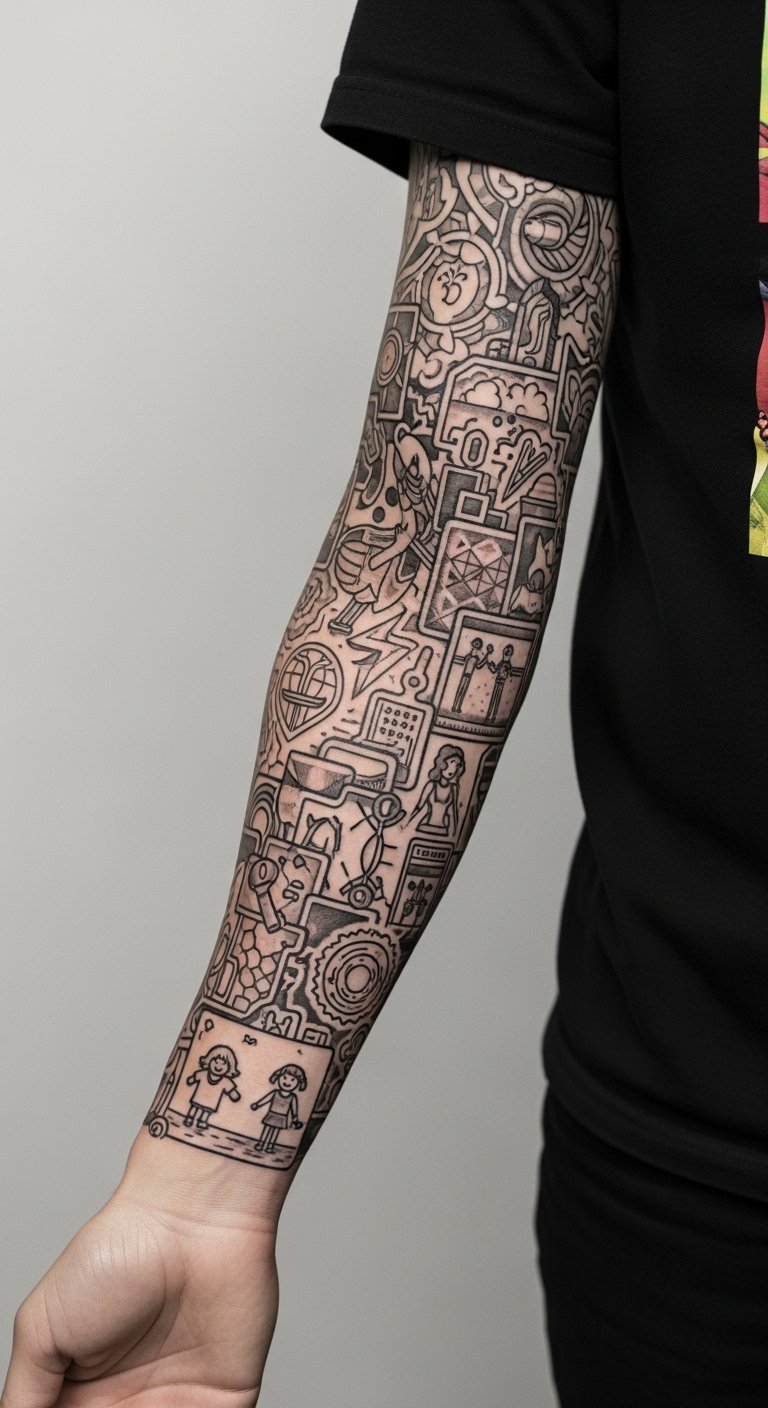
I designed a timeline sleeve for a client once: elements placed top-to-bottom to reflect life phases. This approach works because it gives the sleeve a coherent narrative structure. Pain varies by location; plan sessions like chapters. Keep consistent style anchors—mixing too many starkly different styles can fragment the sleeve. A frequent mistake is adding elements impulsively without a long-term plan; treat it like a chaptered book. Ask your artist how they'd maintain cohesion across decades of imagery.
Botanical Sleeve That Works With Muscular Flow (For Active Bodies)
Style/Technique: Anatomical / Illustrative Flow-Focused Work
Pain Level: Medium (3-5/10)
Session Time: Multiple sessions planned around muscle movement
Best For: Athletes or active people whose arms flex and change shape
I’ve tattooed athletic clients and found that sleeves must respect muscle flow. Leaves and vines that follow the bicep curve look natural when flexed. Pain can increase if sessions touch sensitive areas near tendons. Healing is standard but work with your trainer to avoid early heavy workouts. Avoid symmetrical pieces that don’t account for muscle expansion or tattoos can warp with movement. Ask your artist how the design will shift when you flex and see healed examples on similarly built bodies.
Tattoo Prep and Aftercare Essentials
Aftercare Essentials:
- Aquaphor Healing Ointment, 14oz tube — Use first 3-5 days for heavy moisture
- Saniderm Transparent Adhesive Bandage, 6-inch roll — Popular second-skin method for initial protection
- CeraVe Fragrance-Free Moisturizing Lotion, 12oz — For ongoing moisturizing after scabbing
- Dr. Bronner's Unscented Castile Soap, 8oz — Gentle cleansing during the first week
- Mad Rabbit Tattoo Balm, 2oz — Long-term balm for vibrancy
- Hustle Butter Deluxe, 2.5oz — Vegan aftercare alternative for ongoing skin health
- Tattoo Numbing Cream with 5% Lidocaine, 30g — Apply only after checking with your artist
- Saniderm Starter Pack (multiple sizes) — For varied placement coverage
- SPF 50 Sunscreen Stick for Tattoos — Daily protection to reduce fading
- Hydrocolloid Bandages Large — For small spot touch-ups and blister management
- Tattoo Aftercare Kit (soap, balm, instruction card) — All-in-one option for first-timers
Before your session: hydrate well, avoid alcohol, eat a solid meal. Bring loose clothing for the area the artist will tattoo. After the session: follow your artist’s instructions—clean gently, moisturize, and keep out of direct sun during healing.
Frequently Asked Questions
Q: How bad does a tattoo actually hurt?
A: Pain depends on placement and tolerance. Outer arm and shoulder are usually low (2-3/10). Inner arm, ribs, and elbow folds can be high (6-8/10). It’s more an annoying burning/scraping than sharp pain. For sensitive areas, discuss a numbing cream with 5% lidocaine with your artist.
Q: What if I regret a design later?
A: Sit with an idea for several months and focus on meaningful motifs rather than trends. If needed, cover-ups and reworks are possible but require planning and sometimes heavier blackwork.
Q: How do I keep my tattoo from fading?
A: Sunscreen is essential—use an SPF 50 sunscreen stick daily. Moisturize regularly with a fragrance-free lotion to keep skin healthy.
Q: Can I work out after getting a sleeve?
A: Wait 48-72 hours before heavy workouts, and avoid activities that force sweating on fresh ink for at least one week. If your gym contacts the fresh area (bench press, straps), give it extra time.
Q: Should I get a small tattoo first to test pain?
A: Only if you genuinely want a small piece. Pain varies more by placement than size—tiny wrist pieces can hurt more than larger outer-arm pieces.
Q: How long does a sleeve take to heal?
A: Surface healing is 2-3 weeks; full maturation may take 2-3 months. Expect peeling and dull color during early healing; colors and lines settle as skin regenerates.
Q: Do tattoos look different on different skin tones?
A: Yes. Black and grey reads well across tones; bright colors can be more muted on deeper skin. Artists experienced with diverse skin tones can show healed examples and advise on saturation.
Q: When should I get touch-ups?
A: Wait until the sleeve is fully healed (2-3 months) before assessing touch-ups. Small soft areas are normal and correctable.
Conclusion
Take your time with sleeve planning—this is a long-term body project. Book a consult, bring healed-photo references, and prioritize aftercare: Aquaphor and daily sunscreen will protect your story. Which sleeve idea here are you most drawn to?