
I spent months collecting sacred geometry tattoos I actually liked—then another few months watching how they healed and held up. The problem for me wasn't finding designs; it was finding ones that age well and fit real life. These 28 sacred geometry tattoo ideas focus on balance, meaning, and longevity so you can pick something that still reads as you years from now.
This list leans into dotwork, blackwork, and fine-line sacred geometry tattoo ideas. They work best on forearms, backs, chests, thighs, and wraps. I've seen 2026 trends push clean black line and negative-space pieces—those are the designs that actually look crisp after healing.
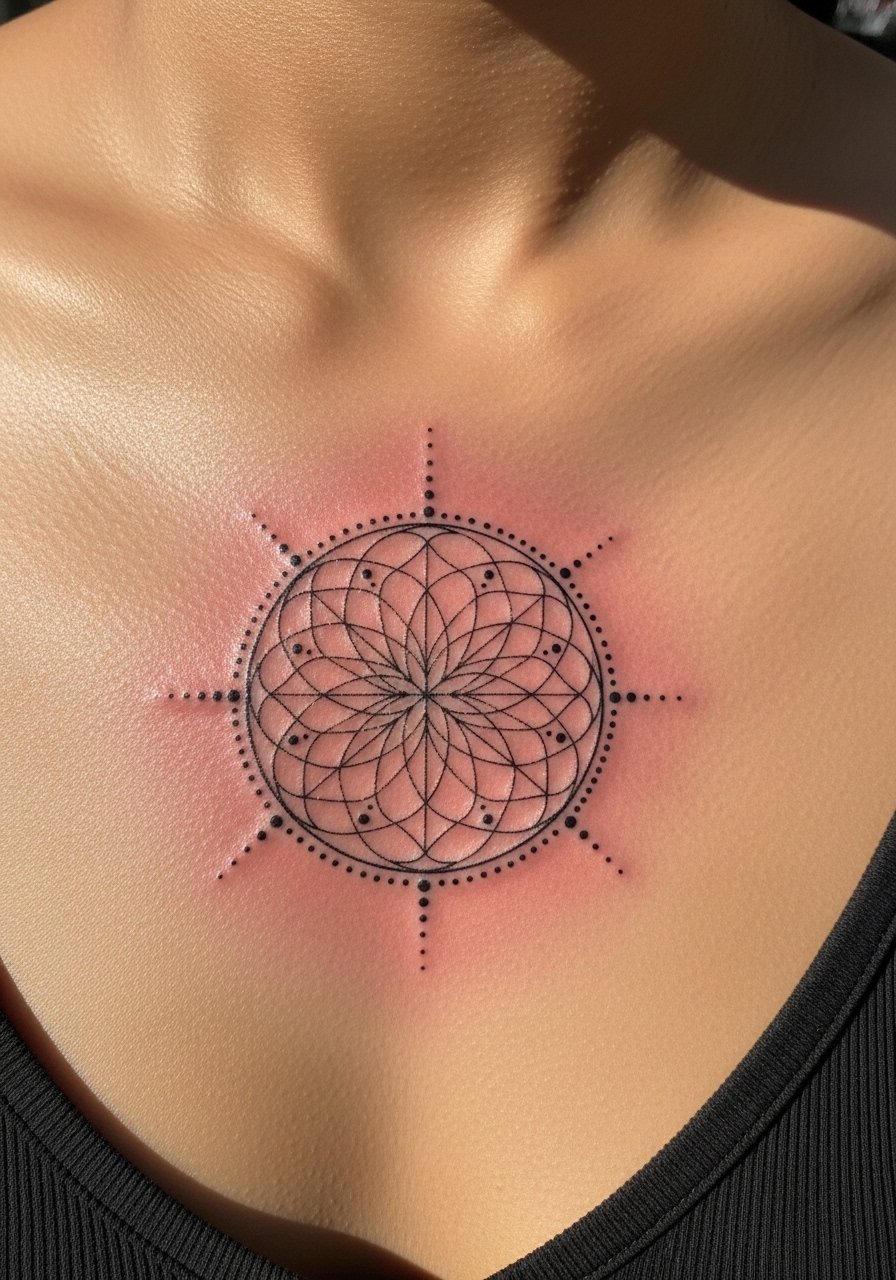
1. Flower of Life Mandala on Upper Back
Style/Technique: Dotwork / Geometric
Pain Level: Low-Medium (upper back)
Session Time: Multiple short sessions or a long single session
Best For: Symmetry lovers, central back statements
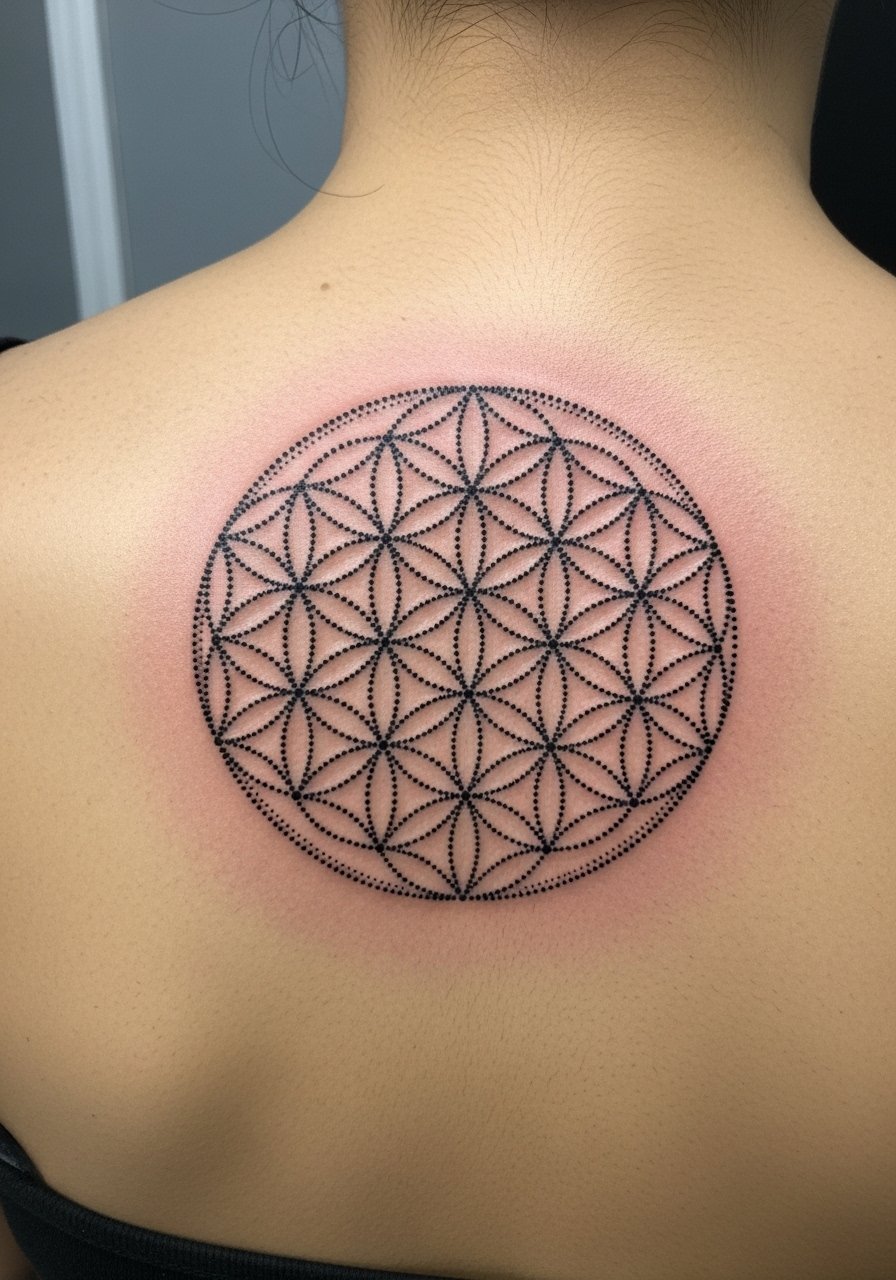
The Flower of Life reads like a classic for a reason—overlapping circles that give a sense of interconnectedness. As a back piece it gets enough canvas to keep the circles precise. Expect mild soreness during sessions but less pain than rib or sternum work. Healing favors dotwork: keep it moisturized and out of direct sun. From what I've seen, crisp black dotwork ages better than colored petals; fine lines can blur if the design is too small. Ask an artist familiar with sacred proportions—I've mentioned Dillon Forte to a few friends and they appreciated his approach to spacing. Avoid cramming too many tiny circles; give each ring room to breathe.
2. Metatron's Cube Half-Sleeve on Outer Forearm
Style/Technique: Blackwork / Fine Line
Pain Level: Medium (outer forearm)
Session Time: 2–4 sessions
Best For: Sleeve starters, spiritual balance pieces
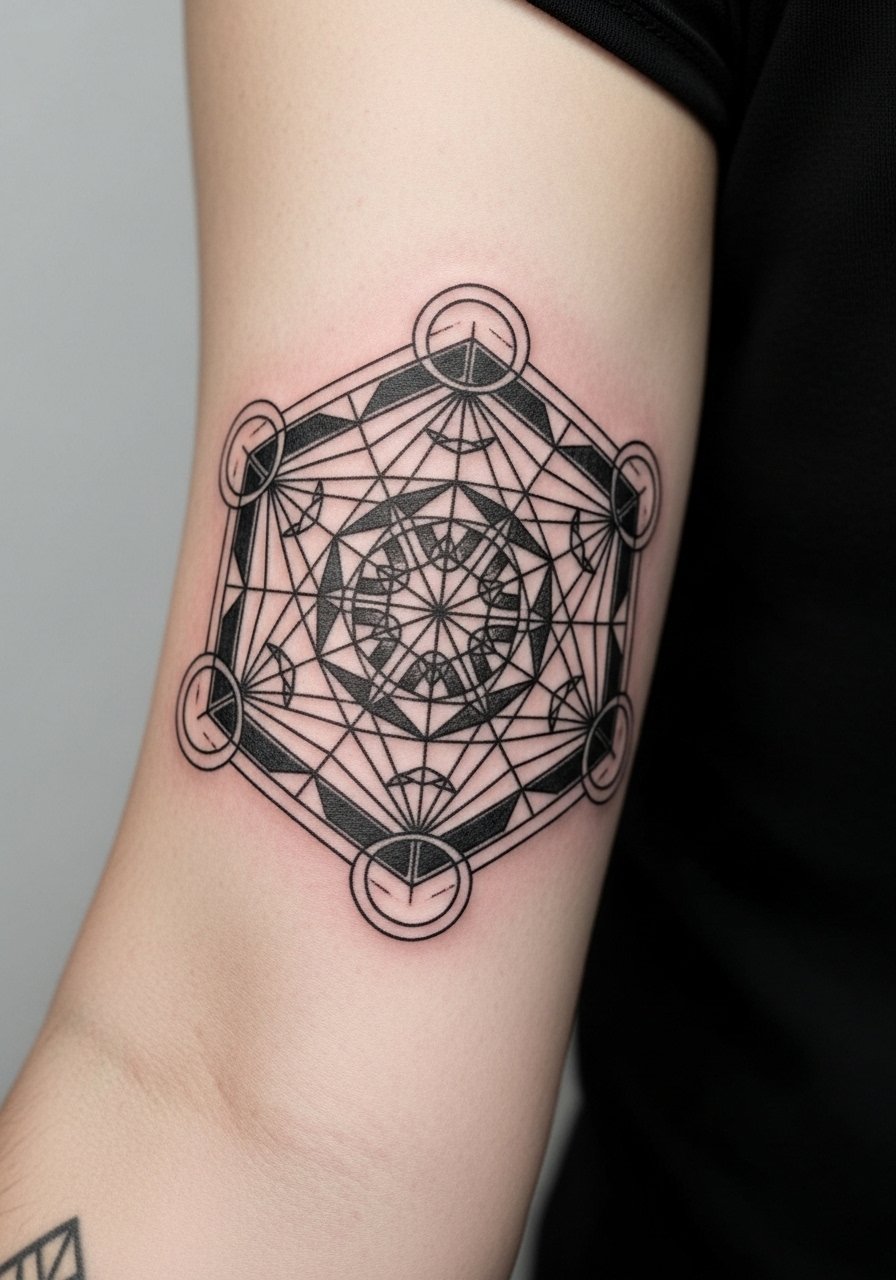
Metatron's Cube is a go-to when you want geometric complexity that still reads as balanced. On the outer forearm it wraps nicely without distortion. Pain is tolerable, and the artist can stagger sessions to keep line precision tight. Blackwork with subtle gray fills keeps the geometry readable as it ages. I've seen people regret tiny Metatron pieces—this design needs scale. A common mistake is weak lineweight; insist on clean, confident outlines and ask to see healed samples in an artist’s portfolio. For touch-ups, dotwork overlay helps refresh depth without overworking the skin.
3. Seed of Life Hexagon on Chest
Style/Technique: Minimalist / Geometric Dotwork
Pain Level: Medium (upper chest area)
Session Time: 1–2 sessions
Best For: First sacred geometry tattoo, symbolic chest piece
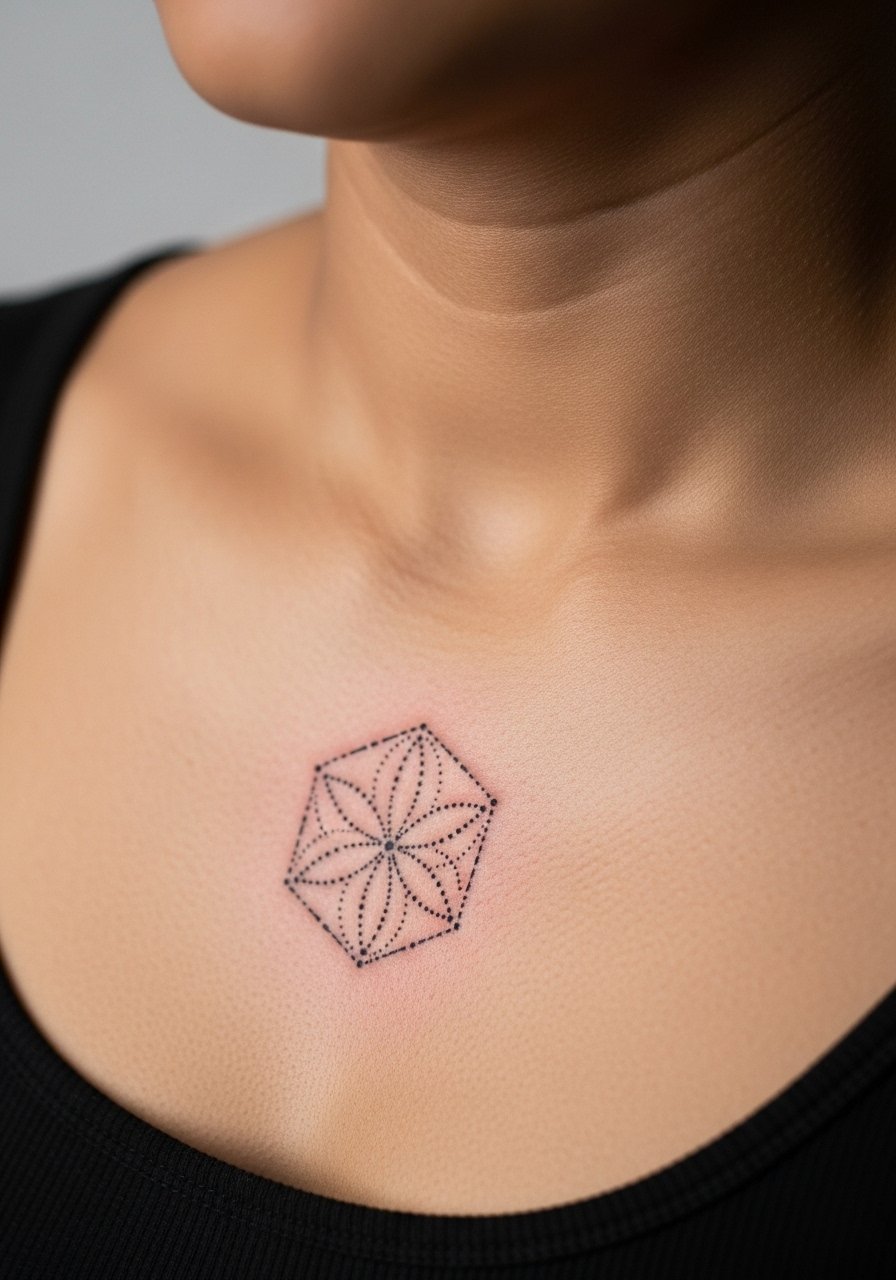
The Seed of Life is perfect for a chest placement that feels intimate. It symbolizes cycles and creation, and as a black dotwork piece it keeps meaning without overcomplication. Chest work sits on flatter canvas—lines stay crisp if sized correctly. Expect moderate pain near the sternum and collarbone. In my experience, artists recommend letting the chest design be larger than you think so the hex pattern doesn't blur together after healing. Avoid heavy shading inside the hex if you want longevity; keep it graphic and let negative space form the pattern.
4. Sri Yantra Inner Forearm
Style/Technique: Neo-Traditional Geometric / Fine Line
Pain Level: Low-Medium (inner forearm)
Session Time: 1–3 sessions
Best For: Meditative, spiritual-focused tattoos
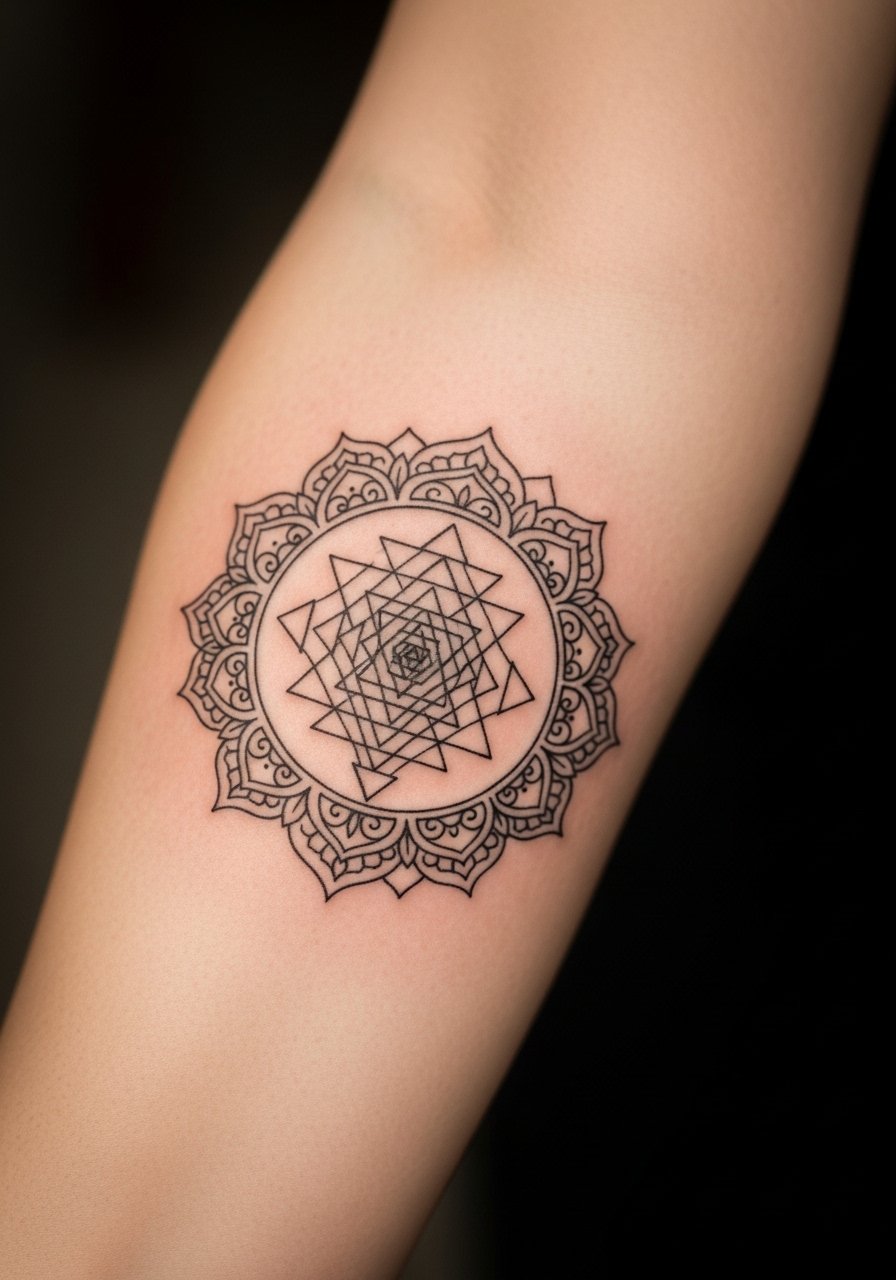
Sri Yantra brings a meditative focus with its nested triangles. On the inner forearm it becomes something you can look at during quiet moments. Pain is manageable and healing tends to be straightforward if you avoid heavy sun. I've noticed people who pick this symbol for a deep personal reason tend to choose blackwork to avoid color-fade regrets. Common mistake: making the geometry too small. Ask your artist about sacred proportions so the triangles line up perfectly and remain readable after healing.
5. Platonic Solids Chest Cluster
Style/Technique: Black & Gray Realism / Geometric
Pain Level: Medium (chest)
Session Time: Multiple sessions
Best For: Elemental symbolism, layered chest pieces
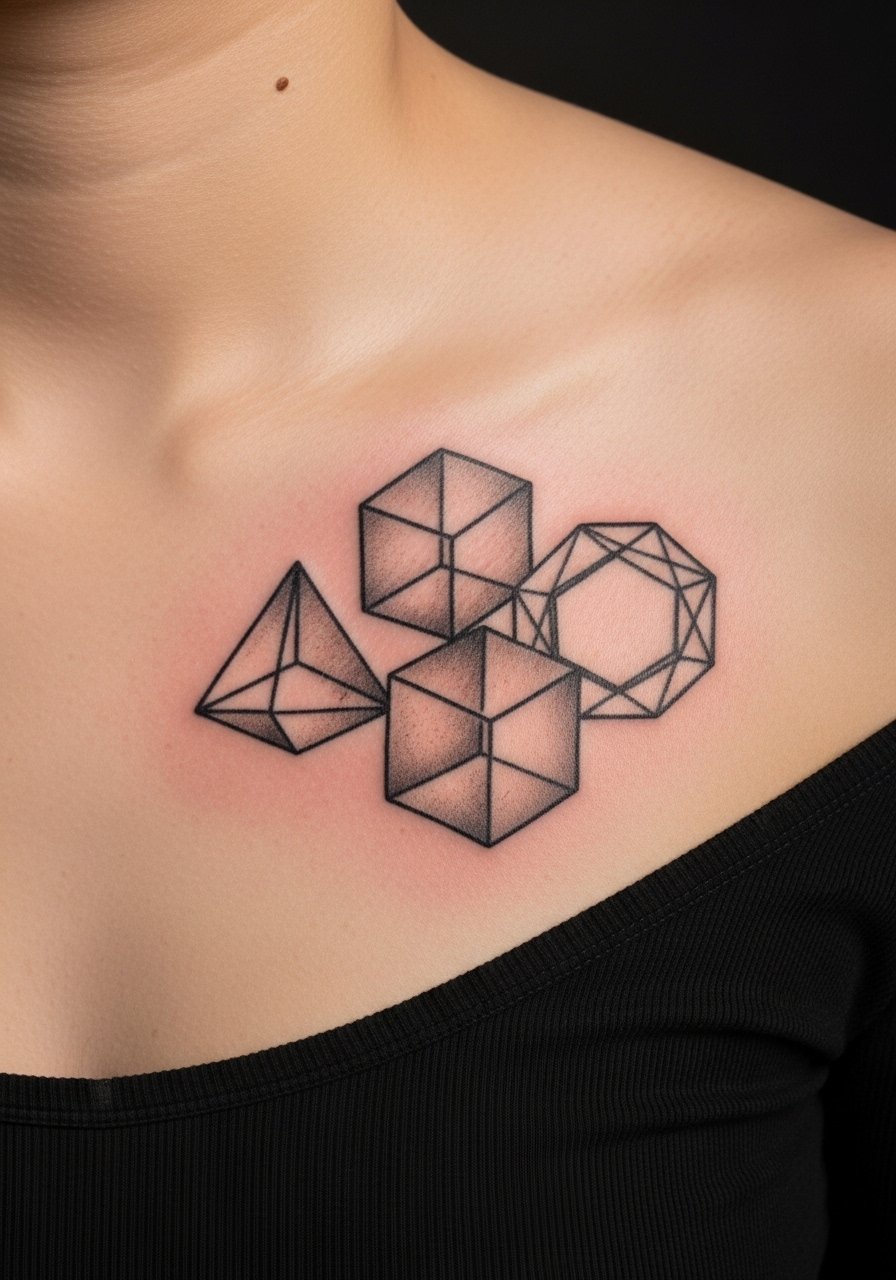
Platonic solids are underrated as tattoo motifs—they each represent an element and can be combined into a compact chest piece that still breathes. The chest gives enough space to maintain clean edges. Expect tenderness across the sternum and near the collarbone. In my experience, grayscale texture adds depth without the aging trouble of bright colors. A frequent error is poor alignment; these shapes need precise angles. Bring printed references and ask your artist about rotational symmetry so the solids look intentional from multiple views.
6. Fibonacci Spiral Armband Wrap
Style/Technique: Fine Line / Dotwork Spiral
Pain Level: Low (upper arm wrap)
Session Time: 1–2 sessions
Best For: Minimalist lovers, organic math tattoos
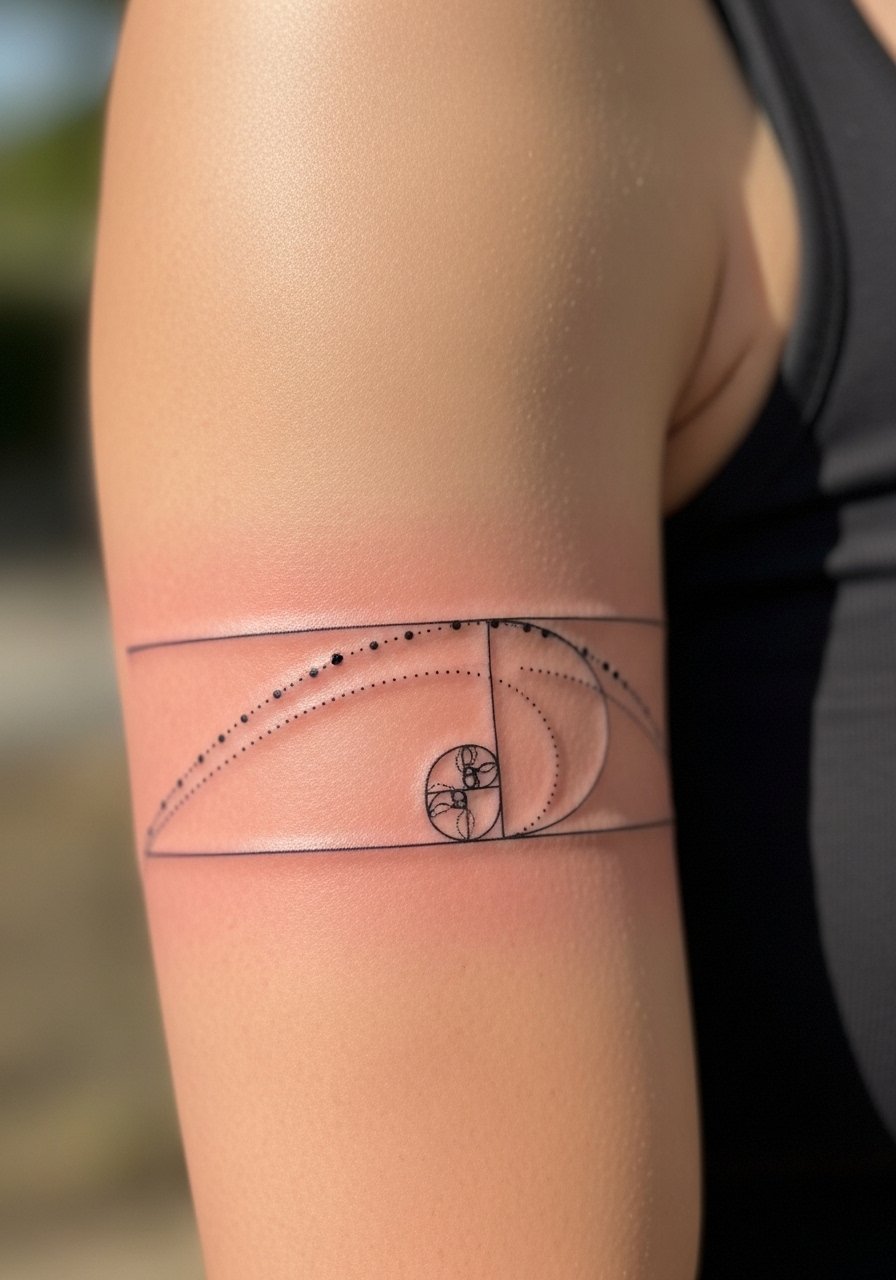
I love the Fibonacci spiral for its sure visual flow; it wraps the arm naturally and feels like movement. It's low-pain, and the fine-line work can be completed quickly. The trick is proper scaling: make sure the spiral’s arms are wide enough to avoid line merging over time. From what I've gathered, dotwork accents help maintain contrast as the skin ages. Common mistake: squeezing the spiral into a tiny band—give it breathing room or it will look muddy once healed.
7. Triangle-in-Circle Minimal Forearm
Style/Technique: Minimalist / Geometric Linework
Pain Level: Low (inner forearm)
Session Time: Single short session
Best For: First sacred geometry tattoo, low-commitment symbolism
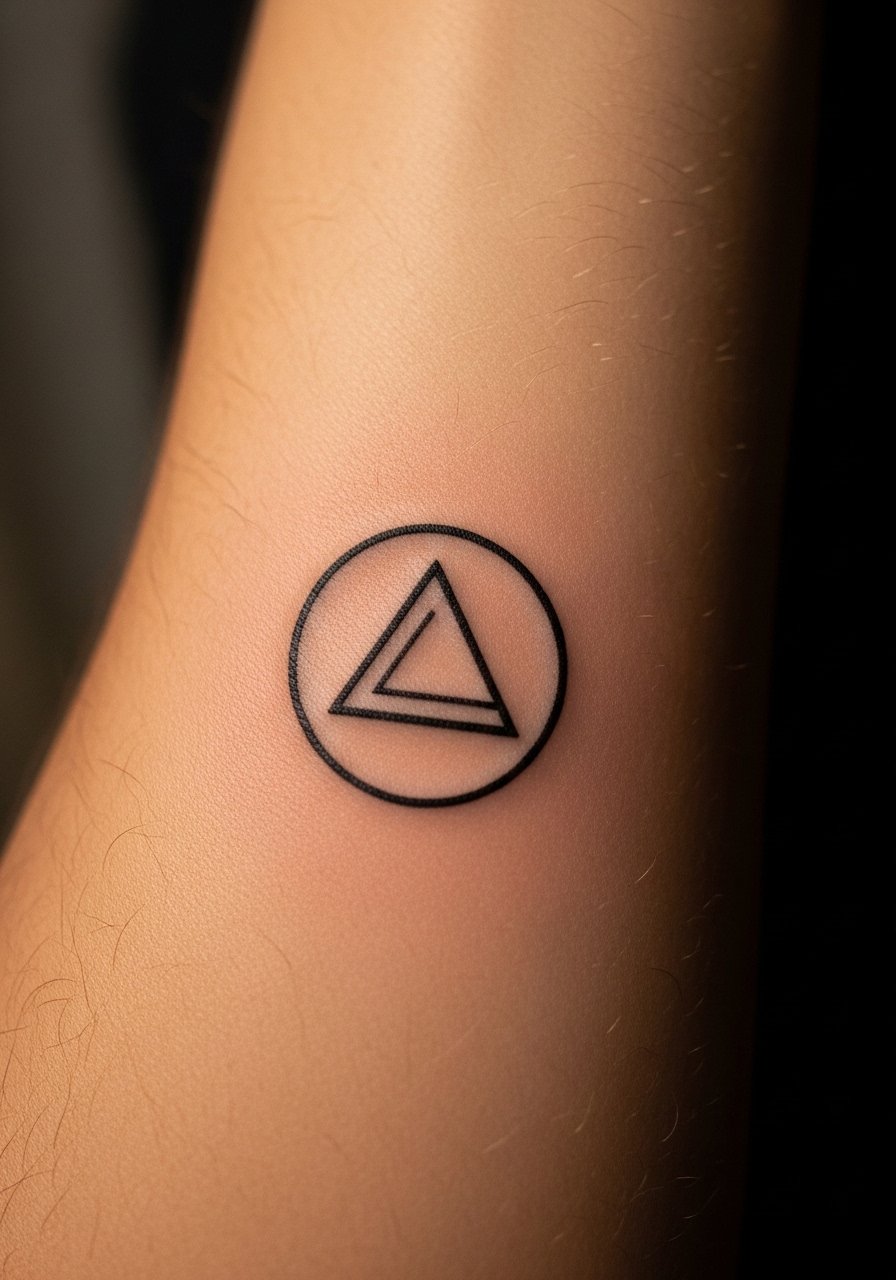
This simple geometry reads like a compact statement about unity or the trinity. Inner forearm placement is forgiving for linework and easy to hide if needed. Pain is mild. I recommend solid, slightly bolder single-line direction—too fine and the edges blur over time. Ask to preview stencil placement; tiny shifts matter for circular symmetry. This is a great "first sacred geometry tattoo" I often suggest to friends who want a meaningful but low-commitment design.
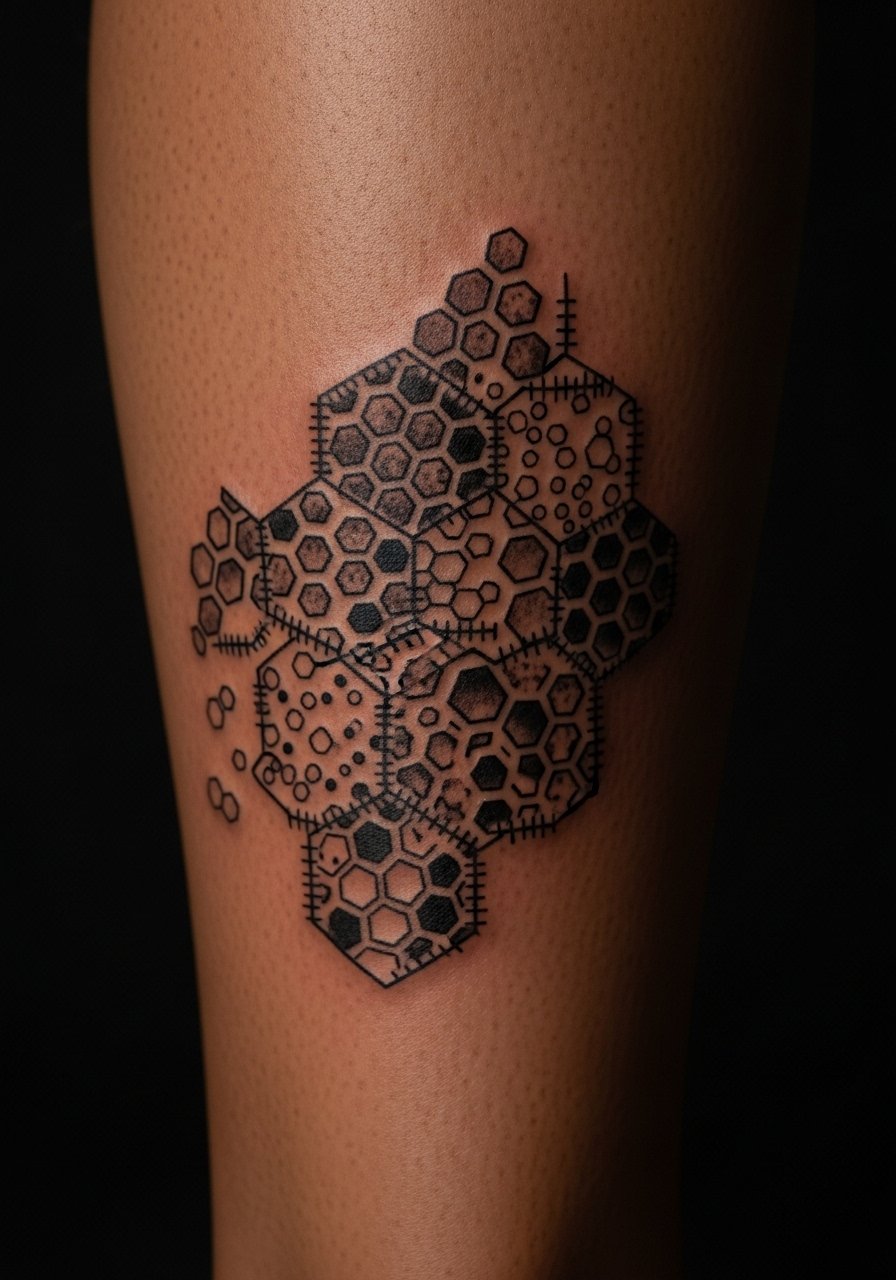
8. Hexagon Mosaic Half-Sleeve (Honeycomb Flow)
Style/Technique: Blackwork / Illustrative with Negative Space
Pain Level: Medium-High (outer forearm to elbow)
Session Time: Multiple sessions
Best For: Unique sleeve starts, modular expansion
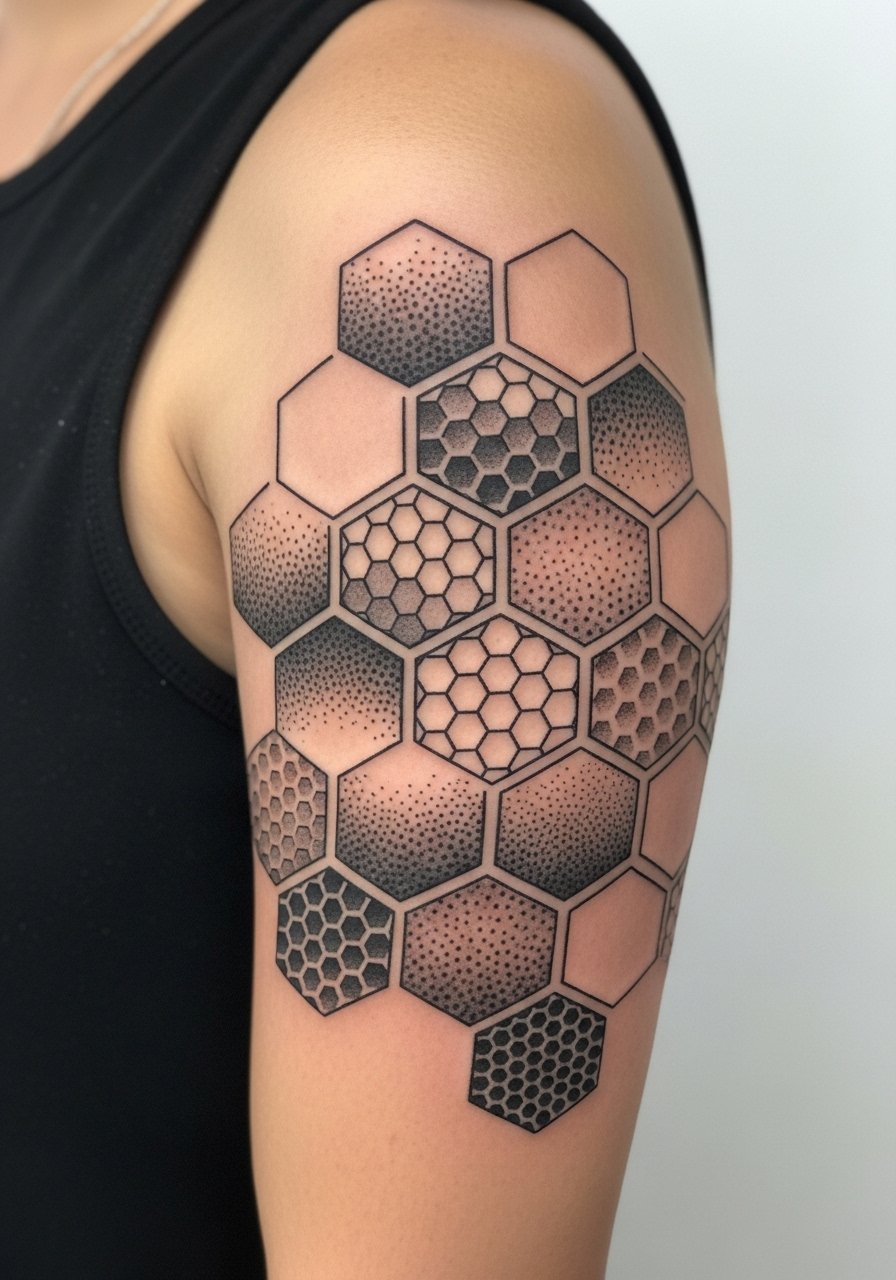
Hexagons let you build a sleeve like tiles—modular and expandable. Negative space between cells creates a fingerprint-like pattern that reads organic and stable. It can be slightly more painful as you approach the elbow. From what I've seen, artists recommend mapping the mosaic to the arm's natural curves to avoid optical warping. A common mistake is making all cells identical; vary lineweight and dot density to create depth. This is one of those pieces that grows well over time into a full sleeve.
9. Om with Metatron Overlay on Shoulder Blade
Style/Technique: Fine Line / Single Needle Overlay
Pain Level: Low-Medium (shoulder blade)
Session Time: 2–3 sessions
Best For: Spiritual fusion pieces, upper back visibility
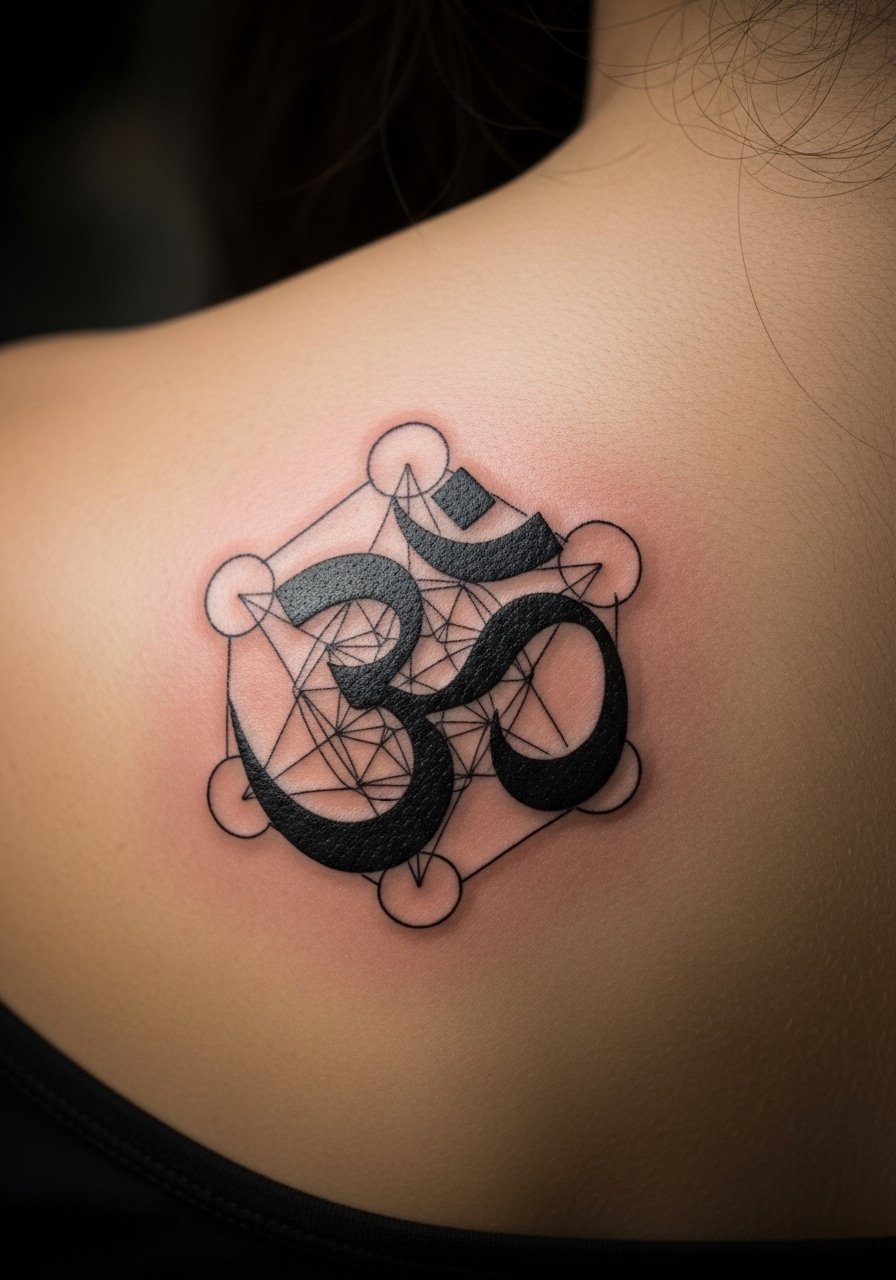
Combining script-like Om with Metatron geometry balances chant-based spirituality with structural pattern. The shoulder blade gives enough flat space for precision and is lower pain than sternum or ribs. I've noticed this overlay looks best when the geometry is slightly lighter than the Om glyph—contrast helps both elements stay readable as they age. Avoid over-detailing the overlay; keep it simplified so the sacred proportions remain intact after healing.
10. Cube of Metatron Full Upper Back
Style/Technique: Dotwork Geometric / Large-Scale Blackwork
Pain Level: Medium (upper back panels)
Session Time: Multiple long sessions
Best For: Statement spiritual balance, large canvas work

The Cube of Metatron deserves scale. On the upper back you can retain the cube’s 3D illusion without losing line clarity. Sessions may be longer, but the back heals well with proper aftercare. In my experience, dotwork helps transition heavy geometry into soft gradients that age gracefully. Common mistake: trying to compress the cube into too small an area; it becomes a blur. Prioritize an artist experienced in geometric grids to keep symmetry crisp.
11. Mandala Spine Flow Vertical Piece
Style/Technique: Geometric Mandala / Dotwork
Pain Level: High (along spine)
Session Time: Multiple sessions
Best For: Meditative center-line pieces, vertical symmetry
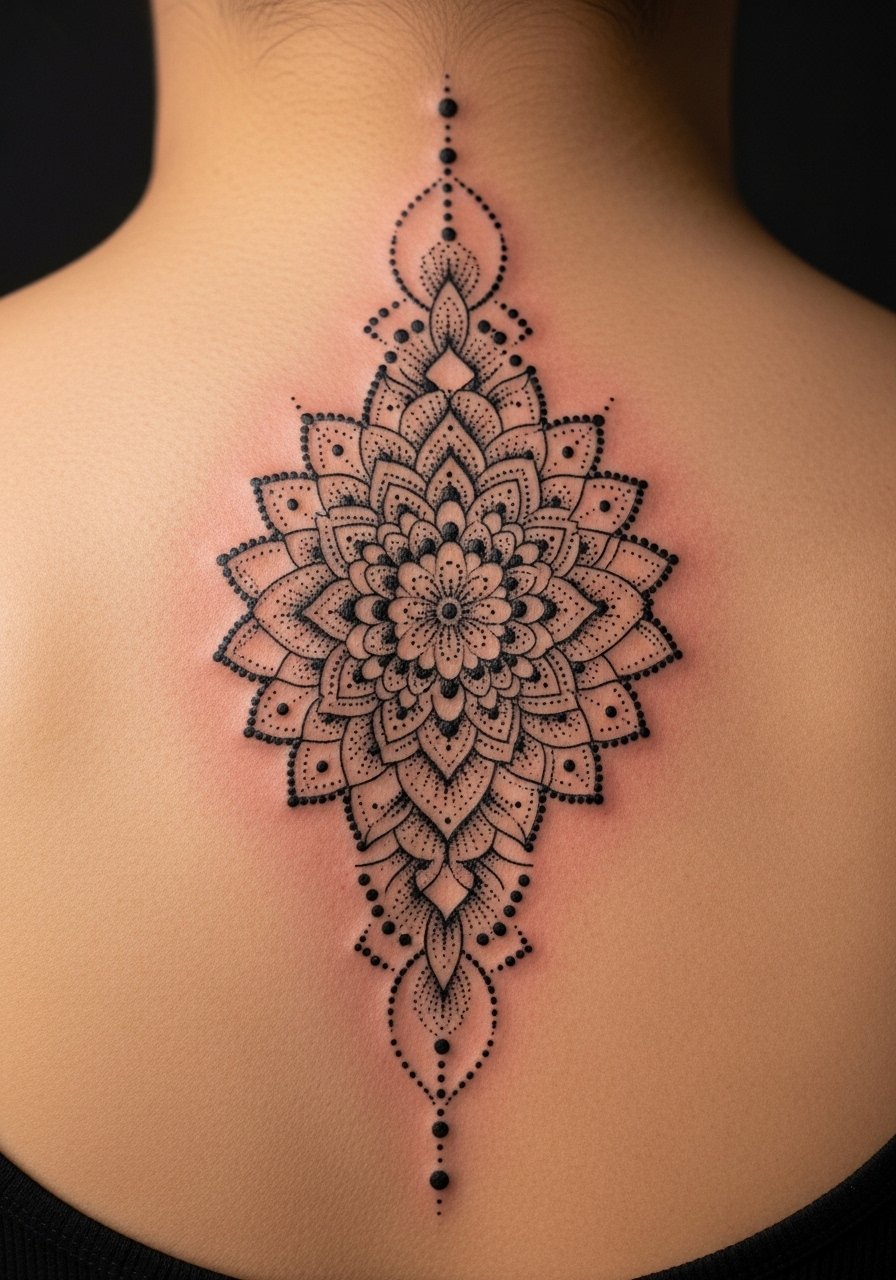
A mandala down the spine reads like a centered meditation. Pain is higher along vertebrae but placement yields striking symmetry. I've seen these age well when the mandala elements are sized to the spine’s length—tiny petals near bone blur. Artists often recommend building the mandala outward from the center so proportions remain balanced. Keep aftercare focused on avoiding friction from clothing while it scabs; that prevents ink migration and preserves precise dotwork.
12. Hollow Cube Thigh Negative Space
Style/Technique: Blackwork / Negative Space Geometry
Pain Level: Low-Medium (outer thigh)
Session Time: 1–2 sessions
Best For: Cover-up or statement thigh piece
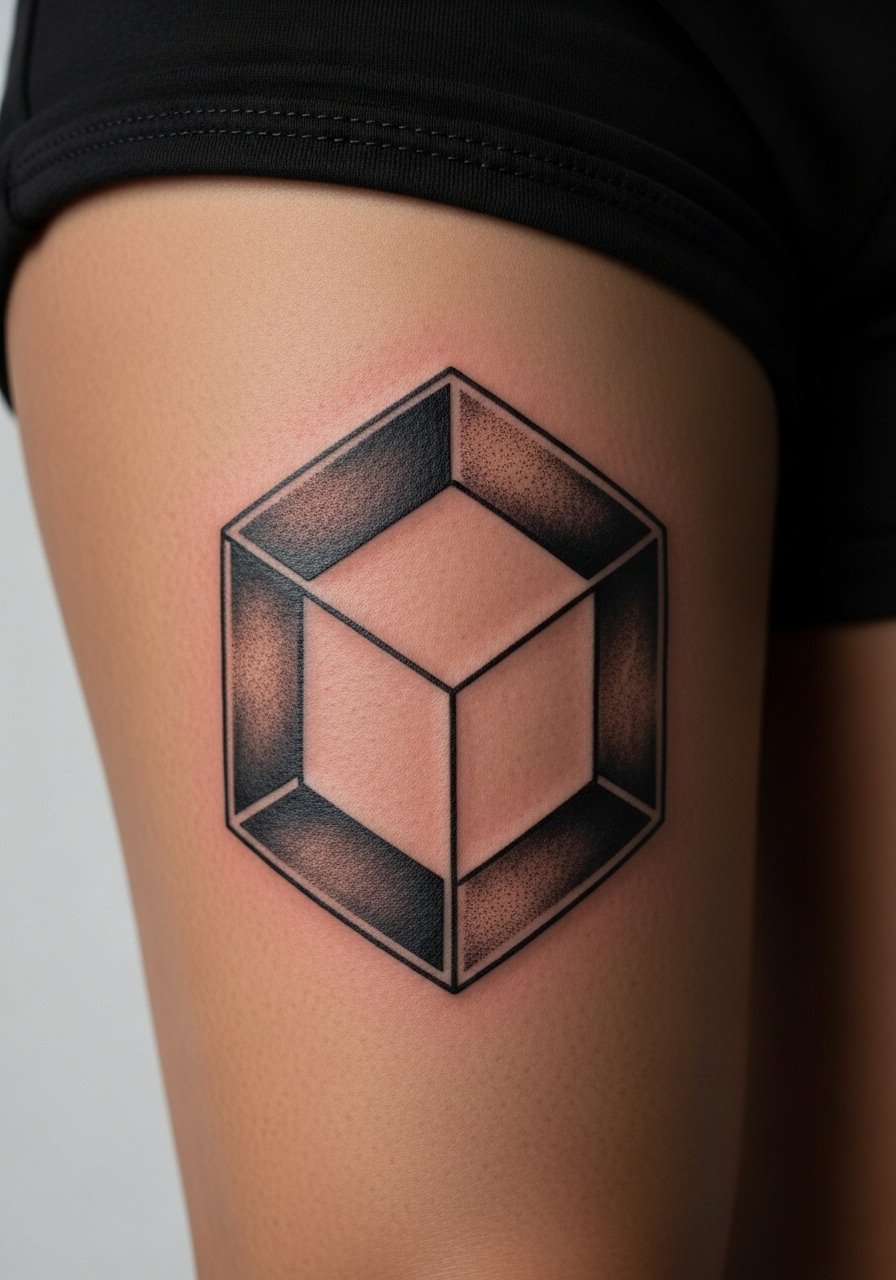
A hollow cube on the thigh uses negative space brilliantly—great for covering older ink or adding depth without heavy shading. Thigh placements are low-pain and forgiving with swelling. I've noticed negative space designs can hide minor line shifts as they heal. Common mistake: over-detailing the internal faces; keep geometry bold so the cube reads from a distance and up close. This design adapts well for diverse skin tones, especially with solid black edges.
13. Star of David with Concentric Circles on Ankle
Style/Technique: Geometric Blackwork / Minimalist
Pain Level: High (ankle)
Session Time: Short session
Best For: Symbolic small placement, balance symbolism
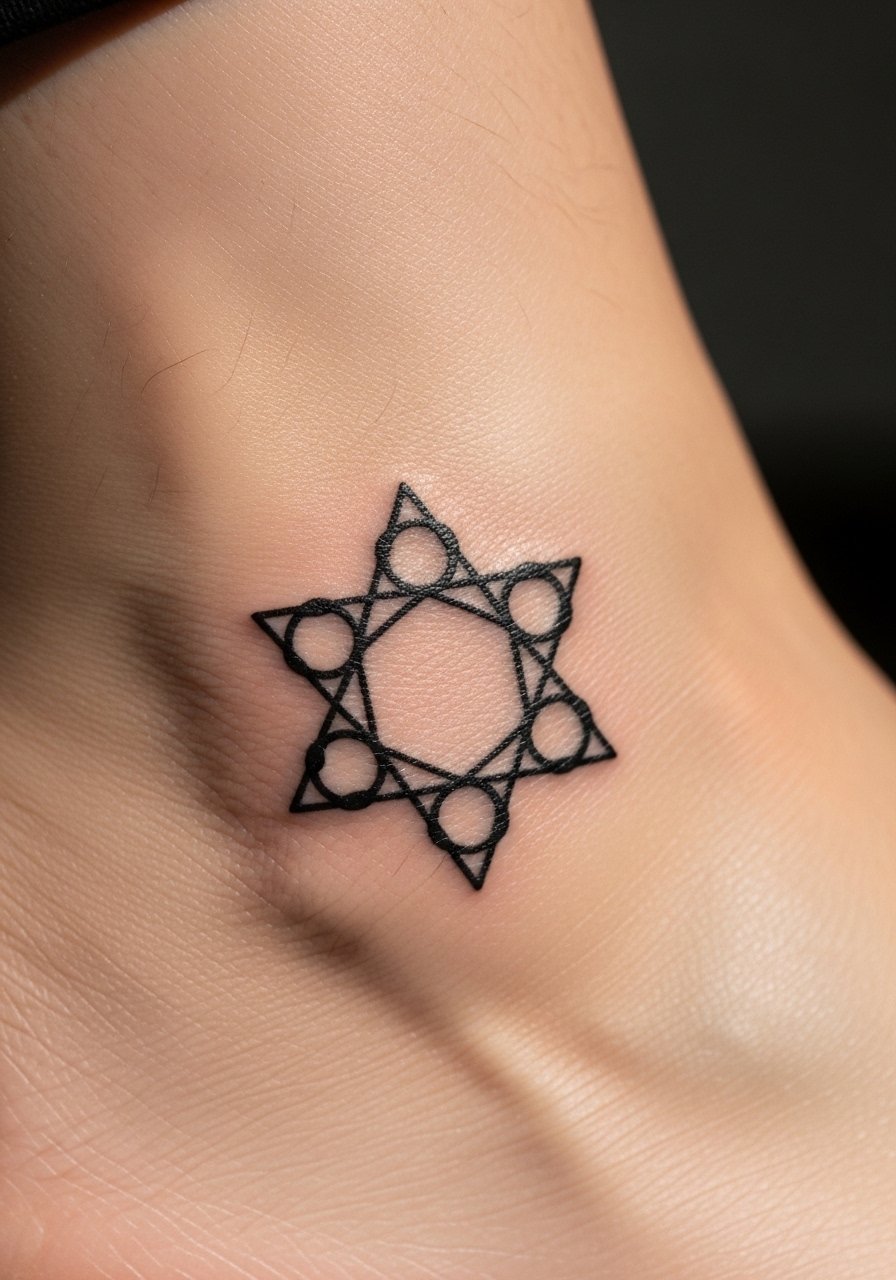
This compact design communicates unity of opposites and balance. The ankle is a pain hotspot—expect sharp, short bursts. Scale matters: keep the symbol large enough to preserve inner circle separation. From what I've seen, blackwork holds best on limbs where friction is moderate; avoid tiny filament lines. If you're nervous about ankle pain, plan for a quick single session and use numbing options after checking with your artist.
14. Grayscale Granite Sleeve with Radial Symmetry
Style/Technique: Black & Gray Realism / Geometric Texture
Pain Level: High (full sleeve)
Session Time: Multiple long sessions
Best For: Tactile depth seekers, full-arm statements
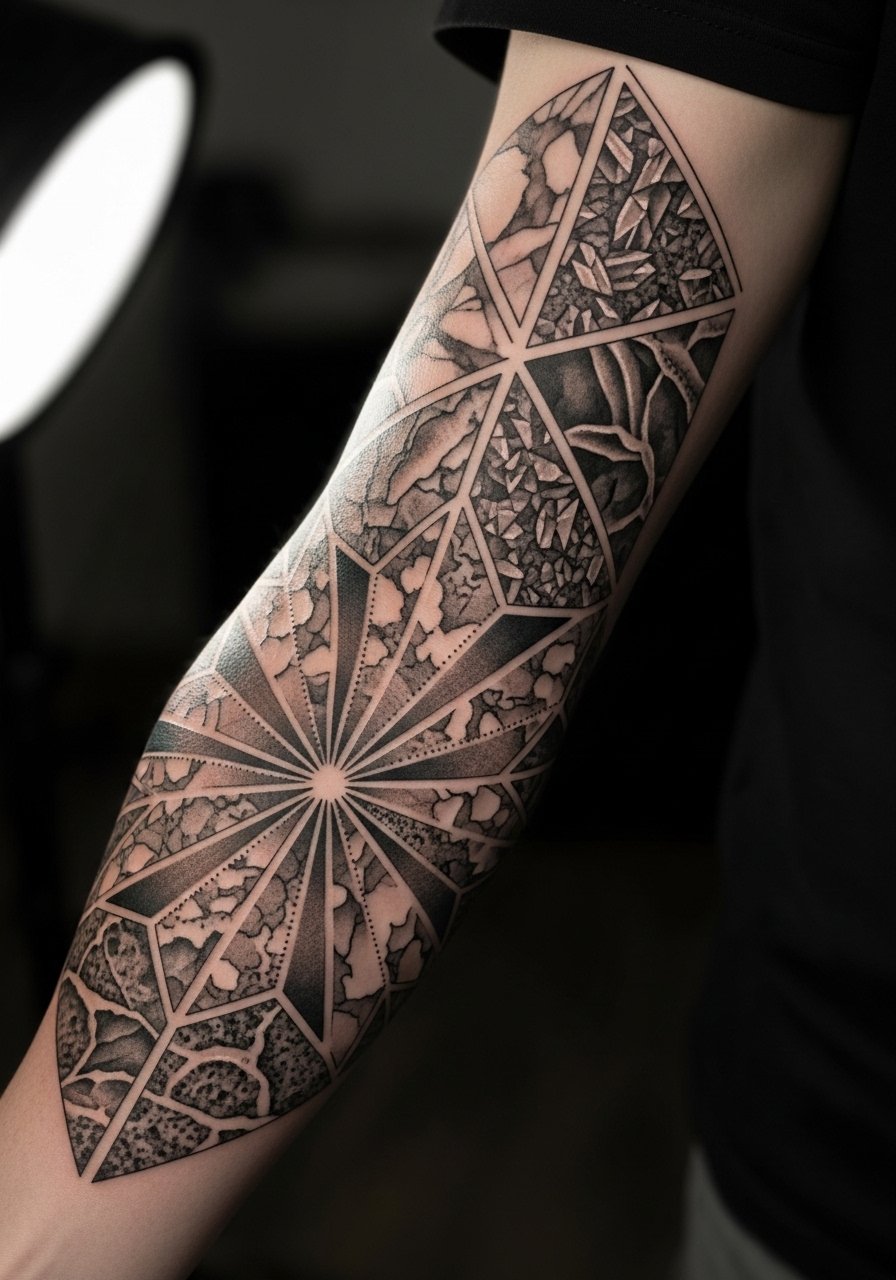
Grayscale granite brings a tactile, almost geological feel to sacred geometry. It reads like cosmic stone wrapping the arm. This is a commitment that ages beautifully if shading is done by an artist skilled in grayscale transitions. Expect tougher sessions and longer healing windows. I've seen these hold up because the texture creates forgiving edges—small blurring becomes atmospheric rather than messy. Avoid over-contrasting tiny details; larger strokes and subtle gradients fare better long-term.
15. Minimalist Dotwork Dot Triangle Behind Ear
Style/Technique: Minimalist / Single Needle Dotwork
Pain Level: High (behind ear)
Session Time: Very short session
Best For: Tiny hidden sacred geometry, subtle symbolism
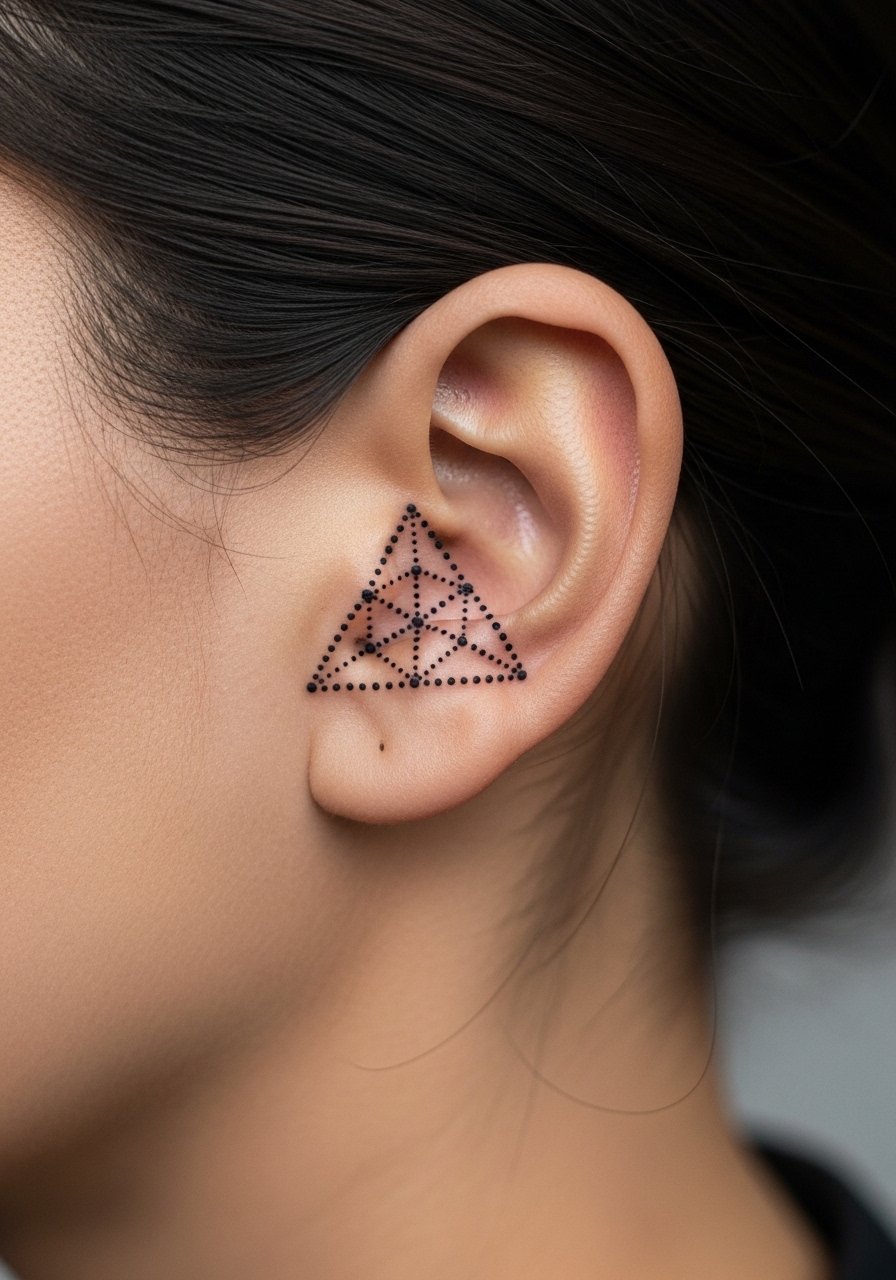
Hidden geometry behind the ear is intimate and subtle. The area is sensitive and heals quickly. Because it's so small, dotwork is the best approach—fine lines can spread. From my experience, keep the piece intentionally tiny but not microscopic; otherwise the triangle will lose its crispness. Bring a clear stencil and accept that touch-ups are common for tiny placements near hairlines.
16. Three-Dimensional Arm Wrap (3D Geometry Around Bicep)
Style/Technique: Blackwork / 3D Geometric Wrap
Pain Level: Medium (bicep/upper arm)
Session Time: 2–4 sessions
Best For: Dynamic flow, multi-angle visual impact
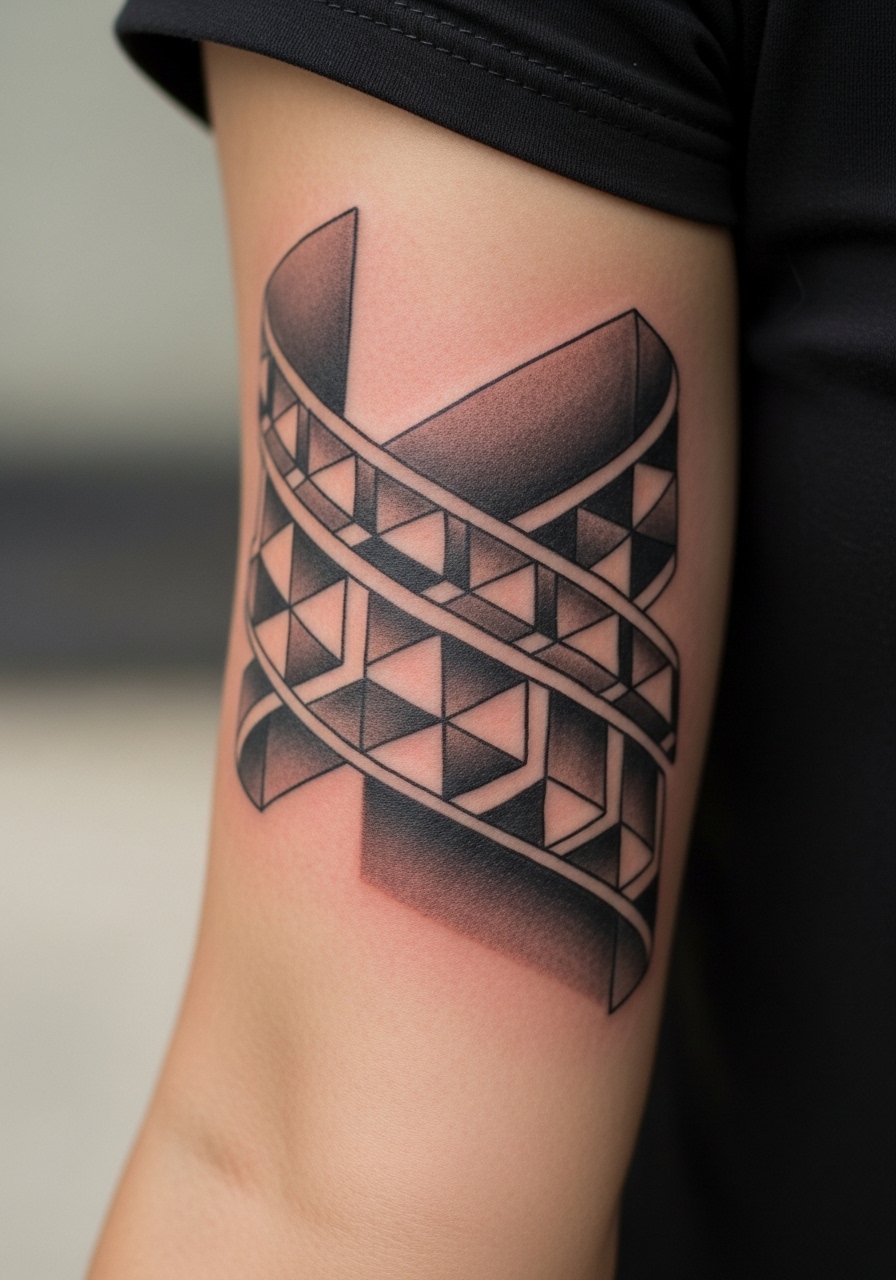
This under-covered idea—3D geometry wrapping the arm—creates movement and shifts as you flex. It’s visually striking and practical: the bicep provides a rounded surface that enhances the 3D illusion. I've seen artists use negative space and varied lineweight to sell depth. Avoid forcing a flat pattern around curves; have your artist mock up the stencil in motion. For aging, slightly bolder lines help the 3D effect persist.
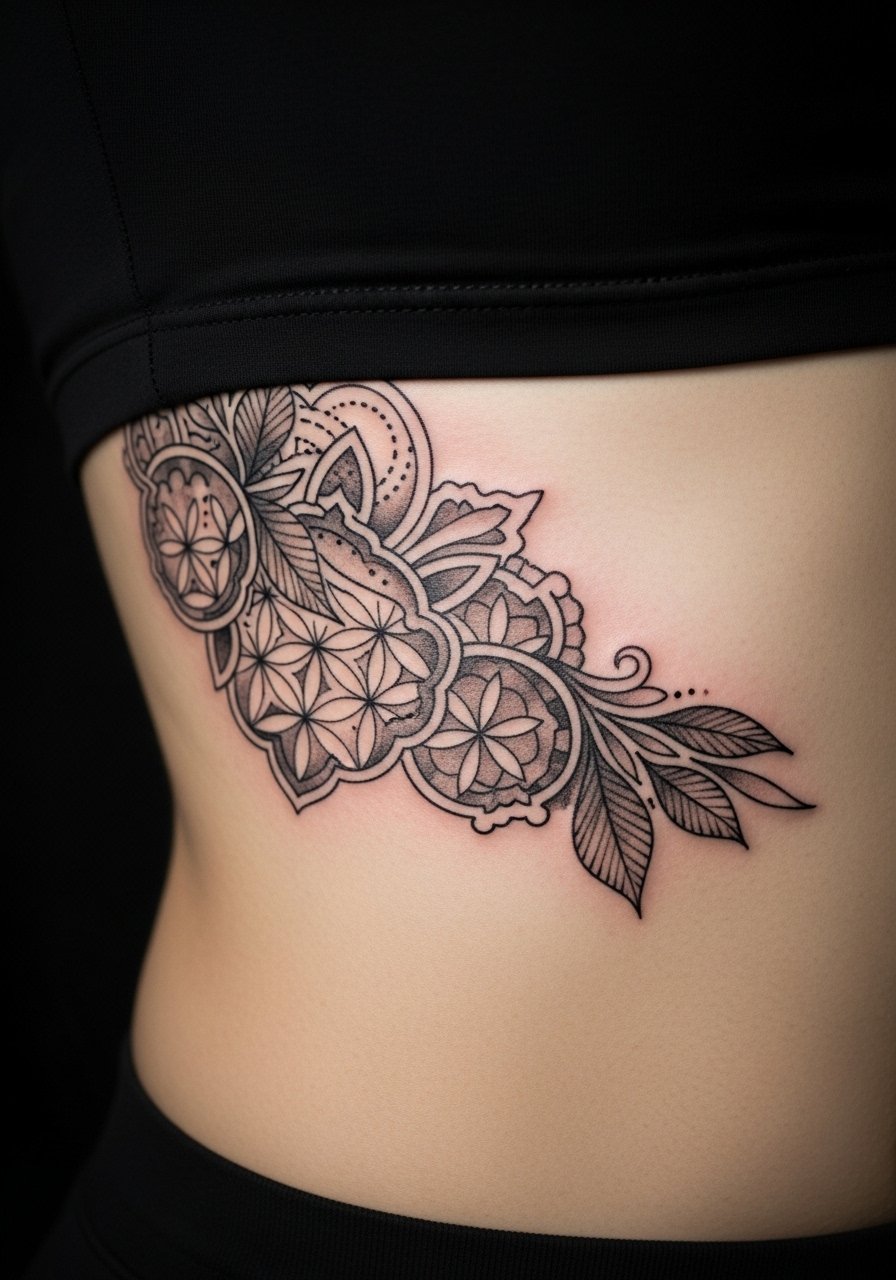
17. Sacred Geometry Thigh Mosaic with Floral Accents
Style/Technique: Geometric Mandala + Neo-Traditional Floral
Pain Level: Low-Medium (thigh)
Session Time: Multiple sessions
Best For: Feminine geometry, modular cover-ups
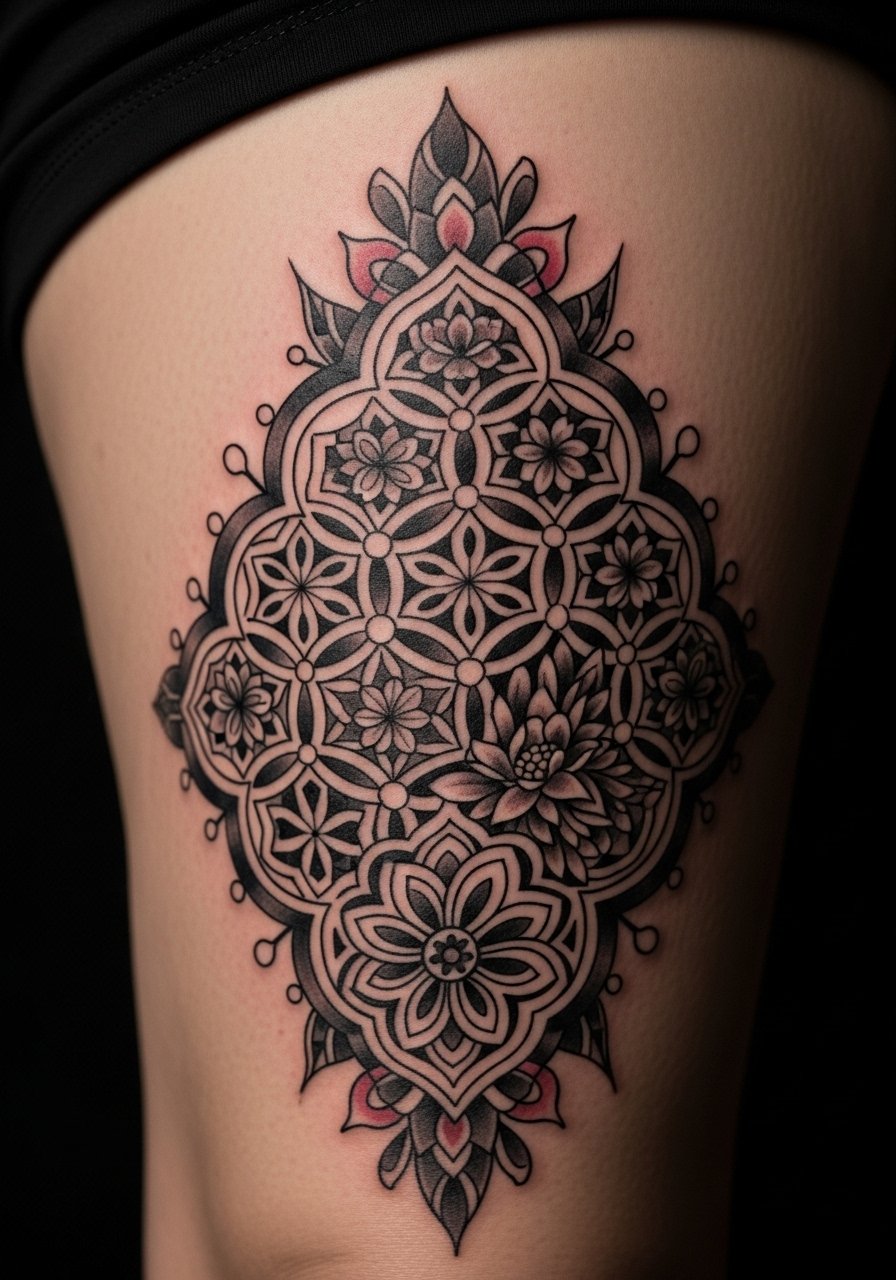
Blending mandala geometry with soft florals on the thigh creates balance between structure and organic shapes. The thigh is low-pain and ideal for larger, intricate layouts. I recommend keeping florals slightly softer so the geometric core remains the focal point. Artists often use this to mask older tattoos—geometry can swallow faded ink when planned well. Don't overload petals near edges; maintain negative space to prevent visual crowding as it heals.
18. Single-Line Infinity Geometry on Wrist
Style/Technique: Fine Line / Continuous Linework
Pain Level: High (wrist)
Session Time: Short session
Best For: Minimalist continuity, daily-visible reminders
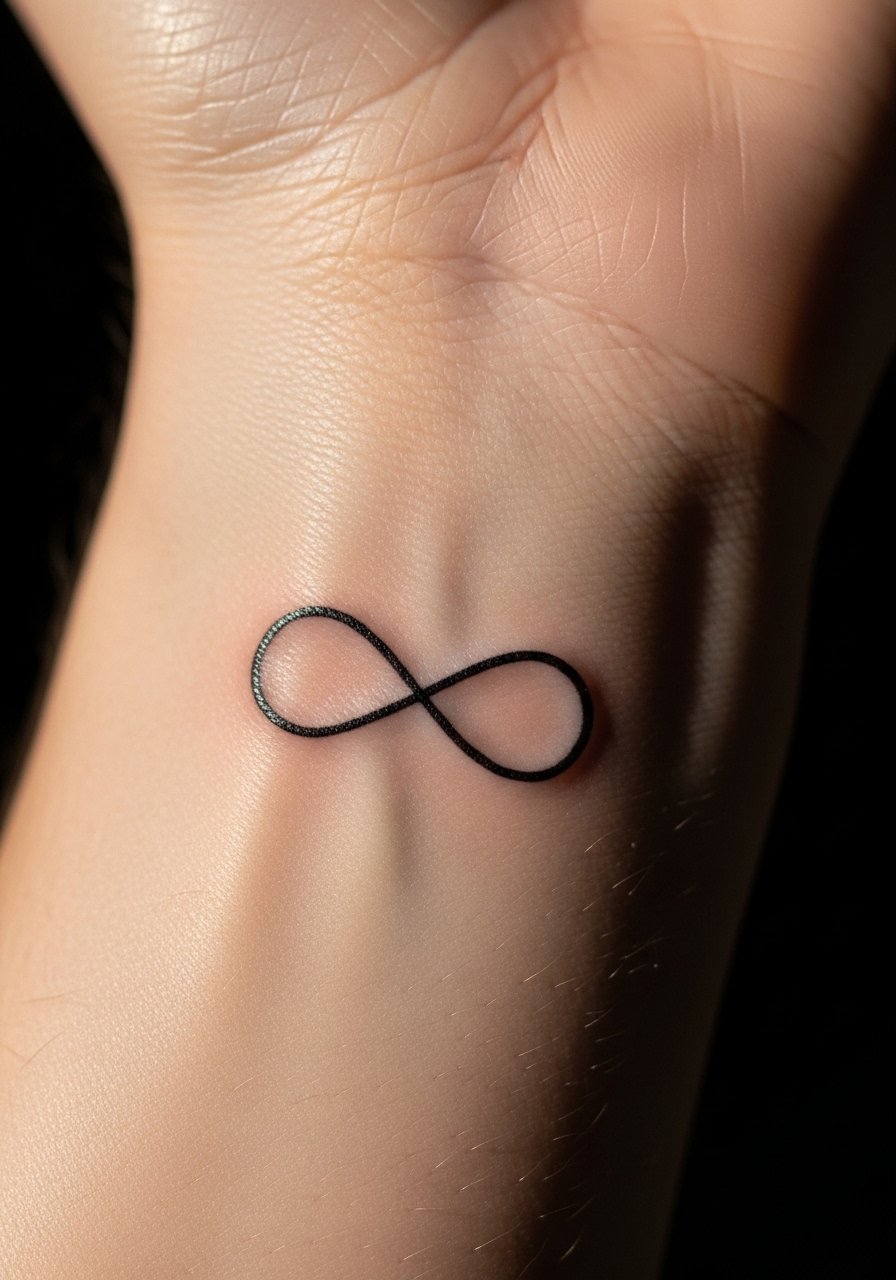
A continuous single-line geometry is elegant on the wrist but can be prone to blur because skin there is thin and mobile. Expect more frequent touch-ups in my experience. If you choose this, ask for a slightly bolder line and a modest size so the loop doesn’t lose its form. Wrist pieces are visible and meaningful but require disciplined aftercare and sun protection to maintain clarity.
19. Interlocking Circles Finger Band
Style/Technique: Minimalist / Micro Geometric Band
Pain Level: High (finger)
Session Time: Short session, possible touch-ups
Best For: Small symbolic bands, subtle sacred geometry

Finger geometry is charming but notorious for fading. I've watched micro bands wear faster due to constant friction and hand washing. If you still want this, accept that touch-ups are likely and choose a thicker band than you think. Blackwork tends to hold better than color. A common mistake is insisting on ultra-fine lines; they disappear quickly. Discuss long-term maintenance with your artist first.
20. Geometric Collarbone Constellation
Style/Technique: Fine Line / Geometric Constellation
Pain Level: High (collarbone area)
Session Time: 1–2 sessions
Best For: Subtle upper-chest geometry, visible neckline work
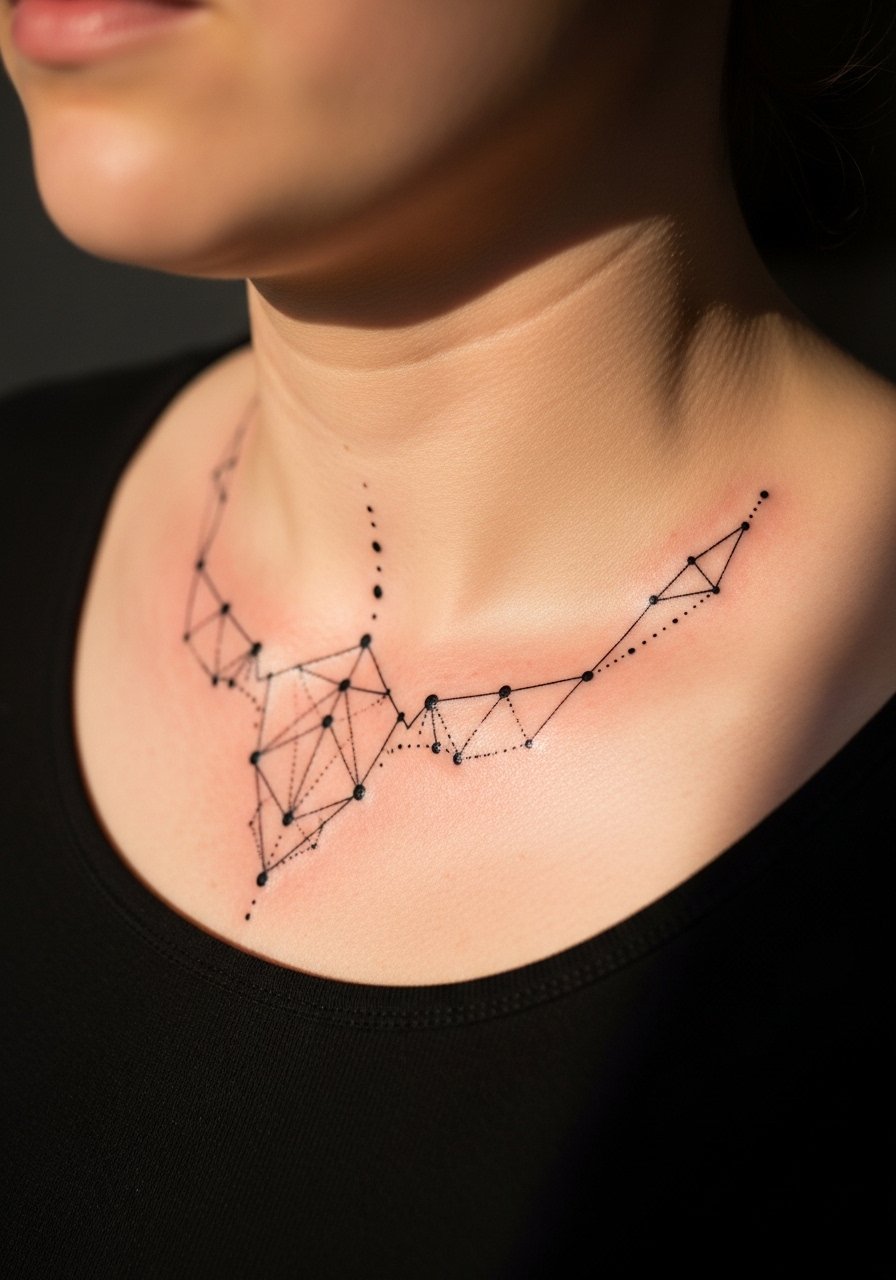
Collarbone geometry reads as delicate and visible with a neckline—great for balance-oriented designs. Pain is higher near bone. In my experience, spacing key points wider prevents lines from merging. Keep dot separators to preserve crispness and plan clothing for the first week to avoid rubbing. Artists usually advise against tiny clusters too close to the bone.
21. Nested Hexagon Sternum Anchored Piece
Style/Technique: Blackwork / Geometric Nesting
Pain Level: High (sternum)
Session Time: Multiple short sessions
Best For: Centered chest anchors, meditative centerpieces
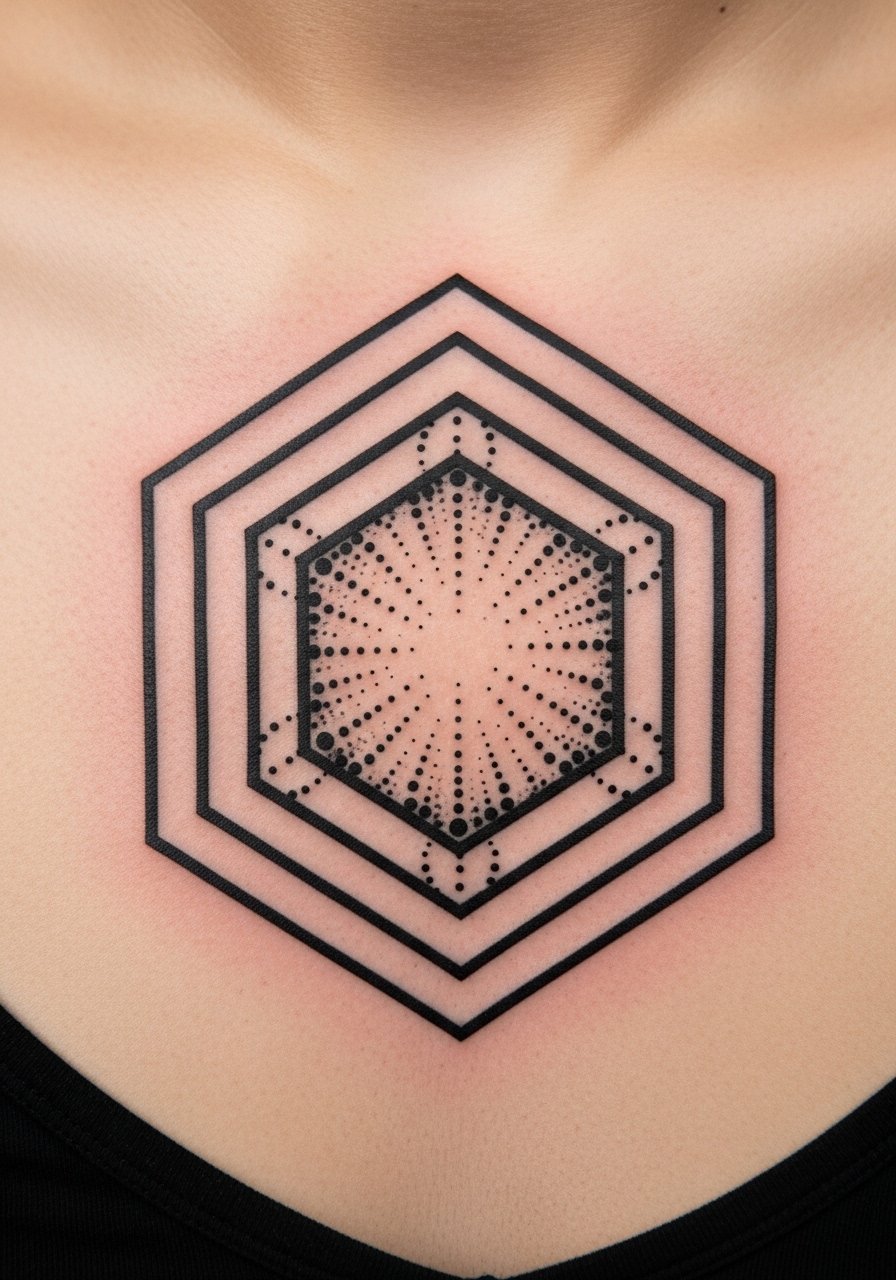
Sternum geometry is dramatic and symbolic but comes with higher pain. Nested hexagons create a ripple effect out from the center chest and feel grounding. From what I've seen, scaling and symmetry are critical—tiny misalignments show quickly. Keep interior details moderate; heavy interior shading on the sternum can age unevenly. Expect longer healing and careful clothing choices to prevent scabbing disruption.
22. Mandala Behind Knee Crescent Flow
Style/Technique: Dotwork Mandala / Curved Placement
Pain Level: High (behind knee)
Session Time: Short sessions with breaks
Best For: Unexpected placement, feminine flow pieces
Placing mandalas behind the knee creates a hidden flow that reads beautifully when you move. It’s a sensitive spot and can feel sharp during tattooing. Artists often break sessions there to manage discomfort. Because motion and bending affect healing, expect a cautious aftercare routine. I've seen these age gracefully if the mandala elements are not hairline-thin—give them bulk.
23. Concentric Circle Sunburst on Nape
Style/Technique: Fine Line / Radiating Geometry
Pain Level: Low-Medium (nape)
Session Time: 1 session
Best For: Subtle back-of-neck statements, spiritual radiance
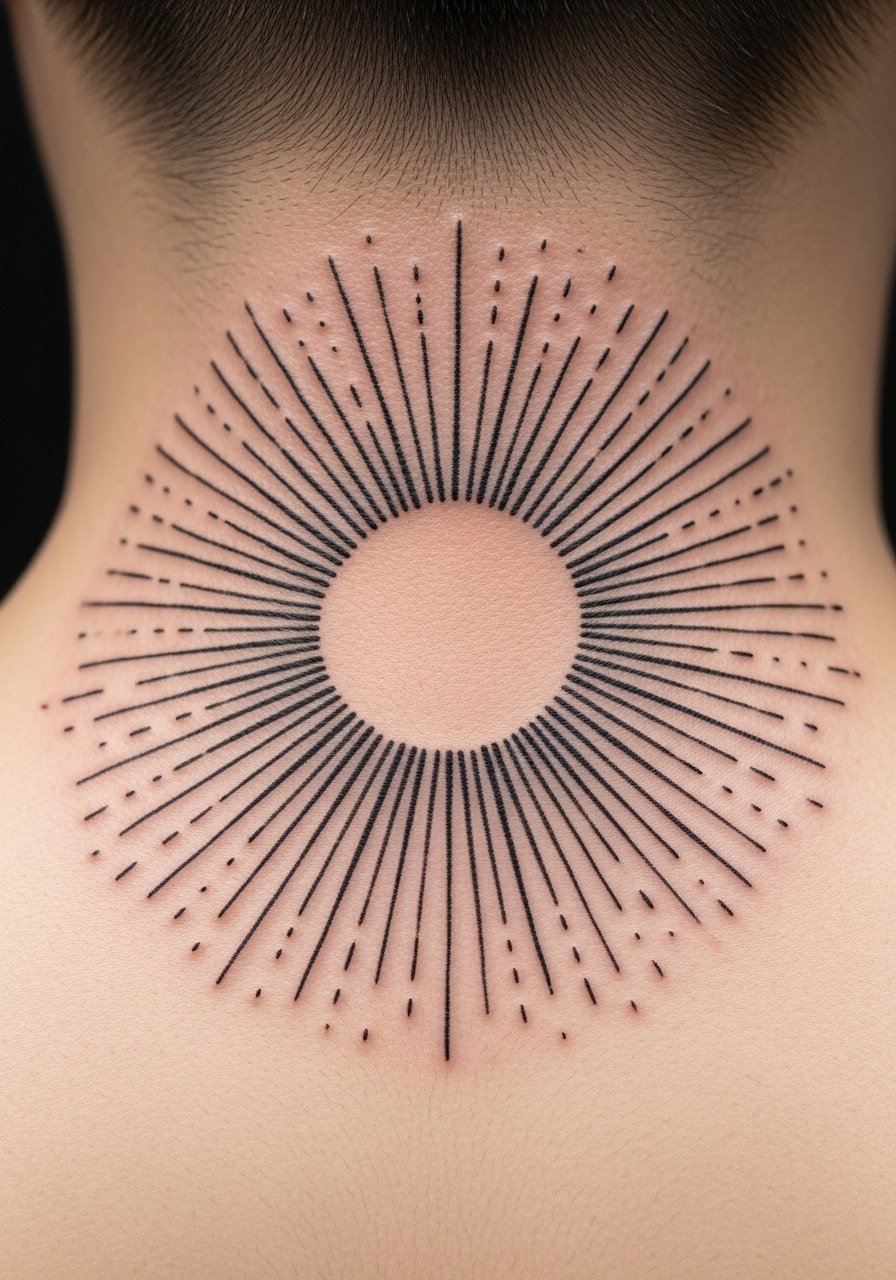
A sunburst or concentric circle motif at the nape is minimal but impactful. The area heals well if you keep hair away and avoid friction. In my experience, this placement is less painful than sternum or ankle but still visible enough to be a personal talisman. Keep the inner circle spacing deliberate; overlapping rings that are too tight blur over time.
24. Sacred Geometry Rib Panel (Leaf-Patterned)
Style/Technique: Blackwork / Geometric-Organic Hybrid
Pain Level: Very High (ribcage)
Session Time: Several sessions with breaks
Best For: Private pieces, dramatic curvature designs
Ribcage geometry is bold and intimate. Pain is high but placement is easy to cover with clothing. I’ve noticed rib panels look best when the artist follows the body’s natural curve—this avoids distortion when you breathe or move. Healing requires careful aftercare because clothing rub can cause scabbing issues. Keep patterns slightly larger to counteract potential blurring.
25. Fractal Geometry Behind Elbow Crescent
Style/Technique: Dotwork / Fractal Patterning
Pain Level: High (behind elbow)
Session Time: 1–2 sessions
Best For: Motion-friendly geometry, elbow accents
Behind-elbow pieces move with your arm and create a kinetic look. It’s sensitive and a tricky healing zone due to flexing. From what I’ve seen, keep the fractal elements broad and avoid tiny stippling on the crease line. Artists often recommend light motion restrictions early in healing to reduce scab disruption. This piece ages well if designed with skin movement in mind.
26. Modular Honeycomb Patchwork on Calf
Style/Technique: Blackwork / Hex Mosaic Patchwork
Pain Level: Low-Medium (calf)
Session Time: 2–3 sessions
Best For: Buildable projects, cover-up integration
A modular honeycomb allows you to expand over time—one of the designer-friendly approaches I recommend. The calf is forgiving and less prone to distortion. I've seen people use this to mask old ink by layering new cells. Keep some cells bold and some open to maintain visual rhythm. Ask your artist how new patches will connect to older work to avoid awkward seams.
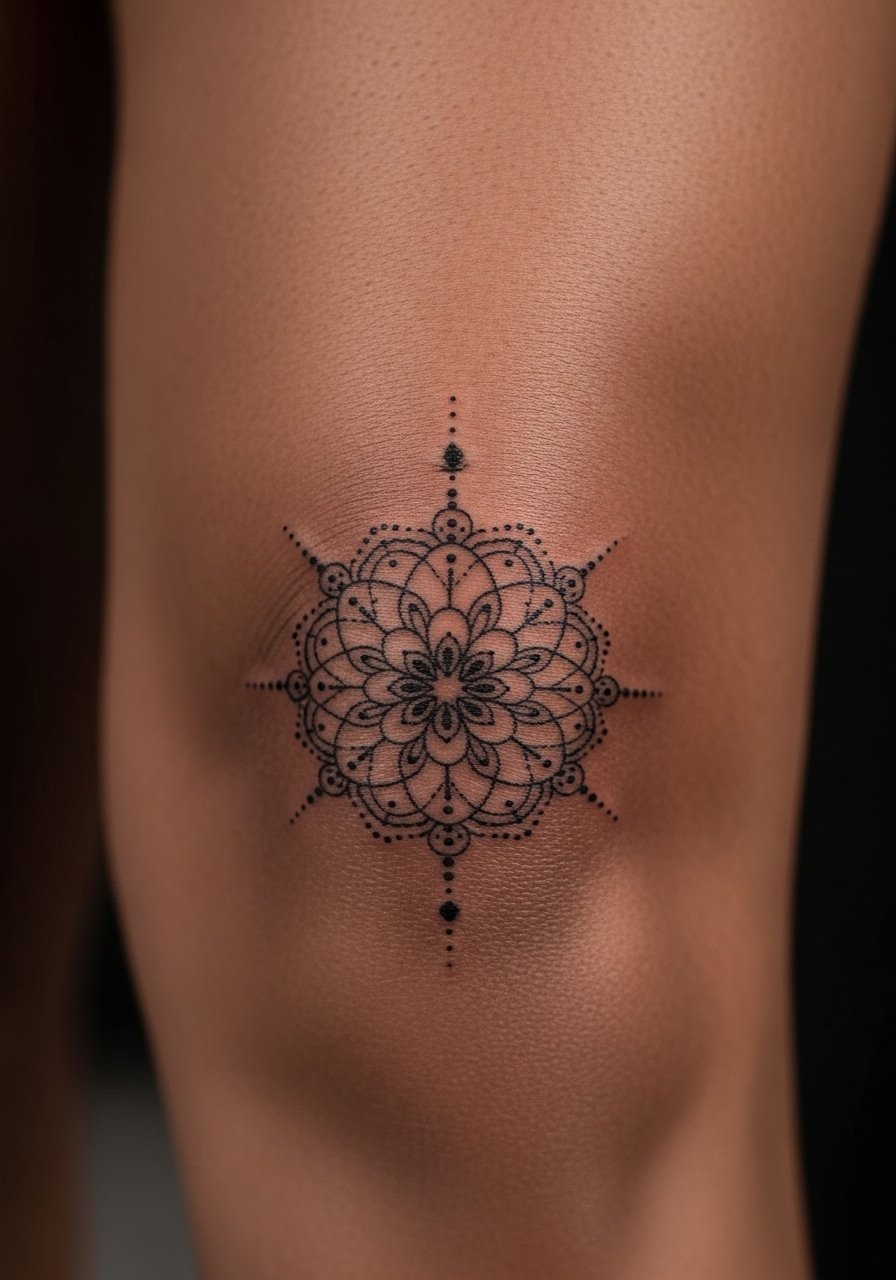
27. Geometric Heart-Center Chest Medallion
Style/Technique: Fine Line / Centralized Mandala
Pain Level: Medium (center chest)
Session Time: 1–3 sessions
Best For: Heart-centered symbolism, visible devotion pieces
A chest medallion centered over the heart reads like a personal talisman. It has emotional resonance and suits mandala geometry. Pain is moderate and healing benefits from minimal movement. I've found that keeping inner mandala elements slightly bolder helps them persevere. A common error is over-detailing too close to the sternum—space is the friend of geometry here.
28. Small Sacred Geometry Behind Shoulder Micro-Grid
Style/Technique: Minimalist / Micro Geometric Grid
Pain Level: Low (behind shoulder)
Session Time: Short session
Best For: Small, elegant homes for sacred shapes
Behind the shoulder is low-pain and perfect for a small grid or constellation of shapes. Micro-grids look best when the artist balances dotwork and line; too fine and the grid dissolves. I've suggested this placement to friends who want a sacred geometry piece that’s discreet but meaningful. Follow-up touch-ups are less common here because the area isn’t exposed to constant friction.
Tattoo Prep and Aftercare Essentials
Aftercare Essentials:
- Aquaphor Healing Ointment, 14oz tube — Recommended for first 3–5 days to keep fine-line work pliable
- Saniderm Transparent Adhesive Bandage, 6-inch roll — Second-skin option many artists actually recommend for the first 24–72 hours
- CeraVe Fragrance-Free Moisturizing Lotion, 12oz — Fragrance-free lotion for days 4–14 to prevent cracking
Before Your Appointment:
- Tattoo Numbing Cream with 5% Lidocaine, 30g — Use only after checking with your artist; helpful for sensitive placements
- Tattoo Stencil Transfer Paper, A4 Pack — Useful if you’re testing custom layouts at home
Long-Term Maintenance:
- SPF 50 Sunscreen Stick for Tattoos, 0.5oz — Daily sunscreen is the single best thing to prevent fading in my experience
- Mad Rabbit Tattoo Balm, 1.75oz — Artists I follow mention this as a good post-healed moisturizer
- Hustle Butter Deluxe, 3.4oz — Vegan option popular for long-term vibrancy
Optional Comfort & Repair Items:
- Tattoo Numbing Spray, 2oz — For touch-ups or very sensitive sessions (ask artist first)
- Hydrocolloid Bandages, Pack of 20 Large — Helpful for small scabs or spot protection during healing
- Dr. Bronner's Unscented Castile Soap, 32oz — Gentle cleaning during first week
These are the items I personally keep in my tattoo kit; artists I talk to often agree on Aquaphor, Saniderm, and a good fragrance-free lotion as essentials.
Frequently Asked Questions
Q: How bad does a tattoo actually hurt?
A: Pain varies by placement and your tolerance. Fleshier areas like the outer thigh or upper arm tend to be mild; ribs, sternum, elbow, and ankle can be sharp. It feels more like a persistent scratching or burning than a single unbearable spike. For sensitive spots try a topical numbing cream only after checking with your artist and follow with gentle aftercare like Aquaphor.
Q: How do I choose a sacred geometry design I won't regret?
A: Sit with your idea for months and test placement with temporary markers. I tell friends to favor timeless symbols—Flower of Life, Seed of Life, Metatron's Cube—over trendy mash-ups. Ask an artist about sacred proportions and request healed photos in their portfolio to see how their linework ages.
Q: What if my lines blur over time?
A: From what I've seen, line blur happens when designs are too small or lines are ultra-fine. Choose slightly bolder outlines for high-motion areas and prioritize blackwork or dotwork for longevity. Sunscreen and moisturizer keep the skin healthy and slow blur.
Q: Can I work out right after getting a geometry tattoo?
A: Wait at least 48–72 hours before light activity, longer if the piece is in a flex area like the elbow or ribs. Sweating can introduce bacteria and cause scabbing to lift; protect new ink with loose clothing and focus on clean, dry healing.
Q: How should I maintain an intricate mandala so it lasts?
A: Keep it out of direct sun, moisturize regularly with a fragrance-free lotion, and consider periodic touch-ups. I also use a sunscreen stick for daily protection—it's the simplest step that preserves fine dotwork and blackwork.
Q: Do sacred geometry tattoos look different on darker skin tones?
A: Yes. In my experience, bold blackwork and dotwork translate best across skin tones; very light inks (white) or muted pastels can vanish on deeper skin. Ask to see healed work on skin tones similar to yours and pick an artist who shows diverse healed examples.
Q: What's the best aftercare for fine-line sacred geometry tattoos?
A: Gentle cleansing, thin layers of an ointment for the first few days, then fragrance-free lotion. Many artists recommend Saniderm for initial protection—use it exactly as instructed. Avoid picking at flakes; keep tattoos out of prolonged sun exposure and use SPF 50 sunscreen after healed to prevent fading.
Q: Are cover-ups possible with sacred geometry?
A: Absolutely—geometry can swallow older ink if you design with negative space and layered shapes. Hollow cubes, honeycomb mosaics, or denser mandalas are options. Talk to your artist about what parts of the old piece you want hidden and bring reference photos so they can plan a modular, expandable cover-up.
