I spent months sketching my own rib design and asking artists about which styles actually age well on the side—these 25 delicate rib tattoos are the ones I kept coming back to. They work with natural curves, feel intimate under clothing, and (critically) can be scaled up or kept whisper-small depending on your pain tolerance.
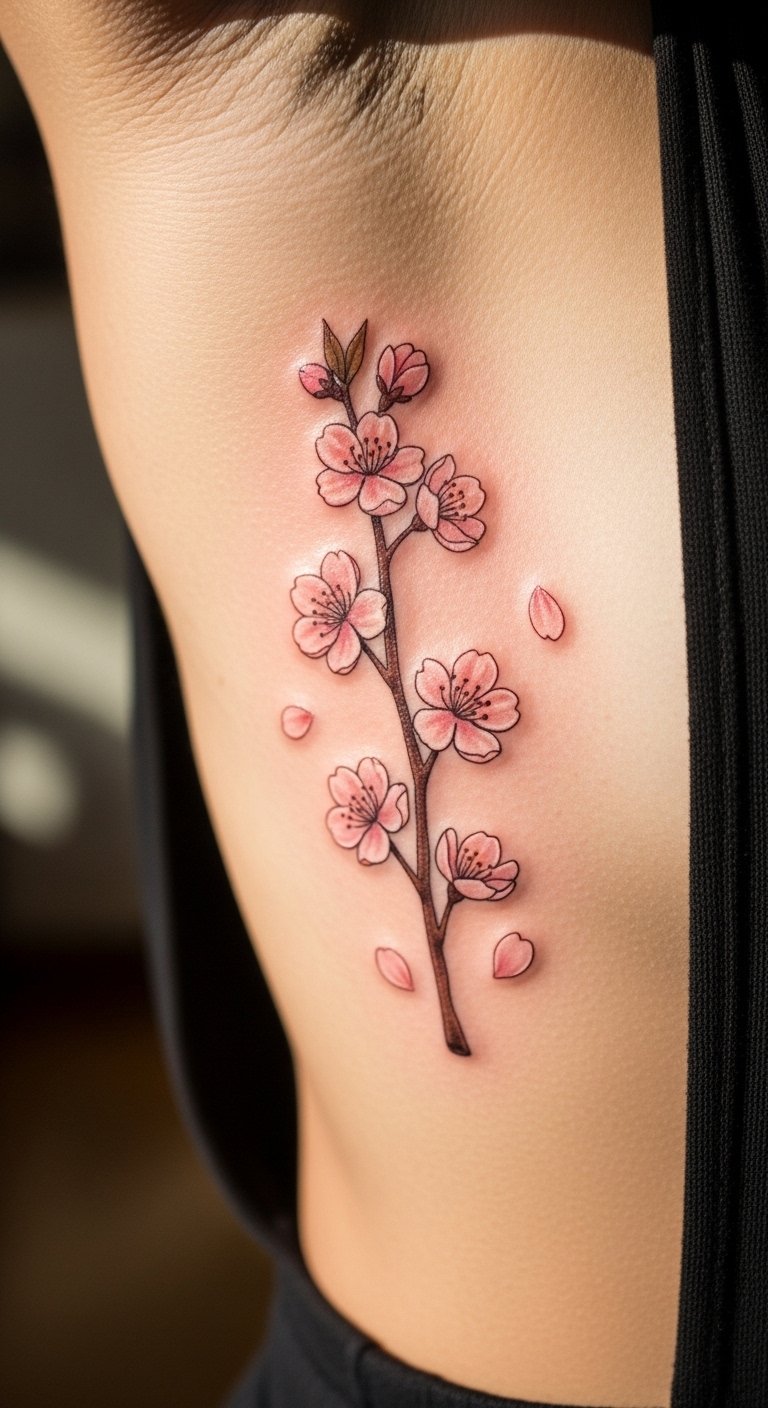
Fine Line Cherry Blossoms on Mid-Rib
Style/Technique: Fine Line / Botanical
Pain Level: Medium-High (6/10)
Session Time: 1–3 hours (single or two short sessions)
Best For: Feminine, underboob or mid-rib placements
I love cherry blossoms here because the organic shapes move with breathing and curves. Fine line keeps the piece delicate; blossoms and falling petals read intimate when you peek at them in a mirror. Expect sharp sting near the lower ribs and slower healing for shaded buds. Ask your artist for healed photos of similar line weights—too-weak lines can blur over time. Keep moisturized and sun-protected while it settles.

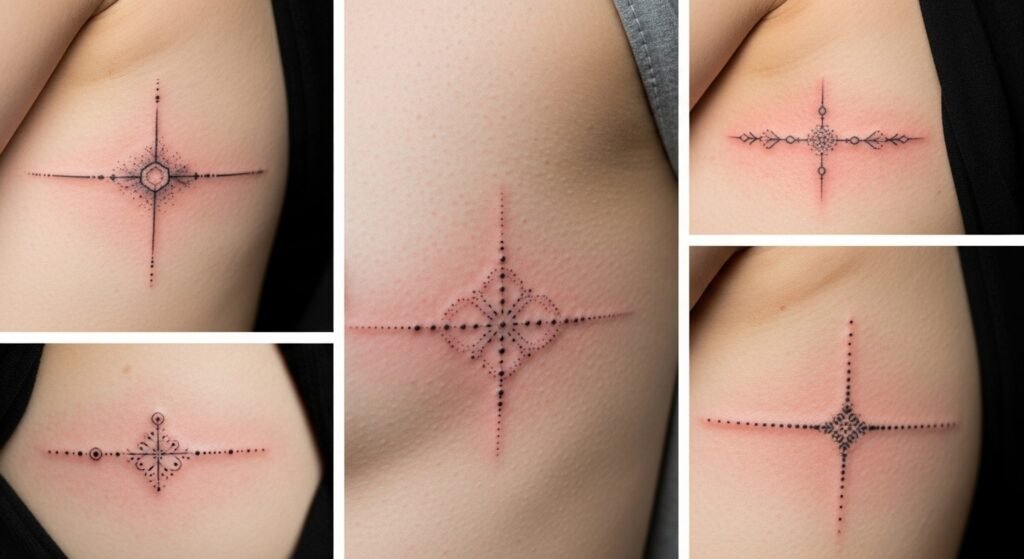
Vertical Script Quote Along the Side Rib
Style/Technique: Modern Calligraphy / Script
Pain Level: High (7/10)
Session Time: 1–3 hours
Best For: Personal mantras, elongated placement that follows ribs
A vertical line of script uses the rib’s natural length—very intimate when tucked under a top. Modern calligraphy looks airy but needs a steady hand: thin flourishes can soften with time, so favor slightly bolder single-line scripts. Pain spikes where ribs are close to the skin, so short breaks help. Bring your exact lettering sample and ask the artist to stencil it on your body to see how it flows with breathing.
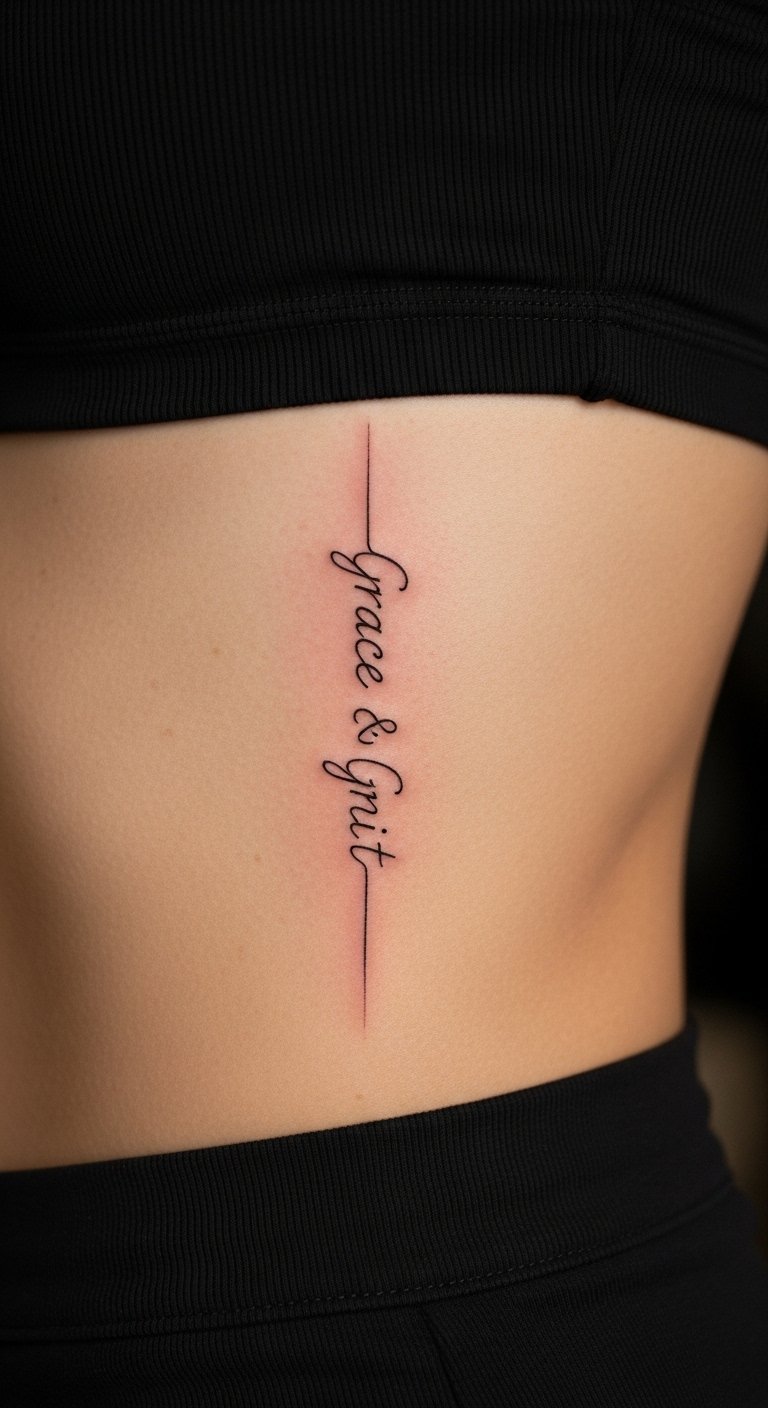
Minimalist Geometric Triangles on Upper Rib
Style/Technique: Minimalist / Geometric
Pain Level: Medium (5/10)
Session Time: 30–90 minutes
Best For: First rib tattoo, low-commitment delicate geometry
Simple stacked triangles or a small hex pattern reads modern and intimate. Geometric pieces need precise spacing—tiny mistakes stand out, so pick an artist experienced in line work. These are quick sessions and easier to tolerate because you can pause after a short piece. Lines may thicken slightly over years; heavier, confident strokes hold better than hairline ones.
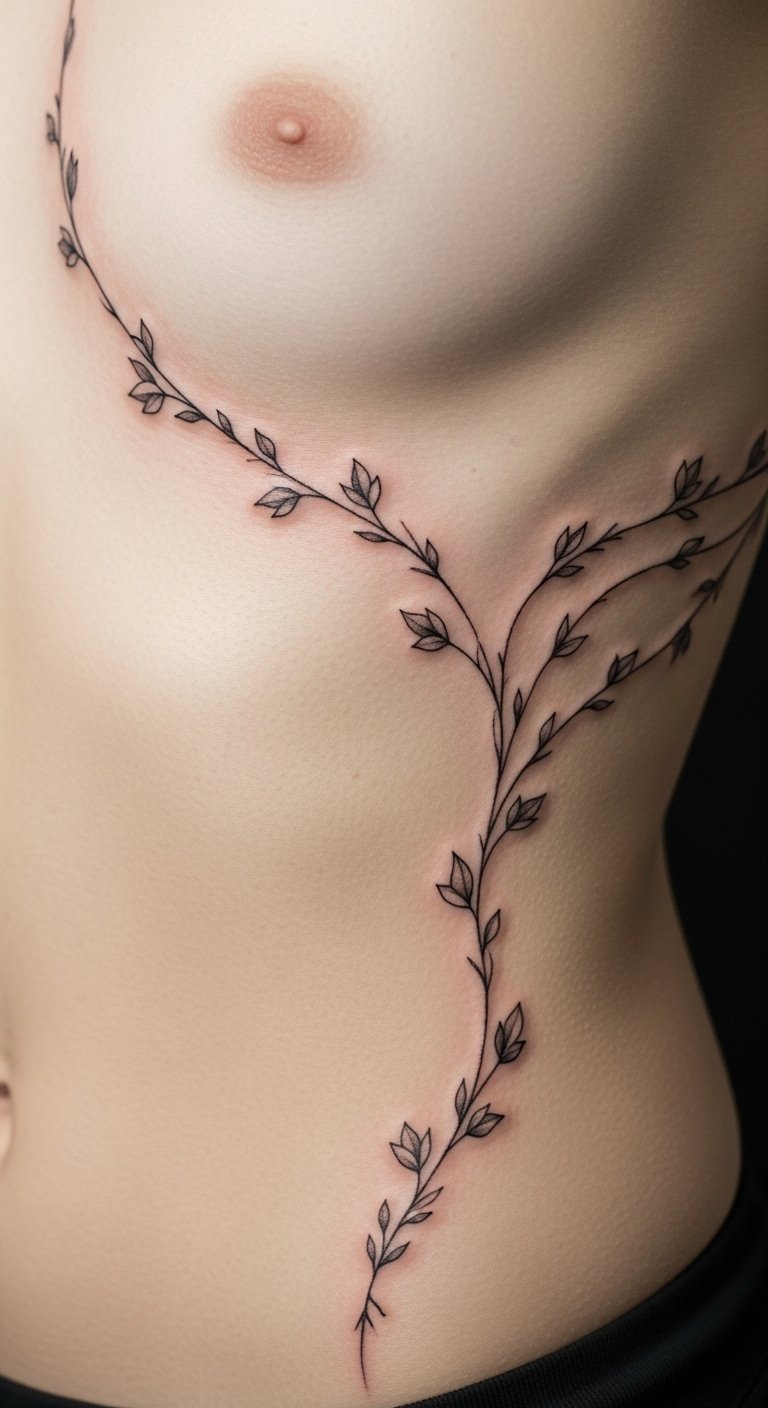
Botanical Vine Wrap Along the Ribs
Style/Technique: Fine Line / Illustrative Wrap
Pain Level: High (7–8/10 for longer wraps)
Session Time: Multiple short sessions for longer wraps
Best For: Flowy pieces that move with your body
A slim vine that wraps a couple of ribs looks like jewelry under clothes. Organic shapes camouflage skin movement better than rigid patterns. Longer wraps are more painful because of session length; I recommend splitting into two short appointments. For aging, pick slightly thicker veins and leaf lines so detail holds as skin stretches.
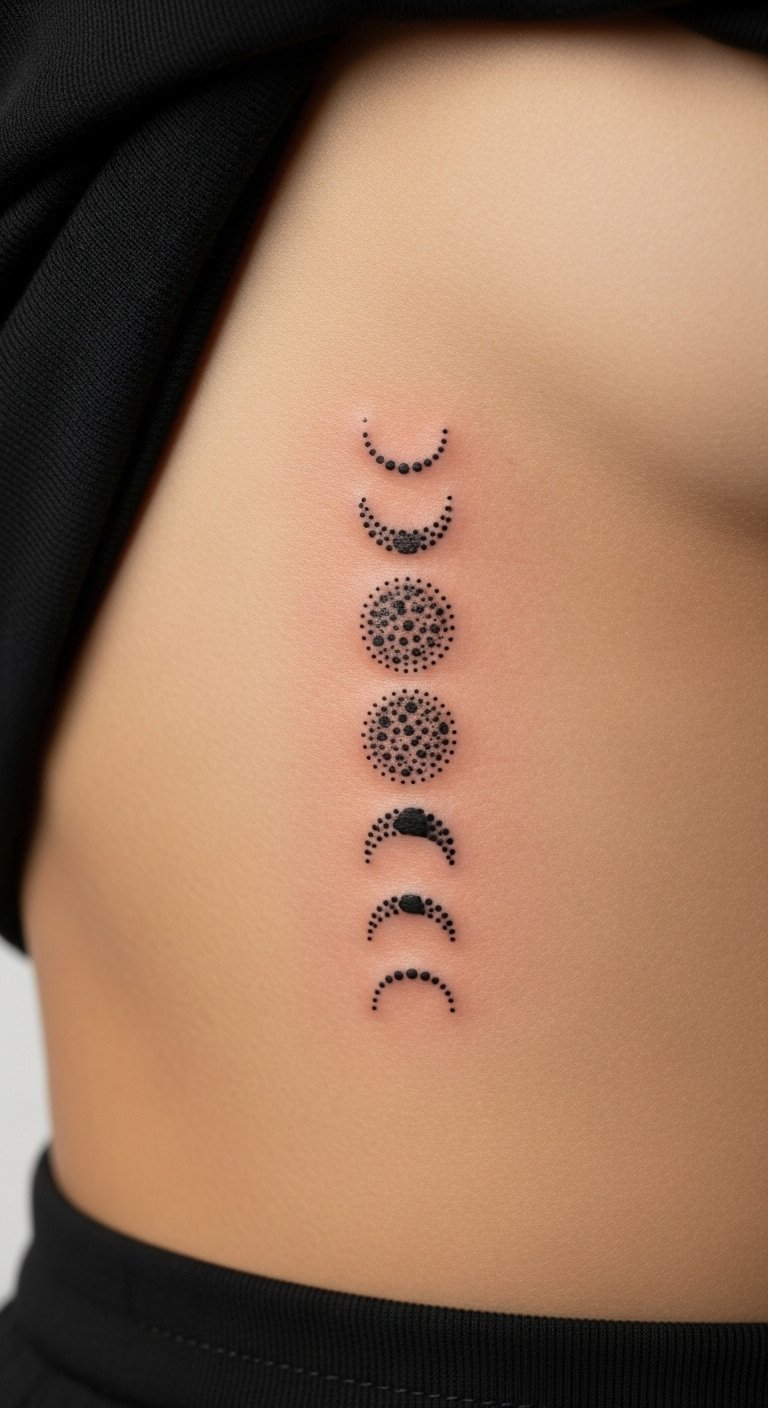
Moon Phases Micro-Realism Mid-Rib
Style/Technique: Micro-Realism / Dotwork
Pain Level: Medium-High (6–7/10)
Session Time: 1–2 hours
Best For: Symbolic, small but detailed pieces
Moon phases stacked vertically make the rib feel like a secret timeline. Micro-shading and dotwork give texture without heavy color. Because these are small, they’re good for testing rib pain tolerance; however, precise dotwork needs a steady artist. Expect surface peeling around days 3–7 and gradual brightening as skin heals.
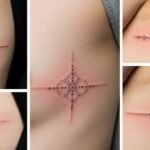
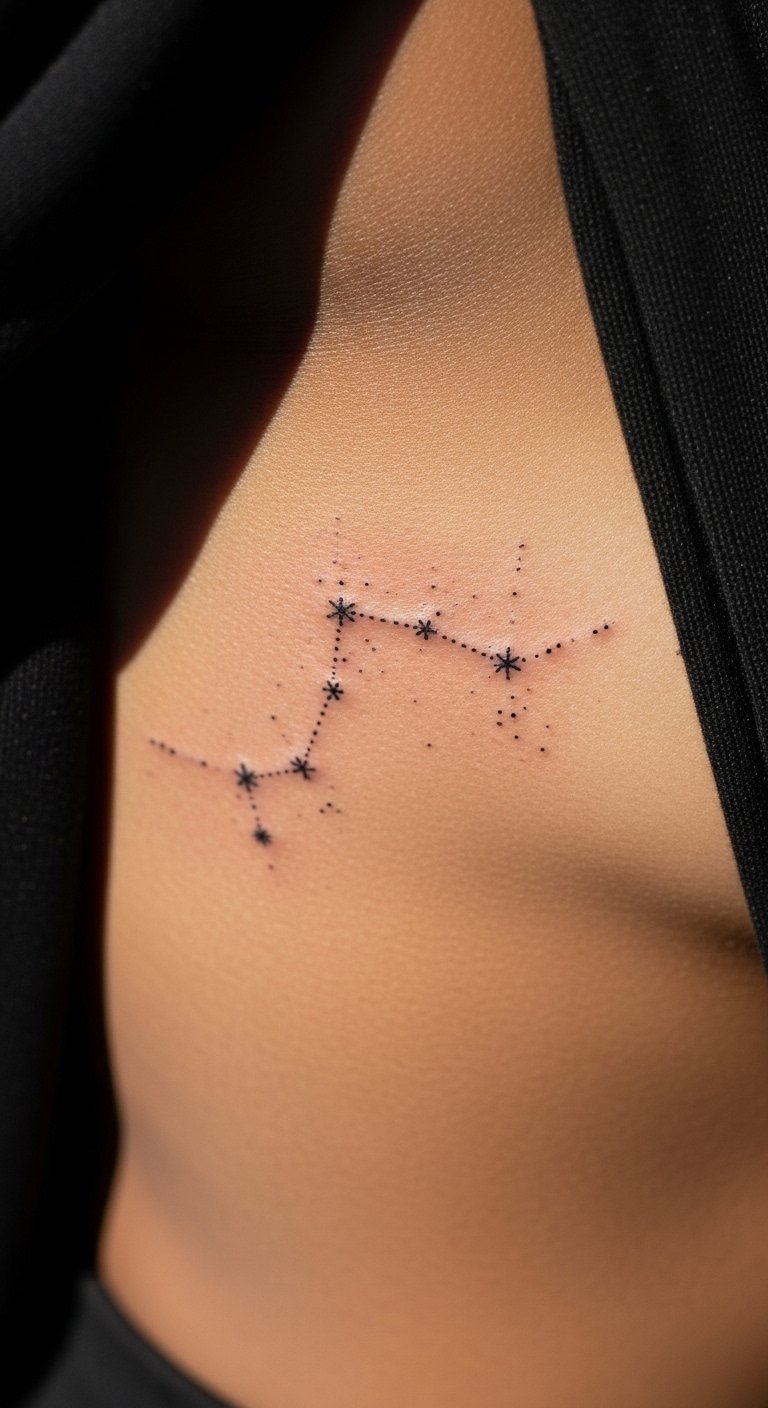
Tiny Constellation Along the Rib
Style/Technique: Minimal / Dotwork
Pain Level: Medium (5–6/10)
Session Time: 30–60 minutes
Best For: Personalized, subtle placement
I used my star pattern here for something private and meaningful. Constellations map well to the rib’s vertical canvas; delicate dotwork and tiny connecting lines read intimate. Keep expectations realistic for line sharpness—closely spaced dots can blur over time, so ask for slightly more spacing or bolder dots.
Feather Quill Along Lower Rib
Style/Technique: Fine Line / Illustrative
Pain Level: High (7/10)
Session Time: 1–2 hours
Best For: Whimsical, flowing placement under the bust
A feather that tapers into bare linework looks like it's floating on your skin. Feathers can be shaded delicately, but avoid ultra-thin barbs—they're the first to blur. I found positioning with arm raised helps give the artist a smooth plane, and that little change makes the tattoo sit cleaner when healed.

Hummingbird in Flight Near Underboob
Style/Technique: Neo-Realism / Fine Line
Pain Level: High (7–8/10)
Session Time: 1–2 hours
Best For: Feminine placement, a peek-a-boo reveal
Tiny birds look dynamic on the rib. Because the design follows muscle and breathing, choose a pose that curves with the body. Color adds vulnerability to the piece—if you go for pastels, know they fade faster and need touch-ups. I recommend healed photos from an artist before committing to color.

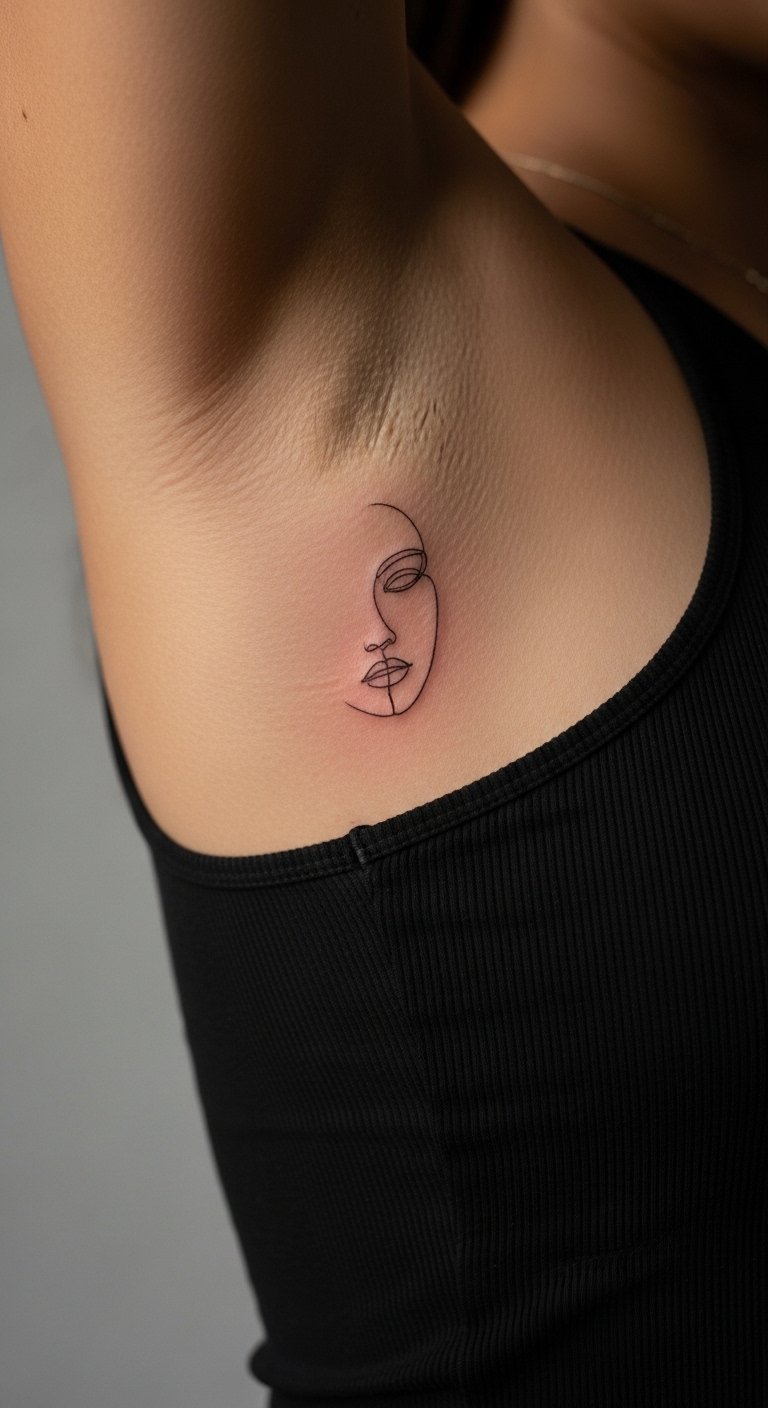
Single-Line Face Continuous Design on Side Rib
Style/Technique: Continuous Line / Minimalist
Pain Level: High (7/10)
Session Time: 1–2 hours
Best For: Artsy, discreet pieces that read abstract
Single-line portraits make an intimate statement without shouting. The rib’s curve can exaggerate the face in a flattering way—artists often position the line to follow the obliques. Because the design is so open, any shakiness is visible; choose an artist confident with continuous-line work.
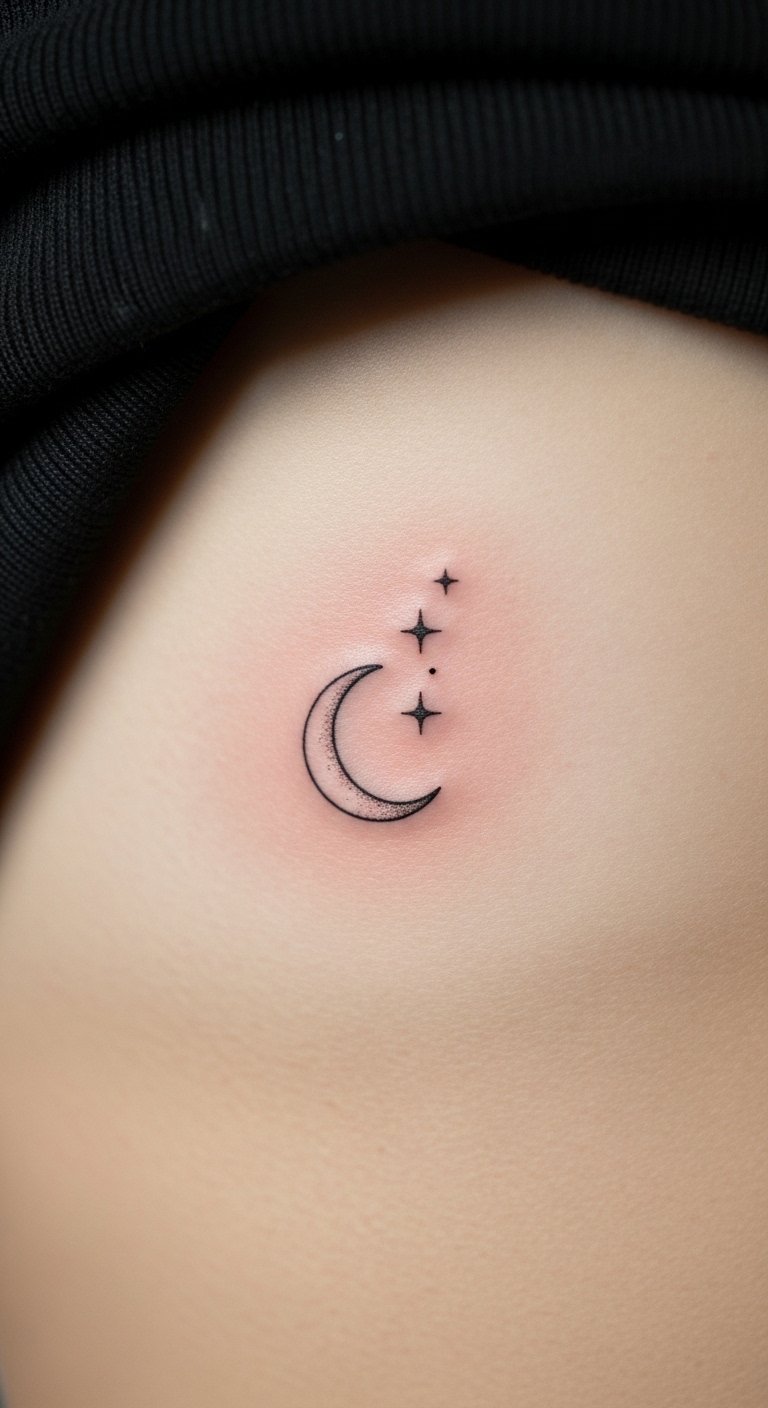
Crescent Moon and Tiny Stars on Upper Rib
Style/Technique: Fine Line / Minimal
Pain Level: Medium (5–6/10)
Session Time: 30–60 minutes
Best For: Subtle, nightly-symbol pieces
A small crescent with sprinkled stars feels private and elegant. It’s forgiving when placed high on the rib where padding helps; avoid packing too many tiny stars—simplicity wins here. Sunscreen is essential once healed to keep crisp black lines.
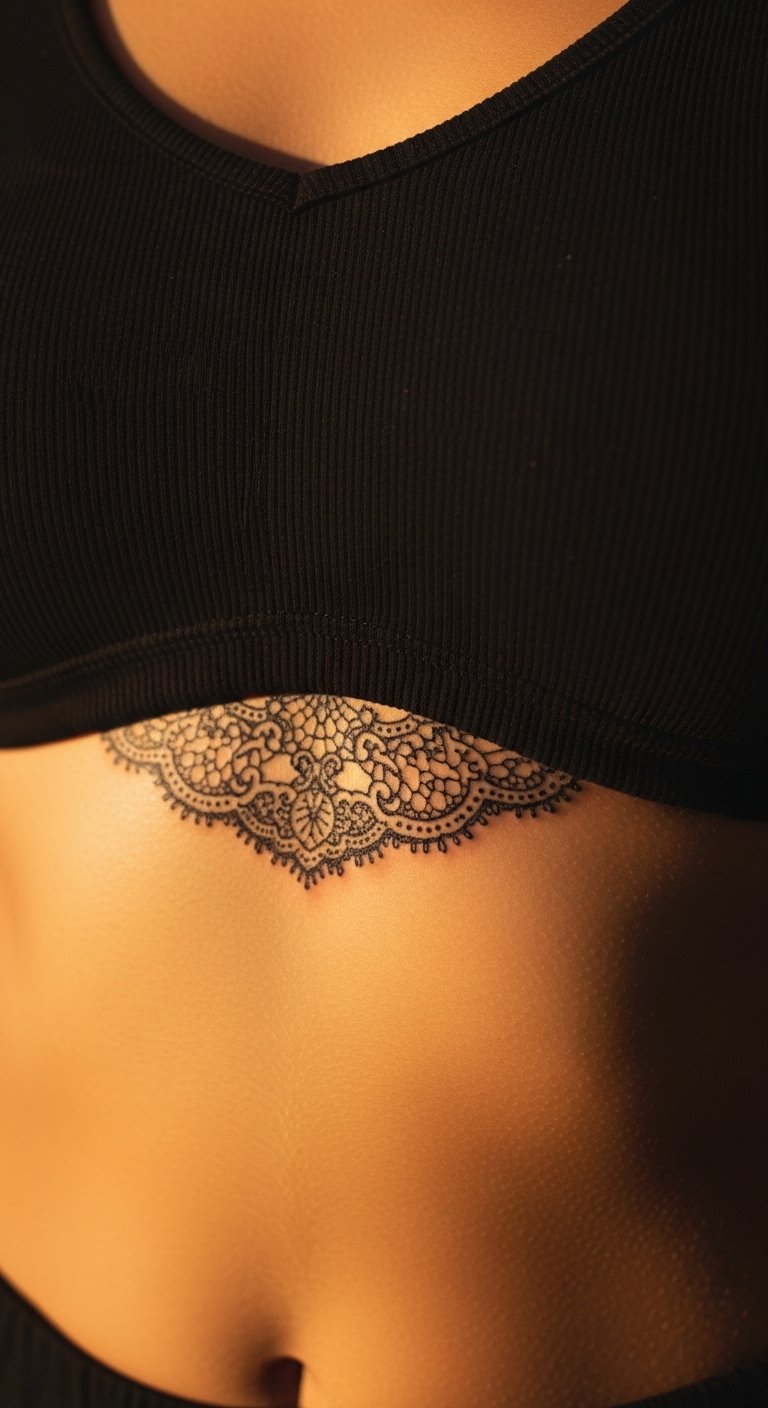
Lace-Inspired Filigree Underboob
Style/Technique: Ornamental / Fine Line
Pain Level: High (7–8/10)
Session Time: 2–4 hours (may be split)
Best For: Underboob jewelry-style tattoos
Lace filigree is sensual and very personal. Because it sits near sensitive tissue and moves with the chest, I prefer slightly bolder outlines to ensure pattern longevity. Ask for stencil placement while you’re standing and seated—how the lace drapes changes with posture.
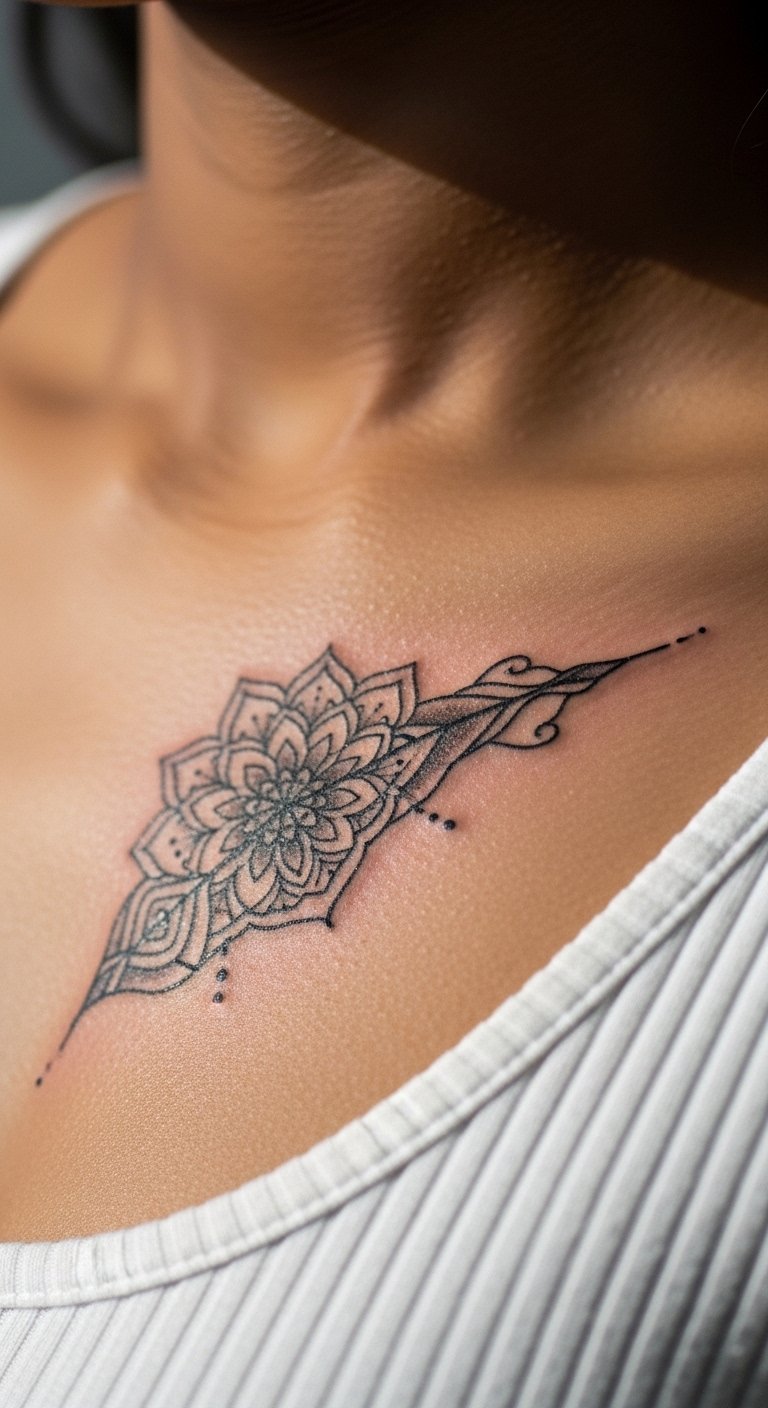
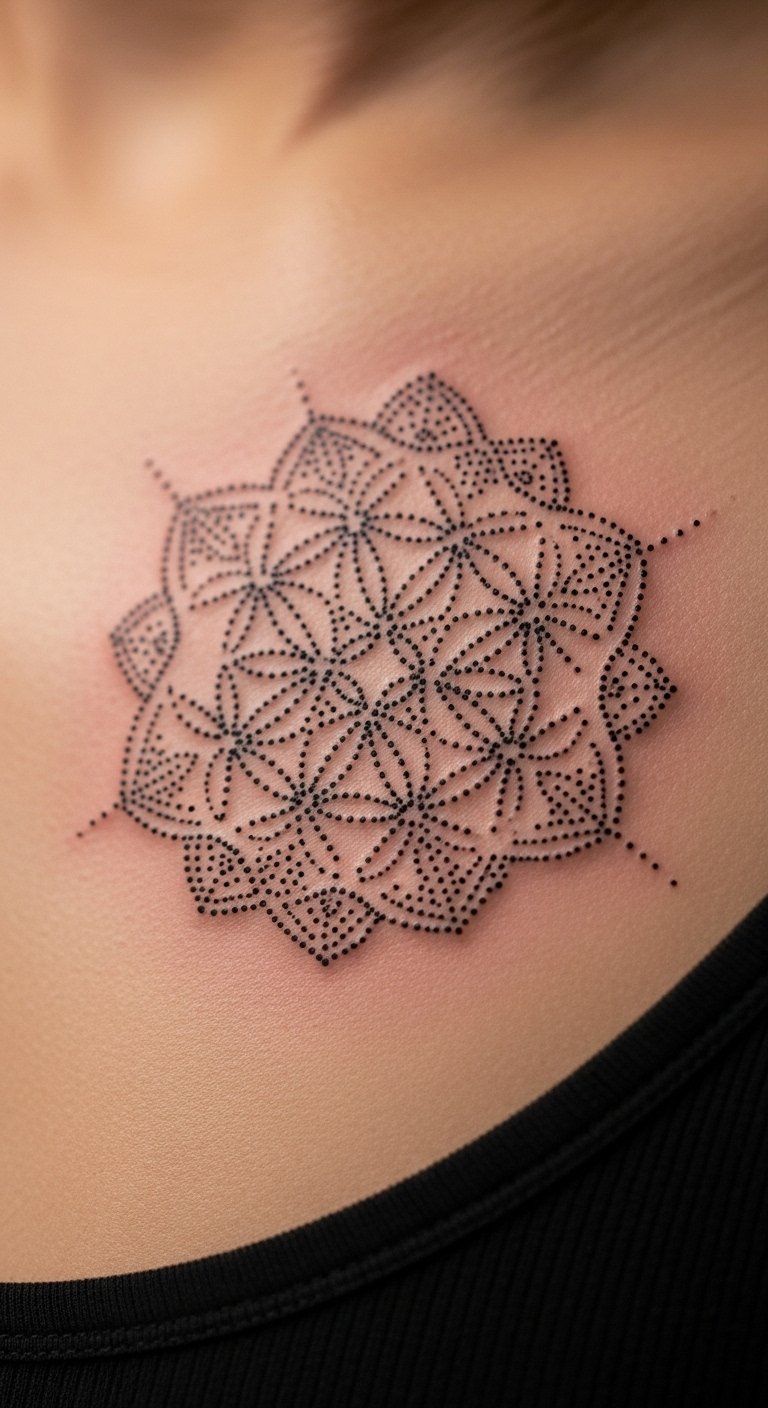
Tiny Mandala Accent by Sternum
Style/Technique: Mandala / Dotwork
Pain Level: High (7–8/10)
Session Time: 1–2 hours
Best For: Centered, spiritual accents
Small mandalas at the sternum/rib junction feel like a hidden charm. Dotwork mandalas age well if the dots are spaced; overly tight dot clusters can merge. Healing tends to itch in this area—resist scratching and use light moisturizing.
Minimal Wave Line at Lower Rib
Style/Technique: Minimal / Single Line
Pain Level: Medium (5/10)
Session Time: 30–60 minutes
Best For: Ocean lovers who want quiet symbolism
A single wavy line mirrors the body’s motion—subtle and easy to hide. Because it’s low-detail, it’s a great first rib tattoo to test pain tolerance. Over years the thin wave may blur slightly; request a gently bolded line for longevity.

Fine Line Cherry Blossom Sprig Vertical
Style/Technique: Fine Line / Botanical Vertical
Pain Level: Medium-High (6–7/10)
Session Time: 1–2 hours
Best For: Elegant vertical flow along ribs
A single sprig with buds stacked vertically complements rib length. I like this because the blooms breathe with the torso—designs that move with the body avoid odd distortion. Expect some soreness on the lower rib; plan an easy day after.
Tiny Butterfly Trail Along the Rib
Style/Technique: Minimal / Illustrative
Pain Level: Medium (5–6/10)
Session Time: 30–90 minutes
Best For: Movement-based motifs, matching pieces
A trailing butterfly sequence reads intimate and motion-based. Keep each butterfly slightly distinct to avoid a single smudge look later; negative space between motifs helps them age better. These are sweet as matching tattoos too.

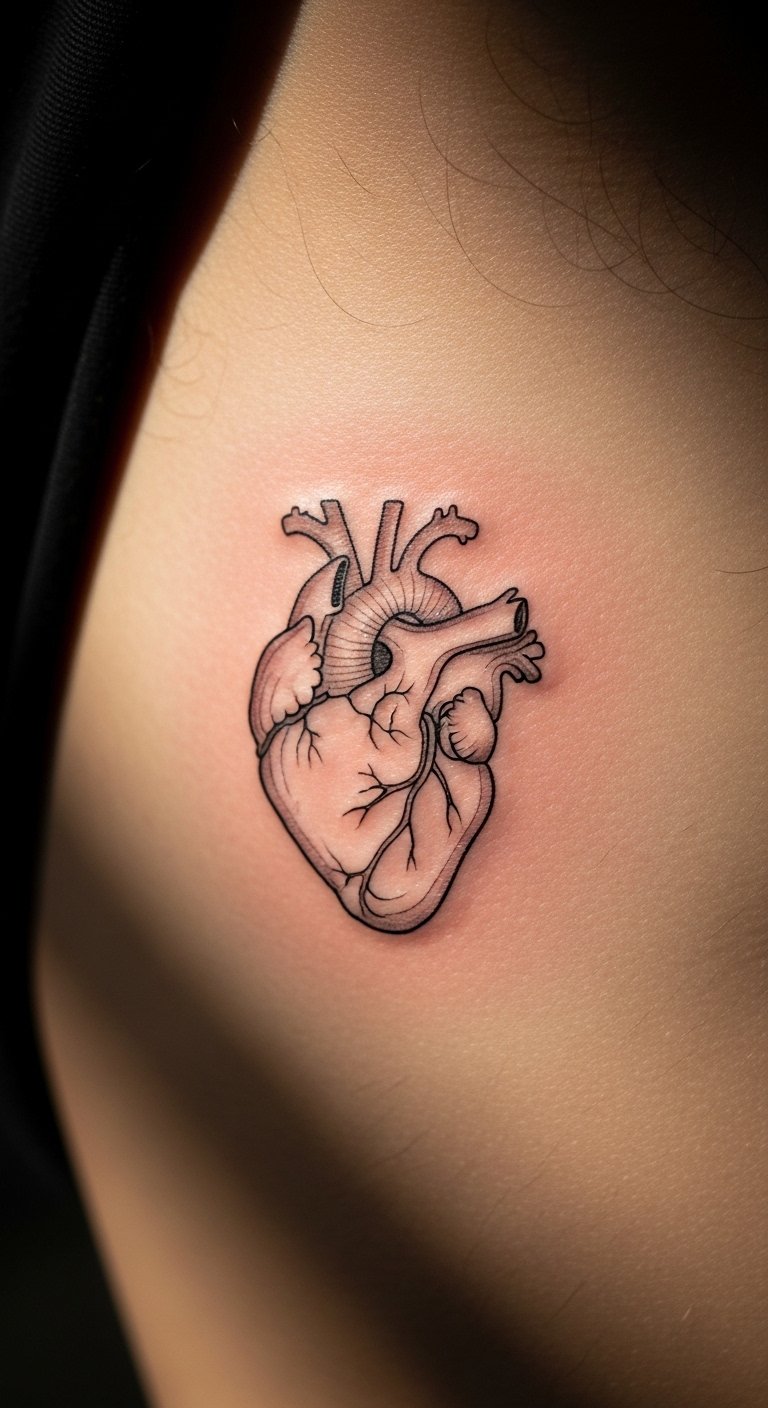
Anatomical Heart Fine Line Mid-Rib
Style/Technique: Micro-Realism / Fine Line
Pain Level: High (7/10)
Session Time: 1–2 hours
Best For: Personal, symbolic pieces with anatomical detail
Anatomical hearts look quietly intense on the rib. The flat canvas allows detail; micro-shading needs time to heal to full tone. Because this is a focal piece, request healed examples on similar placement and skin tones.
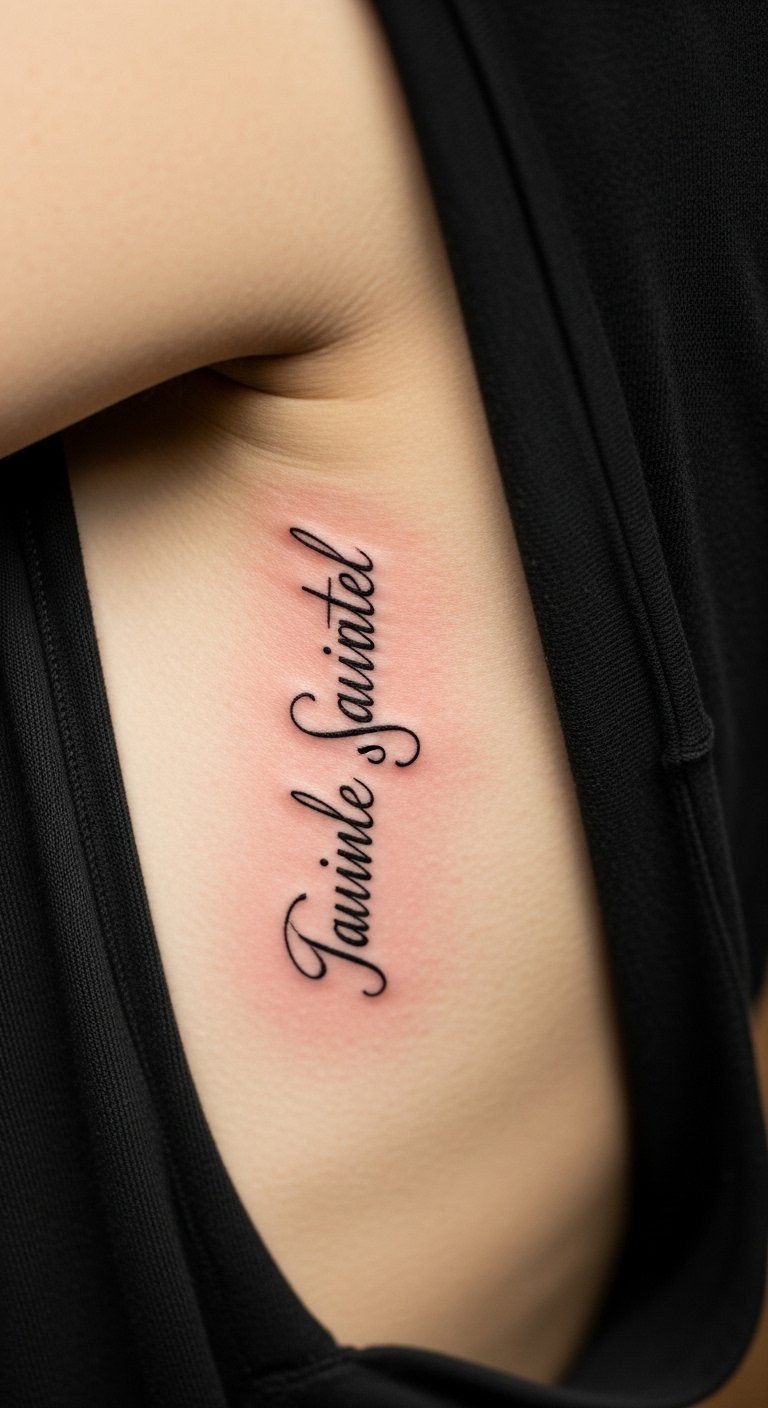
One-Word Vertical Quote in Delicate Script
Style/Technique: Minimal Script / Calligraphy
Pain Level: High (7/10)
Session Time: 30–90 minutes
Best For: Single-word mantras or names
One-word vertical tattoos read intimate and are straightforward—but be mindful of kerning and how letters sit on curves. I always test the stencil in different postures; breath can slightly lengthen the line while tattooing.
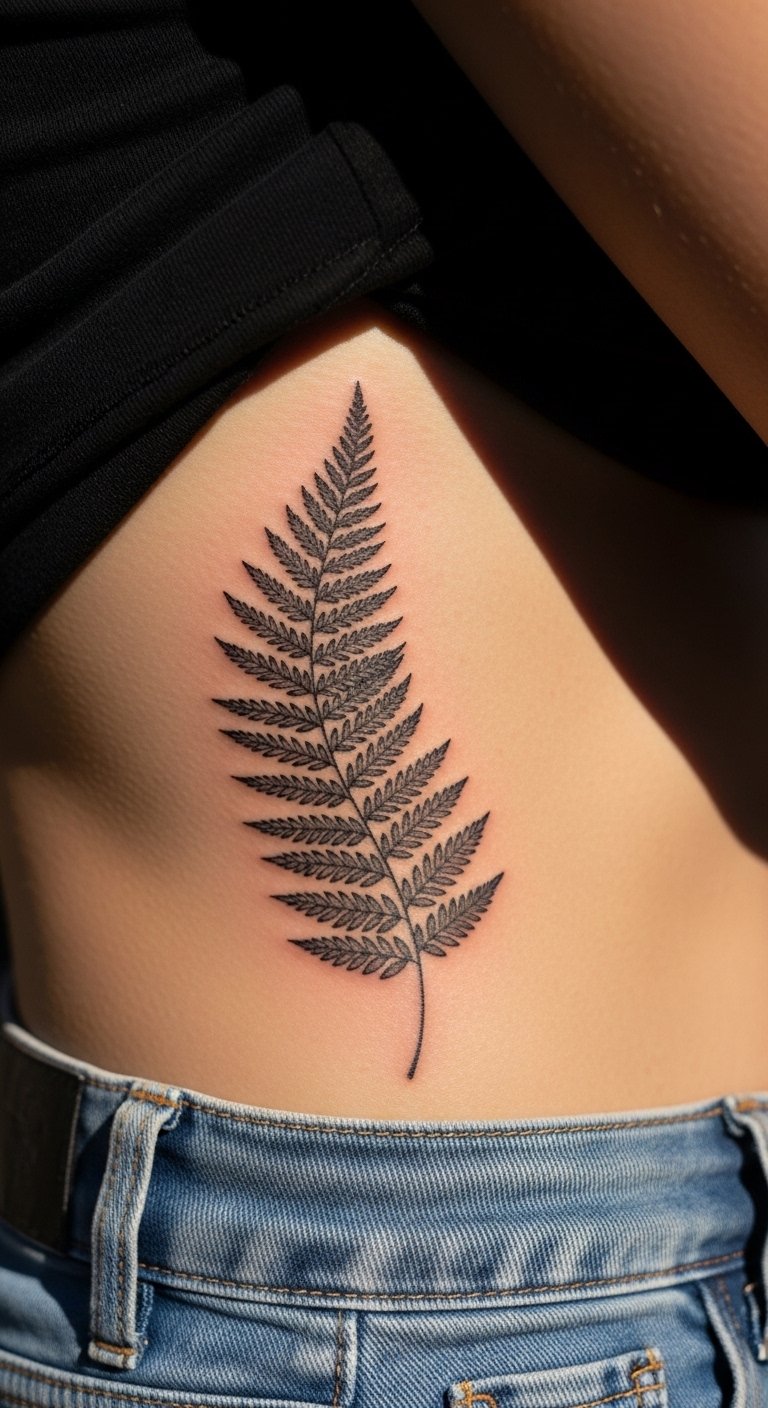
Delicate Fern Rib Wrap
Style/Technique: Fine Line / Botanical Wrap
Pain Level: High (7–8/10)
Session Time: Multiple short sessions for longer wraps
Best For: Natural, flowing, earthy designs
Ferns look great following serratus lines; they’re forgiving with movement because fronds overlap. For aging, ask for slightly bolder midribs so tiny veins don’t disappear. Positioning with your arm raised during the stencil makes a big difference in how the final piece sits.
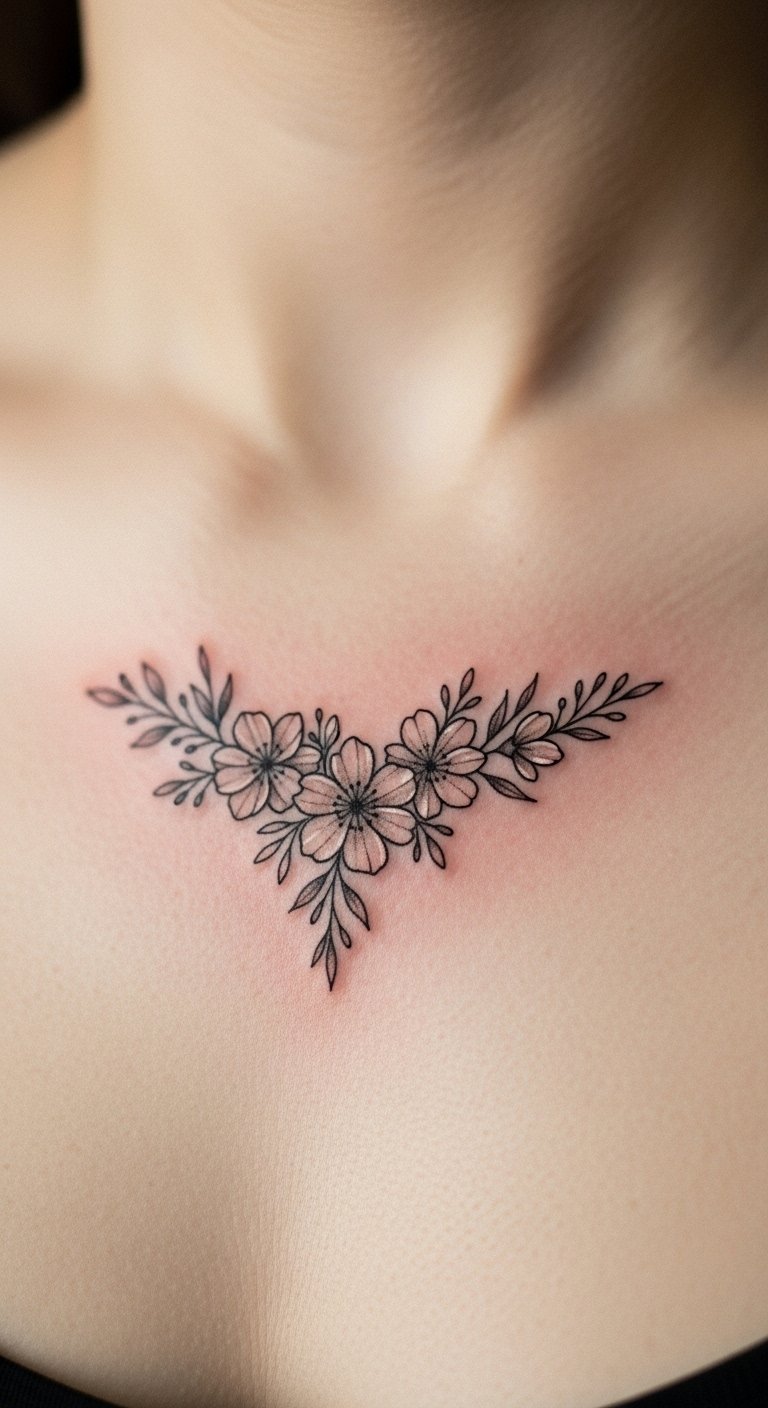
Micro Floral Cluster Under the Bust
Style/Technique: Fine Line / Micro
Pain Level: High (7/10)
Session Time: 1–2 hours
Best For: Tucked-away delicate clusters
Tiny clustered flowers create an intimate vignette. They’re subtle under clothing but lovely in close-up. Small dots and very thin lines are vulnerable to blur—ask for slightly denser core dots.
Dotwork Sacred Geometry Near Sternum
Style/Technique: Dotwork / Sacred Geometry
Pain Level: High (7–8/10)
Session Time: 1–3 hours
Best For: Spiritual, precise pieces
Sacred geometry can be scaled to be delicate, but dotwork requires patience and a practiced hand. Symmetry is everything—ask to see healed symmetrical pieces. Dot spacing affects long-term clarity.
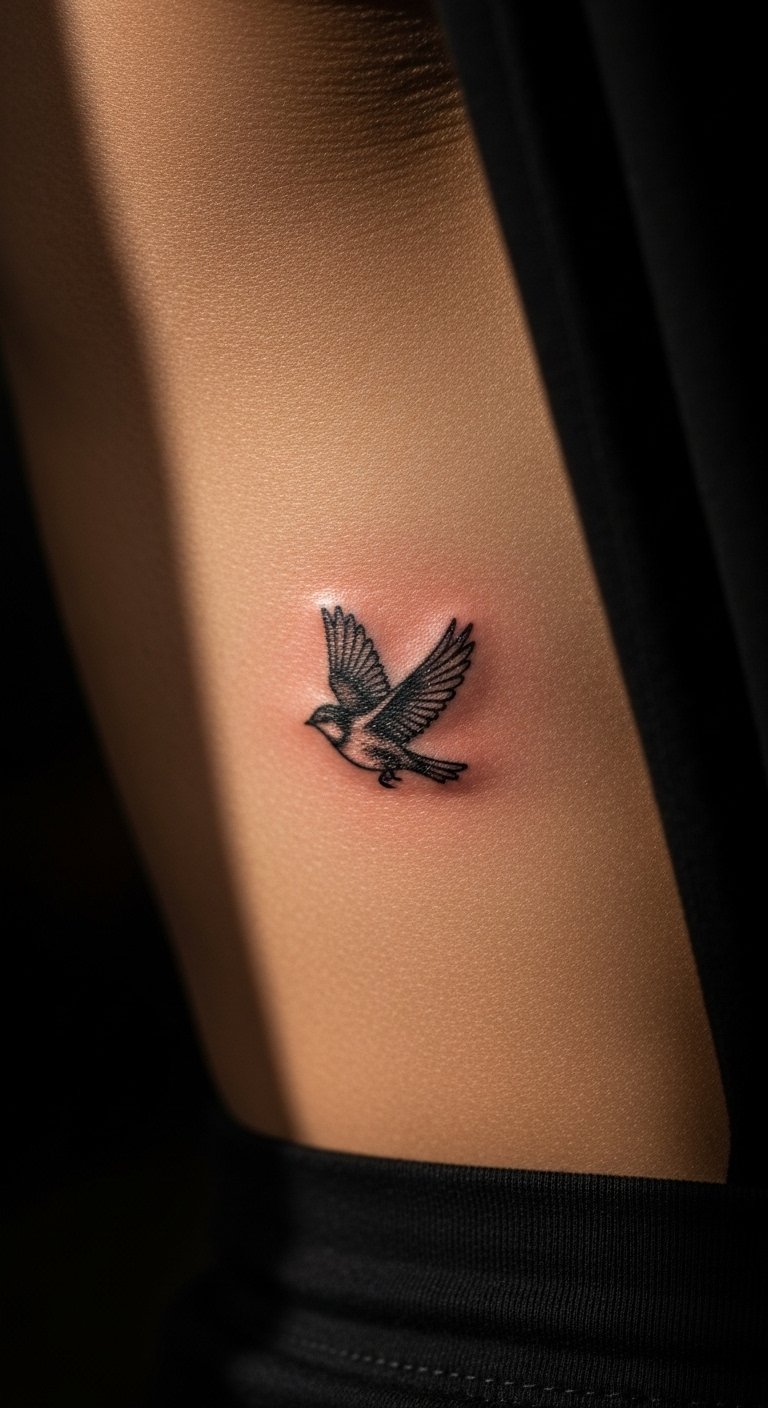
Small Bird in Flight Along Ribs
Style/Technique: Illustrative / Fine Line
Pain Level: Medium-High (6–7/10)
Session Time: 1–2 hours
Best For: Freedom symbols and readable silhouettes
Birds in flight along the ribs use negative space well and stay intimate. Solid black silhouettes age reliably; super-fine feather detail can soften. I prefer slightly stronger wing outlines for durability.
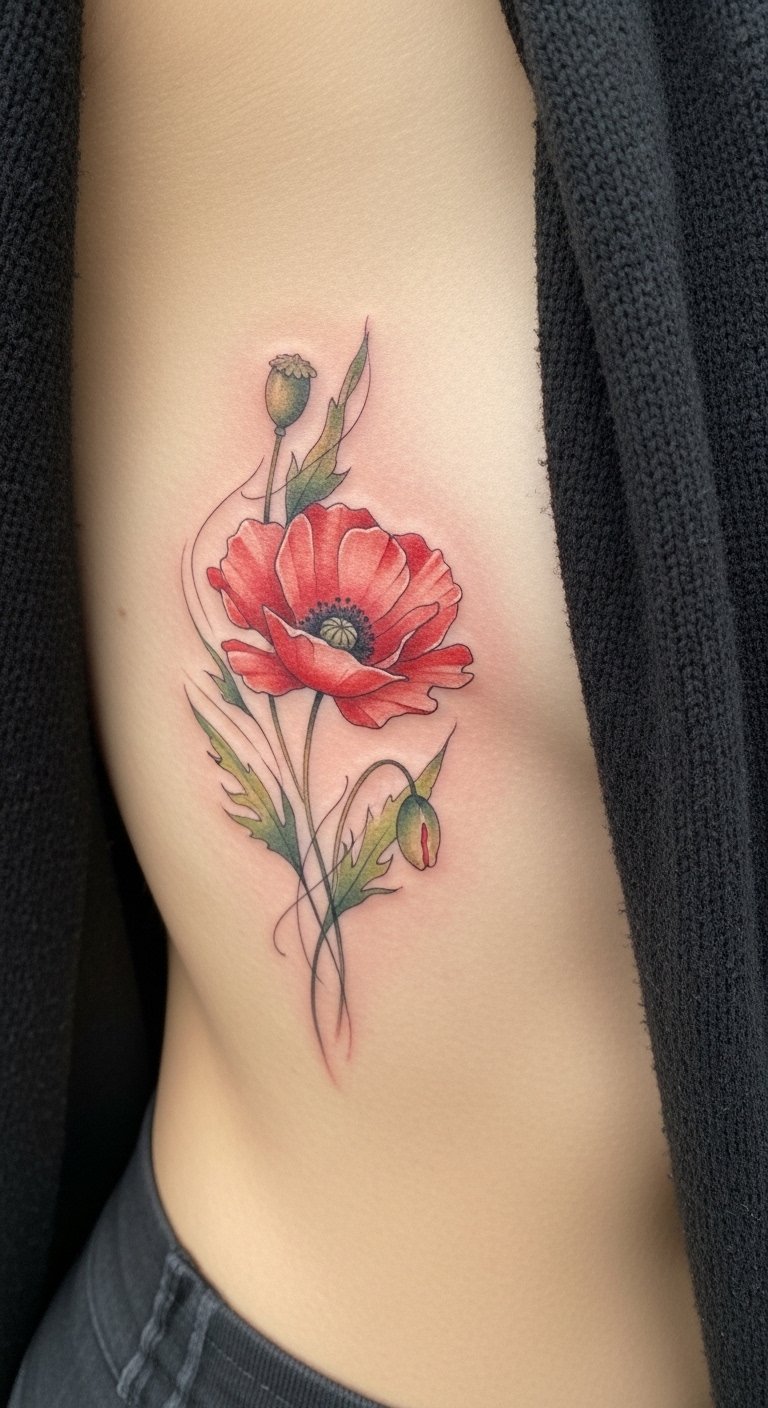
Watercolor Poppy Accent on Side Rib
Style/Technique: Watercolor / Painterly Accent
Pain Level: High (7–8/10)
Session Time: 1–3 hours
Best For: Soft color, artistic pieces
Watercolor looks ethereal on the rib, but color fades faster with sun exposure. For subtle intimacy, keep pigments muted and consider a black fine-line anchor to hold design crispness. Request healed color photos—healed watercolor can look very different from fresh ink.
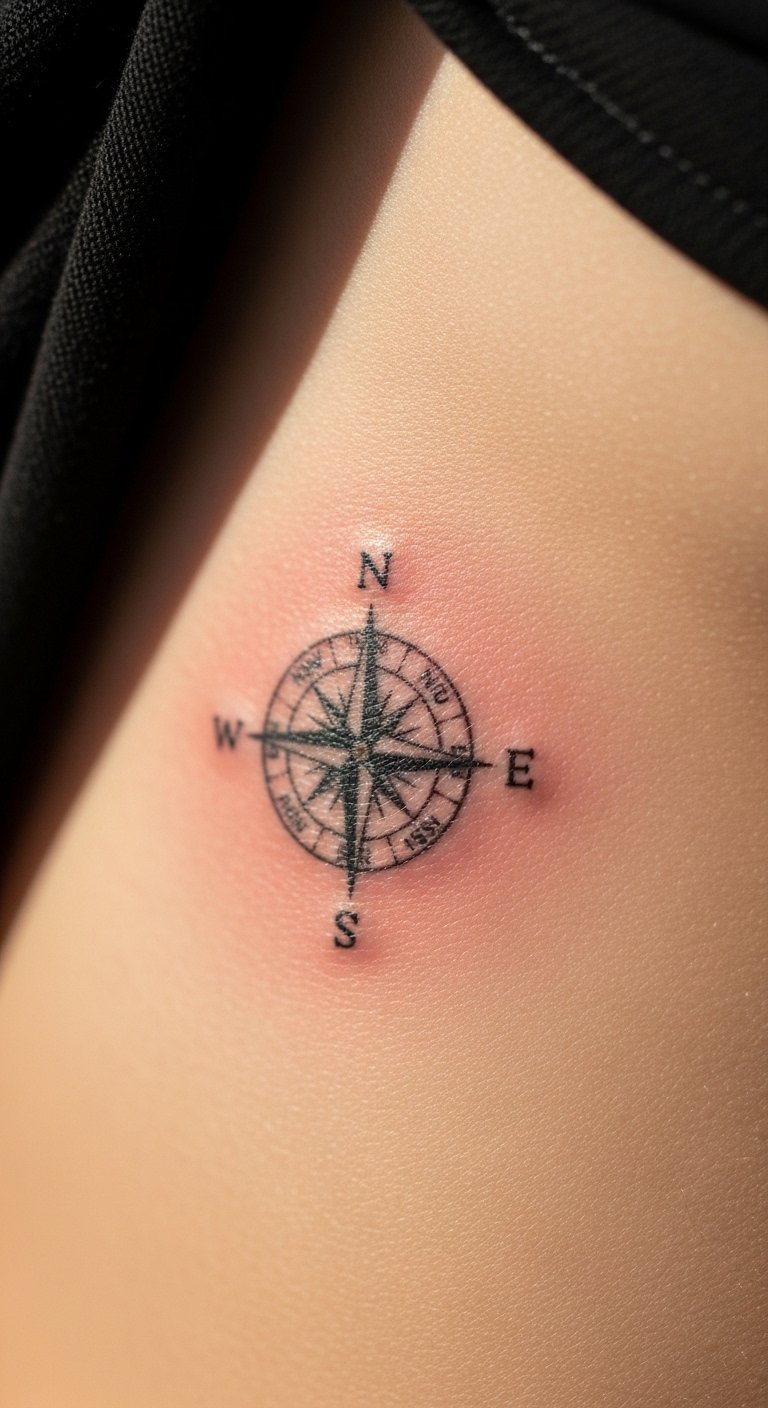
Minimal Compass Vertical Near Rib
Style/Technique: Minimal / Linework
Pain Level: Medium (5–6/10)
Session Time: 30–90 minutes
Best For: Travel symbols that tuck away easily
A slim compass or directional arrow reads understated and meaningful. Clean, slightly bold lines hold the test of time better than hairline maps. Placement near ribs gives the piece a private nod to adventure.
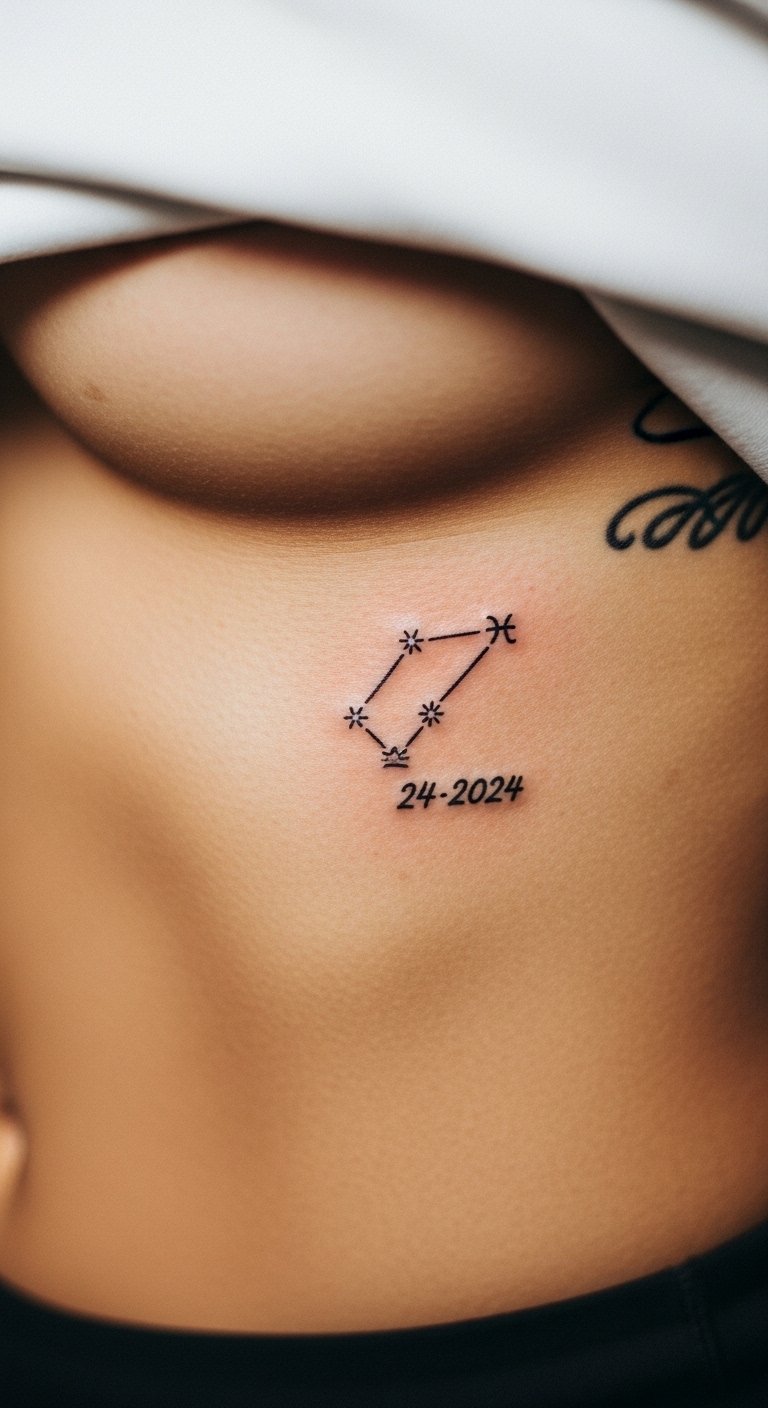
Tiny Zodiac Constellation with Dates
Style/Technique: Minimal / Dotwork + Script
Pain Level: Medium (5–6/10)
Session Time: 30–60 minutes
Best For: Personal astrological symbols kept private
Combine tiny constellation dots with a faint date or sign in micro-script. Keep dot spacing open so stars don’t blur into a patch. It’s a subtle way to carry identity without a bold sign on display.
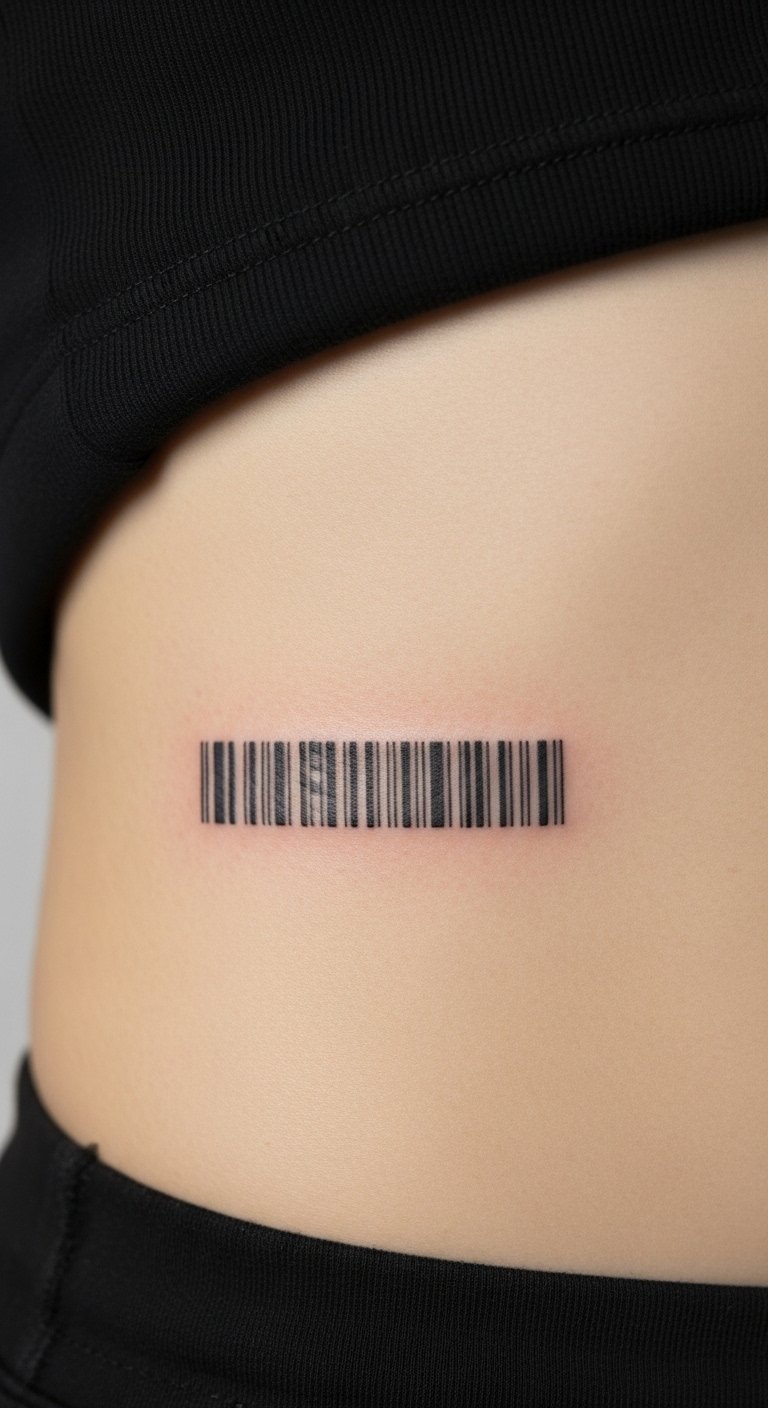
Hidden Morse Code or Barcode Message Along Rib
Style/Technique: Conceptual / Minimal
Pain Level: High (7/10, if longer)
Session Time: 30–90 minutes
Best For: Secret messages or discreet phrases
Morse code or barcode lines look like a textured stripe but carry a private meaning. Because lines are repetitive and close, spacing precision matters—tiny errors read clearly. This design benefits from slightly more separation between elements to age cleanly.
Tattoo Prep and Aftercare Essentials
Below are the products I personally trust and that artists often recommend for rib tattoos—grouped by when you’ll use them.
Aftercare Essentials:
- Aquaphor Healing Ointment, 14 oz tube — For the initial moist-healing phase (first 3–5 days)
- Saniderm Transparent Adhesive Bandage, 6-inch roll — Second-skin option some artists use or recommend
- CeraVe Fragrance-Free Moisturizing Lotion — Daily moisturizer during weeks 2–6
- Dr. Bronner's Unscented Castile Soap, 16 oz — Gentle cleaning in the first days
Before Your Appointment:
- Tattoo Numbing Cream 5% Lidocaine (topical) — single tube — Use only after checking with your artist; apply per instructions
- Thermal Transfer Tattoo Stencil Paper, 8.5×11" — If you’re testing custom layouts at home
Long-Term Maintenance:
- SPF 50 Sunscreen Stick for Tattoos — Daily protection once healed
- Mad Rabbit Tattoo Balm (healed-skin maintenance) — Keeps color vibrant on healed skin
- Hustle Butter Deluxe, 1 lb — Vegan alternative for moisturizing healed ink
Optional Comfort & Recovery:
- Tattoo Numbing Spray for Touch-ups — For very sensitive areas (ask your artist first)
- Hydrocolloid Bandages, assorted sizes — For small scabs or high-friction spots
- Aftercare Travel Kit (soap, ointment, balm) — Handy for weekend trips after a session
I link brands I’ve used or seen frequently in studios—ask your artist which they prefer and follow their specific aftercare routine.
Frequently Asked Questions
Q: How bad does a rib tattoo actually hurt?
A: Ribs rank among the more painful spots because skin is thin and close to bone. I rate most rib placements 6–8/10 depending on padding and exact location. If you’re nervous, start with a tiny design or ask your artist about a topical numbing cream, but always check with them first.
Q: Will a delicate rib tattoo blur or distort with body movement?
A: Designs that flow with the body—vertical scripts, vines, and organic shapes—age better than rigid geometric grids. I recommend slightly bolder core lines for delicate pieces so they don’t diffuse over years.
Q: How long does a rib tattoo take to heal?
A: Surface healing is usually 2–3 weeks; full settling can take 2–3 months. Use a gentle cleanser like Dr. Bronner’s Unscented Castile Soap early, then switch to a fragrance-free lotion.
Q: Can I exercise after a rib session?
A: Wait at least 48–72 hours and avoid heavy upper-body movements that stretch the area for a week. Sweating on fresh ink ups infection risk.
Q: Do colors show differently on darker skin tones?
A: Yes. Black and rich jewel tones hold best across skin tones; light pastel watercolors may read more muted. Ask to see healed examples on skin similar to yours before choosing color.
Q: Should I split a long rib wrap into multiple sessions?
A: For comfort and cleaner details, yes—shorter sessions reduce fatigue and let the artist work crisper lines. I find two focused sessions yield better healed results than one marathon.
Conclusion
Rib tattoos read private and intimate because they live close to your body’s natural motion. My best advice: sit with your idea, view healed examples, and plan aftercare before your appointment. Keep Aquaphor and sunscreen on hand—those two make a huge difference in how delicate lines age. Which of these 25 styles are you leaning toward?