
I spent months staring at ocean tattoos on Instagram before I realized the real question wasn’t “What looks good?” but “What will still feel timeless on my skin?” I wrote this list from talking to artists, testing small pieces, and watching healed work over time—29 calming ocean tattoo ideas that feel limitless and age honestly.
This list focuses on minimalist, illustrative, and micro-realism ocean tattoo ideas that work from wrist to sleeve. These placements suit first ocean tattoo ideas and seasoned collectors alike. From what I’ve seen in 2026 trends, tiny wave work and marine realism are everywhere—and they age very differently, so I note pain, healing, and what to ask your artist.
1. Minimalist Wave Band on Inner Forearm
Style/Technique: Minimalist / Fine Line
Pain Level: Low-Medium (2-4/10)
Session Time: 1 session, 30–90 minutes
Best For: First ocean tattoo, visible but easy to cover with long sleeves
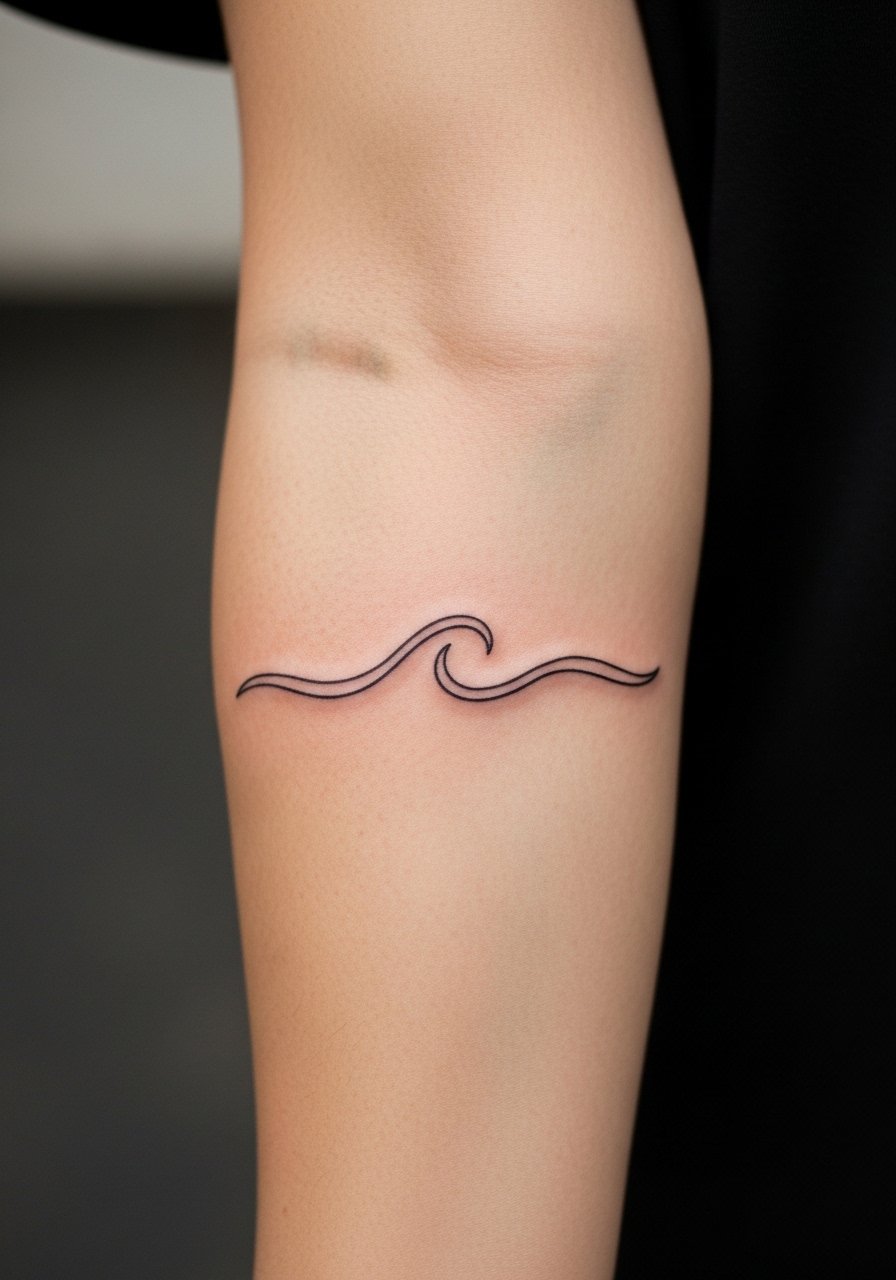
I love the wave band because it reads like a quiet promise—life moves, you move with it. Fine-line placement on the inner forearm flatters the curve and is easier to numb than ribs. Expect surface healing in a couple weeks; the main long-term issue is line blur if lines are too close together. Ask for a slightly heavier weight if you want longevity. This is a go-to for small ocean tattoo ideas and for people nervous about pain.
2. Micro-Realism Single-Needle Waves on Wrist
Style/Technique: Micro-Realism / Single Needle
Pain Level: Medium (4-6/10)
Session Time: 1 session, 1–2 hours
Best For: Tiny ocean detail, discreet placement
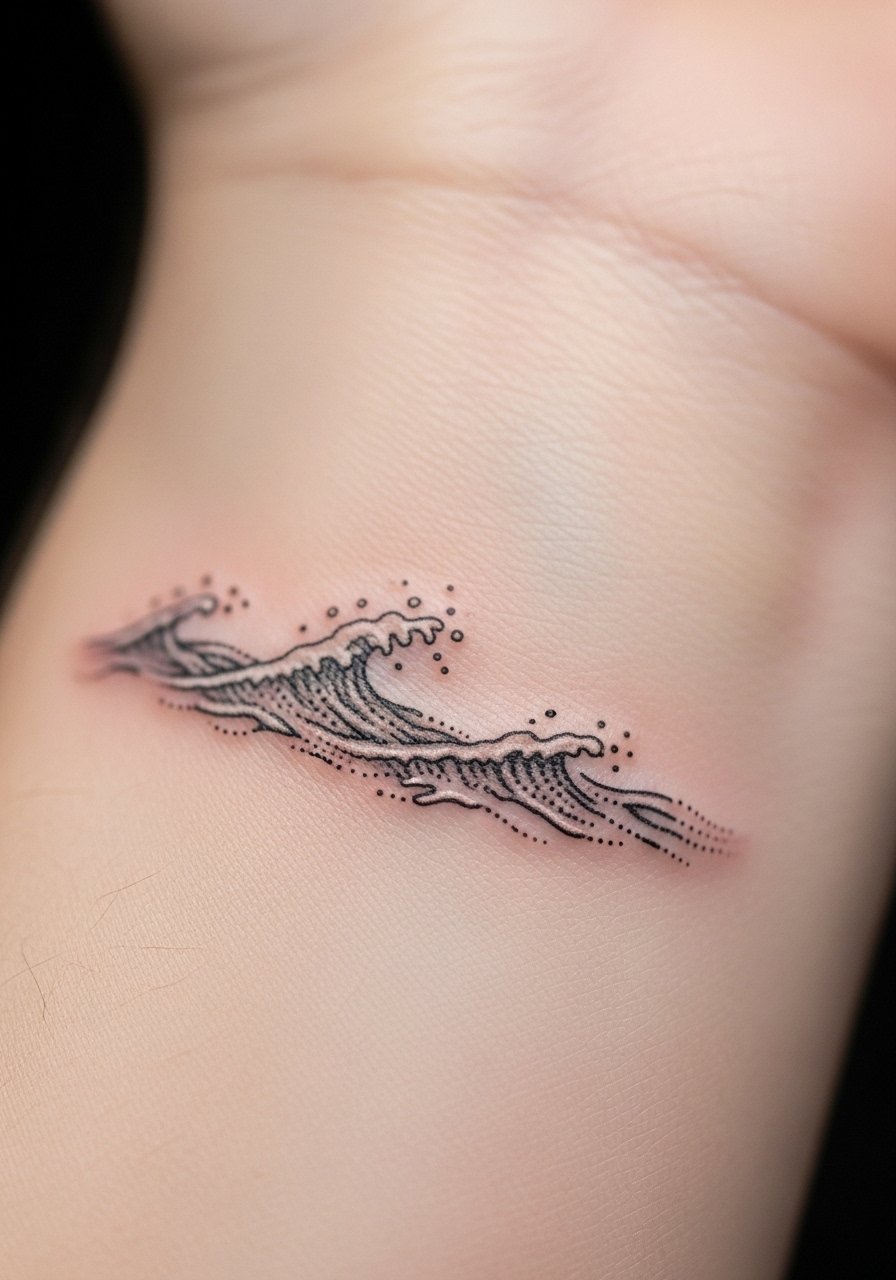
Micro-realism on the wrist captures movement without shouting. Because it uses single-needle detail, the look is ethereal—great for small ocean tattoo ideas. Wrist skin heals fast but is exposed to sun and friction, so sunscreen is critical. I’ve seen these hold nicely if the artist spaces detail and uses slightly bolder anchor dots. A common mistake is asking for too much tiny detail in a very small canvas.
3. Watercolor Seahorse on Ribcage
Style/Technique: Watercolor / Illustrative
Pain Level: High (7-8/10)
Session Time: 2 sessions, 1–3 hours each
Best For: Feminine statement, romantic placement
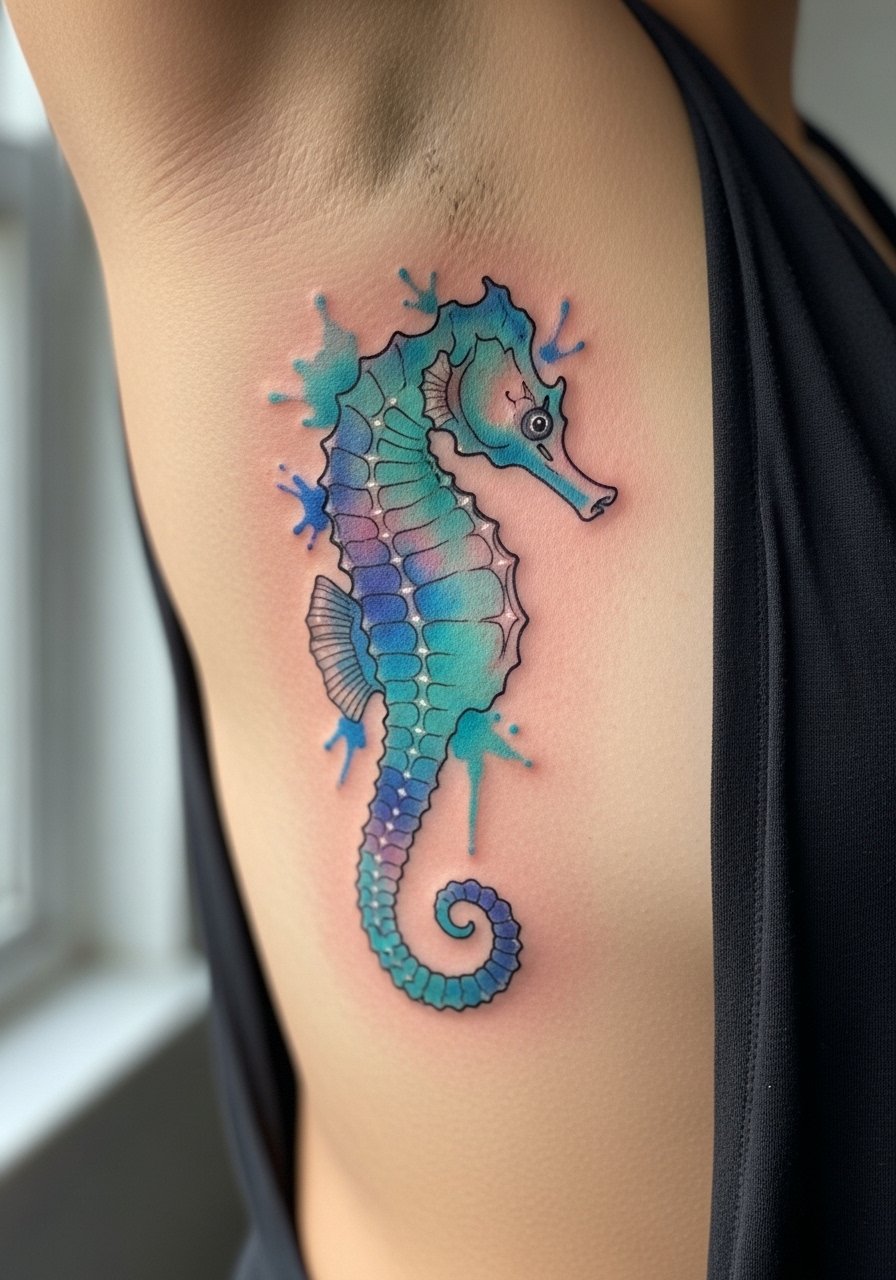
A watercolor seahorse reads delicate and intimate on the ribs. The ribcage is a tender spot—expect higher pain and a slower first-week recovery. Watercolor pigments can fade faster on exposed skin, so pick colors with good saturation and talk to your artist about layering. I recommend asking for slightly stronger outlines where the color sits; that helps the piece keep its shape as it heals.
4. Colorful Seashell Conch on Upper Arm
Style/Technique: Neo-Traditional / Realism
Pain Level: Low-Medium (3-5/10)
Session Time: 1–2 sessions
Best For: Mid-size colorful piece that reads like a treasure
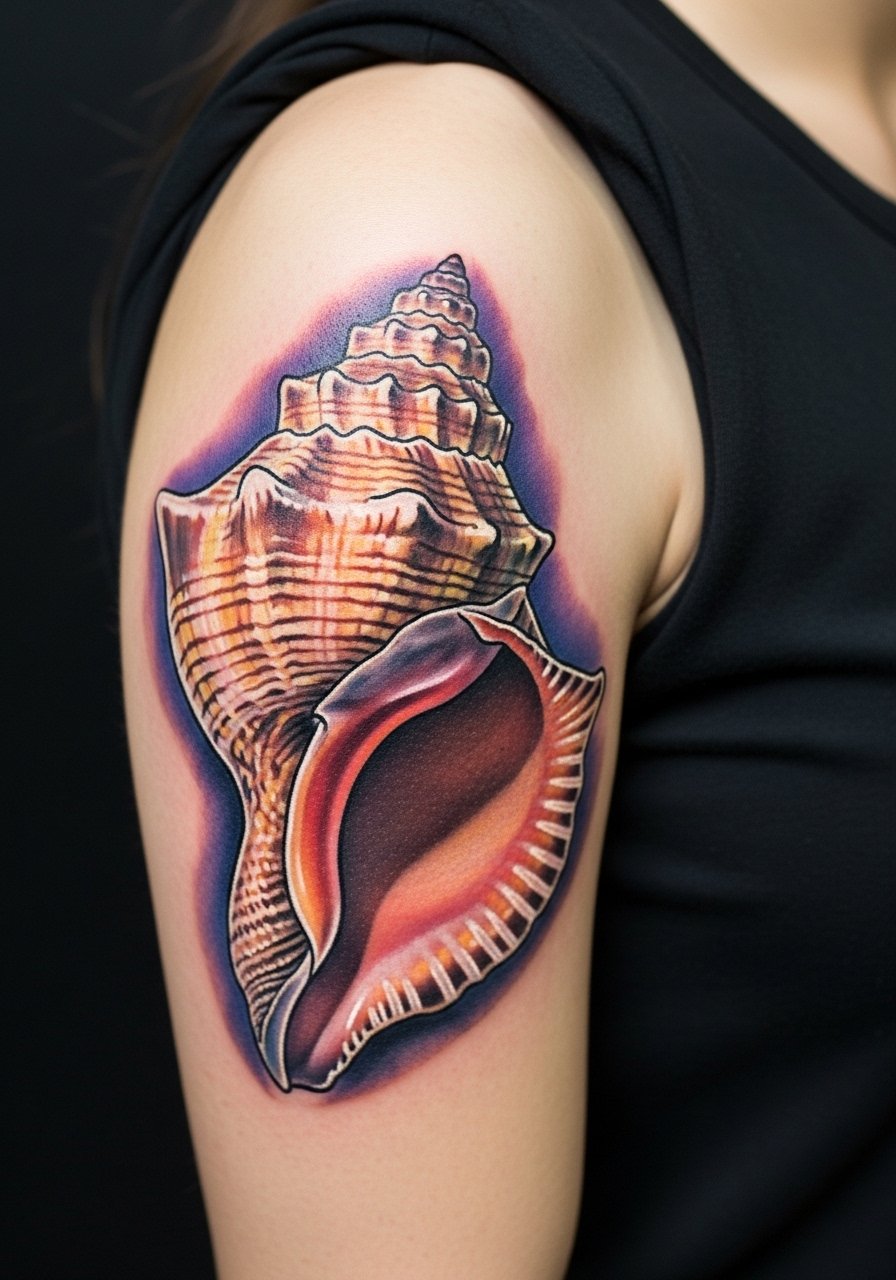
Seashells are personal—your chosen shell shape can reference a memory or place. Upper arm placement is forgiving for mid-size realism, and the flesh there tolerates sessions well. Colorful shells need attentive aftercare and sun protection; from what I’ve seen, blues and greens keep better than pale yellows. Ask to see healed examples from the artist, especially on your skin tone.
5. Ocean Horizon with Lighthouse on Shoulder Blade
Style/Technique: Illustrative / Realism
Pain Level: Medium (4-6/10)
Session Time: 2–3 sessions
Best For: Meaningful horizon scenes, larger but concealable
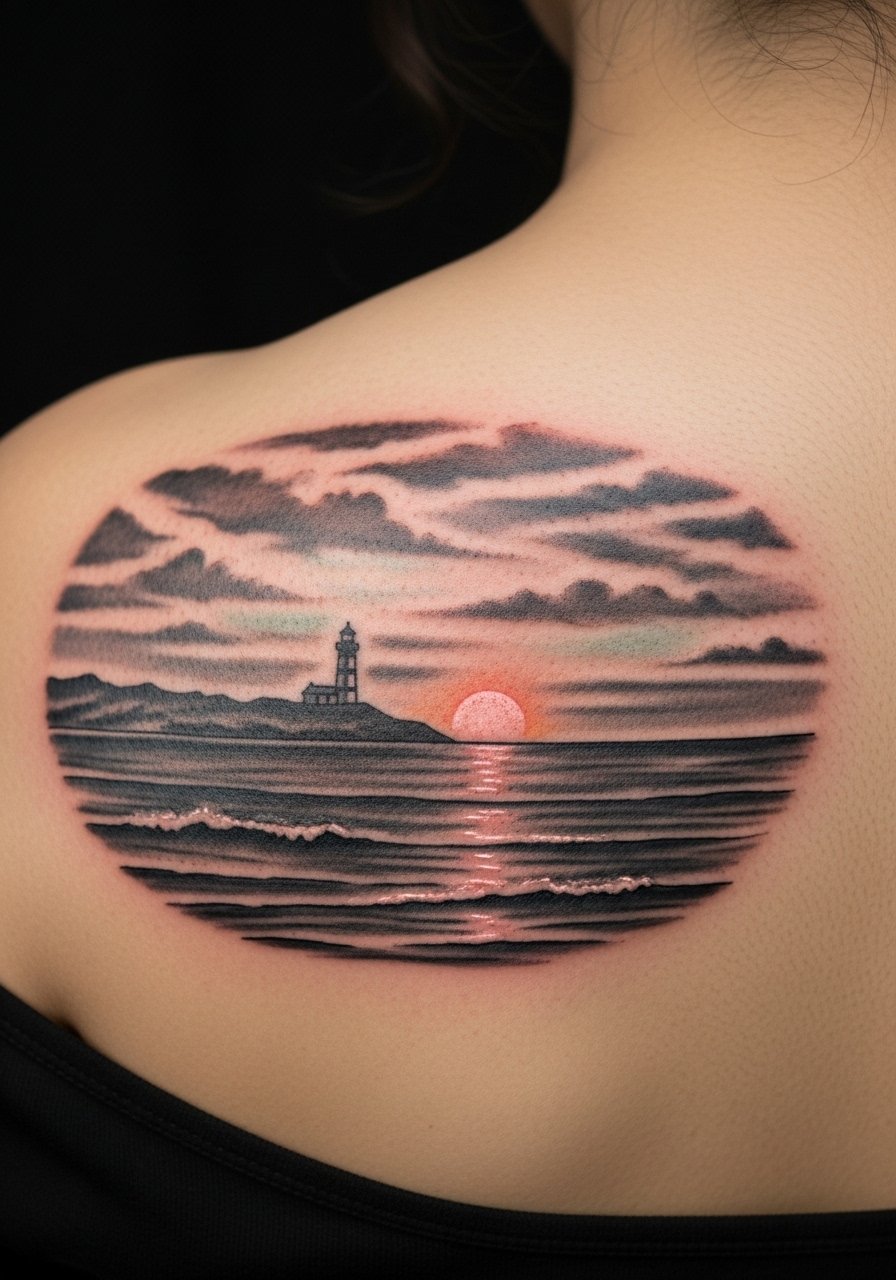
A horizon and lighthouse reads as guidance and calm. Shoulder blades give enough flat space for horizons that wrap slightly with the shoulder contour. Healing is straightforward, but watch sleeping positions to avoid friction. I like this placement for a meaningful piece that can be shown off or hidden easily. Ask your artist about flow so the horizon sits naturally with your shoulder lines.
6. Stormy Sea Sleeve on Full Arm
Style/Technique: Realism / Illustrative Sleeve
Pain Level: High (6-9/10 overall)
Session Time: Multiple sessions across months
Best For: Statement piece, masculine or dramatic aesthetic
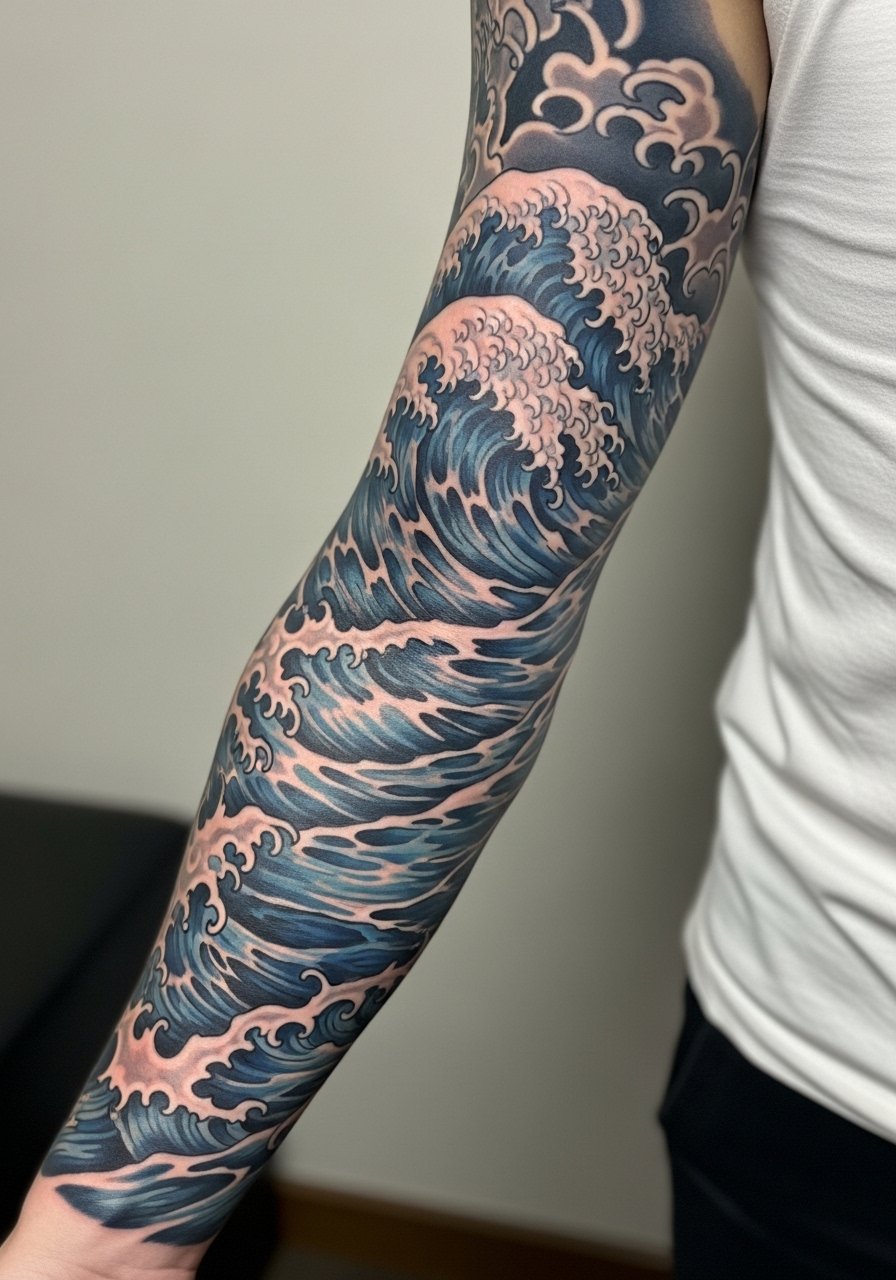
Stormy sleeves are designed to move with the arm—3D waves and dark contrasts play nicely across muscle. Expect many sessions and strategic breaks to let skin recover. This is one of the more intense placements for pain and aftercare, but when healed it creates a powerful, timeless look. My tip: plan composition so big dark areas don’t sit where you’ll get quick sun exposure.
7. Realistic Whale Portrait on Back
Style/Technique: Realism / Black & Gray
Pain Level: Medium (4-6/10)
Session Time: 2–4 sessions
Best For: Large, meaningful marine realism
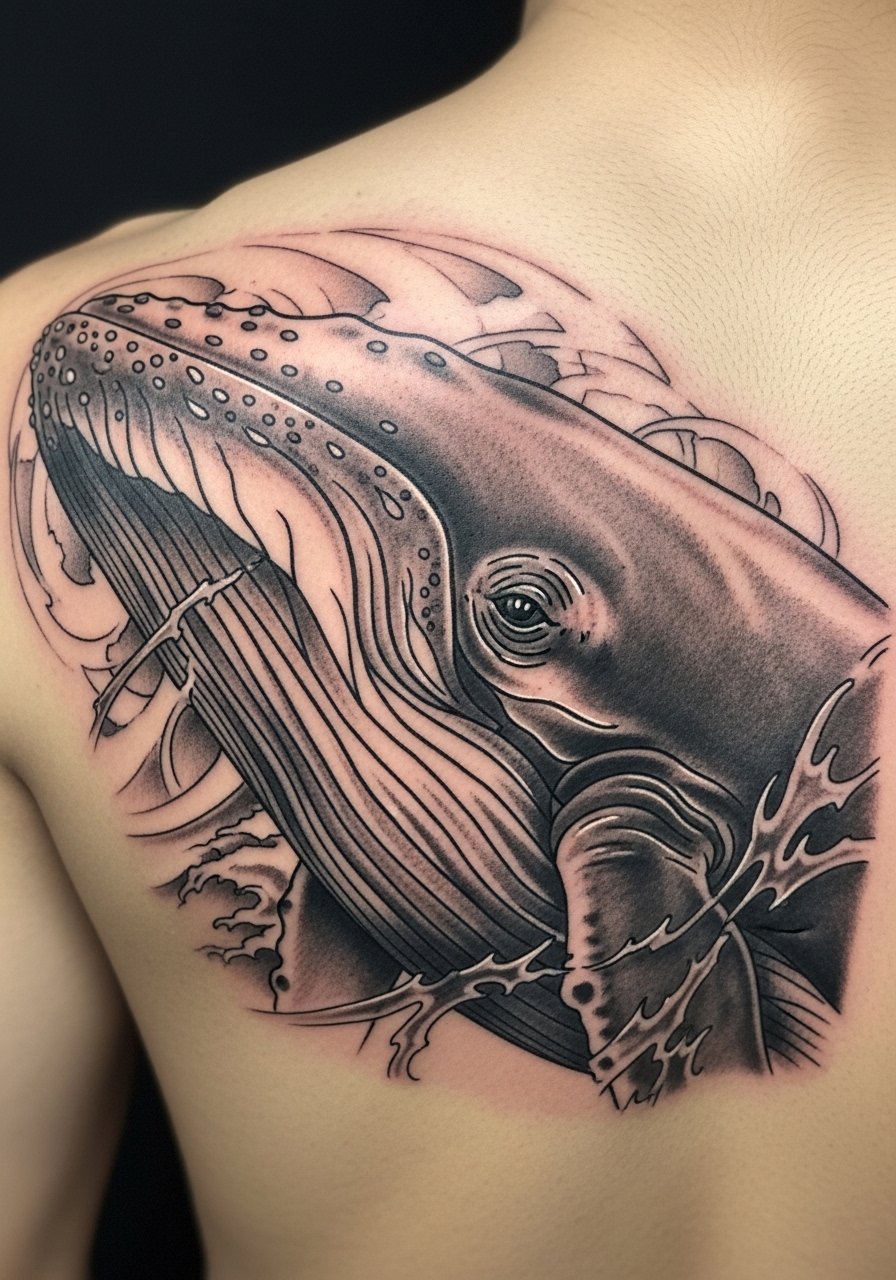
Whale portraits capture ocean depth and presence. A chest or upper-back canvas lets the tail and body breathe. Black and gray realism tends to age well—contrast is your friend. Expect shading sessions and careful blending; avoid tiny fine details crowded in a large dark area. I’ve seen whales look best when the artist plans negative space to preserve shape as the skin settles.
8. Traditional Nautical Octopus on Forearm
Style/Technique: Traditional / Nautical
Pain Level: Low-Medium (3-5/10)
Session Time: 1–2 sessions
Best For: Bold, iconic sea creature work
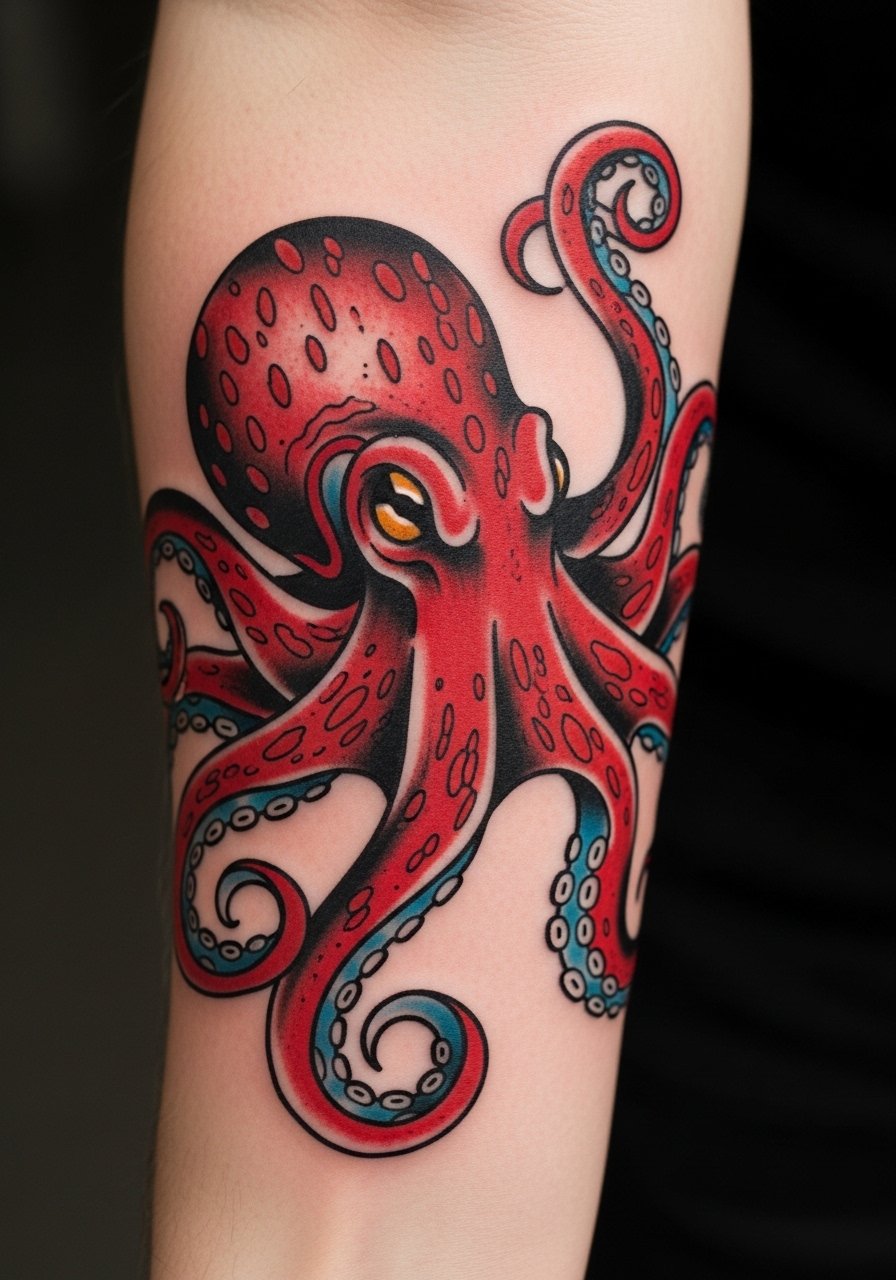
The octopus is classic—adaptability, intelligence, mystery. Traditional linework holds up really well because of strong outlines and solid fills. Forearm placement shows off tentacle wrapping with motion. Ask for bold lines instead of feathered edges if you want long-term integrity. A common mistake is over-detailing within a traditional palette—keep textures simple.
9. Marine Life Band With Turtle And Starfish On Bicep
Style/Technique: Illustrative / Band
Pain Level: Low-Medium (3-5/10)
Session Time: 1–2 sessions
Best For: Colorful, wearable band that peeks from sleeves
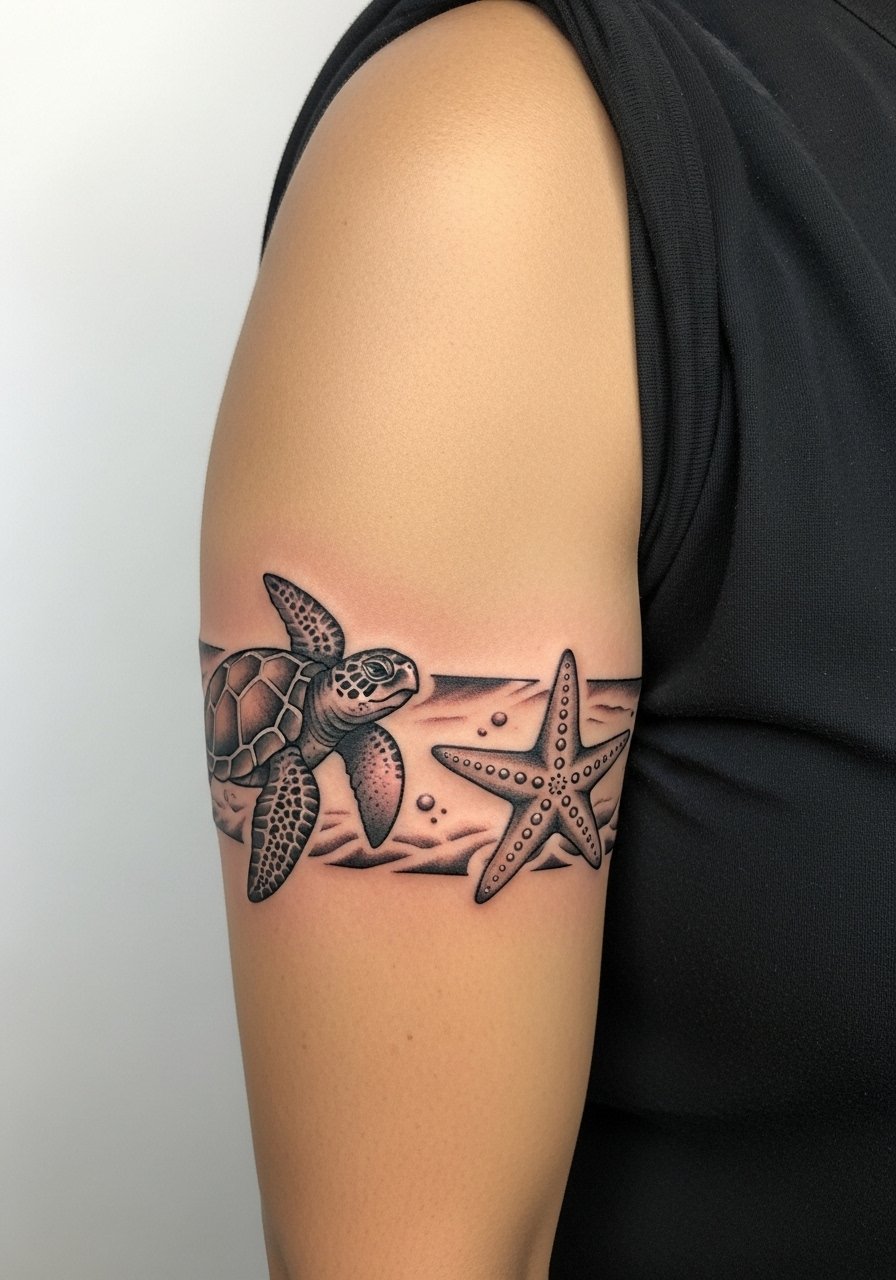
A bicep band with turtle and starfish is a calm, wearable story around the arm. The shape flatters the bicep’s curve and hides easily. Keep colors saturated near the top of the palette and ask about healed examples on similar skin—blues and greens can look different across tones. Bands also work great as progression pieces if you plan to expand into a sleeve later.
10. Palm Tree Beach Scene On Ankle
Style/Technique: Illustrative / Minimalist
Pain Level: Medium (4-6/10)
Session Time: 1 session
Best For: Vacation memory, ankle visibility or concealment
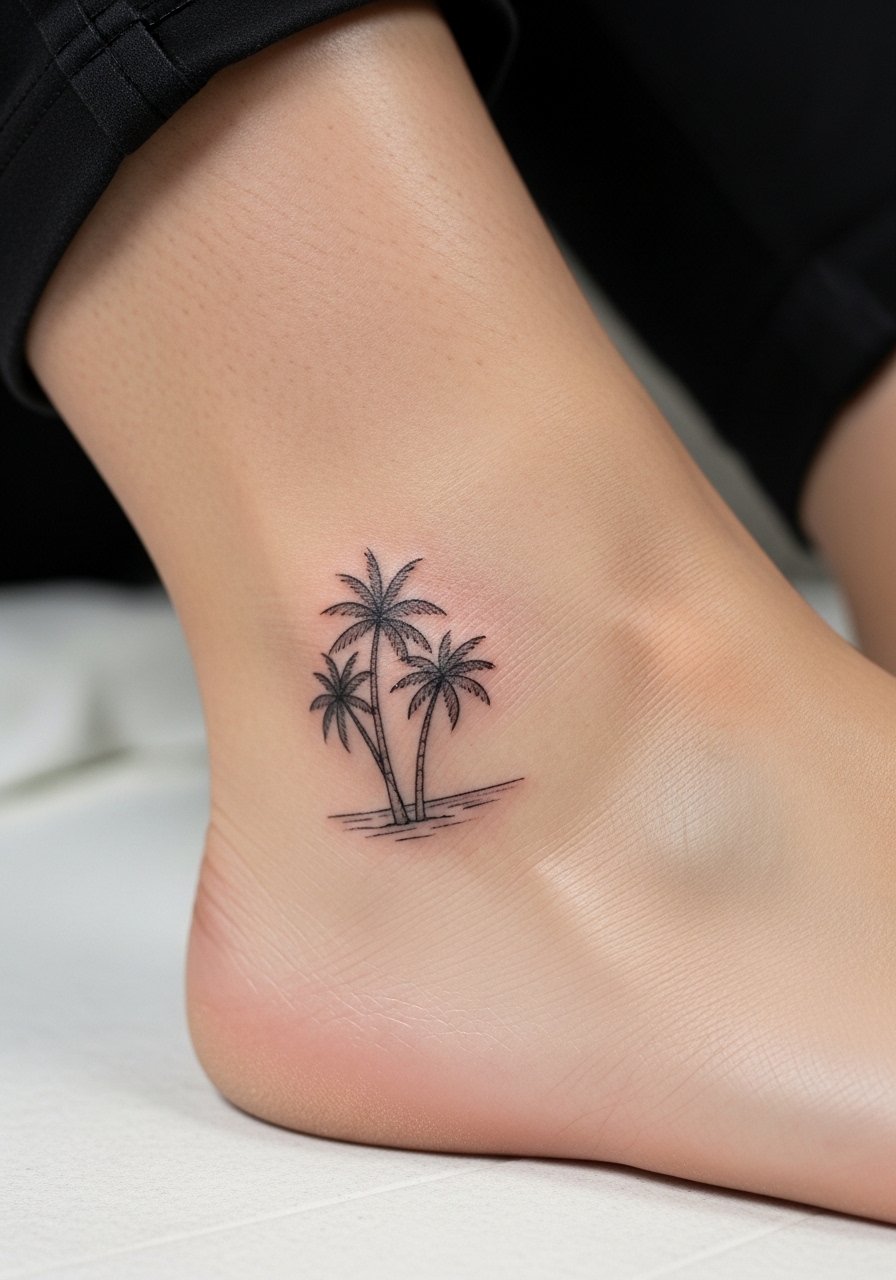
A palm tree scene is instant vacation calm. Ankles are bony, so pain is noticeable but short. Tiny coastal scenes read well when the artist simplifies background details—too many tiny elements here blur over time. If you want a little color, ask for deeper greens and browns that keep their tone as the piece ages.
11. Jellyfish Coral Reef Scene On Thigh
Style/Technique: Neo-Traditional / Watercolor
Pain Level: Low-Medium (3-5/10)
Session Time: 2–3 sessions
Best For: Flowing, colorful work that moves with skin

Jellyfish designs let you play with color and movement—perfect for thigh canvases. Thigh skin tolerates longer sessions and the area heals well. Watercolor blends can fade faster in high-sun areas, but the thigh is usually protected so colors last. Ask for saturated base colors and gentle outlines to keep the piece readable as it matures.
12. Balinese-Inspired Ocean Sketch On Forearm
Style/Technique: Illustrative / Fine Line
Pain Level: Low-Medium (3-5/10)
Session Time: 1–2 sessions
Best For: Cultural tribute, personal heritage pieces
A Balinese sketch brings personal heritage into an ocean motif. The forearm is great for linear storytelling and fine-line cultural details. I’ve seen this style tied to family stories and travel memories—talk to artists like @darina.iskra.tt for authentic motifs. Keep the linework deliberate; avoid tiny filler dots that merge during healing.
13. Starfish With Patterns On Wrist
Style/Technique: Minimalist / Neo-Traditional
Pain Level: Medium (4-6/10)
Session Time: 1 session
Best For: Small, playful seaside symbols
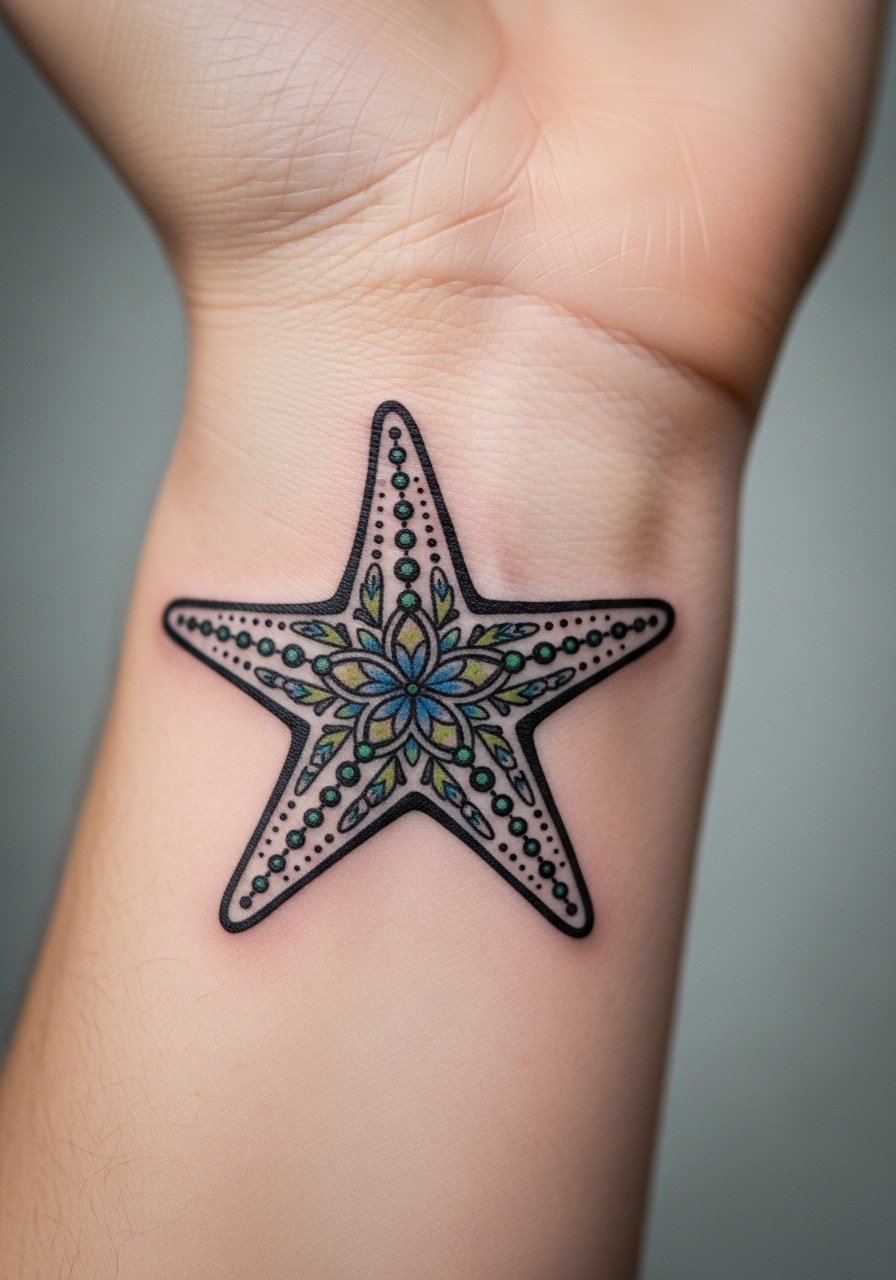
Patterned starfish are playful and customizable. The wrist shows them nicely but watch friction from bracelets and sleeves. If you want color, pick pigments that hold against sun exposure or plan to touch up. Many people use patterned starfish as matching or friendship pieces—keep the main silhouette bold for longevity.
14. Dolphin Flip Design On Ankle
Style/Technique: Illustrative / Minimalist
Pain Level: Medium (4-6/10)
Session Time: 1 session
Best For: Lighthearted matching tattoos or travel mementos
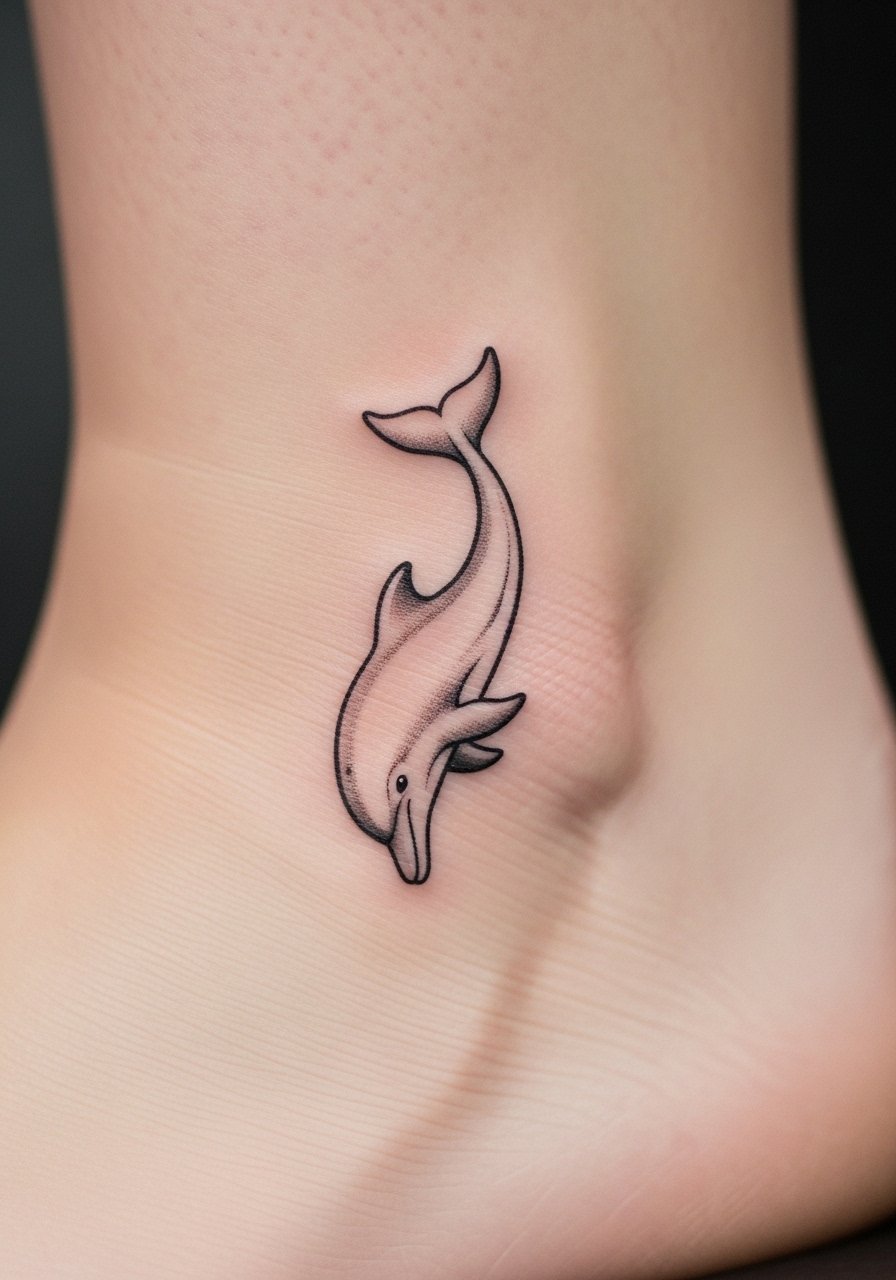
Dolphins read joyful and communal—perfect for matching friend tattoos. Ankle placement gives a small canvas and easy concealment. Dolphins with clear motion lines avoid looking static once healed. A common misstep: packing too many small waves around the dolphin; simpler backgrounds keep it readable.
15. Tiny Wave Behind Ear
Style/Technique: Minimalist / Fine Line
Pain Level: High (6-8/10)
Session Time: 30–60 minutes
Best For: Ultra-discreet ocean token
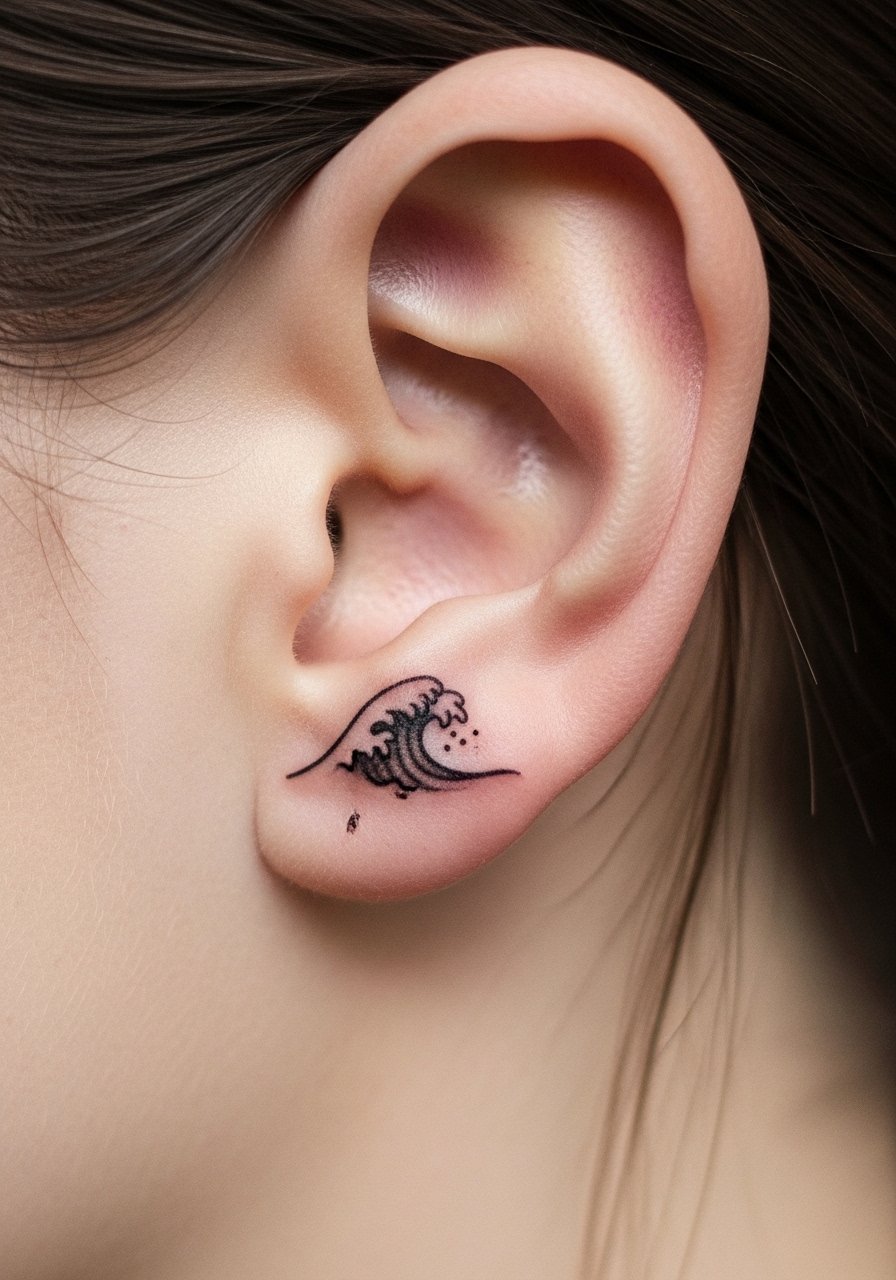
Behind-the-ear tattoos are discreet but surprisingly sensitive. A tiny wave there is a personal symbol you can hide with hair. Expect faster surface healing but be cautious with shampoos and sleeping on the area. Fine-line waves here should be slightly bolder than you imagine so they don’t vanish over time.
16. Moon Phases With Tides Interaction On Ribcage
Style/Technique: Illustrative / Fine Line
Pain Level: High (7-8/10)
Session Time: 1–2 sessions
Best For: Symbolic pieces tying cycles and the sea
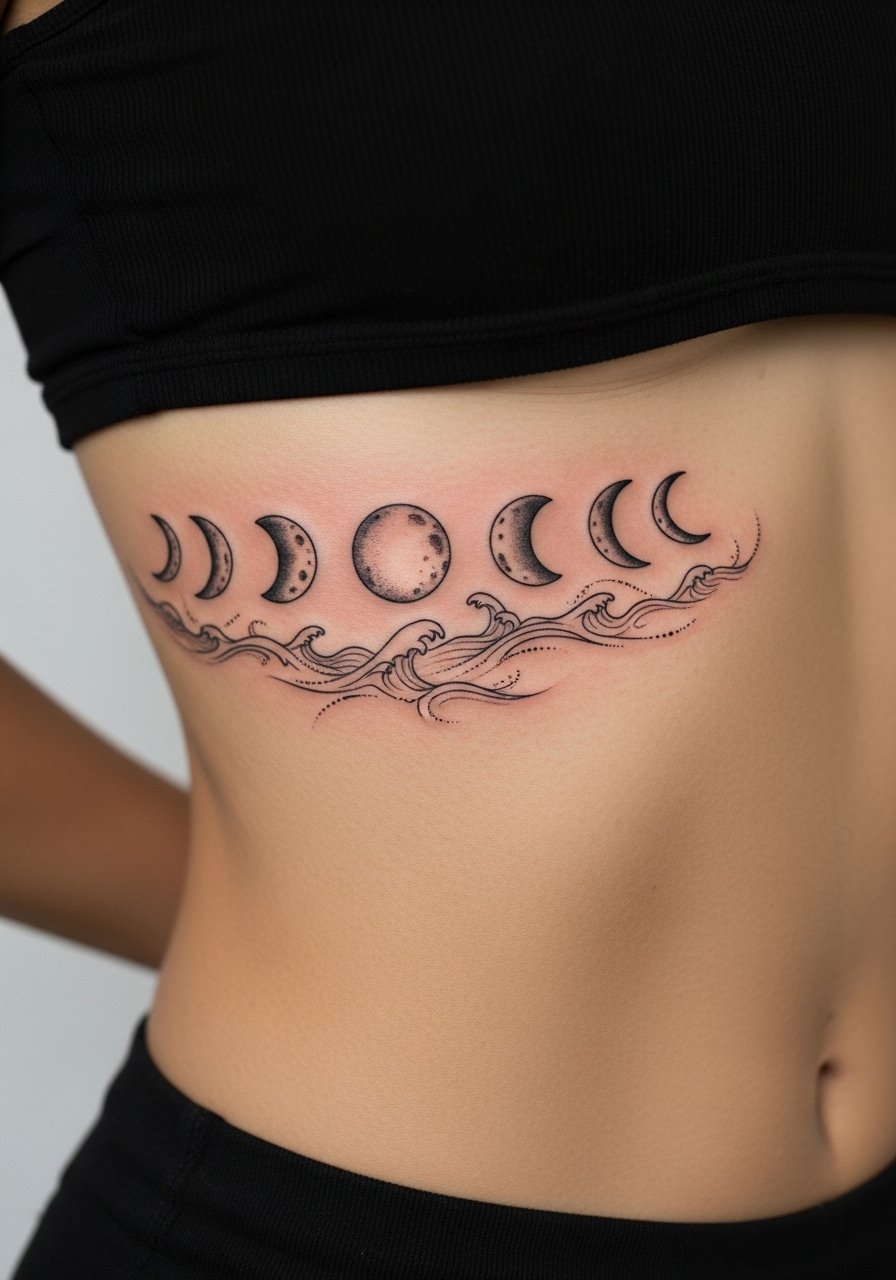
Pairing moon phases with tide lines is a poetic way to show cycles and rhythm. Ribs are sensitive, so plan mentally for a tougher session. I’ve noticed these symbolic combinations age well because their strong shapes remain legible. Ask your artist for clear negative space between moons and wave elements to avoid merge during healing.
17. Galleon Ship In Stormy Sea On Calf
Style/Technique: Illustrative / Realism
Pain Level: Medium (4-6/10)
Session Time: 2–3 sessions
Best For: Narrative, vintage nautical vibes
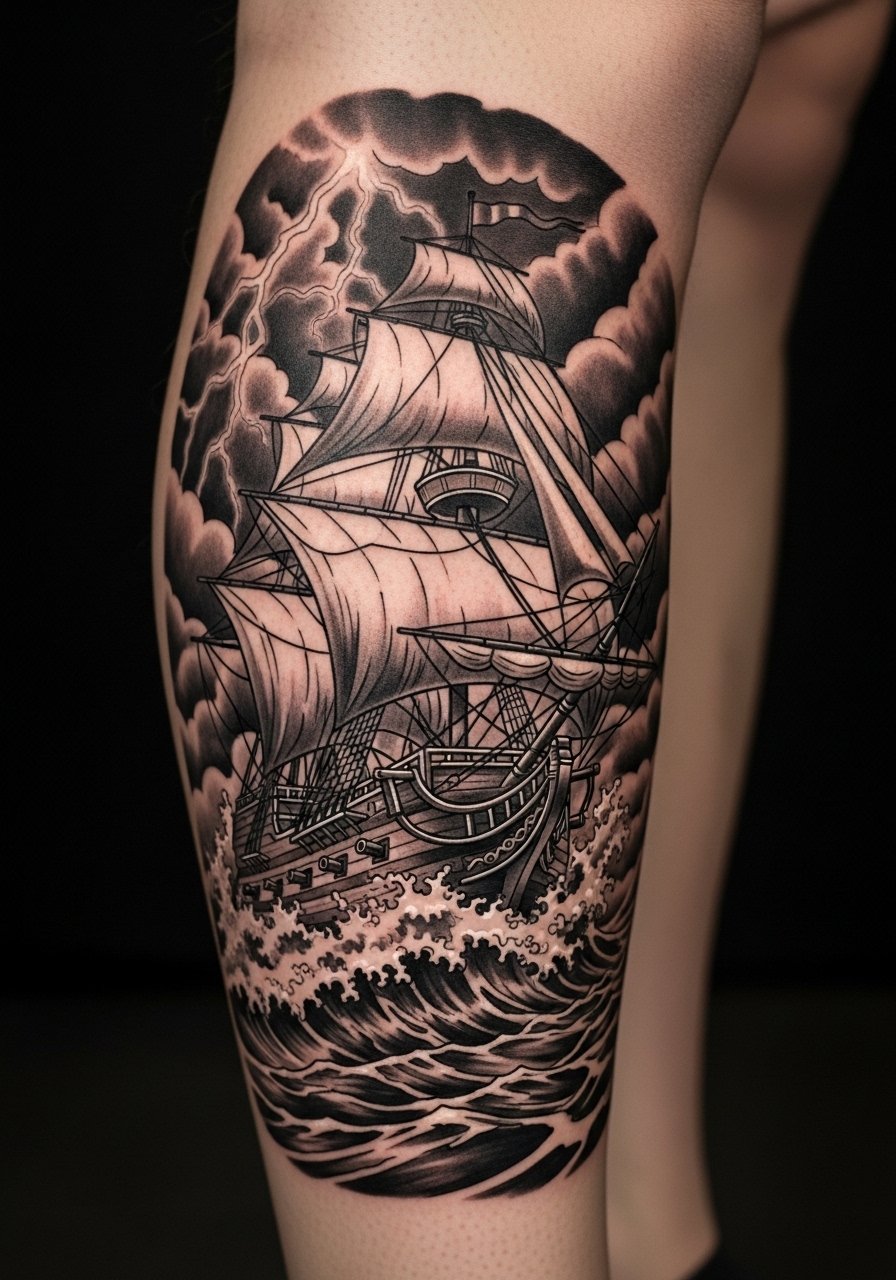
A galleon in stormy seas reads like an epic personal tale. The calf is ideal for vertical ship compositions. Big dark areas should be balanced with highlights so the ship keeps shape over time. This is one of the more under-used classic nautical themes I keep seeing come back—ask your artist to plan highlights for future aging.
18. Cybersigilism Nautical Hybrid On Forearm
Style/Technique: Illustrative / Contemporary Hybrid
Pain Level: Low-Medium (3-5/10)
Session Time: 1–2 sessions
Best For: Modern mystics who want symbolic ocean tech fusion
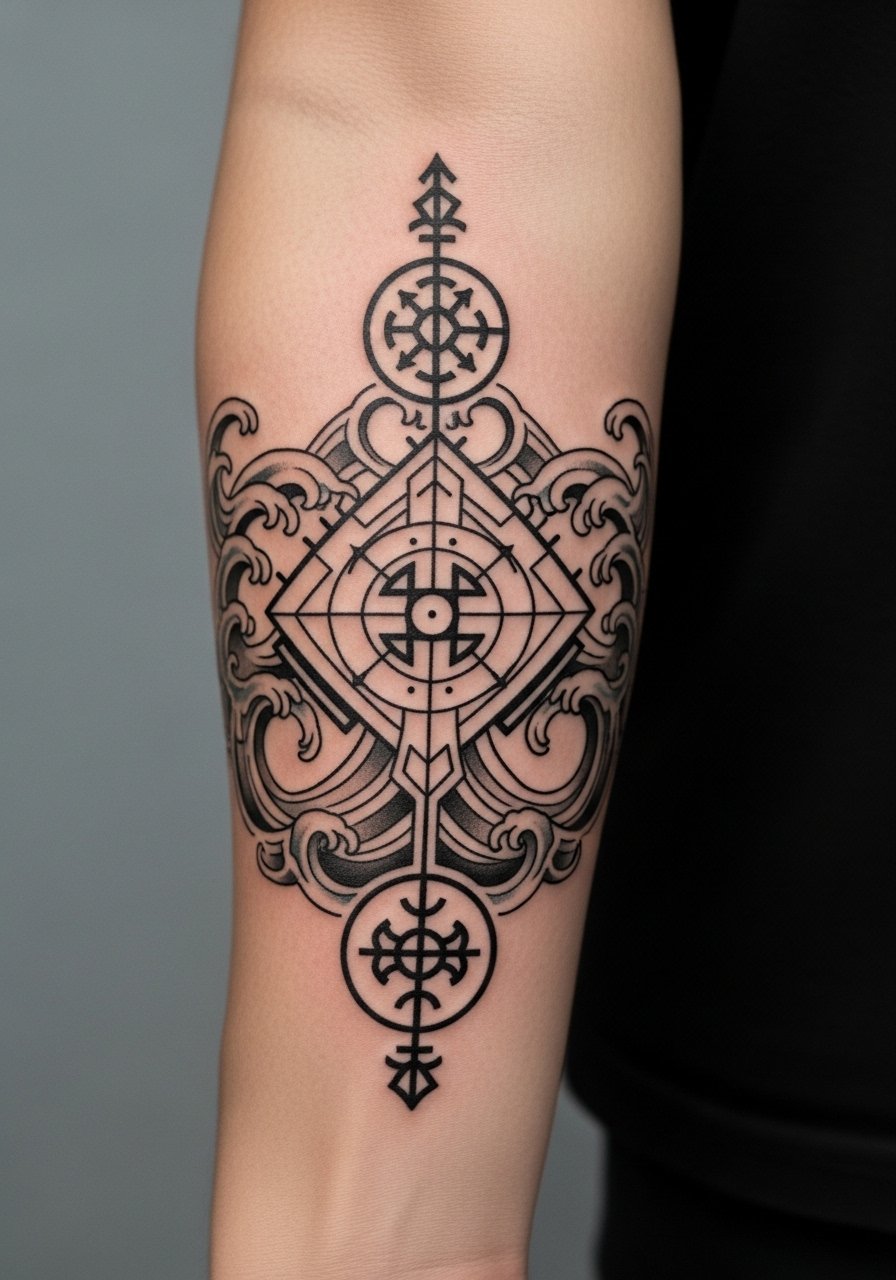
This modern twist blends ocean symbols with tech-inspired sigils—think waves, circuit-like lines, and sigils that read personal meaning. Forearm placement shows detail and lets you explain the symbolism easily. It’s one of the unique angles I rarely see elsewhere, and it’s great if you want something very personal and contemporary.
19. Handpoke Organic Wave Band On Upper Arm
Style/Technique: Handpoke / Organic Blackwork
Pain Level: Low-Medium (3-5/10)
Session Time: 1–3 sessions depending on artist
Best For: Natural-looking bands with imperfect charm
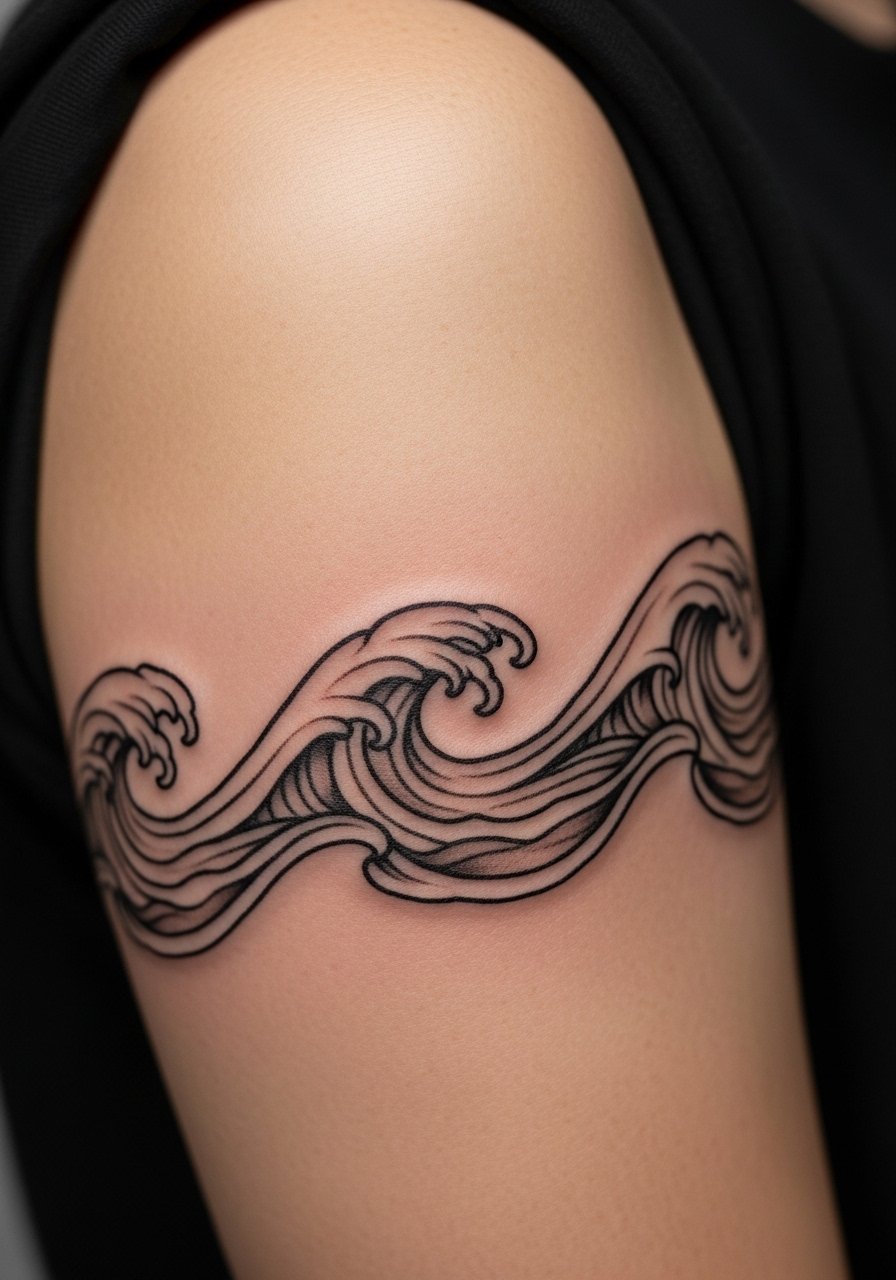
Handpoke bands have a softer, imperfect look compared to machine precision. That organic quality feels calming and timeless. Upper arm flesh tolerates sessions well and lets smaller imperfections read as intentional. If you want that handmade aesthetic, find an artist experienced in handpoke to avoid uneven depth.
20. Minimalist Horizon Line On Collarbone
Style/Technique: Minimalist / Fine Line
Pain Level: Medium (4-6/10)
Session Time: 30–90 minutes
Best For: Elegant, low-commitment ocean statement
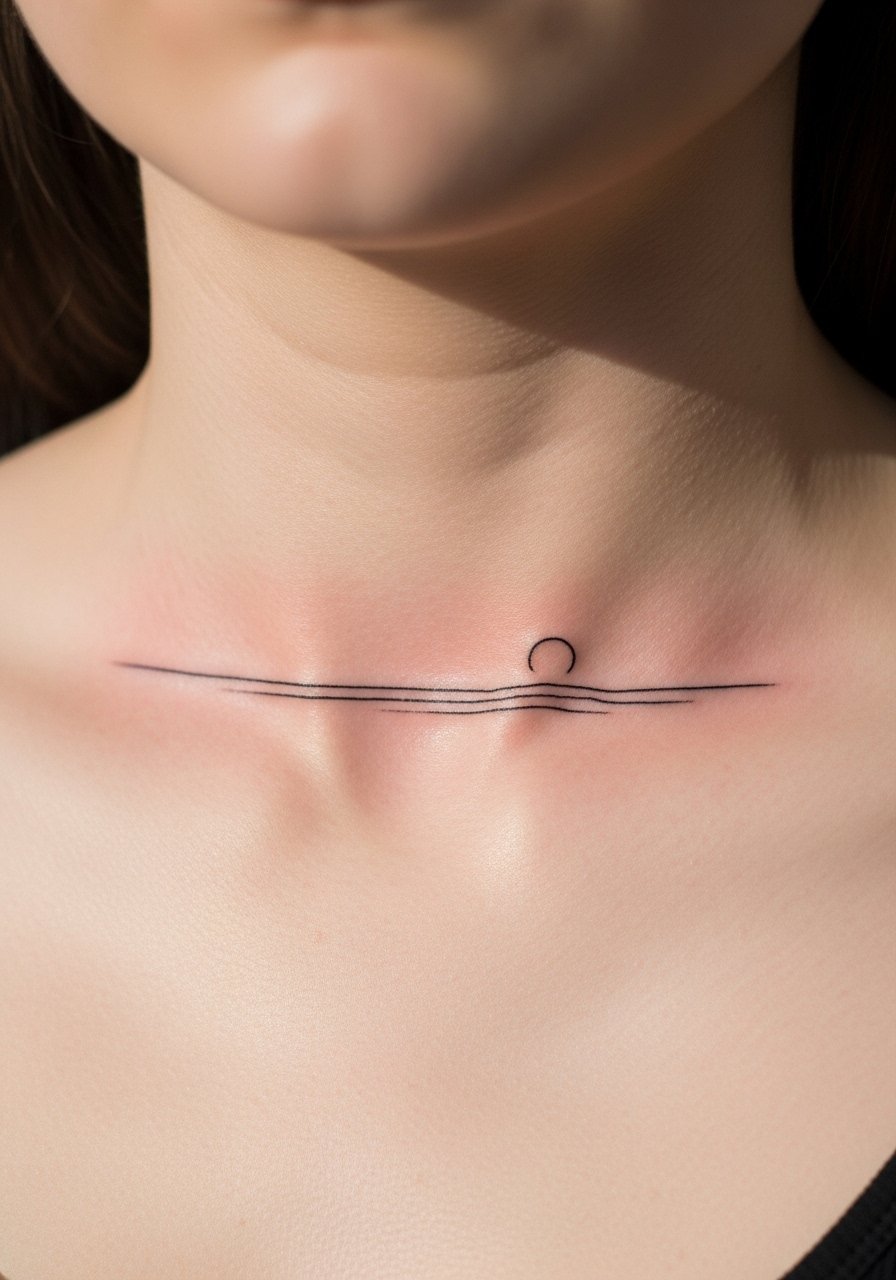
Collarbones make an elegant place for a thin horizon. The area is bony, so expect pinching pain, but sessions are short. This placement pairs well with necklaces and can be hidden with scarves. If you want longevity, ask for a slightly firmer line weight than the faintest possibility.
21. Tiny Nautical Compass On Inner Wrist
Style/Technique: Minimalist / Illustrative
Pain Level: Medium (4-6/10)
Session Time: 30–60 minutes
Best For: Travel-inspired, first ocean tattoo ideas
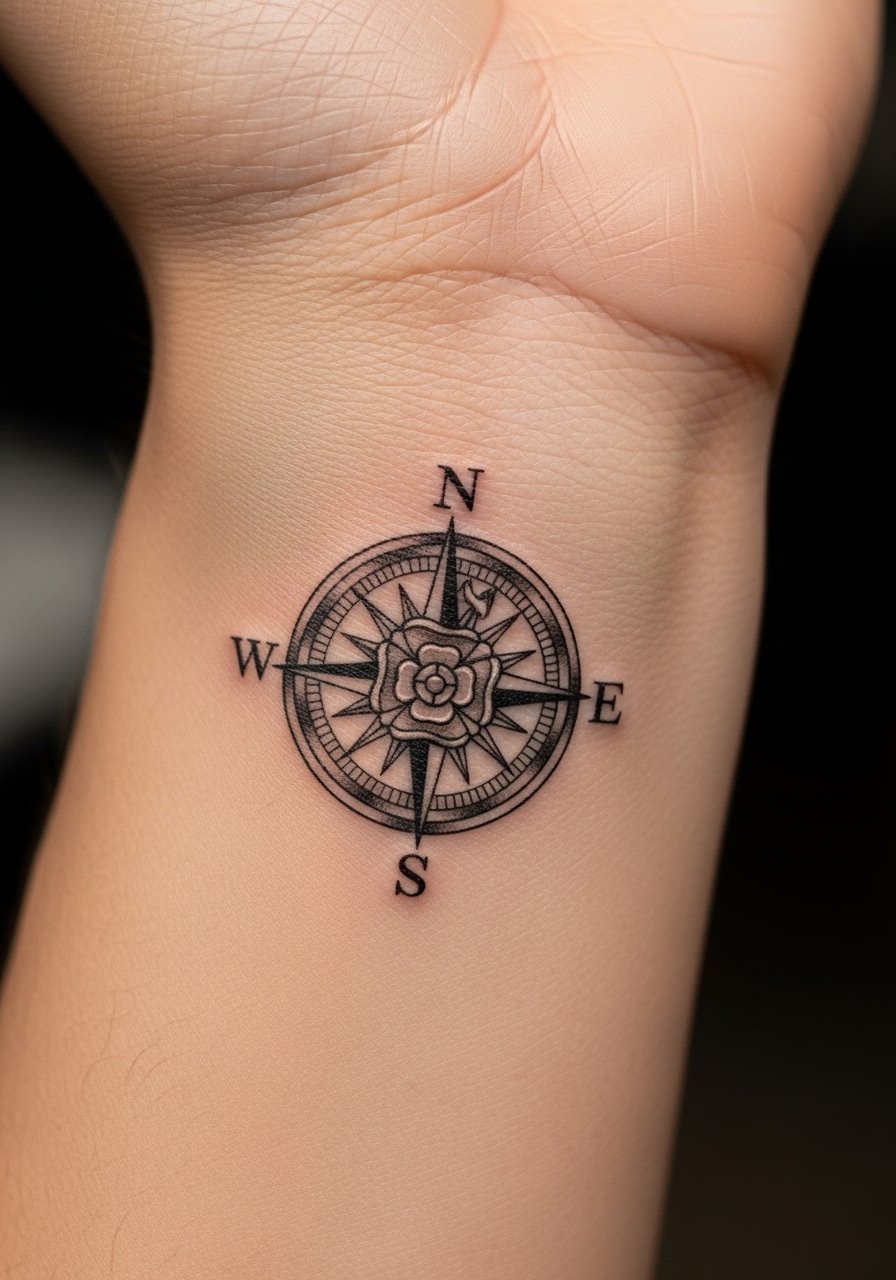
A tiny compass on the inner wrist is practical and symbolic—a little anchor point for decisions. The wrist sees a lot of sun and contact, so expect slightly faster fading; thicker lines help longevity. This is a classic first ocean tattoo idea because it’s meaningful and small.
22. Wave And Mountain Hybrid On Ankle
Style/Technique: Illustrative / Minimalist Hybrid
Pain Level: Medium (4-6/10)
Session Time: 1 session
Best For: People who love both sea and land imagery
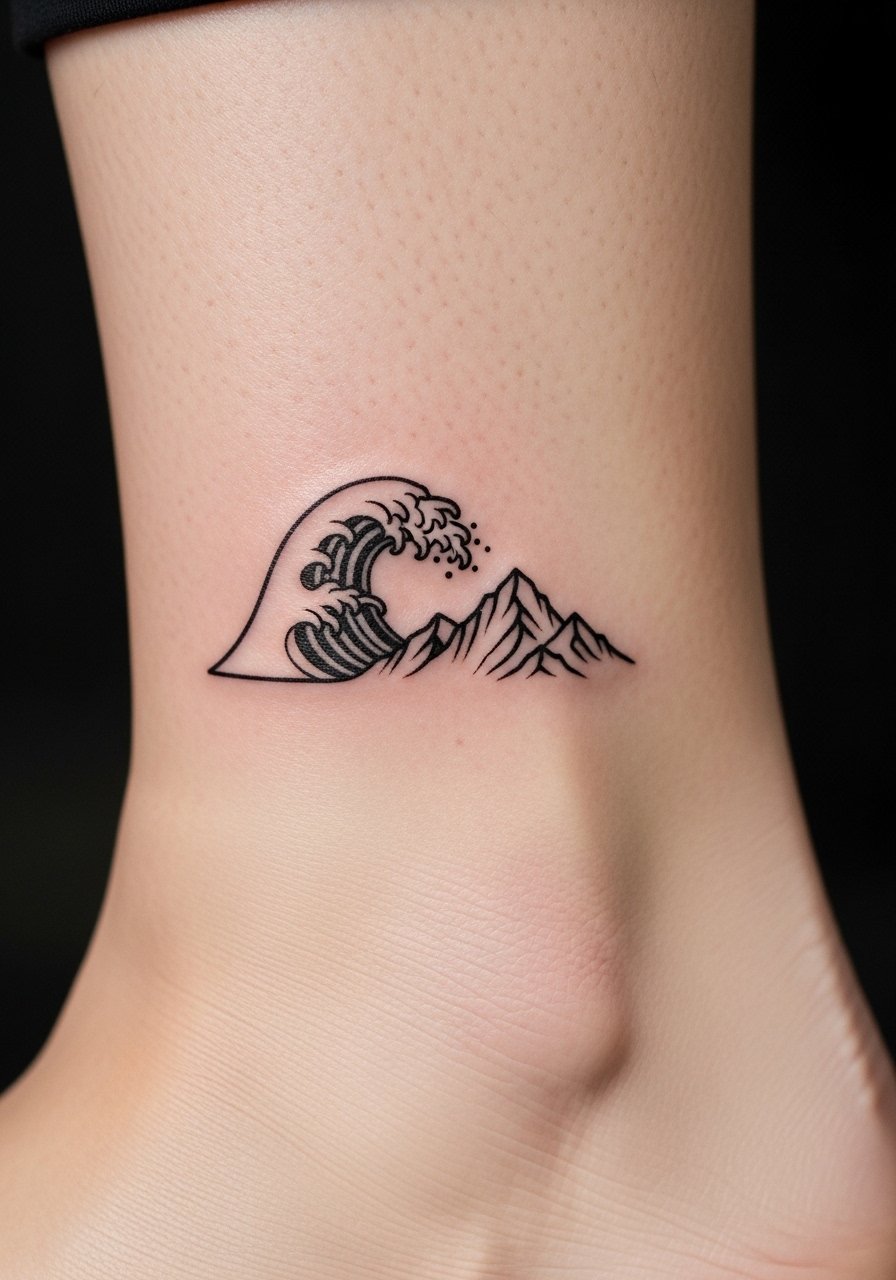
Mixing wave and mountain silhouettes makes a subtle personal landscape. The ankle placement is visible yet easy to conceal. Keep the composition simple; small complex motifs on the ankle blur faster than single silhouettes. I recommend a bold outline for readability.
23. Seahorse Couple On Forearm
Style/Technique: Illustrative / Watercolor accents
Pain Level: Low-Medium (3-5/10)
Session Time: 1–2 sessions
Best For: Paired pieces, romantic symbolism
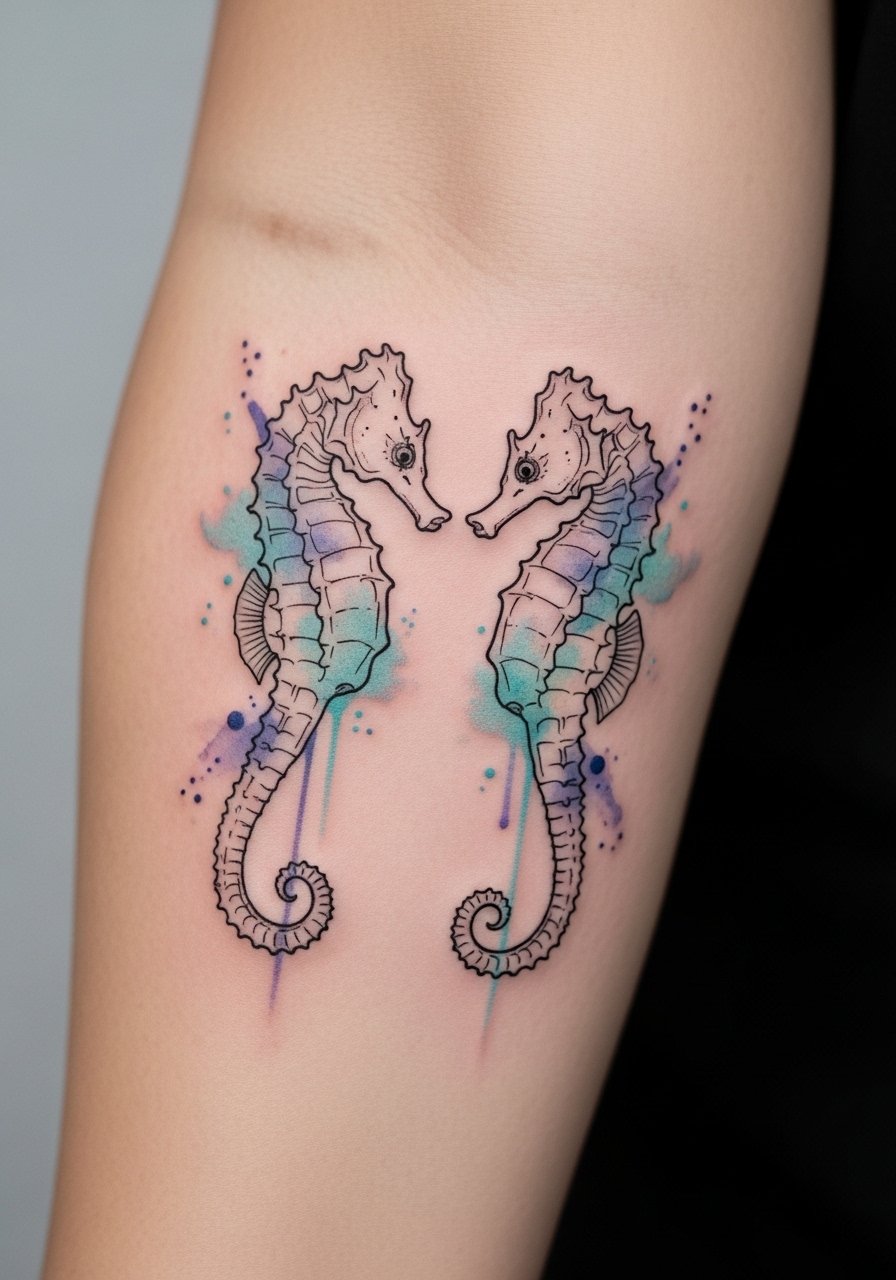
Seahorses pair nicely for couple or friendship tattoos—their gentle form reads intimate. Forearms let you play with negative space and color. If you choose watercolor accents, plan for occasional touch-ups; discuss saturation with your artist so the piece keeps spirit while aging gracefully.
24. Shark Silhouette On Ribcage
Style/Technique: Blackwork / Minimalist
Pain Level: High (7-8/10)
Session Time: 1 session
Best For: Bold, masculine statement pieces
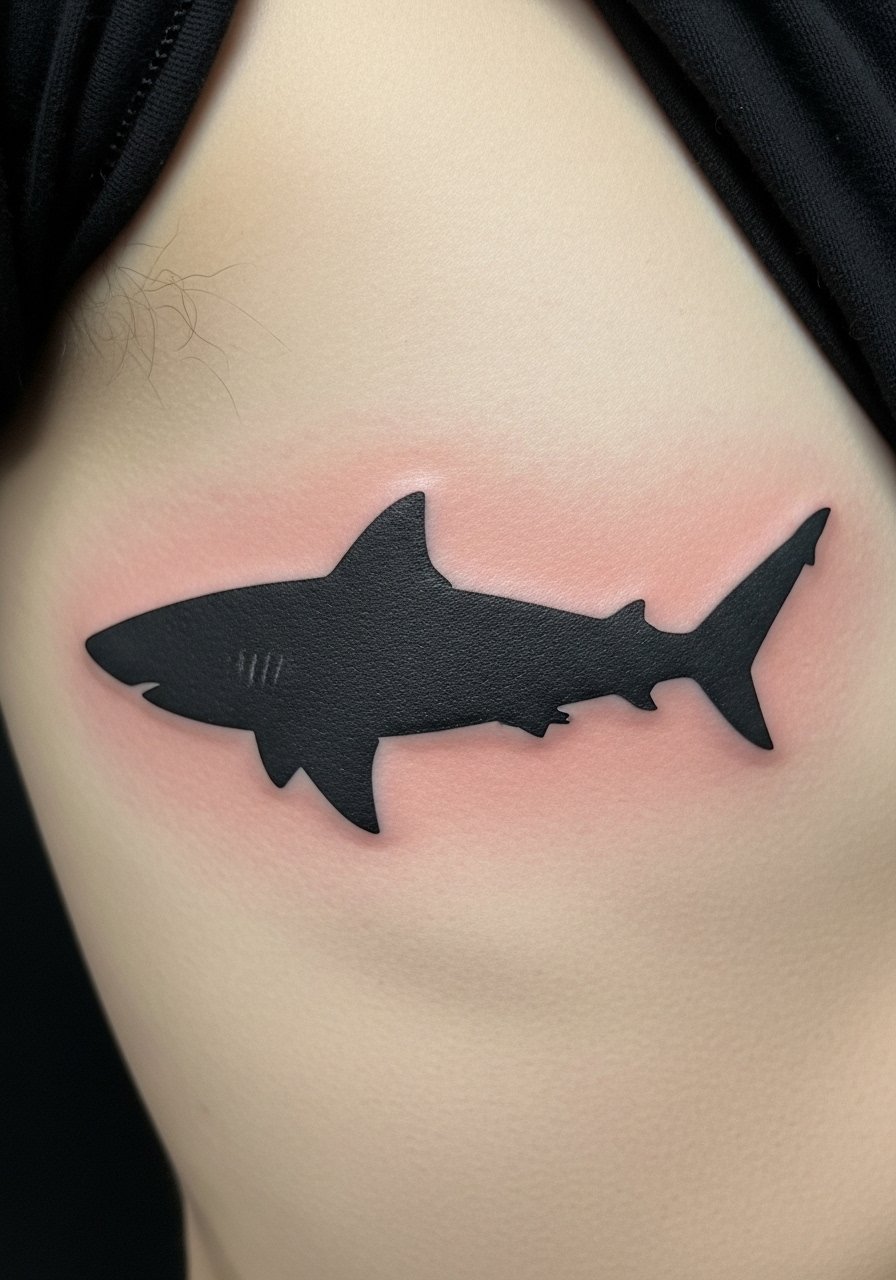
A shark silhouette is bold and graphic. Ribs are painful but provide a dramatic place for flat black shapes. Solid blackwork ages well if the edges are strong—avoid dithering inside large fills that might patch unevenly. I like silhouettes for their timeless, clear message.
25. Kraken Tentacle Wrap On Calf
Style/Technique: Traditional / Illustrative Wrap
Pain Level: Medium (4-6/10)
Session Time: 1–3 sessions
Best For: Dramatic, wrapping pieces that play with motion
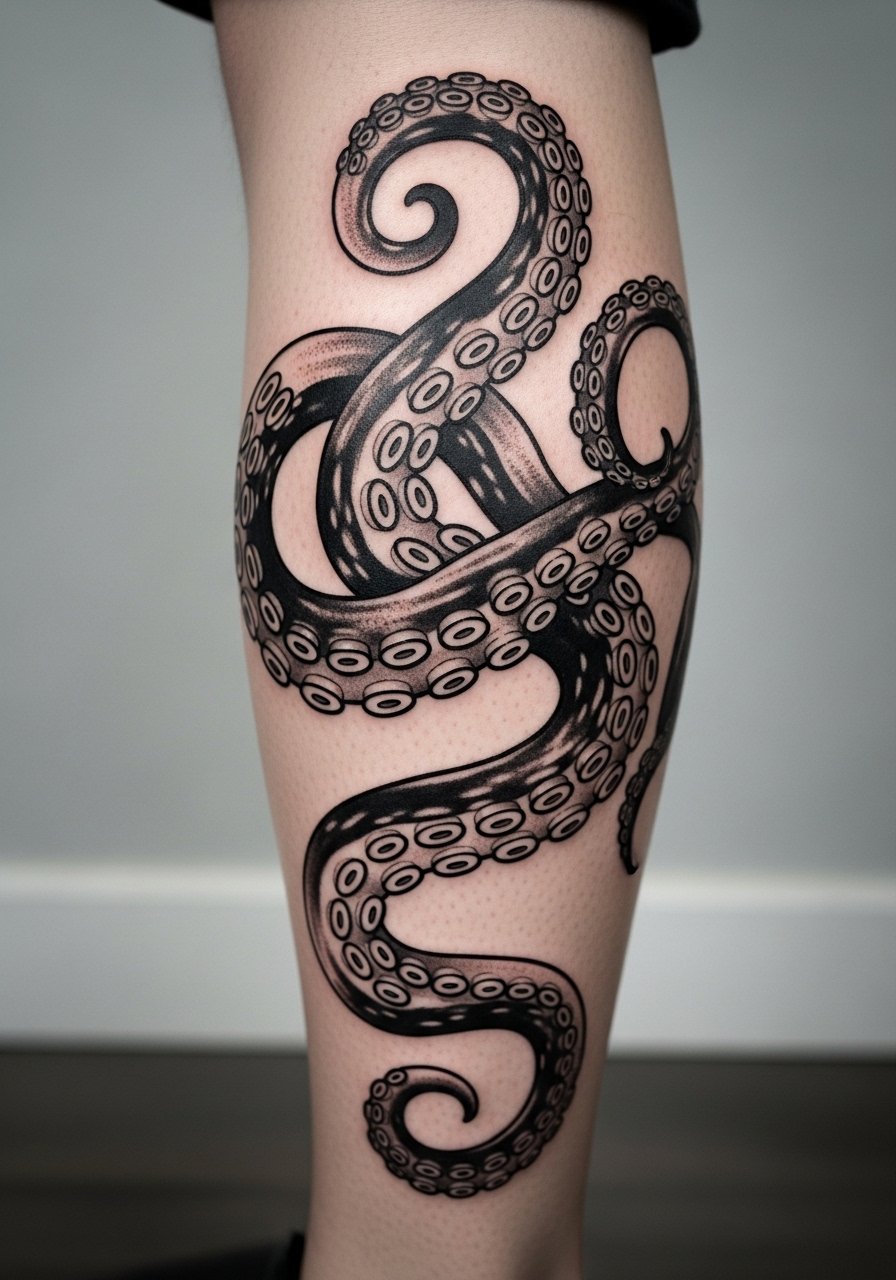
Tentacle wraps are playful and theatrical. The calf gives a nice vertical surface for motion; tentacles can appear to move as you walk. Keep a balance of shadow and highlight so suckers remain defined as the skin ages. This is a great option if you want something dynamic but not full-sleeve.
26. Whale Tail Breaking Water On Hip
Style/Technique: Illustrative / Minimalist
Pain Level: Medium (4-6/10)
Session Time: 1 session
Best For: Feminine placement, hidden or intimate pieces
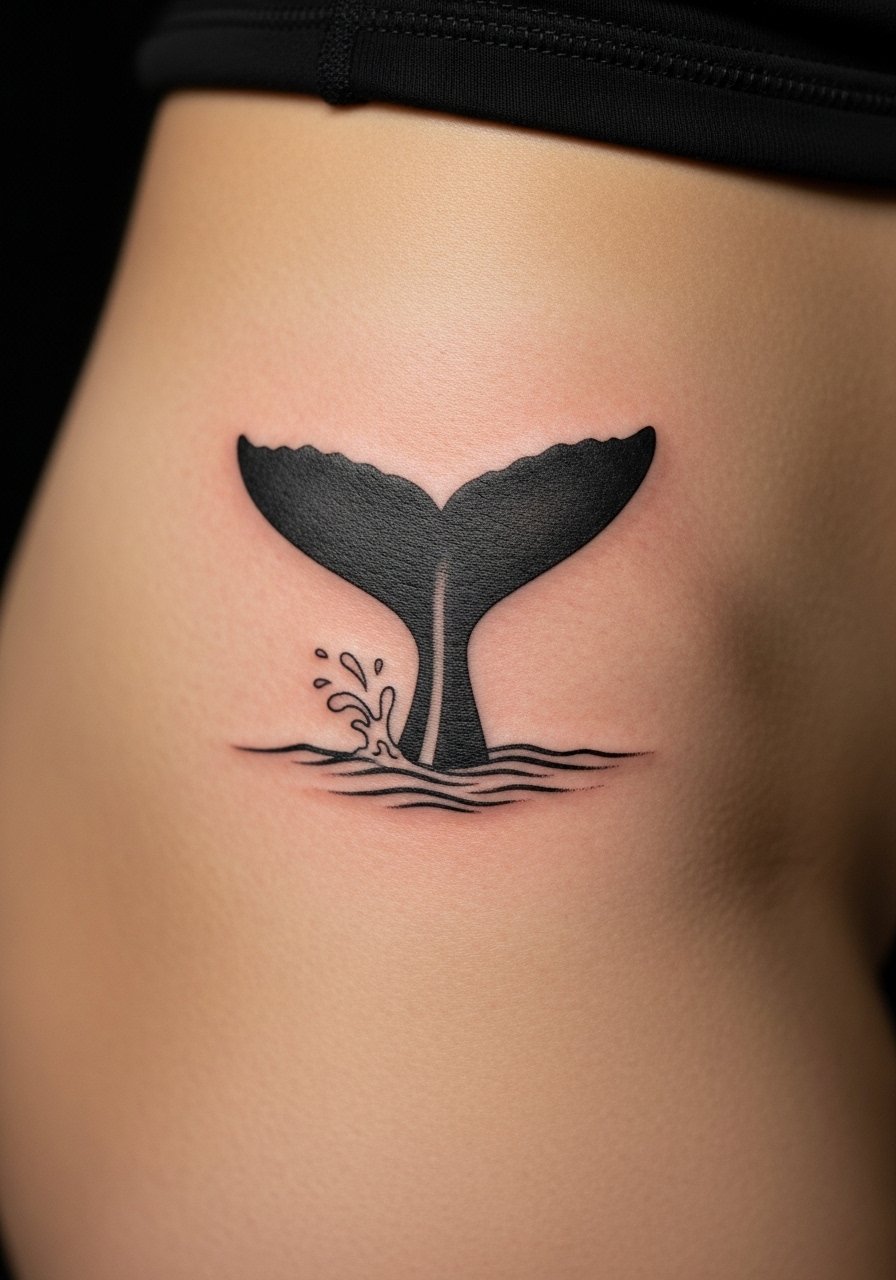
A whale tail on the hip is intimate and symbolic—ideal if you want something private yet meaningful. The hip heals nicely, though clothing can rub early on. Simpler shapes hold up well here; avoid tiny dots that sit where underwear or seams might irritate during healing.
27. Coral Fragment Micro-Realism On Finger
Style/Technique: Micro-Realism / Single Needle
Pain Level: High (7-8/10)
Session Time: 30–60 minutes
Best For: Very small, detail-forward ocean tokens
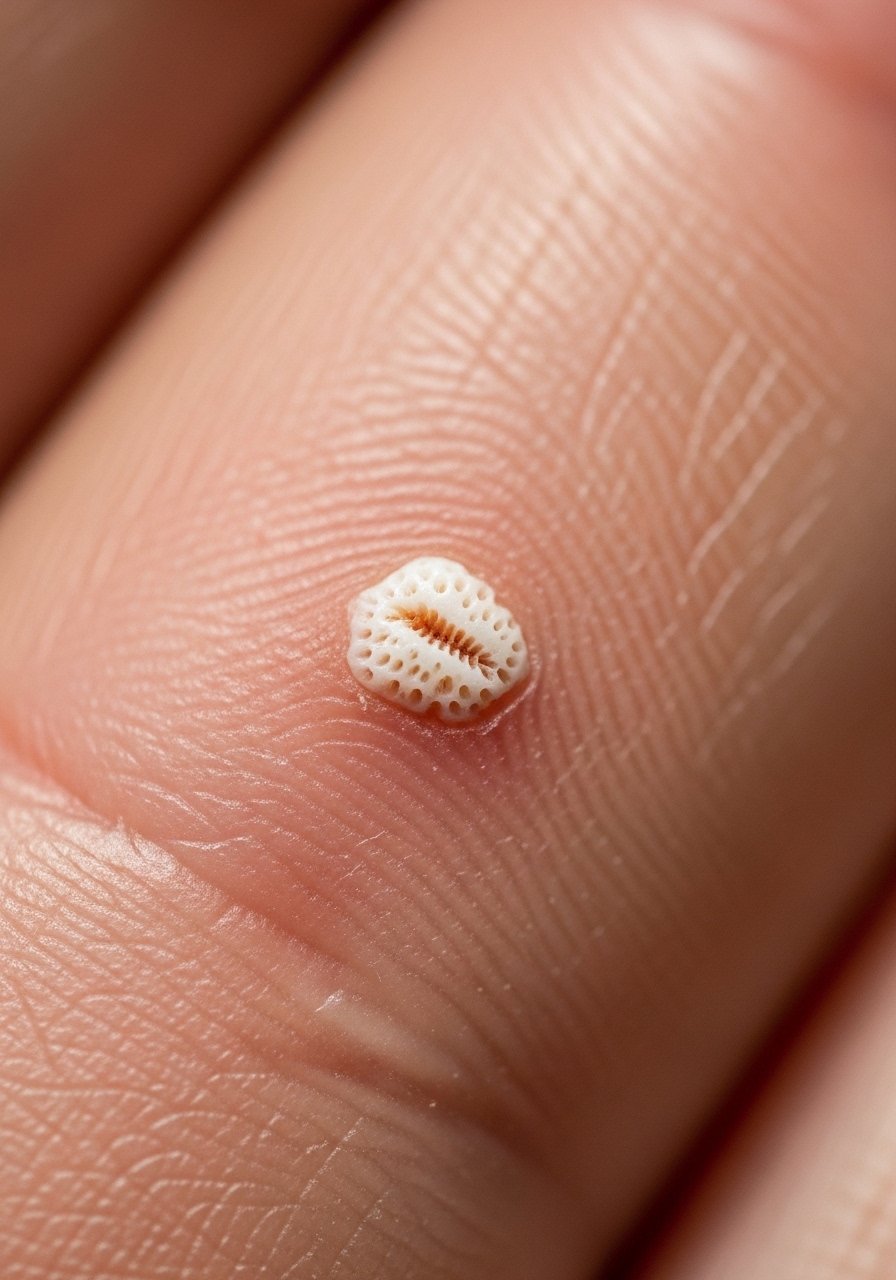
Fingers are tricky: quick heals but heavy fading and blur. Coral micro-pieces look delicate and interesting up close, but expect maintenance. If you go for finger tattoos, plan them as tokens that may need touch-ups—avoid ultra-fine filigree that will vanish first.
28. Tide-Clock Moon And Wave On Sternum
Style/Technique: Illustrative / Fine Line with Dotwork
Pain Level: High (7-8/10)
Session Time: 1–2 sessions
Best For: Centerpiece with symbolic rhythm and intimacy
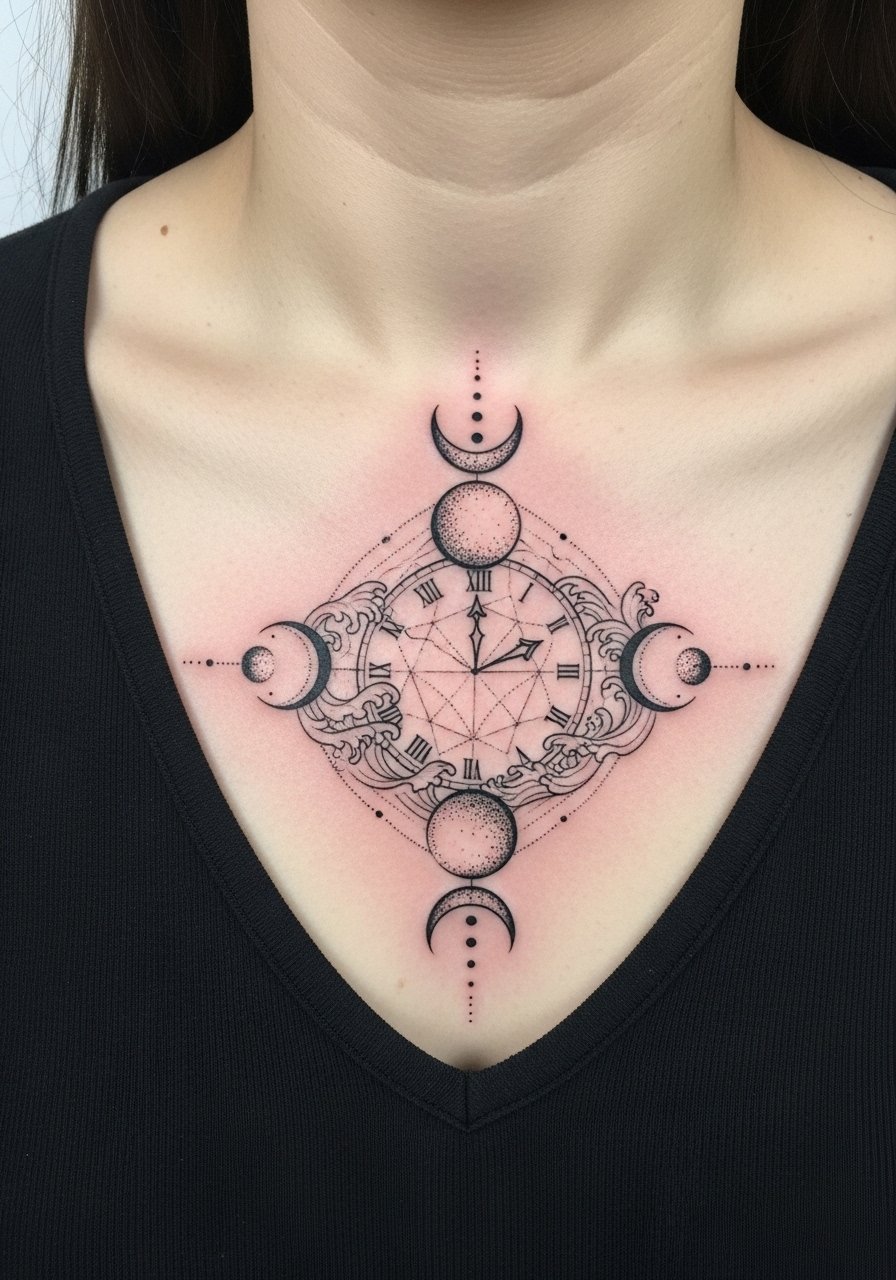
Sternum work is intimate and dramatic. Wage your tolerance for pain against the payoff—this placement creates a strong central composition. I’ve seen these read as both jewelry-like and deeply symbolic. Clear negative space and simple geometry keep the design legible over time.
29. Printable Beach Template Palm Tattoo On Shoulder
Style/Technique: Illustrative / Transfer-Ready
Pain Level: Low-Medium (3-5/10)
Session Time: 1 session
Best For: Customizable pieces using printable templates or stencils
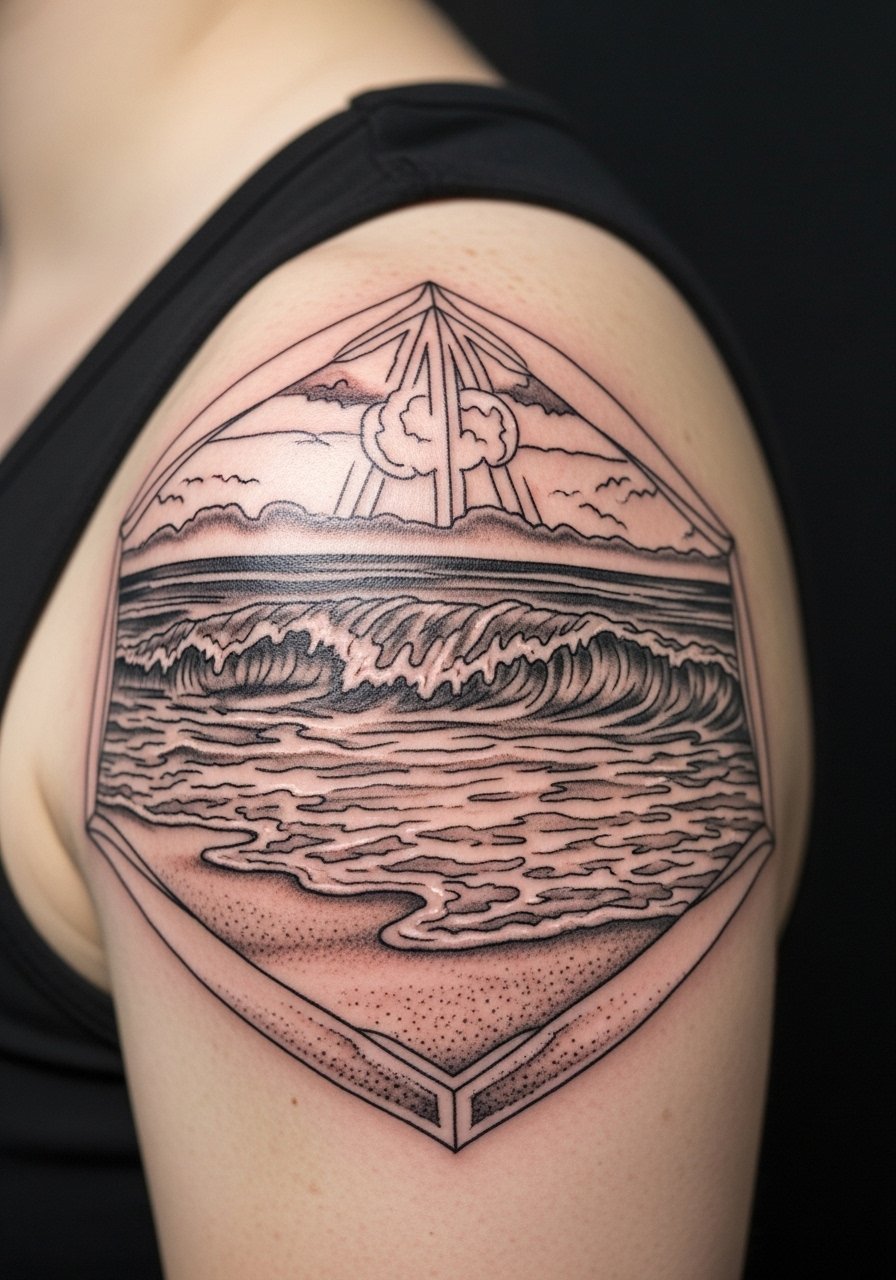
Using printable templates can speed up consultations and help you visualize a beach motif on curved anatomy. Shoulders accept those transfers well, and you can tweak scale easily. If you plan to bring a printable template, ask your artist about stencil paper and how they translate flat files into skin-flowing art.
Tattoo Prep and Aftercare Essentials
Aftercare Essentials:
- Aquaphor Healing Ointment, 14 oz — Use sparingly first 3–5 days per artist guidance
- Saniderm Transparent Adhesive Bandage, 6-inch roll — Second-skin option some artists recommend for first 24–72 hours
- CeraVe Fragrance-Free Moisturizing Lotion, 12 oz — Daily moisturizer for days 4–14
Before Your Appointment:
- Tattoo Numbing Cream with 5% Lidocaine (topical cream) — Ask your artist before use and follow timing instructions
- Tattoo Stencil Transfer Paper, 8.5×11 — Handy if you’re bringing printable templates
Long-Term Maintenance:
- SPF 50 Sunscreen Stick for Tattoos, Portable — Daily protection; I keep one in my bag
- Mad Rabbit Tattoo Balm, 1.7 oz — For occasional moisturize-on-the-go for healed ink
- Hustle Butter Deluxe, 4 oz — Vegan aftercare option some artists praise
Optional Comfort & Healing Aids:
- Hydrocolloid Bandages, Large — Good for small scabs or spot protection after peeling starts
- Dr. Bronner's Unscented Castile Soap, 16 oz — Gentle cleanser for first-week washes
I keep these grouped in a small kit for new tattoos, and I’ve learned artists often have a clear preference—ask them which brand they recommend before buying. From my experience, sunscreen and a good fragrance-free lotion are non-negotiable for long-term vibrancy.
Frequently Asked Questions
Q: How bad does a tattoo actually hurt?
A: Pain varies by placement and your tolerance. Forearm or upper arm tends to be lower (I’d say around 3–4/10 for many people). Ribs, sternum, and behind the ear are higher—expect sharper sensations. For sensitive spots, consider asking about a numbing cream with lidocaine but always check with your artist first.
Q: What if I regret my ocean tattoo later?
A: Sit with designs for weeks or months and start with small ocean tattoo ideas if you’re unsure. Hidden placements (upper thigh, shoulder blade) let you test a design. Laser removal exists but is a long path—pick symbols with personal meaning to reduce regret.
Q: How do I keep my tattoo from fading?
A: From what I’ve seen, UV protection is the biggest factor—use a SPF 50+ sunscreen stick on exposed ink every day. Moisturize with fragrance-free lotion like CeraVe to keep skin healthy. Black and gray hold longest; bright pastels fade faster.
Q: When can I work out after getting an ocean tattoo?
A: Wait at least 48–72 hours before sweating heavily, and longer if it’s in a flex area (elbow, knee). Sweat can irritate a fresh tattoo and increase infection risk. Protect your piece while it’s in that critical first week.
Q: Should I get a small tattoo first to test pain?
A: Only if you actually want that small design. Pain is about placement more than size—tiny wrist or finger tats can hurt more than a medium forearm piece. If you’re nervous, choose a sheltered area like the outer upper arm for your first piece.
Q: How long does a tattoo take to heal?
A: Surface healing is usually 2–3 weeks; deeper healing can take a couple months. The first week is the most important—keep it clean, lightly moisturized, and follow your artist’s aftercare. If you’re using protective coverings like Saniderm-style bandages, follow the timeline your artist prescribes.
Q: Do tattoos look different on different skin tones?
A: Yes. High-contrast black and gray shows up strongly across tones. Bright colors can read differently; some pigments look more muted on deeper skin. I always ask artists to show healed examples on similar skin tones so I know what to expect.
