
I spent months curating nature tattoo ideas because I wanted pieces that actually feel grounding years after I get them. I realized the trick isn't chasing the loudest trend—it's choosing styles and placements that age well and match how you move through the world. These 30 nature tattoo designs are what I keep coming back to in my research and conversations with artists.
This list focuses on fine line, neo-traditional, blackwork, and micro-realism nature tattoo designs. These ideas work for wrists, forearms, biceps, ribs, thighs, and ankles—placements I see artists recommend most. From what I've gathered, artists in 2026 favor intentional, custom nature tattoo designs that hold up healed more than flashy one-off trends.
1. Fine Line Floral Wrist
Style/Technique: Fine Line / Minimalist
Pain Level: Low-Medium (wrist area)
Session Time: 1 session, 1-2 hours
Best For: First nature tattoo, visible sentimental piece
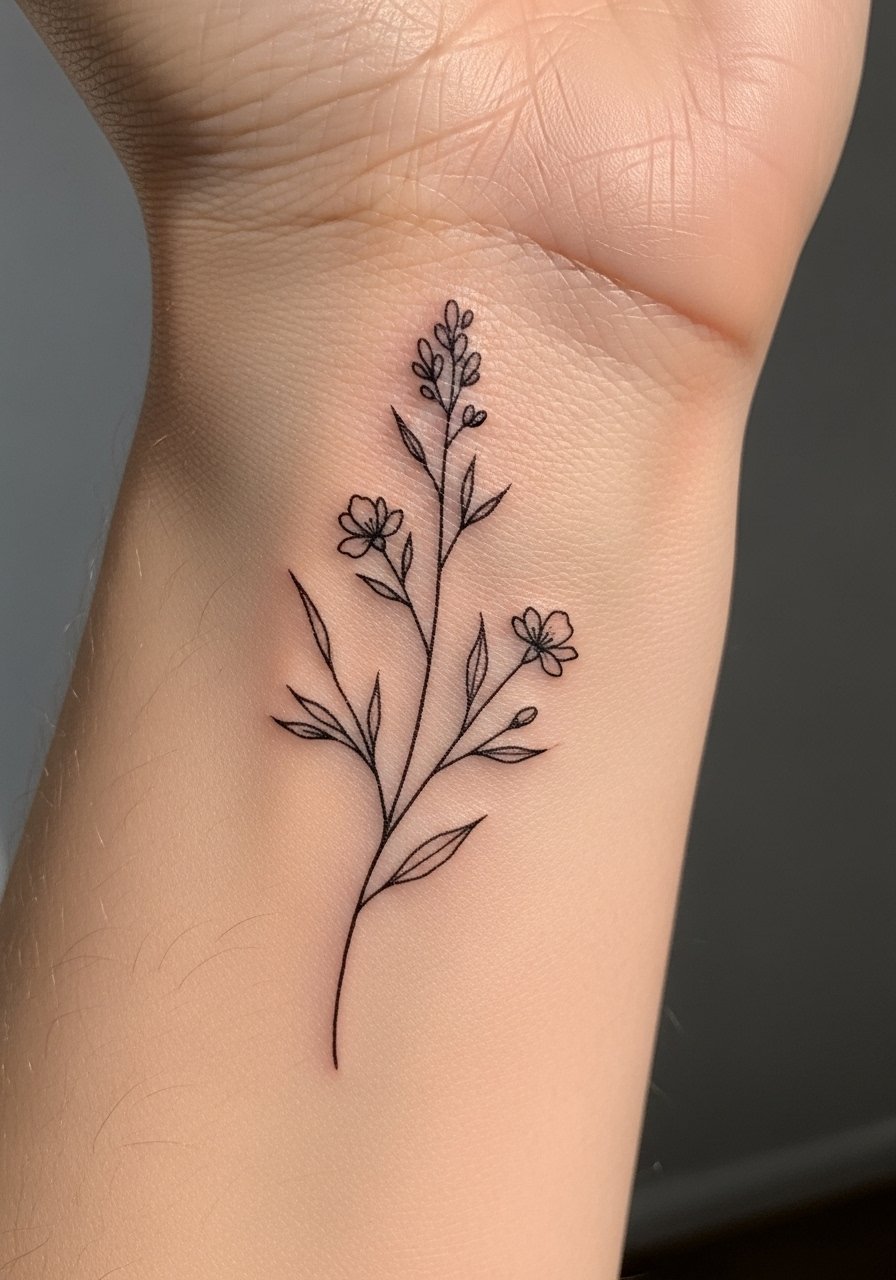
I picked this for myself as a starter piece. Fine-line floral wrist tattoos read like tiny stories. They sit well on the anatomy and photograph cleanly. Expect a sharper sting around the bone; pain is short and manageable. Healing is quick—about two to three weeks for most surface layers—but I’ve seen delicate lines blur if the artist overworks the skin. Ask for single-needle line work and healed portfolio shots from the artist. Avoid tiny details packed too close; they tend to smudge over time. Use fragrance-free lotion during healing and sunscreen later. Search artists who specialize in fine line tattoo ideas and floral tattoo meaning if symbolism matters to you.
2. Abstract Nature Sleeve With Negative Space (Forearm)
Style/Technique: Illustrative / Blackwork
Pain Level: Medium (forearm)
Session Time: Multiple sessions over weeks
Best For: Statement sleeve, art-forward collectors
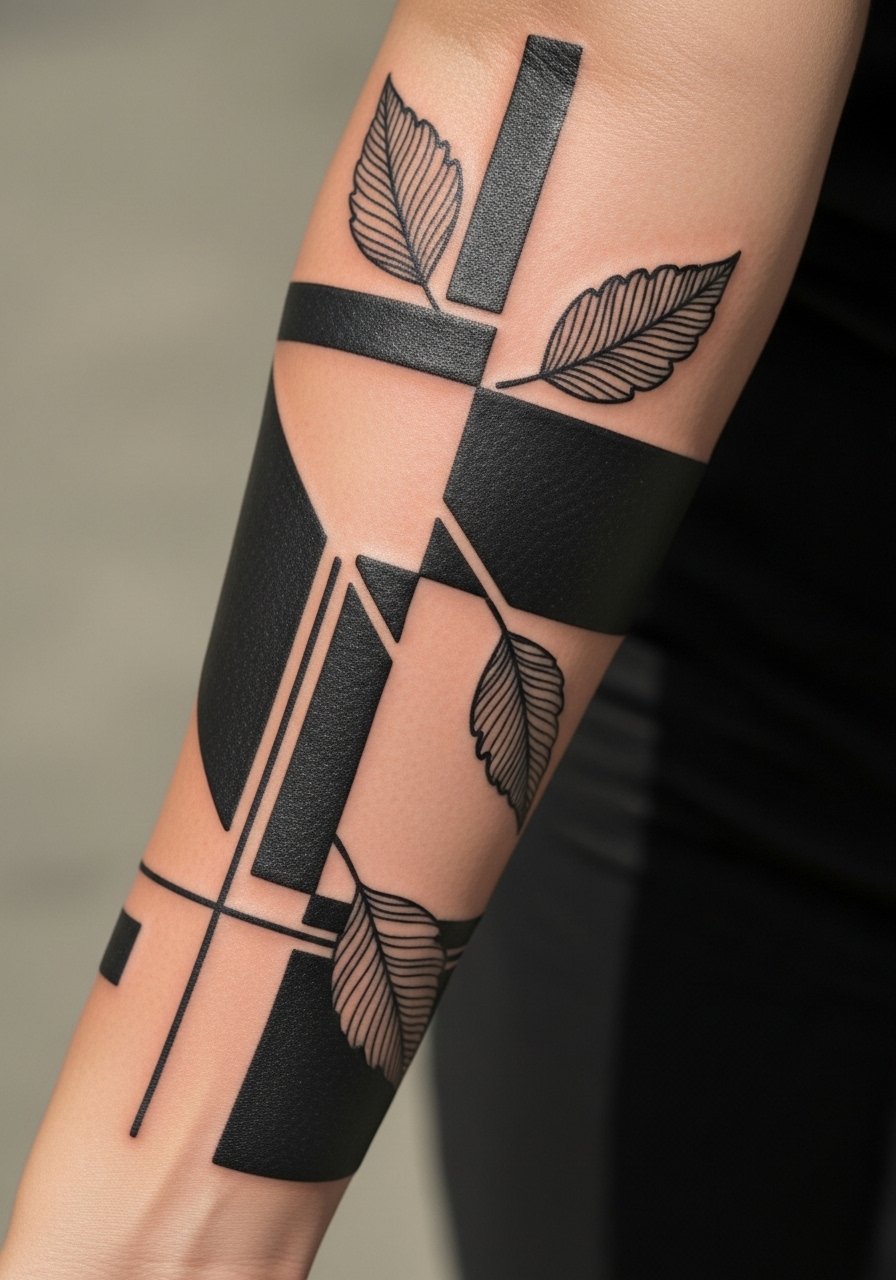
I love how negative space lets the skin breathe in a sleeve. Abstract nature sleeves mix leaves, bark textures, and geometric shapes so the piece reads like art rather than a photo. Forearm sleeves age relatively well because the skin there isn’t constantly stretched like joints. Expect multiple sessions; blackwork settles into a bold, crisp look when healed. Common mistake: copying a feed image without adapting scale—ask an artist to tailor shapes to your arm bone and muscle flow. If you want blackwork tattoo ideas that last, look for artists who balance solid fills with clean negative space.
3. Botanical Realism Thigh
Style/Technique: Realism / Botanical
Pain Level: Low-Medium (thigh)
Session Time: 2–4 hours per session, multiple sessions possible
Best For: Large, private botanical portraits

Botanical realism on the thigh lets an artist show texture—the veins on leaves, dew drops, and subtle color shifts. Thigh skin tolerates longer sessions and heals with minimal movement, so realism holds up nicely. I’ve seen these pieces keep their depth for years if the artist uses strong contrast and good saturation. Pain is generally manageable because the area has more flesh. Avoid overly fine dots in shaded areas; they can disappear. Ask to see healed realism portfolios—Oskar-style realism examples are worth referencing when you consult.
4. Watercolor Flower Forearm
Style/Technique: Watercolor / Illustrative
Pain Level: Low-Medium (inner forearm)
Session Time: 1–3 hours
Best For: Painterly florals, vibrant color lovers
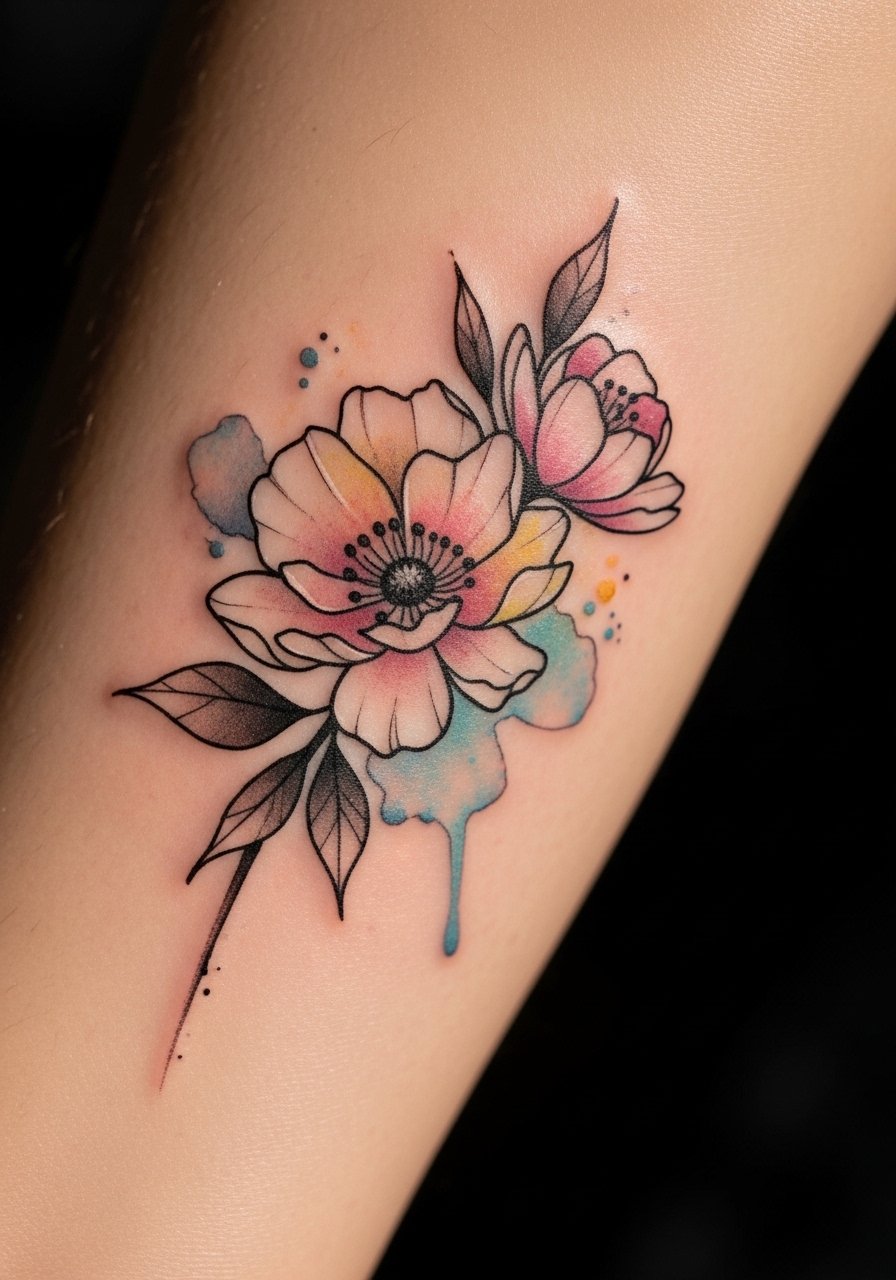
Watercolor florals look like a brushstroke across skin. They feel airy and emotive. In my experience, watercolor requires careful saturation to avoid fading into patchiness. Forearm placement suits the painterly flow and photographs well. Pain is moderate and the session length is short to mid-range. The common advice I’ve heard: mix watercolor with subtle line anchors so the design keeps shape as colors shift. If color longevity matters, ask artists how they plan to balance pigment load—many neo-traditional artists now blend watercolor effects with sturdier outlines.
5. Neo-Traditional Rose Bicep
Style/Technique: Neo-Traditional / Color
Pain Level: Low-Medium (bicep)
Session Time: 1–3 hours
Best For: Bold yet feminine statement
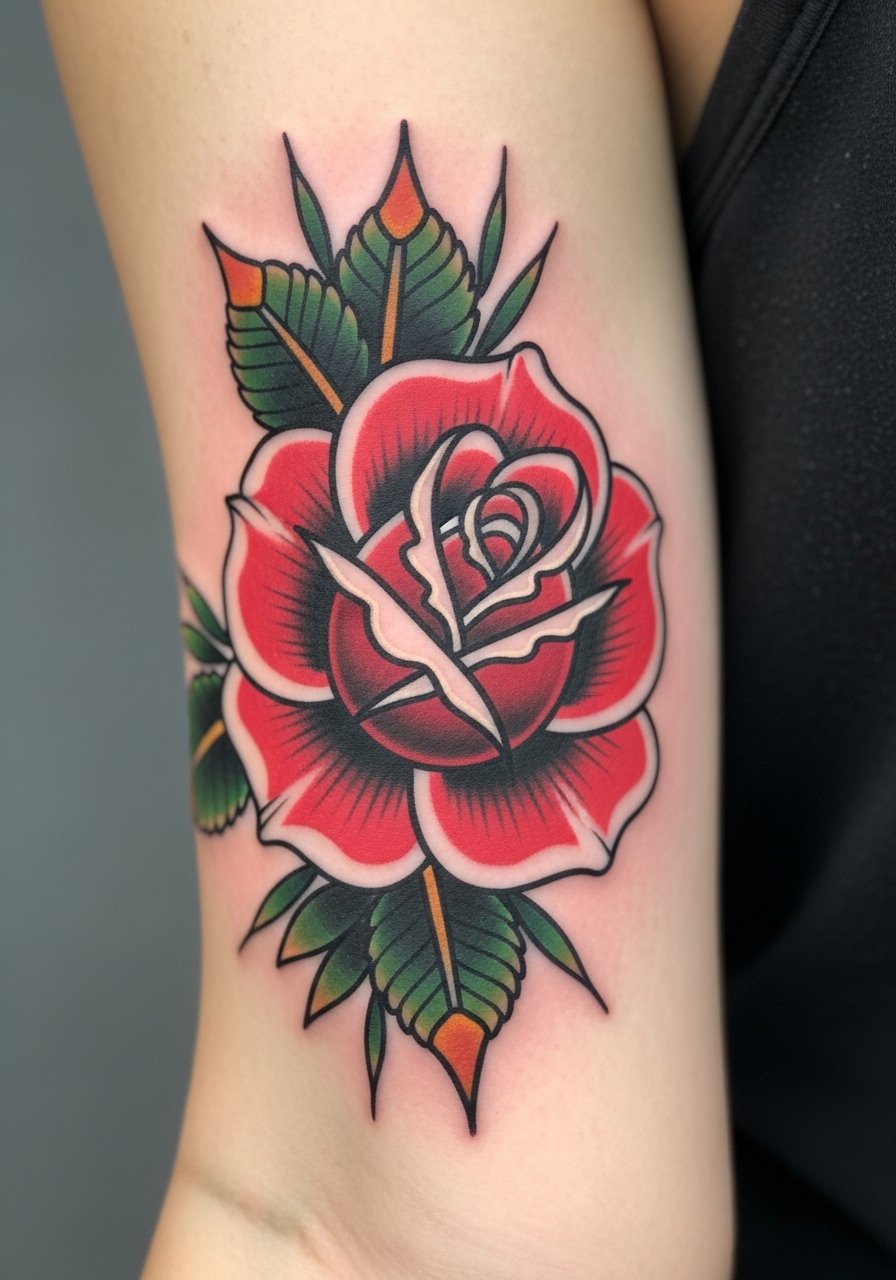
Neo-traditional roses are classic for a reason. They use bold lines and layered color, so they age with character. I’ve seen these remain readable even as color softens. Biceps are a forgiving placement—less painful and easy to cover. Ask for visible healed work in similar color palettes; saturation choices determine long-term brightness. A frequent misstep is overcrowding the composition—neo-traditional reads best with clear shapes and breathing room. Artists like Valerie Vargas do this well; mention the style you want during consults to get the right color balance.
6. Traditional Eagle Chest
Style/Technique: American Traditional / Bold Lines
Pain Level: Medium-High (chest, near sternum)
Session Time: Multiple sessions possible
Best For: Timeless, statement centerpieces
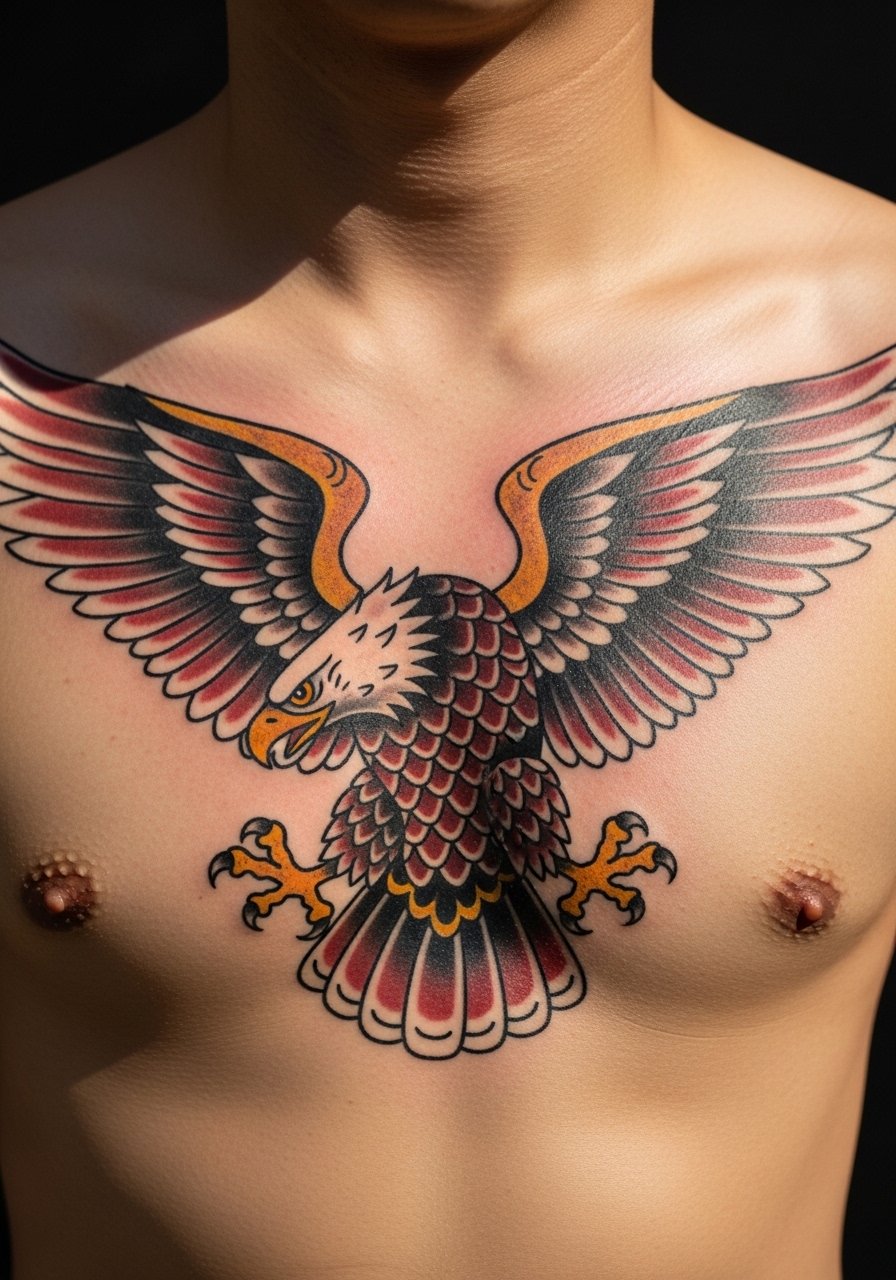
Traditional chest pieces lean on thick outlines and simple palettes so they stand the test of time. The sternum and chest can be more painful, especially near bone. I’ve found these tattoos keep strong contrast even after years. Placement suits symmetrical designs that anchor your torso. The common error is tiny details on a broad area—traditional is about readable iconography. If you want a timeless piece, ask for classic line weight and healed photos. This style pairs well with nature motifs that symbolize strength.
7. Detailed Floral Mandala Upper Back
Style/Technique: Neo-Traditional / Ornamental
Pain Level: Medium (upper back)
Session Time: 3–5 hours per session
Best For: Large, centered floral mandalas
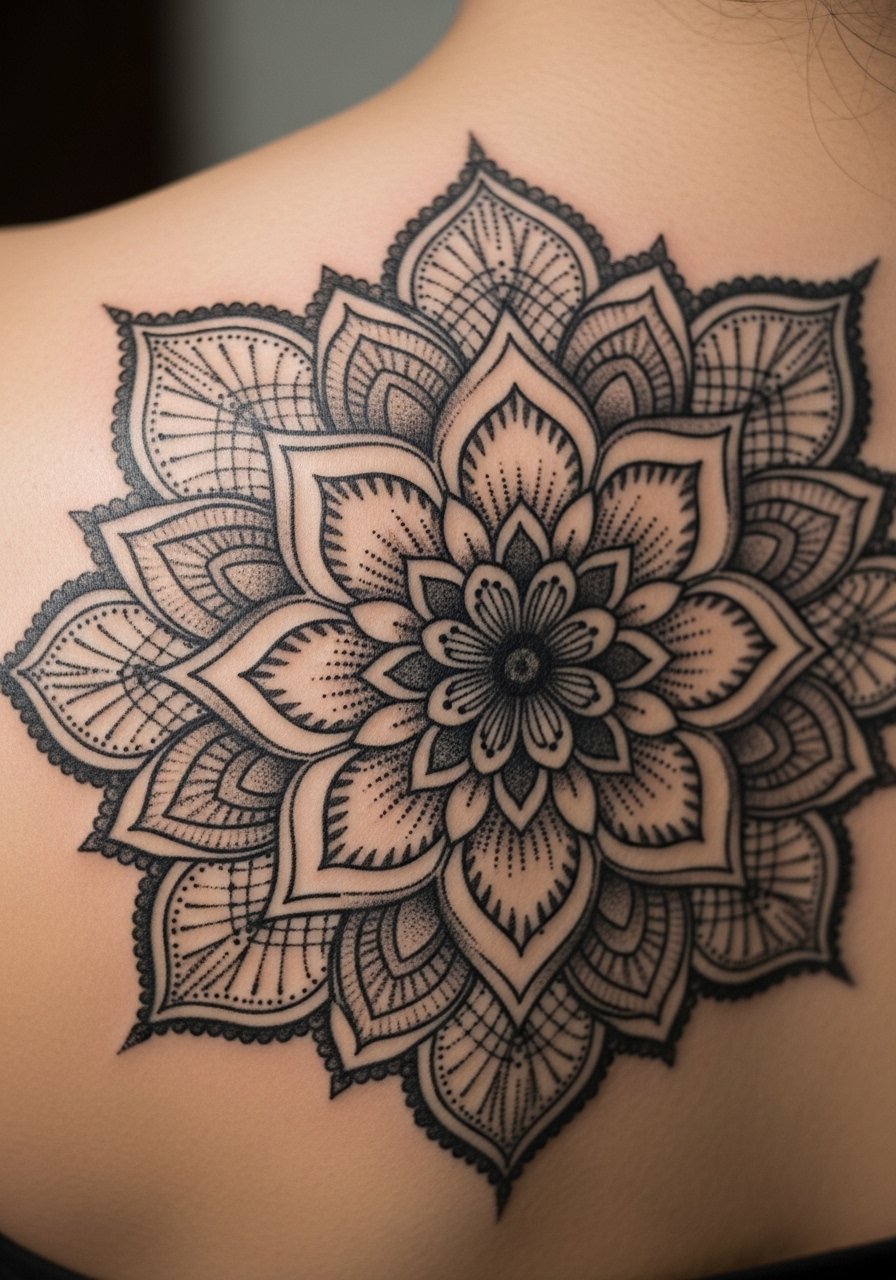
Floral mandalas combine botanical elements with symmetry for a meditative feel. The upper back gives a flat canvas, so artists can pack in detail without distortion. Expect longer sessions and disciplined aftercare; the area heals well but can be sensitive when sleeping. From what I’ve seen, mandalas age gracefully if dotwork and line spacing is balanced—too tight and it fills in. Avoid copying overly dense designs from low-res images. Ask to see healed mandala work, especially on skin tones like yours, to set expectations.
8. Realistic Animal Shoulder
Style/Technique: Realism / Wildlife Portrait
Pain Level: Low-Medium (shoulder cap)
Session Time: 2–4 hours per session
Best For: Wildlife portraits and symbolic animals
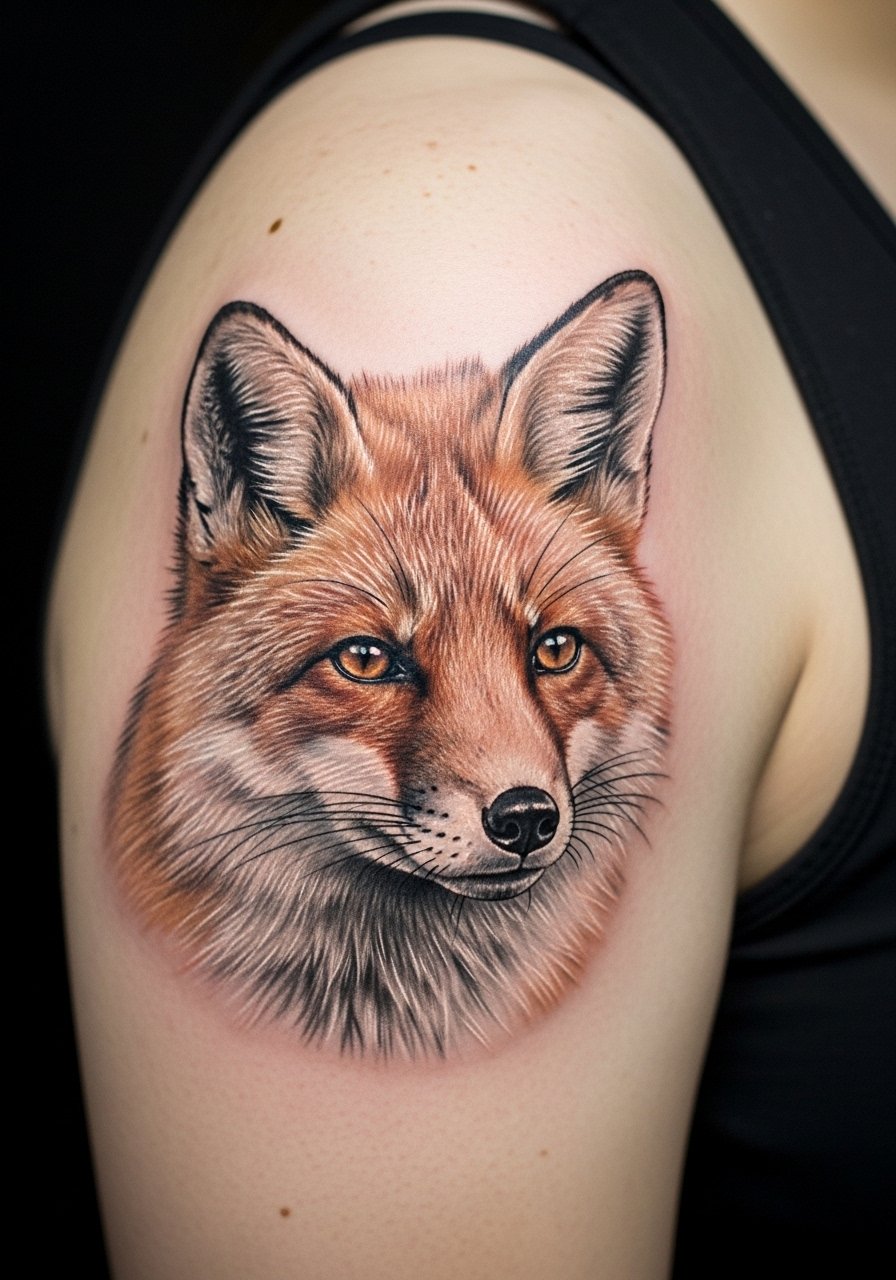
A realistic animal on the shoulder reads like a personal companion. Shoulders allow slight curvature for the image to move with you. I’ve noticed realism requires artists who show consistent healed work; otherwise details can soften. Pain is usually mild because the shoulder has more padding. A common mistake is picking an artist for general realism who hasn’t done wildlife—ask for species-specific portfolio pieces. Oskar-style realism references are useful when discussing fur texture and eye highlights.
9. Tree With Mountains Calf
Style/Technique: Illustrative / Landscape
Pain Level: Low-Medium (calf)
Session Time: 1–2 sessions, 2–4 hours
Best For: Vertical landscape scenes, travel-inspired ink
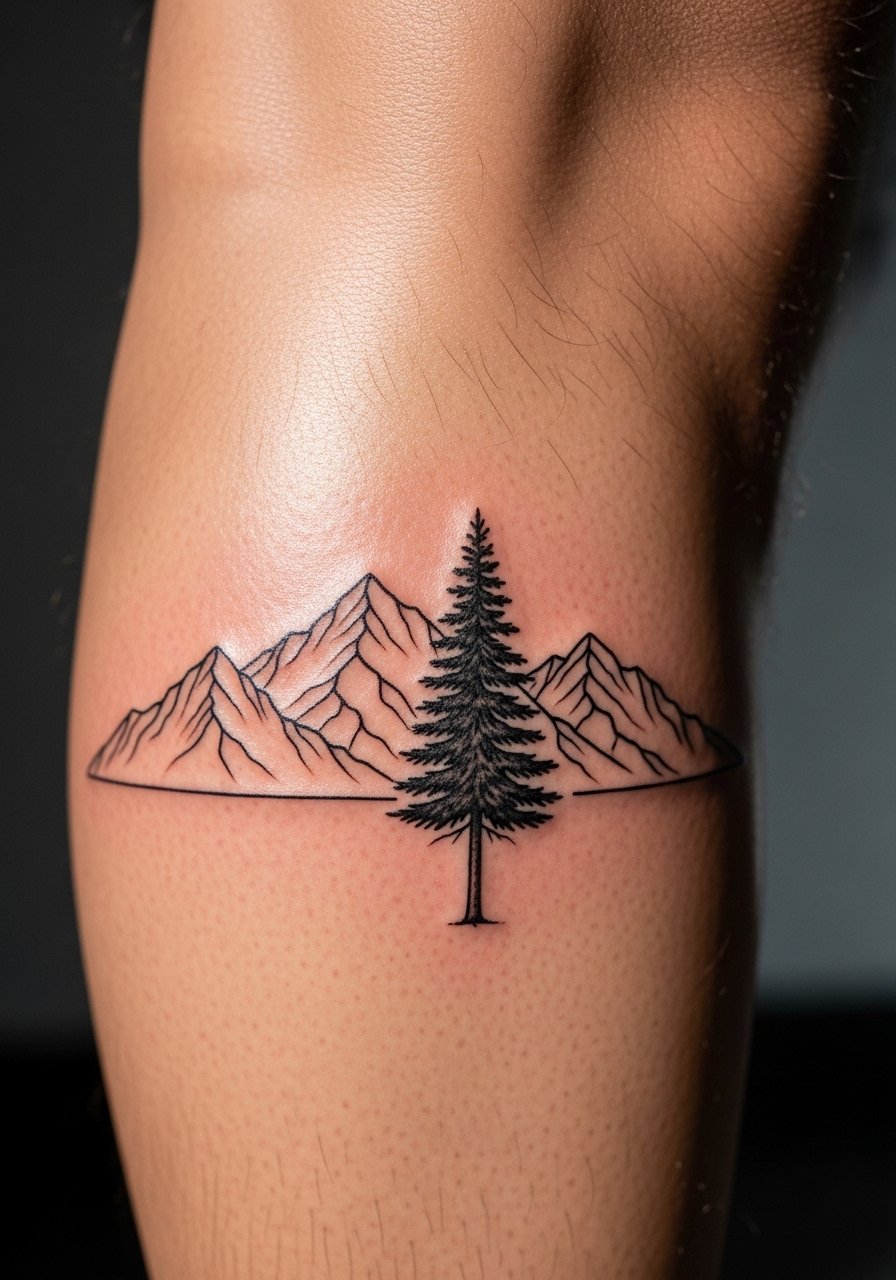
Calf landscapes read like pocket-sized panoramas. A vertical tree with mountains gives a sense of depth and calm. Calf skin tolerates longer sessions and the design sits well when you stand or move. In my experience, simple line landscapes age better than micro-detailed panoramas because the leg sees friction from clothing. Avoid cramming tiny textures—let the silhouette breathe. Many artists recommend testing a temporary placement to confirm scale, especially if you plan sleeves or other leg work.
10. Symbolic Phoenix Ribcage
Style/Technique: Fine Line / Symbolic
Pain Level: High (ribcage)
Session Time: Multiple sessions, 1–3 hours each
Best For: Transformation tattoos, personal rebirth

Phoenix tattoos on the ribs pack emotional punch. The ribcage is a high-pain area, so many people stagger sessions. I’ve seen phoenix designs become profound reminders of resilience. Fine-line phoenix work needs an experienced hand; lines too close together can blur as the skin heals. Ask your artist about session pacing and aftercare for the torso. A common misstep is bringing in heavy color too early—let the outline and structure settle first. If you want symbolism, mention what rebirth looks like to you so the artist can personalize the bird.
11. Blackwork Geometric Leaves Ankle
Style/Technique: Blackwork / Geometric
Pain Level: Medium-High (ankle bone)
Session Time: 1–2 hours
Best For: High-contrast ornamental ankle pieces
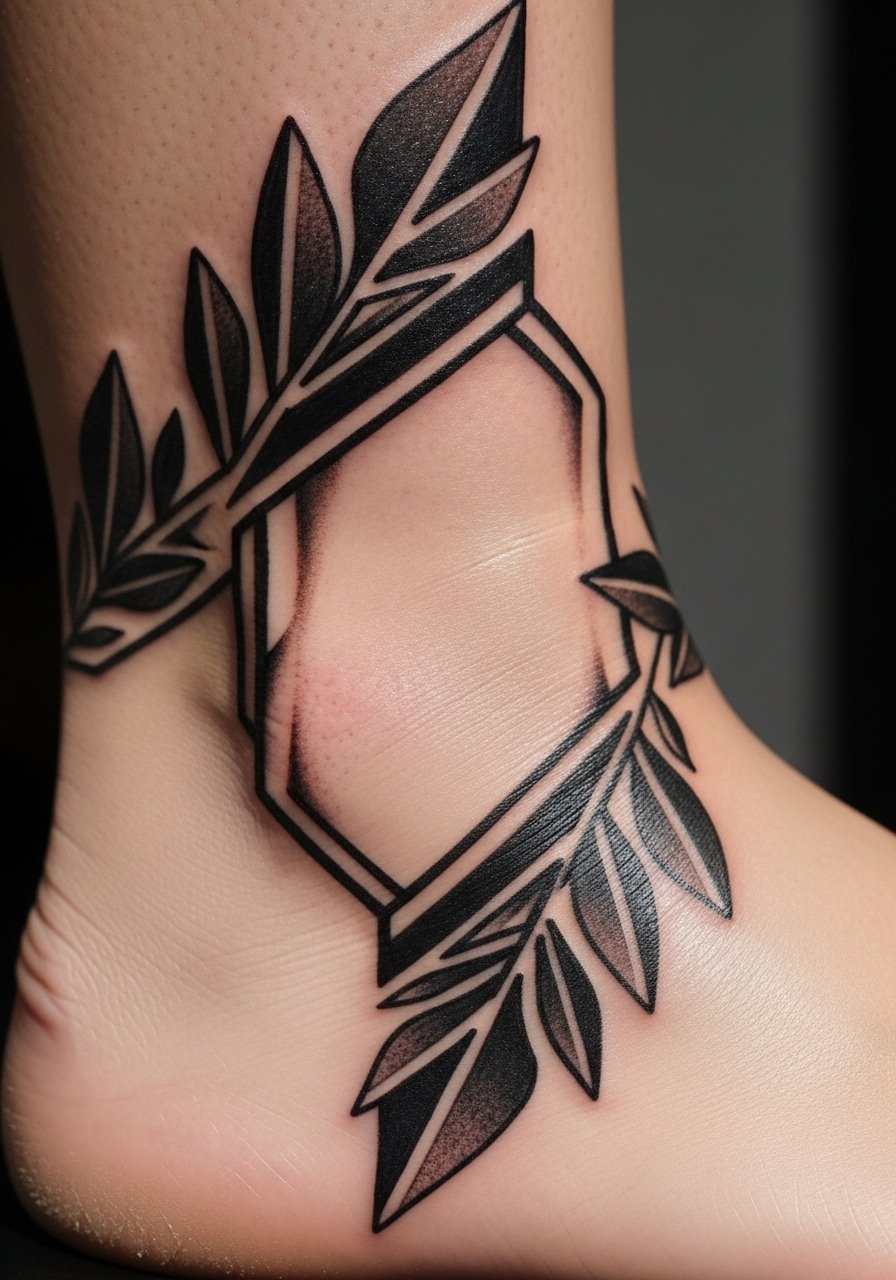
Ankle blackwork is dramatic and ornamental. The bone area hurts more, but sessions are short. Solid black ages well if the artist uses consistent saturation and space for skin to settle. I’ve cautioned friends to avoid extremely fine textures on the ankle; skin there shifts and small details can patch. If you want blackwork tattoo ideas, look for artists like Boris Bianchi who balance shape and negative space. Also consider how footwear might rub during healing and plan accordingly.
12. Y2K Butterfly With Florals (Back of Hand)
Style/Technique: Style Fusion / Minimalist + Watercolor
Pain Level: High (hand)
Session Time: 1–2 sessions
Best For: Nostalgic, visible pieces

Hand tattoos carry nostalgia and visibility. Y2K butterfly tie-ins feel playful and personal. Hands heal fast but the skin regenerates frequently, so colors and fine lines can fade faster. From what I've seen, adding subtle line anchors helps the design survive daily wear. Pain is higher but brief. A common regret I hear: choosing high-visibility placements before being ready—test a temporary first. If you decide on a hand piece, ask for healed examples and plan for future touch-ups.
13. Ornamental Lotus Finger
Style/Technique: Fine Line / Ornamental
Pain Level: Medium-High (finger)
Session Time: 30–60 minutes
Best For: Tiny symbolic reminders, minimalists
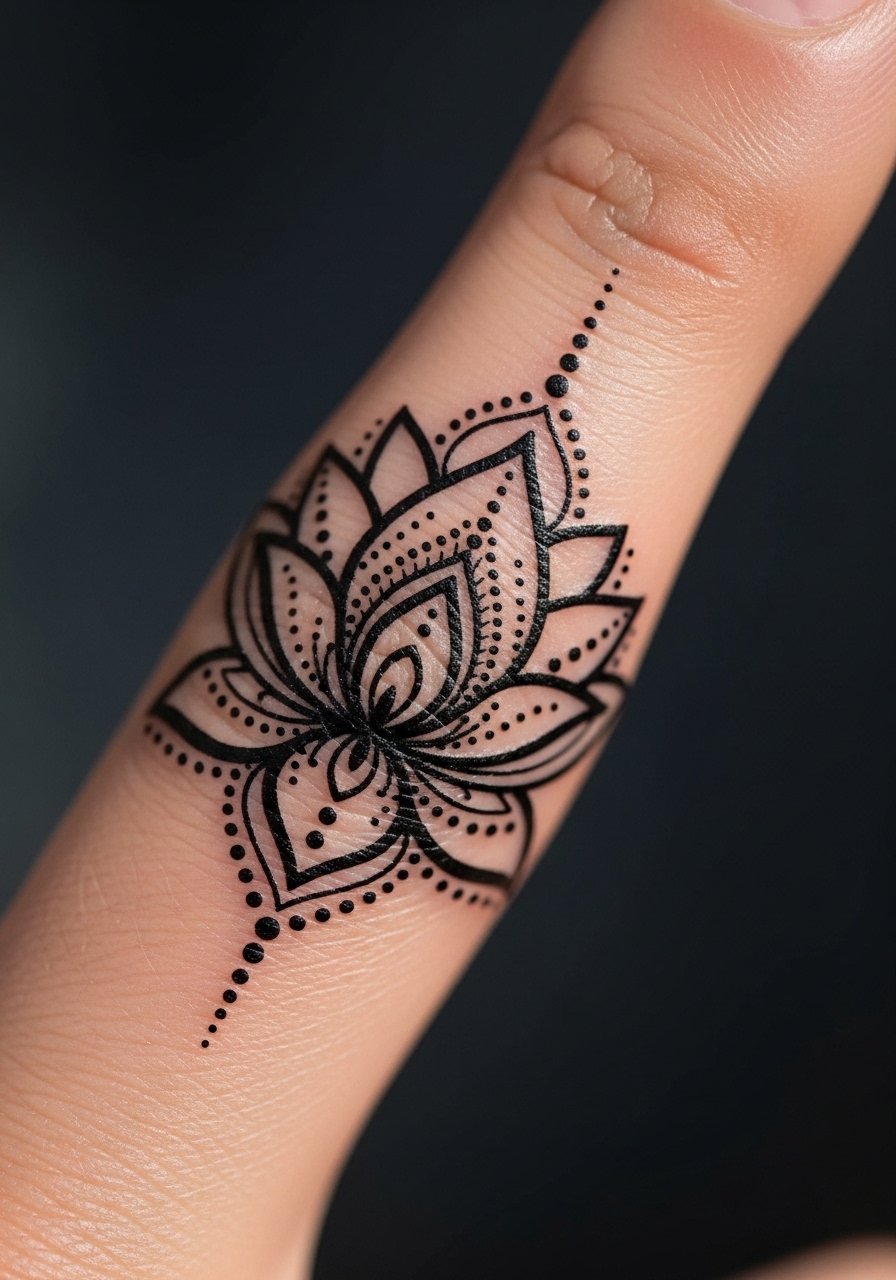
Lotus finger tattoos are intimate and meaningful. Fingers show anatomy clearly—bone and movement make healing tricky. In my experience, simple strong lines hold better than lacey detail. Pain is sharp but short. Many artists recommend touch-ups down the line; it's common. Ask about line thickness: slightly bolder lines tend to last longer on fingers. If you want anatomy-highlighting finger ornaments, bring reference images so the artist can adapt scale to your phalange length.
14. Minimalist Line Art Mountains on Ankle
Style/Technique: Minimalist / Line Art
Pain Level: Medium (ankle)
Session Time: 30–90 minutes
Best For: Subtle nature symbols, travel mementos
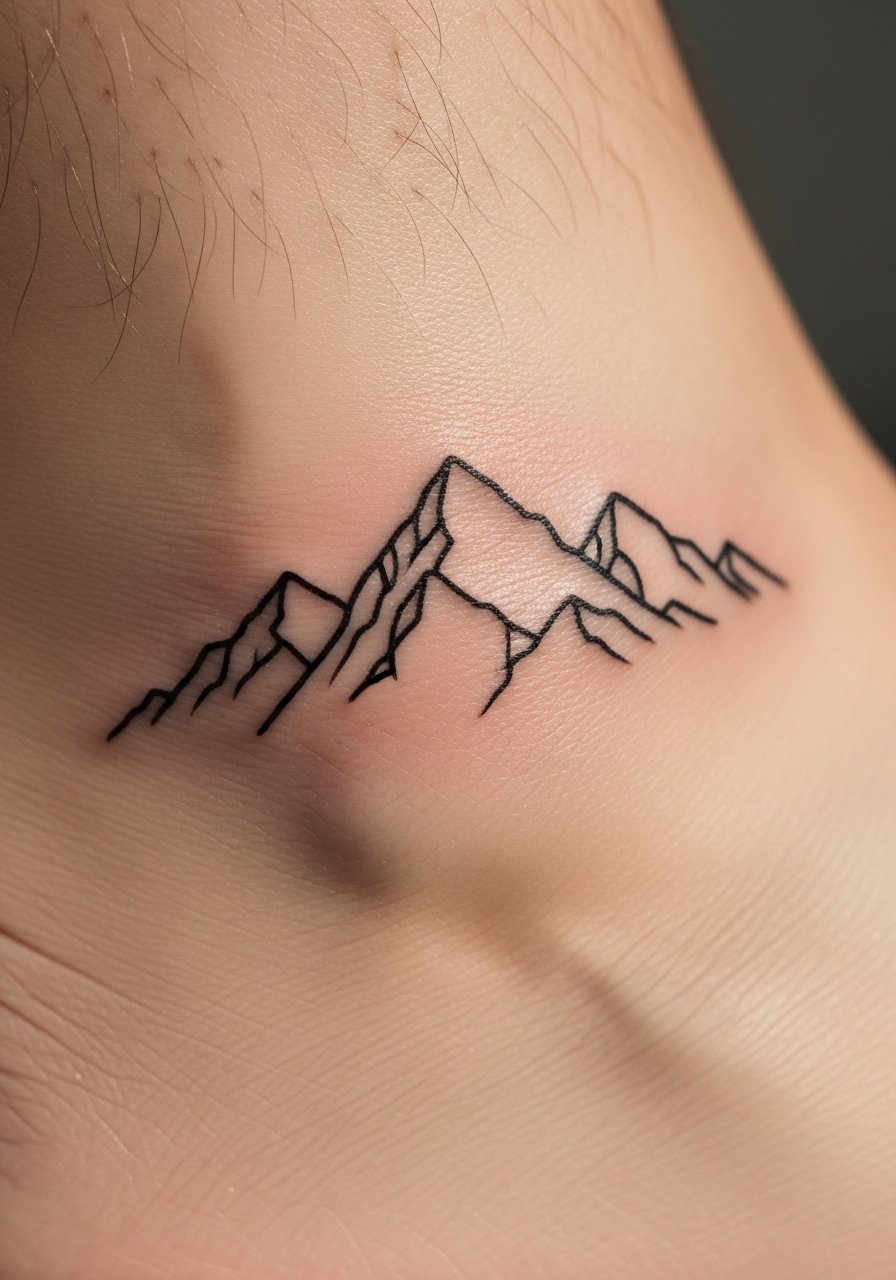
Minimalist mountains read clean and calm. I chose ankle placement because the vertical line mirrors the leg. These are low-commitment but visible when you want them to be. The ankle bone stings more; expect quick sessions. The most common mistake: lines too thin for this area—ask for modest line weight to help longevity. If you want the best forearm tattoo placement instead, consider shifting the design to a forearm or wrist for easier display.
15. Micro-Realism Pet Portrait on Upper Arm
Style/Technique: Micro-Realism / Portrait
Pain Level: Low-Medium (upper arm)
Session Time: 2–3 hours
Best For: Commemorative animal portraits
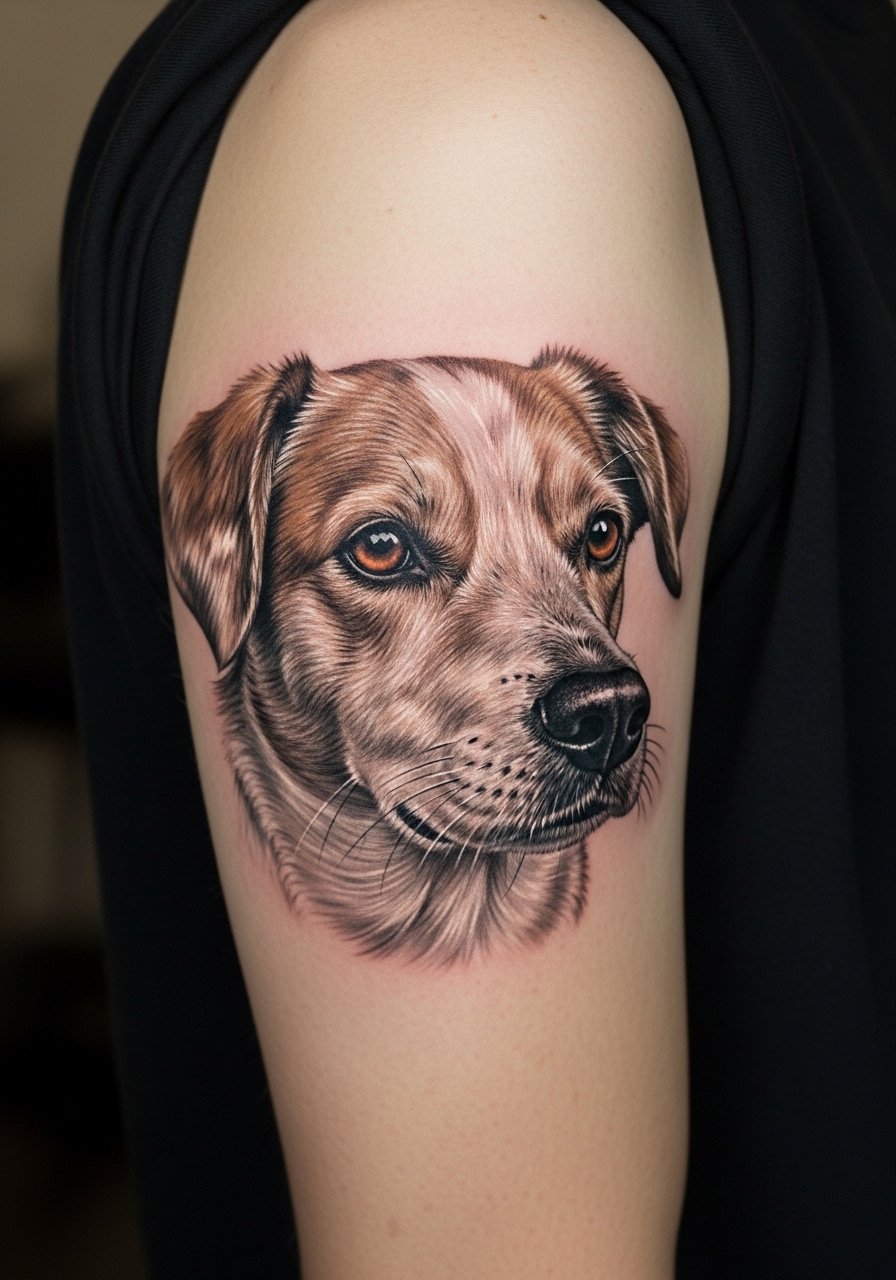
Pet portraits are deeply personal. Upper arm placement is forgiving and shows detail well. I’ve seen micro-realism pop when artists balance tiny strokes with enough contrast. Pain is manageable. Common mistakes include choosing a low-quality photo—bring high-res references. Ask for healed examples of micro-realism on similar skin tones. If your goal is a lasting memorial, consider subtle background elements like flora to anchor the portrait visually.
16. Botanical Anklet With Negative Space
Style/Technique: Fine Line / Ornamental
Pain Level: Medium (around ankle)
Session Time: 1–2 hours
Best For: Decorative, subtle ankle bands
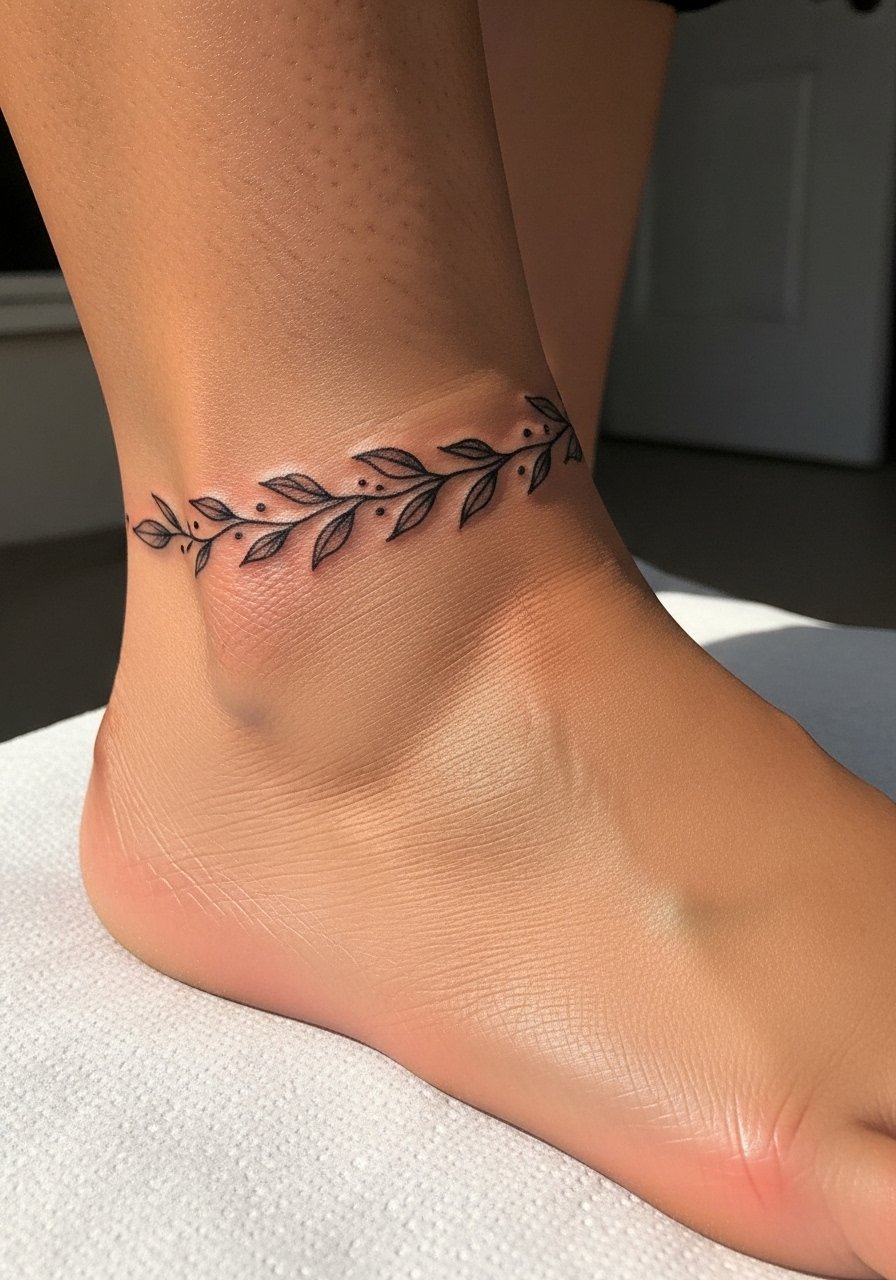
Anklet bands read like jewelry. Using negative space keeps the design airy and wearable. Because ankles see rubbing from socks and shoes, pick slightly stronger lines. I’ve told friends to expect minor touch-ups if they want long-term crispness. Pain is localized but short. Avoid overcomplicating the band—clarity of motif is what makes anklets look intentional rather than cluttered.
17. Tiny Seedling Behind Ear
Style/Technique: Minimalist / Micro
Pain Level: Medium (behind ear)
Session Time: 30–45 minutes
Best For: Hidden, personal symbolism
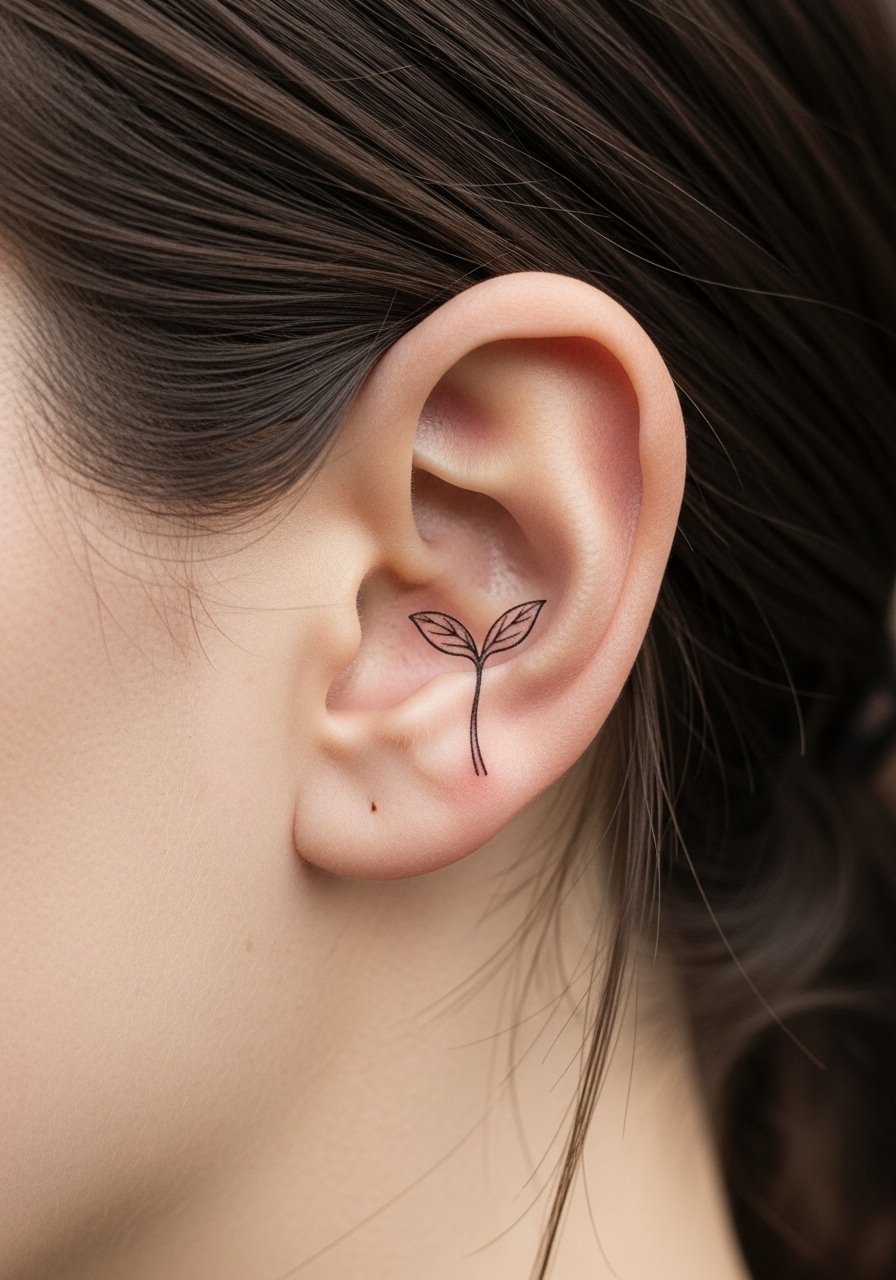
Behind-ear seedling tattoos are discreet and symbolic. The area is sensitive but sessions are short. I picked this style for people who want a private reminder of growth. A common slip-up is over-detailing a very small area—keep it simple. Healing needs caution around hair and shampoo. Ask an artist about placement relative to hairline to keep visibility balanced.
18. Mossy Rock With Lichen Forearm
Style/Technique: Illustrative / Textured Realism
Pain Level: Low-Medium (forearm)
Session Time: 1–3 hours
Best For: Earthy, tactile nature pieces
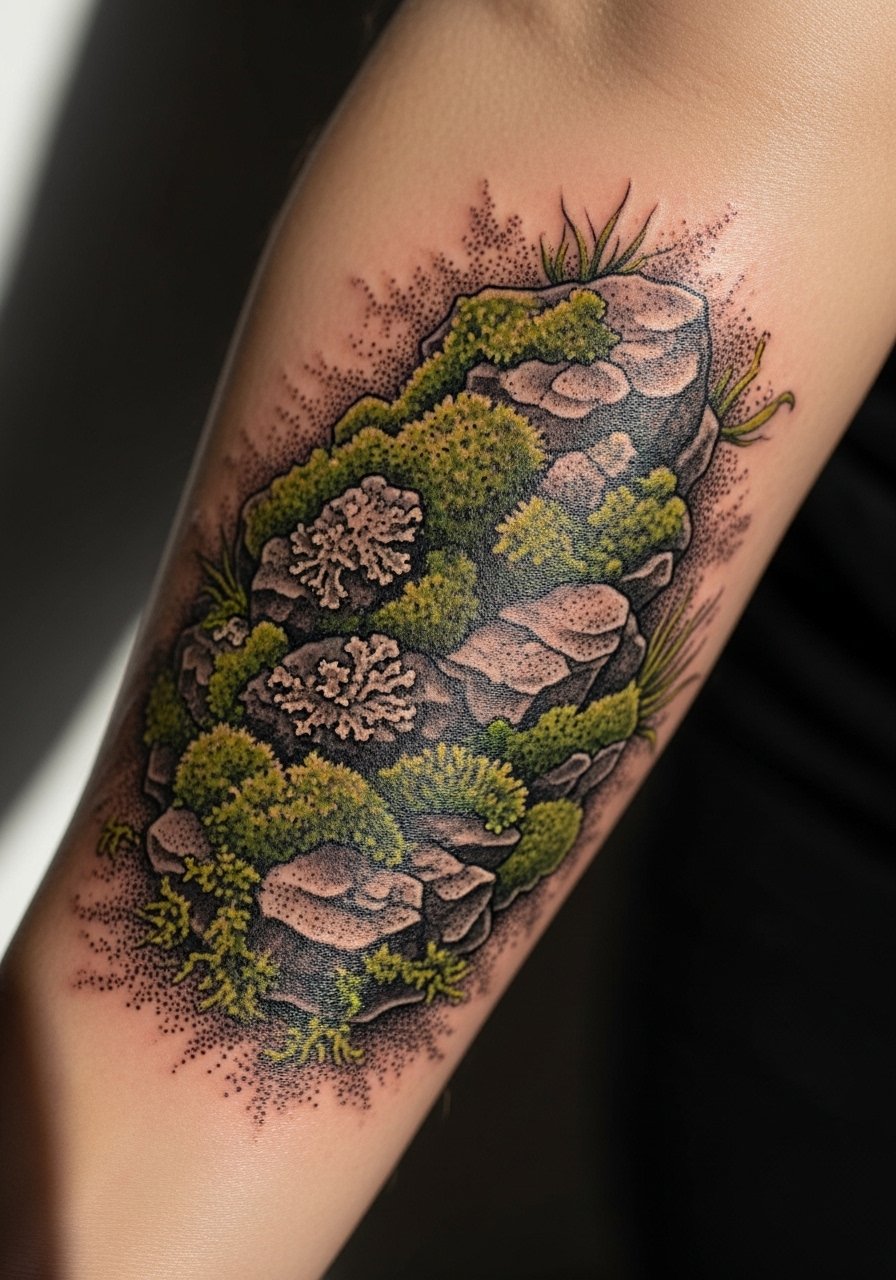
Textures like moss and lichen make tattoos feel lived-in. Forearms are great for showing layered textures without too much distortion. From what I've seen, artists who use micro-dotwork balance texture with clear silhouette so the piece ages naturally. This type of nature tattoo design is perfect if you want something grounded and organic.
19. Sunflower Collarbone Accent
Style/Technique: Neo-Traditional / Floral
Pain Level: Medium-High (collarbone)
Session Time: 1–2 hours
Best For: Feminine, visible accents
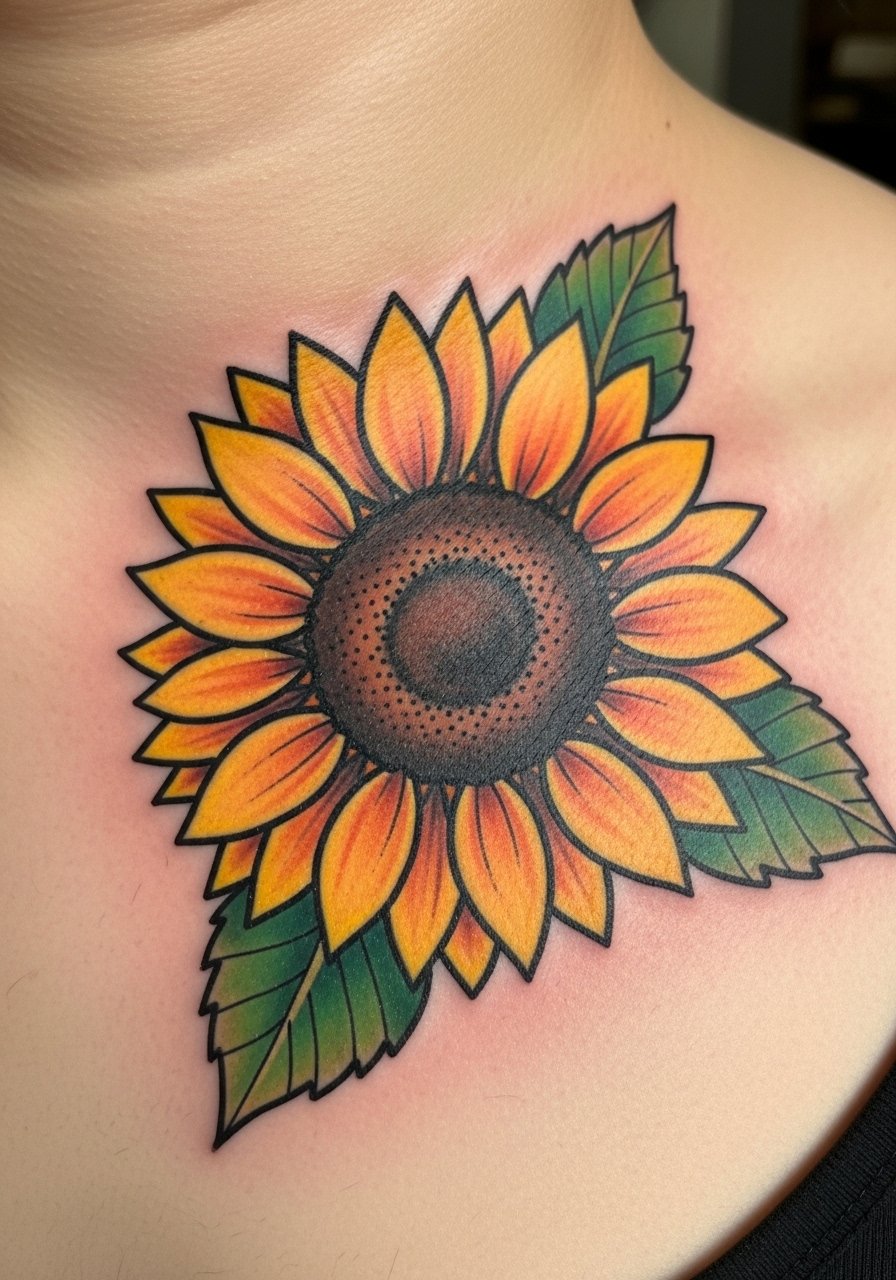
Collarbones show off floral accents beautifully. Sunflowers read bright and steady. The bone area is stingier, so expect higher pain but short sessions. I've found that neo-traditional flower work holds its silhouette as it ages if lines are confident. Avoid overcrowding—let the blossom breathe near the clavicle.
20. Fern Behind Knee (Popliteal)
Style/Technique: Illustrative / Minimalist
Pain Level: High (behind knee)
Session Time: 1–2 hours
Best For: Hidden, movement-driven placements
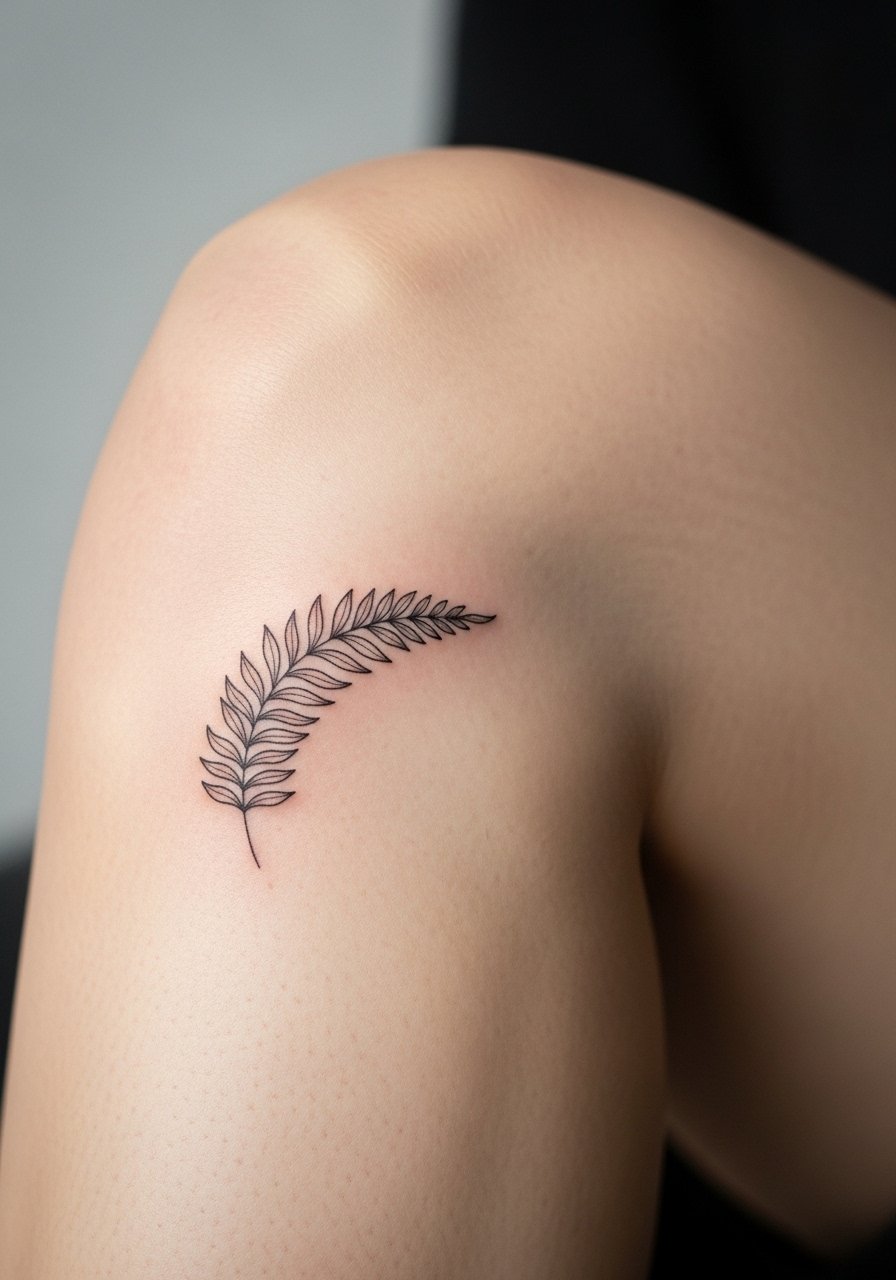
The behind-knee area moves a lot, so designs feel alive when you walk. It is one of the more painful spots to tattoo. I advise simple shapes—fine detail can distort. If you want a hidden nature tattoo that interacts with your movement, a fern here is quietly elegant. Just plan for longer healing and avoid deep knee bends for a while.
21. Crescent Moon With Floral Sleeve Accent (Inner Arm)
Style/Technique: Fine Line / Symbolic + Floral
Pain Level: Medium (inner arm)
Session Time: 2–4 hours
Best For: Mystical yet natural motifs
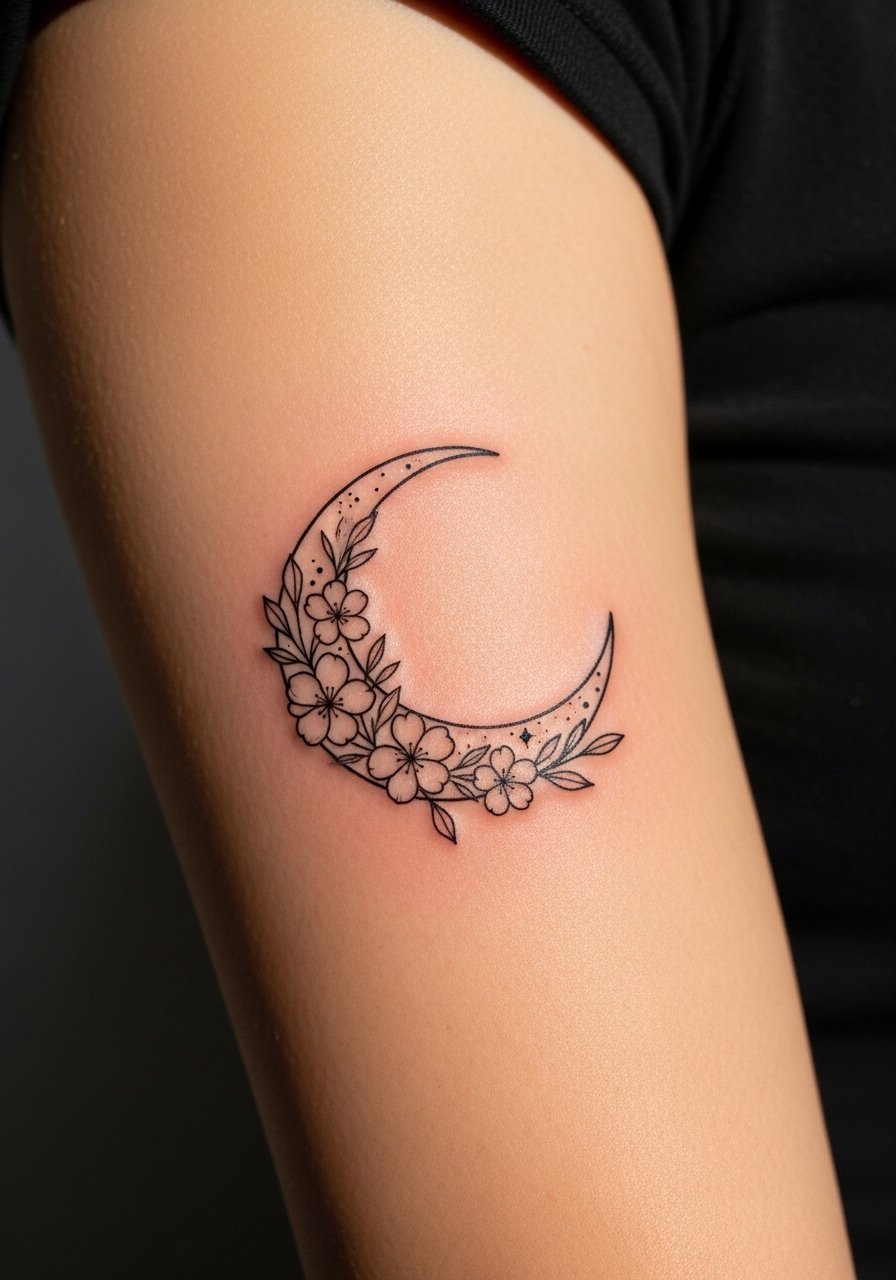
Moon-and-flower pairings feel ritualistic and grounding. Inner arm placement reads intimate and photographs well. I’ve noticed that fine-line moons work best when paired with small floral anchors to preserve shape over time. Ask artists about line spacing to ensure the moon doesn’t blur into petals after healing.
22. Birch Tree Spine Strip
Style/Technique: Blackwork / Illustrative
Pain Level: High (spine)
Session Time: Multiple sessions
Best For: Vertical, contemplative pieces
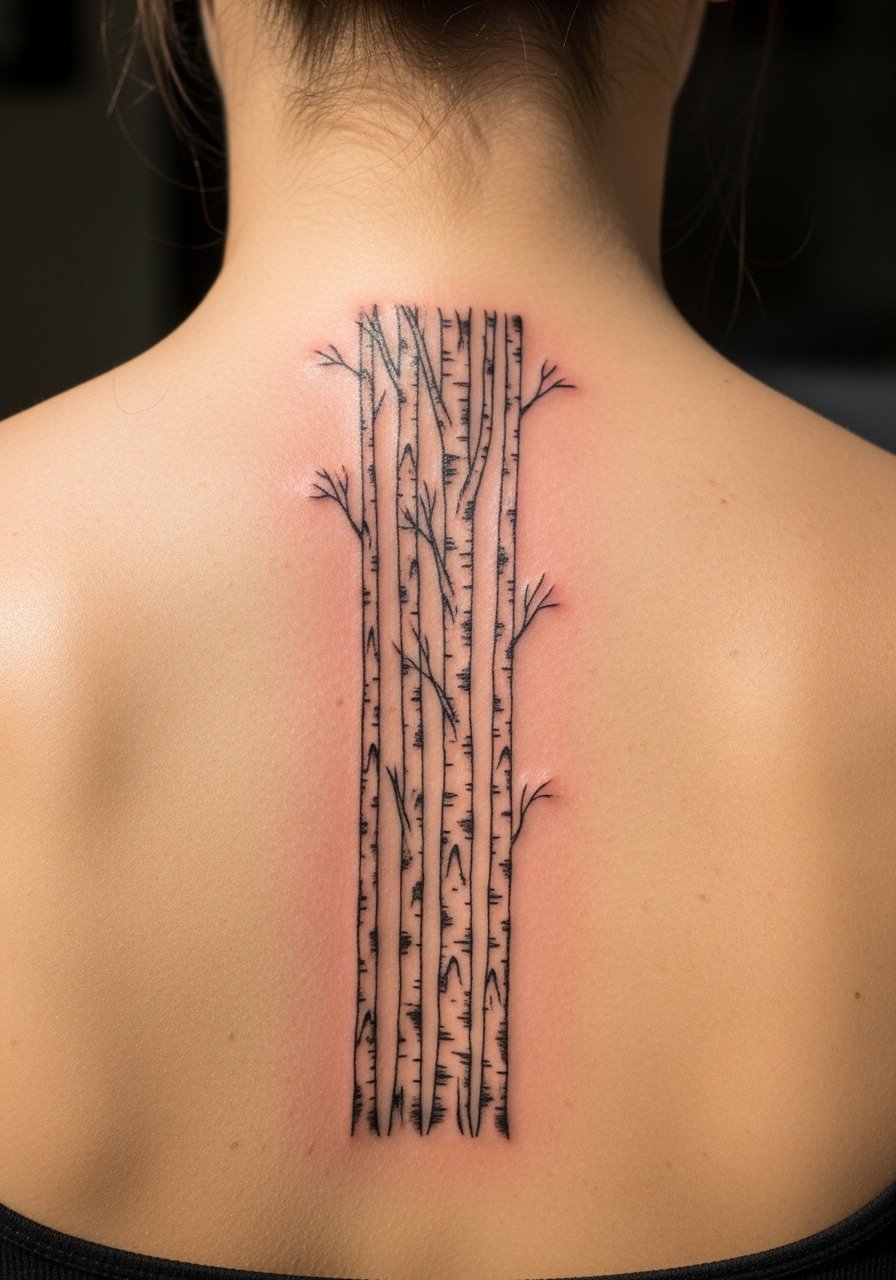
A spine strip of birch trees is meditative. The spine hurts more, but the visual is powerful and grounding. I advise spacing trees to let negative space read as air between trunks. Many people love how this grows with them visually; the elongated placement flatters posture and the back’s skin holds line work well when done by a steady hand.
23. Mushroom Cluster Thigh
Style/Technique: Illustrative / Naturalistic
Pain Level: Low-Medium (thigh)
Session Time: 1–3 hours
Best For: Subcultural or earthy collections
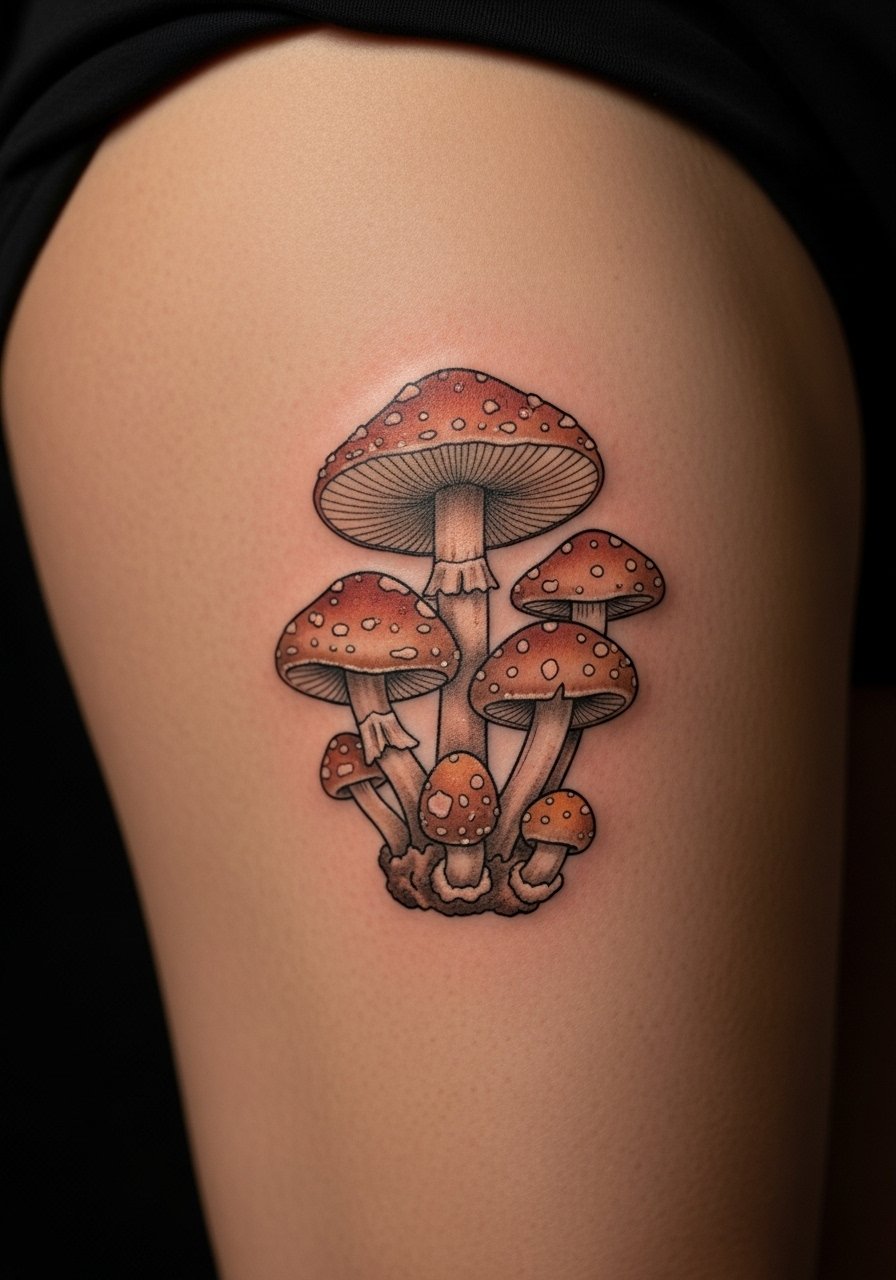
Mushroom clusters feel cozy and grounded. Thighs are a relaxed canvas and accommodate organic groupings. I’ve noticed mushrooms age nicely when shading is balanced and outlines are present. They’re good if you want a nature tattoo that reads like a small scene rather than an icon.
24. River Line Wrapping Forearm
Style/Technique: Minimalist / Line Work
Pain Level: Medium (forearm)
Session Time: 1–2 hours
Best For: Flowing, movement-based tattoos
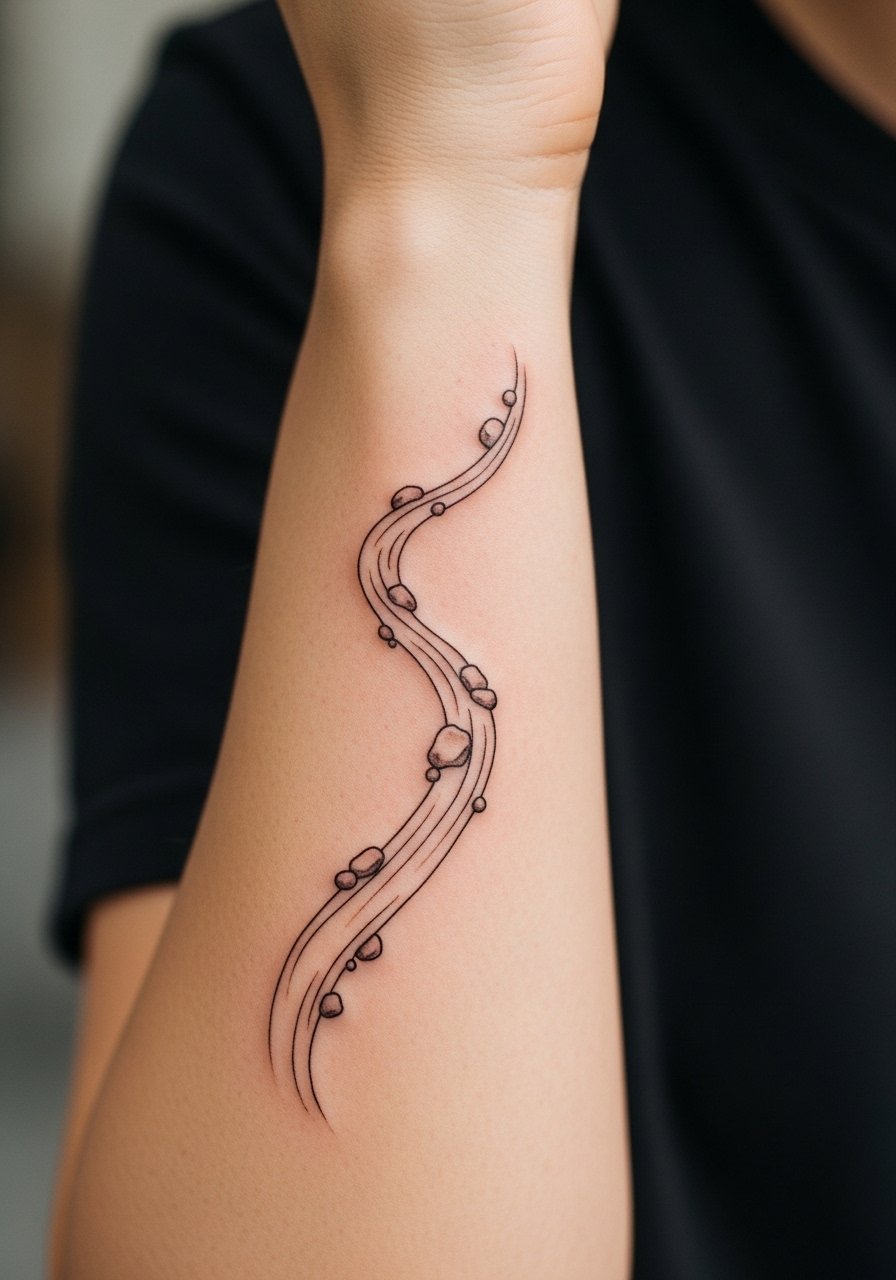
A single river line can feel calming and continual. I like wrapping lines because they interact with your arm movements. Forearm placement makes it easy to show or conceal. Keep line width consistent to avoid patchy healing. Many artists treat this as a design that ages into soft continuity—avoid tiny annotations that might blur.
25. Wildflower Field Calf Band
Style/Technique: Illustrative / Field Composition
Pain Level: Low-Medium (calf)
Session Time: 1–3 hours
Best For: Panoramic floral bands
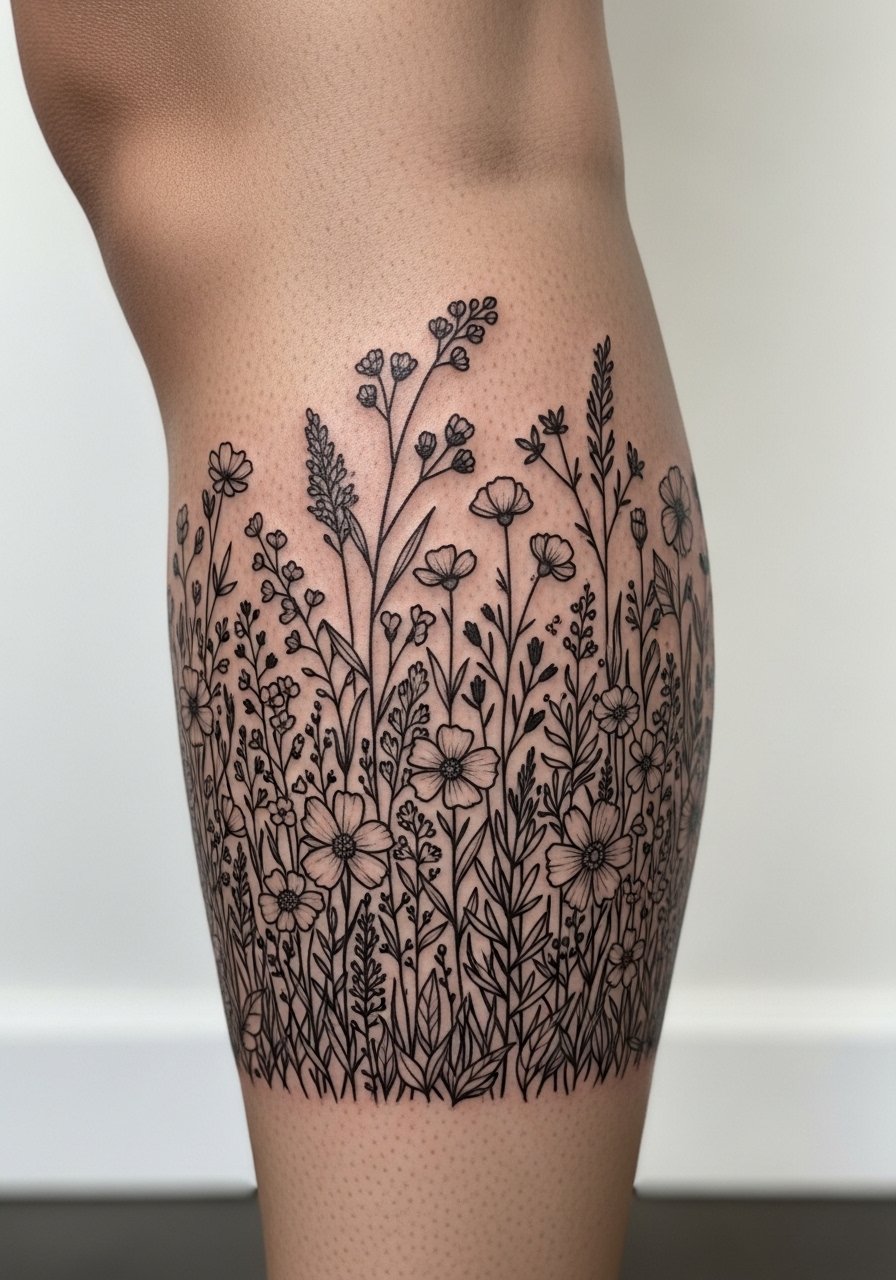
A calf band of wildflowers reads like a strip of meadow. I often recommend moderate line weight for this area to keep individual stems readable. The design works well for casual show-off and stays coherent as skin shifts when you move. It’s a comfortable placement with a relaxed healing curve.
26. Leafy Ribcage Half-Sleeve
Style/Technique: Blackwork / Illustrative
Pain Level: High (ribs)
Session Time: Multiple sessions
Best For: Organic half-sleeves and torso wraps
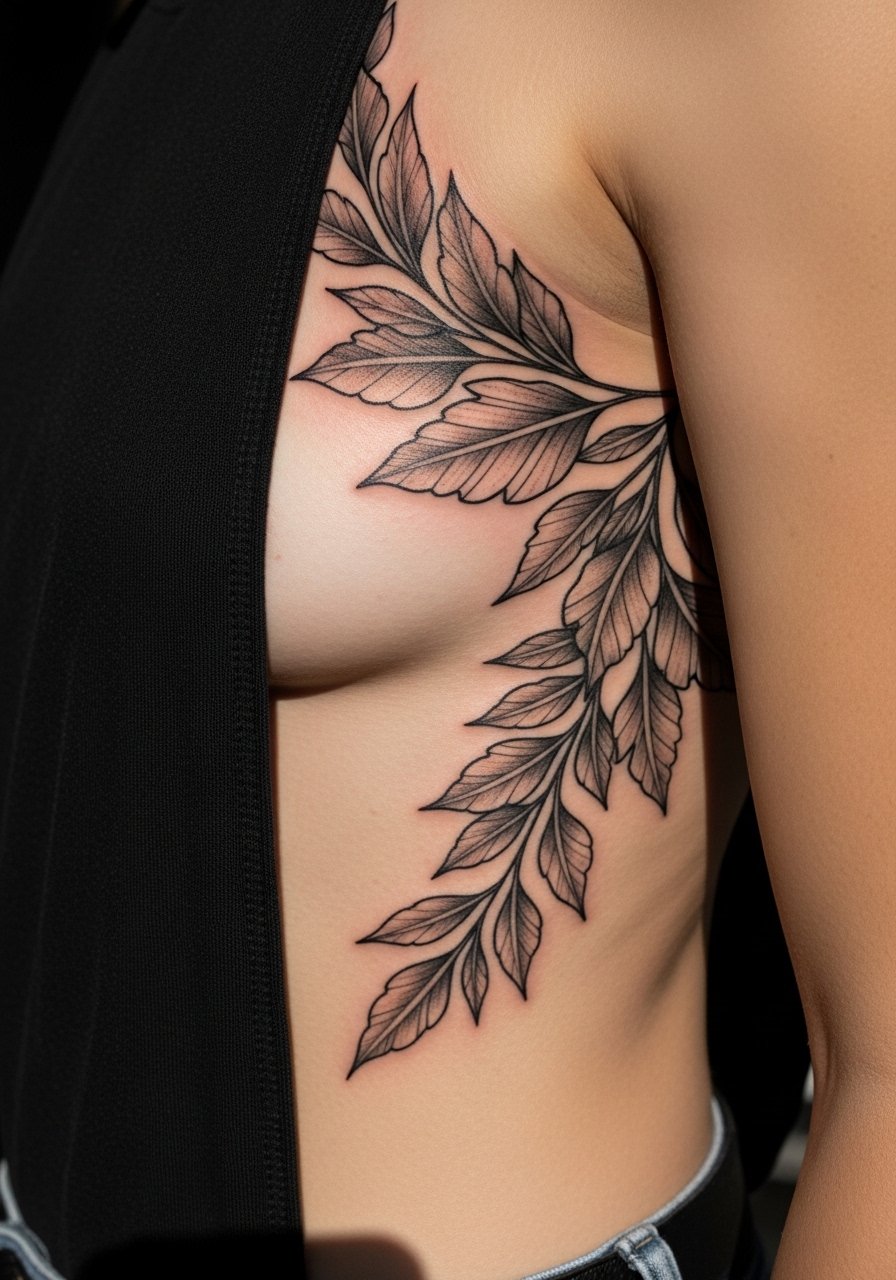
Ribcage wraps feel intimate and sculptural. Leaves that flow into the arm create a sense of being wrapped by nature. Pain is notable but many collectors say the payoff is worth it. To prevent blurring, keep leaf veins purposeful and not overly filigreed. Ask artists about session spacing to manage discomfort.
27. Broken Chain With Vines (Inner Forearm)
Style/Technique: Symbolic / Illustrative
Pain Level: Low-Medium (inner forearm)
Session Time: 1–2 hours
Best For: Freedom and growth symbolism
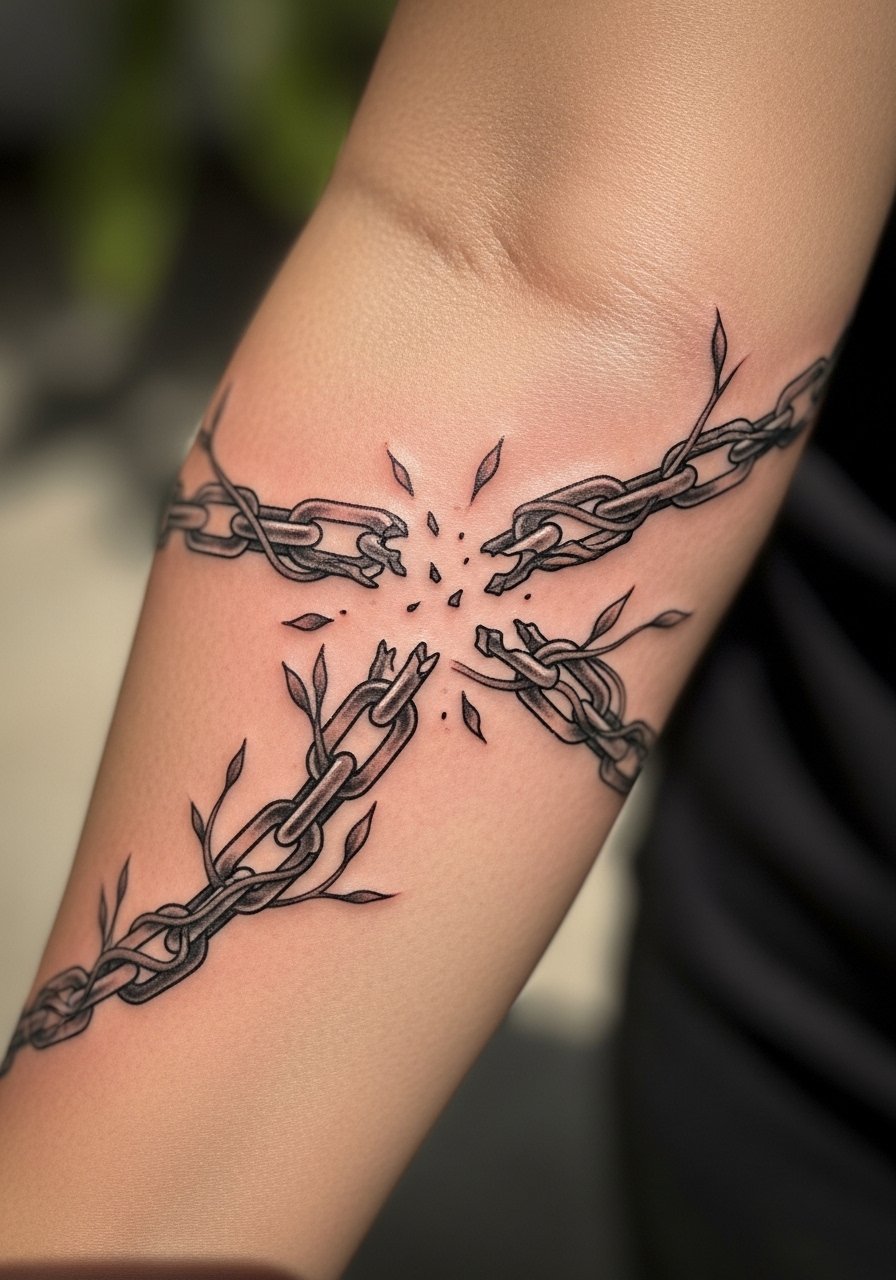
I included this under-covered idea because it pairs transformation symbolism with nature. The inner forearm is great for readable narratives. I’ve seen this design resonate with people who want growth imagery without a literal phoenix. Avoid tiny chain links that clutter—bolder shapes with organic vines read better long-term.
28. Phoenix With Floral Accents (Back/Rib Transition)
Style/Technique: Neo-Traditional / Symbolic
Pain Level: High (back/rib area)
Session Time: Multiple sessions
Best For: Large symbolic rebirth pieces
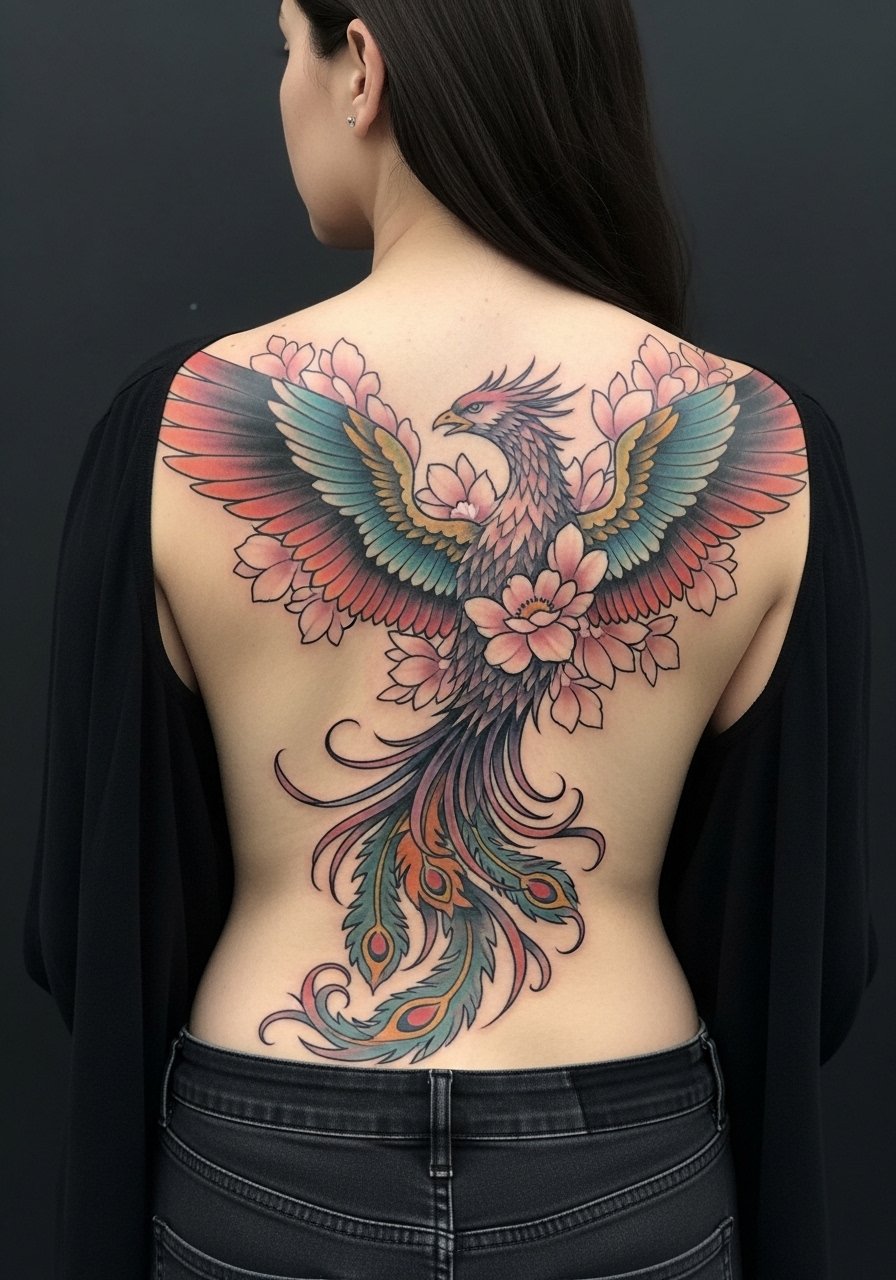
The phoenix is a classic symbol for rebirth. Pairing it with florals softens the motif and ties it to nature. Large placements like back into ribs let artists play with scale. Pain is high across ribs, so plan sessions. I’ve seen phoenix pieces become personal anchors when artists incorporate custom flora tied to personal stories.
29. Y2K Tribal Flame Accent (Fine Line Collar)
Style/Technique: Fine Line / Nostalgic Tribal
Pain Level: Medium (collar/neck area)
Session Time: 1–2 hours
Best For: Nostalgia-driven small accents
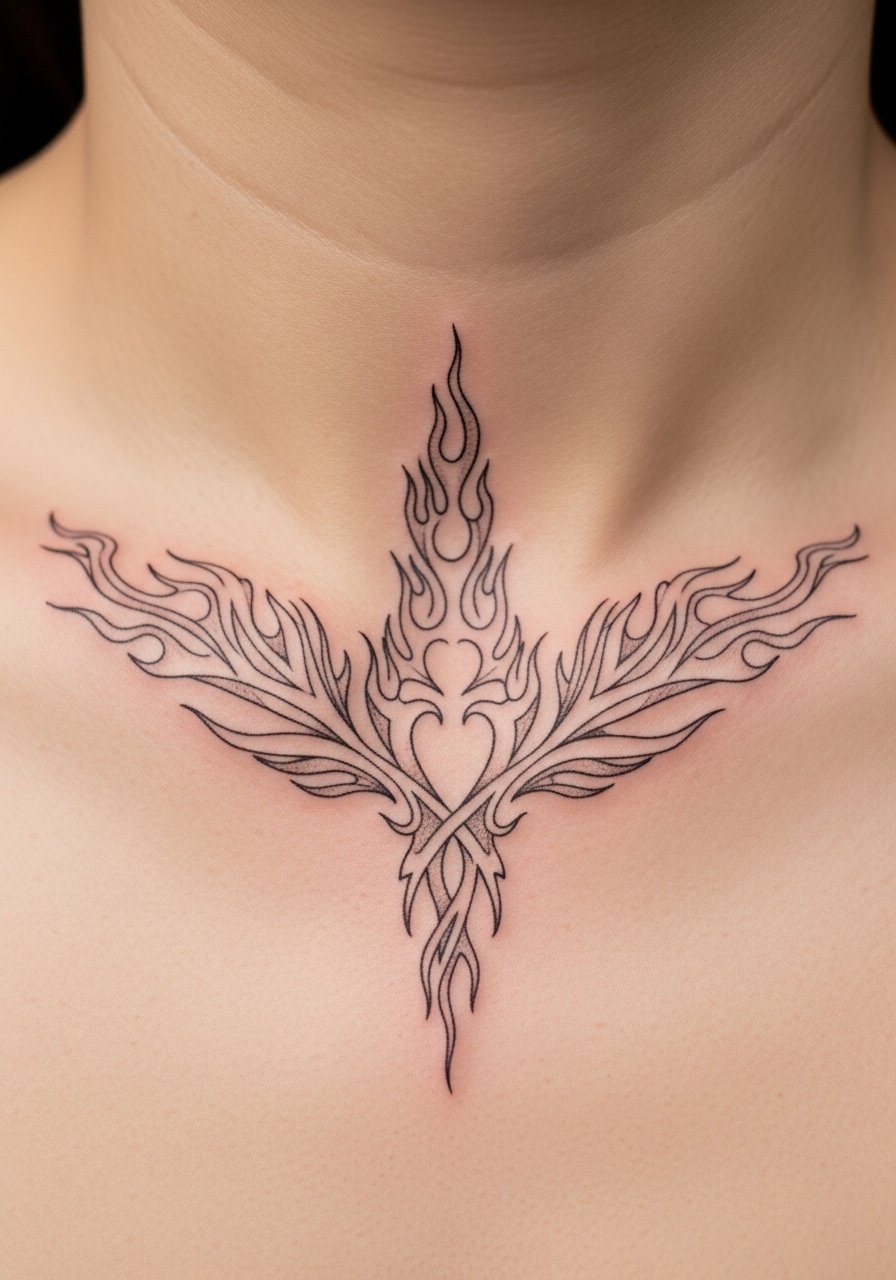
This is one of the under-covered Y2K fusion angles I’ve seen resurface. Tribal flames done in fine line read nostalgic without shouting. Collar placement shows off the waves subtly. Keep scale modest—very thin lines near the collar can fade. Mention Y2K references to your artist so they capture that era’s proportions without overdoing kitsch.
30. Tiny Seed Pod On Finger Side
Style/Technique: Micro / Minimalist
Pain Level: Medium-High (finger)
Session Time: 20–40 minutes
Best For: Small, discreet nature tokens
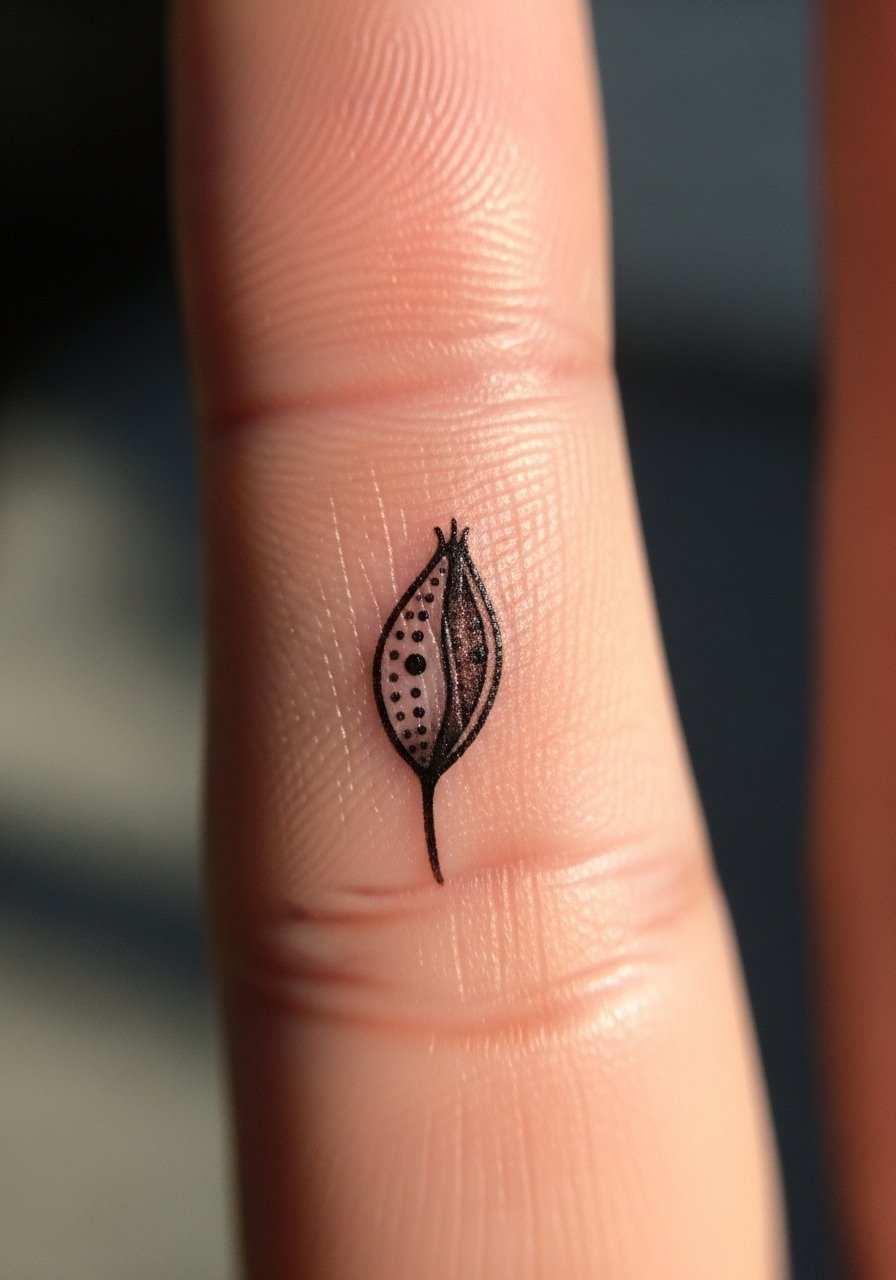
Small seed pods are quiet affirmations of potential. I like how they sit on finger bones and follow the motion of your hands. Fingers need straightforward designs—tiny dotwork can vanish, so ask for confident outlines. Expect quick pain and common touch-ups over the years. If this is your first nature tattoo, it's a gentle way to test placement while keeping meaning.
Tattoo Prep and Aftercare Essentials
Aftercare Essentials:
- Aquaphor Healing Ointment, 14 oz tube — My go-to for the first 3–5 days, used sparingly to keep skin moist.
- Saniderm Transparent Adhesive Bandage, 6-inch roll — Protective second-skin option for the first 24–48 hours if your artist recommends it.
- CeraVe Fragrance-Free Moisturizing Lotion, 12 oz — For days 4–14 to keep healed skin supple without irritation.
- Dr. Bronner's Unscented Castile Soap, 16 oz — Gentle daily cleanser for the first two weeks.
- Mad Rabbit Tattoo Balm, 2 oz — Long-term moisturizer artists recommend to keep colors vibrant.
- Hustle Butter Deluxe, 8 oz — Vegan aftercare option many collectors use for ongoing skin health.
Before Your Appointment:
- Tattoo Numbing Cream with 5% Lidocaine, 30 g — Apply only if your artist approves, 30–45 minutes before session.
- Inkjet Tattoo Stencil Transfer Paper, 20 sheets — Useful if you’re testing custom placement at home beforehand.
Long-Term Maintenance:
- SPF 50 Sunscreen Stick for Tattoos, 0.47 oz — Daily sun protection is essential to prevent fading.
- Hydrocolloid Bandages, 24 count (large) — Handy for small scabs or spot protection during healing.
- Tattoo Aftercare Kit (cleanser + balm) — Good starter pack for first-timers who want everything in one box.
- Alcohol-Free Antibacterial Wipes, travel pack — Useful for keeping the area clean when traveling during healing.
Artists I follow—Roxx and Valerie Vargas among them—often stress sunscreen and gentle moisturizers over heavy marketing products. From what I've gathered, consistent moisturizing and UV protection matter far more than any single brand.
Frequently Asked Questions
Q: How bad does a tattoo actually hurt?
A: Pain depends on placement and tolerance. Outer forearm or thigh is generally low-medium. Ribcage, spine, and ankle bone hit higher. It's more of a sharp scratching or burning than a sudden unbearable pain. For sensitive spots, ask about a tattoo numbing cream with 5% lidocaine but only use it if your artist approves.
Q: What if I regret a design later?
A: I always tell people to sit with ideas for months. Choose personal symbolism over viral trends. If you truly regret it later, removal is possible but takes time. If visibility is the worry, start with easily hidden placements like upper thigh or upper arm.
Q: How do I keep my tattoo from fading?
A: From what I've seen, UV exposure is the main culprit. Keep your tattoo covered or use an SPF 50 sunscreen stick daily. Moisturize with a fragrance-free lotion like CeraVe to keep skin healthy and colors vibrant.
Q: Can I work out after getting a tattoo?
A: Wait at least 48–72 hours before light workouts. If the tattoo is on a flex area (elbow, knee), give it a week before heavy movement. Sweat and friction can irritate healing skin and increase infection risk.
Q: Should I get a small tattoo first to test my pain tolerance?
A: Only if you actually want a small design. Finger or wrist tattoos can hurt more than people expect. If you're nervous, pick an outer arm or thigh piece for a gentler intro.
Q: How long does a tattoo take to heal fully?
A: Surface healing is usually 2–3 weeks. Full dermal healing can take a couple of months. The first week is the most critical—keep it clean, moisturized, and protected with Saniderm or a thin layer of Aquaphor if recommended.
Q: Do tattoos look different on different skin tones?
A: Yes. Black and gray often translate reliably across skin tones; some bright colors may show differently on deeper tones. I recommend asking to see healed examples from artists on the same skin tone to set realistic expectations.
