
I spent months collecting ideas for music tattoos before I realized the real problem: finding designs that still read as music after healing. These pieces are about rhythm, memory, and how ink behaves over time—so I focused on styles that age well and feel personal to true fans.
This list zeroes in on ink that reads as music—minimalist symbols, lyric scripts, micro-realism album art, and bold traditional pieces. These ideas work across forearm, chest, ribs, and behind-ear spots. From what I’ve seen in 2026 trends, wearable, meaningful music tattoos and fine line lyric scripts are rising.
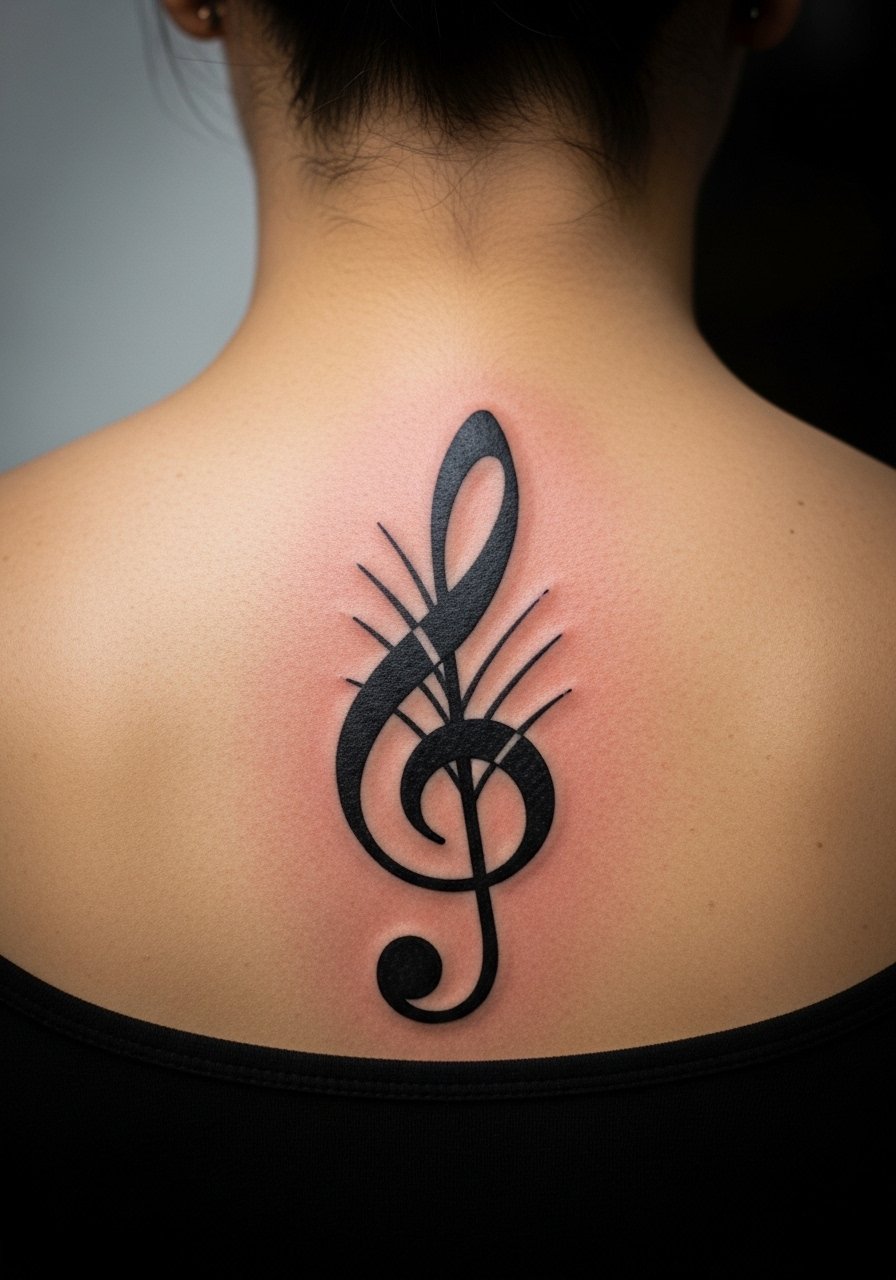
1. Fine Line Treble Clef Behind Ear
Style/Technique: Fine Line / Minimalist
Pain Level: Low-Medium (3/10)
Session Time: 30–60 minutes
Best For: First-time visible music tattoo
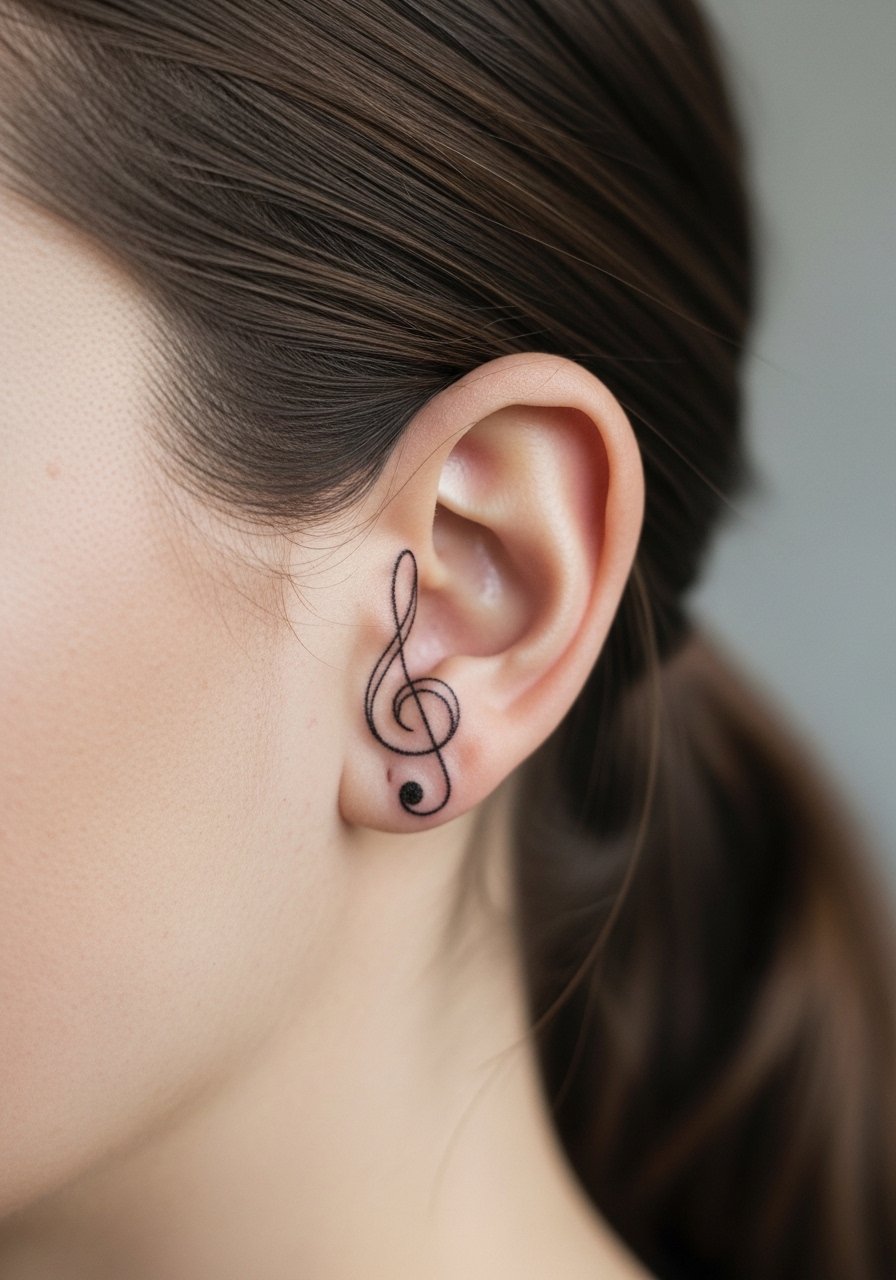
I love how a tiny treble clef reads like a secret. Fine line gives a delicate, musical vibe. Behind the ear stays subtle and moves with hair. Expect tingle-level pain. Heals in 2–3 weeks; keep moisturized. Fine lines blur faster—ask for slightly bolder lines if you want long-term clarity. Look for artists who do precise single-needle work.
2. Minimalist Soundwave Wrist Band
Style/Technique: Minimalist / Linework
Pain Level: Low (2-3/10)
Session Time: 1–2 hours
Best For: Personal lyric or favorite song snippet
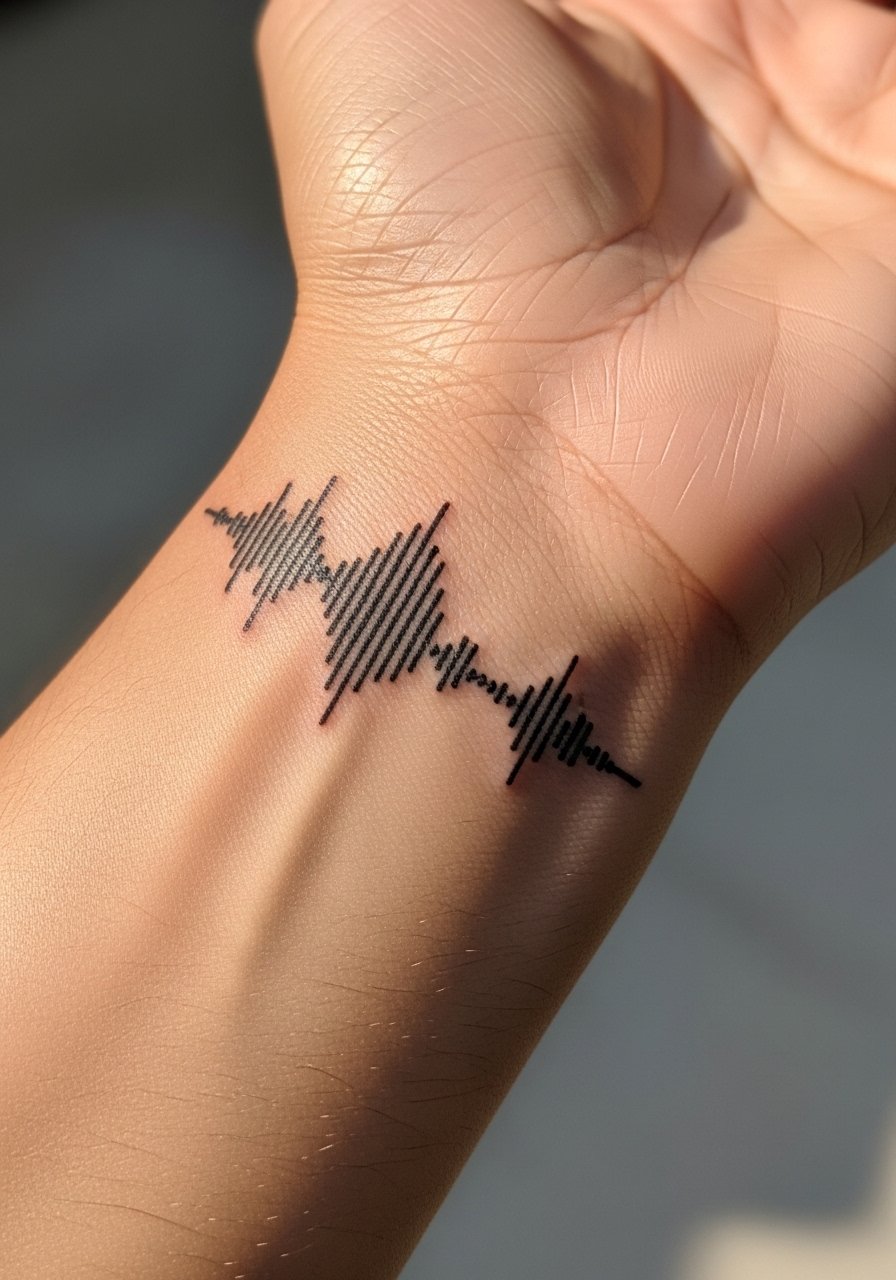
I converted a favorite chorus into a soundwave band. It reads modern and meaningful. Wrist placement is visible and easy to show. Pain is mild, but wrist skin is thin so expect buzzing. Heals in 2–4 weeks. Soundwaves age okay if lines aren’t razor-thin. Common mistake: making the wave too detailed—simplify for longevity.
3. Micro-Realism Album Cover on Chest
Style/Technique: Micro-Realism / Portraiture
Pain Level: Medium (4-6/10)
Session Time: 3–6 hours (may need touch-ups)
Best For: Statement piece for devoted fans
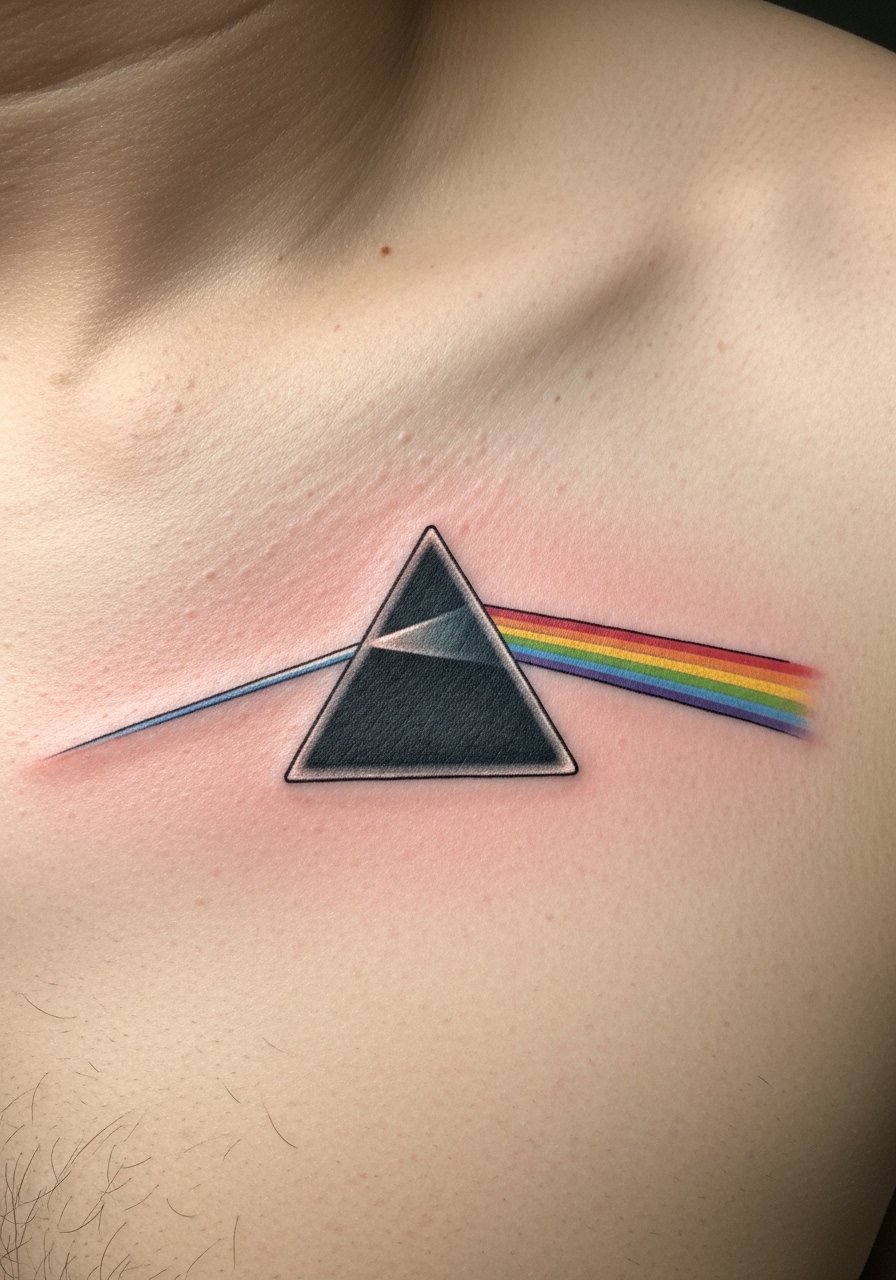
Getting an album cover in micro-realism keeps the art intimate. Chest flatness helps detail. Pain is moderate near sternum. Heals over weeks; color looks muted while settling. Micro-realism needs an experienced artist—ask to see healed album samples. Avoid tiny unreadable details that look smudged after a year.
4. Bold Traditional Microphone on Upper Arm
Style/Technique: Traditional / American Traditional
Pain Level: Low (2-3/10)
Session Time: 1–3 hours
Best For: Timeless, high-visibility music statement
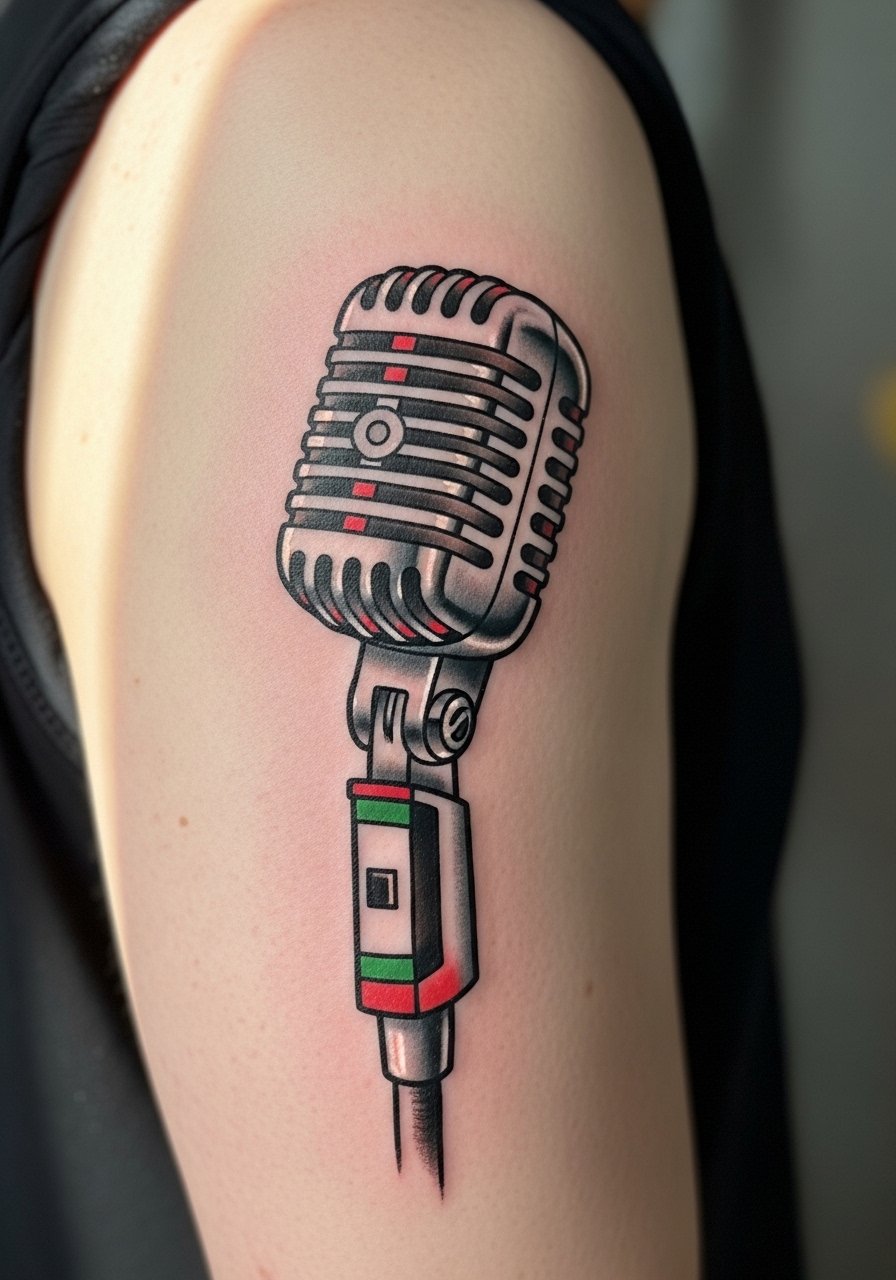
A classic microphone in traditional style holds up well. Thick lines and saturated blacks age steadily. Upper arm is forgiving pain-wise and easy to cover. Expect surface healing in 2–3 weeks. Ask for crisp line weight—too many tiny color fills can fade unevenly. Traditional is forgiving when touched up down the road.
5. Neo-Traditional Concert Poster on Thigh
Style/Technique: Neo-Traditional / Illustrative
Pain Level: Medium (4/5)
Session Time: Multiple sessions
Best For: Big, colorful statement that’s easy to hide
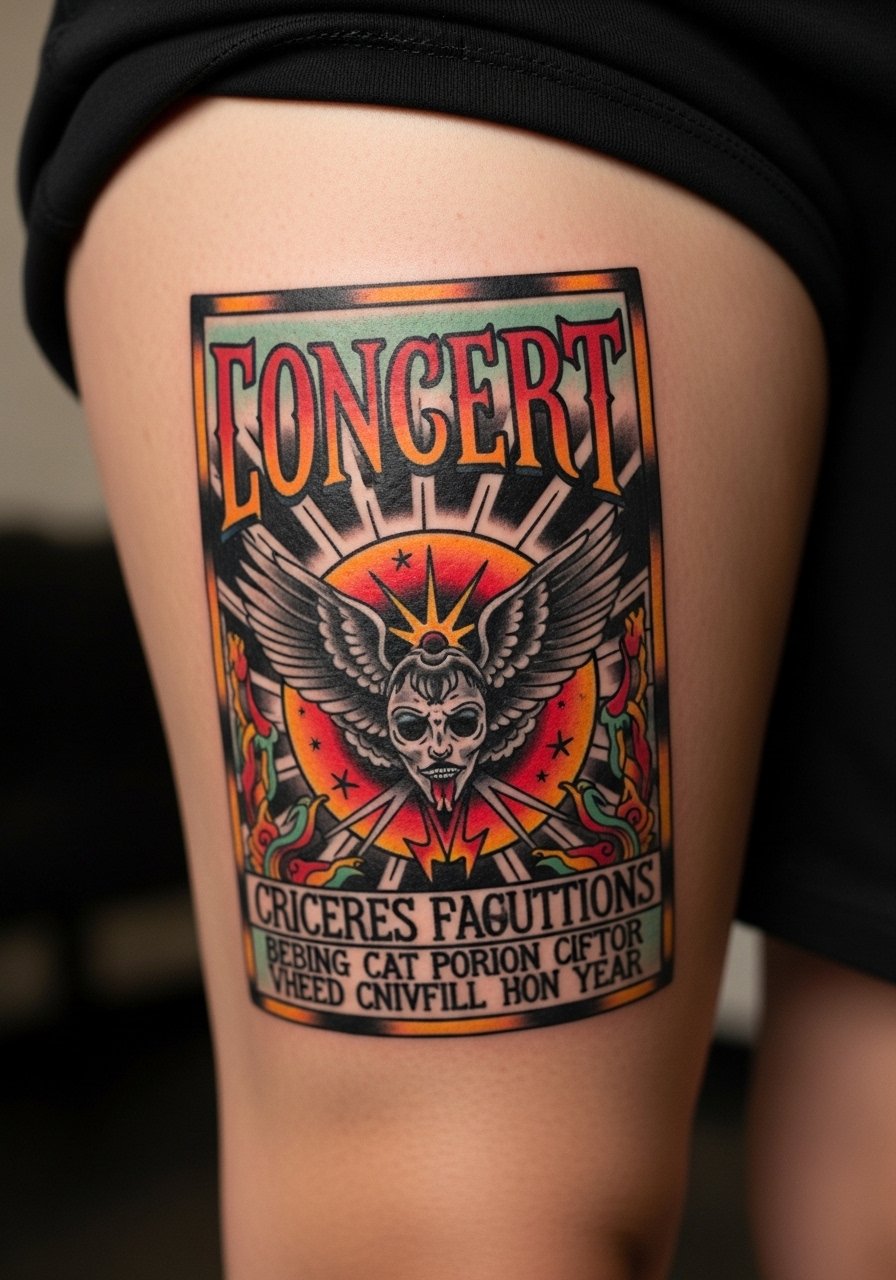
Neo-traditional gives album poster vibes with bold shapes and modern color. Thigh is a great canvas for size and detail. Pain is moderate; fleshier area helps. Heals in a few weeks; colors may need a top-up after a year depending on sun exposure. Don’t cram small text; keep type large enough to remain legible when healed.
6. Watercolor Lyric Script Along Ribcage
Style/Technique: Watercolor / Script
Pain Level: High (7/10)
Session Time: 1–3 hours
Best For: Emotional lines or chorus phrases
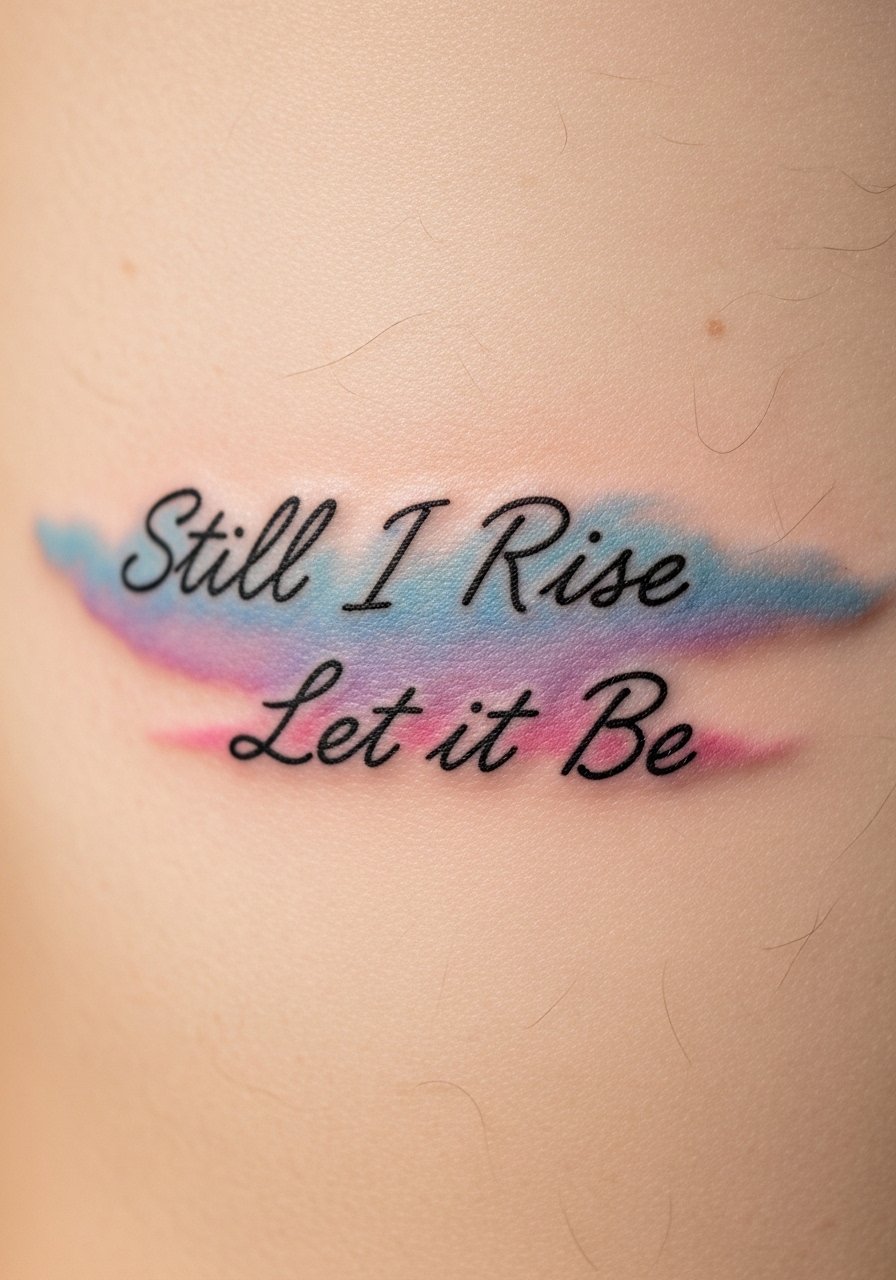
Lyrics along ribs read intimate and visceral. Watercolor adds emotional wash but fades faster. Ribs hurt more; expect strong discomfort. Healing needs gentle care; colors look muted during healing then settle. Ask your artist about pigment saturation for skin tone. Common mistake: overly thin script that blurs—choose bold, legible lettering.
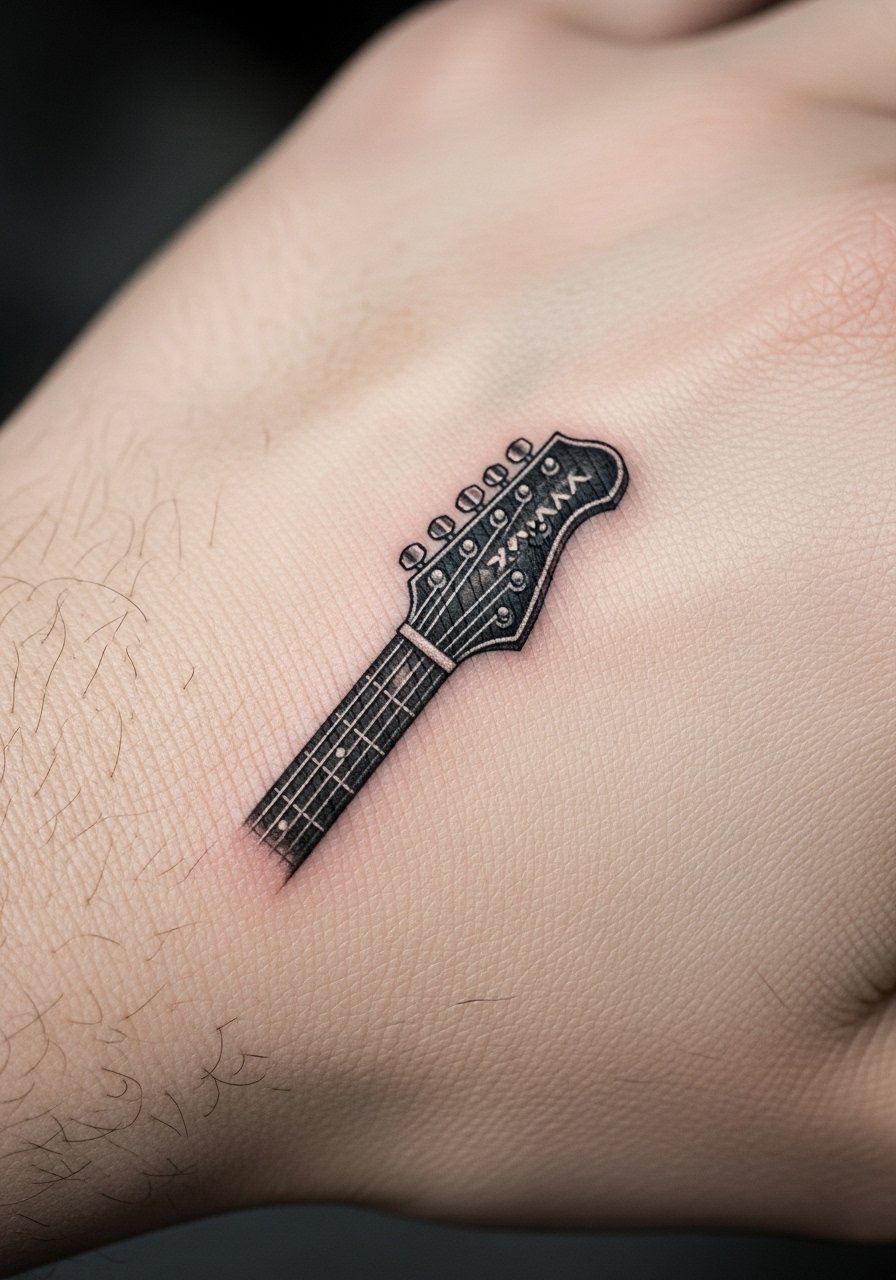
7. Blackwork Guitar Silhouette on Calf
Style/Technique: Blackwork / Solid Fill
Pain Level: Medium (4/10)
Session Time: 1–2 hours
Best For: Bold, low-fuss music symbol
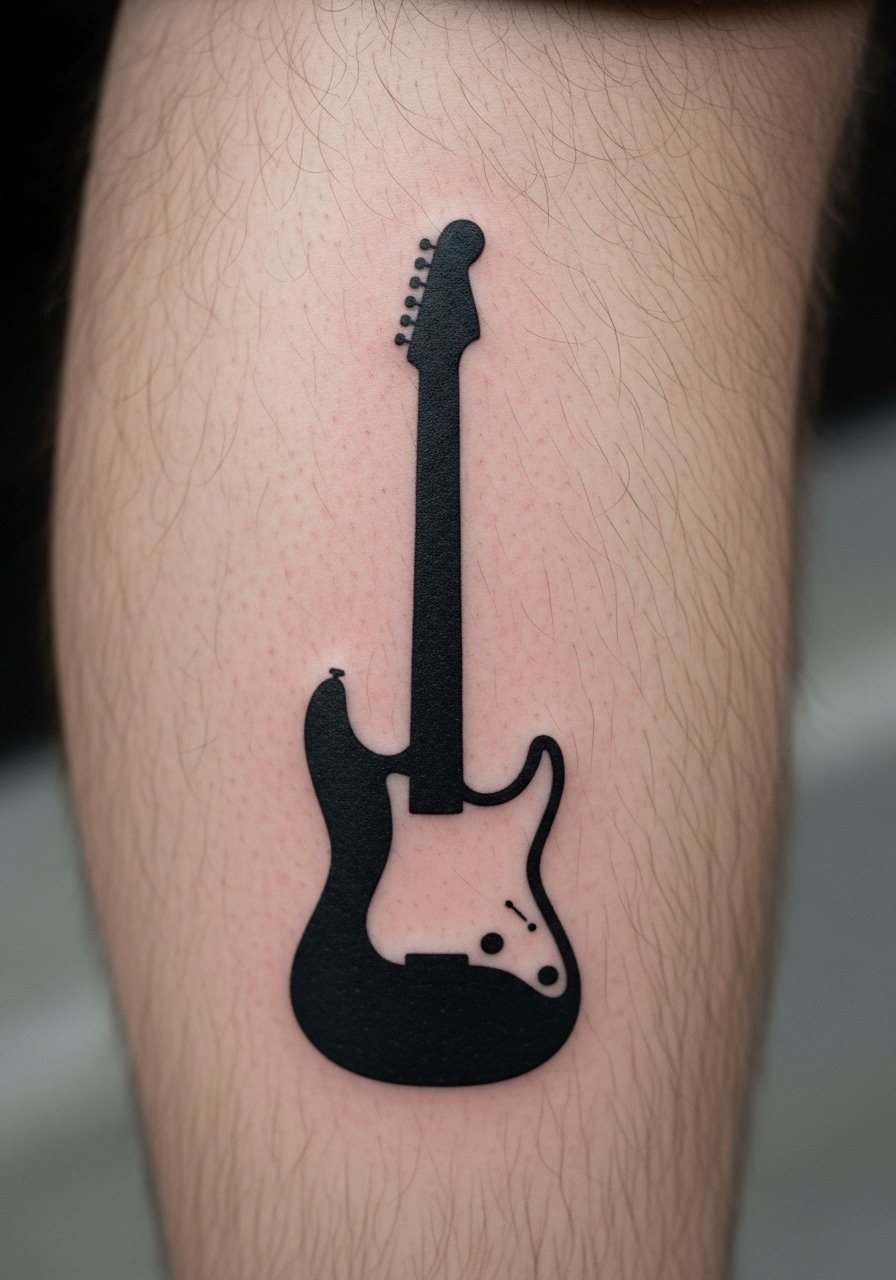
A black silhouette reads clearly at a distance. Calf placement tolerates solid fill well. Pain is moderate but brief. Heals in 2–3 weeks; black holds best across skin tones. Avoid tiny internal details in silhouette—solid shapes last longer and keep the guitar instantly recognizable.
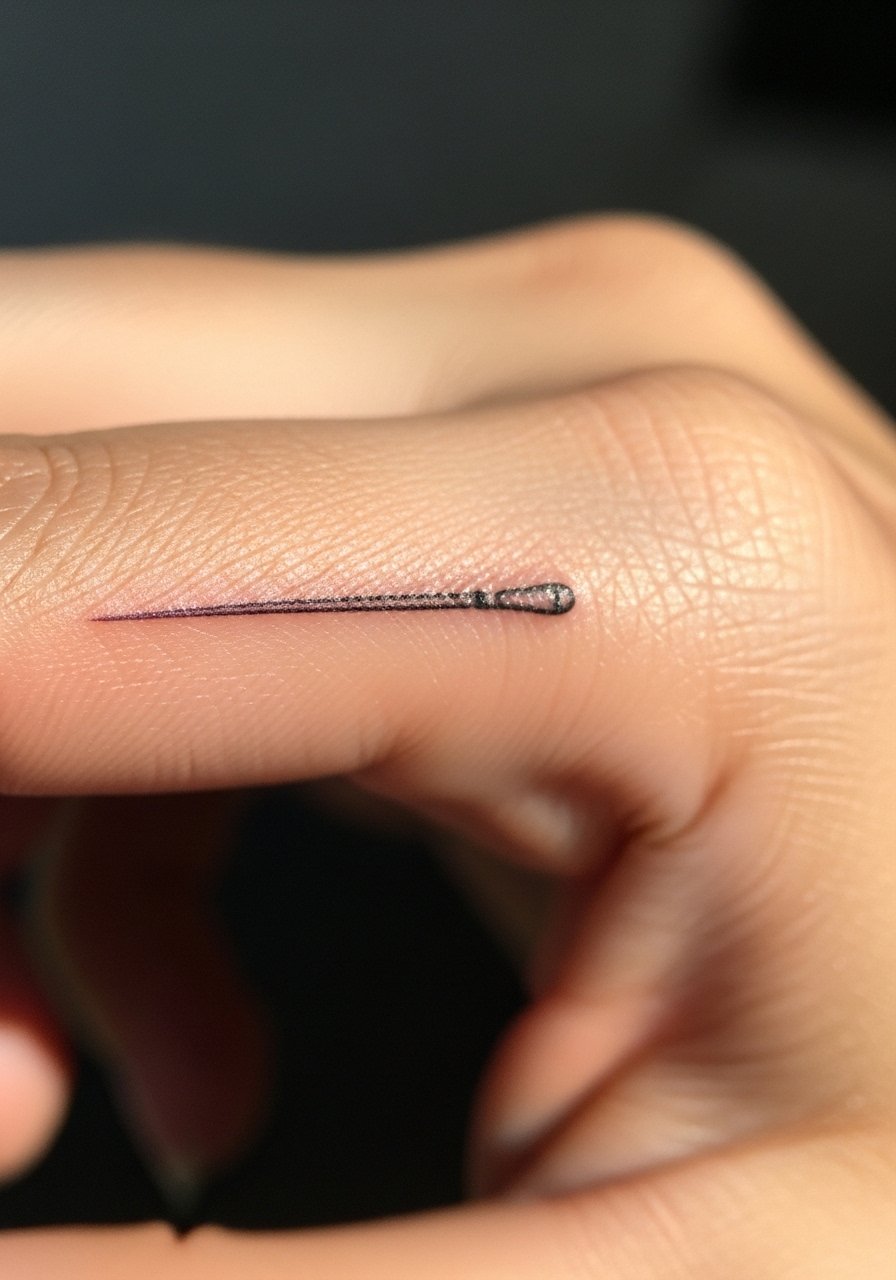
8. Micro-Lettering Song Title on Finger
Style/Technique: Fine Line / Micro-Lettering
Pain Level: High (6-8/10)
Session Time: 30–60 minutes
Best For: Tiny, meaningful reminders
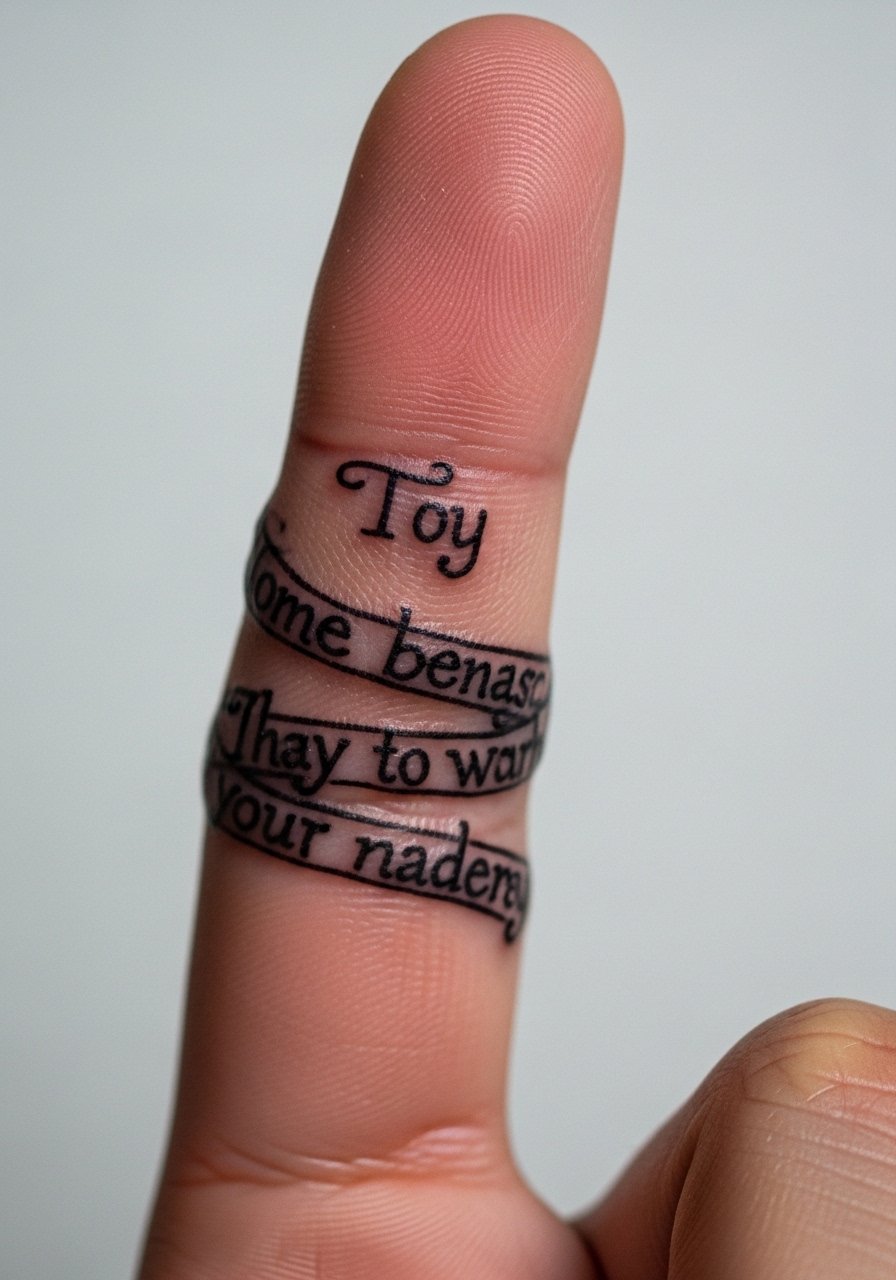
Finger tattoos are intimate but tricky. I love the daily reminder of a lyric, but fingers blur and need touch-ups. Pain is sharp. Heals in 2–4 weeks with more fading risk. Artists often advise thicker strokes for fingers. Mistake to avoid: tiny script without room to breathe—pick short words and bold lines.
9. Minimalist Notation Ankle Band
Style/Technique: Minimalist / Geometric Linework
Pain Level: Medium (4/10)
Session Time: 1–2 hours
Best For: Discreet melodic motif
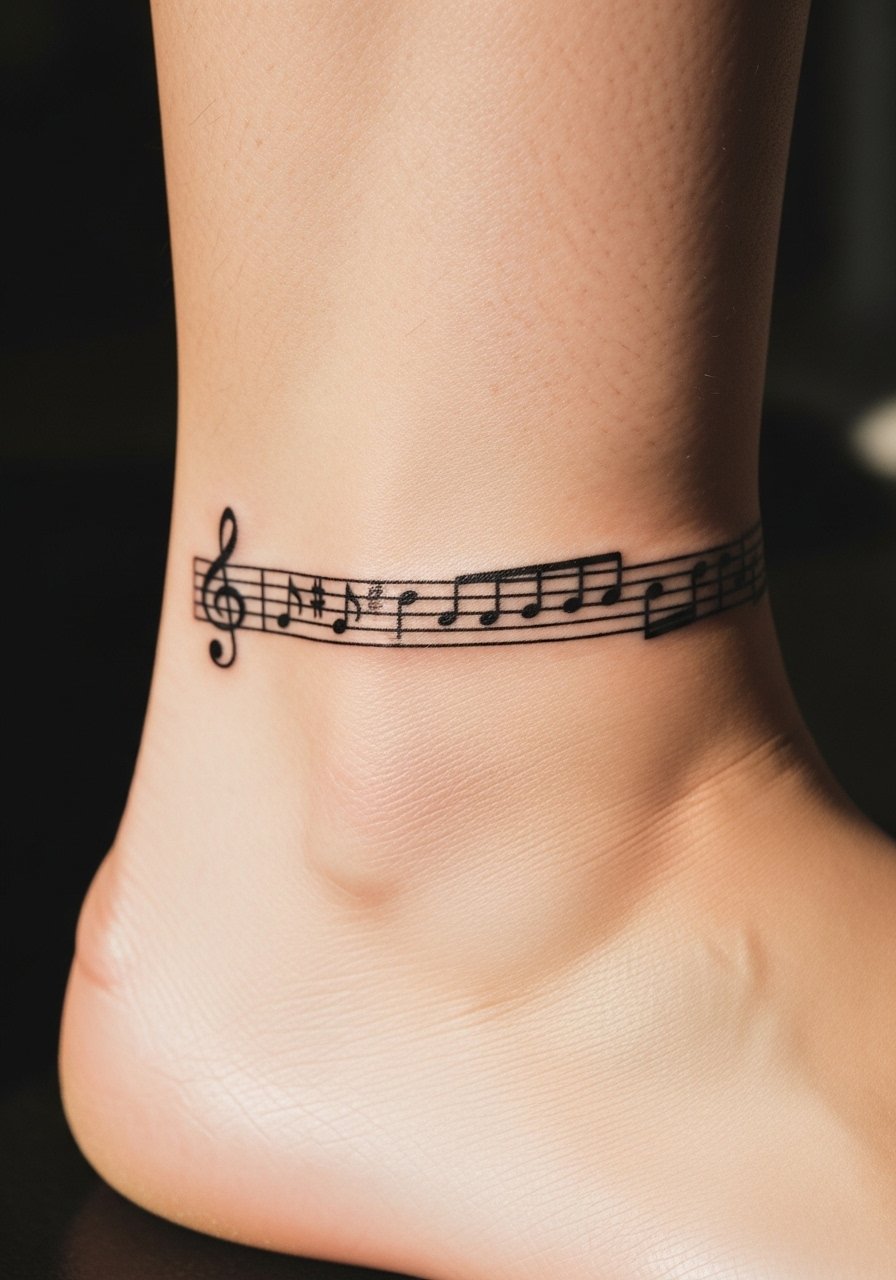
A small staff or single bar of notation at the ankle is subtle and chic. Ankles can be finicky for healing—boots and socks irritate. Pain is moderate. Keep lines slightly thicker than you think for longevity. I’ve seen thin staffs fade into patchy lines; ask for a simple reduced-note motif.
10. Micro-Realism Portrait of a Musician on Upper Arm
Style/Technique: Micro-Realism / Portrait
Pain Level: Medium (4-5/10)
Session Time: 3–6 hours
Best For: Tribute tattoos to artists or mentors
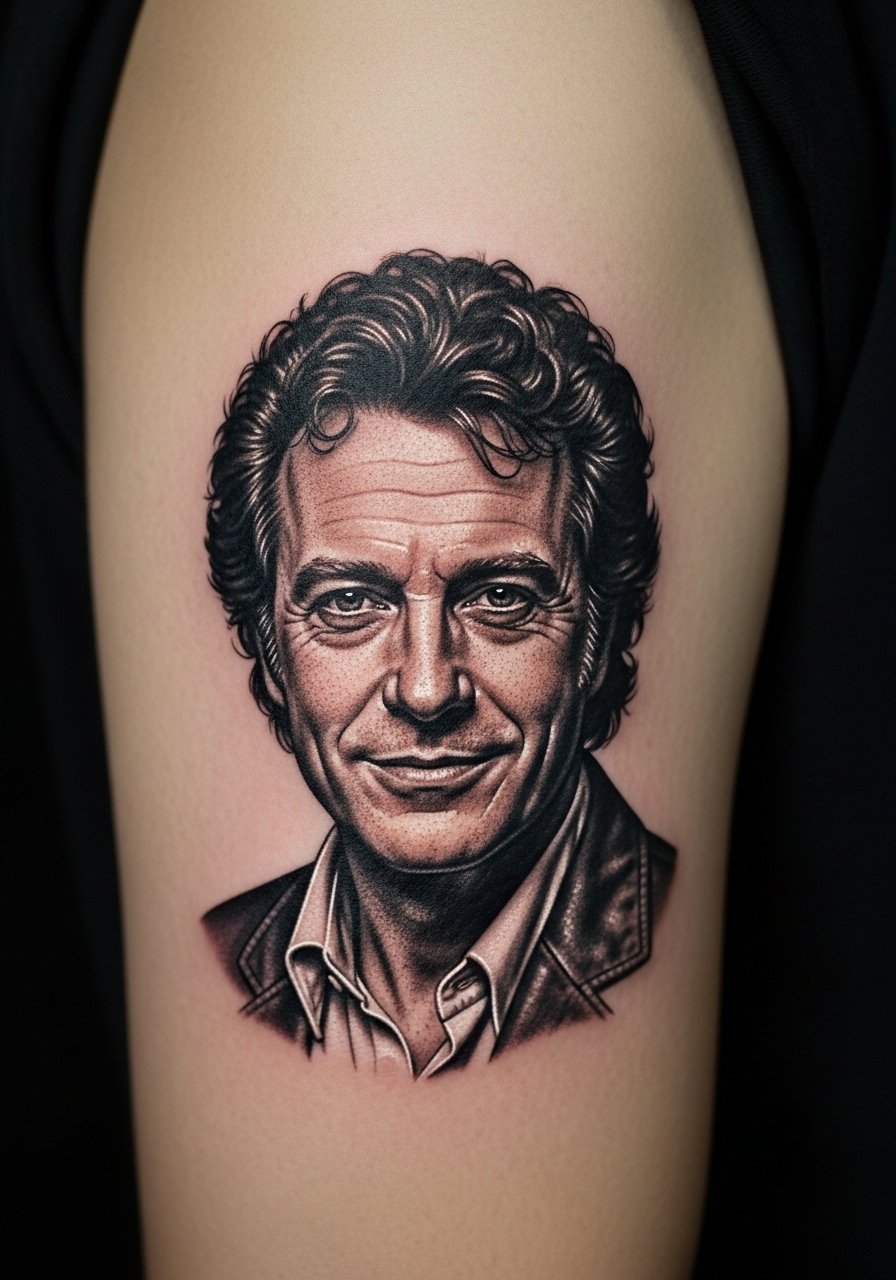
Portraits need precision. On the upper arm you get enough space for detail. Expect multiple hours and touch-ups. Heals in weeks; micro-realism can look soft at first then sharpen. Ask to see healed portraits on similar skin tones. Avoid over-detailing hair strands that can blur into gray patches.
11. Sheet Music Half-Sleeve on Inner Forearm
Style/Technique: Fine Line / Illustrative
Pain Level: Medium (4/5)
Session Time: Multiple sessions
Best For: Visible, lyrical storytelling pieces
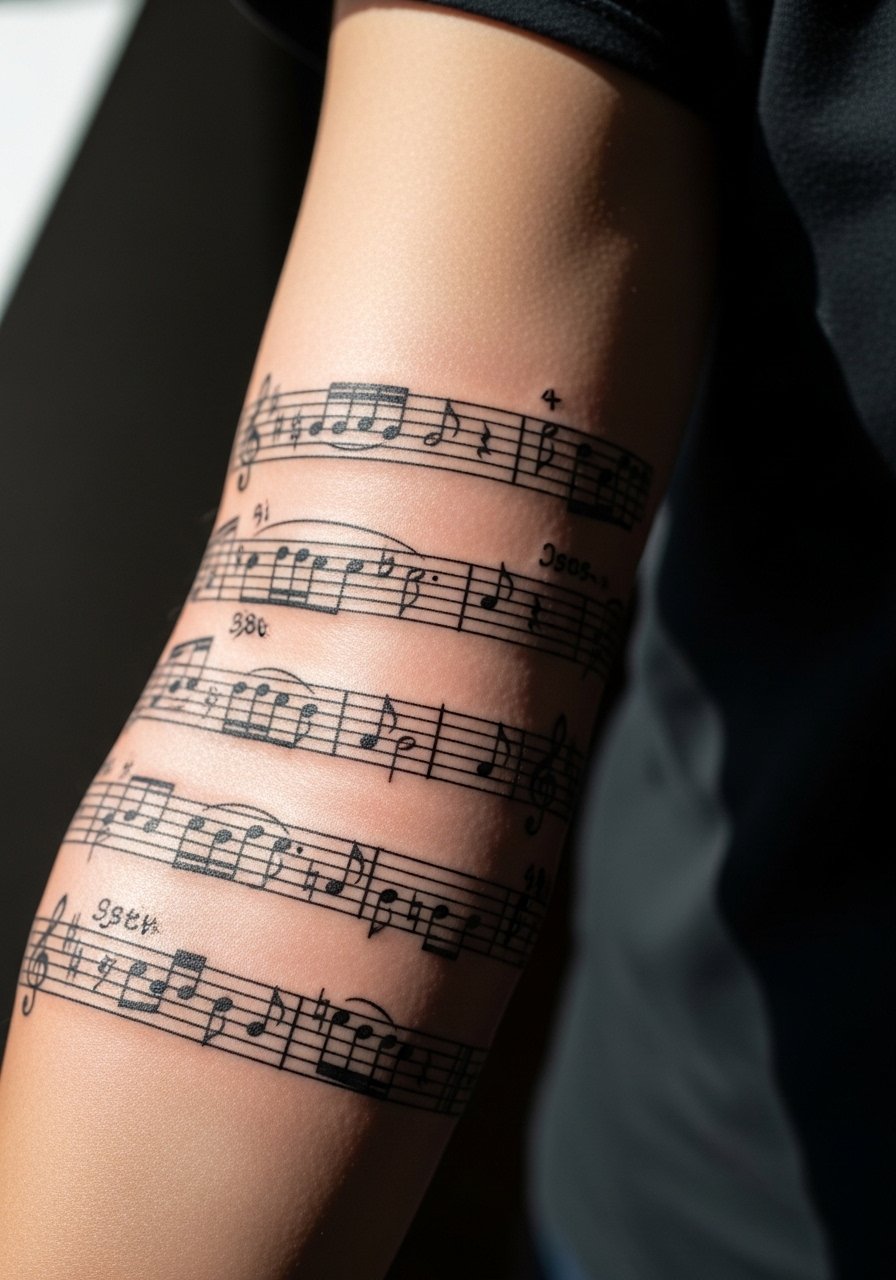
A forearm sheet-music sleeve reads like a visual playlist. Inner forearm heals well and is low pain. Lines must be spaced for clarity—too tight and the notes blend. Heals in a few weeks; use SPF to preserve black lines. Common mistake: trying to include an entire song—simplify to a memorable bar.
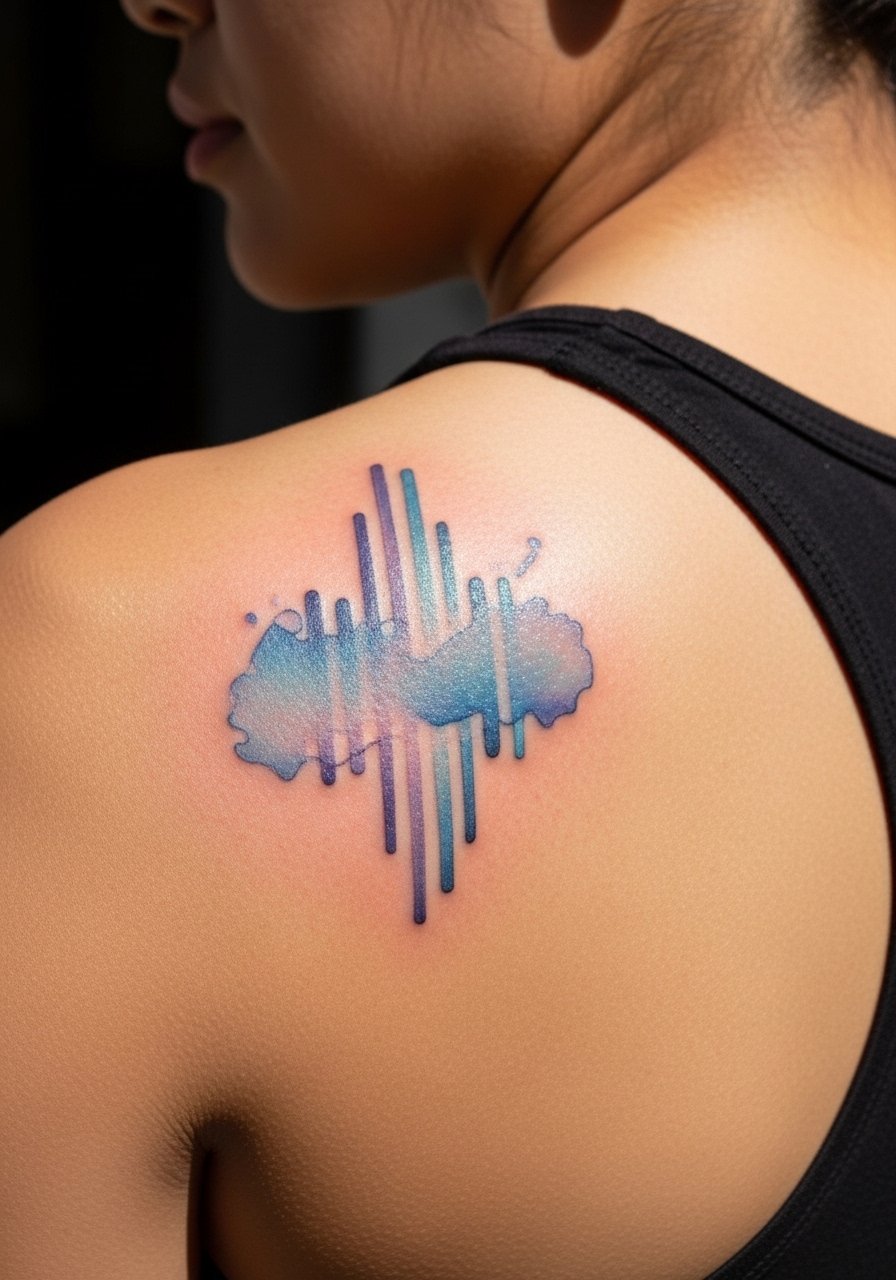
12. Geometric Soundwave Sternum Piece
Style/Technique: Geometric / Blackwork
Pain Level: High (7/10)
Session Time: 2–4 hours
Best For: Bold center-chest statements
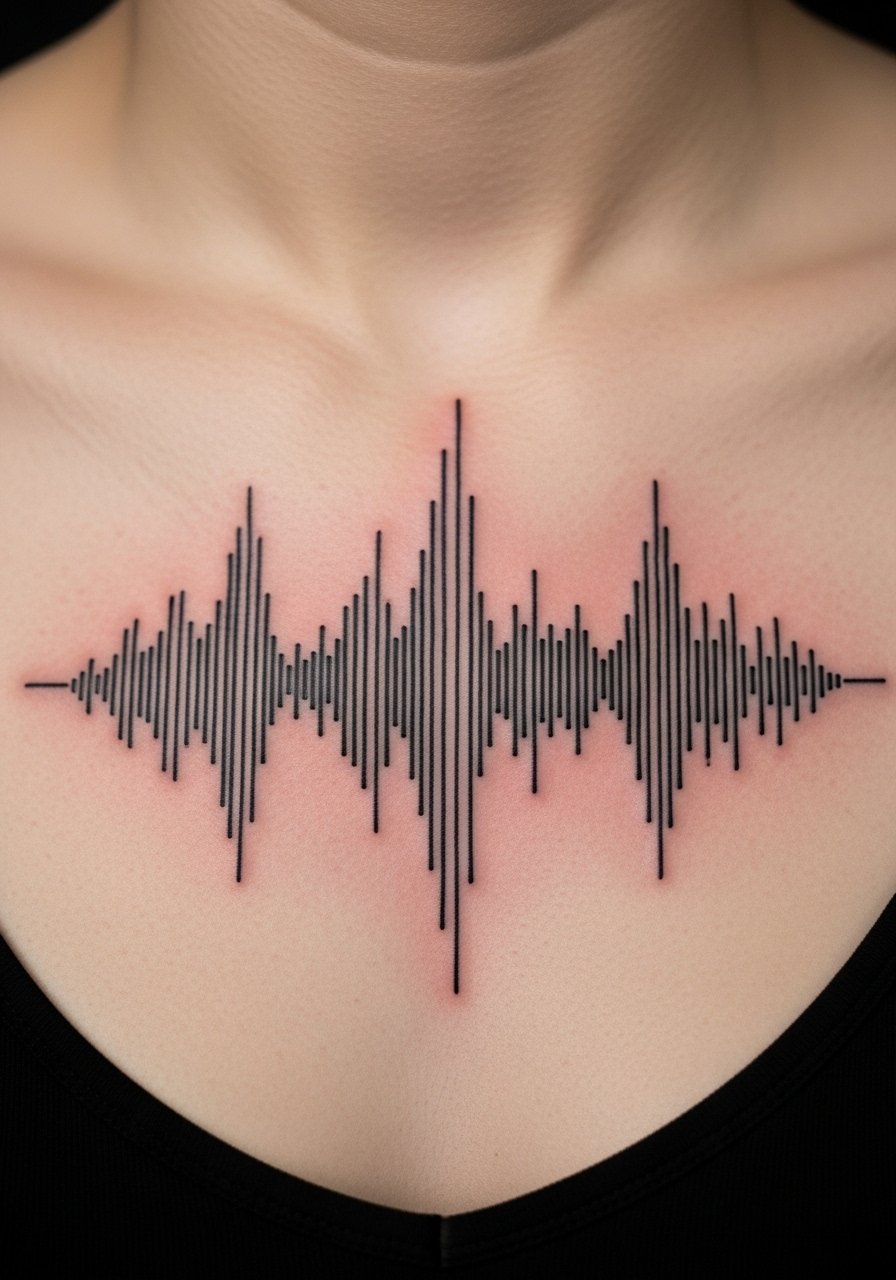
A sternum soundwave merges music with symmetry. Sternum tattoos hurt more but sit strikingly. Heals over weeks; avoid tight clothing. Blackwork holds well here. Avoid ultra-fine details near bone—bold geometry retains form. Ask your artist about negative-space balance for the best healed contrast.
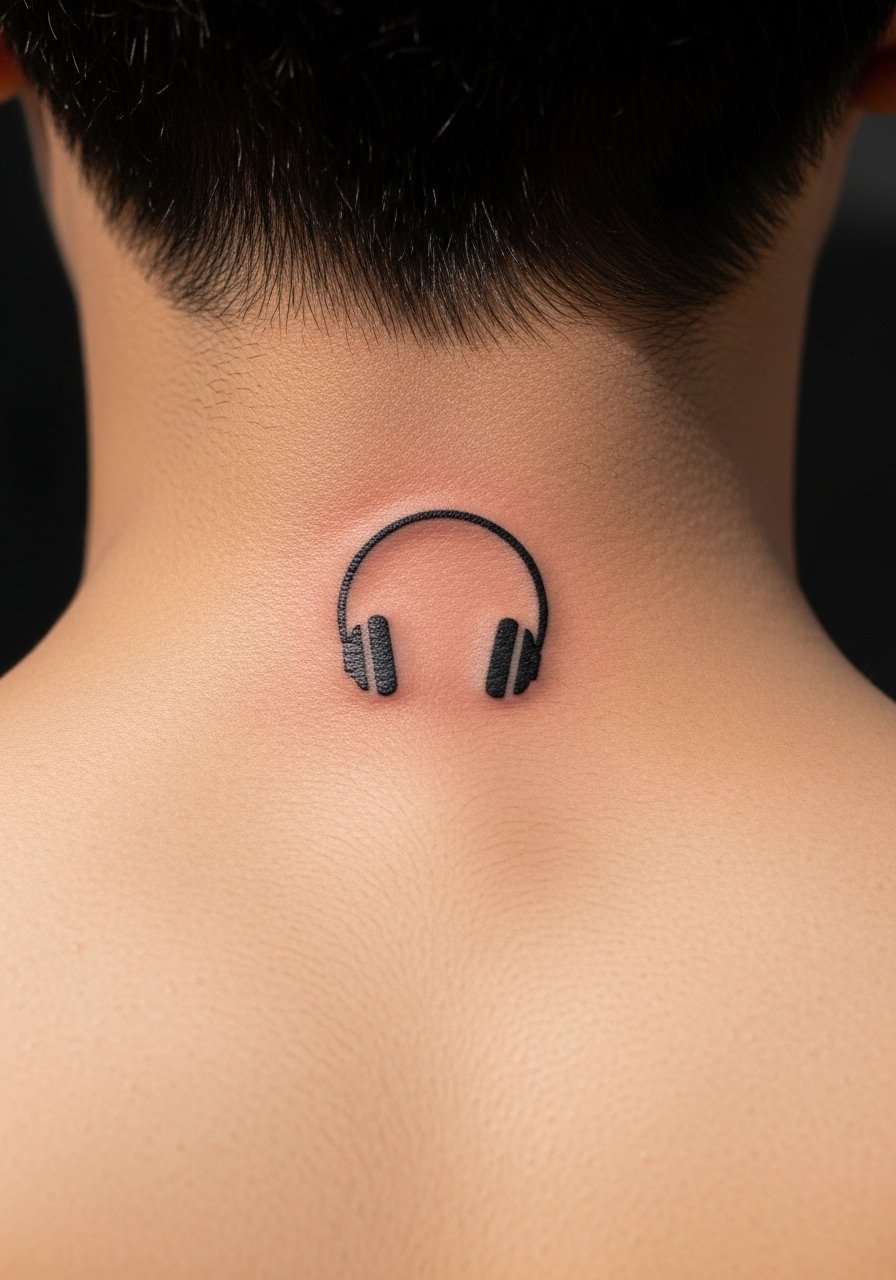
13. Minimalist Earbuds Line on Neck
Style/Technique: Minimalist / Continuous Line
Pain Level: Medium (4/10)
Session Time: 45–90 minutes
Best For: Casual, modern music nod

A continuous-line earbuds design feels playful and modern. Neck placement is visible and a bit tender. Heals in 2–3 weeks but needs careful sun protection. Lines should be bold enough to avoid blowout. I’d ask an artist experienced in continuous-line work to keep spacing consistent.
14. Blackwork Clef Spine Runner
Style/Technique: Blackwork / Linear
Pain Level: High (7-8/10)
Session Time: 2–4 hours
Best For: Vertical centerpieces with dramatic effect
A vertical clef down the spine is striking and very personal. Spine tattoos hurt—expect higher pain. Heals in a few weeks; keep sleeping position in mind. Bold blackwork ensures long-term readability. Avoid extremely fine curls that can blur across vertebrae movement.
15. Tiny Lyric Bar Behind Collarbone
Style/Technique: Script / Fine Line
Pain Level: Medium (4/10)
Session Time: 30–60 minutes
Best For: Subtle, wearable lyric quotes
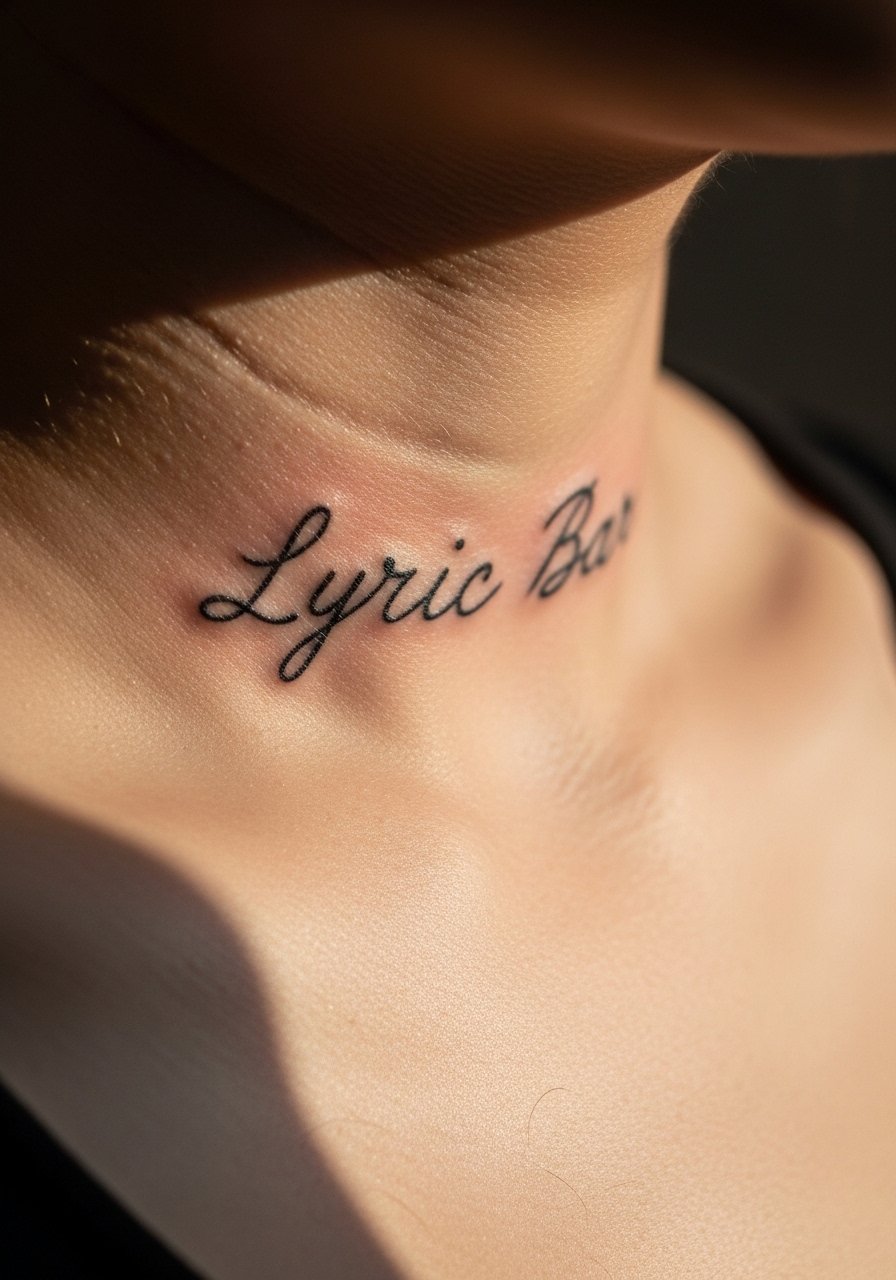
I used a short chorus line behind my collarbone. It’s intimate and shows with neckline changes. Pain is moderate due to thin skin. Heals in 2–3 weeks. Script needs spacing; too small and it blurs. Ask for slightly bolder strokes and proof of healed script samples.
16. Watercolor Abstract Sound on Shoulder Blade
Style/Technique: Watercolor / Abstract
Pain Level: Low-Medium (3/10)
Session Time: 1–3 hours
Best For: Colorful, artistic music interpretation
Abstract watercolor evokes melody without words. Shoulder blade is low pain and hides under clothing. Colors look dreamy when fresh; they mellow with time. Watercolor requires touch-ups to keep vibrancy. Ask for color saturation tailored to your skin tone—some pigments fade faster than black.
17. Neo-Traditional Vinyl Record on Forearm
Style/Technique: Neo-Traditional / Colorwork
Pain Level: Low-Medium (3-4/10)
Session Time: 1–3 hours
Best For: Nostalgic music fans
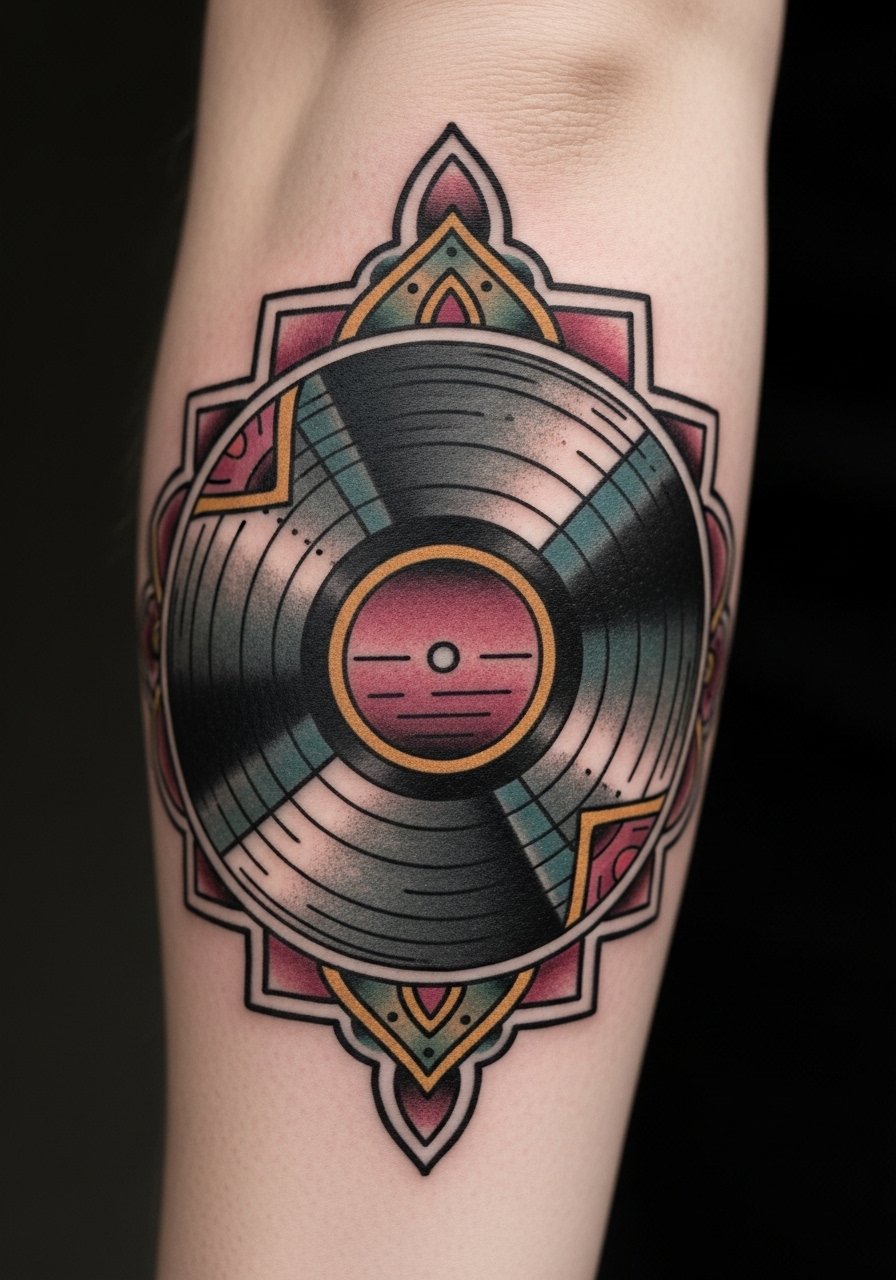
A vinyl record in neo-traditional style feels classic with a modern twist. Forearm placement is visible and heals predictably. Colors may soften; black rims keep the image sharp. Avoid tiny lettering on the label—big type survives better. Look for artists who balance bold outlines with subtle shading.
18. Micro-Realism Instrument Detail on Hand
Style/Technique: Micro-Realism / Tiny Detail
Pain Level: High (7-8/10)
Session Time: 1–2 hours
Best For: Fans who want instrument tribute
Instrument details on hands are striking but high-maintenance. Hands are exposed and fade faster. Pain is high. Heals in a few weeks but expect frequent touch-ups. Choose slightly larger scale than you imagine; tiny mechanical parts blur on moving skin. Seek artists with healed hand work in their portfolio.
19. Minimalist Piano Keys Along Rib
Style/Technique: Minimalist / Blackwork
Pain Level: High (7/10)
Session Time: 1–2 hours
Best For: Elegant, linear music nod
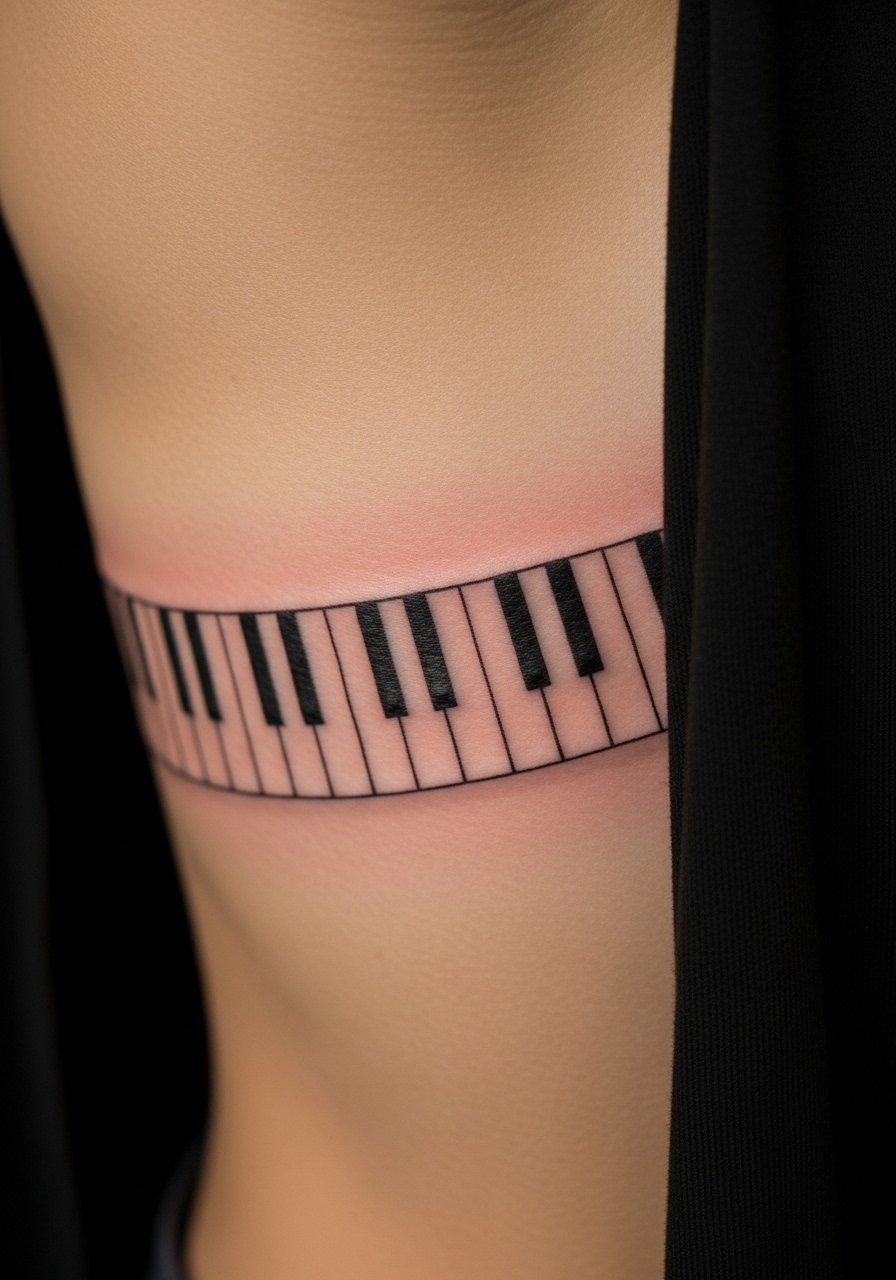
Piano keys along the ribs look refined. Ribs are painful and require steady breathing. Heals over several weeks; keep clothing loose. Black keys age well if lines are bold. Avoid intricate shading between keys—flat blacks hold form better long-term.
20. Band Logo Micro-Realism on Inner Bicep
Style/Technique: Micro-Realism / Logo Reproduction
Pain Level: Medium (4/10)
Session Time: 1–3 hours
Best For: Fans wanting accurate band insignia
If you choose a band logo, fidelity matters. Inner bicep protects the art and is comfortable to heal. Logos with heavy black elements hold longer. Ask for permission if needed and bring a high-res reference. Avoid tiny text; logos should be sized to remain crisp when healed.
21. Single-Note Minimalist Collar Tattoo
Style/Technique: Minimalist / Single-Note
Pain Level: Low-Medium (3/10)
Session Time: 20–45 minutes
Best For: Discreet musical symbol

A single note at the collarbone is understated but meaningful. Placement is visible and delicate. Pain is manageable. Heals in 2–3 weeks. Keep the note bold enough to withstand daily movement and sun exposure. I’ve seen too-fine notes blur—choose a slightly heavier line.
22. Blackwork Metronome on Sternum Side
Style/Technique: Blackwork / Symbolic
Pain Level: High (7/10)
Session Time: 1–2 hours
Best For: Symbolic rhythm tribute
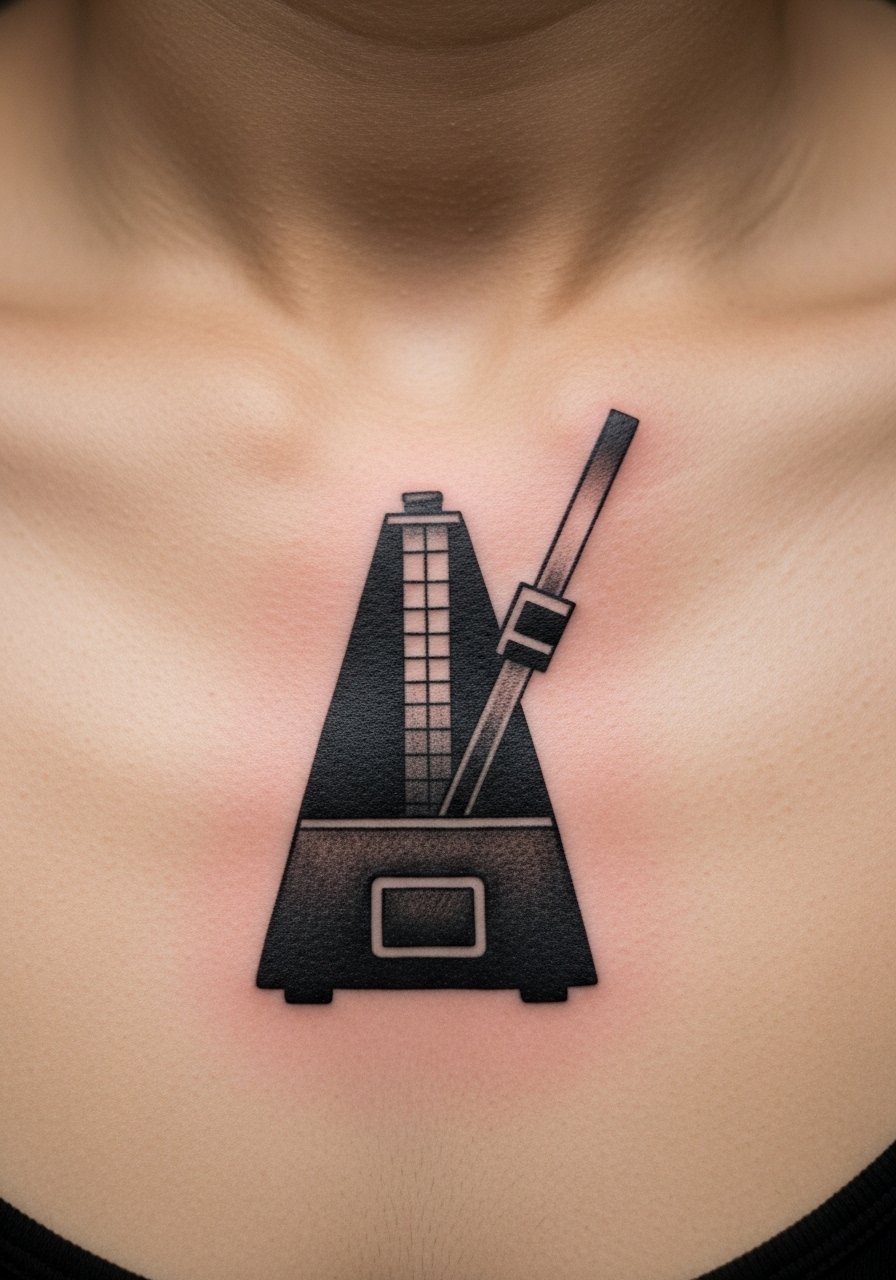
A metronome symbolizes rhythm and discipline. Placement near the sternum is bold and tender. Heals over weeks; heavy blackwork preserves shape. Avoid tiny ticks or numbers—they can blur. Ask an artist experienced with chest pieces for even saturation.
23. Watercolor Guitar Pick on Wrist
Style/Technique: Watercolor / Small Color
Pain Level: Low (3/10)
Session Time: 30–60 minutes
Best For: Colorful, compact fan symbol
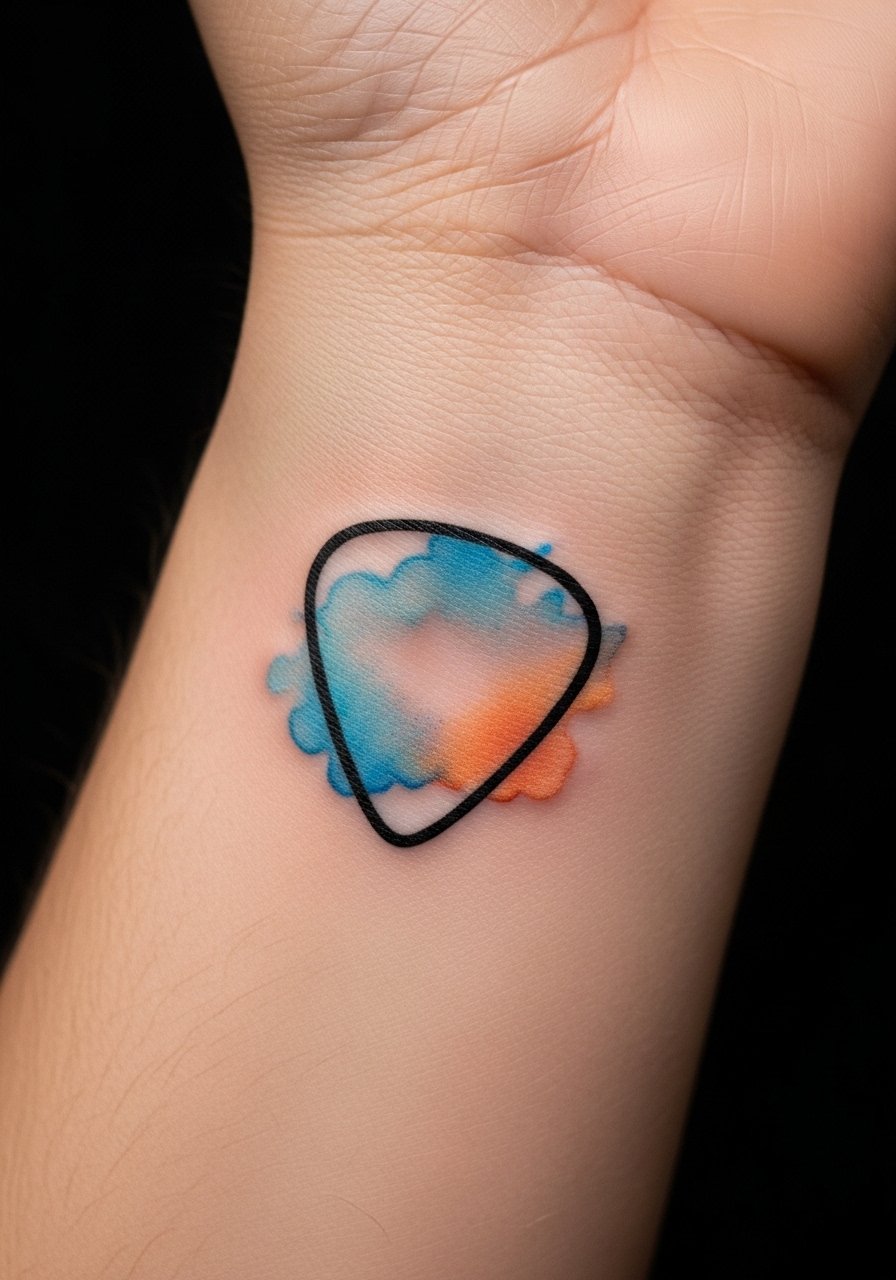
A watercolor pick looks playful and personal on the wrist. Wrist skin is thin but manageable. Colors fade faster here—SPF and balm help. Avoid extremely pale pigments that disappear on deeper tones. I recommend artists who can show healed watercolor examples on similar skin tones.
24. Minimalist Headphone Cable Wrapping Ankle
Style/Technique: Minimalist / Continuous Line
Pain Level: Medium (4/10)
Session Time: 45–90 minutes
Best For: Subtle design that wraps naturally
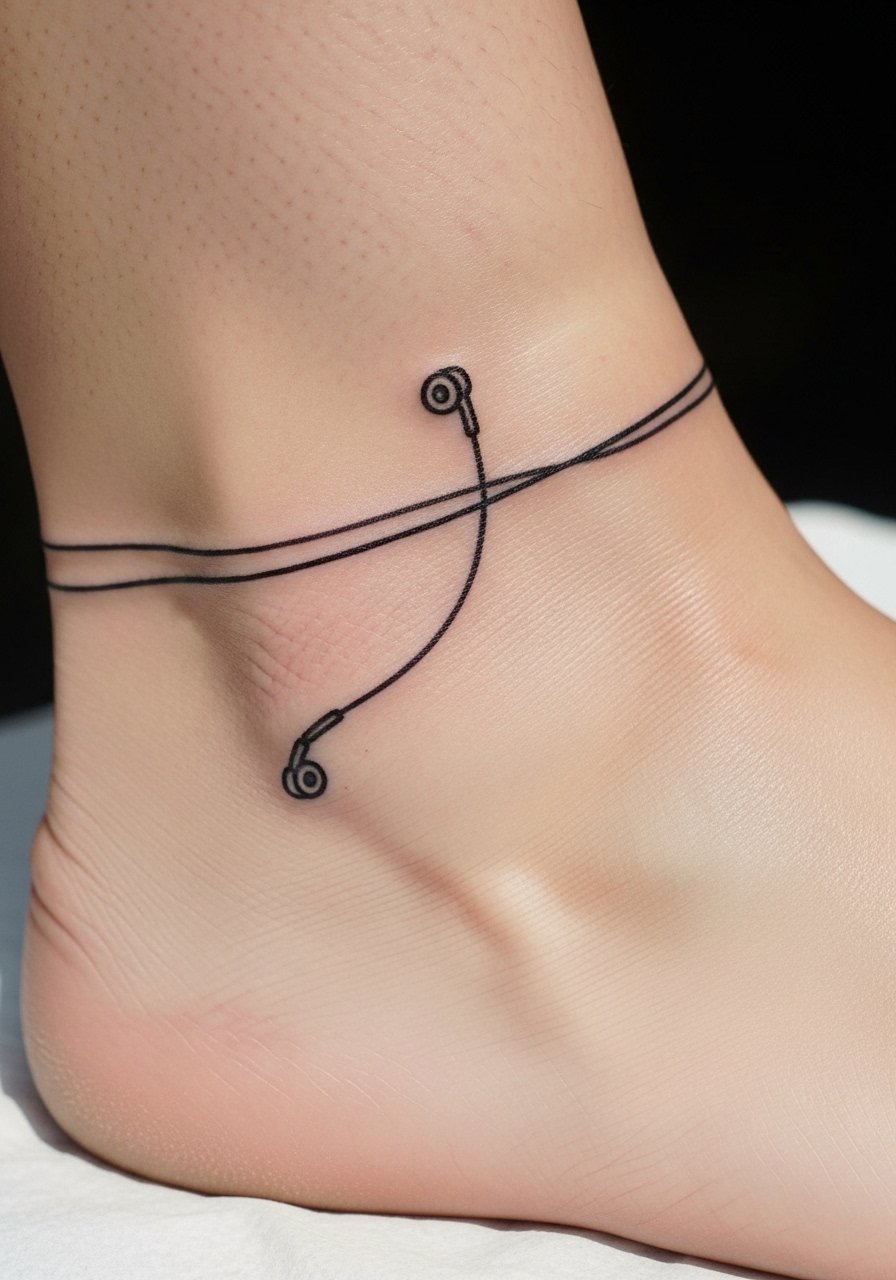
A cable wrap follows ankle contours and feels organic. Ankles need thicker lines to avoid blowout. Heals in a few weeks; avoid friction from shoes. Common mistake: too many loops—keep the flow simple for easier healing and long-term readability.
25. Fine Line Conductor Baton on Finger Side
Style/Technique: Fine Line / Minimalist
Pain Level: High (6-7/10)
Session Time: 30–60 minutes
Best For: Musicians and conductors wanting a tiny symbol
A baton on a finger is neat but high-maintenance. Fingers are exposed and prone to fade. Pain is sharp. Heals in 2–4 weeks. Make the baton slightly thicker than instinct suggests. Ask for healed finger work photos from the artist.
26. Micro-Realism Headphone Jack Behind Ear
Style/Technique: Micro-Realism / Tiny Object
Pain Level: Low-Medium (3-4/10)
Session Time: 30–90 minutes
Best For: Quirky, concealed music detail

A tiny jack behind the ear is playful and hidden. Low to moderate pain. Heals quickly but keep hair away during healing. Metallic micro-realism needs subtle contrast—avoid excessive white ink which often fades. Ask to see healed tiny object tattoos.
27. Blackwork Bass Clef on Ribcage Curve
Style/Technique: Blackwork / Bold Symbol
Pain Level: High (7/10)
Session Time: 1–2 hours
Best For: Dramatic, sculptural symbol
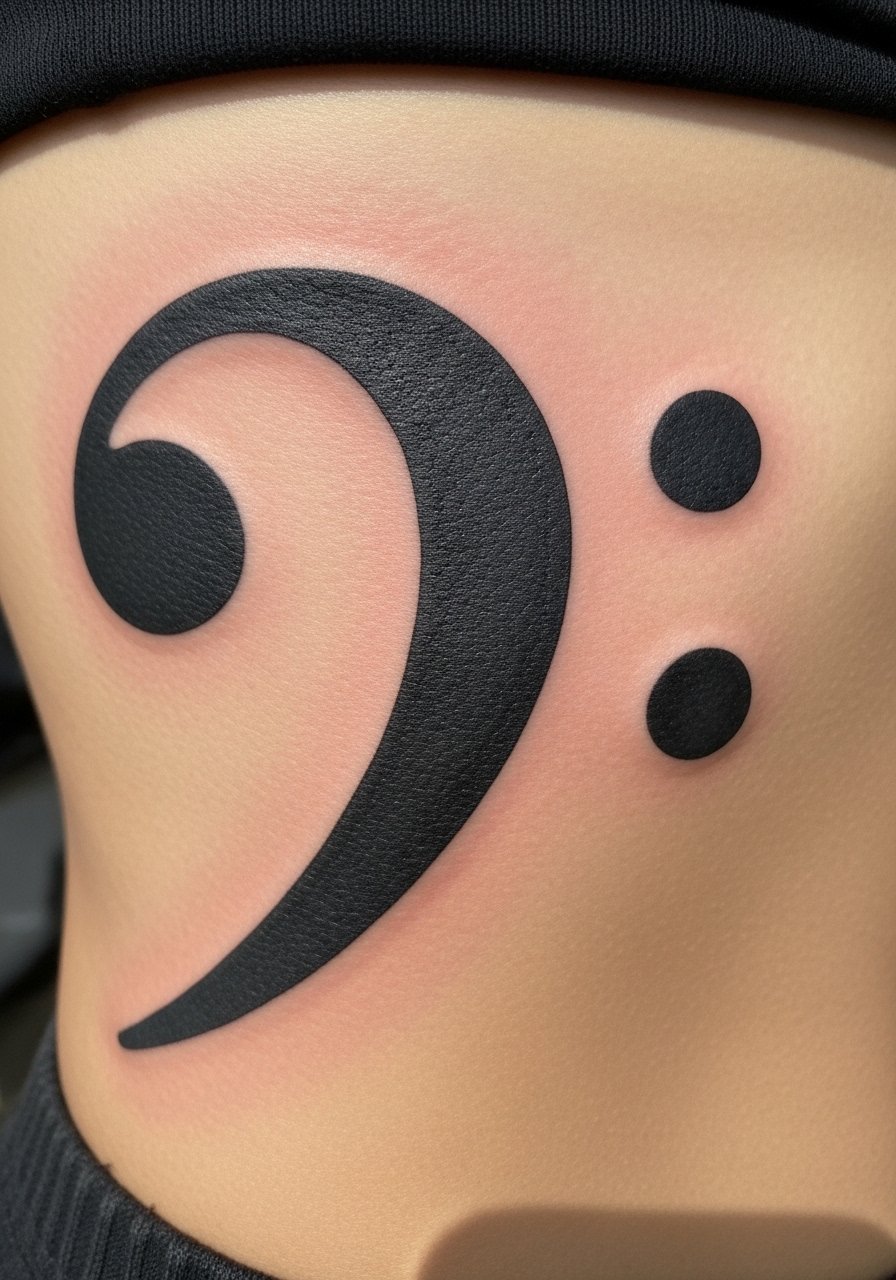
A bass clef along the ribs follows body shape and reads strong. Pain is high but the result is sculptural. Heals over weeks. Bold fills stand up to the movement and flexion of the torso. Avoid slender tails that can feather along ribs.
28. Neo-Traditional Headliner Banner on Chest
Style/Technique: Neo-Traditional / Script Banner
Pain Level: Medium (4/10)
Session Time: 2–4 hours
Best For: Band names or tour dates in a classic style

A banner feels like old-school tour memorabilia. Chest placement is visible and dramatic. Heals well with care. Keep lettering bold and spaced—small caps can blur. Ask for examples of healed lettering on chest to ensure clarity.
29. Minimalist Headphone Icon on Nape
Style/Technique: Minimalist / Iconic
Pain Level: Low-Medium (3/10)
Session Time: 30–60 minutes
Best For: Hidden, cool-tech music motif
A nape headphone icon is subtle when your hair is up. Pain is manageable. Heals in 2–3 weeks. Minimal icons need clear negative space to stay readable. I suggest slightly bold lines and ask artists for healed nape work.
Tattoo Prep and Aftercare Essentials
Aftercare Essentials:
- Aquaphor Healing Ointment, 14oz tube — Recommended first 3–5 days for heavy scabbing spots
- Saniderm Transparent Adhesive Bandage, 6-inch roll — Second-skin healing method artists actually use
- CeraVe Fragrance-Free Moisturizing Lotion, 12oz — For daily moisturization days 4–30
- Dr. Bronner's Unscented Castile Soap, 32oz — Gentle cleaning during first week
Before Your Appointment:
- Tattoo Numbing Cream 5% Lidocaine — Use only if your artist approves, apply 30–45 min prior
- Disposable Razor for Prep, Pack of 5 — Trim area if your artist asks
Long-Term Maintenance:
- SPF 50 Sunscreen Stick — Daily protection to prevent fading
- Mad Rabbit Tattoo Balm, 2oz — Keeps healed color vibrant; artists recommend for ongoing care
- Hustle Butter Deluxe, 3oz — Vegan aftercare alternative many artists mention
Optional Comfort Items:
- Tattoo Numbing Spray — For touch-ups or very sensitive areas
- Hydrocolloid Bandages, Large — Useful for spot healing and preventing scab picking
Frequently Asked Questions
Q: How bad does a tattoo actually hurt?
A: Pain varies by placement and person. Outer arm or forearm felt like a steady buzz for me (3/10). Ribs and spine were sharp and deep (7–8/10). Small areas like fingers and hands sting more than their size suggests. Consider approved numbing cream for sensitive spots.
Q: How long does a tattoo take to heal?
A: Surface healing happens in about 2–3 weeks. Full skin regeneration takes 2–3 months. The first week is key—clean gently with unscented soap and use Aquaphor or Saniderm as your artist recommends. Expect peeling around day 4–10; don’t pick.
Q: What if I regret a music tattoo later?
A: Sit with a design for months before committing. If you need to change it later, cover-ups or laser exist but take time. Choosing placements that can be hidden (upper thigh, upper arm) buys privacy while you decide.
Q: How do I keep my tattoo from fading?
A: From what I’ve seen, sun exposure is the #1 fading cause. Use an SPF 50 sunscreen stick daily on healed tattoos and moisturize with fragrance-free lotion to keep skin healthy. Black holds best; pale colors need more upkeep.
Q: Can I work out after getting inked?
A: Wait at least 48–72 hours before light workouts. For areas that flex a lot (shoulder, knee), wait longer to avoid stretching the healing skin. Sweat can irritate a fresh tattoo—keep it dry and clean.
Q: Do tattoos look different on different skin tones?
A: Yes. Black and gray styles show consistently across tones. Bright colors may appear more muted on deeper skin tones. White ink is often subtle. I always ask artists to show healed examples on similar skin so I know what to expect.
Q: Should I get a small tattoo first to test my tolerance?
A: Only if you genuinely want a small piece. Size doesn’t predict pain—placement does. A tiny wrist tattoo might hurt more than a larger outer-arm piece. If you’re nervous, pick a low-pain area and a design you’ll still love.
Q: Which aftercare products do artists actually recommend?
A: Many artists I’ve spoken with suggest starting with Saniderm or Aquaphor for the first days, switching to a fragrance-free lotion like CeraVe after the initial seal. For long-term vibrancy, I use a dedicated balm like Mad Rabbit.
