
I spent months saving reference images before I finally committed to an hourglass design. The real snag wasn’t picking a pretty hourglass—it was choosing a style that would still feel honest years from now. These 22 hourglass tattoo ideas focus on how a piece looks healed, where it sits, and the feelings each style carries.
This list leans on fine line, traditional, and black-and-gray realism with placements that range from wrist to sleeve. I’ve seen 2026 trends push minimalist hourglass tattoos and surreal cosmic twists—so I mixed classic symbols (skulls, roses, wings) with a few under-shared ideas like mountain‑peak lower bulbs and nautical motifs. Pick what matches your meaning, test with a temporary, and ask an artist about healed photos before booking.
1. Fine Line Minimalist Hourglass on Inner Wrist
Style/Technique: Fine Line / Minimalist
Pain Level: Low-Medium (3/10)
Session Time: 1 hour
Best For: First tattoo, subtle daily reminder
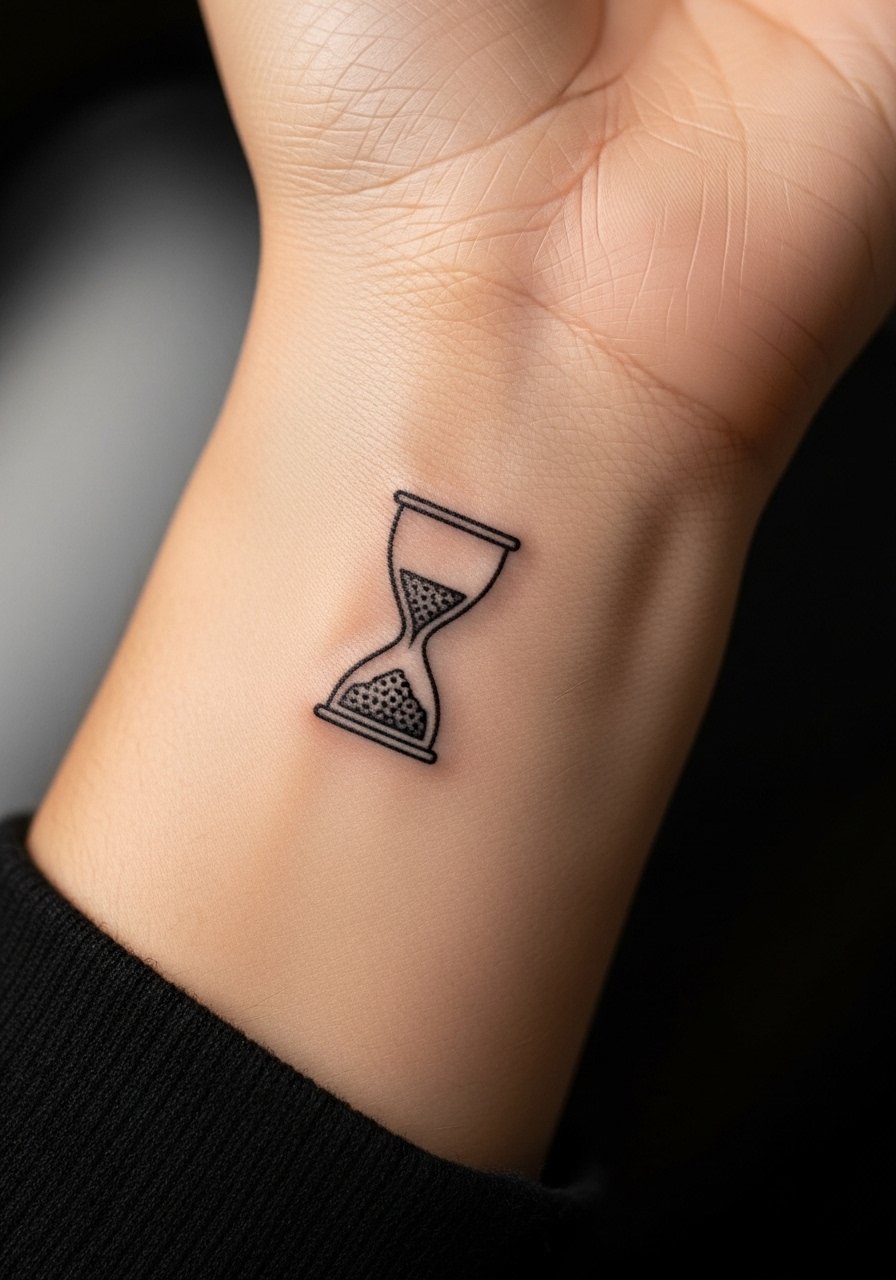
This small hourglass tattoo is all about subtlety: a clean outline, tiny grains of sand, and negative space. I picked this style when I wanted the hourglass meaning without shouting it—it's great as a small hourglass tattoo to remind you about passage of time. Inner wrist placement is visible but easy to hide with a watch or bracelet. Expect a short session and mild soreness; wrists sting more than fleshy areas. Fine line work looks delicate fresh, but from what I’ve seen, lines can blur a bit over years—ask your artist for slightly bolder anchors so the design holds. Common mistake: making the piece too tiny for legible sand detail. Ask for healed photos of similar wrist work and request a fine line hourglass tattoo sample from the artist.
2. Traditional Bold Hourglass with Wings on Forearm
Style/Technique: Traditional / Neo-Traditional
Pain Level: Low (2-3/10)
Session Time: 1-2 hours
Best For: Statement piece that ages well
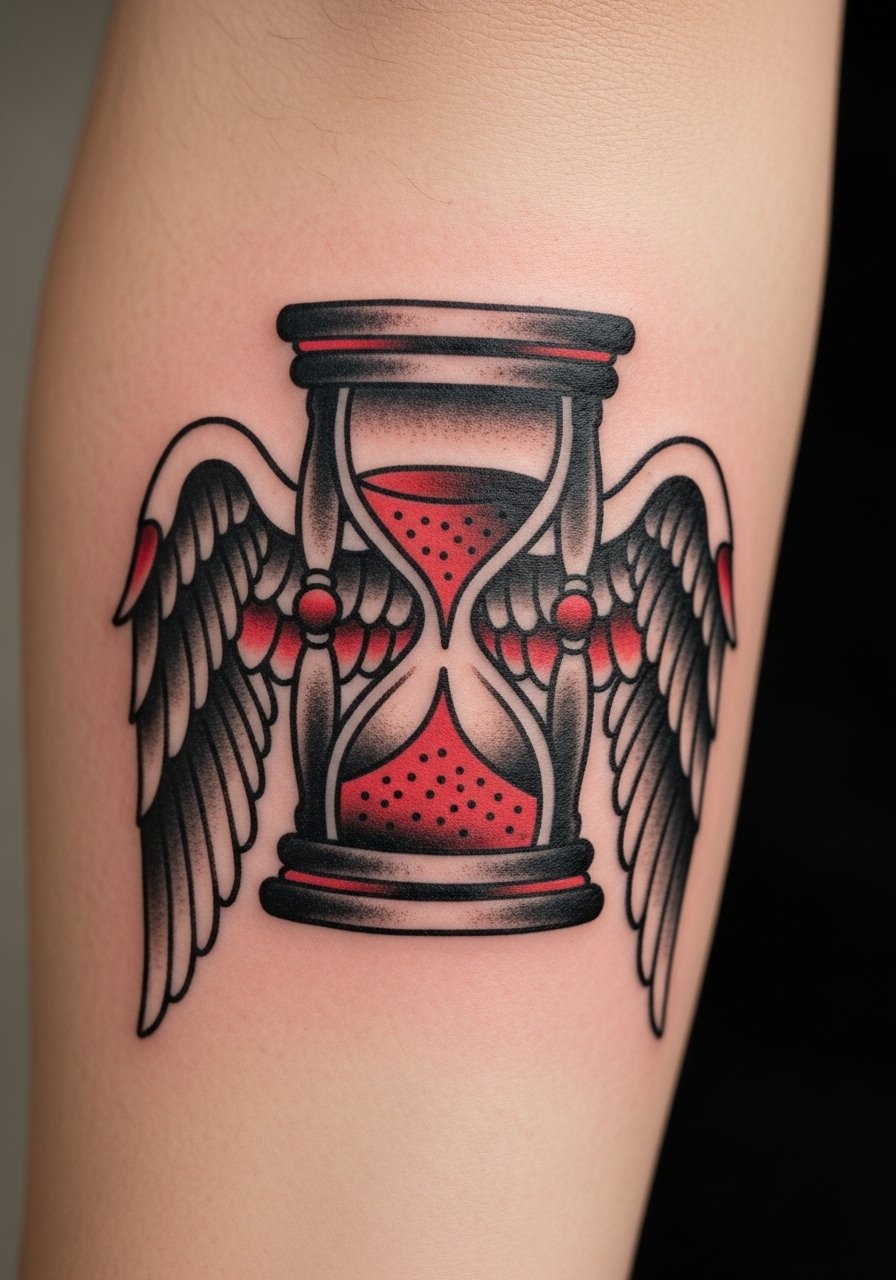
The "time flies" motif reads immediately when you add wings to an hourglass. Traditional style is forgiving: bold outlines and saturated colors keep the piece readable as it ages, which I appreciated when I compared healed photos. Forearm placement gives room for a medium design and is easy to cover with long sleeves if needed. Pain is manageable and sessions are short. This design pairs well with roses or banners if you want personalization. Watch out for overly fine feather details—traditional wings should lean into bold shapes. If you like the hourglass tattoo with wings idea, look for artists experienced in American traditional color packing and ask to see healed forearm pieces.
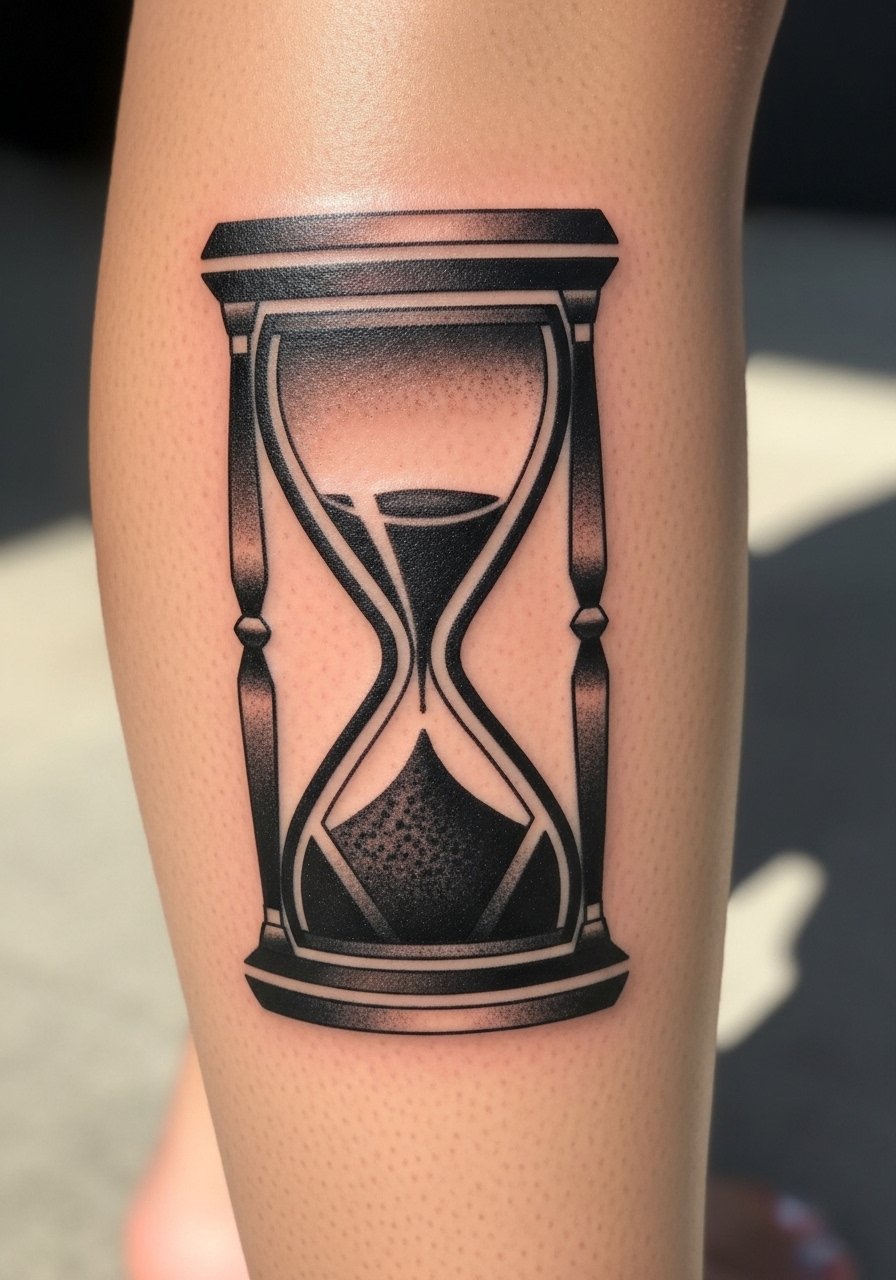
3. Black and Gray Realistic Hourglass with Skull Base on Upper Arm
Style/Technique: Realism / Black and Gray
Pain Level: Medium (4/10)
Session Time: 2-3 hours
Best For: Memento mori, chest or upper arm statement
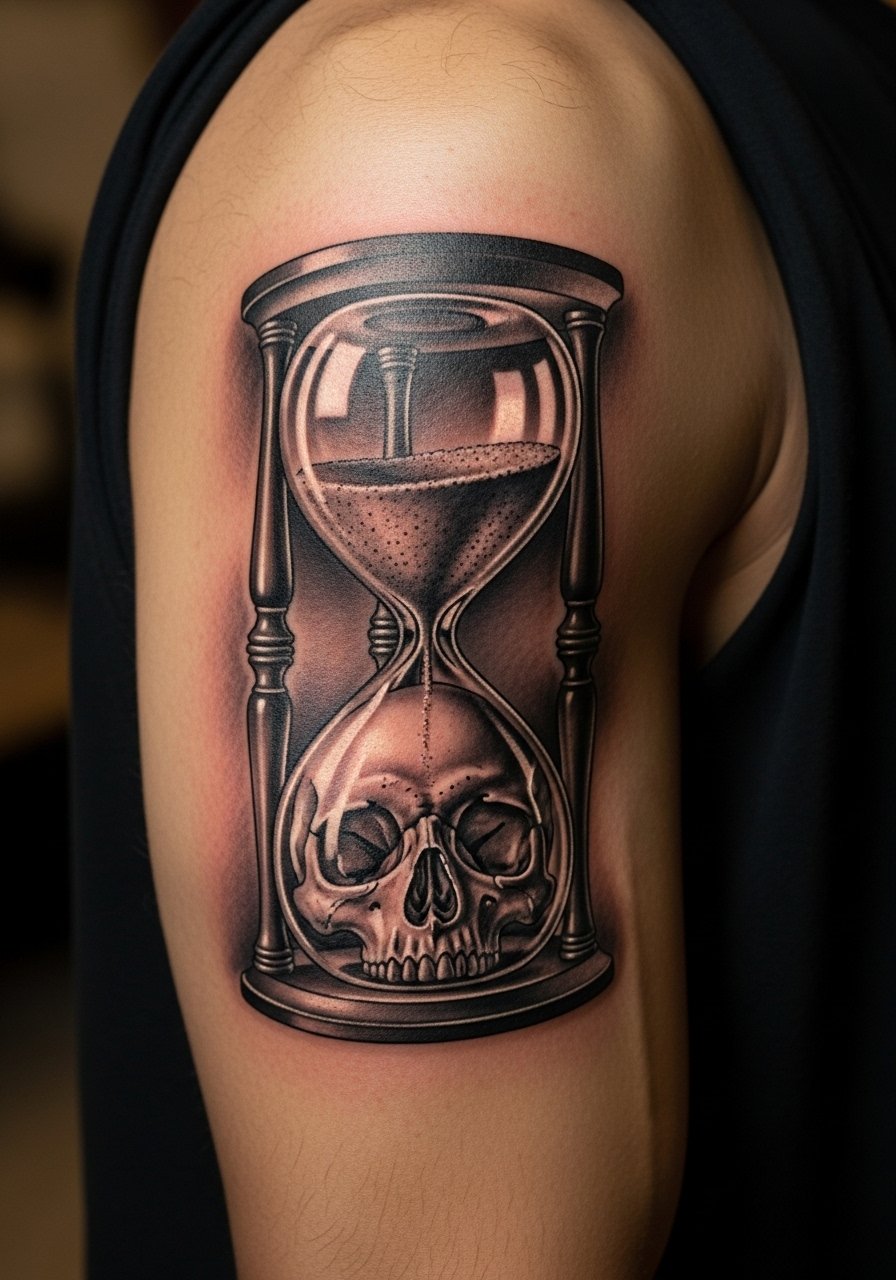
I went with a realistic hourglass when I wanted weight behind the symbolism. The skull base grounds the piece as a memento mori—time measured against mortality. Upper arm placement is forgiving for healing and lets the shading breathe. Expect moderate discomfort during long shading passes; realism needs an experienced artist who knows gray wash and negative space. Healed results are worth it: black and gray hourglass tattoos often hold depth better than bright colors. A mistake I see is cramming too much tiny detail into a small hourglass—ask your artist to scale shading so it reads well healed. Show the artist any references of healed black and gray hourglass tattoo designs you like.
4. Hourglass with Spilling Sand and Shattering Glass on Thigh
Style/Technique: Neo-Traditional / Illustrative
Pain Level: Low-Medium (3/10)
Session Time: 2 sessions, 2-3 hours each
Best For: Dramatic, mid-sized piece that tells a story
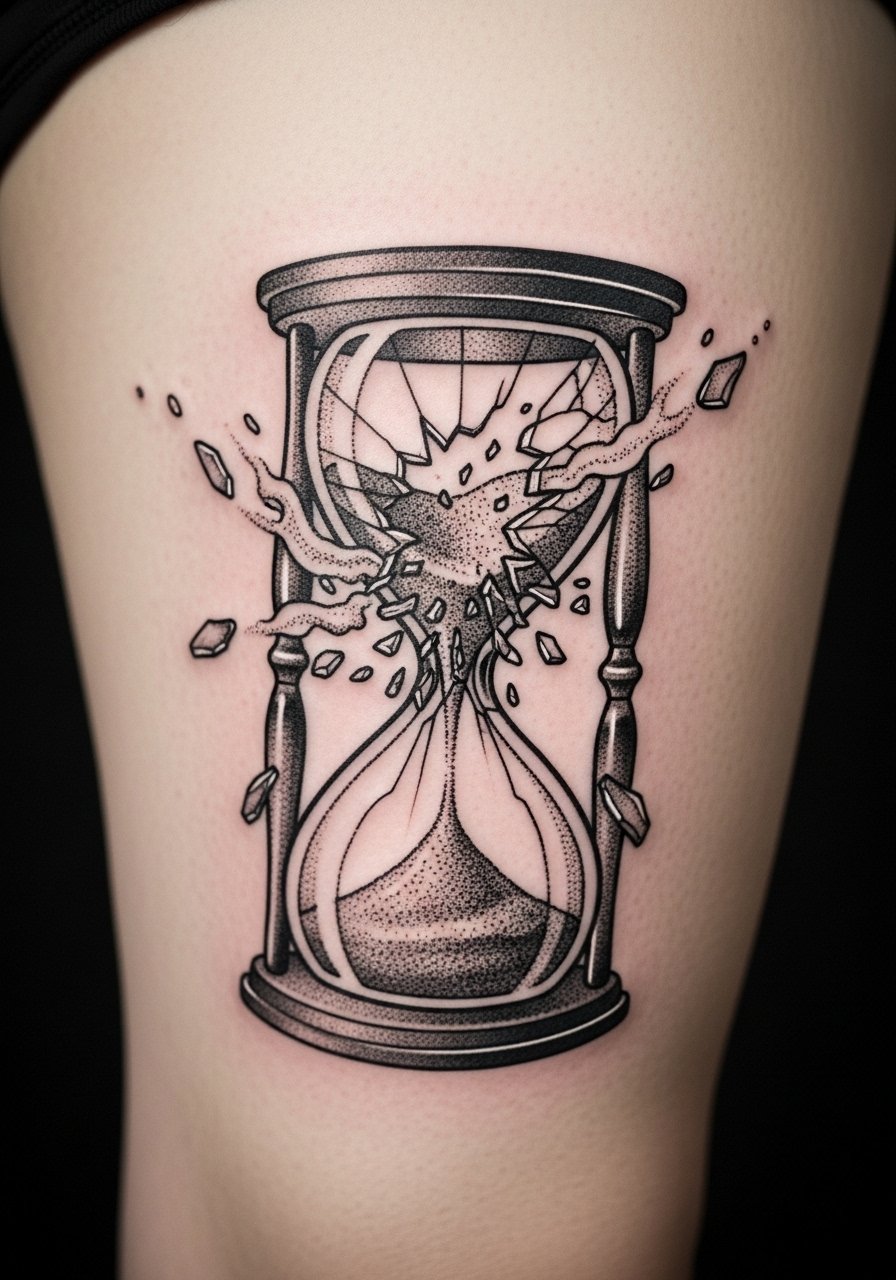
A shattering-hourglass design literally shows change in motion—sand spilling, shards flying. I love this when the message is about disruption or sudden life shifts. The thigh gives space for dramatic composition and is relatively low pain. Because of motion lines and stipple work, it’s important your artist is comfortable with neo-traditional line weight and illustrative shading. Expect a two‑session layout to let the skin rest between heavy shading passes. In my experience, dynamic pieces age well if outlines are clear and negative space is used smartly. Avoid compressing too many action lines into a small area; this design benefits from breathing room.
5. Floral-Adorned Hourglass on Ribcage
Style/Technique: Illustrative / Floral
Pain Level: High (7/10)
Session Time: 1-3 hours
Best For: Personal, romantic statement hidden under clothing
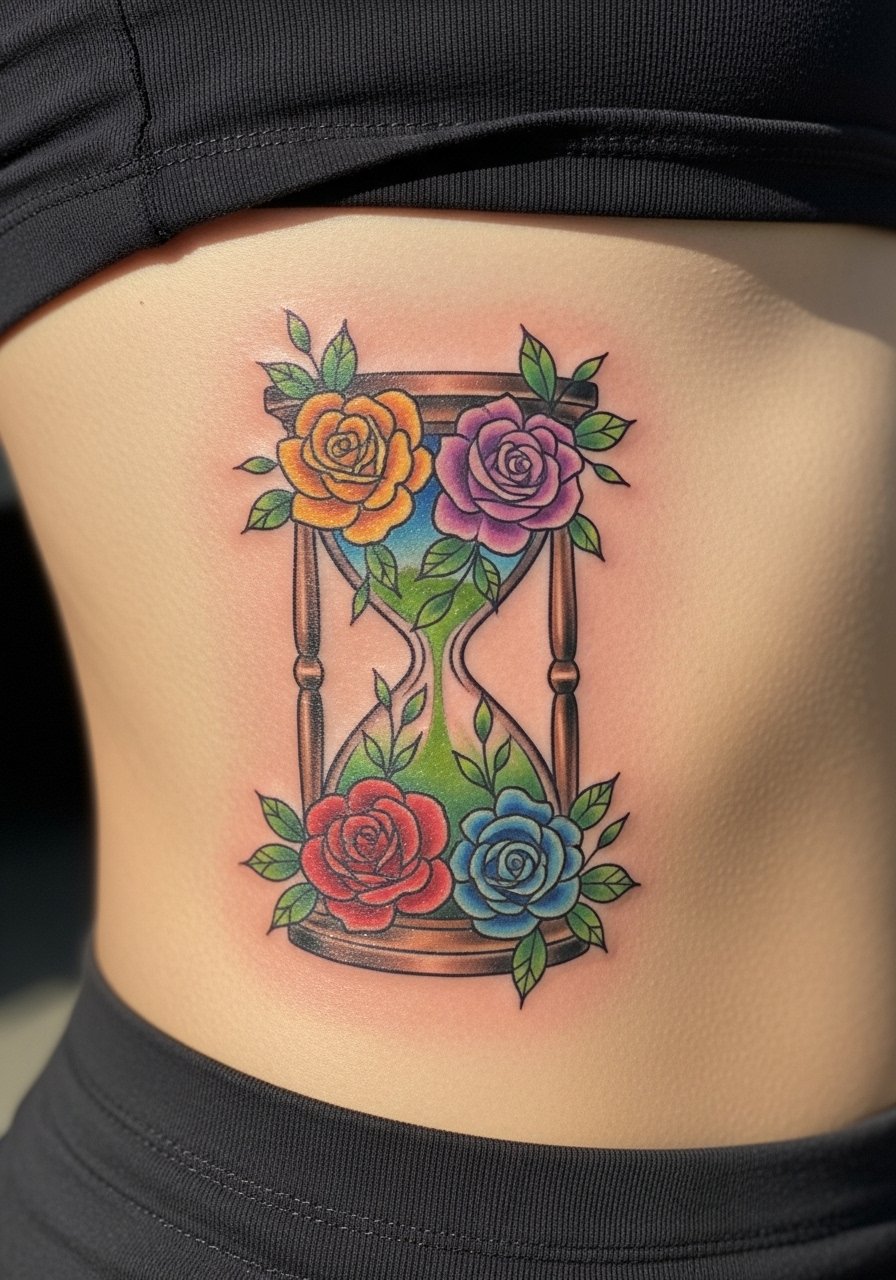
Pairing flowers with an hourglass softens the theme—time and growth together. The ribcage is intimate and looks beautiful with curved composition following the breast line. I’ll be honest: ribs hurt more than arms or thighs, but the end result is worth it if you want something meaningful and private. Healing on ribs needs extra care because clothing can rub; I used a soft, loose shirt for the first week. Floral elements let you personalize the hourglass meaning—birth flowers, favorite blooms. From what I’ve seen, color can fade on the ribs over years, so discuss color saturation and healed examples with your artist. Don’t make petals too tiny; they’ll blur if the piece is scaled down.
6. Ouroboros-Wrapped Hourglass on Shoulder Blade
Style/Technique: Blackwork / Symbolic
Pain Level: Low-Medium (3/10)
Session Time: 1-2 hours
Best For: Philosophical collectors, back piece integration
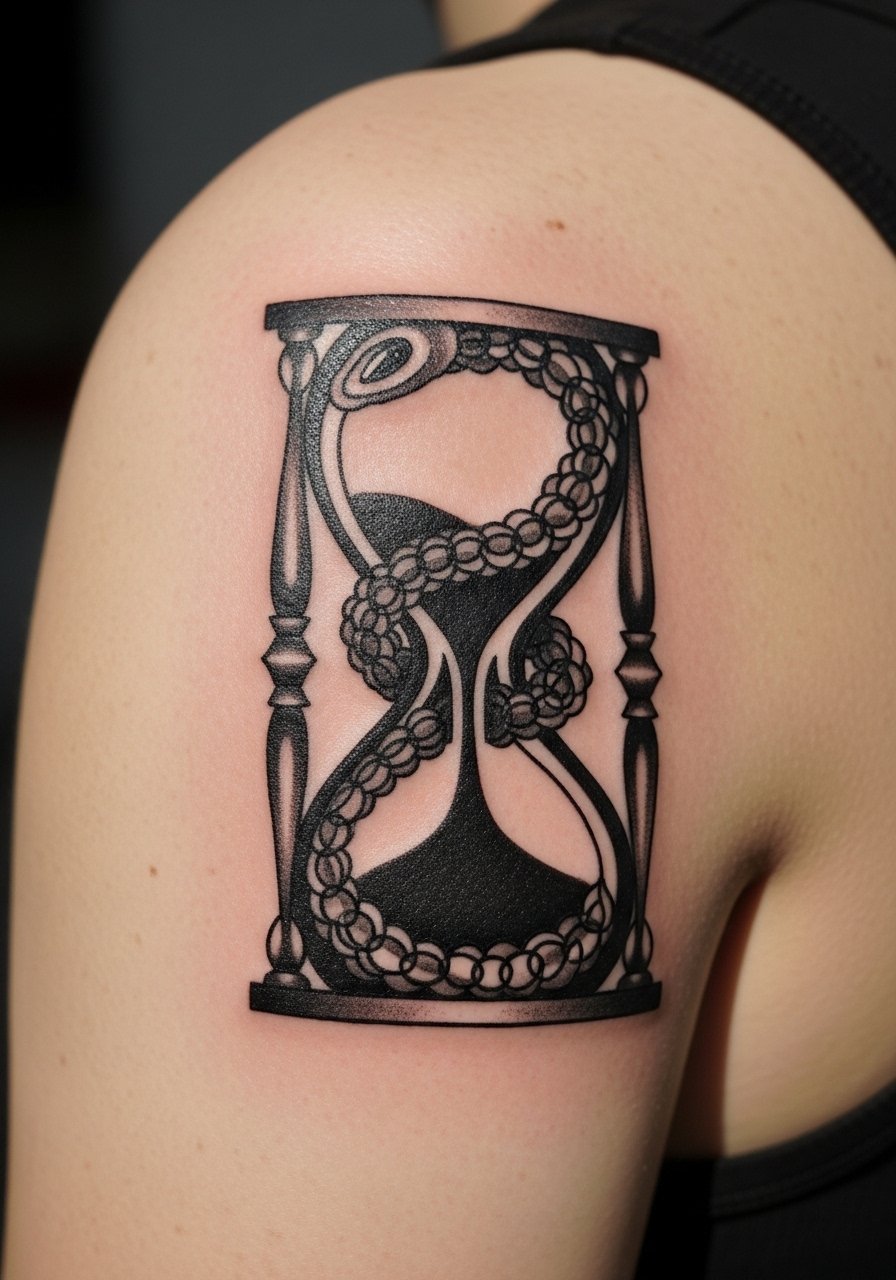
An ouroboros (snake eating its tail) contrasted with an hourglass juxtaposes eternity and finitude. I saw this idea pop up in philosophy-focused feeds and liked the balance it creates visually. Shoulder blade placement sits nicely under clothing and can grow into a larger back composition. Blackwork ages reliably—solid fills and crisp negative space keep the design readable. Pain is mild since the shoulder blade has more flesh than ribs. Common mistake: too thin snake scales—ask for bold scale suggestion that reads healed. Mention you want a clear distinction between the snake’s body and the hourglass glass for better longevity.
7. Photorealistic Falcon Over Hourglass on Full Sleeve
Style/Technique: Realism / Photorealistic
Pain Level: High (8/10 over sessions)
Session Time: Multiple sessions, sleeve-length
Best For: Full-sleeve collectors, narrative tattoos
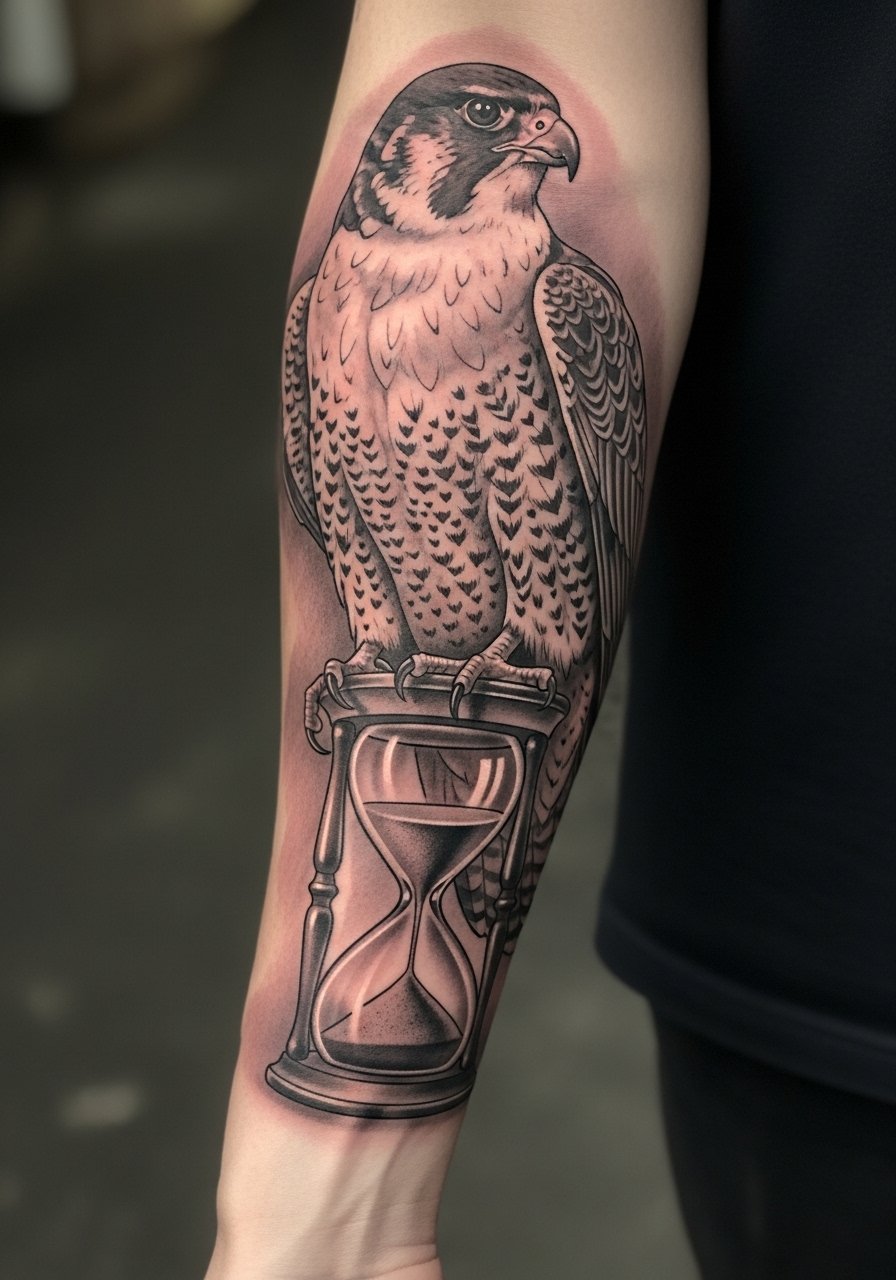
If you want drama and movement, a falcon diving over an hourglass makes time feel hunted or urgent. This is a big commitment—full-sleeve realism requires multiple sessions and an artist skilled in photorealistic feather work and smooth gradients. Expect higher pain across the sleeve and long healing windows between sessions. I recommend checking healed sleeve portfolios; small details like feather barbs and sand grains must read well months after. In my experience, black and gray realism integrated with negative space keeps a sleeve cohesive. Avoid tiny text or micro details that won’t survive sleeve scale and time.
8. Burning Candle Inside Hourglass on Outer Calf
Style/Technique: Illustrative / Black and Gray with Warm Accents
Pain Level: Medium (4/10)
Session Time: 2-3 hours
Best For: Symbolic pieces for sleeves or standalone

Putting a burning candle inside an hourglass layers metaphors—life’s flame trapped in time. I’ve seen this design as a contemplative sleeve element. Outer calf placement is low pain and great for medium-size compositions that show while standing. The contrast between warm flame tones and cool black-and-gray shading adds depth. Artists usually recommend letting color heal before heavy top-ups—ask for healed examples with flame accents on similar skin tones. Common slip-up: flames too small to read once healed. Make sure the candle and sand have distinct values so the hourglass silhouette remains legible.
9. Gothic Hourglass with Celestial Elements on Inner Forearm
Style/Technique: Gothic / Dark Academia Aesthetic
Pain Level: Low-Medium (3-4/10)
Session Time: 1-2 hours
Best For: Moody, visible pieces that suit layered style
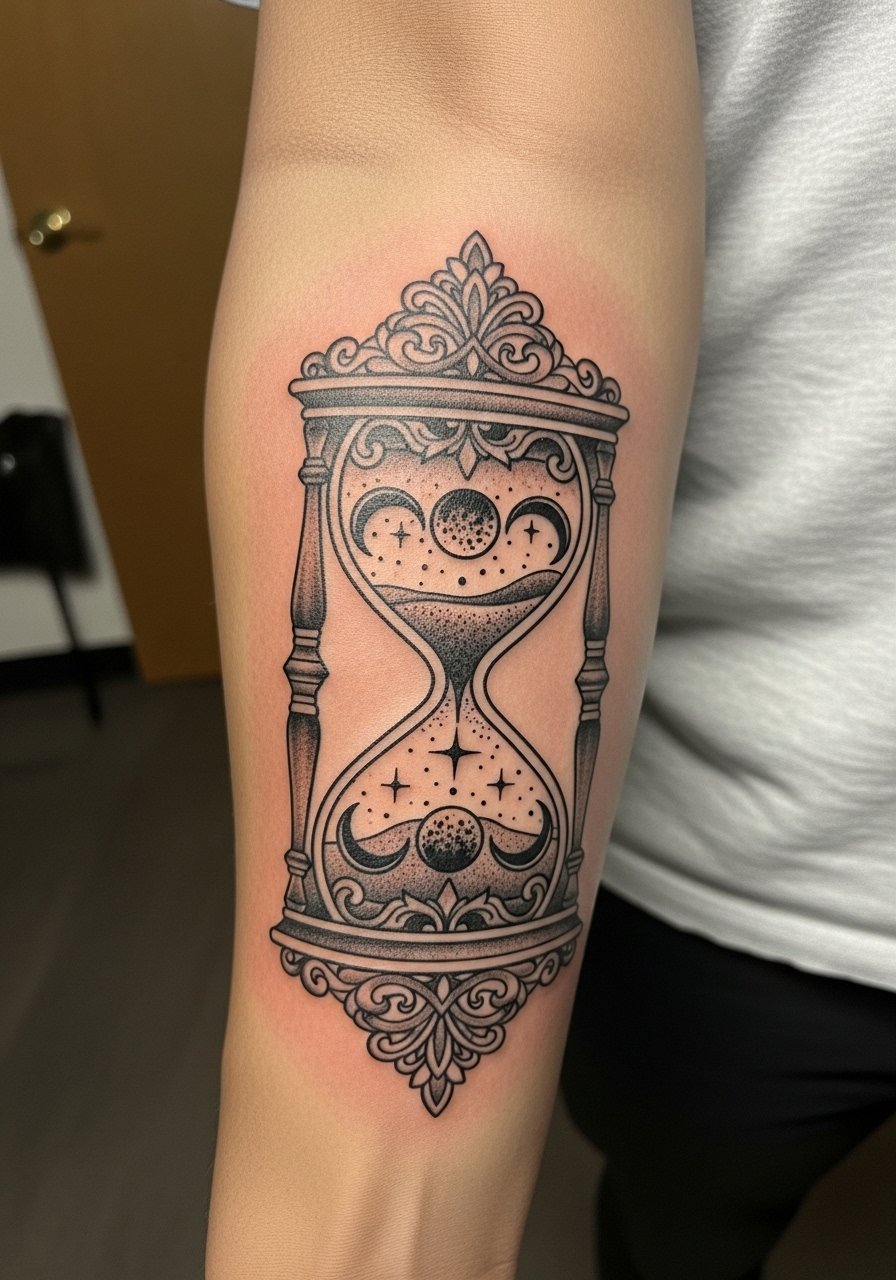
I gravitate to celestial hourglasses when I want something ornate but wearable. Add moons, stars, and filigree to give a dark-academic feel that plays well with black-and-gray shading. Inner forearm placement is comfortable for sessions and easy to check during healing. Pain is manageable, but filigree detail benefits from controlled shading and experienced linework. From what I’ve seen, gothic pieces look best when the black contrasts are strong—ask your artist about adding subtle white highlights for healed pop. Avoid overly fine scrollwork that will blur; bold yet delicate lines are the sweet spot.
10. Saturn-in-Bulb Surreal Hourglass on Outer Forearm
Style/Technique: Surreal / Blackwork
Pain Level: Low (2-3/10)
Session Time: 1-2 hours
Best For: Cosmic, symbolic forearm pieces
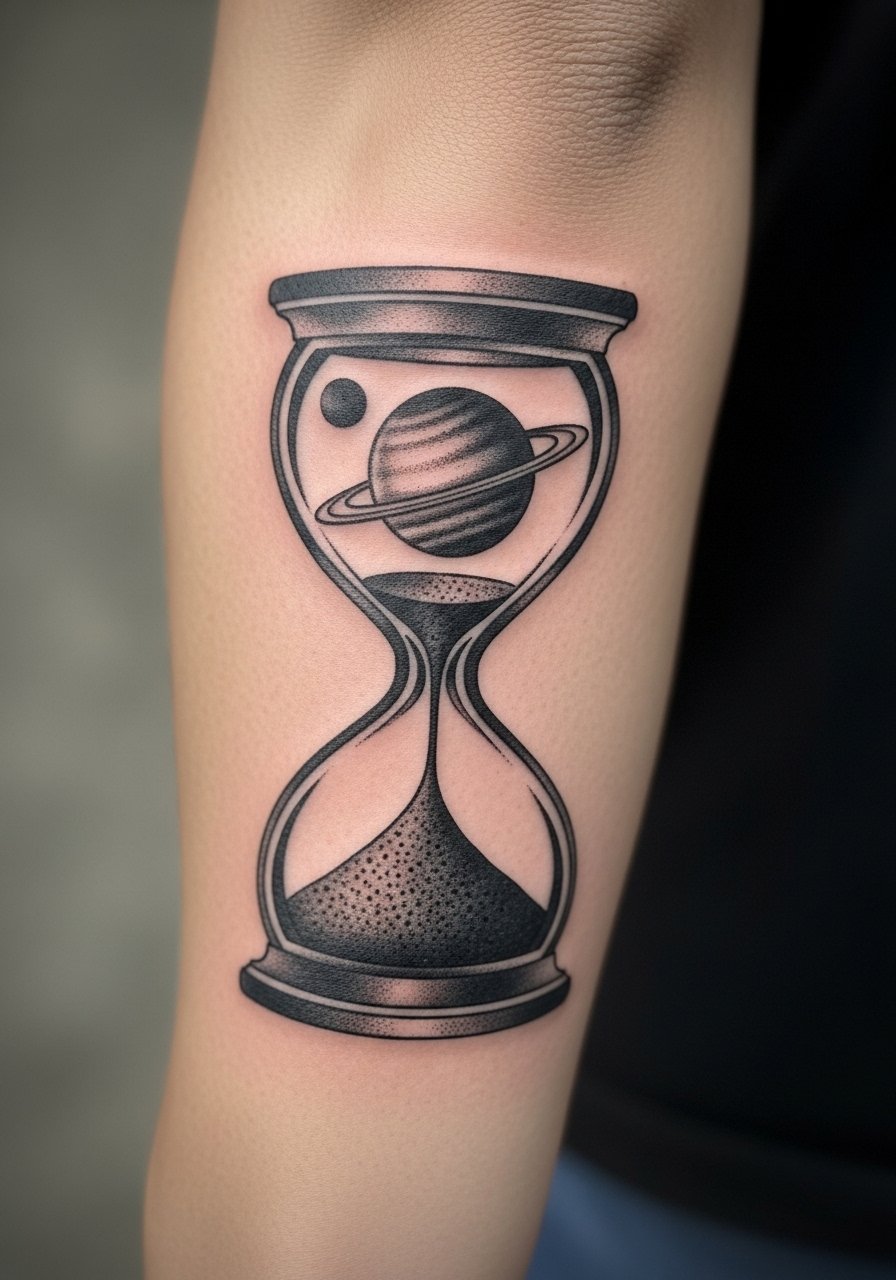
Replacing sand with a planet like Saturn gives the hourglass a cosmic twist—time as the universe. I first saw this on artist reels and liked how surreal elements avoid cliché. Forearm placement offers good visibility and flow for elongated designs. Blackwork and negative space emphasize the planetary silhouette and age well. Pain is low compared to ribs or spine. Make sure the planet’s ring and texture are bold enough to remain visible over time—tiny planetary dots can get lost. If you want a surreal hourglass tattoo idea, discuss how negative space will be used so the piece reads healed.
11. Wings and Roses Hourglass on Shoulder Blade
Style/Technique: Neo-Traditional / Romantic
Pain Level: Low (3/10)
Session Time: 1-2 hours
Best For: Feminine but strong symbolism, mid-back pieces
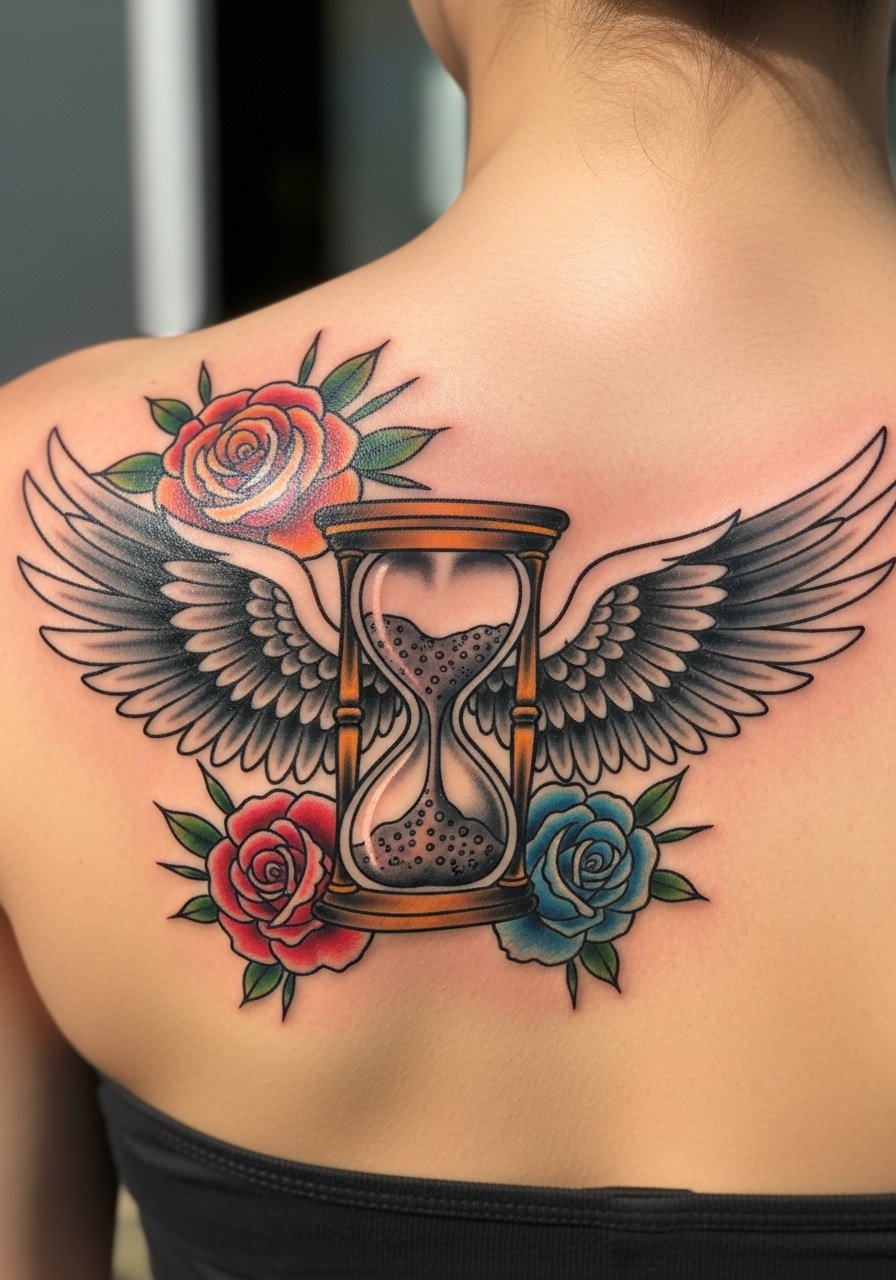
Wings plus roses put time in a romantic context—love and fleetingness. Shoulder blade placement is perfect for curved compositions and is easy to conceal. I’ve seen healed examples where color choices give roses staying power when artists pack pigments well. Pain is mild, but ask your artist about color saturation on your skin tone since reds can shift. A common error is tiny thorns or petals that blur; keep floral elements mid-sized. Tell the artist you want a wings and roses hourglass design that reads from a few feet away.
12. Skull-Crowned Hourglass Integrated Into Sleeve (Chicano Style)
Style/Technique: Chicano / Black and Gray Realism
Pain Level: High (8/10 across sessions)
Session Time: Multiple sessions for sleeve integration
Best For: Heritage pieces and full narrative sleeves
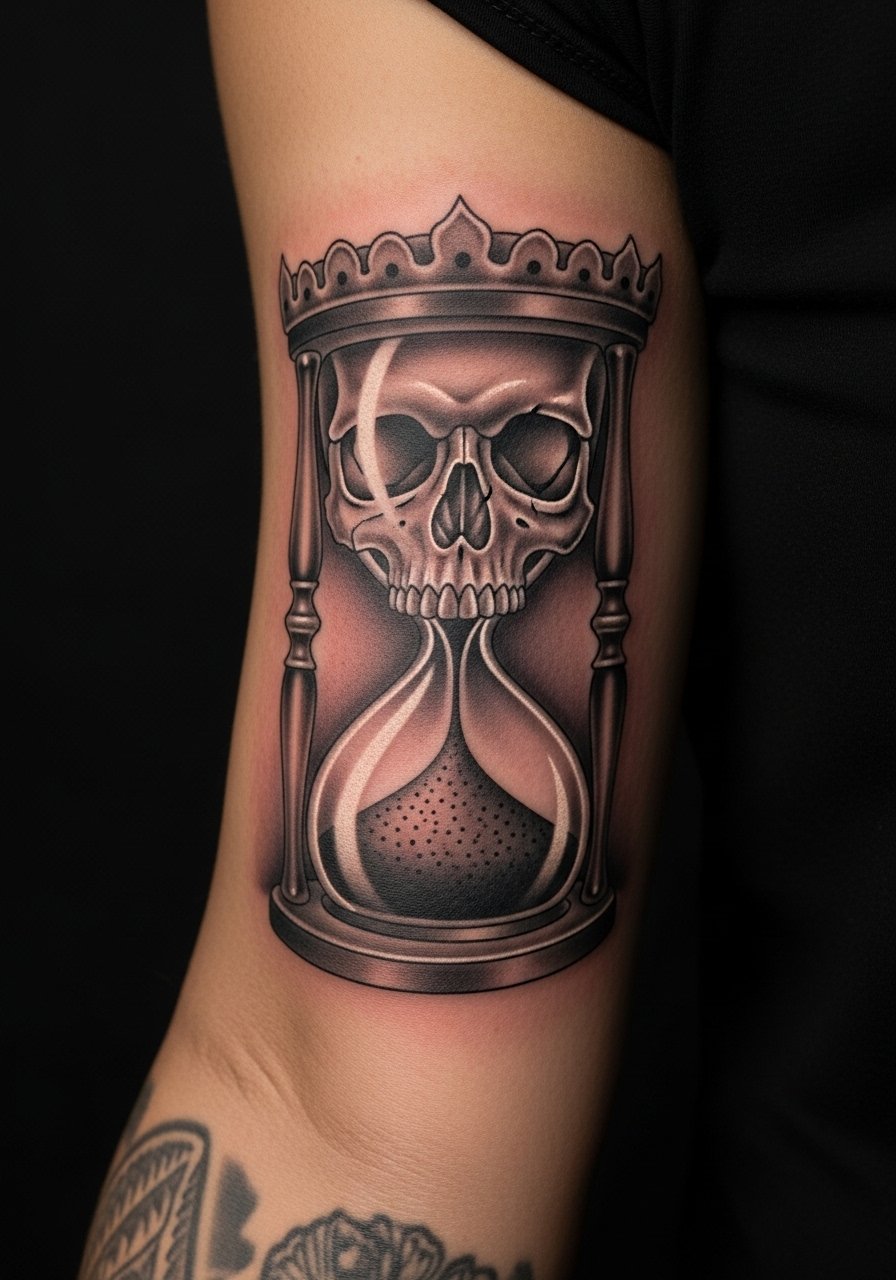
Chicano-style hourglasses with skull crowns carry cultural visual language and strong memento mori energy. This is a commitment—sleeve projects require an artist versed in Chicano shading and composition. Pain adds up over sessions, and healed shading relies on consistent gray wash technique. From what I’ve seen, these pieces last beautifully when artists use smooth gradients and strategic highlights. Respect cultural context and ask about the artist’s experience with Chicano realism. Avoid mixing unrelated motifs that dilute the cultural narrative—keep it cohesive for the best healed impact.
13. Abstract Symmetrical Hourglass Down Spine
Style/Technique: Abstract / Minimalist
Pain Level: High (6-7/10 along spine)
Session Time: 1-2 hours
Best For: Symbolic balance pieces, statement along the spine
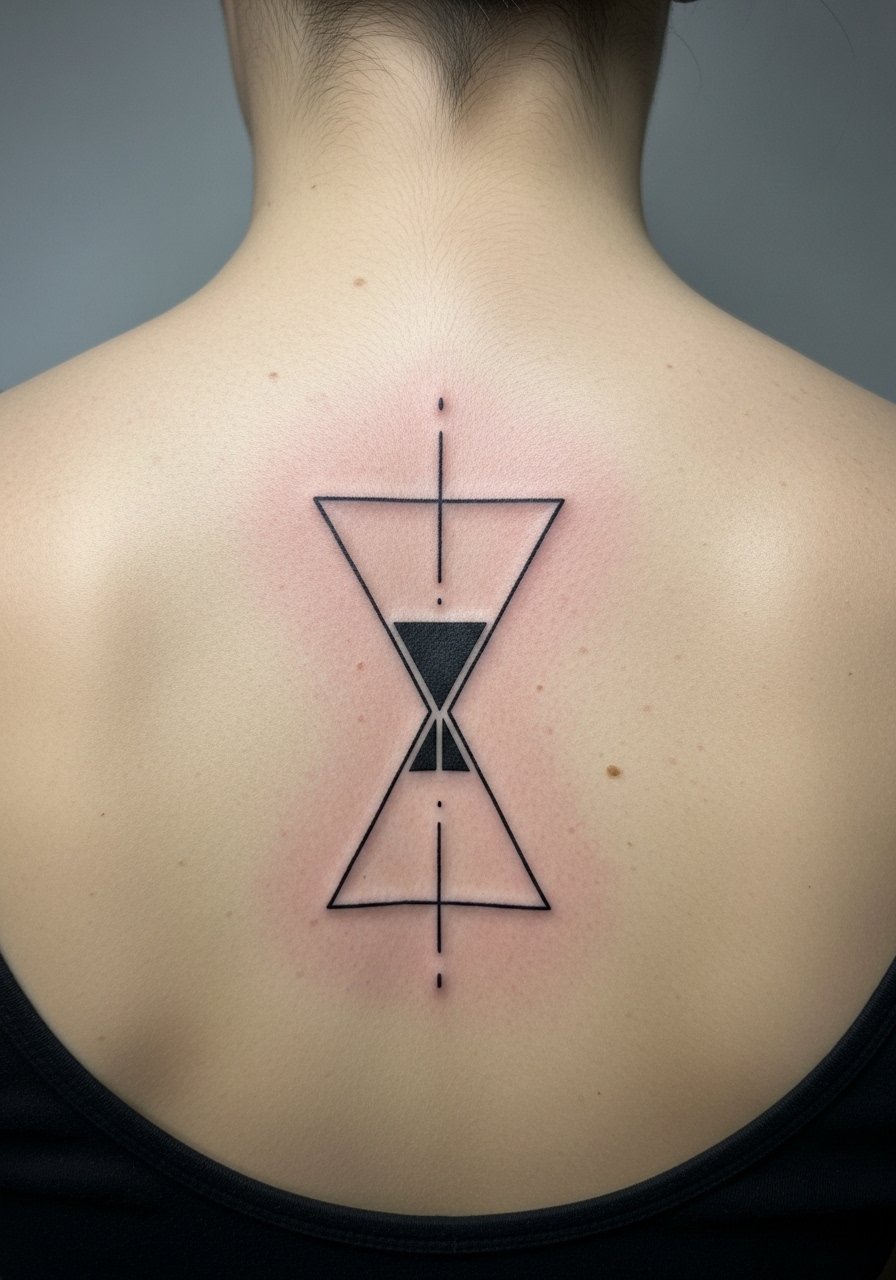
Symmetry reads as balance—an abstract hourglass can be a little philosophical and a lot clean. The spine offers a striking vertical axis but is more painful; I felt twinges that differ from fleshy spots. Minimalist geometric hourglasses hold their meaning without ornate detail, and black linework along the spine tends to age predictably if lines are solid. Common mistake: using ultra-fine lines on the spine—they blur faster. Ask for slightly heavier line anchors and discuss how the piece will look when your back moves. This is a great "balance" focused hourglass tattoo design.
14. Small Hourglass Behind Ear (Micro Tattoo)
Style/Technique: Micro-Realism / Fine Line
Pain Level: Medium-High (5/10)
Session Time: 30–60 minutes
Best For: Hidden meaningful mark, first small hourglass tattoo
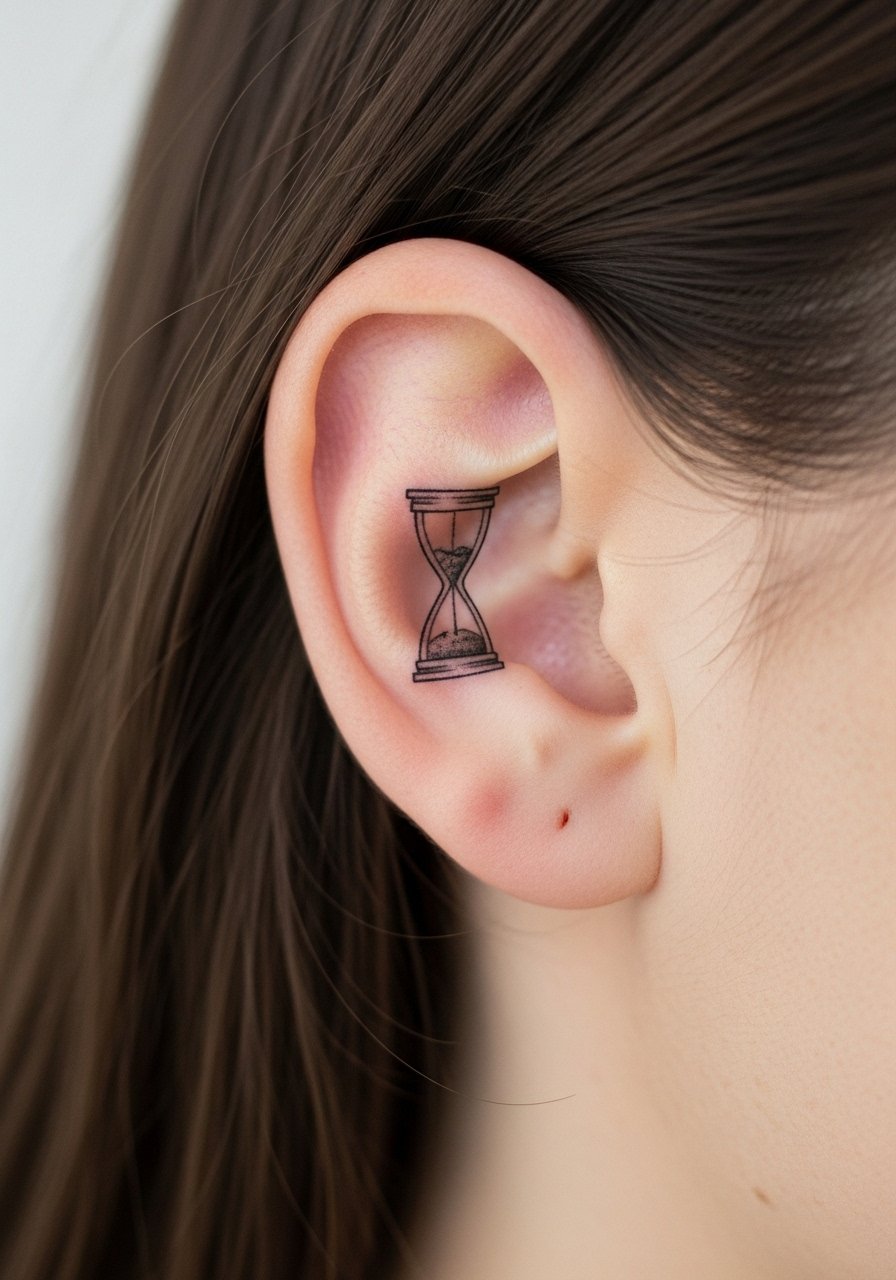
A tiny hourglass behind the ear is discreet and meaningful—perfect if you want a small hourglass tattoo without the commitment of large visibility. Behind-ear placement is sensitive, with sharper sensations during the session. Micro tattoos can look delicate fresh but may blur over years, so request slightly bolder anchors. I recommend keeping the design very simple—tiny sand dots and a clear silhouette. If you’re nervous, this is a valid way to test pain and healing without a large piece. Discuss with your artist how the micro design will age on your skin tone.
15. Hourglass With Mountain Peak Lower Bulb on Hip
Style/Technique: Illustrative / Negative Space
Pain Level: Medium (4-5/10)
Session Time: 1-2 hours
Best For: Grounded symbolism, nature lovers
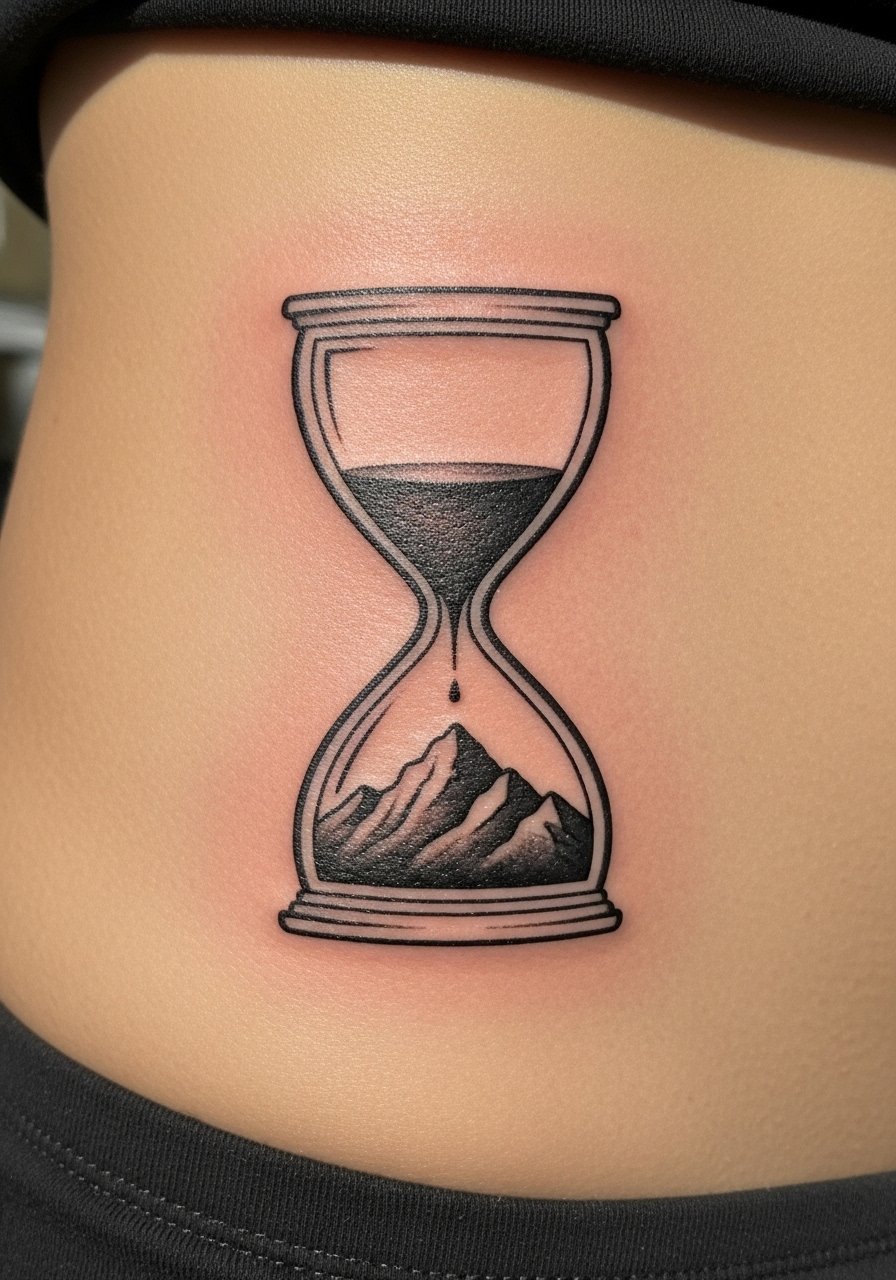
This under-shared idea—mountain inside the lower bulb—turns the hourglass into a landscape metaphor: time grounding you. Hip placement is flattering for curved designs and healable with minimal friction if you choose loose clothing. I found this concept speaks to people who want personal geography embedded in their hourglass tattoo meaning. Negative space mountain peaks age nicely if the lines are bold enough. Avoid cramming tiny topographic detail; simple peaks and contrast read better over time.
16. Nautical Ship Hourglass on Upper Thigh
Style/Technique: Illustrative / Nautical
Pain Level: Low-Medium (3-4/10)
Session Time: 1-2 hours
Best For: Maritime symbolism, larger canvases
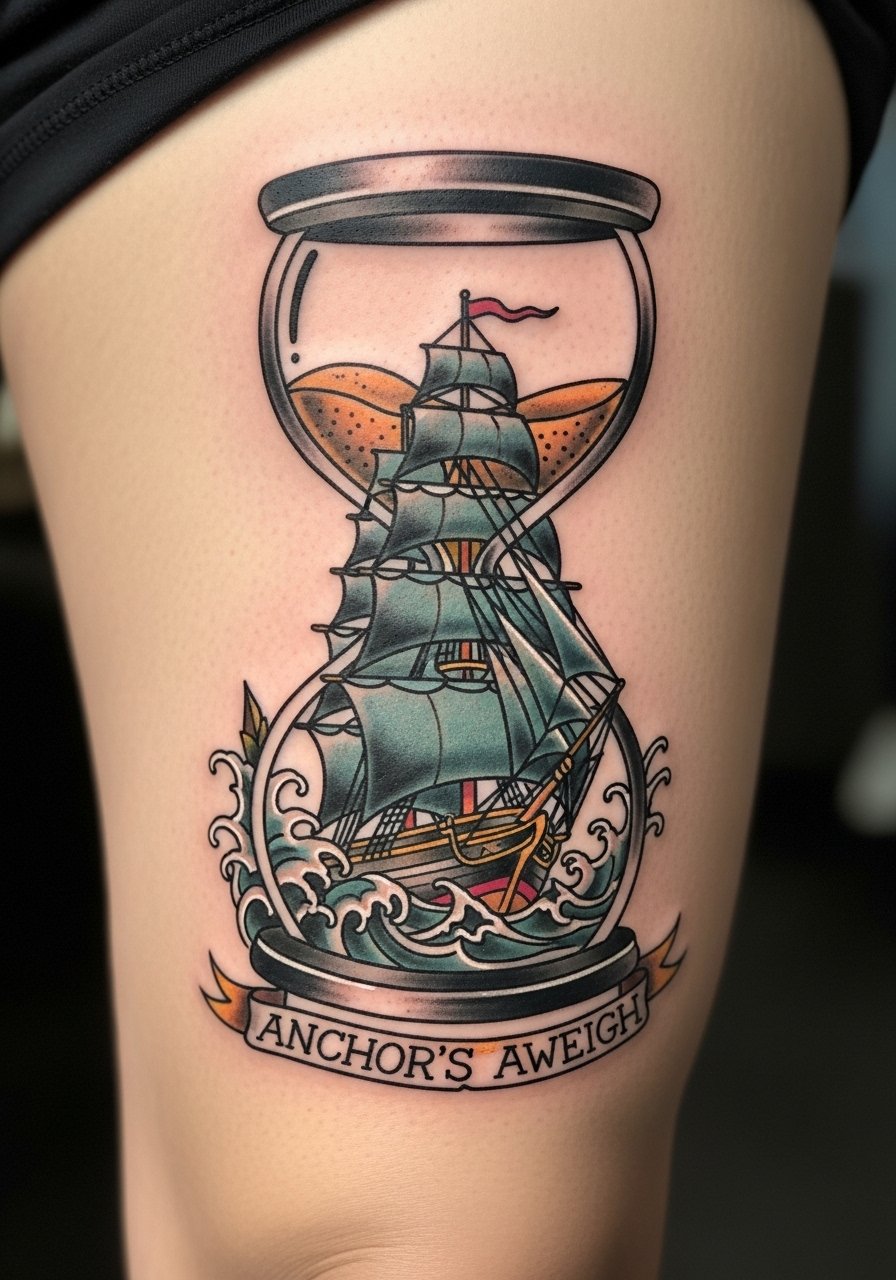
Historical ship motifs pair well with hourglasses—think of old mariners measuring time at sea. Upper thigh placement gives room for detail and is easy to hide. I like this for folks wanting a narrative, almost vintage feel. Thigh skin tolerates longer sessions, so you can get richer line work. Make sure the ship silhouette is bold enough to read once healed; too many tiny rigging lines will blur. Ask for healed examples of nautical pieces on similar skin tones.
17. Half-Shattered Hourglass Symmetry on Chest
Style/Technique: Neo-Traditional / Illustrative
Pain Level: Medium-High (6/10 on sternum)
Session Time: 1-3 hours
Best For: Symmetrical chest pieces that read across the sternum
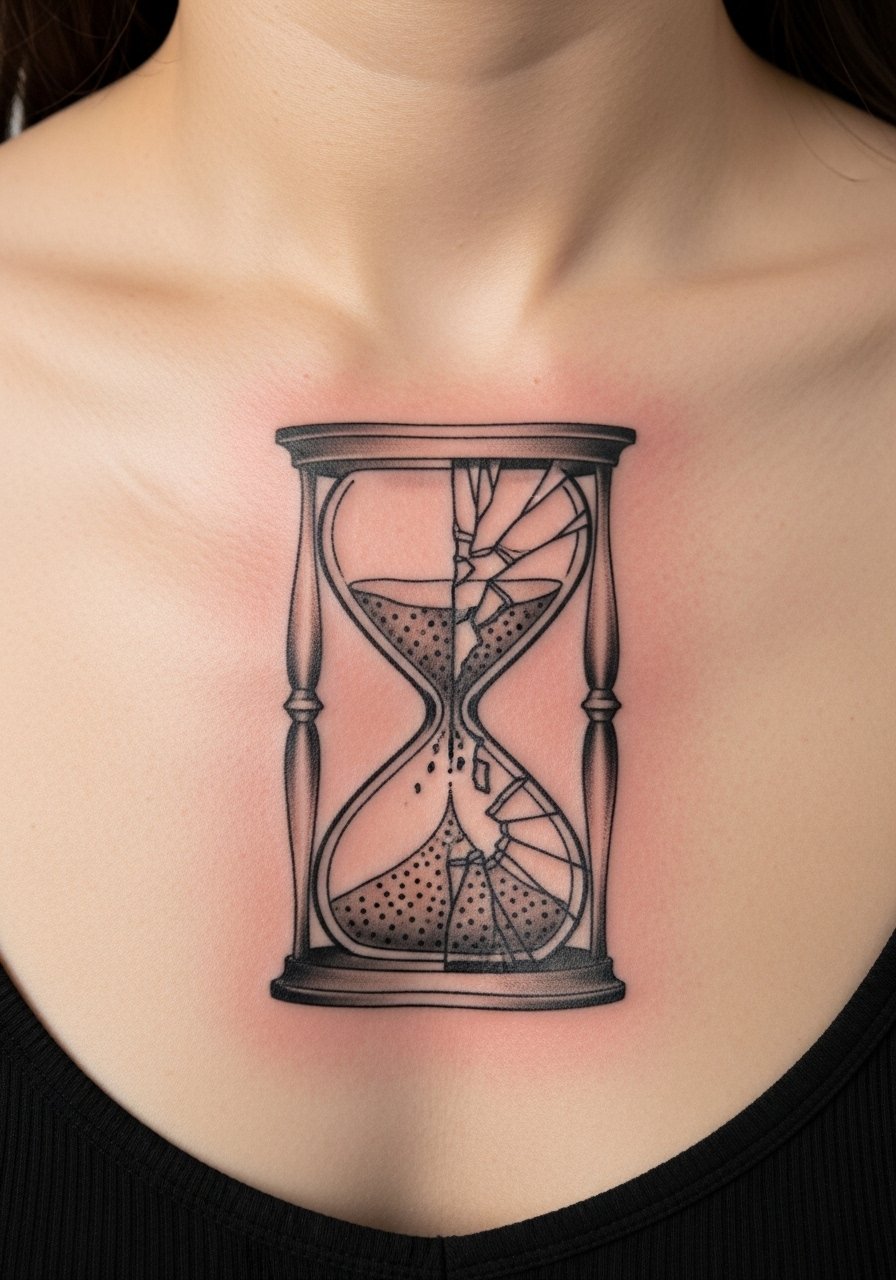
A chest hourglass split and shattered across the sternum creates a dramatic symmetry—good for themes of breaking cycles. The sternum area stings more, especially near bone, but the result is a bold statement. From what I’ve seen, symmetry relies on precise stencil placement and an artist comfortable with sternum work. Pay attention to how the shards are spaced; too many fragments can clutter the chest visually after healing. This is a bold hourglass tattoo design meant to be seen.
18. Geometric Blackwork Hourglass on Calf
Style/Technique: Geometric / Blackwork
Pain Level: Low (2-3/10)
Session Time: 1-2 hours
Best For: Modern, easily integrated into patchwork sleeves
Geometric hourglasses lean modern and minimal while still feeling symbolic. I like putting these on the calf where clean lines can stretch and be seen in profile. Blackwork holds up well over years—solid fills and crisp geometry age predictably. Calf placement is low pain and heals neatly. Common mistake: using too many intersecting thin lines—stick to bold geometry that reads a year out. This is a strong "fine line hourglass tattoo" alternative if you prefer bold blackwork.
19. Watercolor Hourglass With Fading Sand on Rib Side
Style/Technique: Watercolor / Illustrative
Pain Level: High (7/10 on ribs)
Session Time: 1-3 hours
Best For: Painterly, colorful pieces for expressive collectors
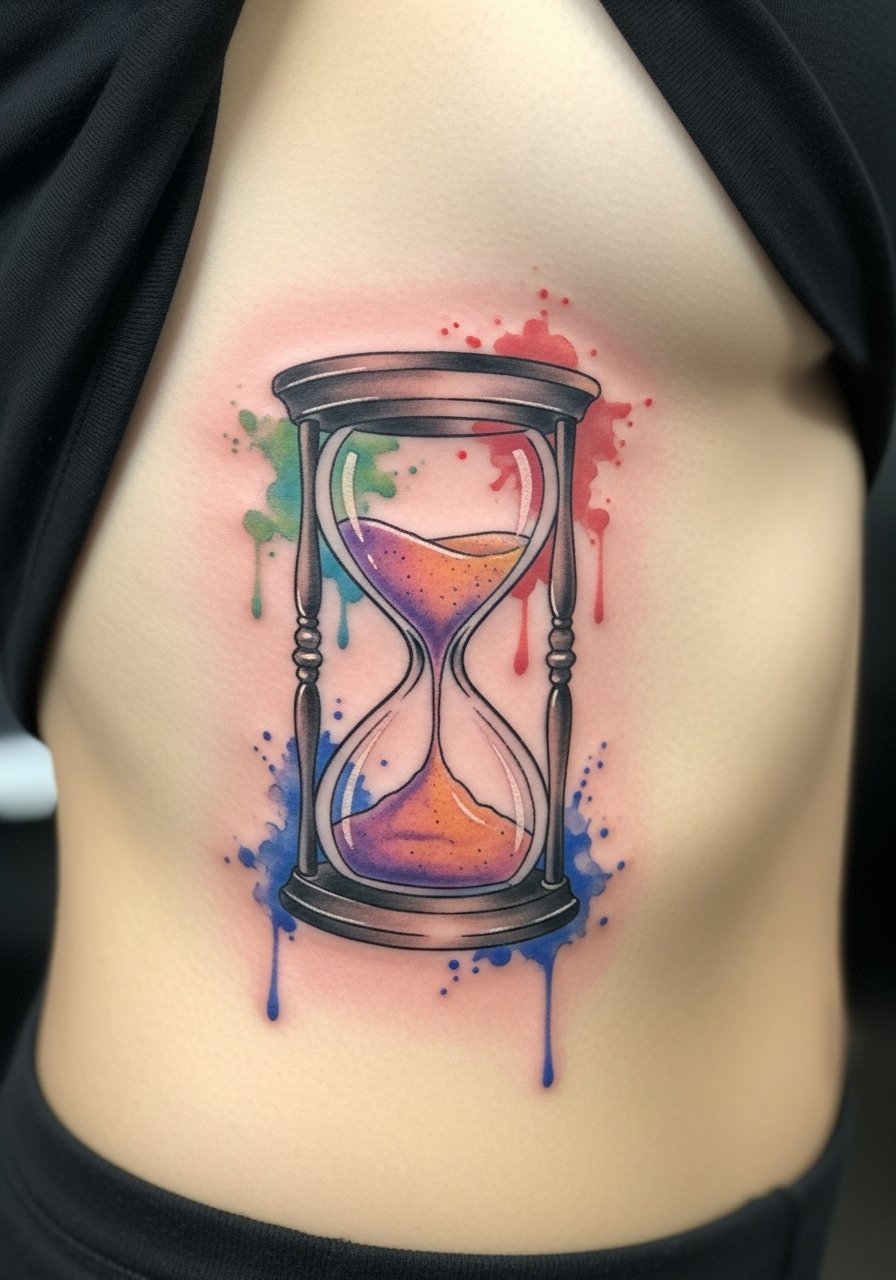
If you want a softer, painterly take, watercolor hourglass tattoos use color washes to suggest time bleeding. I’d caution that watercolor heals differently depending on pigment and skin tone—colors can look muted after a year, so talk to the artist about saturation and healed examples. Rib placement accentuates flow but is higher pain. Ensure outlines remain present if you want longevity; pure wash without anchors can soften into an indistinct patch over time. I’ve seen great results when artists combine subtle outlines with watercolor fills.
20. Mechanical Gears Hourglass on Upper Arm
Style/Technique: Steampunk / Illustrative
Pain Level: Low-Medium (3-4/10)
Session Time: 1-2 hours
Best For: Industrial, symbolic pieces that symbolize function and fate
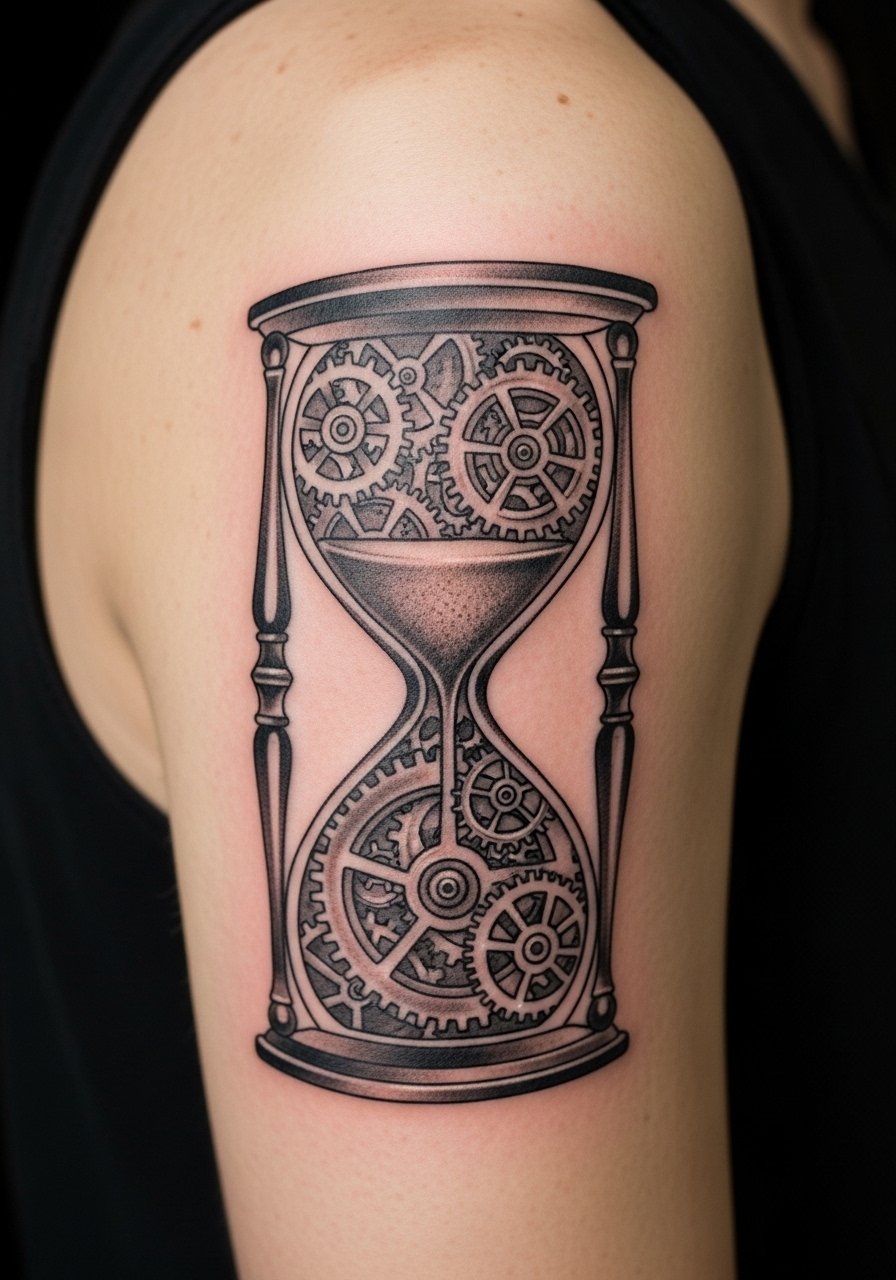
A gear-filled hourglass says time is a machine—lots of folks choose this to express structure or fate. Upper arm placement tolerates detail and is easy to conceal. For gear mechanics, I recommend clear separations between cogs and glass so the design reads after healing. Pain is mild, and shading should be done with consistent gray wash. Avoid overcrowding with micro-gear teeth; larger, readable cogs age best.
21. Minimalist Dotwork Hourglass on Ankle
Style/Technique: Minimalist / Dotwork
Pain Level: Medium (4/10 on ankle)
Session Time: 45–90 minutes
Best For: Low-visibility, clean pieces for tested wearers
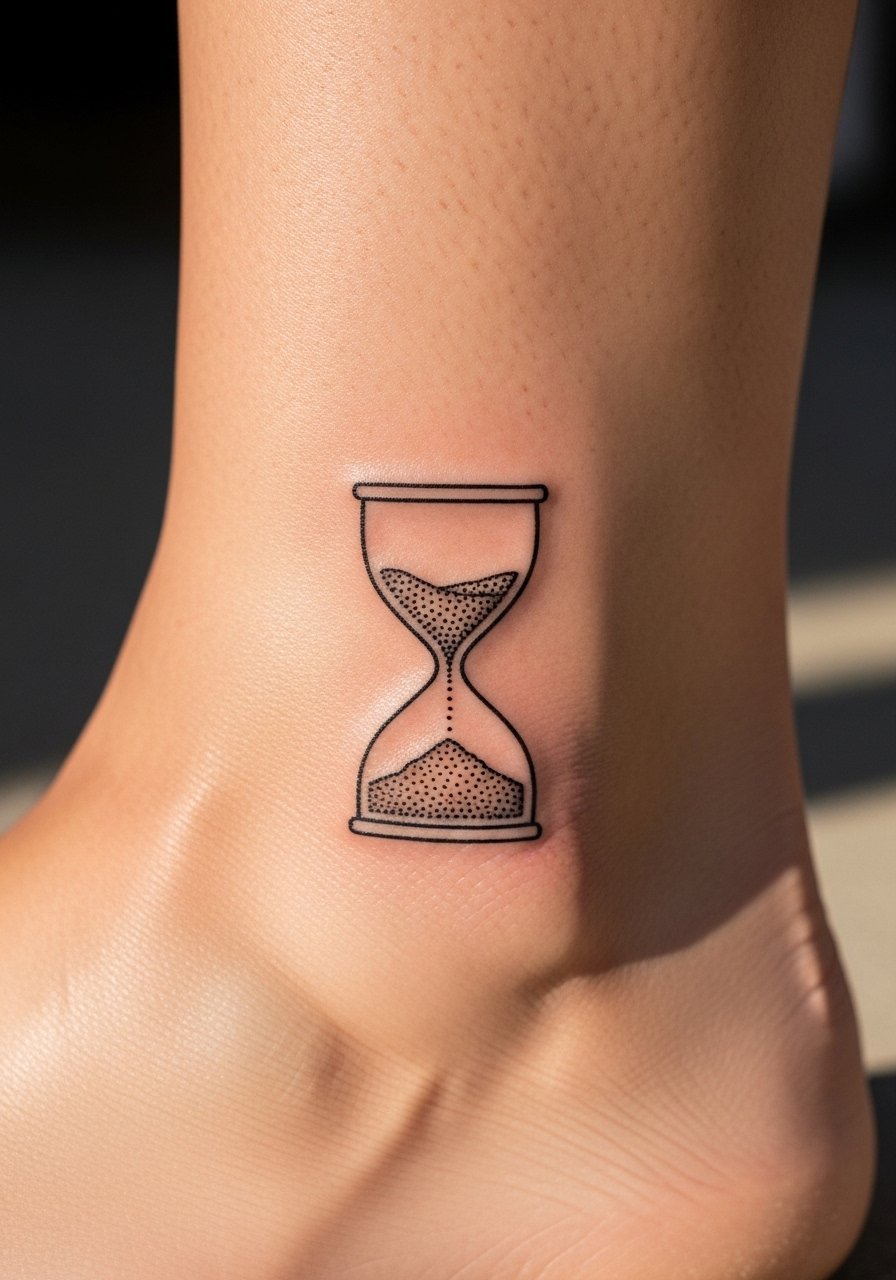
An ankle hourglass is discreet and good for people who want a meaningful but small hourglass tattoo. Dotwork can give texture without heavy lines, but tiny dots may soften—ask your artist about dot density. Ankle skin can be bony and slightly sharper during the session, but healing is straightforward. From what I’ve noticed, minimalist designs that are slightly scaled up fare better over time than micro-tiny pieces. If you pick an ankle spot, plan shoes and socks in the first week to avoid rubbing.
22. Hourglass With Compass and Stars on Back Shoulder
Style/Technique: Illustrative / Nautical-Surreal Blend
Pain Level: Low-Medium (3-4/10)
Session Time: 1-2 hours
Best For: Travel symbolism, upper back canvases
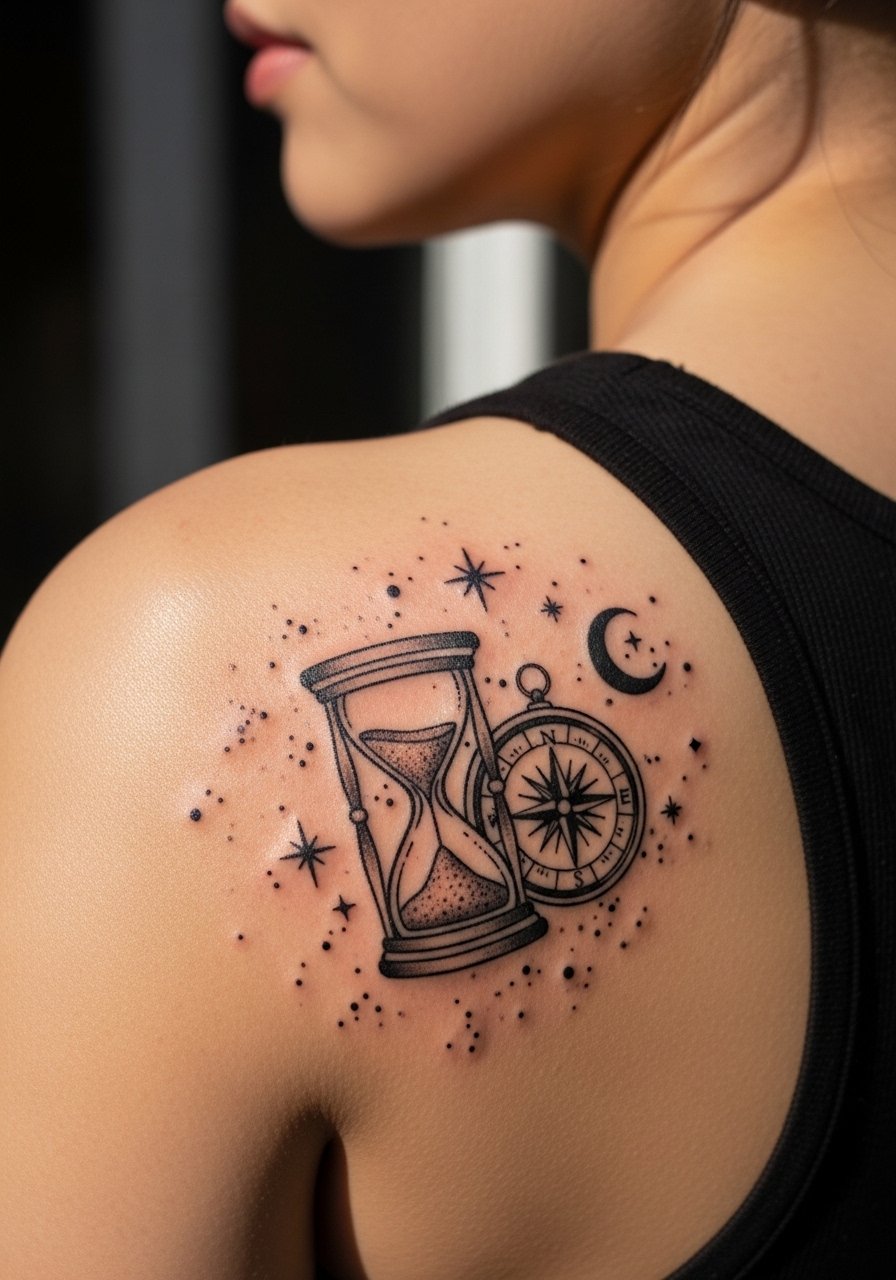
Combining a compass with an hourglass reads like time guiding direction—perfect if your meaning ties to travel or life decisions. Upper back shoulder placement is forgiving and photographs well. Small stars and compass markers should be bold enough to last; tiny ticks get lost. Pain is mild, and healing is usually uncomplicated. I like this for people who want an hourglass tattoo design that's both symbolic and narrative without committing to a full sleeve.
Tattoo Prep and Aftercare Essentials
Aftercare Essentials:
- Aquaphor Healing Ointment, 14oz Tube — Recommended for first 3–5 days to keep fresh ink protected
- Saniderm Transparent Adhesive Bandage, 6-Inch Roll — Second-skin option many artists use
- CeraVe Fragrance-Free Moisturizing Lotion — Daily moisturizer for week 2 onward
- Dr. Bronner's Unscented Castile Soap, 32oz — Gentle soap for cleaning during early healing
- Hustle Butter Deluxe, 4oz — Vegan aftercare alternative artists sometimes recommend
Before Your Appointment:
- Numbing Cream With 5% Lidocaine — Use only after checking with your artist
- Tattoo Stencil Transfer Paper — Helpful if experimenting with custom placement at home
Long-Term Maintenance:
- SPF 50 Sunscreen Stick For Tattoos — Daily sun protection to prevent fading
- Mad Rabbit Tattoo Balm, 2oz — Keeps healed ink vibrant
- Hydrocolloid Bandages (Large) — For spot healing or scab protection
- Tattoo Numbing Spray — For touch-ups or sensitive areas
- Saniderm Starter Pack (Varied Sizes) — If you prefer adhesive covering straight from the shop
A note from my experience: artists I’ve talked to always stress sunscreen and gentle moisturizing. Test products on a small patch of skin first if you’re sensitive. For intricate black-and-gray shading, ask your artist which balm they trust for the first week.
Frequently Asked Questions
Q: How bad does a tattoo actually hurt?
A: Pain depends on placement and your tolerance. Fleshy spots like outer thigh or upper arm feel low—around a 2–4 out of 10 for many people. Ribs, sternum, and behind-the-knee hit higher. From what I’ve felt and heard, it’s more an annoying burning/scratching than unbearable. For sensitive areas try a numbing cream with lidocaine after checking with your artist.
Q: What if I regret my hourglass tattoo later?
A: I’ve seen regret happen when people chase trends. To avoid that, personalize the hourglass with flowers, mountains, or a compass so it ties to your story. If visibility worries you, choose a hidden placement like the upper thigh or shoulder blade and test with temporary tattoos first.
Q: How do I keep an hourglass tattoo from fading?
A: Sunscreen is non-negotiable—UV is the biggest ink killer I’ve seen. Use an SPF 50 sunscreen stick for tattoos daily on exposed pieces and moisturize with a fragrance-free lotion like CeraVe. Black and gray hourglass tattoos hold contrast longer; very light colors fade faster.
Q: Can I work out after getting an hourglass tattoo?
A: Wait at least 48–72 hours before sweating hard, and longer if the tattoo is in a flex area (elbow, knee). Sweat can introduce bacteria and lift scabs—stick to light movement early. Use gentle cleaning with Dr. Bronner’s Unscented Castile Soap during the first week.
Q: Should I get a small tattoo first to test my pain tolerance?
A: Only if you actually want a small piece. I wouldn’t pick a design you don’t love just to "practice." Pain varies by placement more than size, so a tiny wrist tattoo can hurt more than a larger outer arm piece.
Q: How long does an hourglass tattoo take to heal?
A: Surface healing is usually 2–3 weeks; full skin remodeling can take a couple of months. The first week is critical—keep it clean, moisturized, and protected with products like Aquaphor or a Saniderm cover if your artist uses it. Expect peeling around day 3–7 and resist picking.
Q: Do tattoos look different on different skin tones?
A: Yes. Black and gray hourglass tattoo designs show well across skin tones; bright colors may appear muted on deeper skin. I always ask artists for healed photos on similar skin tones to set realistic expectations.
Q: What’s the biggest mistake people make with hourglass tattoos?
A: From what I’ve seen, it’s choosing overly intricate tiny details without considering healed legibility. Make sure sand, hands, or skull features are scaled to last; ask to see healed examples of the exact style on comparable placement.
