
I spent months staring at guitar tattoos on collectors, then getting one myself, and one thing stood out. The problem is rarely the design. It is choosing a style that ages well on your skin. I pulled together guitar tattoo ideas I actually see on clients and in studio portfolios in 2026, plus a few fresh takes artists are starting to post.
This list focuses on classic to modern styles, from fine line acoustic outlines to bold blackwork electric pieces. Placements range from inner forearm and ribcage to finger micro-picks and full back pieces. I keep seeing certain looks repeatedly in studios this year. These picks reflect what really holds up after healing, plus a few under-covered angles I think will trend.
1. Fine Line Acoustic Outline on Inner Forearm
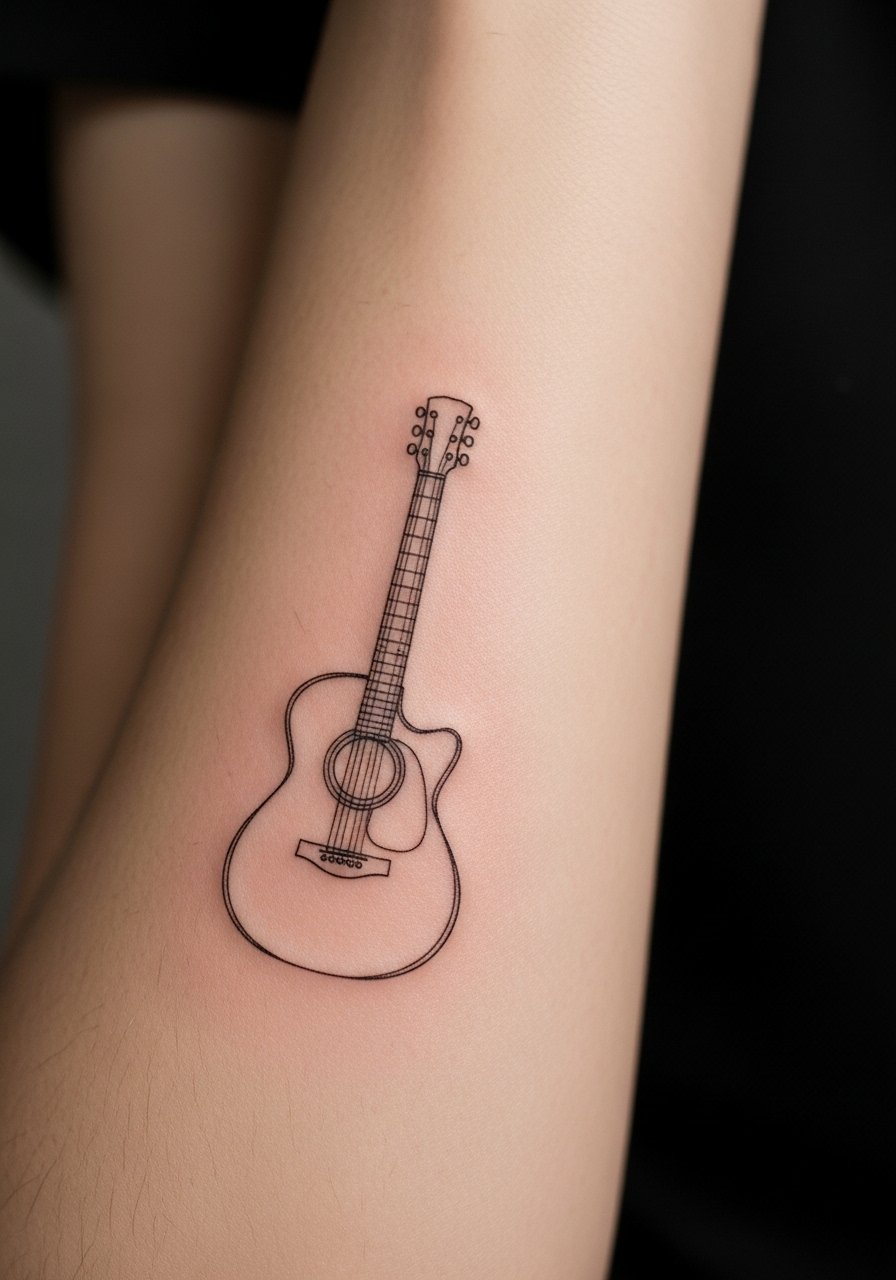
I first noticed this on a friend who wanted something subtle. The fine line technique gives a minimalist vibe that reads like jewelry. Inner forearm is low pain for most people. Expect a single 45 to 90 minute session. I tell artists to use slightly heavier outer lines than typical fine line to keep the body of the guitar from disappearing after a year. Fine line blurs faster on oily skin. At six months the outline will soften. At two years it may need a touch-up if you want razor sharp edges. Common mistake is making the body too small. Ask for a scale test during the consult so the guitar has negative space to breathe. For aftercare use a gentle fragrance-free lotion during healing to avoid clogged pores.
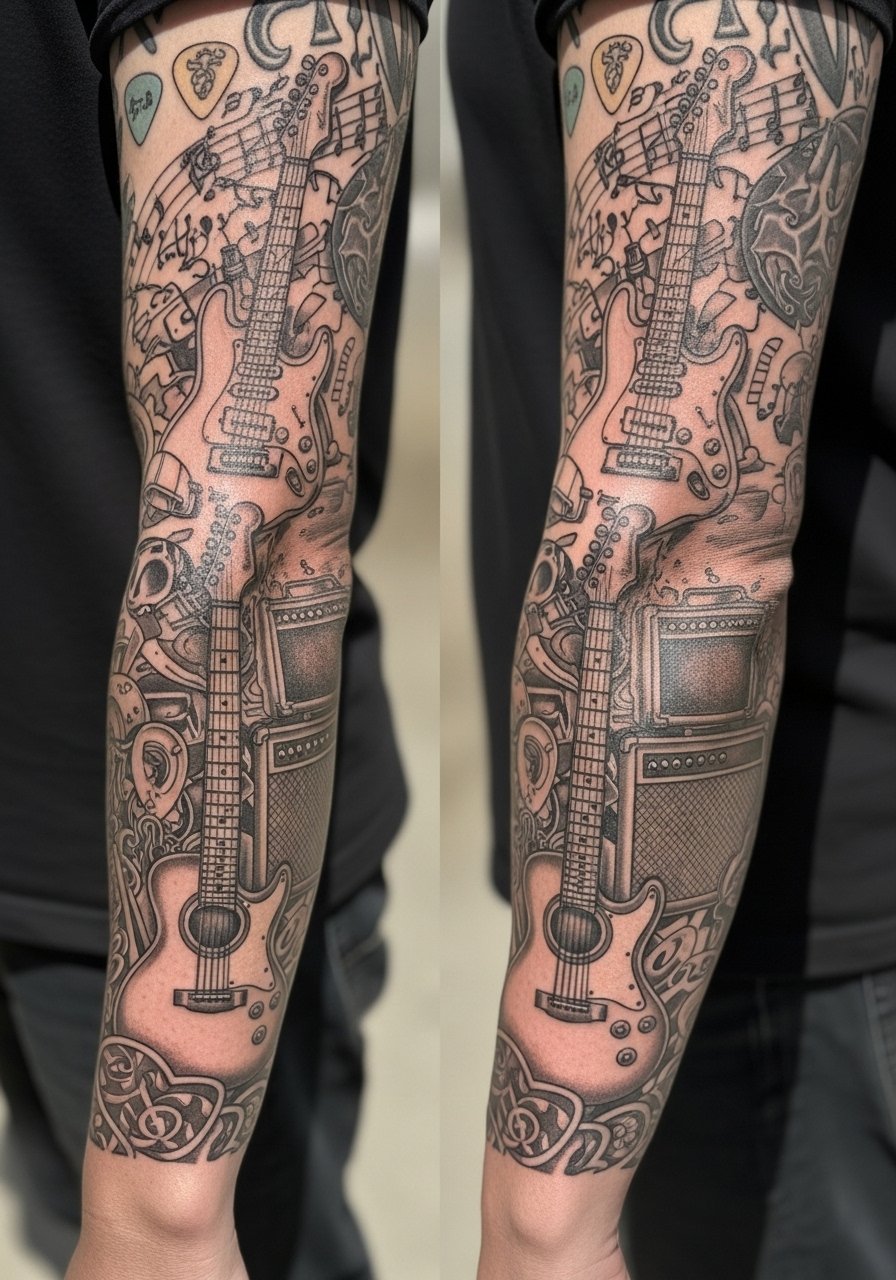
2. Micro-Realism Electric Portrait on Upper Arm
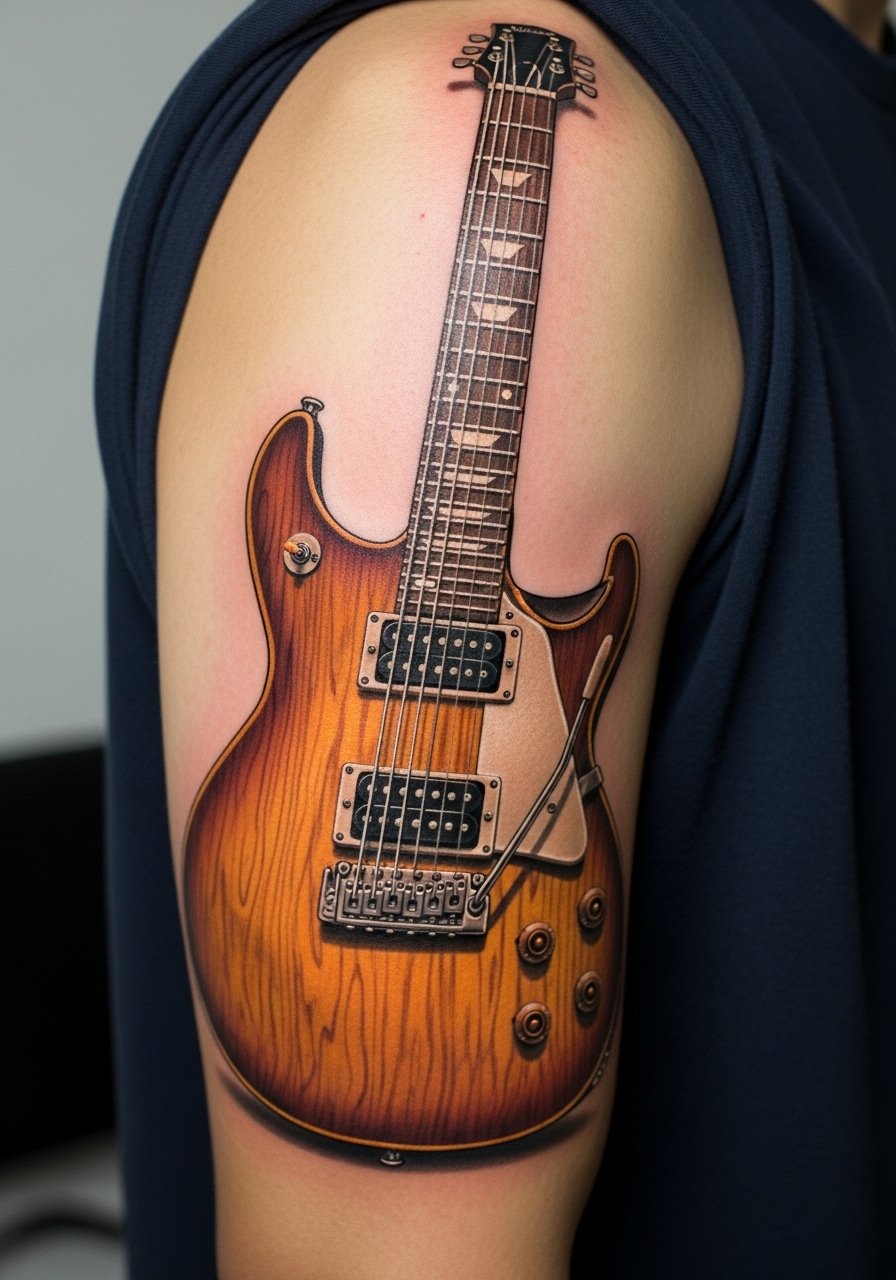
I remember seeing this style on a touring guitarist. Micro-realism shows wood grain, frets, and pickups. Upper arm is forgiving and hides well under sleeves. Pain is low. Session time is usually two to three hours for a mid-sized piece. Tell your artist you want photographic detail, but ask them to slightly exaggerate contrast so pickups still read after a year. A common version that ages poorly uses tiny highlights that vanish. If you plan a sleeve later, place the neck facing the elbow for flow. At six months the tiny white highlights will fade. Expect some softening by year two. Don't push for hyperfine hairline details unless you're prepared for future touch-ups.
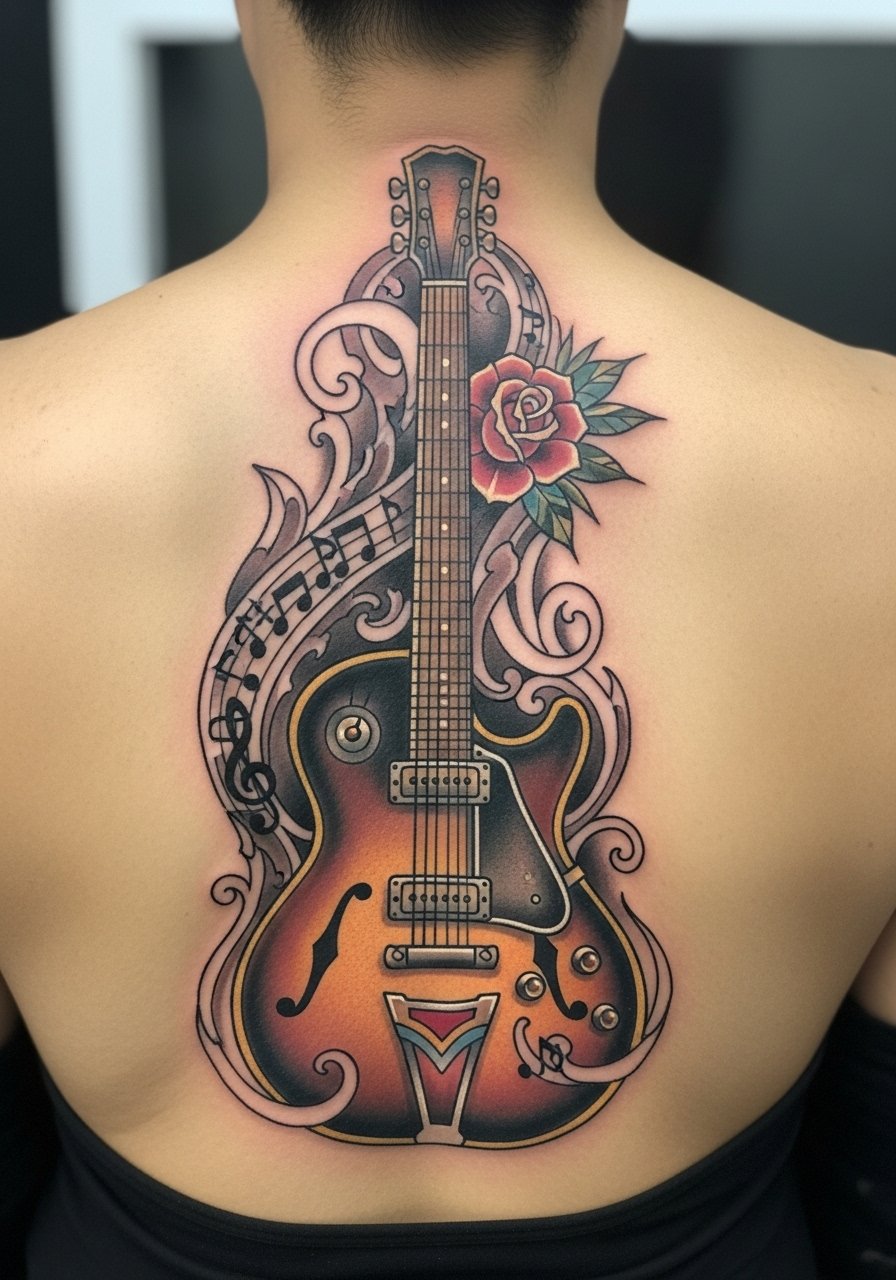
3. Traditional Electric With Roses on Chest

There is a classic appeal to bold traditional linework paired with roses. Chest placement makes it a statement piece. Chest pain ranges moderate. A session can be one to three hours depending on color. Traditional styles hold ink well because of thick lines and saturated color. Tell your artist you want bold outlines and dense color blocks, not watercolor fades, to keep it vibrant long term. People often make roses too detailed for this style. Keep petals simple. When healed the black will stay crisp. If you plan gym time soon, wait at least 48 hours before heavy chest workouts to avoid scabbing problems.
4. Watercolor Guitar Splash on Ribcage
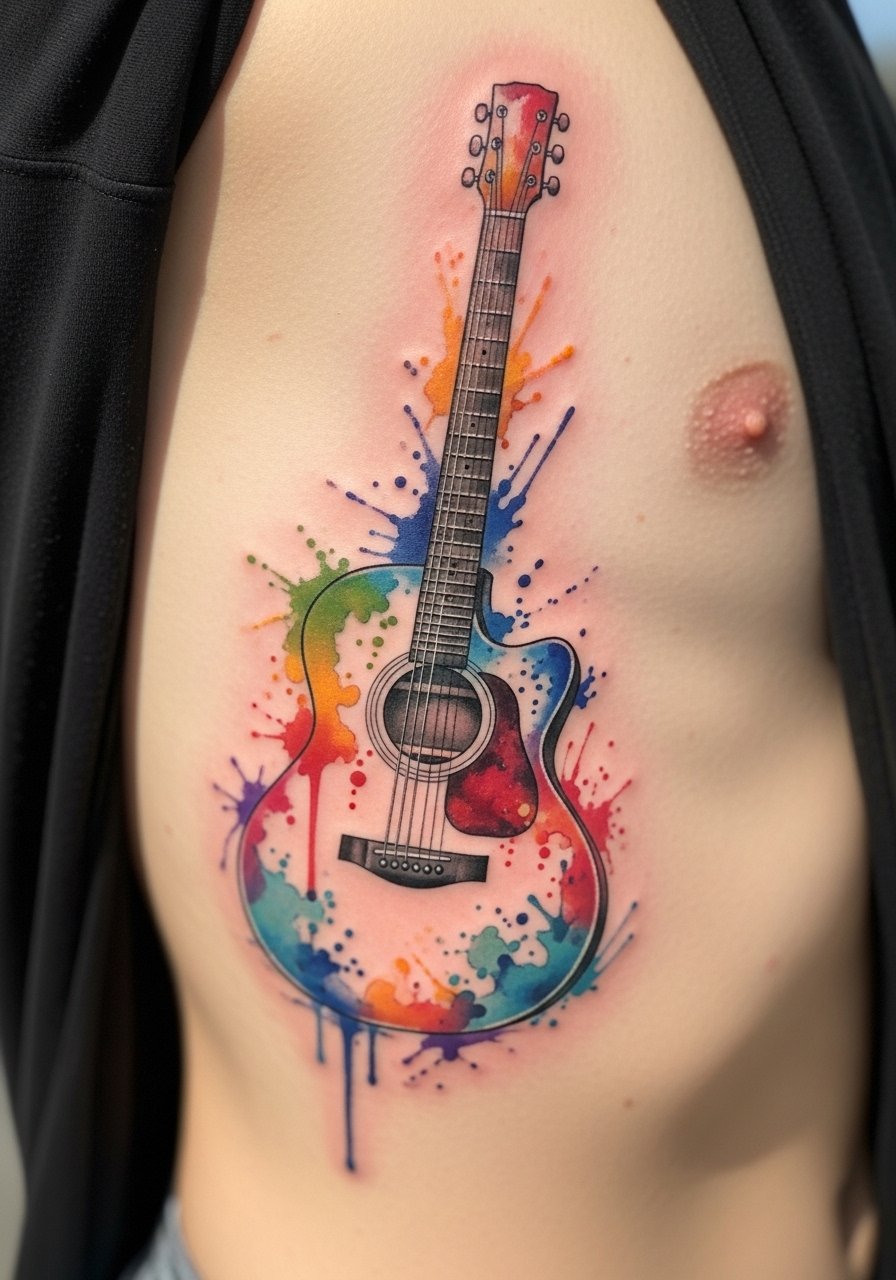
Fair warning, ribcage is a 7 out of 10 on pain for most people. Watercolor is eye-catching fresh, with paint-like bleeds. I recommend this if you want color mood rather than sharp lines. Sessions tend to be longer. Artists I like will anchor the watercolor with a thin outline that ages more predictably. Watercolor pigments can look patchy after healing. Ask for concentrated pigment near focal points to avoid blotchy fade. At six months the colors mellow. At two years the softer tones may need a refresh to regain vibrancy. The common mistake is asking for full watercolor without any structure. A thin outline or light black wash helps it survive sun exposure.
5. Blackwork Solid Guitar Silhouette on Back
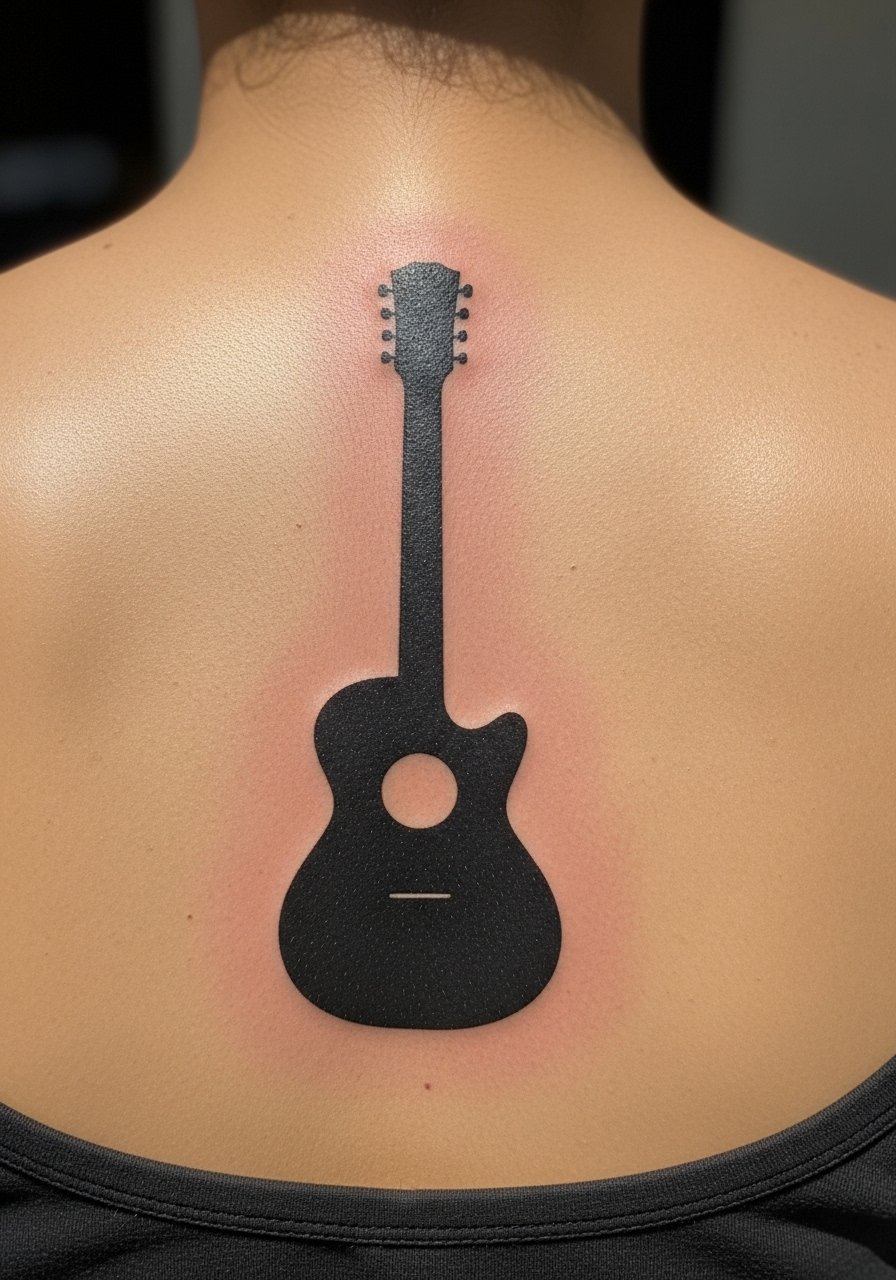
I saw a group of collectors choose blackwork silhouettes when they wanted bold negative space. The back gives room to make it big and graphic. Pain is low to moderate. Session time is one to two hours for a solid shape. Blackwork holds up excellently since large saturated areas age more predictably than thin lines. If you want texture, add small negative-space strings or fret markers. A mistake is going too small. If a silhouette is under three inches it can look like a blob after healing. Ask the artist about ink packing so the black remains even. For maintenance use a long-term tattoo balm to keep the surface soft.
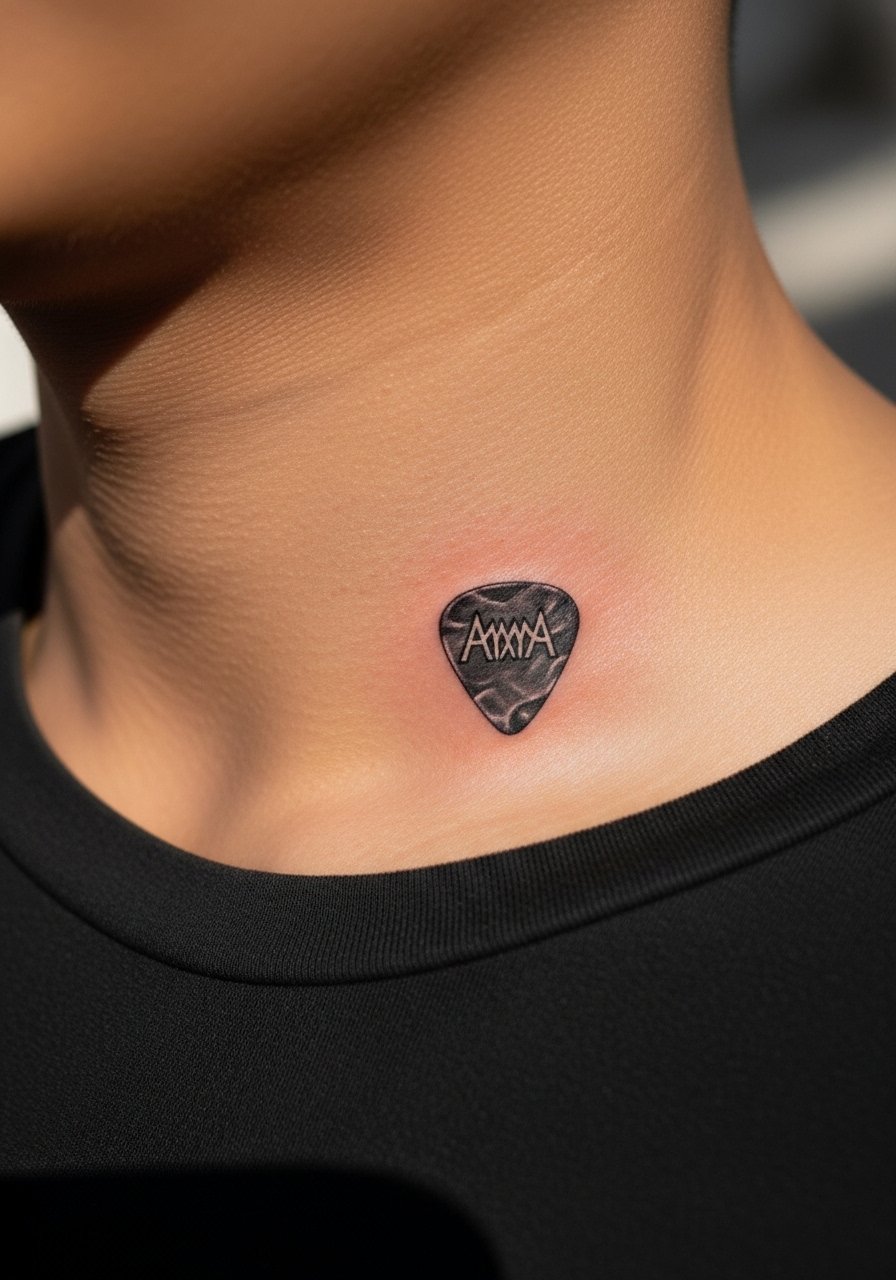
6. Minimalist Guitar Pick Behind Ear
I first saw this as a discreet nod from a session musician. Behind the ear is surprisingly sensitive. Expect high pain and a quick 10 to 20 minute session. This spot heals fast but lines can blur sooner because of movement and hair. Tell your artist you want thicker pick edges than typical micro work. Tiny details inside the pick rarely last. If you want something noticeable later, place it on the neck or forearm. A common mistake is asking for intricate text inside the pick. Keep it simple. Check the healed photo after three months and plan touch-ups if the edges fuzz.
7. Neo-Traditional Guitar With Skull on Upper Thigh

When I saw this at a convention, the color combinations popped. Thigh placement tolerates larger pieces and is medium pain. Sessions can go two to five hours. Neo-traditional gives you bold lines with decorative shading. For a piece that ages well, ask the artist to use dense color packing in dark areas and avoid tiny stippling in shadows. Healed at one year the colors stay rich if you protect against sun. Mistake people make is placing too many tiny ornamental elements that merge over time. If you want to show it off on warm days, consider clothing choices during healing to avoid friction.
8. Geometric Guitar Neck on Spine
I once recommended a vertical guitar neck for a client building a back piece. Spine tattoos are high pain. Expect multiple short sessions. Geometric style uses precise linework and dotwork to create rhythm. Lines need room, so scale up. Tiny parallel lines along the neck can blur into a bar after a year. Ask for slightly thicker primary lines. At six months the dotwork will settle and look integrated. At two years expect some softening in the thinnest lines. A common mistake is cramming too much detail in a narrow column. Also plan clothing with low abrasion during healing.
9. Single-Needle Finger Micro Guitar
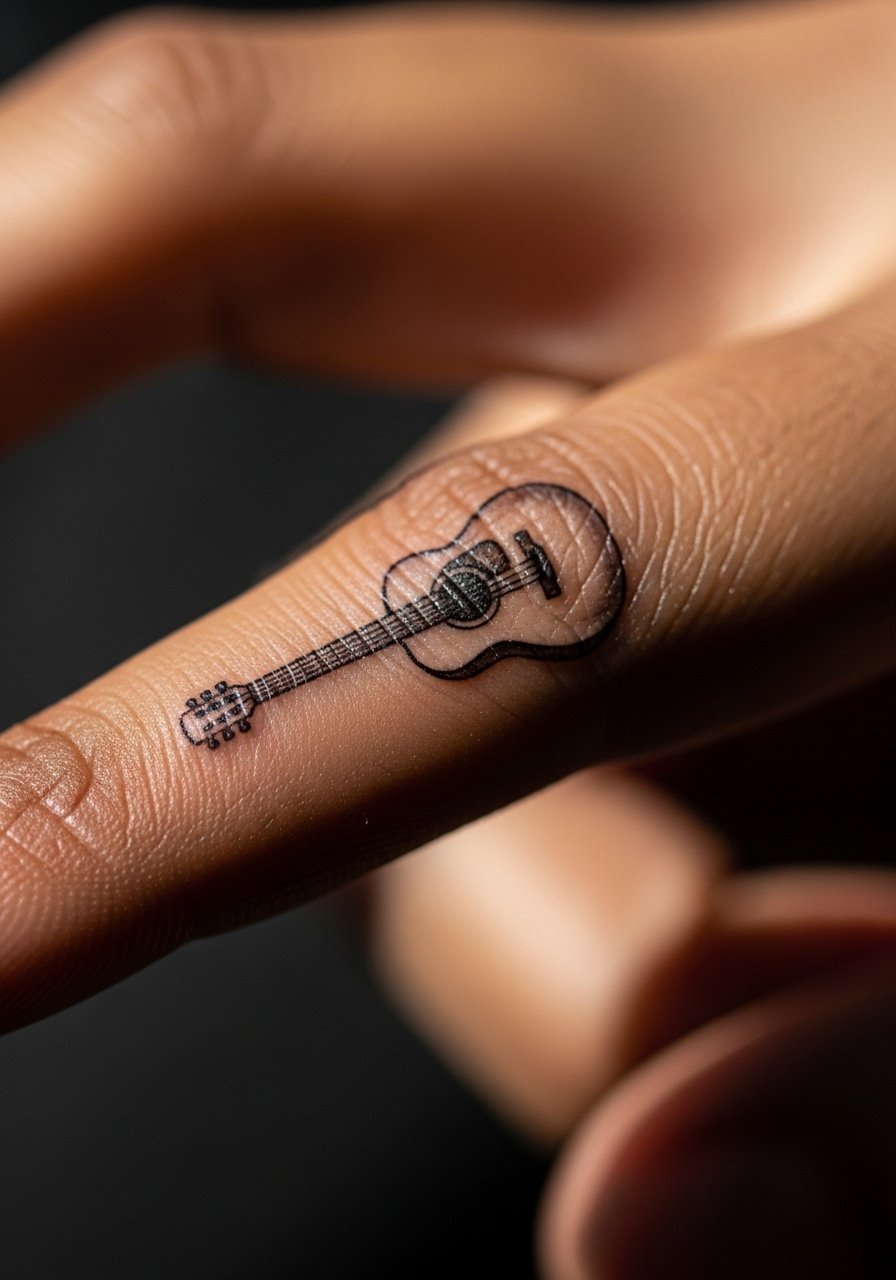
Finger tattoos are tempting for visibility, but I warn friends these wear fast. Pain on fingers is high. Sessions are short though, often under 30 minutes. Single-needle micro guitars can look crisp fresh yet blur within a year, especially on the sides of fingers where skin flexes. If you want longevity, have the artist use slightly heavier lines and avoid tiny crosshatching. A good consultation line is ask for a flat black fill in areas that will see friction. Expect touch-ups. People often forget that constant hand washing and sun exposure accelerate fading.
10. Watercolor Soundwave Guitar Wrap on Wrist
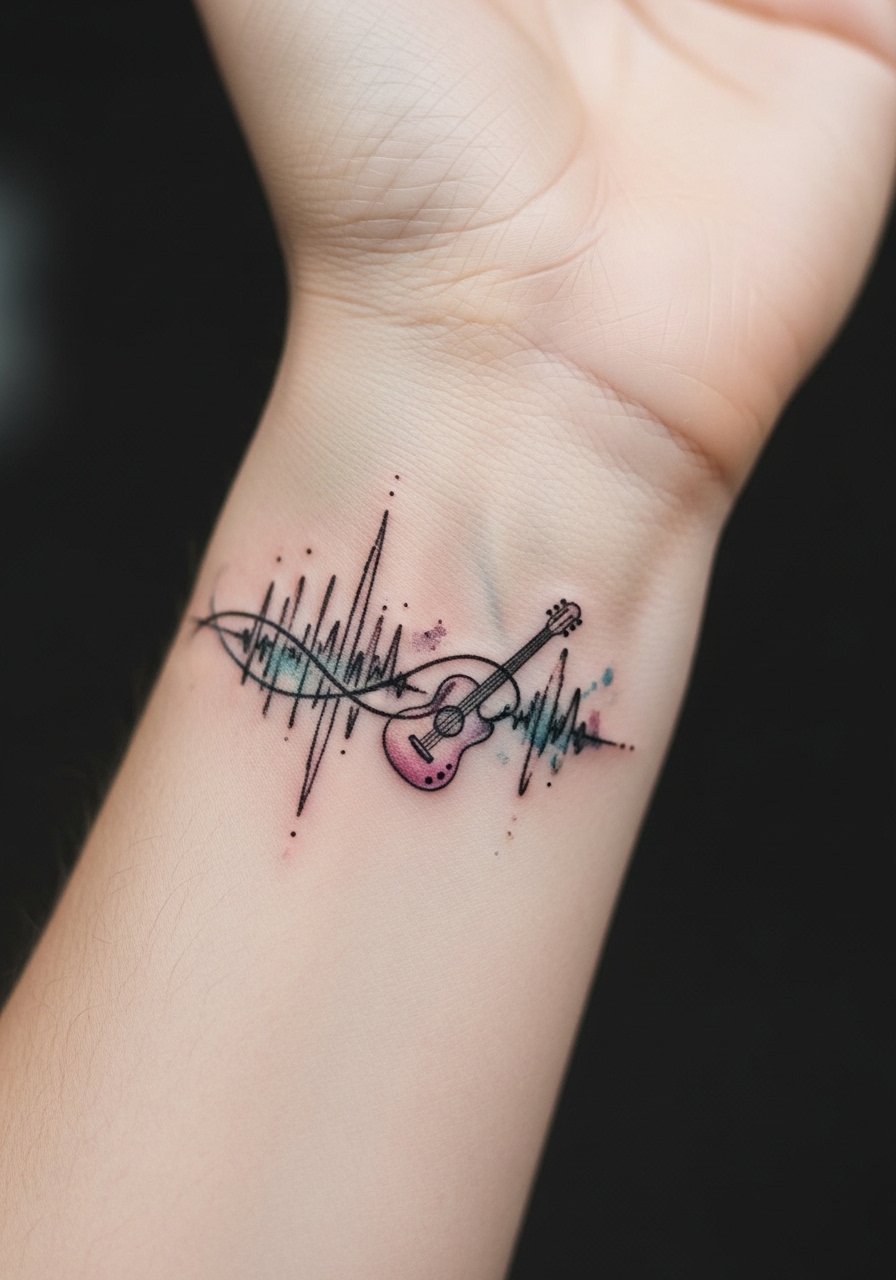
I found this idea from a session where a client wanted their favorite riff encoded into a visual. A wrist wrap reads intimate. Pain is low to moderate. The watercolor soundwave pairs well with a thin, readable line of the guitar. Ask the artist to anchor the soundwave with a darker core so it keeps shape after fading. Watercolor edges blur, which is part of the look, but avoid very light pigments that disappear. At six months the wash will soften. At two years you might lose the palest tones. Tell your artist which riff to prioritize visually so the design keeps meaning even as details fade.
11. Micro-Realism Guitar Pick With Logo on Collarbone
This is a favorite for fans who want a band logo but in a tiny format. Collarbone placement is moderate pain. Sessions are quick. Printing a logo in a micro pick tests the artist's precision. I advise asking for high contrast between logo and pick background. Tiny logo details that are too thin will smear over time. At six months the logo will still be legible if bold. At year two expect softening. If the logo matters to you, plan a low-saturation background color to make re-inking easier later. Many clients underestimate healing friction from clothing against the collarbone.
12. Traditional Guitar Headstock On Calf
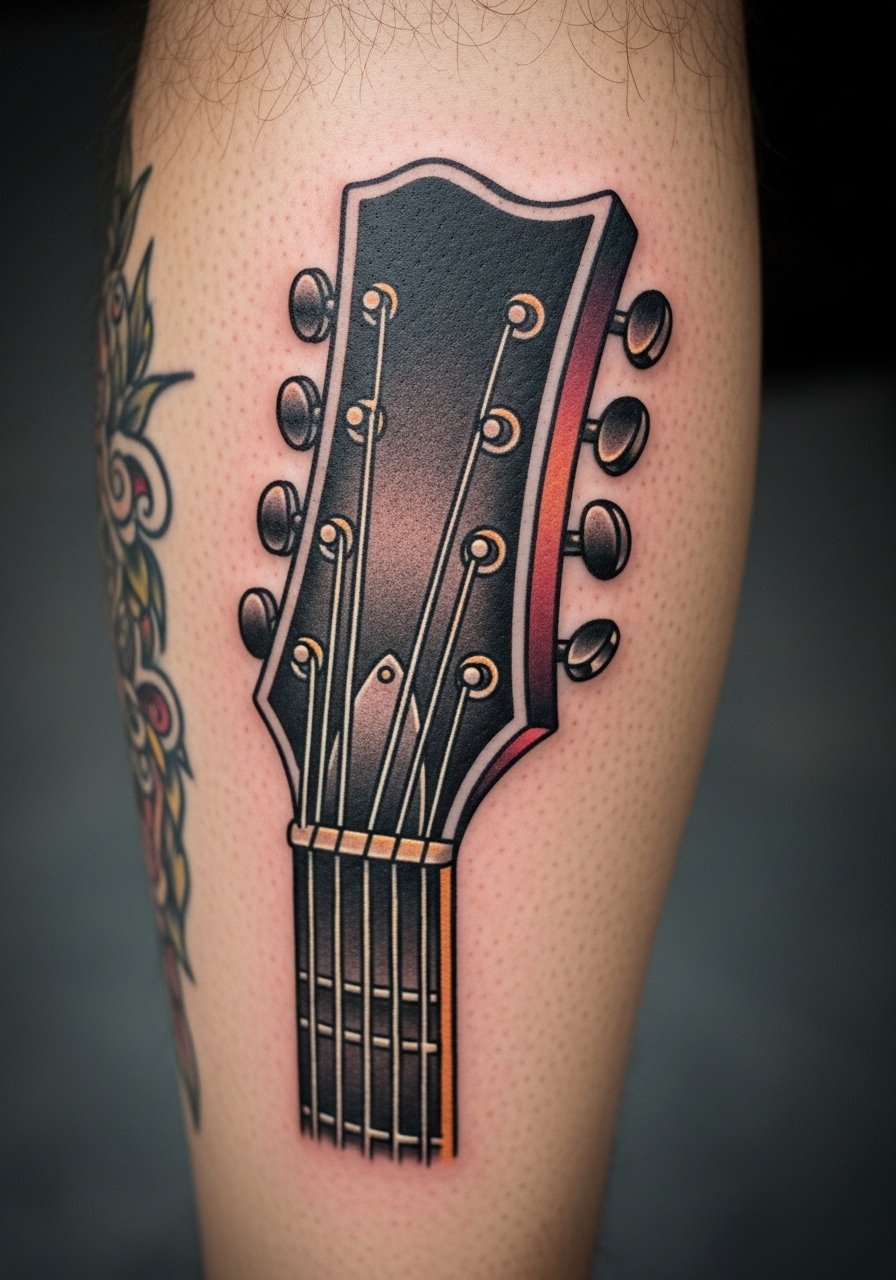
I love calf placements for balance and low interference with movement. Pain is low. A headstock in traditional style uses bold lines so it remains crisp. Session time runs one to two hours. Artists recommend strong black outlines around tuning pegs to prevent loss of shape. A common mistake is detailing the wood grain too finely. That detail vanishes quicker than you expect. At six months the black will still read well. Keep the area moisturized during later months to protect the ink surface.
13. 3D Acoustic On Sternum
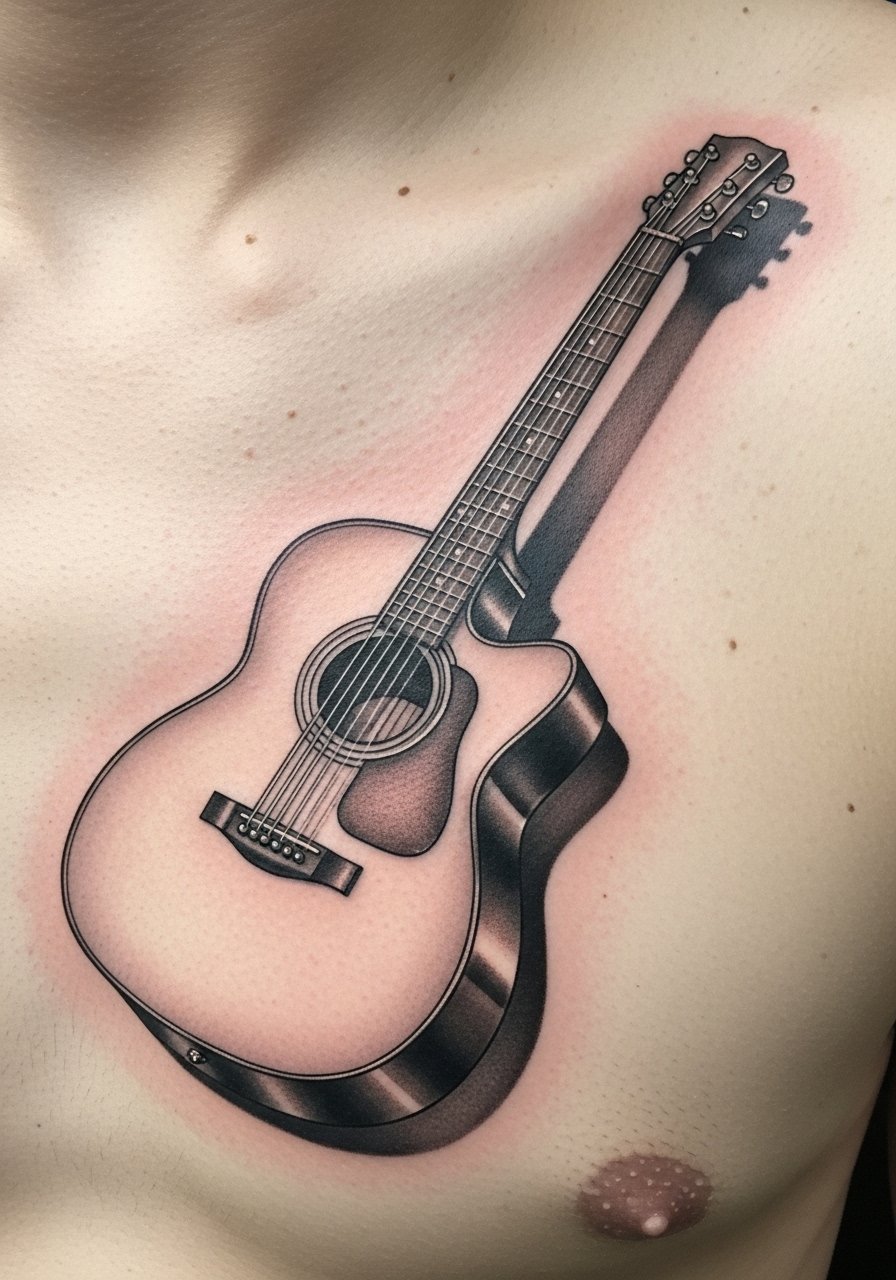
Sternum pieces are intense for pain. I have a client who loved the living silhouette effect. 3D shading creates depth and feels like jewelry against the chest. Expect multiple sessions. The technique ages well if the shadows are bold enough. Soft gray gradients can blur into flatness if they are too faint. Tell your artist to punch up contrast in darker zones. At six months the piece will look more wearable as scabs settle. Avoid tight clothing that rubs during initial healing. People often underestimate how tender the sternum area stays for a week.
14. Minimalist Line Art Guitar on Ankle
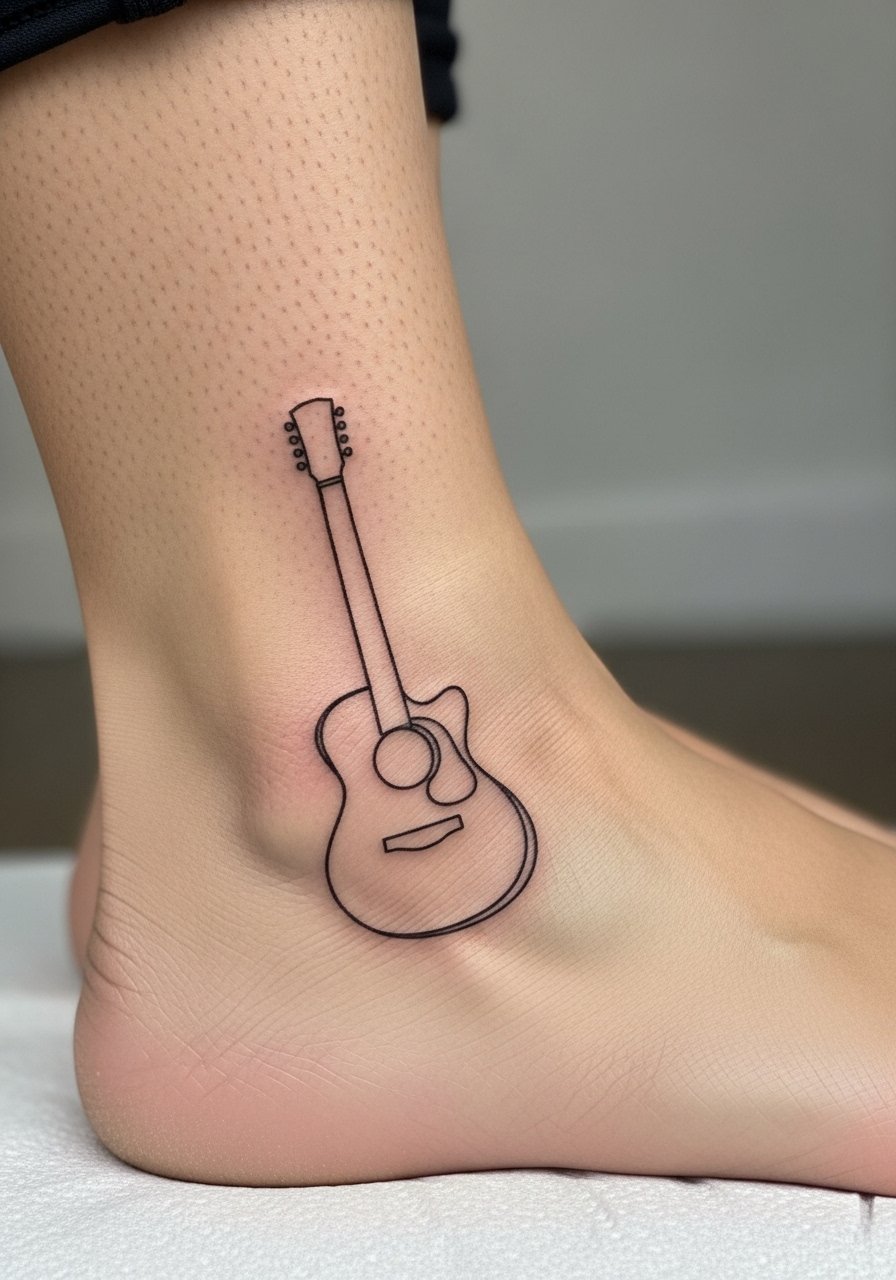
Ankle tattoos are cute but finicky. I recommend minimalist line art if you want a low-key symbol. Pain varies but is usually moderate. Sessions are short. Minimal lines can fade or warp with footwear friction. Ask for slightly strengthened anchor points in the design so the main shape survives. At six months the lines settle. After a year they can soften. A common mistake is asking for a completely unbroken continuous line in a high-friction zone. Breaks can help longevity.
15. Neo-Traditional Jazzy Guitar on Upper Back
I found this look among jazz musicians who wanted motion in the piece. Upper back allows broader compositions and medium pain. Sessions may be two to three hours. Neo-traditional fills add depth and age better than fine stippling. Ask your artist for slightly larger music notes so they remain recognizable later. A mistake is packing too many tiny notes. At six months the shading will look integrated. If you plan a large future back piece, coordinate the neck orientation during your consult.
16. Blackwork Broken Strings On Ribcage
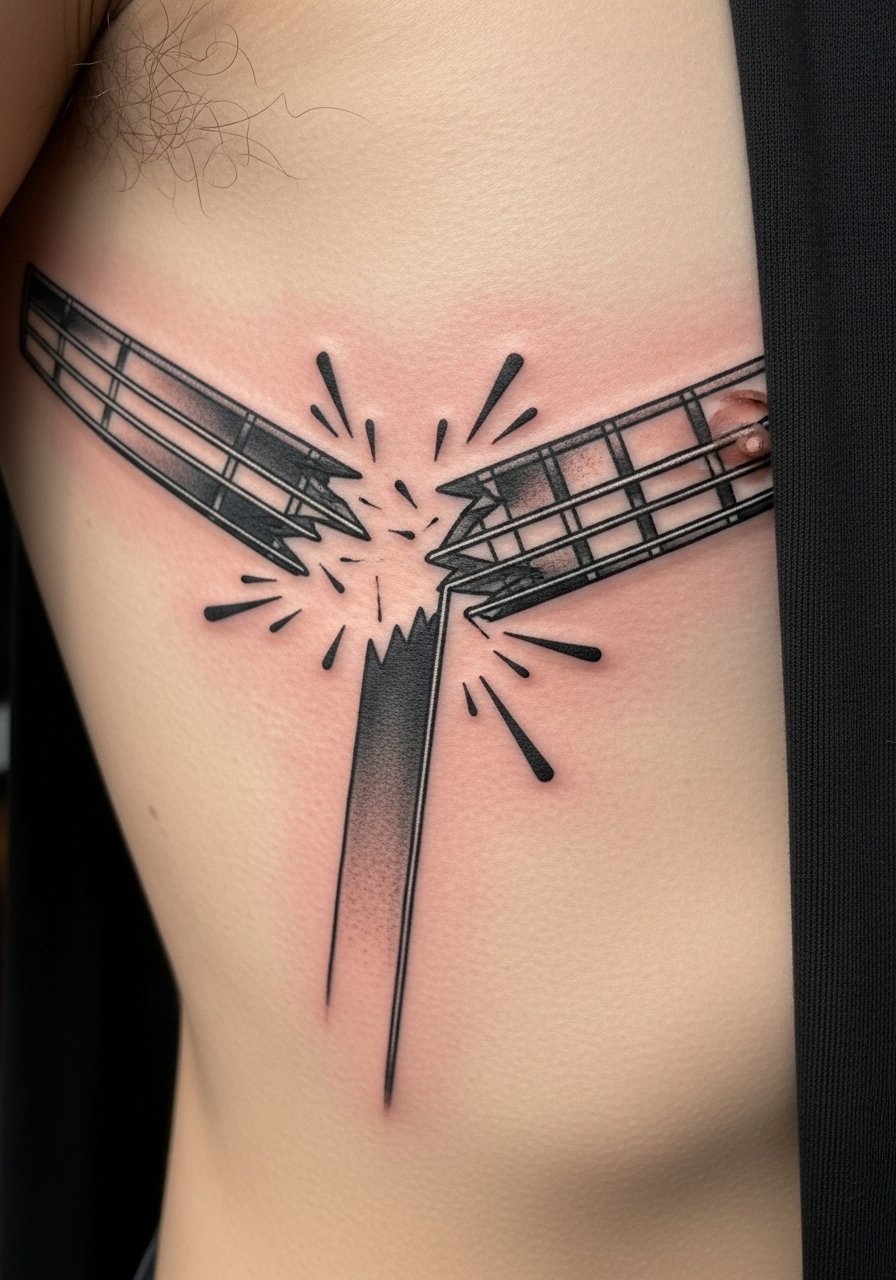
I saw this as an emotional piece symbolizing endings. Ribcage is painful. A bold blackwork approach reads well on this curved area. Sessions can be two or more hours. Heavy black lines and negative space hold up. Fine threadlike strings drawn too thin will fade into smudges. Ask for thicker string lines with micro negative gaps to preserve the broken look. At six months the contrast will be stable. Keep sun off this area during healing to avoid uneven fading. Many people forget rib movement makes scabs more likely.
17. Acoustic Scene in Oval Frame on Thigh
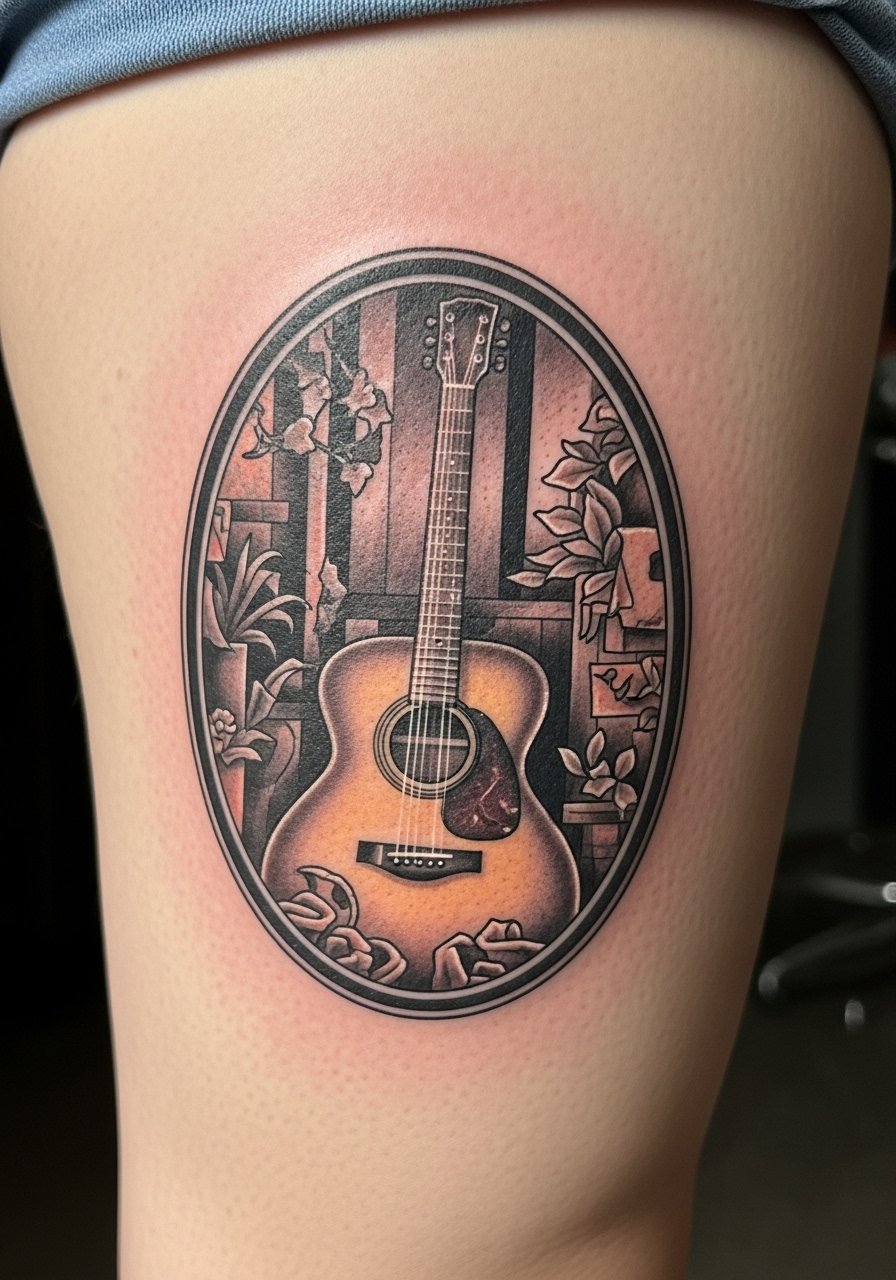
I like this for storytelling. Thigh placement is forgiving and less painful. Sessions tend to be longer but comfortable because the area has more flesh. An oval frame protects the composition from distortion during movement. Ask your artist to design the frame slightly wider to prevent border softening. Tiny background textures may blur after a couple of years. If you plan to sit for multiple hours, bring snacks and a playlist. People often skip stretching between long sessions and feel sore afterwards.
18. Silent Pick Tattoo on Finger Pad
Finger pad tattoos are notorious for short life. I recommend this only as a novelty or if you plan frequent touch-ups. Pain is sharp and immediate. Sessions are short. Expect the ink to fade faster because of the skin type. If you want it to last, choose bold black and accept touch-ups. A common mistake is asking for color on finger pads. Color vanishes much quicker. Tell your artist you understand the maintenance. Keep the area dry during early healing to reduce bleeding.
19. Retro Amp and Guitar Combo on Lower Leg
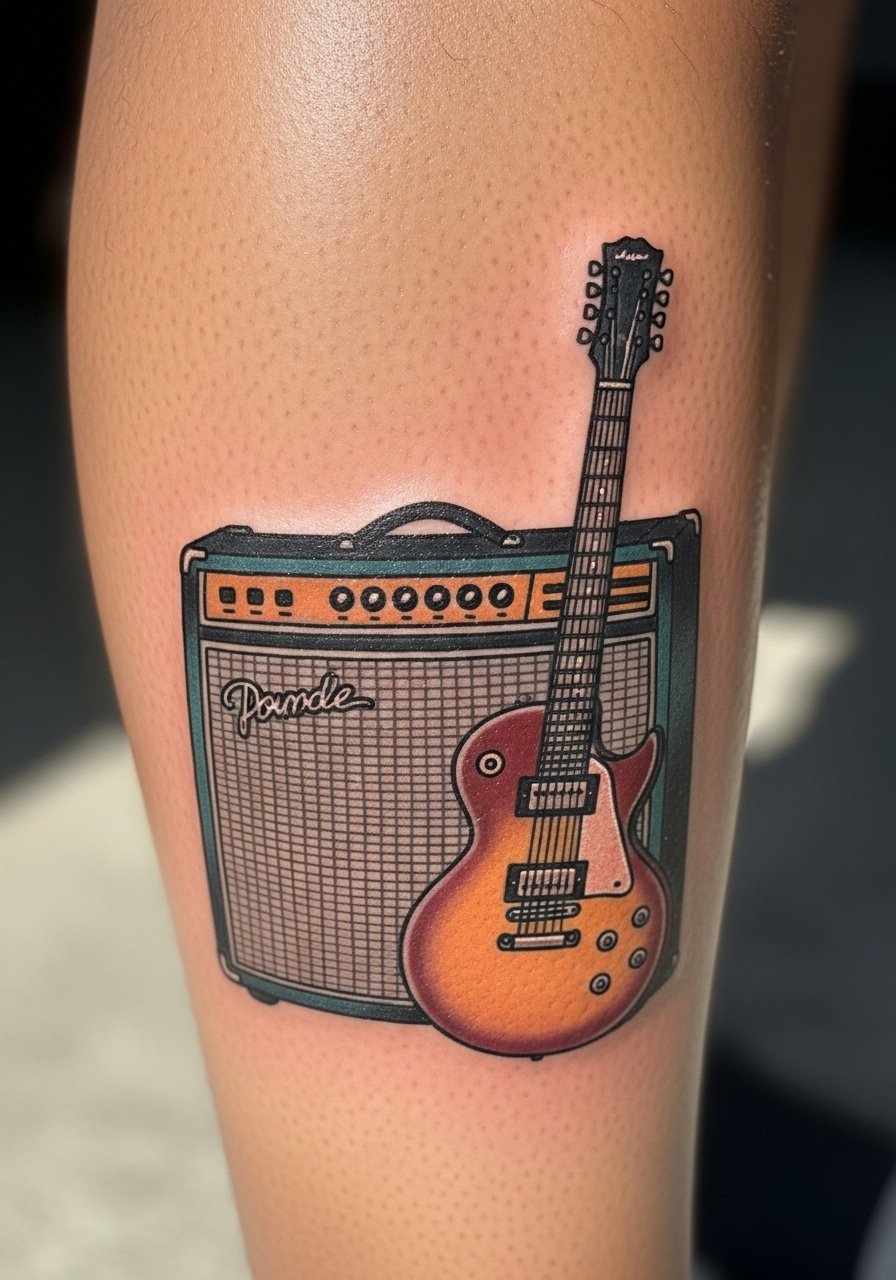
I recommend this for collectors who like narrative pieces. Lower leg placement is low pain and easy to protect while healing. Sessions run one to three hours. Bold outlines and saturated fills make this last. Artists suggest strong black separation between objects to prevent merging. A mistake I see is making the amp too detailed with tiny knobs. Simplify controls and keep knobs bold. After six months the composition reads clean. Moisturize regularly to maintain the skin surface.
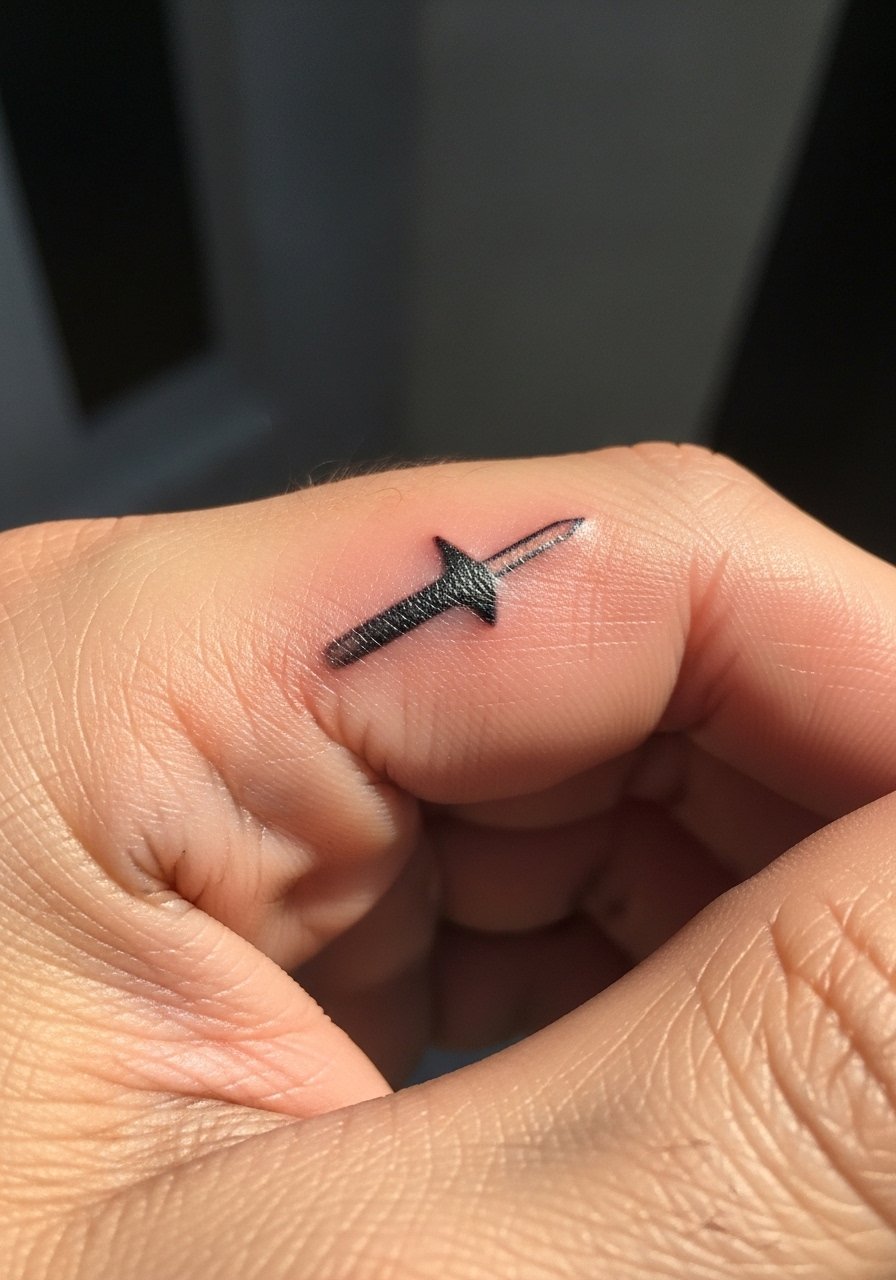
20. Finger Joint Tiny Fret Marker Dots
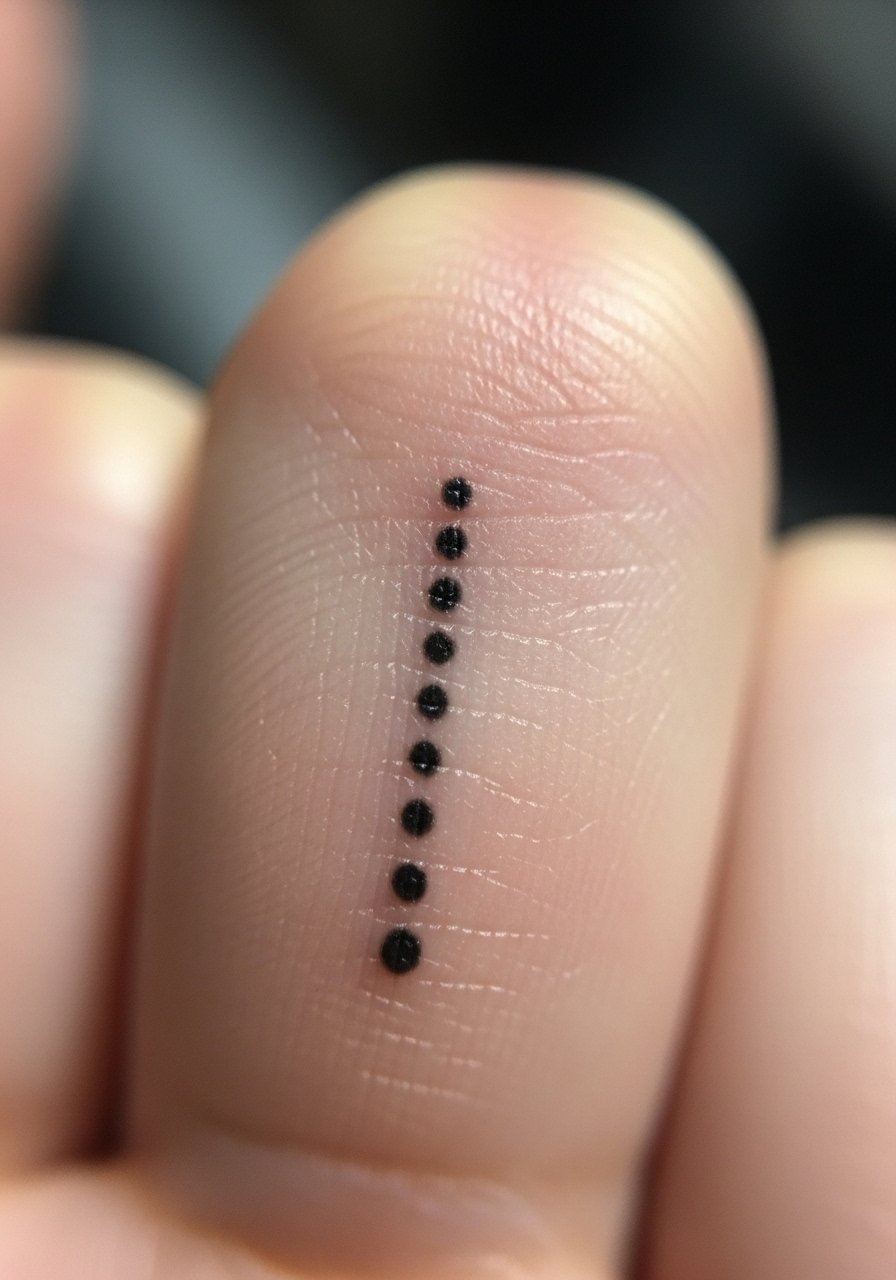
Tiny dots on finger joints are cute but blink-and-you-miss-it. Pain is sharp. Sessions take minutes. These age quickly because joints flex a lot. If you want one, ask for larger dots with heavy black. At six months the dots will still be visible. At one year expect them to need a touch-up. The most common error is picking too small a dot for the joint. Upsize for durability. Keep in mind daily work and hand washing accelerate fade.
21. Guitar With Floral Wrap on Inner Bicep
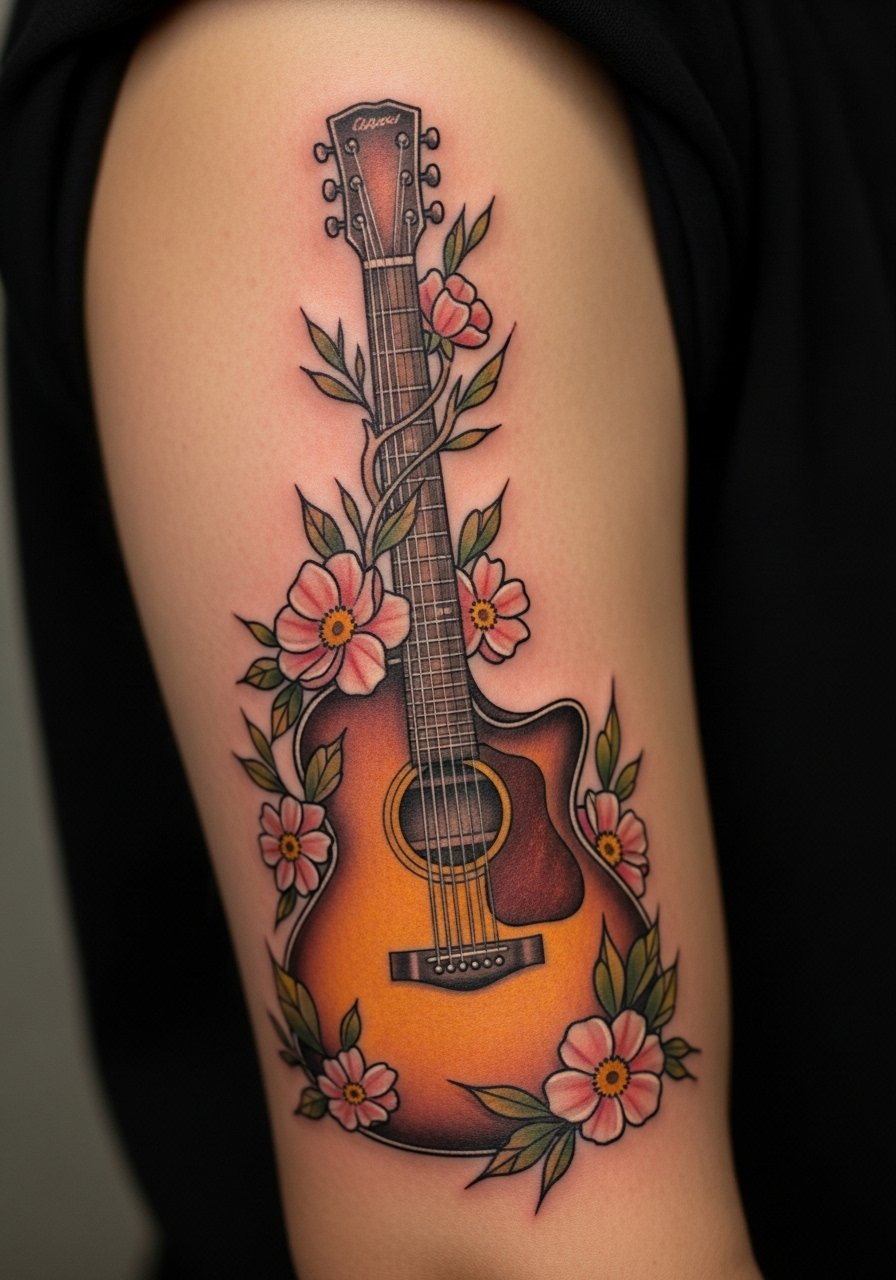
I recommended this to someone who wanted a softer rock look. Inner bicep is moderate pain and easy to hide. Sessions are usually two hours. The floral wrap helps distract from small line softening in the guitar body. Tell your artist you want the flowers to age into the guitar, not over it. Overly fine petal lines often vanish and leave ghosting. At six months the design settles into one cohesive piece. Avoid heavy friction from tight sleeves during the first two weeks of healing.
22. Soundwave Bar Across Chest With Tiny Guitar
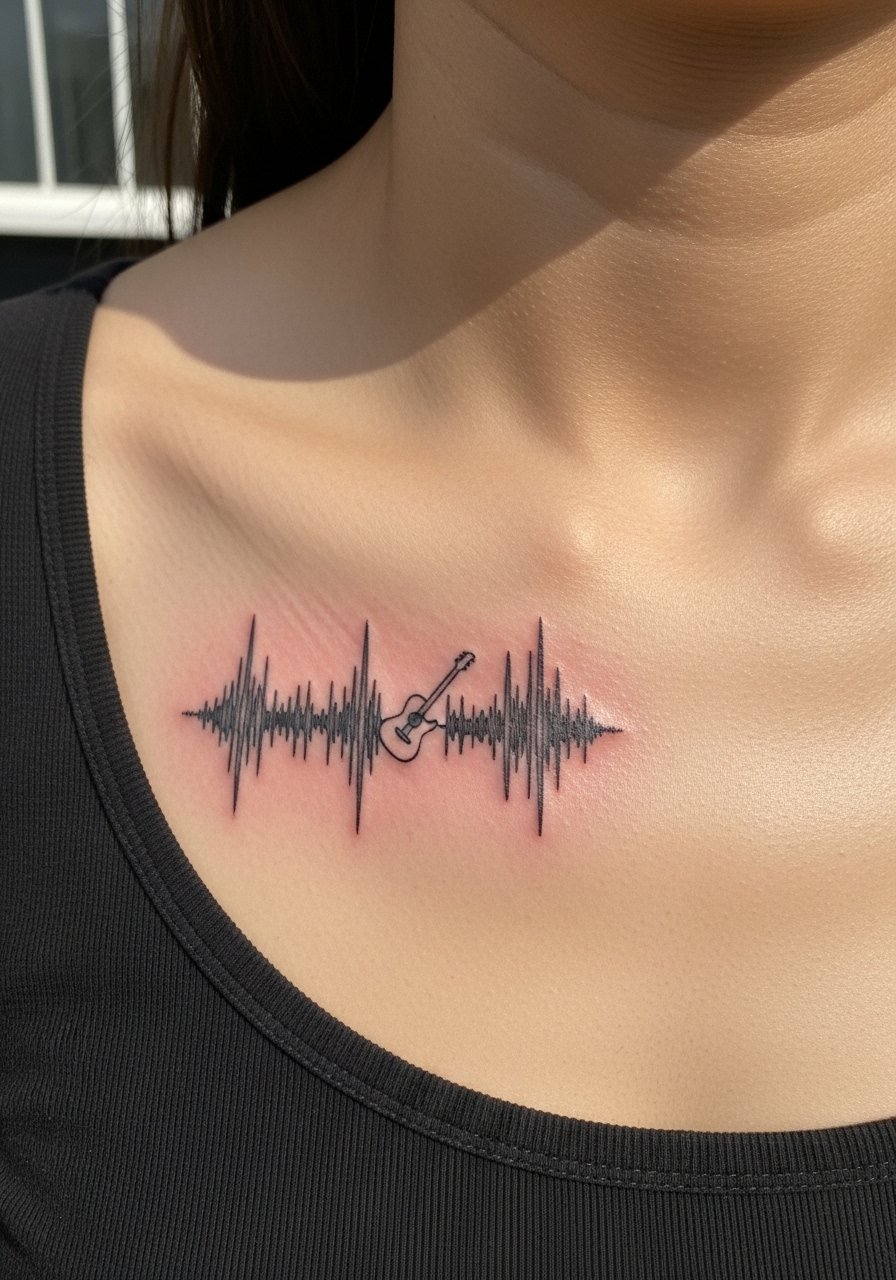
I see clients use favorite riff patterns to tell a story on the chest. The chest placement allows a wide readable waveform. Pain is moderate. Sessions are usually one to two hours. For survival, ask for a bolder baseline for the waveform so it keeps its shape. Tiny guitars can get lost, so request a slightly larger silhouette or a darker fill. At six months the waveform remains legible. At two years the thinnest spikes may need touching up. People forget chest sweat can affect early scabbing.
23. Sleeve Concept With Guitar Collage on Full Arm
When a client told me they wanted a musical life captured, a sleeve was the best answer. Full arm pieces take many sessions. Pain varies by zone. Collage sleeves let you mix techniques, like blackwork guitars next to watercolor notes. For longevity, coordinate styles so the most detailed areas are on lower abrasion zones. I advise mapping out negative space early to avoid overcrowding. A frequent mistake is adding too many tiny elements that clutter after healing. Plan sessions spaced out to let early work settle so you can judge how much more detail to add later.
Tattoo Prep and Aftercare Essentials
Healed skin matters more than session tricks. From what I've gathered, artists often recommend a small set of reliable products. I list what I use and what artists I trust actually recommend.
Aftercare Essentials:
- Aquaphor Healing Ointment, 14oz tube — Industry standard for first 3-5 days. Use a thin layer over fresh ink.
- Saniderm Transparent Adhesive Bandage, 6-inch roll — Second skin healing method. Apply right after the session if your artist approves.
- CeraVe Fragrance-Free Moisturizing Lotion, 16oz — For days 4-14 to keep healed skin supple.
- Dr. Bronner's Unscented Castile Soap, 32oz — Gentle cleaning during the first week.
Before Your Appointment:
- Hush Numbing Cream 5% Lidocaine, 1oz — Apply 30-45 minutes before only if your artist says yes.
- Thermo Tattoo Stencil Paper 8.5×11, 10 pack — Useful if you refine layout at home before the consult.
Long-Term Maintenance:
- SPF 50 Sunscreen Stick for Tattoos, 0.7oz — Prevents fading year after year. Reapply when in the sun.
- Mad Rabbit Tattoo Balm, 2oz — Keeps healed tattoos vibrant during long-term care.
- Hustle Butter Deluxe, 4oz — Vegan aftercare, good for both healing and maintenance.
Optional Comfort Items:
- Numbify Tattoo Numbing Spray, 1oz — For touch-ups or sensitive zones when artist approves.
- Hydrocolloid Bandages Assorted, 12 pack — Great for small tattoos and blister-style protection.
Every artist I asked flagged the wash, a breathable bandage, and a quality balm as essentials. I use the soap for first-week cleaning, Aquaphor for the first few days, then move to CeraVe and a balm like Mad Rabbit. Saniderm gets recommended when you want less scabbing and more controlled healing.
Frequently Asked Questions
Q: Will fine line guitar tattoos blur into each other if I get a full sleeve?
A: From what I've seen, fine line work does soften faster when packed tightly in a sleeve. If you want a fine line aesthetic and a sleeve, ask your artist to alternate line weights. Have them darken primary outlines and use lighter internal lines for detail. That balance keeps the silhouette readable after one to two years. For maintenance, keep a small jar of Hustle Butter Deluxe, 4oz handy to moisturize the area long term.
Q: Do watercolor-style guitars need different aftercare than traditional ones?
A: Yes, in my experience watercolor tattoos often use lighter pigments that can migrate more easily. I suggest avoiding heavy ointments for the first 24 hours unless your artist instructs otherwise. Use a gentle soap like Dr. Bronner's Unscented Castile Soap, 32oz and switch to a light lotion like CeraVe Fragrance-Free Moisturizing Lotion, 16oz after day three. Also ask for slightly denser pigment near focal points during the consult.
Q: How painful is a ribcage guitar and how long does it take to heal?
A: Ribcage work is one of the more painful spots for most people. Sessions can be long for larger pieces and may be split into multiple appointments. Healing follows the standard timeline. Expect scabbing in the first week and reduced tenderness by two weeks. From what I've gathered, full surface healing takes about four to six weeks. Keep the area dry and avoid stretching movements for the first week to reduce scab disruption. If you want a protective product during the first days, Saniderm is often recommended, such as Saniderm Transparent Adhesive Bandage, 6-inch roll, but check with your artist first.
Q: Can a micro-realism guitar pick on the collarbone keep a band logo readable?
A: I have seen micro-logo picks last when the logo contrast is strong. Ask your artist to simplify the logo into bold positive and negative shapes. Tiny type rarely survives, so convert text into a symbol or initials if possible. If it matters to you, plan a touch-up at six to twelve months. During consults I ask artists to show a scale mock so we can judge legibility before inking.
Q: What aftercare should I use immediately after a finger or joint guitar tattoo?
A: Finger and joint areas need special care because they move and get wet a lot. Keep it as dry and clean as you can in the first 48 hours. Use a thin layer of Aquaphor Healing Ointment, 14oz tube for the initial days. After day three, switch to Mad Rabbit Tattoo Balm, 2oz to keep skin flexible. Plan for touch-ups and protect the area from heavy use while scabs form.
Q: Are there tattoo products that artists actually recommend versus ones that are just marketing hype?
A: From talking to artists, the essentials are simple. A gentle cleanser like Dr. Bronner's, a breathable second-skin option like Saniderm for people who want it, and a fragrance-free lotion such as CeraVe. Balms like Mad Rabbit and Hustle Butter are popular for keeping healed ink vibrant. Numbing creams and sprays can be helpful for anxious clients, but artists often prefer you discuss them ahead of the session. I personally keep a sunscreen stick for tattoos, like SPF 50 Sunscreen Stick for Tattoos, 0.7oz, and recommend regular application when exposed to sun.
Q: What should I tell my artist in a consult for a realistic acoustic sleeve versus a symbolic minimal guitar collection?
A: For a realistic sleeve, ask for mock-ups that show contrast and negative space at full scale. Request that the artist emphasize core shadows so details survive long term. For a symbolic minimal collection, be explicit about final size and ask for slightly thicker anchor lines. Tell them about your lifestyle, skin type, and how often you expect to touch up. I always ask artists for healed photos of similar work so I know what to expect after a year.
