
Someone I know spent six months bookmarking floral back tattoos before booking anything. The problem was not the designs available. It was knowing which floral style would hold up on skin, how much it would hurt on the spine, and when a touch-up would be realistic. I spent time in five shops across Brooklyn and talked with artists who work in fine line and blackwork. Below are 20 floral back ideas that fit different pain tolerances and life patterns, plus what to say to your artist so the result looks like the photo long after healing.
1. Fine Line Single Stem Rose, Upper Center Back

Someone I know first got this after seeing a friend with similar linework. Tell your artist you want slightly thicker contour at the base so the stem keeps definition after a year. Expect a moderate pain level on the upper back and a session under two hours for a single stem. The mistake I see is asking for lines so thin they become hairlines. Fine line here can blur faster than bold outlines. Plan a touch-up around year two if you want crisp petal separation. If you want a wider visual field, ask the artist to leave breathing room around the design.
2. Stipple-Shift Peony Cluster Across Shoulder Blades

Fair warning: shoulder blades move with posture, so expect short breaks if the artist needs different angles. Ask for stipple shading rather than smooth gradients to keep texture as the piece heals. Stipple ages nicely because dots retain contrast longer than washed gradients. People often request too much tiny detail packed into a small area. If you plan large jewelry or bras, mention that now so the cluster sits comfortably under straps. Session time usually runs two to three hours. Expect mild soreness when reaching or lifting for the first week.
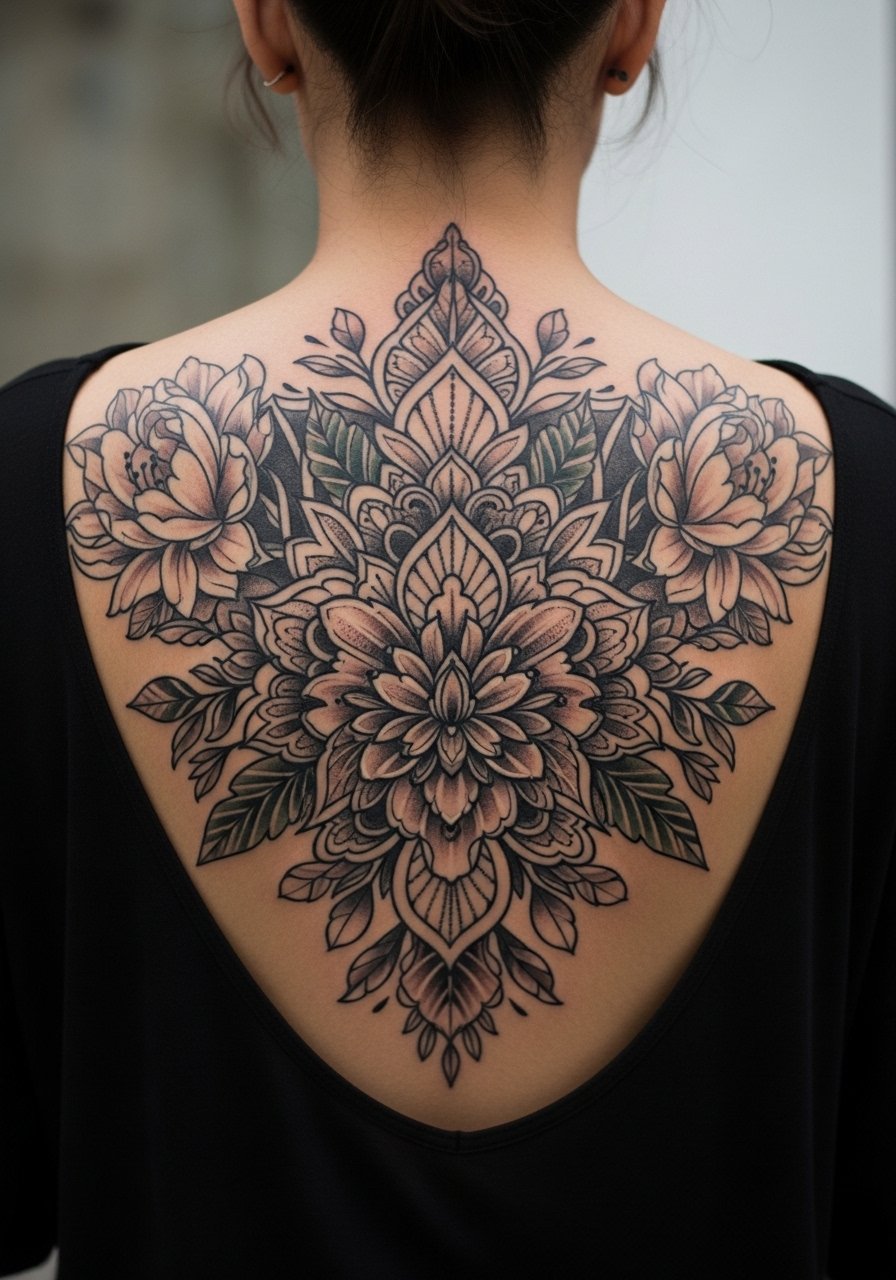
3. Blackwork Floral Spine Column
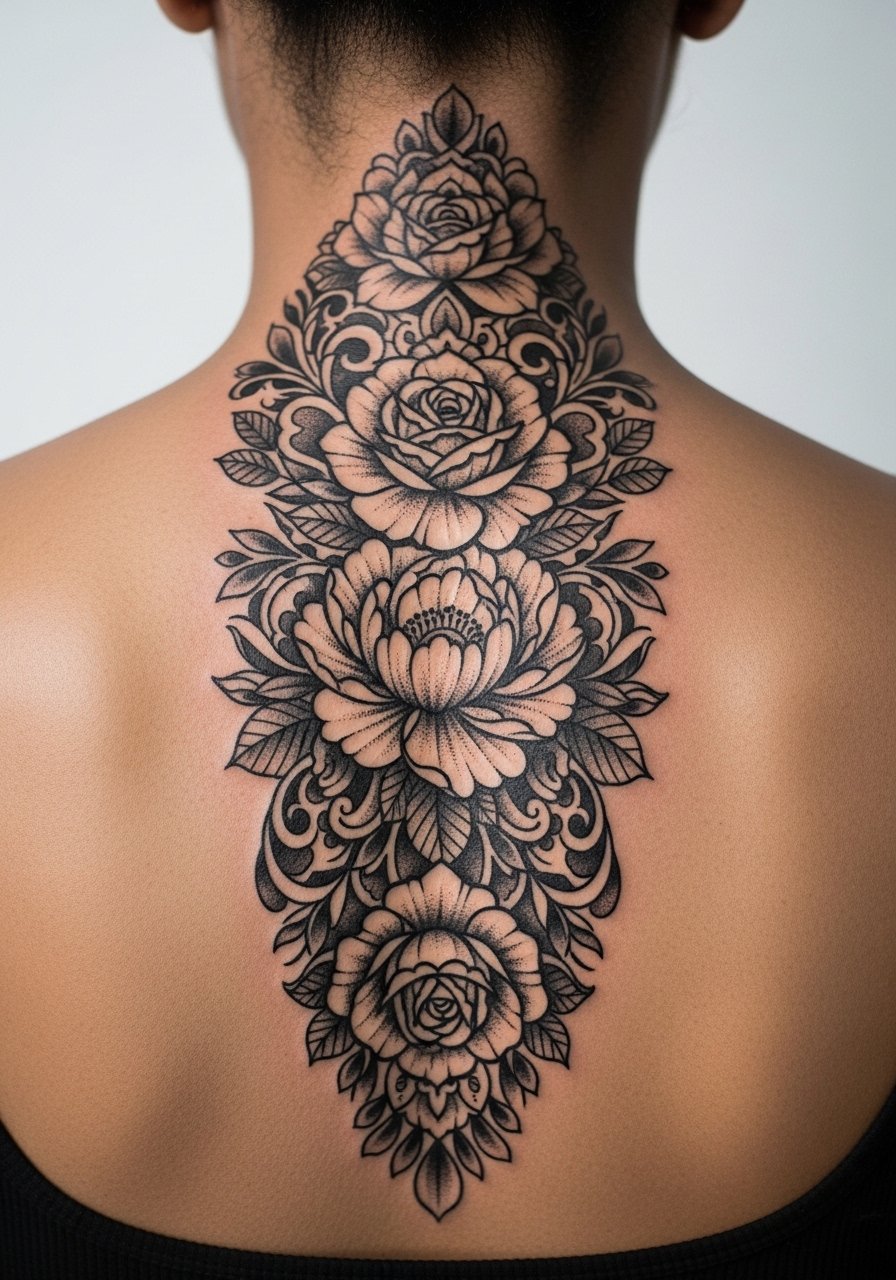
There is a split in opinion about heavy blackwork on the spine. One camp worries about blowout because the spine skin can be thin and mobile. The other camp says bold solid fills resist fade and actually mask small blowouts. Ask your artist where they stand on edge tapering and packing. This style feels intense during the session because the needle rides near bone. Expect multiple shorter passes across two sessions for full saturation. Common mistake is asking for overly fine petal detail inside solid fills, which defeats the point of blackwork clarity.
4. Watercolor-Adjacent Wildflowers, Upper Back Sweep

Most watercolor tattoos fade into washed patches when pigment is placed too shallow. One group of artists says watercolor is best avoided on the back because it needs dense saturation to hold. The other group adapts by using stronger anchors in the design and touch-up plans. Tell your artist you want the watercolor effect but with anchored dark linework that can be refreshed later. This placement spreads well visually, but color touch-ups may be required at year two to keep the soft pools vibrant. Expect the session to feel like long, gentle passes rather than sharp stings.
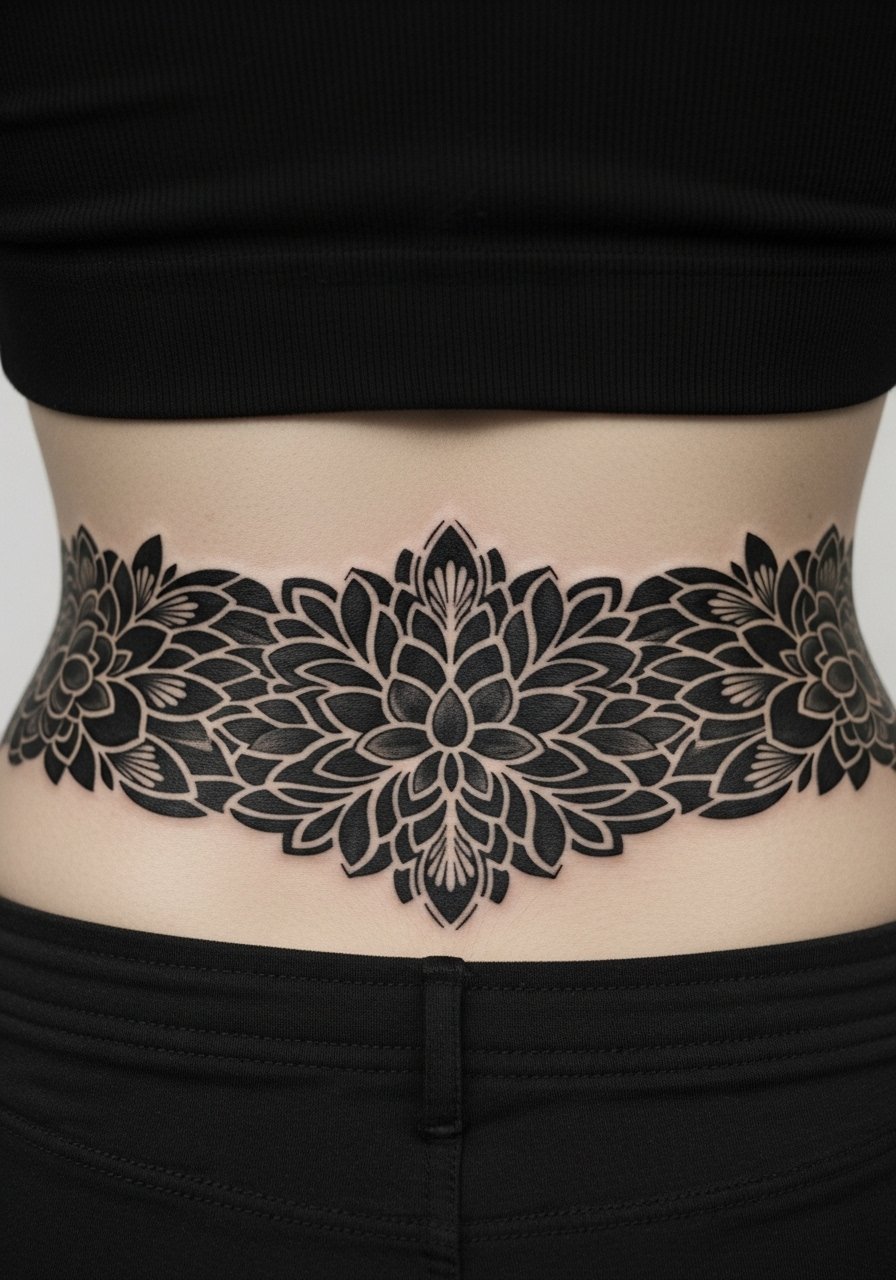
5. Botanical Mandala Bloom, Centered Lower Back

When you sit down with your artist for a mandala, bring a photo showing how it sits with your natural waistline. The lower back can be forgiving for symmetry if the piece aligns with the spine and belt line. People often ask for too many tiny spokes, which blur over time. Ask for larger spacing between dot work and spokes to preserve the geometry. Session time commonly falls between three and four hours depending on diameter. Lower back tattoos can interact with clothing, so mention daily wear to the artist for placement tweaks.
6. Vintage Botanical Flash Panel, Mid-Back

There is visual impact in bold outlines that read at a distance and keep shape after healing. If you want a mid-back panel, request the artist use a mix of bold outlines and medium shading to avoid early fading into blotches. The session usually feels like intermittent pressure, not sharp localized pain. A common error is asking for flash to be shrunk down too small. Explain where you want it to sit on your scapula and ask to see a stencil while standing so you can check movement. Touch-ups for color are typically every three to four years for heavy color.
7. Asymmetrical Blooming Vine, Left-to-Right Sweep

Visual impact lead. This placement reads as a single motion across the back and fits under one strap or across a dress opening. Tell the artist you want directional growth towards the shoulder to play with clothing lines. The mistake here is making the vine too narrow and expecting it to stay visible from across a room. Expect the session to be moderate in length and slightly uncomfortable when working near the scapula ridge. Plan a touch-up at year two if you want the vine to stay crisp. Mention any future plans for expansion so the artist composes with future pieces in mind.
8. Micro-Realism Floral Portrait, Upper Left Back

When you ask for micro-realism, bring macro photos of the flowers you like. Artists will need references to translate petal nuance into ink. Micro-realism has a higher touch-up likelihood because tiny contrasts can soften quickly. A common mistake is compressing too many flower types in a small patch. Session time can stretch to three hours depending on detail. Mention any history of keloid scarring during consultation because realistic shading sits differently on raised scar tissue. If you want longevity, accept that a two-year touch-up is possible.
9. Geometric Floral Panel With Negative Space

When you choose geometry mixed with florals, ask for negative space to be mapped out in the stencil phase. The design ages well if the gaps are large enough to avoid blurring. The mistake I see is packing geometry too tightly into small areas so the negative space disappears after healing. Sessions are steady and can feel like long repetitive passes, especially with stipple. Expect a touch-up window at three years if you want the crisp edges maintained. Tell your artist how visible you want the geometry with clothing so they can scale appropriately.
10. Single Large Peony Over Left Scapula

Personal observation lead. A single large peony sits well on the scapula because it follows natural muscle shape. Mention to your artist that you want the bloom to follow the curve of the shoulder blade so it looks organic when you move. The common error is making a round bloom too small for the scapula, which reads cramped. Expect sharper discomfort when the needle passes near the bone edge. Healed appearance holds well with mid-weight shading and light touch-ups at year three if you keep sun exposure low.
11. Floral Lace Sternum Extension

Pain warning lead. The sternum is a higher pain spot for many. If you want a lace-like floral that reaches toward the clavicle, ask the artist for slightly bolder anchor points so the pattern keeps its lace look after healing. One typical mistake is insisting on ultra-thin filigree across the sternum, which can vanish into fuzziness. This placement may require a series of short sessions. Note that sternum work often needs careful aftercare because movement and clothing friction can stress fresh lines.
12. Cascading Orchid Spine Accent

Consultation lead. Tell your artist you want the orchids to breathe and not become a straight column of petals. Ask where they suggest placing secondary blooms so the composition moves with your spine. Orchids near the spine can feel sharp during the session, especially at the vertebrae. A common error is packing too many tiny buds down the column. Expect one or two sessions depending on size, and plan for a touch-up in two to three years to refresh petal edges.
13. Minimalist Line-Work Floral Crescent
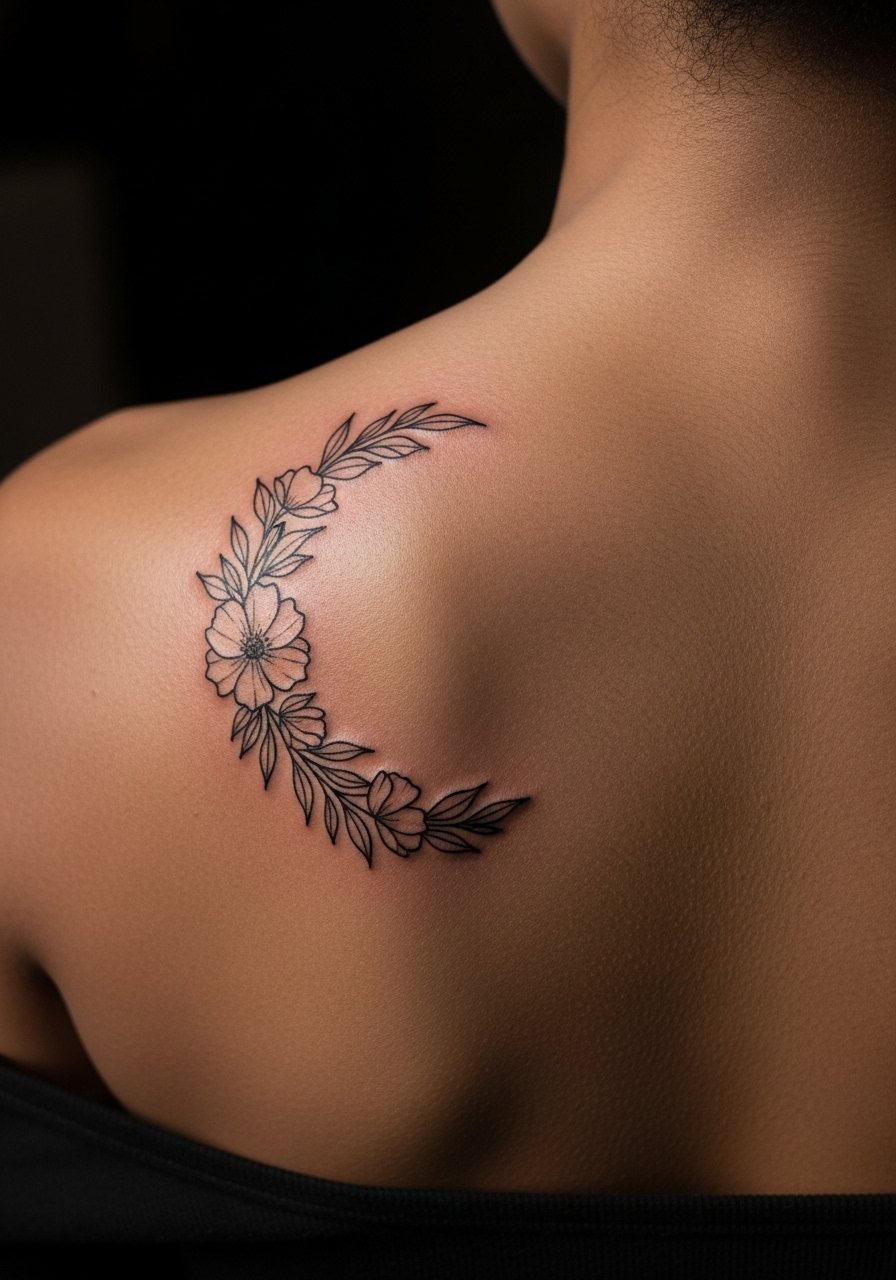
Mistake lead. The biggest mistake with minimalist line-work is scaling it too small for a busy area like the upper back. When you request a crescent, specify the curve radius and ask to see a standing stencil so you can gauge movement with your shoulders. Pain is lower on fleshy parts but can spike near bone. Minimalist work often needs an earlier touch-up than heavy ink because thin lines can soften. Session times are short, often under an hour for a modest crescent. Tell the artist your clothing habits so they place the arc where straps do not rub.
14. Botanical Sleeve Across the Upper Back

Visual impact lead. A botanically themed upper back sleeve gives room for variety without committing to a full torso piece. Tell your artist which flowers matter most so they get priority placement. The mistake is trying to cram in too many species without regard for negative space. Sessions will be multiple and spread over months. Expect mild soreness across the area and planning for touch-ups at the two to four year mark depending on sun exposure. Mention future arm extension plans if you think you might grow this into a full sleeve later.
15. Blackout Petal Silhouette Panel
Controversy lead. Artists split on blackout pieces for florals. One camp says blackout panels create dramatic contrast and age predictably. The other camp cautions that large blackout areas hide future expansion and healing complications. Ask the artist about long-term options for cover-ups or additions before you commit. Sessions are intense and often require multiple visits to fully saturate. Blowout risk is mitigated by keeping solid edges crisp and allowing full healing between passes.
16. Colored Lotus With Delicate Highlights

Aging lead. Color choices matter for lotus petals because pinks and yellows can fade faster without dense saturation. Tell your artist you want saturated anchors in shadow areas so highlights retain pop over time. A common mistake is relying on translucent color only without darker anchors. Sessions are typically two hours for medium size. Expect a touch-up at year two if you spend time in sun. If you plan regular pool visits or vacations, plan touch-ups around those cycles.
17. Vine and Bloom Negative Space Band

Consultation lead. When asking for a band that uses negative space, request a standing stencil so the artist can align it with your posture. The mistake here is requesting a band that crosses natural folds and then wondering why it looks distorted seated. This area usually rates moderate on pain and can be done in a single session if sized correctly. Expect touch-ups at year three for edge crispness if you wear tight belts or backpacks often. Mention daily activities so the artist can offset pressure points.
18. Antique Botanical Illustration Replica
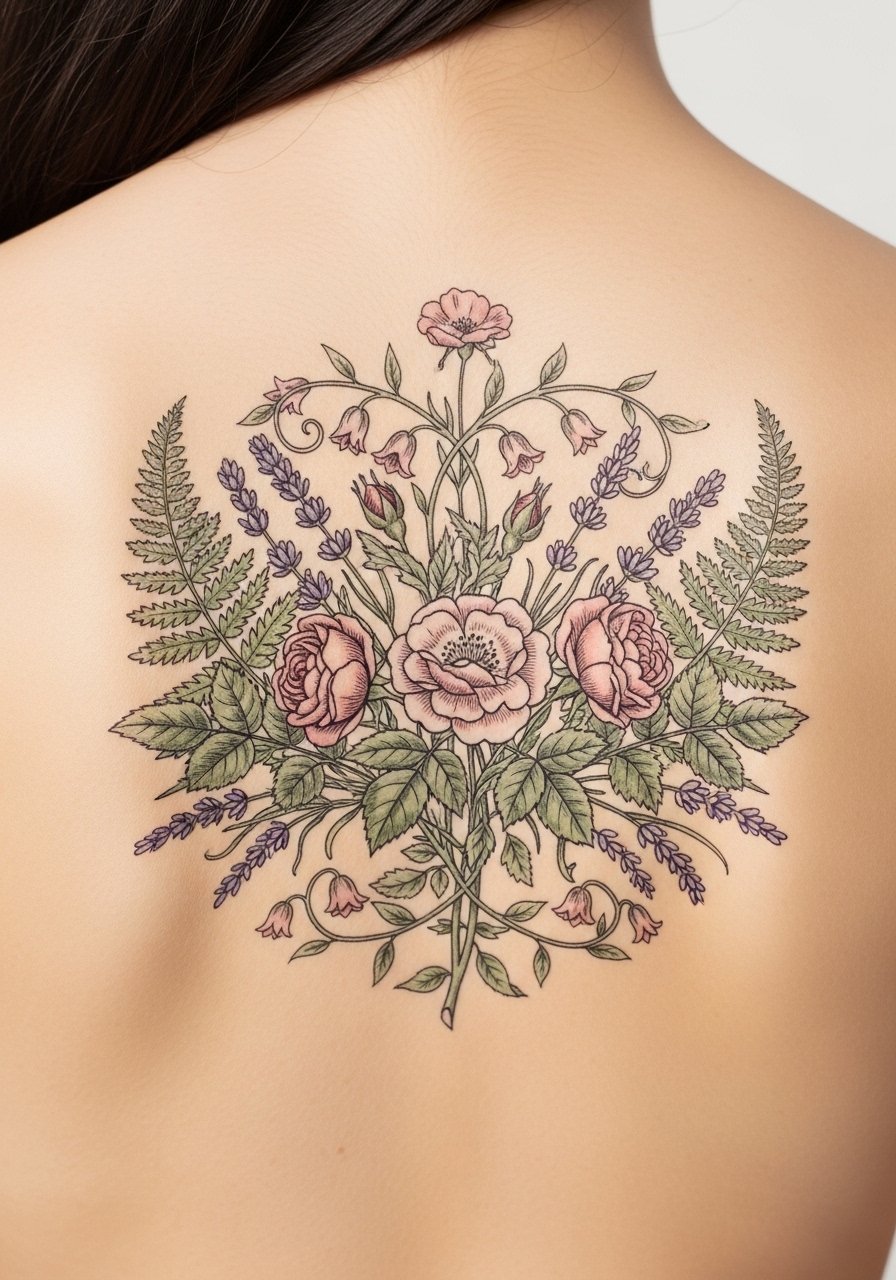
Personal observation lead. If you want an antique illustration feel, bring high-resolution prints so the artist can match etching strokes. The error is asking for exact replication at a small scale. Older illustration detail needs room to convert into readable linework. Sessions can be long depending on size and will feel like repetitive fine passes. Expect the piece to hold detail well if the artist uses slightly heavier linework than the original print. Talk about future framing options if you plan to add companion pieces.
19. Peony and Script Hybrid, Lower Center Back

Consultation lead. When text is part of a floral, specify the exact wording and font so your artist can size letters to survive future softening. A common mistake is tiny script tucked under dense petals that vanishes. Sessions are moderate, and lower back placement typically handles script fine when letters are spaced. Ask for the stencil to be placed while you stand and sit to ensure the script does not warp with posture. Expect a possible touch-up at year two for line crispness.
20. Mixed-Technique Floral Backpiece With Negative Space Frame
Mistake lead. The biggest error with a large mixed-technique backpiece is not planning the frame and negative space early. Tell the artist which flowers you want as focal points and which should recede. Sessions are multiple and often split between linework and color passes. Blowout risk rises with overly tight detail near the edges, so leave breathing room. Budget time for a year one touch-up to unify tone and refresh contrast where needed. If you plan to add a sleeve, say so during the first consult.
Tattoo Prep and Aftercare Essentials
Fragrance-free gentle foaming cleanser. Use for the initial 72-hour wash routine to remove ointment and crusting without stripping skin oils.
Lightweight fragrance-free balm for tattoos. Apply thin layers after cleansing to keep surface hydrated while allowing the skin to breathe.
Medical-grade second skin bandage, 6-inch roll. Useful for large backpieces when your artist recommends occlusion for the first 24 to 48 hours.
Silicone scar sheet pack. Helps with raised areas if you have a history of hypertrophic scarring after the tattoo is healed.
Broad-spectrum mineral sunscreen SPF 30+. After healing, sunscreen is the single most important measure to slow fading and loss of saturation.
Lightweight breathable aftercare ointment comparable to Aquaphor. Use sparingly during the first week if your artist recommends an occlusive. This is the single mainstream product listed here.
Reusable soft clothing extenders for straps. Helpful to avoid rubbing fresh ink with bras or tight tops while healing.
Medical-grade occlusive bandage, single-use sheets. For areas where friction is unavoidable, these sheets protect and reduce scabbing risks.
Every tattoo is different. Always follow your artist's specific aftercare instructions. Consult a dermatologist if you have skin concerns or unusual healing issues.
Frequently Asked Questions
Q: Will fine line rose work on my upper back if I am prone to blurred lines?
A: It depends on scale and the artist's technique. Ask for slightly stronger outer lines and spaced inner detail to reduce blurring risk. If you tend to scar or have thin skin, plan a touch-up at year two and discuss adjustments in line weight during the consult.
Q: How painful is a spine column floral compared to a mid-back peony?
A: The spine column will usually feel sharper because the needle rides over bone. A mid-back peony sits on softer tissue and tends to register as a long dull pressure. Pain perception varies a lot, so break sessions into shorter intervals if needed.
Q: Do watercolor-style floral pieces need different aftercare than traditional color work?
A: Yes, watercolor-adjacent pieces often rely on shallow, airy color that may require denser anchor points and earlier touch-ups. Follow the same wash and balm routine, but check in with your artist about a planned color refresh at year two if you want sustained bloom.
Q: Can I protect a large floral back tattoo from fading without constant sunscreen?
A: Sunscreen is the best protection. After healing, regular use of a broad-spectrum mineral sunscreen on exposed sessions is essential. Clothing and shade help, but sunscreen stops the majority of UV-driven pigment loss.
Q: What should I show my artist if I want an antique botanical illustration style?
A: Bring high-resolution reference images of the illustration you love and photos of your upper back standing and sitting. Ask the artist to show a stencil on you before the session so you confirm scale and flow.
Q: If I plan a future sleeve extension, how do I request a back botanical that fits later?
A: Tell the artist up front that you plan additions and ask them to compose with natural expansion corridors in mind. Leave buffer zones and avoid closed shapes that would force awkward seams when you connect pieces.
Q: Is there a one-size-fits-all healing product you recommend for the first week?
A: No single product fits everyone, but a fragrance-free gentle foaming cleanser plus a lightweight fragrance-free balm works well for many. If your artist recommends occlusion, medical-grade second skin bandage in the immediate post-session window can help.
