
I spent months saving family photos and sketches before I committed to my first family piece. The real challenge wasn't the design — it was picking a style and placement that would still feel honest five and fifteen years from now. I looked for designs that age well, work with different skin tones, and carry a clear emotional thread. These 25 family tattoos are the ideas I kept returning to while planning my own work.
This list leans into meaningful, timeless family tattoos: fine line, traditional, micro-realism, blackwork, and minimalist pieces. Placements range from inner forearm and chest to behind the ear and ribs. From what I've seen, artists in 2026 prefer clean lines and portraits that read well healed rather than just fresh.
1. Fine Line Botanical Sleeve On Inner Forearm
Style/Technique: Fine Line / Illustrative
Pain Level: Medium (3-4/10)
Session Time: 3-5 sessions
Best For: Statement piece, easy to hide with sleeves

I loved this idea because plants can represent family growth without being literal. Fine line leaves and tiny initials or birth-date roman numerals give privacy and meaning. Inner forearm is visible but easy to cover. Expect moderate pain for inner forearm and repeated sessions for detailing. Healing takes 2-3 weeks for surface peeling; full settling around 3 months. Fine lines can blur over years—ask your artist about slightly thicker primary lines to preserve clarity. Common mistake: too-small text or details that won't age well. Ask for healed photos from artists who specialize in fine line and illustrative work.
2. Micro-Realism Portrait On Upper Arm
Style/Technique: Micro-Realism / Photorealism
Pain Level: Low-Medium (3/5)
Session Time: 3-6 hours, may need touch-ups
Best For: Tribute portrait, visible statement
Portraits feel deeply personal. Upper arm gives enough space for detail and handles long sessions better than ribs. Micro-realism looks delicate when healed if the artist uses proper contrast. I’ve seen portraits that look great fresh but muddy when healed because contrast wasn't planned. Pain is manageable on the outer arm; longer sessions mean fatigue rather than sharp pain. Expect touch-ups after healing to keep features crisp. Avoid tiny eyes or lashes—ask your artist how they plan contrast and saturation for longevity on your skin tone.
3. Minimalist Line Family Silhouette Behind Ear
Style/Technique: Minimalist / Single Line
Pain Level: Low-Medium (4/10)
Session Time: 30-60 minutes
Best For: Subtle tribute, hidden placement
A tiny single-line family silhouette or connected faces behind the ear is intimate and low-profile. It’s quick, so pain is short but the area is sensitive. Heals fast—surface healing in a week. The trick is simplicity: complex faces won't work here. I recommend minimalist line artists who show healed examples on similar skin tones. Common mistake: asking for too much detail. This style reads well healed because there’s minimal ink to blur. If you want color, keep it muted and sparing.
4. Traditional Family Crest On Chest
Style/Technique: Traditional / American Traditional
Pain Level: Medium (4/10)
Session Time: 2-4 hours
Best For: Bold, timeless statement near heart
A family crest or shield in traditional style feels classic and stands the test of time. Chest placement is meaningful—close to the heart—though expect moderate discomfort over sternum or ribs. Traditional’s heavy lines and saturated colors age well; black holds strong and colors mellow gracefully. Artists who do neo-traditional or American traditional work can adapt heraldic elements into a personal crest. Avoid tiny lettering; bold banners with initials scale better. I’ve noticed traditional pieces often look stronger after a year of healing.
5. Micro-Realism Pet Portrait On Thigh
Style/Technique: Micro-Realism / Color
Pain Level: Low (2-3/10)
Session Time: 2-4 hours
Best For: Hidden, large canvas for detail
For me, pets are family. The thigh is forgiving for long sessions and great for detailed color portraits. Pain is lower on fleshy areas. Healed color portraits can look softer than fresh work, so aim for slightly stronger saturation at the session. Ask to see healed pet portraits from the artist to judge how colors settle. Common mistake: using only pastels—some pigments fade faster. Thigh portraits are easy to hide or show depending on clothing.
6. Blackwork Tree Of Life On Back Shoulder Blade
Style/Technique: Blackwork / Graphic
Pain Level: Medium (4/10)
Session Time: 2-5 hours
Best For: Symbolic, modular for future additions
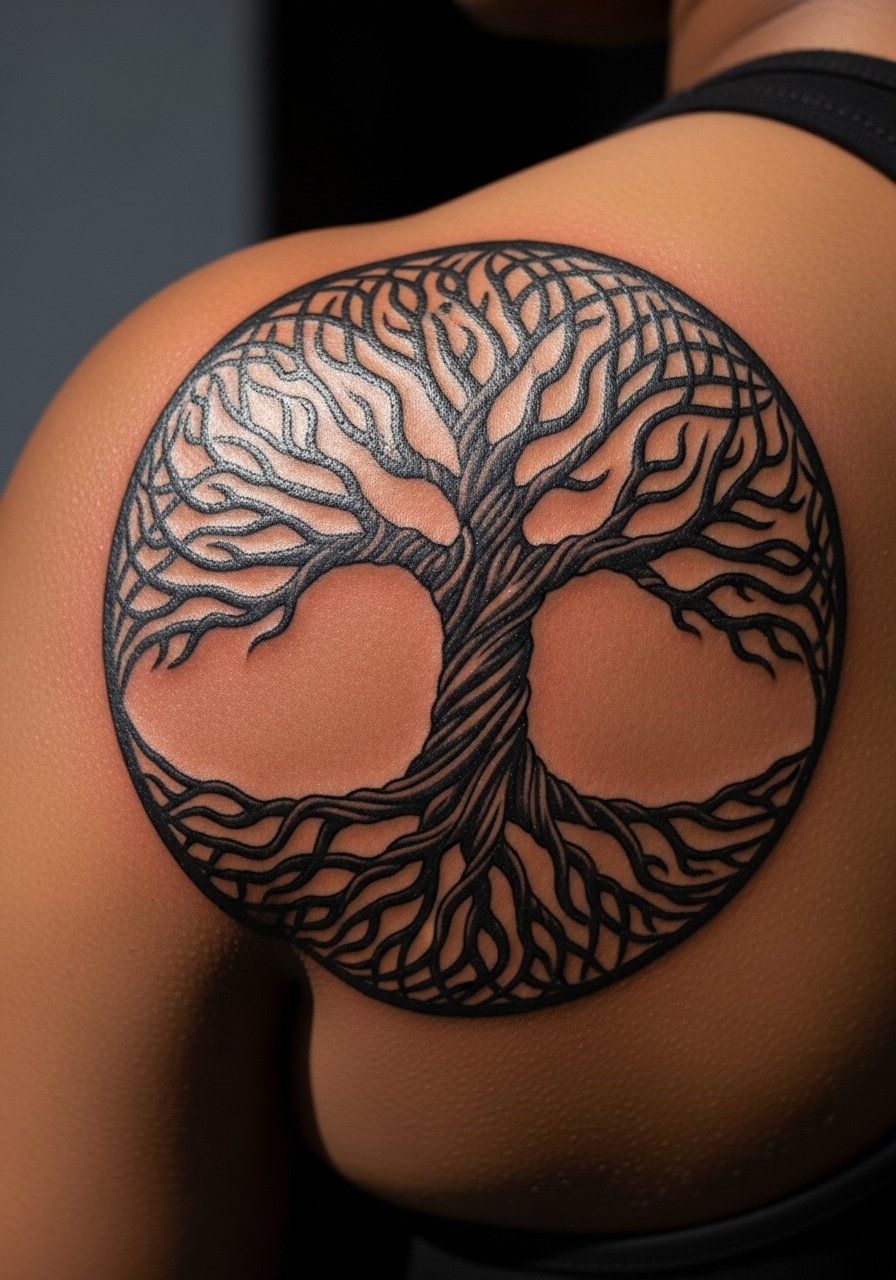
A blackwork Tree of Life reads clearly on most skin tones and ages well because of strong contrast. Shoulder blade gives a broad canvas and is great if you want to add names or dates later along branches. Expect moderate pain especially closer to the spine. Blackwork heals reliably—less fading than delicate color. Common mistake: too much tiny detail in branches. Look for an artist experienced in graphic blackwork to ensure lines remain crisp as the skin ages.
7. Watercolor Family Watercolor Bouquet On Ribcage
Style/Technique: Watercolor / Painterly
Pain Level: High (7/10)
Session Time: 3-5 hours (may need multiple)
Best For: Emotional, flowing art close to heart
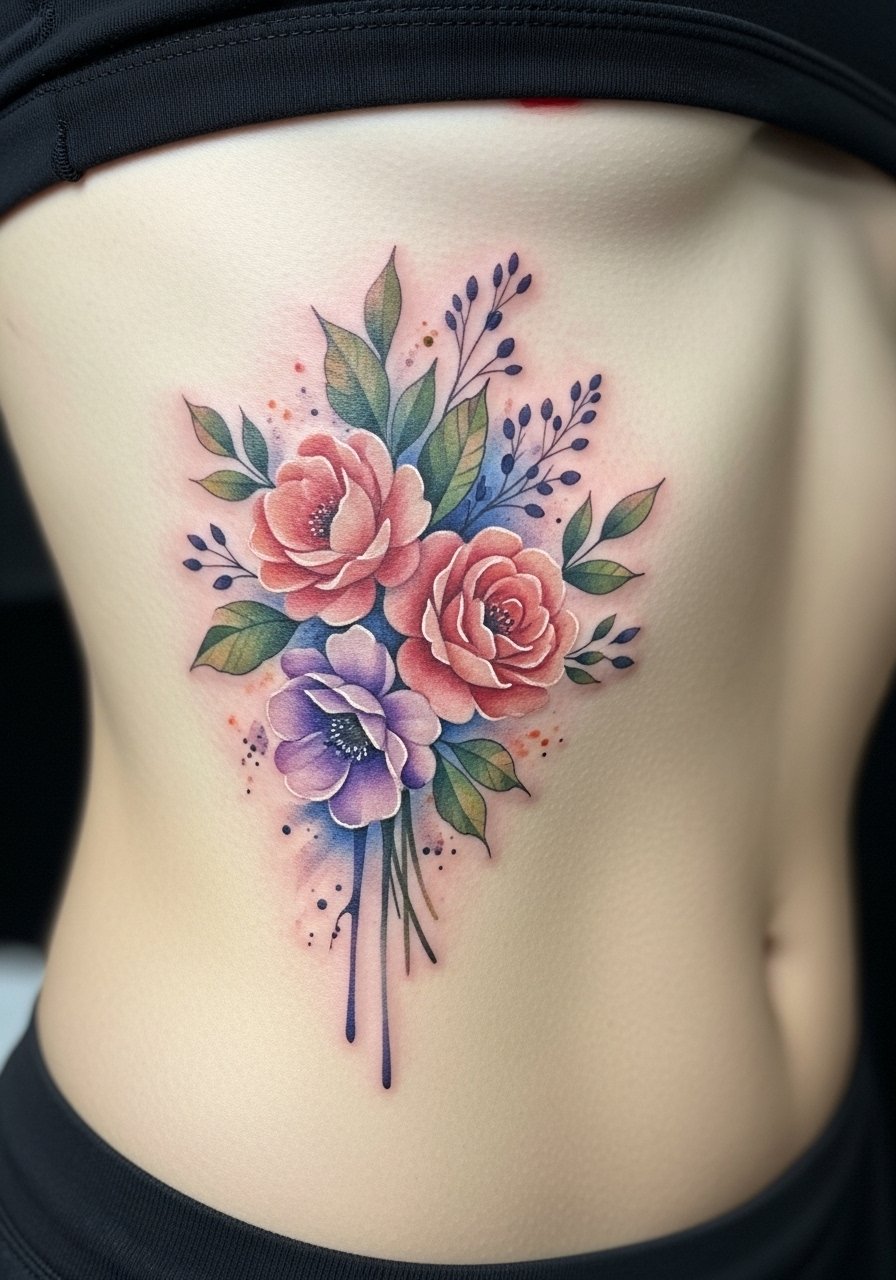
Watercolor looks beautiful but ribs are painful and the pigments can fade faster. I’ve seen gorgeous rib pieces that lost some vibrancy—artists plan for stronger under-saturation to compensate. This placement is intimate and meaningful, but expect longer recovery and cautious aftercare because movement and breathing stress the area. Avoid overly light washes; ask about pigment choices and touch-up plans. If you want emotional color, pair watercolor with a bold black outline or name to anchor it for the long run.
8. Neo-Traditional Family Portrait Frame On Upper Thigh
Style/Technique: Neo-Traditional / Color
Pain Level: Low (2-3/10)
Session Time: 2-4 hours
Best For: Stylized portrait with decorative elements

Neo-traditional portrait frames let you blend stylized faces with decorative motifs—great for family groups or ancestor tributes. The thigh gives room for composition and is easier for longer sessions. Neo-traditional ages well because of solid linework and considered color choice. I recommend artists who mix illustrative portraiture with decorative elements. Avoid tiny face details; stylized features hold up better. Healing is straightforward; expect full settling in a few months.
9. Minimalist Coordinates On Inner Wrist
Style/Technique: Minimalist / Numeric
Pain Level: Low (3/10)
Session Time: 15-45 minutes
Best For: Subtle daily reminder, visible placement
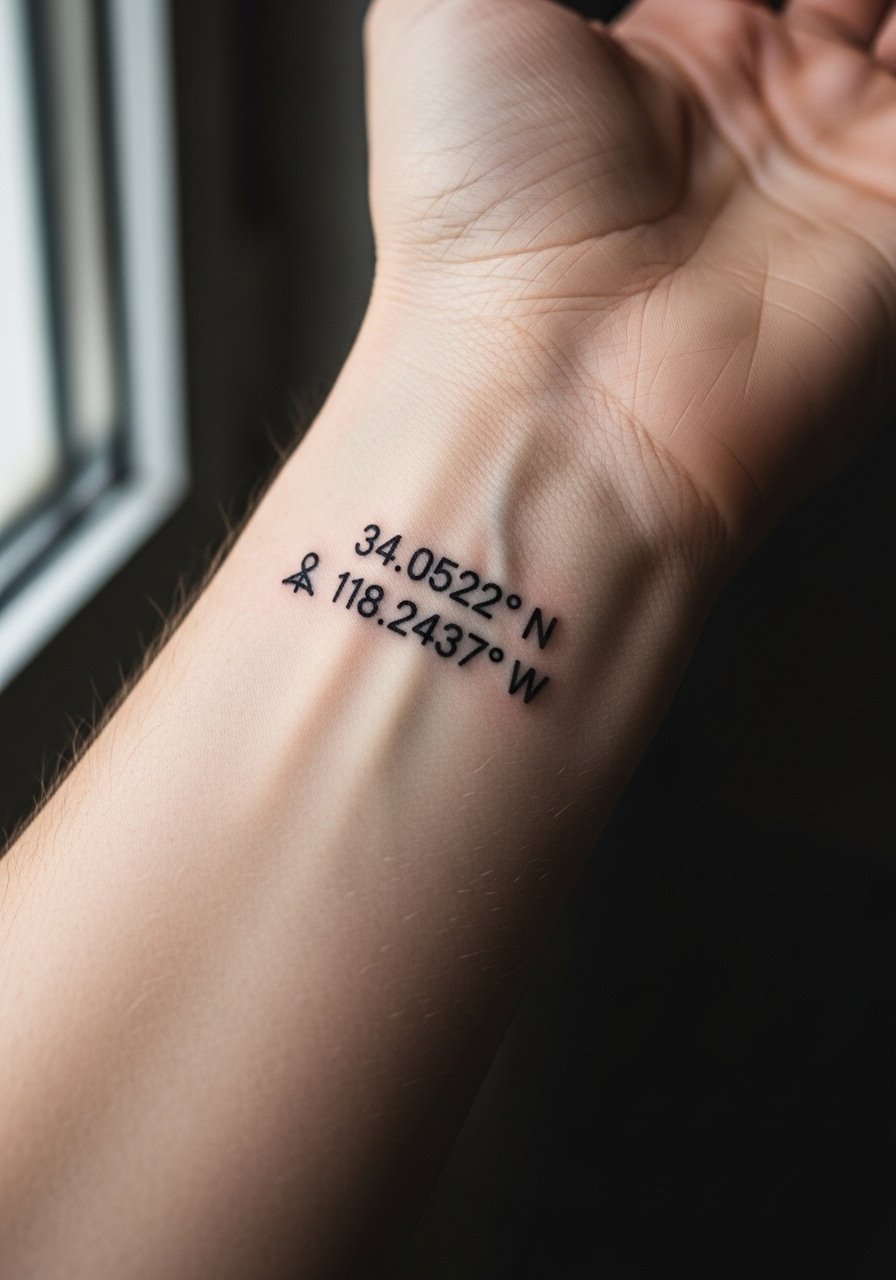
Coordinates of a family home or birth location are quietly meaningful. Inner wrist is visible and convenient for daily reminders. Lines and numbers need to be sized for legibility—tiny digits blur over time. Pain is brief and manageable. Heals quickly but avoid sun exposure for long-term clarity. Common mistake: choosing a font that’s too thin; ask the artist about kerning and healed examples. This is a low-commitment way to carry a location-based family memory.
10. Matching Minimalist Rings On Fingers
Style/Technique: Minimalist / Single Line
Pain Level: High (6-8/10)
Session Time: 30-90 minutes each
Best For: Symbolic commitment, always visible
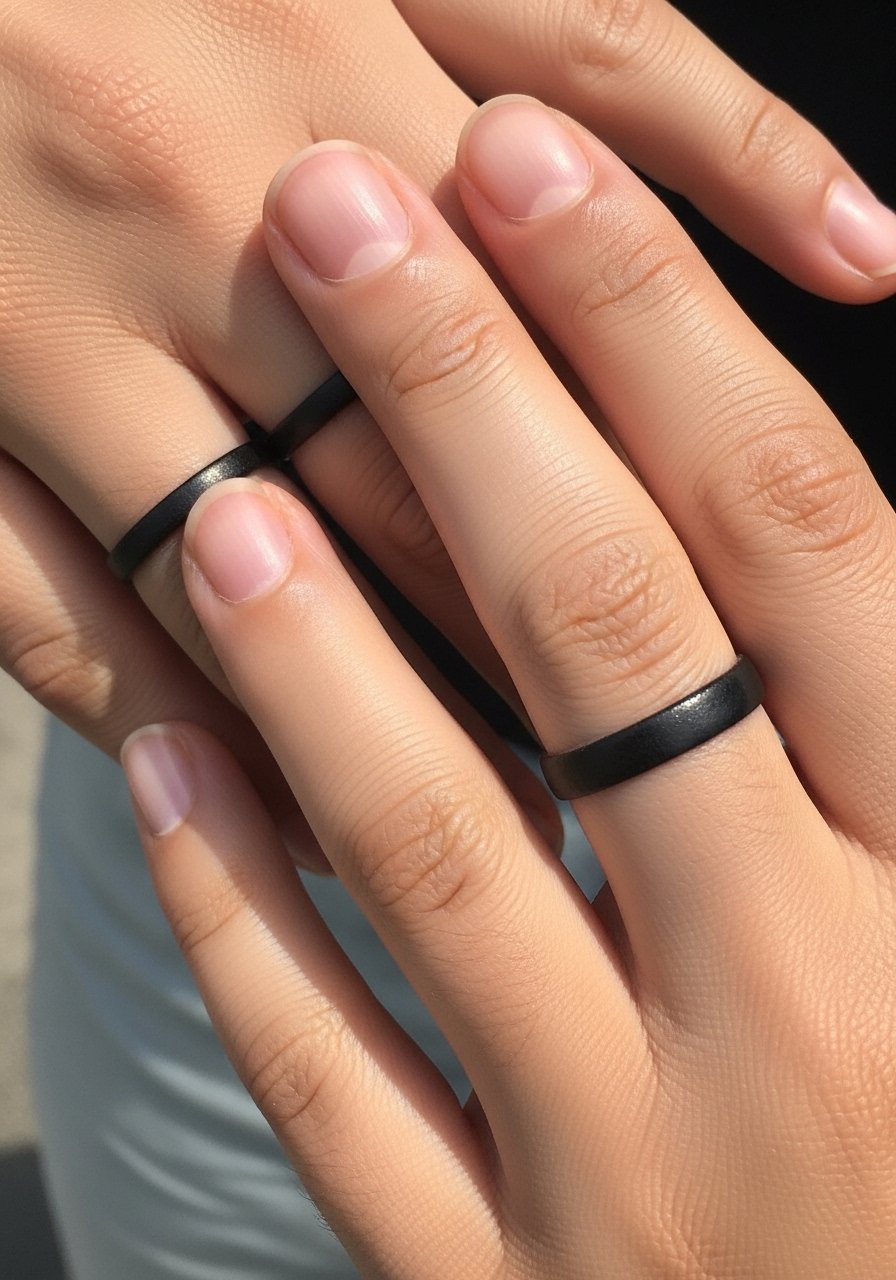
Finger tattoos read differently healed because skin regenerates fast and lines can blur. Matching rings for partners or family members are meaningful but demand upkeep—touch-ups are common. Pain is higher due to thin skin and bone proximity. If you want longevity, choose slightly wider bands and bold lines. I’ve seen thin script disappear; bold, simple shapes translate to longer life. Discuss maintenance with your artist before committing.
11. Scripted Name With Heartbeat On Side Rib
Style/Technique: Script / Fine Line
Pain Level: High (7-8/10)
Session Time: 1-2 hours
Best For: Personal tribute, private placement
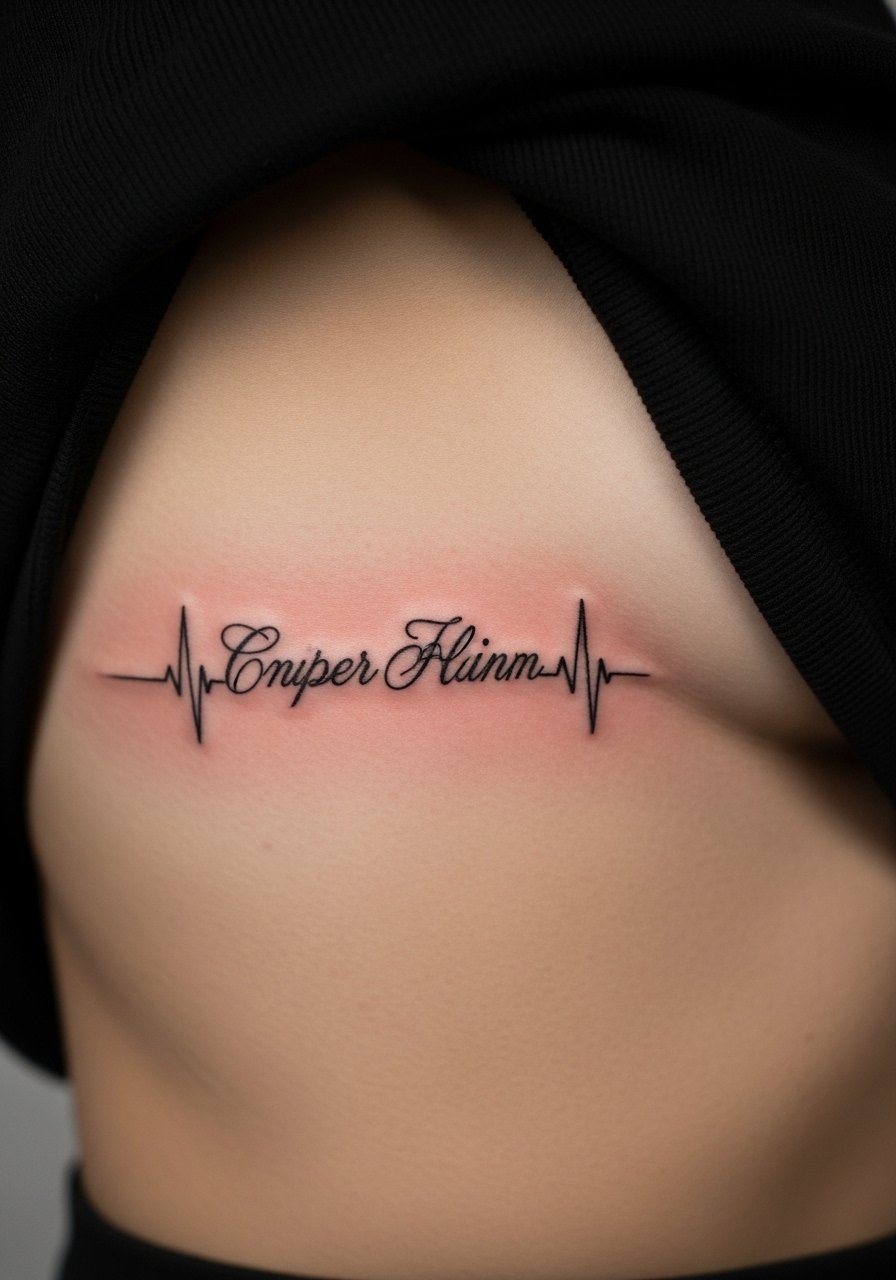
A name woven into a heartbeat line is a strong emotional piece. Ribs are one of the more painful spots, but the result is intimate and private. Fine script must be sized well; too-small letters blur. Expect slower healing due to movement; keep clothing loose during the first week. From what I've seen, boldening the main strokes slightly helps the script remain readable over time. Common mistake: overly ornate fonts in a high-motion area.
12. Family Coordinates Constellation On Collarbone
Style/Technique: Minimalist / Dotwork
Pain Level: Medium (4/10)
Session Time: 1-2 hours
Best For: Subtle, stylish chest piece
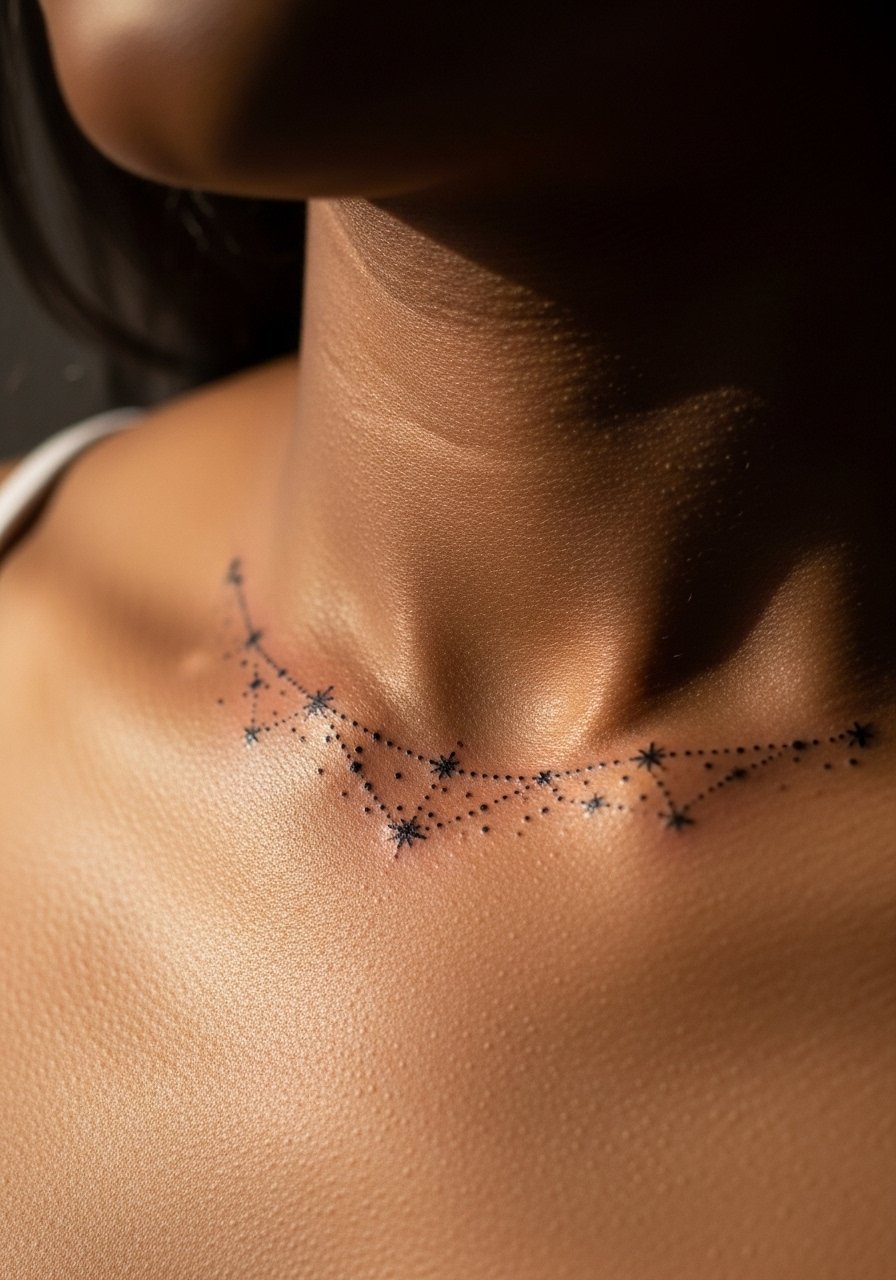
Mapping family members as stars in a small constellation along the collarbone is a modern, chic approach. Collarbone area has medium pain and looks great with jewelry. Dotwork and small stars hold up if dots are not too tiny. Healing is straightforward but avoid friction from necklaces early on. I like this because it scales—you can add stars over time as family grows. Ask your artist about spacing to avoid dots merging as skin ages.
13. Blackwork Surname Script Across Upper Back
Style/Technique: Blackwork / Bold Script
Pain Level: Medium (4/10)
Session Time: 1-3 hours
Best For: Readable statement on a large canvas
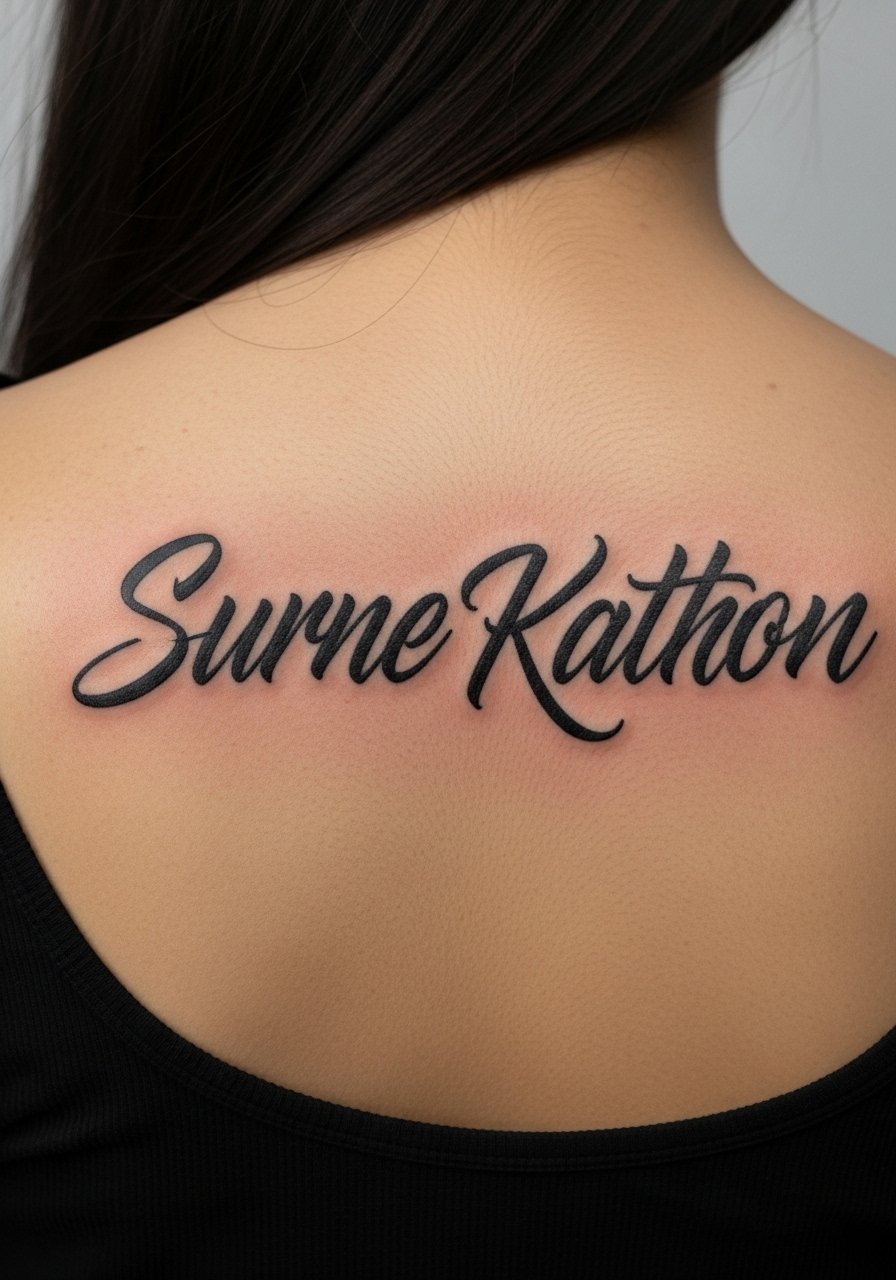
A bold surname across the upper back reads clearly and ages well if letterforms are thick enough. Back offers a large canvas and tolerable pain for longer sessions. Blackwork script is forgiving; heavy strokes remain legible as lines settle. I suggest checking how the font looks healed at 6-12 months. Common mistake: skinny scripts that fade into thin lines. Artists who specialize in lettering can advise on kerning and stroke weight.
14. Small Footprints On Ankle For A Newborn
Style/Technique: Micro-Realism / Tiny Linework
Pain Level: Low (2-3/10)
Session Time: 30-60 minutes
Best For: New parent tribute, hidden with socks/shoes
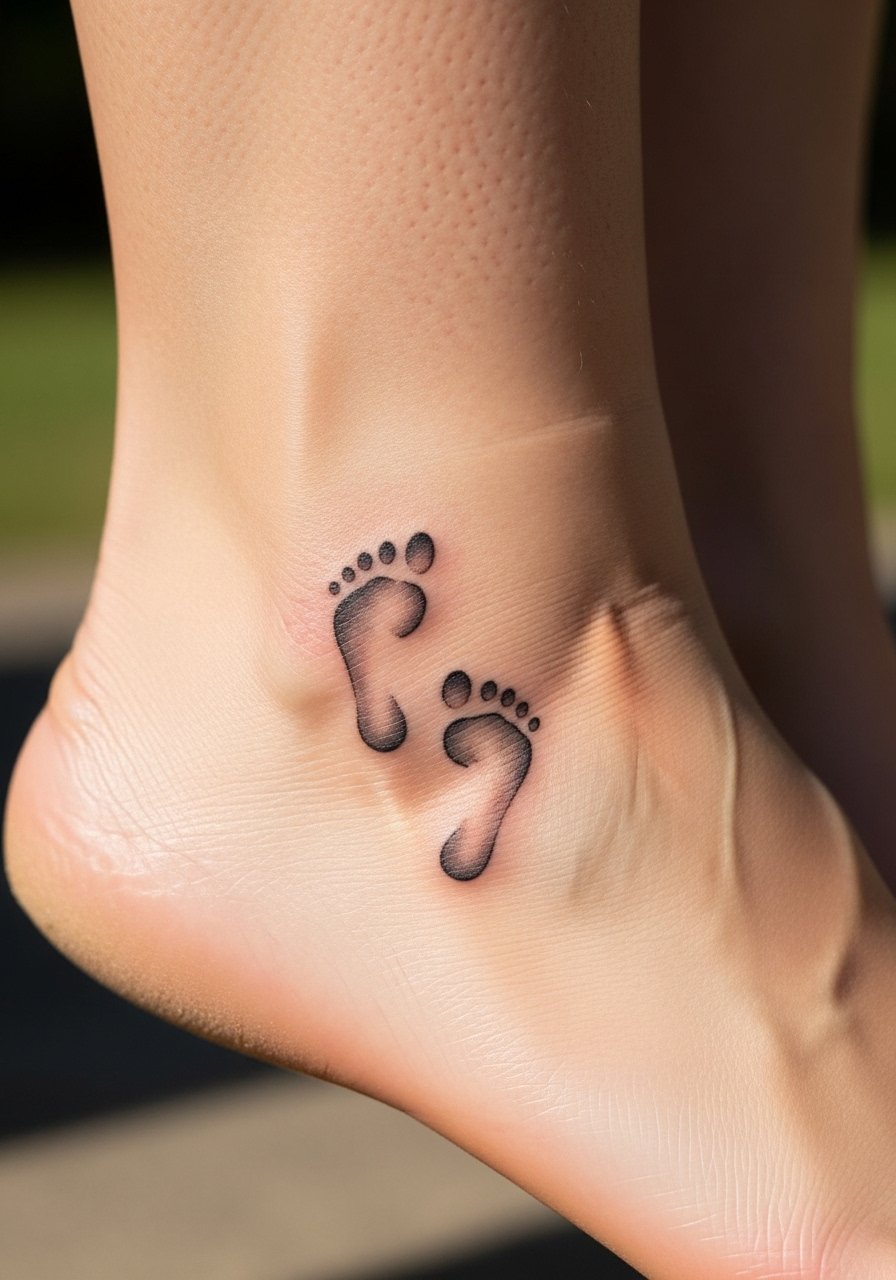
Tiny newborn footprints on the ankle are sentimental and compact. Ankles can be sensitive but healing is quick. Detail needs to be bold enough that prints don't soften into smudges. I recommend clear, simple lines and a slight outline to keep definition as the skin changes. If you want added text, keep it minimal. This placement is easy to hide during work or show off when you want.
15. Family Tree With Initial Leaves On Ribcage
Style/Technique: Illustrative / Fine Line
Pain Level: High (7/10)
Session Time: 2-4 hours
Best For: Personal montage, expandable design
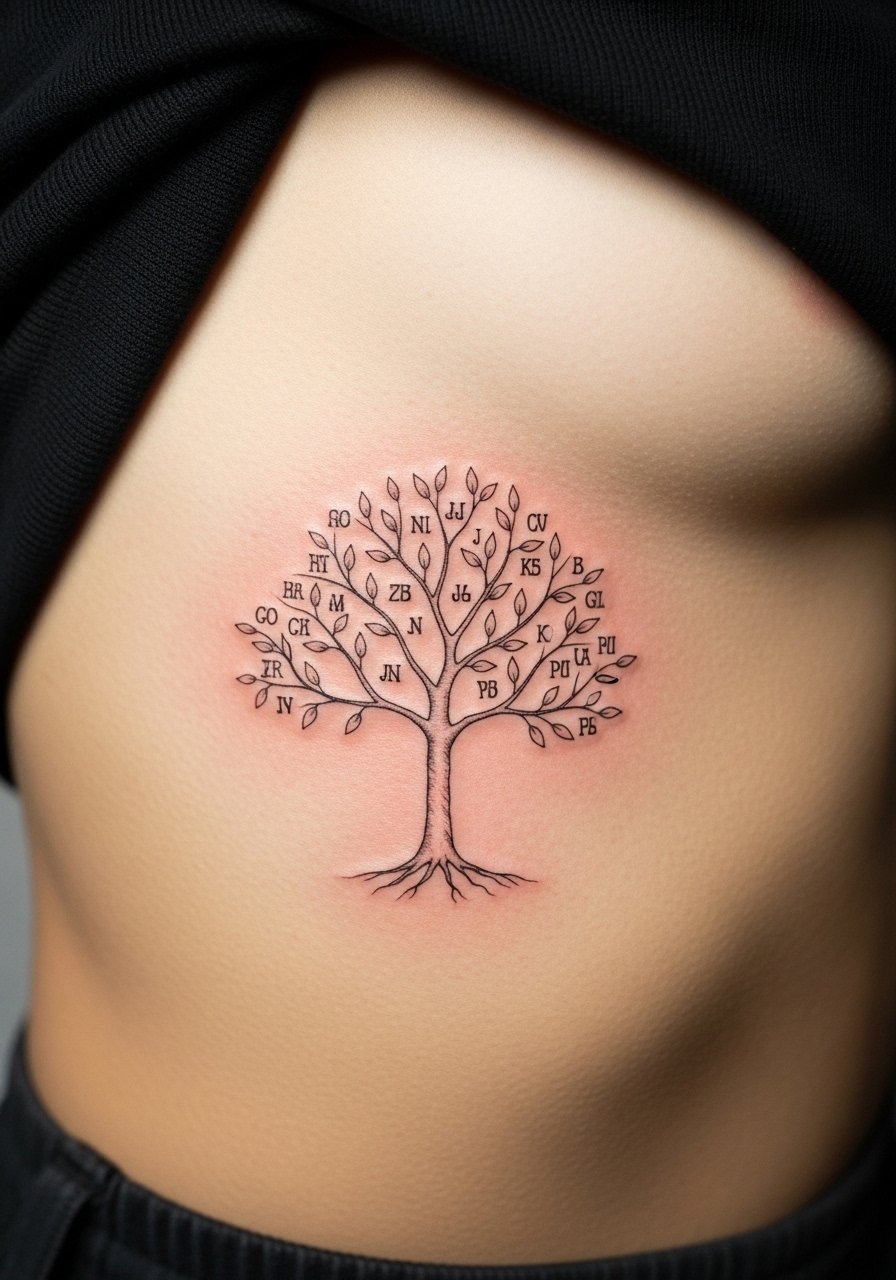
A family tree with initials on leaves is a classic. Ribs are painful but offer privacy. Fine line branches need to be composed so initials are legible. I’ve seen trees lose small initials as lines spread—so plan slightly bolder leaf edges. This design is modular; you can add leaves over time. Ask the artist about spacing and healed examples to avoid small text disappearing.
16. Blackwork Infinity Knot On Inner Wrist
Style/Technique: Blackwork / Symbolic
Pain Level: Low (3/10)
Session Time: 30-60 minutes
Best For: Constant reminder, small placement
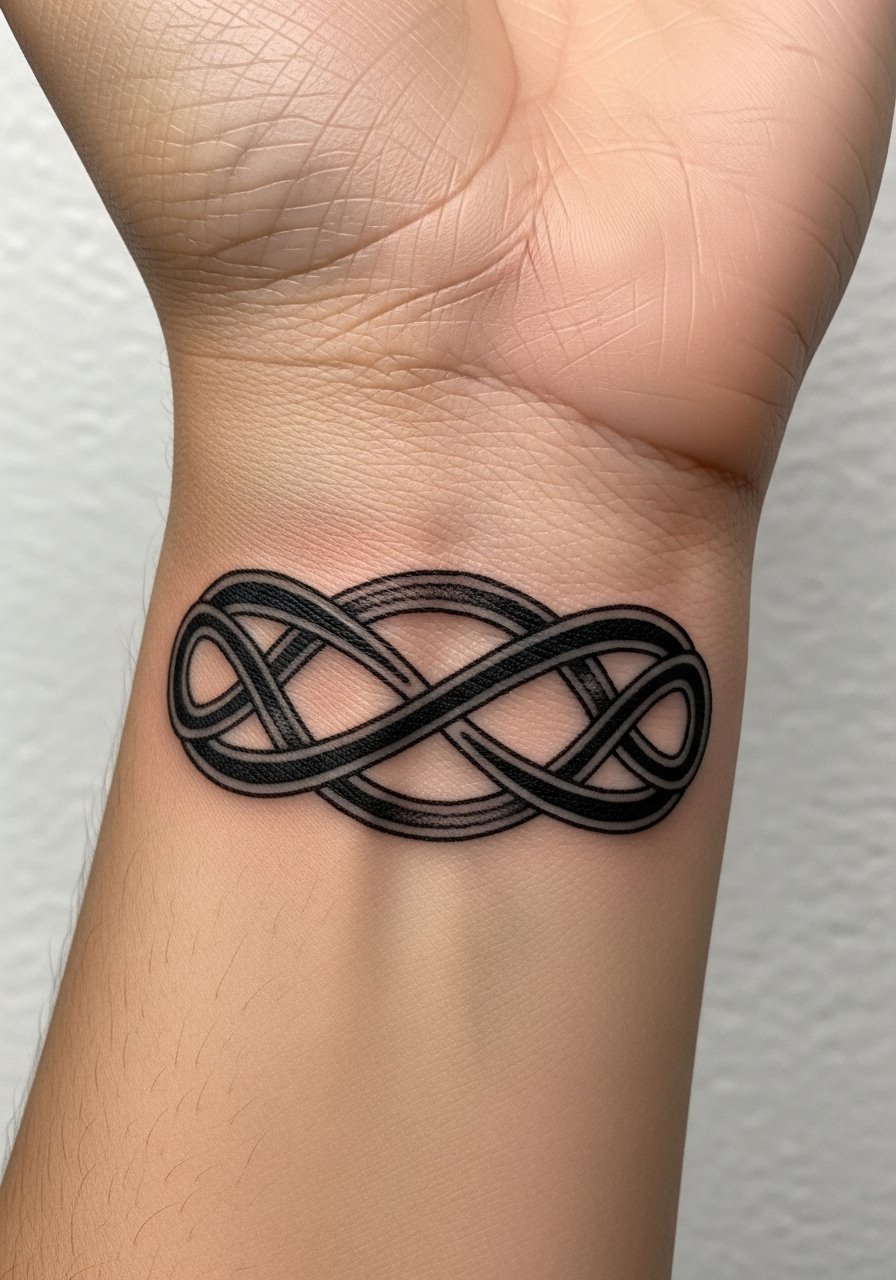
An infinity knot is simple and symbolic. Inner wrist is visible and heals quickly but may need touch-ups. Bold blackwork keeps the symbol readable longer than thin lines. I like this for a daily, discreet reminder of family ties. Common mistake: overcomplicated knots that look messy when shrunk to wrist size. Ask for a slightly larger scale to preserve the knot's negative space.
17. Watercolor Handprints On Upper Arm
Style/Technique: Watercolor / Childlike Illustration
Pain Level: Low (2-3/10)
Session Time: 1-2 hours
Best For: Playful tribute to children
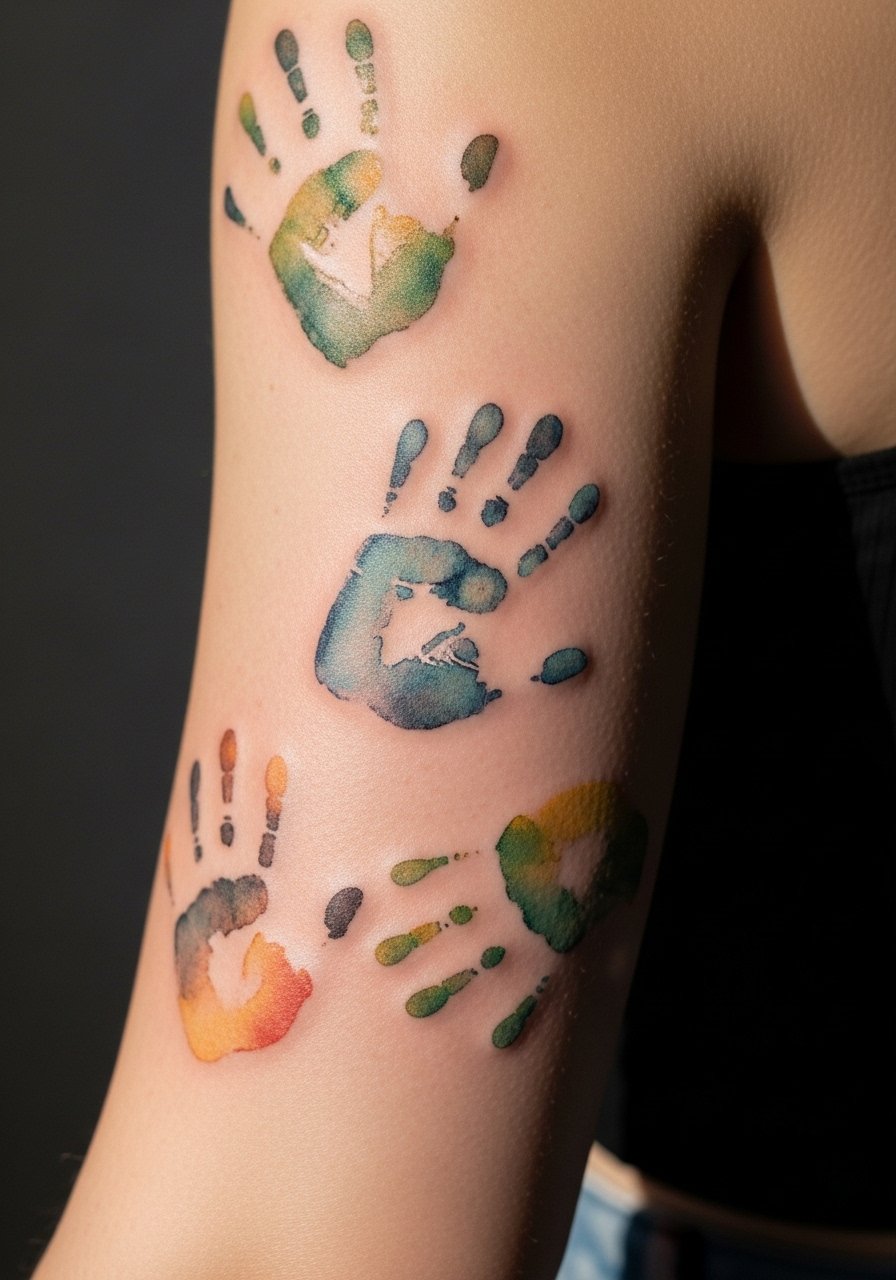
Handprint tattoos capture a moment—especially toddler prints. Upper arm is forgiving and shows color reasonably well. Watercolor fade is a known issue, so ask your artist about stronger initial saturation and planned touch-ups. I’ve seen these hold best when paired with a faint black outline that can be softened if you prefer. Healing is straightforward, but bright pigments may need annual refreshes to stay vivid.
18. Minimalist Puzzle Pieces On Hip
Style/Technique: Minimalist / Geometric
Pain Level: Medium (4/10)
Session Time: 30-60 minutes
Best For: Symbolic, easy to hide
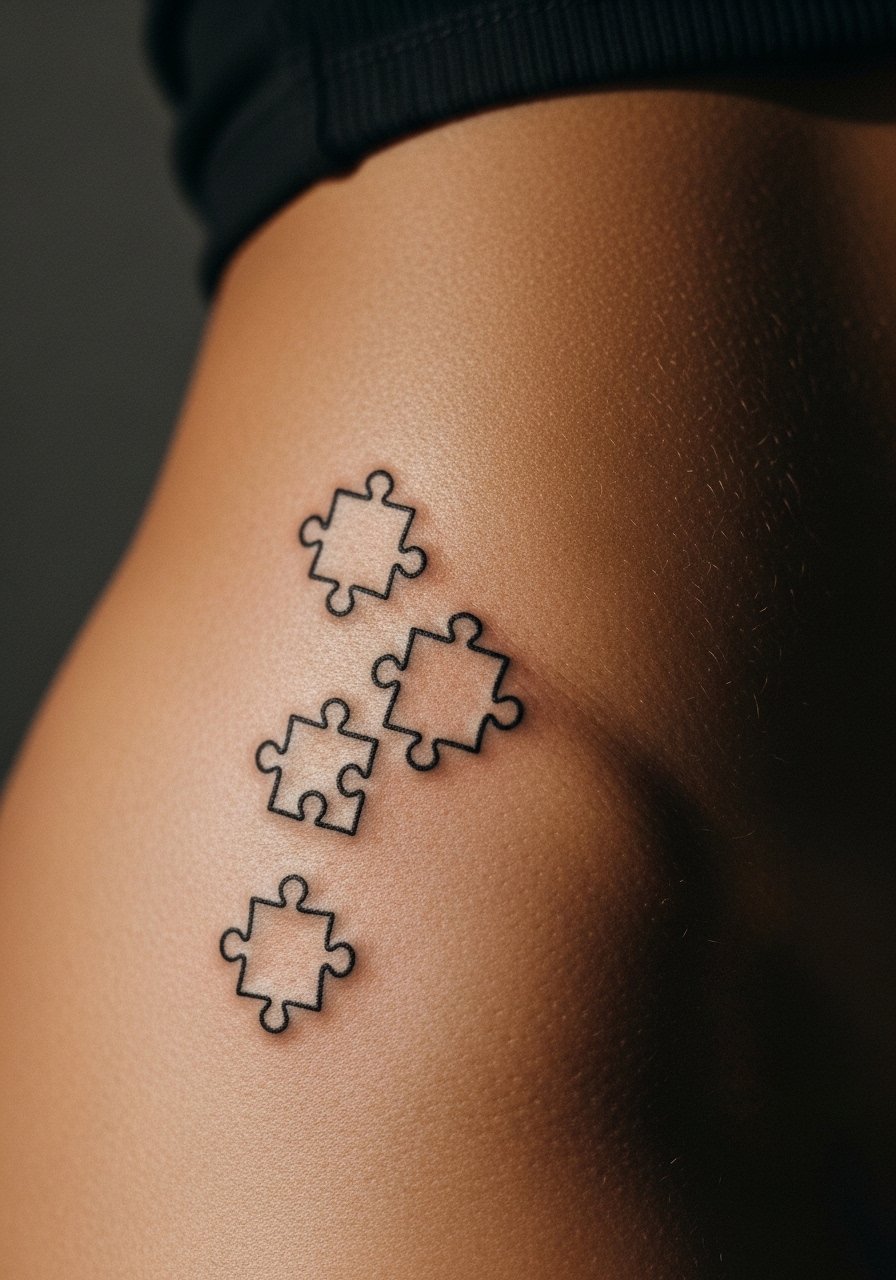
Puzzle pieces can represent how family members connect. Hip placement is private and tolerable pain-wise. Small geometric tattoos fare well if shapes are bold enough—tiny negative spaces can blur over time. I recommend slightly larger pieces and solid black fill for longevity. This is also a good spot if you want paired matching tattoos with a partner or sibling.
19. Portrait Locket Tattoo On Sternum
Style/Technique: Micro-Realism / Black & Gray
Pain Level: High (8/10)
Session Time: 2-4 hours
Best For: Deeply personal, hidden under clothing
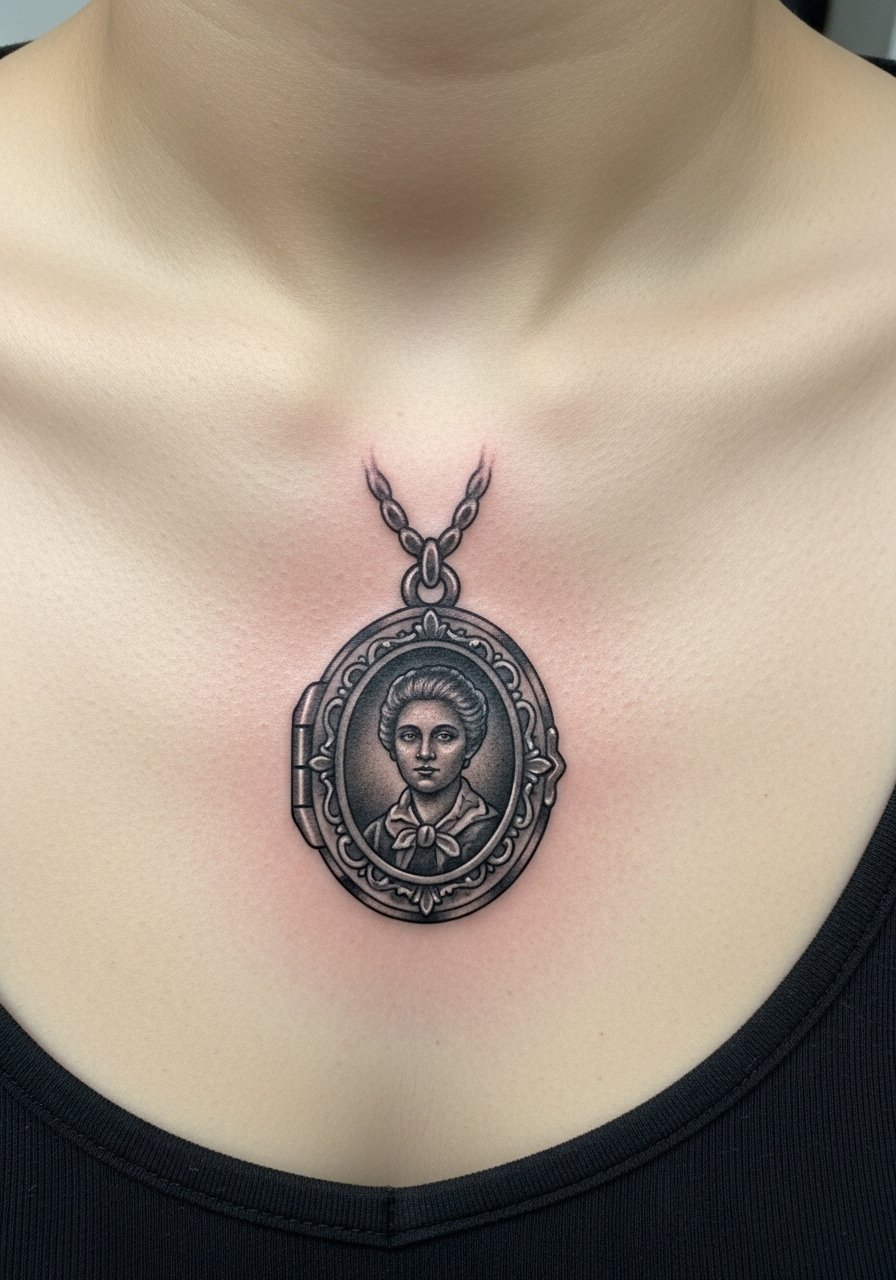
A locket-style portrait over the sternum is intimate and symbolic. Sternum sessions can be intense, but the placement keeps it close to the heart. Black-and-gray portraits with strong contrast give the best longevity here. Expect a longer healing window because of movement. I suggest artists who specialize in micro-realism and black-and-gray portraiture. Avoid tiny facial features that could blur; focus on strong light and shadow for longevity.
20. Tiny Birth Flowers On Finger
Style/Technique: Minimalist / Botanical
Pain Level: High (6-8/10)
Session Time: 15-45 minutes
Best For: Sentimental, always visible
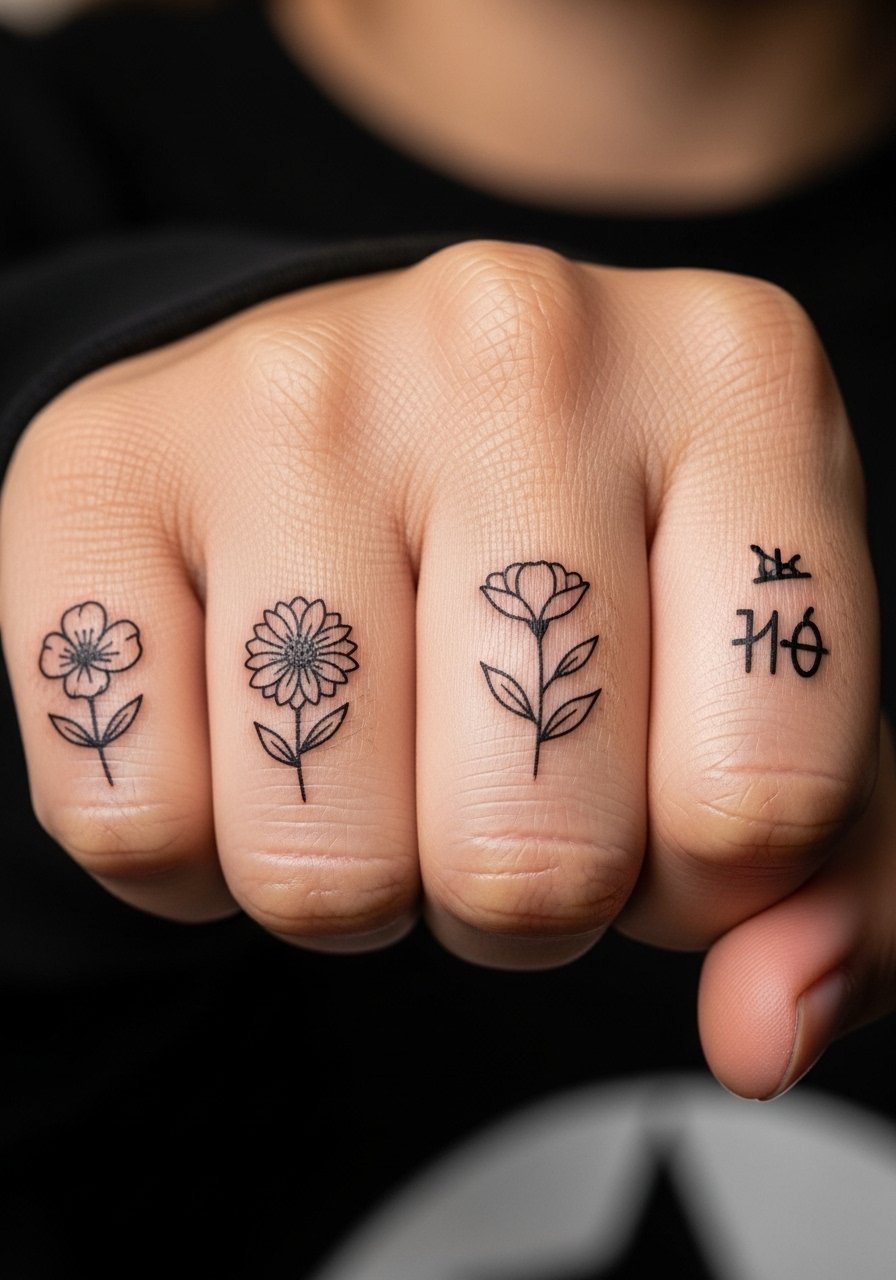
Finger tattoos are charming but high maintenance. Birth flowers on finger joints are cute and symbolic but often need touch-ups. Pain is higher due to thin skin. I recommend slightly thicker outlines and minimal color to avoid blurring. Ask to see healed finger examples. If you want longevity, consider placing them on the side of the finger rather than the joint.
21. Geometric Family Coordinates On Calf
Style/Technique: Blackwork / Geometric
Pain Level: Low (2-3/10)
Session Time: 1-2 hours
Best For: Modern look, larger surface for lines
Geometric coordinates on the calf merge precision with meaning. Calf is low-pain and offers a good vertical canvas. Straight lines and negative space age well if the artist uses enough line weight. I’ve seen geometric work hold up well when artists plan for slight natural spreading. Avoid ultra-thin parallel lines that can merge later.
22. Matching Sun And Moon For Parent And Child On Chest
Style/Technique: Minimalist / Symbolic
Pain Level: Medium (4/10)
Session Time: 30-90 minutes
Best For: Paired or matching tattoos, visible yet coverable
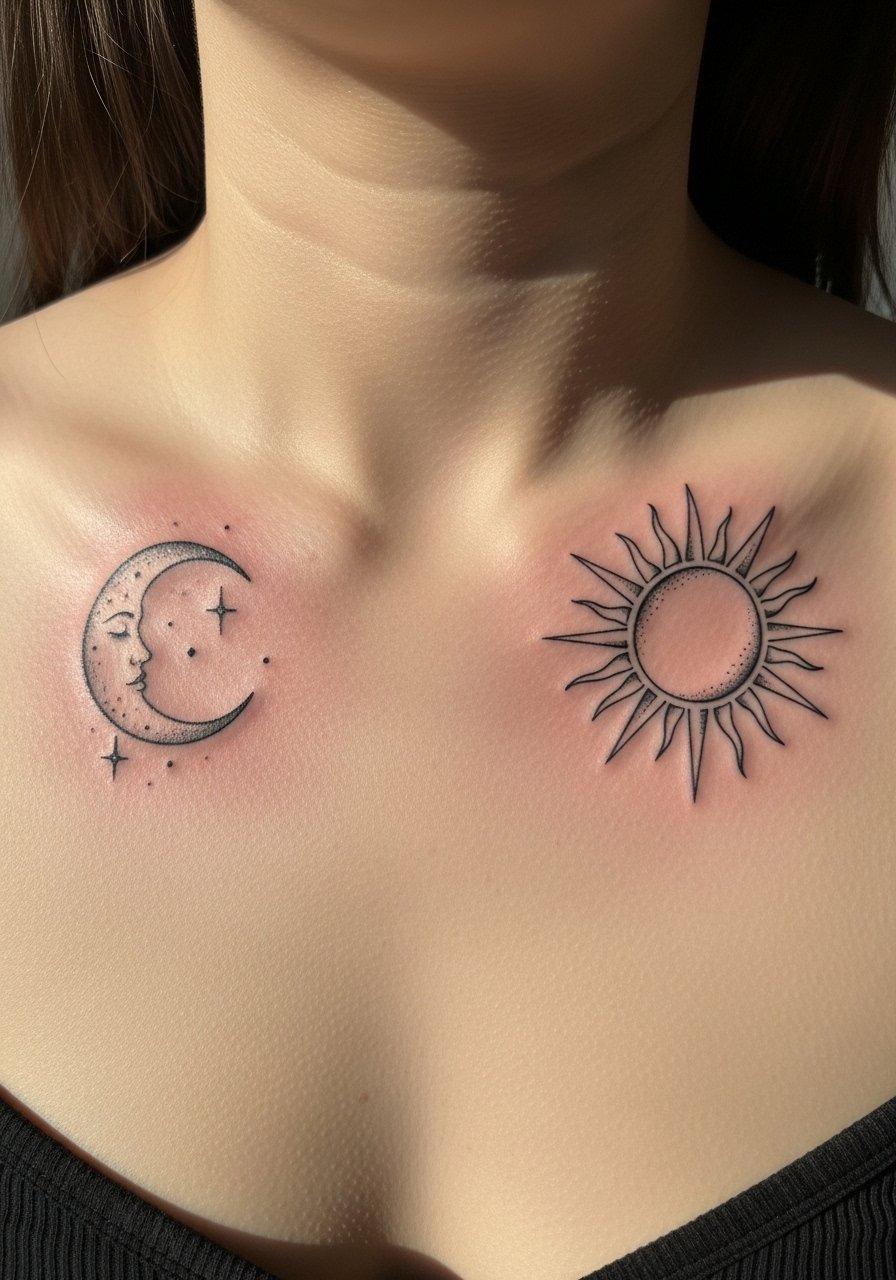
Sun and moon motifs for parent-child pairs are classic. Chest near the collarbones is meaningful and easy to show or hide. Minimal lines keep the symbols timeless. I recommend simple blackwork for longevity. Artists often suggest slight variations between the two to maintain individuality while pairing them visually.
23. Morse Code Names On Forearm
Style/Technique: Minimalist / Dot & Dash
Pain Level: Low (3/10)
Session Time: 30-60 minutes
Best For: Private message, visible placement
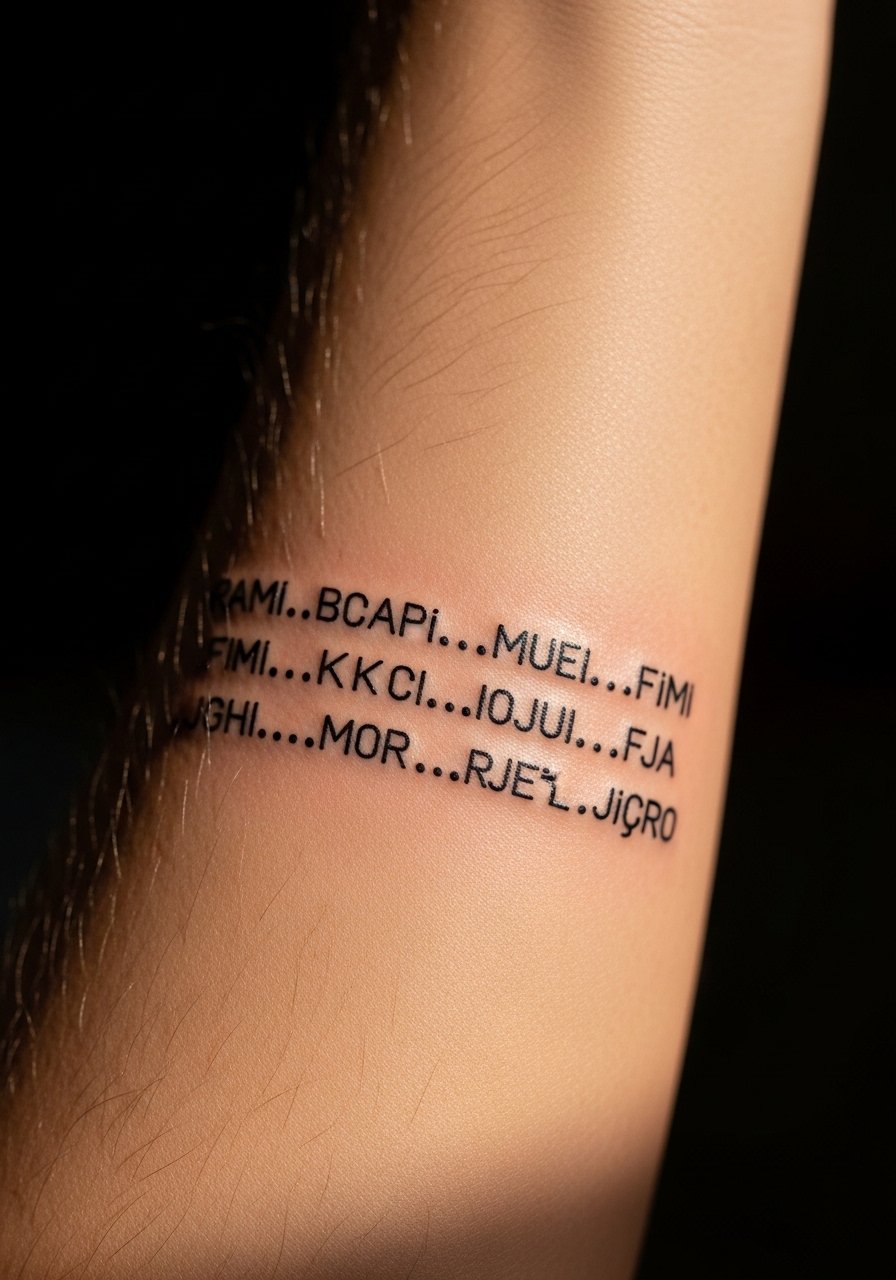
Morse code is a neat way to carry names without obvious text. Forearm placement is visible and low-pain. Dots and dashes need spacing planned so they remain distinct as skin ages. I’ve found this works well for people who want a hidden message that only family deciphers. Ask about size—tiny marks can merge, so slightly larger dots work better long-term.
24. Fingerprint Heart On Upper Arm
Style/Technique: Micro-Realism / Unique Impression
Pain Level: Low-Medium (3-4/10)
Session Time: 1-2 hours
Best For: Extremely personal, tactile memory

Combining two fingerprints into a heart is a deeply personal visual. Upper arm placement keeps it private and gives enough space for detail. Fine ridge details can blur if too tiny, so artists often stylize prints into bolder lines that still read as a fingerprint. This idea is unique and feels like carrying someone’s touch with you. Ask for healed examples to judge legibility.
25. Small Anchor With Initial On Behind Collarbone
Style/Technique: Minimalist / Nautical
Pain Level: Medium (4/10)
Session Time: 30-60 minutes
Best For: Anchoring symbol of family stability
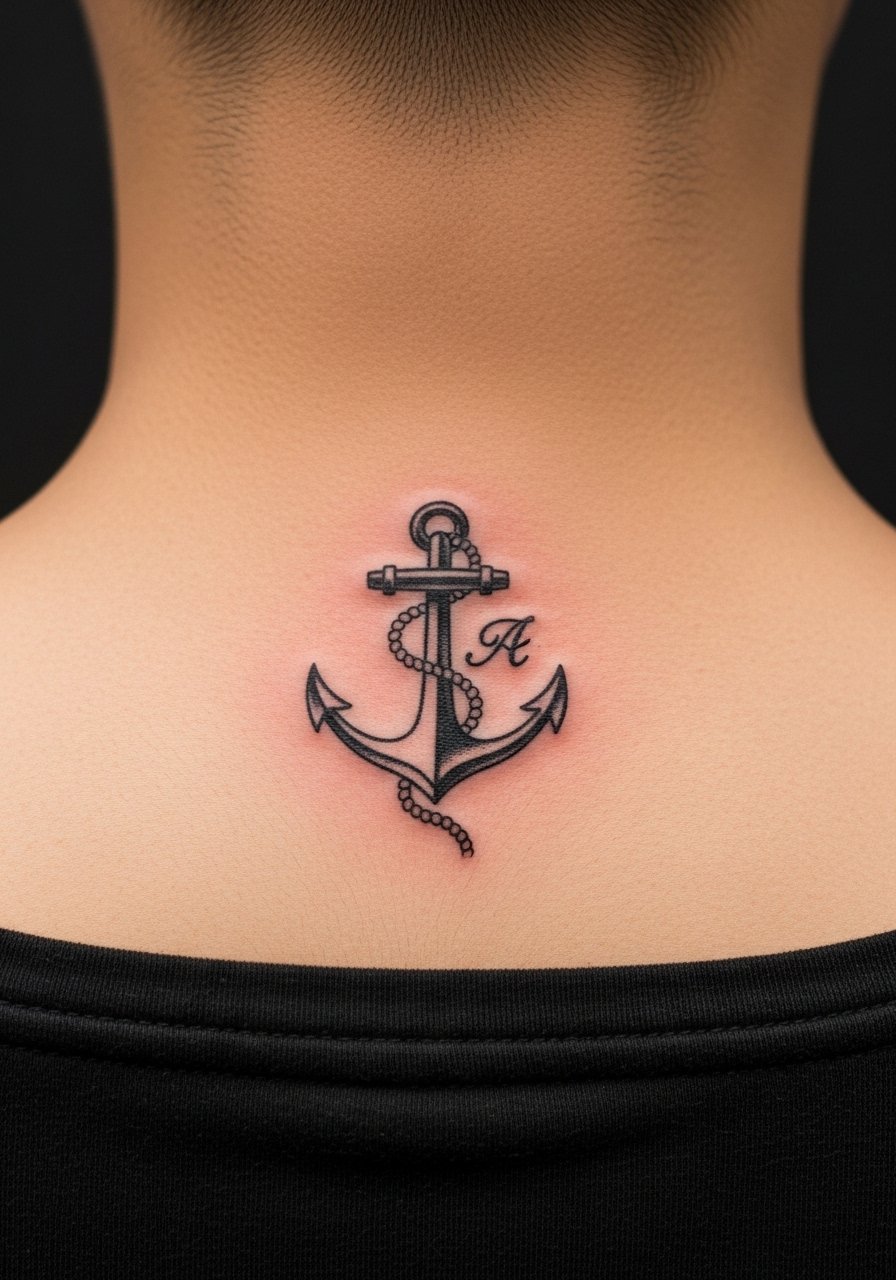
An anchor with a family initial behind the collarbone is a neat way to symbolize stability. Placement is subtle and the area takes ink well with moderate discomfort. Simple black anchors age predictably. I like this for people who want a classic motif with a personal twist. Keep the initial bold enough to survive the initial healing spread.
Tattoo Prep and Aftercare Essentials
Aftercare Essentials:
- Aquaphor Healing Ointment, 14oz tube — Great for the first 3-5 days to keep skin protected
- Saniderm Transparent Adhesive Bandage, 6-inch roll — Second-skin method many artists recommend
- CeraVe Fragrance-Free Moisturizing Lotion, 12oz — For days 4-14 to keep skin hydrated
- Dr. Bronner's Unscented Castile Soap, 16oz — Gentle cleanser for daily washes
- Mad Rabbit Tattoo Balm, 2oz — Long-term moisturizer artists often suggest
- Hustle Butter Deluxe, 8oz — Vegan aftercare alternative, great for healed skin
- SPF 50 Sunscreen Stick for Tattoos — Daily protection to prevent fading
- Tattoo Numbing Cream with 5% Lidocaine — Use only after artist approval, apply 30-45 minutes pre-session
- Tattoo Stencil Transfer Paper — Handy if you sketch ideas at home first
- Hydrocolloid Bandages Large — For spot protection on small tattoos after initial healing
- Silicone Tattoo Cover Sheets (Saniderm Alternative) — For people who prefer different brands
- Antibacterial Hand Soap Pump, 8oz — Keep hands clean before touching fresh ink
Before Your Appointment:
- Tattoo Numbing Cream with 5% Lidocaine — Ask the artist first
- Tattoo Stencil Transfer Paper — For at-home mockups
Long-Term Maintenance:
Frequently Asked Questions
Q: How bad does a tattoo actually hurt?
A: Pain depends on placement and your tolerance. Forearm and upper arm are usually low—about 3/10 in my experience. Ribcage, sternum, and ankle can be 7-8/10. It’s more nagging and burning than sharp. For sensitive sessions, discuss numbing cream with 5% lidocaine with your artist first.
Q: What if I regret my tattoo?
A: Give your idea time. I always sit with designs for months. If visibility is a concern, pick hidden placements like upper thigh or ribcage. Laser removal exists but it’s a long process. Consider cover-up-friendly designs if you think you might change your mind.
Q: How do I keep my tattoo from fading?
A: Sunscreen is the biggest factor. From what I've seen, daily use of an SPF 50 sunscreen stick preserves color. Keep skin moisturized with fragrance-free lotions like CeraVe. Black ink fades slowest; light yellows and pinks fade faster.
Q: Can I work out after getting a tattoo?
A: Wait 48-72 hours minimum. If the tattoo is on a joint or area that flexes, wait a week or more. Sweat increases infection risk and can interfere with healing. Keep the area clean with a gentle soap like Dr. Bronner's Unscented Castile Soap.
Q: Should I get a small tattoo first to test my pain tolerance?
A: Only if you want that design. Size isn’t the only pain factor—placement matters more. A tiny wrist tattoo might hurt more than a larger thigh piece. Think about the placement and whether you truly want the design long-term.
Q: How long does a tattoo take to heal?
A: Surface healing is usually 2-3 weeks. Full skin remodeling can take 2-3 months. The first week is critical—clean, moisturize, and protect with products like Aquaphor or Saniderm if your artist recommends it. Expect peeling around days 3-7; do not pick.
Q: Do tattoos look different on different skin tones?
A: Yes. Black and gray work really well across tones. Bright colors may appear muted on deeper skin tones. White ink is subtle on darker skin. I always ask artists to show healed examples on similar skin tones before committing.
Q: What should I avoid during healing?
A: Avoid heavy sweating, swimming, and sun exposure for the first 2 weeks. Keep clothing loose over the area. Use a gentle cleanser and the recommended ointment. If your artist recommends Saniderm, follow their timeline for removal and aftercare.
