
I spent months saving screenshots of futuristic tattoos before I realized the real problem. I could name the style I liked, but I could not tell which designs would still read clean after a year on skin. These 24 cyberpunk tattoos are the ones I kept circling back to. They show up in studios this year and they hold up healed.
This list leans hard into futuristic, neon, and biomechanical vibes. Most pieces work well on forearms, ribs, chest, and calves. From what I have seen, artists are pairing fine line circuitry with UV highlights for a long-lasting, high-impact look.
1. Fine Line Neo-Mechanical On Inner Forearm
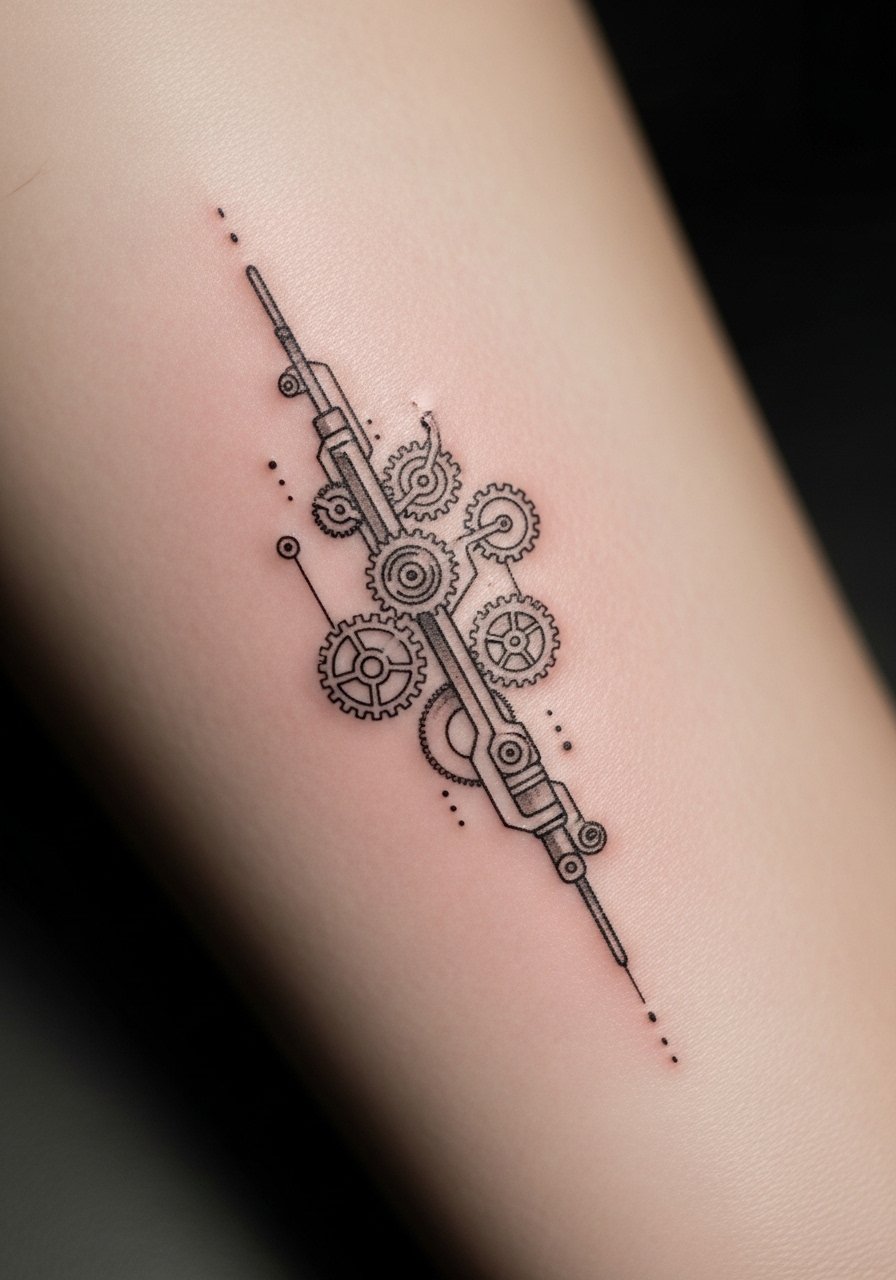
I first saw this on a friend and it reads like a schematic that moves when you bend your wrist. Fine line technique keeps the circuitry crisp. Expect moderate pain for the inner forearm and one to two sessions depending on size. Ask your artist for slightly thicker primary lines so the tiny connectors do not blur together after two years. A common mistake is asking for ultra-thin micro lines across a wide area. That version fades into a gray mess after long sun exposure. Tell your artist you want "line weight hierarchy" and show reference photos with healed examples. Healed looks keep contrast by using subtle dotwork shading around the components. For aftercare, I use Aquaphor for the first three days to prevent scabbing.
Product Recommendation: Aquaphor Healing Ointment, 14oz tube
2. Blackwork Circuit Board On Upper Arm
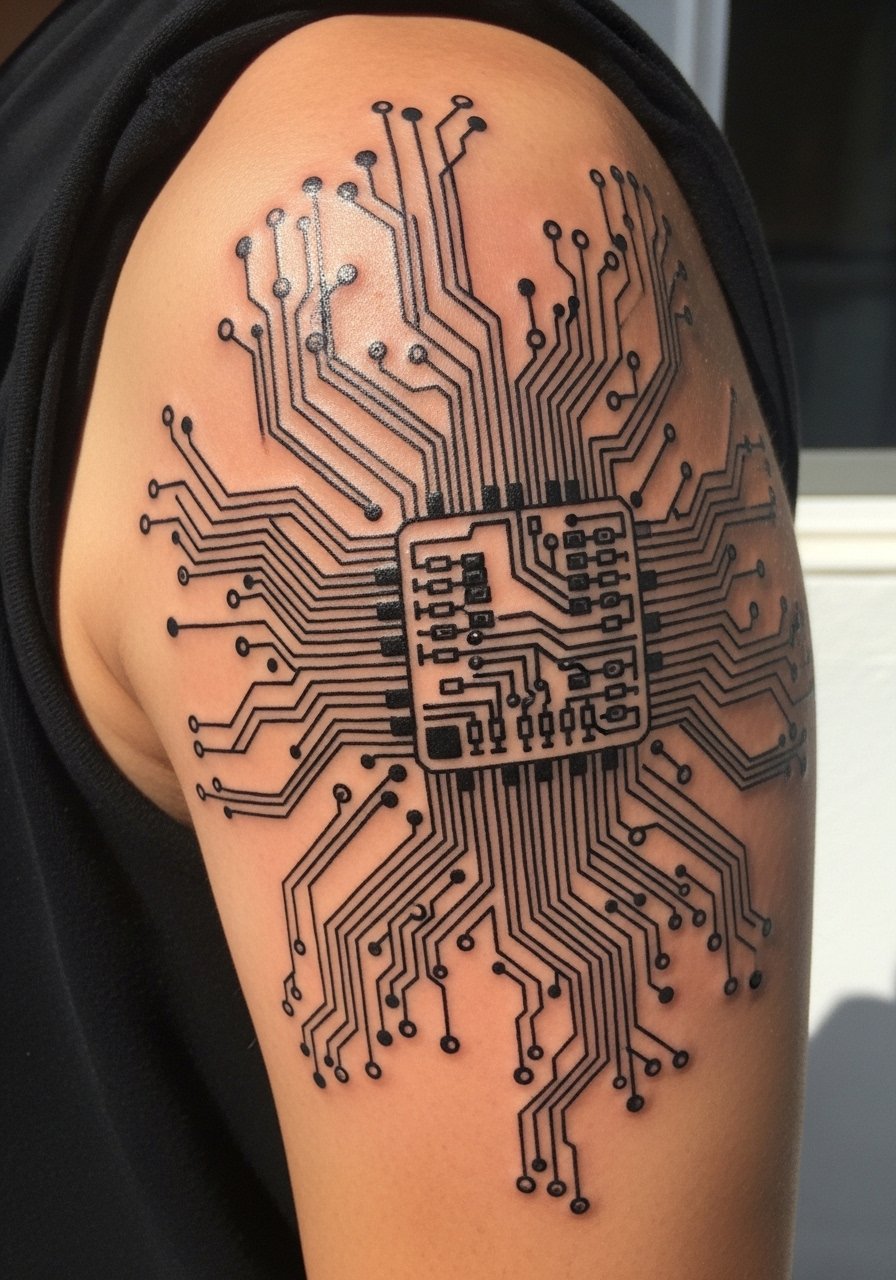
Fair warning, large blackwork covers heal differently than lines. The upper arm handles big fills well and the pain is usually low. I recommend this if you want bold presence from across a room. Tell your artist to plan the negative space as "pathways" rather than tiny isolated dots. That helps with long-term clarity. Sessions run long because of packed black. If an artist blobs black in tight clusters the ink can migrate and look muddy at 18 months. In my experience, staggered sessions with at least four weeks between them helps the skin recover. Ask to see healed blackwork that is two to five years old during your consult.
Product Recommendation: Saniderm Transparent Adhesive Bandage, 6-inch roll
3. Micro-Realism Cybernetic Eye On Chest
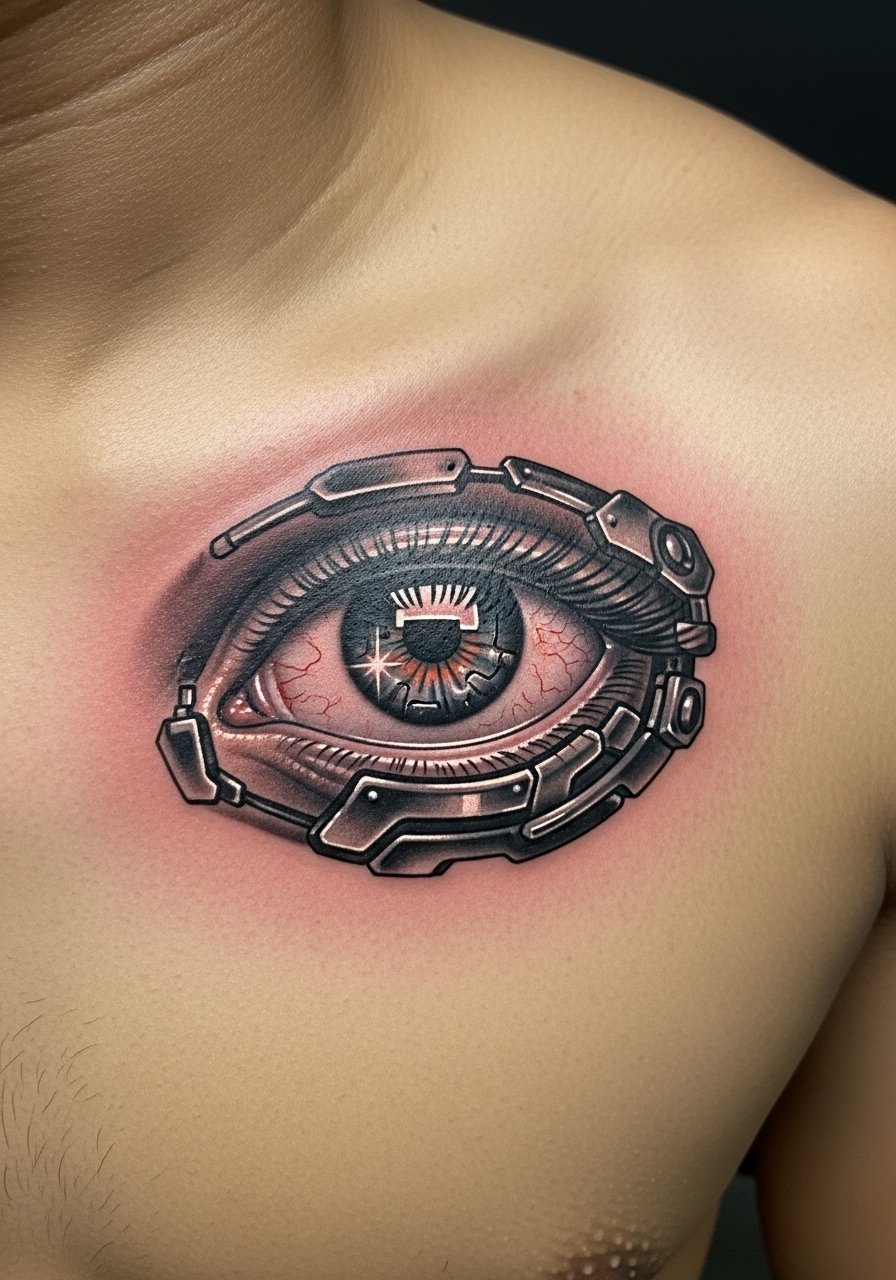
I noticed micro-realism eyes draw people in. Placing one on the chest gives it a slightly intimate vibe with medium pain. The trick is to request crisp highlights and very defined contrast so the reflective parts do not wash out after healing. Ask your artist to leave a thin white highlight unfilled for later touch-up if needed. Many clients pick too small a scale and lose the detail after six months. For session time plan two short sittings rather than one marathon. Healed at six months the tiny metallic pieces look softer. If you plan a shirtless lifestyle, add sun protection early because UV kills that tiny contrast quickly.
4. UV Ink Neon Circuit On Outer Forearm

I have mixed feelings about UV only pieces. They look electric fresh but lose visible punch in daylight. So I like a combo, black or blue anchors with UV highlights. Outer forearm pain is low. In my experience, UV ink holds best when used sparingly, as accents in recessed lines. A mistake I see is full UV fills thinking they will glow bright all the time. They mostly glow under blacklight and can fade unevenly. Tell your artist exactly where you want glow, and where you want standard pigment for longevity. Healing behaves like normal ink but UV can feel dryer, so use a moisturizing balm after day three.
Product Recommendation: Mad Rabbit Tattoo Balm, 2oz
5. Glitch Watercolor Pixel Sleeve On Upper Arm
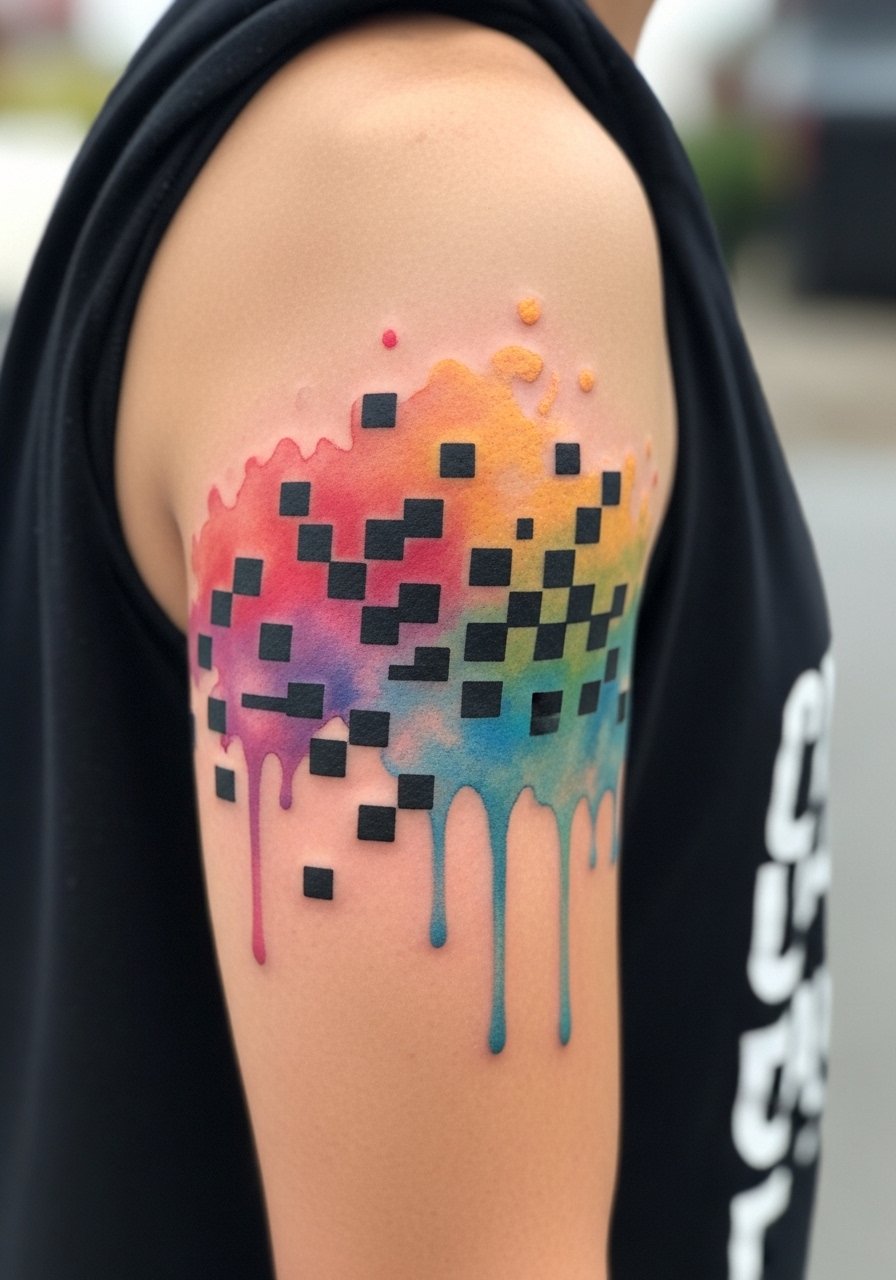
When I first saw glitch watercolor combined with pixels, I thought it would blur fast. It can if artists use too much soft blending next to tiny blacks. For sleeves, pair bold geometric pixels with watercolor washes. Upper arm tolerates long sessions. Pain is moderate. Tell your artist you want "defined pixel islands" and not a fully blended wash meeting tiny black squares. Healed after a year the watercolor will soften, but the pixels keep structure if the artist uses a slightly thicker line. A common mistake is requesting watercolor over large scar tissue. Healing there is unpredictable. Plan touch-ups at 12 to 18 months for color refresh.
6. Minimalist Line HUD On Behind Ear
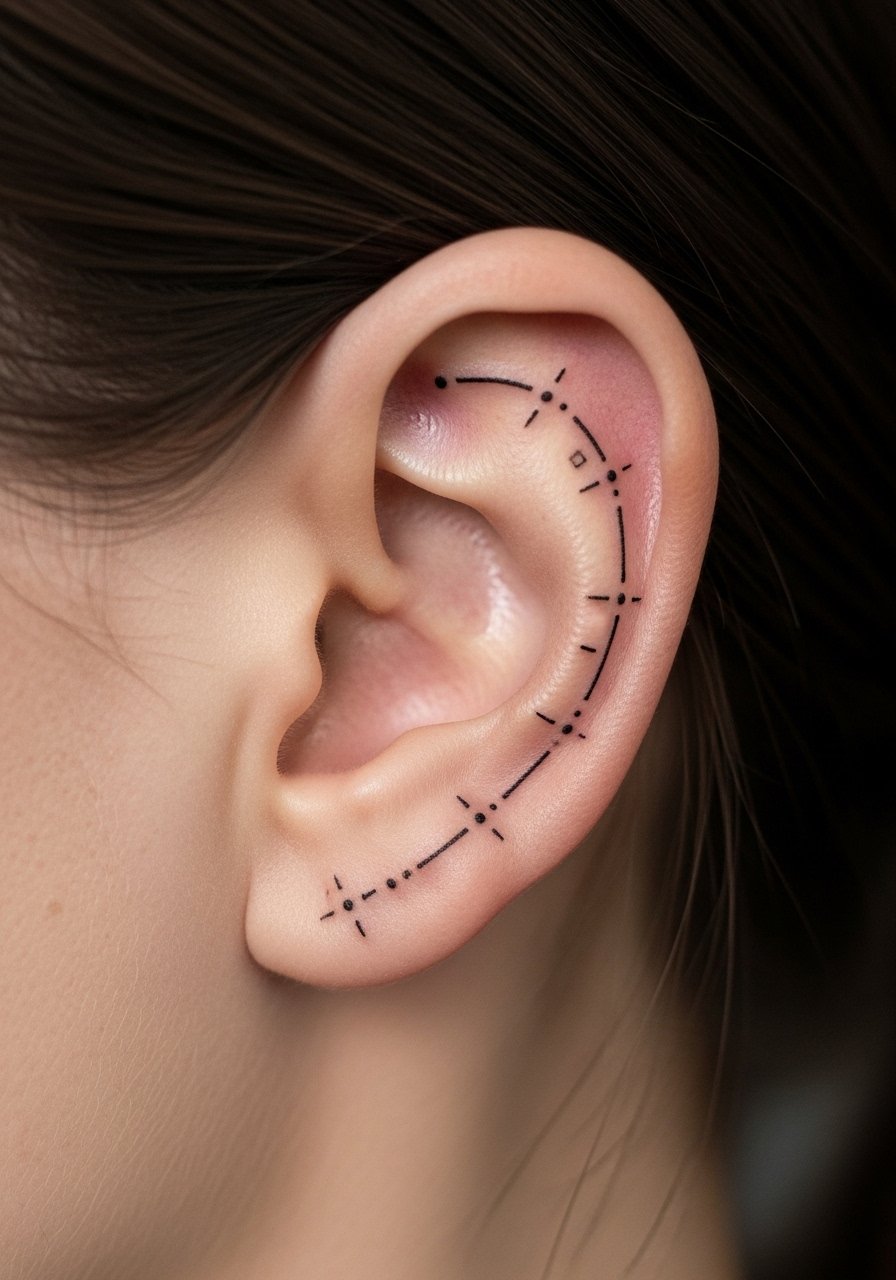
Small HUD or heads-up-display tattoos behind the ear are deceptively powerful. The area is sensitive so expect sharp but short pain. I usually recommend this for people who want subtle tech vibes without commitment to a visible sleeve. Healed at six months they age well if kept simple. The biggest error is asking for too many tiny details. Those vanish or merge in 12 to 24 months. Tell your artist to simplify the design into key elements and to avoid ultra thin connectors. If you sweat a lot or sleep on that side, consider a hydrocolloid bandage for the first two nights.
Product Recommendation: Hydrocolloid bandages for small tattoos
7. Dotwork Neural Net On Ribcage
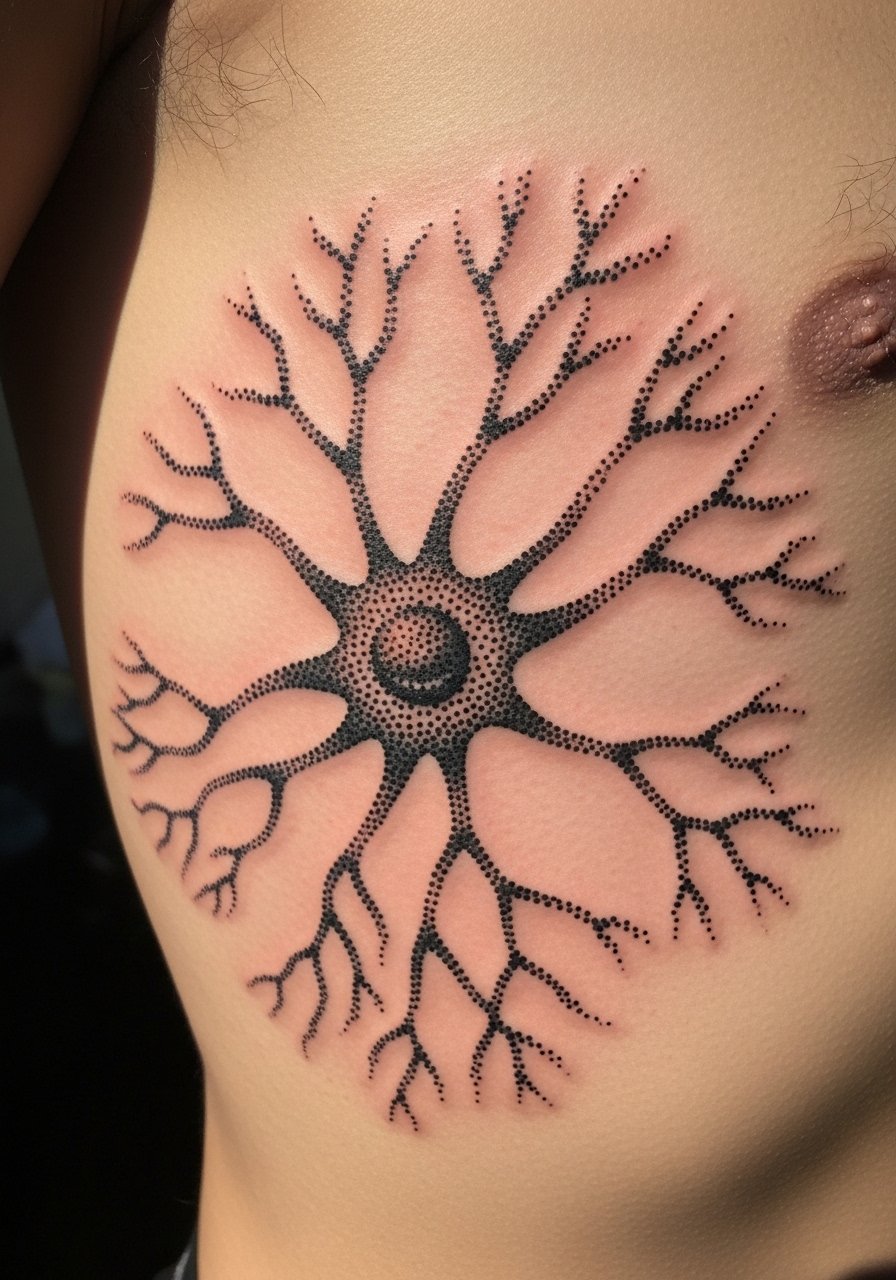
Fair warning, the ribcage is high on the pain chart. I chose it once for a neural net. Sessions are slow because you need breaks. Dotwork lets the skin breathe and ages predictably if the dots are placed with spacing that allows for minor spreading. I see people ask for extreme density across the whole ribcage and then regret it as the dots melt into a gray after two years. Ask your artist to show healed chest or ribcage dotwork from at least three years out. Plan multiple short sessions, and use gentle soap like Dr. Bronner's for cleanings.
Product Recommendation: Dr. Bronner's Unscented Castile Soap, 8oz
8. Geometric Chrome Spine On Upper Back
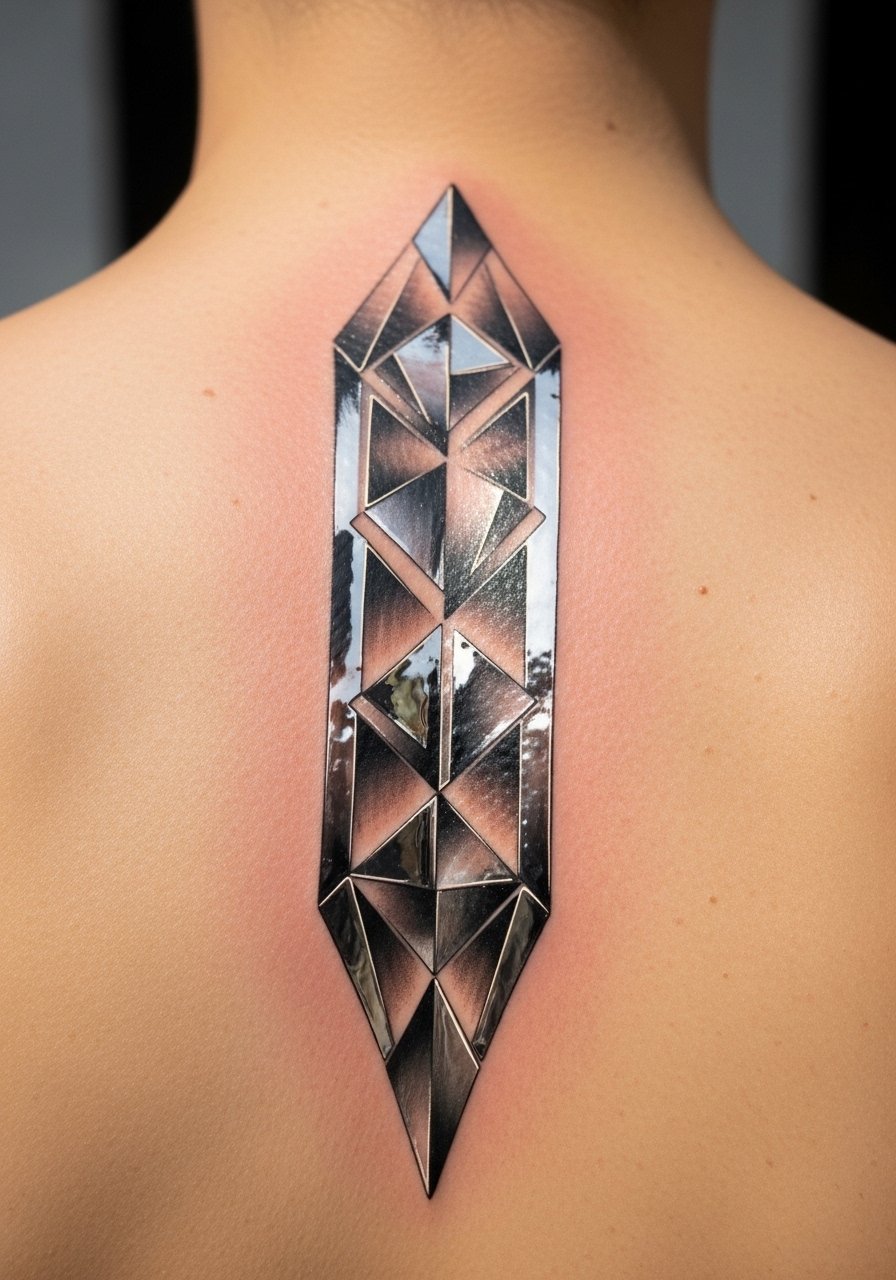
Most people think spine work is only dramatic for full-back pieces. A chrome geometric column along the upper spine reads architectural and it photographs well. Pain is high when over vertebrae. I recommend spacing elements so that the skin's movement does not break the lines. A common mistake is mapping tiny triangles right on a curve. They warp as the body moves and age oddly. Tell your artist you want "edge retention" and to avoid hairline geometry right on the spinous processes. Healing is slow because clothing rubs the area. Saniderm can be a game-saver for the first five days.
Product Recommendation: Saniderm Transparent Adhesive Bandage, 6-inch roll
9. Micro-Realism Android Hand On Thigh
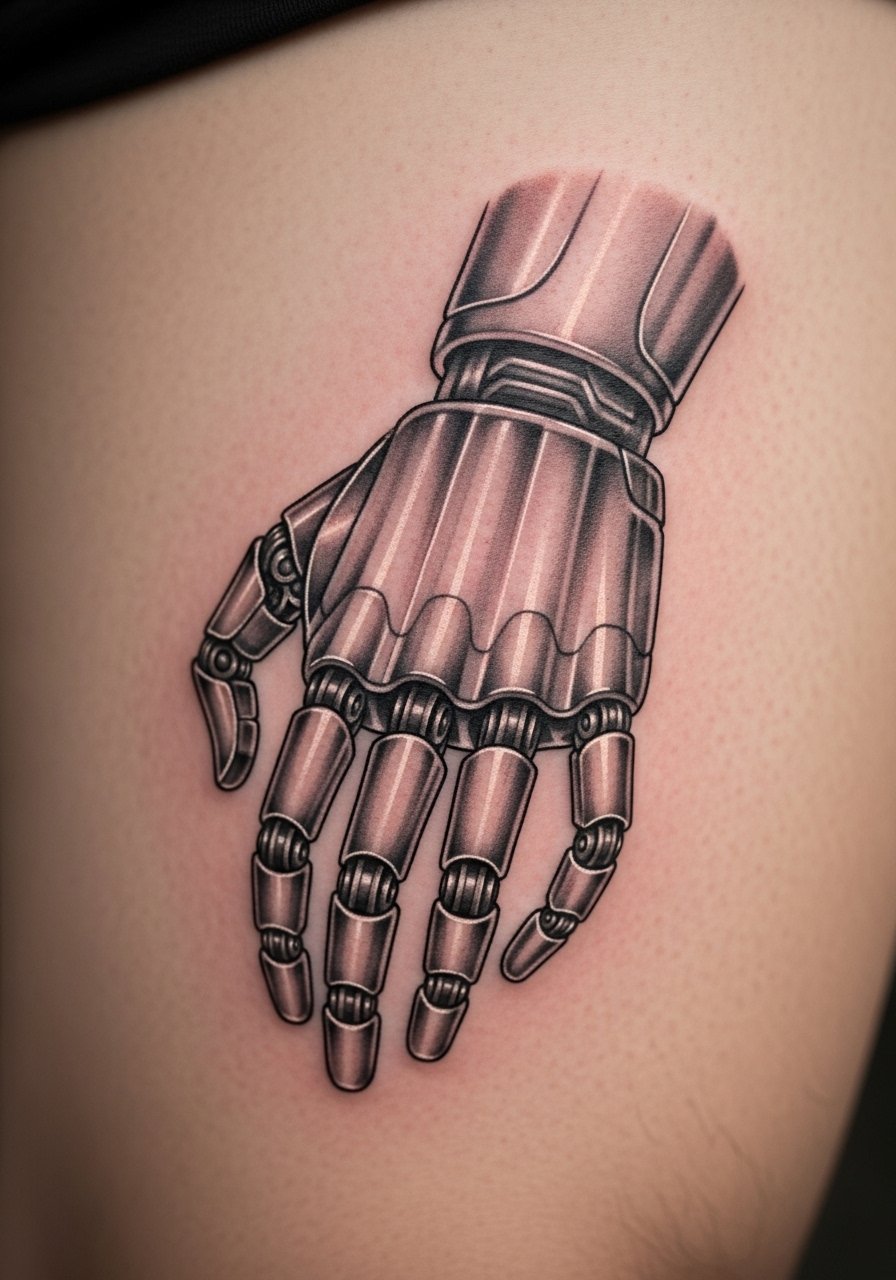
I picked the thigh for a micro-realism android hand because the canvas is forgiving. Pain is low to moderate. The detail holds up better on thicker skin. If you want to show motion, request blur lines that contrast with crisp metal edges. Artists sometimes try to cram in too many tiny screw heads. Those lose clarity at 12 months. Ask to see healed micro-realism on the same body area. Sessions can be long, so bring hydration and snack options. After healing at six months the piece will have softened, but the core contrast should remain.
10. Neo-Traditional Cyber-Samurai On Chest

I love the chest for narrative pieces like a cyber-samurai. Neo-traditional line work keeps the iconography readable over time. Chest pain varies with proximity to sternum. Tell your artist you want saturated colors in the initial session and outlines slightly bolder than normal. A mistake I see is asking for tiny color gradients without strong outlines. Those blend and dull after a couple years. Plan for a color refresh at two years if you live outdoors a lot. Healed, the piece will keep its silhouette even as softer gradients mellow.
11. Barcode Minimalist On Wrist
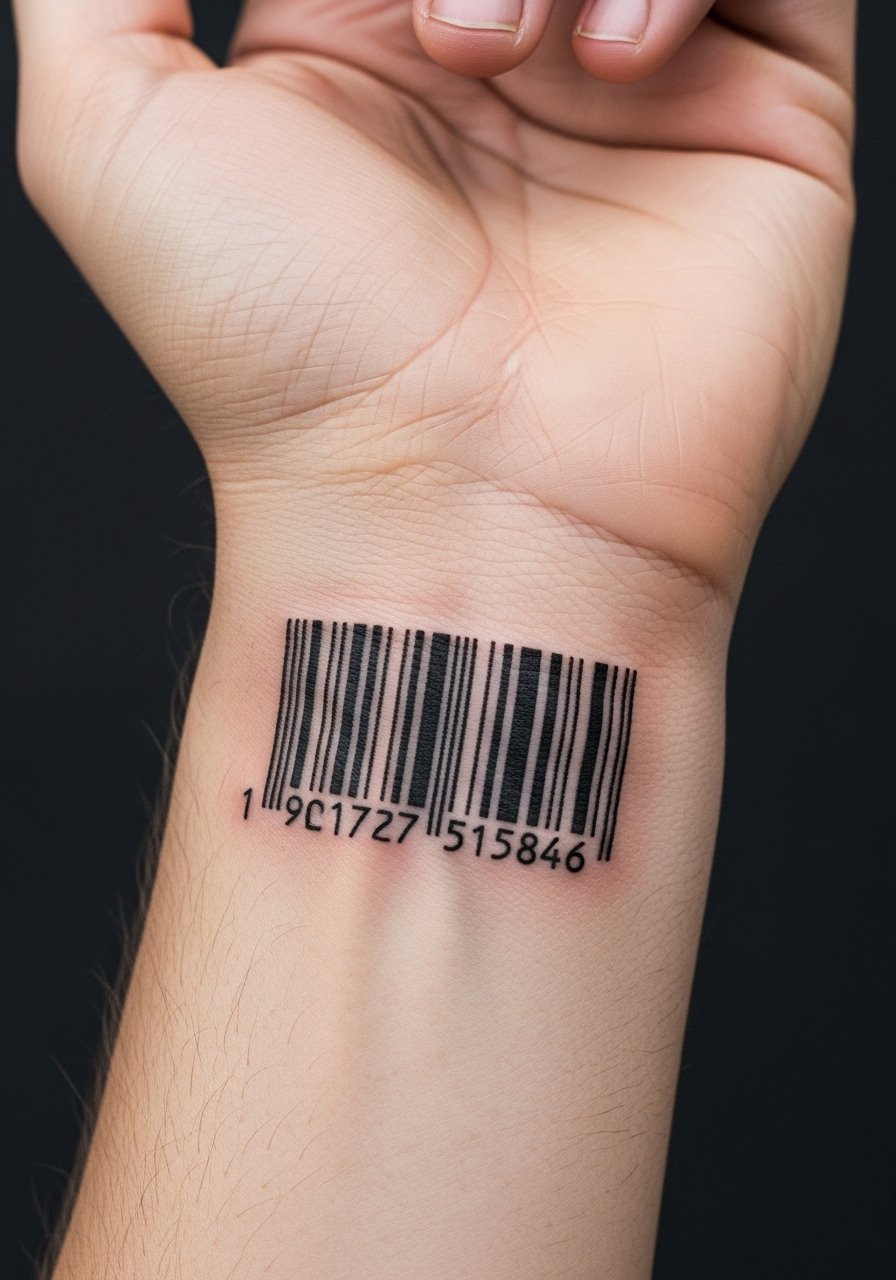
I got a barcode on my wrist years ago and it taught me scale matters. The wrist is visible and the thin verticals can blur if too tight. Pain is low but constant. Ask your artist to space the bars slightly wider than the initial mockup. That small change makes a big difference at 18 months. Avoid tiny barcodes with micro text underneath. The text disappears. For maintenance use SPF on exposed wrists to slow fading. If you want scannable detail, expect frequent touch-ups.
12. Holographic Koi With Neon Background On Calf
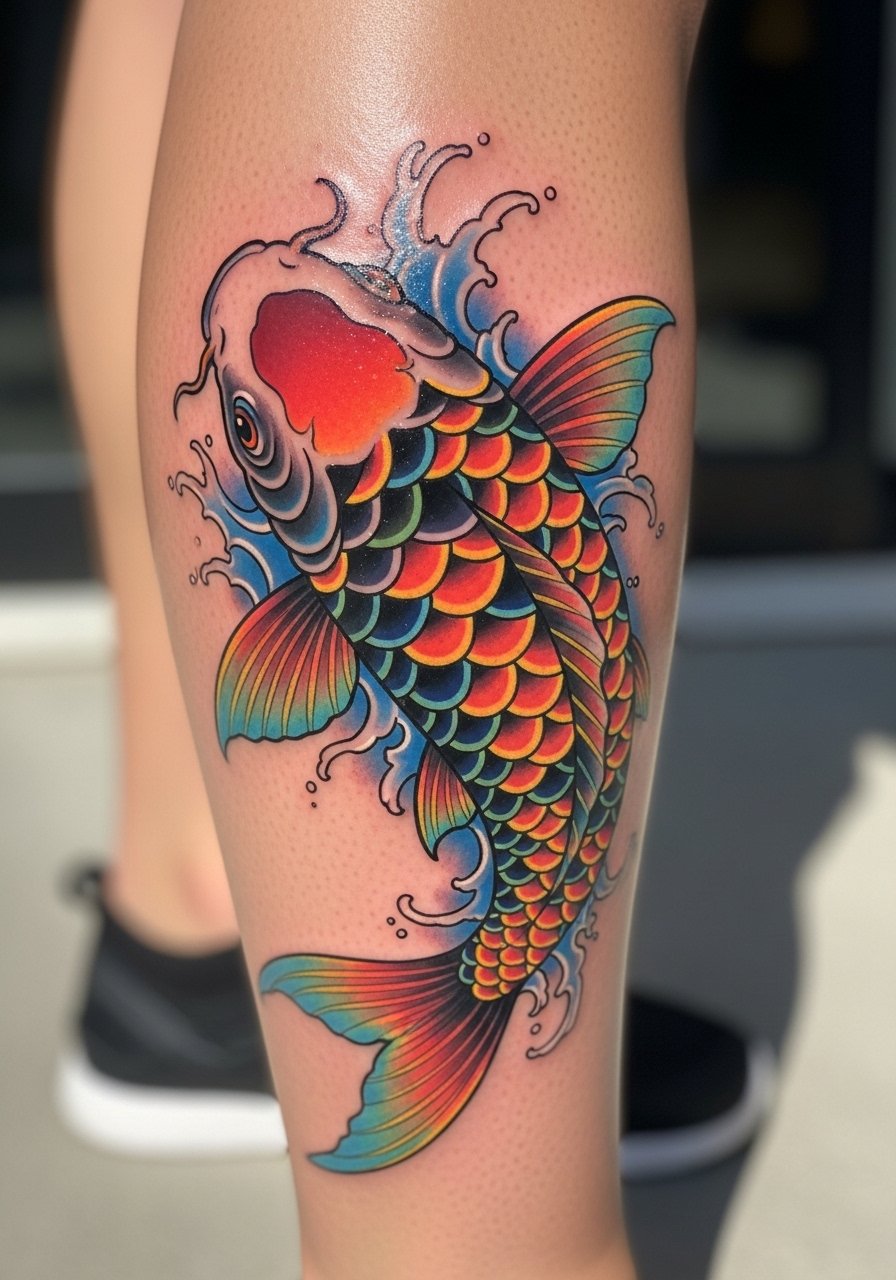
I was skeptical about holographic color washes on moving muscles, but calves are ideal. The muscle gives the koi motion and the neon background reads like a city reflection. Pain is moderate. Tell your artist you want defined scale edges and neon layered beneath, not on top. Many artists place neon on top which flakes and fades faster. Expect the bright washes to soften at six months. Plan for a touch-up at a year if you want the neon to stay vibrant. Use a fragrance-free lotion as you heal to avoid smelly residue that attracts lint.
13. Circuit Tattoo Sleeve In Negative Space On Full Arm
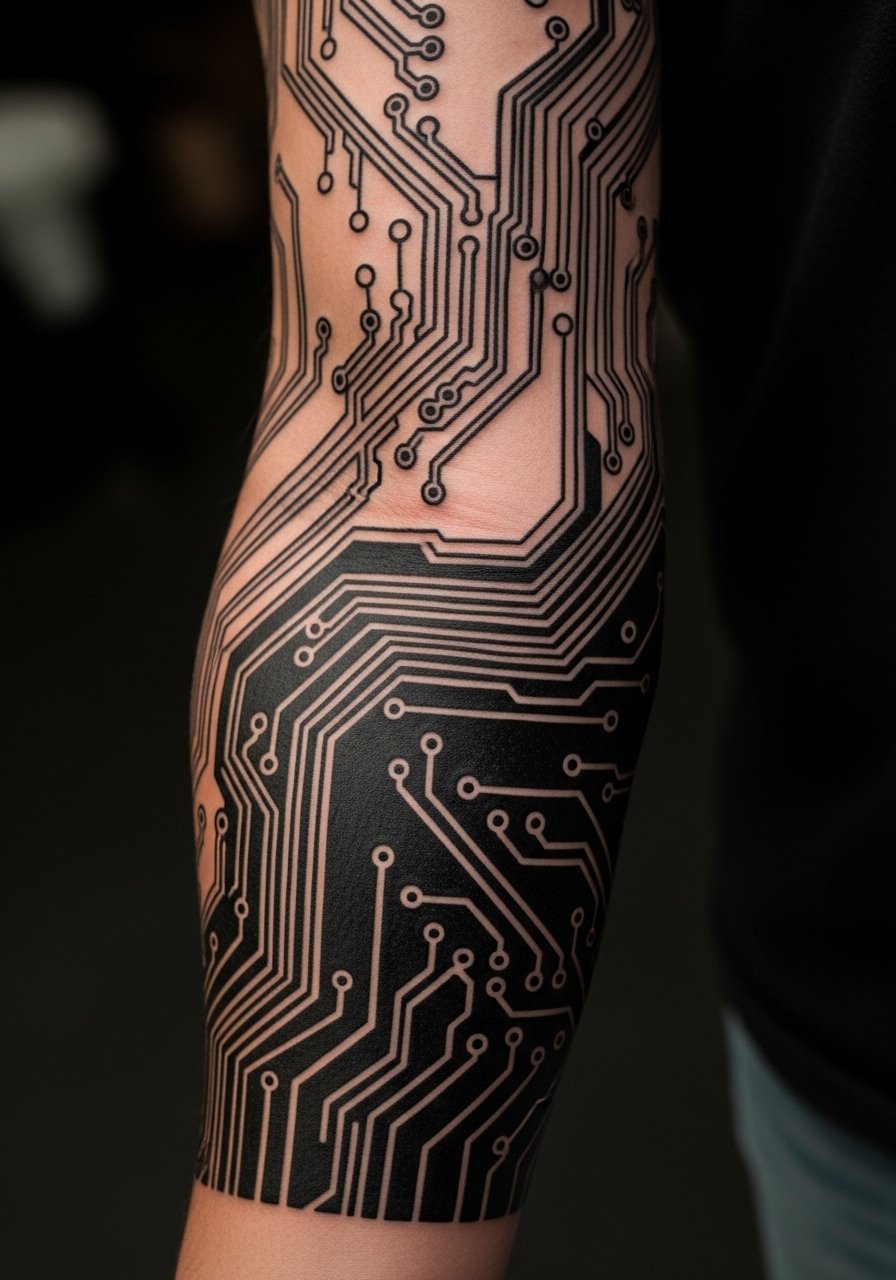
I saw an artist use negative space to create a sleeve that looks like a printed circuit board. It reads cleaner long term because skin acts as the highlight. Full arm sleeves take multiple long sessions. Pain varies across the arm. Tell your artist to design with breathing room around thin connectors. I see sleeves that pack everything tight. Those end up as a gray patch after a few years. Healed after a couple years, the negative space approach retains depth better. Hydration between sessions speeds recovery. If you plan ink under shirts daily, expect more friction and slower settling.
14. Barcode Map Micro-Realism On Inner Bicep
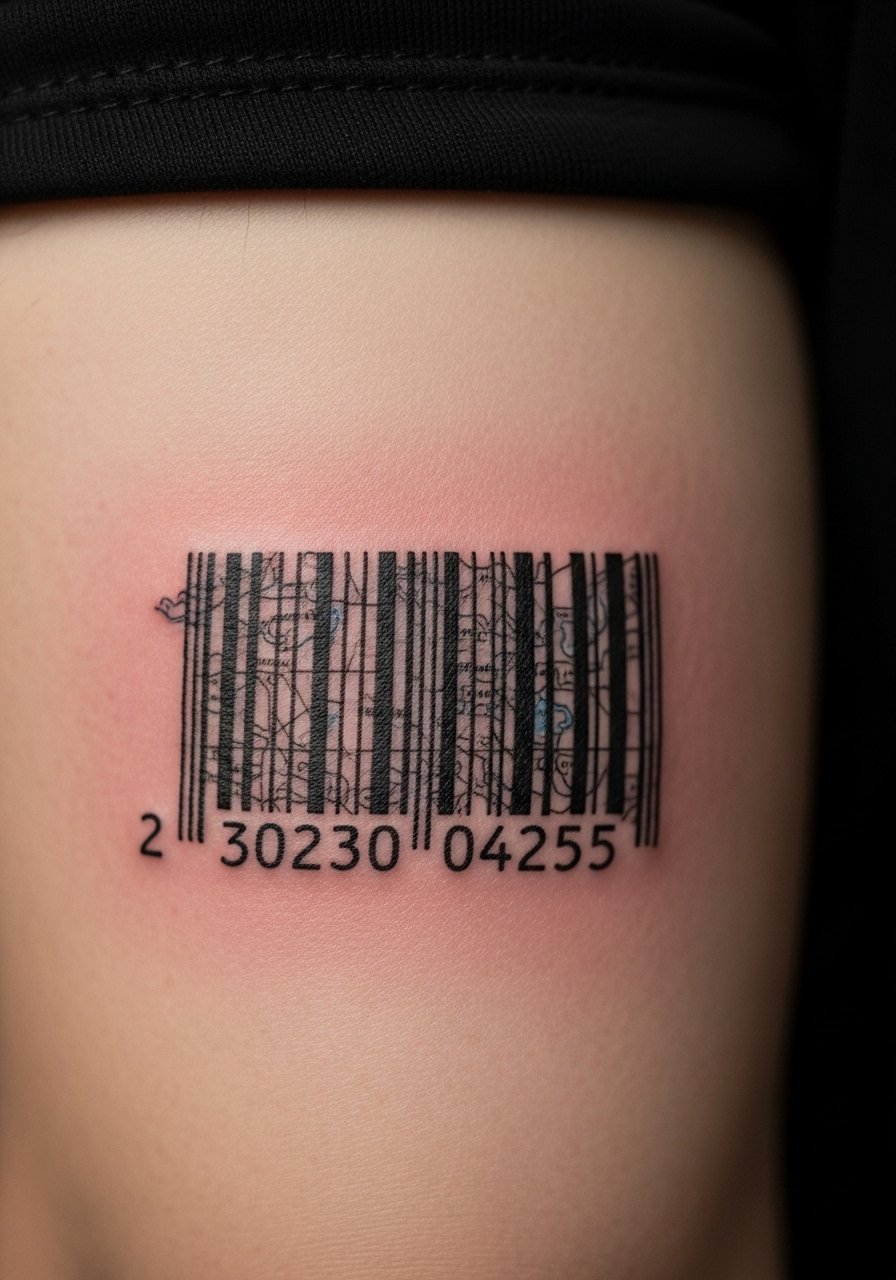
One of my favorite consults included a barcode that hid a tiny street map. The inner bicep hides the detail well when relaxed. Pain is medium. Ask your artist to scale the smallest roads slightly larger than in the reference. The mistake most clients make is wanting literal map micro-lines. Those will blur. I recommend focusing on recognizable nodes rather than tiny alleys. Healed at six months the map remains readable if the lines had spacing and contrast. For active people, expect a touch-up at one year due to arm movement.
15. Augmented Reality QR Code On Outer Forearm
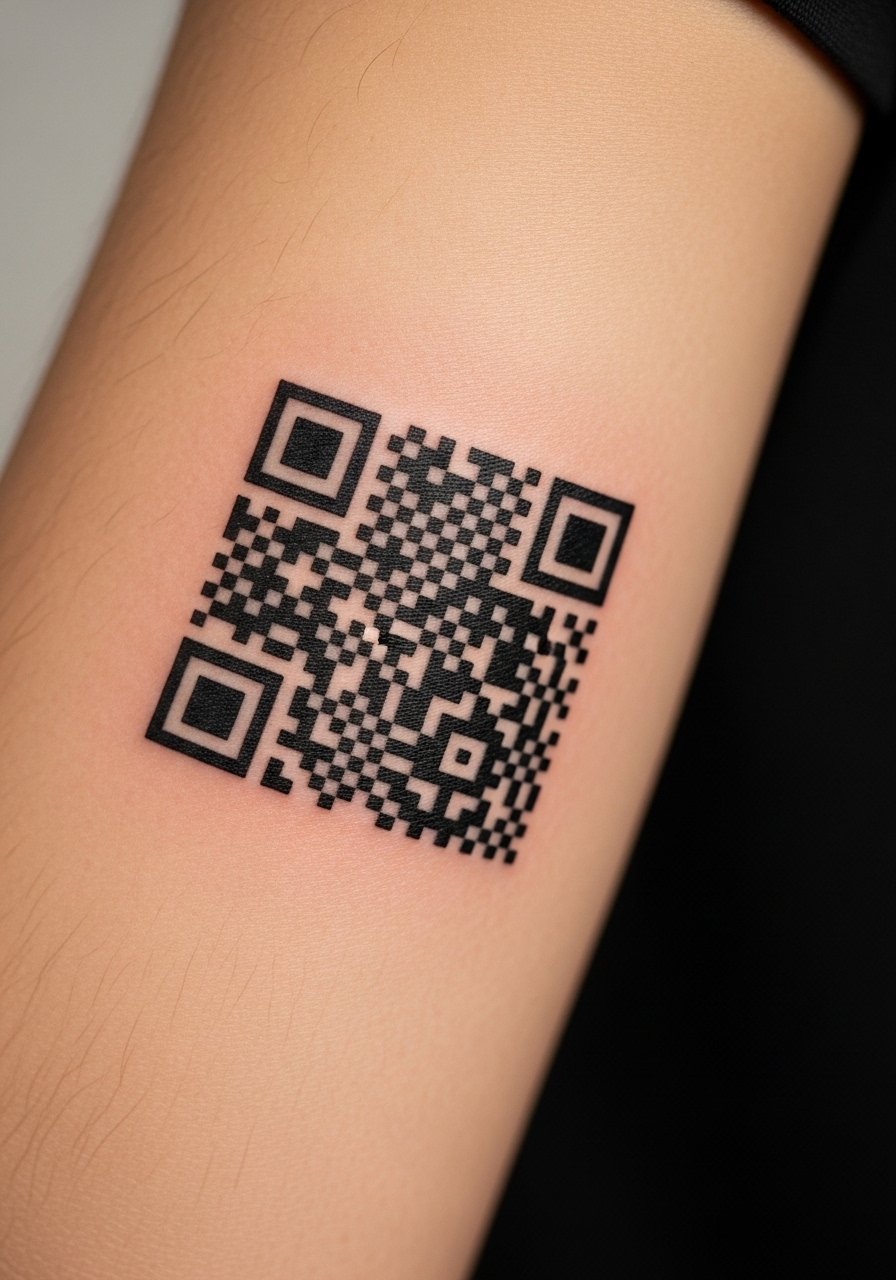
I scanned a QR tattoo once and it linked to a playlist. The outer forearm is great for scannable designs. Pain is low. To keep the code scannable, insist on crisp black blocks and adequate spacing. A huge mistake is reducing the module size too much to fit a smaller area. Then it fails to scan. Tell your artist you want "machine-readable spacing." Expect re-touch after six months if parts fade. Keep it out of constant sun to maintain high contrast.
16. Robotic Spine Column Micro-Realism On Lower Spine
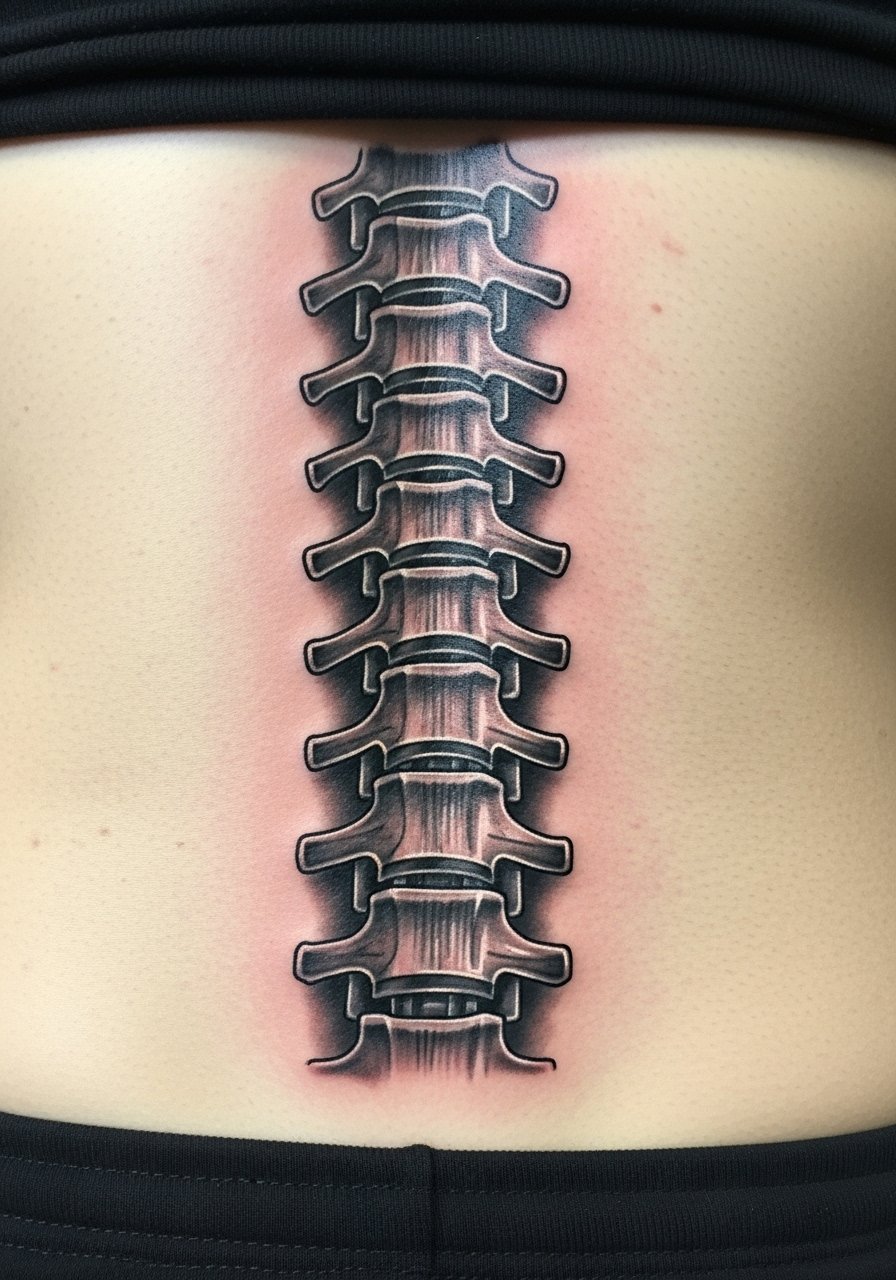
I have a lower spine tattoo and I can say the area heals slowly. A robotic column with micro-realism reads mechanical and organic at once. Pain is high near the tailbone. Ask your artist to plan the piece so the segments move with your posture. Many clients ask for rigid segments that look stiff when they bend. Healed after a year the shadows soften. Schedule touch-ups for the deeper contrast if you want that crisp metallic look to last.
17. LED Pixel Heart On Sternum
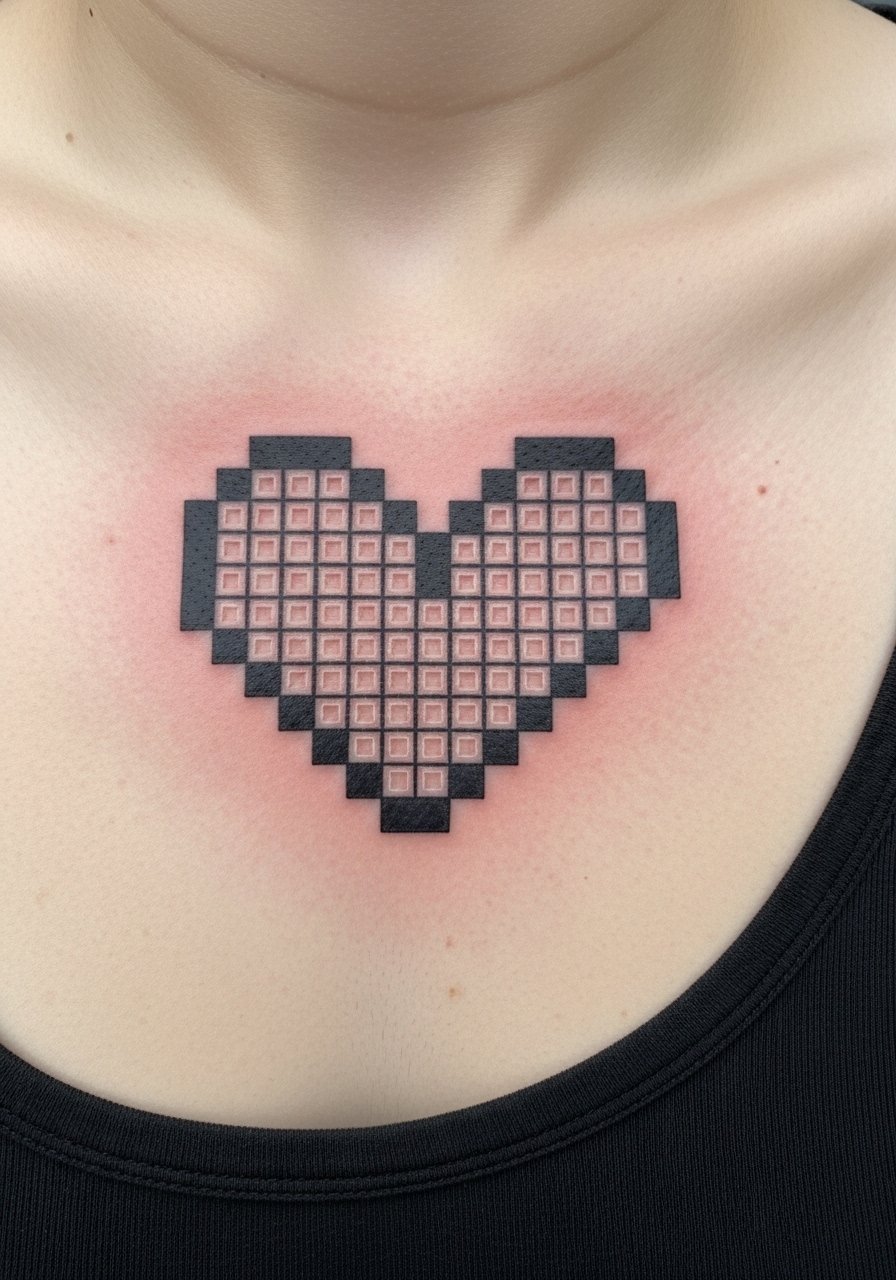
Sternum pieces can be intense in the chair. I recommend LED pixel hearts for people who want a bold but compact statement. Pain is notable. Ask the artist to avoid tiny dots for inner pixels. Those tend to merge over time. A common error is using too many small color blocks without black anchors. Healed at six months, the black anchors maintain structure while color softens. Keep your shirt material in mind as it can rub the central chest while you sleep.
18. Synthwave Skyline On Ribcage Side

I first noticed synthwave cityscapes on ribcages during late-night studio visits. The ribcage suits horizontal compositions that wrap slightly. Pain is high but the result reads cinematic. Tell your artist to block in strong silhouettes first. If they try to detail every tiny window you will lose clarity. Healed, neon gradients will soften like a sunset. For durability request denser pigments in the skyline outlines. Avoid placing a large, fine-lined skyline all the way to the sternum as it can warp with breathing.
19. Cybernetic Eye Behind Shoulder Blade
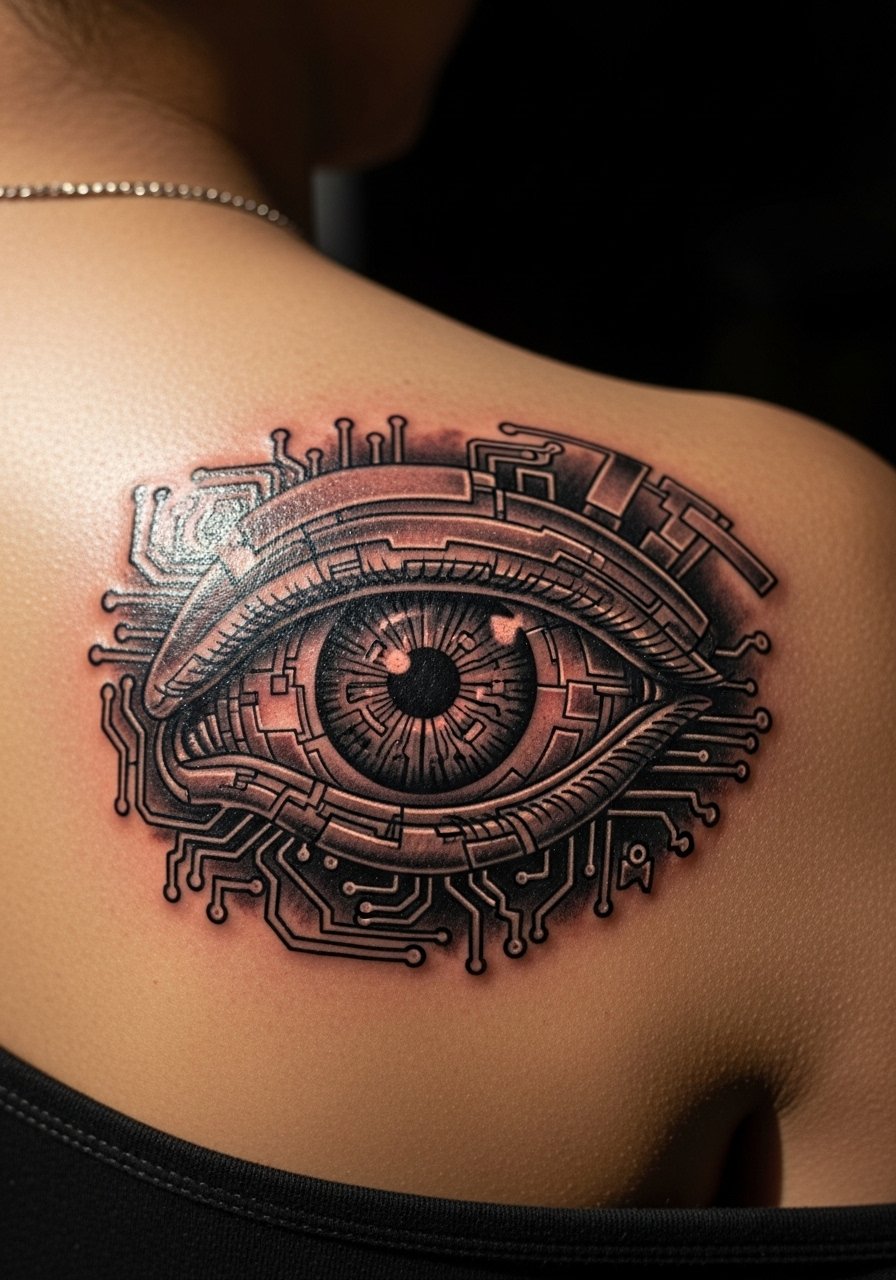
I recommend the shoulder blade when you want a piece that peeks out with clothing changes. The area is medium pain. Ask your artist to balance the tiny lashes of the mechanical eye with negative space so the detail does not muddy. Many people choose too small an eye and then the iris details become indistinct. Healed at one year the metallic highlights will dim a bit. If you wear backpacks often, expect more friction during healing and plan for protective coverings on the first week.
20. Microchip Geometric On Ankle
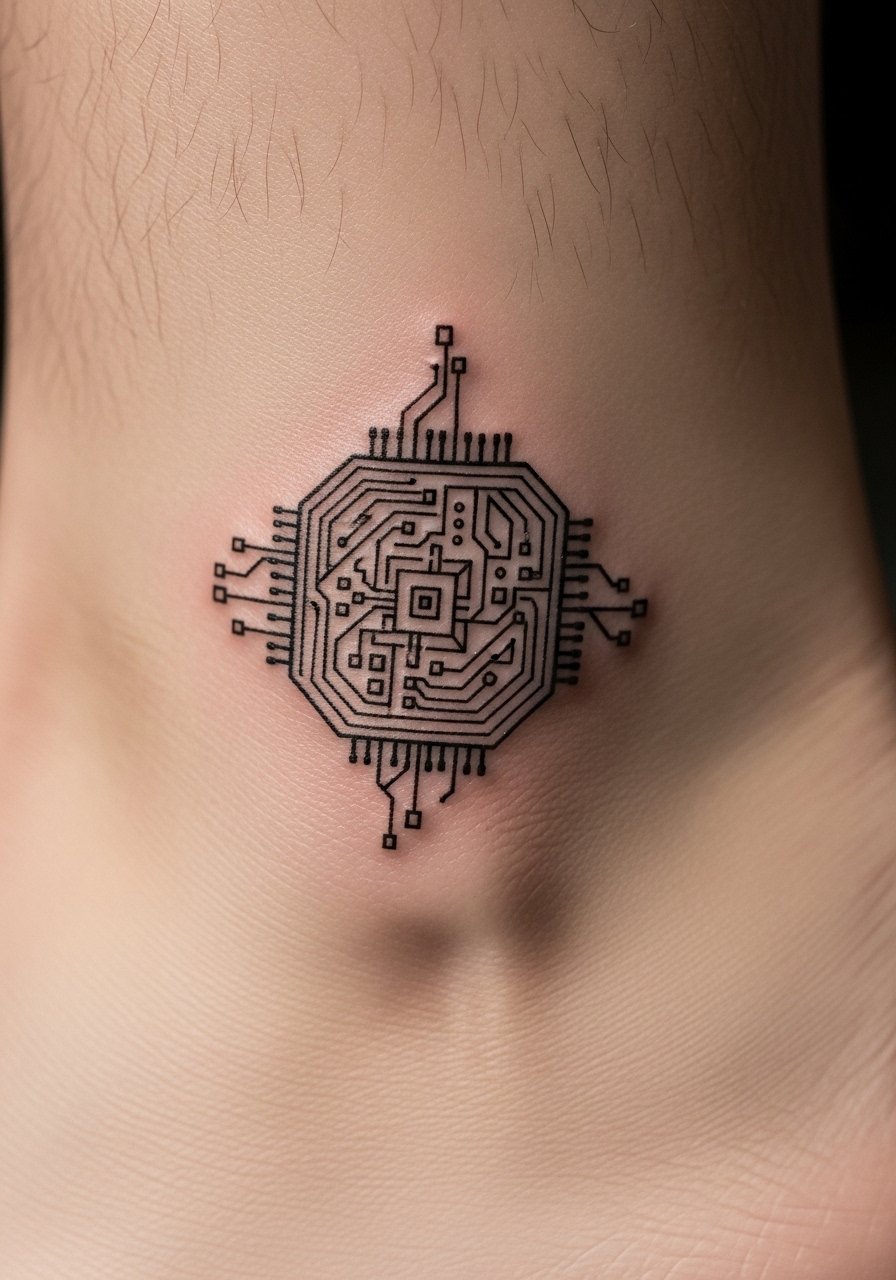
Ankle placements are low profile but the skin is thin. The pain is sharp. Microchip geometry works if you keep the design compact and avoid hairline traces. I always tell clients to allow slightly larger nodes than the digital mockup. Tiny connectors on the ankle spread more because of movement and footwear rub. Healed after six months the piece will look slightly softer. For longevity, choose a design with bolder anchors and plan for a touch-up after a year if you are frequently active.
21. Biomechanical Thigh Sleeve In Blackwork

Thighs are the best canvas for full biomechanical sleeves. The skin accepts large black areas well. Pain is low compared to ribs. I advise planning negative space that follows muscle lines. A frequent mistake is wrapping rigid plates across a rounded thigh. That ages oddly when muscles relax. Healed pieces keep depth when the artist uses graduated shading and leaves space for future color if you want it. Sessions can be long so bring comfortable seating options.
22. Synthetic Floral Line Art On Collarbone
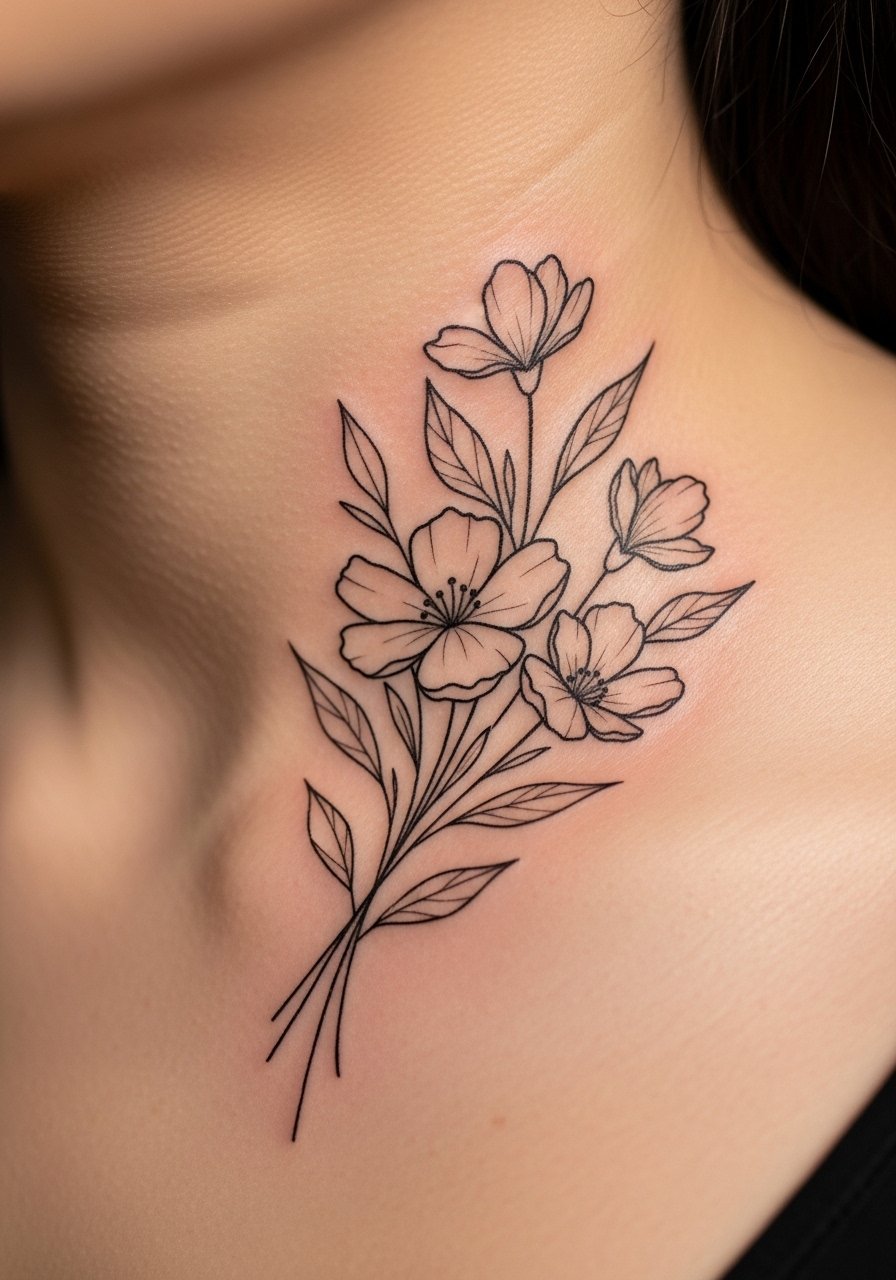
I love floral motifs that feel synthetic, like petals made of circuit traces. The collarbone is high visibility and the pain is moderate. Ask your artist to thicken the outer petals slightly. Thin outer lines disappear quicker with friction from clothing. A common mistake is asking for an ultra-delicate filament across the clavicle. That vanishes at 12 to 18 months. Healed, the design will sit elegantly. Use a quality moisturizer to avoid dryness over the collarbone during healing.
23. Holographic Barcode Full Back Panel
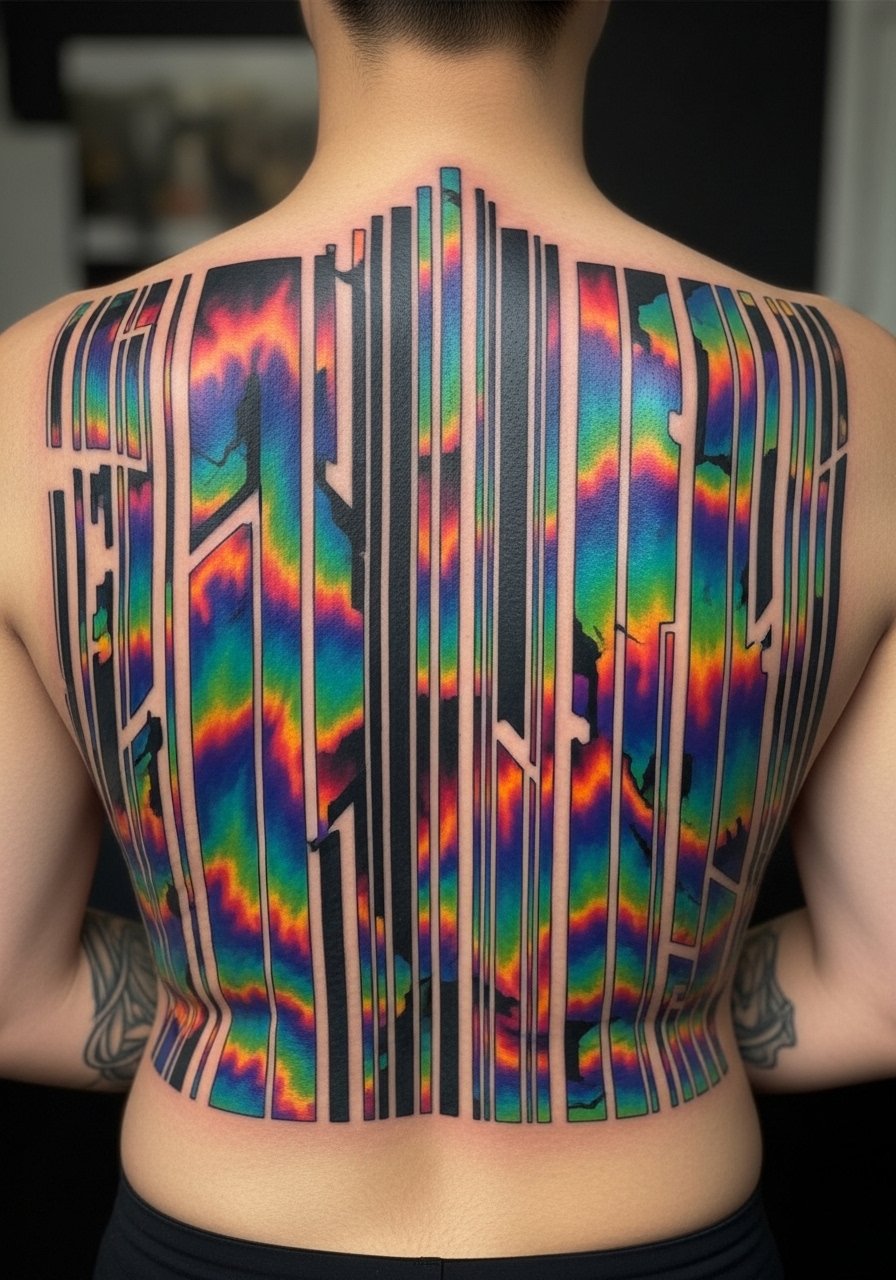
Full back holographic panels are commitment pieces. I have sat through consultations where clients change scale a dozen times. Pain is varied and sessions are multiple. The key is planning the holographic layers under stronger outlines. A frequent misstep is relying on translucent color alone to define form. That fades quicker. Healed after a couple years the piece will have softened gradients but the outlines should keep structure if placed well. Discuss long-term maintenance with your artist before booking.
24. Minimalist Neural Circuit Behind Ear And Nape
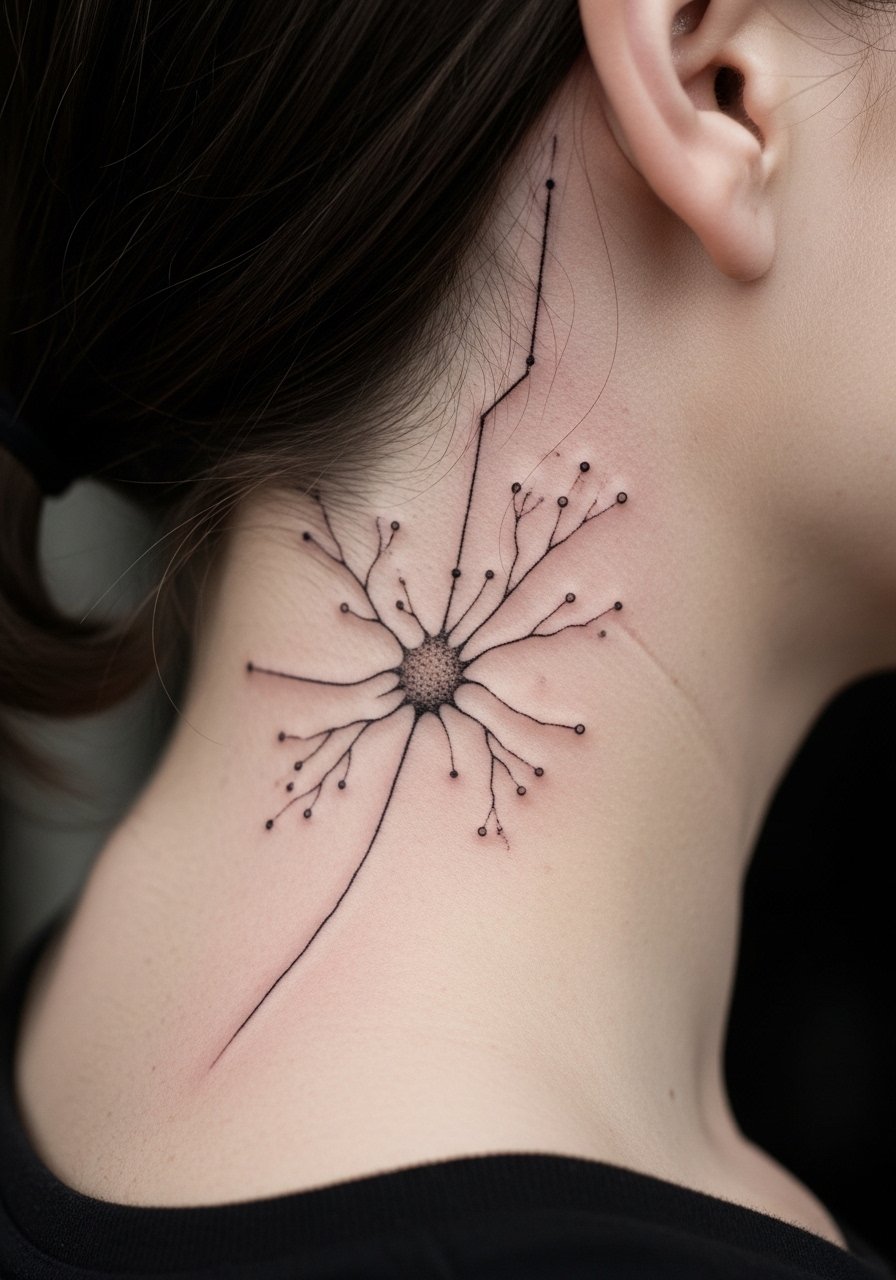
One last piece I get asked about often is a tiny circuit from behind the ear down toward the nape. It is private and futuristic. Pain is sharp but brief. For this area I stress simplicity. Tell your artist to prioritize node spacing and to avoid too many connector lines. I see clients who request dense networks that later look like a gray smudge. Healed at six months the minimal approach reads intentional. Consider Saniderm for the first four days if you sleep on that side.
Tattoo Prep and Aftercare Essentials
After testing products across many heals I keep a short kit. Artists have recommended most of these items. I group them by use so you can grab what you need for each stage.
Aftercare Essentials:
- Aquaphor Healing Ointment, 14oz tube — Use first 3 to 5 days to prevent scabbing
- Saniderm Transparent Adhesive Bandage, 6-inch roll — Second skin healing method for initial protection
- CeraVe Fragrance-Free Moisturizing Lotion, 12oz — For days 4 to 14 when you switch from ointment
- Dr. Bronner's Unscented Castile Soap, 8oz — Gentle cleaning without additives
Before Your Appointment:
- Tattoo Numbing Cream With 5% Lidocaine, 30g — Apply 30 to 45 minutes before if your artist approves
- Tattoo Stencil Transfer Paper, Pack — Handy if you sketch concepts at home first
Long-Term Maintenance:
- SPF 50 Sunscreen Stick For Tattoos, 0.5oz — Use daily on exposed tattoos to slow fading
- Mad Rabbit Tattoo Balm, 2oz — Keeps healed ink vibrant for months
- Hustle Butter Deluxe, 2oz — Vegan aftercare alternative for long-term moisture
Optional Comfort Items:
- Tattoo Numbing Spray, 50ml — Useful for touch-ups or very sensitive spots
- Hydrocolloid Bandages, Pack — For small tattoos or to protect scabs
Every artist I have talked to will emphasize hydration, sun protection, and patience. I recommend talking through product choices at your consult so you follow studio-preferred methods.
Frequently Asked Questions
Q: Will fine line circuitry blur if I get a full sleeve of it?
A: From what I have seen, fine line circuitry across a full sleeve works if the artist designs with line weight hierarchy. Ask for primary lines that are slightly thicker than the micro connectors. Also request negative-space lanes so the lines breathe. If you get ultra-fine tracery across the whole arm the thin lines will spread and merge after one to two years. Consider planning for touch-ups at 12 months.
Q: Do UV neon accents need special aftercare compared to normal color?
A: In my experience UV and neon inks heal much like traditional pigment. The main difference is they tend to feel drier and can fade unevenly under sunlight. I suggest using a gentle ointment for the first three days, then switch to a fragrance-free lotion. For protection, use a sunscreen stick daily on exposed areas once fully healed. I like the SPF 50 sunscreen stick for tattoos linked earlier.
Product Recommendation: SPF 50 Sunscreen Stick For Tattoos, 0.5oz
Q: How painful is ribcage dotwork and what should I tell my artist?
A: Ribcage dotwork is one of the more painful options. I have had rib sessions and they require patience. Tell your artist to space the dots intentionally so that you do not end up with a dense patch that blurs. Ask for staggered sessions and short breaks. Many artists recommend Saniderm for the first five days to protect against friction from clothing. Expect slower healing because of movement from breathing.
Product Recommendation: Saniderm Transparent Adhesive Bandage, 6-inch roll
Q: Can a QR or barcode tattoo remain scannable long term?
A: I have scanned QR tattoos at one and three months with success. Long term scannability depends on contrast, module size, and placement. Outer forearm and calf are good spots. Tell your artist you want "machine-readable spacing" and show a test print during the consult. Keep the area out of direct sun and plan for a touch-up if the black softens.
Q: Should I use Aquaphor or a balm like Hustle Butter during the first week?
A: From what I have gathered, many artists suggest Aquaphor in the very first three to five days to prevent heavy scabbing. After that most recommend switching to a cleaner lotion or a balm like Hustle Butter or Mad Rabbit. I alternate depending on skin dryness. If your studio has a preference follow it. Aquaphor is great for barrier work early on. Hustle Butter is good for ongoing moisture.
Product Recommendation: Hustle Butter Deluxe, 2oz
Q: How will a neon holographic back panel age compared to blackwork panels?
A: In my experience blackwork panels maintain structure longer because dark pigments resist visible softening. Neon holographic panels look dramatic fresh and then mellow. If your lifestyle involves a lot of sun or open-back clothing, expect the holographic washes to need a refresh at 12 to 24 months. Ask your artist to anchor holographic washes with strong outlines so the composition remains readable as color softens.
Q: Any tips for minimizing pain on thin-skin areas like the ankle and behind the ear?
A: I have used numbing cream before for small pieces when an artist approved it. Apply a topical with 5 percent lidocaine about 30 to 45 minutes before if your artist says it is okay. Also hydrate well in the days before your session and avoid caffeine the day of. For fragile areas I recommend short sessions so you can rest between passes. If you try numbing products, test a small patch first and discuss timing with your artist.
Product Recommendation: Tattoo Numbing Cream With 5% Lidocaine, 30g
