
I spent months bookmarking cyberpunk tattoos before I finally committed to my first neon-lined piece. The hard part wasn't picking a cool motif—it was knowing which styles actually heal well and still read like "future" after a year. These 24 cyberpunk tattoos reflect what I've seen artists push in 2026 and what tends to age cleanly versus what looks great only when fresh.
This list focuses on neon-accented linework, blackwork biomechanical, and micro-realism chrome finishes. Placements range from sleeves to behind-the-ear, and I picked ideas that work for visible statement pieces or easily hidden experiments. From what I've seen, UV accents and solid blacks age differently—ask about saturation and touch-ups during your consult.
1. Neon Circuit Sleeve on Outer Forearm
Style/Technique: Fine Line + Neon Accent
Pain Level: Medium (3-4/10)
Session Time: 2–4 hours per session, multi-session sleeve
Best For: Statement piece, visible tech aesthetic
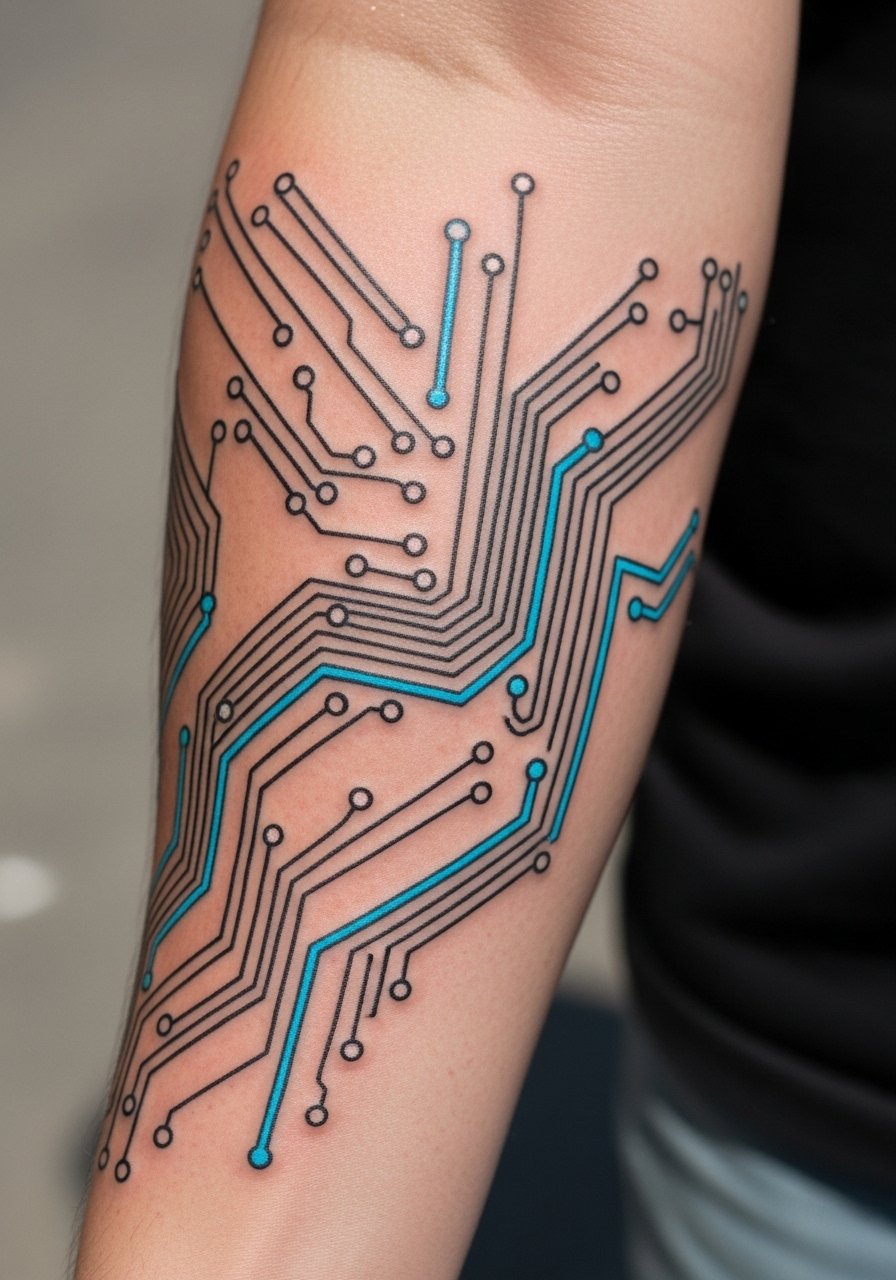
I chose this style after seeing a handful of artists use negative space to make circuitry read like wearable UI. It reads clean on the outer forearm because flat skin keeps thin lines steady. Expect buzzing discomfort—forearm is manageable but sessions can be long. Healing: fine lines may soften, so ask for slightly bolder line weights than you think. UV or neon ink pops fresh but fades faster; plan on touch-ups. Avoid overly dense micro-lines that blur into a gray mass over time. Ask your artist for steady single-needle work plus slight weight for longevity.
2. Holographic Eye on Collarbone
Style/Technique: Micro-Realism + Color Wash
Pain Level: High (6-7/10)
Session Time: 2–3 hours
Best For: Statement, near-clavicle visibility
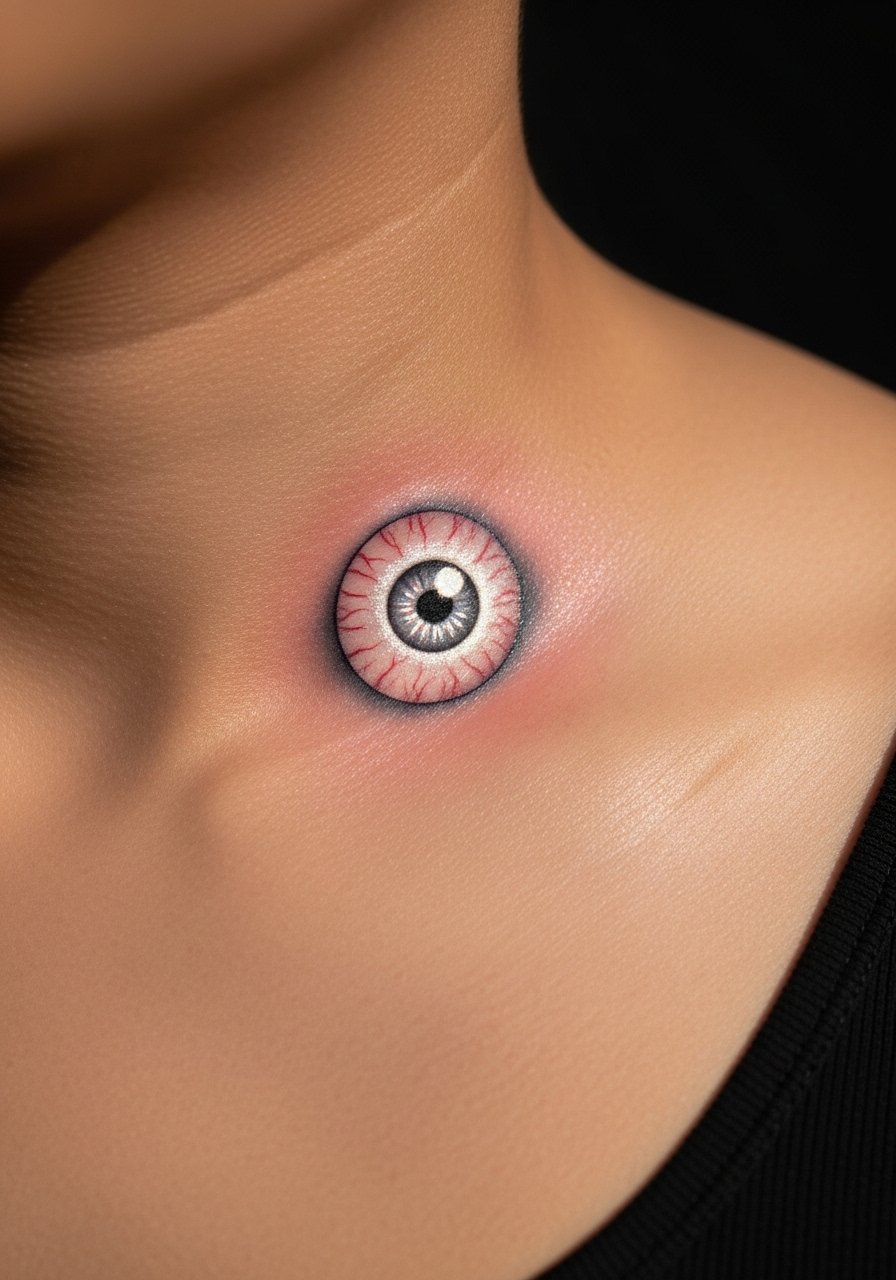
The collarbone gives a dramatic angle for a holographic eye design. It looks like a wearable HUD when color gradients are layered right. Expect sharp stinging on the bone; healing takes care and sleeping positions matter. Colors may mute as the skin regenerates—white highlights especially sink in and can disappear on darker tones. One mistake I see is relying on tiny white dots for contrast; ask your artist to build contrast with saturated mid-tones too. This piece reads as slightly eerie and very cyberpunk when healed.
3. Biomechanical Spine Column on Back
Style/Technique: Blackwork + 3D Shading
Pain Level: High (7-8/10)
Session Time: Multiple sessions, 3–6 hours each
Best For: Statement back piece, cover-up potential
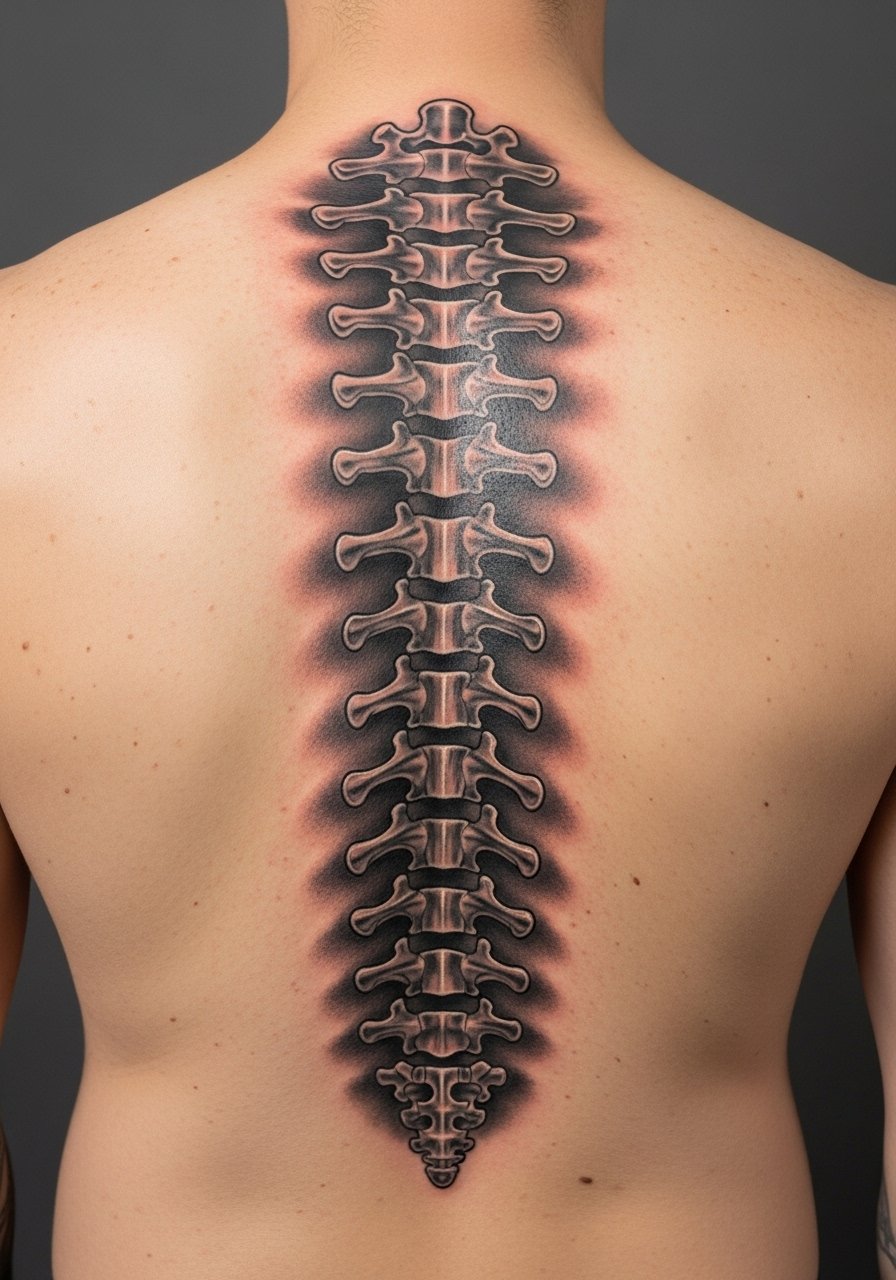
A spine column in a biomech style looks like an implanted exoskeleton. It’s dramatic and ages well because bold black and solid shading hold. Pain on the spine is intense—plan for breaks and multiple sessions. Healed texture softens some crisp edges, so artists often add deep blacks to preserve depth. Common mistake: over-detailing tiny gears that become muddy—focus on bold separations and negative space. Ask for reference healed pieces to see how the shading settles on real skin.
4. Neon Skyline Ankle Wrap
Style/Technique: Minimalist + Neon Gradient
Pain Level: Medium-High (5-6/10)
Session Time: 1–2 hours
Best For: Small statement, ankle visibility
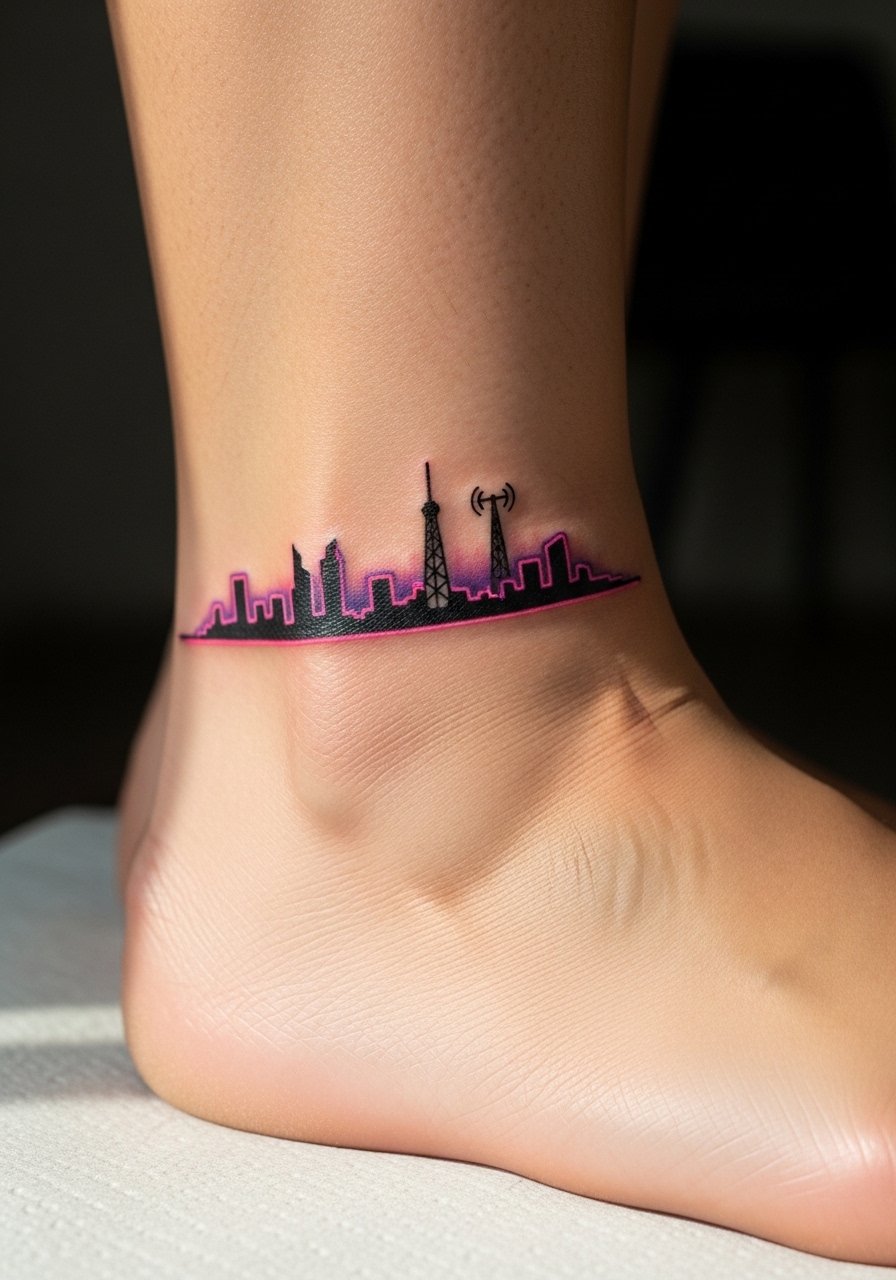
A tiny neon skyline wraps perfectly at the ankle—great if you want a futuristic vibe without a huge commitment. Ankles sting due to low padding; expect higher pain and careful aftercare because of rubbing from shoes. Neon gradients look amazing fresh but can patchy-erase as they heal; artists may recommend denser color saturation. Avoid filling too many tiny details—the silhouette should be readable from a few feet. This placement is easy to hide with socks but shows well in summer.
5. Glitch Portrait Half-Face on Upper Arm
Style/Technique: Neo-Realism + Glitch Effects
Pain Level: Medium (4-5/10)
Session Time: 3–5 hours
Best For: Statement arm piece, portrait lovers

Glitch portraits pair realism with digital distortion—part face detailed, part fragmented neon blocks. Upper arm offers enough canvas and tolerable pain. Healed portraits can look softer; neon glitch bars may need refreshers. A pitfall is overcrowding the portrait with tiny pixel blocks that blur; ask your artist to keep the portrait strong and use blocks as accent. Artists who do both realism and illustrative work execute this best.
6. Microchip Wristband Tattoo
Style/Technique: Fine Line + Minimalist Band
Pain Level: Medium (4/10)
Session Time: 1–2 hours
Best For: First-timers, subtle tech nod
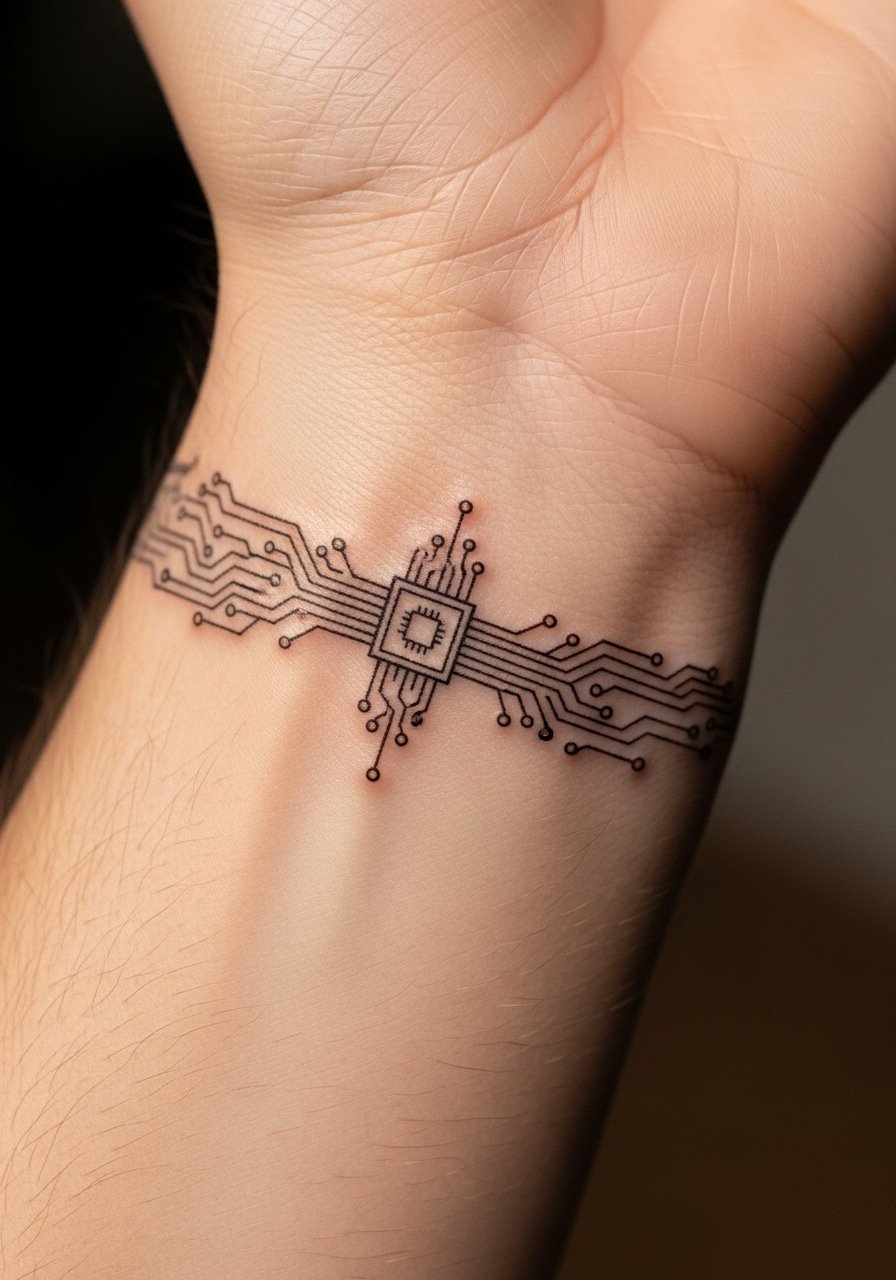
This wraps like a bracelet and reads like an implanted ID. Wrists are visible and heal relatively quickly but flexing can stretch lines—expect occasional touch-ups. Fine linework must be executed by someone used to thin, steady work. I’ve noticed bands with slightly heavier outlines settle better over time. Avoid extremely micro-detail; keep chip icon bold enough to read after healing. It’s a quiet cyberpunk statement that’s easy to conceal with a watch or sleeve.
7. UV-Reactive Barcode Behind Ear
Style/Technique: Minimalist + UV Ink Accent
Pain Level: Low-Medium (2-4/10)
Session Time: 30–60 minutes
Best For: Hidden-cool, club/UV contexts
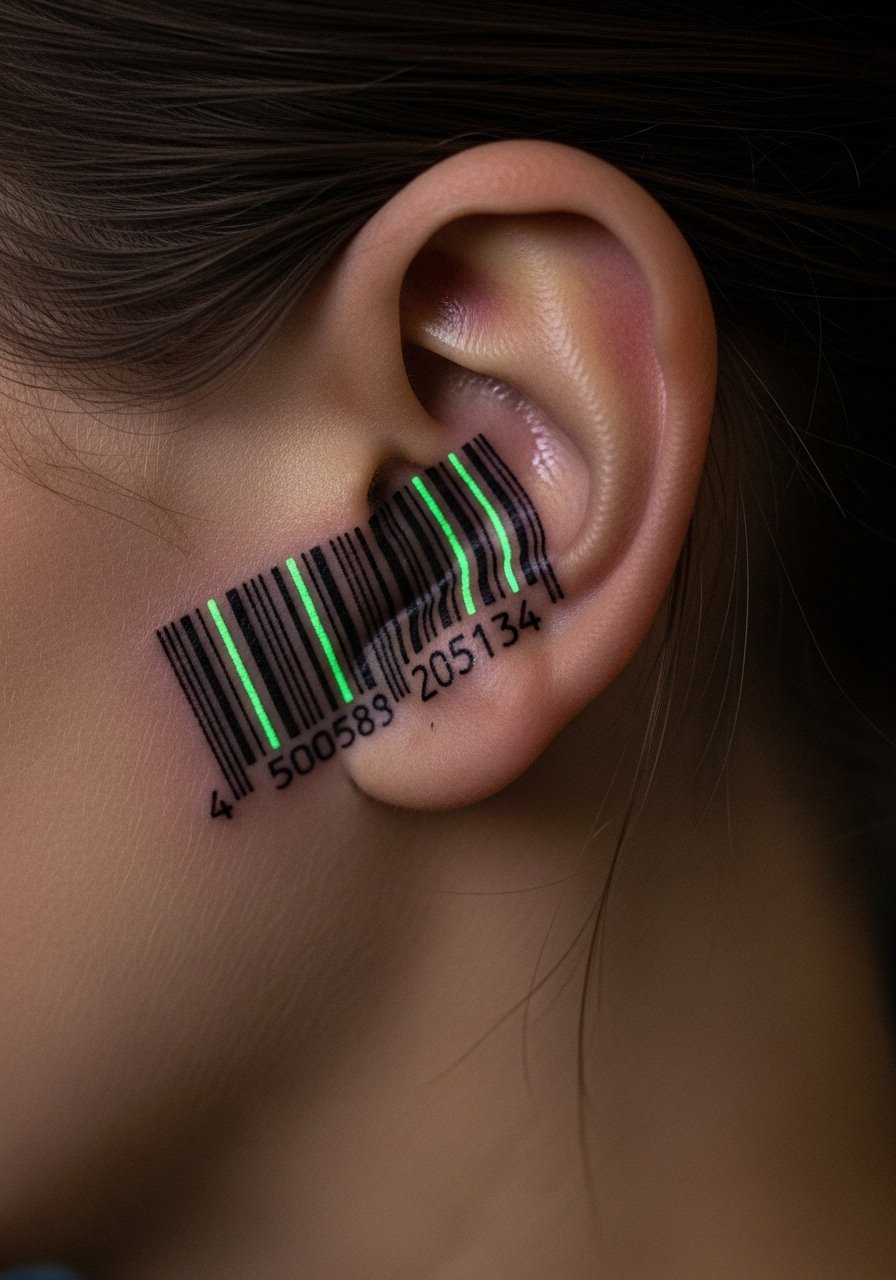
Behind the ear is discreet and surprisingly low on pain. A barcode with UV lines reads almost invisible in regular light but glows under blacklight—a fun party trick. UV inks fade quicker and need touch-ups; from what I've seen, artists often suggest black anchors to keep design readable long-term. Avoid placing super-dense chips here; the skin is thin and fine lines can blur. Check healed UV examples from your artist—results vary.
8. Cyber-Samurai Shoulder Cap
Style/Technique: Neo-Traditional + Blackwork
Pain Level: Medium (4-5/10)
Session Time: 2–4 hours
Best For: Bold shoulder piece, wearable armor look
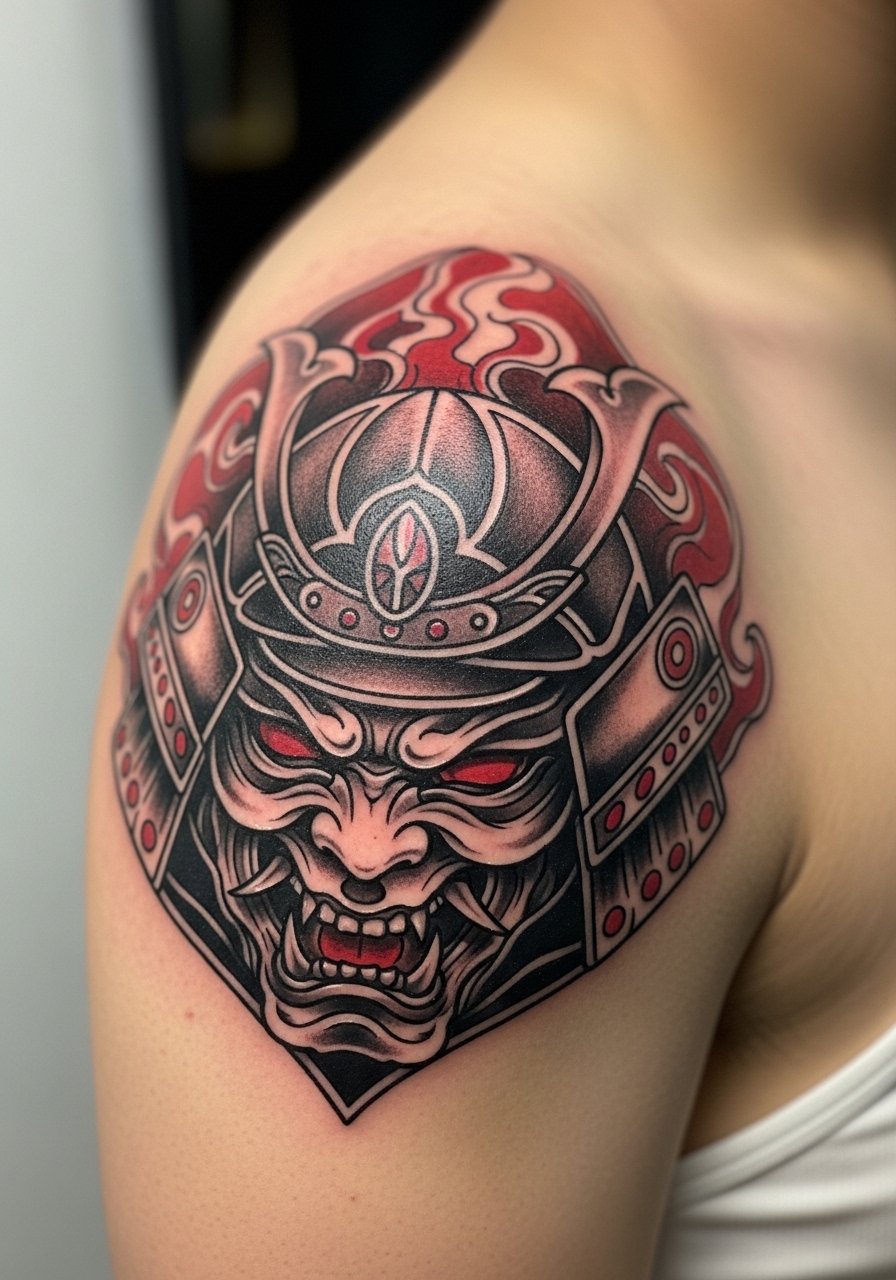
I fell for this after seeing traditional samurai motifs fused with mech plating. The shoulder cap reads like shoulder armor and wears well because shapes are bold. Shoulders are less painful and heal predictably. Colors like reds can shift; artists often layer blacks for lasting contrast. A common error is cramming too many small elements—let the armor plates speak in clear shapes. This one ages into a bold, graphic statement.
9. Data-Stream Forearm Band
Style/Technique: Geometric + Fine Line
Pain Level: Medium (3-4/10)
Session Time: 1–2 hours
Best For: Forearm wrap, readable graphics
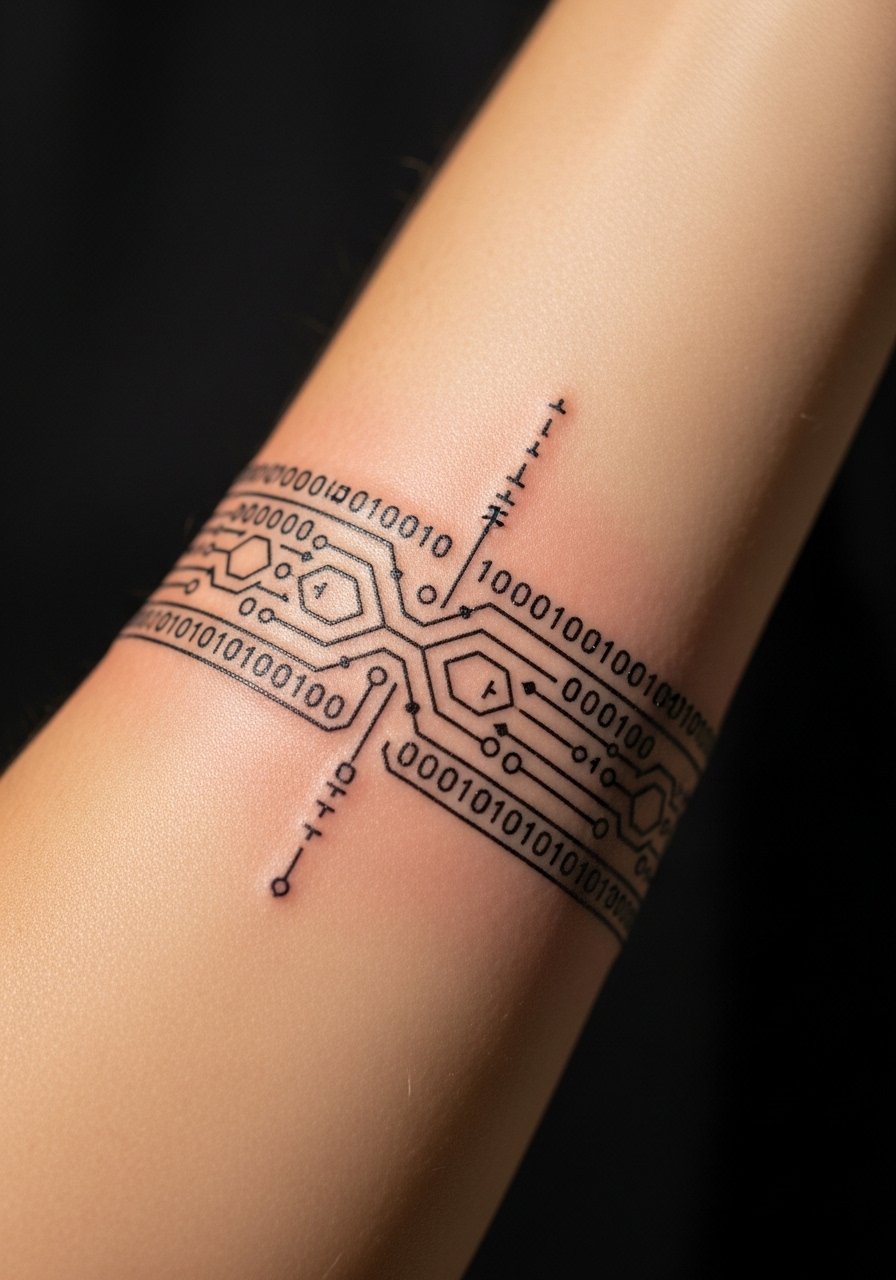
A flowing band of geometric "data" lines looks clean on the forearm as a readable tech motif. Forearm placement keeps edges stable; fine lines may soften, so moderate weight helps. Pain is manageable. Watch out for overly intricate micro-text—small binary-looking dots can fade into texture. Ask for bold separators and rhythmic negative space so it stays readable healed.
10. Chrome Mech Hand on Back of Hand
Style/Technique: 3D Realism + Blackwork
Pain Level: High (8/10)
Session Time: 2–4 hours
Best For: Brave statement, always-visible art
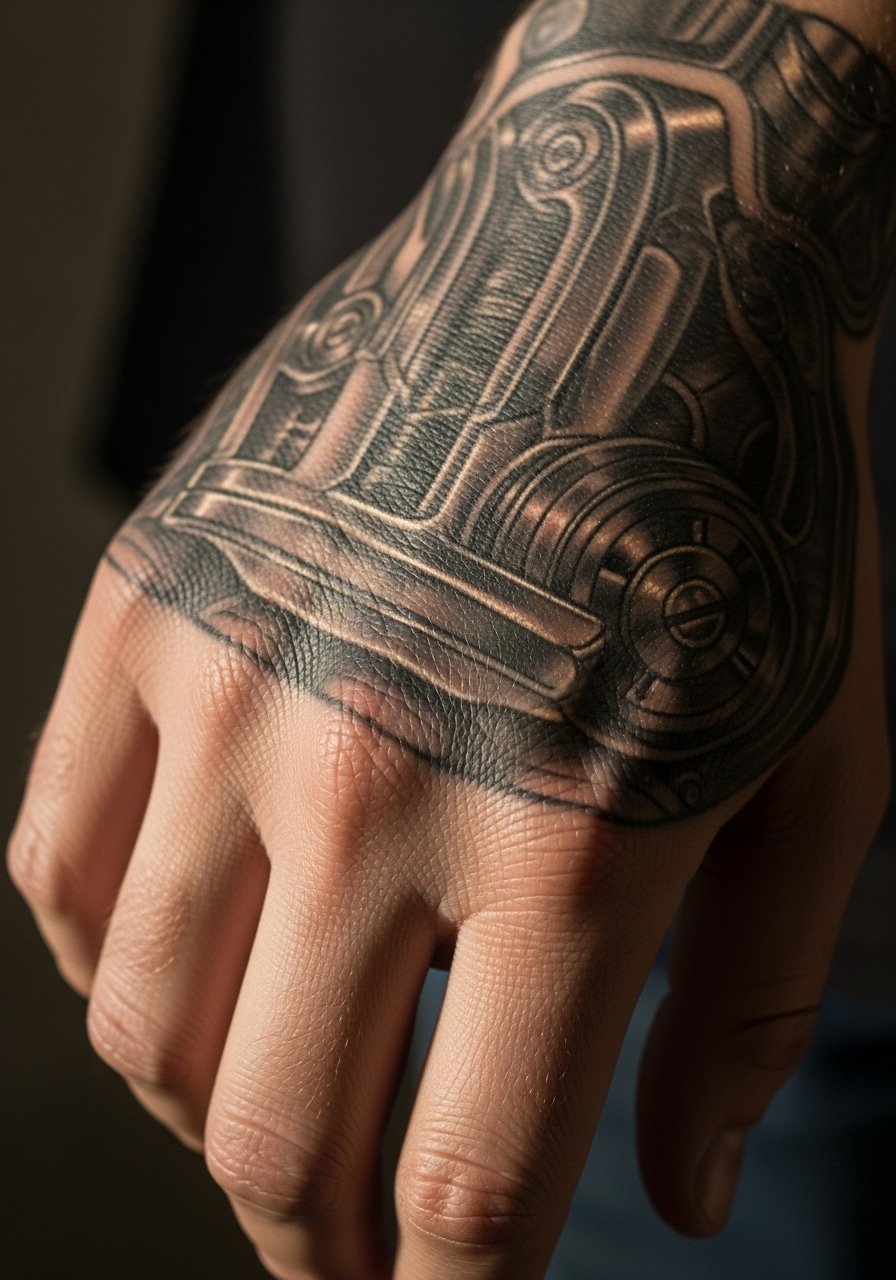
Back-of-hand tattoos are aggressive in visibility and pain. Chrome mech pieces look striking but face heavy sun and abrasion—expect faster fading. From what I've seen, bold black and thick shading survive best here. If you want long-term clarity, accept regular touch-ups. Avoid tiny gears and super-fine highlights; they blur. This placement is a commitment but reads as raw cyberpunk identity.
11. Augmented Reality QR on Ribcage
Style/Technique: Minimalist + Functional Design
Pain Level: High (7-8/10)
Session Time: 1–2 hours
Best For: Hidden interactive tattoo
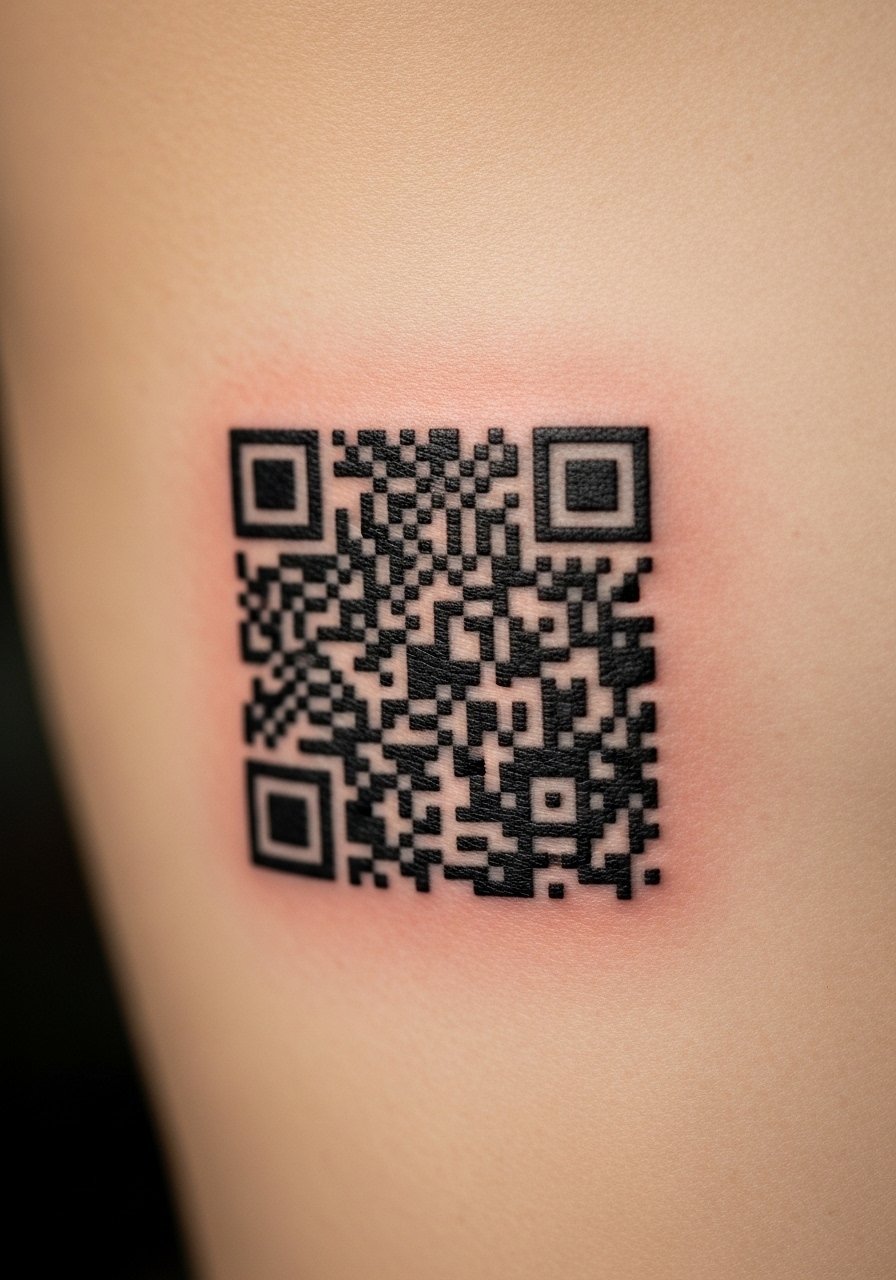
A QR or AR marker on the ribcage is clever if you want an interactive element. Ribs hurt and breathing makes sessions tricky. Precision is critical—any line drift and the code won’t scan. Healed softening can break machine readability; discuss pixel spacing and slightly larger modules with your artist. Many artists recommend scanning tests during the session. It’s a techie choice that’s visually minimal but functional.
12. Synthwave Sunset Behind Calf
Style/Technique: Color Block + Minimalist
Pain Level: Medium (4/10)
Session Time: 1–2 hours
Best For: Calf visibility, retro-futurist vibe
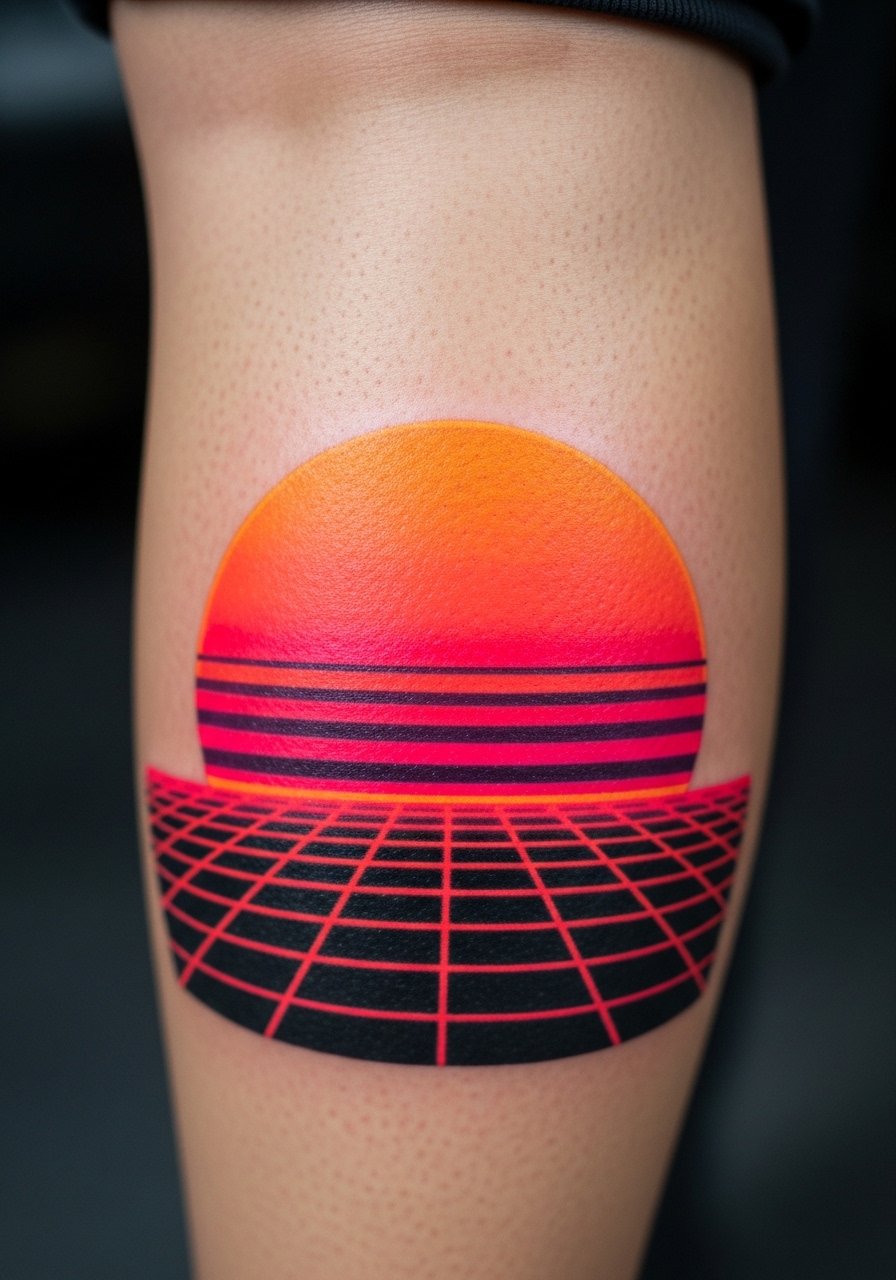
I love how synthwave palettes read as nostalgia-for-the-future. Calf placement is forgiving and shows the gradient well. Color blocks heal reliably if saturation is solid; thin gradients risk patchiness. Avoid super-fine grids that disappear. This reads bold from a distance and maintains silhouette as it ages, provided you protect it from sun.
13. AI Neural Net Thigh Panel
Style/Technique: Blackwork + Dotwork
Pain Level: Medium (4-6/10)
Session Time: Multiple sessions for large panels
Best For: Thigh canvas, private statement

Thighs provide great real estate for neural net-like patterns—nodes and connecting lines that suggest thinking machines. Dotwork ages gracefully, but tiny dots can blur if too close. Pain is moderate on the fleshy thigh. A mistake is over-detailing nodes tightly; spacing preserves pattern clarity as the skin shifts. This looks best when scaled to the thigh's flow.
14. Hologram Wing Behind Shoulder Blade
Style/Technique: Illustrative + Neon Highlight
Pain Level: Medium (4-5/10)
Session Time: 2–3 hours
Best For: Upper-back statement, clothing interplay
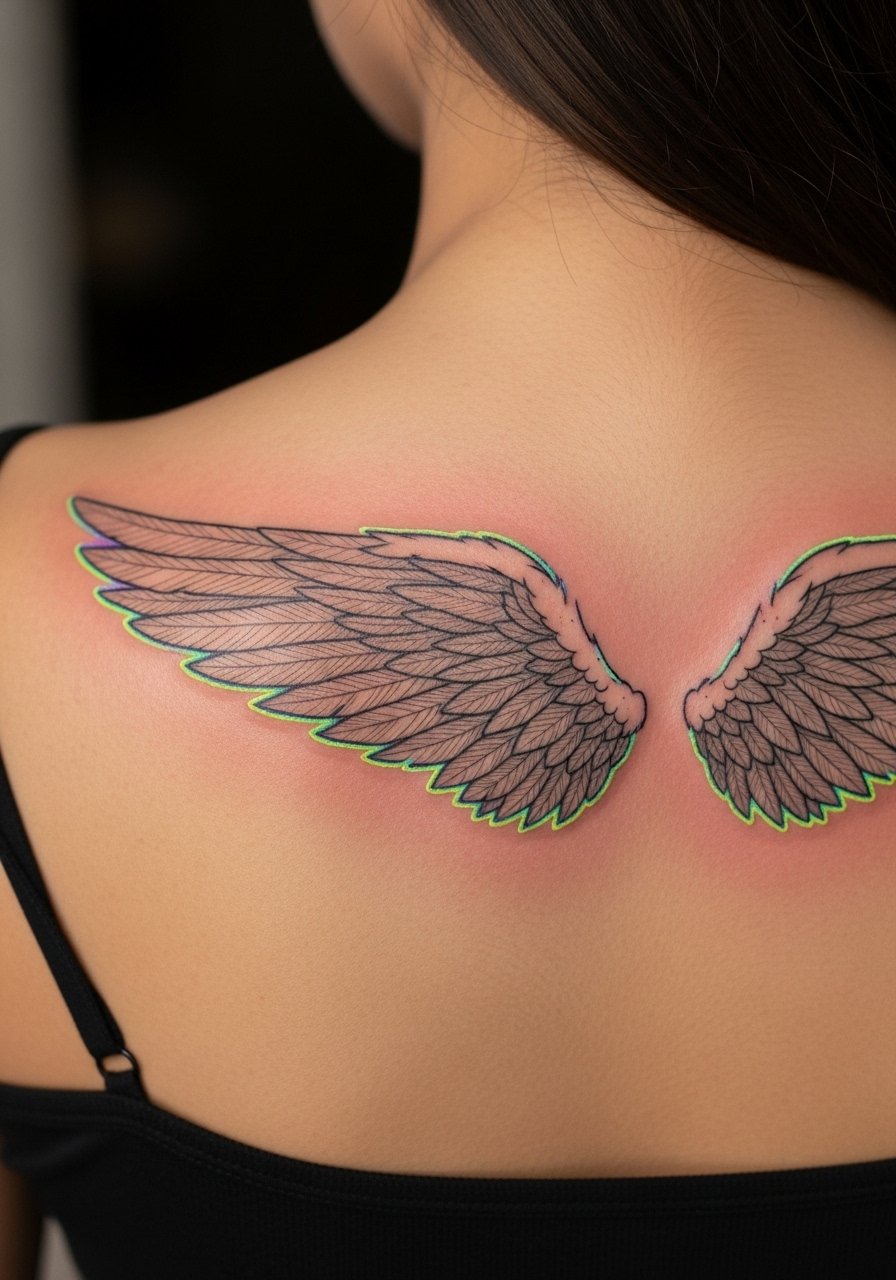
Placed just under the shoulder blade, hologram wings peek when you want them to. The area tolerates detail and recovers cleanly. Neon edges give that futuristic lift but need heavier under-paint to last. Avoid excessively thin feather shafts; they tend to feather out. This placement flatters movement and layers well under clothing.
15. Pixel Implant Nape of Neck
Style/Technique: Pixel Art + Minimalist
Pain Level: Low-Medium (3/10)
Session Time: 30–60 minutes
Best For: Hidden-cute, easy cover with hair
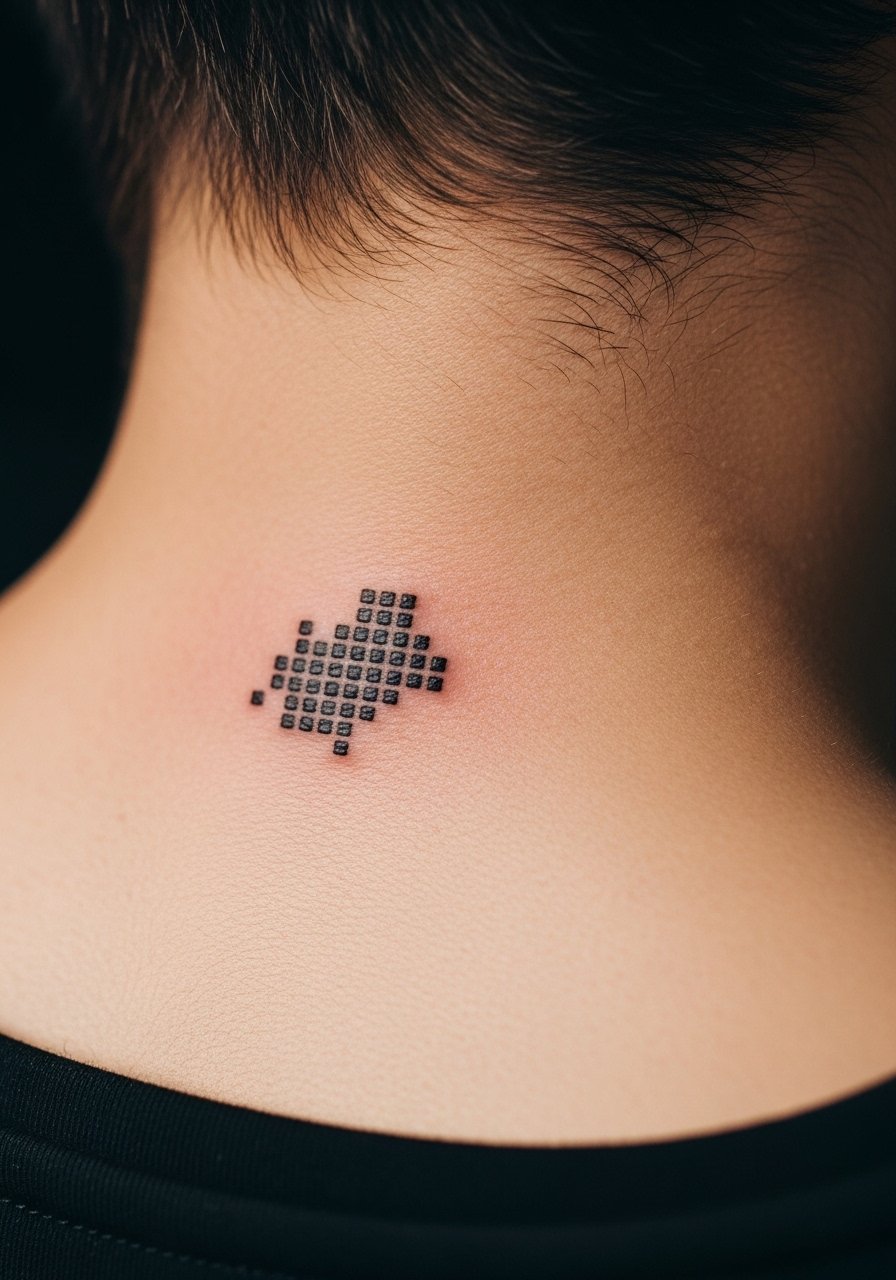
The nape is discrete and low on pain if you keep designs small. Pixel implants are minimalist but read as intentional tech marks. Hair covers them easily for work or formal events. Be mindful of tiny squares merging—spacing matters. This is a low-commitment way to test how you carry cyberpunk ink day-to-day.
16. Cybernetic Ribcage Floral Mix
Style/Technique: Biopunk + Floral Blackwork
Pain Level: High (7-8/10)
Session Time: Multiple sessions
Best For: Dramatic chest/rib overlay
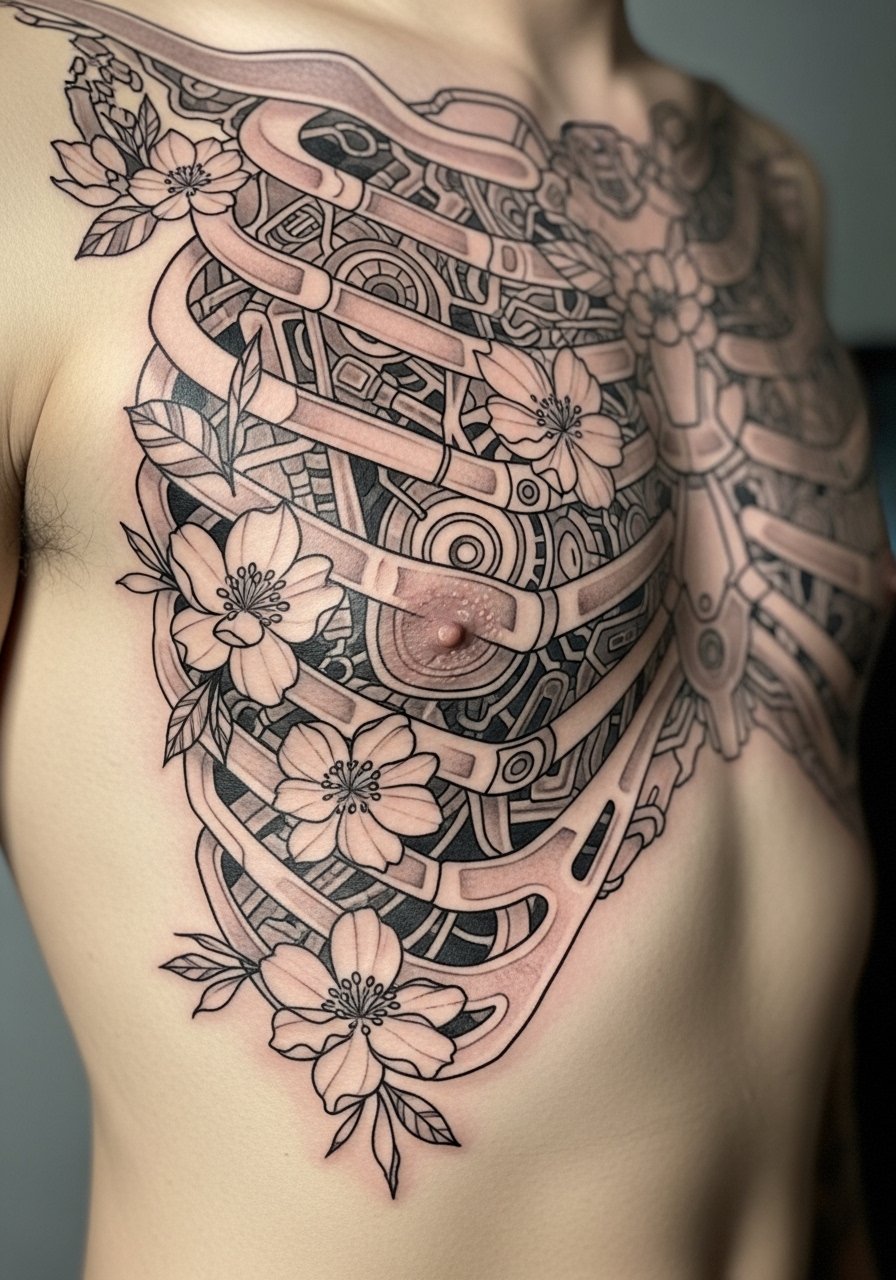
Combining organic blooms with mechanical ribs creates conflict between nature and machine—classic cyberpunk. Ribs are painful, so plan multiple shorter sessions. Bold blacks anchor the piece so flowers don’t vanish as lines soften. A common misstep is too many thin petal veins—they blur; ask for solid petal shapes. Heals into a textured, layered composition.
17. Neon Kanji Wrist Patch
Style/Technique: Calligraphic + Neon Accent
Pain Level: Medium (4/10)
Session Time: 30–90 minutes
Best For: Small visual statement, cultural nod
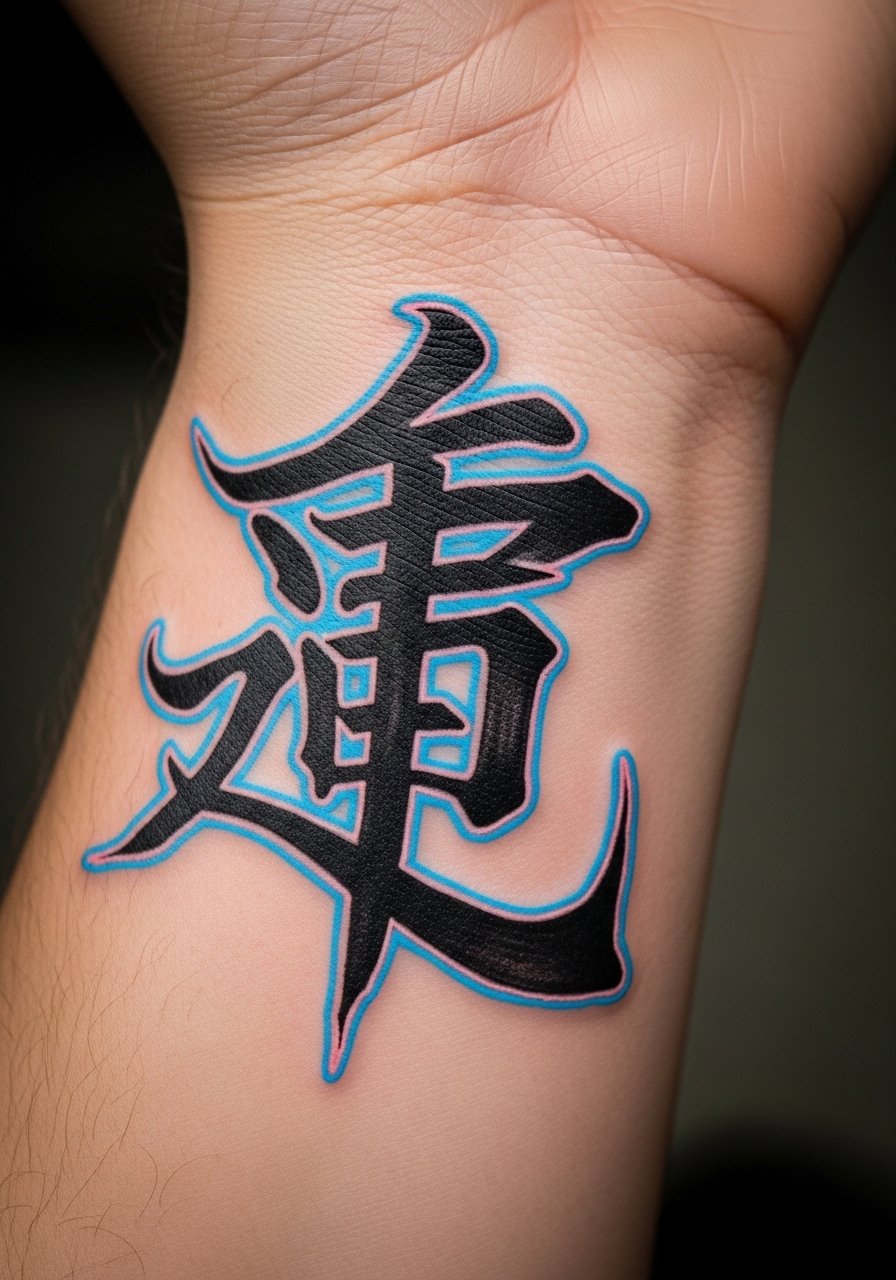
Kanji with neon halos blends traditional calligraphy and future light. Wrists show movement and are visible. Stroke weight is essential; too thin and the characters degrade. I recommend slightly heavier calligraphy than you think. Neon halos are for flair; ensure the character itself has enough contrast to remain legible after healing.
18. Data Crystal Sternum Piece
Style/Technique: Geometric + Micro-Realism
Pain Level: High (7/8/10)
Session Time: 2–4 hours
Best For: Center-chest statement, intimate reveal
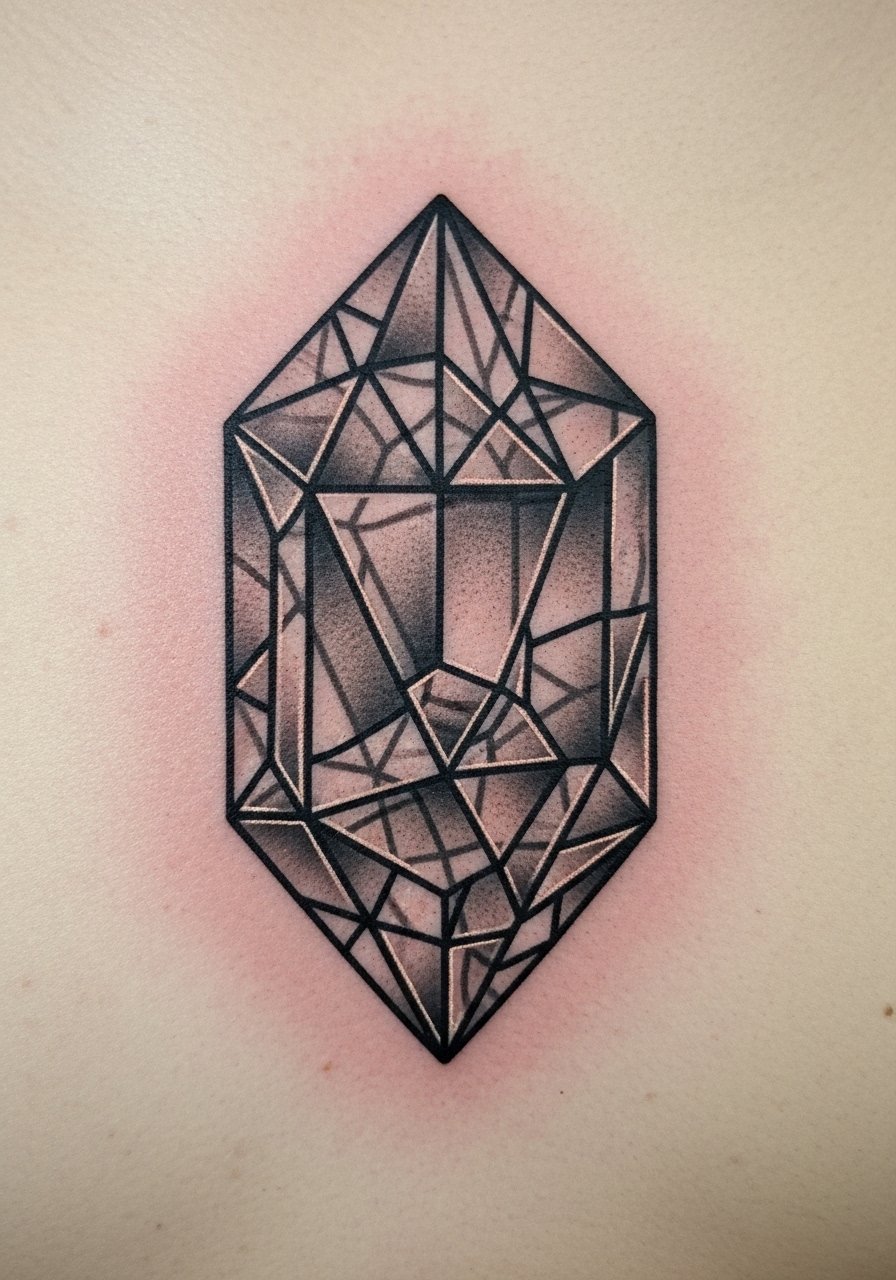
Sternum pieces are bold and painful but read as central insignia. Faceted "data crystals" with sharp planes hold well if blacks are deep. Shading around edges needs saturation to avoid patchiness. Beware tiny facets—larger planes maintain the crystal illusion as lines soften.
19. Optical Sensor Eye on Temple
Style/Technique: Micro-Realism + Fine Line
Pain Level: High (7/10)
Session Time: 1–2 hours
Best For: Small face-adjacent tech, edgy accent
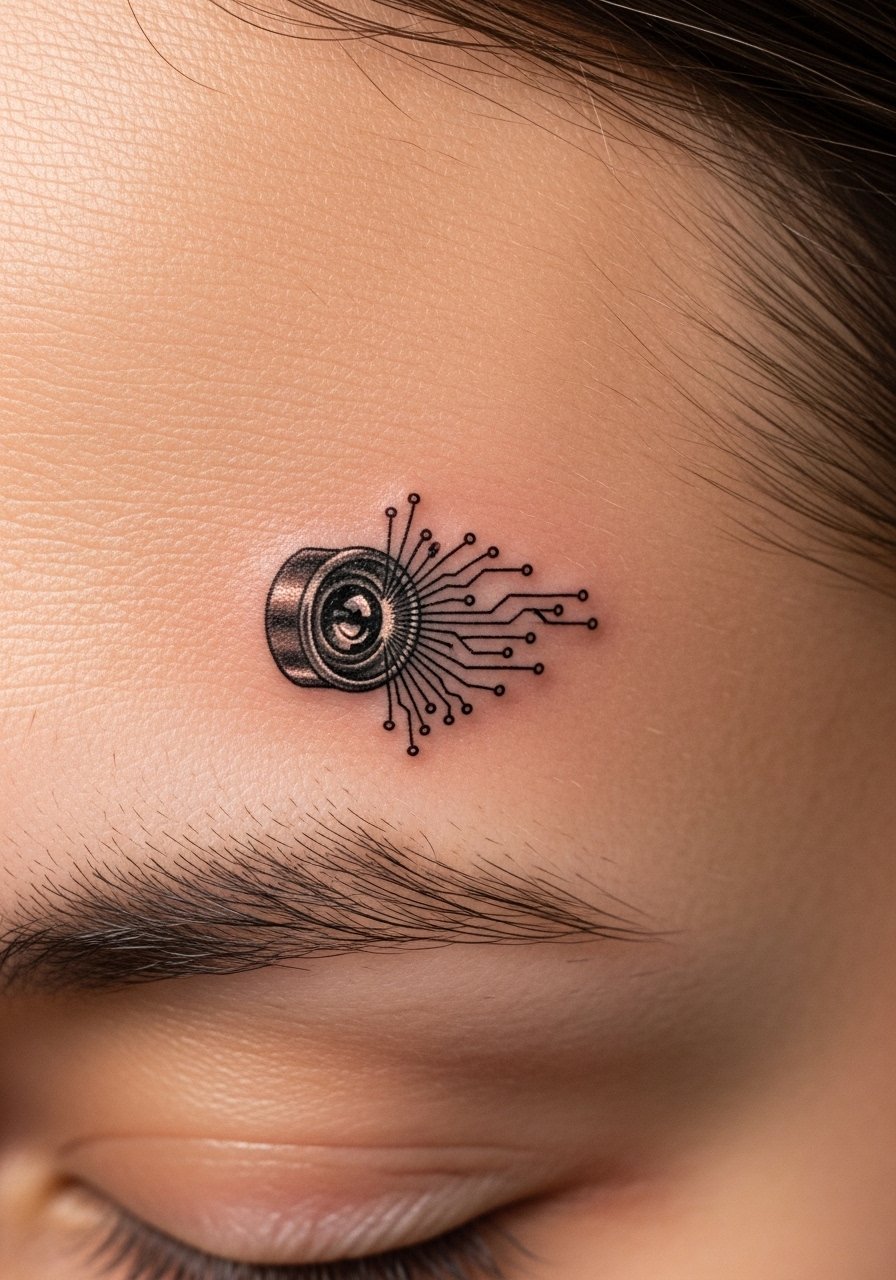
Temple and face-adjacent areas are very visible and sensitive. Small sensor eyes read like implants but require light maintenance. Lines here can blur faster due to facial movement; artists often keep shading soft and anchors bold. Consider social and workplace implications—this spot is high-visibility.
20. Neon Koi Cyber Fusion on Thigh
Style/Technique: Neo-Traditional + Neon Highlights
Pain Level: Medium (4-5/10)
Session Time: 2–4 hours
Best For: Large organic-cyber piece, leg canvas
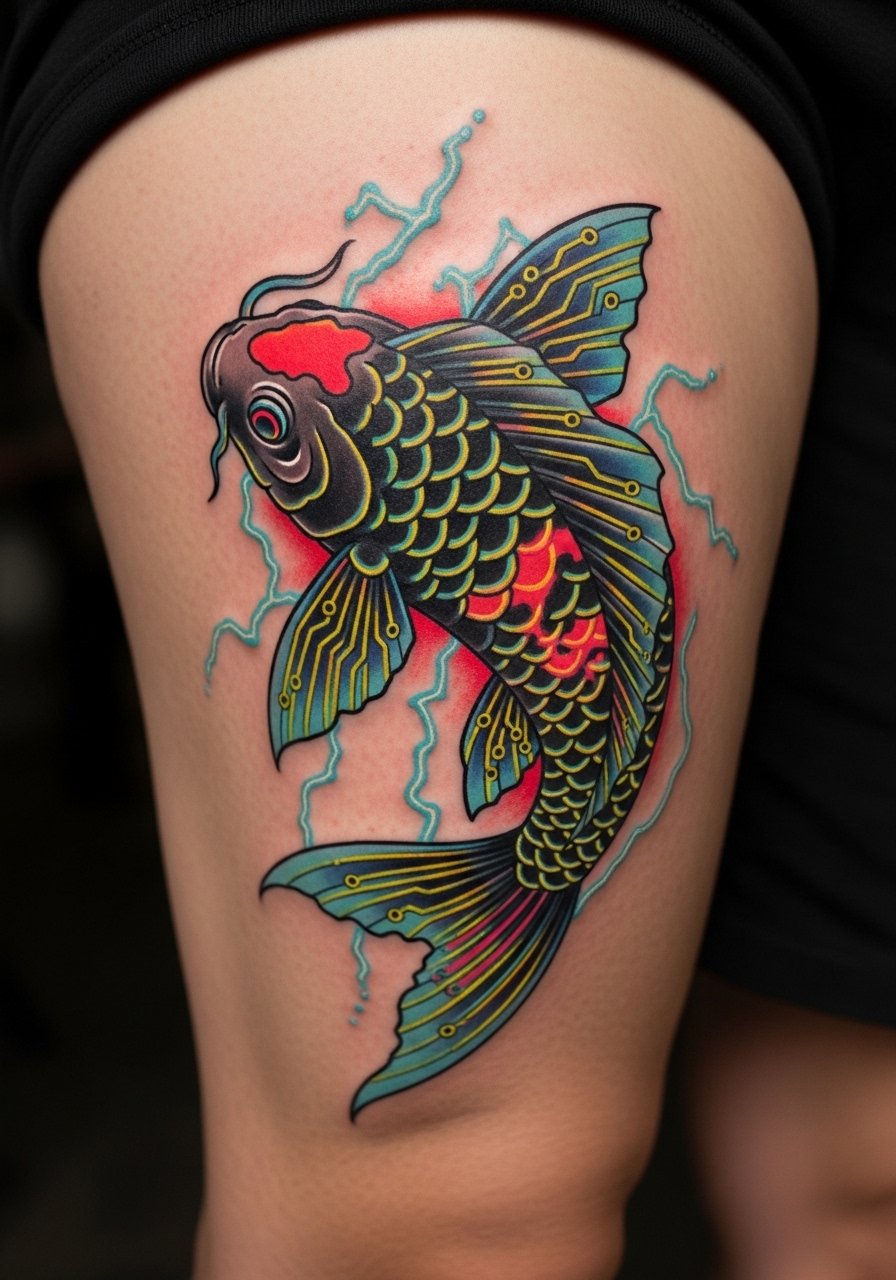
Koi motifs translated into cyber scales feel familiar yet futuristic. Thighs are forgiving for color saturation; neon highlights give a glowing underlay. Keep outlines solid to prevent color bleed. Avoid overly tiny circuit texture that will muddy—bold scale patterns read better over time.
21. Glowing HUD Shoulder Blade Panel
Style/Technique: UI-Inspired + Fine Line
Pain Level: Medium (4/10)
Session Time: 1–2 hours
Best For: Wearable interface look, upper-back
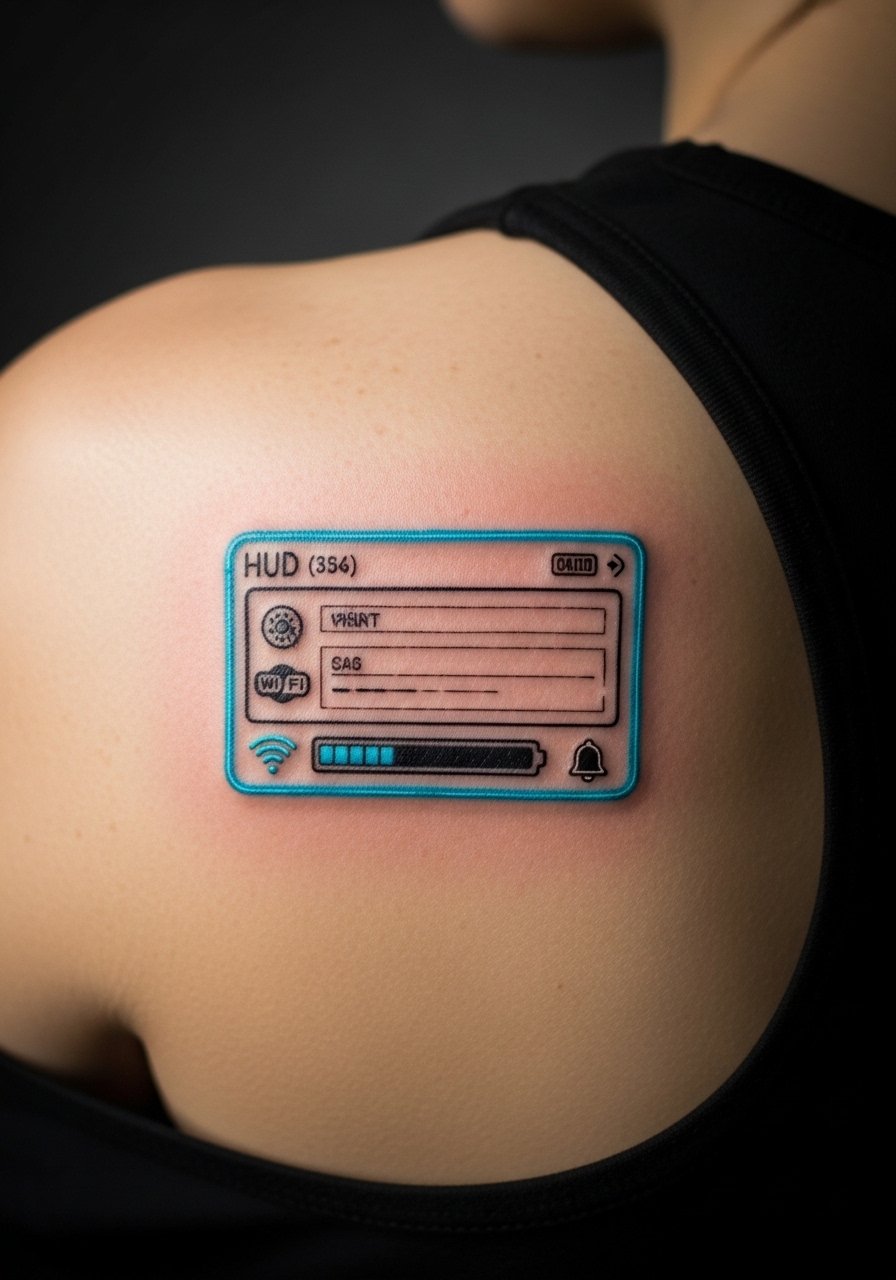
HUD panels translate interface elements into skin—icons, bars, and circular motifs. Shoulder blade movement flatters the layout. Fine lines need slight weight to survive the first year. I’ve seen panels with too many micro-icons lose readability—pick a few strong elements and let them breathe.
22. Pixelated Circuit Sternum-to-Sternal Band
Style/Technique: Pixel Art + Blackwork Band
Pain Level: High (7/10)
Session Time: 2–3 hours
Best For: Central chest band, bold geometry
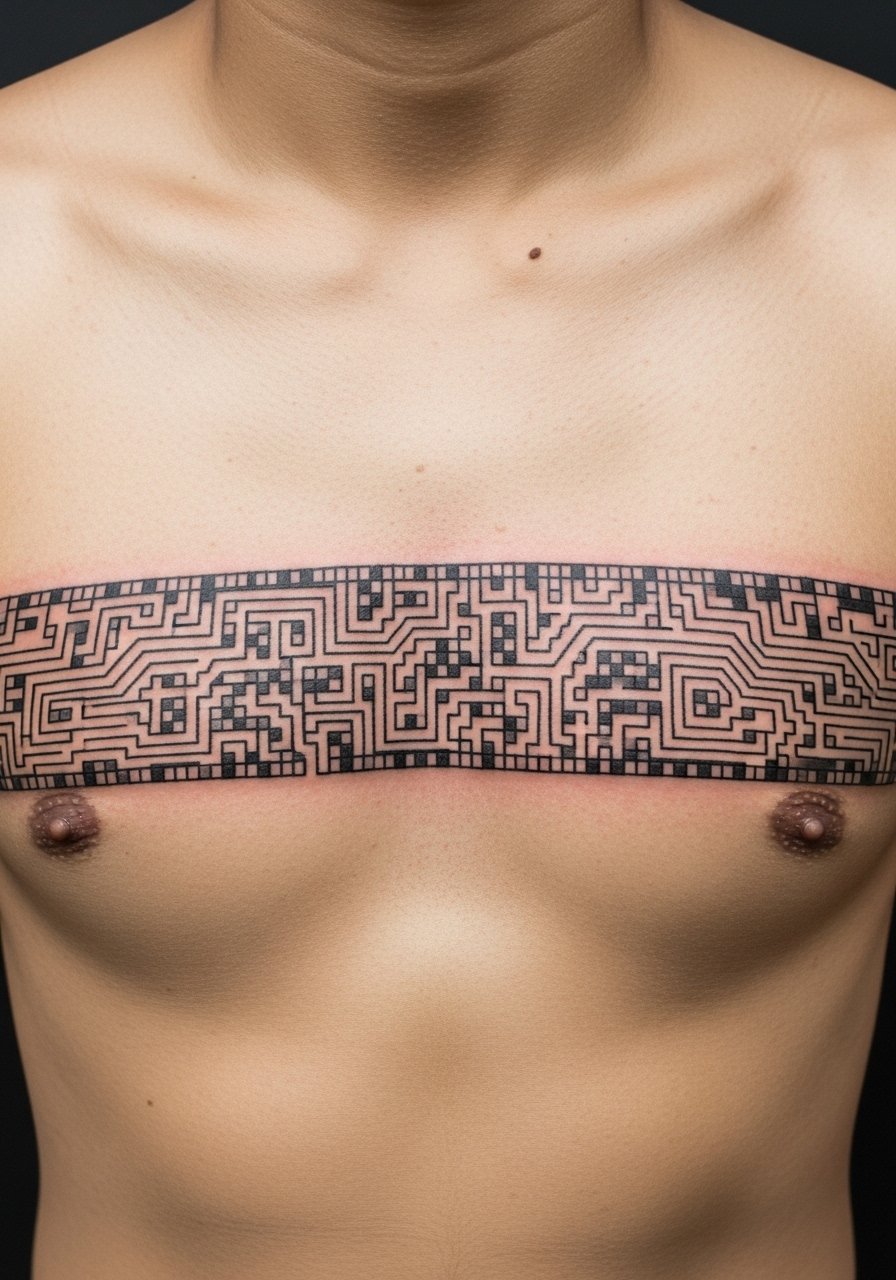
A pixelated chest band reads like an embedded motherboard. The sternum area hurts and requires care. Pixel spacing must be generous enough to remain distinct as the skin heals. Artists often recommend thicker separators. This one is graphic and ages into a textured band if designed with longevity in mind.
23. Robotic Vertebrae Throat Line
Style/Technique: Blackwork + 3D Shading
Pain Level: High (8/10)
Session Time: 1–2 hours
Best For: Vocal identity piece, bold neck statement

Neck and throat pieces are high-visibility and painful. A vertical robotic vertebrae motif reads as an implanted column. Healed clarity depends on robust blacks—thin lines fade quickly. Expect sensitivity and longer healing; avoid if you need a low-profile look for professional reasons.
24. AI Brain Temple Patch
Style/Technique: Micro-Realism + Dotwork
Pain Level: High (7/10)
Session Time: 1–2 hours
Best For: Head-adjacent symbolism, subtle statement

A small brain patch near the temple suggests augmented cognition. Placement is sensitive and visible; dotwork can create a textured neural feel that holds well if dots are spaced. Tiny circuit traces can blur—ask for bold anchors. This reads thoughtful and tech-forward when healed.
Tattoo Prep and Aftercare Essentials
Aftercare Essentials:
- Aquaphor Healing Ointment, 14oz tube — Great first 3–5 days for sealing and moisture
- Saniderm Transparent Adhesive Bandage, 6-inch roll — Second-skin healing method many pros recommend
- CeraVe Fragrance-Free Moisturizing Lotion, 12oz — For days 4–14 to keep skin supple
Before Your Appointment:
- Tattoo Numbing Cream with 5% Lidocaine — Ask your artist before use; handy for sensitive spots
- Tattoo Stencil Transfer Paper — If working on custom layouts at home
Cleaning & First Week:
- Dr. Bronner's Unscented Castile Soap, 16oz — Gentle cleanser for washing
- Medical Disposable Gloves, 100 Pack — Useful for applying ointment cleanly
Long-Term Maintenance:
- SPF 50 Sunscreen Stick for Tattoos — Daily protection to prevent fading
- Mad Rabbit Tattoo Balm, 2oz — Keeps healed ink vibrant
- Hustle Butter Deluxe, 4oz — Vegan aftercare option artists often mention
Optional Comfort Items:
- Tattoo Numbing Spray — For touch-ups or very sensitive areas
- Hydrocolloid Bandages (Large) — For small scabs or spots needing extra protection
Frequently Asked Questions
Q: How bad does a cyberpunk tattoo hurt?
A: Pain depends on placement and your tolerance. Outer arm/forearm = about 3–4/10. Ribs, neck, hands = 7–8/10. It's more persistent discomfort than sudden agony. For sensitive placements, consider numbing cream with 5% lidocaine after talking it over with your artist.
Q: Do neon or UV inks last?
A: UV and neon inks look electric fresh but often fade faster than saturated pigments. From what I've seen, anchoring neon with deeper mid-tones or black outlines preserves the design. Expect to plan touch-ups if you rely heavily on UV accents.
Q: How do cyberpunk designs age compared to traditional tattoos?
A: Bold blackwork and solid shapes age best. Fine neon lines and tiny pixel details are the first to blur. I've noticed pieces designed with intentional negative space and slightly heavier line weight hold visual clarity longer.
Q: Can I get a small neon test first?
A: Yes—start with a small wrist, nape, or behind-ear piece to see how neon or UV reacts on your skin. The wrist or nape heals predictably and shows you how the color settles without a huge commitment.
Q: How should I protect my cyberpunk tattoo from fading?
A: Sunscreen is mandatory. I use a daily SPF 50 sunscreen stick on exposed ink. Keep tattoos moisturized with a fragrance-free lotion like CeraVe and avoid prolonged sun.
Q: What if my small details blur?
A: If micro-lines or tiny dots blur, touch-ups are common. When designing, I ask artists to slightly increase line weight or spacing for longevity. Avoid packing micro-detail into high-movement areas.
Q: How long before I can exercise after getting a cyberpunk tattoo?
A: Wait at least 48–72 hours for light movement, longer for sweat-heavy workouts—ideally a week for full sweat exposure. Sweat and friction impair healing. Keep cleaning gentle with Dr. Bronner’s unscented soap and moisturize.
Q: Do these designs work on darker skin tones?
A: Yes, but color choices matter. Blacks and deep blues show up reliably. Bright neons can read differently—ask for higher saturation and healed examples on similar skin tones. White ink rarely reads strongly on deeper skin; use it sparingly for highlights.
