
I spent months saving Christian tattoo images to a private folder before I realized the real challenge: picking a design that honors my faith and still looks good healed. I wanted pieces that read as prayer, not just decoration. Below are 28 faith-forward ideas I kept returning to—styles artists recommend in 2026 and designs that actually hold up long-term.
This list leans on black and grey realism, minimalist faith tattoos, and a few bold blackwork pieces. These ideas work well on forearm, chest, shoulder, back and ribs. From what I've seen, minimalist faith tattoos and scripture scripts are the easiest to live with, while large Jesus portraits and blackwork scenes are statement pieces that need experienced artists.
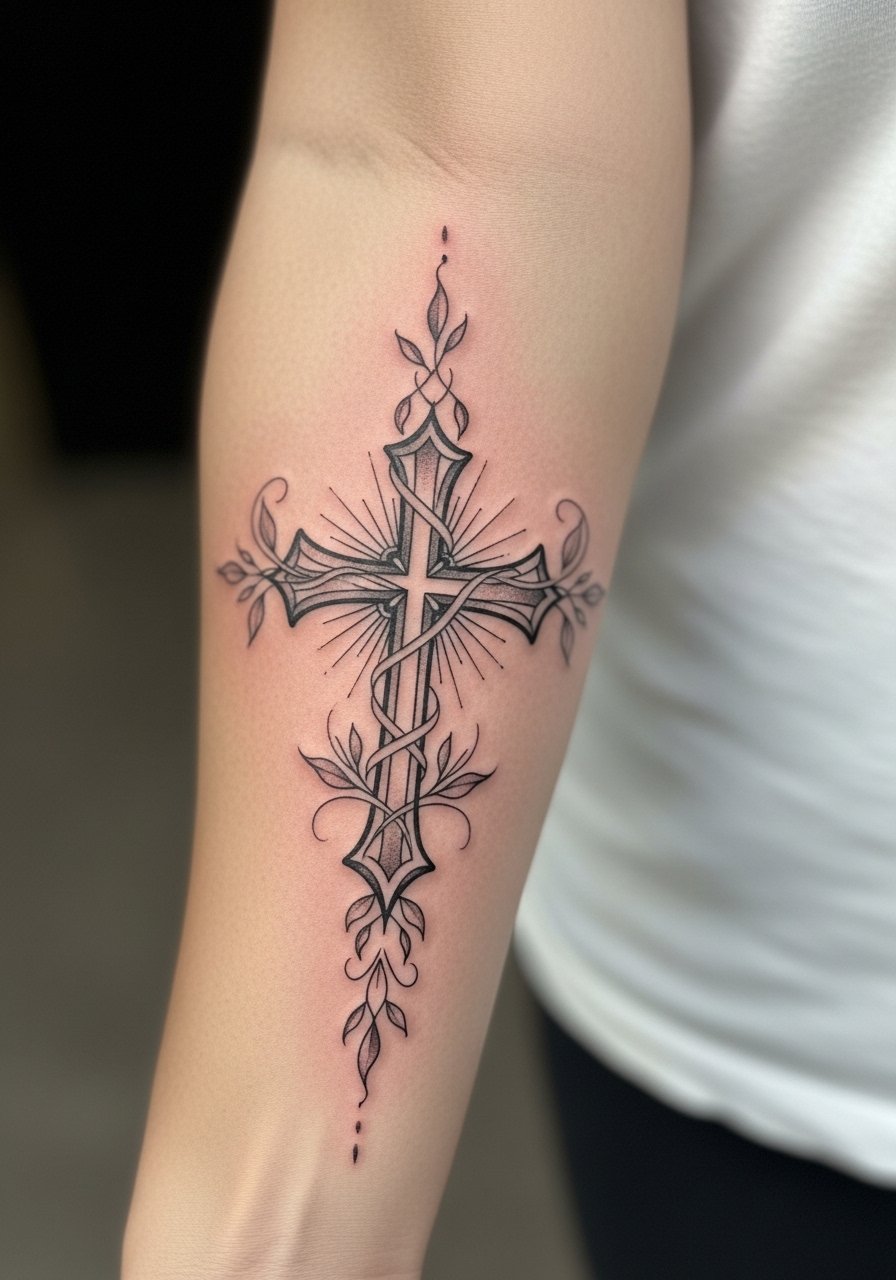
1. Minimalist Cross With Wings on Inner Forearm
Style/Technique: Fine Line / Minimalist
Pain Level: Low-Medium (3/10)
Session Time: 1 session, 1-2 hours
Best For: First Christian tattoo, visible yet discreet
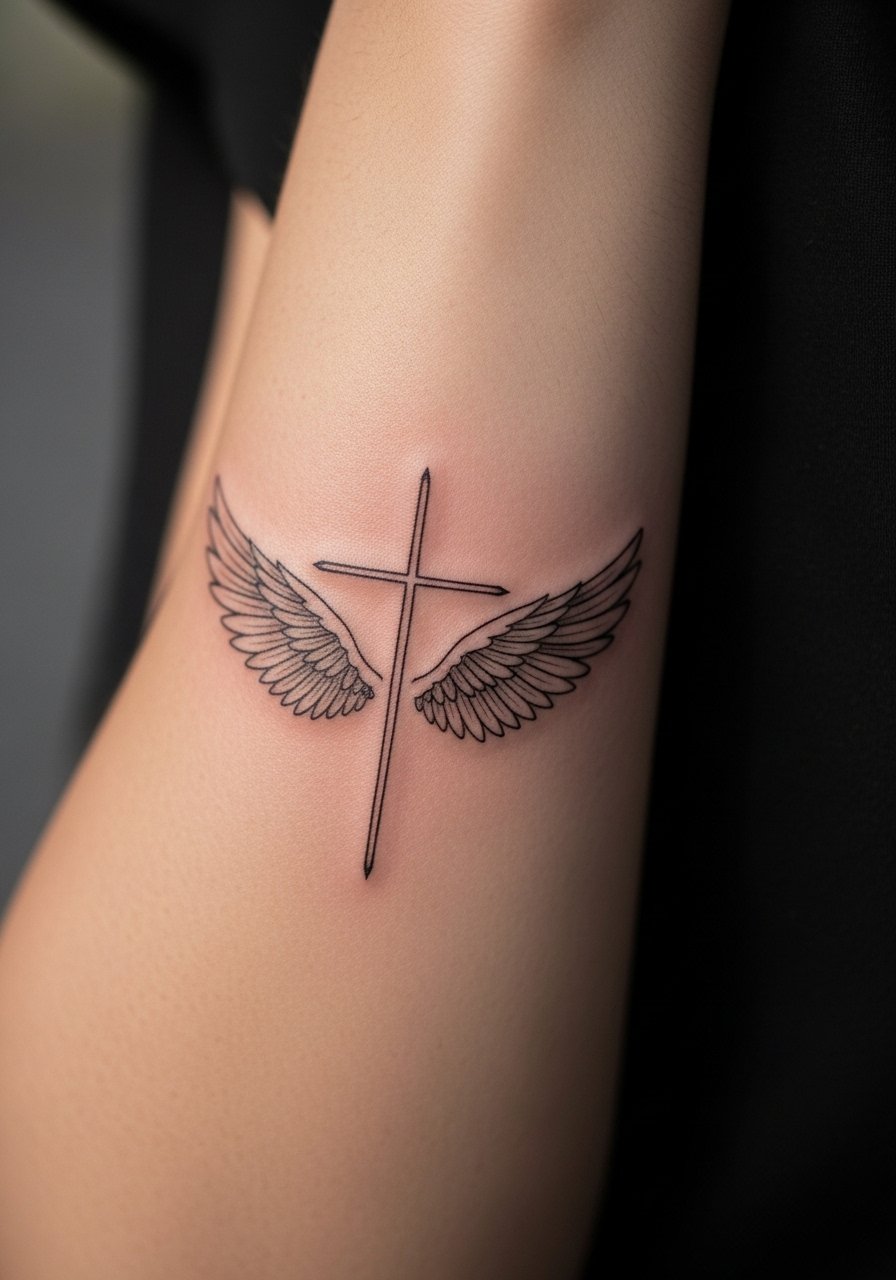
I love this design for its quiet symbolism—divine protection and ascent without heavy imagery. Fine-line wings add movement and soften the cross. Inner forearm placement keeps it visible for daily reminders but easy to cover with sleeves. Pain is manageable and healing usually follows the typical 2–3 week surface stage. Ask for slightly bolder primary lines if you worry about future blurring; ultra-fine lines can lose crispness over years. I’d tell my artist I want healed examples, especially on my skin tone. For aftercare, keep it moisturized with fragrance-free lotion and avoid sun exposure so the thin lines don't blur. This is a great minimalist faith tattoo for someone nervous about a large commitment.
2. Cross With Crown Of Thorns On Chest
Style/Technique: Black and Grey / Realistic Shading
Pain Level: Medium (4-6/10)
Session Time: 2-3 sessions, 2-4 hours each
Best For: Statement piece, meaningful chest placement
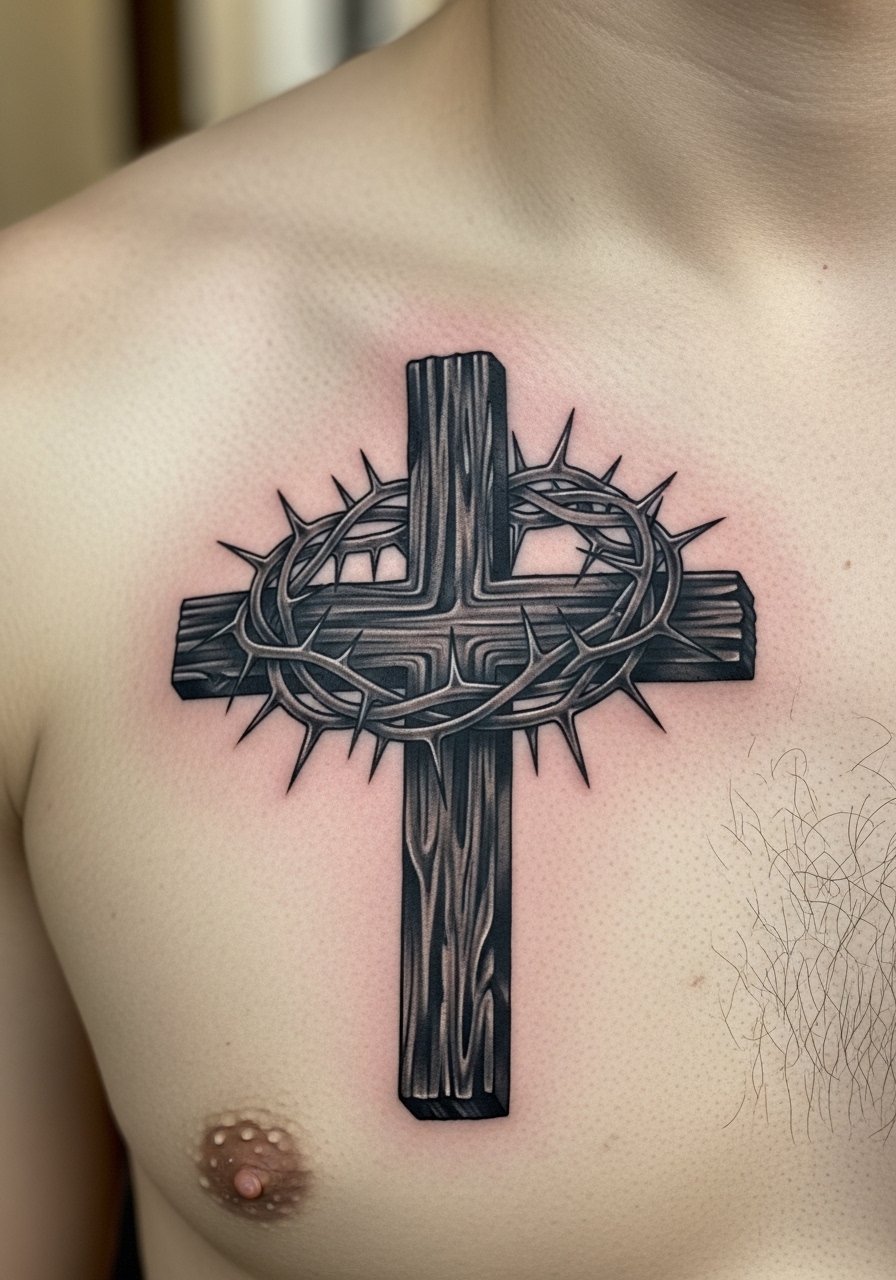
A cross wrapped in the crown of thorns is raw and reverent. On the chest it feels close to the heart—literally a devotional piece. Black and grey shading gives depth without relying on color. Expect moderate discomfort over the sternum and near the collarbone. Healing needs patient care: avoid heavy chest movement and sweating for the first week. From what I've seen, detailed shading keeps its solemn look if you choose a black and grey specialist who understands contrast and how inks settle. Ask to see healed chest pieces in their portfolio. A common mistake is overcrowding the design—leave negative space so the thorns and cross read clearly over time.
3. Black and Grey Jesus Portrait on Upper Arm
Style/Technique: Realism / Black and Grey
Pain Level: Medium (4/6/10)
Session Time: Multiple sessions, 4+ hours total
Best For: Devotional portrait, visible art piece
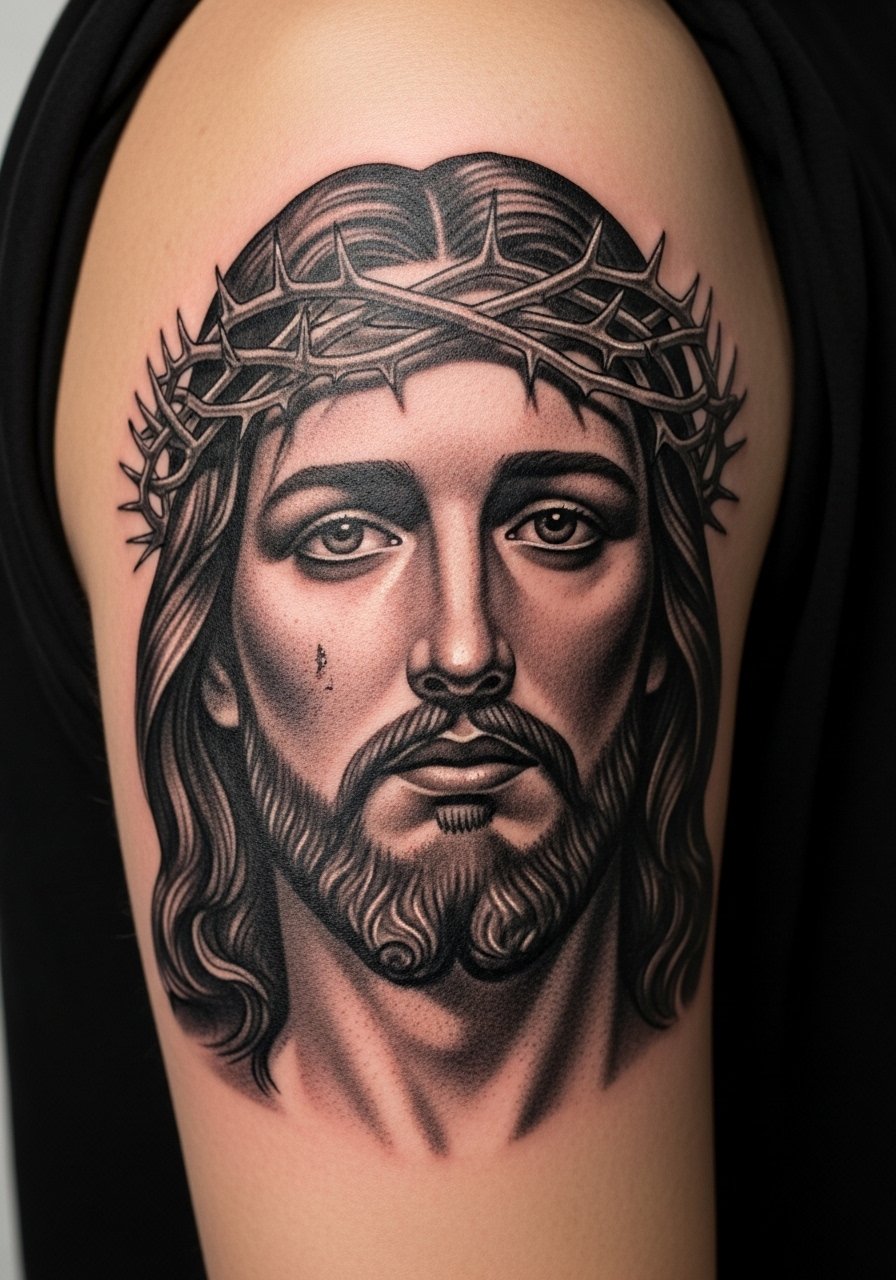
A Jesus portrait carries strong emotional weight. Realism in black and grey gives the solemnity most of us want—photo-like depth without flashy color. Upper arm placement is forgiving for pain and easy to show or hide. Portraits need an artist experienced in facial realism and who can match your vision for expression. In my experience, healed portraits look softer than fresh photos; fine highlights mellow and deep blacks remain anchor points. Avoid artists who only post fresh work—ask for healed examples across skin tones. Aftercare is critical: gentle cleansing and fragrance-free moisturizers keep the shading crisp. Expect multiple sessions and honest consultation about reference photos.
4. Praying Hands With Cross On Forearm
Style/Technique: Traditional / Illustrative
Pain Level: Low-Medium (3/10)
Session Time: 1-2 sessions, 2-3 hours
Best For: Classic faith statement, forearm visibility
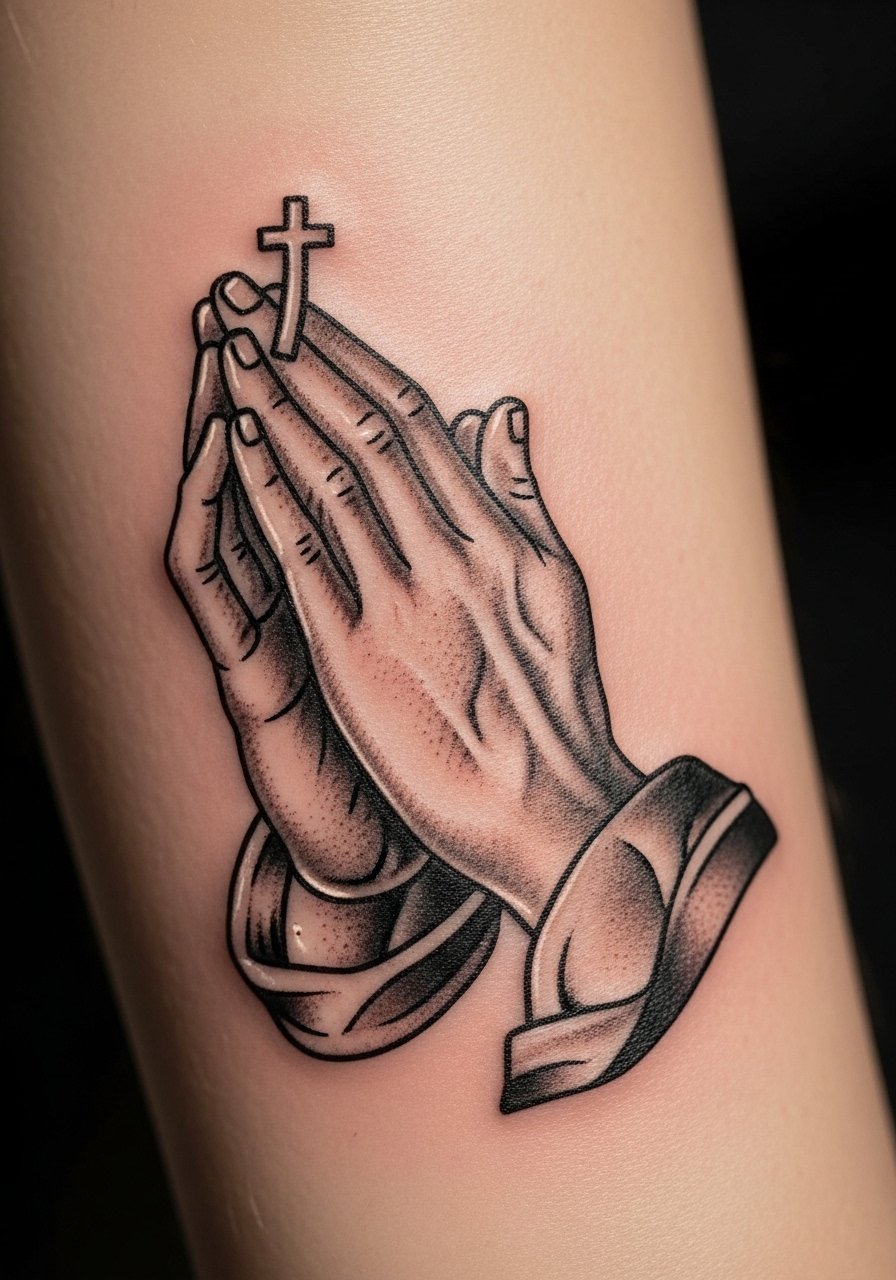
Praying hands are timeless. Add a small cross or rosary beads for personalization. Traditional line work and bold shading make this design durable—lines hold well over time. Forearm placement lets the image read easily and keeps pain low. From what I've gathered, many people choose this first faith tattoo because it feels familiar and respectful. A common mistake is cramming too much detail into a small area; keep scale balanced so hands and cross don't blur together as skin ages. Ask your artist for slightly stronger outlines for longevity, and plan simple aftercare: clean, pat dry, and moisturize.
5. Virgin Mary With Lily On Shoulder
Style/Technique: Sketch / Fine Line
Pain Level: Medium (4/10)
Session Time: 2-3 sessions, 2-3 hours
Best For: Devotional, feminine expression on shoulder or thigh
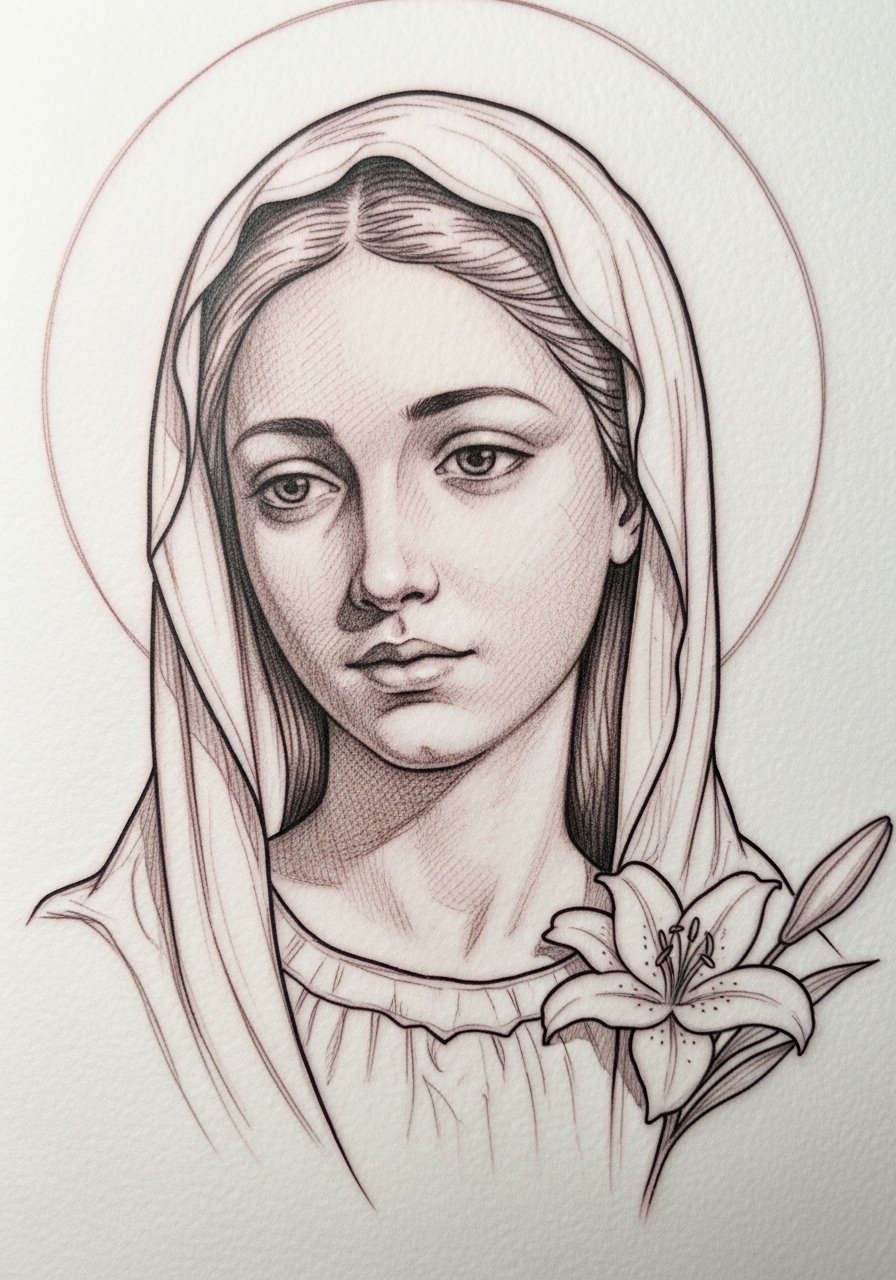
The Virgin Mary paired with a lily reads of purity, maternal protection, and cultural tradition. A sketch-style approach keeps it elegant rather than overly ornate. Shoulder placement contours well and avoids the worst pain zones. Sketch lines soften as they heal; that’s part of the appeal. To avoid regret, I asked my artist to keep facial features subtle and symbolic rather than photo-realistic—this preserves devotion without trying to replicate a single image. If you want color, discuss pigment choices carefully; red and yellow fade differently across skin tones. Long-term, black and grey keeps the image solemn and readable on darker skin.
6. Cross With Guardian Angel On Back
Style/Technique: Black and Grey / Realism
Pain Level: Medium-High (5/10)
Session Time: Multiple sessions, 3+ hours each
Best For: Large back piece, protective symbolism
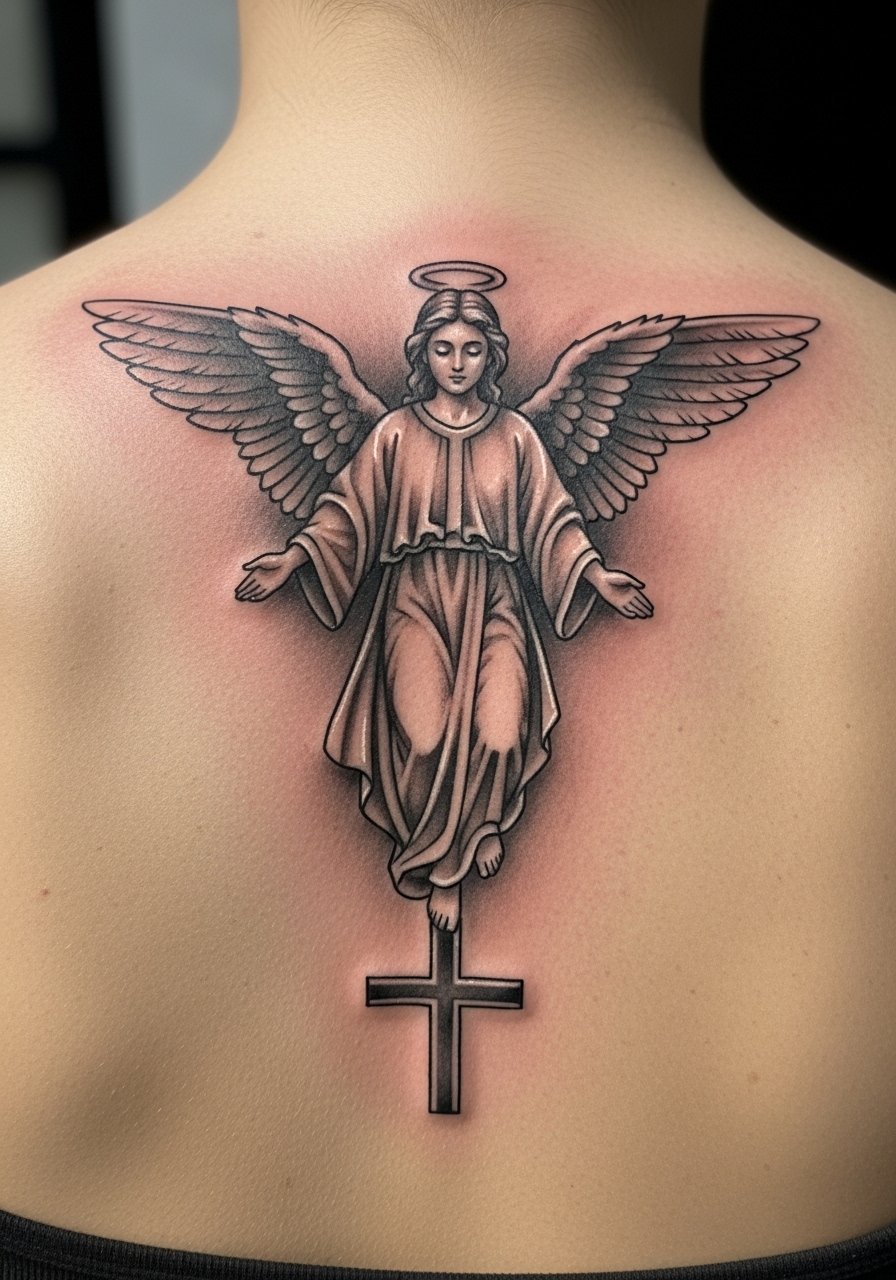
This composition reads like protection: an angelic figure watching over a central cross. Back placement allows scale and dramatic shading that smaller areas can’t handle. Expect moderate pain on the scapula and near the spine. From the artists I follow, black and grey is preferred for this subject because it carries gravity and ages predictably. A frequent mistake is overcrowding—give the wings room to breathe so they read as wings, not a texture block. Healing requires sleeping adjustments to avoid pressure on the piece for the first week. Ask to see healed back pieces from your artist and confirm they handle large-scale shading well.
7. Scripted Biblical Verse (Joshua 1:9) Along Ribcage
Style/Technique: Minimalist / Script
Pain Level: High (6-8/10)
Session Time: 1-2 hours
Best For: Personal reminder, intimate placement
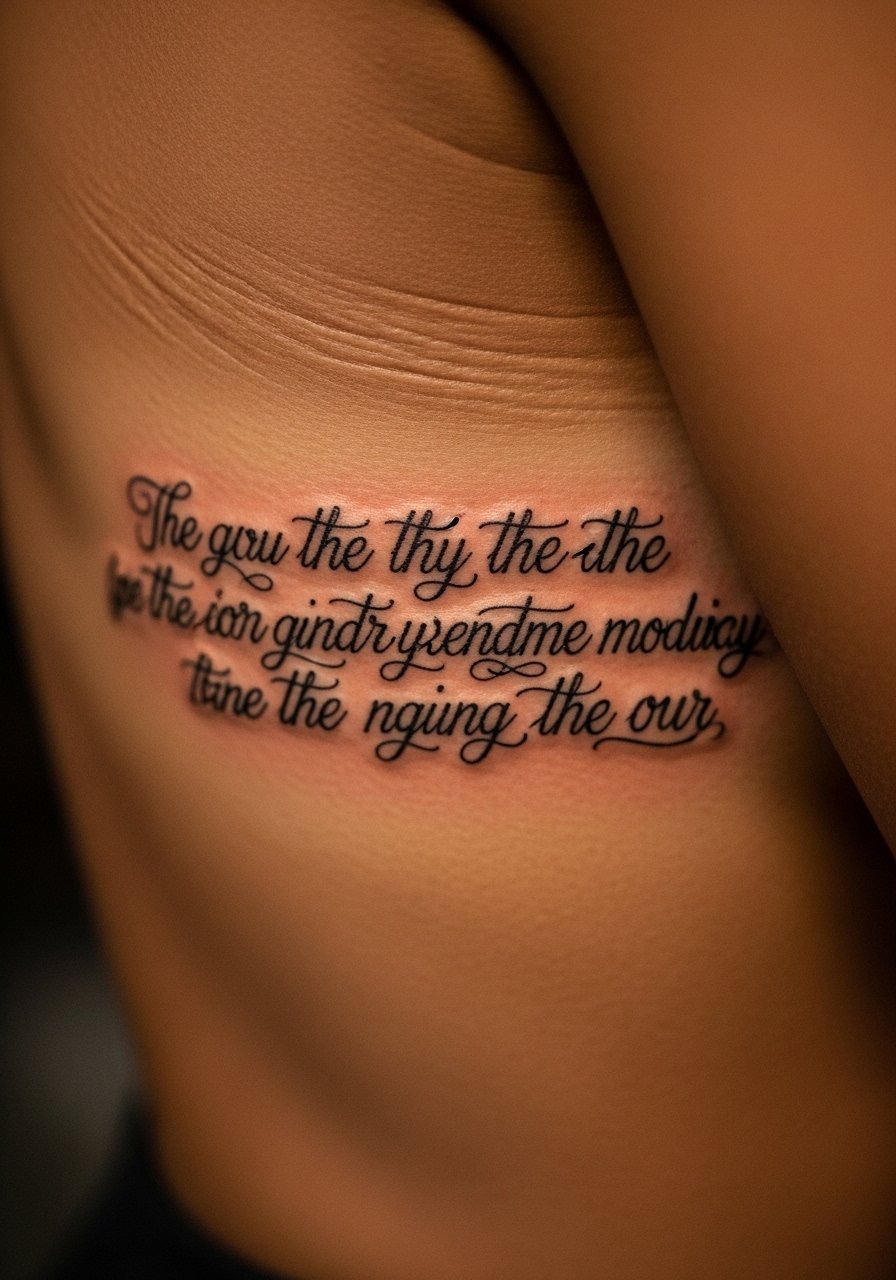
A scripture tattoo is a daily anchor. Ribcage is intimate and often chosen for privacy, but it’s one of the more painful spots. I’ve seen people pick verses that guided them through hard times. Use a legible, timeless script and keep character spacing roomy; tiny script can bleed into a blur. Ask your artist for healed script examples—fresh script looks crisp but heals softer. Aftercare needs diligence: avoid tight clothing rubbing the area and keep moisturized. Using a virtual try-on tool like Tatship before the session helped me test length and placement.
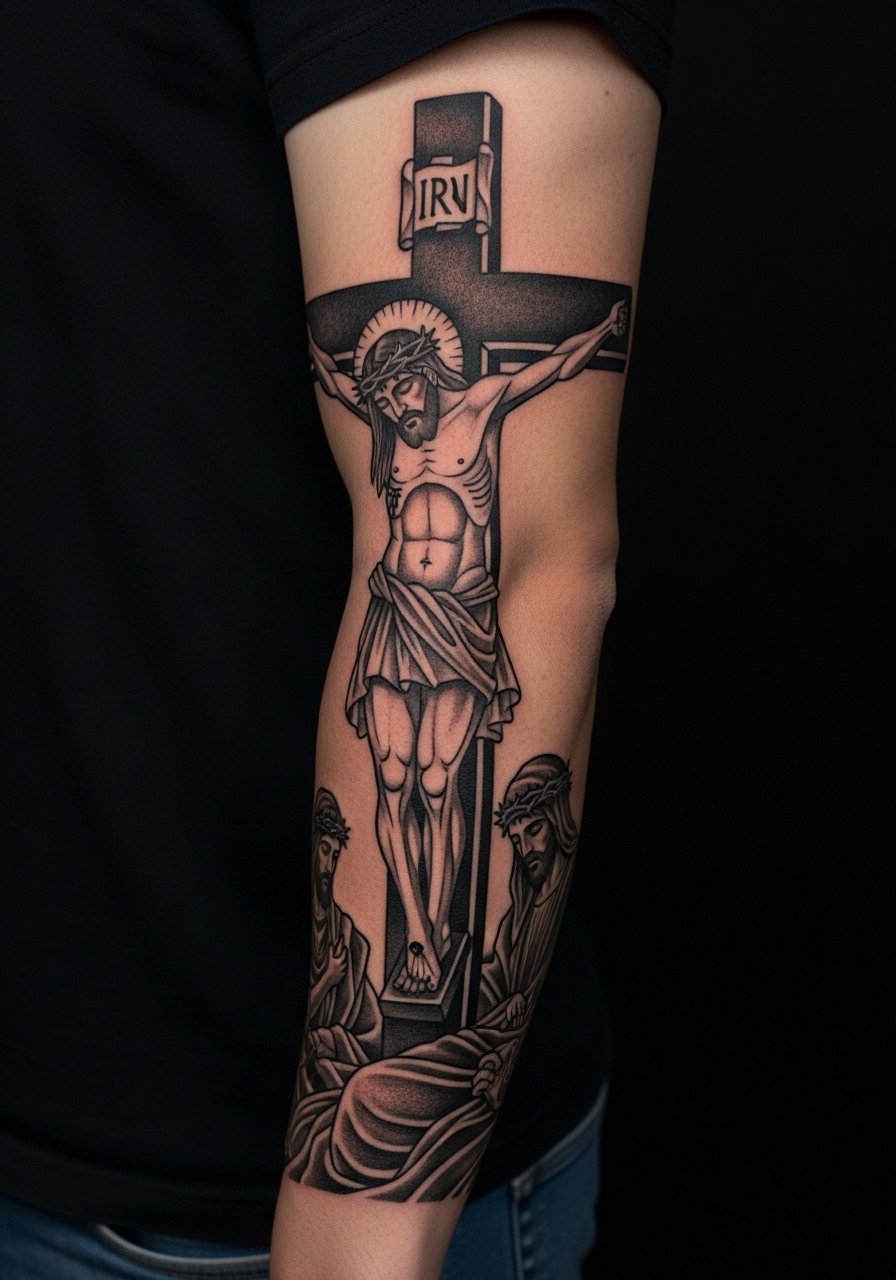
8. Blackwork Jesus Crucifixion On Chest/Arm
Style/Technique: Blackwork / Graphic Realism
Pain Level: Medium-High (5-7/10)
Session Time: Multiple sessions, 4-6+ hours
Best For: Dramatic devotion, statement piece
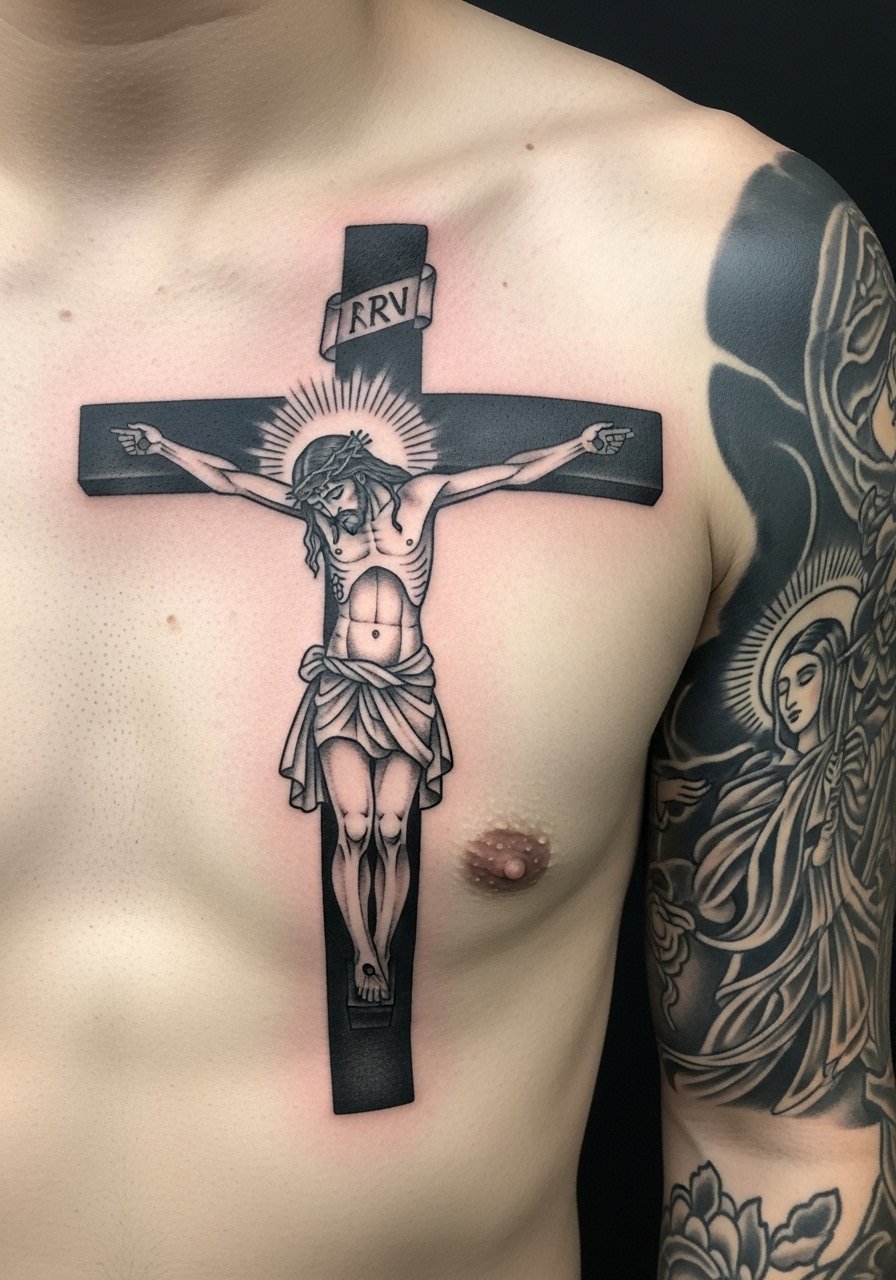
Blackwork crucifixion scenes are intense and demand an artist who understands contrast and negative space. This style reads dramatically from a distance and retains its silhouette as it ages. Expect longer sessions and a heavier healing phase because of large solid fills. From my experience, choosing blackwork over color reduces long-term fading and keeps the piece solemn. The key mistake is losing storytelling clarity—keep focal points clear (face, cross, hands) and avoid too much background noise. If you're drawn to raw storytelling, this is one of the most powerful Christian tattoo ideas.
9. Watercolor Dove With Tiny Cross On Wrist
Style/Technique: Watercolor / Minimalist
Pain Level: Low (2-4/10)
Session Time: 1 session, 1-2 hours
Best For: Gentle, feminine faith tattoo
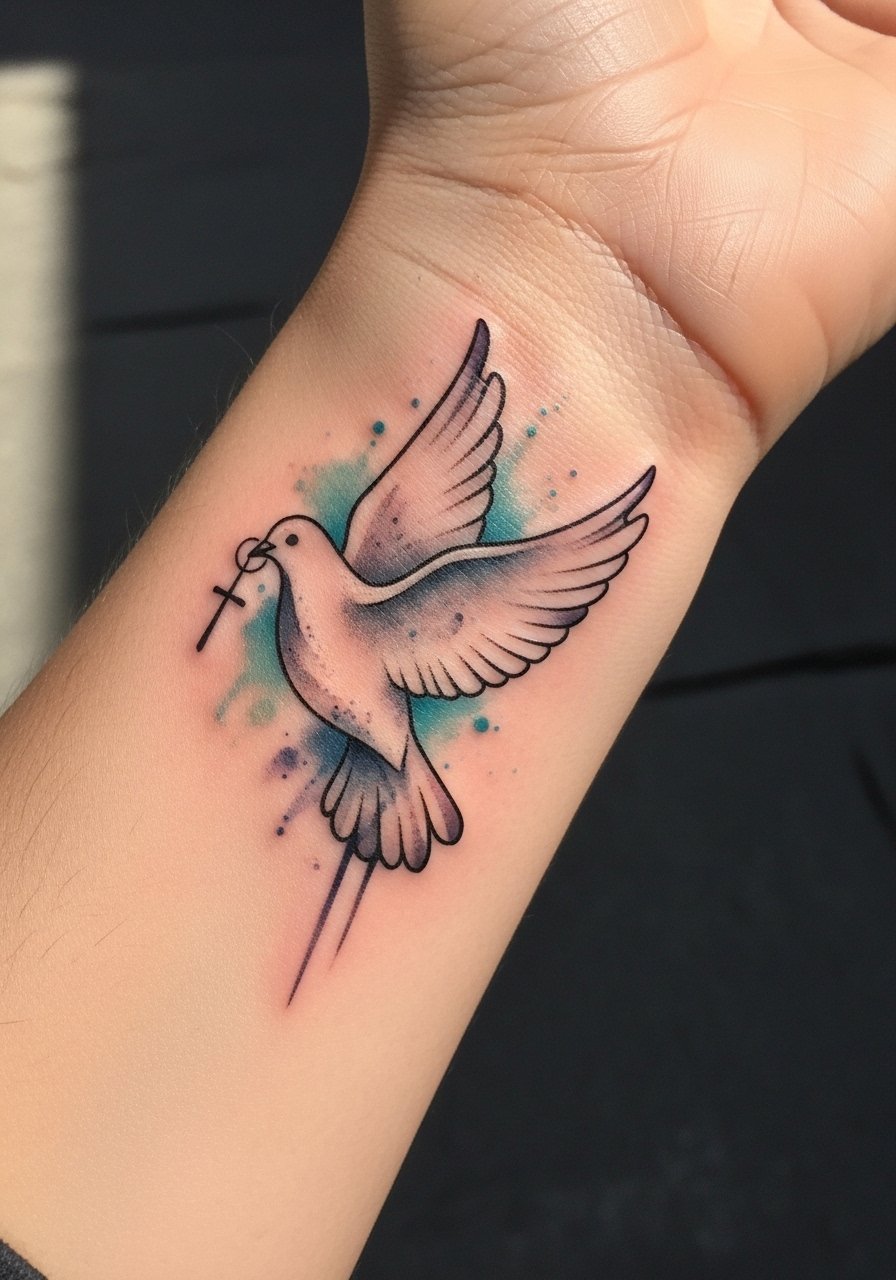
A dove represents the Holy Spirit and peace. Watercolor brings a soft, ethereal vibe. Wrist placement is intimate and visible. I want to flag that watercolor can fade faster than blackwork, especially bright tones. From what I’ve seen, artists often recommend adding subtle black outlines to preserve the dove’s shape over time. If you love the painterly look, accept periodic touch-ups. Keep it out of direct sun and moisturize. This is a lovely minimalist faith tattoo that reads hopeful and light.
10. Cross With Lion On Bicep
Style/Technique: Black and Grey / Realistic
Pain Level: Medium (4/10)
Session Time: 2-3 sessions, 2-4 hours each
Best For: Symbol of strength and resurrection
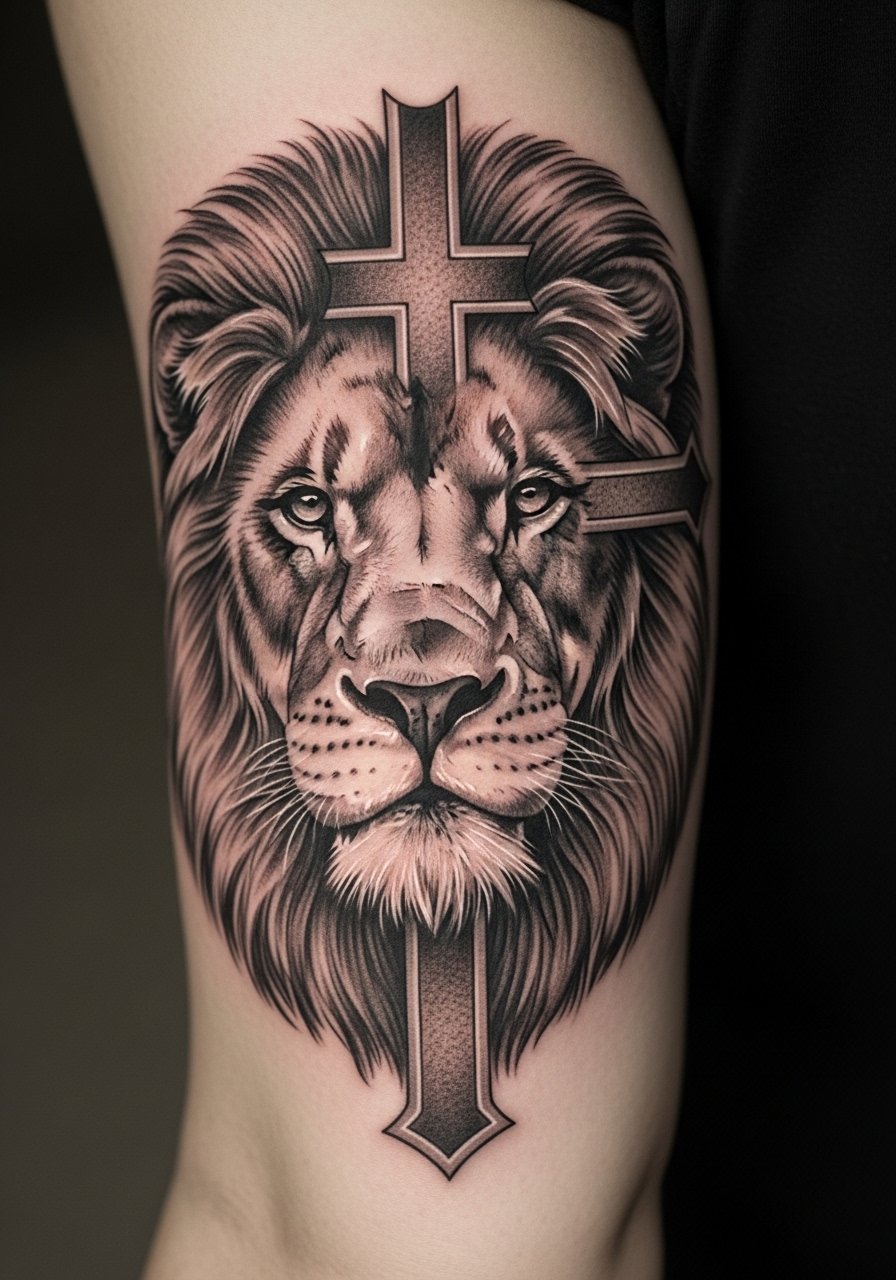
The lion paired with a cross speaks of courage and resurrection imagery (Lion of Judah). Bicep placement lets you scale the realism while keeping pain moderate. Black and grey fur detail ages well if the artist uses contrast wisely. A common misstep is making the lion too busy for its space; aim for clear focal points and readable silhouettes. Ask to see healed fur work on similar skin tones. This design reads powerful both up close and from a short distance—great for a person who wants faith and strength pictured together.
11. Sacred Heart With Jesus On Shoulder
Style/Technique: Chicano / Traditional
Pain Level: Medium (4/10)
Session Time: 2 sessions, 2-3 hours each
Best For: Cultural devotion, bold shoulder placement
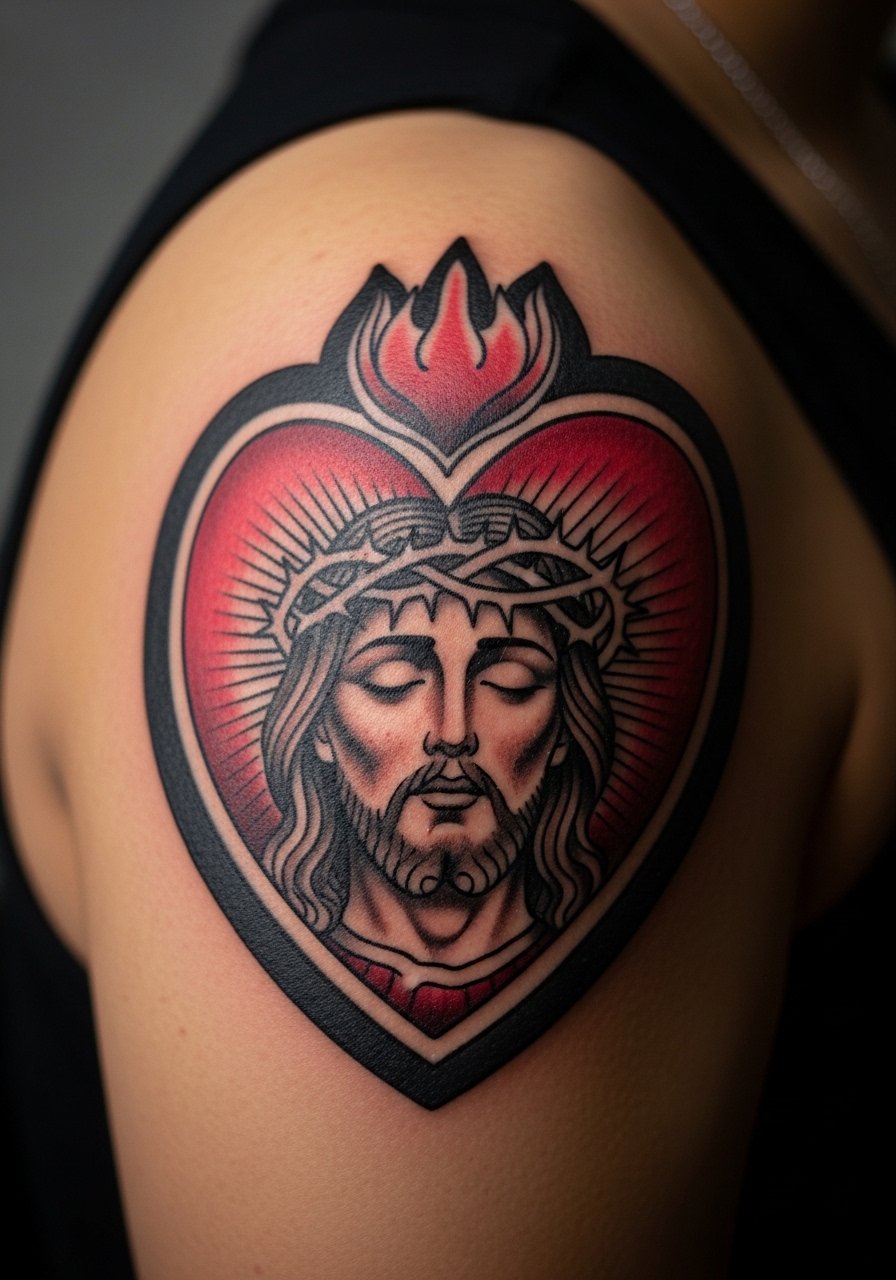
The sacred heart has deep cultural roots and reads as devotion and divine love. Chicano or traditional styles keep it bold and long-lasting. Shoulder placement is great for showing or covering. Colors in this design can fade depending on hue and skin tone, so plan touch-ups with realistic expectations. From my experience, this style looks best with strong outlines and saturated darks that hold up while red hues mellow. Mention to your artist you want the healed look prioritized—many artists can show 1–3 year healed photos that help set expectations.
12. Dotwork Cross With Stars And Clouds On Forearm
Style/Technique: Dotwork / Geometric
Pain Level: Low-Medium (3/10)
Session Time: 1-3 sessions, depends on size
Best For: Modern twist on heavenly symbolism
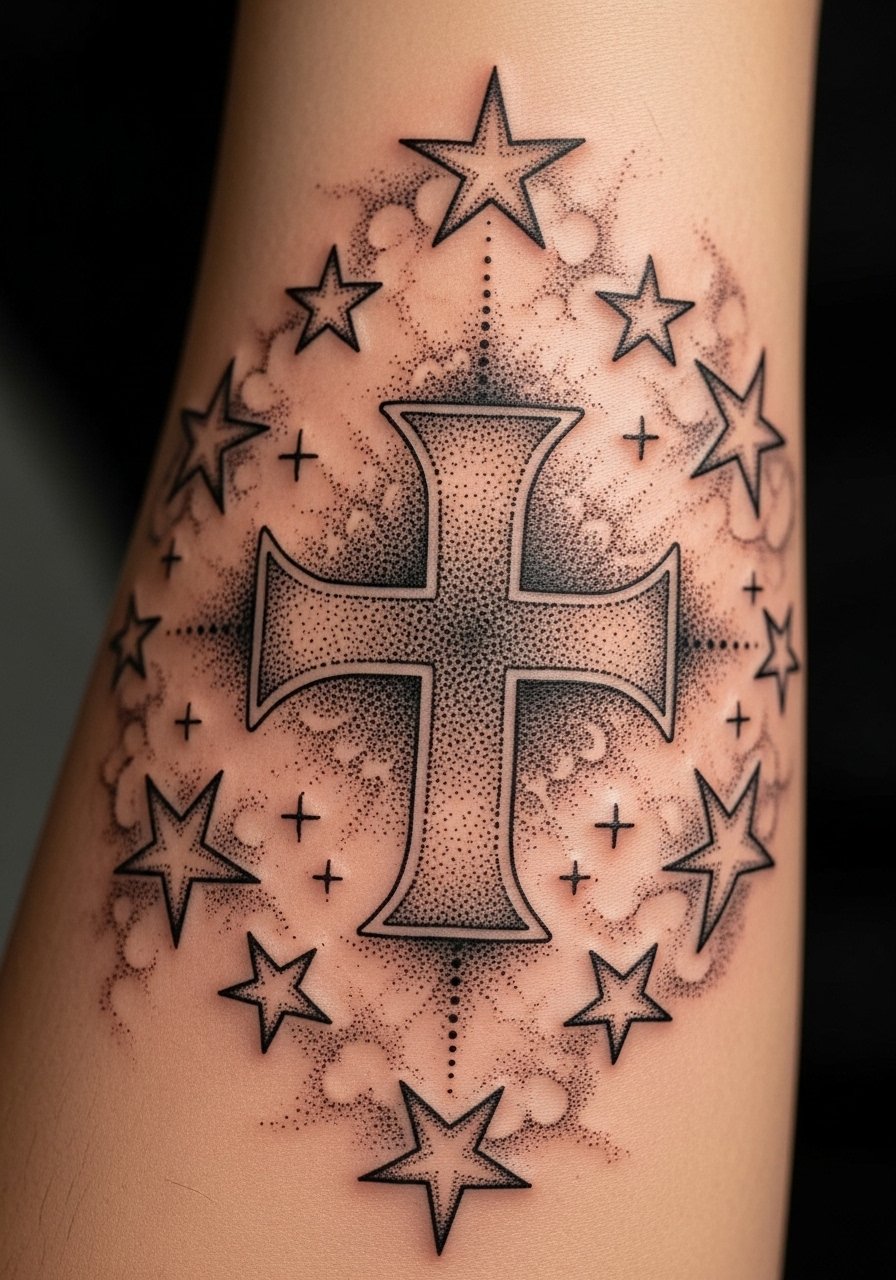
Dotwork makes heavenly elements feel ethereal. A cross framed by stars and clouds reads aspirational—heavenward. Forearm placement is ideal for visibility and low pain. Dotwork ages predictably if done with consistent density; very fine stippling can blur a bit but retains value through contrast. One mistake is over-complicating the pattern; keep stippling balanced. If you want a modern take on classic symbolism, this geometric dotwork cross is a thoughtful option.
13. Tau Cross With Ichthys On Ankle
Style/Technique: Black and Grey / Minimalist
Pain Level: Medium (4-6/10)
Session Time: 1 session, 1-2 hours
Best For: Ancient symbol, subtle placement
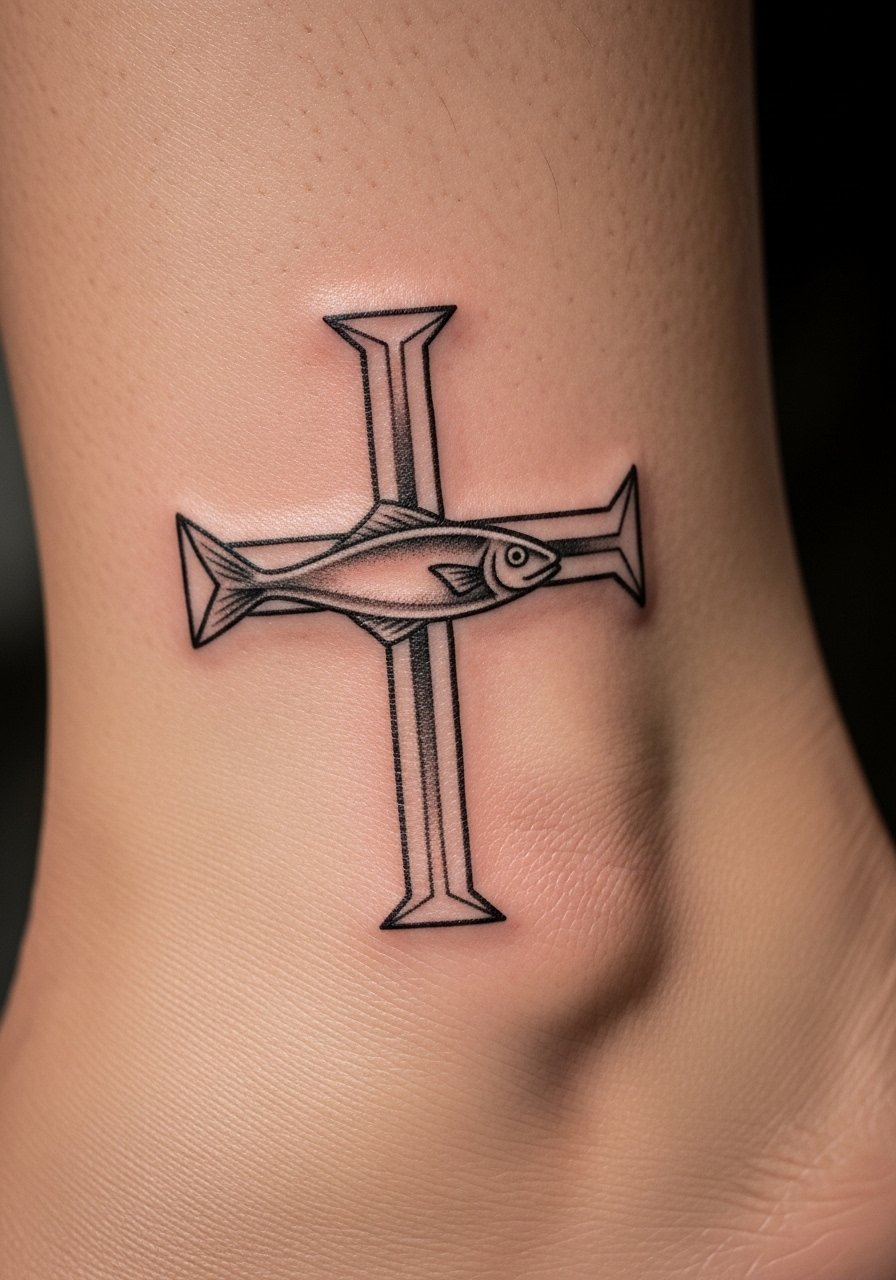
The Tau cross and Ichthys are early Christian symbols with historical depth. Ankle placement keeps the tattoo discreet yet meaningful. Geometric execution helps the symbols age cleanly. Expect some discomfort over thin skin and bone. From what I’ve noticed, people attracted to ancient symbology appreciate how subtle and historically rooted this combination feels. Avoid overly ornate surrounds; the power is in the simple geometry and the quiet reference to early church identity.
14. Cross With Pocket Watch/Compass On Wrist
Style/Technique: Neo-Traditional / Illustrative
Pain Level: Low-Medium (3-4/10)
Session Time: 1-2 sessions, 1-3 hours
Best For: Themes of divine timing and guidance
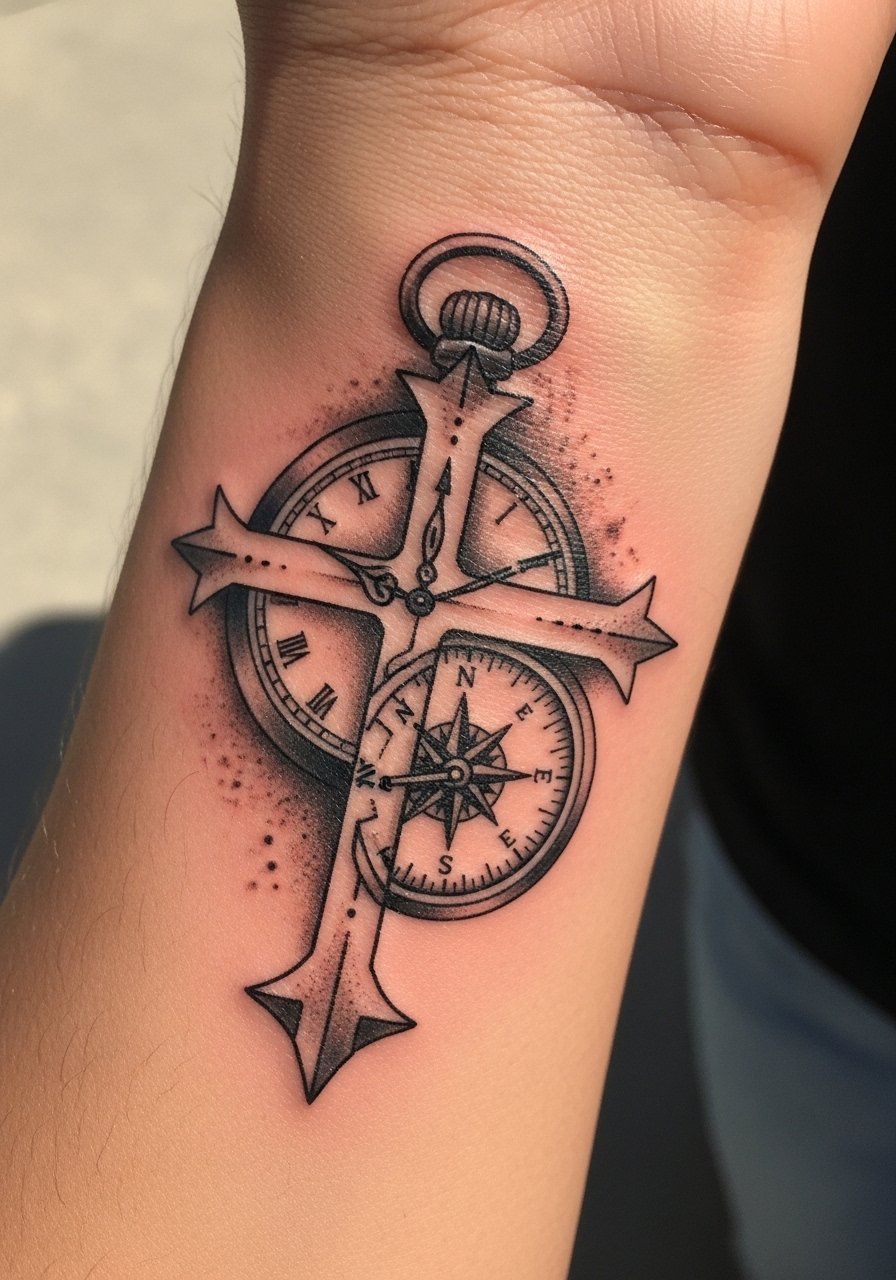
This is one of the under-covered ideas I love: a cross integrated with a pocket watch or compass. It’s personal—time and direction guided by faith. Wrist placement makes the symbolism accessible and daily. Keep the composition tight so the watch face and compass read at small scale. The common mistake is packing too much detail into the wrist; stick to bold hands and clear numerals. I used a virtual try-on to check scale before committing. It's a creative way to say "God guides my time and path."
15. Orthodox Cross With Lion And Alchemy Elements On Back
Style/Technique: Black and Grey / Fusion Realism
Pain Level: Medium-High (5-7/10)
Session Time: Multiple sessions, 3+ hours each
Best For: Bold theological symbolism and mystical fusion
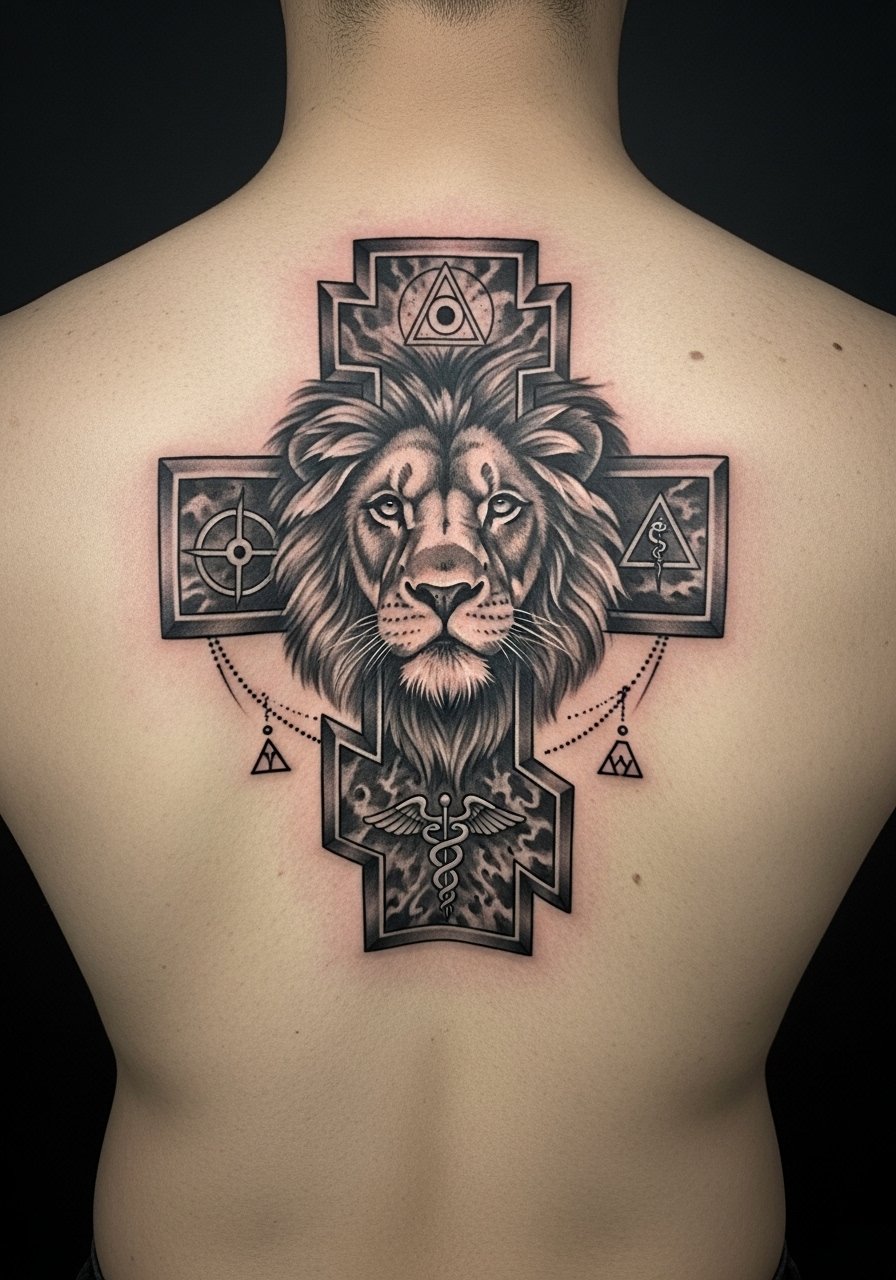
This rare fusion pairs traditional Orthodox cross forms with a lion and alchemical motifs for an almost esoteric faith piece. It’s bold, ornate, and best on the back where scale lets each symbol breathe. From what I’ve seen, few artists attempt this cleanly—portfolio review is a must. The piece can read powerful if the artist keeps the cross legible and balances the lion as a supporting figure. Expect a multi-session commitment and detailed aftercare; sleeping positions matter during healing. It's a standout choice for someone wanting doctrinal depth in visual form.
16. Geometric Cross Down Spine (Dotwork/Linework)
Style/Technique: Geometric / Dotwork
Pain Level: High (6-8/10)
Session Time: Multiple sessions, 2-4 hours total
Best For: Modern, vertical placement with strong visual line
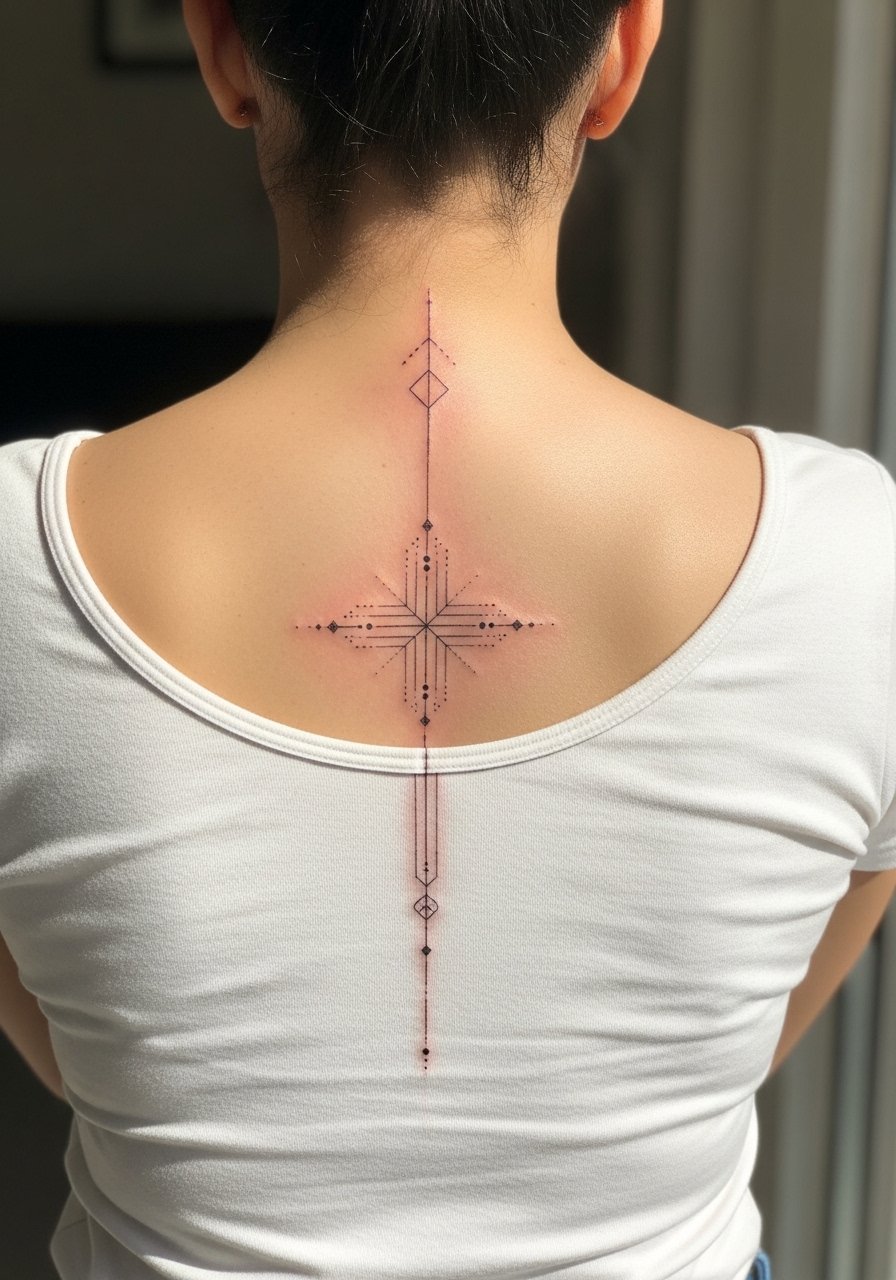
A vertical geometric cross down the spine is striking and modern. The spine placement amplifies the verticality but is one of the more painful spots. Geometric precision is key—symmetry mistakes show immediately. On the plus side, strong black lines and dot gradients age nicely if executed with firm outlines. I recommend reviewing healed spine work in your artist’s portfolio. This design suits someone who wants a contemporary, structured take on a classic faith symbol.
17. Micro Ichthys Behind Ear Or On Ankle
Style/Technique: Minimalist / Micro
Pain Level: Low (2-4/10)
Session Time: 30–60 minutes
Best For: Discreet faith sign, first Christian tattoo
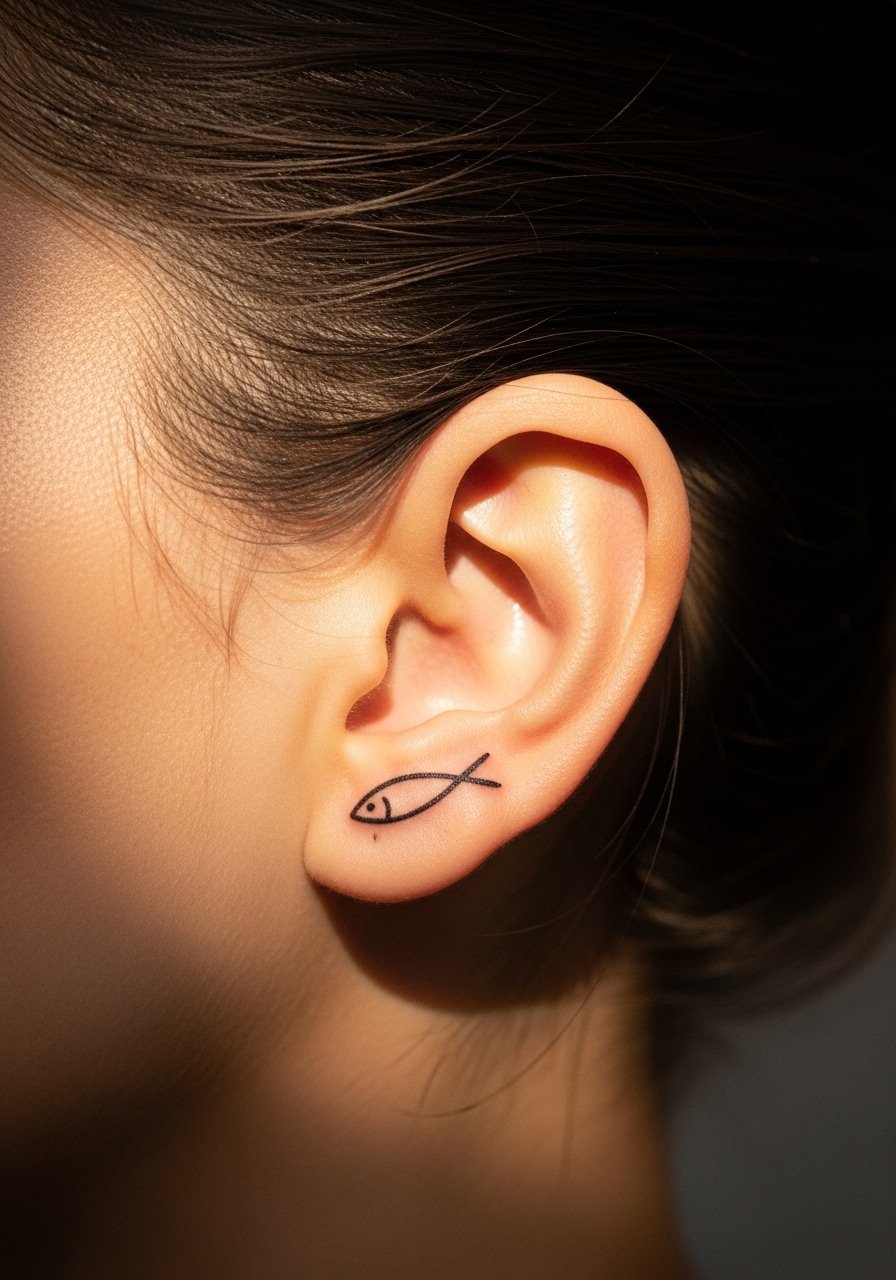
Tiny fish symbols are an excellent first Christian tattoo. They’re easy to hide and deeply historical. Behind the ear is discreet and light on pain. Micro tattoos are delicate—expect some line softening over time. From what I’ve observed, keeping the ichthys simple with a single bold line helps longevity. If you want a quiet daily reminder of faith without headline imagery, this is a lovely minimalist faith tattoo.
18. Tiny Cross Behind Thumb Or On Finger
Style/Technique: Minimalist / Single-Line
Pain Level: Medium-High for fingers (5-8/10)
Session Time: 30–90 minutes
Best For: Ultra-subtle faith mark
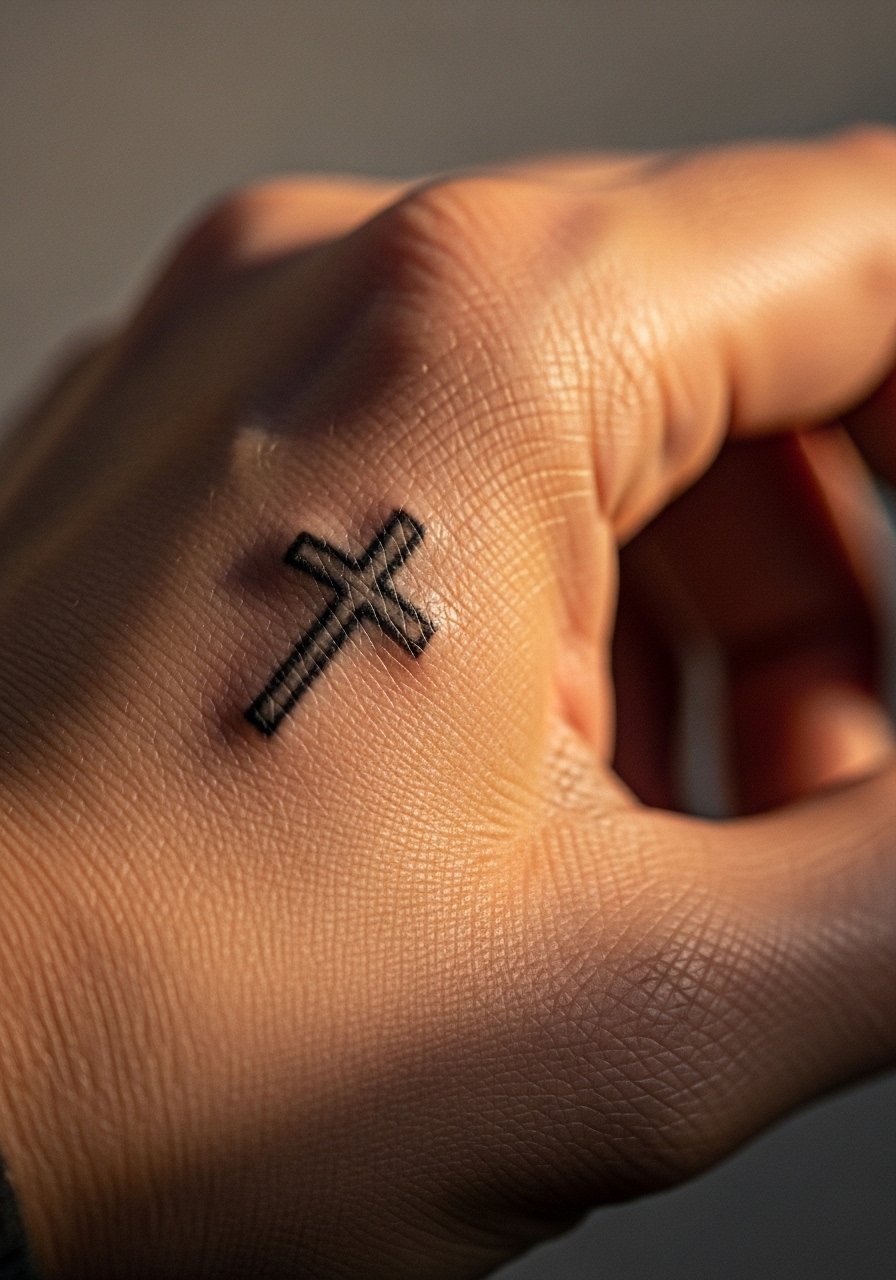
Small crosses on fingers or behind the thumb are visible but fragile locations. I’ve seen them lose crispness faster because hands get so much wear. If you pick this, opt for slightly thicker lines and accept that touch-ups may be needed. Fingers hurt a bit more due to thin skin and are prone to ink migration. This placement is great if you want a constant tactile reminder of faith, but know maintenance could be part of the long-term plan.
19. Haloed Micro Jesus On Collarbone
Style/Technique: Micro-Realism / Fine Line
Pain Level: Medium (4-6/10)
Session Time: 1-2 hours
Best For: Subtle portrait near the heart or collarbone
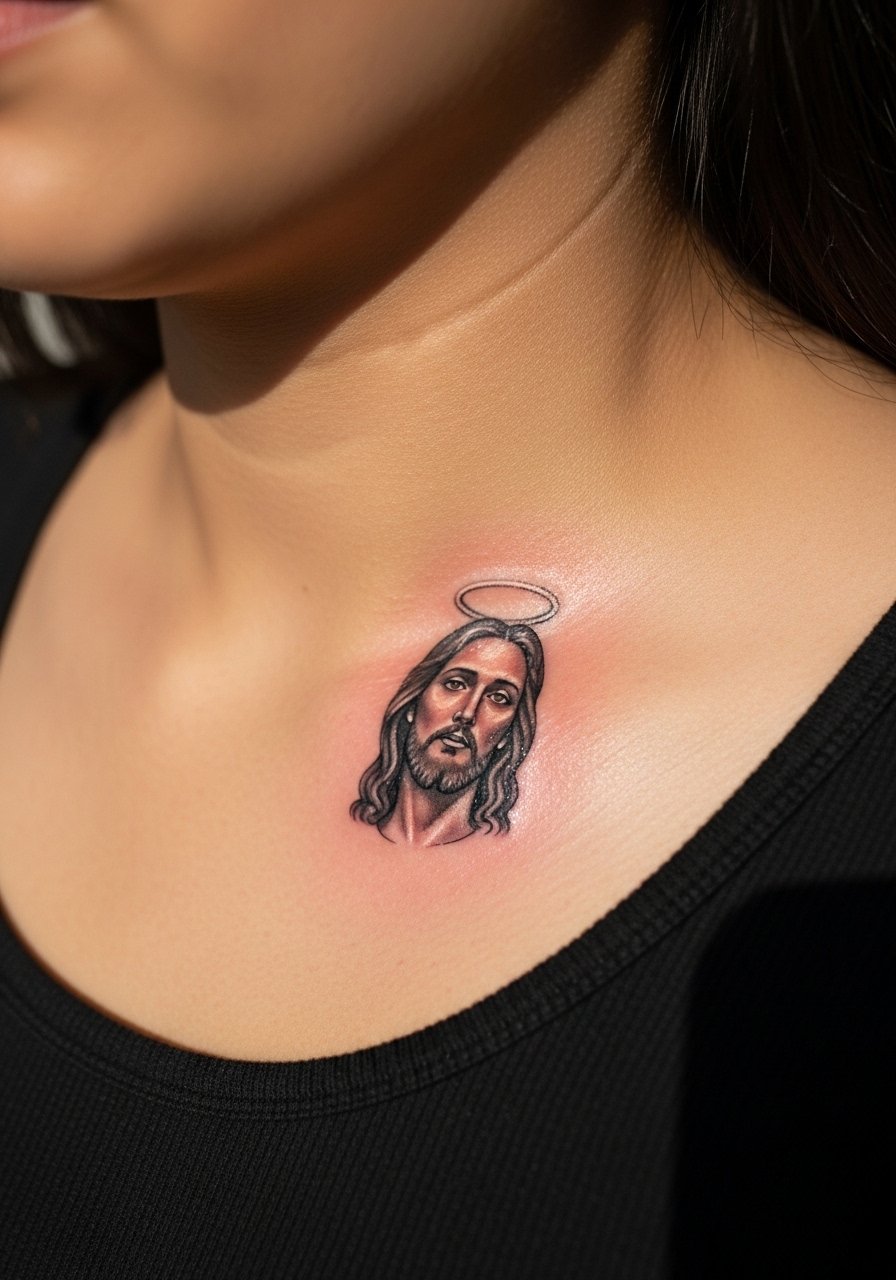
A small haloed Jesus portrait near the collarbone reads both personal and wearable. Micro-realism requires an artist with a steady hand. Collarbone pain is moderate but the result can be deeply moving. Healed micro portraits look less contrasted than fresh work—expect a softening of fine details. Ask to see healed micro-portrait samples. This is a great choice if you want a devotional portrait that’s intimate rather than large.
20. Guardian Angel On Shoulder Blade (Black and Grey)
Style/Technique: Black and Grey / Realism
Pain Level: Medium (4/6/10)
Session Time: 2-3 sessions
Best For: Protective symbolism, mid-back visibility
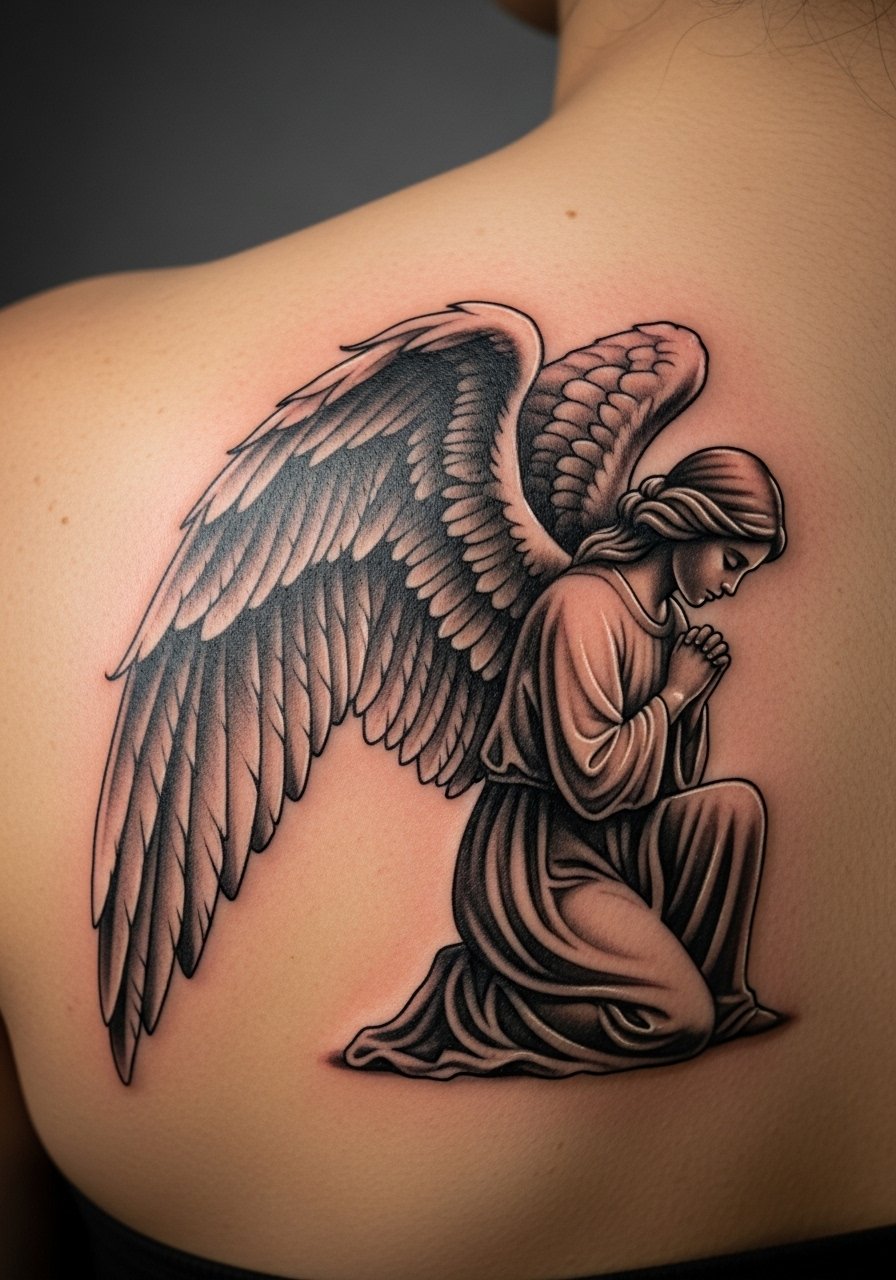
An angel on the shoulder blade reads like a guardian watching over you. The shoulder blade accepts good scale without intense pain. Black and grey keeps the mood reverent and ages well. Many artists recommend leaving some negative space around wings so they don’t blend into the background over time. I’d request healed photos and discuss sleeping positions for the first week. This is a popular pick for people who want protection imagery that still feels classy and wearable.
21. Chicano Sacred Heart With Script On Upper Arm
Style/Technique: Chicano / Neo-Traditional
Pain Level: Low-Medium (3-4/10)
Session Time: 2 sessions
Best For: Cultural faith expression and bold aesthetics
Chicano sacred hearts combine devotion and cultural artistry. The upper arm is forgiving and displays the work well. This style stays readable because of strong black outlines and clear lettering. From what I've seen, people who choose Chicano work appreciate the narrative possibilities—incorporate names, dates, or short mottos for personalization. Ask to view healed examples; color saturation often softens. This design balances devotion and visual impact.
22. Cross With Vines Fine Line Sleeve On Inner Forearm
Style/Technique: Fine Line / Illustrative Sleeve
Pain Level: Medium (4/10)
Session Time: Multiple sessions, 2-4 hours total
Best For: Flowing devotional sleeve that can expand
A vertical cross woven with vines makes faith feel organic—growth, life, and rooted belief. Inner forearm sleeves are visible and personal. Fine lines can age, so I recommend modest contrast: slightly bolder main lines with delicate vine details. From what I’ve noticed, sleeves like this age gracefully if negative space is preserved. Good for people who want an extendable piece—they can add scripture or figures later.
23. Large Crucifixion Scene As Half Sleeve
Style/Technique: Blackwork / Narrative Realism
Pain Level: High (6-8/10)
Session Time: Multiple long sessions
Best For: Full storytelling devotion
If you want a full narrative, a half-sleeve crucifixion conveys the story fully. This is a commitment—both in sessions and aftercare. Blackwork keeps the scene readable from a distance and holds up over time. I’d caution against cramming background details; the story reads best when focal elements (Christ, cross, onlookers) are prioritized. This is for someone ready for a major devotional statement and who’s prepared to care for a larger piece during healing.
24. Cross With Flaming Horse Or Grizzly (Warrior Protector) On Thigh
Style/Technique: Geometric / Neo-Traditional
Pain Level: Medium (4/6/10)
Session Time: 2-3 sessions
Best For: Warrior/protector symbolism, leg placement
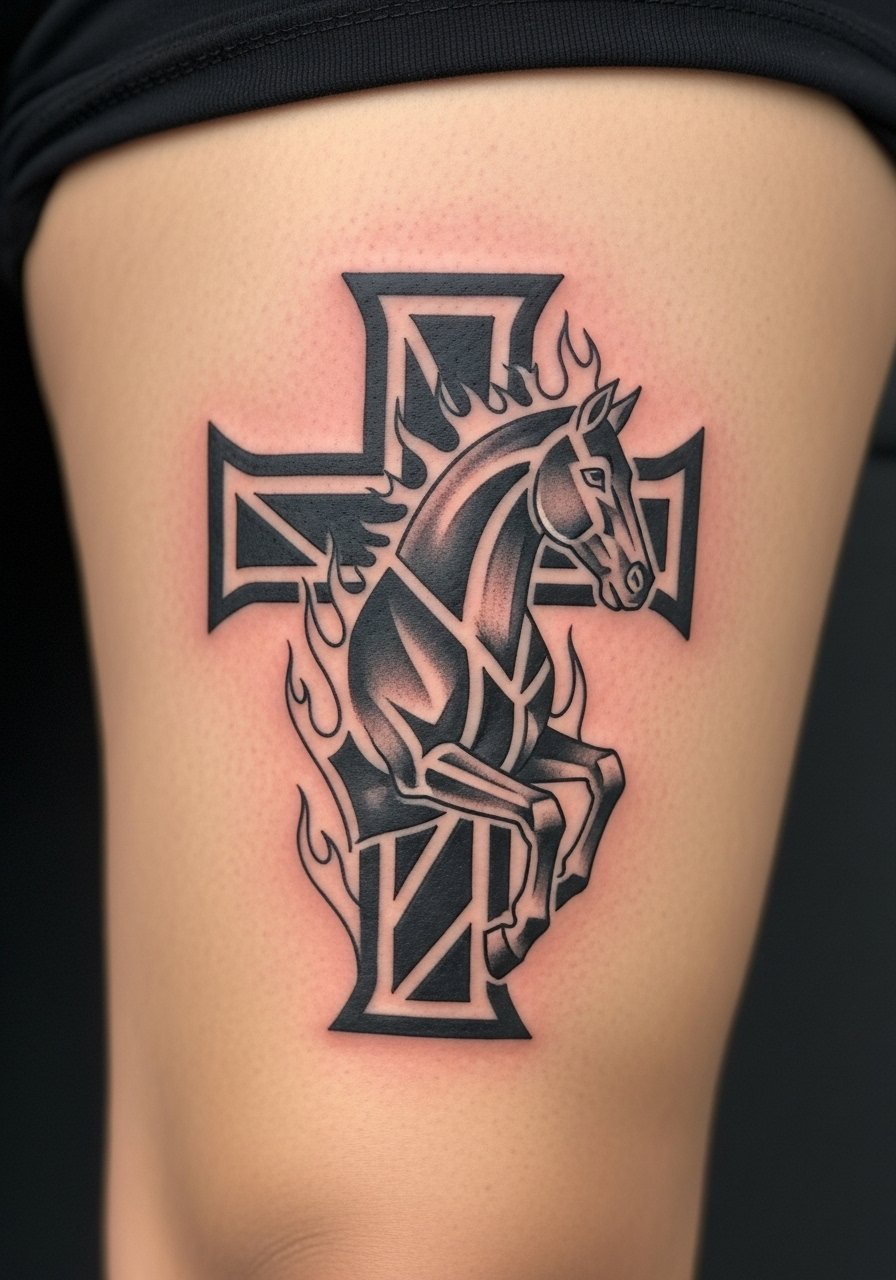
This unique mash-up blends warrior imagery with faith. A flaming horse or grizzly paired with a cross creates a protector motif with dramatic energy. Thigh placement lets you go big and bold with lower pain than rib areas. Geometric treatments modernize the look. From what I’ve seen, originality like this stands out—just make sure the symbolism matches what you mean to communicate. Ask the artist to draft multiple compositions since readability at different distances matters.
25. Psalm Script With Small Floral Accent On Ribcage
Style/Technique: Script / Fine Line with Floral Accent
Pain Level: High (6-8/10)
Session Time: 1-2 hours
Best For: Personal scripture, intimate location
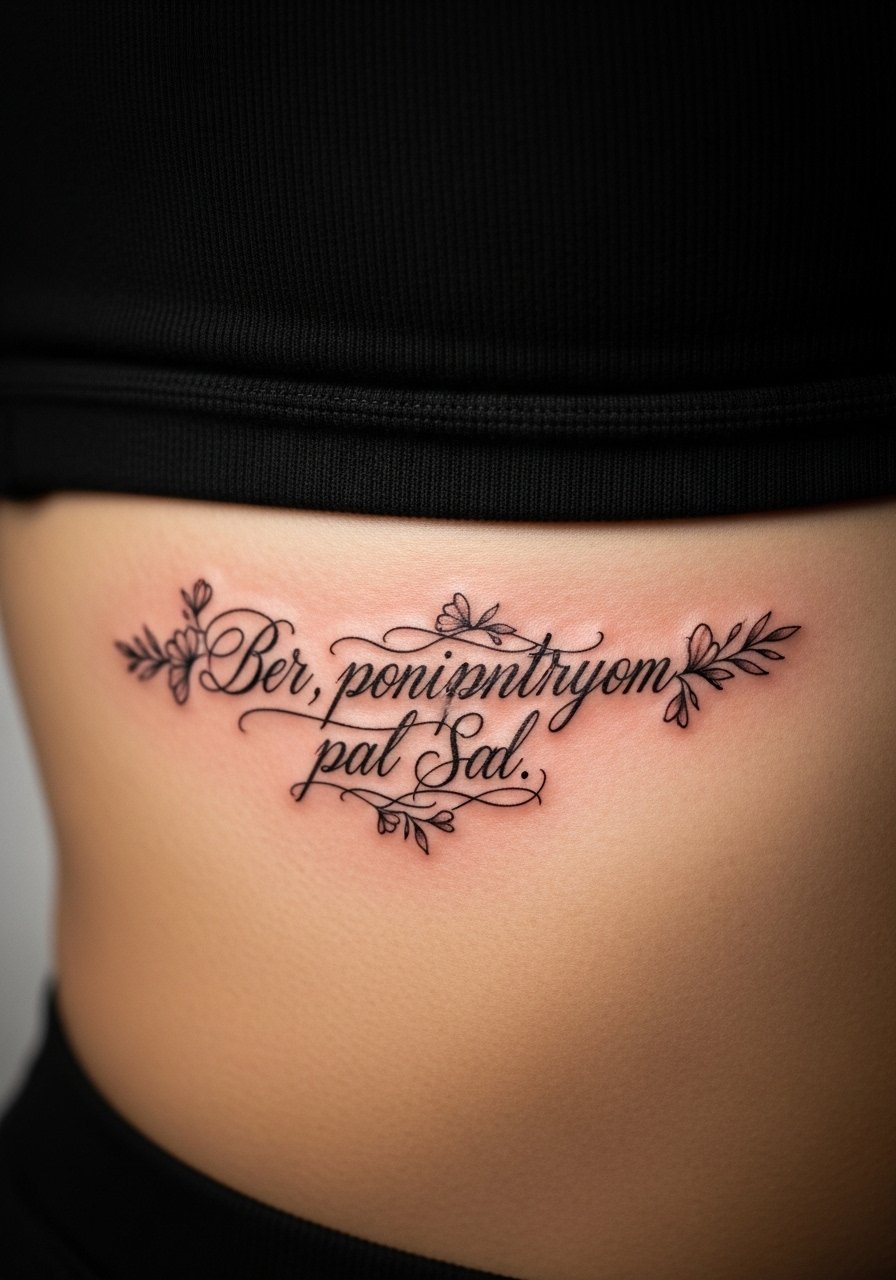
Scripted psalms are quiet and powerful. Pairing a verse with a small floral or lily ties text to meaning. Ribcage offers intimacy but expect higher pain. I asked my artist to space letters generously for long-term legibility. From my experience, script heals softer than expected—so choose a font with a little weight. Keep clothing soft against the area during healing to avoid irritation.
26. Stained-Glass Virgin Mary Neo-Traditional On Back Panel
Style/Technique: Neo-Traditional / Color (Stained-Glass)
Pain Level: Medium-High (5-7/10)
Session Time: Multiple sessions, 3+ hours each
Best For: Colorful devotional back piece
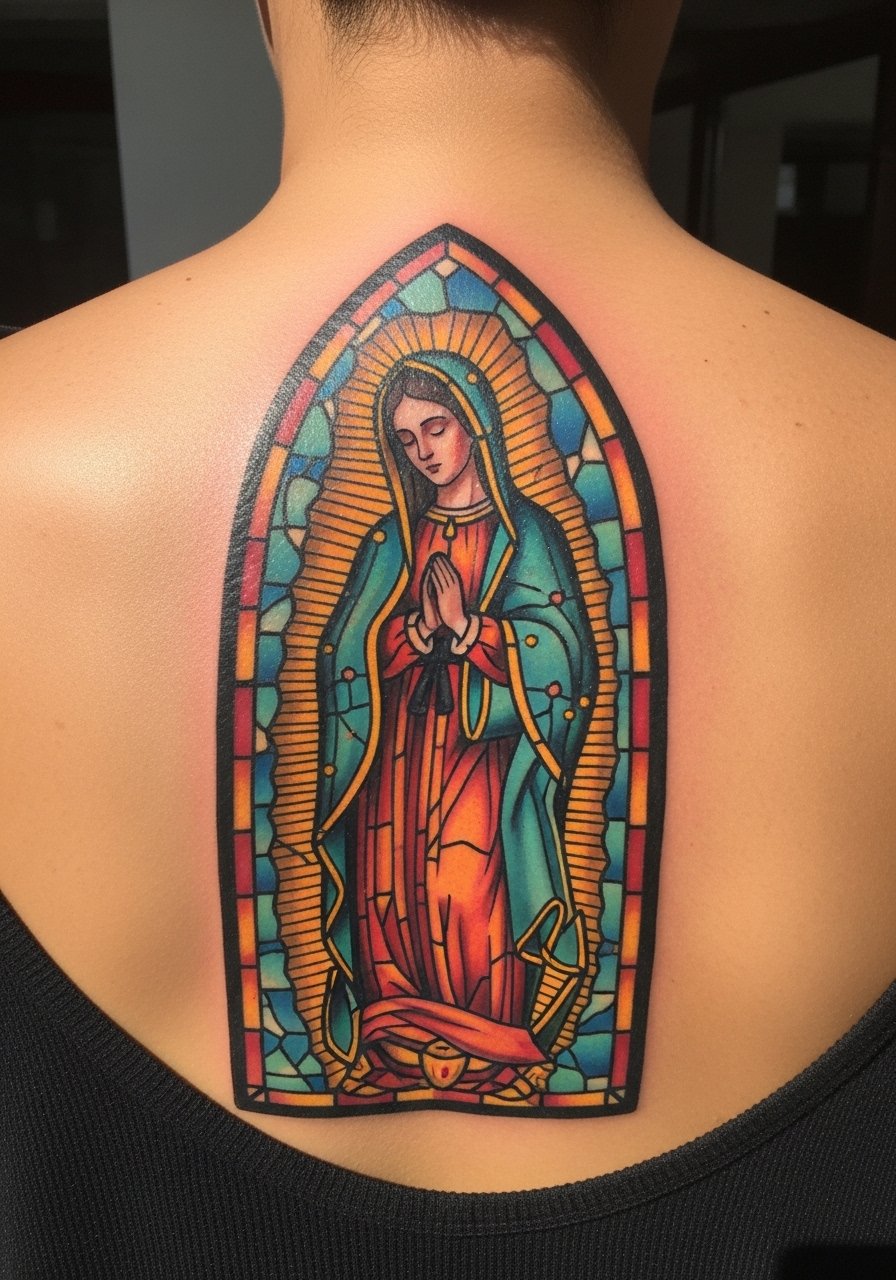
This approach uses color like a window—vibrant shapes framed by bold black lines. Stained-glass Virgin Mary pieces are visually stunning and deeply symbolic. Color does shift while healing, so expect richness to mellow. From what I’ve seen, black outlines keep the shapes legible as color fades slowly. Back panels allow scale and narrative detail. This is for someone wanting a vivid devotional statement.
27. Anchor Cross Nautical Faith On Forearm
Style/Technique: Traditional / Nautical
Pain Level: Low-Medium (3-4/10)
Session Time: 1–2 hours
Best For: Faith + maritime symbolism, forearm display
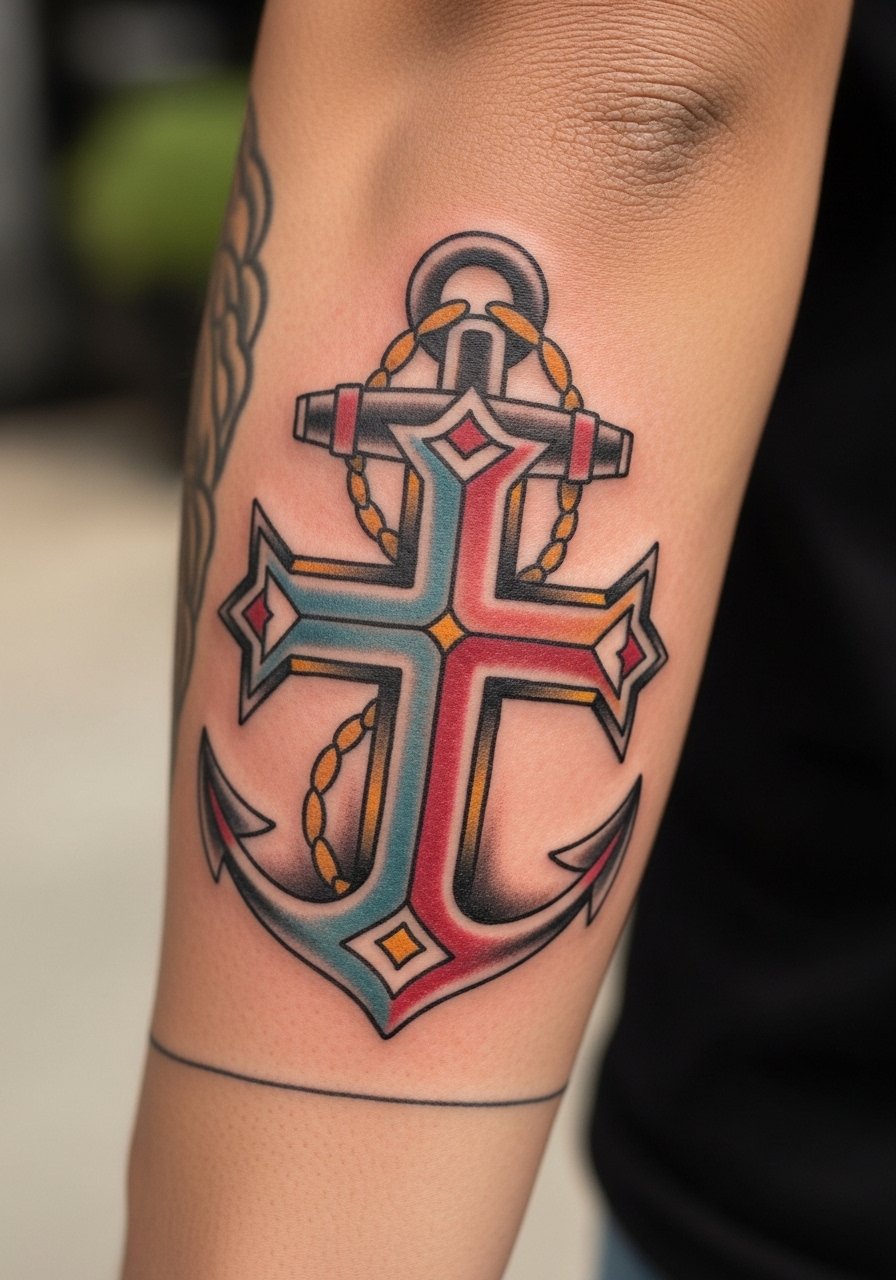
An anchor-cross combines stability and faith—a classic sailor’s symbol adapted for Christian meaning. Traditional bold lines and limited palette keep it durable. Forearm placement makes it visible and low-pain. This is a great pick for someone who wants a symbolic but wearable Christian tattoo that reads easily at a glance.
28. Memorial Name With Small Cross On Inner Bicep
Style/Technique: Script / Minimalist with Symbol
Pain Level: Low-Medium (3-4/10)
Session Time: 1 session, 1–2 hours
Best For: Memorial, personal devotion
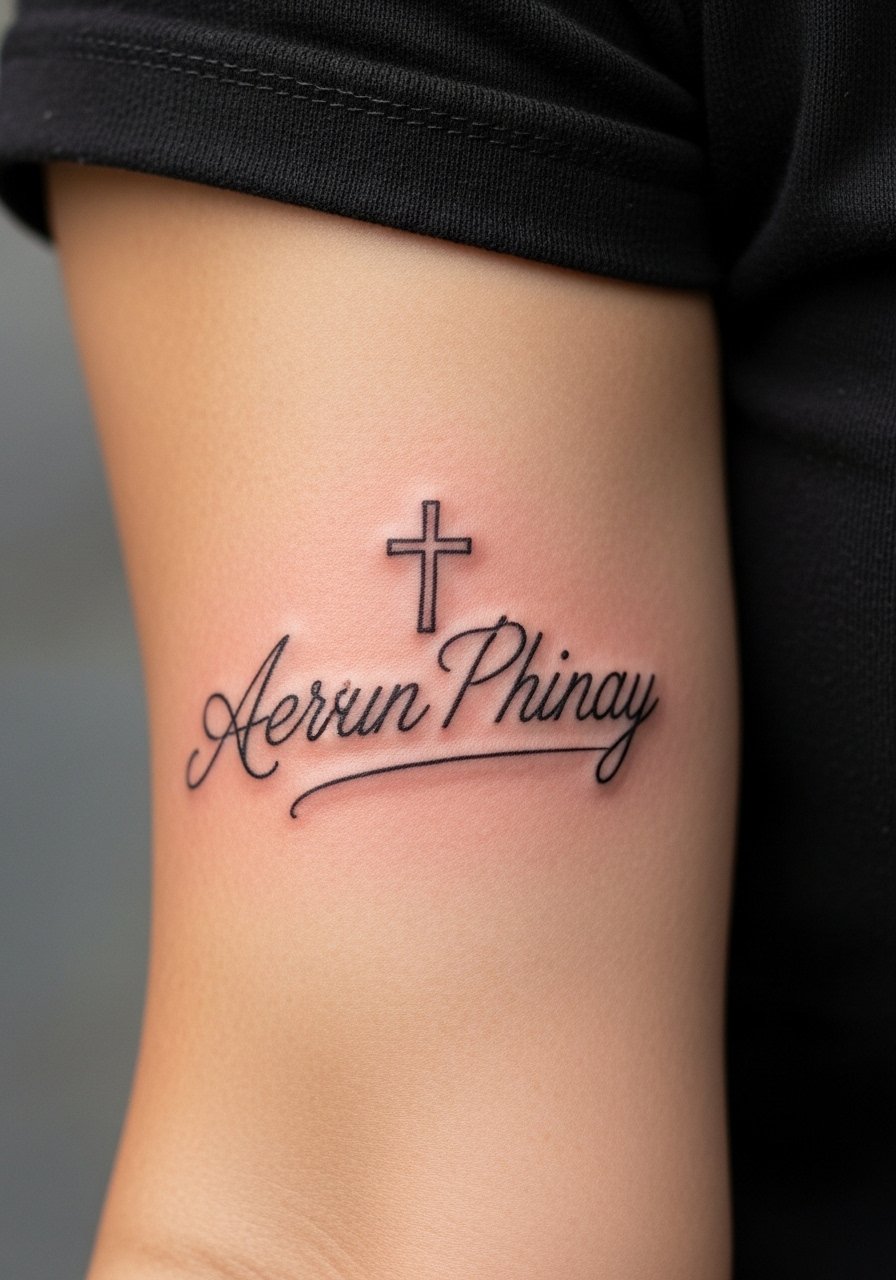
Memorial name tattoos with a tiny cross are intimate and specific. Inner bicep placement keeps the memory close and pain moderate. Choose a legible script and keep the cross small but bold enough to age well. From what I've experienced, this is one of the most emotional Christian tattoo ideas—simple, respectful, and wearable.
Tattoo Prep and Aftercare Essentials
Aftercare Essentials:
- Aquaphor Healing Ointment, 14oz tube — Great for first 3–5 days as artists often recommend
- Saniderm Transparent Adhesive Bandage, 6-inch roll — Second-skin option many artists use for the first 24–72 hours
- CeraVe Fragrance-Free Moisturizing Lotion — Daily moisturizer for days 4–14
- Dr. Bronner's Unscented Castile Soap, 16oz — Gentle cleanser for the first two weeks
Before Your Appointment:
- Tattoo Numbing Cream 5% Lidocaine — Ask your artist before use
- Tattoo Stencil Transfer Paper A4 — Useful if you’re testing placement at home
Long-Term Maintenance:
- SPF 50 Sunscreen Stick for Tattoos — Sunscreen is the single best anti-fade tool I use
- Mad Rabbit Tattoo Balm, 2oz — Good for keeping healed ink vibrant
- Hustle Butter Deluxe, 8oz — Vegan aftercare alternative many artists recommend
Optional Comfort & Repair:
- Hydrocolloid Bandages (large) — For small spots that need extra protection later
- Tattoo Aftercare Kit (multi-item) — Handy for first-time careers
I keep these basics in a small kit. From what I’ve learned, artists often prefer Aquaphor early, then a fragrance-free lotion like CeraVe. Saniderm or similar second-skin can reduce scabbing and speed the critical first 48–72 hours—ask your artist if they use it.
Frequently Asked Questions
Q: How bad does a tattoo actually hurt?
A: Pain depends on placement and tolerance. Outer arm and forearm are low (around 3/10). Ribcage, spine, and ankle tend to be higher (6–8/10). It’s more of a sustained scratchy/burning feeling than a sharp shock. For sensitive spots, consider asking about tattoo numbing cream 5% lidocaine—but check with your artist first.
Q: I'm worried my Christian tattoo will be misunderstood—what should I do?
A: I had that worry. The best move is to research the symbol’s history and sit with the design for months. Choose classic symbols (cross, dove, ichthys) or a scripture line you live by. If you have denominational concerns, discuss them with a mentor or artist familiar with religious imagery.
Q: How do I keep scripture or fine lines from blurring?
A: From my experience, spacing and line weight matter more than font. Ask for slightly bolder primary lines and room between letters. Aftercare—gentle cleaning and daily moisturizing—helps. Later, use an SPF 50 sunscreen stick to protect the area from UV fade.
Q: How long before I can work out after getting inked?
A: Wait at least 48–72 hours before light exercise, longer if the tattoo is on a flex area (elbow, knee). Sweat and friction increase infection risk and can affect ink retention. If you must be active, keep the area clean and avoid tight clothing that rubs the fresh tattoo.
Q: Should I get a small tattoo first to test faith ink?
A: Only if you actually want a small tattoo. Don’t get something meaningless just to test pain. If you’re anxious, start with a tiny ichthys or a small cross in a low-pain zone. That will give you a sense of the process without a big commitment.
Q: Do colors look different on different skin tones?
A: Yes. Black and grey shows up well across tones. Bright colors may appear muted on deeper skin and white ink is often subtle. I always ask to see healed examples on similar skin tones. Artists who regularly work across tones can advise on saturation and palette.
Q: What aftercare products do artists actually recommend?
A: Most artists I follow recommend starting with Aquaphor for the first few days, or Saniderm for a sealed healing method, then switching to a fragrance-free lotion like CeraVe. For long-term vibrancy, a quality tattoo balm like Mad Rabbit or Hustle Butter helps. Sunscreen is non-negotiable for longevity.
Q: What's the biggest aftercare mistake people make?
A: Picking at scabs and exposing new tattoos to sun or pool water. From what I’ve seen, those actions cause uneven healing and premature fading. Keep it clean, moisturized, and out of strong sunlight while it’s settling.
