
I spent months saving arrow tattoo screenshots before I realized my real worry wasn’t the art — it was picking a style that still looks good healed. These 25 simple arrow tattoos cover minimalist staples, bold tribal bundles, and a few under-the-radar ideas I kept seeing in healed photos and artist portfolios.
This list focuses on minimalist, tribal, and geometric arrow styles that work on wrists, forearms, ribs, and ankles. I’ve been following 2026 trends and artists keep recommending clean blackwork and three-arrow bundles as long-term winners.
1. Fine Line Single Arrow on Inner Wrist
Style/Technique: Fine Line / Minimalist
Pain Level: Low (2-3/10)
Session Time: 30-60 minutes
Best For: First tattoo, small arrow tattoos, hidden or visible
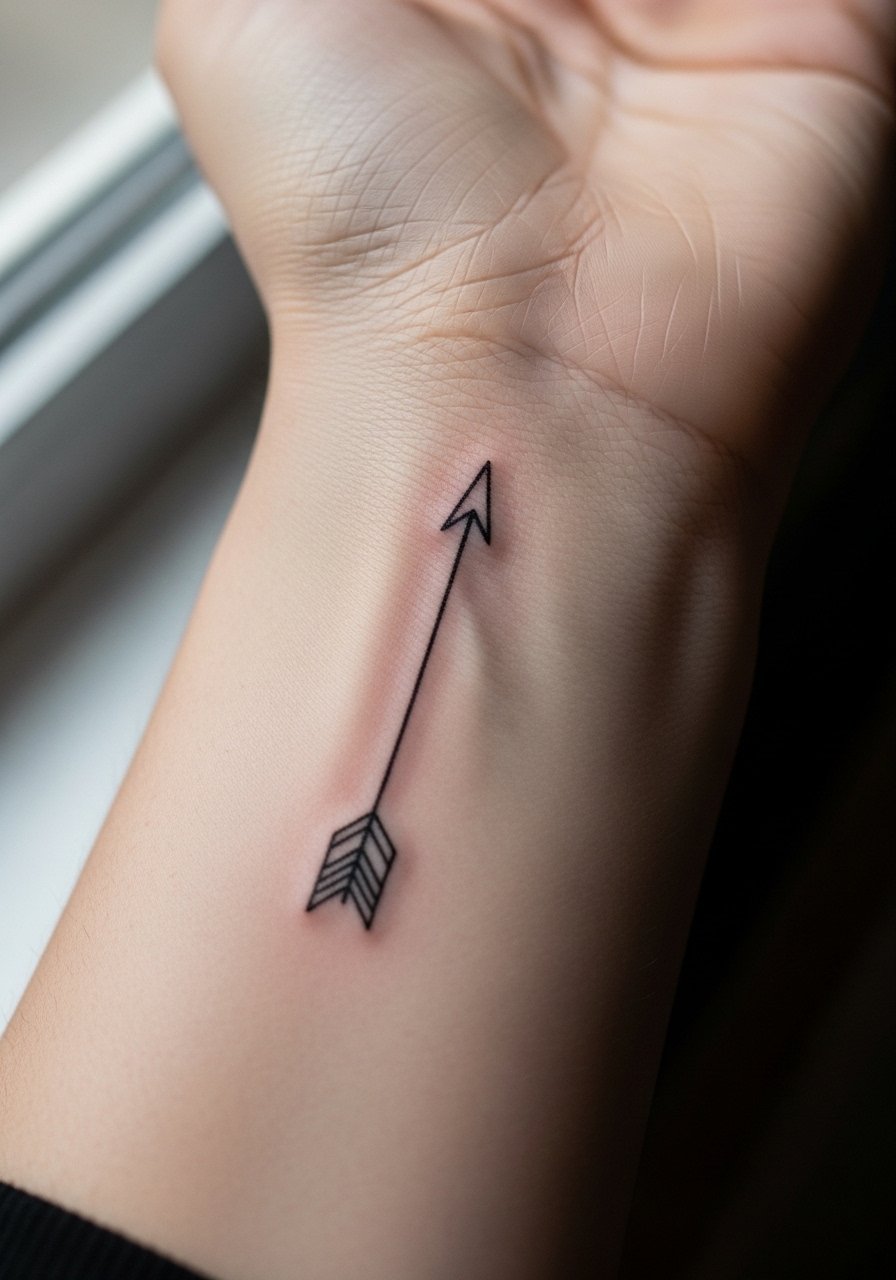
A tiny fine line arrow feels purposeful without shouting. I like this for a first tattoo because it reads as intentional and is easy to conceal with a watch or bracelet. Pain is low on the inner wrist but expect some buzzing and tenderness while it heals. Aftercare is straightforward: gentle soap, thin layer of ointment, and sunscreen once healed. From what I’ve seen, fine line work can blur over several years if the lines are too thin, so ask your artist about slightly stronger line weight for longevity. Mention "small arrow tattoos" and "arrow tattoo placement" in your consult. Avoid getting a hairline-fine single line unless the artist has healed examples on similar skin tones.
2. Three Arrows Bundle on Forearm (Unity Design)
Style/Technique: Traditional / Tribal Bold Line
Pain Level: Low-Medium (3-4/10)
Session Time: 1-2 hours
Best For: Family symbol, forearm visibility
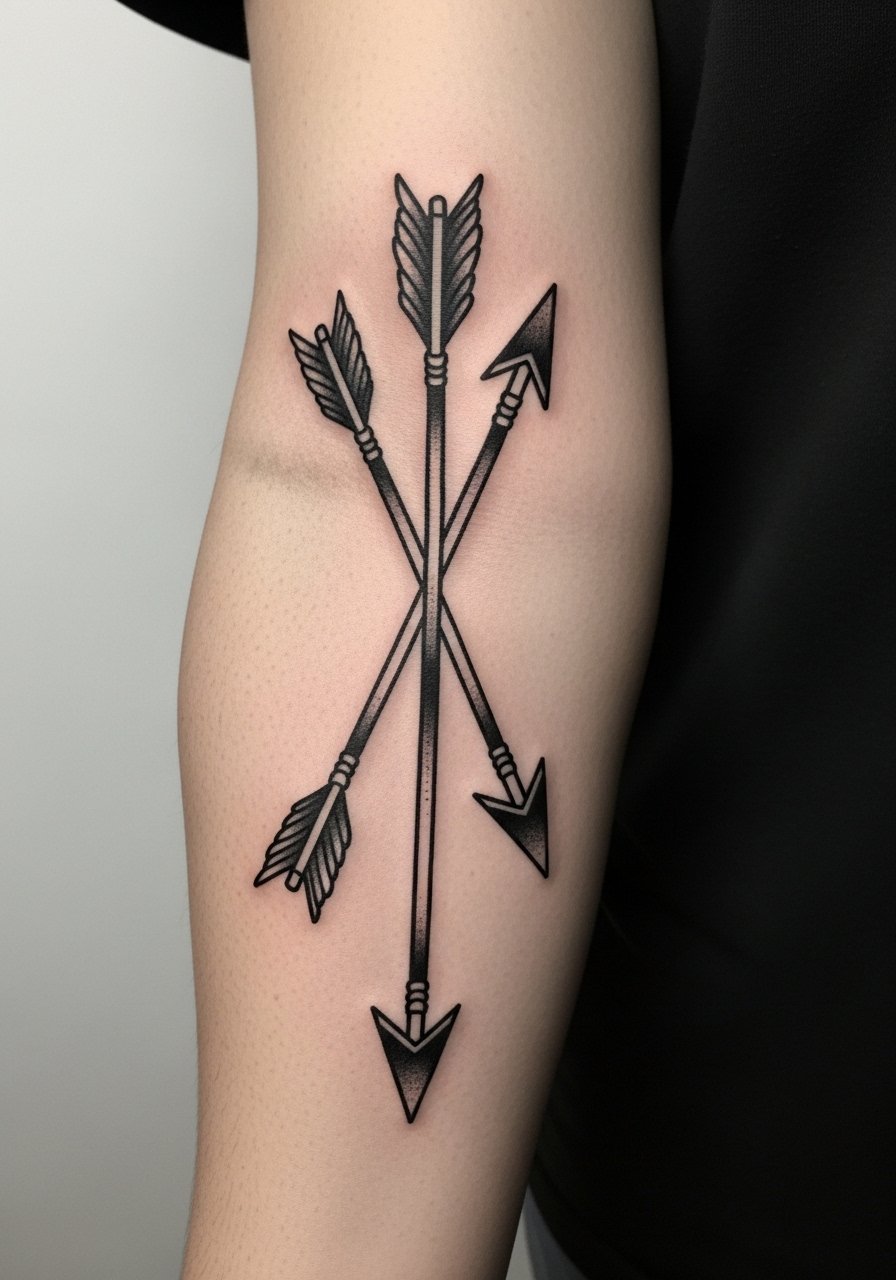
Three arrows grouped together are my go-to recommendation for people wanting symbolism that lasts. I’ve seen this used to represent family, friendship, or protection. The bold linework ages well across skin tones, which helps if you want a long-lasting blackwork piece. Placement on the forearm follows natural arm flow and is a lower-pain spot. Artists who specialize in tribal or neo-traditional styles are best for this look — ask to see healed three arrows tattoo meaning examples. A common mistake is cramming too many fine details into the arrows; stick to clear negative space so the motif holds up. Healing is simple but keep the area moisturized and avoid heavy friction during the first two weeks.
3. Bow and Arrow With Feathers on Upper Arm
Style/Technique: Neo-Traditional / Illustrative
Pain Level: Low (2-3/10)
Session Time: 1-2 sessions, 2-4 hours
Best For: Shoulder or upper arm statement
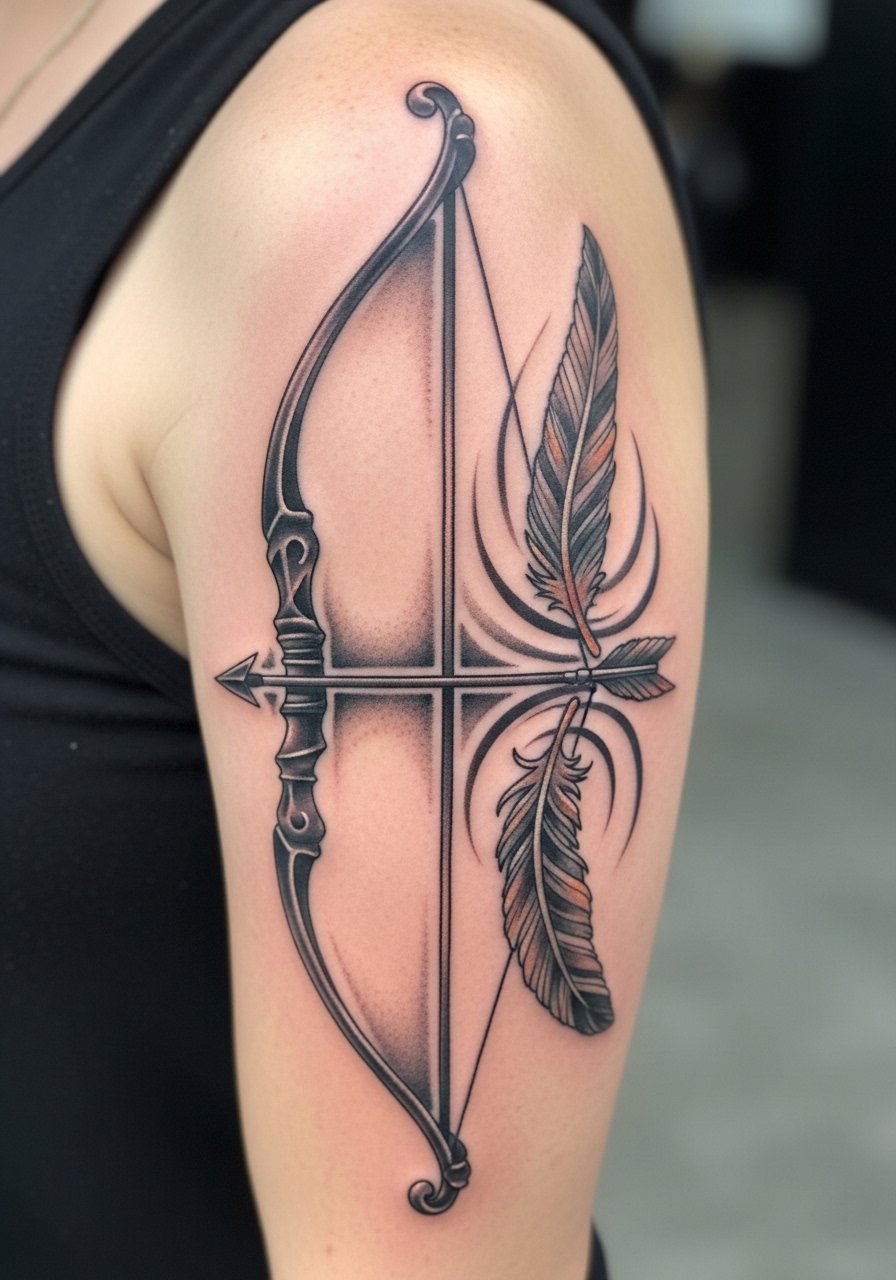
A bow and arrow with feather accents reads like precision and courage. I found this design often placed on the upper arm where there’s room for detail and shading. Pain is mild on the outer upper arm and healing is forgiving. Artists who do neo-traditional work can balance bold outlines with soft shading so the feathers keep texture as they age. Ask about ink saturation and how color performs on your skin tone — from my experience, muted palettes in black & gray hold up best. Avoid tiny feather details; scale them so they remain readable after a year or two.
4. Geometric Arrow Band on Forearm
Style/Technique: Geometric / Blackwork
Pain Level: Medium (4/10)
Session Time: 1-3 hours
Best For: Forearm wrap, visible directional design
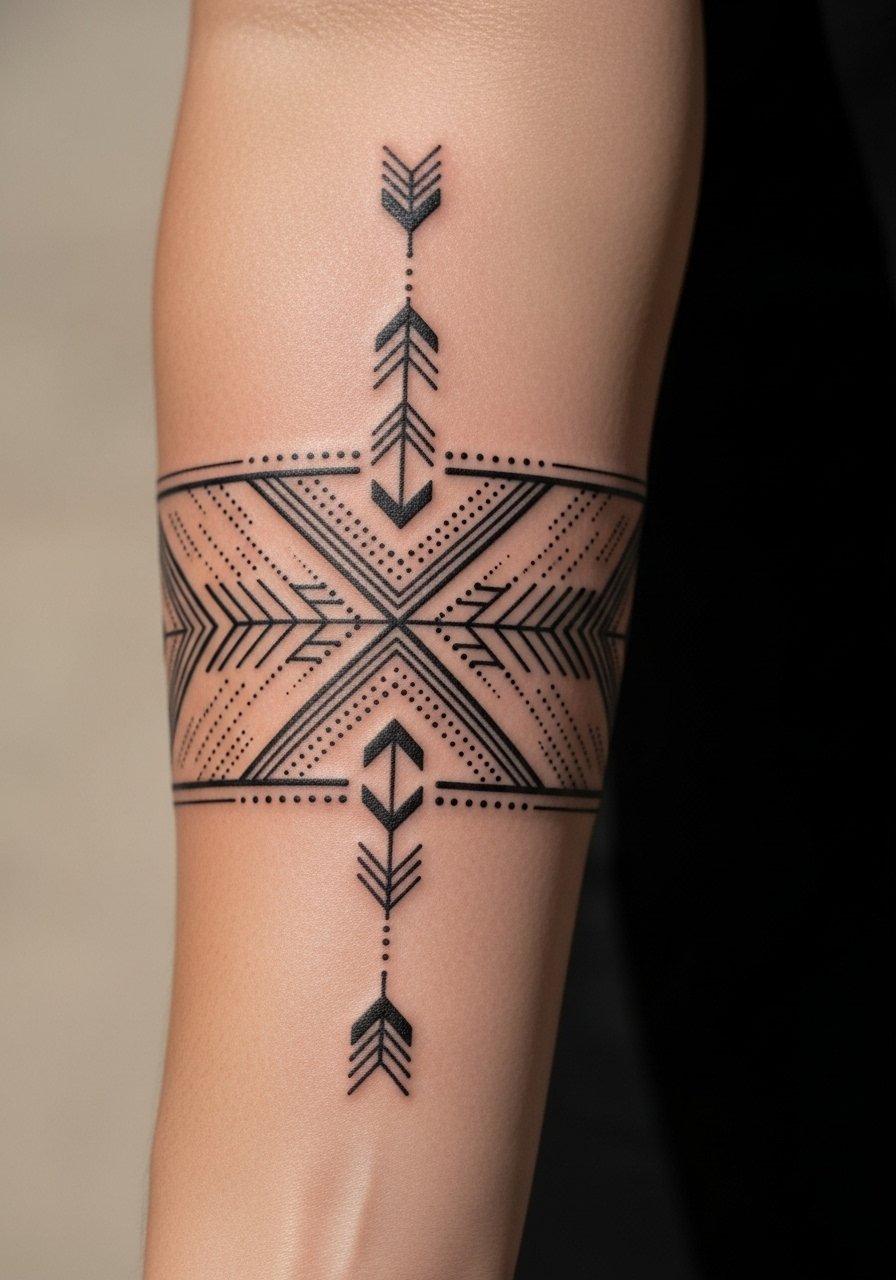
Geometric arrow tattoos give a modern, symmetrical vibe. I’ve seen people choose a repeating arrow band or a single arrow with geometric accents for a sleek look. This style benefits from an artist skilled in consistent linework and spacing — mistakes show quickly in geometric designs. Forearm placement is ideal because it shows the pattern along the arm’s length and heals with minimal movement. Expect medium pain while the needle crosses dense skin or near the wrist joint. For longevity, bold blackwork and clean negative space trump tiny details. Bring reference photos and ask for healed geometric arrow tattoo examples.
5. Heart Pierced by Arrow on Collarbone
Style/Technique: Minimalist / Realism
Pain Level: Medium-High (4-6/10)
Session Time: 1 session, 1-2 hours
Best For: Small romantic piece, collarbone visibility
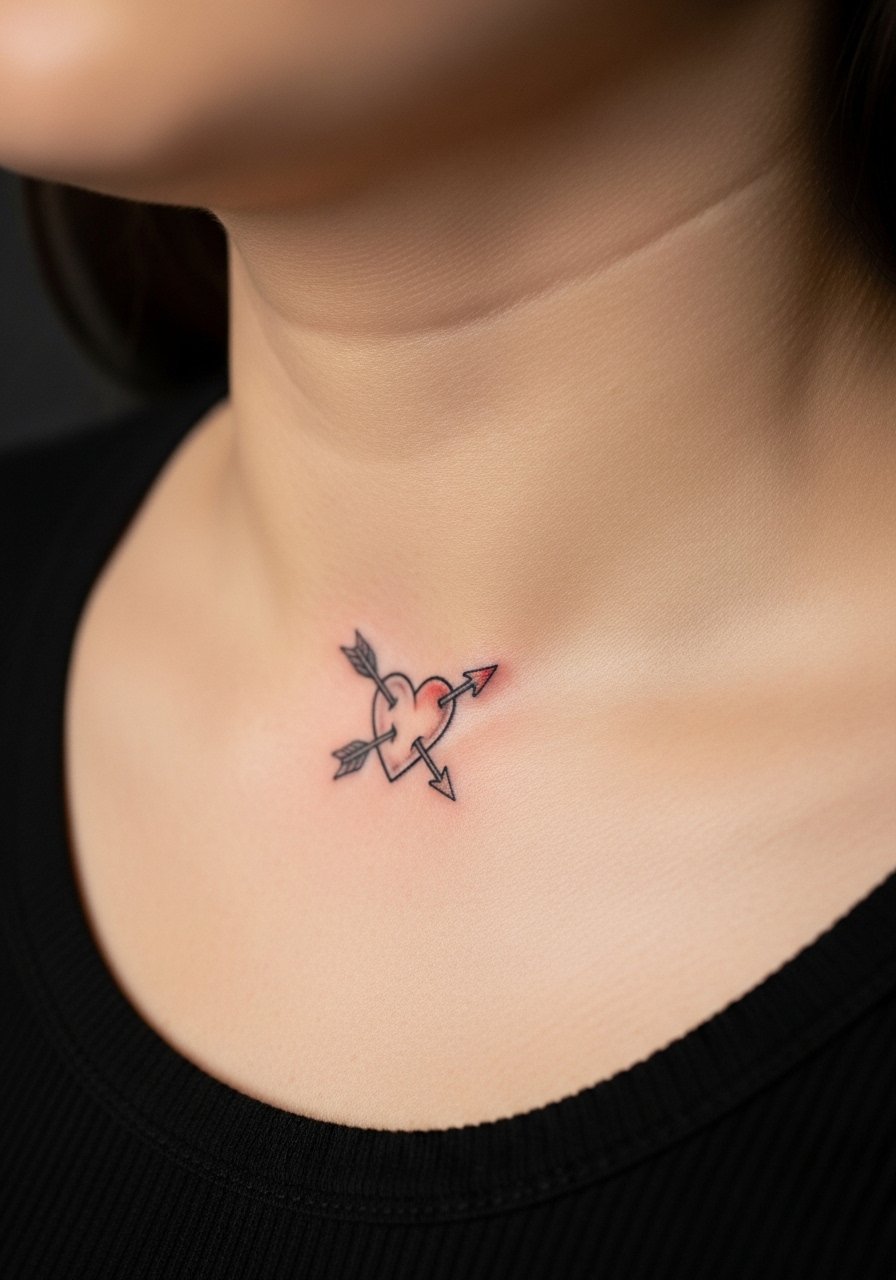
Heart-and-arrow designs are classic for love symbolism. I like collarbone placement because it follows body lines and can be easily shown or covered. Pain on the collarbone is more pronounced than the forearm, so pack patience. Ask for a balanced size — too small hearts with thin arrows can lose clarity as skin shifts. In my experience, subtle color accents brighten the design but black outlines are the workhorse for aging. Avoid overly intricate filigree that looks great fresh but muddles once healed.
6. Floral Bow and Arrow on Ribcage
Style/Technique: Watercolor / Floral Neo-Traditional
Pain Level: High (7-8/10)
Session Time: 2 sessions
Best For: Feminine statement, thigh or ribcage placement
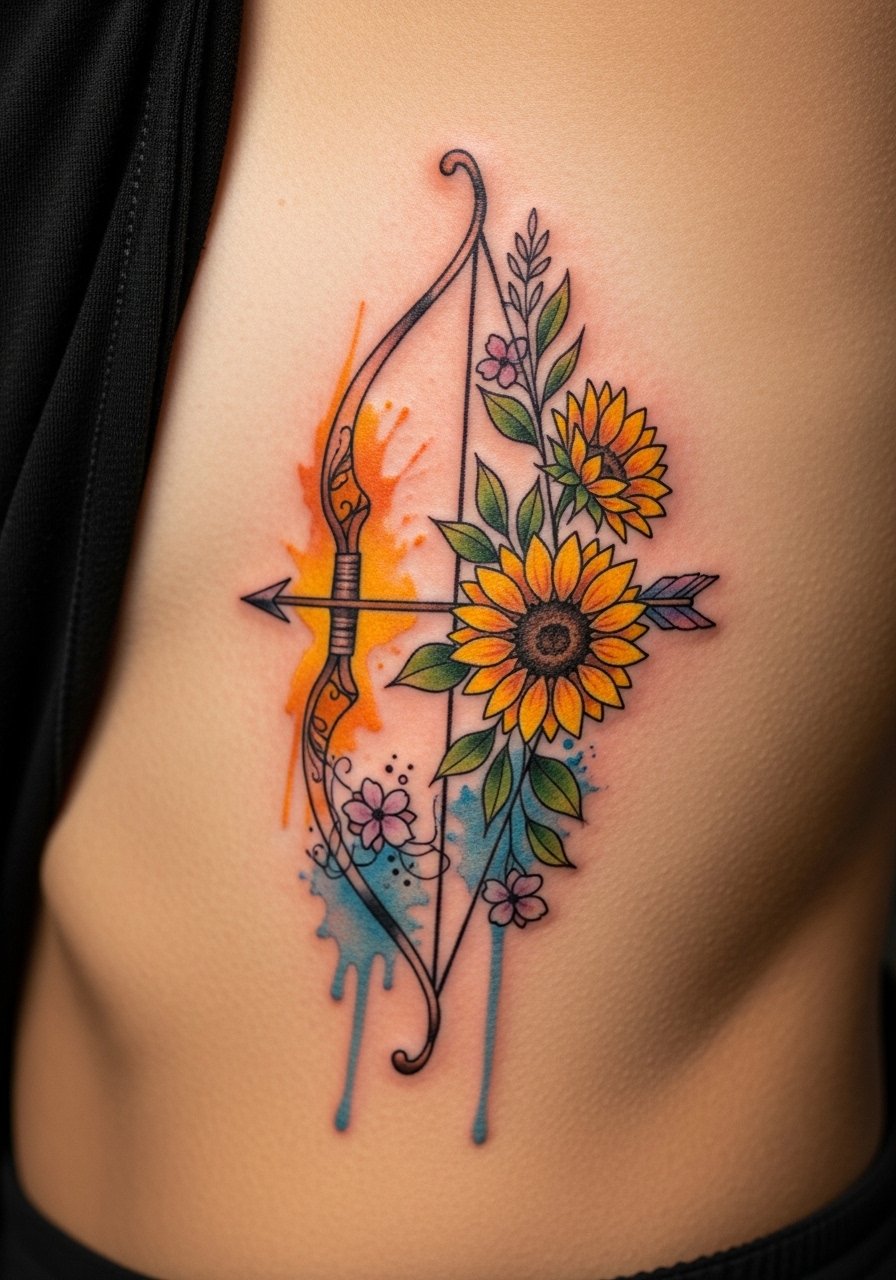
A floral bow-and-arrow pairs direction with positive symbolism — sunflowers for joy, roses for devotion. Ribcage placement looks stunning but is one of the higher-pain areas; I always tell friends to prepare for longer breaks. Healing colored watercolor pieces needs sun avoidance and consistent moisturizing. From what I’ve observed, watercolor can fade unevenly, so artists often recommend stronger black anchors in the design to keep shape. Ask your artist about touch-up timelines for color work. Don’t pick the ribcage if you can’t sit still; session length and breath control matter.
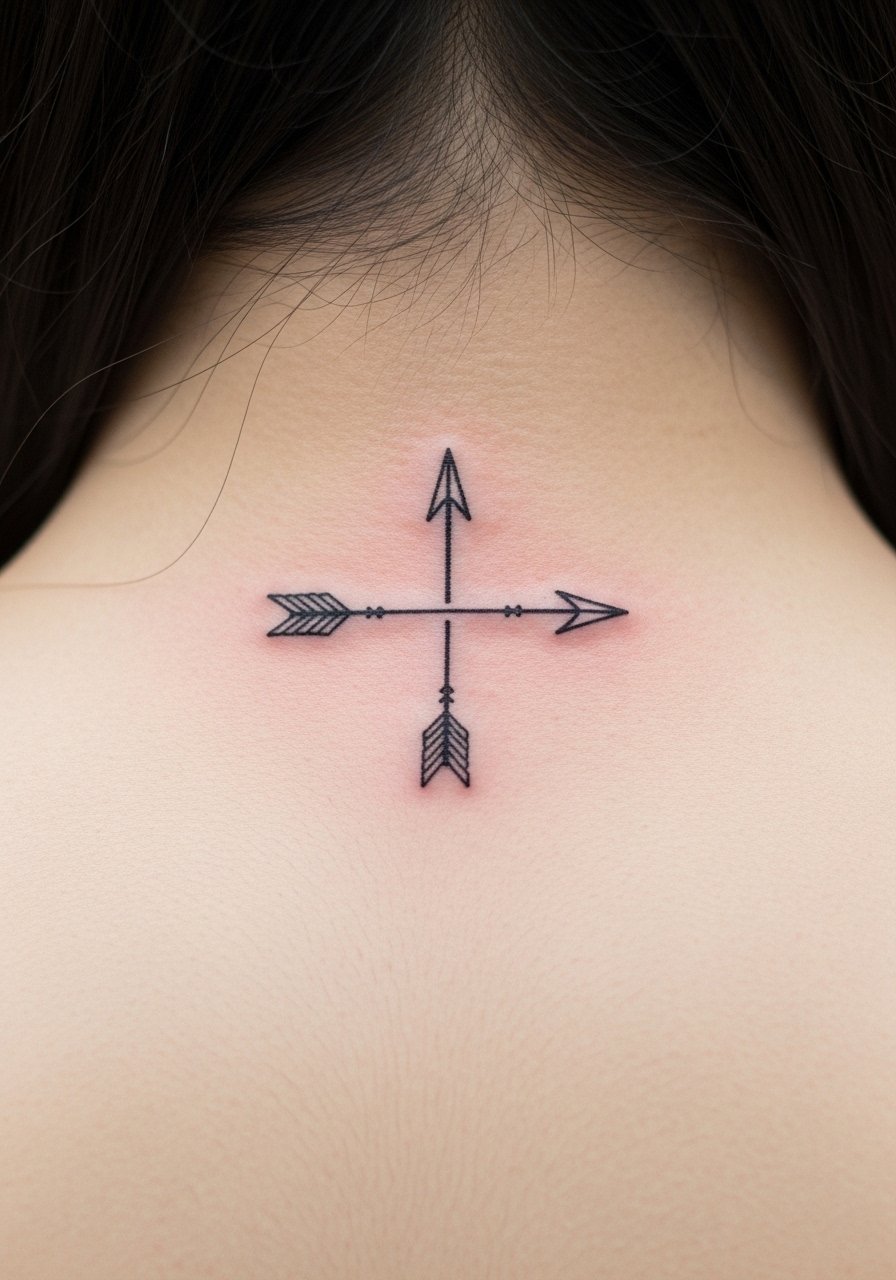
7. Infinity Arrow Loop on Ankle
Style/Technique: Illustrative / Minimalist
Pain Level: Medium (4-5/10)
Session Time: 45-90 minutes
Best For: Ankle or finger small tattoo, symbolic journey
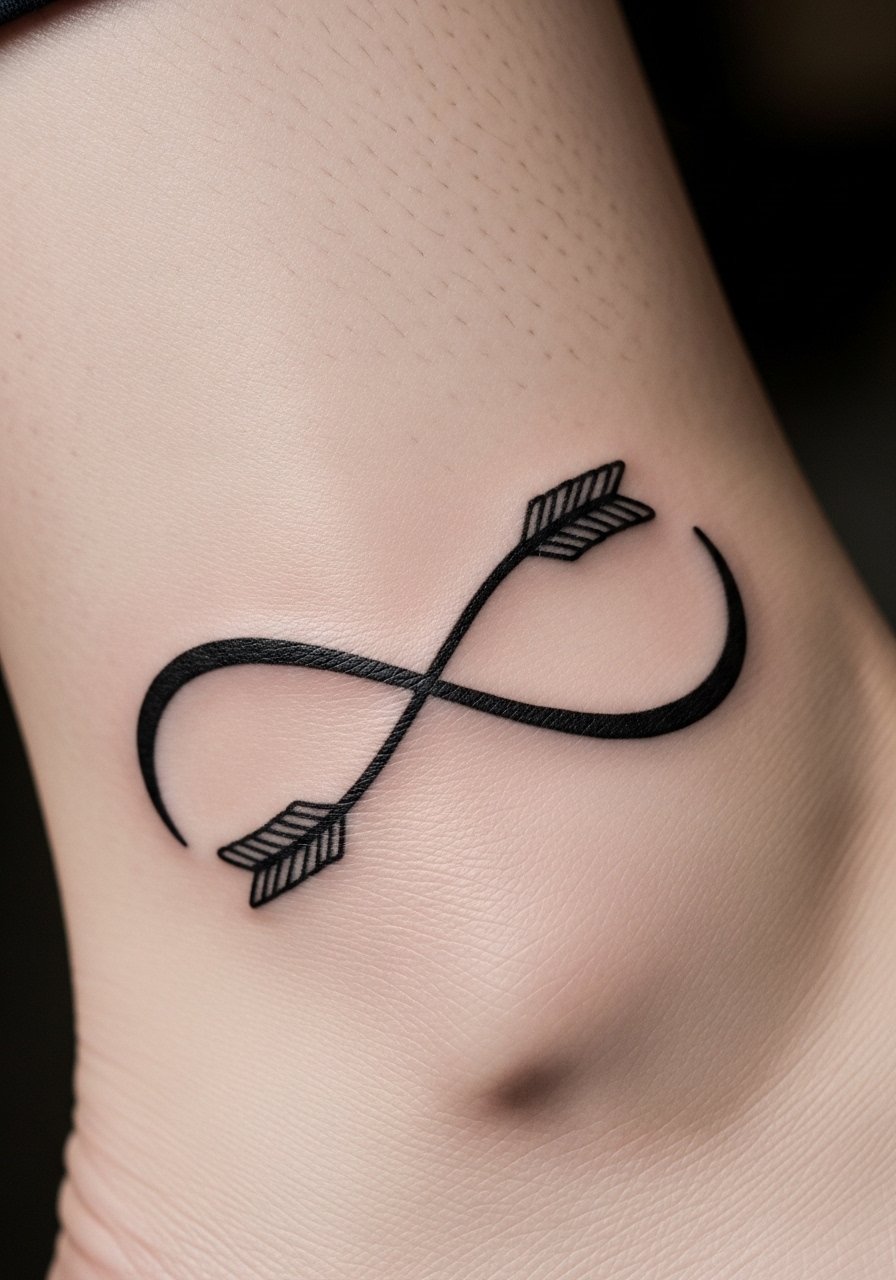
The infinity arrow loop reads like a lifelong path or endless drive. Ankle placement is visible but can be fussy during healing because of socks and shoes. I tell people to plan wardrobe around initial care. Tiny illustrative details need confident linework because small designs blur faster. This is a classic "arrow tattoo ideas" pick for someone who wants symbolic ink without a large commitment. Discuss how the loop interacts with your ankle’s natural curves so the symbol sits right when you stand.
8. Three Arrows in Triangle on Upper Arm
Style/Technique: Bold Line / Tribal
Pain Level: Low-Medium (3-4/10)
Session Time: 1-2 hours
Best For: Upper arm, resilience symbol
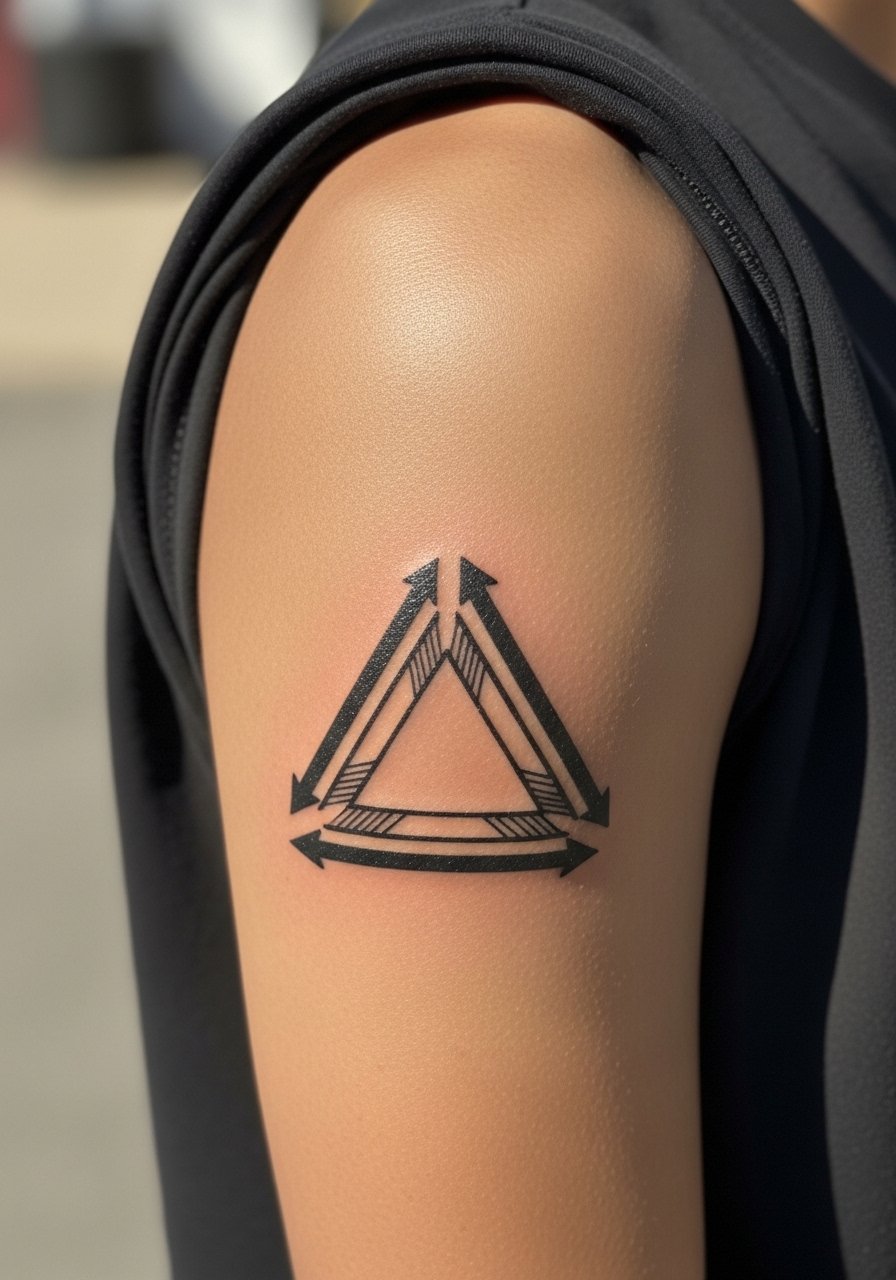
This compact geometric motif signals resilience and community strength. I’ve seen it used as a standalone badge or part of a sleeve. Upper arm placement keeps pain low and offers concealability when needed. Because the design is bold, it tends to age well—perfect for those worried about long-term clarity. A common mistake is crowding the triangle with extra elements; keep it clean. Ask your artist for healed photos of similar bold-line pieces on skin tones like yours.
9. Snake-Wrapped Arrow Down Spine
Style/Technique: Realistic / Blackwork
Pain Level: High (7-9/10)
Session Time: Multiple sessions
Best For: Spine or thigh statement, transformation symbol
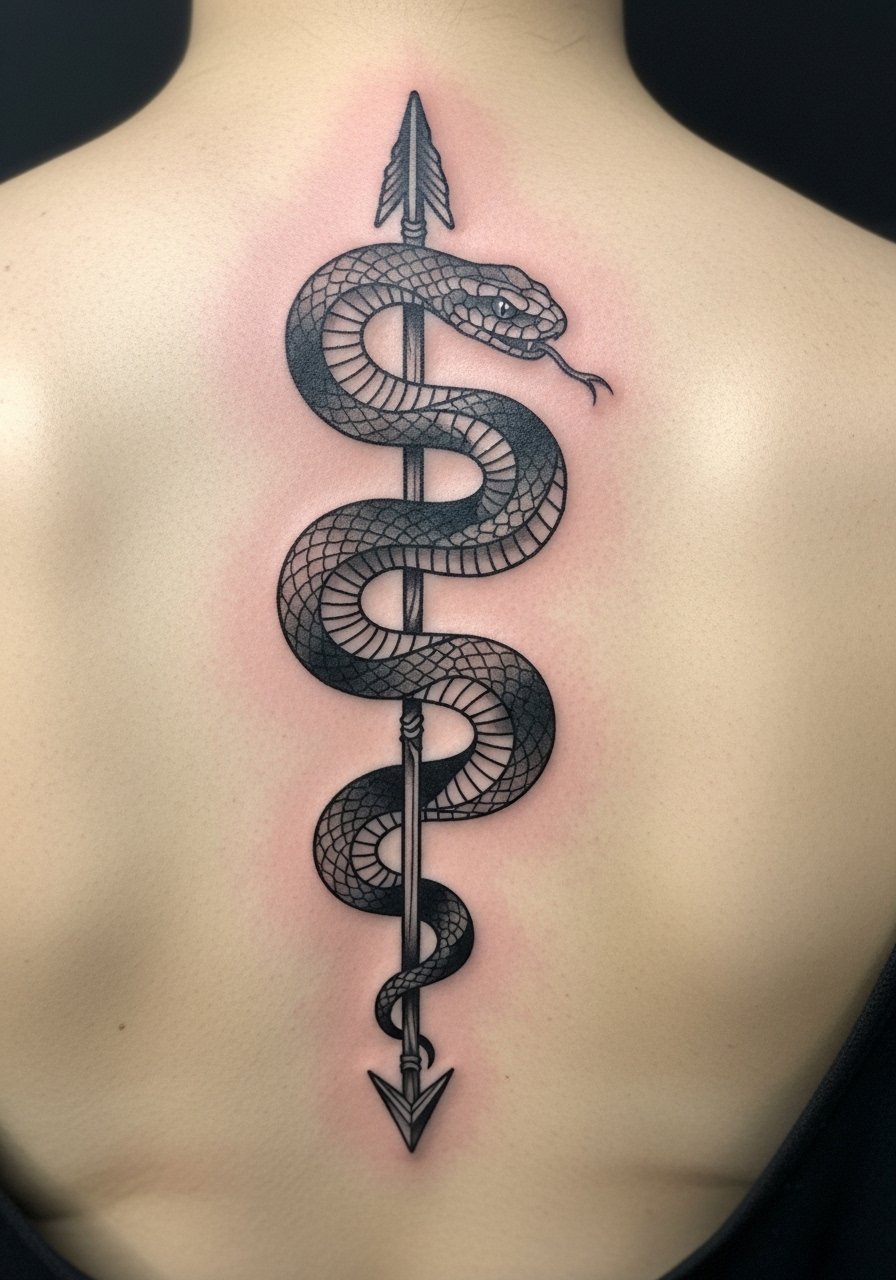
A snake-wrapped arrow reads like ambition plus rebirth. Spine work looks dramatic but is one of the most painful spots — the bone and nerve density make sessions intense. I only suggest this for people prepared for multi-session pieces. Blackwork holds up best here; fine scales and delicate shading can blur if too small, so scale up details accordingly. Artists skilled in realism and blackwork can show healed results that prove the idea’s longevity. Plan for careful aftercare: the spine area moves a lot and needs extra attention during the first weeks.
10. Broken Arrow Tied With Rope on Chest
Style/Technique: American Traditional / Bold
Pain Level: Medium (4-6/10)
Session Time: 1-2 sessions
Best For: Chest statement, healing/conflict theme
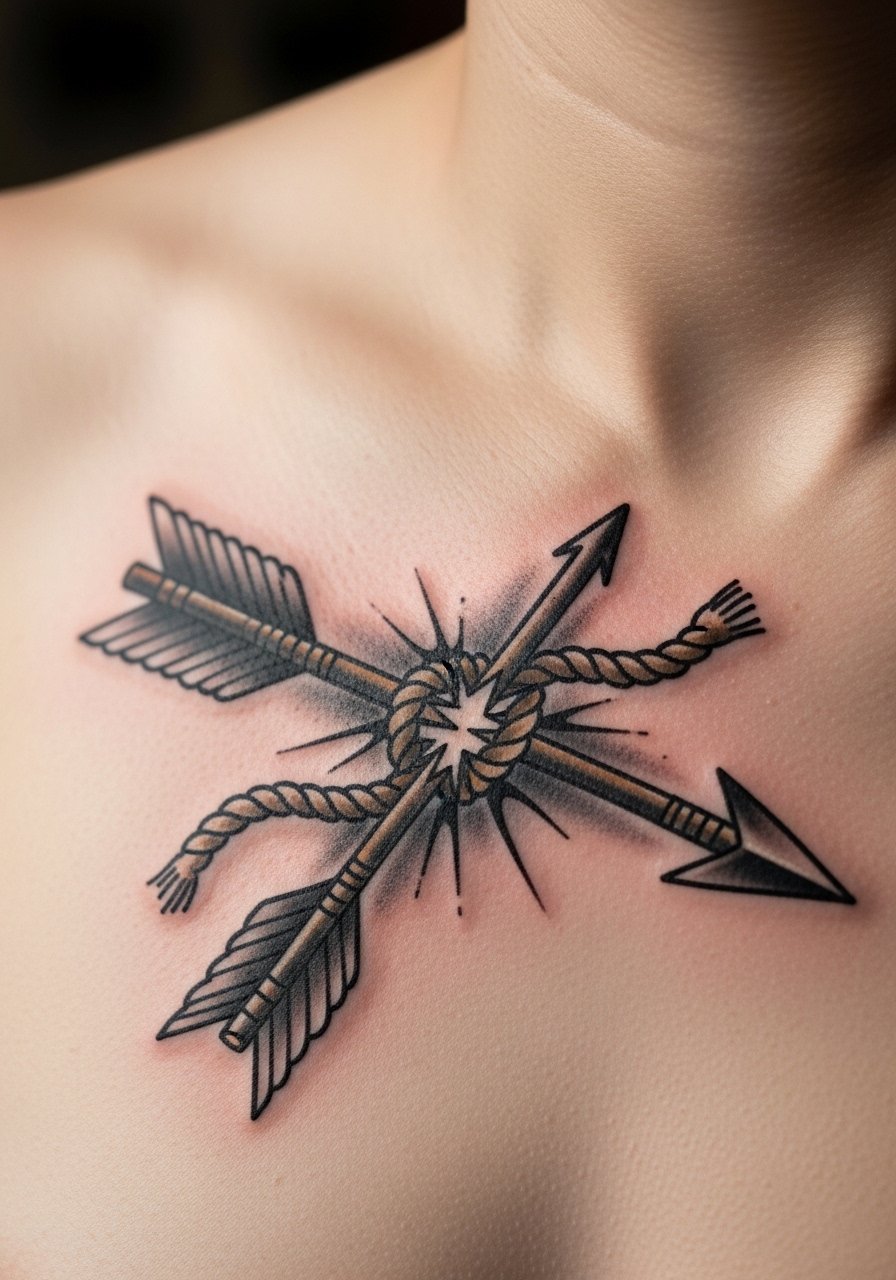
A broken arrow symbolizes healing or letting go of conflict. Chest placement gives gravity to that message and looks great over time in bold traditional style. Expect moderate pain — the chest can be sensitive, especially near the sternum. From what I’ve learned, traditional color palettes fade more slowly if the outlines are strong. Avoid overly small knots or rope details; they can lose definition. Ask to see healed American traditional pieces with ropework for confidence.
11. Feathered Arrow With Wings on Inner Forearm
Style/Technique: Fine Line / Ornamental
Pain Level: Low-Medium (3-4/10)
Session Time: 1-2 hours
Best For: Inner forearm, symbol of independence
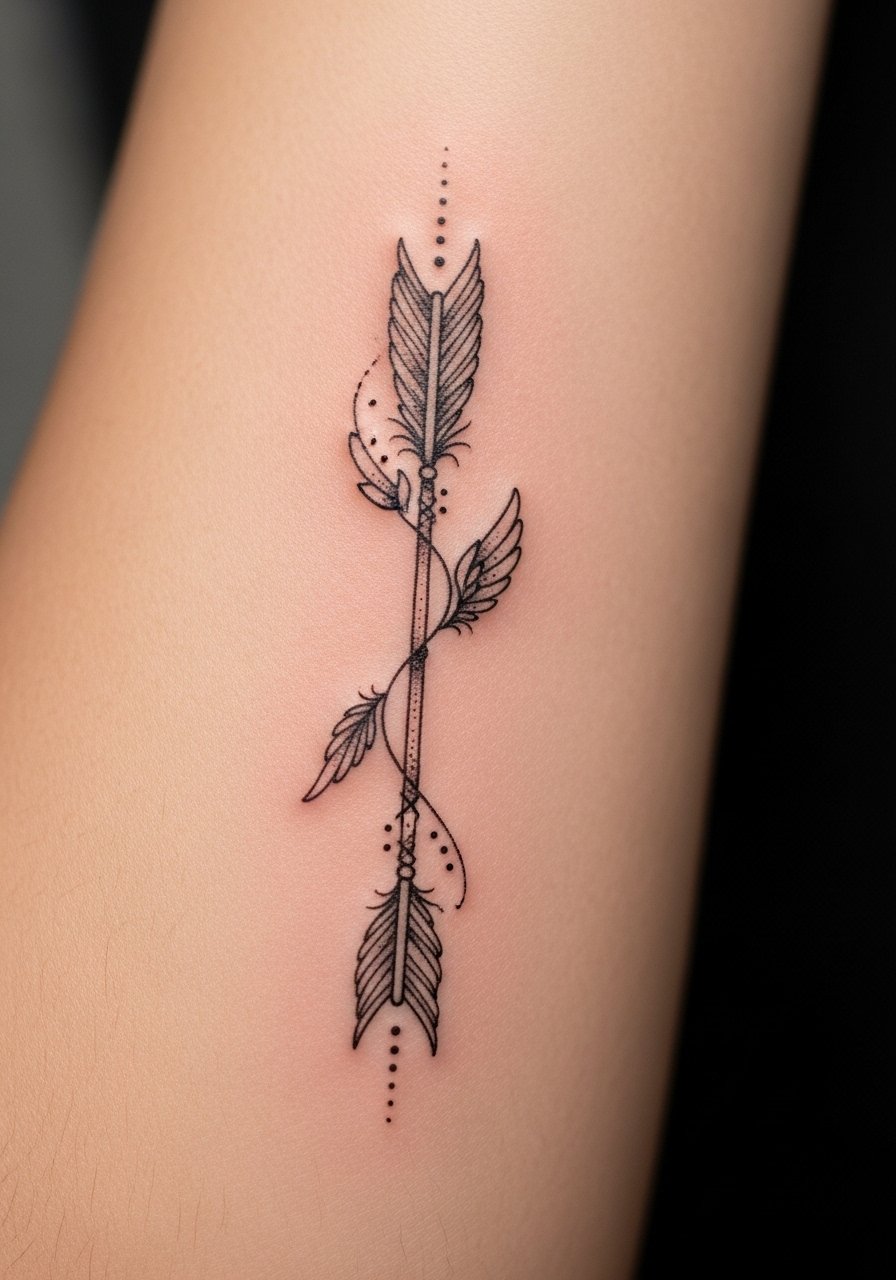
Feathered arrows feel light and independent. Inner forearm placement is low-pain and great for showing detail. I recommend fine-line artists who also have ornamental portfolios. A common mistake is making feathers too intricate; simple, deliberate strokes read better healed. Keep moisturizing during the first month to help fine lines stay crisp. This is a top "feathered arrow" option if you want something elegant and readable on darker skin tones too.
12. Compass Arrow On Shoulder Blade
Style/Technique: Dotwork / Geometric
Pain Level: Low (2-4/10)
Session Time: 1-2 hours
Best For: Shoulder blade, guidance symbolism
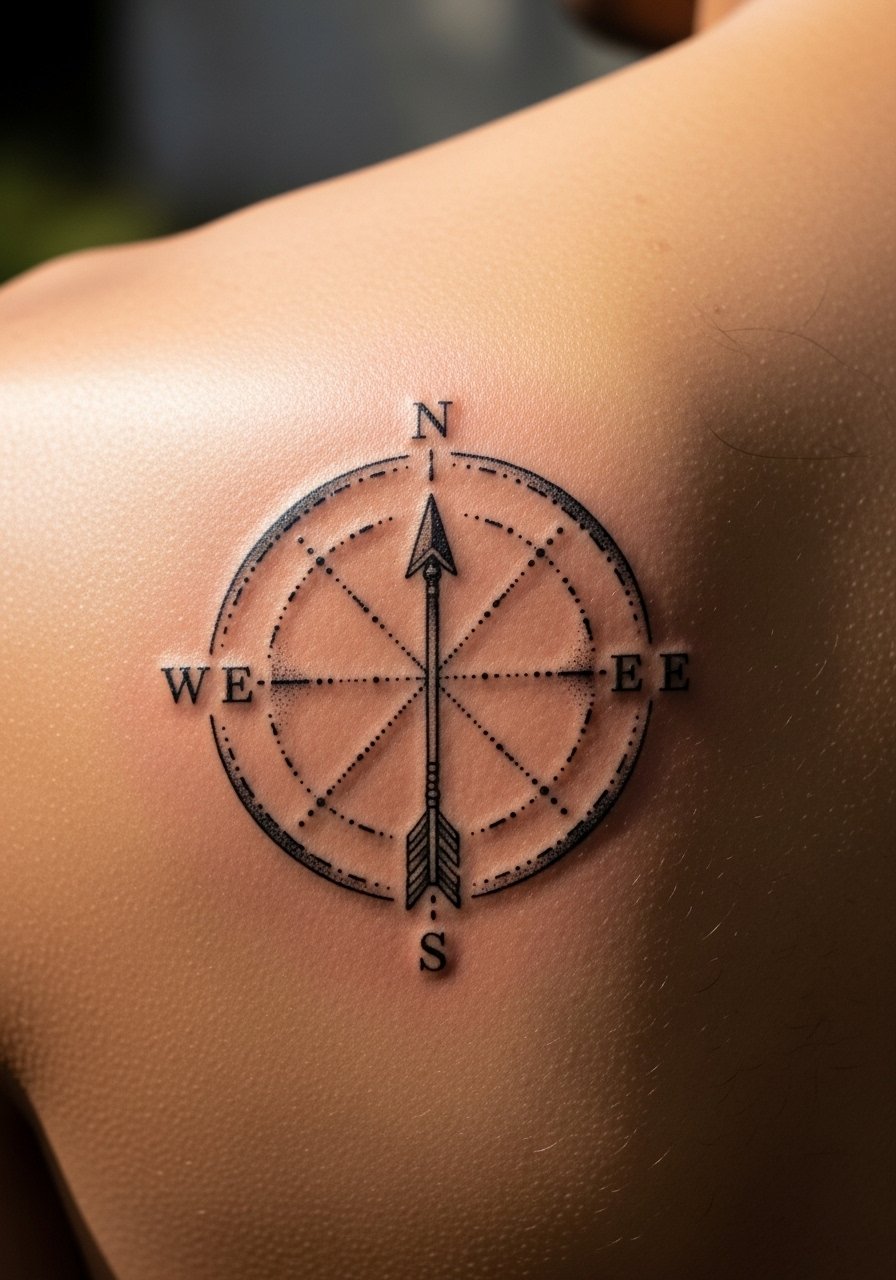
Compass arrows are all about direction and new life choices. Shoulder blade placement lets the piece sit flat and be easily covered. Dotwork provides texture without heavy color, and I’ve seen it hold nicely over time when dots are spaced correctly. Pain is low; healing is straightforward. Ask your artist about how the compass aligns with your body’s natural center so the design reads right when you move.
13. Downward Arrow With Lotus on Spine Base
Style/Technique: Minimalist / Botanical
Pain Level: High (6-8/10)
Session Time: 1 session
Best For: Lower spine, spiritual symbol
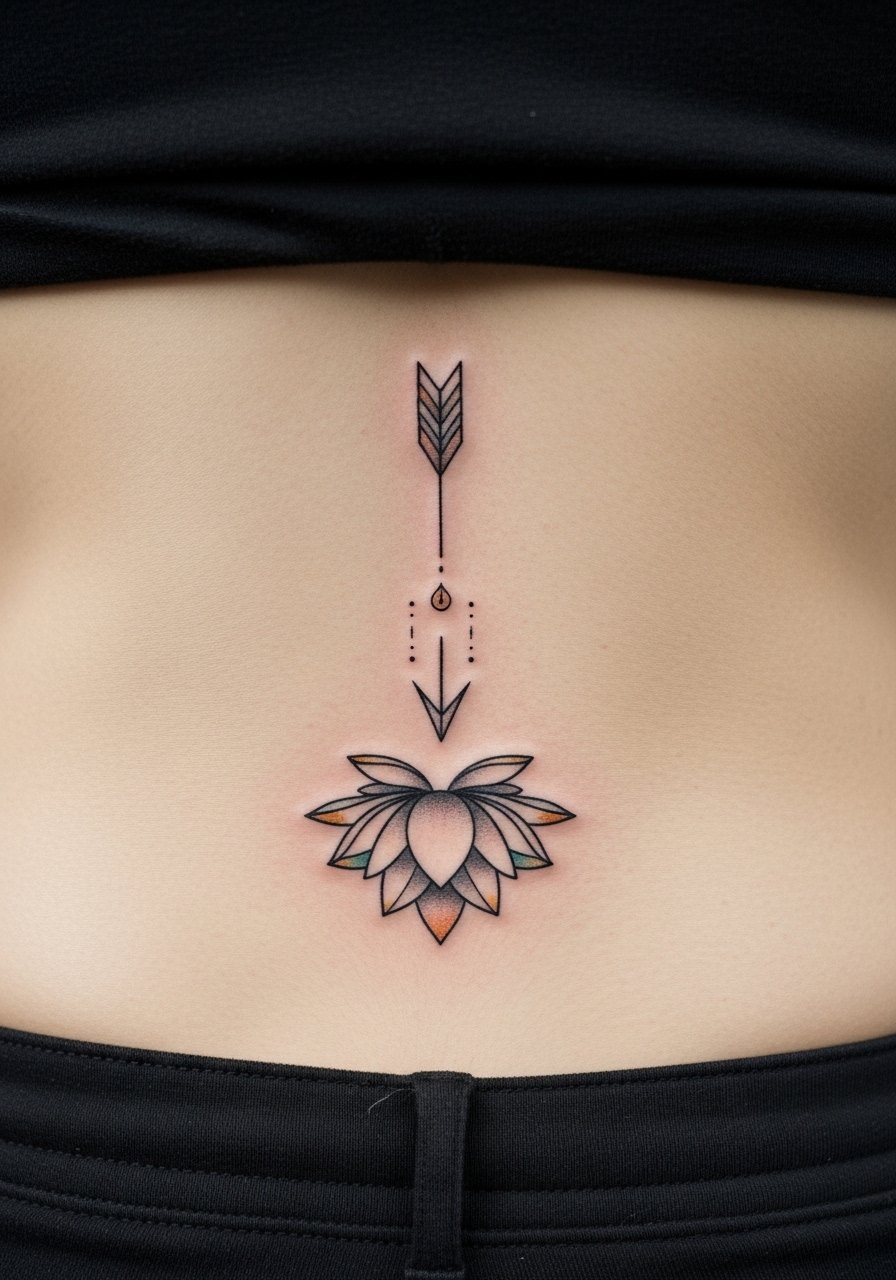
A downward arrow with a lotus conveys peace and inner growth. Lower spine placement can be painful and sits over sensitive areas, though it looks clean once healed. I often recommend this to people wanting a contemplative piece visible only when desired. Minimalist linework needs to be scaled so the lotus petals remain distinct after healing. Avoid white ink details — they rarely show up on deeper tones. Plan on careful sleeping positions for the first two weeks to avoid rubbing.
14. Sagittarius Glyph Arrow on Wrist
Style/Technique: Illustrative / Zodiac Glyph
Pain Level: Low (2-3/10)
Session Time: 30-60 minutes
Best For: Wrist, zodiac fans, tiny symbolism
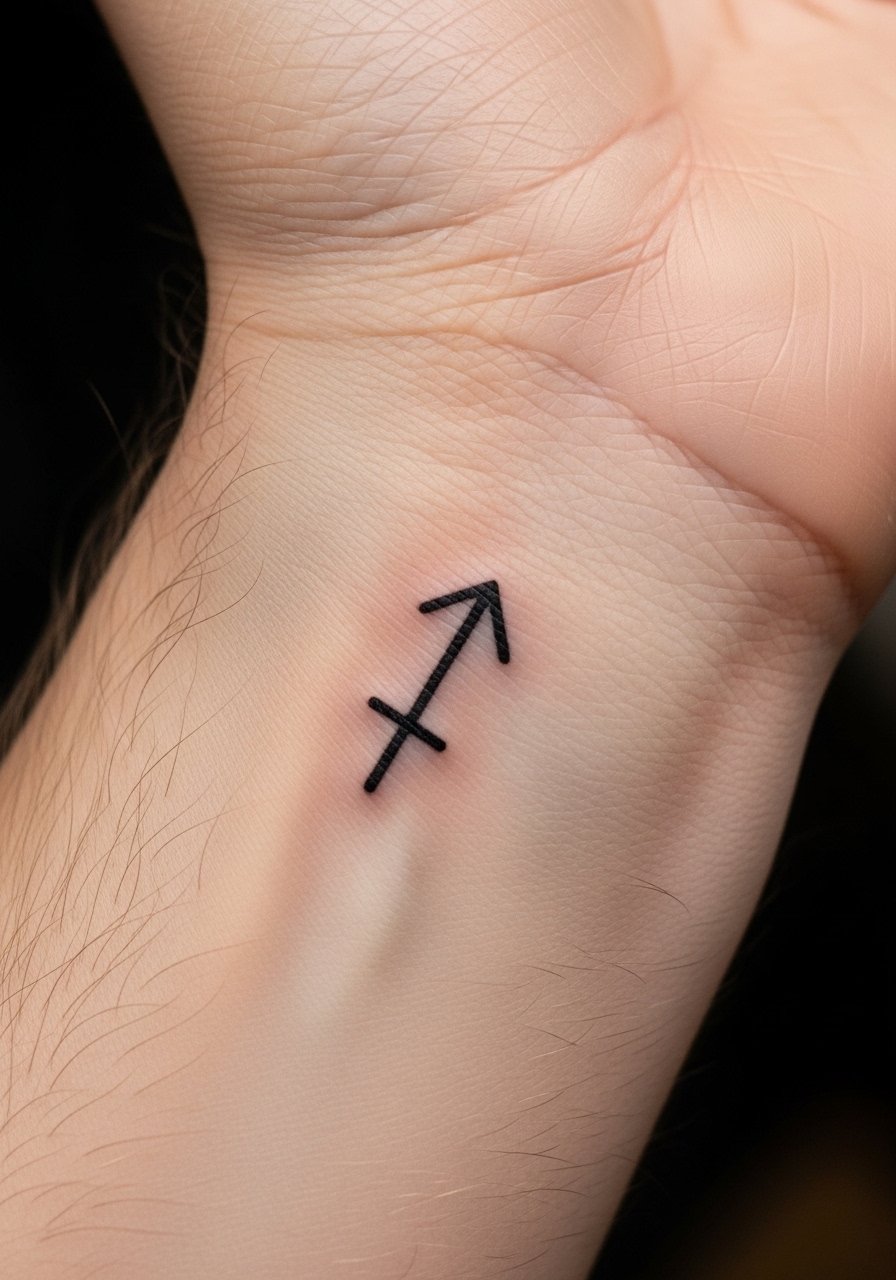
If you’re a Sagittarius or just love the archer motif, this tiny glyph arrow is discreet and meaningful. Wrist placement is visible and personal but takes some care with movement. From what I’ve seen on social media, zodiac arrow tattoos are trending for micro-scale ink. Keep the glyph simple — too many plant accents can clutter the tiny space. Ask your artist for micro healed examples to ensure legibility.
15. Minimalist Arrow Along Finger
Style/Technique: Micro / Fine Line
Pain Level: Medium-High (5-7/10)
Session Time: 30-60 minutes
Best For: Finger, subtle everyday reminder
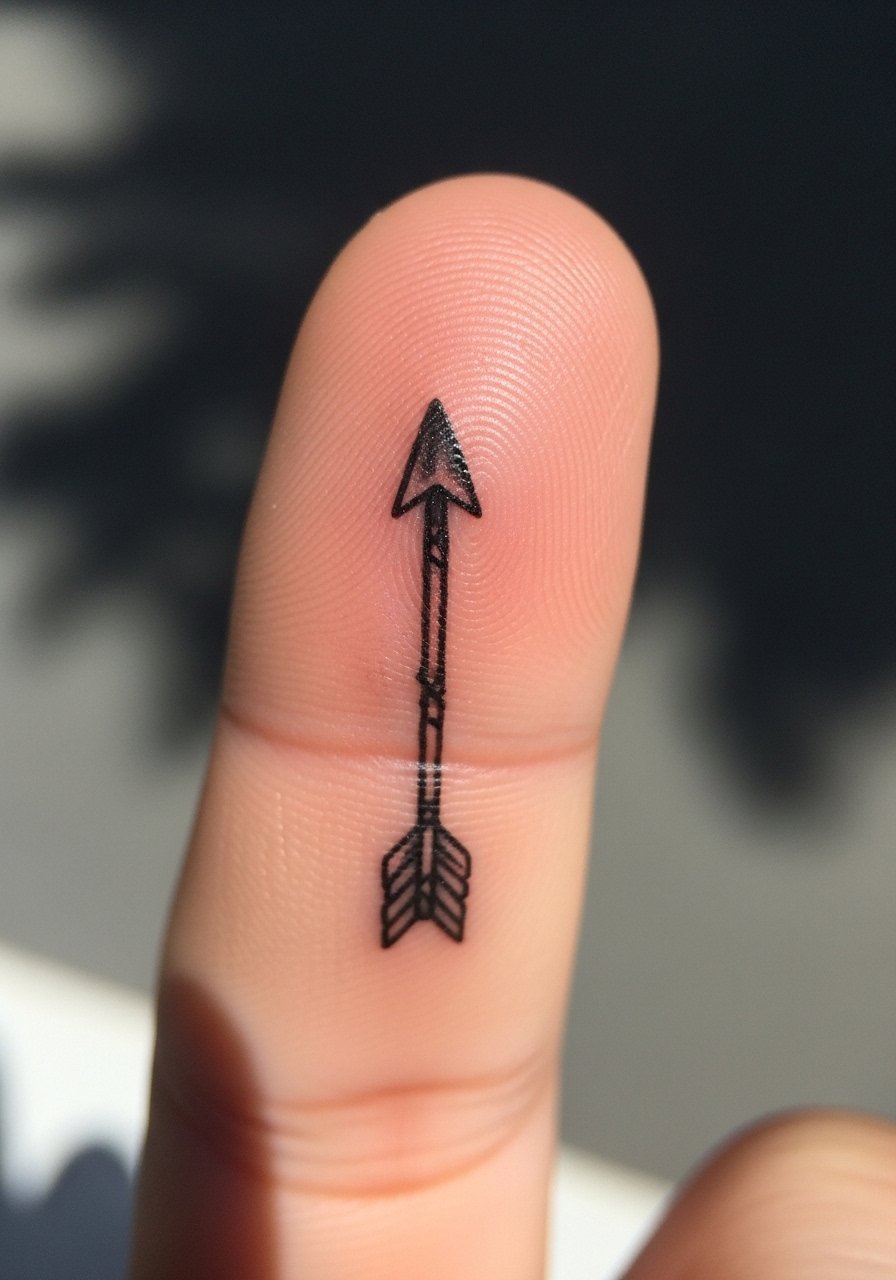
Finger tattoos are deceptively tricky: they look great fresh but often need touch-ups because of constant use. An arrow along the side of a finger is a discreet reminder of direction, but expect faster fading and occasional fill-ins. Pain is noticeable; fingers are sensitive and the skin is thin. If you want longevity, discuss alternative placements like the side of the wrist or ankle. Waterproofing and careful aftercare help but don’t eliminate the wear issue.
16. Arrow Breaking Diamond on Bicep (Invincibility)
Style/Technique: Custom / Bold Illustrative
Pain Level: Low-Medium (3-4/10)
Session Time: 1-2 hours
Best For: Bicep, unique custom piece
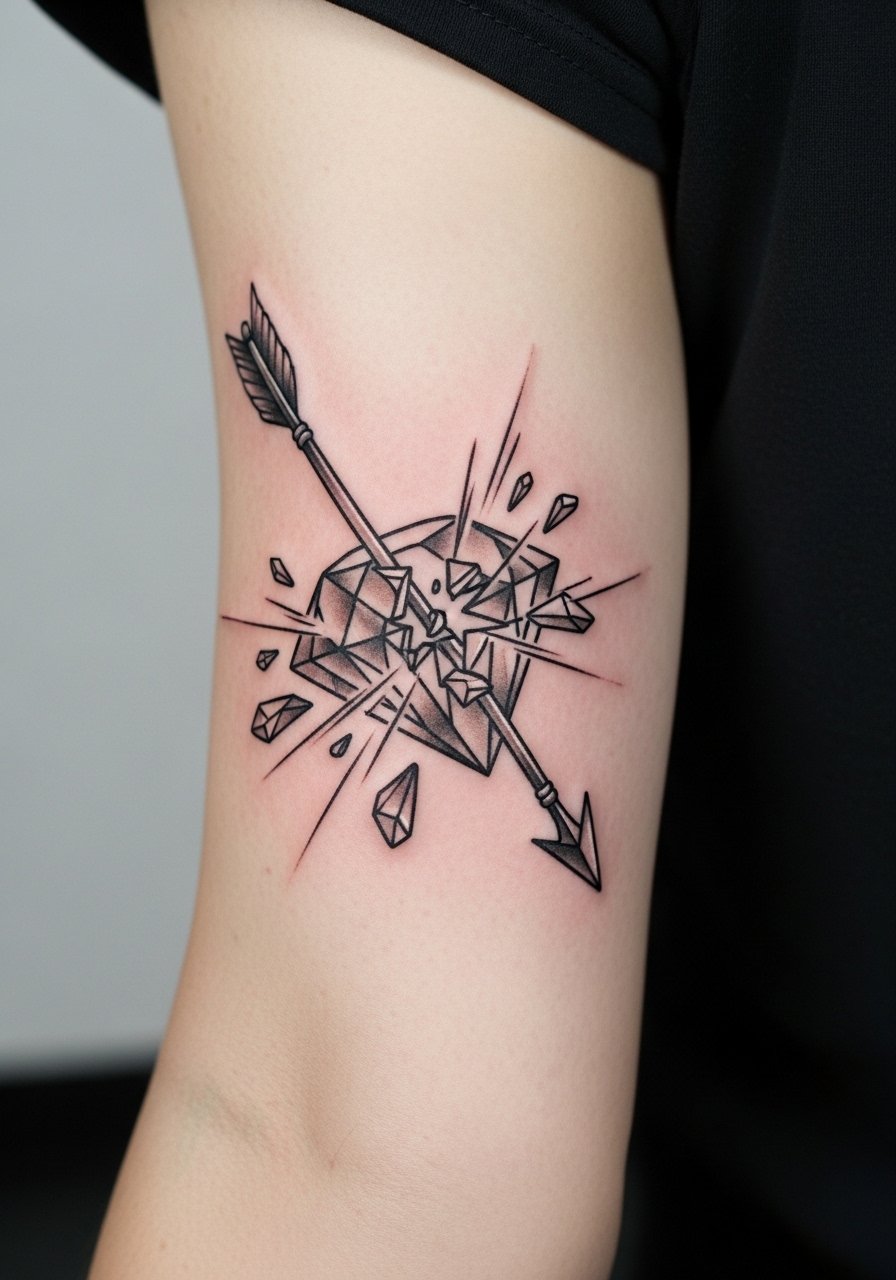
This under-covered idea feels defiant — an arrow smashing a diamond for invincibility or breaking barriers. Bicep placement keeps pain low and gives the design room. I’ve only seen this once in portfolios, so it’s a good custom pick if you want something different. Make sure the diamond facets are bold enough to remain clear after healing. Artists who do illustrative or neo-traditional work can balance the cracked geometry and arrow motion elegantly.
17. Two Arrows Pointing Away on Chest
Style/Technique: Bold / Symbolic
Pain Level: Medium (4-6/10)
Session Time: 1-2 hours
Best For: Chest, personal conflict or separation symbolism
Two arrows pointing away can represent personal battles or moving on. Chest placement gives the motif weight. I noticed this idea rarely appears in mainstream round-ups but carries strong emotional narrative when done cleanly. Symmetry is crucial — uneven angles look off once healed. It’s a bold choice emotionally, so sit with the meaning and consider adding a small date or initials for personalization.
18. Blue Stroke Organic Arrow on Thigh
Style/Technique: Freehand / Organic Watercolor Accent
Pain Level: Low-Medium (3-5/10)
Session Time: 1-2 hours
Best For: Thigh, dynamic movement feel
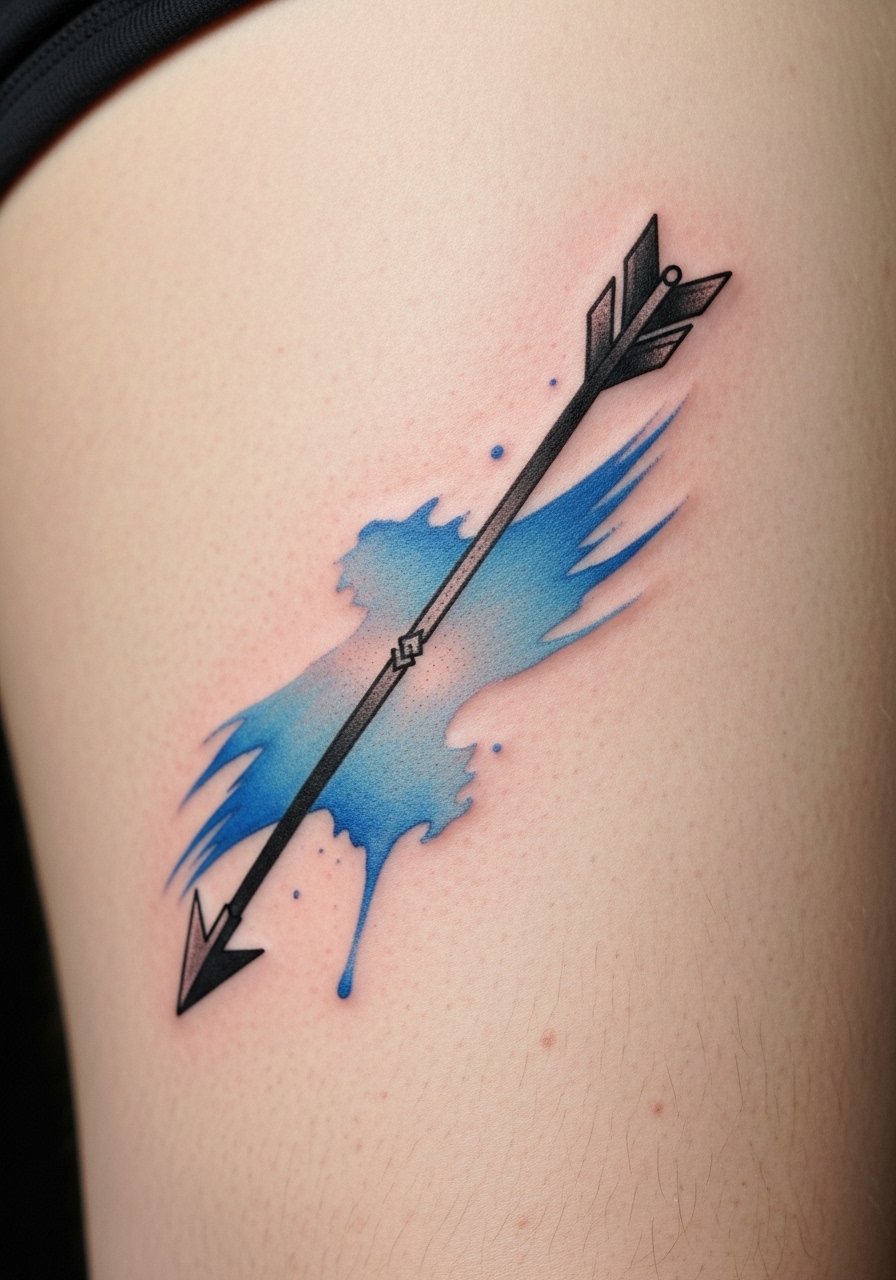
I spotted this freehand idea as a fresh take: a dynamic blue stroke behind a simple arrow for movement. Thigh placement is forgiving and great for larger organic shapes. Because watercolor can fade faster, pairing it with solid black linework keeps the arrow readable as colors soften. This is one of those under-covered angles that looks artsy but still symbolic.
19. Arrow Within Circle Ankle Tattoo (Forward Change)
Style/Technique: Minimalist / Symbolic
Pain Level: Low (2-3/10)
Session Time: 30-60 minutes
Best For: Ankle, forward-change symbol
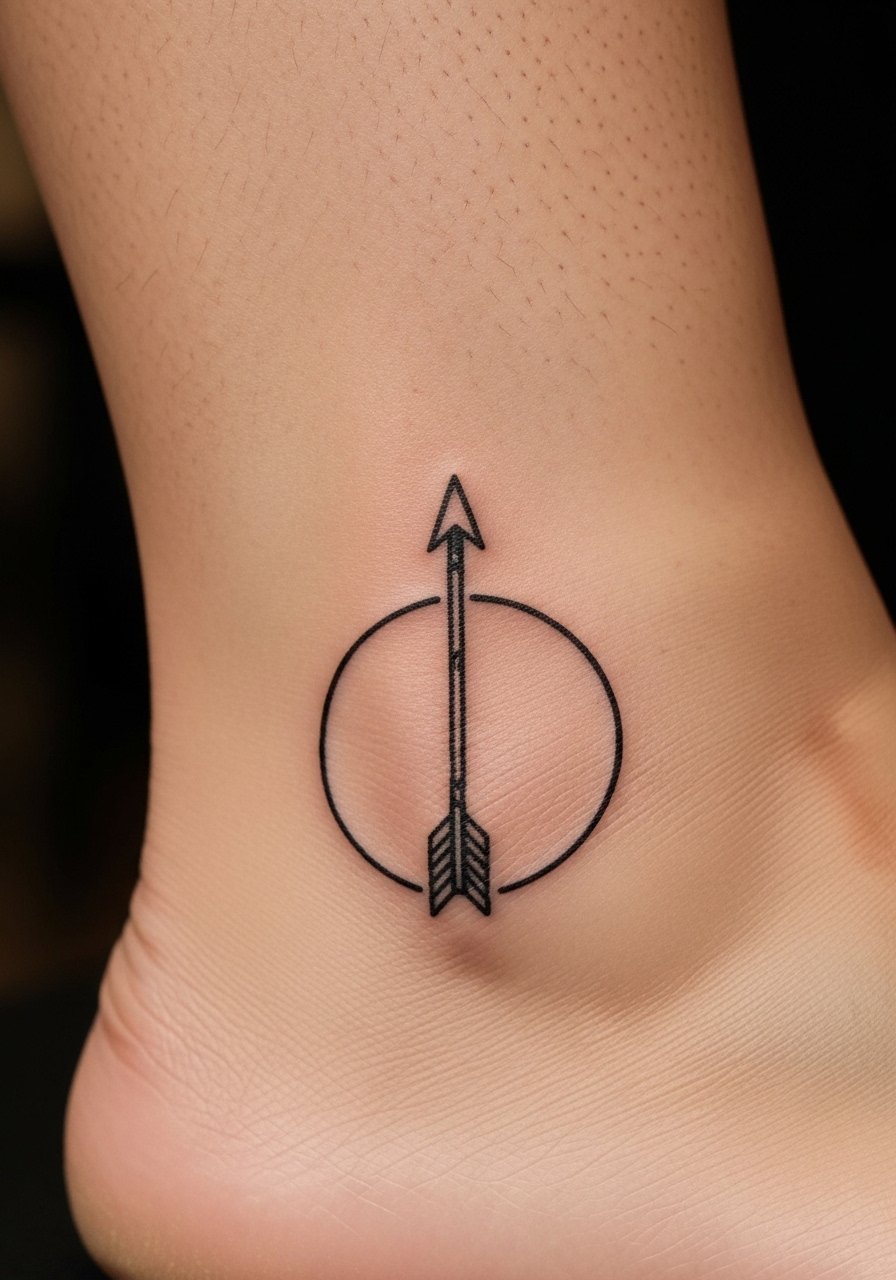
An arrow enclosed in a circle reads like intentional forward change — a compact symbol you can hide or show. Ankle placement is popular for small arrow tattoos but can rub against socks during healing. I like this for people who want a tidy, meaningful piece that’s easy to cover. Ask for a slightly thicker circle so it doesn’t break up over time.
20. Arrow With Coordinates On Forearm
Style/Technique: Illustrative / Text Integration
Pain Level: Low-Medium (3-4/10)
Session Time: 1-2 hours
Best For: Forearm, location-based memory
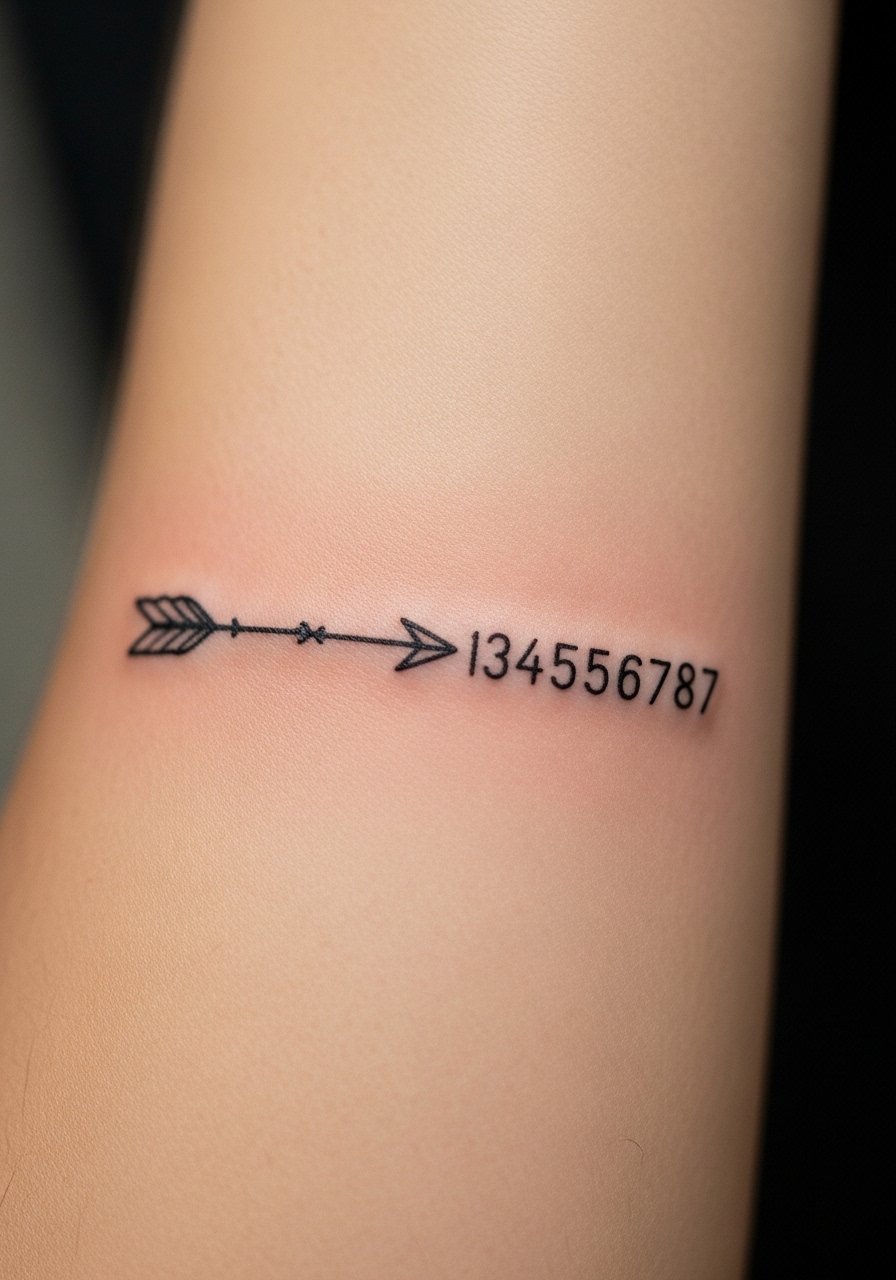
Pairing an arrow with coordinates points to a meaningful place — birthplace, meeting spot, or home. Forearm placement shows the story and keeps text legible. I always advise clients to use clear, slightly larger numerals for coordinates so the numbers don’t blur. Artists experienced in fine text and simple illustrative work are best here. Consider spacing the text from the arrow to maintain clarity as skin ages.
21. Quiver Cluster on Shoulder (Multiple Arrows)
Style/Technique: Traditional / Cluster Layout
Pain Level: Low (3-4/10)
Session Time: 1-2 hours
Best For: Shoulder cap, group symbolism
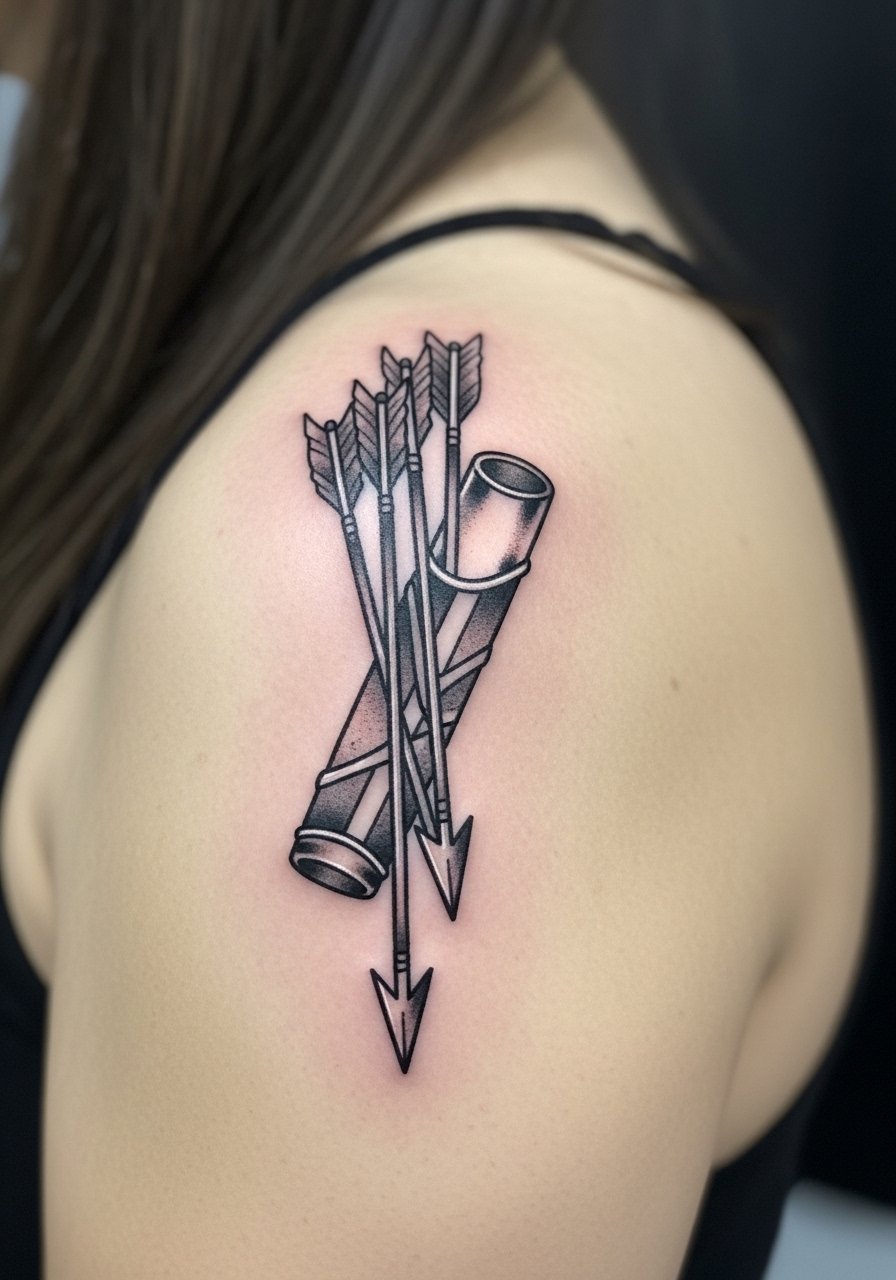
A quiver cluster reads as readiness and collective strength. Shoulder placement is low-pain and offers a flat canvas for grouping. I recommend keeping each arrow simple rather than adding intricate ornamentation that competes visually. This is a tidy way to represent multiple people or goals in one compact piece.
22. Arrow Through Mountain Range on Ankle
Style/Technique: Minimalist / Landscape Linework
Pain Level: Medium (4-5/10)
Session Time: 1-2 hours
Best For: Ankle, adventure symbolism
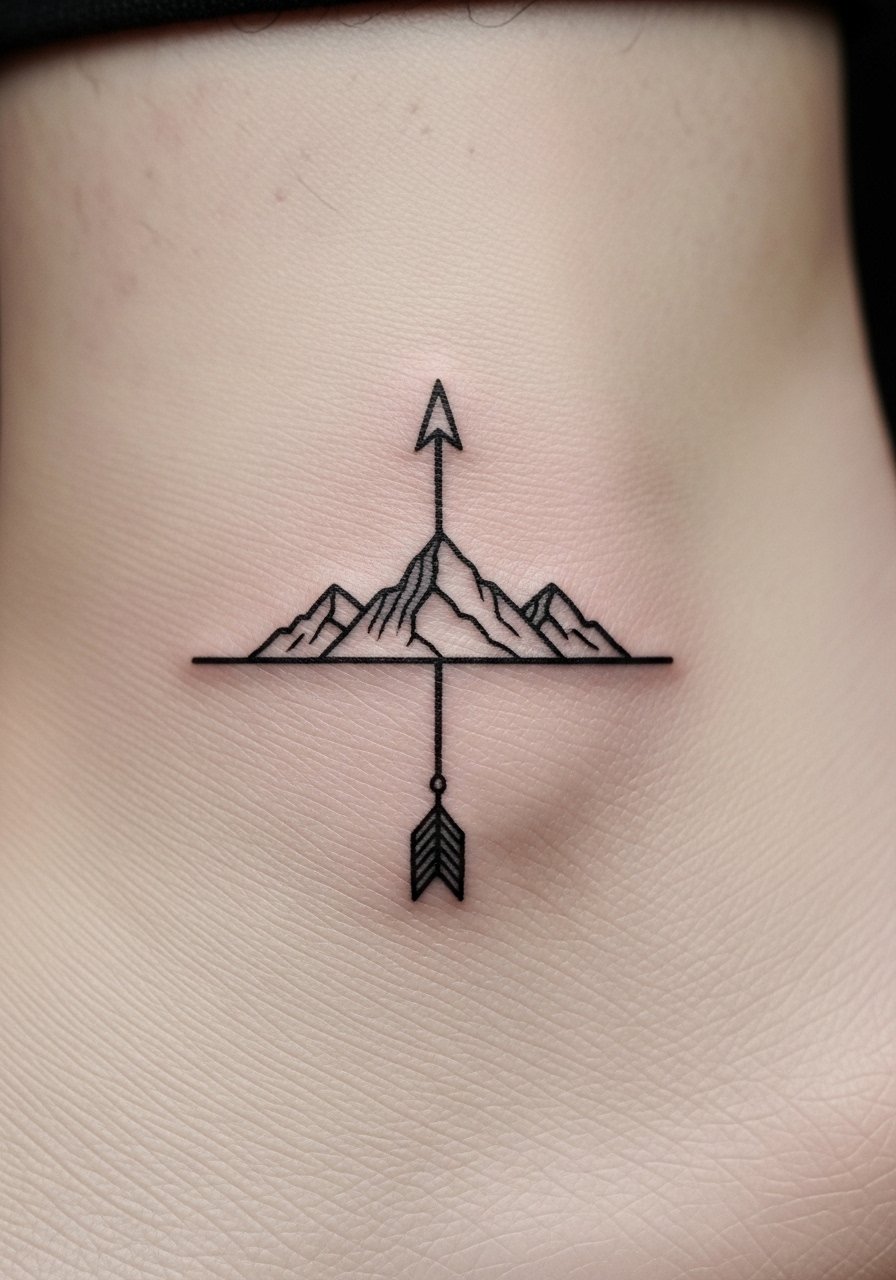
This design blends direction with exploration. I love it on the ankle because it looks like a mark of every journey. Keep the mountains simple to avoid loss of detail over time. Artists who do landscape linework can show healed examples. Avoid tiny peaks that’ll blur; broader shapes last longer.
23. Double-Ended Arrow On Back Of Neck
Style/Technique: Minimalist / Symmetry
Pain Level: Medium (4-6/10)
Session Time: 30-60 minutes
Best For: Nape, balanced aesthetic
A double-ended arrow can mean balance or tension — pointing both ways at once. Back of the neck placement is discreet and stylish, but can be sensitive. Keep lines clean and avoid tiny decorative filler. It’s an elegant micro piece that sits well under hair or behind a collar.
24. Arrow With Floral Band On Thigh
Style/Technique: Ornamental / Floral Band
Pain Level: Low (3-4/10)
Session Time: 1-2 sessions
Best For: Thigh statement, feminine positivity
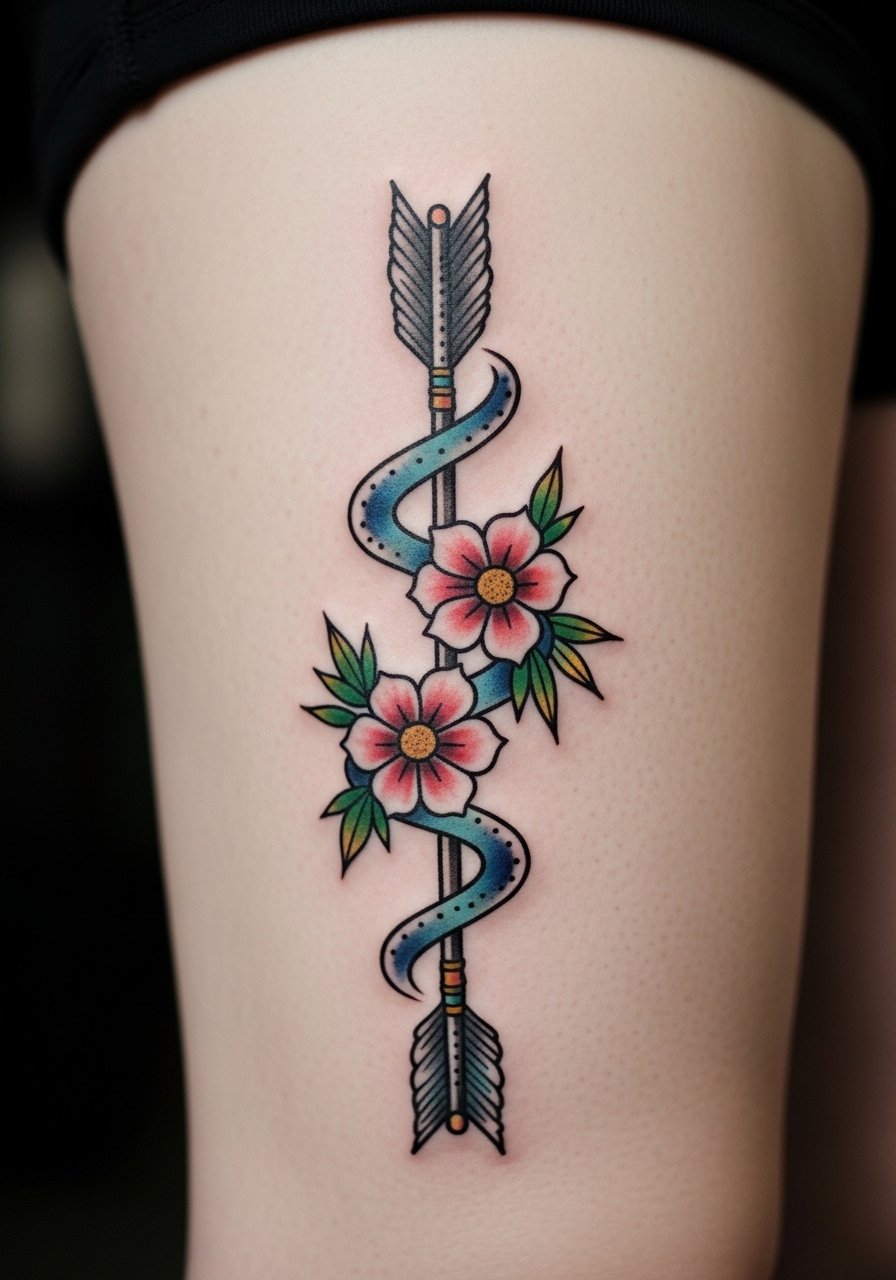
Wrapping an arrow in a floral band softens its message and adds femininity. Thigh placement is forgiving for larger floral elements and is lower pain than ribs. Watercolor accents can look lovely, but from what I’ve seen, black anchors help the shape survive color fade. Avoid tiny petal work; scale flowers to last.
25. Infinity Arrows Crossed Behind Ear
Style/Technique: Micro / Illustrative
Pain Level: Medium (4-6/10)
Session Time: 30-60 minutes
Best For: Behind ear, tiny symbolic mark
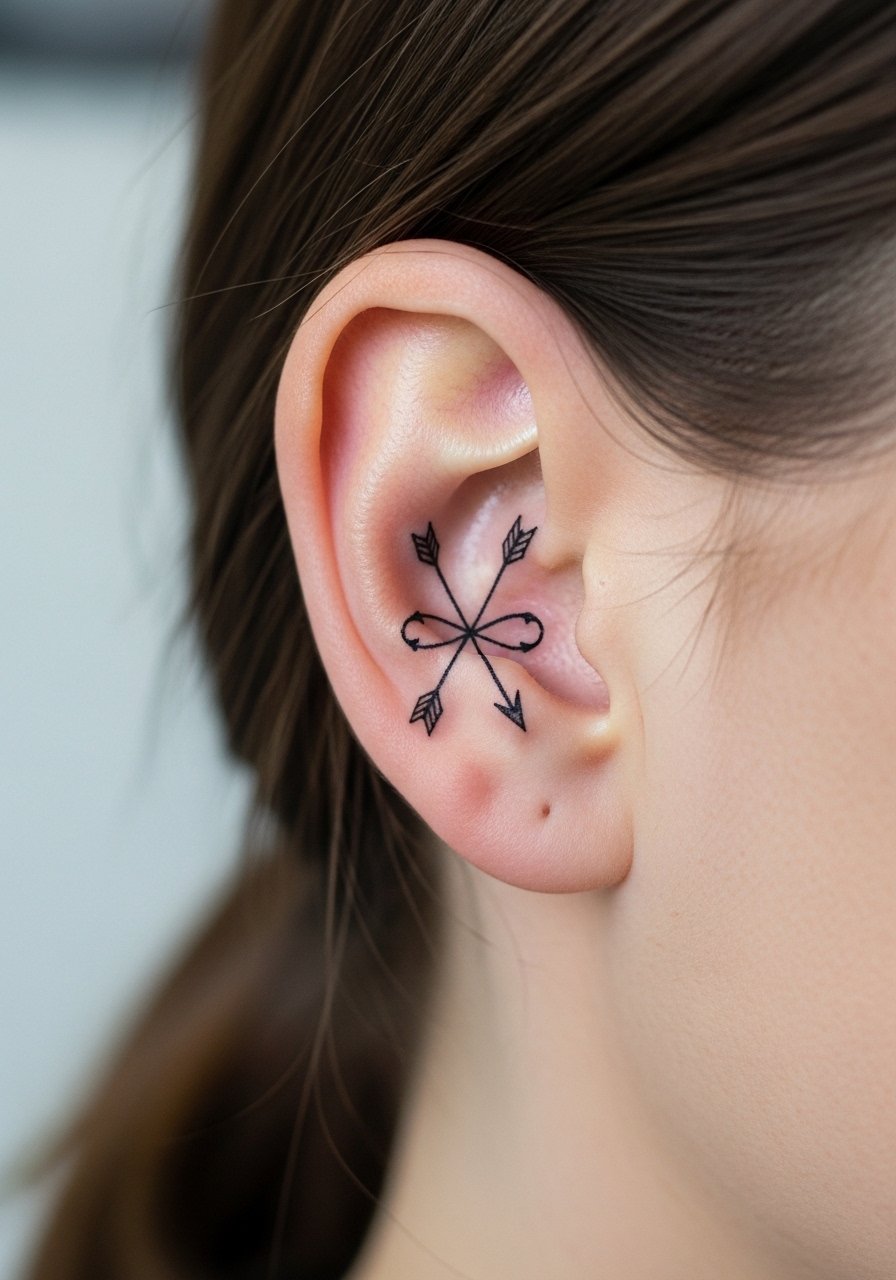
A behind-ear infinity-arrow cross is subtle and personal — perfect if you want something meaningful but private. The skin here is thin, so expect medium pain. Micro details need careful scaling; artists who work on tiny, delicate pieces with healed examples are ideal. Keep expectations realistic about future touch-ups due to the delicate placement.
Tattoo Prep and Aftercare Essentials
Aftercare Essentials:
- Aquaphor Healing Ointment, 14oz tube — Recommended for the first 3-5 days to keep skin protected.
- Saniderm Transparent Adhesive Bandage, 6-inch roll — Second-skin option many artists suggest for initial coverage.
- CeraVe Fragrance-Free Moisturizing Lotion, 12oz — Lightweight everyday moisturizer for days 4-14.
- Dr. Bronner's Unscented Castile Soap, 16oz — Gentle cleaning during the first week.
Before Your Appointment:
- Tattoo Numbing Cream with 5% Lidocaine — Use only if your artist approves; helps on sensitive spots.
- Tattoo Stencil Transfer Paper — Handy if you want to visualize size and placement beforehand.
Long-Term Maintenance:
- SPF 50 Sunscreen Stick for Tattoos — Sunscreen prevents fading over years.
- Mad Rabbit Tattoo Balm, 2oz — Keeps healed tattoos vibrant.
- Hustle Butter Deluxe, 3oz — Vegan aftercare option for ongoing moisture.
Optional Comfort Items:
- Tattoo Numbing Spray — For touch-ups or very sensitive areas.
- Hydrocolloid Bandages (Large) — For small healing spots or to protect a fresh touch-up.
Artists I follow often recommend Aquaphor and Saniderm for the initial phase, then switching to a fragrance-free lotion like CeraVe. For color work, keep sunscreen in rotation to protect pigments.
Frequently Asked Questions
Q: How bad does a tattoo actually hurt?
A: Pain depends on placement and personal tolerance. Outer forearm and upper arm are usually low (2-4/10). Ribs, spine, and ankle tend to be higher (6-9/10). It’s more a steady scratching or burning than sharp pain. For sensitive spots, ask about a tattoo numbing cream with lidocaine—it helps but won’t remove all sensation.
Q: What if I regret the symbolism later?
A: Personalize thoughtfully and sit with the idea for months. Small placements like wrist or ankle let you hide or cover up if needed. I’ve seen artists incorporate names or dates subtly into arrow designs, which makes them feel evergreen.
Q: How do I keep my arrow tattoo from fading?
A: Sunscreen is essential. From what I’ve seen, UV exposure is the biggest fading culprit. Use an SPF 50 sunscreen stick daily on healed tattoos and moisturize regularly with a fragrance-free lotion.
Q: Can I work out after getting an arrow tattoo?
A: Wait at least 48-72 hours before intense sweating, longer if the tattoo is in a flex area like the shoulder or knee. Sweating can irritate a fresh tattoo and increase infection risk. Keep it clean and protected with recommended aftercare.
Q: Should I start with a small arrow to test pain and commitment?
A: Only if you actually want that design. A tiny wrist arrow might hurt less overall but could need touch-ups. If your priority is testing pain tolerance, choose an easy-to-heal area like the outer upper arm.
Q: How long does an arrow tattoo take to heal?
A: Surface healing is usually 2-3 weeks; full settling takes 2-3 months. The first week is critical—clean gently with mild soap and follow your artist’s instructions. Expect peeling days 3-7 and don’t pick at flakes.
Q: Do arrow tattoos look different on different skin tones?
A: Yes. Bold blackwork shows reliably across tones; bright colors may appear more muted on deeper skin and white ink can be nearly invisible. I always ask artists for healed photos on skin tones similar to mine before booking.
Q: What’s the one aftercare product artists actually recommend?
A: Most artists I know suggest either Saniderm for the first few days or a thin layer of Aquaphor followed by fragrance-free lotion. Follow your artist’s specific timeline—they see healed results daily.
