
I spent months bookmarking abstract pieces before I understood the real issue: abstract tattoos look great fresh, but not every style ages the same on skin. These 30 ideas focus on abstract approaches that spark curiosity—designs artists still recommend in 2026 and the ones I've seen hold up healed.
This list leans into abstract, minimalist, blackwork, and watercolor vibes. Placements range from inner forearm to ribs and thighs. From what I’ve seen, artists are pushing controlled chaos—clean negative space, intentional blurring, and color blocks that heal predictably.
1. Fine Line Abstract Flora on Inner Forearm
Style/Technique: Fine Line / Minimalist
Pain Level: Low-Medium (3-4/10)
Session Time: 1-3 hours
Best For: First tattoo, visible conversation starter
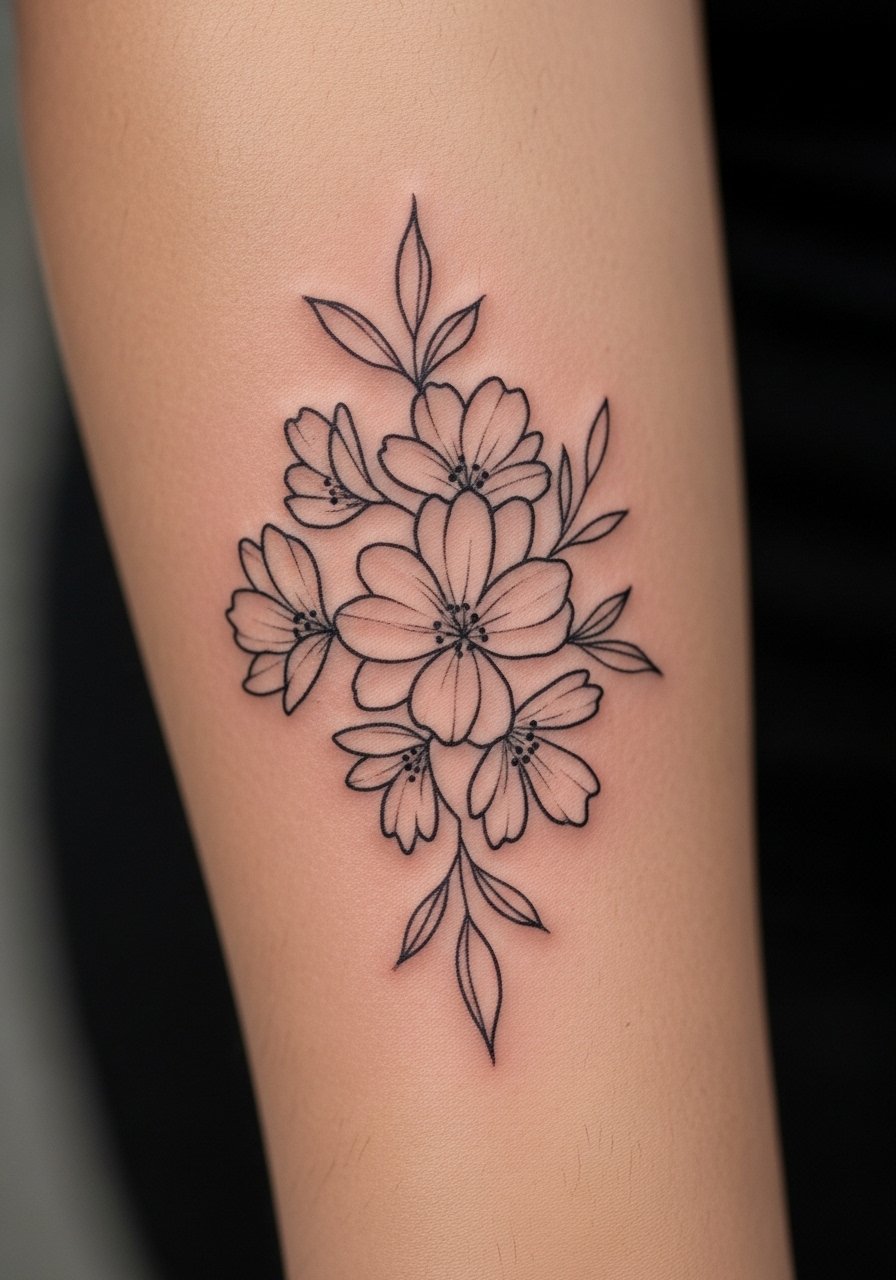
I love how abstract flora reads like a sketch rather than a literal flower. It feels personal and timeless. Inner forearm placement gives steady canvas and low pain. Healing is usually 2–3 weeks for surface skin; expect lines to soften slightly. I recommend asking for slightly bolder line weight if you want longevity—I've noticed ultra-thin lines can blur faster. After initial healing use fragrance-free lotion and sun protection. Common mistake: asking for microscopic detail on thin skin. Look for an artist strong in fine line and illustrative work, someone who shows healed examples on similar skin tones.
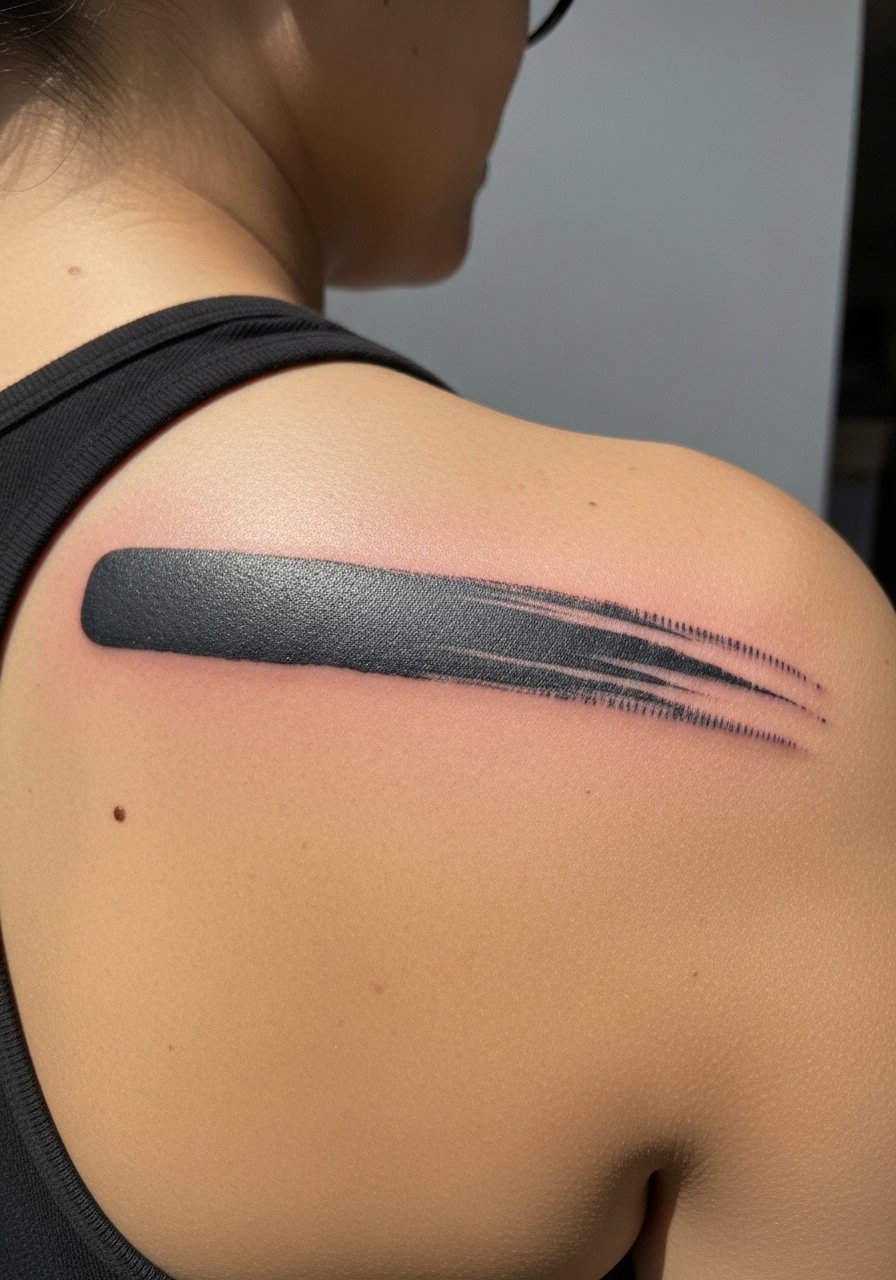
2. Blackwork Negative Space Band Behind Ear
Style/Technique: Blackwork / Negative Space
Pain Level: Low (2-3/10)
Session Time: 1 hour
Best For: Subtle, easily hidden
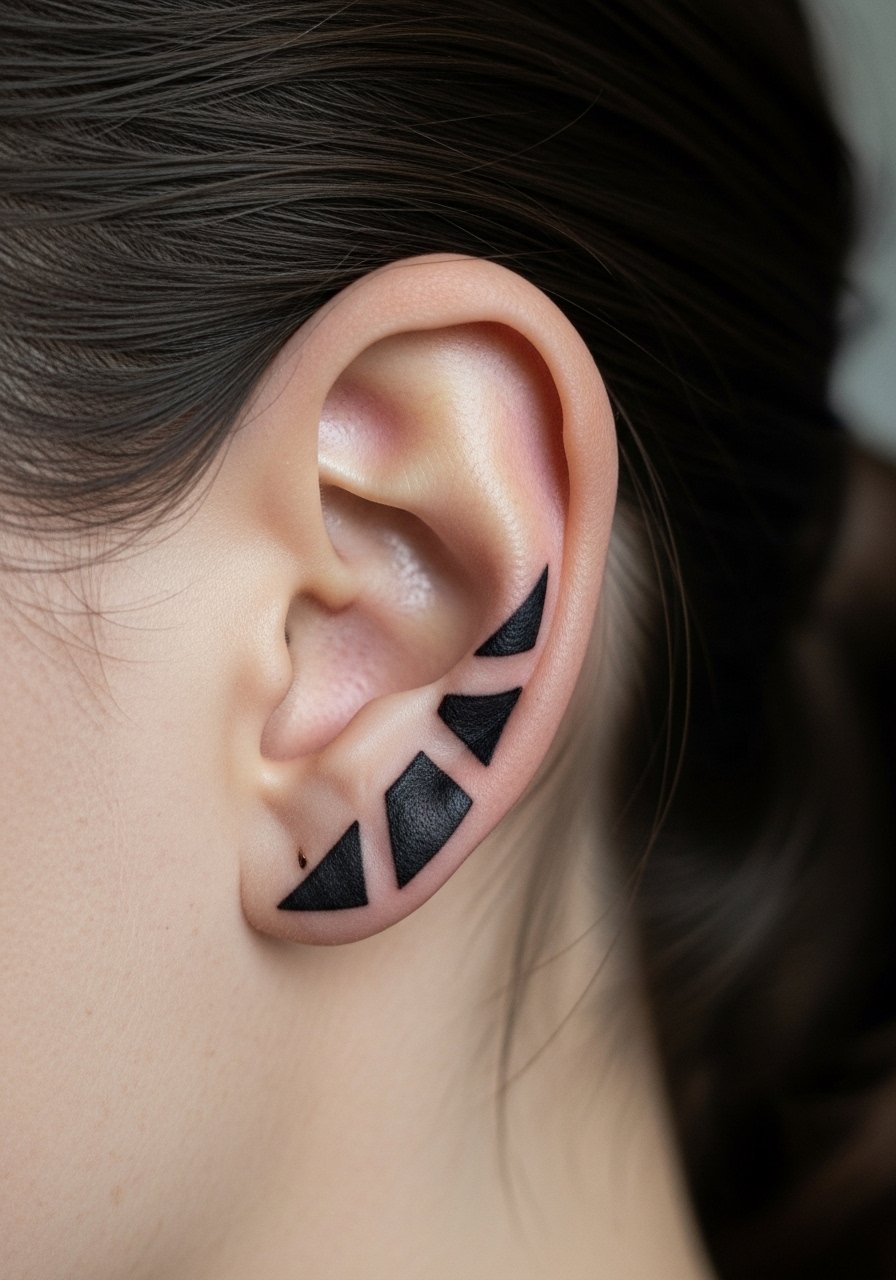
A behind-ear blackwork piece reads bold but stays discreet. The negative-space technique creates intrigue without fine line fragility. Pain here is mild because of shallow tissue, though proximity to bone can sting briefly. Healing is quick but avoid sleeping on it. This placement ages well if you use dense black rather than thin micro lines. Artists I follow suggest solid fills over delicate lace when you want permanence. Common mistake: expecting complex detail in a tiny area. Ask your artist about contrast—strong black and clear gaps make the design hold up.
3. Watercolor Color Block on Upper Thigh
Style/Technique: Watercolor / Painterly Abstract
Pain Level: Medium (4-5/10)
Session Time: 2-4 hours
Best For: Bold color statement, easy to hide
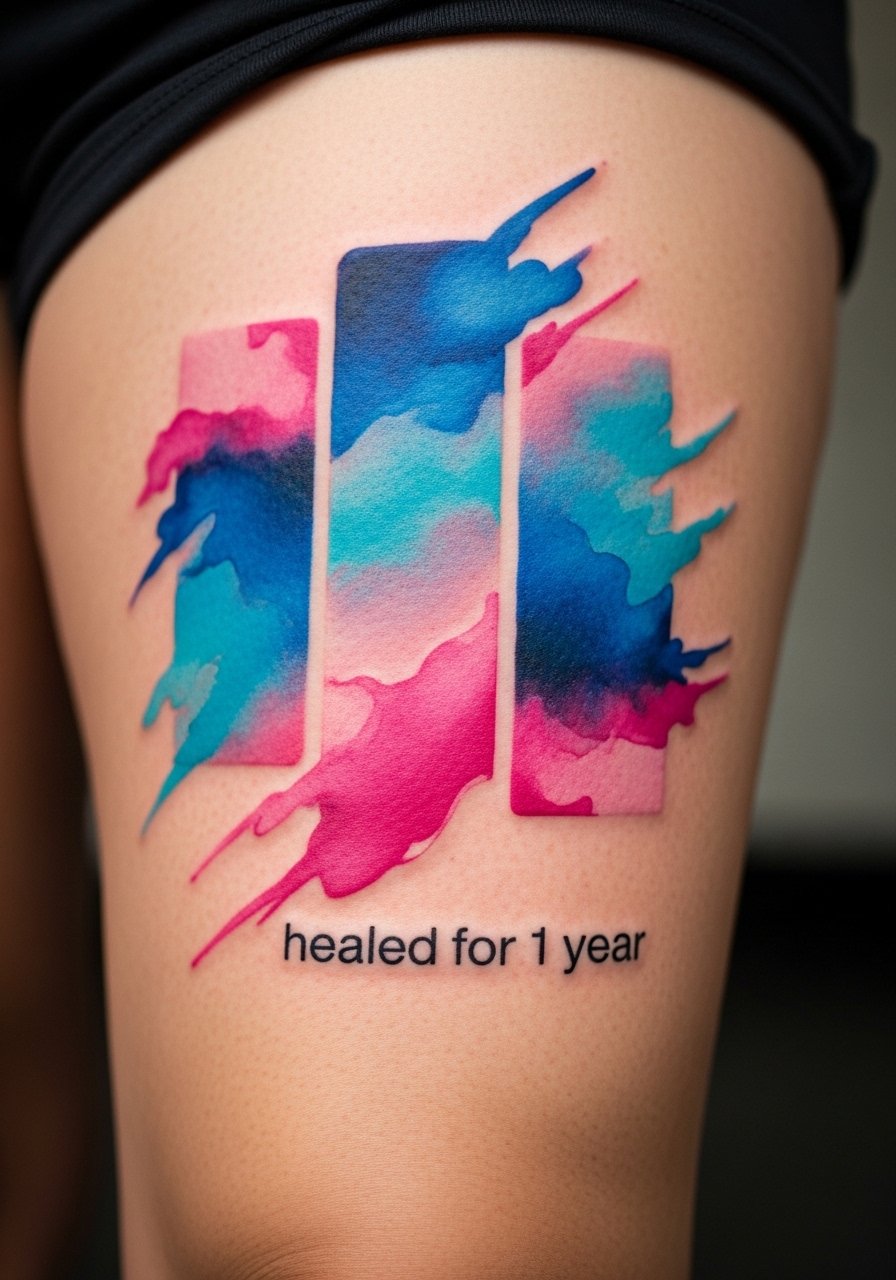
Watercolor abstract blocks read like a canvas slice on your skin. Thighs give a broad surface so colors can breathe and blend without overworking. Pain is moderate—muscle and fat help with comfort. I've seen watercolor fade faster if artists use low saturation; ask for denser pigment and layered sessions. Healing needs careful moisturizing and sun protection once healed. This style is about feeling more than clarity—expect soft edges and organic bleeding. Avoid expecting crisp lines; watercolor is about wash and mood. Find an artist skilled in packed color and blending so healed results stay vibrant.
4. Geometric Fragmentation on Sternum
Style/Technique: Geometric / Dotwork
Pain Level: High (7-8/10)
Session Time: Multiple sessions
Best For: Statement piece, central placement
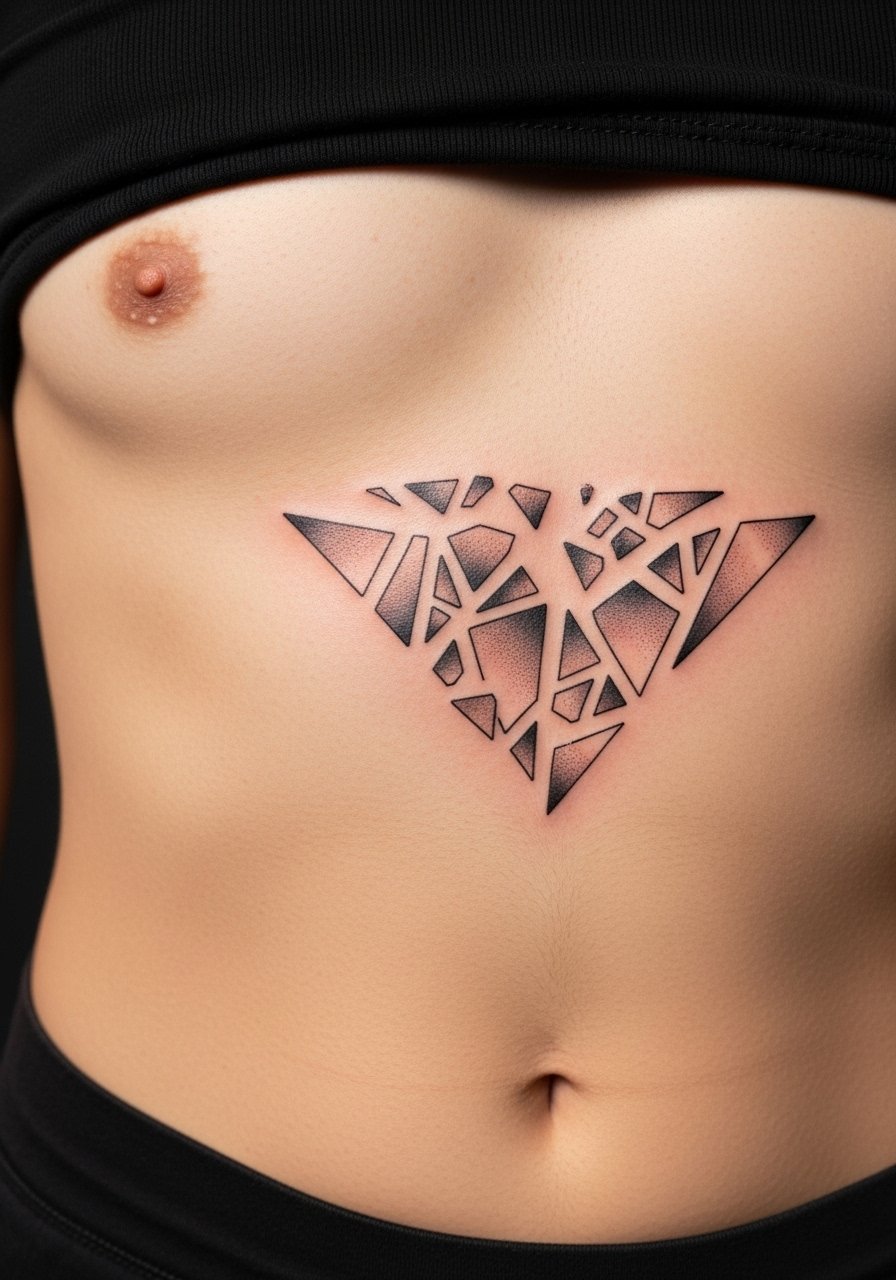
Sternum geometry creates a strong focal point. The sternum is a painful area, so expect higher discomfort and multiple sessions for neat fill and dotwork. I’ve noticed dotwork and thin geometric lines need meticulous aftercare; movement while healing can cause gaps. This placement ages well when lines are bold and shapes have contrast. Avoid overly intricate micro geometry—the skin shifts and small connections can blur. Ask your artist about spacing and how shapes will flow with breathing and clothing. Healed photos from the artist are essential to gauge expected aging.
5. Minimalist Line Wave on Ankle
Style/Technique: Minimalist / Single Line
Pain Level: Medium-High (5-6/10)
Session Time: 30–90 minutes
Best For: Subtle visible accent, easy to hide with socks
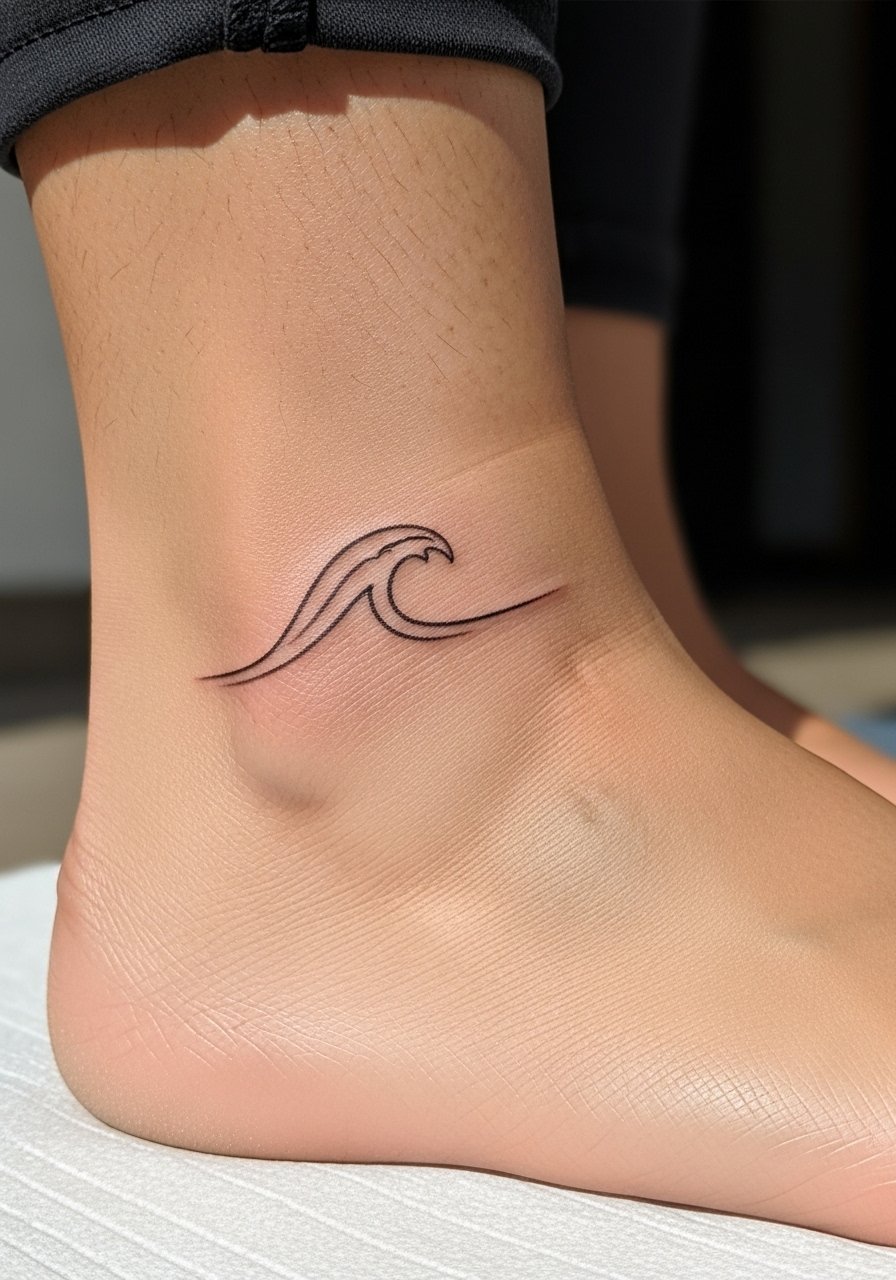
A single-line wave or continuous loop is quiet and symbolic. Ankles are sensitive—thin skin and bone make for sharper pain and slightly longer initial soreness. Lines tend to blur, so I suggest moderate line weight. Sessions are short but the key is steady hands. Healing requires avoiding tight socks and boots for a few days. Common mistake: requesting ultra-fine single lines that vanish over time. Ask your artist for healed-line examples and consider a slightly bolder stroke for durability.
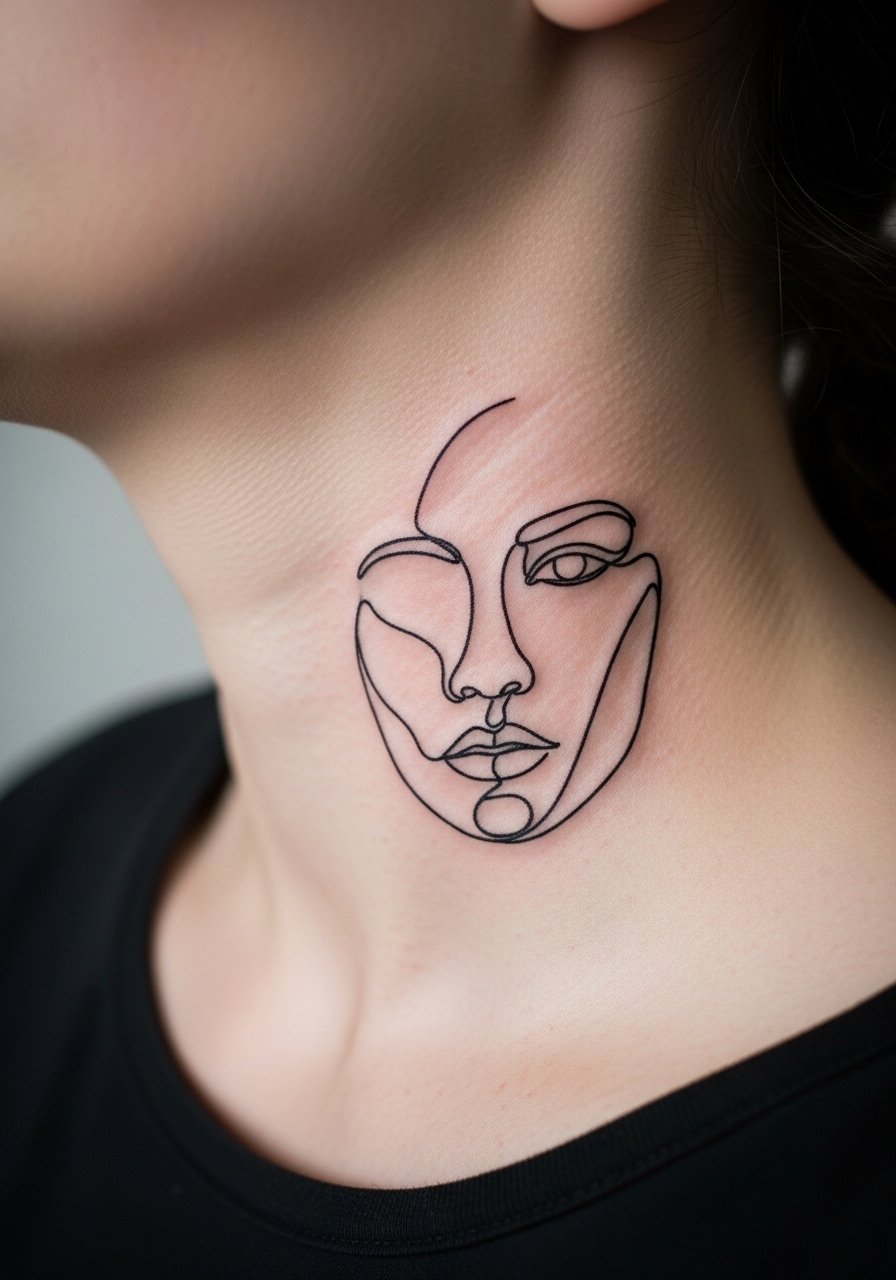
6. Surrealist Face Fragment on Upper Arm
Style/Technique: Neo-Surreal / Micro-Realism Mix
Pain Level: Low-Medium (3-4/10)
Session Time: 2-4 hours
Best For: Visible art piece, conversation starter
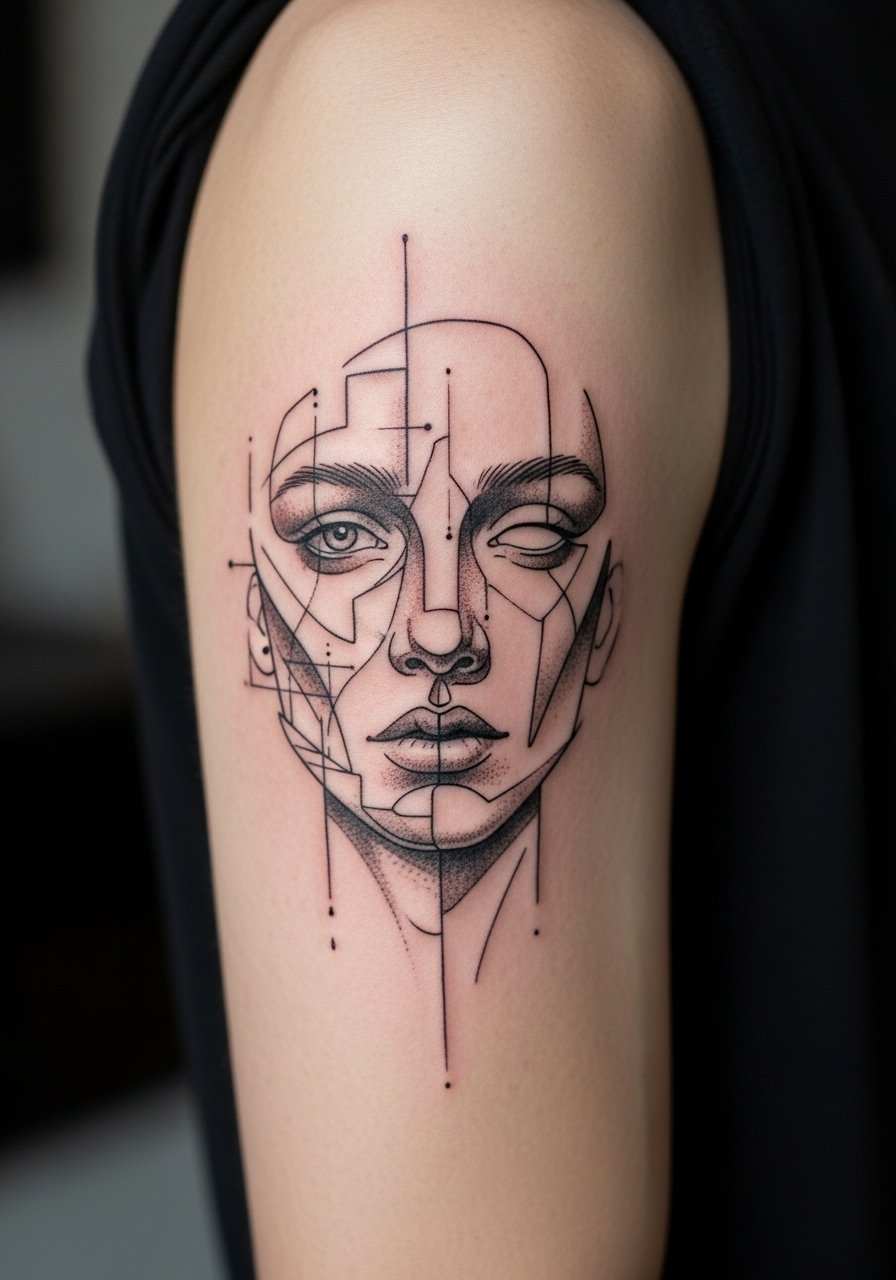
Fragmented faces feel intimate and enigmatic. The upper arm is forgiving, with low pain and easy healing. Combining micro-realism features with abstract negative space creates depth without overcrowding. From what I’ve seen, this combo keeps meaning while aging smoothly when shading is dense and lines not microscopic. Watch for artists who can balance portraiture and abstract shapes—ask for healed photos. During healing, avoid tight sleeves that rub. A common mistake is over-detailing the facial features at small scale; keep facial elements larger than you think.
7. Abstract Mountain Silhouette on Ribcage
Style/Technique: Minimalist / Blackwork
Pain Level: High (7/10)
Session Time: 1-3 hours
Best For: Hidden statement, meaningful symbolism
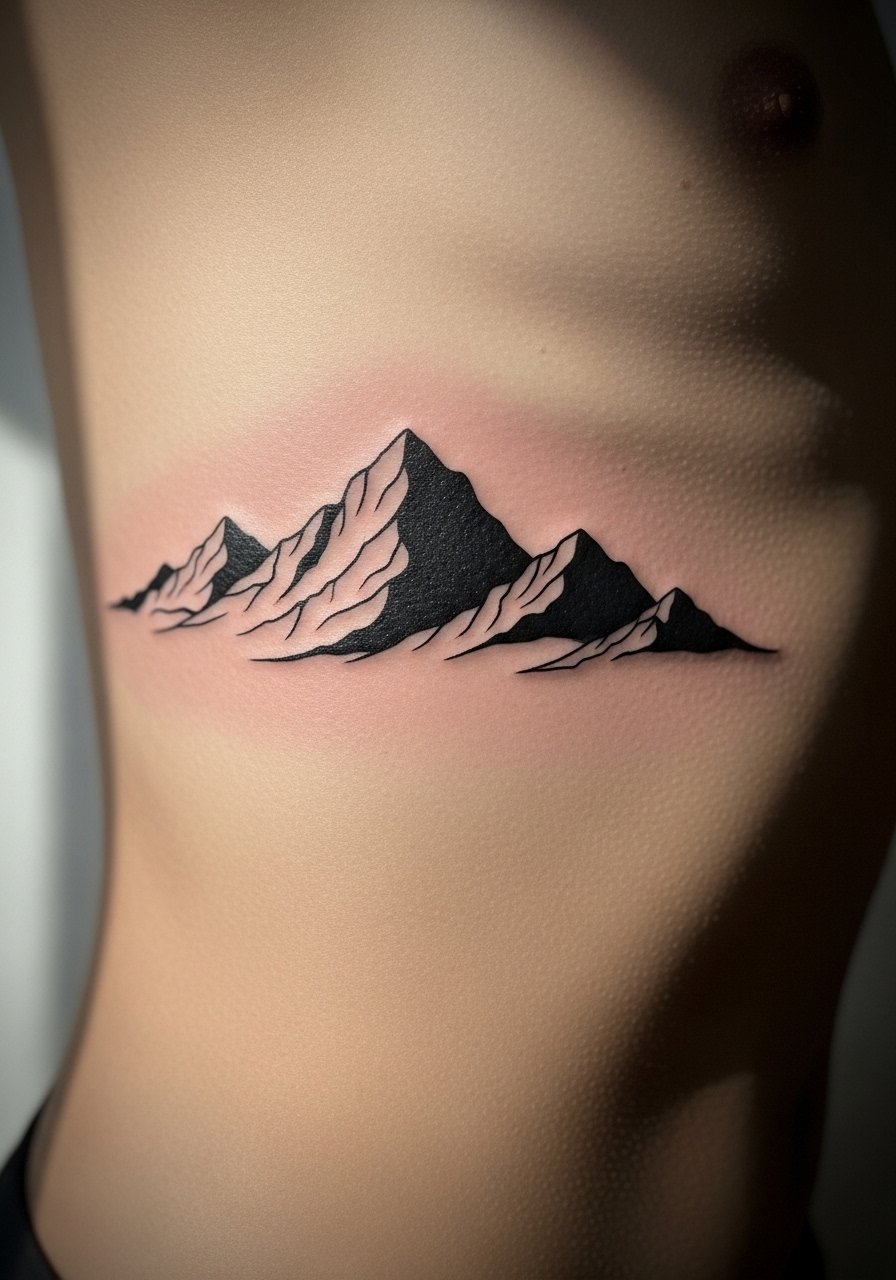
Ribcage placements make for strong visual statements but hurt. Mountains in abstract silhouette give a timeless, meaningful vibe. I’ve noticed ribs can cause more ink migration if lines are too close—solid shapes with clear negative space age better. Healing needs slow movement and no heavy exercise for a few days. Ask for reference of healed ribs from your artist, especially for contrast retention. A common mistake is expecting perfect straight lines over curved ribs; embrace slight organic shifts.
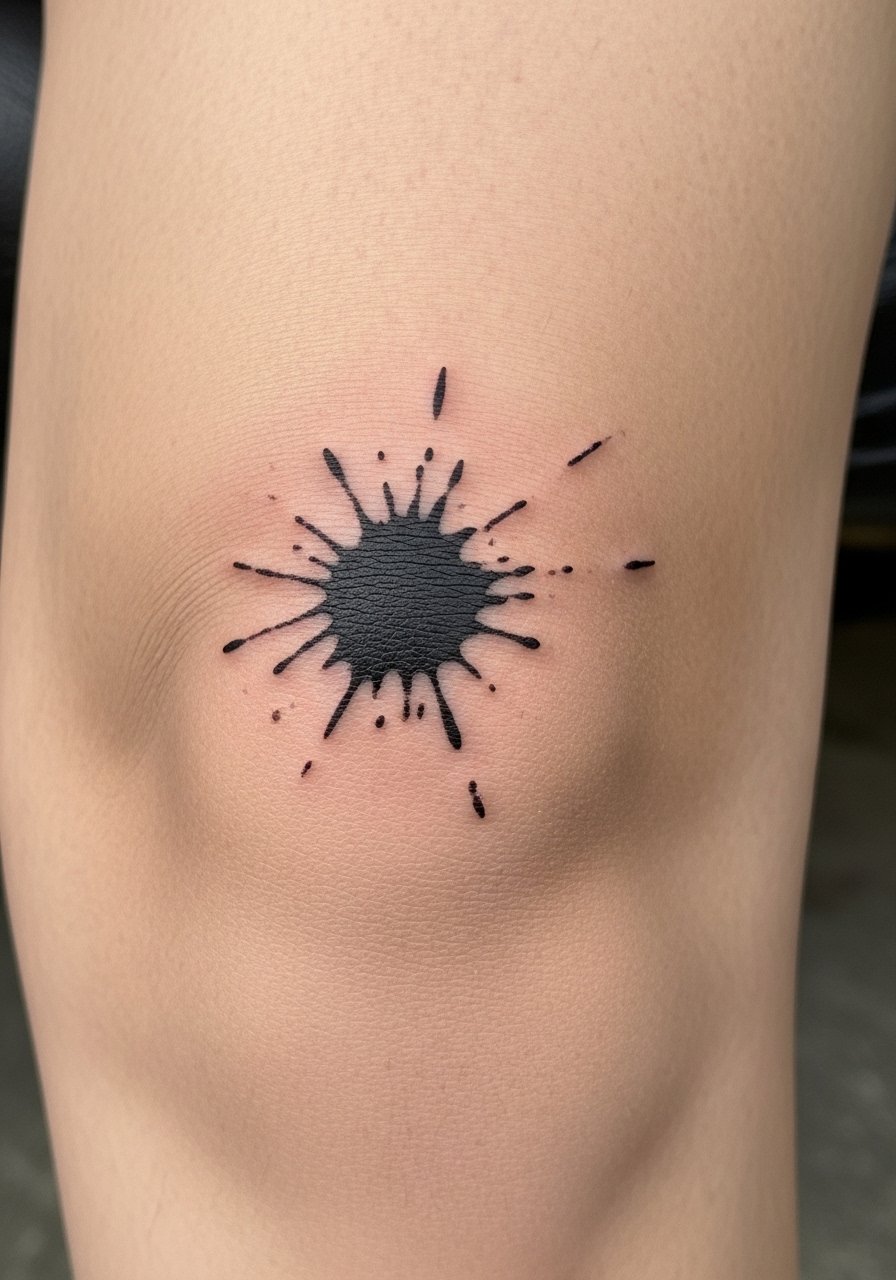
8. Color-Splash Abstract on Collarbone
Style/Technique: Watercolor / Abstract Splash
Pain Level: Medium (4-5/10)
Session Time: 1-2 hours
Best For: Feminine placement, visible accent

Collarbones offer elegant display space. Color splashes that follow bone contours look sculptural. Pain varies—over bone it’s sharper; near the shoulder slightly easier. I advise medium pigment saturation and small touch-ups later if needed. Watercolor here can fade if left unprotected, so daily sunscreen after healing is essential. Avoid tiny details; rely on flowing color and bold brushstroke feel. Ask your artist about layering color to ensure healed vibrancy.
9. Monochrome Brushstroke on Calf
Style/Technique: Blackwork / Painterly Stroke
Pain Level: Low (2-3/10)
Session Time: 1-2 hours
Best For: Bold, elongated placement
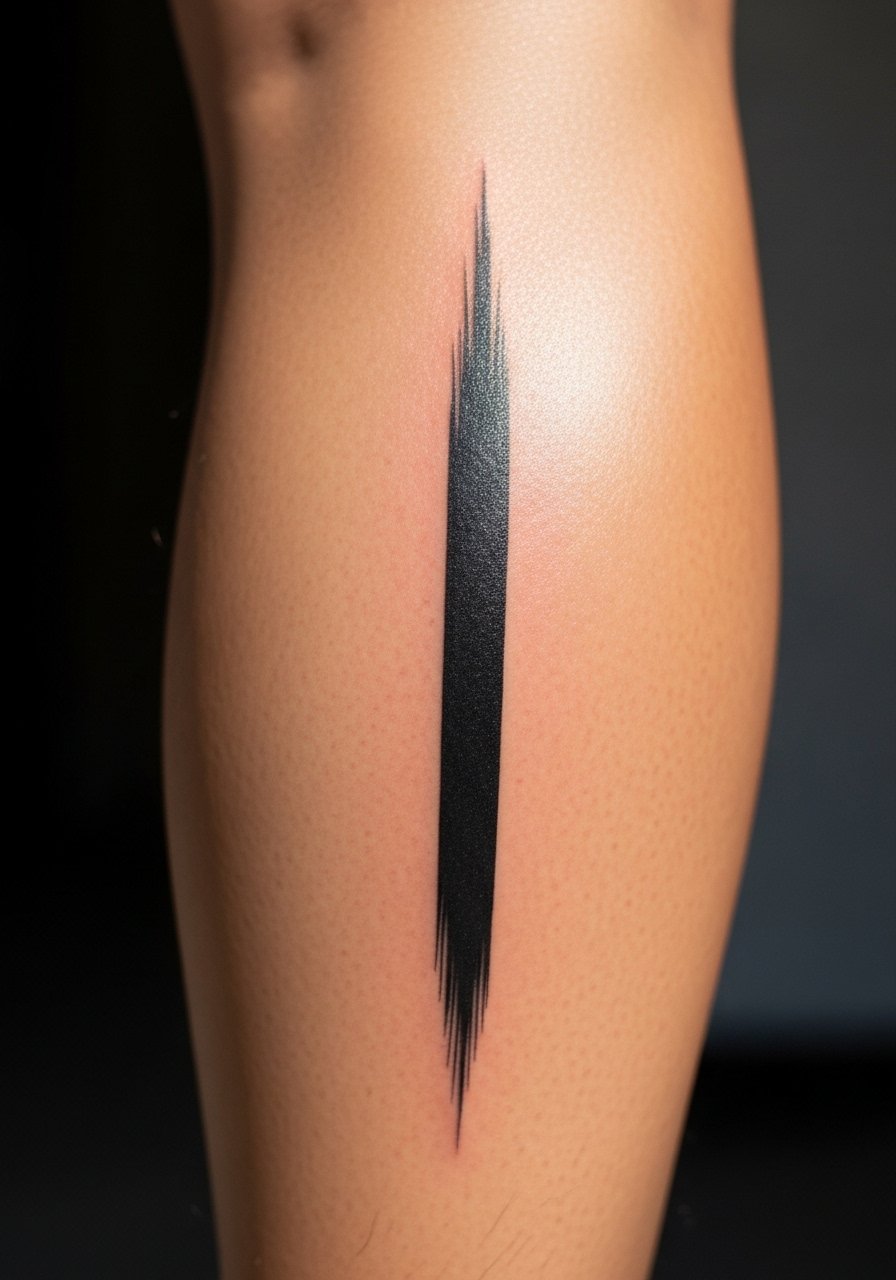
A single brushstroke is bold yet minimal. Calf muscle gives a flat, visible canvas and low pain. Black brushstrokes hold up well if the artist uses controlled saturation. I’ve seen these age gracefully; healed texture adds character. Healing is straightforward—avoid tight socks that rub. The mistake is asking for textured ink that looks like paint splatter at microscopic scale; ask for intentional edge softness and consistent saturation to avoid patchiness.
10. Micro-Realism Abstract Petal on Thumb
Style/Technique: Micro-Realism / Fine Line
Pain Level: High (8/10)
Session Time: 1 hour
Best For: Tiny keepsake, tactile placement
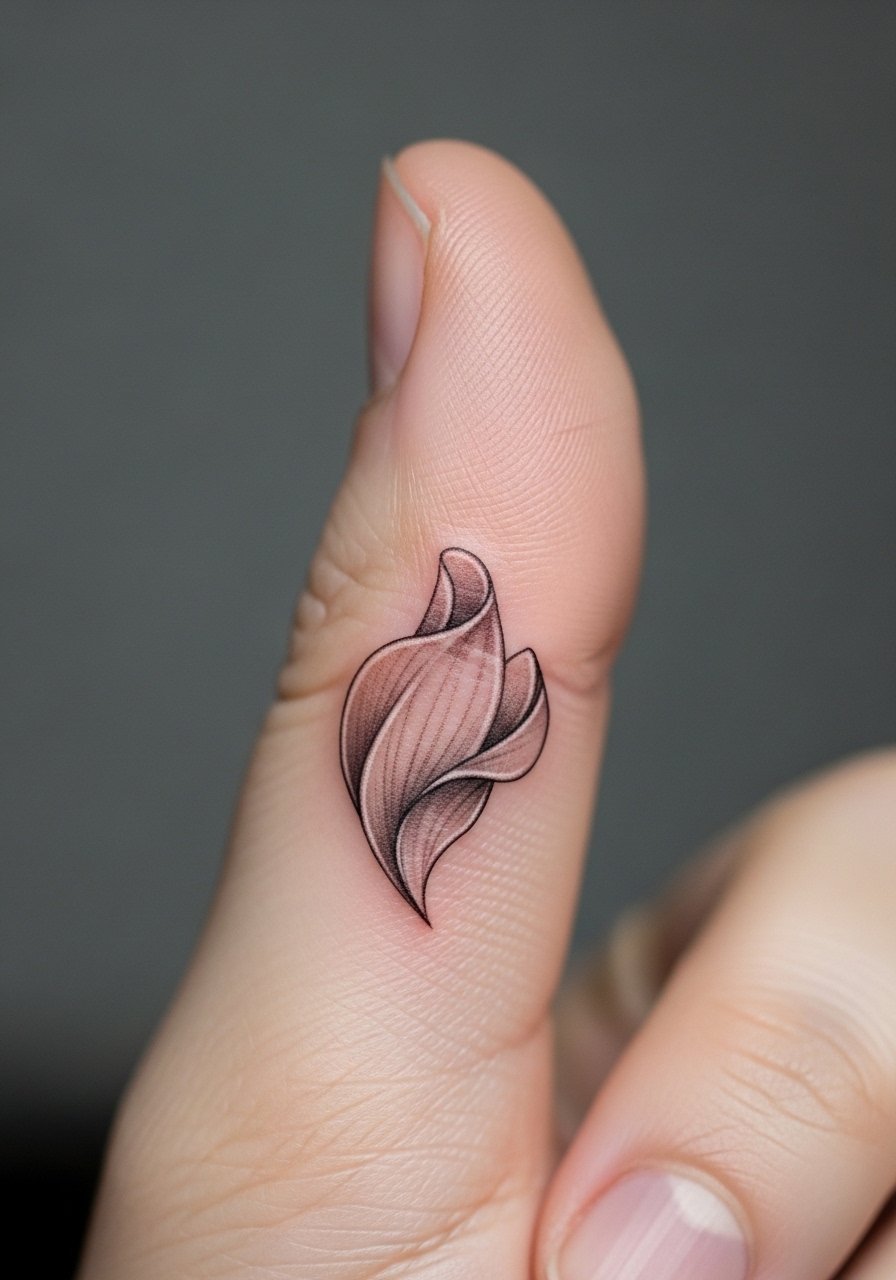
Thumb tattoos are expressive but notorious for fast wear due to friction. An abstract petal in micro-realism looks delicate but needs solid shading and slightly bolder edges to survive. Pain is intense because of thin skin and bone. Expect touch-ups down the road. For aftercare avoid heavy hand work for several days. Common mistake: asking for ultra-fine hairline details—these fade quickly on hands. Look for an artist experienced with hand tattoos and healed examples.
11. Asymmetric Circle Cluster on Back of Neck
Style/Technique: Geometric / Minimalist
Pain Level: Low (2-3/10)
Session Time: 30–90 minutes
Best For: Subtle neck accent, easy to hide with hair

A cluster of circles or orbs reads modern and symbolic. Back-of-neck placement is low to moderate pain and easy to cover with hair. Circles with varied weight and spacing age reliably if lines aren’t micro-thin. I’ve seen artists recommend denser inks for neck pieces because of sun exposure when hair is up. Common mistake: crowding too many tiny shapes; leave breathing room. Ask to see healed neck examples from the artist, especially on similar hair coverage and skin tone.
12. Abstract Solar System Along Forearm
Style/Technique: Dotwork / Minimalist Celestial
Pain Level: Low-Medium (3-4/10)
Session Time: 1-3 hours
Best For: Storytelling sleeve starter
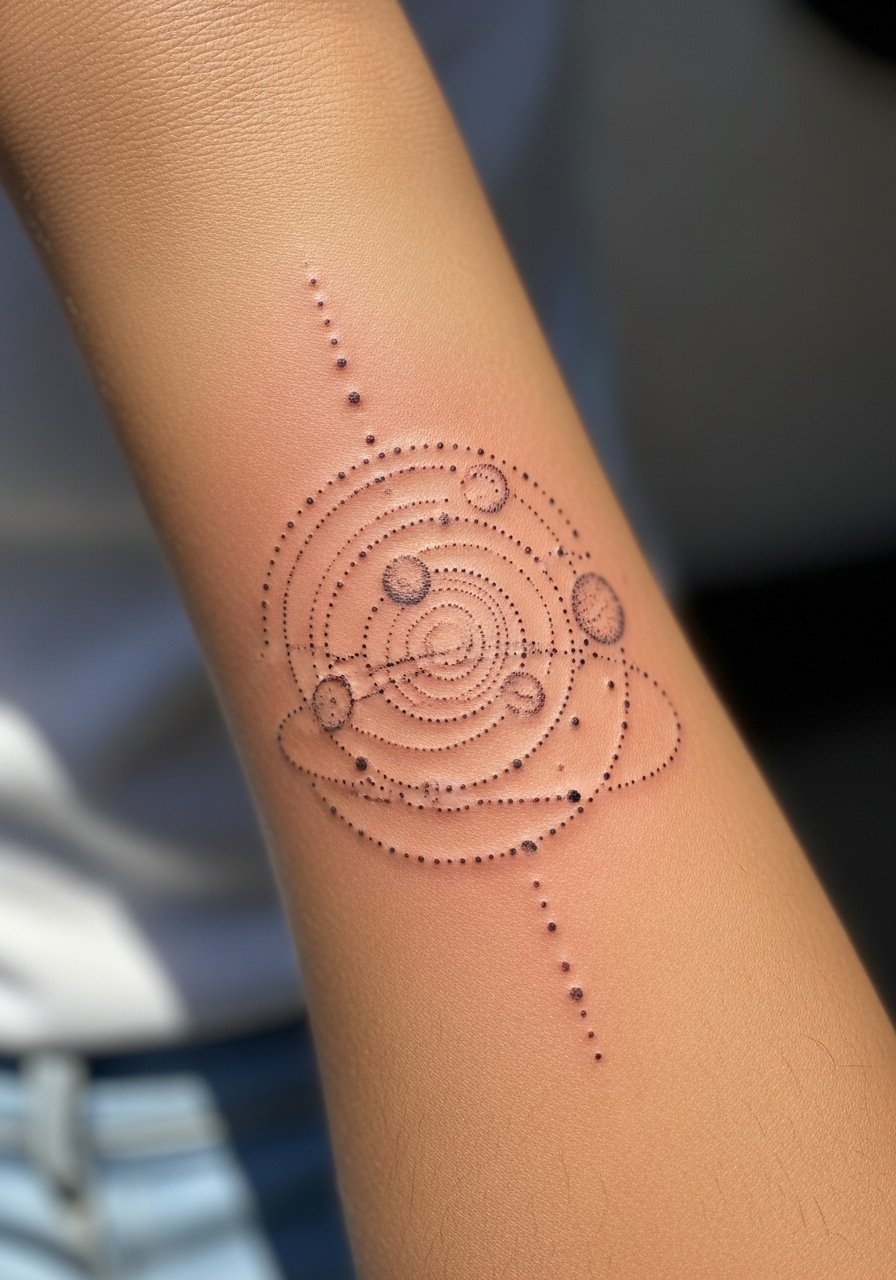
Celestial motifs arranged abstractly make great forearm pieces. Forearm skin is forgiving; pain is moderate. Dotwork planets and rings can look striking healed if dot density is controlled. Tiny isolated dots may blur, so ask for slightly denser clusters. I’ve found forearm pieces usually heal cleanly unless you scrub too hard while cleaning. A common mistake is asking for too many micro-dots without spacing—this causes muddying. Request healed examples and plan for potential touch-ups for tiny dot details.
13. Fragmented Line Portrait on Thigh
Style/Technique: Neo-Realism / Abstract Fragment
Pain Level: Low (2/3/10)
Session Time: 2-4 hours
Best For: Larger intimate art piece
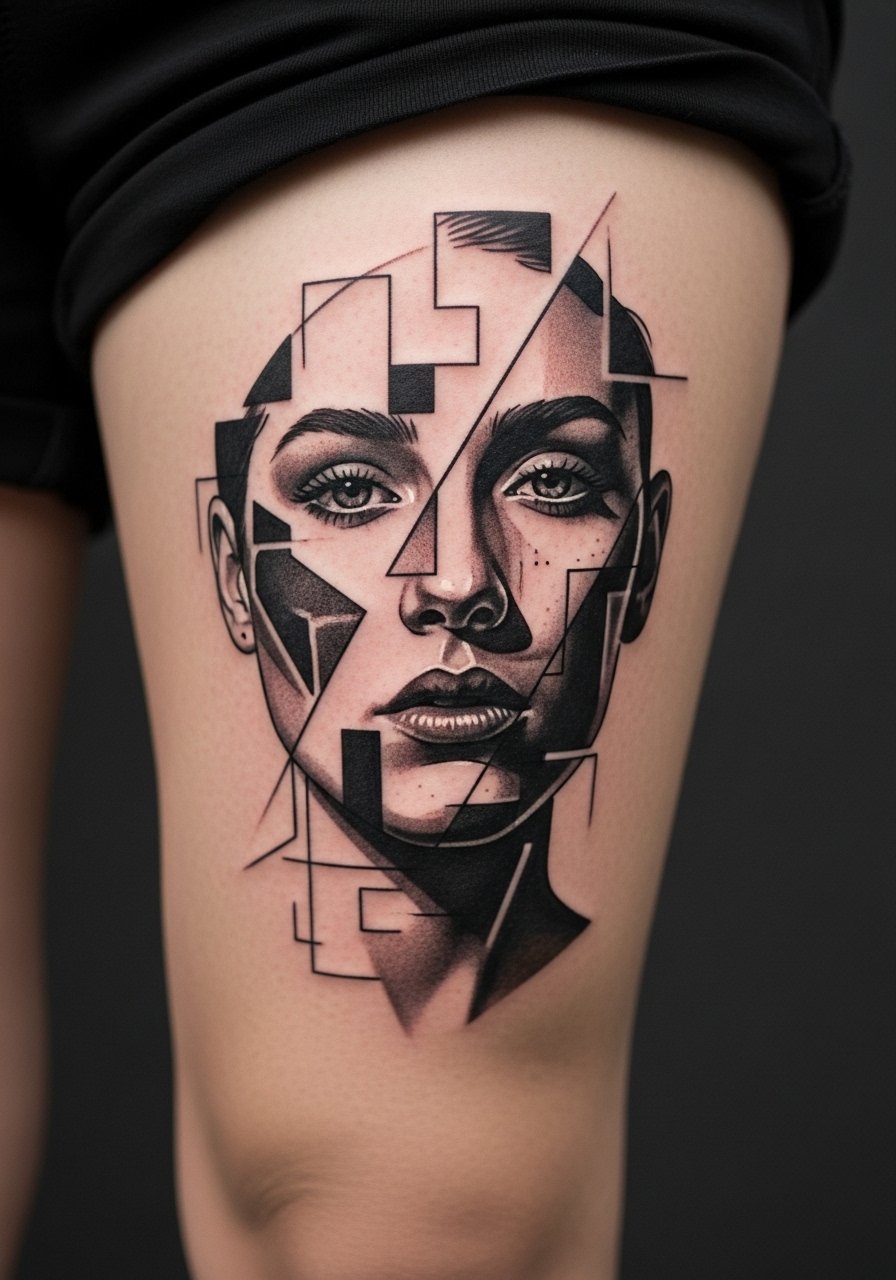
Thighs are generous canvases for abstract portrait fragments. Pain is low. Larger scale allows for a mix of realism and geometric breaks that age well. I’ve noticed portrait fragments with bold blocking hold contrast over years better than tiny hairlines. Healing needs standard care—avoid tight clothing and friction. Common mistake: overfilling with tiny texture; instead use clear blocks of tone and intentional gaps. Ask for healed thigh examples to judge how shading settles.
14. Negative Space Maze on Inner Bicep
Style/Technique: Blackwork / Negative Space
Pain Level: Medium (4-5/10)
Session Time: 1-3 hours
Best For: Bold yet personal piece
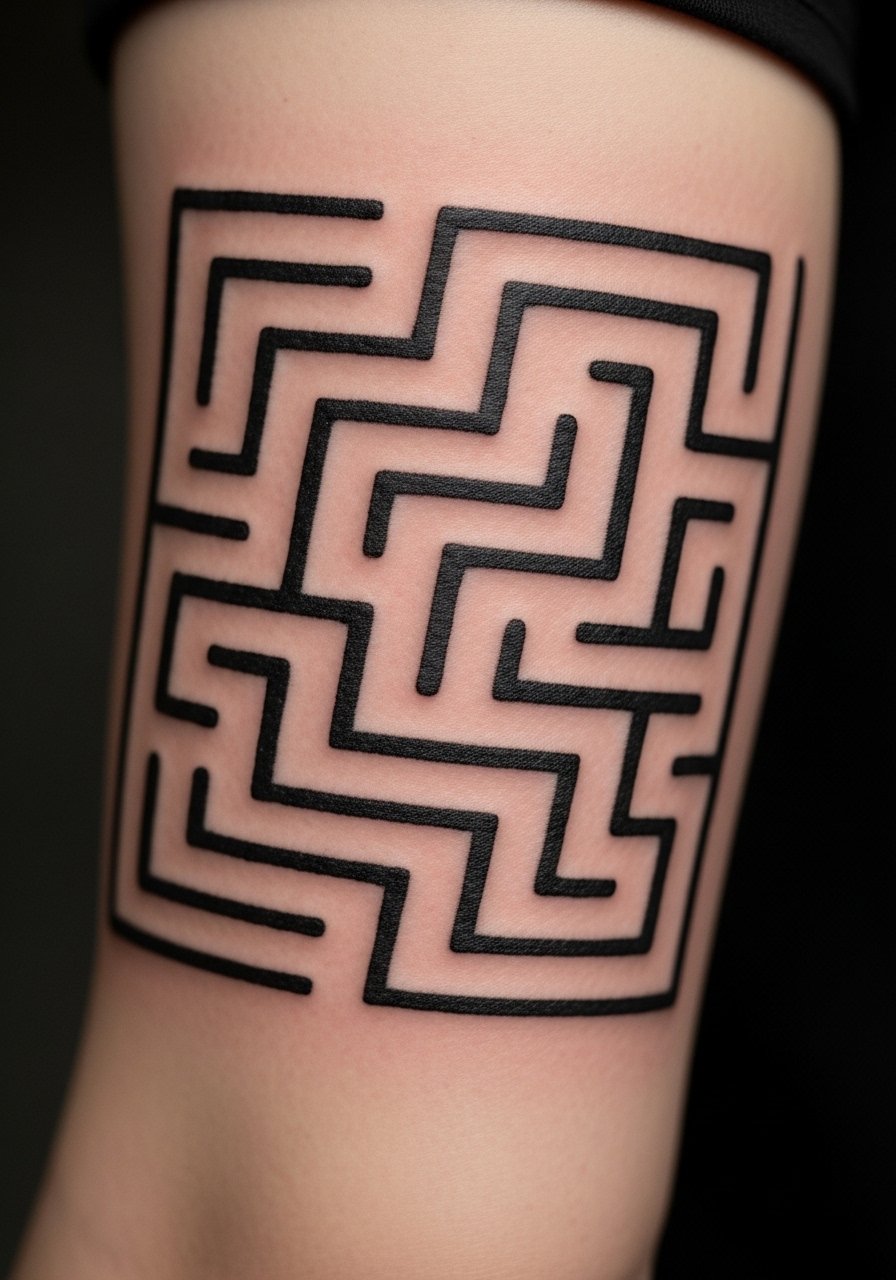
Inner bicep offers privacy and a curved surface. A negative-space maze reads complex and deliberate. Pain is moderate and tends to feel intense near the armpit. I recommend solid blacks with clearly defined gaps—this combination keeps the maze readable as skin ages. Common mistake: overly thin separators between blacks and skin; they can blur. Ask your artist about ink saturation and spacing to ensure longevity.
15. Smudged Ink Brush on Shoulder Blade
Style/Technique: Abstract Painterly / Blackwork
Pain Level: Low (2-3/10)
Session Time: 1-2 hours
Best For: Back accent, upper-body flow
Shoulder blades show off sweeping, smudged brush effects. Pain is minimal. The skin there tolerates texture well. I've seen these age into pleasing organic marks if artists avoid fine speckling and opt for controlled, dense strokes. Healing is simple; avoid tight straps during the first week. The main mistake is requesting tiny splatter details; they become indistinct. Look for an artist with painterly tattoo style and healed portfolio shots.
16. Asymmetrical Color Bar on Wrist
Style/Technique: Minimalist / Color Block
Pain Level: Medium (4/5/10)
Session Time: 30–90 minutes
Best For: Wrist accent, visible color
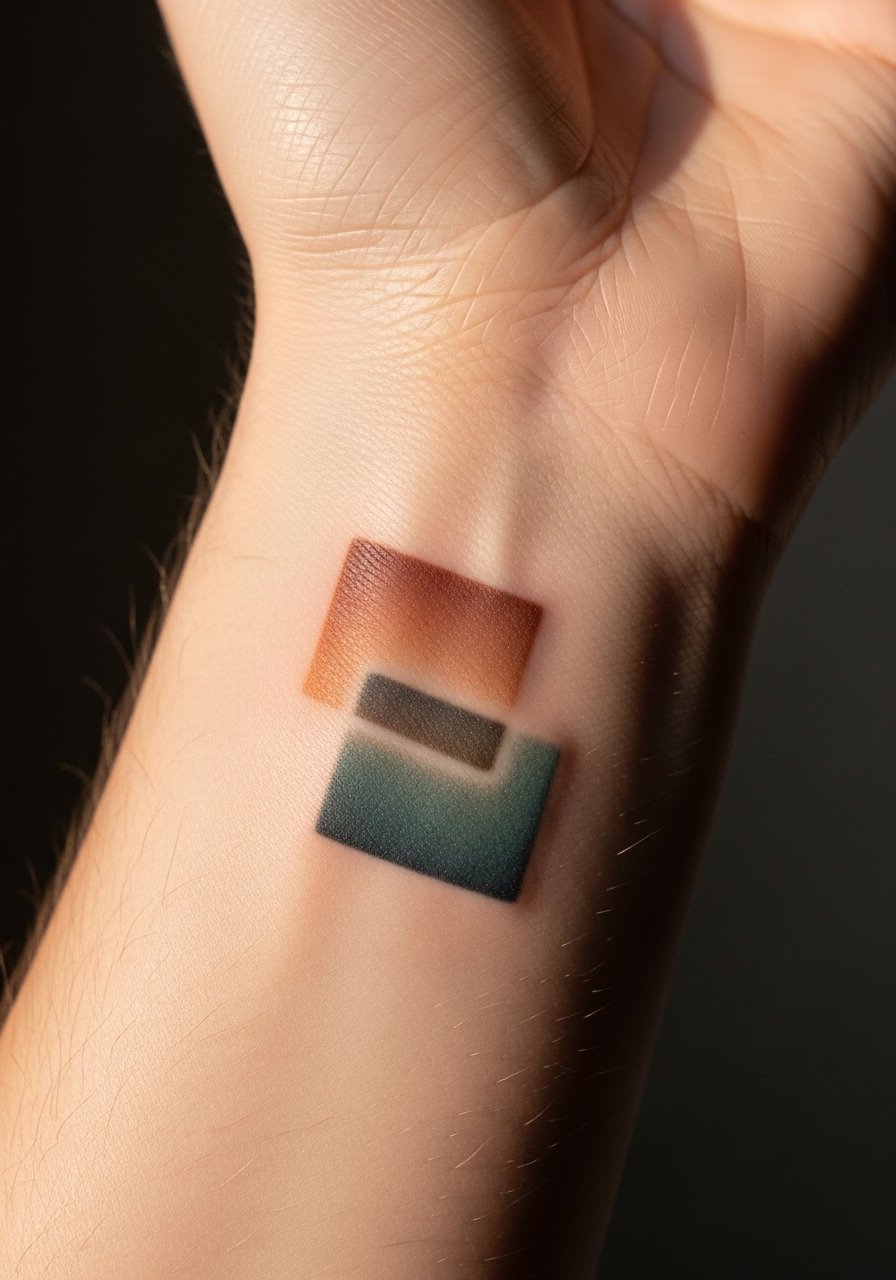
Wrist color bars are modern and eye-catching but face friction and sun. Expect moderate pain. I recommend slightly denser color saturation and thicker edges so the blocks age as intended. I've noticed reds and oranges fade faster; talk to your artist about pigment choices for longevity. Avoid tiny gradients—solid blocks retain a cleaner look healed. Keep moisturized and use sunscreen once healed.
17. Optical Illusion Spiral on Palm Side of Hand
Style/Technique: Blackwork / Optical
Pain Level: Very High (9/10)
Session Time: 1–2 hours
Best For: Brave statement, high visibility
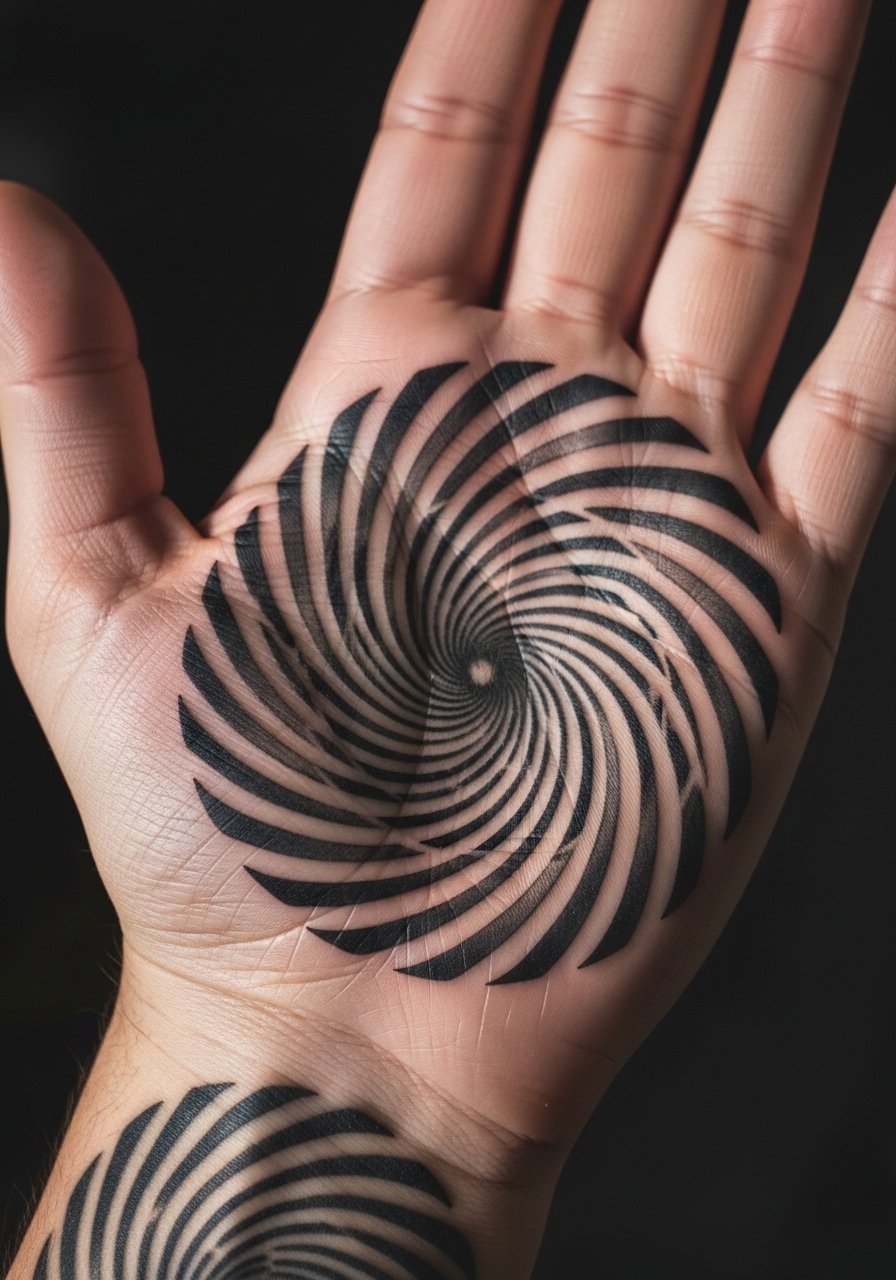
Palm tattoos are high maintenance. Skin regenerates quickly and friction makes ink migrate. Optical spirals look cool but expect heavy touch-ups. Pain is intense. From what I’ve seen, simple, bold black shapes with intentional spacing fare better than intricate tiny lines. Think of this as a living piece that will change. Ask any artist experienced with hands for healed shots. Consider longevity trade-offs before committing.
18. Glitched Pixel Cluster on Upper Chest
Style/Technique: Micro-Abstract / Geometric
Pain Level: Medium (4-5/10)
Session Time: 1-2 hours
Best For: Chest focal point, peekable under shirts
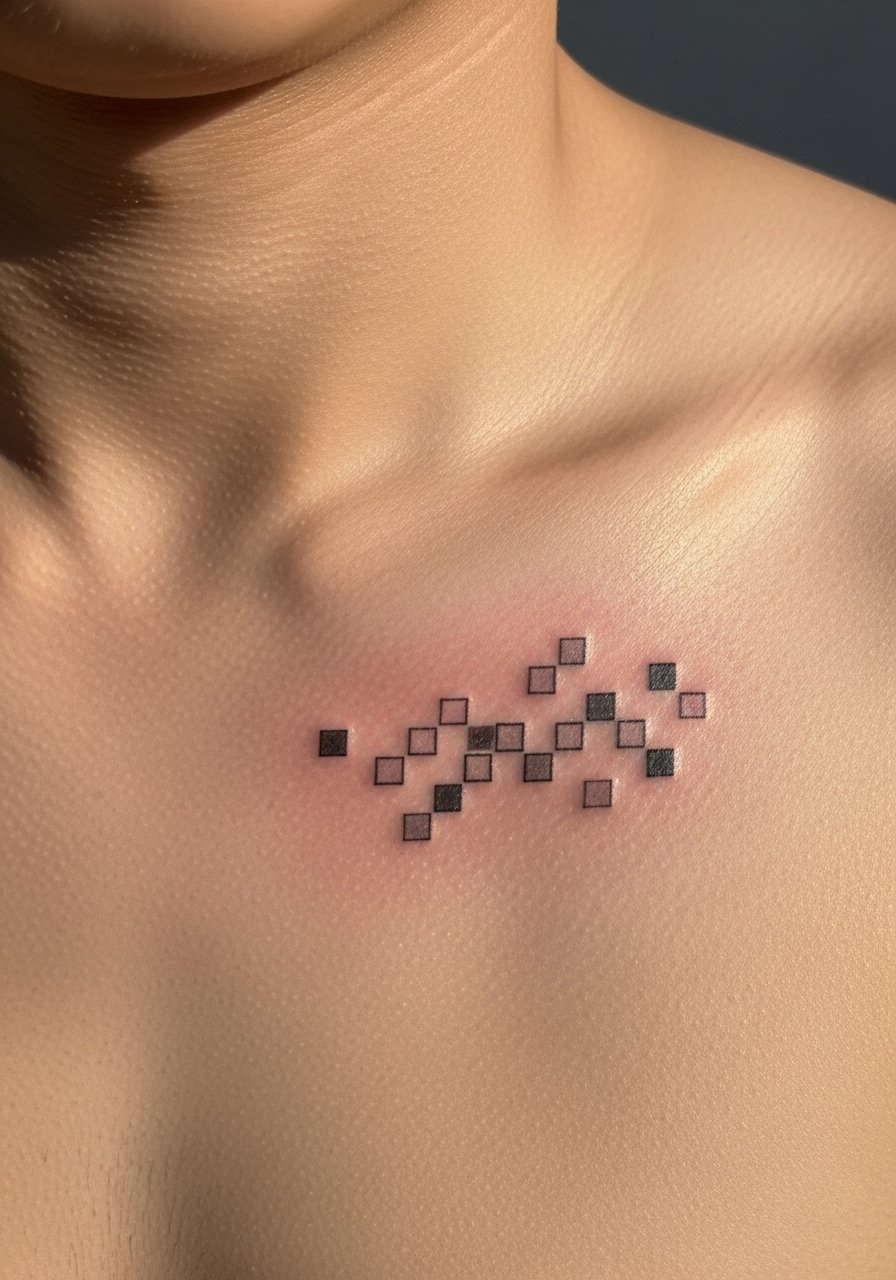
Pixel or glitch motifs feel techy and modern. The upper chest offers a flat area and moderate pain. Pixels need clear separation and solid fills to retain shape as skin settles. Tiny isolated squares can fade or blur, so I advise grouping and slightly larger blocks. Healing needs sun protection—chest gets sun exposure. Common mistake: expecting crisp pixel edges without considering skin movement; ask for balanced spacing and saturated fill.
19. Organic Line Topography on Lower Back
Style/Technique: Linework / Map-Like Abstract
Pain Level: Low (2-3/10)
Session Time: 1-3 hours
Best For: Flowing, easy-to-cover piece
Topographic lines create a sense of landscape and motion. Lower back is low pain and a forgiving canvas. Lines that vary in weight read sculptural even as they soften. I’ve seen these age nicely when the artist avoids ultra-thin hairlines. Healing is easy; avoid tight waistbands during the first week. A common mistake is crowding too many contour lines—leave space for clarity and future touch-ups.
20. Fragmented Color Triangle on Calf
Style/Technique: Geometric / Color Block
Pain Level: Low (2-3/10)
Session Time: 1-2 hours
Best For: Standout leg piece
Calf color triangles are graphic and balanced. Calf skin tolerates color well and pain is low. Overlapping fields with sharp edges look modern; ask for crisp borders and layered ink to minimize future bleeding. I've noticed color choices matter—some pigments hold better on deeper skin tones, so discuss options with your artist. Avoid tiny slivers of color that disappear; make fields substantial.
21. Abstract Waveform Along Ribcage Side
Style/Technique: Fine Line / Flowing Abstract
Pain Level: High (7/10)
Session Time: 1–3 hours
Best For: Hidden sensual placement
Side rib waveforms create organic motion. The ribs are painful but rewarding. Fine lines require careful spacing to avoid muddling. I recommend medium line weight and clear gaps for longevity. Healing needs patience—avoid heavy lifting and stretching. Common mistake: wanting ultra-detailed waviness; instead aim for bold rhythm and intentional negative space. Ask your artist about breathing-friendly placement so the piece flows with motion.
22. Cubist Bird on Shoulder Cap
Style/Technique: Neo-Traditional / Cubist Abstract
Pain Level: Low (2-3/10)
Session Time: 1-3 hours
Best For: Shoulder visibility, symbolic design
A cubist bird merges recognizable subject with abstract geometry. Shoulders give roundness and low pain. Blocks of color and black outlines age well if balanced. I've noticed that angular pieces hold structure in healed photos better than tiny cross-hatching. Healing is straightforward. Avoid crowding with fine texture—favor clear planes and decisive contrast. Look for artists comfortable with neo-traditional forms and bold color packing.
23. Split-Face Line Duo on Side Neck
Style/Technique: Minimalist / Line Portrait
Pain Level: High (7/8/10)
Session Time: 1–2 hours
Best For: Edgy neck accent
Neck tattoos are high visibility and discomfort. A split-face single-line portrait is striking but needs confident line work. Lines should be slightly bold to survive neck movement and sun. I’ve seen thin single lines fade unevenly here, so ask for a tested line weight. Healing is similar to other exposed areas—keep it clean and use sunscreen post-healing. Consider how often you expose the area to sun; darker inks hold up better.
24. Interlocking Rings Over Elbow Pit
Style/Technique: Geometric / Blackwork
Pain Level: Very High (8/10)
Session Time: 1–2 hours
Best For: Unique joint placement, conversation piece
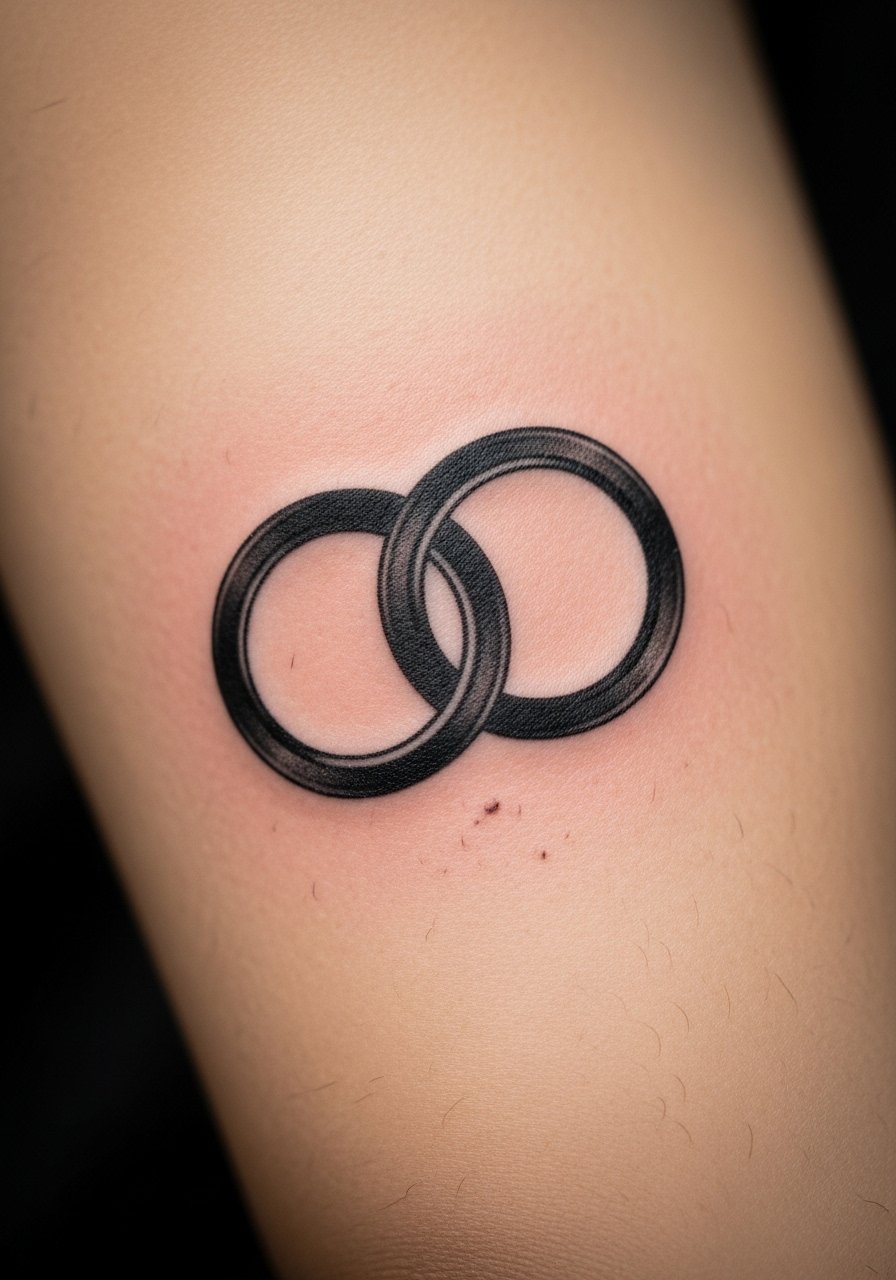
Elbow pits are challenging—movement and constant bending can distort ink. Interlocking rings across the joint look dynamic but need bold fills and tolerance for future touch-ups. Pain is high. I've noticed thicker blackwork on joints ages better than delicate work. Expect some softening where the skin flexes. Ask your artist about placement across folds and realistic expectations for longevity.
25. Abstract Floral Dot Bouquet on Palm Edge
Style/Technique: Dotwork / Minimalist Floral
Pain Level: Very High (9/10)
Session Time: 1 hour
Best For: Hidden but tactile
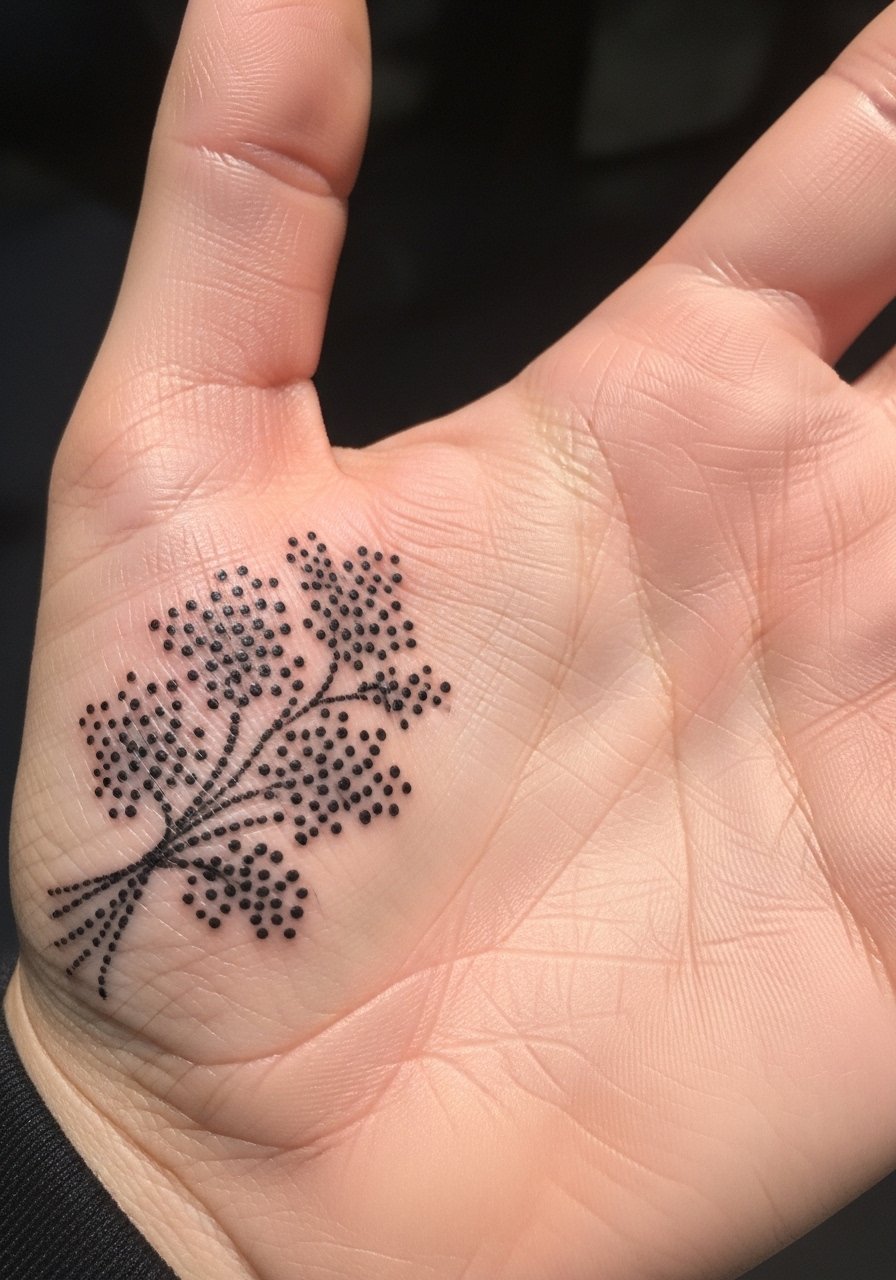
Palm-edge tattoos are brave choices. The flora dot bouquet reads intimate but suffers from heavy wear—ink can fade fast due to constant friction. Pain is high. From experience, denser dot clusters and thicker boundaries help retention. Plan for maintenance. Common mistake: expecting long-term clarity; accept that hands are dynamic. Ask your artist for hand-tattoo experience and healed photos.
26. Linear Cityscape Along Collar
Style/Technique: Fine Line / Architectural Abstract
Pain Level: Low-Medium (3-4/10)
Session Time: 1–2 hours
Best For: Collarbone or upper chest linear accent
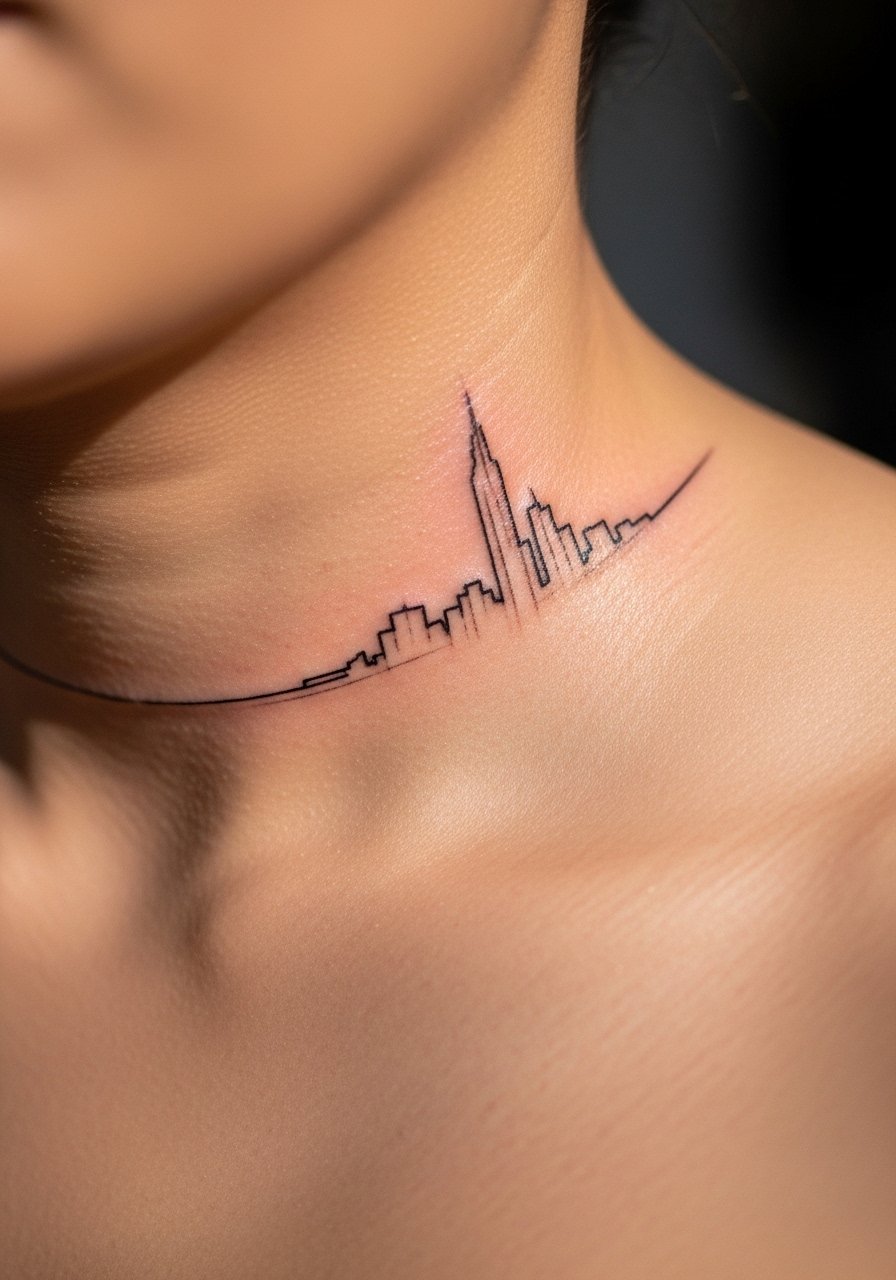
A linear cityscape feels modern and personal. Collarbone placement shows off horizontal lines well. Fine detail works if lines are balanced; ultra-thin spires can blur. I suggest slightly bolder anchors and airy spacing. Healing requires sun avoidance for a few weeks if exposed. The main mistake is overcomplicating skyline silhouettes; simplicity ages better. Ask for healed collarbone examples so you can see line settling.
27. Organic Ink Splotch Behind Knee
Style/Technique: Abstract / Painterly Splotch
Pain Level: High (6-7/10)
Session Time: 1–2 hours
Best For: Playful hidden spot
Behind-knee pieces move and flex a lot. An organic splotch works because it's meant to feel fluid. Pain varies; the fold area stings more. I’ve seen these age with soft diffusion—choose deliberate edge softness. Healing requires caution with bending and seating positions. Avoid tight clothing that compresses the area. Ask about how the artist positions the splotch to flow with your anatomy.
28. Fractured Mirror Lines on Spine
Style/Technique: Linear Abstract / Symmetric
Pain Level: Very High (8/10)
Session Time: Multiple sessions
Best For: Dramatic vertical statement
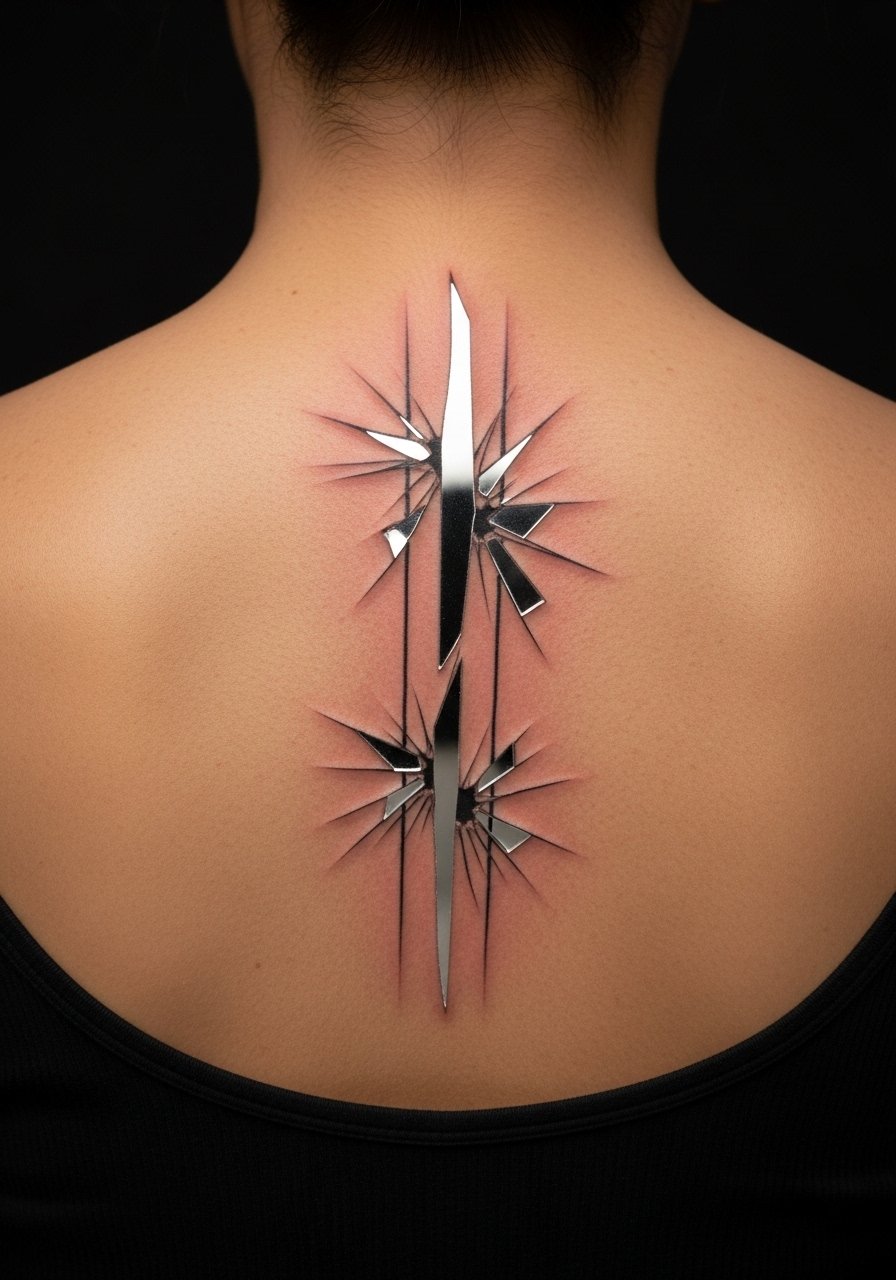
Spine pieces are dramatic but painful. Fractured mirror lines that run vertically echo the body's central axis. Pain is high and sessions may be split. I recommend bold, evenly spaced lines and intentional negative space; this keeps symmetry readable as skin ages. Healing means avoiding heavy bending and sleeping positions that compress the spine. Common mistake: putting microscopic spacing—wider gaps survive better.
29. Minimalist Crescent Cluster on Finger Sides
Style/Technique: Minimalist / Tiny Celestial
Pain Level: Very High (8-9/10)
Session Time: 30–60 minutes per finger
Best For: Subtle finger accents

Finger sides are intimate but rough on ink. Crescents look charming but need thicker strokes than expected. Pain is high and fading is common. I've found that slightly bolder moons with subtle shading last longer. Avoid white ink; it disappears. Plan for touch-ups. Ask your artist for finger-healed examples to set realistic expectations.
30. Multi-Layered Abstract Mandala on Upper Back
Style/Technique: Blackwork / Layered Abstract
Pain Level: Medium (4-5/10)
Session Time: Multiple sessions
Best For: Large back centerpiece
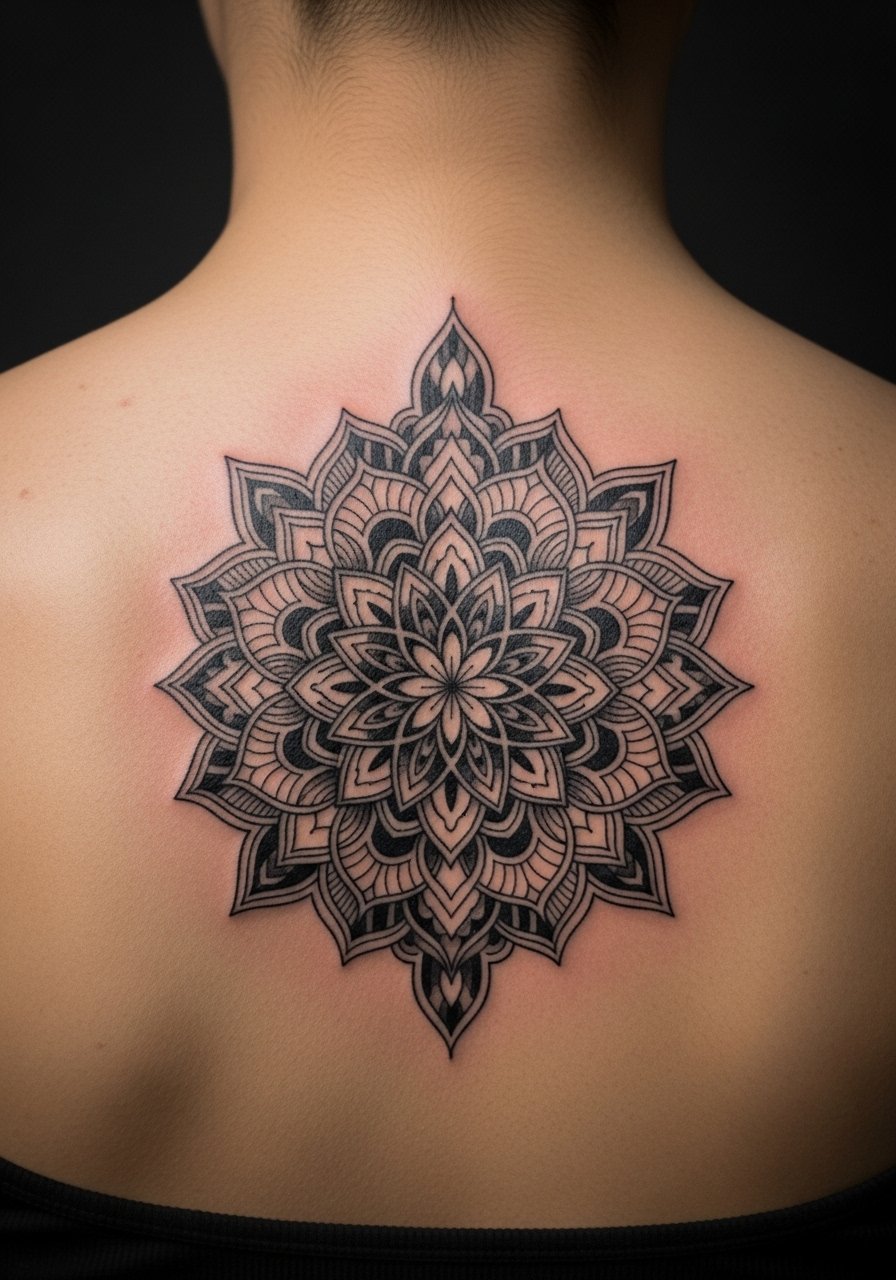
An abstract mandala on the upper back is bold and meditative. Upper back pain is moderate and sessions can be spread out. Layered blackwork with clear negative space makes the piece readable as it ages. I advise avoiding ultra-fine lace details; instead use distinct rings and spacing. Healing is straightforward—wear loose clothing during recovery. Common mistake: packing too many tiny elements; leave breathing room and prioritize contrast.
Tattoo Prep and Aftercare Essentials
Aftercare Essentials:
- Aquaphor Healing Ointment, 14oz tube — Use for first 3-5 days on small-to-medium pieces
- Saniderm Transparent Adhesive Bandage, 6-inch roll — For second-skin protection on larger areas
- CeraVe Fragrance-Free Moisturizing Lotion, 12oz — Daily moisturizer for days 4–14
- Dr. Bronner's Unscented Castile Soap, 32oz — Gentle wash for cleaning tattoos
Before Your Appointment:
- Tattoo Numbing Cream with 5% Lidocaine, Tube — Apply 30–45 minutes before only if your artist approves
- Stencil Transfer Paper, 8.5×11 Pack — For at-home layout checks
Long-Term Maintenance:
- SPF 50+ Sunscreen Stick for Tattoos — Daily sun protection to prevent fading
- Mad Rabbit Tattoo Balm, 2 oz — For healed tattoo conditioning and color preservation
- Hustle Butter Deluxe, 4oz — Vegan aftercare alternative for healed skin
- Hydrocolloid Bandages Large Pack — Useful for spot protection during healing
Optional Comfort Items:
- Tattoo Numbing Spray — For quick touch-ups or sensitive areas
- Disposable Razor Pack for Prep — For careful shaving of small areas pre-appointment
Artists I know commonly recommend Aquaphor or Saniderm for the first phase. For days 4–14 most suggest a fragrance-free lotion like CeraVe. For long-term vibrancy, I’ve seen Mad Rabbit and Hustle Butter get consistent recommendations from tattoo communities. Remember: sunscreen is the single biggest thing that preserves tattoo life.
Frequently Asked Questions
Q: How bad does a tattoo actually hurt?
A: Pain depends on placement and your tolerance. Outer arm and calf = lower (2–4/10). Ribs, hands, and palms = much higher (7–9/10). It's often more of a persistent scratching or burning than sharp pain. For very sensitive spots, consider discussing a numbing cream with lidocaine with your artist—many pros will advise for or against its use.
Q: What if I regret the design later?
A: Sit with ideas for months. I waited on a sleeve idea for nearly a year before committing. If visibility worries you, choose placements that are easier to hide—upper thigh, upper arm, or ribcage. Laser removal exists but is a long process; plan designs with longevity in mind and ask about cover-up options if needed.
Q: How do I keep my tattoo from fading?
A: Sunscreen and moisturizing are non-negotiable. From what I’ve seen, UV exposure is the top culprit for fading. Use an SPF 50+ sunscreen stick daily on exposed tattoos. Keep skin healthy with a fragrance-free lotion like CeraVe.
Q: Can I work out after getting a tattoo?
A: Wait at least 48–72 hours before moderate exercise, longer for large or joint-area tattoos. Sweat can introduce bacteria and disrupt scabbing. If your piece is on a flex area (elbow, knee), give it a full week before intense movement. During early healing follow your artist's cleaning routine and avoid soaking the tattoo.
Q: Should I get a small tattoo first to test my pain tolerance?
A: Only if you actually want a small tattoo. Size doesn't always equal pain—placement matters more. A tiny wrist or ribcage tattoo may hurt more than a larger thigh piece. If nervous, choose a less painful area like outer upper arm for your first piece.
Q: How long does a tattoo take to heal?
A: Surface healing is 2–3 weeks. Full dermal healing can take 2–3 months. The first week is crucial—keep the area clean, moisturized, and protected. Expect peeling around days 3–7; don't pick. Use Saniderm or Aquaphor initially if recommended by your artist.
Q: Do tattoos look different on different skin tones?
A: Yes. Black and gray tattoos show well across tones. Bright colors can read differently; some pigments appear more muted on deeper skin. White ink is often subtle on darker tones. I always ask artists for healed examples on my skin tone before booking.
Q: What should I avoid before my appointment?
A: Avoid heavy drinking the night before, avoid long sun exposure that could burn the area, and don't exfoliate aggressively right before the session. If shaving is needed, use a fresh disposable razor or ask the artist to prep the area. If you plan to use numbing cream, confirm with the artist first and consider a topical numbing cream.
